

Page 1
10.1” Core Tablet
NID-1006
Instruction Manual
Please read carefully before use and keep for future reference.
Page 2

Table of Contents
Thank You ..................................................................... 4
In the Box ......................................................................4
Before You Start ........................................................... 5
At a Glance .................................................................... 6
Basic Operation ............................................................ 8
Turning the Unit On and Off ........................................................ 8
Sleep ................................................................................................ 8
About the Lock Screen and Security........................................... 9
Charging ........................................................................................ 10
Getting Started ............................................................10
Connecting to a Wireless Network ........................................... 10
Using the Touchscreen ................................................................ 10
Using the Navigation Icons ..........................................................11
Using the Home Screen ................................................................12
Using the Dock ..............................................................................13
All Apps Icon ..................................................................................13
About the Notication Bar ......................................................... 14
Making Yourself at Home ...........................................15
Changing the Wallpaper ..............................................................15
Adding App Icons to the Home Screen ......................................16
Adding Widgets to the Home Screen ......................................... 17
Using Folders on the Home Screen ............................................18
Using the On-Screen Keyboard .................................. 19
Entering Text..................................................................................19
Basic Editing .................................................................................20
Managing & Using Apps ...............................................21
About the Apps ............................................................................. 22
Manage your Calendar ........................................................ 22
Using the Camera ................................................................. 23
Managing Downloads .......................................................... 25
Apps Settings and Options ......................................................... 26
Connecting to Wi-Fi Networks .................................. 29
Connecting to a Wi-Fi Network ................................................29
Adding a Network Manually ......................................................30
Set Advanced Wi-Fi Options ......................................................30
Connecting to Bluetooth® Devices ............................ 32
Page 2 Naxa Electronics
Page 3

Adjusting the System Settings .................................. 33
Wireless & Networks ...................................................................33
Wi-Fi ...................................................................................... 33
Bluetooth ............................................................................. 33
Data Usage ........................................................................... 33
More ....................................................................................... 33
Device .............................................................................................34
Display ...................................................................................34
Sound & notication ...........................................................34
Storage ..................................................................................34
Battery ................................................................................... 35
Apps........................................................................................ 35
Users ...................................................................................... 35
Personal .........................................................................................36
Location access ....................................................................36
Security ..................................................................................36
Language and Input ............................................................. 37
Backup & Reset .................................................................... 37
Accounts ........................................................................................ 37
System ........................................................................................... 38
Using Keyboards, Mice, and Other USB Devices ....... 38
Using a Keyboard .........................................................................38
Using a Mouse ..............................................................................39
Other input devices .....................................................................39
Connect to a Computer via USB................................. 39
Using HDMI Out ........................................................... 40
Tuning Your Tablet’s Performance ............................40
Optimizing battery life ................................................................40
To extend the life of your battery: ....................................40
To check the battery level and usage details ................. 41
Troubleshooting ..........................................................41
Warnings and Precautions .........................................42
Specications .............................................................46
Support ....................................................................... 47
www.naxa.com Page 3
Page 4

Thank You
In the Box
We know you have many choices when it comes to
technology; thank you for choosing us here at Naxa
Electronics. Established in 2001 in Los Angeles, California, we are dedicated to delivering products that entertain and delight.
We trust that you will be happy with your purchase.
Please read this manual carefully and save it for refer-
ence. You may also nd the latest FAQ, documentation,
and other product material at our website. Come visit
us on the web at www.naxa.com and see all that we
have to offer!
Please take a moment to make sure that you have everything in the list below. Although we make every effort to ensure that each Naxa device is securely packed
and sealed, we know a lot can happen in between us and
you. If anything is missing, check back with your local
retailer to get immediate assistance. If they cannot help
you, please contact our Naxa Support team at www.
naxa.com/naxa_support.
• NID-1006 tablet
• AC power adapter
• USB cable
• User manual
Page 4 Naxa Electronics
Page 5

Before You Start
Please take note of the following before you start.
1) Do not drop the unit. Avoid forceful shaking of the
display to prevent damage or unusual operation.
2) Do not touch the unit with metal objects to avoid
short circuits.
3) Schedule regular backup of your data to prevent
the loss of important data. Always backup your
data before upgrading the rmware.
4) Do not disassemble. Do not wipe the surface of the
unit with alcohol, thinner or benzene.
5) Do not disconnect the tablet while it is formatting
or uploading/downloading. Doing so may corrupt
your data.
6) Do not allow water or foreign objects to enter the
tablet.
7) Do not use the tablet in places that are extremely
hot, cold, dusty, or humid.
8) Specications are subject to change and improve-
ment without notice.
www.naxa.com Page 5
Page 6
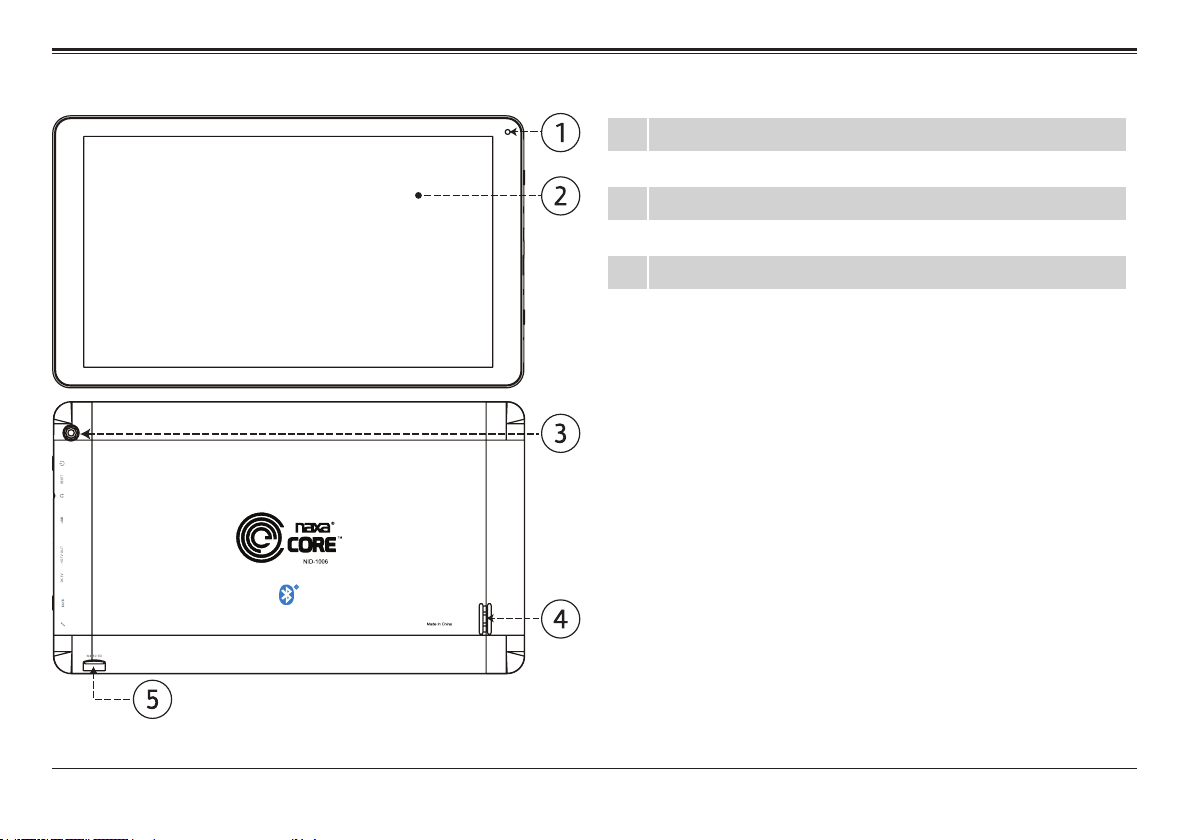
At a Glance
1 Front camera
2 LCD touchscreen
3 Speaker
4 Rear camera
5 microSD card slot
Page 6 Naxa Electronics
Page 7
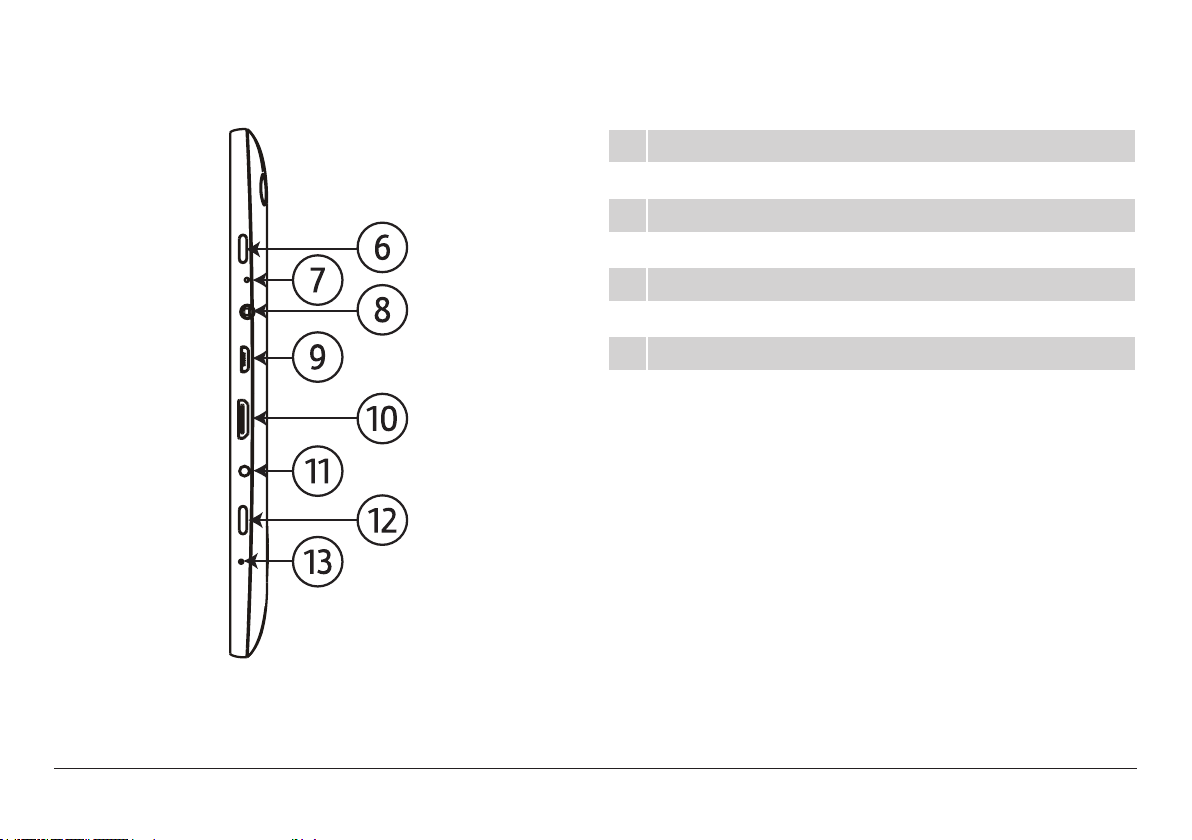
6 Power button
7 Reset button
8 Headphone jack
9 Micro USB port
10 HDMI output
11 Power connector (DC 5 V)
12 Back button
13 Microphone
www.naxa.com Page 7
Page 8
Basic Operation
Sleep
Place the tablet into Sleep mode to conserve power.
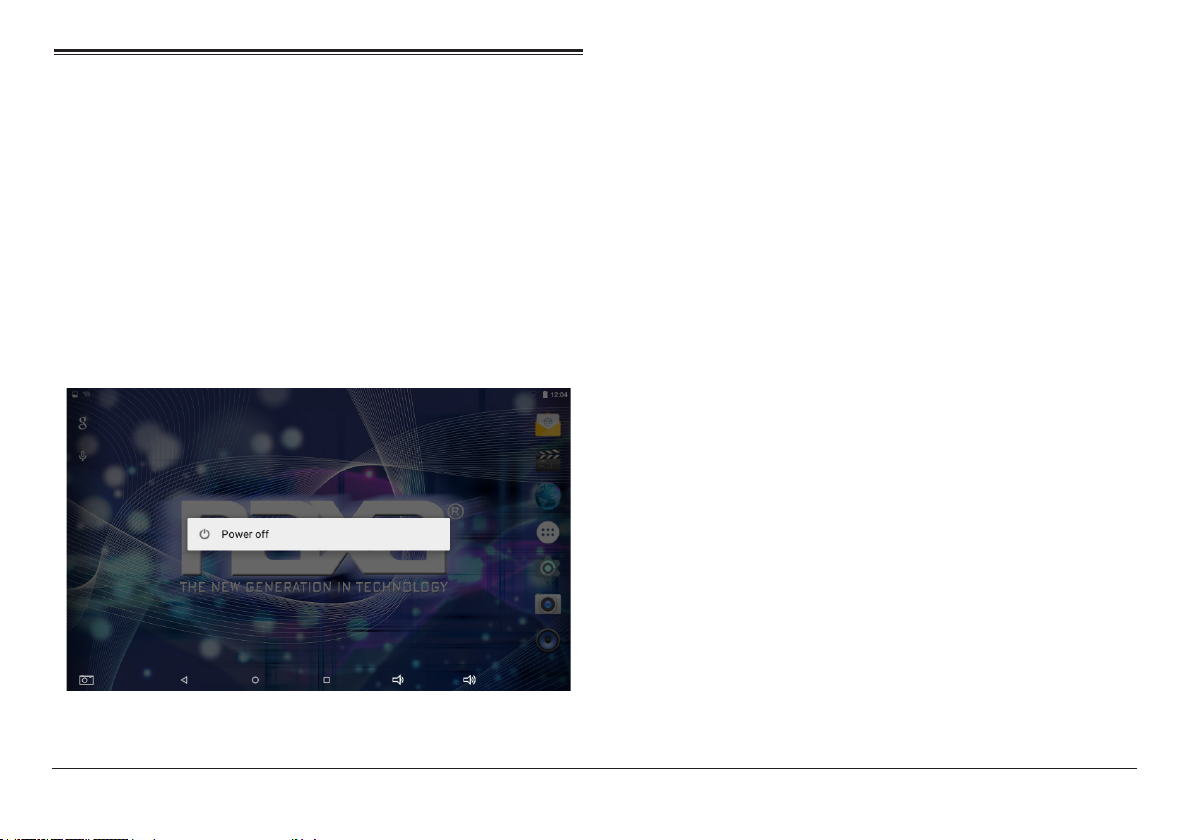
Turning the Unit On and O
Press and hold the power button [6] until the screen
turns on and displays the start-up logo (about 3 seconds).
Press and hold the power button [6] until the screen
displays the Power menu. Tap Power off to turn the
tablet off.
To place the tablet into Sleep mode, press the power button once while the tablet is on. The screen will turn off.
To wake the tablet from Sleep mode, press the power
button again. The screen will turn on. (It may take a
second or two for the tablet to wake from sleep.)
When the tablet is woken from sleep, the
screen will be locked for your security. To
unlock the screen, simply tap and hold the
lock icon, then swipe your nger up the
screen.
If you have set a password or other security
feature, you will need to enter it to continue.
Page 8 Naxa Electronics
Page 9
About the Lock Screen and Security
Customize the lock screen settings to prevent unauthorized use of your tablet.
1) Swipe down from the top of the screen to view the
Notications Panel. Tap the top bar, then tap the
Settings icon.
2) Browse down the list of settings to locate the Personal section. Tap Security.
4) Tap the type of lock to use on the Lock Screen
(None, Swipe, Voice Unlock, Pattern, PIN, or Password).
After you set a lock here, the tablet will display the lock
screen whenever you turn the screen on. You will need
to enter the password, PIN, or other security feature to
continue using the tablet.
Screen lock options are listed in the ap-
proximate order of the strength of their
ѥ
security, starting with “None” and “Slide,”
which provide no security. Voice Unlock and
Pattern provide minimal security, although
it can be more convenient than the stron-
ger options. Naxa recommends that you
always establish a strong PIN or password
for security.
To learn more about your tablet’s secu-
rity options, please refer to the section
“Adjusting System Settings > Personal >
Security”.
3) Tap Screen lock.
www.naxa.com Page 9
Page 10

Charging
When the battery level is low, the tablet will prompt
you to charge the tablet. Connect the provided charger
to the Power connector [11] of the tablet; plug the other
end of the charger to household AC 100-240 V power.
Batteries contain chemicals that may be
regulated by your local government. Ob-
ѥ
serve all local regulations when disposing
of this device
Getting Started
Connecting to a Wireless Network
Your tablet works best when it is connected to the Internet. Connect to a wireless network to experience
the best that your tablet has to offer. To learn how
to connect to a wireless network, refer to the section
“Connecting to Wi-Fi Networks”.
To improve the performance and life of the
battery, charge the tablet for an additional
15 minutes after the tablet indicates that it
has been fully charged.
Page 10 Naxa Electronics
Using the Touchscreen
Use your ngers to manipulate icons, buttons, menus,
the onscreen keyboard, and other items on the touchscreen. You can also change the screen’s orientation.
To select or activate something, tap it gently with your
nger.
To type something (e.g., a name, password, or a website
address), just tap where you want to type. A keyboard
will appear on the screen; tap the keyboard to type.
Page 11
Other common gestures include:
• Tap & Hold: Tap an item & hold your nger over it
until an action occurs. Do not lift your nger from
the screen.
• Rotate the Screen: On most screens, the orienta-
tion of the display will automatically rotate with
your tablet as you turn it. You can change this option from the Display setting screen.
• Tap & Drag: Tap an item & hold your nger over
Using the Navigation Icons
it for a moment; then, without lifting your nger,
drag your nger along the screen until you reach
the target position. Try using Tap & Drag to reposition icons on the Home screen.
The Navigation icons are always displayed at the bottom of the screen. No matter what you are doing, these
icons are always available for you to browse the different screens of your tablet.
• Swipe or slide: Slide your nger quickly across the
surface of the screen. Do not pause when your
nger rst touches the screen to avoid dragging
items accidentally. Swipe up or down to browse a
list of items, or try swiping left or right on a Home
screen to view other Home screens.
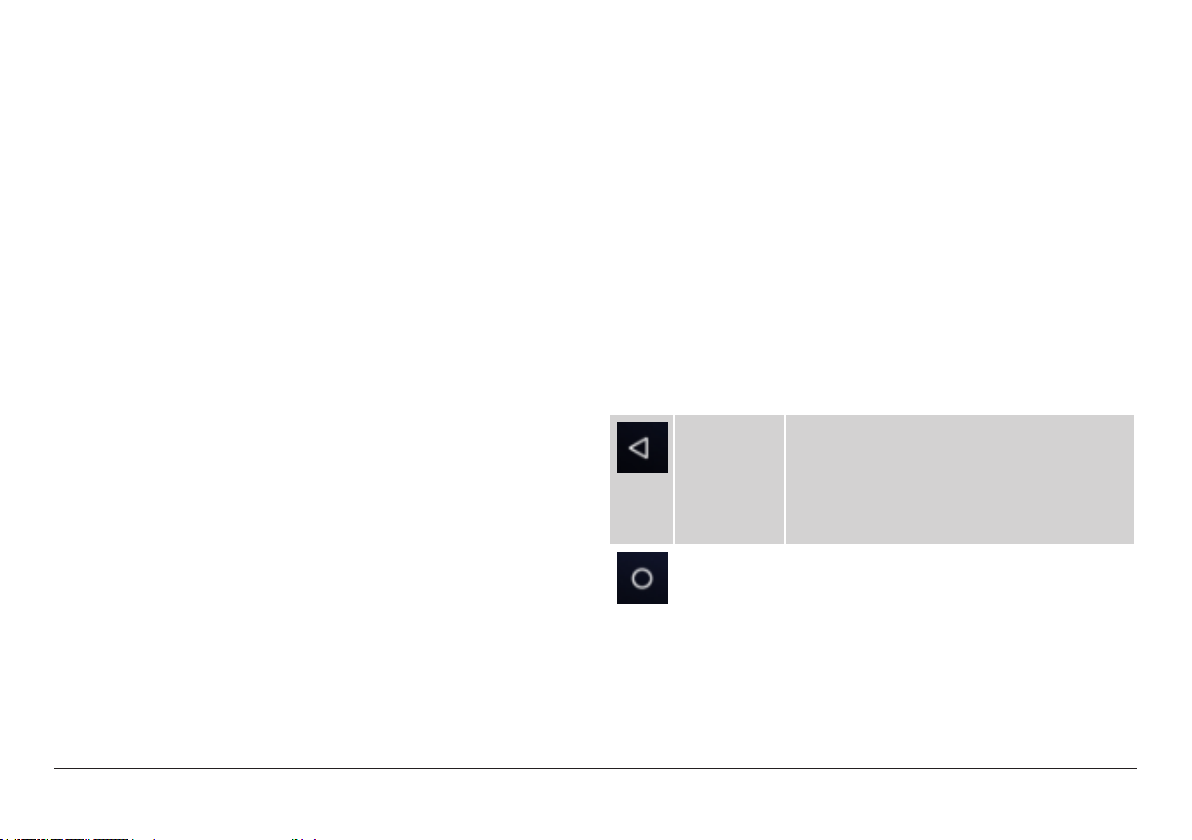
Icon Name Description
Back Tap this icon to return to the previous
screen, even if it was in a different app.
Tapping Back repeatedly will return you
to the Home screen; you cannot go back
further than the Home screen.
• Pinch-to-Zoom: In some apps (such as Browser
and Gallery), you can zoom in and out by placing
two ngers on the screen at once and pinching
them together (to zoom out) or spreading them
Home Tap this icon to navigate to the Home
screen. If there are multiple Home
screens, tap Home again to return to the
central Home screen.
apart (to zoom in).
www.naxa.com Page 11
Page 12

Icon Name Description
Recent Tap this icon to display a list of screens
that you’ve worked with recently. Tap the
thumbnail image of any screen to open
it.
To remove an app from the list, swipe the
thumbnail left or right, or tap the X.
Using the Home Screen
The Home screen is the rst thing you’ll see when you
turn on the tablet. The Home screen can display app
icons, widgets, and folders.
Volume
down
Volume up Tap to increase the volume level.
Tap to lower the volume level.
The Navigation icons may fade away if the
screen has not been touched in a while for
example, when watching a video. Simply
tap the screen to display them again.
• To open an app, folder, or widget, tap it.
• If there are additional Home screens, swipe the
screen left or right to view them.
• To return quickly to the main, center Home screen,
tap the Home icon in the navigation bar.
Page 12 Naxa Electronics
Page 13
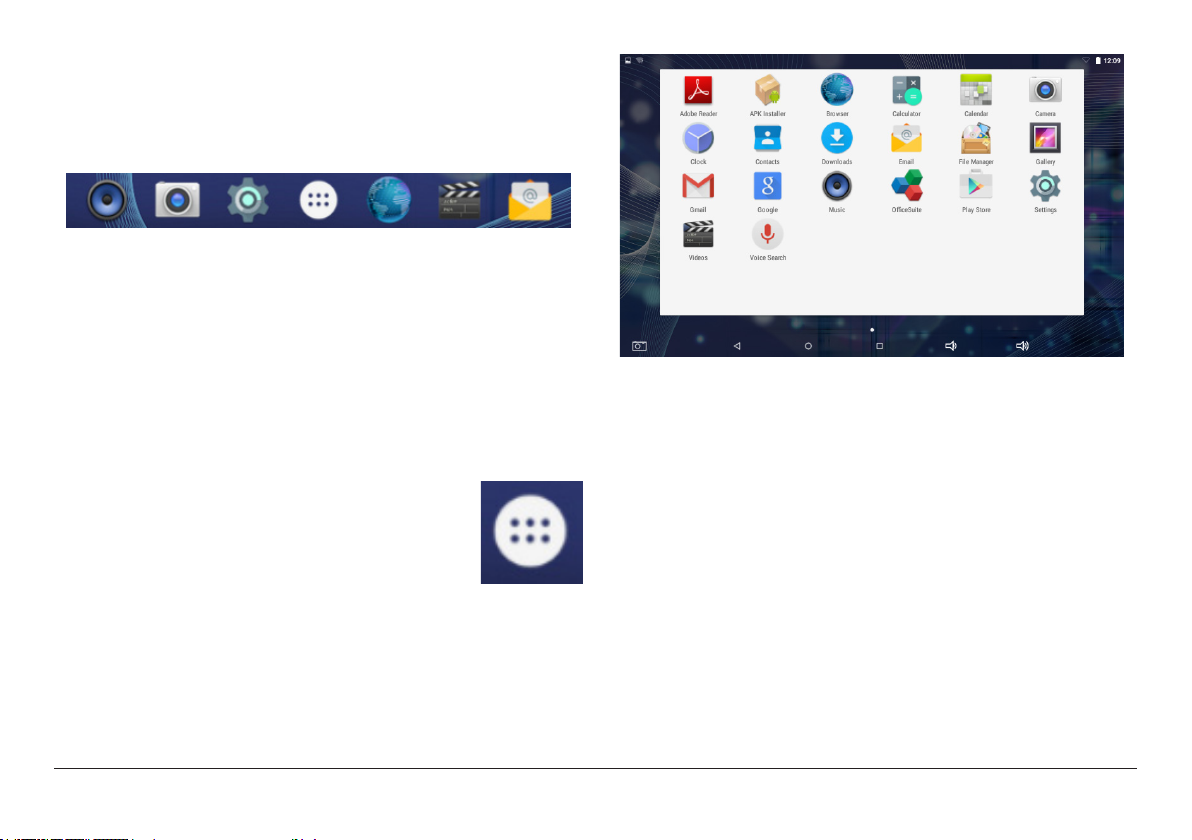
Using the Dock
The dock is a permanent xture on all home screens. The
dock is a good place to put apps that you will use a lot.
• To add an app to the dock, tap and hold the app
icon and drag it into the dock.
• To remove an app from the dock, tap and hold
an icon in the dock, then drag the icon out of the
dock.
All Apps Icon
The All Apps icon is displayed in the center
of the Dock and is accessible on all Home
screens. Tap it to see a list of all apps that
are on your tablet.
• Tap an app icon in the list to start it.
• Tap and hold an app icon then drag it to a home
screen to create a shortcut that is easily accessible.
To place an app icon shortcut on another
home screen, drag it to the edge of the
screen and wait for a new home screen to
appear. (If the current home screen is empty, the tablet will not create a new home
screen).
www.naxa.com Page 13
Page 14
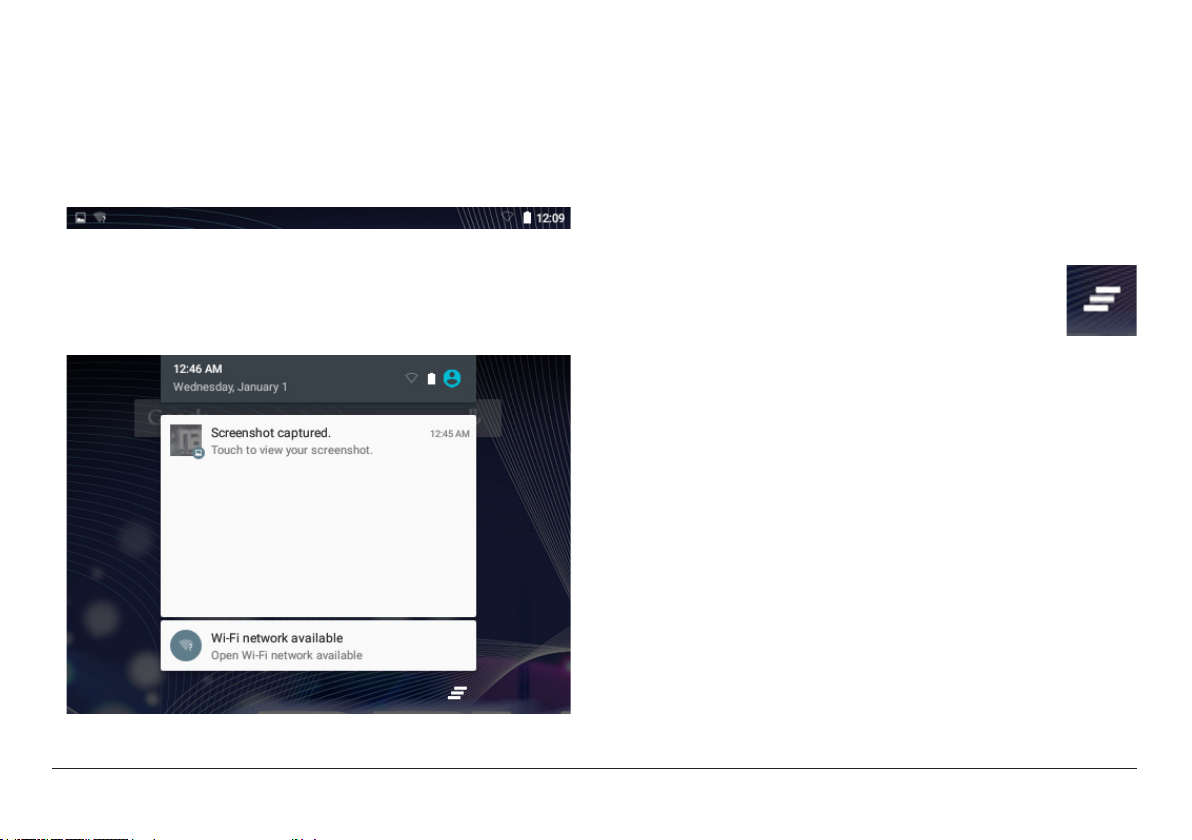
About the Notication Bar
The Notication Bar is found at the top of the screen
and displays quick status information (e.g., the time
and battery life).
• Swipe up and down to browse the alerts.
• Tap on an alert to open it with an app.
• Swipe down on an alert to see additional informa-
tion provided by the app. Some alerts will contain
controls that allow you to respond to the alert
without going to the app.
If you swipe down from the top of the screen, the No-
tication Panel will appear. The notication panel is
where you can view alerts from your apps.
Page 14 Naxa Electronics
• Swipe left or right on an alert to dismiss
it. At the bottom of the list of alerts,
there is a Dismiss All Alerts button; tap it
to dismiss all alerts at once.
Page 15
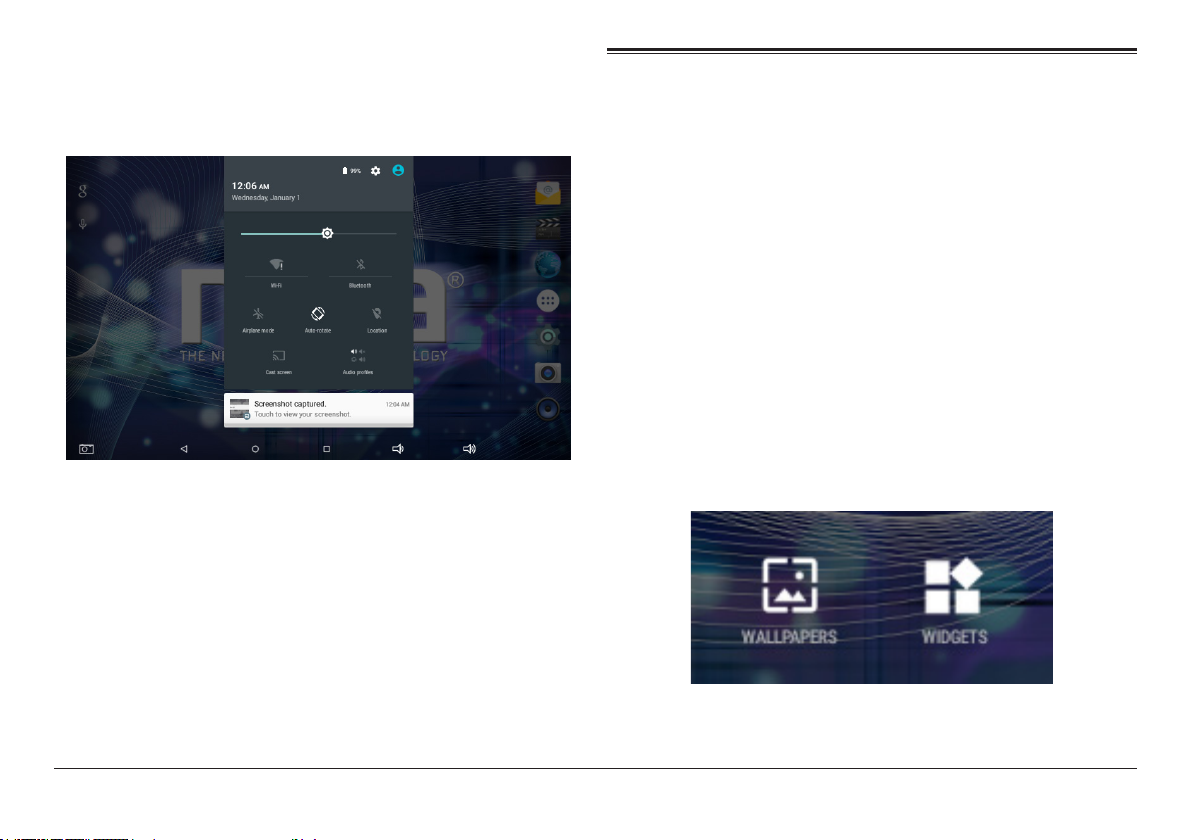
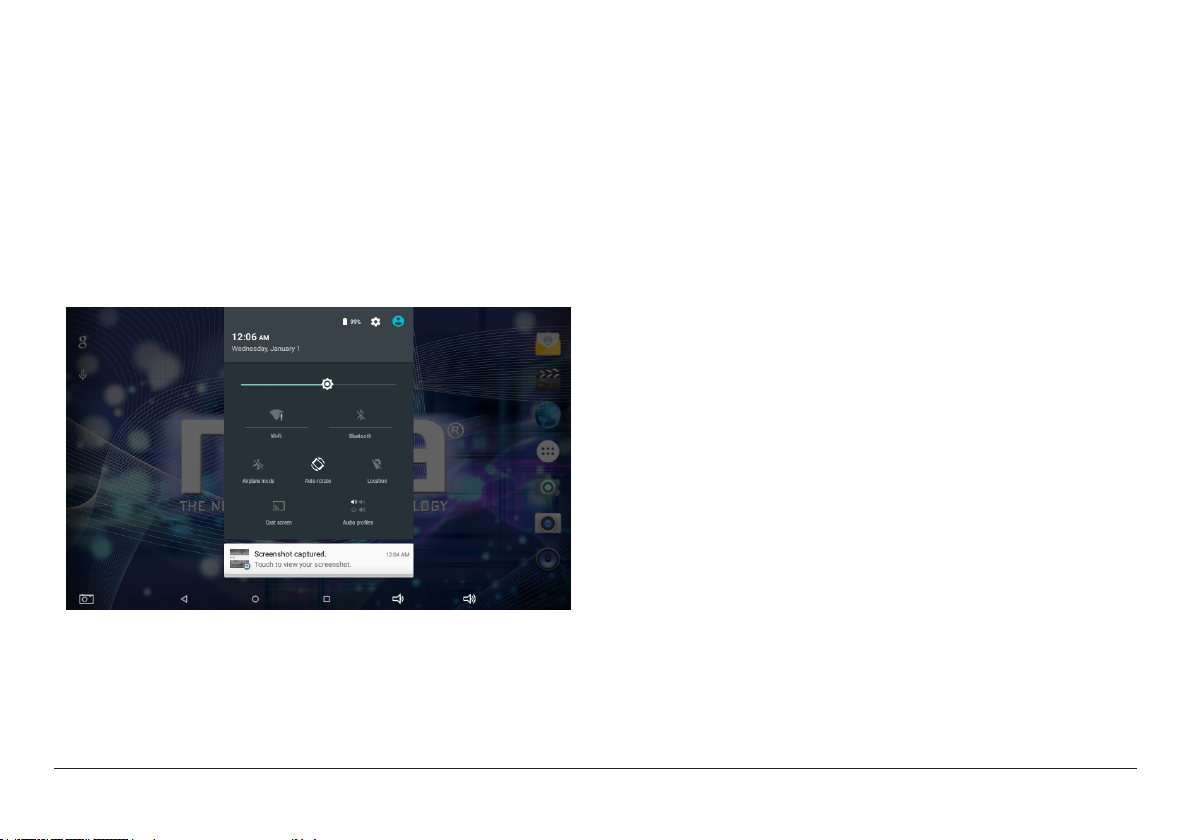
To view the Quick Settings panel, tap the top of the notication panel. Use the Quick Settings to adjust frequently used options (e.g., Wi-Fi, Bluetooth).
• Tap an options icon to turn it on or off.
• Tap the label below the icon to view additional
settings.
Making Yourself at Home
Changing the Wallpaper
Wallpapers are background images that you can use to
personalize your Home screens. Your wallpaper can be
a custom image, one of the wallpaper images included
with the tablet, or a Live Wallpaper (i.e., an animated
wallpaper).
To change the wallpaper:
1) Tap & hold on an empty part of a Home screen,
then tap WALLPAPERS.
www.naxa.com Page 15
Page 16

2) Swipe left/right to browse the available wallpapers. Tap a wallpaper to preview it, then tap Set
Wallpaper to activate it. To set a custom wallpaper,
tap Pick image.
Live wallpapers are animated and may
reduce your tablet’s battery life.
Additional wallpapers may be downloaded
from the Internet or Android application
markets.
Adding App Icons to the Home Screen
Add App icons to a Home Screen to quickly access your
favorite apps.
1) To add an app icon, tap the All Apps icon
in the center of the Dock to see all of your
apps.
2) Swipe left or right to browse and nd the app you
want. Tap and hold the app icon to pick it up, then
drag it to its place on a Home screen.
Related settings
Settings > Device > Display > Personalize > Wallpaper
Page 16 Naxa Electronics
Page 17

3) To see detailed information about an
app: Tap & hold the app icon to pick it
up, then drag and drop it on the App Info
icon at the top of the screen.
4) To remove an app icon from the Home screen, tap
& hold it, then drag the icon to the Remove icon at
the top of the screen.
This will only remove the icon from the
Home screen. It will not uninstall the app.
Adding Widgets to the Home Screen
Some apps have Widgets that can be placed on a Home
screen. Widgets are like windows into your apps; they
allow you to use some features of the app quickly from
the Home screen.
To add a widget:
1) Tap & hold on an empty part of a Home screen,
then tap WIDGETS.
www.naxa.com Page 17
Page 18

2) Swipe left/right to browse the available widgets.
Tap and hold a widget to pick it up, then drag it to
an empty space on a Home screen.
If you have dragged the widget to a Home
screen that doesn’t have room for it, the
widget will not be added.
Some widgets will prompt you to make
additional choices before it is added to the
Home screen.
Using Folders on the Home Screen
You can combine several app icons in a folder. Tap and
hold an icon to pick it up, then drop it onto another
icon. A folder will be created that contains both icons.
On any Home screen, you can
1) Open a folder: Tap it. The folder opens.
Page 18 Naxa Electronics
Page 19

2) Rename a folder: Tap the folder label.
3) Reposition an app or folder icon on the screen: Tap &
hold the icon, then drag the icon to where you want it.
Using the On-Screen Keyboard
Entering Text
Enter text using the onscreen keyboard. Some apps
automatically display the keyboard when necessary; in
others you display the keyboard by tapping where you
want to type.
As you type, the keyboard displays suggestions above
the top row of keys. To accept a suggestion, tap it.
Place related app icons in the same folder
(e.g., video apps, game apps, communication apps, etc.)
www.naxa.com Page 19
Page 20

Basic Editing
Tips & Shortcuts
• Moving the insertion point: Tap where you want
to type. The cursor blinks in the new position, and
a marker appears below it. Drag the marker to
move the cursor.
• Selecting text: Tap & hold (or double-tap) within
the text. The nearest word will be highlighted with
markers at each end of the highlighted selection.
Tap & drag the markers to change the selection.
The markers will disappear after a few moments;
to make them reappear, tap the text again.
• Cut or copy text: Select some text, then tap the
SELECT ALL, CUT, OR COPY icon.
• Deleting text: Tap the [delete] key to delete se-
lected text or the characters before the cursor.
To make the keyboard go away, tap the Close
icon found in the Navigation bar at the bottom of the screen.
• To type in capital letters: Tap the Shift key once
to switch to capital letters for one letter. Tap &
hold the Shift key to type in capital letters; release
the Shift key to return to typing in lower case letters.
• To turn caps lock on: Double-tap the Shift key to
turn Caps Lock on. The Shift key will be highlighted
to indicate that Caps Lock is active. To turn Caps
Lock off, tap the Shift key again.
• To show numbers or symbols: Tap the ?123 key. To
see more choices, tap the [ ~[< ] key. Tap ABC to
return to letters.
• To quickly access common punctuation and
symbols: Some keys have an alternate function.
These keys are located near the space bar and are
labeled with a smaller, gray symbol. Tap & hold
these keys to use their alternate functions.
• To type alternate characters: Some keys can pro-
duce alternate characters (e.g., accented vowels).
Tap & hold these keys to see these alternate letters or symbols, then tap again to type.
Page 20 Naxa Electronics
Page 21

• To change the input language or keyboard: Tap
and hold the comma key [ , ] to view the input options menu.
Related settings
Settings > Personal > Language & input
Managing & Using Apps
To see all your apps, tap the All
Apps icon on any Home screen, and
the main All Apps screen will open.
You will be able to see all of your
apps, including those downloaded
and installed from the Internet.
You can move app icons to any of
your Home screens.
From All Apps, you can:
• See additional app screens: Swipe left or right.
• Launch an app: Tap its icon.
• Place an app icon on a Home screen: Tap & hold
the app icon to pick it up, then drag it to its place.
• To see detailed information about an app: Tap &
hold the app icon to pick it up, then drag and drop
it on the App Info icon at the top of the screen.
www.naxa.com Page 21
Page 22

About the Apps
Manage your Calendar
Software has been preinstalled on the tablet for your
convenience.
Some apps may not work if certain region and network
service requirements are not met.
The Calendar app lets you view and
edit your schedule.
When you sign into a Google Account,
any existing calendar events from
that account will be synced with your
Calendar app. After that, all of your events will stay
in sync automatically, whether you make changes on
your Tablet, or from another device that is synced to
your Google Account. As you add events from different
sources, they are synced automatically across all the
places you need them.
Page 22 Naxa Electronics
Page 23

To view your Calendar, tap on the Home screen or All
Apps screen.
To change the Calendar view, tap the tabs at the top of
the screen labeled Day, Week, Month, or Agenda.
Swipe to scroll vertically or horizontally. In the Day or
Week views, spread your ngers apart or pinch them
together to zoom in or out.
• Manage events and calendars. Tap the icons across
the top of the screen or tap the Menu icon for additional options.
Using the Camera
The Camera app is a combination
camera and camcorder.
To take pictures and videos, rst tap
the Camera icon on a Home screen
or the All Apps screen.
You can view photos and videos you take with the camera with the Gallery app.
From any of these views, you can:
• Read or edit event details. Tap an event to view its
details.
www.naxa.com Page 23
Page 24

When Camera starts, you can:
• Take a picture. Tap the shutter button.
• Start recording a video. Tap the camcorder icon.
• Switch between the front and rear camera. Tap
the switch camera icon.
• Adjust the camera options. Tap the settings icon
to view recording/capture options. Tap the arrow
to view lighting and color options.
• View the most recently taken picture. Tap the
thumbnail displayed in the corner of the screen after you take a picture. You can share the picture by
tapping the icons displayed along the right side of
the image (you must be signed into your Google Account or other account that allows picture sharing).
Page 24 Naxa Electronics
Page 25

Managing Downloads
Files, apps, and other items you
download from your email, app marketplaces, or in other ways are saved
to your tablet’s internal storage. Use
the Downloads app to view, open, or
delete what you’ve downloaded.
Downloaded les are stored in the Download directory
that’s visible when your tablet is connected to a com-
puter. You can view and copy les from this directory.
To open Downloads and manage downloaded les:
1) Tap the Downloads icon from the All Apps screen.
2) Tap an item to open it.
3) Tap the headings of earlier downloads to view them.
4) Tap and hold to select multiple items, then tap the
Share icon and choose a sharing method from
the list, or tap the Trash icon to delete them.
5) Tap the Sort icon to change the display sort or-
der (by name, by date modied, or by size).
www.naxa.com Page 25
Page 26

Apps Settings and Options
View detailed information about your apps and remove
and manage apps on your tablet.
1) Swipe down from the top of the screen to view the
Notications Panel. Tap the top bar, then tap the
Settings icon .
2) Browse to the Device section, then tap Apps.
3) You’ll see four tabs at the top of the screen; swipe
left/right to change tabs. Each tab displays a list of
apps or their components:
• Downloaded. Displays apps you’ve download-
ed from app marketplaces or the Internet.
• On SD Card. Displays apps that are installed on
the memory card (if available).
• Running. Displays all apps, processes, and ser-
vices that are currently running or that have
cached processes, and how much RAM they are
using. At the top right corner of the screen, tap
the Cached/Running processes icon to change
which processes are displayed.
• All. Displays all apps that came with your
tablet and all apps that you have downloaded
from app marketplaces.
Page 26 Naxa Electronics
Page 27

To switch the order of the lists displayed in the Downloaded or All tabs, tap Menu > Sort by name or Sort by
size.
To view details about an app or other item listed under any tab, tap its name. The information and controls
available vary among different types of apps, but commonly include:
• Force stop button: Stops an app that is misbehav-
ing. Stopping an app, process, or service may cause
your device to stop working correctly. You may
need to restart your tablet after doing this.
• Uninstall button: Deletes the app and all of its
data and settings.
• Disable button: Prevents the app from running,
but does not uninstall it. This option is available
for some apps and services that can’t be uninstalled.
• Move to SD card/Move to Device: Change where
the application is installed. Applications will work
best when installed to internal (device) memory.
Not all apps can be moved to the SD card.
• Clear data button: Delete an app’s settings and
other data without removing the app itself.
• Clear cache: If the app stores data in a tempo-
rary area of the tablet’s memory, lists how much
information is stored, and includes a button for
deleting the data.
• Launch by default: If you have congured an app
to launch certain le types by default, you can
clear that setting here.
• Permissions: Lists the kinds of information about
your tablet and data the app has access to.
www.naxa.com Page 27
Page 28

Some apps cannot be uninstalled from
your tablet, but they can be disabled. Tap
the Disable button to stop the app from
running on your tablet.
A note about memory usage
You typically don’t need to worry about managing apps
beyond installing, opening, and using them. But there
may be times when you want to know more about
what’s happening behind the scenes.
les, and so on are stored, remains visible for your con-
venience.
Your tablet also manages how apps use RAM. It may
cache some things you’ve been using recently, for
quicker access if you need them again, but it will erase
the cache if it needs the RAM for new activities. You affect the way apps use internal storage directly and indirectly in many ways; for example, by:
• Installing or uninstalling apps.
Apps use two kinds of memory: internal storage and
RAM. They use internal storage for themselves and any
les, settings, and other data they use. They also use
RAM (memory designed for temporary storage and fast
access) when they’re running.
Your tablet manages and carefully guards the portion
of internal storage where the system, apps, and most
data for those apps are stored, because this area may
contain your private information. It’s not possible to
view this portion of internal storage when you connect
your device to a computer with a USB cable. The other
portion of internal storage, where music, downloaded
Page 28 Naxa Electronics
• Downloading les in Browser, mail, and other apps.
• Creating les (for example, by taking pictures).
• Deleting downloaded les or les you created.
• Copying les between your device and a computer
via USB.
You rarely need to manage the way apps use RAM. But
you can monitor RAM usage and stop them if they mis-
behave.
Page 29

Connecting to Wi-Fi Networks
Connecting to a Wi-Fi Network
If you’re adding a Wi-Fi network when rst setting up
your device, Wi-Fi is turned on automatically.
Your tablet works best when it is connected to the Internet. Your tablet can connect wirelessly to the Internet using Wi-Fi networks.
Wi-Fi is a wireless networking technology that can provide Internet access at distances of up to 100 meters,
depending on the Wi-Fi router and your surroundings.
To use Wi-Fi, you connect to a wireless access point, or
“hotspot.” Some hotspots are open and you can simply
connect to them. Others implement security features
that require other steps to set up, such as digital certicates or other ways to ensure that only authorized
users can connect.
1) Swipe down from the top of your screen to reveal
the Notications panel, tap the top bar, and then
tap the Settings icon .
2) Under Wireless & networks, tap Wi-Fi.
3) Slide the Wi-Fi switch to the On position.The device
scans for available Wi-Fi networks and displays the
www.naxa.com Page 29
Page 30

names of those it nds. Secured networks are indicated with a Lock icon.
4) Tap a network name to see more details or to connect to it. If the network is secured, you will be
prompted to enter a password or other credentials.
(If you don’t know the password, you will need to
ask the owner of the network to provide it.) If the
tablet nds a network that you connected to previously, it will connect to it automatically.
5) To forget a network or to modify its settings, tap &
hold the network name.
• You may want the tablet to forget a network if
you don’t want to connect automatically or if
you no longer use the network.
• Modify a network’s settings to change the
password or to congure its advanced options
(i.e., Proxy and static IP settings). Networks are
congured by default to not use proxy servers and to use automatic IP addressing. Proxy
settings need to be added for each individual
Wi-Fi network.
Adding a Network Manually
Some Wi-Fi networks are congured so that the tablet cannot detect them automatically. These networks
need to be added manually.
Under Wireless & Networks, tap Wi-Fi to select it.
1) Tap the options icon , then tap “Add Network”.
2) Enter the SSID (name) of the network.
3) If necessary, enter security or other network con-
guration details.
4) Tap Save.
The information about the network is saved. Your tablet will connect to this network automatically the next
time you come within range.
Set Advanced Wi-Fi Options
Under Wireless & Networks, tap Wi-Fi to select it. Tap
the Options icon and choose Advanced.
These are the settings you can adjust:
Page 30 Naxa Electronics
Page 31

• Network notication: By default, when Wi-Fi
is on, you receive notications in the Status bar
when your device detects an open Wi-Fi network.
Uncheck this option to turn off notications
• Scanning always available. Enable to allow
Google’s location service and other apps to scan
for networks, even when Wi-Fi is off. This allows
for a better experience with apps that rely on
location data.
• Keep Wi-Fi on during sleep: To conserve mobile
data usage, your device stays connected to Wi-Fi
when the screen goes to sleep.
Tap this option to change this default behavior:
either to stay connected to Wi-Fi only when the
device is connected to a charger (when battery life
isn’t a problem), or to disconnect from Wi-Fi during sleep.
• Avoid poor connections: Don’t use a Wi-Fi net-
work unless it has a good Internet connection.
• Install certicates: Select a Wi-Fi certicate to
install, if available.
• Wi-Fi Direct: Connect to another Wi-Fi direct
device.
• Wi-Fi optimization: Minimize battery usage when
Wi-Fi is on.
• WPS push button: Use with the WPS button on
your router, if available.
• WPS Pin Entry: Generates a PIN to use with your
Wi-Fi router, if necessary.
This screen also displays the following information:
• MAC address: The unique Media Access Control
(MAC) address of your tablet when connected to a
Wi-Fi network.
• IP address: The Internet Protocol (IP) address as-
signed to the device by the Wi-Fi network you are
connected to (unless you used the IP settings to
assign it a static IP address).
Related settings
Settings > Wireless & networks > Wi-Fi
Settings > Wireless & networks > Data usage
www.naxa.com Page 31
Page 32

Connecting to Bluetooth® Devices
Some Naxa tablets can connect to Bluetooth devices.
To learn if your tablet supports Bluetooth, please refer
to the Specications section of this manual.
Bluetooth technology works with computers, head-
sets, speakers, and other compatible devices to help
users stay connected wirelessly. Utilizing the 2.4GHz
ISM transmission spectrum for global audio & digital
data, Bluetooth has created a new wave in modern
communication.
3) Slide the Bluetooth switch to the On position.
4) Set the device to temporarily broadcast its identity
(that is, set it to “Discoverable” or “Pairing” mode).
This will allow the tablet to detect the device. Refer
to the documentation that came with your device
to learn more.
5) The name of the device will appear under the heading Available Devices. Tap on the device to pair it to
your tablet.
• If your device is protected by a PIN code, the
tablet will prompt you to enter the code in
order to connect (popular default codes are
“0000” and “1111”).
To connect to a device, make sure that Bluetooth is
turned on. You will need to go through a one-time
“pairing” process to establish a secure connection to
your tablet.
1) Swipe down from the top of your screen to reveal
the Notications panel, tap the top bar, and then
tap the Settings icon .
2) Under Wireless & networks, tap Bluetooth.
Page 32 Naxa Electronics
• If you don’t see your device, you can have the
tablet search for available devices again. Tap
the Options icon in the upper right corner of
the screen, then tap Refresh. The tablet will
update the list of available devices
6) Devices that have been paired to your tablet appear
under the heading Paired Devices. Tap the name of
a paired device to connect to it.
Page 33

Adjusting the System
Wireless & Networks
Settings
To view the System Settings screen, swipe down from
the top of your screen to reveal the Notications panel,
tap the top bar, then tap the Settings icon .
Wi-Fi
To learn about the Wireless & Networks options, refer
to the section “Connecting to Wi-Fi Networks”.
Bluetooth
To learn about the Bluetooth options, refer to the section “Connecting to Bluetooth® devices”.
Data Usage
See how much data your tablet has used over time, and
how much data has been used by each of your applications.
More
• Airplane Mode: Enable this option to turn off ALL
wireless radios (i.e., Wi-Fi, Bluetooth).
• VPN: Add a VPN network for secure networking.
www.naxa.com Page 33
Page 34

Device
takes for the screen to turn off when you’re not
using it.
Display
Adjust the display options of the tablet.
• Brightness level: Move the slider to set the bright-
ness level on your tablet.
• Adaptive brightness: Enable adaptive brightness
to automatically optimize the brightness level on
your tablet based on the available light around
you. Adaptive brightness is on by default and you
can still adjust your brightness when needed.
• Sleep: Change how long it takes for your tablet’s
screen to turn off when you’re not using it.
• Daydream: Set up screensavers that display pho-
tos, colorful backgrounds, and more when your
tablet is charging.
• Font size: Change the font size displayed on your
tablet.
• HDMI settings: Enable HDMI output, select the
video output resolution, and change how long it
• ScreenshotSetting: Change the screenshot behav-
ior of your tablet. To take a screenshot when the
button is not displayed in the status bar, press the
Power button and tap Volume Down at the same
time.
• When device is rotated: Change how your screen
displays what’s on the screen when you rotate
your screen. This option won’t show up if you’ve
disabled “Auto-rotate screen” in accessibility settings.
• Cast screen: Touch the Cast screen icon to con-
nect your device to Chromecast.
Sound & notication
Adjust the sound options of the tablet.
Storage
Adjust the storage options of the tablet.
Page 34 Naxa Electronics
Page 35

• Default write disk: Select USB to have the tablet
save les and apps to built-in memory by default.
• Internal storage: Shows how much memory is left
available to be used. This total does not count the
amount of memory used by les required by the
tablet to run such as the operating system.
• Mount/Unmount SD card: When a microSD card
is installed, the tablet will automatically mount
the card to make it available for use. Unmount the
card before removing it from the tablet to prevent
data corruption.
To learn about the Apps options, refer to the section
“Managing & Using Apps > Apps Settings and Options”.
Users
If you share your tablet with other people, you can set
up different proles for each user. Each user can have a
prole with their own accounts, customized lock screens,
home screens, and other settings.
Set up your own user account rst, then hand the tablet over to another person. Allow them to set up their
own space.
Battery
Adjust the battery options of the tablet.
What each user can do with the tablet will be nearly
the same. However, only the tablet’s owner can remove
any user completely, or uninstall other user’s apps.
(The rst user is automatically set to be the owner.)
Apps
The Apps settings allow you to adjust several aspects
of the way your tablet uses memory.
You’ll see four tabs at the top of the screen; swipe left/
right to change tabs. Each tab displays a list of apps or
their components.
www.naxa.com Page 35
To add a new user, you must be the owner.
• Tap on Add User in the upper right corner of the
screen. Follow the on-screen instructions to complete the process.
Page 36

• Users may customize their own info from the
Users settings screen. Users may change their
picture, their nickname, or add/change additional
text to describe the user.
To switch between users:
to set the lock. The screen lock types are listed in approximate order of strength.
• Swipe provides no protection, but lets you get to
the Home screen quickly, or open the Camera app
to start taking pictures immediately.
• The lock screen will display each user’s image and
nickname. Choose a user by tapping their image
and then unlock the screen.
Personal
Location access
Adjust the location services options of your tablet.
Security
Set screen lock: Depending how you use your tablet,
you may want to set some form of automatic screen
lock to prevent unauthorized access. If a screen lock
has been set, the screen locks when your tablet’s display goes to sleep. Select one of the screen lock types
from the list and then follow the onscreen instructions
Page 36 Naxa Electronics
• Voice Unlock uses the built-in microphone to
check for the voice of an authorized user to unlock
the tablet. Follow the instructions on screen to
set it up. When Voice Unlock is enabled, you can
simply say a passphrase to unlock your tablet.
• Pattern lets you draw a simple pattern with your
nger to unlock the tablet.
• PIN requires four or more numbers. Hold the tab-
let in portrait mode, enter your pin, and then enter
your PIN once more to conrm.
• Password requires four or more letters or num-
bers. Hold the tablet vertically, enter your password, and then enter your password once more to
conrm. This is the most secure option, as long as
you create a strong password. For best security,
specify a password that is at least 8 characters
long, contains a mixture of numbers, letters, and
Page 37

special symbols, and doesn’t contain any recognizable words, phrases, or personal information.
Language and Input
Adjust the Language and Input options of your tablet.
Backup & Reset
Adjust the Backup & reset options of your tablet.
Accounts
You can use multiple Google Accounts and e-mail accounts on your tablet.
You may also be able to add other kinds of accounts,
depending on which apps are installed on your tablet.
Some you can add in the Accounts & Sync screen, as
described here. Others you add using an app that works
with those kinds of accounts. For example, you can add
IMAP and POP3 email accounts with the Email app.
• Add Account: Tap Add Account, then choose the
type of account to add. Follow the onscreen in-
structions to enter information about the account.
To add some accounts, you may need to obtain
details from system administrator about the service to which the account connects. For example,
you may need to know the account’s domain or
server address. Most accounts require a username
and password, but the details depend on the kind
of account and the conguration of the service
you’re connecting to. Depending on the kind of
account, you may be asked to congure what
kinds of data you want to sync, the name of the
account, and other details. When you’re nished,
the account is added to the list in Accounts & sync.
Depending on how you congured the account,
email, contacts, and other information will start
syncing to your tablet.
• Remove an account: Tap the name of an account
to select it. Tap the Options icon at the top right
corner of the screen and choose “Remove account”. Remove an account to delete it and all
information associated with it from your tablet,
including email, contacts, settings, and so on.
www.naxa.com Page 37
Page 38

• Manually sync an account: Tap the name of an
account, then tap the Options icon at the top right
corner of the screen and choose “Sync Now”.
• Account sync options: Tap the name of an account to
choose which types of data to sync. Some apps, such
as E-mail, Gmail, and Calendar, have separate syn-
chronization settings that provide more ne-grained
control. In such cases, the settings you select at the
account level are still valid. For some accounts, syncing is bi-directional; changes that you make to the
information on your tablet are made to the copy of
that information on the web. Google Accounts works
this way. Other accounts support only one-way sync:
the information on your tablet is read-only.
System
Using Keyboards, Mice, and Other USB Devices
You can connect a keyboard, mouse, or even a joystick
or other input device to your tablet via USB and use it
just as you would with a PC.
You will need an adapter to connect the keyboard or
other device to your tablet’s USB port. To connect more
than one USB device at a time, use a powered USB hub
to reduce the drain on your tablet’s battery.
Using a Keyboard
In addition to entering text, you can use your keyboard
to navigate your tablet’s features.
Adjust the System options of your tablet.
• Date & Time.
• Accessibility.
• Developer options.
• About Tablet.
Page 38 Naxa Electronics
• Use the arrow keys to select items on screen.
• Pressing Return when an item is selected is equiv-
alent to tapping that item.
• Pressing Escape is equivalent to tapping Back.
• Press Tab or Shift+Tab to move from eld to eld
in a form or other screen with multiple text elds.
Page 39

Using a Mouse
When you connect a mouse to your tablet and move
the mouse, an arrow-shaped cursor appears, just as on
a computer.
• Use the mouse to move the cursor.
• Clicking, pressing, and dragging with the mouse
button are equivalent to tapping, tapping & holding, and dragging with your nger, respectively.
• Only one mouse button is supported.
Other input devices
You can connect other input devices to your tablet.
However, games and other apps must be designed to
support the features of an input device (e.g., dedicated
buttons or other controls).
Connect to a Computer via USB
You can use a USB cable to connect your tablet to a
computer in order to transfer music, pictures, and oth-
er les in both directions.
When you connect your tablet to the USB port on your
computer, the tablet will prompt you to turn on USB
storage.
• Tap Turn on USB storage to make your tablet’s
storage available to your computer. You can now
copy les back and forth as you would with any
other external storage drive.
• Tap Turn off USB storage to use your tablet nor-
mally while your computer charges the battery.
Related Settings
Settings > Device > Storage > Menu > USB computer connection
www.naxa.com Page 39
Page 40

Using HDMI Out
Connect the tablet to an external display (like a TV)
with a mini HDMI to HDMI cable (type A to type C). You
can adjust the video output resolution in the tablet’s
System Settings.
Related settings
Settings > Device > Display > HDMI settings
To adjust the settings described here, swipe down from
the top of the screen to view the Notications panel,
tap the top bar, and then tap the Settings icon.
To extend the life of your battery:
• If you aren’t using Wi-Fi, use the Settings app to
turn it off.
• If you have a navigation app, map, or other app
that uses Location services, do not leave it open
when you are not using it.
Tuning Your Tablet’s Performance
Optimizing battery life
You can extend your battery’s life between charges by
turning off features that you don’t need. You can also
monitor how much power your apps and system resources are using.
Page 40 Naxa Electronics
• Lower the screen brightness level and set a short-
er Sleep timeout (Settings > Device > Display).
• If you don’t need it, turn off automatic syncing for
all apps (Settings > Personal > Accounts & sync).
Note that this means you need to sync manually
to collect messages, email, and other recent infor-
mation, and you won’t receive notications when
updates occur.
• If you know you won’t be near a Wi-Fi network for
a while, switch to Airplane mode. Press and hold
the power button until the Tablet options dialog
appears, then tap Airplane Mode.
Page 41

To check the battery level and usage
details
Tap Settings > Device > Battery.
• The charge status and charge level of the battery
are displayed at the top of the screen. The discharge graph shows battery level over time since
you last charged the device, and how long you’ve
been running on battery power.
• Enable Standby intelligent power saving to extend
the tablet’s usable time.
• Enable Battery Saver to turn on automatically,
which improves battery life by decreasing the tablet’s performance and other methods.
Troubleshooting
1) What if the tablet freezes or exhibits other abnormal behavior during operation?
Use a paperclip to press the RESET button [7] to restart
the tablet.
2) What if an app freezes, does not respond, or exhibits other abnormal behavior?
Close the app. Tap the “Recent Screen” icon and then
swipe left or right to close the non-responsive app. An
alternative would be to locate the non-responsive app
in Settings > Device > Apps and then tap the Force Stop
button.
3) Why the standby time is so short sometimes?
Battery performance is impacted by many things, including the temperature and what you are using the
tablet for. Temperatures that are too high or too low
will reduce battery performance. The tablet will work
best in room temperature environments (i.e., approxi-
mately 72 degrees Fahrenheit). Apps that require a lot
of processing power (e.g., games) will use more energy and reduce battery performance device in normal
temperature.
4) Only charge the tablet with the included power
adapter. Fully charge the tablet the rst time you
use it. Make sure it has power before you use it.
www.naxa.com Page 41
Page 42

Warnings and Precautions
• To prevent re or shock hazard, do not expose this appliance to rain
Important Safety Information
1. Read Instructions: All the safety and operating instructions should be
2. Retain Instructions: The safety and operating instructionshould be
3. Heed Warnings: All warnings on the product and in the operating in-
4. Follow Instructions: All operating and usage instructions should be
The lightning ash with arrowhead symbol within an equilateral
triangle is intended to aler the user to the presence of uninsulated “dangerous voltage” within the product’s enclosure that may
be of signicant magnitude to constitute risk of electric shock
The exclamation point within an equilateral triangle is intended
to alert the user to the presence of important operation and servicing instructions in the literature accompanying the appliance.
CAUTION
• Do not block the ventilation openings or holes.
• Do not place any naked ames (such as lighted candles) on the ap-
paratus.
• When discarding batteries, follow all local rules and laws governing
the disposal of batteries. Consider the environmental impact of your
actions!
5. Cleaning: Unplug this product from the wall outlet before cleaning.
6. Attachments: Use only attachments recommended by the manufac-
7. Water and Moisture: Do not use this product near water (e.g., near a
8. Accessories: Do not place this product on an unstable cart,
or moisture.
read before the product is operated.
retained for future reference.
structions should be adhered to.
followed.
Do not use liquid cleaners or aerosol cleaners. Use a damp cloth for
cleaning.
turer. Use of other attachments may be hazardous.
bathtub, washbowl, kitchen sink, laundry tub, in wet basements, or
near a swimming pool and the like).
stand, tripod, bracket, or table. Use only with carts,
stands, tripods, brackets, or tables recommended
by the manufacturer or sold with the product. Any
mounting of the product should follow the manufacturer’s instructions and should use a mounting accessory recommended by the manufacturer.
Page 42 Naxa Electronics
Page 43

A product and cart combination should be moved with care. Quick
stops, excessive force, and uneven surfaces may cause the product
and cart combination to overturn.
9. Ventilation: Slots and openings in the cabinet are provided for ventilation to ensure reliable operation of the product and to protect it
from overheating. These openings should never be blocked by placing
the product on a bed, sofa, rug, or other similar surface. This product
should not be placed in a built-in installation such as a bookcase or
rack unless proper ventilation is provided or the manufacturer instructions have been adhered to.
10. Power Sources: This product should be operated only from the type of
power source indicated on the rating label. If you are not sure of the
type of power supply to your home, consult your product dealer or
local power company. For products intended to operate from battery
power or other sources, refer to the operating instructions.
11. Grounding or Polarization: This product may be equipped with a polarized alternating-current line plug that has one blade wider than
the other. This plug will only t into the power outlet in one direction.
This is a safety feature. If you are unable to insert the plug fully into
the outlet, try reversing the direction of the plug. If the plug should
still fail to t, contact an electrician to replace the obsolete outlet. Do
not defeat the safety purpose of the polarized plug.
12. Power-Cord Protection: Power supply cords should be routed so that
they are not likely to be walked on or pinched by items placed upon
or against them, paying particular attention to cords at plugs, convenience receptacles, and at the point which they exit from the product.
13. Protective Attachment Plug: The product may be equipped with an at-
tachment plug with overload protection. This is a safety feature. See
the operating instructions for replacement or directions to reset the
protective device. If replacement of the plug is required, be sure the
service technician has used a replacement plug that has the same over-
load protection as the original plug as specied by the manufacturer.
14. Outdoor Antenna Grounding: If an outside antenna is connected to
the product, be sure the antenna system is grounded so as to provide
some protection against voltage surges and built-up static charges.
Article 810 of the NationalElectrical Code, ANS/NFPA70 provides information withregard to proper grounding ofthe mast and supporting structure,grounding of the lead-in wire to an antenna-discharge
unit, size of groundingconductors, location of antenna-discharge
unit, connection to groundingelectrodes, and requirements for the
grounding electrode (see gure).
15. Lightning: For added protection for this product, unplug it from the
walloutlet and disconnect the antenna or cable system during a
lightning stormor when it is left unattended and unused for long periods of time. This willprevent damage to the product due to lightning
or power-line surges.
www.naxa.com Page 43
Page 44

16. Power Lines: An outside antenna system should not be located in the
vicinityof overhead power lines or other electric light or power circuits, orwhere it can fall into such power lines or circuits. When installing an outsideantenna system, extreme care should be taken to
keep from touching suchpower lines or circuits, as contact with them
might be fatal.
17. Overloading: Do not overload wall outlets, extension cords, or integral conveniencereceptacles as this can result in a risk of re or electric shock.
18. Object and Liquid Entry: Never push objects of any kind into this pro-
ductthrough openings as they may touch dangerous voltage points or
shout-outparts that could result in a re or electric shock. Never spill
liquid of any kindon the product.
19. Servicing: Do not attempt to service this product yourself as opening orremoving covers may expose you to dangerous voltage or other
hazards.Refer all servicing to qualied service personnel.
20. Damage Requiring Service: Unplug this product from the wall outlet
and referservicing to qualied service personnel under the follow-
ing conditions:a) when the power-supply or plug is damaged; b) if
liquid has been spilledor if objects have fallen into the product; c) if
the product has been exposedto rain or water; d) if the product does
not operate normally by following theoperating instructions. Adjust
only those controls that are covered by theoperating instructions as
improper adjustment of other controls may resultin damage and will
often require extensive work by a qualied technician to restore the
product to its normal operation; e) if the product has been dropped or
damaged in any way; f) when the product exhibits a distinct change in
performance—this indicates a need for service.
21. Replacement Parts: When replacement parts are required, be sure
thatyour service technician has used replacement parts specied
by the manufactureror have the same characteristics as the original
part. Unauthorizedsubstitutions may result in re, electric shock, or
other hazards.
22. Safety Check: Upon completion of any service or repairs to this
product,ask the service technician to perform safety checks to ensure
that the productis in proper operating condition.
23. Wall or Ceiling Mounting: The product should be mounted to a wall or
ceiling only as recommended by the manufacturer.
24. Heat: The product should be situated away from heat sources such as
radiators,heat registers, stoves, or other products (including ampli-
ers) thatproduce heat.
Page 44 Naxa Electronics
Page 45

FCC NOTICE
This device complies with Part 15 of the FCC Rules. Operation is subject
to the following two conditions: (1) this device may not cause harmful
interference, and (2) this device must accept any interference received,
including interference that may cause undesired operation.
Note: This equipment has been tested and found to comply with the limits for a Class B digital device, pursuant to Part 15 of the FCC Rules. These
limits are designed to provide reasonable protection against harmful in-
terference in a residential installation. This equipment generates, uses
and can radiate radio frequency energy and, if not installed and used in
accordance with the instructions, may cause harmful interference to radio communications. However, there is no guarantee that interference
will not occur in a particular installation. If this equipment does cause
harmful interference to radio or television reception, which can be de-
termined by turning the equipment off and on, the user is encouraged to
try to correct the interference by one or more of the following measures:
• Reorient or relocate the receiving antenna.
• Increase the separation between the equipment and receiver.
• Connect the equipment into an outlet on a circuit different from that
to which the receiver is connected.
• Consult the dealer or an experienced radio/TV technician for help.
CAUTION ON MODIFICATIONS
Any changes or modications not expressly approved by the grantee of
this device may void the authority granted by the FCC to operate the
equipment.
WARNING:
This product contains lead, a chemical known to the State of California to
cause cancer and birth defects or other reproductive harm. Wash hands
after handling.
www.naxa.com Page 45
Page 46

Specications
Display Panel 10.1” TFT LCD
Display Resolution 1024 x 600
Touch layer Capacitive touch screen
OS Android 5.0
CPU Cortex A7 1.3GHz (quad core)
RAM 1 GB
Memory 8 GB
External Memory microSD, microSDHC (up to 32GB)
Wireless Connectivity Wi-Fi 802.11 b/g/n
Bluetooth v 4.0
A/V connectivity Headphone out (3.5 mm)
HDMI out (mini Type C)
Built-in microphone
Built-in speaker (1 W)
Camera Rear: 2 MP (interpolated)
Front: 0.3 MP
Audio MP3, WMA, FLAC, APE, OGG
Video MPEG4-sp, ASP, DivX, WMV, RMVB,
H.264/1080P
Operating temperature -20°C to 60°C (68°F to 140 °F)
Power supply AC 100~240V, 50/60 Hz; DC 5V
Battery Rechargeable lithium-polymer
battery
Note: Product are improved continuously. We reserve the right to modify
the product and specications without prior notice.
In case of malfunction due to electrostatic discharge, just reset the product to resume normal operation (reconnecting the power source may be
required).
Page 46 Naxa Electronics
Page 47

Support
If you have problems with your device, please consult the instructions in this manual. Please also visit us on the
web at www.naxa.com to get up to the minute news, alerts, and documentation for your device. For additional
assistance, please contact Naxa Technical Support.
NAXA Technical Support
2320 East 49th St.
Vernon, CA 90058
http://www.naxa.com/naxa_support/
www.naxa.com Page 47
Page 48

 Loading...