

Page 1

Google Android Internet TV Box
Instruction Manual
Model No.: NGT-20
Read all of the instructions before using this appliance and keep the
instruction manual in a safe place for future reference.
Page 2

Contents
Important Safety Instructions
Safety and product notices 1
Disposal of your old product and batteries 1
Product Introduction
Feature highlights 2
Accessories 2
Connection
OUTPUT jacks
3weivrevOtcudorP
4lortnocetomeR
5noitcennoC
5ylppusrewopehtottcennoC
5skcajTUPNI
5
Getting Started
lortnocetomerehteraperP
Find the correct input on your TV
Use the Setup menu
Setup
Play
Additional Information
Troubleshooting
Working with secure certificates
7rewoptcennoC
7
7
7
9unemPUTES
01yalP
11snoitacificepS
21tinuniaM
21erutciP
21dnuoS
21yalP
12
Page 3
Safety and product notices
Important Safety Instructions
Warning: Dangerous high voltages are present inside this
enclosure. To avoid electric shock, do not open the cabinet,
refer servicing to qualified personnel only.
To ensure the proper operation, all the safety and operating
instructions should be read carefully before connection and
operation.
1. Read these instructions.
2. Keep these instructions.
3. Heed all warnings.
4. Follow all instructions.
5. Do not use this player near water and keep the appliance
away from rain and any moisture. Dry location use only.
6. Clean only with dry cloth. Do not clean the unit with strong
chemical agents or abrasive cleaners. Never spill liquid of
any kind on the product. Do not allow residue or liquids to
enter any part of the appliance as this may cause risk of
electrocution. Always disconnect from the mains before
cleaning.
7. Do not block any ventilation openings and , install in accordance with the manufacturer’s instructions.
8. Never place the product, remote control or batteries near
naked flames or other
produce heat. Do not expose the device and the remote
control to direct sunlight.
9. Protect the power cord from being walked on or pinched
particularly near the convenience receptacles, and the
point where they exit from the player.
10.
ufacturer.
11.
Do not place this appliance on an unstable cart, stand,
tripod, bracket, or table. The appliance may fall, causing
serious injury to the user and damage to the product. Do
not place it on top of any other appliance.
The appliance is intended for household use only, and
12.
not for commercial, industrial or outdoor use.
13.
Risk of overheating! Never install the product in a
confined space. Always leave a space of at least 10cm
around the product for ventilation. Ensure curtains or
other objects never cover the ventilation slots on the
product.
14.
Always use the appliance with a power outlet of the same
voltage (A.C. only) as marked on the appliance.
15.
No naked flame sources such as lighted candles should
be placed on the apparatus.
16.
Do not operate the unit if it is not working normally or has
been damaged in any way. Turn the unit off, unplug it
from the power source and consult service personnel. Do
not attempt to repair, disassemble or modify the
appliance. There are no user-serviceable parts inside.
Repairs should only be performed by qualified personnel.
17.
Do not immerse the unit, plug or cord in water or spray
with liquids. Doing so may cause electric shock. Do not
use the appliance with an extension cord unless this cord
has been checked and tested by a qualified technician or
service person. Do not let the power cord hang over the
edge or a table or bench top or touch any hot surface.
heat sources such as radiators,
-
18. Unplug this player during lightning storms or when it is
unused for long periods of time.
19.
ing is required when the player has been damaged in any
way, such as power-supply cord or plug is damaged, liquid has been spilled or objects have fallen into the player,
the player has been exposed to rain or moisture, does not
operate normally, or has been dropped.
20. Please keep the unit in an environment with good ventilation.
21. WARNING:
do not expose this apparatus to rain or moisture. The apparatus shall not be exposed to dripping or splashing and
placed on apparatus.
22. WARNING: Where the mains plug or an appliance coupler is used as the disconnect device, the disconnect device shall remain readily operable.
23.
temperatures or excessive moisture rain, sand.
24.
In the event of a product malfunction, disconnect this
appliance from the mains supply by removing the mains
plug from the mains outlet. Always ensure the mains plug
is accessible.
CAUTION: TO REDUCE THE RISK OF ELECTRIC SHOCK,
DO NOT REMOVE COVER OR BACK.
NO USER-SERVICEABLE PARTS INSIDE. REFER SERVICING TO QUALIFIED PERSONNEL.
Do not attempt to dismantle the appliance. You may become
exposed to invisible laser radiation if the product is open or
the interlock is failed or defeated, avoid direct exposure to
beam.
the appliance, batteries or discs to extreme
Disposal of your old product and batteries
Your product is designed and manufactured with high quality materials and components, which can be recycled and reused.
Please observe the local regulations regarding the disposal of packaging materials,
exhausted batteries and old equipment.
-
1
Page 4
Product Introduction
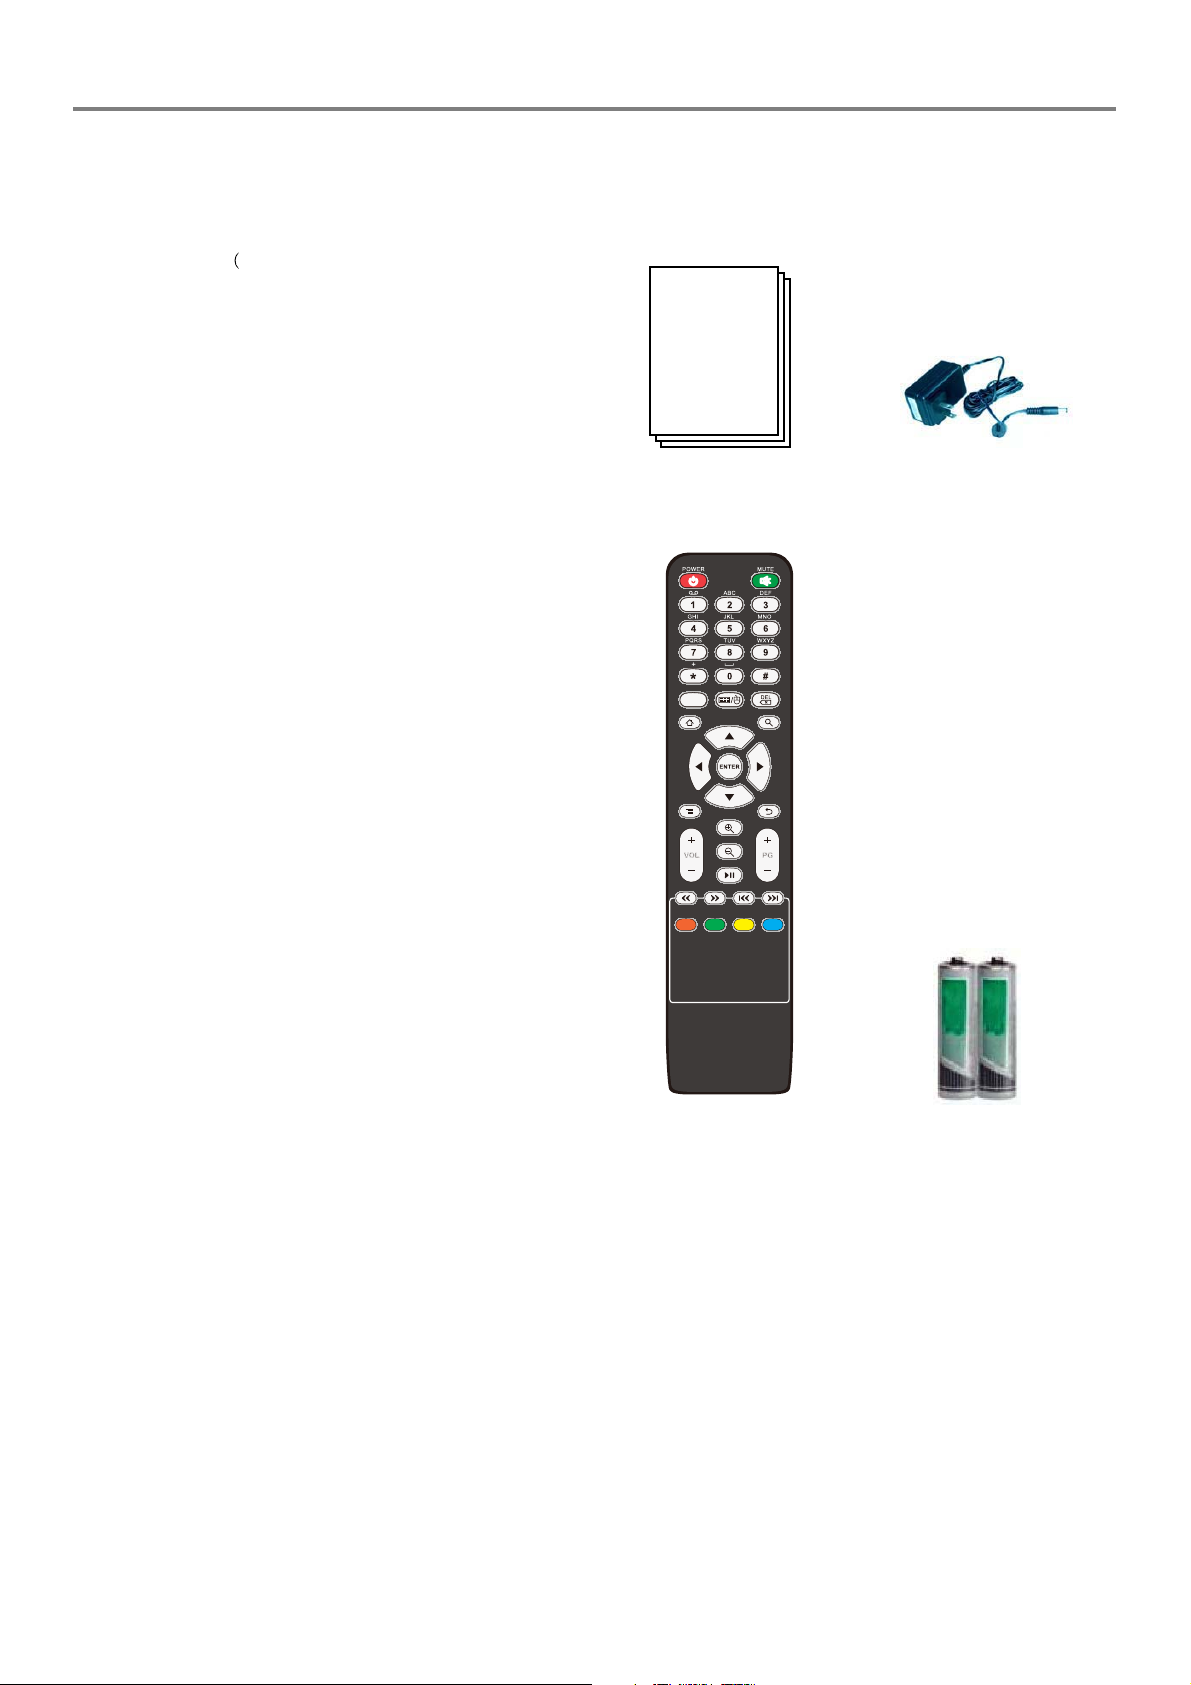
Feature highlights Accessories
Multimedia(FHD)
Game (Local, Network)
Make sure all the accessories are included with the player. If
any item is damaged or missing, contact your dealer.
Network Application
Touch Machine,Instead X86 platform
Support Wi-Fi,
Support 2.4G
Support DLNA
Support Flash 10.1
Support Desktop with weather,Calendar,Clock,Note;
Application Market
System and application upgrade by USB and network
Native, internet)
Instruction Manual
123/abc
Power adaptor
2
Remote Control
Batteries
Page 5
Product Overview
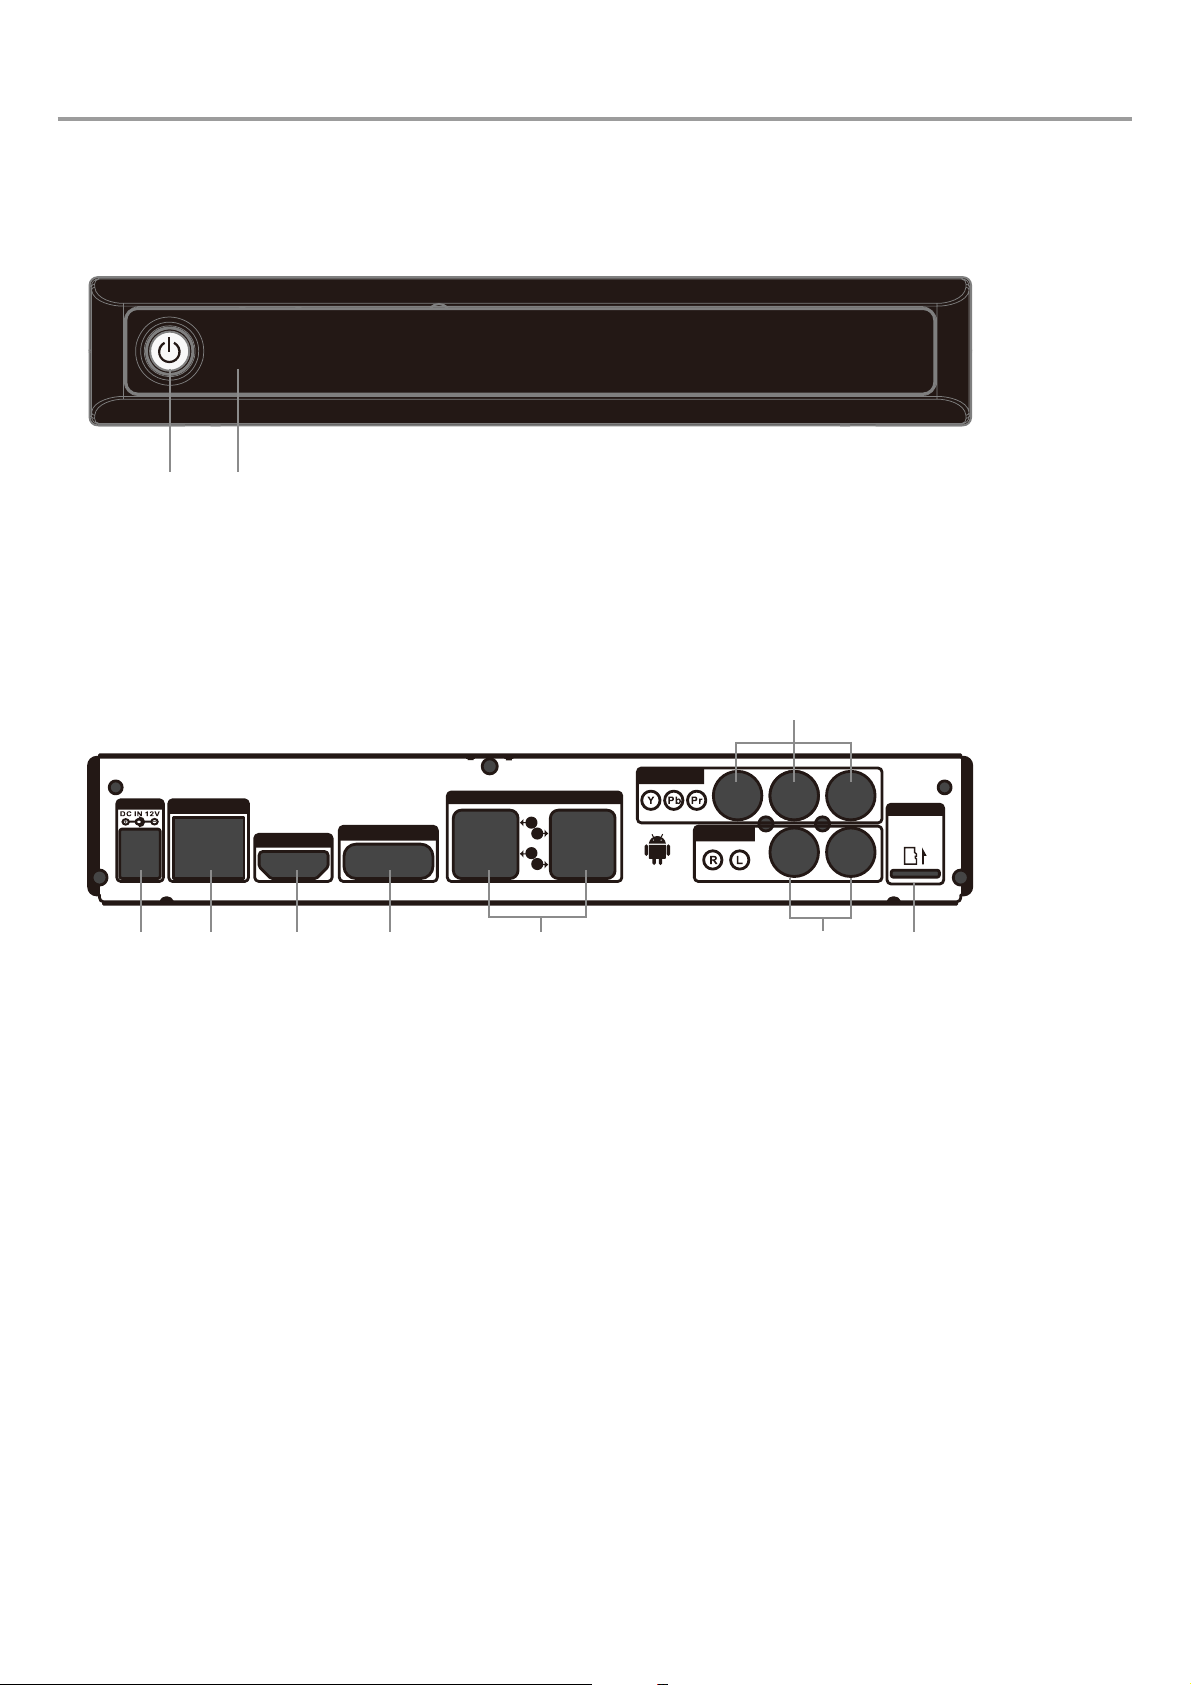
Main unit
Front Panel
IR
Product Introduction
1
2
1. POWER button: Turn on this product or switch to standby mode.
2. IR sensor: Detect signals from the remote control. Point the remote control at the IR senser.
Back panel
6
COMPONENT VIDEO
Power
LAN / RJ45
HDMI
E-SATA
12 3 4 5
USB 2.0 (5V, 3A MAX)
1
3
2
4
AUDIO (STEREO)
ANDROID 2.2
7
INPUT jacks:
1. Power in
2. LAN Jack
4. eSATA jack
5.USB1/2/3/4 Jack
8. micro SD Jacks
MEMORY
micro
SD
8
OUTPUT jacks:
3. HDMI Jack
6. YPbPr Jacks
7. YPbPr audio R/L Jacks
3
Page 6

Remote control
Product Introduction
1
3
4
5
8
123/abc
1. POWER: Turn on the product or switch to standby mode.
2
2. MUTE: Press to mute the sound or cancel the mute state.
3. Buttons for entering numbers and words
Press the button repeatedly to enter the numbers,
words and symbols.
6
4. 123/abc: Exchange the enter mode from number and words for the buttons above.
The screen will display “123” or ”abcABC” when you press the button, in
”123” state you could only enter the numbers by the numbers above, and
7
Keyboard/Mouse: Exchange the enter mode from keyboard and mouse.
9
Delete: Delete the previous word you entered.
5. Home: Return to the home menu.
10
6. Search: Display the search menu.
7. ENTER: Buttons for menu operation.
8. : Display the current operation menu.
11
9. Return: Return to previous menu.
10. VOL+/-: Volume+/-.
12
PG+/-: Page+/-.
Zoom in: Zoom in the web page.
Zoom out: Zoom out the web page.
Play/Pause
11. Fast backward
Fast forward
Previous
NEXT
12. Colour buttons: Spare buttons, no function.
in ”abcABC” state you could enter all by pressing the button repeatedly.
Keyboard: you could select the items by the buttons.
Mouse: you should use the buttons to move the mouse on the
screen, and use ENTER button to confirm you selection.
ENTER
4
Page 7

Connection
Basic connections:
Input
LAN
eSATA
Note
Output
Connection
Connect to the eSATA
Power
Connect to the USB device
LAN / RJ45
USB 2.0 (5V, 3A MAX)
E-SATA
HDMI
COMPONENTVIDEO
1
3
2
4
AUDIO (STEREO)
ANDROID 2.2
MEMORY
micro
SD
Connect to the power supply
Power
LAN / RJ45
HDMI
USB 2.0 (5V, 3A MAX)
E-SATA
COMPONENT VIDEO
1
3
2
4
AUDIO (STEREO)
ANDROID 2.2
(AC100-240V
INPUT jacks
Connect to the LAN (network)
Power
LAN / RJ45
HDMI
USB 2.0 (5V, 3A MAX)
E-SATA
COMPONENT VIDEO
1
3
2
4
AUDIO (STEREO)
ANDROID 2.2
MEMORY
micro
SD
MEMORY
micro
SD
Power
LAN / RJ45
HDMI
USB 2.0 (5V, 3A MAX)
E-SATA
COMPONENTVIDEO
1
3
2
4
AUDIO (STEREO)
ANDROID 2.2
Note
Connect to the micro SD card
Power
LAN / RJ45
HDMI
USB 2.0 (5V, 3A MAX)
E-SATA
COMPONENTVIDEO
1
3
2
4
AUDIO (STEREO)
ANDROID 2.2
OUTPUT jacks
Connect to the HDMI jack
MEMORY
micro
MEMORY
SD
micro
SD
micro
SD
Power
LAN / RJ45
HDMI
USB 2.0 (5V, 3A MAX)
E-SATA
COMPONENTVIDEO
1
3
2
4
AUDIO (STEREO)
ANDROID 2.2
MEMORY
micro
SD
Page 8

Connect an HDMI cable (not supplied) to:
V.
Tip
Connection
o play digital video images
it is necessary
device
content protection system).
Connect to the YPbPr jacks
R
L
Power
LAN / RJ45
HDMI
USB 2.0 (5V, 3A MAX)
E-SATA
COMPONENT VIDEO
1
3
2
4
ANDROID 2.2
via an HDMI
Y
Y
AUDIO (STEREO)
MEMORY
micro
y.
SD
Y
ip
labelled as Y V.
Note
V.
V.
y.
6
Page 9

Getting Started
Connect power
Caution
AC power cord, ensure you have
completed all other connections.
Risk of product damage! Ensure that the power supply
voltage corresponds to the voltage printed on the back of the
unit.
Note
The type plate is located on the back of the product.
Connect the AC power cable to a suitable wall socket.
This product is ready to be set up for use.
Caution
Always follow the instructions in this chapter in sequence.
Prepare the remote control
Find the correct input on your TV
1. Press to turn on this product.
2. Turn on the TV and switch to the correct video input (refer
to the TV user manual on how to select the proper input).
Use the SETUP menu
When first time power up, You’ll see Welcome Page.
It will help you to config your device.
Adjust the position of the screen
Caution
Due to a risk of explosion! Keep batteries away from heat,
1. Open the battery compartment.
2. Insert 2xAAA batteries with correct polarity (+/-) as indicated.
3. Close the battery compartment cover.
Select Language
Select network and setup
Note
If you are not going to use the remote control for a long
time, remove the batteries.
Do not mix old and new batteries.
Do not mix alkaline, standard (carbon-zinc), or
rechargeable (ni-cad, ni-mh, etc) batteries.
Batteries contain chemical substances, so they
should be disposed of properly.
Setup the time
7
Page 10

Getting Started
Use the number buttons on the remote control to enter the
number, and use the buttons to change the position,
then select “Done” item and press “ENTER” button to save
and continue the next setting.
Setup Time zone
The submenus
MUSIC menu
PICTURE menu
Use the buttons to select the “+” or “-”, and press
“ENTER” button to set the time, then select “Done” item and
press “ENTER” button to save and continue the next setting.
Configuration View
Home screen
VIDEO menu
APPS menu
INTERNET menu
Press buttons to select the item and press “ENTER”
button to enter the submenu.
SETUP menu
8
Page 11

Setup
SETUP menu
Press buttons to select the SETUP menu, then press
buttons to select SETTINGS menu, press ENTER
button to enter the SETTINGS menu.
The Set-up application contains most of the customizing
and configuring, such as language, aspect ratio, password,
date&time, Wi-Fi. And you can upgrade the system here.
Connecting to Wi-Fi networks
Wi-Fi is a wireless networking technology that can provide
Internet access at distances of up to 100 meters, depending
on the Wi-Fi router and your surroundings.
To use Wi-Fi on NGT-20, you access a wireless access
point, or “hotspot”. Some access points are open and you can
simply connect to them. Others are hidden or implement other
security features, so you must configure the set so it can
connect to them.
There are numerous systems for securing Wi-Fi connections,
including some that rely on secure certificates or other
schemes to ensure that only authorized users can connect.
For details, you can ask the network administrator.
The Status bar displays icons that indicate Wi-Fi status.
Connecting to Wi-Fi networks
If you’re adding a Wi-Fi network when first setting up, Wi-Fi
is turned on automatically, so youcan skip to step 3.
1 Press Home, press Set-up, and select Wi-Fi Setting.
2 Check Wi-Fi to turn it on. Blue indicate the Wi-Fi is on, Gray
is off.
3 Choose a network to connect to it.
If the network is open, you are prompted to confirm that you
want to connect to that network by pressing ENTER for
connection. if the network is secured, you’re prompted to
enter a password or other credentials.(You can ask your
network administrator for details.)
To receive notifications when open networks are in range
By default, when Wi-Fi is on, you receive notifications in the
Status bar when the system detects an open Wi-Fi network.
1 Turn on Wi-Fi, if it’s not already on.
2 In the Wi-Fi settings screen, check Network notification.
You can uncheck this option to stop notification.
To add a Wi-Fi network
You can add a Wi-Fi network so the system will remember it,
along with any security credentials, and connect to it
automatically when it is in range. You must also add a Wi-Fi
network to connect to it, if it does not broadcast its name
(SSID), or to add a Wi-Fi network when you are out of range
of it.
To join a secured network, you need to contact the network’s
administrator to learn what security scheme is deployed on it
and to obtain the password or other required security
credentials.
1 Turn on Wi-Fi, if it’s not already on.
2 In the Wi-Fi settings screen, select Add Wi-Fi network(the
item will high-lighted), and press ENTER.
3 Enter the SSID of the network.
4 Enter any required security credentials.
5 Save.
The system connects to the wireless network. Any credentials
that you entered are saved, so you are connected automatically
the next time you come within range of this network.
To forget a Wi-Fi network
You can make the system forget about the details of a Wi-Fi
network that you added, for example, if you don’t want the
system to connect to it automatically or if it’s a network that you
no longer use.
1 Turn on Wi-Fi, if it’s not already on.
2 In the Wi-Fi setting screen, select the name of the network
and press ENTER.
3 Select Forget network and press ENTER.
Android Keyboard On screen keyboard settings
The Android Keyboard setting apply to the onscreen keyboard
that is included with the system.
1). Wi-Fi settings
Wi-Fi Check to turn on Wi-Fi so you can connect to Wi-Fi
networks.
Network notification Check to receive an alert when an open
Wi-Fi network becomes available.
Add Wi-Fi network Opens a dialog where you can add a Wi-Fi
network by entering its SSID (the name it broadcasts ) and
security type.
NOTE:For the pre-installed driver, please use the special USB
wireless card.
2). Ethernet configuration
Ethernet Opens the ethernet.
Ethernet configuration
1-Ethernet Devices Select the corresponding devices.
2-DHCP/Static IP
If you check use Static IP, you can enter IP address/Netmask/
DNS address/Default manually, rather than n DHCP protocol
to obtain network setting from the network itself.
(For details, please ask the administrator of the network.)
9
Page 12

Play
3). Proxy Settings
If you must visit the internet un-directly, A proxy service
should be set here:
the Hostname and the Port. For details, you can search from
internet or ask somebody.
4).Display
The player outputs video signals of the highest resolution for
you TV(default) If the picture is not clear, natural or to your
satisfaction, try another option that suits your TV.
Resolution Setting Select the type of video signals output from
the HDMI out jack.
720p/1080i/1080p
Adjust screen size After entering the screen, first press
ENTER, then adjust screen size to fit display thought .
5). Applications
You could find and operate the applications in the menu.
You should operate according the hints on the menu.
6). Privacy
You should enter the menu to reset the settings according the
hints when there’s some troubles with your machine.
Note: All the datas will be losed except the datas in the devices.
7). Language & Keyboard
You can select the language which you want.
You can you use the physical keyboard freely,but must turn on
the “Android keyboard”in the “setting”menu if you want to use the
“screen keyboard”.
8). Date & Time
Automatic “
system time will synchronize with the network.
Set date & Set time: You can set manually.
Select time zone: Select the local time zone.
Use 24-hour format: 24-hour(default)
Select date format: 2010/10/29 & 29/10/2010 & 20/29/2010
9). System upgrade
Warning! If the system deteces file(*.img)in the root of USB, it
will upgrade.
During upgrading, no progress bar, and the system will restart
itself.
10. About device
Information about the system can be viewed here.
” means use network-provided values, and the
Picture menu
Press buttons to select the PICTURE menu, then press
ENTER button to enter the device list, select the device you
want to play, and press ENTER button to display the picture
files.
Video menu
Press buttons to select the VIDEO menu, then press
ENTER button to enter the device list, select the device you
want to play, and press ENTER button to display the video
files.
APPS menu
Play
Music menu
Press buttons to select the MUSIC menu, then press
ENTER button to enter the device list, select the device you
want to play, and press ENTER button to display the music
files.
Press buttons to select the APPS menu, then press
buttons to select the menu you want, and press ENTER button
to enter the submenu.
INTERNET menu
Press buttons to select the INTERNET menu, then press
buttons to select the menu you want, and press ENTER
button to enter the submenu.
Note: Before you enter the INTERNET menu, you should make
sure the internet settings in SETUP menu are ready.
10
Page 13

Note
notice
Additional Information
Platform
Power Supply
Connectivity
Resolution
Video support
WMV9,
etc
Graphic Format
Network function
Dimensions
Net Weight
Audio support
Page 14

Troubleshooting
Warning
Before requesting after service please check this
possible resolution.
Risk of electric shock. Never remove the casing of the
product. To keep the warranty valid, never try to repair
the product yourself.
Main unit
No reaction to the remote control
Make sure the player is connected to a power outlet.
Insert the batteries correctly.
Point the remote control at the IR sensor located on the
front panel of this product.
If the remote still does not function, try putting new batteries
into the remote control.
Picture
No picture
See TV manual for correct video input selection. Change
the video input until you see the screen.
Play
UDF, ISO9660 or JOLIET format.
or .JPEG.
.wma or .WMA
for Windows Media™ Audio.
‘No entry’ sign appears on the TV
The requested operation is not possible.
Working with secure certificates
If your organization’s VPN or Wi- Fi networks rely on secure
certificates, you must obtain the certificates and store them in
the system’s secure credential storage, before you can
configure access to those VPN or Wi- Fi networks on the system.
If your network administrator instructs you to download the
certificates from a website, you’re prompted to set a password
for the credential storage when you download the certificates.
No picture on HDMI connection
If this player is connected to an unauthorized display
device with an HDMI cable, the audio/video signal may not
be displayed.
Check if the HDMI cable is faulty. If faulty or damaged,
replaced the HDMI cable.
Check your display device if the appropriate input was
selected.
playback.
Sound
No audio output from the TV
Ensure that the audio cables are connected to the audio
input of the TV.
Assign the audio input of the TV to the corresponding
video input. See the TV user manual for details.
No audio output from the loudspeakers of the audio
de
Ensure that the audio cables are connected to the audio
input of the audio device.
Turn the audio device to the corresponding audio input
source for the player.
No sound on HDMI connection
You may not hear any sound from the HDMI output if the
connected device is non-HDCP compliant or only DVIcompatible.
12
Page 15

 Loading...