

Page 1
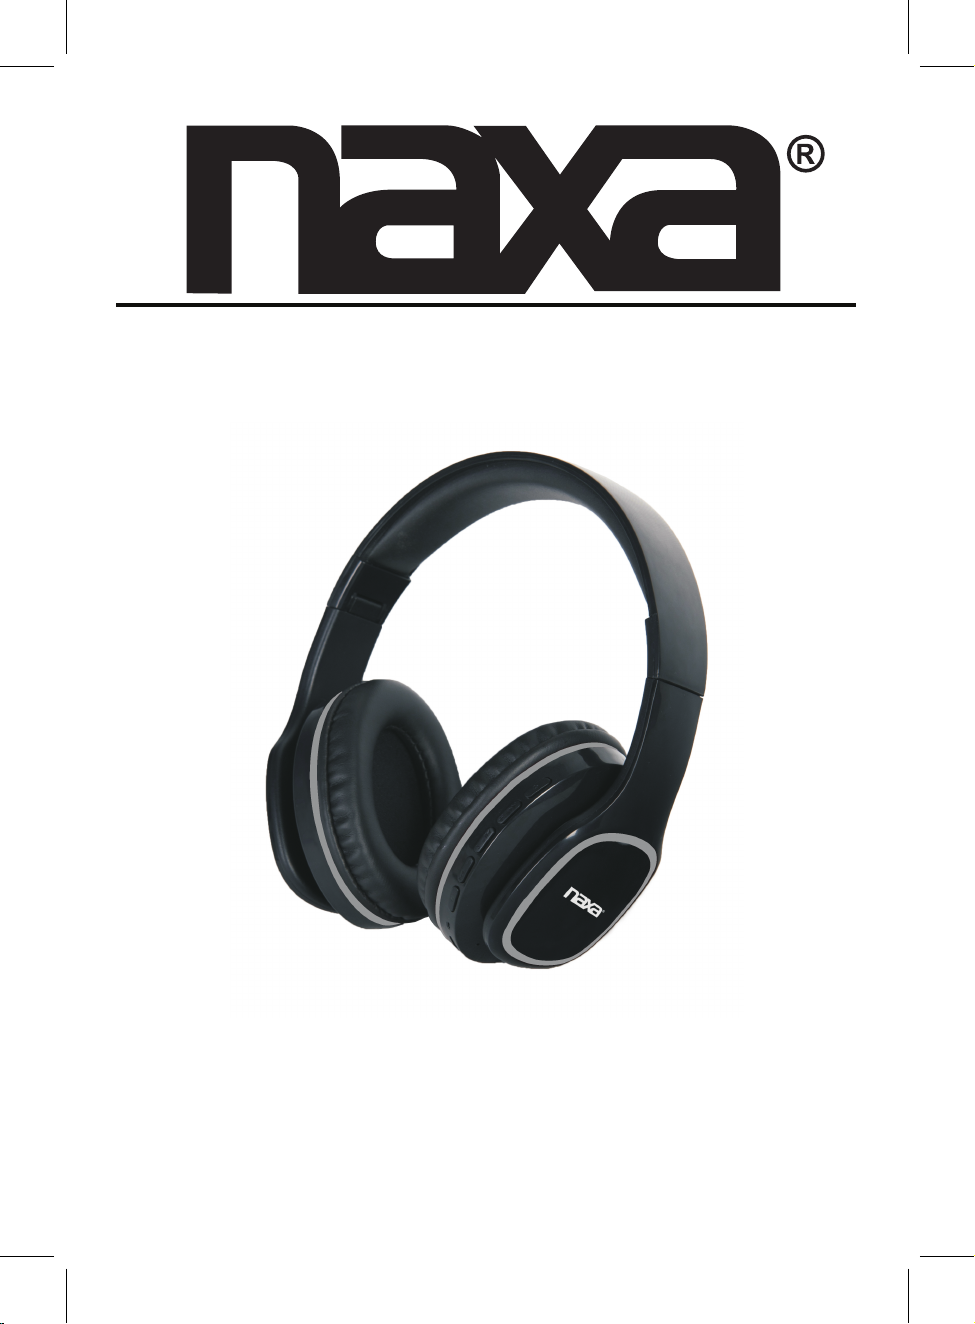
Voice-Controlled Bluetooth® Headphones
with Google Assistant™ & Siri Assistant™
MODEL:NE-968
Please read this user manual carefully to ensure proper use of this product
and keep this manual for future reference
Page 2
A
IMPORTANT SAFETY INSTRUCTIONS
CAUTION
RISK OF ELECTRIC SHOCK
DO NOT OPEN
CAUTION: TO REDUCE THE RISK OF ELECTRIC SHOCK, DO NOT REMOVE THE
COVER (OR BACK) OF THE DEVICE. NO USER SERVICEABLE PARTS ARE
INSIDE. PLEASE REFER SERVICING TO QUALIFIED SERVICE PERSONNEL.
DANGEROUS VOLTAGE:The lighting flash with arrowhead symbol within
an equilateral triangle is intended to alert the user to the presence of
uninsulated “dangerous voltage” within the product’s enclosure that may
be of sufficient magnitude to constitute a risk of electric shock to persons.
TTENTION:The exclamation point within an equilateral triangle is intended to
alert the user to the presence of important operating and maintenance
(servicing) instructions in the literature accompanying the appliance.
WARNING:TO PREVENT FIRE OR SHOCK HAZARD, DO NOT EXPOSE
THIS UNIT TO RAIN OR MOISTURE.
Warning:
- This product is built with an internal rechargeable battery.
- Batteries (a battery pack or installed batteries) shall not be subject to excessive
heat, such as direct sunlight, fire, or the like.
- Changes or modifications not expressly approved by the manufacturer could void
the user’s authority to operate this device.
- Usage of controls or adjustments of performance procedures, other than those
specified
- Recharge the battery when the device indicates that the battery is low.
- It is recommended to charge the battery immediately when the battery is low.
- To
charging.
- To prolong the life of the battery, consider recharging its battery at least once per
month.
herein, may result in hazardous exposure.
prolong the life of the battery, it is NOT recommended to use the device when
2
Page 3
IMPORTANT SAFETY INSTRUCTIONS
FCC STATEMENT:
This device complies with part 15 of the FCC Rules. Operation is subject to the
following two conditions:
(1)This device may not cause harmful interference, and
(2)This device must accept any interference received, including interference
that may cause undesired operation.
FCC NOTICE:
This equipment has been tested and found to comply with the limits for a Class
B digital device, pursuant to Part 15 of the FCC Rules. These limits are
designed to provide reasonable protection against harmful interference in a
residential installation. This equipment generates, uses and can radiate radio
frequency energy and, if not installed and used in accordance with the
instructions, may cause harmful interference to radio communications.
However, there is no guarantee that interference will not occur inaparticular
installation. If this equipment does cause harmful interference to radio or
television reception, which can be determined by turning the equipment off and
on, the user is encouraged to try to correct the interference by one or more of
the following measures:
●Reorient or relocate the receiving antenna.
●Increase the separation between the equipment and receiver.
●Connect the equipment into an outlet on a circuit different from that to which
the receiver is connected.
●Consult the dealer or an experienced radio/TV tec
hnician for help.
FCC WARNING:
To assure continued operation, follow the attached installation instructions and
use only shield cables when connecting to other devices. Changes or
modifications not expressly approved by the party responsible for compliance
could void the user's authority to operate the equipment.
Cancer and Reproductive Harm-www.P65Warnings.ca.gov
To prevent possible hearing damage, do not listen at high volume levels
for long periods of time.
3
Page 4
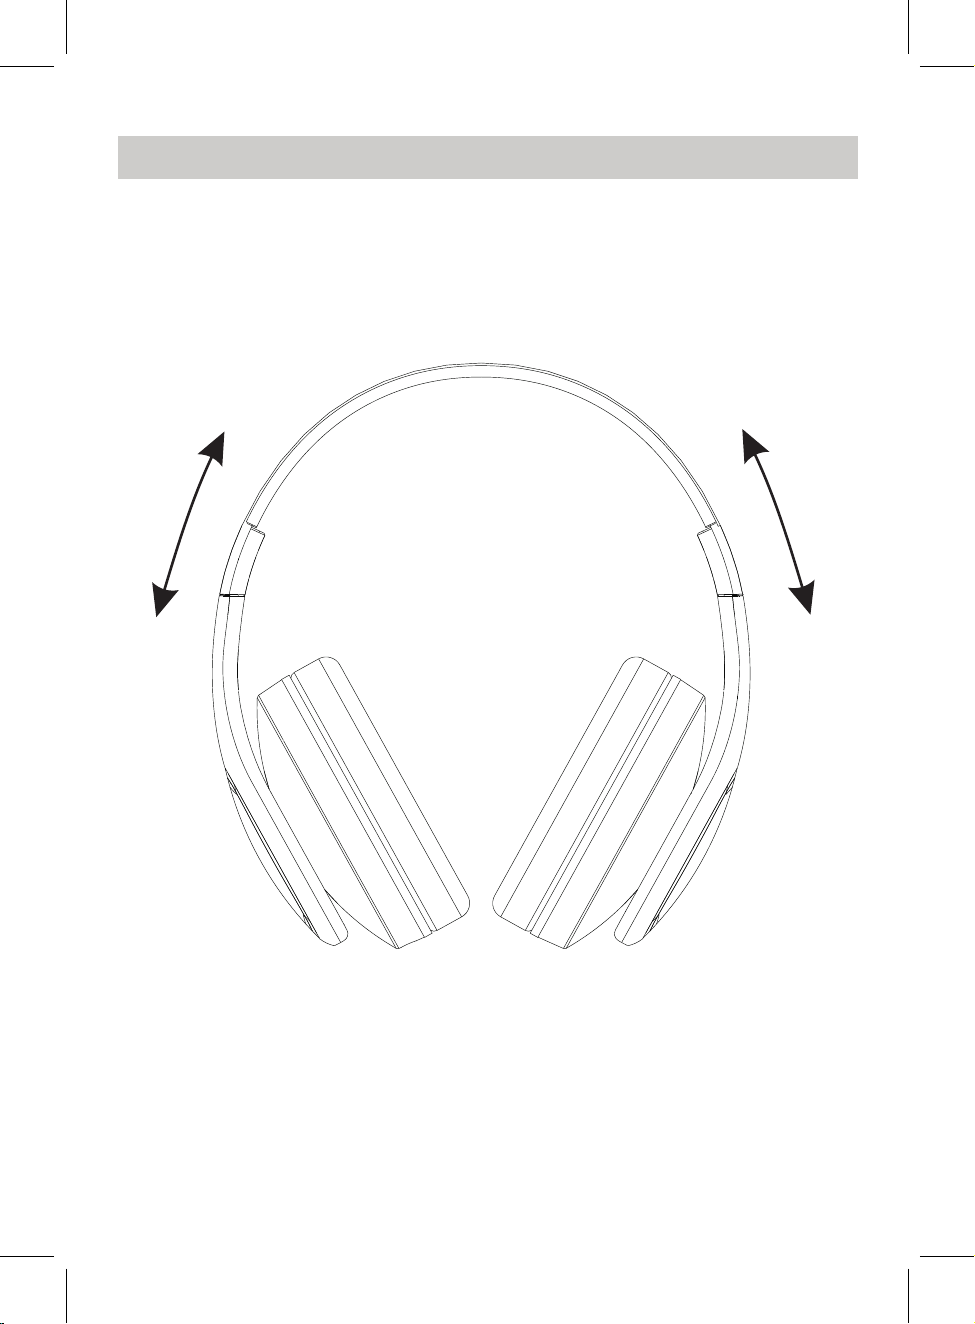
HEADPHONES ADJUSTMENT
The headphones can be adjusted properly following the direction of the arrowhead,
as illustrated below. This affords a comfortable and form-fitting experience for the
user.
4
Page 5

FUNCTION PANEL
1
2
M
I
C
C
H
A
R
G
6
7
1. Power On/Off Button
2. Volume Up, Next Button
3. Play/Pause, Hands-Free Button
4. Volume Down, Previous Button
5. Voice Control Button
3
U
S
B
E
L
I
N
4
N
I
E
8 9
10
5
F
T
6. Built-In Microphone
7. Micro-USB Charging Port
8. Aux-In Jack
9. Indicator
10. TF Card Slot
5
Page 6

RECHARGING THE UNIT
The unit has a built-in Li-ion rechargeable battery, charge it before use or when it is
drained as below:
1. Connect the Micro USB Plug from the supplied USB Charging Cable to the USB
CHARGE Port.
2. Plug the Macro USB Plug to the USB Port on Laptop (or USB Adapter) as below.
USB
CHARGE
3. While charging, the indicator on the unit will turn Red, it will turn Blue when
completely charged.
NOTES:
A. Before first time use, charge approximately 2 hours until the unit is completely
charged.
B. Recharge and store the unit within the temperature range of 5°C~35°C
(40°F~95°F).
C. Do not charge longer than 24 hours. Excessive charging or running the unit
until the battery fully drains will damage battery. Battery life will be extended
if you keep the battery fully charged.
D. Battery life naturally shortens slowly over time.
E. The rechargeable battery incorporated in this product is not user replaceable.
6
Page 7

BLUETOOTH OPERATION
1. Press and hold the button to turn on the unit, the indicator will turn Blue
and begin blinking.
2. Activate the bluetooth menu on the
Search the unit, and the device name “NAXA NE-968” will appear on the pairing
list. Select it and establish a connection.
3. After successful connection, the indicator light will be solid Blue.
4. Play a track on your paired device as normal.
While playing:
Press the Button to pause. Press it again to resume playing.
Press the or button to adjust volume level.
Press and hold the or button to skip to next or previous track.
Hands-free Function:
Press the Button to answer the incoming call, press it agian to end the call.
Press and hold the Button to refuse the incoming call.
Press the Button twice to redial the last dialed phone number.
NOTES:
If the auxiliary cable is inserted into the AUX-IN jack, or the TF-Card inserted into
the card slot, the unit will be switched to AUX- IN or TF-Card mode.
device you wish to connect to the unit.
The latter one inserted will be selected as a playing source.
INSTALLING GOOGLE ASSISTNAT
1. Access the Google Play Store or Apple App Store from your smartphone device.
2. Install the Google Home app onto your smartphone device.
Google, Android™, Google Play, Google Home, Chromecast Built-in and other marks and logos are trademarks of Google Inc.
7
Page 8

3. Establish a wireless connection from the wireless router to your smartphone.
If Wi-Fi is not available, you can use data.
4. Activate the Bluetooth functionality on your smartphone device.
* The Google Home app uses Bluetooth to identify the headphones.
5. Open the Google Home app and follow the on-screen instructions to set the initial
settings for the headphones.
SETTING UP SIRI ASSISTANT
1. To set up Siri Assistant on your headphones, you need an iPhone, iPod touch, or iPad
with iOS 12 or later.
2. To begin, ensure that your iOS device has Bluetooth mode turned.
3. Turn on the headphones. Then hold your unlocked iOS device within a few
centimeters of the headphones, until the setup screen appears. Tap “Set Up” and follow
the on-screen instructions.
Note: If the setup screen does not appear automatically, open the Home app on your
iOS device, tap the , then tap Add Accessory. Tap “Don’t Have a Code or Can’t
Scan?”, then select the headphones in the Nearby Accessories list. If you do not have the
Home app already installed, you can download it from the App Store.
4. Listen for “Hey Siri” in the Siri & Search settings menu of your iOS device.
VOICE ASSISTANT
1. Connect the unit with your phone with Siri or Google Assistant through Bluetooth.
2. Press the button on the unit, then speak your requests to the Microphone
on the unit.
M
8
Page 9

3. You can visit any function on your phone, navigate the desired location, asking
weather or traffic, giving a call to somebody on your contact list, checking the
NBA schedule, checking the emails, playing music, sending message, checking
the airline information, browsing the photos, etc.
4. When the phone searching the answer from network, you may need to activate
your Wifi or phone data streaming.
AUX IN
1. Insert one end of the 3.5mm auxiliary cable to the AUX-OUT jack on the
external player.
2. Insert the other end of the 3.5mm aux cable cable to the AUX-IN jack of the unit.
MP3
AUX IN
Connect to the hone
audio d evice s
( MP3 layer , mobile phone, or
iPod/iPad , etc.)
Mobile Phone
3. Turn on the unit.
4. Play music on external player.
While playing:
Press the or button to adjust volume level.
NOTE:
Do not insert the TF-Card into card slot, or it will switch to TF-Card playing mode.
9
Page 10

TF-CARD PLAYING
1. Insert the TF-CARD into the TF card slot with the
copper plate facing upside, as shown in the figure on the right.
2. Turn on the unit.
TF
3. The unit will play automatically.
TF-CARD
4. When finished playing, push the TF-CARD again to spring out from the slot.
NOTE:
Do not insert the auxiliary cable, or it will switch to AUX-IN playing mode.
TROUBLESHOOTING GUIDE
Check the following before requesting service:
SYMPTOM POSSIBLE CAUSE POSSIBLE SOLUTION
Can’t power on Built in battery drained Recharge the battery
No sound or
sound weak
Sound
distortion
BT not
f
unctioning
Volume level of paired/connected device
is in low level
Volume level of the connected/paired
device too high
The external BT device had NOT paired to
the unit
T
he external BT device too far from the
unit
Rise the volume level of the
paired/connected device
Reduce the volume level of the
connected/paired device
Pair the external BT device to the
unit
Place the external BT device
close to the unit
10
Page 11

SPECIFICATIONS
Power source: Built-in DC 3.7V, 250mAh rechargeable battery
Recharge by DC 5V through Micro USB port
Charging time: approx. 2 hours
Running time: approx. 3.5 hours @70% volume
Bluetooth working range: up to 32 feet in open area
NOTE: The unit will power off when no any operation (no Bluetooth connection, no
Line In cable or TF Card inserted) for 10 minutes.
ACCESSORIES:
1 x User Manual
1 x USB Charging Cable
SPECIFICATIONS AND ACCESSORIES ARE SUBJECT TO CHANGE
WITHOUT NOTICE
SUPPORT
If you have problems with your device, please consult the instructions detailed
in this manual. Please also visit us on the web at www.naxa.com to get the latest
news, alers, and documentation for your device. For addition assistance, please
contact Naxa Technical Support.
NAXA Technical Support
2320 East 49th St.
Vernon, CA 90058
http://www.naxa.com/naxa_support/
11
 Loading...