

Page 1
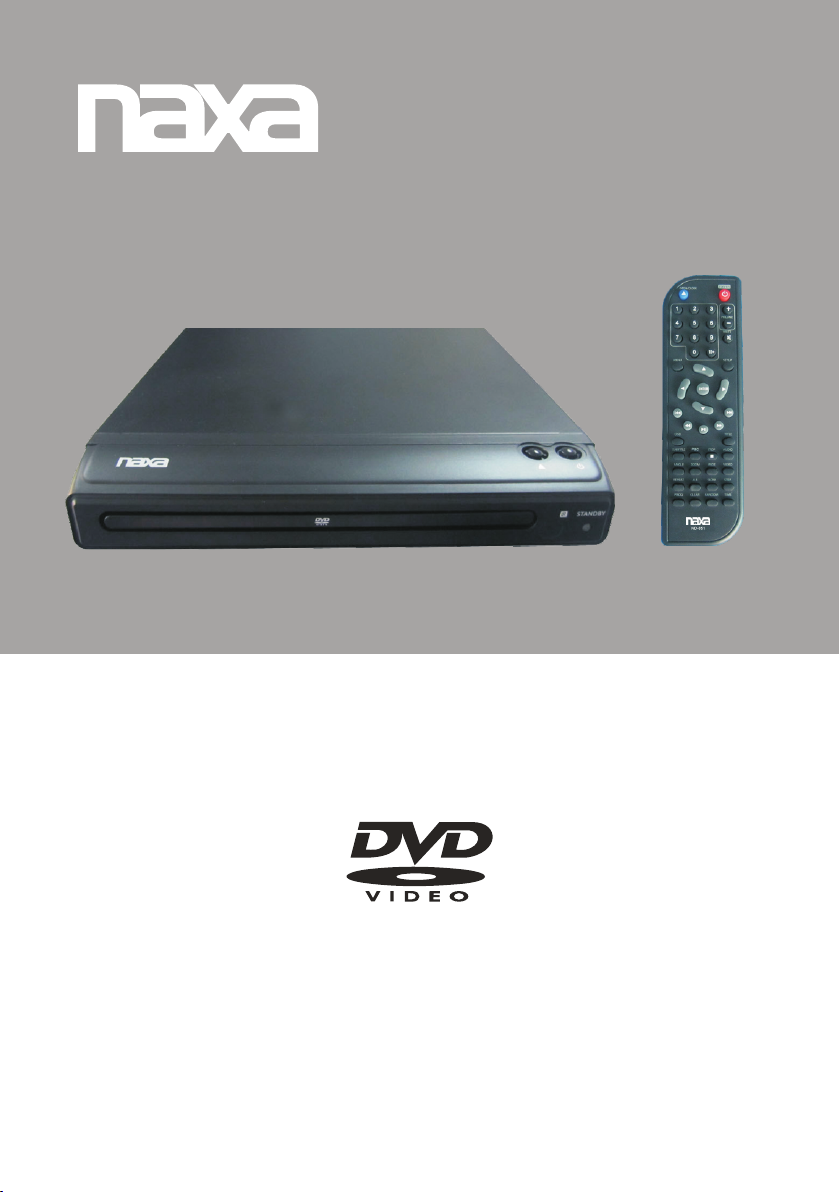
ND-851
Manual de Operación
REPRODUC TOR DE DISCO VERSATIL DIGITAL (DVD)
ESCANEO PR OG RESIVO
FAVOR D E LEE R EST E MANU AL CO MPLETAME NTE AN TES D E OPER AR Y/ O CONECTAR E STE P RODU CTO .
CON SER VAR EL MA NUA L PARA FUT URA S REFEREN CIA S.
Page 2
IMPORTANTES INSTRUCCIONES DE SEGURIDAD
- 1-
Page 3

IMPORTANTES INSTRUCCIONES DE SEGURIDAD
- 2-
Page 4
IMPORTANT SAFETY INSTRUCTIONS
17) O verlo ading
Do no t overl oad wal l outle ts and ex tensi on cord s as this c an resu lt in a ris k of fire o r elect ric
sho ck.
18) O bject a nd liqu id entr y
Nev er push o bject s of any ki nd into t he prod uct thr ough op ening s as they m ay touc h dange rous
vol tage po ints or s hort ou t parts t hat cou ld resu lt in fir e or elec tric sh ock. Ne ver spi ll or spr ay any
typ e of liqu id on the p roduc t.
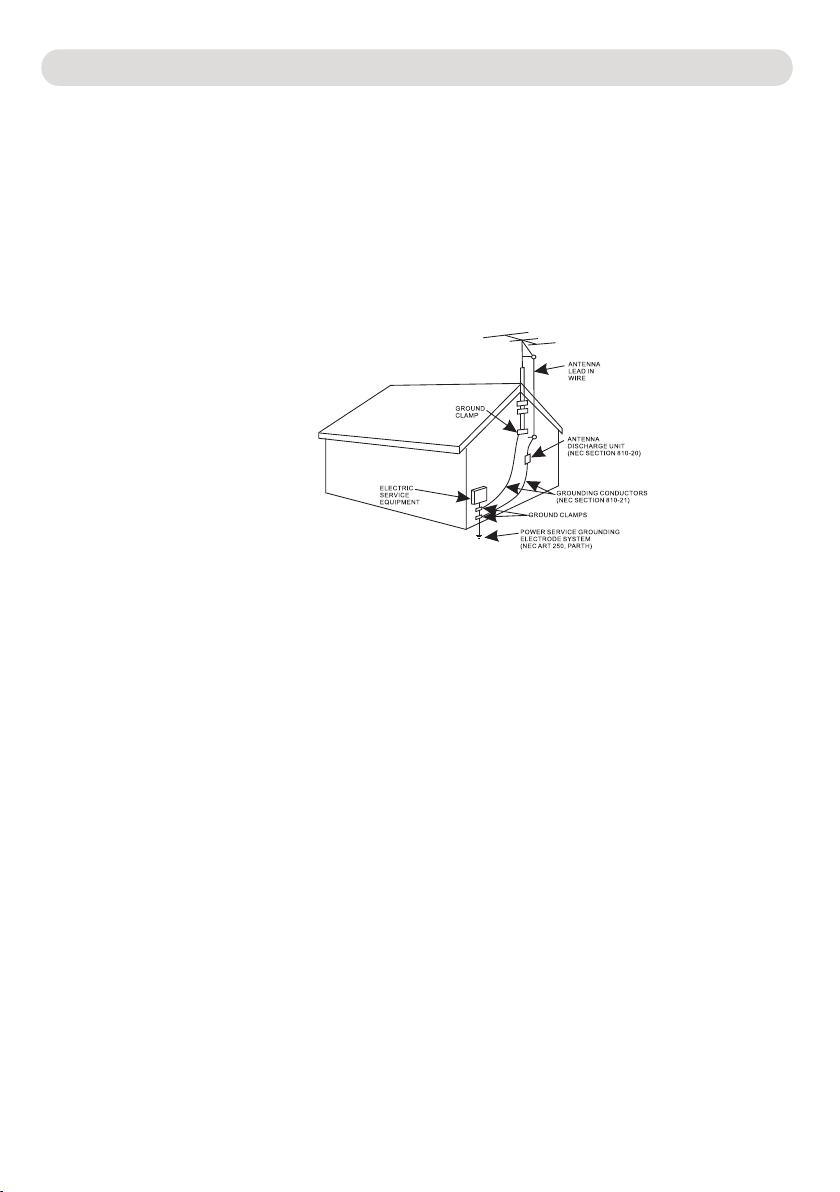
19) O utdoo r anten na grou nding
If an o utsid e anten na is con necte d to the pr oduct , be sure t he ante nna sys tem is gr ounde d so as to
Pro vide so me prot ectio n again st volt age sur ges and b uilt up s tatic c harge s. Sect ion 810 o f the
Nat ional E lectr ic Code A NSI/ NFPA 70 prov ides in forma tion wi th resp ect to pr oper gr oundi ng
of th e mast an d suppo rting s truct ure, gr oundi ng of the l ead- in wi re to an ante nna dis charg e produ ct,
siz e of grou nding c onduc tors, l ocati on of ant enna- di scharge p roduc t, conn ectio n to grou nding
ele ctrod es and re quire ments f or the gr oundi ng elec trode s.
20) Se rvice
Do no t attem pt to ser vice th is prod uct you rself a s openi ng or rem oving c overs m ay expo se you to
dan gerou s volta ge or oth er haza rds. Re fer all s ervic ing to qu alifi ed serv ice per sonne l.
21) Re placeme nt part s
Whe n repla cemen t parts a re requ ired, b e sure th e servi ce tech nicia n uses re place ment pa rts
spe cifie d by the ma nufac turer o r those t hat hav e the sam e chara cteri stics a s the ori ginal p arts.
Una uthor ized su bstit ution s may res ult in fi re or ele ctric s hock or o ther ha zards .
22) Sa fety chec k
Upo n compl etion o f any ser vice or r epair s to this p roduc t, ask th e servi ce tech nicia n to perf orm
saf ety che cks to de termi ne that t he prod uct is in p roper o perat ing con ditio n.
23) Wall or ce iling mou nting
The p roduc t shoul d be moun ted to a wa ll or cei ling on ly as rec ommen ded by th e manuf actur er.
24) Da mage requ iring s ervic e
Unp lug thi s produ ct from t he wall o utlet a nd refe r servi ce to qua lifie d servi ce pers onnel u nder th e
fol lowin g condi tions .
a) Wh en the po wer- sup ply cord or p lug is da maged .
b) If l iquid h as been s pille d or obje cts hav e falle n into th e produ ct.
c) If t he prod uct has b een exp osed to r ain or wa ter.
d) If t he prod uct doe s not ope rate no rmall y by foll owing t he oper ating i nstru ction s. Adju st only
tho se cont rols th at are co vered b y the ope ratin g instr uctio ns, as an a djust ment of o ther
con trols m ay resu lt in dam age and w ill req uire ex tensi ve work b y a quali fied te chnic ian
to re store t he prod uct to it s norma l opera tion.
e) If t he prod uct has b een dro pped or t he cabi net has b een dam aged.
f) Wh en the pr oduct e xhibi ts a dist inct ch ange in p erfor mance -this ind icates a ne ed for se rvice .
25) No te to CATV sys tem insta ller
Thi s remin der is pr ovide d to call t he CATV sy stem inst aller' s att ention to A rticl e 820- 40 of t he
NEC t hat pro vides g uidel ines fo r prope r groun ding an d, in par ticul ar, spe cifie s that th e cable
gro und sha ll be con necte d to the gr oundi ng syst em of the b uildi ng, as cl ose to th e point o f cable
ent ry as pra ctica l.
NOT E: Refe r all ser vicin g to qual ified s ervic e perso nnel. S ervic ing is re quire d when
the u nit has b een dam aged in a ny way su ch as the f ollow ing: th e power -supp ly cord
or pl ug has be en dama ged, li quid ha s been sp illed i nto uni t, the un it has be en
exp osed to r ain or mo istur e, the un it has be en drop ped or th e unit do es not op erate n ormal ly.
- 3-
Page 5
IMPORTANT SAFETY INSTRUCTIONS(CONTINUED)
NOTES ON HANDLING:
Whe n shipp ing the D VD play er, alwa ys use th e
ori ginal s hippi ng cart on and pa cking m ateri als.
For m aximu m prote ction , repac k the uni t as it
was o rigin ally pa cked at t he fact ory.
Do no t use vol atile l iquid s, such a s insec t spray,
nea r the DVD p layer. D o not lea ve rubb er
or pl astic p roduc ts in con tact wi th the DV D playe r
for a l ong tim e. They w ill leave m arks on the f inish .
The t op and re ar pane ls of the D VD play er
may b ecome w arm aft er a long p eriod o f use.
Thi s is norm al and no t a malfu nctio n.
Whe n the DVD p layer i s not in us e, be sur e
to re move th e disc an d turn of f the power.
NOT ES ON LOC ATIN G THE DVD P LAYER:
Whe n you pla ce this D VD play er near a T V, radi o
or VC R, the pl aybac k pictu re may be come po or
and t he soun d may be di stort ed. In th is case , move
the D VD play er away f rom the T V, radi o or VCR.
NOT ES ON CLE ANING :
Use a s oft, dr y cloth f or clea ning
For s tubbo rn dirt , soak th e cloth i n a weak
det ergen t solut ion, wr ing wel l and wip e. Use a
dry c loth to w ipe it dr y. Do no t use any t ype
of so lvent , such as t hinne r and ben zene, a s they
may d amage t he surf ace of th e DVD pla yer.
If yo u use a che mical -satu rated c loth to c lean
the u nit, fo llow th at prod uct's i nstru ction s.
Warning : Clean ing and a djust ment of l enses a nd /or
oth er comp onent s of play back me chani sm shou ld be
per forme d by a qual ified s ervic e techn ician .
NOTES ON MOISTURE CONDENSATI ON:
Moi sture c onden satio n damag es the DV D playe r.
Ple ase rea d the fol lowin g caref ully.
Moi sture c onden satio n occur s, for ex ample , when yo u
pou r a cold dr ink int o a glass o n a warm da y. Dro ps of
wat er form o n the out side of t he glas s. In the s ame way,
moi sture m ay cond ense on t he opti cal pic k-up le ns
ins ide thi s unit, o ne of the m ost cru cial in terna l parts
of th e DVD pla yer.
Moi sture c onden satio n occur s durin g the
fol lowin g cases :
Whe n you bri ng the DV D playe r direc tly fro m a cold
pla ce to a war m place .
Whe n you use t he DVD pl ayer in a r oom whe re you
jus t turne d on the he ater, or a p lace wh ere the c old
win d from th e air con ditio ner dir ectly h its the u nit.
ln su mmer, wh en you us e the DVD p layer i n a hot and
hum id plac e just af ter you m oved th e unit fr om an air
con ditio ned roo m.
Whe n you use t he DVD pl ayer in a h umid pl ace.
Do no t use the D VD play er when m oistu re
con densa tion ma y occur.
lf yo u use the D VD play er in suc h a situa tion,
it ma y damag e discs a nd inte rnal pa rts. Re move
the d isc, co nnect t he powe r cord of t he DVD pl ayer
to th e wall ou tlet, t urn on th e DVD pla yer and l eave it
ON fo r two or th ree hou rs. Afte r two or th ree hou rs,
the D VD play er will h ave war med up an d evapo rated
any m oistu re. Kee p the DVD p layer c onnec ted to
the w all out let and m oistu re cond ensat ion wil l
sel dom occ ur.
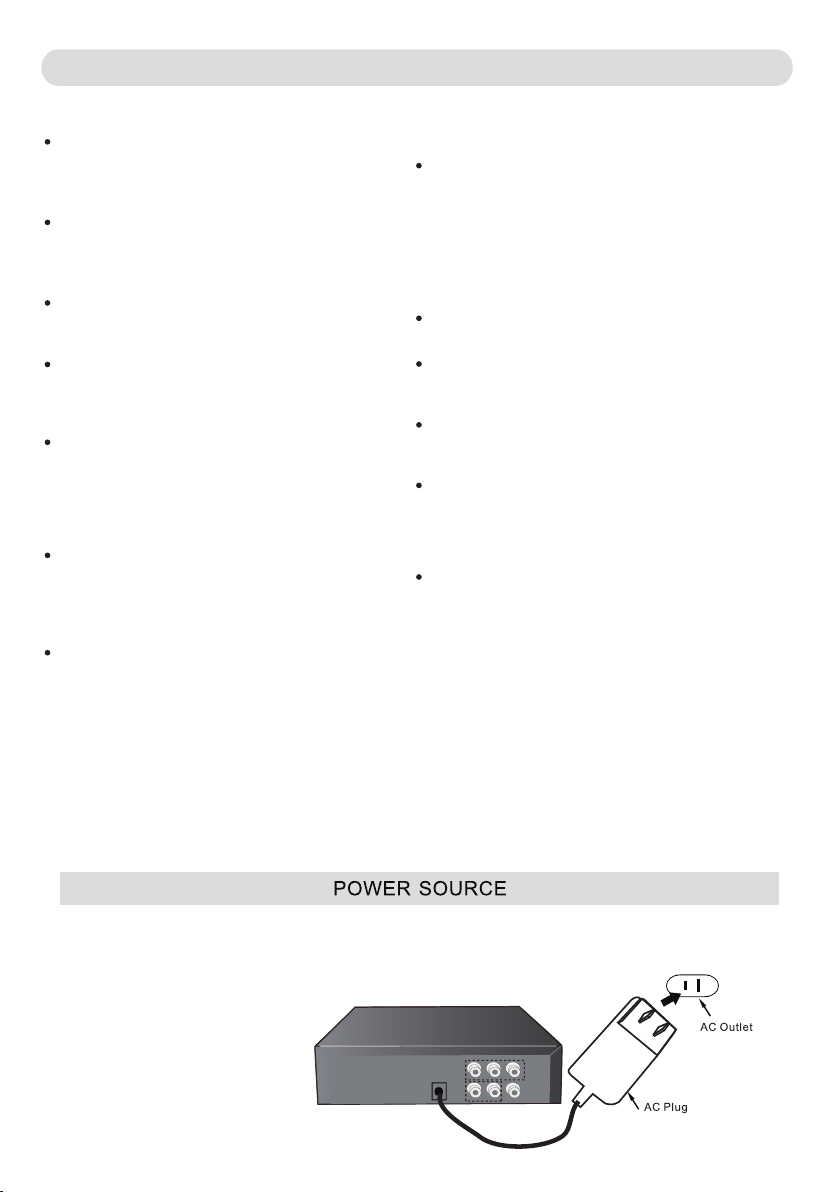
Ins ert the s mall pl ug from t he supp lied AC/ DC Adapt or to the D C IN Jack o n the rea r of Play er. Inse rt the
AC/ DC Adapt or into a c onven ientl y locat ed AC outl et havi ng AC 100- 240V~ , 50/60 H z.
Not e: This AC /DC Adapto r is intend ed to be in a
ver tical o r floor m ount po sitio n.
DC IN Jac k
- 4-
Page 6
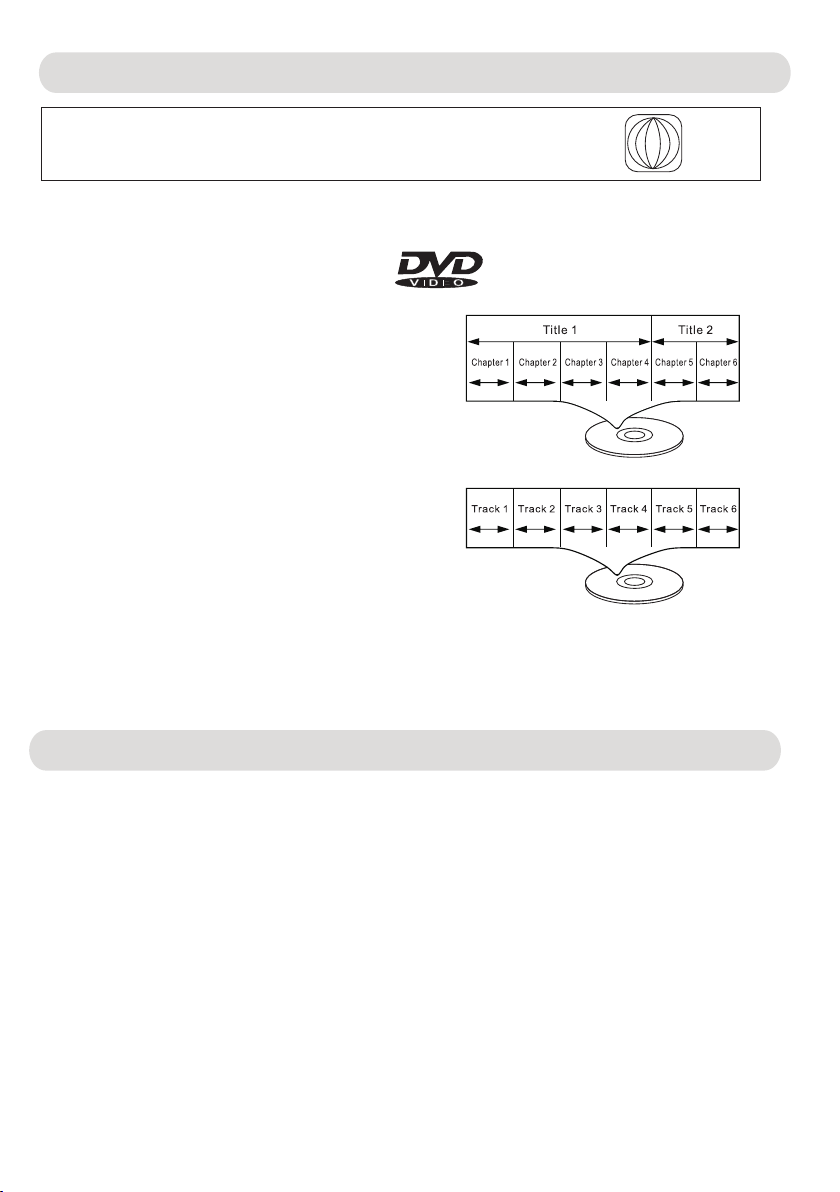
ABOUT DISCS
ABOUT DISCS
The region number for this DVD Player is:
See the following page for information regarding region numbers.
PLAYAB LE DISCS:
The f ollow ing dis cs can be p layed b ack on th is DVD pl ayer:
DI SC T YPE S:
DV D
Da ta o n mo st D VDs is di vi ded in to s ecti on s call ed t itle s
an d th en i nt o subse ct io ns c al led ch ap ter s, e ac h of w hich
is gi ven a ti tle or chap te r numb er. So me f ea tu res of t his
DV D pl aye r wi ll n ot o pera te w ith so me D VD dis cs a s th ey
ar e pr ese t. I f a fu nction y ou s ele cted d oes no t run as
de sire d , r ef er to t he m an ual ac co mpa nying th e DV D disc .
AU DIO CD
Da ta o n an a udio C D is d ivided i nto se cti ons ca lled t rac ks ,
ea ch o f wh ic h is gi ven a tr ack nu mber.
IM POR TANT:
It is i mpo rta nt th at y ou r ead the ma nu al t hat accompani es t he D VD disc , as there ar e
fe atu res that a re o n the DV D pla yer th at c ann ot be us ed w ith certain DV Ds .
Th ere are al so e xtr a features o n the DVD di sc that ar e di ffe ren t for ea ch D VD disc ,
so they a re n ot explained i n th is owner's m anu al.
Th is player co nf or ms t o the NT SC a nd PA L co lor sys tem s . Ho wev er , i f you ar e in
th e USA , Ca nad a or Mexico, leave th is se tti ng o n NT SC . I f inc orr ect ly s et t o PAL , the
TV picture ma y roll ve rti cal ly. In th is ca se , s et t he T V s ystem to NT SC a s sp eci fie d on p age 19 .
1
ABOUT DISCS (CONTINUED)
ABOUT DISCS(CONTINUED)
No tes on C op yr ight:
It i s forb id de n by l aw to c op y, br oa dc ast, s how, br oa dcast on c ab le, pl ay i n pu bl ic a nd r en t co py ri ghted
ma terial without permis sion. DVD v ideo d iscs are c opy pr otected, and any recordings mad e fro m th es e
di scs wi ll b e di st or ted. This product incor po ra tes co pyright protect io n te ch no logy that is p ro tected by
me thod c laims of c er tain U.S. Patents and other intellect ua l pr op er ty r ights owned by M ac rovision
Ma crovision Corpora ti on , an d is int en de d fo r ho me a nd oth er lim it ed v ie wing u ses on ly, u nl ess
ot herwise authorize d by Macro vi si on C or poration. Rever se eng in ee ring or di sassembly is prohibit ed .
Re gion M anagement Infor ma ti on:
Th is D VD P la ye r is d esigned and manufact ured to r es pond t o th e Re gi on M an agement Informa ti on t ha t
is r ec or ded on a DVD disc. If the Region number descri be d on the DVD disc does not correspon d to
th e Re gi on n um ber of t hi s DV D pl ay er, this DVD player canno t play tha t disc . You m ay not be able to
pl ay b ac k so me D VD v ideo discs on t hi s pl ay er i f th ey w er e pu rc ha sed from o utside your geographi c
ar ea o r ma de for bus iness purposes. When you try to p lay ba ck a n un au thorized disc, Wron g Regi on
ap pears on t he T V sc re en.
- 5-
Page 7
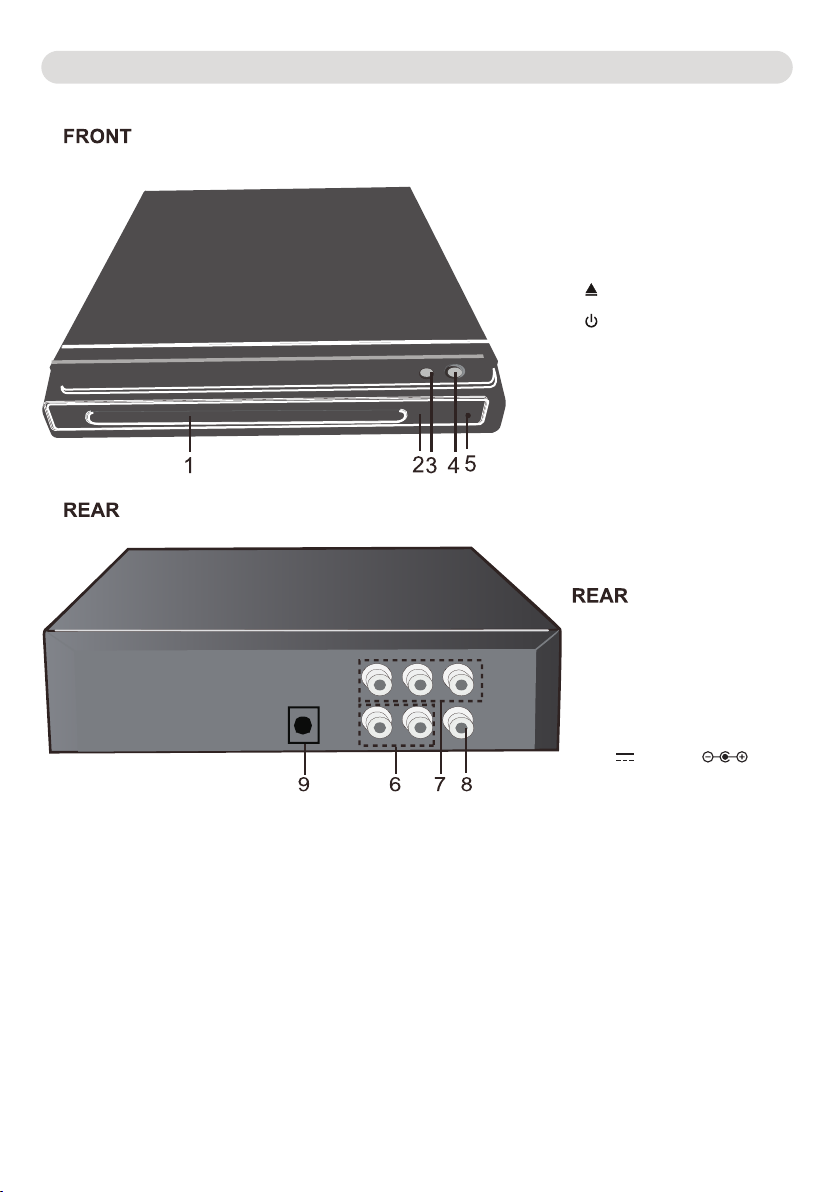
LOCATION OF CONTROLS
1.Disc Tray
2.Remote Sensor
3. (Open/ Cl ose) Button
4. (Standby) button
5.Standby lndicator
6. Audio Left/Right Output Jacks
7.Component Video (Y,Pb,Pr)
Output Jacks
8.Video Output Jack
9.DC IN Jack
(DC 5V, 1.5A )
- 6-
Page 8

LOCATION OF FEATURES
OPEN/CLOSE button
Numeric buttons
0-9 and 10+)
MENU button
Direction buttons
Fast Search and
buttons
Play/Pause button
SUBTITLE button
PBC button
ANGLE button
ZOOM button
REPEAT button
A-B button
PROG (Program) button
CLEAR button
)
PBC
POWER button
VOLUME +/ - button
MUTE button
SETUP bu tto n
ENTER button
Skip and buttons
TITLE button
AUDIO button
STO P button
VIDEO button
WIDE button
STEP but ton
SLOW button
TIME button
RANDOM button
- 7-
Page 9

dir ectio ns.)
BATTERY INSTALLATION
PBC
- 8-
Page 10

CONNECT TO TV:
Connect to TV through AV (Vi deo/Audio) Output Jacks
DC 5V
Connect
(YUV Connection cable NOT included ):
DC 5V
(AV Co nne cti on ca ble i ncl ude d ):
Pb
Y
L R
Pr
VIDE O
supplied
Pb
Y
Pr
- 9-
L R
VIDE O
Connection cables not included
Page 11

DVD PLAYBACK OPERATIONS
Playback of a DVD:
1. Connect the Player to the TV as pr evi ous procedures.
2. Insert the small plug from the supplied AC/DC Adaptor to the DC IN Jack on the rear of Player.
Insert the AC/DC Adaptor into a conveniently located AC outlet having AC 100-240V~, 50/60Hz. The Red
Standby Indicator on the front cabinet will turn on.
3. Press the button on the Player or Remote Control to turn on. The color of STAN DBY LED
indicator on the front cabinet will turn to green.
4. Pre ss th e Ope n/C los e ( ) but ton t o ope n the d isc tray. Plac e the d isc o n the c ent er of t ray w ith
label side face up. Closed the tray by press the Open/Close ( ) button. The unit will start
playback automatically.
5. During playback:
~ Press the or buttons repeatedly to fast search for a specific section forward/backward.
Press Play/Pause button to resume normal playback.
~ Press the or buttons repeatedly to skip to specific track/chapter.
~ Press Play/Pause button to pause, press Play/Pause button to resume playback.
6. Press STOP button to stop playback. The player will remember the point where disc was stopped. Press
Play/Pause button again, playback will start from this point. To stop playback completely or to start again
from the beginning, press STO P button twice.
7. To pow er off, press the button to turn off the player. The color of the STAN DBY LED indicator
will turn to red.
NOTE: If the player will not be used for a long period of time, power off the player by unplugging
the AC/DC adaptor from the wall outlet.
OPERATIONS
Slow motion playback:
During playback, press the SLOW button repeatedly to set the slow motion speed. Press Play button to
resume normal playback.
GOTO
Press the GOTO but ton o nce , the Title/Chapter selection menu will appear on the screen. Use the
Direction / or numeric buttons to select or enter the number of the desired Tit le/ Cha pte r. Pre ss th e
ENTER button to start playback of the selected chapter.
Press the button twice. Th e tim e sel ect ion menu will appear on the screen, enter the desired GOTO
time by pressing the numeric buttons then press the ENTER button. The player will play the movie starting at the
selected time.
Repeat Playback:
During playback, press the REPEAT button once; “CHAPTE R” wi ll ap pea r on th e scr een t hen t he cu rre nt
Chapter will playback repeatedly and continuously.
Press the REPEAT button twice; “TITLE” will appear on the sc ree n the n the c urr ent Title will playback
repeatedly and continuously.
Press the REPEAT bu tto n thr ee ti mes ; “AL L” will appear on the screen then all the tracks on the disc will
playback repeatedly and continuously.
Press the REPEAT button repeatedly until "OFF" appe ar on t he sc ree n to tu rn off repeat mode.
A-B Repeat Playback:
During Playback, press the A-B button to define where you want the section to start. Press the A-B
button again to define where you would like the section to end, the unit will then play the selected section
repeatedly and continuously. Press the A-B button again to resume normal playback.
Note: Th is fu nct ion i s not a vai lable on all discs.
- 10-
Page 12

OPERATIONS
Programming a DVD or CD
1. Install a DVD or CD into the player as previously instructed then press the PROG (Program) button, the
program setting menu will appear on the display as the figures below.
2. For CD, use the direction buttons to select and highlight the desired track number then press ENTER button.
The selected track number will appear on the list.
For DVD, use the direction button to select and highlight the desired title number. The current chapter number
will appear on the screen. Use the direction button to select and highlight the desired chapter number then
press ENTER button. The se lec ted t itle/chapter number will appear on the list.
3. Repeat the same procedures until all the desired tracks are added in the list.
4. Press the Play/Pause button to play the selected tracks.
5. To can cel t he pr ogr am, p res s the S top button twice.
Program setting
menu of CD
Program setting
menu of DVD
- 11-
Page 13

OPERATIONS
Programming JPEG or MP3
1. Install the JEPG or MP3 disc into the player as previously indicated.
2. Press the PROG (Program) button, the "Program mode" will appear on the screen as the figure below.
3. Use the Direction buttons to select and highlight the desired track. Press the ENTER button to confirm the
selection.
4. Repeat the same procedures until all the desire tracks are selected.
5. Use the Direction buttons to select and highlight the "Play" button on the screen then press the ENTER
button to start playback of the selected tracks.
6. To can cel t he pr ogr am, p res s the S top button twice.
Program mode
ROOT
PICTURES
607×872
2003/ 7/12
0013
014016
02b71f7 013a0
03
10
1029297 9298
1034734 8
1034735 7
List
1
2
3
4
5
6
7
8
Play
- 12-
Page 14

OPERATIONS
AUDIO:
Press the AUDIO button repeatedly to select the available language/sound channels. This function is not
available on all discs
Subtitle:
Press the SUBTITLE button repeatedly to select the subtitle language or turn the subtitle menu off. This function is
not available on all discs.
DVD Menu:
Press the MENU button , the menu of the current DVD will appear on the screen. Use the Direction buttons to
select the desired option, and then press the ENTER button to confirm the selection. This function is not
available on all discs.
Tit le
Press the TIT LE bu tto n , the t itl e men u of the current DVD will appear on the screen. Use the direction buttons to
select the desired option, and then press the ENTER button to confirm the selection. This function is not
available on all discs.
OSD (On Screen Display):
During playback, press the OSD button repeatedly to read the information of playback status.
Zoom:
During movies playback, press the ZOOM button repeatedly to zoom in the picture.
press the direction buttons to select the parts of the zoomed picture to watch. This function is not available
on all discs.
Angle:
If multi-angle scenes are available on the current DVD, press the ANGLE
button repeatedly to select the desired scenes. This function is not available on all discs.
Mute
To temporarily mute the playback sound, press the MUTE button. Press again to resume normal playback.
VIDEO:
Press repeatedly to set the Vid eo output modes to AV, YUV o r YUV P-SCAN.
Notes:
~ Set to AV if you c onn ect ed th e TV via the AV output jacks.
~ Set to YUV i f you c onn ect ed th e TV via the YUV jacks.
~ Set to YUV P -SC AN if y ou co nne cte d the TV via the YUV jacks and your TV supports Progressive video input.
~ If the settings is incorrect, the TV screen will become abnormal. Press the VIDEO button repeatedly until the
screen turn to normal.
STEP
Press STEP bu tto n dur ing p lay, the player will ent er th e sti ll pi ctu re mo de. I f the b utt on is p res sed a gain, the disc is
advanced by one frame (step). When the button is kept pressed, consecutive frame advance works. To return to
normal play, pres s PLAY button.
Note: Some discs do not have such function.
Note: Th e col or sy ste m of Television in US, Cana da an d Mex ico i s NTS C.
Volu me
Press the Volume buttons to increase or decrease the volume of audio output from the unit.
PBC function (only VCD)
When playing VCD 2.0 press PBC button to display title menu use number key choice and ENTER
button to play music.
RETURE
Press to turn to previous menu/page.
A-B REPEAT
Press A-B button during playback at the point where repeat play is to commence (a) then press again at the point
where repeat play is to be concluded (B). Repeat playback between point (A) and point (b) starts. Press A-B button
once more where TV s cre en ap pea rs RE P OFF to return to nor mal p lay.
.
- 13-
Page 15

CD PLAYBACK
Playback of a CD:
1. Power on the player and place the disc into the player as previously indicated.
2. During playback:
~ Press the Play/Pause button to pause. Press again to resume normal playback.
~ Press the or to fast search the specific section of the current disc.
~ Press the or buttons to skip tracks.
3. Press STOP button to stop playback. The player will remember the point where disc was stopped. Press
Play/Pause button again, playback will start from this point. To stop playback completely or to start again
from the beginning, press STO P but ton twice.
4. When finished , press the button to turn off the player. The co lor o f the S TANDBY LED indicator
will turn to red.
NOTE:If the player will not be used for a long period of time, power off the player by unplugging the
AC/DC adaptor from the wall outlet.
MP3 and JPEG (Picture) Discs Operations:
1. Power on the player and place the disc into the player as previously indicated. The player will start playing
the first track automatically.
2. To sel ect t he de sir ed fo lde r/t rack, use the Direction buttons to select and highlight the desired folder then
press the ENTER button. Th e fil e lis t will appear on the screen.
3. Use the Direction buttons to select and highlight the desired file then press the ENTER button to start playback of
the selected track
Repeat:
During playback, press the REPEAT button repeated ly to s ele ct:
Off : Pla y all t he tr ack s on th e disc one by one.
Track: Play the current track repeatedly.
Folder: Play the tracks in the current folder repeatedly.
All: Play all the tracks repeatedly.
Notes:
1. Disc loading period of the JEPG discs may be longer than loading DVD disc.
2. Th e ope rat ion i s sim ila r to DV D disc playing.
3. Zoom is not available in JEPG (Photos) playback.
IMPORTANT NO TES :
will appear on the TV scr een d uri ng operation if you try to access a function that is not available on the disc.
Some discs may take a few seconds to load. If a disc is inserted incorrectly, dirty, dam age d, or i s not present at
all, “NO DISC” will appear in the display.
Always hold the disc without touching either of its surfaces. When inserting a disc, position it with the printed title
side facing up, align it with the guides and place it in its proper position.
It is important that you read the manual that accompanies the DVD disc as there are features that are on this
DVD player that cannot be used with certain DVDs. There are also extra features that are differ ent f or ea ch DV D
disc, so they are not explained in this owner ’s ma nua l.
- 14-
Page 16

SYSTEM SETUP
Setup Menus:
In stop playback mode, press the SETUP button, the setting menu will appear on the screen as below. Using
the Direction buttons to select and highlight the function you need to set. Press the Direction button to enter.
Press the Direction , buttons to set. Press the ENTER button to confirm the selection. Press the SET UP
button to save the settings and exit.
In Language Setup Page:
Press the irection buttons , to select OSD menu, DVD menu, Audio Language and Subtitle D
as desire then press the Direction button to enter.
1. If OSD (On Screen Display Language) is selected, press the Direction button to enter. Press the
Direction
the selection. Press the SET UP button to save the se tti ng an d exi t.
buttons , to select the desired language then press the Enter button to confirm
2. If Audio Subtitle is selected, press the Direction button to enter. Press the DirectionMenu, or
to select the desired language. Then press the Enter button to confirm the
buttons ,
selections.
In Screen Setup Page:
Press the Direction buttons , to select TV Type , Scr een S ave r, TV Sy ste m, Video Output,
As desire then press the Direction button to enter.
1. If TV typ e is se lec ted , pre ss th e Direction button to enter. Press the Direction buttons , to select
4:3 PS; 4:3 LB or 16:9 to match the aspect ratio of your TV then press the Enter button to confirm
the selection. Press the SETUP but ton to save the setting and exit.
Notes:
PS: Select when the unit is connected to an external conventional TV. Video material formatted in the Pan4: 3
Scan style is played back in that style (the left and right edges are cut off).
LB: Select when watching DVDs on connected unit to an external conventional TV. Wide-screen images4: 3
are shown on the screen with a Black band at the top or bottom.
16:9: Select when the unit is connected to an external wide-screen TV.
Press the SET UP button to save the setting and exit. This is not available on all discs.
Brightness or Contrast
- 15-
Page 17

SYSTEM SETUP
2. If Screen Saver i s selec ted, pr ess the Directio n butto n ►to e nter. Press the Direction buttons
▲, ▼ to select On or Off as des ired then press th e Enter b utton t o confi rm the sele ction .
Press the SETUP bu tto n to sa ve th e set ting and exit. When set to On, the screen saver will come on when the
unit stops or the image is paused for approximately ten minutes. When set to is Off, the screen saver will
not come on.
3. If TV system is selected, press the Direction button to enter. Press the Direction buttons , to select the
form at of o utp ut si gna ls to PAL, NTSC or AUTO. Then press the Enter button to confirm the selection.
Press the SET UP button to save the setting and exit.
Notes:
Set it to NTSC if the color system of your TV is NTSC. (Default setting. Th e TV signals in US, Canada and
Mexico is NTSC).
Set it to P if the color system of your TV is PAL .
AL
Set it to AUTO if th e col or sy ste m of your TV is mul ti.
4. If Vide o out put i s sel ect ed, p ress the Direction button to enter. Press the Direction buttons , to
select video output modes to
Notes:
~ Set to if you connected the TV via the AV on the player and AV
on the TV as the figure on page 10.
~ Set to YUV if you connected the TV via the YUV jack on the player and YUV IN jacks on the TV as the
figure on page 10.
~ Set to YUV P-SCAN if you con nected the TV via th e YUV jack on the player and YUV IN jacks on the TV (TV also
set to Progress ive Video in put mode) as the figure on page 10.
5. If Brightness is selected, press the direction button ( ) to enter. Press the direction buttons ( , ) to select
6. If Contrast is selected, press the direction button ( ) to enter. Press the direction buttons ( , ) to select
contrast level
button to save the setting and exit.
In Audio Setup Page:
Down Mix
If Down Mix is selec ted, pr ess the D irection butto n ►to ent er. Pres s the Dir ectio n buttons ▲,▼
to select "Lo/Ro " or "Lt/ Rt" to se t the rear audio cha nnels m ode as de sired. Press the SETUP button
to save the setting and exit.
AV cable cable
brightness le vel f rom Normal,Bright or Soft as desired. Then p res s the E nte r but ton t o con firm the selection.
Press the SETUP bu tto n to sa ve th e set ting and exit.
from -4 to +4 as desired. Then p res s the Enter button to confirm the selection. Press the SETUP
AV,YUV or YUV P-SCAN.
- 16-
Page 18

SYSTEM SETUP
In Custom Setup Page:
Press the Direction buttons , to select ,P ass wor d, or Default as desired, Parental Ctrl Angle Mark
then press the Direction button to enter.
1 Ctrl. If Parental is selected, press the direction button ( ) to enter.
The Password menu will appear on
(Default password is 5050). Press the Direction button , to set the rate level as below as
desired then press the ENTER button to confirm. Press the SETUP button to save the settings and exit. .
Rate levels:
1:KID SAF, Kidsafe
2 :G , All ages
3 :PG, Parental Guidance
4:PG-13, Parental Guidance less than 13 years old
5:PGR, Under 17 years old, Parental Guidance suggested
6:R, Under 17 years old, Parental Guidance strongly
7:NC+17 years old and above
8:ADULT, Ad ult o nly
2. If Password is selected, changed the password as follows:
A. Press the direction button to enter. The column will highlighted.
B. Enter the 4 digit current password by press the numeric buttons.
C. Enter the 4 digit new password by press the numeric buttons.
D. Enter the new password again.
E. Press the SETUP butt on to s ave t he se ttings and exit.
3. If Angle Mark is selected, press the Direction button to enter. Press the Direction buttons , to select ON
(When
multi-angle will not appear on the screen) as desired then press Enter button to confirm your selection . Press
the SET UP button to save the setting and exit. (Angle mar ks ar e not a vai lab le on a ll DV Ds. )
the multi-angles available on the disc, icon of multi-angle wi ll ap pear on the screen) or OFF (Icon of
the screen. Enter the four digit password by number buttons (0-9)
4. If Default is selected, press the Direction button to highlight reset. Press the Enter button to reset all
settings to default setting. Press the SET UP button t o exi t.
Exit Setup Mode page:
Press the ENTER button to exit.
- 17-
Page 19

CARE AND MAINTENANCE
Caring for Discs
Treat the disc carefully. Handle the disc only by its edges.
Never allow your fingers to contact with the shiny, unprinted
side of the disc.
Do not attach adhesive tape, stickers, etc. to the disc label.
Clean the disc periodically with a soft, lint-free,dry cloth,
Never use detergents or abrasive cleaners to clean the disc.
If necessary, use a C D cle ani ng ki t.
If a disc skips or gets stuck on a section of the disc,
it is probably dirty or damaged(scratched).
When cleaning the disc, wipe in straight lines from the center
of the disc to the outer edge of the disc. Never wipe in
circular motions.
Discs should be stored in their cases after each use to avoid damage.
Do not expose discs to direct sunlight, high temperatures or dust, etc.
Prolonged exposure or extreme temperatures can warp the disc.
Do not stick or write anything on either side of the disc. Sharp writing
Instruments, or the ink, may damage the surface.
Cleaning the Unit
To prev ent f ire o r sho ck ha zar d, di sconnect your unit from the
AC power source when cleaning.
The f ini sh on y our u nit m ay be c leaned with a dust cloth and
cared for as other furniture. Use caution when cleaning and
wiping the plastic parts.
Mild soap and a damp cloth may be used on the front panel.
- 18 -
Page 20

TROUBLESHOOTING GUIDE
Check the following before requesting service:
GEN ERAL
No po wer.
Pow er on, bu t unit no t funct ionin g
pro perly.
No pi cture a nd/or n o sound .
Pla yback p ictur e rolli ng .
Pic ture qu ality n o good.
The r emote c ontro l is not wo rking .
SYM PTOM
AC/ DC Adapt or unpl ugged .
Con densa tion ha s forme d.
Wro ng type of di scs or the di sc is cor rupte d.
The d isc is di rty or in serte d incor rectl y.
The connection cables are not installed correctly.
The v ideo ou tput of t he play er are in corre ctly
set .
The c onnec ted TV po wer is off.
Col or syst em of the p layer h as wron g
set tings .
The d isc is di rty.
The b atter ies are w eak or de ad.
The b atter ies are n ot inst alled p roper ly.
The r emote i s not aim ed at the s ensor.
Dis tance i s too far .
The re is an ob stacl e in the pa th of the
bea m.
DVD n ot inse rted, o r inser ted up- side- down.
POS SIBLE C AUSE
POS SIBLE S OLUTI ON
Ins ert the s mall pl ug from t he supp lied
AC/ DC Adapt or to the D C IN Jack o n the
rea r of Play er. Inse rt the AC/ DC Adapt or
int o a conve nient ly loca ted AC out let
Unp lug the u nit and w ait abo ut one to
two h ours un til the p layer i s dry.
Try other d iscs.
Cle an disc a nd inse rt with l abel si de-up .
Re-in stall the connection cables.
Pre ss the VI DEO but ton rep eated ly unti l
cor rect pi cture a ppear s on the TV.
Turn the TV o n.
Pre ss the N/ P but ton unt il
cor rect pi cture a ppear s on the TV.
Cle an the di sc.
Rep lace ba tteri es.
Ins tall ba tteri es as the p olari ty mark ings
ins ide bat tery co mpart ment.
Aim t he remo te at the s ensor.
Ope rate wi thin 15 '
Mov e obsta cle.
Ins ert DVD c orrec tly.
rep eated ly
The u nit doe s not sta rt play back.
Som e funct ions do n ot oper ate as
sta ted.
Sel ected l angua ge is not b eing
sho wn in the s ubtit les, or s poken .
Sub title a re not wo rking p roper ly.
Ang le cann ot be cha nged.
The R ating L evel pa sswor d has
bee n forgo tten.
A non- playa ble dis c is inse rted.
The d isc is no t place d in the tr ay.
The d isc is di rty.
Som e featu res and f uncti ons are n ot
ava ilabl e on all di scs.
The p reset s ound La nguag e, subt itle no t
ava ilabl e in the cu rrent d isc.
Sub title s not tur ned on.
Ang les may n ot be rec orded o n the dis c
(se e disc ja cket/ case) ,or the y may onl y
be re corde d on cert ain sec tion.
- 19-
Try other C D, DVD di scs.
Pla ce the di sc on the d isc tra y corre ctly
Cle an the di sc.
The f uncti on is not a vaila ble on th e
cur rent di sc, try o ther di scs.
The f uncti on is not a vaila ble on th e
cur rent di sc, try o ther di scs.
~ Turn t he subt itle on .
~
The f uncti on is not a vaila ble on th e
cur rent di sc, try o ther di scs.
~ Try an other d isc.
~ The multi-angle is not attached in whole
disc, wait un til the m ulti- angle i con " "
appear on the screen then press the ANGLE
but ton on th e remot e contr ol to cha nge.
Use t he supe r passw ord "50 50” to re lease
the l ock and r eset a ne w passw ord.
Page 21

SPECIFICATIONS
Power Source
Power source of the Remote Control
Color System
Discs Played:
DVD-VIDEO Disc
12cm sing le-si ded, sing le laye r
12cm sing le-si ded, dual l ayer
12cm doub le-si ded, single laye r
8cm singl e-sid ed, singl e layer
8cm singl e-sid ed, dual la yer
8cm doubl e-sid ed, singl e layer
COMPACT D ISC ( CD)
12cm disc
8cm disc
Audio Output Level
Audio Signal Output Characteristics:
Frequency Responses:
DVD (Linear Audio)
CD Audio
S/N Ratio
Pickup:
Wavelength
Laser Power
DC 5 V; 1.2A
DC 3V, 2 x AAA size batteries, includ ed
NTSC/PAL
2 Vrms (1KHz, 0dB)
20Hz-20KHz (48KHz/96KHz sampling)
20Hz-20KHz
70dB
655nm
Class 1
Specifications are subject to change without notice.
Accessories:
1 x Instruction manual
1 x Remote Control
1 x AV conn ect ion c abl e
1 x AC/DC Adaptor
Input: AC 100-240V~,50/60Hz, 0.18A
Output: DC 5V, 1.2A,
- 20-
 Loading...