

Page 1
Page 2

Precaution
Class 1 laser product
This car multi-media player is a class 1 laser product. However
This car multi-media player uses a visible/invisible laser beam
which could cause hazardous radiation exposure if directed.
Be sure to operate the car multi-media player correctly as
instructed. Use of controls or adjustments or performance of
procedures other than those specified herein may result in
hazardous radiation exposure. Do not open covers and do not
repair yourself. Refer servicing to qualified personnel.
Page 1
Page 3

Content
Precaut ion.... ............ ....... ............ ....... ............ ....... ............ ...................
Content ....... ............ ....... ............ ....... ............ ................... ............ ....... ..
Install ation dia gram... ............ ................... ................... ............ ....... ......
Wiring diagram....... ....... ............ ................... ................... ............ ....... ...
General k nowledg e about rem ote control... ....... ............ ....... ............ .....
Locatio ns and Name s of contro ls on main unit... ....... ............ ....... ..........
Locatio ns and Name s of contro ls on remote control..... ................... ......
Same func tions in an y work sour ce mode....... ....... ............ ....... ............ .
Radio ope ration. ............ ....... ............ ....... ............ ....... ............ .............
Disc/US B/card op eration ............ ....... ............ ....... ............ ....... ............ .
1. Loadin g or unload ing a disc, USB or card...... ................... ...............
1.1 Loadi ng a disc, US B or card.............. ................... ............ ....... .......
1.2 Unloa ding a disc , USB or card............ ................... ............ ....... .....
2. Poppin g up Functi on Icons-board....... ................... ............ ....... ......
2.1 Funct ion Icons -board of D igital Video/VCD/MP EG4/Ima ge
/MP3/WM A...... ............ ....... ............ ....... ............ ................... ..........
2.2 CD inte rface.. ................... ................... ............ ....... ............ ....... ....
3. Functi on of contr ols on the touch screen/main unit/re mote
control ....... ............ ................... ................... ............ ....... ............ ....
* Region Co de..... ............ ................... ................... ............ ....... .........
* Parenta l Control ................... ............ ....... ............ ....... ............ ....... ..
1
2
3
4
5
6
7
8
11
13
13
13
14
14
14
15
16
25
26
AUX IN oper ation.. ............ ....... ............ ....... ............ ....... ............ ...........
Rear View Camera ....... ............ ....... ............ ....... ............ ....... ............ ....
Troubles hooting ............ ....... ............ ....... ............ ................... ............ ..
Specifi cation. ................... ............ ....... ............ ....... ............ ....... ...........
Page 2
27
28
29
30
Page 4
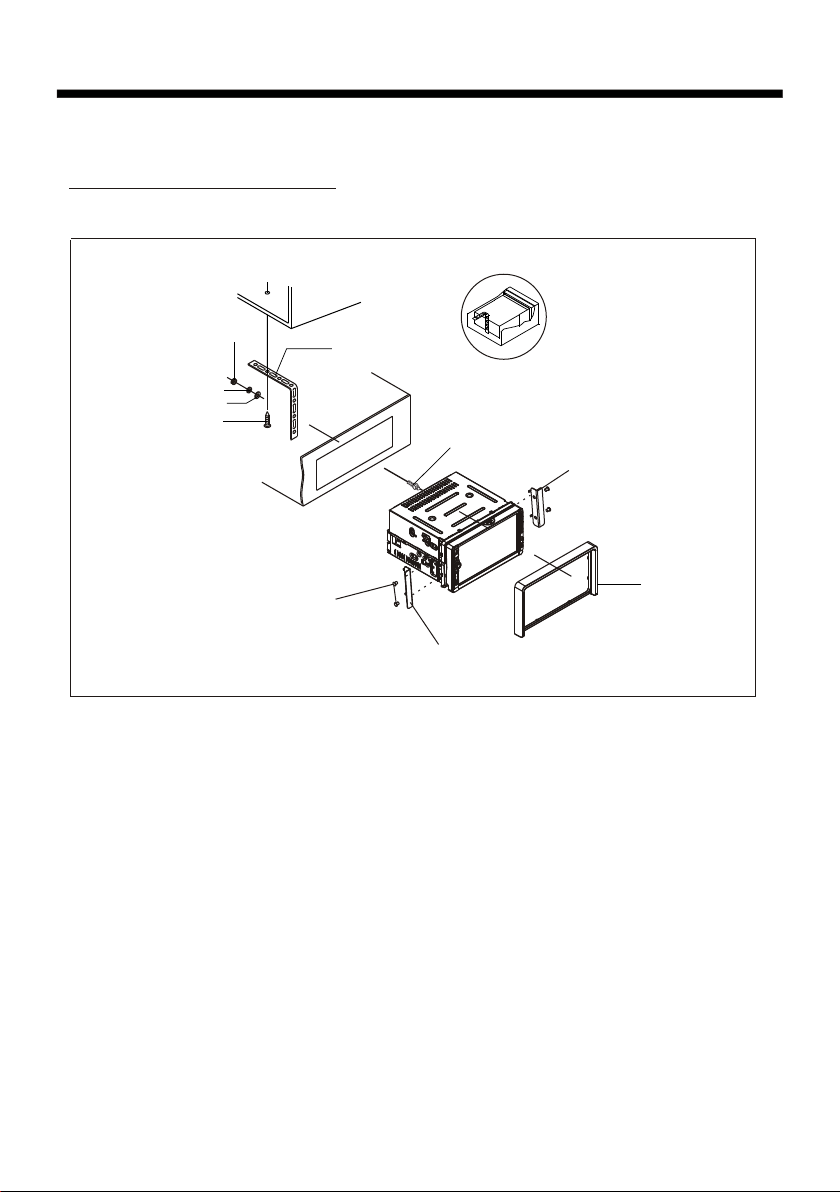
Installation diagram
Installation diagram
DAS H BOARD
HEX N UT
SPR ING WASH ER
PLA IN WASHE R
TAPP ING SC REW
MOU NTING B OLTS
META L MOUN TING
STR AP
CON SOLE
MOU NTING B RACKE T
HEX B OLT
MOU NTING B RACKE T
PLA STIC FR AME
Page 3
Page 5

Wiring diagram
Wiring diagram
RADIO ANTENN A JACK
AUDIO L OUT (white)
AUDIO R OUT (red)
VID EO OU T (BR OWN )
SUB WOOFER
(B+) 12V
REAR CAMERA SWITCH
(B-) PARKING BRAKE
REAR CAMERA INPUT
GRE Y
PIN K
BRO WN
YEL LOW
ISO C ONNEC TOR
BLU E
YEL LOW
BLA CK
RED
FUSE
AUTO ANTE NNA
CONSTANT 12 VOLTS
GROUND(B- )
IGNI TION SWIT CH
FRO NT
Lch S PK.
REA R
Lch S PK.
WHI TE
WHI TE/BL ACK
GRE EN
GRE EN/BL ACK
GRE Y
GRE Y/BLA CK
VIO LET
VIO LET/B LACK
FRO NT
Rch S PK.
REA R
Rch S PK.
NOTE:
1. Must u se 4 oh ms impedan ce of s peakers.
2. Afte r con necting pa rki ng Line, vid eo on s creen of contro l panel
will be d isp layed only a fte r
apply ing p arking bra ke.
3. Befo re fi nishing wi rin g, do not atta ch co ntrol panel ont o chassis.
Page 4
Page 6

General knowledge about remote control
GENERAL KNOWLEDGE AB OUT REMOT E CONTROL
1. Removing in sulat ing sheet
using remote c ontro l for the f irst time, you
If
can see an insul ating s heet at t he bottom
side of remote c ontro l as righ t.
you must remov e the ins ulati ng sheet as right.
Other wise, t he remo te cont rol is disabled.
2. Repl ace lit hium ce ll
If the el ectri c energ y of lith ium cell is weak,
replace it.
1 Press and hold t he mova ble blo ck as direction
)
indicated by a rrow 1 as r ight, a t one time pull
cell holder ou t of remo te cont rol as direction
indicated by a rrow 2 as r ight.
2 Replace the ol d cell by a n ew one wi th (+)
)
polarity sid e upwar d as righ t.
3 Insert the cel l holde r into re mote control agai n
)
as righ t.
3 Note ab out usi ng remo te control
.
1 You should face th e emitt ing win dow of remote contr ol towa rds the s ensor
)
window of the un it.
2 Operation an gle for f ront pa nel: About 30 degree
)
3 The dis tance between the e mitti ng wind ow of remote contro l and the s ensor
)
window of the un it : < 5M .
4 War ning fo r lithium ce lls of re mote co ntrol
.
leakage may ca use dam age to re mote control.1 Cell
)
2 Do not throw cel ls into f ire, it m ay cause explosio n.
)
.
3.To avoid risk of ac ciden t, keep c ells ou t of reach of childre n.
Page 5
Page 7
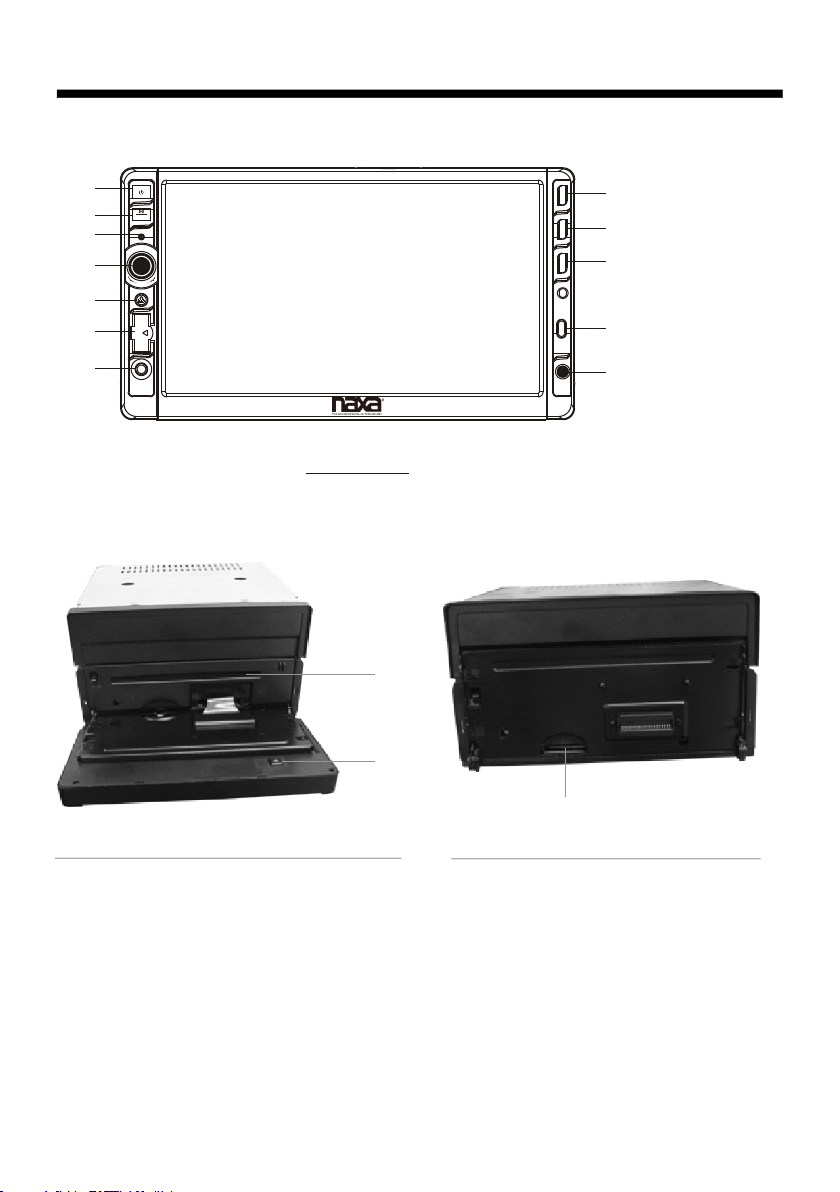
Locations and names of controls on main unit
1
2
CH1~6
RESET
3
4
5
SEL
H
S
U
P
_
+
VOL
OPEN
6
7
AUX IN
8
MUTE
EQBND
9
10
11
REL
12
IR
Control Pa nel
13
14
Top Fr ont Vi ew Dra win g afte r Flip ping do wn Con trol Pa nel
1. POWE R BUT TON
2.
>|| or CH 1~6 B UTTON
3. RESET BUTTON
4.
SEL BUTT ON an d VOL KNOB
5. OPEN B UTTON
6. USB PORT and COVER
7. AUX IN JACK
MUTE BU TTON
8.
15
Front View Dra wing a fte r Remo vin g Cont rol P anel
9. EQ BUT TON
10. BAN D BUT TON
11. REL BU TTO N
12. IR SE NSO R WIN DOW
13. DIS C SLO T
14. EJE CT BUTTON
15. CAR D SLO T
Page 6
Page 8
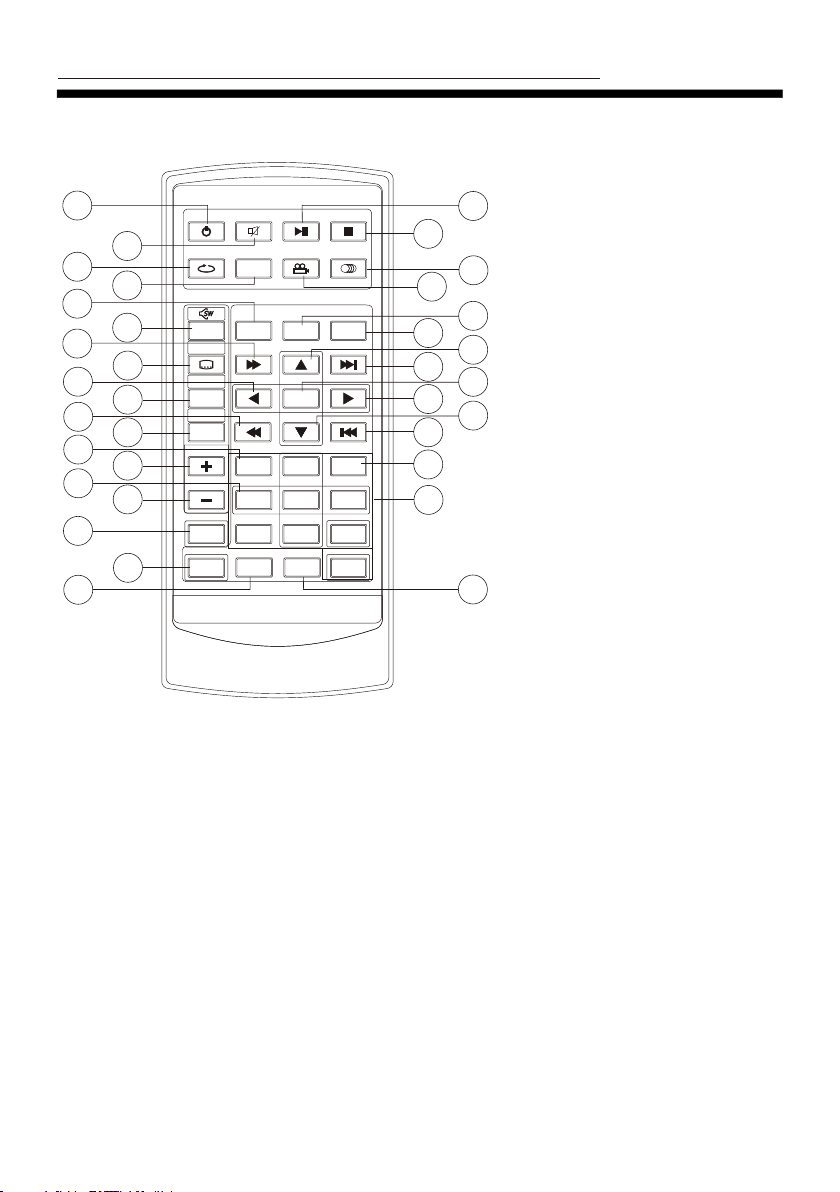
Locations and Names o f Controls on Remote Co ntrol
1
2
3
POW ERPOW ER
REP EATREP EAT
MUT EMUT E
ZOO MZOOM
4
5
MEN UMEN U
7
9
11
13
15
17
6
8
10
12
14
16
18
LO/D XLO/ DX
OSDOSD
BAN DB AND
TIT LE/PB CTIT LE/PB C
A/P SA/P S
VOLVOL
VOLVOL
SELSEL
SET UP SETUP
MOD E M ODE
TOP
11
RDM
44
77
GOT OGOT O
19
16. VOL - BUT TON
17. SEL BU TTO N
18. SET UP BU TTO N
19. GOTO BUTTON
20. >|| B UTTON
21. STOP BUTTON
22. AUD IO or M O/S T BUTTON
23. ANG LE BU TTO N
24. EQ BU TTON
25. CLK B UTTON
PLA Y/PAUS EPLA Y/PAUS E
ANG LEAN GLE
EQE Q
ENT ERENTE R
22
55 66
88
+1 0+ 10
STO PS TOP
MO/ STMO/ ST
CLKCL K
INT
33
99
00
21
23
25
27
29
31
32
33
20
22
24
26
28
30
34
1. POWE R BUT TON
2. MUTE B UTTON
3. REPE AT BUTTON
4. ZOOM B UTTON
5. MODE B UTTON
6. MENU o r SW BU TTO N
7. >> BUT TON
8. SUBT ITL E or LO /DX B UTTON
9. < BUTTON
10. BUTTON
BAND or O SD
11.
<< BUTTON
12. A/P S or TITLE/PB C BUT TON
13. TOP BUTTON
14. VOL + BUT TON
15. RDM B UTTON
26. ^ BUT TON
27. >>| B UTTON
28. ENT ER BU TTON
29. > BUT TON
30. V BUT TON
31. |<< B UTTON
32. INT B UTTON
33. NUM BER (0~ 9) BUTTO N
34. +10 B UTTON
Page 7
Page 9

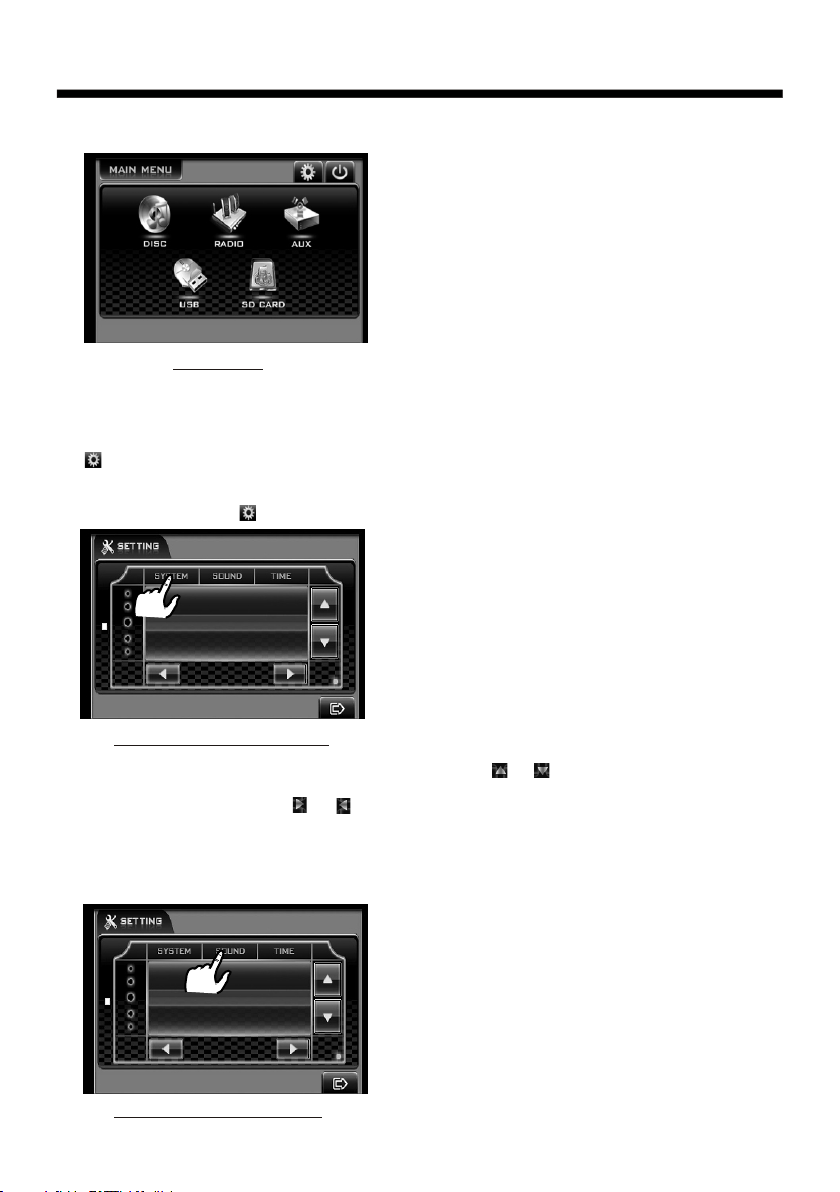
Same functions in any work source mode
Same functi ons in any work source mode
1. POWER button and icon
In power off mo de, p res sin g POW ER bu tto n on re mot e con tro l or pr ess ing P OWE R but ton o n
control panel powers on main unit.
In power on mode, pressing POWER button on remote control or pressing POWER button on
control panel or touching icon on source menu(see Source menu fig.on next page)
powers off ma in un it.
2. VOL kno b & VOL +/V OL- b utt ons
To ad jus t vol ume l eve l, ro tat e VOL knob on control panel or press or hold VOL+ or VOL- button
on remote control.
3. SEL but ton
To swit ch be twe en BA SS, TRE BLE ,BA LAN CE, FA DE, COL OR, BRI GHT NES S,C ONT RAS T, TINT
and VOLUME, briefly and repeatedly press SEL bu tto n.
After switching on the desired mode above, rotate VOL kn ob or p res s VOL+/VOL- buttons to set it.
To swit ch be twe en LO UD, S WF, EQ, D X/L OCA L(i n rad io mo de) , STE REO /MO NO( in ra dio m ode ),
TIME 12H/24H, CLOCK, BUZZ,EUR/USA FREQ,A NIM ATIO N and B G , lon g pre ss SE L butt on to s wit ch
on LOUD, then briefly and repeatedly press SEL bu tto n.
After switching on the desired mode above, rotate VOL knob or press VOL+/VOL- buttons to set it.
4. MUTE button
To swit ch MU TE mo de on o r off , pre ss MU TE bu tto n on re mot e con tro l or on c ont rol p ane l.
5. EQ button
To sele ct a de sir ed pr eset EQ mo de fr om JA ZZ, C LAS SIC , POP , R OCK a nd US ER, press EQ
button on remote control or on control panel continuously.
6. To switch LOUD mode
To swit ch on o r off L OUD m ode , lon g pre ss EQ b utt on on r emo te co ntr ol or o n con tro l pan el .
7. SW button
To swit ch on o r off S UBW OOF ER mo de, l ong p res s SW bu tto n on re mot e con tro l.
8. CLK button
Press CLK button on remote control to display clock time .
9. MODE button and source menu
To swit ch wo rk so urc e betwee n RAD IO, D ISC (af ter i nse rti ng a di sc) , USB (af ter i nse rti ng a US B
storage), CARD(after inserting a card) and AUX IN , press MODE button on remote control
continuously.
During disc(non-CD)/USB/card playback, touch screen to pop up Function Icons-board and then
touch the icon in the Function Icons-board to enter the source menu(refer to Disc/U SB/ Car d
Operation) .
During AUX IN playback, touch screen to pop up AUX interface and then touc h ico n to en ter
the source menu(refer to AUX Operation).
In radio or CD mode, touch icon to enter the source menu(refer to Radio Operation and Disc
/USB/Card Operation).
Page 8
Page 10
Same functions in any work source mode
The source menu d isp lay s as fo llo ws:
Source Menu
In source menu, t ouc h one i con o f DIS C, RA DIO , AUX, U SB an d SD Ca rd
to enter one work sour ce of D ISC , RAD IO, AU X IN, U SB an d SD Ca rd.
10. icon
1) SETTING SYSTEM
In source menu, t ouc h ico n to di spl ay SY STE M pag e of SE TUP m enu a s fol low s:
BRI GHTN ESS
CONT RAST
COLOR
15
System page of SETTING menu
In the SYSTEM page of SE TUP menu, repeatedly touch the or ic on to h igh lig ht on e set tin g
item of BRIGHTNESS , CON TRA ST, COL OR, TINT, ANIMATIO N and WALLPAPER. After highlighting a
desired setting it em, t ouc h the o r ico n to se t it.
2) SETTING SOUND
In SETUP menu, touch SOUND icon to display SOUND page o f SET UP menu as follows:
TRE BLE
BAS S
BAL ANCE
+03
Sound page of SETTING menu
Page 9
Page 11

Same functions in any work source mode
In the SO UND p age o f SETUP me nu, repeatedl y tou ch th e or icon to highli ght o ne setting
item of TREBLE, B ASS , BAL ANCE, FADE, SUBW OOF ER, L OUDNESS, RADI O LOC /DX (entering
Sourc e Men u in ra dio mode), RADI O STE REO (entering Sou rce M enu in radio mode ) and B UZZ ER
ON/OFF. After hi ghl ighting a desir ed se tti ng item, touch th e or ic on to s et it.
3) SETT ING TIME
In SETU P menu, to uch TIME i con t o dis play TIM E page of SETUP menu as follo ws:
HOU R
MIN UTE
24H /12H
08: 13
Tim e pag e of SE TTI NG me nu
In the TIME page of S ETU P men u, re pea tedly touch the o r ico n to hi ghlight one set tin g
item of H OUR , MIN UTE and 24H/12H . Af ter h igh lighting a desi red s ett ing item, touch t he or
icon to s et it .
After fi nis hin g setting, touc h ico n to re turn back to norm al pl ayback.
11.OPEN button
press O PEN b utt on on control pan el to f lip d own the control p ane l.
12.RE L but ton
Press R EL bu tto n on control pane l to de tac h the control pan el, t hen hold the righ t par t of th e
contr ol pa nel t o lift up a little an d pul l it ri ghtwards to rem ove i t.
13.RE SET butt on
When LC D dis pla ys wrongly or som e but ton s are not availab le or s ound is distort ed, u se th e
sharp e nd of a p oin ted object to pre ss RE SET butt on to reset the pro gra m to ze ro.
Page 10
Page 12

Radio operation
Radio Operation
1. To enter RADIO mode(MODE b utt on or R ADI O ico n)
When you use M ODE b utt on or s our ce menu (tapping RADIO ic on) t o ent er RA DIO
mode, it wil l dis pla y rad io in terface as follows:
DXDX STST US ERUS ER SWF SWF
107.00107.00
FM1FM1
87.5087.5 0
11
22
90.0090.0 0
33
98.0098.0 0
* Some icons o n rad io in ter fac e correspond with th e but ton s on re mot e con trol or control
panel as fol low s:
SWF icon = SW bu tto n(r emo te co ntr ol)(long pressin g)
LOUD icon = EQ b utt on( rem ote c ontrol)(long pressi ng)
icon = MUTE bu tto n
and icons = VO L- an d VOL + but ton s = VOL knob
EQ icon = EQ but ton
: To enter source menu.
2. To switch between bands (B AND )
The BAND icon or button can s wit ch be twe en ba nds of FM1, FM2, FM3, AM1(MW1) and AM2
(MW2), and t he wo rd FM 1,F M2, FM3 ,AM1(MW1) or AM2(MW2) wi ll be d isp lay ed on s creen.
MHZMHZ55CHCH
106.00106.00
66
44
55
107.00107.00
86.6086.6 0
3. To search for a station ( < and > ic ons o r v and ^ b utt ons )
1) Long touc hin g < or > ic on or l ong pressing v or ^ button on r emo te co ntr ol ca n automatically
search dow n or up f or an a vai lab le station beginni ng fr om th e cur ren t frequency.
2) Briefly t ouc hin g < or > ic on or b riefly pressing v or ^ b utt on on r emo te co ntr ol can manually
search dow n or up f or a yo ur de sir ed station beginni ng fr om th e cur ren t fre quency.
4. To preset and scan all me mor y sta tio ns (A PS ic on or A/PS button)
1) When long t ouc hin g APS ic on or l ong pressing A/PS but ton o n rem ote c ont rol , t he radio
searches f rom t he lo wes t fre quency and checks th e sig nal s tre ngt h level until 1 cycle
search is fi nis hed , and t he 6 st ron gest stations are pr ese t to co rre spo nding preset
number mem ory b ank f or th e cur rent band.
The preset tin g fun cti on ca n be implemented in selec ted F M or AM( MW) b and . (It c an pr esets
3x6 statio ns fo r FM an d 2x6 s tat ions for AM( MW) in all)
2) When brie fly t ouc hin g APS ic on or briefly pressi ng A/P S but ton , the r adi o sca ns
for each pre set s tat ion i n FM or AM (MW ) band from NO.1 bank, each p res et st ati on br oad casts for 5 se con ds. Af ter f ini shing a circle of scannin g, it w ill r esu me br oadcasting the
station in N O.1 b ank .
NOTE: In FM ba nd, F M1, FM2 a nd FM 3 are p reset and scaned as on e ban d at a ti me;
In AM(MW) ban d, AM 1(M W1) a nd AM2 (MW 2) are preset and scan ed as o ne ba nd at a t ime .
Page 11
Page 13

Radio operation
5. To prese t and lis ten to a me mory st ation (1~6 ic ons or 1~ 6 butto ns or CH1 -6 butt on )
1) Long touching one of 6 number(1~6) icons or long pressing one of 6 number(1~6)
buttons can preset the current broadcasting station of the current band in the number
memory bank; .
2) Briefly touching one of 6 number(1~6) icons or briefly pressing one of 6 number(1~6)
buttons can listen to the memory station in th e curre nt band p reset in the num ber
memory bank.
* CH1-6 button:
1)To preset a st ation in a me mory bank w ith CH1-6 button , first sel ect a desir ed
band; the n press CH1 -6 button to select a desired m emory ban k; and then s earch
for a desir ed statio n; finally long press CH1-6 b utton to st ore the station in the
memory ba nk.
2)To listen to a preset stati on with CH1-6 button, f irst swit ch on a desired band, then
continu ously pre ss CH1-6 bu tton highlight and list en to it.
6. To switc h on betw een ste reo and m ono mod e (MO/ST button)
Press MO/ST bu tton on remote control to select STEREO or MONO mode for FM band.
When the ST EREO mode i s activated, it ca n get bette r audio effect; when the
MONO mode i s activat ed, it can get clear er audio si gnal.
7. To switc h on betw een loc al and dis tance m ode (LO/DX button)
Press LO/ DX butt on to tur n LOC on to tune for local statio ns with wea k interference;
Press LO/ DX button t o turn DX on to tune for d istance s tations w ith stronger sig nal.
Page 12
Page 14

Disc/USB/card operation
Disc/ USB/Card O per ation
1. Load ing or unloadin g a disc, USB or c ard
1.1 Loa ding a disc, USB or c ard
To play files in a d isc, press O PEN b utton on con trol panel t o flip down th e con trol
panel , then inser t a dis c with label s urface up in to disc slot, the n flip up the co ntrol
panel a nd attach on to ch assis till h ear a click so und, final ly it w ill automa tically pl ay.
* CAUTI ON OF USING DISC
1) Hand le a disc by its e dge, do not to uch t he surface o f play side.
2) Befo re inserti ng di sc, wipe the d isc outwar ds from the di sc
cente r with a clean , sof t, dry, lint-fre e cloth. Do no t use s olvents
/thin ner such as pe tro l/benzin e, cleaner.
3) After t aking a disc o ut of d isc slot, pu t the disc ins ide disc cas e to
keep it c lean.
4) Do not s tick paper o r tap e on the disc su rface of pla y side. If
there i s glue (or ana log) on the di sc su rface, mus t wipe it up
befor e using.
To play files in a U SB, firstl y ope n USB port cov er, then inse rt USB stora ge in to
USB por t, and then it w ill p lay files in t he USB autom atically.
CH1~6
RESET
SEL
H
S
U
P
_
+
VOL
OPEN
AUX IN
MUTE
EQBND
REL
IR
Label
surface up
To play files in a c ard, first ly pr ess REL bu tton to deta ch control p ane l, then h old
the rig ht part of the c ont rol panel to l ift up a littl e and pull it ri ght wards to rem ove
it, and t hen insert t he ca rd into card s lot till hea r a click soun d, an d then attac h
the con trol panel o nto c hassi s aga in, by now it wi ll play file s in th e card au tom atically .
Page 13
Page 15

Disc/USB/card operation
1.2 Unl oad ing a disc, USB or ca rd
To unload the di sc in d isc slot, use STOP button to sto p pla yback and then pr ess
OPEN bu tto n to flip down the co ntr ol panel, th en pr ess EJECT bu tto n to ej ect disc,
then re mov e it.
To pull away the U SB st orage, use STOP bu tton to stop p lay back, then you ca n
remov e the U SB storage .
To unload the ca rd in c ard slot, use STOP button to sto p pla yback, then pre ss
REL butt on to detach t he co ntrol panel and t hen h old the righ t par t of it to lift up a
littl e and p ull it wards t o rem ove it, and th en yo u can p ush the card f or re lease
it and th en pu ll it out of the card s lot .
* Durin g MP3 /WMA playback, t he in formatio n of fi le, folder, t itl e, artist and alb um
will be s cro lling on LCD d isp lay. As lo ng as t he current p lay ing MP3/WMA mus ic
conta ins r elevant ID 3 tag i nfo rmation in v ers ion 1.0/2. 0 for mat, the 3 items
under lin ed above wil l be sc rolling on LCD di spl ay; otherw ise , they will no t.
* There is ESP functio n for a ll formats of dis cs.
2. Popp ing u p Function Icon s-b oard
right
2.1 Fun cti on Icons-boar d of Di gital Vi deo/VCD/ MPE G4/Image/MP 3/W MA
Durin g Dig ital Video/VCD/M PEG 4/Image playb ack , tapping an y pla ce on touch
scree n can p op up Functi on Ic ons-board 1 as ne xt pa ge, then tap i con t o pop
up Func tio n Icons-board 2 a s nex t page.
Durin g MP3 /WMA playba ck, t app ing any plac e exc ept folder a rea , track area and
MP3/W MA& Image&MPEG4 i con s can pop up Fun cti on Icons-boar d 1 sam e as one
of Digi tal Vide o/V CD/MPEG4 /Im age, then tap ico n to po p up Functio n Ico ns board 2 s ame a s one of Digit al Video /VC D/MPEG4/Ima ge.
[M P3][M P3]
ITL E / SONG: T RACK 03 / ITL E / SONG: T RACK 03 /
WMAWM A
Mp3Mp 3
Folder a rea Tra ck ar ea
00100 1
00200 2
00300 3
00100 1
00200 2
00300 3
00400 4
00500 5
00600 6
00700 7
00700 7
00800 8
MP3/WM A icon Image ic on M PEG4 icon
Page 14
Page 16

Disc/USB/card operation
The Function Icons-boa rds dis play as f ollow s:
Funct ion I con s-board 1 Funct ion I con s-board 2
* Some icons on th e Funct ion Ico ns-boards descript as fo llows :
: Same as MUTE but ton.
: Same as VOL- but ton or ro tating
VOL knob wit h anti-clock wise.
: Same as VOL+ but ton or ro tating
VOL knob wit h clock wise.
: Poping up sour ce Menu .
: Poping up Func tion Ic ons-b oard 2.
2.2 CD in terfa ce
: Same as EQ button.
: Same as CLK button.
: Same as long pressing EQ bu tton.
: Same as SW button.
: Poping up Function Icons-boa rd 1.
During CD play back, t he CD int erfac e displays as follo ws:
* Some icons on th e CD inte rface d escri pt as follows:
: Poping up sour ce Menu .
EQ : Same as EQ butt on.
: Same as VOL- but ton or ro tating
VOL knob wit h anti-clock wise.
: Same as MUTE but ton.
: Same as VOL+ button or rotating
VOL knob wit h clock w ise.
SWF : Same as SW button.
LOUD : Same as long pressin g EQ butt on.
Page 15
Page 17

Disc/USB/card operation
3. Func tio n of control s on th e tou ch screen/ mai n unit/rem ote c ontrol
1. icon o r but ton
Durin g pla yback, use i t to pa use playba ck; i n pause mode , use i t to resume pl ay back.
In CD int erf ace, the ico n dis plays as .
2. icon o r but ton
Durin g Dig ital Video/VCD/C D/MP3/WMA pla yba ck, tappin g or pr essing it pr e-s top
or paus e pla yback; in pr e-s top or pause m ode , use icon or bu tto n to resume
playb ack .
Durin g pla yback, tap pin g or pressin g it tw ice to fully s top p layback; i n ful ly stop
mode, u se ic on or button t o sta rt playbac k fro m the beginn ing o f the media.
Durin g MPE G4/image p lay back, use ic on or b utton to dis pla y root menu as
follo ws:
[M P3][M P3 ]
ITL E / SONG: T RACK 03 / ITL E / SONG: T RACK 03 /
WMAWM A
Mp3Mp 3
Folder a rea Tra ck area
00100 1
00200 2
00300 3
MP3/WM A icon Ima ge ic on MP EG4 i con
Durin g MP3 /WMA playba ck, t he root menu a bov e displays a ll th e time.
00100 1
00200 2
00300 3
00400 4
00500 5
00600 6
00700 7
00700 7
00800 8
When di spl aying root m enu , use < or > butto n to hi ghlight th e cur rent chapt er/
track , the c urrent fol der o r the kind ico ns.
* If ther e are n o track for a kin d ico n, you can’t h igh light the ki nd ic on.
/chap ter
When hi ghl ighting a ki nd ic on, press EN TER b utton to ent er it .
When hi ghl ighting th e cur rent folde r, use v o r ^ button to hi ghl ight other f old ers
and the n pre ss ENTER but ton t o enter it.
When hi ghl ighting th e cur rent track , use v o r ^button to h igh light othe r tra cks and
then pr ess E NTER butto n to pl ay it.
* For ima ge, a fter highl igh ting a track , pre ss ENTER but ton t o display on ly th e high light ed tr ack; press > || bu tton to disp lay a ll tracks step by s tep from the high lighted
track .
* Tapping fold er ic on, track ic on or k ind icon can e xec ute the oper ati on above.
3. / icon s or bu ttons
Durin g pla yback, con tin uously tap pin g or icon or con tin uously pre ssi ng
or butt on ca n fast backw ard s or forward s at th e followin g mul tiple of nor mal
Page 16
Page 18

Disc/USB/card operation
speed: x2, x4, x8 , x20 , x1.
During fast pla yba ck, u se ic on or b utt on to r esu me no rmal playback.
For image fi les , no th is fu nct ion .
4. / icons or buttons
During pla yba ck, u se on e of th em to p lay p rev iou s or ne xt chapter/track.
In CD int erf ace, the ico ns di splays as / .
5. Number bu tto ns
During Dig ita l Video/VCD(PB C OFF )/M PEG 4/I mag e/C D/M P3/ WMA pl ayback,
use number butt ons t o inp ut ch apt er/ tra ck SN . , the n it will play or display it.
To input a chapt er/ tra ck wi th an S N tha t is eq ual t o or bi gge r than 10, use the +10
button to input t he ten and then use 0-9 bu tto n to in put t he
units orde r.
in
I.e. +10 ~ 1 = 11 (number 11 chap ter /tr ack will be displayed/played. )
During VCD p lay bac k, wh en it i s in PB C ON mo de, t he nu mber buttons are disabled.
MENUM ENU
6. icon and MENU bu tto n
PBCPB C
During Dig ita l Video playback , use M ENU i con o r but ton t o dis pla y the c urr ent
chapter list, t hen u se di rec tio n but ton s to se lec t your desired chapter and then
press ENTER but ton t o pla y it.
digit in s place digit
For VCD, MENU but ton i s dis abl ed, t rac k lis t is di spl ayed on the monitor screen
by pressin g TITLE/PBC button or tapp ing i con .
For MPEG4/ima ge, M ENU b utt on an d ico n are d isa bled, root menu is displayed
on the monitor sc ree n by pr ess ing b utt on or t app ing i con .
For MP3/WMA, ME NU bu tto n and i con a re di sab led , root menu displays on
the monito r screen a ll th e tim e. Ro ot me nu of M P3/ WMA is s ame a s the one of
MENUMENU
PBCP BC
MENUM ENU
MENUMEN U
PBCPBC
PBCPB C
MPEG4/image .
For CD, MENU butt on is d isa ble d.
MENUMEN U
7. icon and TITLE /PB C but ton
PBCPBC
During Dig ita l Video playback , use TITLE/PBC button to displ ay ti tle l ist ; the n use
direction but ton s to se lec t you r des ire d tit le an d then press ENTER button to open
the chapter lis t of th e tit le; t hen u se di rec tio n but ton s to select your desired chapter
and then pre ss EN TER b utt on to p lay.
* You can also tap a d esi red t itl e and t hen c hap ter t o pla y.
During VCD p lay bac k, us e ico n or TI TLE /PB C but ton t o switch PBC mode on
or off. When PBC mode is switched on, it will pla y fro m the b egi nni ng of m edi a til l
MENUMENU
PBCPBC
it displays a tra ck li st. W hen a t rac k lis t is di spl aye d, use the number buttons to
select you r des ire d tra ck to p lay.
For MP3/WMA/M PEG 4/i mag e, ic on an d TITLE/PBC b utt on ar e dis abl ed.
MENUMENU
PBCPBC
For CD, the TITLE/PBC button is disabled.
Page 17
Page 19

Disc/USB/card operation
8. icon a nd GOTO button
For Dig ital Video/MP EG4/VCD/ ima ge/MP 3/W MA, you can us e , , ,number
and ENT ER icons or GO TO, < , >, number an d ENT ER buttons t o select a cha pter
/trac k or from a play back time po int to play.
Durin g playback , tap icon or pr ess GOTO button t o dis play ch ang eable
playb ack inform ation bar as f ollows:
Digit al Vi deo:
MPEG4 :
VCD:
Image :
MP3/W MA:
* Durin g playback , tapping ic on can also di splay the Go to Functio n ico ns-bo ard
as foll ows:
When di splaying t he changea ble playba ck informa tion bar, use / i con o r
< or > butt on to highli ght title SN .(o nly for Digi tal Video) , chap ter/trac k SN. or
elaps ed time of cur rent chapt er/track (disable d for i mage) .
When hi ghlighti ng title SN. o r chapter/ tra ck SN. , use num ber icons or b uttons to
input d esired SN. o f title or cha pter/tra ck, t hen use E NTE R icon or butt on to play
the sel ected chap ter/trac k.
When hi ghlighti ng elapsed t ime of curre nt chapter /tr ack(d isa bled fo r ima ge), use
numbe r icons or but tons to inpu t desired pl ayback tim e point for th e pla yback t ime
of the wh ole media fo r Digital Video /VCD and of th e current ch apt er/track f or
MPEG4 /MP3/WMA , then use ENT ER ic on or but ton t o play from th e playback t ime
point .
For CD, G OTO b utton is dis abled.
9. icon o r ZOOM butto n
Durin g Digital Video /VCD/MPE G4/ image p lay back, use ic on or ZOOM but ton
to swit ch zoom mode b etween ZOO M 2, ZO OM 3, ZOOM 4, ZO OM ½, ZOOM 1/3 ,
ZOOM 1/ 4 and ZOOM OFF.
When zo oming in vid eo/image , use direct ion button s to mo ve vide o/i mage
upwar ds, downwa rds, right wards or lef twards.
When no t zooming in i mage, dire ction butt ons c an swit ch on 4 f ixed rotat ed
angle s between >= 90 deg cw, <=90 d eg ccw, ^=UP- DOWN and LEFT-R IGHT.
v=
Page 18
Page 20

Disc/USB/card operation
For MP3 /WMA, ZOOM bu tton disab led.
icon an d are
For CD, t he ZOOM butt on is dis abled.
10. OSD i con or bu tton
Durin g Digital Vi deo /MPEG 4/Image/ MP3/W MA playbac k, use OSD ico n or
butto n to display p layba ck informa tion ba r as bellows :
Digita l Video:
MPEG4 :
VCD:
/VCD
Image :
MP3/W MA:
For CD , OS D button is di sable d.
11. ico n or REPE AT button
Durin g Digital Vi deo playba ck, use icon o r REPEAT button to s witch repe at
mode be tween REP CH APTER, REP TITLE, RE P ALL and REP OFF.
use ico n or to
repea t mode be tween R P , R EP ALL or REP OFF.
Durin g VCD(P BC OFF)/CD p layback, REPEAT button s witch
E 1
Page 19
Page 21

Disc/USB/card operation
During MP 3/WMA/M PEG4/image playback, us e icon or REP EAT bu tton to
switch re peat mode b etween REP1,REP FOLDE R(or DIR),REP ALL or REP OFF.
During VC D(PBC ON) p layback , icon and REPEAT button are disabled.
1 . icon or RDM button
2
During Di gital Video/VCD(PBC OFF)/CD/ MP3/WMA pl ayback, tapping icon or
long pres sing RDM bu tton switches random mode o n or off.
For MPEG4 /image/ VCD(PBC ON) playback, RDM butto n disable d.
13. icon or I NT butt on
During VC D/CD play back, tap ping icon or long pressing IN T butto n switches
intro mod e on or off .
For Digit al Vide o/MP3/WMA/MP EG4/ima ge, icon an d INT button are disabled .
. icon or but ton
14
During Di gital Video play back, use icon or button to swi tch betwe en audio
tracks (d ependin g on the current playing medi a).
/ CD icon or
During VC D playbac k, use button to s witch aud io channels between
MONO L, MON O R, MIX MONO and STER EO.
For MPEG4 /MP3/WM A image , button disabled.
15. icon or b utton
During Di gital Video play back, use icon or button to swi tch subti tle languages
on or off (depend ing on the cu rrent playing media).
icon and ar e
For VCD/M P3/WMA/ MPEG4/image, button di sabled.
For CD, the b utton is di sabled.
/ icon and ar e
icon and are
16. AN GLE icon or button
During Di gital Video play back, use ANGLE icon or press ANG LE button t o
play in differen t angles (d epending on the current pla ying medi a).
For VCD/M P3/WMA/ MPEG4/image, t he ANGLE ic on and butt on are disabled.
For CD, the AN GLE butto n is disabled.
Page 20
Page 22

Disc/USB/card operation
17. icon or SETUP butto n
Use icon or SETUP butto n to ente r Media S etup Me nu for se tting up all media
parameter values.
Use icon or SETUP butto n to disp lay Med ia Setu p Menu(the default page is
SYSTEM SETUP);
Media Setup Menu has 4 page s in all. W hen hig hligh ting a pa ge, tap the aim page
icon or press > or < button to hi ghlig ht anot her pag e;
After selecting a page, ta pping t he aim it em icon o r press ^ o r v butto n to highlight
a setup item in the selecte d page;
After selecting a setup it em, tap ping th e aim val ue; or pr ess > but ton to en ter the
setup item, then press v or ^ b utton t o selec t a desir ed valu e, fina lly press ENTER
button to confirm it.
After finishing settin g, tapp ing EXI T icon or press SETUP button t o exit Me dia
Setup Menu to resume norm al play back.
Description of t he 4 page s:
1) SYSTEM SETUP
SYS TEM S ETU P
TV S YST EM
SC REE N SAV ER
TV T YPE
PAS SWO RD
RAT ING
DE FAULT
E X I T
TV SYSTEM
This se tup ite m is for se tting u p video s ystem i n NTSC, PAL or AUTO .
If you set a non-matched vi deo sys tem for p layin g a video , the playing video will
display white-black o r flash .
SCREEN SAVER
This se tup ite m is for sw itchi ng scre en saver on or off .
TV TYPE
This se tup ite m is for se tting u p video d isplay size.
Page 21
Page 23

Disc/USB/card operation
(1) 4:3 P S: Choo se this item when con necti ng a monitor with 4:3 s creen . When
playi ng vide o with 16 :9 size, the l eft and r ight part of video wi ll be cut o ut, and
video w ill dis play in f ull screen .
(2) 4:3 L B: Choo se this item when con necti ng a monitor with 4:3 s creen . When
playi ng vide o with 16 :9 size, the t op and bo ttom part of the moni tor scr een will
be turn ed into a b lack square .
(3) 16: 9: Choo se this item when con necti ng a monitor with 16: 9 wide sc reen.
PASSWORD
This setup item is fo r locki ng or unlocking par ental c ontrol. Th e default mo de
is lock ed. The defa ult unl ocking password i s 0000.
To lock or un lock paren tal con trol:
(1) Hig hligh t PASS WORD it em and then press > or EN TER but ton to enter i t;
(2) Inp ut pass word 00 00;
(3) Pre ss ENTE R button to confirm , then it w ill unlock or lock pa renta l control.
Remov e th secti on of the Us er Manu al to kee p this sensi tive
* e of the PASSWORD
infor matio n confi dential.
RATING
This setup item is fo r setti ng a new ratin g level o f paren tal contro l.
(1) Fir st high light PASSW ORD item to se e wheth er pare ntal contr ol is loc ked or no t.
If it is in l ocked m ode, unlock paren tal con trol referring to PASSW ORD abo ve.
(2) Hig hligh t RATI NG item a nd press > or EN TER but ton to enter it, then u se ^ or v
butto n to sele ct your desired rat ing lev el, and then press EN TER but ton to
confi rm.
(3) Hig hligh t PASS WORD it em again and then pre ss > or ENT ER button to e nter it ,
then in put pas sword 0 000, and pre ss ENTE R button to lock pare ntal co ntrol
again .
DEFAULT
This setup item is to c hange a ll parameter back t o the def ault facto ry valu es.
2) LANG UAGE SE TUP
LA NGUA GE SE TUP
OS D LAN GUA GE
AUD IO L ANG
SU BTI TL E LAN G
ME NU LA NG
E X I T
Page 22
Page 24

Disc/USB/card operation
OSD LANGUAGE
This item is for sel ectin g the typ e of language disp layed o n the scr een except for
subtitle langu age and m enu language(depend ing on cu rrent playing media).
AUDIO LANG
This it em is for s electing the type of audi o langu age(d epending on curr ent pla ying
media).
SUBTITLE LANG
This item is for sel ectin g the typ e of subtitle language( depen ding on current
playing m edia) .
MENU LANG
This item is for sel ectin g the typ e of menu language (depe nding o n current playin g
media).
3) VIDEO SETUP
VI DEO S ETU P
BR IG HTN ESS
CO NT RAS T
HU E
SAT URAT IO N
SH AR PNE SS
E X I T
BRIGHTNESS
For adjusting br ightn ess of video output.
CONTRAST
For adjusting co ntras t of vide o output.
HUE
For adjusting hu e of vide o output.
SATURATION
For adjusting sa turat ion of vi deo output.
SHARPNE SS
For adjusting sh arpne ss of video output.
Page 23
Page 25

Disc/USB/card operation
4) DIGITAL SETU P
DI GITA L SET UP
DY NAM IC RA NG E
E X I T
DYNAMIC R ANGE
This it em is for adj usting li near compressi on ratio. I f you set it to FULL,
Peak-to -Peak val ue of audio signal is minimum ; if you set it t o OFF, Peak-to
-Peak val ue is maxim um.
Page 24
Page 26

Disc/USB/card operation
* Region Code
If you inse rt a disc int o the disc slot and REGION ERRO R is displa yed, th e car
multi-m edia syst em can not play the di sc. The r eason is th at the region code s
of the car mu lti-med ia system and the used disc do no t match eac h other.
Appendix: Region co de of D
Motion Picture Association of America (MPAA ) divid ed the wo rld int o 6 regio ns, and
gave every region a region code for locking and unlocking D playb ack.
Basically, a co ded D player can play only the discs if its region code is the
same D play er. Othe rwise , it cann ot play t he disc .
as the code of t he igit al Vide o
Please
impose this restriction. igital
Video i gital Video -
The pro blems c aused b y area co de inco nsist ency production of
unlocked version D p layer s and rec odabl e D play ers .
Region codes and the countries or areas represented by region codes are as follows:
Region 1: America, Canada, East-Pacific Inlands;
Region 2: Japan, West E urope , North E urope , Egypt , South Af rica, M iddle E ast;
Region 3: Taiwan, Hong Kong, South Korea,
Thailand, indones ia, etc.;
Region 4: Australia, New Zealand, Central South America, South Pacific Inlands;
Region 5: Russia, Mongolia, Indian Peninsula, Middle Asia, E ast Eur ope, No rth
Korea, North Africa, North-west Asia etc.;
Region 6: China mainland.
note that only the D discs and D playe rs prod uced by
the 8 biggest film-making companies of Am erica The D
discs and D players not produced by the 8 biggest film maki ng
companies of Ameri ca are no t restr icted b y the rule of region code. Generally, they
are called Free Region Code or Full Region Code.
South-east Asian countries inc lude
igital Video
igital Video igital Video
igital Video
igital Video
igital Video i gital Video
has motivated the
The 8 big gest fi lm m aking c ompan ies of Ame rica are as follows:
1. Wa rnerB ros;
2. Columbia;
3. 20thCenturyFOX;
4. Paramount;
5. Universal;
6. UA(UnitedArtist);
7. MGM(MetroDogwynMayer);
8. Wa ltDis ney
-
Page 25
Page 27

Disc/USB/card operation
* Parenta l Control
Q: After ins erting a Di gital Video disc into the d isc slot,
?
and asks yo u to input a pa ssword, w hat should you do
A: The pl aying dis c is locked b y a rating le vel of parental co ntrol. If t he curren t
rating le vel of pare ntal cont rol of the Digital Vi deo pl ayer is lower than the one
of curren t disc, you m ust input t he correct password of pare ntal cont rol to
unlock th e parenta l control a nd enter a rating le vel one
of the curr ent disc in o rder to pla y the disc.
* For facto ry preset p assword o f parental contr ol of Digital Vi deo playe r, please
see the par t of Media Se tup Menu.
Appendi x: Parent al Control
Parenta l Control f unction of a Digit al Vi de o player ca n control playback of
movie rat ings on a dis c. You can set th e Digit al Vi de o player to b e a certain
rating le vel of pare ntal cont rol using the Media Setup Men u. If the rat ing level
of parent al contro l of a disc is hi gher than the one of the Digital Video player,
the Digit al Vi de o player ca nnot play the disc.
The Dig ital Vi deo movie c an be designed so that the Digi tal Video player can
play different v ersions o f content of a particular mov ie accord ing to the di fferent
rating le vels of par ental con trol. Depending on igital Video , the
scenes th at are not su itable fo r children will be cleared or r eplaced b y suitabl e
scenes au tomatic ally.
if a dialog ue box pops u p
equal to or h igher tha n
the D feat ures
The rat ing level s of Parent al Control are as follows:
1 Kid Safe
2 G
3 PG
4 PG 13
5 PG R
6 R
7 NC 17
8 Adult
Page 26
Page 28

AUX IN operation
AUX IN oper ation
An exte rnal AV system c an use th e car AV sys tem as monitor and am plifi er.
1. Use an AV cable to make th e car AV sys tem and t he external AV system conn ected
throu gh the AUX I N jack on control pan el of the c ar AV sys tem and the AV Out j acks
of the ex terna l AV syste m.
MUTE
EQBND
REL
IR
VIDEO IN ( yel low)
RCH IN (re d)
LCH IN (wh ite )
MOD
CH1~6
RESET
SEL
H
S
U
P
_
+
VOL
OPEN
AUX IN
2. Play t he exte rnal AV system , then use MOD E butto n or Source Me nu to ent er AUX
IN mode f or the ca r AV syste m. By now, t he program p layed b y the external AV
syste m can be ou tput throu gh the mo nitor o f the car AV system and t he spea kers
conne cted to t he car AV system .
* The icons on the AUX int erfac e descript a s follo ws:
: Poppi ng up Sou rce Menu.
: Same as V OL+ but ton or rotat ing
EQ : Same a s EQ butt on.
: Same as M UTE but ton.
VOL knob with clock wise .
SWF : Sam e as long p ressing SW button .
: Same as V OL- but ton or rotat ing
VOL knob with anti-clo ck wise .
LOUD: S ame as lo ng pressing EQ butt on.
3. In AUX IN mo de, you c an use SE L, +, -, VOL, MU TE, EQ , SW and LOUD butt ons
or icon s to adju st audio and video.
Page 27
Page 29

Rear View Camera operation
REAR VIEW C AMERA
The car AV system ca n make you lo ok at the actual sta tus behin d your car wh en
you chang e the gear le vel to the back position.
1. Use an vid eo cable to m ake the car AV system and the rea r view came ra con nected th rough the R EAR CAMERA INPUT jack in the rear cabin et of the car AV
system an d the VIDEO O UTPUT jack of the rear view c amera.
Make the RE AR CAMERA SW ITCH line in the rear cabinet o f the car AV sys tem
connect ed to (B+)1 2V power supply.
2. When you c hange the g ear level t o the back positio n, the scre en of the car AV
system wi ll displa y the actual status behind yo ur car.
* Note : the ex ternal mo nitor can not display the act ual statu s behind your car.
Page 28
Page 30

Troubleshooting
Troubles hooti ng
Please read the user manual carefully bef ore u sin g the c ar A/V s yst em. If you have any
diffic ult y usi ng this car A/V system, . If you still
afte r using all the suggestions, please contact
unable to resolve the problem your dealer
or an authorised service cen tre .
NO PICTURE, SOUND
* Ensure that the power switch is on.
* Ensure that the power cord is not damage d or th e fus e is no t blo wn.
NO SOUND BUT HAV E PIC TUR E
* Ensure that the player’s aud io ou tpu t speaker ’s au dio
input.
* Check whether the audio connector is d ama ged .
* Check whether you have turned down the v olu me.
* Ensure that the audio is not in MUTE mode.
BLACK AND WHITE PICTURE OR SCREEN ROLLING
* Ensure that you have set right mode of video sy ste m (e.g. PAL, NTSC).
FLAWS OF P ICT URE O R SOU ND
* Check whether disc is scratched or staine d.
* Check whether AV connector and output terminal is stained.
* Check whether there is condensatio n ins ide t he le ns. I f so, p owe r on th e pla yer a nd do
not work for an hour or so, then try again.
refer to the troubleshooting guide are
is properly connected to the
DISPLAYS: NO D ISC O R BAD D ISC
* Ensure that you have inserted a disc int o the d isc s lot .
* Check whether disc is inserted wi th la bel s ide u pwa rds .
* Check whether disc is bent.
* Check whether disc is stained or scratche d bad ly.
* Ensure that disc format is compatible to the player.
* Ensure that temperature inside the c ar is n ot to o hig h. If s o, co ol off until the ambient
temperature returns to normal.
* Insert another disc into the disc slot.
REMOTE CONTROL IS I NSE NSI TIV E OR DO ES NO T WORK
* Check whether the lithium cell of the remote con tro l is po wer ful a nd wo rki ng pr ope rly.
* Direct the IR emitting window of the remote control to the IR sen sor o f mai n uni t.
* Check whether there are some obstacl es be twe en re mot e con tro l and m ain u nit .
SOME FUNCTION BUTTO NS DO N OT WO RK
* Tur n off ACC power, then turn on again.
* Reset unit to zero, then turn on again.
* Remove control panel from chassis, r eattach it onto the chassis and then turn it on again.
RADIO DOES NOT WOR K
* Check whether antenna cable is conne cte d fir mly.
* Manually tune for a station.
Page 29
Page 31

Specification
Specification
General
Power Suppl y Requirement............ ....... ....... ....... ....... ..........DC 12V
Current con sumption............................. ....... ....... ....... ......1 0A MA X.
Audio
Signal Outp ut............... ..... ..... ................. ..... ..... .....2ch&4ch line ou t
Frequency R esponse.................. ..... ..... ................. ..... .20 Hz - 20 KHz
S/N Ratio....... ..... ..... ................. ..... ..... ...................... ..... ....90 dB (JI S)
Wow and Flutter........ ..... ...................... ..... ....Bel ow measurab le limits
TFT Monitor
Monitor Scr een Size. ...................... ..... ..... ................. ..... .7 Inch Wid e
Disc/USB/ Card
Compatibl e Format. ...Digi tal Video/MP EG4/V CD/IMAGE/MP3 /WMA/ CD
Color Syste m..................... ..... ..... ................. ..... ..... ...........NTS C/PAL
Radio
FM
Frequency r ange... ....... ...................................87 .5MHz - 107.9 MHz
Usable sens itivity......... ....... ....... ....... ....... .............................15dBu
I.F Frequen cy.... ....... ....... ....... ..........................................10 .7MHz
AM(MW)
Frequency...... ....... ....... ....... ...............................5 30KHz - 171 0KHz
Usable sens itivity......... ....... ....... ....... ....... .............................40dBu
I.F Frequen cy.... ....... ....... ....... ............................................ 450KHz
NOTE:
Specifica tion and design are subj ect to modification, w ithout no tice,
due to improv ements in technology.
88-J770 0-04MADE IN CHINA
Page 30
 Loading...