

Page 1
Page 2

To ensure safety while driving
and to comply with laws,
drivers should not watch video or
operate the video device while driving.
Page 3

Content
Precaution..... ..... ..... .......................
Safety Informatio n.... ..... ................
Disc Notes ........ ..... ..... ..................
Installation .... ..... ..... .................. ....
Electric Connecti on .... ..... .............
Remote Control .... ..... ..... ..............
Basic Operation ... ..... ..... ...............
Loading/Ejecting a DISC .. ..... ..........
Open/Close Monitor and Angle
Adjustment...... ..... ..... ......... ........
TFT Mon itor Adjustment ............ ....
Setting animation..... ..... ..................
Setting wallpaper...... ..... .................
Setting LED Light....... ..... ................
Audio Quality Adjustment. ..... ...........
Setting Time ....... ..... ..... .................
Setting Audio Mode ........ ..... ............
Reset Factory Setti ngs ... ..... ..........
Rear Vi ew Camera ................. ..... ..
Control Panel ..... ..... ..... .................
Unit keys ......... ..... ..... .....................
Radio Operation ... ..... ..... .............
Listening to radio...... ..... .................
Storing and Listening to a mem ory
station ......... ..... ..... .................. ...
Automatic Memory St oring &
Program Scanning...... ..... ............
Media Operation....... ..... .................
Basic Operation....... ..... ...................
2
Selecting Play Mode..... ..... ...............
3
On-Screen Display Functi on... ..... ......
4
Digital Video Special Function.... ....
5
Multi-Subtitle Languag e funct ion.. .....
9
Multi-audio language Fun ction ..... .....
10
Multi-angle Function.. ..... ..................
13
Tit le menu f uncti on .... .................. ....
13
Media Setup Menu... ..... ..... .............
System Setup..... ..... ..... ...................
13
Language Setup........ ..... ................
14
Video S etup .................... ..... ...........
14
Digital Setup ..... ..... ..... ....................
15
AUX Operation ..... ..... ..... ................
15
BT Operation..... ..... ..... ...................
15
USB Operation ..... ..... ..... ...............
15
SD/MMC Card Operati on .... ..... .......
16
MP3/WMA/JPEG/MP EG4 Pla y ..... ....
16
Specification ... ..... ..... ....................
16
Troubleshooting. ..... ..... .................
17
17
20
20
20
21
22
23
23
25
26
26
26
26
26
27
27
29
30
31
32
33
35
36
37
38
39
-1-
Page 4

Precaution
THANK YOU FOR PURCHASING THIS CAR D IGITAL VI DEO PLAYER .
Before oper ating the unit, read thi s manual thoroughly and keep it handy
for future re ference .
To avoid injury or accident , read the follo wing precautions before
installin g and operating the unit .
ON INSTALLATION
DO NOT install any receiver in loca tions where;
- it may obstru ct the steering wheel and gearshift lever operations, as th is
may result in a t raffic accident.
- it may obstru ct the operation of safe ty devices such as air bags, as this
may result in a f atal accident.
- it may obstru ct visibility.
DO NOT operate any receiver while m anipulating the steering wheel, a s
this may resu lt in a traffic accide nt.
The driver mu st not watch the monitor while driving.
IF THE DRIVER watches the monitor w hile driving, it may lead to
carelessn ess and cause an accident.
IF YOU NEED to operate the receive wh ile driving, be sure to look ahead
carefully o r you may be involved in a traffic accident.
IF THE PARKING BRAKE is not engaged.“ ParkingBrake” fl ashes on the
monitor, and n o playback picture will be shown.
- This warn ing appears only when th e parking brake wire is connected to
the parking b rake system built in the car ( refer to the electric connection )
ABOUT THE LIQ UID CRYSTAL DISPLAY (LCD) PANEL
Do not press on t he LCD panel on the unit as doing so can distort the
picture or ca use a malfunction . Th e picture may become unc lear , or the
LCD panel may b e damaged .
NOTES ON CLEA NING
-Clean the LC D panel with a slightly damp soft cloth.
-Do not use sol vents such as benzine, thinner, commercially available
cleaners or a ntistatic spray .
-Do not use alcohol to clean the screen .
If your car was p arked in a cold or hot place , the picture may not be clear .
The monitor is not damaged . The picture will become clea r the temper ature in your c ar becomes normal .
-2-
Page 5

Safety Information
CAUTION:
THIS DI GITAL VIDEO PLAYER IS A CLASS I L ASER PR ODUCT. HO WEVER
THIS DIGITAL VIDEO PLAYER USES A VISIBLE/INVISIBLE LASER BEA M
WHICH COULD CAUSE .
HAZARDOUS RADIATION EXPOSURE IF DIREC TED. BE S URE TO OPERATE
THE DIG ITAL VIDEO PLAYER CORRE CTLY AS IN STRUC TED.
USE OF CONTROLS OR ADJUS TMENT S OR PERF ORMANCE OF
PROCEDURES OTHER THAN TH OSE SPECIFIED HEREIN MAY RESULT IN
HAZARDOUS RADIATION EXPOSURE.DO NOT OPEN COVERS AND DO NOT
REPAIR YOUR SELF. REF ER SERVICI NG TO QUALIFIED PERSONNEL.
WARNING:
TO RE DUCE THE RISK OF FIRE O R ELECT RIC SHO CK, DO NOT EXP OSE THI S
EQUIPMENT TO RAIN OR MOI STURE .
TO RE DUCE THE RISK OF FIRE O R ELECT RIC SHO CK, AND ANNOYING
INTERFERENCE, USE O NLY THE REC OMMEN DED ACCES SORIE S.
THIS DE VICE IS INTENDED FOR CONTINUOUS O PERATION.
REGION MANA GEMENT INFORMATIO N:
This Di gital Vide o Playe r is designed and manufactured to respon d to the Re gion
Management Inform ation t hat is re corde d on a Digital Video di sc. If the Region
number described on the Digi tal Video disc does n ot corr espon d to the Region
number of this Digital Video Player, this Digita l Video Player cann ot play t his dis c.
-3-
Page 6
DISC NOTES
Disc format s supported by this
player
Digital
Video
VCD
CD
Digital
Video
VCD
CD
Audio a nd Video
Disc si ze 12 c m
Audio a nd Video
Disc si ze 12 c m
Audio
Disc si ze 12 c m
(although not enough to make i t unusable) depending on your hand ling it a nd
conditions in the usage envi ronme nt.
Note these scratche s are not a n indic ation of any problem with the pla yer.
Lab el side
up
MP3
MP3
Audio
Disc si ze 12 c m
Discs which c annot be played
with this pla yer
Digital Video-RAM
CDV
CD-G
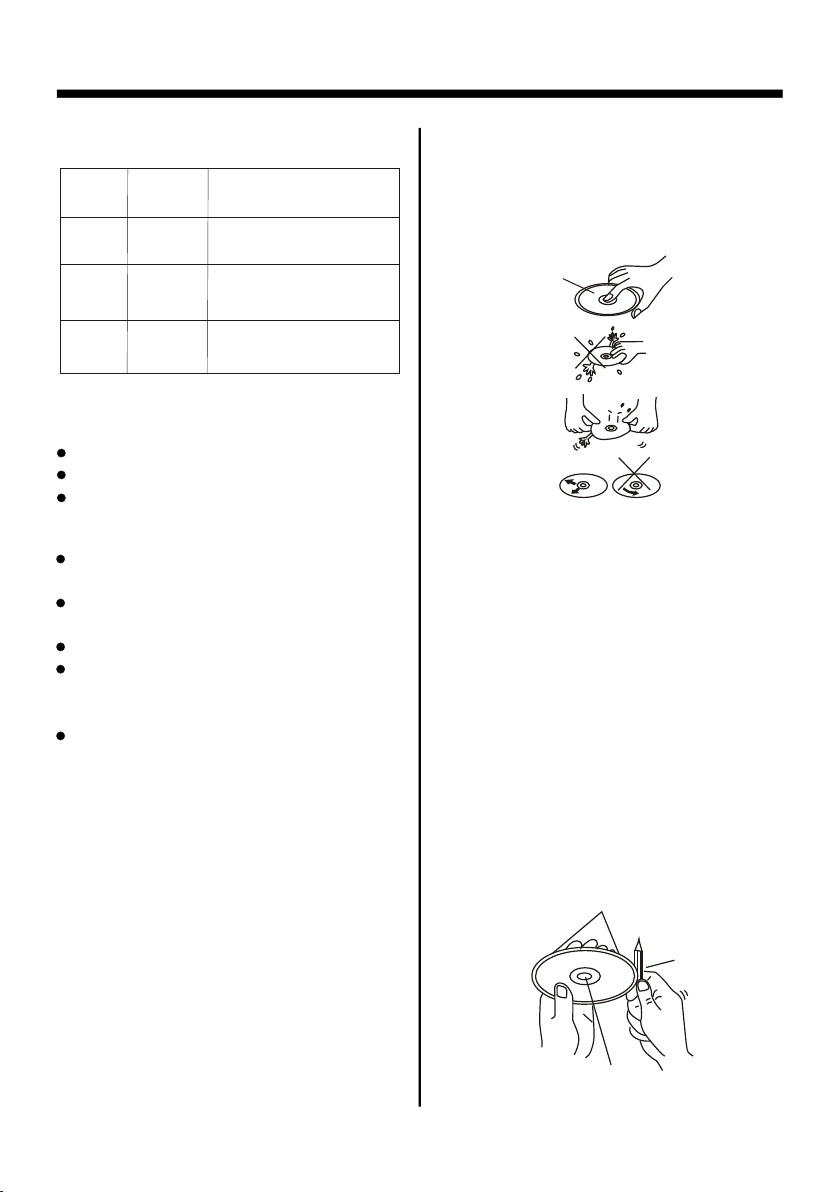
Handling an d Cleaning
Dirt, dust, scratch es and wa rping d isc
will cause misoperation.
Do not place stickers o r make
scratches on discs.
Do not warp discs.
A disc sh ould al ways be kept in its
case when not in use to pre vent fr om
damaging.
Do not place discs in the f ollow ing
places:
1.Direct sunlight
2.Dirty, dusty and damp areas
3.Near car heaters
4.On the seats or dashbo ard
Disc Cleani ng
Use a dry soft cloth to wip e the sur face.
If the disc is quite dirt y, use a soft cloth
slightly moistured with is oprop yl
(rubbing) alcohol. Never u se solv ents
such as benzine, thinner or co nvent ional
record cleaners as they may ma r the
surface of the disc.
Note:
A disc may become somewhat scra tched
Do no t touch
the
und ersid e
of th e disc
Do no t
ben d
Wip e the di sc fro m
cen ter
tow ard the o utsid e
edg e
Preparing N ew Discs with Rough
Spots
A new disc ma y h av e r oug h e dg es on
its in side and ou ts ide ed ge s.If a disc
with rou gh edges is us ed , t he prope r
setting w ill not be per fo rme d and th e
player will not p lay th e disc.Therefore,
remove the ro u gh edg e s i n ad v anc e
by using a ball point pen or penci l as
shown on the right.To re mov e th e
rough edges, press the sid e o f th e pen
or pencil against the inside a nd outs ide
edges of the disc.
Rou gh spot s
on
out side ed ge
Bal l point p en
or pe ncil
Rou gh spot s
on in side
edg e
-4-
Page 7
Installation
NOTES:
Choose the mounting locati on wher e the uni t will not interfere with the normal
driving function of the driv er.
Before finally inst allin g the uni t, conn ect the wiring temporarily and make sure
it is all connected up pr operl y and the u nit and t he system work properly.
Use only the parts incl uded wi th the un it to ens ure proper installation. The use
of unauthorized parts can ca use mal funct ions.
Consult with your nea rest de aler if i nstal lation requires the drilling of holes or
other modificatio ns of the v ehicl e.
Install the unit wher e it does n ot get in t he driv er s way and cannot injure the
passenger if there is a s udden s top, li ke an eme rgency stop.
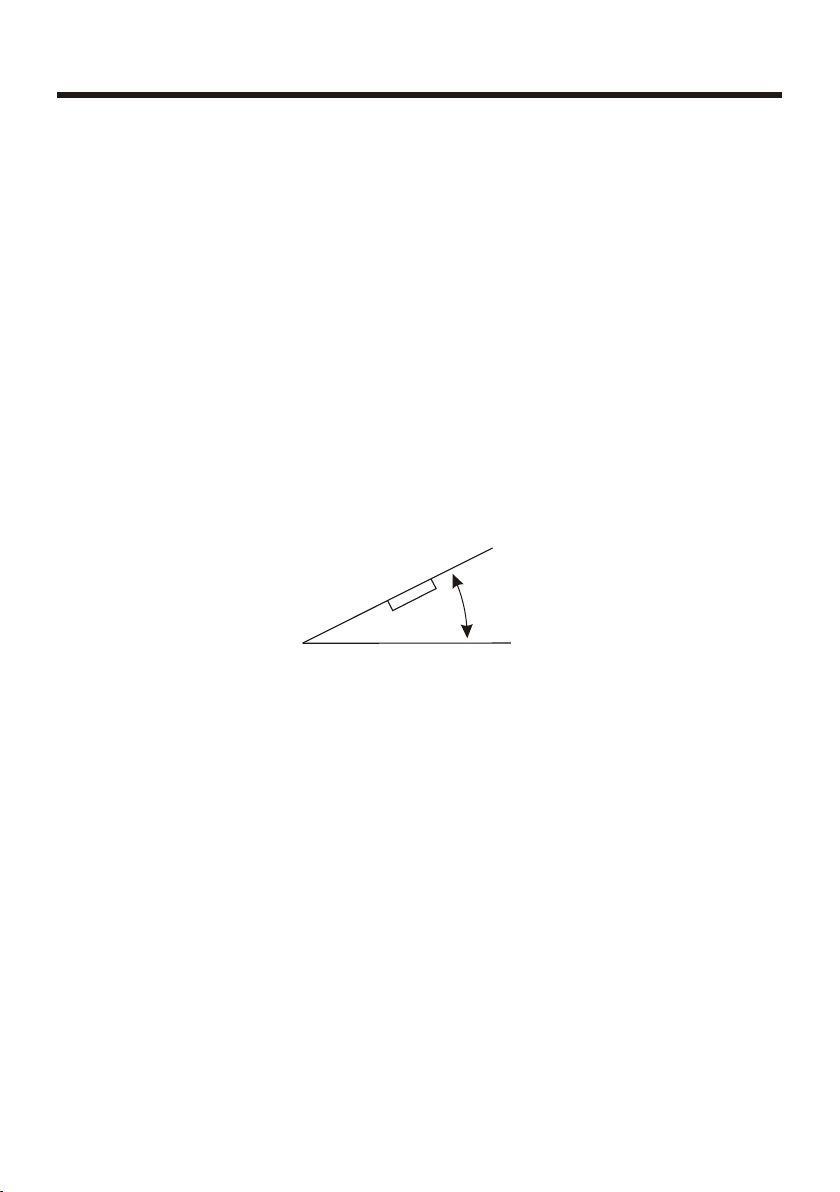
If installation ang le exce eds 30 fr om hori zontal, the unit might not give its
optimum performan ce.
'
30
Avoid in stalling the unit where it would be subjec t to high t emper ature, such
as from direct sunlig ht, or fr om hot ai r, from the heater, or where it would be
subject to dust, dirt o r exces sive vi brati on.
DIN FRONT/R EAR-MOUNT
This un it can be properly installed either from " Front "(con ventional DIN
Front-mount) or "Re ar"(D IN Rear -moun t installation, utilizing threaded
screw holes at the side s of the un it chas sis). For details, refer to the followin g
illustrated insta llati on meth ods.
-5-
Page 8
Installation
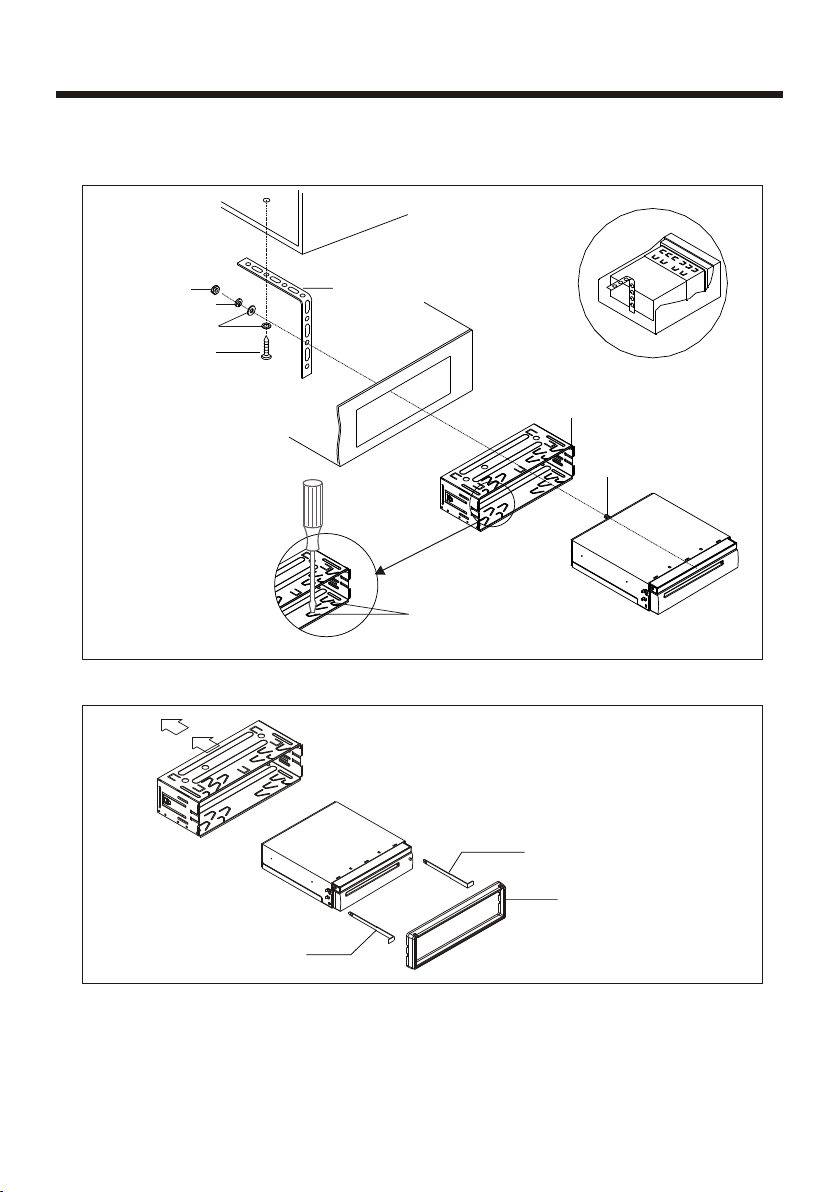
Installating the unit
DASH BOA RD
HEX NUT
SPRING WA SHER
PLAIN WAS HER
TAPP ING S CREW
SCREWD RIVER
METAL M OUNT ING
STRAP
TABS
CONSOL E
KEY PLATE
SLIDE BR ACKET
HOUSIN G
HEX BOLT
PLASTI C TRIM OUT
KEY PLATE
If you want to take CHASSIS out of the SLIDE BRACKET HOUSING, first remove
the PLASTIC TRIM OUT of the both sides away, then insert the two KEY PLATE into
left and right side of chassis as above illustration.
-6-
Page 9
Installation
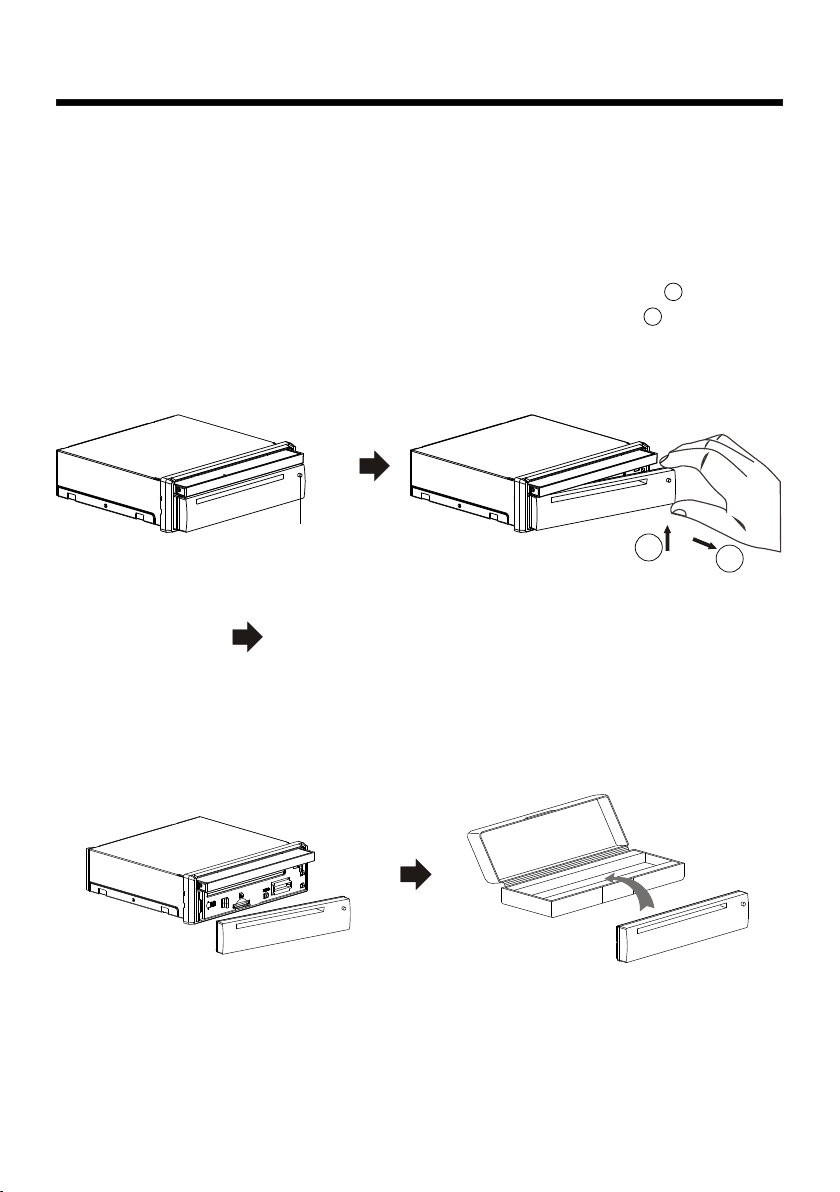
How To Remove And Install The Front Panel
When detaching or attachin g the con trol pa nel, be careful not to damage the
connectors on the back of the co ntrol p anel an d on the panel holder.
Detaching T he Front Panel
Before deta ching the control panel, be sure to turn off the p ower.
1). Press the “REL” rel ease bu tton an d the rig ht hand side of front pane will release
First pull up the panel as the directi on indi cated b y the arr ow (See )And then
taking out th e panel as th e direc tion in dicated by the arrow (See ).
1
2
REL button
2). Put the front panel i n the pro tecti ve case f or safe keeping.
1
protect ive case
2
-7-
Page 10
Installation
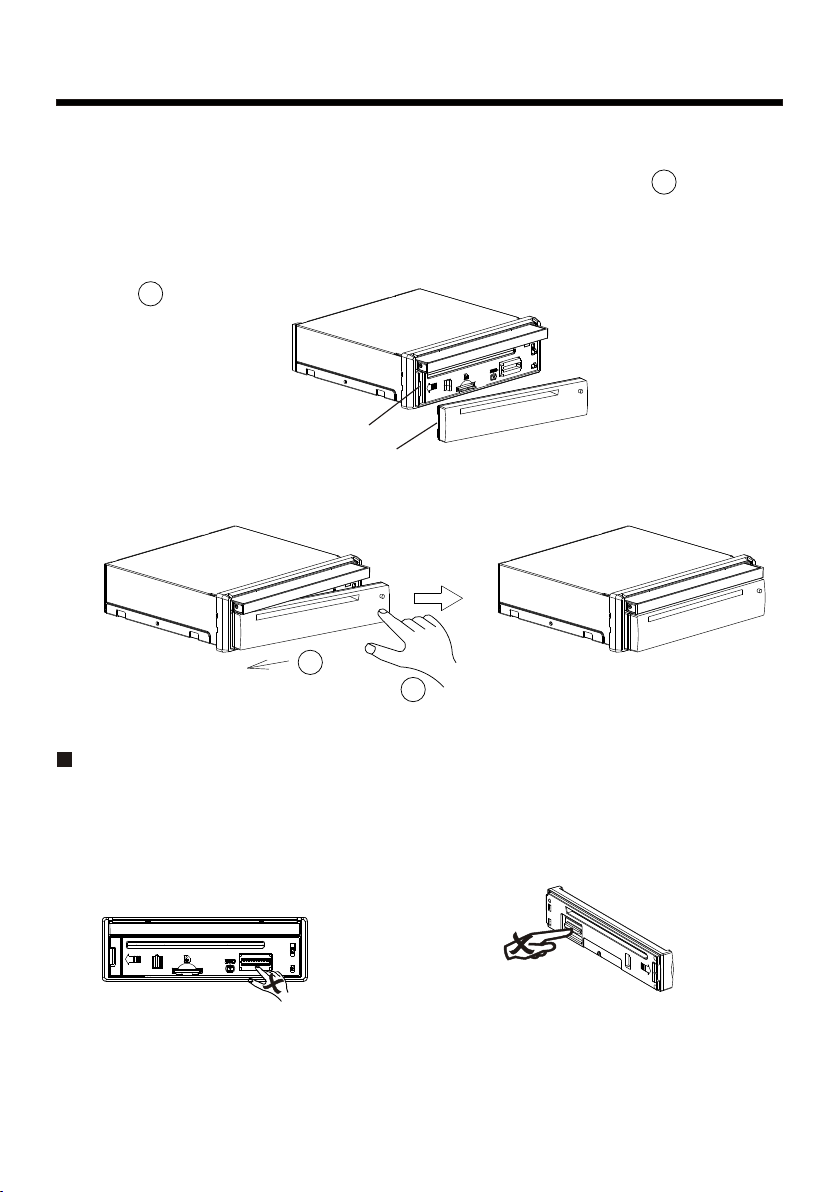
ATTACHING THE FRONT PANEL
1). First, insert the l eft sid e of the fr ont panel into the main unit(SEE ).
(Note: the “Hollow ” po int on th e front p anel must be attached into the “Bulge”
point of the unit . )
2). Gently push the rig ht-do wn hand s ide of th e front panel until you feel a “ Click” .
(SEE )
2
Bulge
Hollo w
1
1
2
Precautio ns
Do not touch the contacts on the f ront pa nel or th e unit body, si nce thi s may
result in poor electrical co ntact . If dirt o r dust accumulates on the contact s ,
wipe them with a clean, dry clot h .
-8-
Page 11
Electric Connection
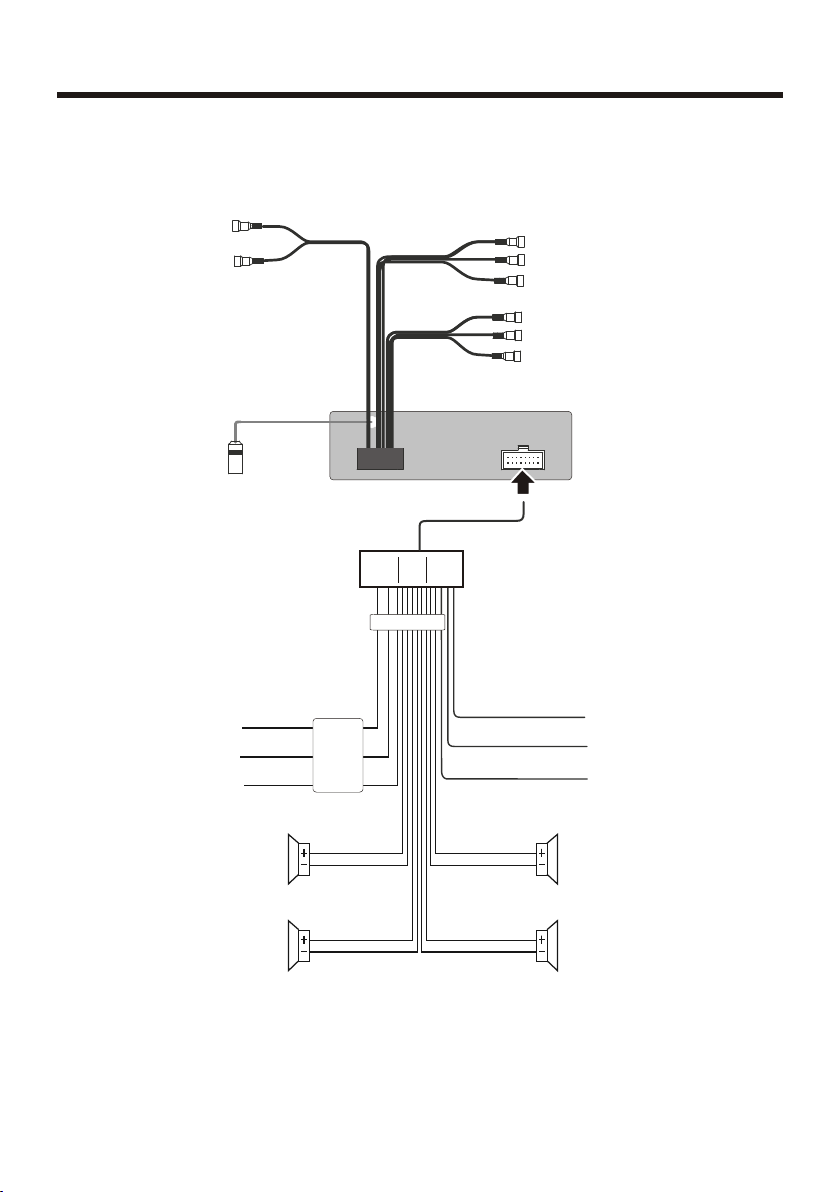
WI RING CONNECTION
REA R RCA OUTP UT
RCH RED
LCH WHITE
RADIO ANTENN A JA CK
CAB LE
RCA CA BLE
FRO NT RCA OUT PUT
CAB LE
ISO CO NNECT OR
REAR CAMERA IN PUT Y ELLOW
SUBWOOFER G REY
VIDEO IN YE LLOW
FRONT RC A RE D R
VIDEO OUT YEL LOW
FRONT RC A WH ITE L
(B+)12V
REAR CAMERA SW ITC H
(B-)PAR KIN G BRAKE
AUTO AN TEN NA
FRONT
RCH SPK.
REAR
RCH SPK.
IGN ITI ON SWI TCH( B+)
MEM ORY BA CK-U P(B+ )
GRO UND (B-)
FRONT
LCH SPK.
LCH SPK.
REAR
RED
YEL LOW
BLA CK
CHO KE
BOX
WHI TE
WHI TE/BL ACK
GRE EN
GRE EN/BL ACK
PIN K
BROWN
BLUE
GRE Y
GRE Y/BLA CK
VIO LET
VIO LET/B LACK
Note:
the earth connection cable ( parki ng brak e B-) must be connected in order for
pictures to be played back to th e monit or. If the c able has not been correctly
connected, the message “PARKING BRAKE ” appea rs on the m onito r.
-9-
Page 12
Remote Control
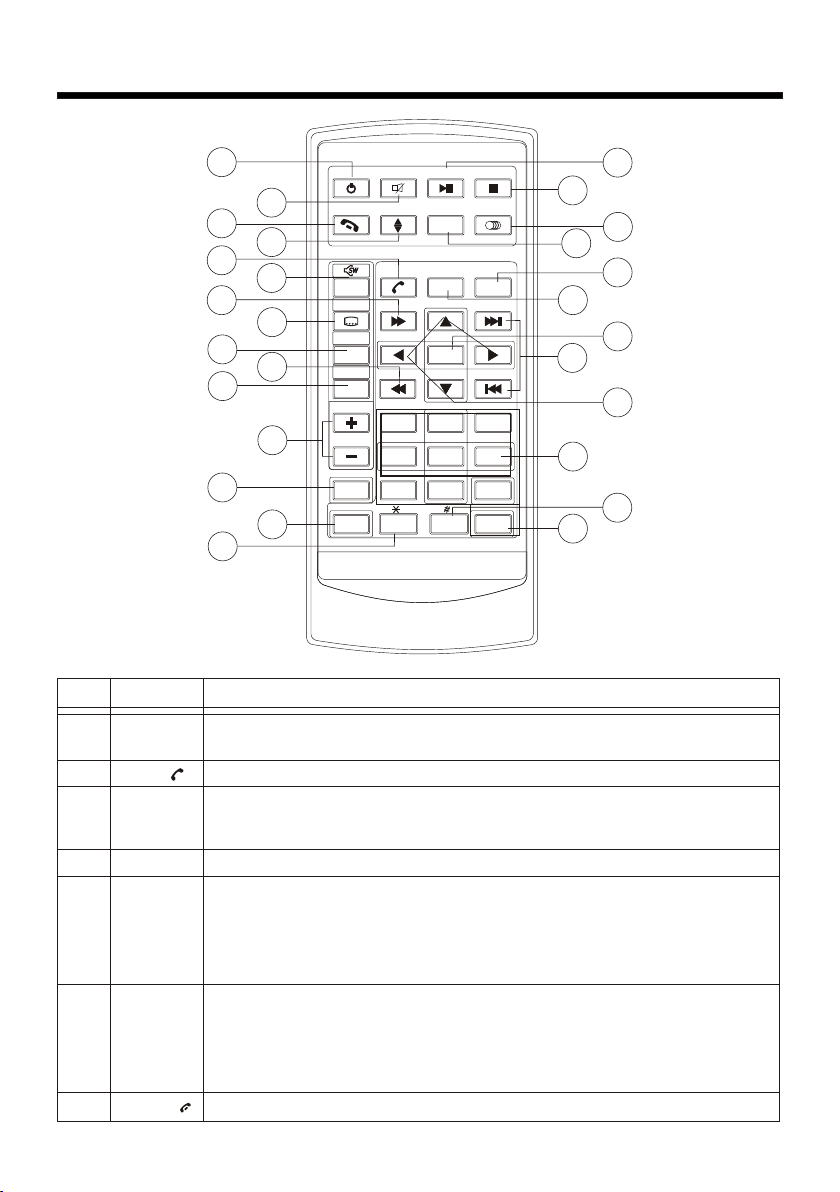
Ref #
1
Button
CLK
15
7
17
MOD EMODE
RED IAL
MUT EM UTE
PLA Y/PAU SEPLA Y/PAU SE
ANG LEAN GLE
ZOO MZO OM
STO PSTO P
MO/ STMO/ ST
19
2
22
14
18
10
13
6
24
11
4
MEN UMEN U
LO/ DXL O/DX
OSDOSD
BAN DBA ND
TIT LE/PB CTIT LE/PB C
A/P SA/P S
VOLVOL
VOLVOL
SELSEL
SET UP SET UP
PAIR
TOP
11
RDM
44
77
GOT OGOT O
LOU D
EQEQ
ENT ERENT ER
RPT
22
55 66
88
+1 0+ 10
CLKC LK
INT
33
99
00
8
Function
Press it briefly to vie w the clo ck time .
16
3
5
20
1
21
23
9
12
27
26
25
2
3
4
5
6
7
PAIR/
STOP
SETUP
MO/ST
(AUDIO)
SUBTI TLE
LOCAL /
DISTANT
Redial/
Press it to us e the BT function , ref er to see BT operation
Press once to pause playback . Press P LAY/PAUSE to resume
playback. Please note: if yo u press S TOP tw ice, pl ayback will
start at the beginning of the di sc.
Press this button to op en the SE TUP menu.
In Radio mode, press this butt on to cha nge bet ween Mono and
Stereo reception modes (wh en a stat ion is we ak, sometimes
switching to Mono will impro ve soun d quali ty). In Disc Playback
mode, pressing this button o pens th e AUDIO se tup menu for
making changes to the way the so undtr ack is re produced.
In Digital Video Disc Playback mode, pressing t his but ton wil l
allow you to change the subtit le lang uage on d iscs which have
this as an option.
In Radio mode, press this butt on to cha nge the r adio reception
sensitivity in stations ar e near or f ar.
Pre ss it to use the BT function , refer to the BT opera tion.
-10-
Page 13
Remote Control
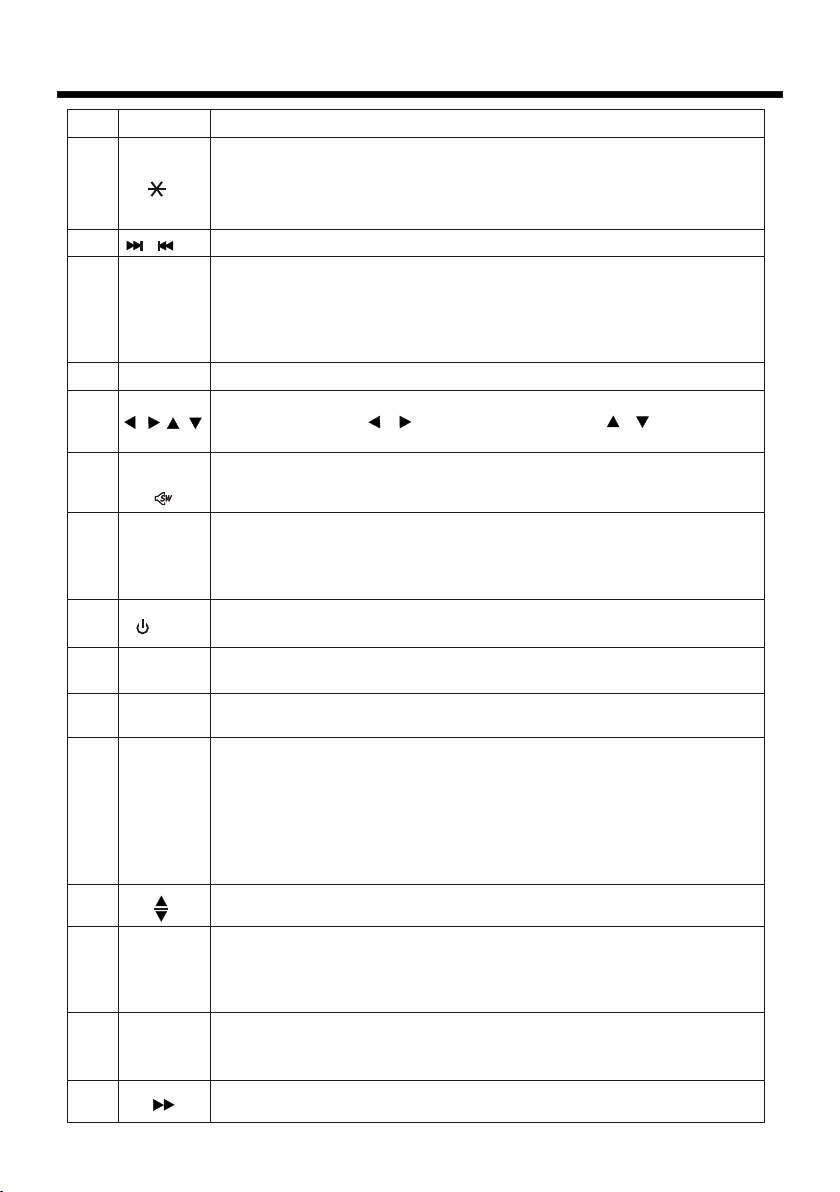
Ref #
8
9
10
11
12
13
14
15
16
17
18
19
20
21
Button
GOTO
/
SEL
VOL+/-
/ / /
Menu
SubWoo fer
( )
BAND
(OSD)
/MOD
PLAY/
PAUSE
MUTE
TITLE/
PBC(A/PS)
ZOOM/
ANGLE
EQ/LOUD
Funct ion
Press t his button to begin p layback at a moment i n the pro gram
you designat e. Use number but tons to e nter the data that is
needed. In BT menu, i t serves as the asteris k butto n on
your mobile ha ndset.
Press t hese buttons to ski p ahead or back one tra ck.
Briefly press this bu tto n rep eat edly to switch between B ASS,TR E,BAL,FA DER,
COLOR,B RIG HT,CONTR,TIN T and V OL; Lo ng pr ess t his b utton to switch BT, th en
briefly press this bu tto n rep eat edly to switch between LOUD,SWF,EQ ,DX/LOC AL
(in radio mode),STE REO /MO NO( in radio mode),TIME 24 H/1 2H,SET CLOCK,BUZZ,
EUR/USA FREQ,A NIM A,BG and LED; Af ter s witching a desired ite m abo ve, press
VOL+ or VOL- but ton t o set.
Use these cont rols to a djust the volume le vel.
Press t o navigate the vari ous menus present i n the pro duct.
In TV mode, pr ess / to fi ne tune. Press the / to se lect
channel upwa rd and do wnward.
Press t his button briefl y to display the root l evel di rectory of a
Digital Vide o disc. Pr ess and hold this but ton to tu rn on or off the
SUBWOOFER ou tput.
In Radi o mode, pr ess thi s button repeated ly to swi tch between
the five radio b ands: F M1 > FM 2 > FM3 > A M1(MW1) > AM2 (MW2).
In Disc Playba ck mode s, Press this button t o see inf ormation
about the disc c urren tly in play.
Press this button to turn th e uni t ON , pre ss an d hold to turn the
unit OFF. Press it briefly to select a de sired work source.
In Disc Playba ck mode, press to p ause pl ayback. Press a gain to
start where pl aybac k stopped.
Press t his button to turn of f the audio. Press again to res tore th e
sound to its pri or volu me level.
When pl aying a D igital Vid eo, pres sing th is button wi ll open the
TITLE m enu whi ch is record ed on the medi a. When play ing a VCD
disc, pres s this butto n to create a PB C (Playback Contr ol) menu
for the d isc to as sist in maki ng playbac k selec tions. I n Rad io
mode, pres s and hold thi s button to st art the A uto-Program m ode,
durin g which t he tuner wil l scan for all s trong s tations an d assign
them to t he radi o preset but tons.
Press t his button to Open/ Close the operate m onito r .Long press
it to adjust the a ngle of m onitor Upward/D ownward.
For Dig ital Vi deo dis cs whic h have al terna te view ing ang les
encoded, whe n you see t he "ang le mark " symbo l advis ing you
that these angles are available, longer press this button to see
them. S hortl y press i t butto n to incr ease th e pictu re in size .
Press r epeatedly to cycl e through the diffe rent eq ualizer curve
presets you ma y wish to u se for enhanced lis tening. Press l onger
to switch the LOUDNESS functi on ON and O FF .
22
In Disc Playback mode, press for fa st fo rward play back.
-11-
Page 14
Remote Control
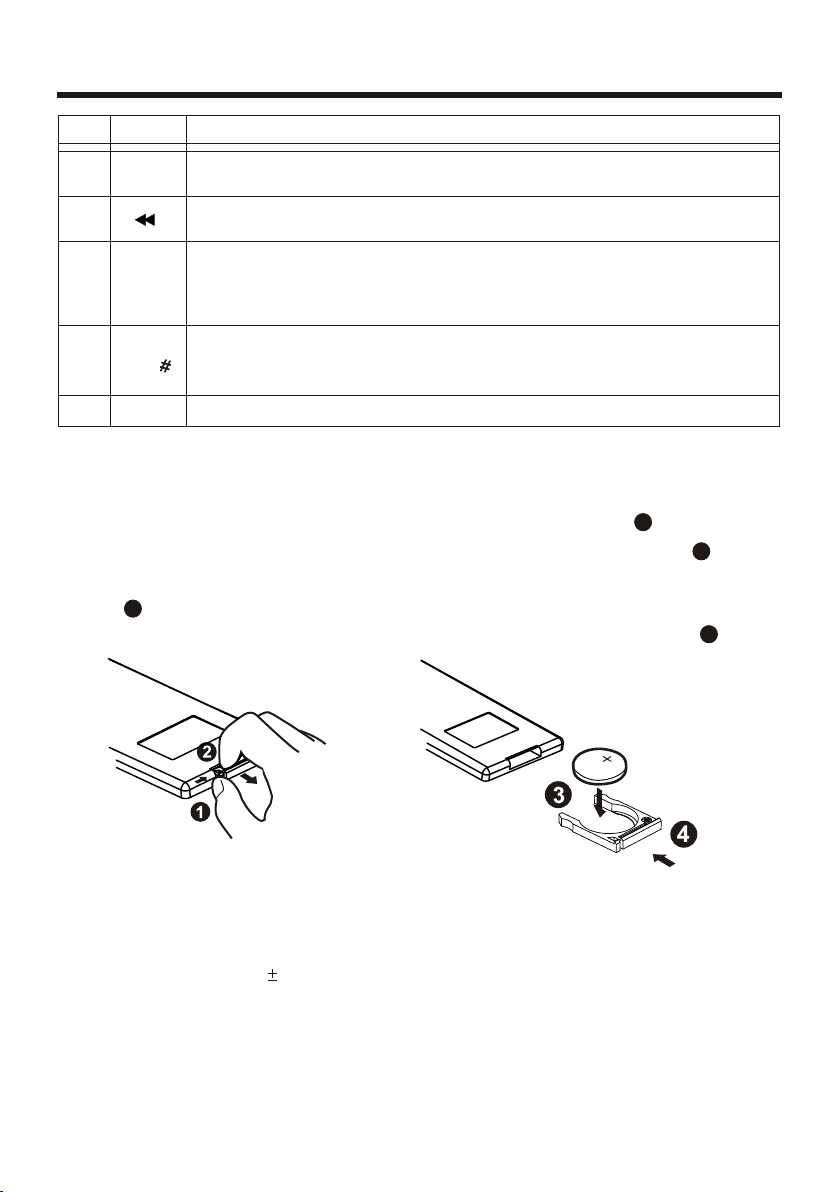
Ref #
23
24
25
26
27
Button
ENTER
0-9
+10/
1-6
This button is used to co nfirm s elect ions an d settings within many
of the menus in the OSD sys tem.
In DISC mode, press it to reverse rapidly
Use to input numerical value s durin g progr amming, with the GOTO
button, or to directl y selec t a track t o play .
This button is used with the oth er numb er butt ons for use with
two-digit number entries . In BT menu, it serves a s the has h
button on your mobile handse t.
Six numbered preset butto ns st ore and re call stations fo r eac h ban d
Function
Preparing the Remote Control
Inserting t he Battery
1.First push to insid e as the di recti on indi cated by the arrow (See )And then
Remove the battery ho lder as t he dire ction i ndicated by the arrow (See ).
2.Replace the battery Set a ne w batte ry prop erty with (+)side up as illustrated
(See ).
3.Insert the batter y holde r. Push in t he hold er to the original position(See ).
3
1
2
4
Using the Rem ote Control
Face the remote contr ol towa rds the p layer f ront face IR mark (remote control s ignal
receiver).
Operation angle: About 30 deg ree in ea ch the di rection of the front of the IR mark.
Note :
The lithium cell in the batter y compa rtmen t of remote control has been secured for
transport with a foil . B efore i nitia l use ple ase remove this foil so that the remote
control is ready for operati on .
-12-
Page 15
Basic Operation
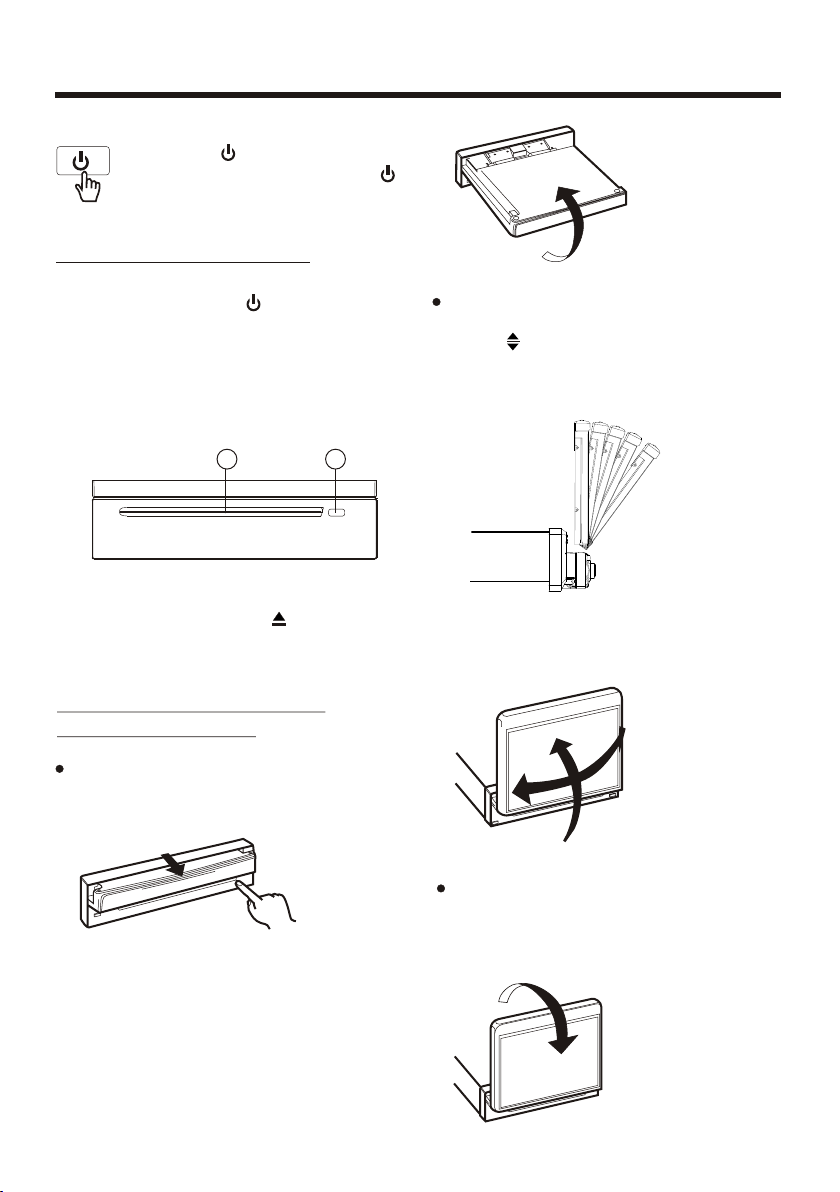
POWER ON/OFF
Touch the “ ” IC ON on scr een
to turn the unit off . Press the“ ”
onthe front panel to tu rn It on,
press it again to turn off .
LOADING/EJECTING A DISC
Loading a Disc
1. Press the POWER ( ) butt on on the
front pane to turn the de vice on .
2. Insert the disc with p rinte d side fa cing
up into the disc slot (1) .
3. The pl ayer starts playback the disc
automatically .
1
Ejecting a Disc
In disc mode, Press the ( 2) butt on on
the front panel to ejec t the dis c .
2
FIG.2
Adjusting the viewing angl e .
When the monitor does not move , you
press button on the pan el to tur n
the monitor upward or downwa rd at
fine steps to get a desir ed view ing
angle .
FIG.3
Do not rotate the monitor forc ibly to
avoid mechanical damage .
OPEN/CLOSE MONITOR AND
ANGLE ADJUSTMENT
Touch OPEN but ton on front panel, the
monitor will draw out automa tical ly .
FIG.1
OPE N/CLOS E butto n
When the monitor draws out to a ce rtain
location, it will turn upwar d autom atically and stop at vertical p ositi on .
FIG.4
Return the monitor to t he cent ral
viewing position, then pre ss OPEN
button on the front pan el , the mo nitor
will turn downward automat icall y .
FIG.5
-13-
Page 16
Basic Operation
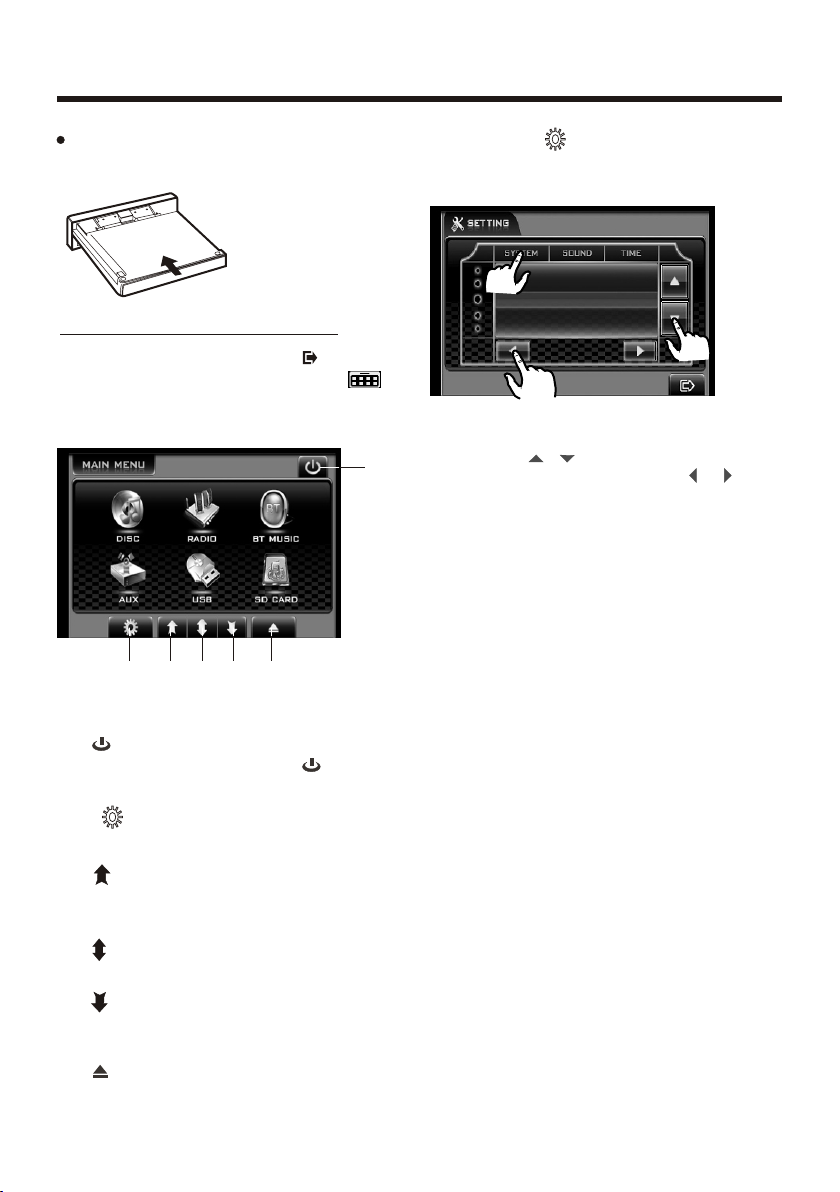
When the monitor turn s downw ard to
a certain angle, it will draw in .
FIG.6
TFT Monitor Adjustment
In Radio mode, touch the“ ”
icon or In media mode , touch the
range to enter the home menu,
the message like following a s below.
(1)
(2) (5) (6)(4)(3)
The touch buttons on th e base of t he
The touch buttons on th e base of t he
The touch buttons on th e base of t he
touch monitor:
touch monitor:
touch monitor:
(1). (Power) button
in any modes, touch the “ ” I CON
to switch the unit off .
(2). Button
to enter the setting me nu.
(3). Button
to adjust the angle of th e monit or
upward until your desired an gle .
(4). Button
Touch to ope n/clo se the mo nitor .
(5). Button
to adjust the angle of mo nitor d own ward until your desir ed angl e .
(6). Button
Touch to all ow inse rting o r eject ing
of the media discs.
Touch the “ ” ICON on touch
screen to enter the set ting mo de, the
message will display like fo llowi ng :
Cont rast
Color
Tint
16
Touch “SYSTEM” on the setting me nu,
touch the “ / ” ICONS to sele ct the
adjustment item, to uch the “ / ”
ICONS to adjust the sel ectme nt item , it
depends on your habit to setup t he data .
ADJUSTABLE ITEMS:
BRIGHT: 0 to 32
Adjust if the picture i s too bri ght or
too dark.
CONTRAST: 0 to 32
Adjust the contrast of the bri ght and d ark
portion.
COLOR: 0 to 32
Adjust the color for th e pictu re-li ghter o r
darker.
TINT: 0 to 32
Adjust the tint if the hum an skin c olor is
unnatural.
-Adjustable when “NTSC “ is se lecte d for
“NTSC/PAL “ .
ANIMATION
In RADIO mode, you can change the
playing time of animation am ong of
“OFF, 10S, 30S, 1M,1. 5M, 2M, 3M and 4M ”.
Note:
Please set the playing time of t he ani mation to “ 10S ” for the f irst, w hen you
turn the unit on .
-14-
Page 17
Basic Operation
SETTING WALLPAP ER
in wallpaper mode, you can sel ect the
among of “AUTO, GREEN, YELLOW, RED,
LIGHT BLUE, BLUE, PINK ” .
When you select the “AUTO” item, the
player will change the backg round
automatically .
SETTING LED LIGHT (3 CO LORS)
In LED COLOR mode, you ca n selec t the
color among of “Auto, Blue, Red, Pink ” .
When you select the “AUTO” item, the
player will change the panel c olor
illumination automatic ally .
BT ON/OFF
Touch to switch the BT mode ON or OFF .
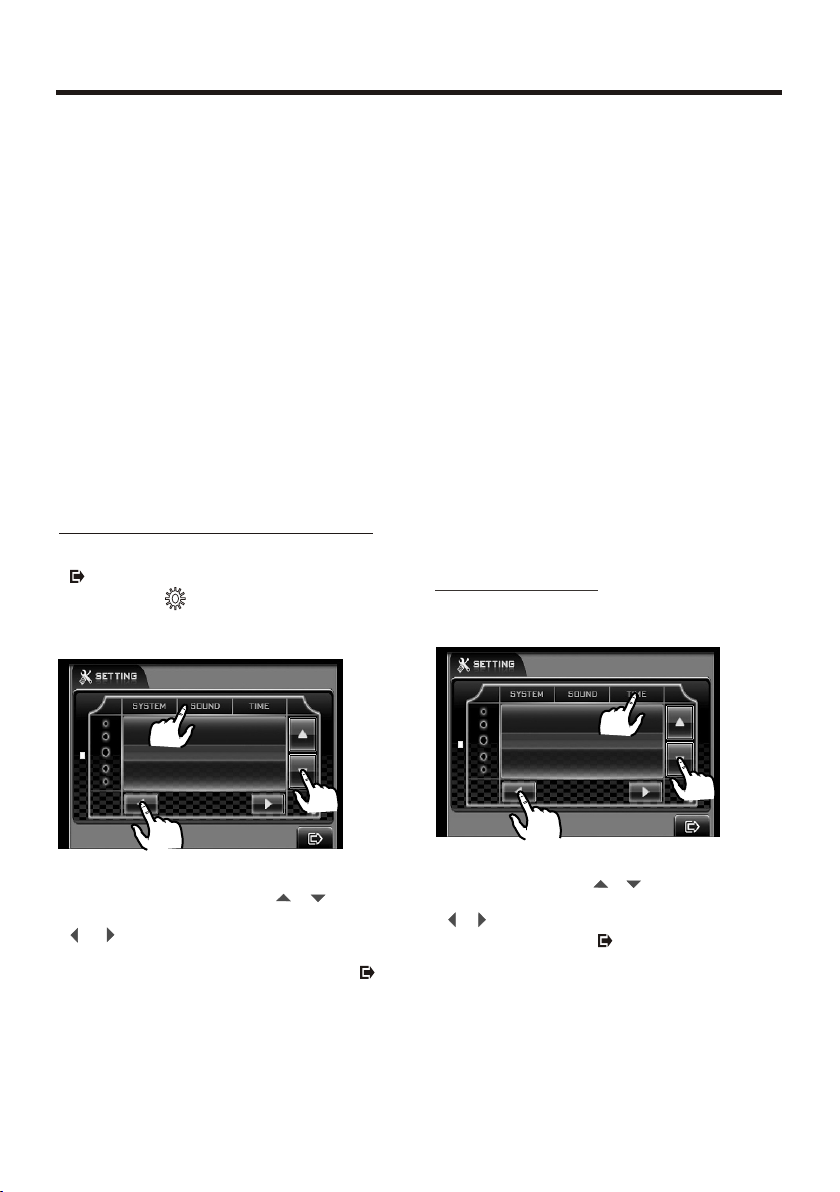
AUDIO QUALITY ADJUSTMENT
In Radio mode, touch the scree n of the
“ ” ICON to enter the home me nu,
touch the “ ” ICON to enter t he
Setting mode, the message wi ll disp lay
in the screen :
BASS: -7 to +7
Adjust bass level .
BALANCE: R 0-10 to L 0-10 .
Adjust sound balance betwe en left
and right speakers .
FADE: F 0-10 to R 0-10
Adjust sound balance betwe en fron t and
rear speakers .
SUB-WOOFER: ON or OFF .
LOUDNESS: ON or OFF .
RADIO LOC: LOC or DX.
RADIO STEREO: STERE O or MONO .
BUZZER: ON or OFF.
SETTING TIME
In SETTING mode, touc h the “TIME”
range to select the tim e mode .
SETSET
TRE BLE
BAS S
BAL ANCE
+06
Touch the “ SOUND ” sec tion on t he
setting menu, touch the “ / ” ICON S
to select the adjustm ent ite m, touc h the
“ / ” ICONS to adjust the sel ectme nt
item , It depends on your h abit to s elect
the Au dio mod e . The n touch t he “ ”
icon to return to the pre vious p layba ck .
ADJUSTABLE ITEMS:
TREBLE: -7 to +7
Adjust treble level .
HOU R
HOU R
MIN UTE
MIN UTE
24H /12H
12H /24H
11: 36 AM
36
Touch the “ TIME ” section on the setting
menu, touch the “ / ” ICONS t o
select the adjustment item , touch t he
“ / ” ICONS to adjust the sel ectme nt
item, then touch “ ” icon to confirm.
It`s depend on your need to setu p
the data.
ADJUSTABLE ITEMS:
Hour adjustment: 0-23
Minutes adjustment: 0-59
Tim e forma t selec tment : 2 4H/1 2H
-15-
Page 18
Basic Operation
Setting Audio Mode
In any modes, touch the “ EQ” ran ge on
the touch screen (or press the E Q butto n
on remote control) to select o ne of
the preset sound modes: ROCK /POP/
JAZZ/CLASSIC/US ER .
The information will displ ay in the
monitor as follow :
ROCK
POP
It`s depend on your habit to sel ect the
Audio mode .
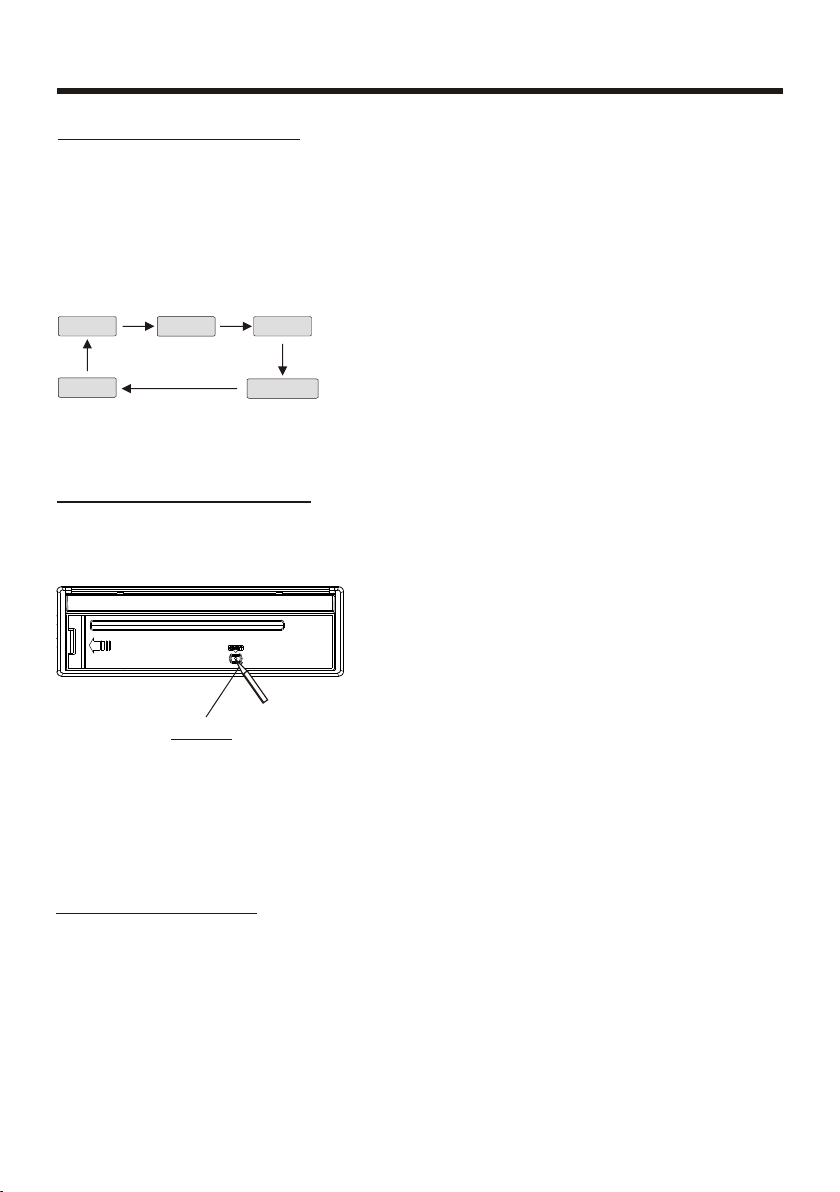
Reset Factory Settings
RESET bu tton is p laced o n the hou sing
and must be activated with eit her a
ballpoint pen or thin metal ob ject.
The RESET button is to be activated for
the following reasons:
A. Initial installation of t he unit w hen
all wiring is completed.
B. All the function buttons do no t opera te.
C. Error symbol on the di splay.
USER
RE SET
JAZZ
CLASSIC
Rear View Camera
When connecting the rear vie w camer a
the mirror image of the rear vie w is auto matically displayed on the m onito r
when you change the gear to the ba ck
position.
(Note: additional monito r can not d ispla y
the image.)
-16-
Page 19
Control Panel
UNIT KEYS
3
5
+
11
9
6
Sliding Pla te di agram aft er re mov ing Co ntr ol Pa nel
18
2
10
4
19
15
Control Pan el
16
12
17
14
8
1
7
13
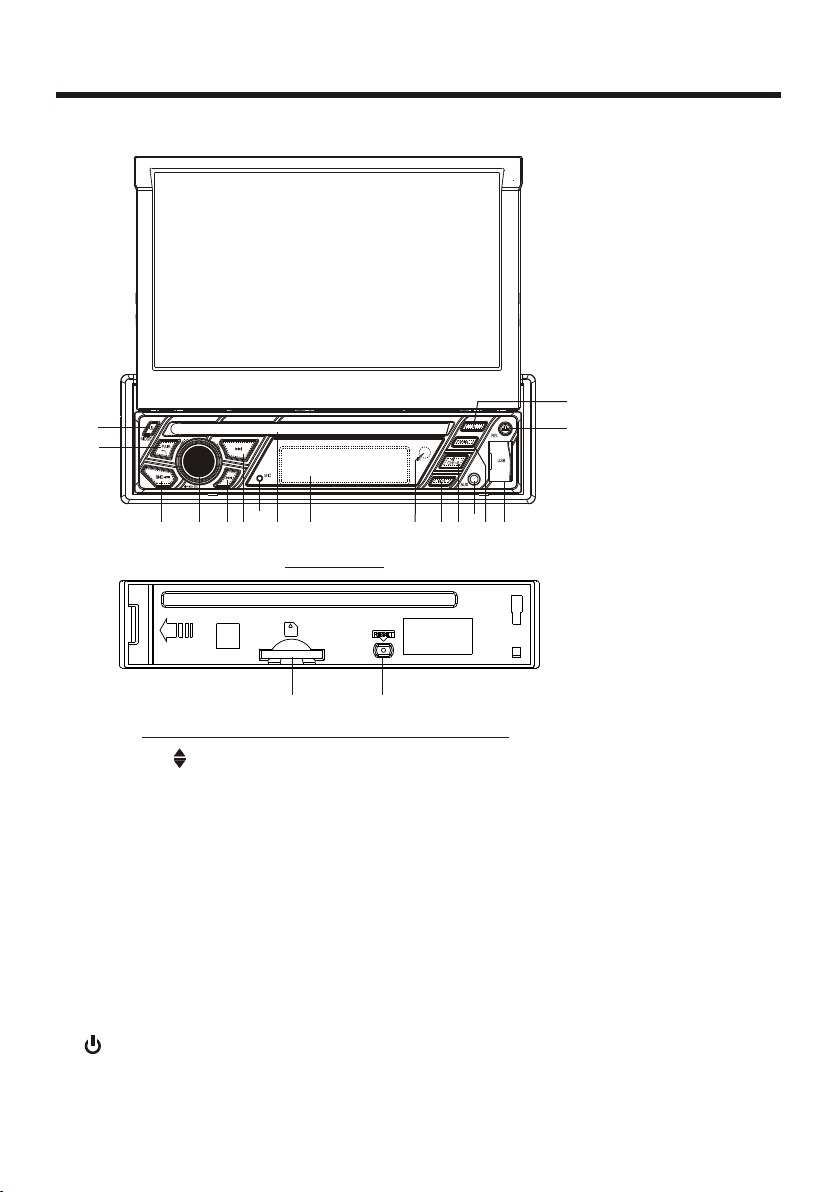
1. OPEN o r BUTTON
To slide the mon itor out and s tand it up or in to the monit or slot, press this button;
To adjust t he angle of th e monitor, lo ng press thi s button .
2. VOL & SEL
In norm al mode, knob is u sed to incre ase or decre ase the volu me.
KNOB BUTTON
the VOL
Brief ly press SEL b utton repe atedly to sw itch betwe en BASS,TRE,B AL,
FADER, COLOR,BR IGHT,CONTR ,TINT and VOL; Lo ng press SEL button
to swit ch BT, then brief ly press SEL button re peatedly t o switch bet ween
LOUD, SWF, EQ,DX/LO CAL(in rad io mode),S TEREO/MO NO(in radi o
mode) ,TIME 24H/ 12H,SET CLOCK ,BUZZ,EU R/USA FREQ, ANIMA ,BG
and LED ; After switc hing a desir ed item abov e, rotate VO L knob to set.
3. (POW ER )/MODE BU TTO N
Brief ly press it to t urn on the uni t, long p it to tur n off t he unit.
ress
In powe r on mode, pre ss it repeat edly to sele ct RADIO , DISC, USB, CARD,
AUX IN or BT M USIC mode.
-17-
Page 20

Control Panel
4/10. | << and >>| BUT TON S
In radi o mode, Long p ressing |< < or >>| butto n can automatically searc h down or up
for an av ailable st ation begi nning from t he current f requency; Bri efly press ing |<< or
>>| but ton can manu ally searc h down or up for a y our desire d station begin ning from
the cur rent frequ ency.
In medi a or BT MUSIC mode, p ressing |< < or >>| butto n can play previous or next
track ; continuo usly and lon g pressing | << or >>| butt on can fast backw ards or
forwa rds at the fol lowing mul tiple of nor mal speed: x 2, x4, x8, x20, x1.
* In BT MUSIC mo de, the func tion of the fa st forward s or backwards is disabled.
5. PAIR/ BUTTON
P the part of the .lease refer to BT oper ation
6. BAND / BUTTON
In radi o mode, pres s it repeate dly to selec t the desire d radio band: FM1 , FM2,
FM3, AM1 (MW1) and AM2 (MW2) .
For BT funct ion and oper ation, ple ase refer to t he part of the BT operat ion.
7. MUTE B UTTON
Short p ress this bu tton to mute o r resume sou nd.
8. >||/ CH1-6 BUTTON
In medi a mode, use th is button to p ause or r esume play back.
In radi o mode, use th is button to p reset or lis ten to a memory station
1) To prese t a station in a m emory bank w ith CH1-6 bu tton, firs t select a desire d band;
then pr ess CH1-6 bu tton to sele ct a desired m emory bank ; and then search f or a
desir ed station ; finally lo ng press CH1 -6 button to s tore the statio n in the memor y
bank.
2) To listen t o a preset sta tion with CH 1-6 button , first switch on a desired ban d, then
conti nuously pr ess CH1-6 bu tton highl ight and lis ten to it.
9. REL BUTTON
To detach control panel , press R EL button on control panel.
After detaching con trol pa nel, ho ld the ri ght part of the control panel and pull it
upwards a little and th en to you t o remov e it from c hassis.
-18-
Page 21

Control Panel
11. (EJECT) BUTTON
During disc playback, pres s this bu tton to e ject the disc. After the diss is eject ed,
press this button to dr aw the di sc in aga in.
12. IR sensor
13. USB PORT and COVER
14. AUX IN JAC K
15. LCD display
16. SD/MMC card slot
17. RESET BUTTON
When LCD displays wro ngly or s ome but tons are not available or sound is
distorted, press RE L button to detach the control panel and r emove i t, then u se
the sharp end of a pointe d objec t to pres s RESET butt on on con trol panel to
reset the program to ze ro.
18. MIC (microphone )
19. DISC SLOT
-19-
Page 22
Touch Screen Operation
RADIO OPERATION
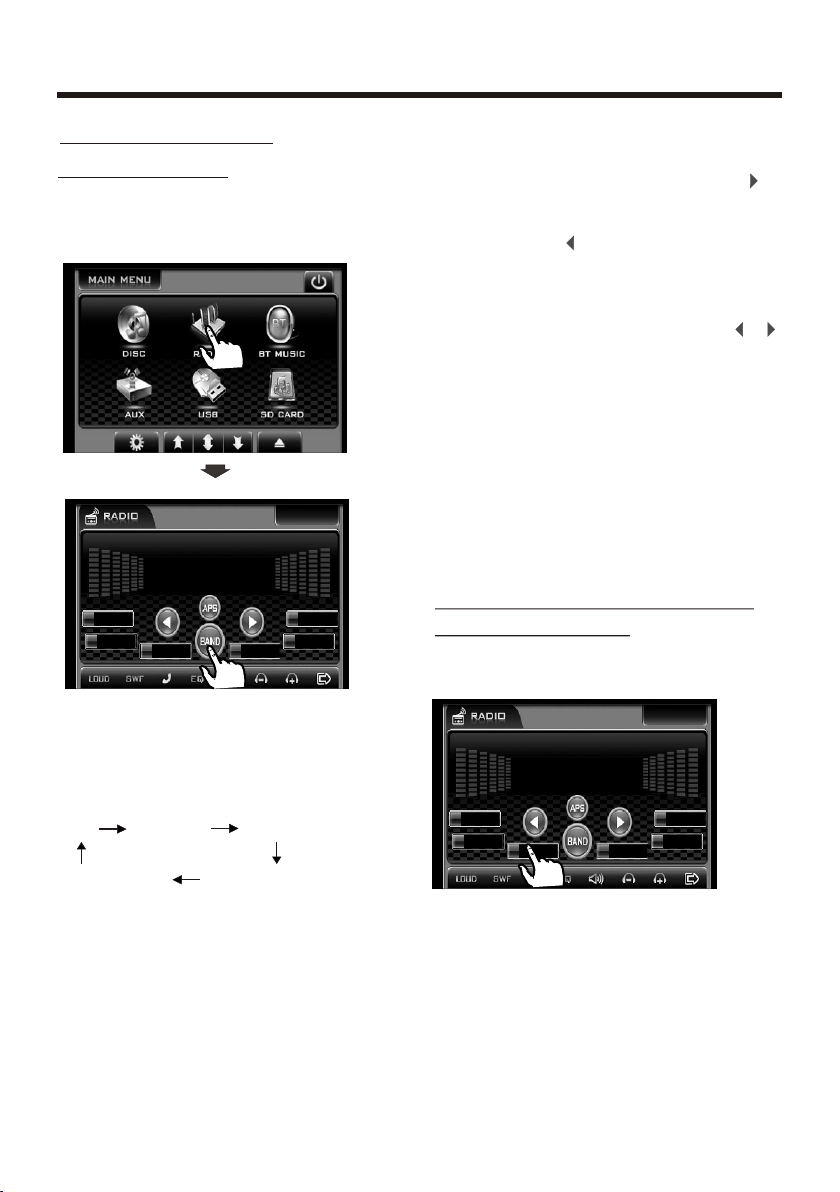
Listening to Radio
Touch the RADIO ICON in hom e menu
to enter the RADIO mode :
DXDX STST USE RUSE RS WFSWF
107.00107.00
11
22
87.5087. 50
90.0090. 00
33
FM1FM1
98.0098. 00
MHZMHZ55CHCH
106.00106.00
66
44
55
107.00107.00
86.6086. 60
Start Searching For a Station
Manual Search
During Radio mode, briefly t ouch “ ”
to increase frequency by one s tep of
channel spacing.
Briefly touch “ ” to decr ease fr equen cy
by one step of channel spacing .
Automatic Search
During Radio mode, touch and h old
(for more than 2 seconds ) eithe r “ / ”
ICONS to start search f or a radi o stati on
automatically.
To tune in strong-singnal FM
Station onl y (LO/DX function)
In radio model,Longer pres s the sel
knob repeatedly to select LO C/DX,
then rotate the VOL knob to
choose
between the LOC and DX mode of Loc al
and Long-distance traffic news .
Storing and Listening to a
Memory Station
Setting Mem ory
Selecting T he Frequency Band
Touch the s creen of “ BAND ” section
repeatedly to select the ban d , the
message will show in turn :
FM1 FM2 FM3
AM2(MW2)
AM1(MW1)
When an FM ster eo broadcast is
hard to recei ve
Press ST/MO button on t he remo te
control to select the M ONO or ST EREO
mode . (When Stereo mod e is acti vated ,
the ST sy mbol will appear . )
DXDX STST USE RUSE RS WFSWF
107.00107.00
11
22
87.5087. 50
90.0090. 00
33
FM1FM1
98.0098. 00
MHZMHZ55CHCH
106.00106.00
66
44
55
107.00107.00
86.6086. 60
With this system, a tot al of 30 st ation s
can be stored in the memory of six
buttons. Each band stores up t o six
preset stations. The stations might be
FM1, FM2, FM3, AM1(MW1), and
AM2(MW2) band.
The operation is as below :
- Store in Memory
>S elect t he frequency band
>S elect t he station
-20-
Page 23
Touch Screen Operation
>K eep the d esired memory key pressed
in until the station is heard ag ain aft er
a brief interruptio n .
- Retrieve a preset station
Touch the 1-6 ranges briefly to re triev e
a station which had been store d in the
memory in advance the c hose nu mber
is shown on display .
Automatic Memory Storing &
Program Scanning
DXDX STST USE RUSE RS WFSWF
107.00107.00
FM1FM1
87.5087. 50
11
22
90.0090. 00
33
98.0098. 00
Automatic P reset Setup
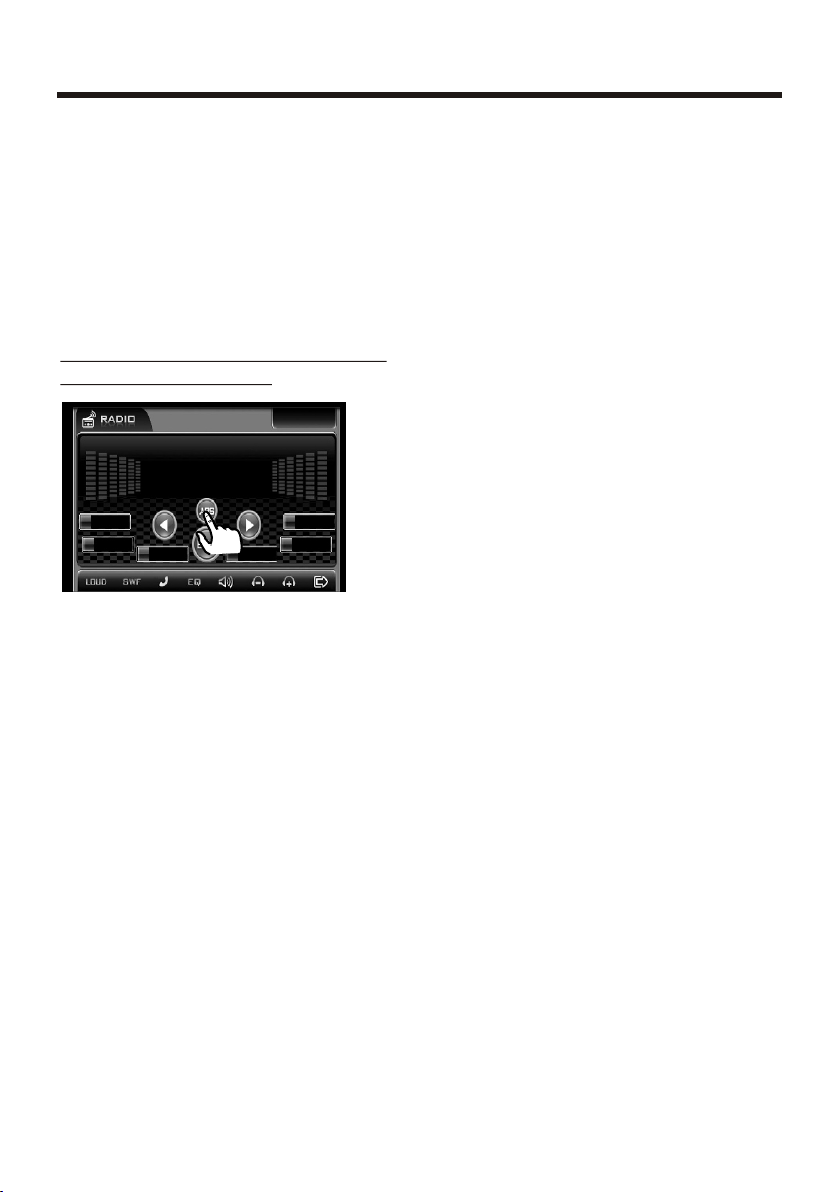
In Radio Mode, touch an d keep (f or more
than 2 ’ S) the sc reen of “ APS ” range to
active automatic st ation s torag e.
The rad io searches within the current
frequency band, e.g . FM1, fo r the str on ger signal level until the sea rch cyc le
has finished . Th e six str onges t stations
are then allocated to t he corr espon ding
storage locations .
Then th e station of the first storage
location is set .
Scan Functi on
In Radio mode, briefl y touch t he “APS ”
section on the touch sc reen , th e radio
briefly plays all the p reset s tatio ns of the
frequency band .
MHZMHZ55CHCH
106.00106.00
66
44
55
107.00107.00
86.6086. 60
-21-
Page 24
Touch Screen Operation
Media Operation
In any modes, repeatedly pre ss MOD
button on front panel to enter t he medi a
play mode .
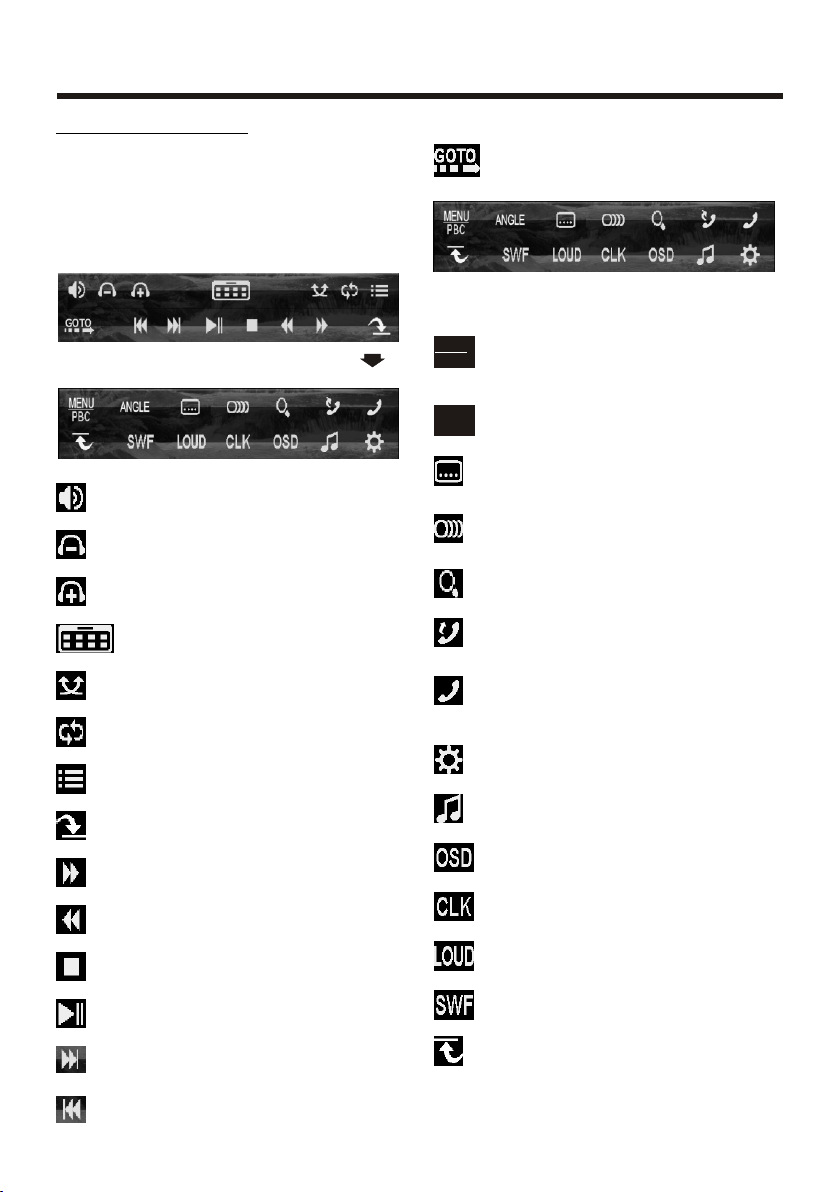
The message will display as be low :
(When Parking Brake is appli ed .)
MENUM ENU
PBCPB C
ANGLEANGLE
Mute function
To decrease the volume level
To search the disc with numbers
In Digital Video mode, touch to
display the root menu. In VCD
mode, touch to switch t he PBC
ON and PBC OFF.
To select the viewing angle
To show/hide the Subtitle
(depending on the media)
To change the AUDIO setting
(depending on the media)
To increase the volume level
To enter the main menu
Random Function
Repeat Function
Intro Function
Next menu
To search fast forward
To search fast backward
Stop
Play/Pause the disc
To skip the next track
To skip the previous track
ZOOM IN and OUT
Redialing
Registering Devices With O ne
Another. In BT mode, touch
to call up the BT menu .
To display the SETUP menu
To select the Equalizer mode
On screen- display
To show / hide the clock
Loudness Function
Subwoofer Function
Previous menu
-22-
Page 25
Touch Screen Operation
BASIC OPERATION
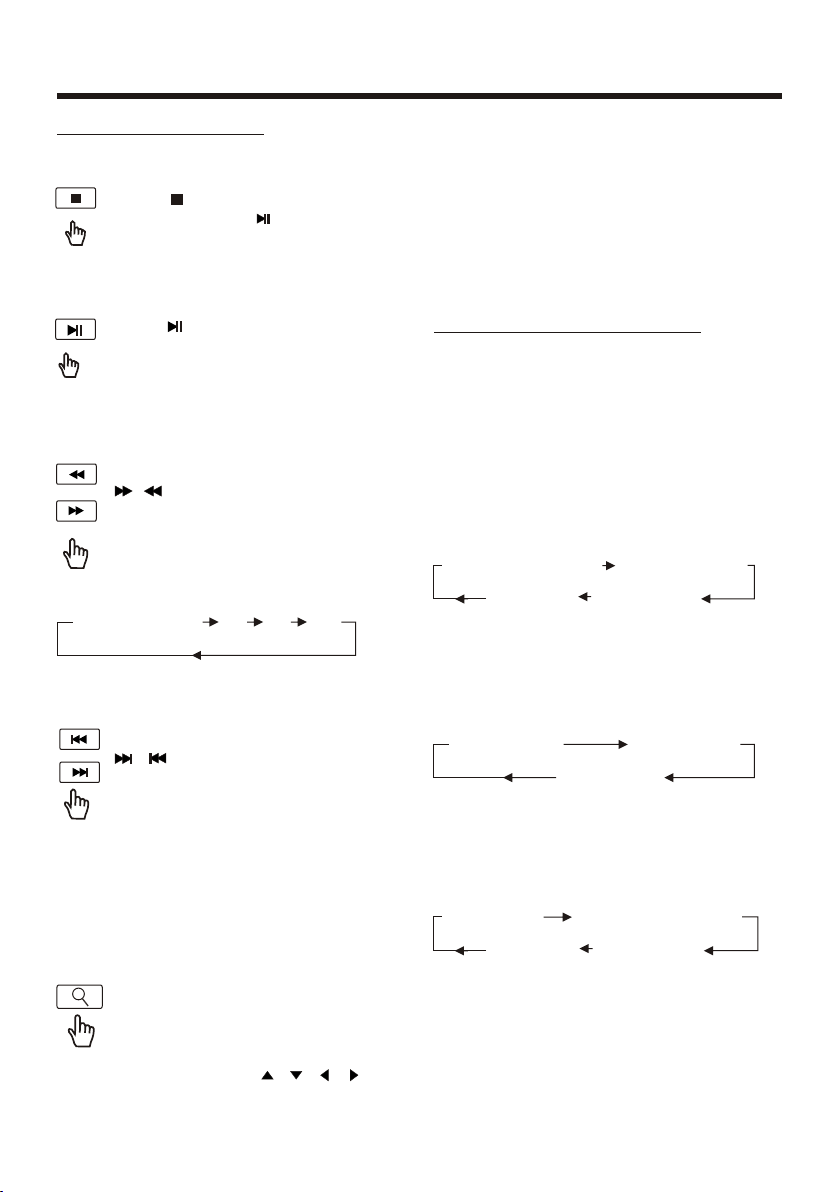
Stopping Play
Touch ICON to stop the unit
playback. Touch to start play.
Pause (still picture)
Touch during playback to temporarily pause play. Touch aga in to
return to normal playback.
Rapid Forward/Rapid Reverse
During DISC playback, touc h
/ for rapid forward/r evers e.
The speed of rapid forward/
reverse changes accordin g to the
disc as follows:
Digital Video/VCD/CD/MP3:
Normal P lay back 2 x 4x 8x 2 0x
Skipping Track
During DISC playback, touc h
/ to skip to next/back on e
track.
Note :
For some VCD2.0 disc (P BC-pl aybac k
control), above these butt ons may b e
unavailable.
Zoom Function
Repeatedly touch for zoom- in/
zoom-out rates as fol lows:
“zoom 2, zoom 3, zoom 4 , zoom ½,
Use the direction keys ( / / / on
remote control to move the enl arged
picture.
zoom 1/3, zoom 1/4 , zoom off . ”
Note:
when the JPEG disc playback, i n norma l
mode, you can use the cursor but tons to
rotate the picture .
Press UP to invert an image .
Press DOWN to mirror an i mage .
Press LEFT to rotate an image to left .
Press RIGHT to rotate an image to right .
SELECTING PLAY MODE
During the Disc playback, to uch the
“RPT, RDM, INT ” range to select the
diffe rent playing mode .
1). REPEAT FUNCTION
FOR Digital Video :
Touch the screen of the “RPT” rang e
(or press longer the RPT butto n on the
remote control) to se lect RE PEAT mo de
as follows :
CHAPTER REPEAT ON TITL E REPEAT O N
REP EAT OFF
FOR VCD/CD:
Touch the screen of the “RP T” rang e
(or press longer the RPT butto n on the
remote control) to se lect RE PEAT mo de
as follows :
REPEAT ON E REP EAT ALL
FOR MP3 :
Touch the screen of the “RPT” rang e
(or press longer the RPT butto n on the
remote control) to se lect RE PEAT mo de
as follows :
REP EAT ONE R EPEAT FO LDER ( or DIR)
REP EAT OFF
2). INTRO FUNCTION
FOR CD :
Touch the screen of the “IN T” sect ion
(or longer press the 3/INT but ton on th e
remote control ) to play the pre vious 1 0
-23-
REP EAT ALL
REPEAT OFF
REP EAT ALL
Page 26
Touch Screen Operation
seconds part of each tr ack/c hapte r on
disc.
(Touch it again to cancel this mod e)
FOR VCD :
Touch the screen of the “IN T” sect ion
(or longer press the 3/INT but ton on
the remote control ). I t displ ay will
following menu as below :
SEQ P LAY INRO 1
Note: when select the INRO Mode, this
player to start to play t he prev ious 10
seconds part of each tr ack/c hapte r on
disc. (Touch it again to cancel
this mode .)
FOR Digital Video/MP3 :
For Digital Video/MP3 , press the INT
button is not available .
3). RDM(RANDOM) FUNCTION
During DISC playback, touc h scree n of
“RANDOM” section ( press the 4 /RDM
button longer on the remote co ntrol t o
play in random. Each playing , the ord er
is diff erent . (Depend on the disc used
for VCD).
Touch it again to cancel this func tion .
Note : in random mode, th e butto n is
not available .
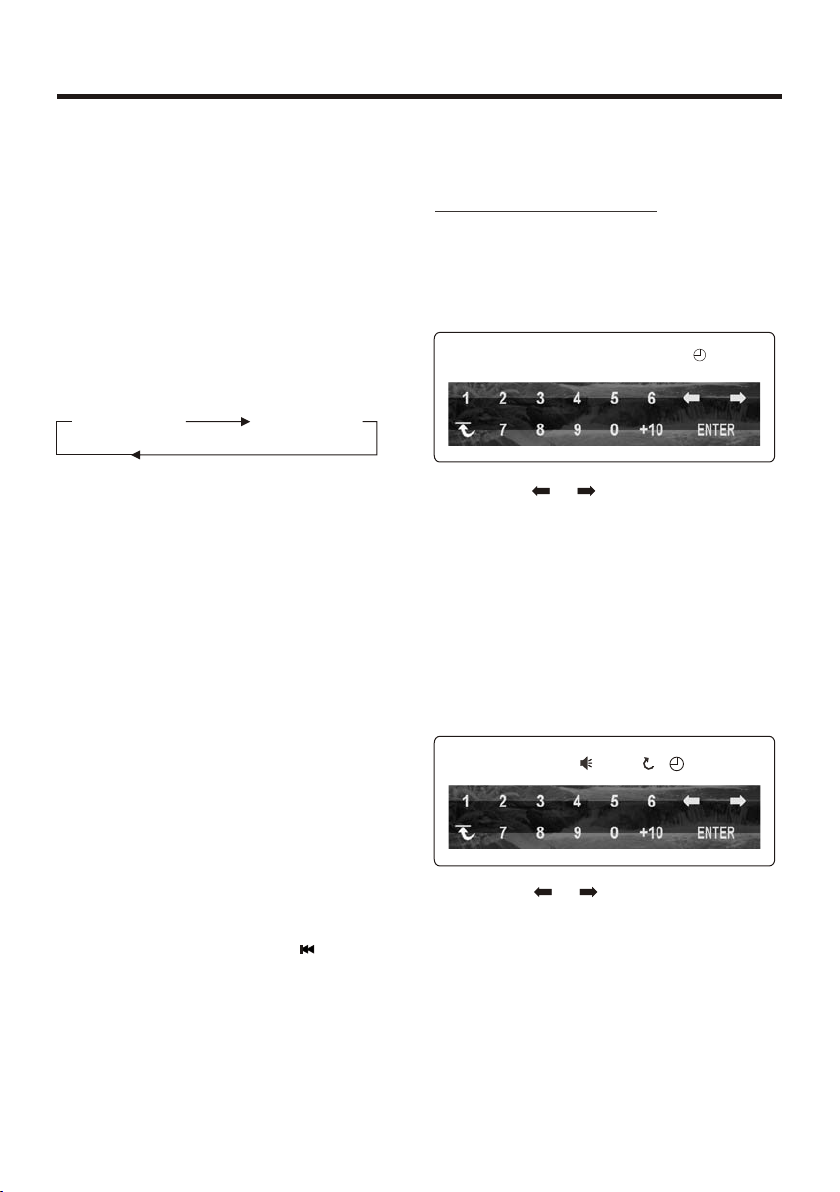
DISC Search (GOTO)
FOR Digital Video :
Touch the screen the of “GO TO” range
the screen will display the fo llowi ng
message :
Digital Vid eo TT 0 1/0 1 CH 03/31 0:01:44
Touch the / to select the you r
adjustment item, th en sele ct the it em
you want to watch throu gh CHAP TER/
TIME setting by touch ing the n umber ic
buttons , then touch th e ENTER b utton
to confirm .
FOR VCD (With PB C OFF):
Touch the screen the of “GO TO” range ,
the screen will display the fo llowi ng
message :
VCD TRK 0 1/1 9 PBC 0:01:44
Touch the / to select the you r
adjustment item, th en sele ct the it em
you want to watch throu gh TRACK/TIME
setting by touching the numb eric
buttons , then touch th e ENTER b utton
to confirm .
A
-24-
Page 27
Touch Screen Operation
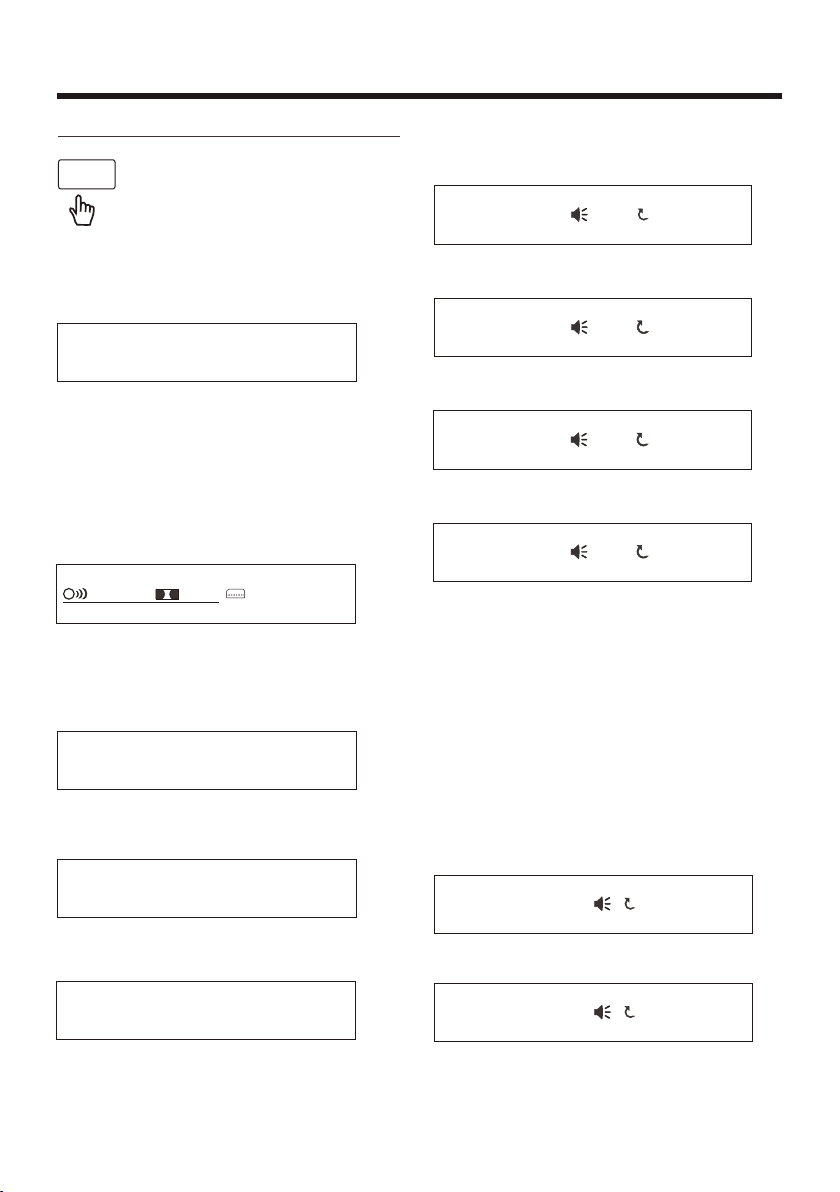
ON-SCREEN D ISPLAY FUNCTION
OS D
1. Digital Video:
A.Tou ch or Pre ss OSD for first time:
Digita l Vide o TT 01/ 01C H 04/3 1 C 0:0 2:06
Tit le Numb er, Total Title Number,
Chapter Number, Total Chapter Number
of this Title o f the disc currently being
played will be shown on the scre en,
along with the elapsed time.
B.Tou ch or Press OSD for second time:
½ ENG 2CH OFF AN O FF
The underlined part is different from
the used discs. The AN is a cam era
figure for some models.
C.Tou ch or Pre ss OSD for third time:
Digita l Vide o TT 01/ 01CH 04/3 1 C -0:01:3 2
During playback, touch the
screen of the OSD secti on,
it will display the followin g
as below :
2.Example for VCD/SVCD/C D:
A.Tou ch or Press OSD for first time:
VCD TRK 1/19 PBC C 0:01: 36
A
B.Tou ch or Pre ss OSD for second time:
VCD TRK 1/19 PBC C -0:06 :06
A
C.Tou ch or Pre ss OSD for third time:
VCD TRK 1/19 PBC T 0:0 2:12
A
D.Tou ch or Pre ss OSD for fourth time:
VCD TRK 1/19 PBC T -1: 23:06
A
E.Tou ch or Pre ss OSD for the fifth time:
The message on the screen will b e
cleared for SVCD and VCD.
NOTE:
For CD(audio) Disc, touch OS D butto n
is not available .
D.Tou ch or Pre ss OSD for fourth time:
Digita l Vide o TT 01/ 01C H 04/3 1 T 0:16 :00
E.Tou ch or Pre ss OSD for fifth time:
Digita l Vide o TT 01/ 01CH 04/3 1 T -1:3 6:55
F. Touch or Pres s OSD for s ixth ti me:
The message on the screen will b e
cleared.
3. Example for MP3
A.Tou ch or Pre ss OSD for first time:
CDrom TR K 2/7 6 C 0:00:36
A
B.Tou ch or Pre ss OSD for second time:
CDrom TR K 2/7 6 C -0:03:38
A
C. Touch or P ress OSD for third time:
The message on the screen will b e
cleared.
-25-
Page 28
Touch Screen Operation
Digital Video Special Function
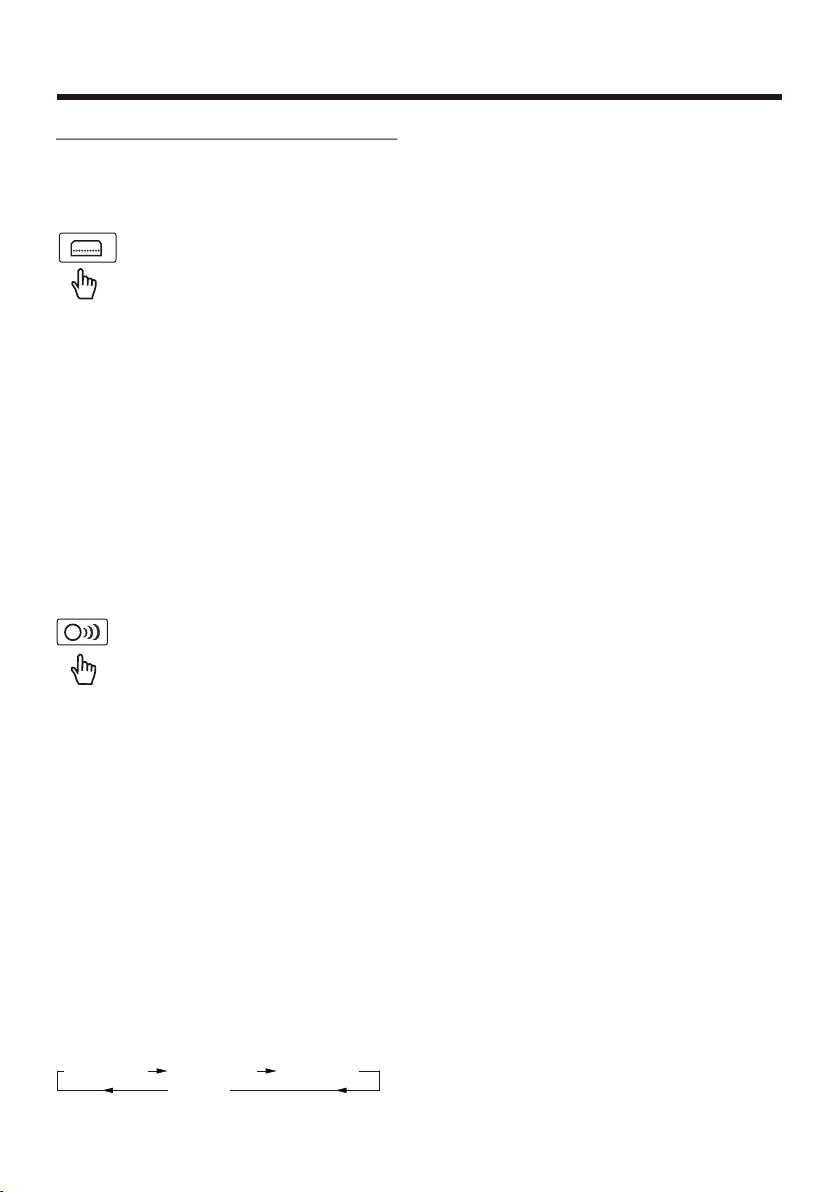
1. Multi-subtitle Language
Function (for Digital Video Only)
During Digital Video playback.
Touch the SUBTITLE sect ion
on touch screen(or pr ess the
SUBTITLE on the remot e) .
Each time the button is p resse d or touc h,
number of the subtitl e langu age cha nges
in sequential order.
Notes:
- The lan guage number is different
according to the disc .
- Some discs only contain one su btitl e
language.
- When no different subtitle language
are recorded, “ INVALID KEY ” wi ll be
displayed at screen left top c orner.
2. Multi-Audio Language Function
For Digital Video:
During Digital Video playback ,
touch the AUDIO secti on on
on the remote .) Each tim e the but ton is
pressed or touch , number of the a udio
soundtrack language chan ges on
sequential order.
Notes:
- The lan guage number is different
according to the disc .
- Some disc only contain one lan guage
soundtrack
- When no different language soundtra ck are recorded will be
display at screen left top cor ner.
touch screen (or press the AUDIO
“ INVALID KEY ”
For VCD/CD:
during playback, touch the A UDIO
section of the touch sc reen or P ress
AUDIO on the remote . It is p ossib le to
switch the sound between mon aural
and stereo sound.
MON O LEF T MONO R IGHT
STE REO
MIX -MO NO
3. Multi-Angle Function
(for Digital Video Only)
During Digital Video playback, touch the
ANGLE button on the tou ch scre en .
Each time the button is p resse d , the
number of the angel changes in s equen tial order .
Notes:
- The ang le number is differ ent
according to the disc .
- The fun ction only work for disc having
scenes recorded at di fferent angles.
- When no different angle are recorded,
will be displayed at
“ INVALID KEY ”
screen left top corne r.
4. Title Menu Function
For Digital Video:
If the Digital Video has multiple titles
recorded on the disc. It can sel ect
preferred title fro m the tit le menu t o start
playback.
- During Digital Video playback, press
TITLE button on the rem ote .Th e title
menu is display.
- Select preferred ti tle by th e curso r
button and confirme d by pres s the
ENTER button .
For VCD:
Press TITLE/PBC but ton on th e remot e
control while the disc is play ing, yo u can
switch between "PBC ON"and " PBC off"
mode.
-26-
Page 29
Touch Screen Operation
MEDIA SETUP MENU
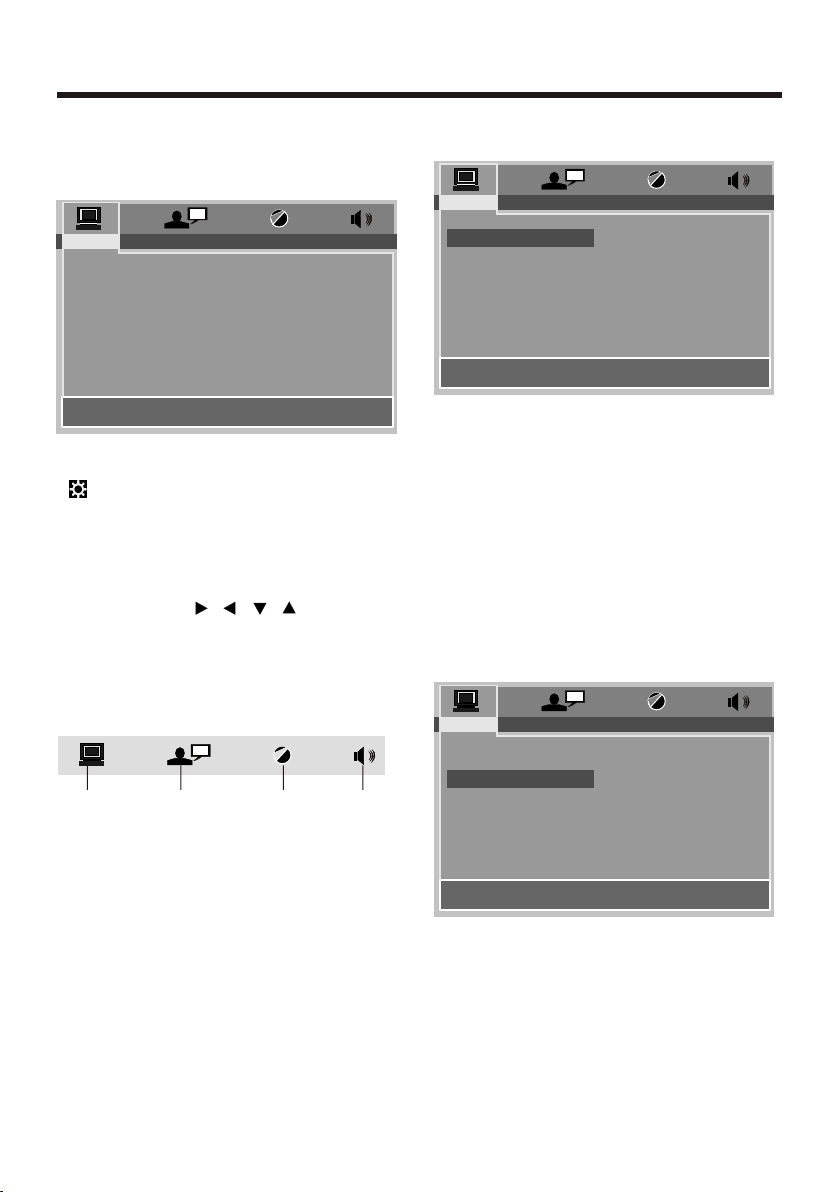
USING THE MENU
SYS TEM S ETU P
TV S YST EM
SC REE N SAV ER
TV T YPE
DE FAULT
EX IT
1. IN disc model Touc h the scr een of
“ ” range or press the SETUP button
on remote .
2.The SETUP menu is displayed.
3.Tou ch dire ctly the desired item to
select the preferred item .
Or by using the / / / bu ttons .
4. Touch th e EXIT sec tion to c lear th e
setup menu or press the SETUP on th e
remote control .
Overview Of The Main Menu
(1) ( 2) (3) (4)
(1). System Settings
(2). Language Settings
(3). Video Settings
(4). Digital Settings
SYSTEM SETUP
SYS TEM S ETU P
TV S YST EM
SC REE N SAV ER
TV T YPE
DE FAULT
EX IT
TV TYPE SETUP
This player is capable of play ing dis cs
recorded in either PAL or NTSC for mats.
Make the selection based on wh ether y ou
are connecting the unit to a PAL TV or an
NTSC TV. You can also set the unit to
AUTO (a utoselect). The d isadvantage to
autoselect is that ea ch time y ou turn t he
unit on it checks to see wh at kind o f
monitor is connected, whic h cause s a
small delay and some flicker ing of th e
display image which you may fi nd
unpleasant.
SYS TEM S ETU P
TV S YST EM
SC REE N SAV ER
TV T YPE
DE FAULT
EX IT
SCREEN SAVER SETUP
If the screen displays a stati c image f or
too long, some "burn-in" may o ccur,
leaving a permanent trace of t he imag e
behind. To avoid this, turn ON the
SCREENSAVER item. After a short
period of inactivity on the mo nitor, t he
unit will substitute a movin g image t o
avoid burn-in.
NT SC
PAL
AU TO
ON
OF F
-27-
Page 30
Touch Screen Operation
SYS TEM S ETU P
TV S YST EM
SC REE N SAV ER
TV T YPE
DE FAULT
EX IT
16:9
4: 3PS
4: 3LB
16 :9
4:3 Letter Box
4:3 Pan Scan
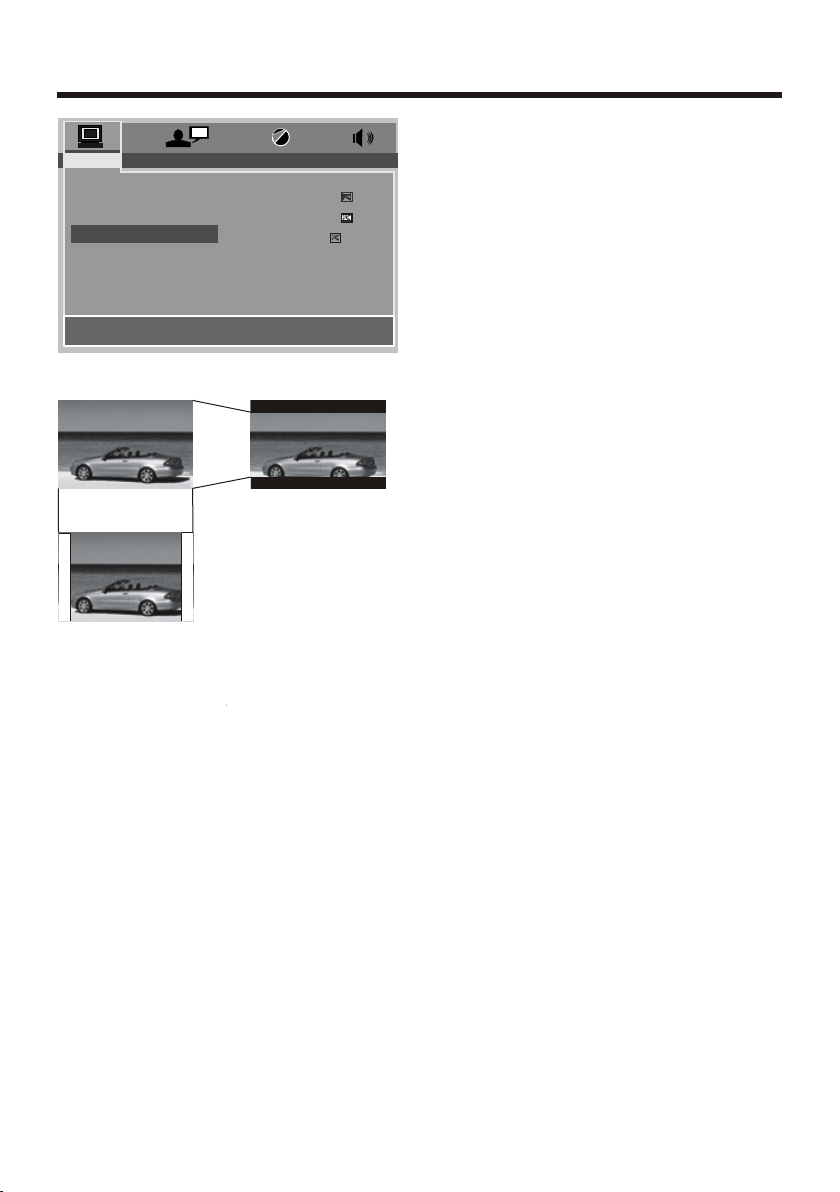
TV TYPE SETUP
This is t o select the appropriate TV
aspect (4:3 or 16:9) ac cordi ng to the
connected TV set.
Normal/PS (For 4:3 TV )
Played back in the PAN & SCAN style.
(If connected to wide -scre en TV, the
left and right edges ar e cut off.)
Normal/LB (For 4:3 TV )
Played back in LETTER B OX styl e.
(If connected to wide -scre en TV, black
bands appear at top and bottom o f the
screen.)
Wide (F or 16:9 T V)
Select when a wide-screen TV set is
connected.
-28-
Page 31
Touch Screen Operation
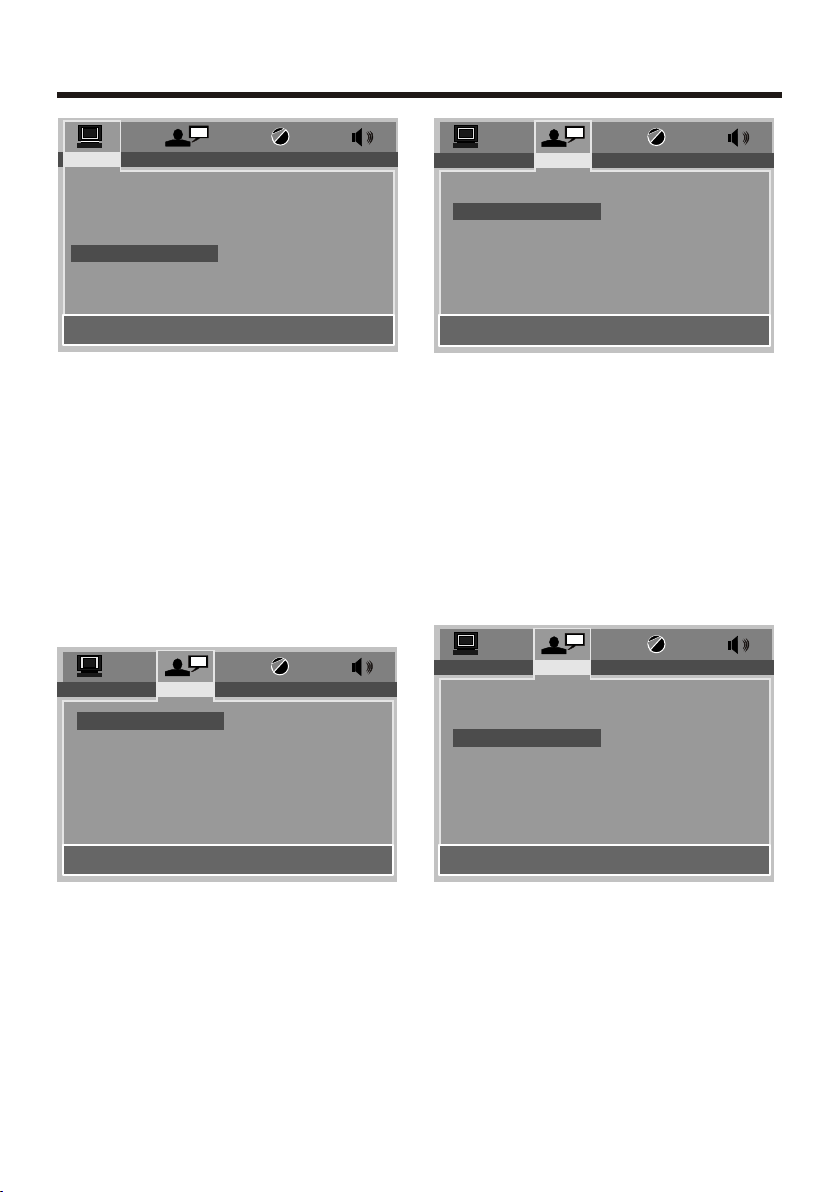
SYS TEM S ETU P
TV S YST EM
SC REE N SAV ER
TV T YPE
DE FAULT
RE STO RE
EX IT
DEFAULTS
Selecting the DEFAULT item an d confi rming RESTORE will return ALL pe rsona l
settings you have made, incl uding r adio
and TV pr esets, to the factory default
settings.
LANGUAGE SETUP
LA NGUA GE SE TUP
OS D LAN GUA GE
AU DIO L ANG
SU BTI TL E LAN G
ME NU LA NG
EX IT
EN GLI SH
GE RMA N
SPA NIS H
FR ENC H
PO RTU GU ESE
ITA LIA N
RU SSI AN
LA NGUA GE SE TUP
OS D LAN GUA GE
AU DIO L ANG
SU BTI TL E LAN G
ME NU LA NG
EN GLI SH
GE RMA N
SPA NIS H
FR ENC H
PO RTU GU ESE
ITA LIA N
RU SSI AN
EX IT
AUDIO LANGUAGE SETU P
Select the preferre d AUDIO so undtr ack
language by touching direc tly the
desired language .
LA NGUA GE SE TUP
OS D LAN GUA GE
AU DIO L ANG
SU BTI TL E LAN G
ME NU LA NG
EX IT
EN GLI SH
GE RMA N
SPA NIS H
FR ENC H
PO RTU GU ESE
ITA LIA N
RU SSI AN
OF F
OSD LANGUAGE SETUP
Select the preferre d OSD lan guage b y
touching directly the desi red lan guage .
SUBTITLE LANGUAGE S ETUP
Select the preferre d Subti tle lan guage
by touching directl y the des ired
language .
-29-
Page 32
Touch Screen Operation
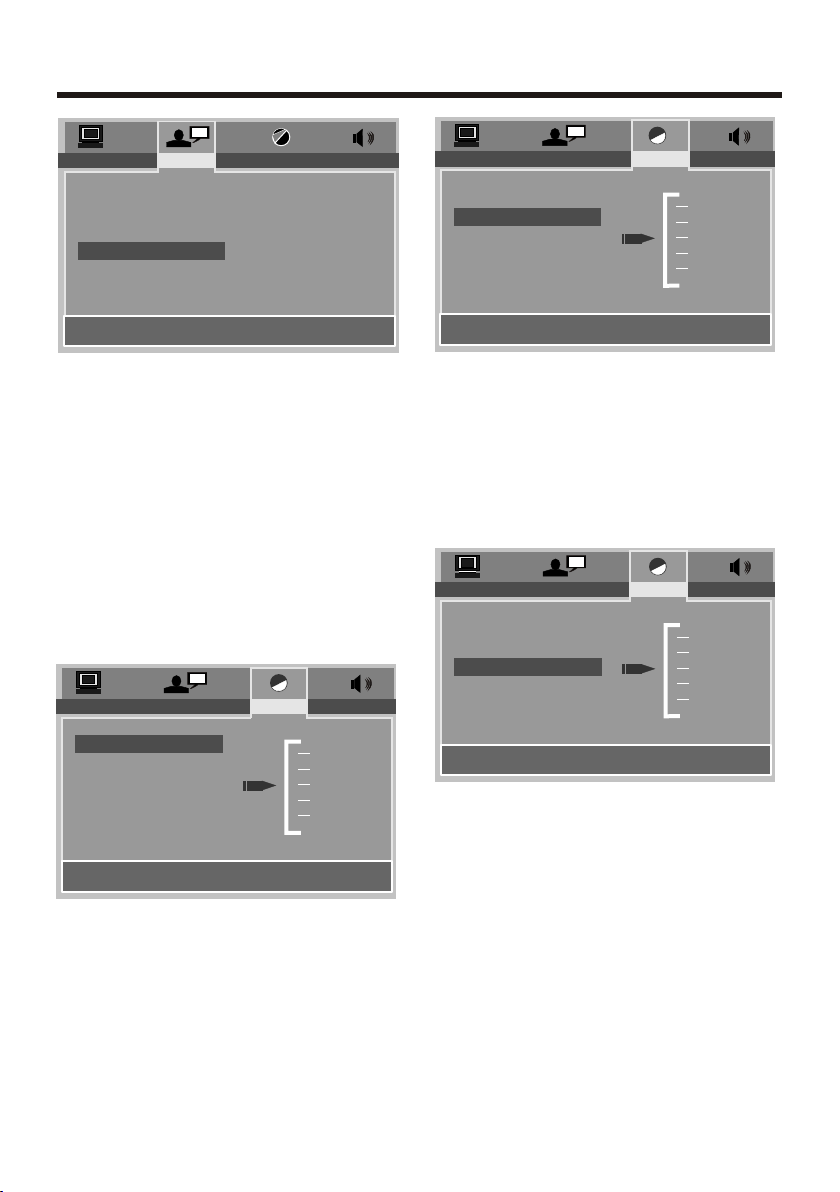
LA NGUA GE SE TUP
OS D LAN GUA GE
AU DIO L ANG
SU BTI TL E LAN G
ME NU LA NG
EN GLI SH
GE RMA N
SPA NIS H
FR ENC H
PO RTU GU ESE
ITA LIA N
RU SSI AN
EX IT
DISC MENU LANGUAGE SE TUP
Select the preferre d DISC ME NU lang u age by touching directly the d esire d
language .
VIDEO SETUP
these settings allow you to se t the vid eo
signal brightness, contr ast, hu e, and
saturation .
VI DEO S ETUP
BR IGH TN ESS
CO NTR AS T
HU E
SAT URAT IO N
SH ARP NE SS
EX IT
12
10
8
6
4
2
0
VI DEO S ETUP
BR IGH TN ESS
CO NTR AS T
HU E
SAT URAT IO N
SH ARP NE SS
12
10
8
6
4
2
0
EX IT
CONTRAST- the contrast of the v ideo
signal (the dark portions of p ictur es).
VI DEO S ETUP
BR IGH TN ESS
CO NTR AS T
HU E
SAT URAT IO N
SH ARP NE SS
+6
+4
+2
0
- 2
- 4
- 6
EX IT
HUE- the hue of the video signal ( the
color of the pictures) .
BRIGHTNESS- the bri ghtne ss of the
video signal (how light the pi cture i s) .
-30-
Page 33
Touch Screen Operation
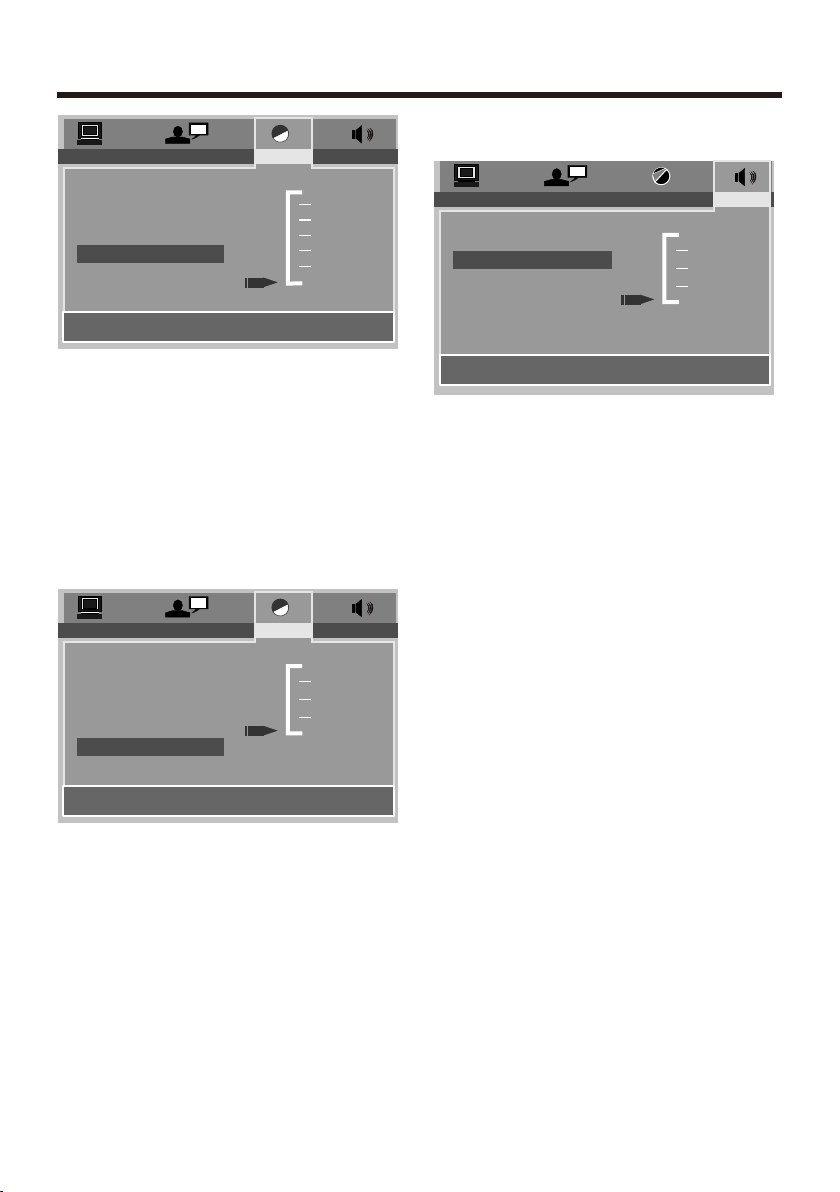
DIGITAL SETUP
VI DEO S ETUP
BR IGH TN ESS
CO NTR AS T
HU E
SAT URAT IO N
SH ARP NE SS
12
10
8
6
4
2
0
EX IT
SATURATION - the sat urati on of the
video signal (the vividnes s of the co lor)
all above can be adjusted to you r
tasters .
VI DEO S ETUP
BR IGH TN ESS
CO NTR AS T
HU E
SAT URAT IO N
SH ARP NE SS
8
6
4
2
0
DI GITA L SETU P
FULL
DY NAM IC RA NGE
6/8
4/8
2/8
OFF
EX IT
DYNAMIC RANGE CONTROL
Select DRC and adjust the dyna mic
range of a Dolby Digital encod ed
program. There are 8 steps between
full compression and off compression.
EX IT
SHARPNESS- the sharpness o f the vid eo
signal (the image setting ac umina tion) .
-31-
Page 34
Touch Screen Operation
AUX Operation
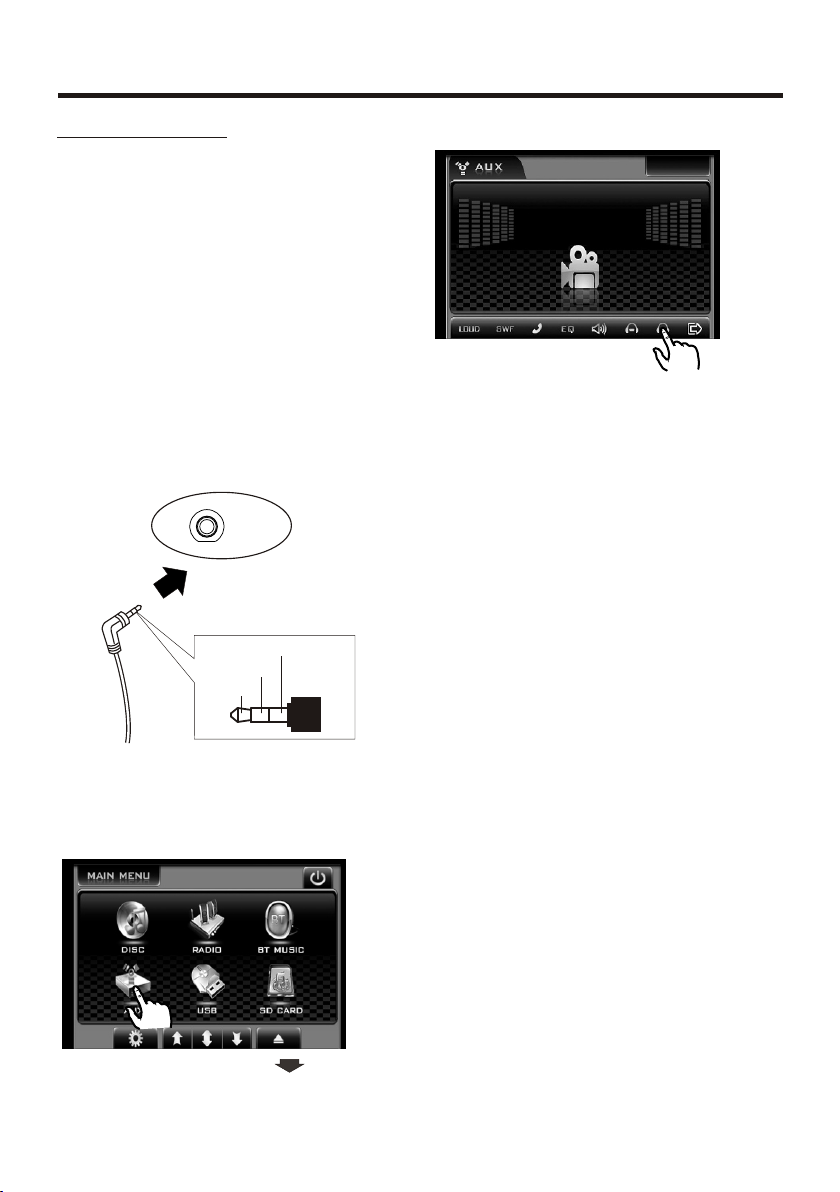
On the front panel of thi s unit, t here is a n
AUX IN jack, follow the d iagra m below t o
connect analogue replay de vices (only
for the Audio c onnect, if you want to
connect the Video, please plug the RCA
<Vide o input > on the back of the unit .) .
Use this jack to replay sound of o ther
replay equipment such as Dig ital Video
players, computers, etc. Via the loudspeakers.
1). Please connect th e exter nal dev ice
with stereo jack (3.5mm)pl ug the Aux i n
socket .
AUX IN JACK FRONT PANEL
AUX IN
AUX IN
Gro und
Rig ht
Lef t
3). You n ow hear t he sound from the
external device played bac k throu gh
the loudspeakers .
4). Touch th e volum e+/- se ction s on
touch screen or use the VOL+/- o n
the panel to adjust the volume l evel.
AUX IN
2). In main menu, touch “ AU X ”
ICON or press “MOD” but ton on
control panel to enter AUX IN mod e .
-32-
Page 35
Touch Screen Operation
BT OPERATION
1. “Pair” To Your BT Phone
Prior to using the Car Kit for the f ist tim e,
you must pair it with a BT-enable d
mobile handset.
The following steps descri bes pai ring
the instruction for a t ypica l BTenabled mobile handset.
1). Place the Car Kit and m obile h and set in 3 meters apart.
2). Put the Car Kit in pair ing mod e.
a. Press the POWER button to turn
ON, the BT ICON will flas h on TFT .
b. Touch th e screen of “ ” section
or press longer the “PAIR/ ” on
the remote control un til the w ord
“ BT ” icon fl ashin g , it’s now rea dy
for pairing.
3). Set your BT phone to
“discover” the Car Ki t .
Following your phone’s instruction
guide for details, activat e your
mobile handset’s BT mode , the
handset will search f or acce ssibl e
BT devi ces.
IMPORTANT:
1). If the pairing can no t be comp leted
within approximat ely 2 min utes ,
whiles the pairing mo de is act ivate d,
and you will need to reat tempt p airin g
(See steps 2-5 above) .
2). Af ter pairing is completed, if the BT
ICON is stilling flash on the TFT ,
please follow the steps to rea ttemp t
pairing through your hands et unti l the
BT ICON remains solid o n the scr een.
2. Using The BT C ar Kit.
Once connecting is co mplet e, you
may access the follow ing fun ction .
Some of the below menti oned fu nct ions only accessibl e for han dset
supported with hand s-fre e profi le.
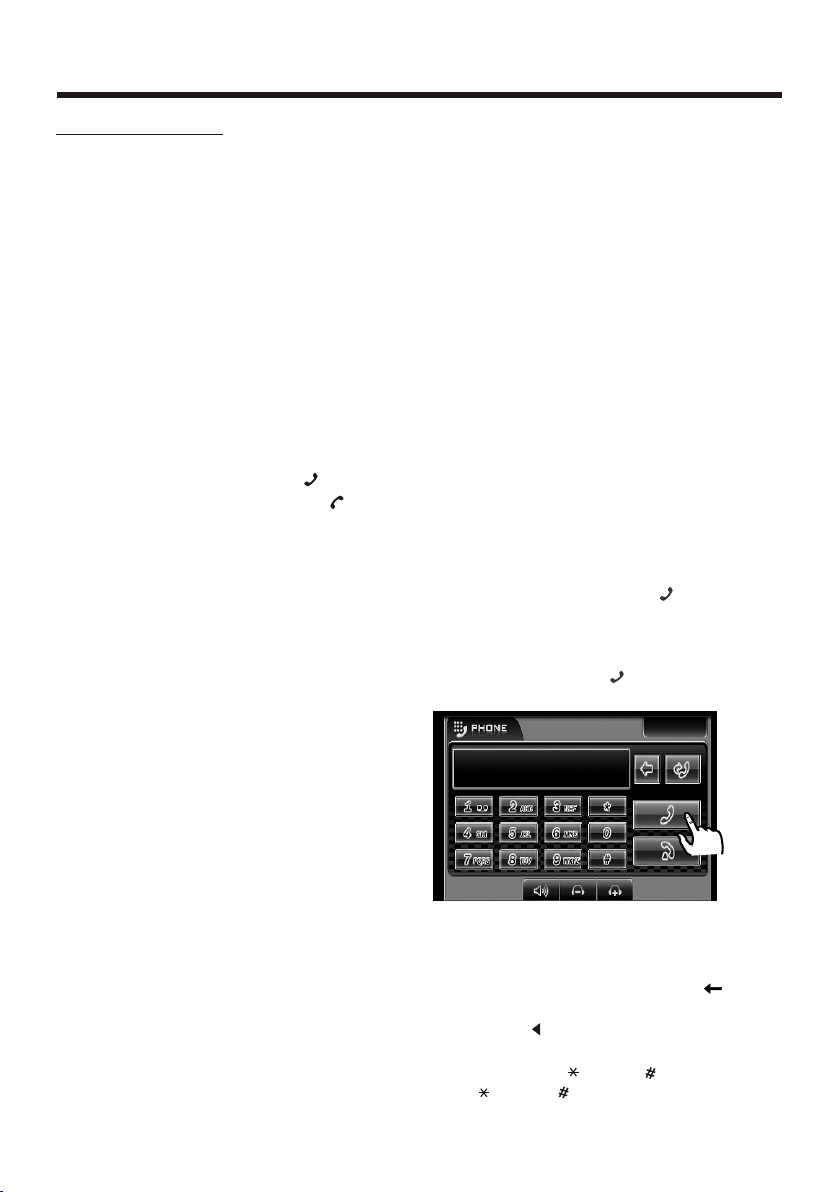
MAKE A CALL
Touch the sc reen of “ ” s ectio n ,
the dial numbers will d ispla y on the
monitor . then you can to uch the
number section on scr een , and
then touch the “ ” sectio n to call .
ca ll d ia l ou tca ll d ia l ou t
138 00 13 80 00138 00 13 80 00
4). Your phon e will fi nd this Car Kit .
Select this Car Kit fro m the lis t.
5). Enter passkey “8888”, t hen press
“OK” to pair t he Car Kit and the hand set .
6). Select the “CONNECT” from the list
on the phone, if you conn ect suc ces sfully , the BT ICON rema ins sol id on
the screen , then you can o perat e
the function of BT about the
unite .
Note: When you dial the w rong nu mber,
you can touch the scree n of “ ” to
delete the wrong number . (You c an also
press the “ ” button on the r emote
control to do so .)
Please note : “ ” and “ ” serve s as
the “ ” and “ ” button on your
mobile handset .
-33-
Page 36
Touch Screen Operation
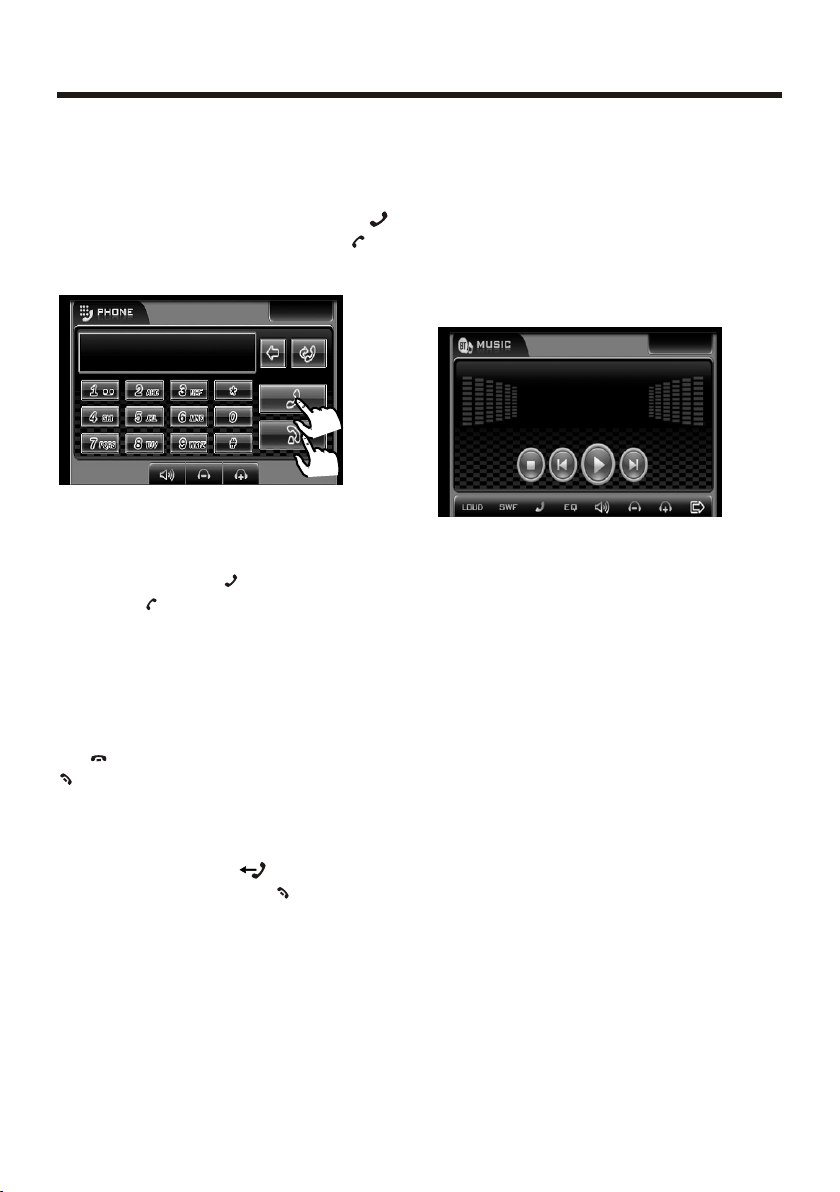
ANSWER A CALL
After you hear the ring to ne, a inc oming
telephone number will disp lay on th e
TFT monito r . Tou ch the screen of “ ”
range to listen or pres s the “PAIR/ ”
button shortly on the r emote c ontro l .
ca ll C OM E INca ll C OM E IN
138 00 13 80 00138 00 13 80 00
CALL TRANSFER
During talking mode , user can t ouch
the screen of the “ ” range ( or pres s
the “PAIR/ ” button on remote control )
to transfer the audio f rom the u nit bac k
to the mobile phone for privac y reaso n .
END/REJECT A CALL
In BT men u, touch the screen
of “ ” range (or press brie fly “REDIAL/
” button on remote control) .
REDIAL LAST NUMBER
In BT men u, touch “ ” range (or
press longer “ REDIAL/ ” butto n on
the remote control th e “DIAL LAST CALL
/DIAL OUT NOW ” will display on the
TFT monito r .
ADJUST THE VOLUME
During conversation in pro gress ,
tune the Volume switch u ntil yo u reach
the desired volume level.
PLAY BT MUSIC
In BT mod e, repeatedly the MOD
on the panel to select th e “BT MUSIC ”
Mode . Th e message will display like
following as follows :
Note:
the function of resum e playb ack aft er
pausing or stopping is avail able on ly for
some mobile phone.
Note:
1). Before using the fu nctio n of the BT
about the unit , please c heck yo ur
phone’s instruction guide or contact
phone manufacture if you are n ot sure
if your phone supports the han ds-fr ee
BT func tion .
2). When operating th e funct ion of BT
about the unit , you need m ake
your call-phone and the unit s ucces s fully for one time. Afterwards, you only
need to take on the power a nd the
function of BT wi ll work i n three
minutes automatic ally if y ou want t o
operate the functio n of BT .
3). If you want not to use th e funct ion of
the BT ab out the unit , you can
select the BT OFF .
-34-
Page 37
Touch Screen Operation
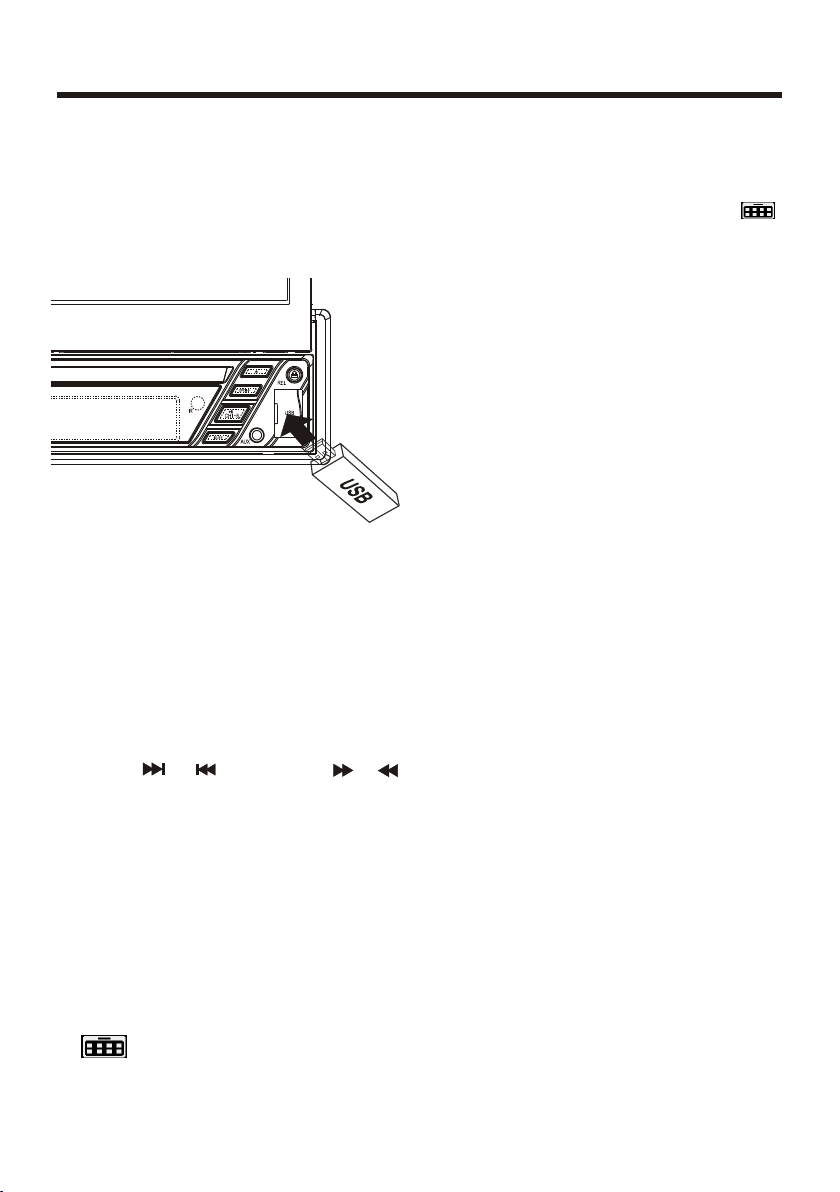
USB OPERATION
Following the diagram belo w, conne ct
your USB device to the fr ont pan el
USB port . If it is properl y conne cted,
the device will be mounted and s tart
playing automatically.
IN USB PLAYBACK MODE
User can use your finge r direc tly to to uch
the desired track to st art pla y .
You can use the U P, DO WN, RIGHT or
LEFT bu ttons to navigate and to select
files to play, and press ENTER to begin
playback (or viewing, in the c ase of
JPEG files).
To skip to the next or last tra ck, tou ch or
press the or . Press the or
buttons for Fast Forw ard or Fa st
Reverse playback.
REPEAT pl ay mode s are als o avail able
by repeatedly pushing REPE AT until
the desired mode is fou nd.
Changing From DISC to USB Playback
Mode
If the disc present in th e playe r is an
Digital Video or VCD or MP3/WMA or
MP4 disc, touch the scr een of th e “ ”
range to enter the home m enu, th en
touch the “USB” ICON to en ter the USB
mode .
IMPORTANT NOTE:
To prevent damage to the USB devic e,
do not remove or disconnect it d uring
playback. it is also a good prac tice to
remove the USB drive during di sc
playback.
Changing From USB to DISC Playback
modes
If you are in USB Playbac k mode an d
wish to begin playback of a disc a lread y
in the player, touch the s creen o f the
“ ” range to enter home men u,
then touch the “ DISC ” ICON to enter the
DISC mode .
-35-
Page 38
Touch Screen Operation
SD/MMC card OPERATION
The unit can support playbac k MP3/W MA/JP EG/MP4 and Divx format which are
stored into SD and MMC memory ca rd .
Please read below before you s tart th e opera tion of memory card .
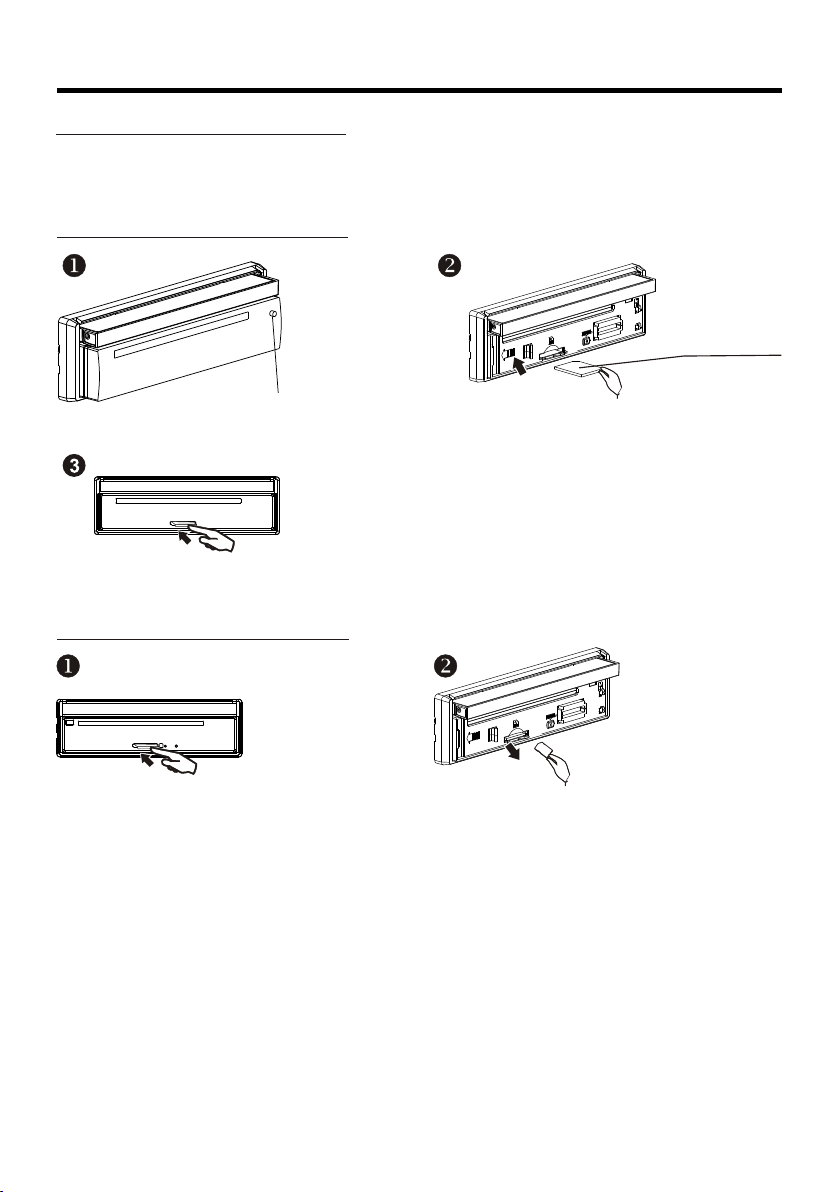
INSERTING THE SD OR MMC CARD .
Label s ide
facin g upw ard
Insert the memory car d
Press REL bu tton to d etach able the panel
Press in till heard a “CLICK”
REMOVING THE SD OR MMC CARD .
into slot with label side
facing upward .
Note: the mini card slot for GPS o nly.
Remove the memory card Press in till heard a “CLICK”
Mode change to SD/MMC card
After a SD or MMC card was in serte d into th e main un it card slot . the unit will starts
playing the files containe d on the me mory ca rd . Once the unit read the memory card
successfully, the first file on the memor y card wi ll auto matic ally start playback.
Press the MODE button r epeat edly is a llowi ng changing to other modes .
Change DISC to SD/MMC card
The operations are same as USB m ode, re fer to se e USB operation .
Change SD/MMC card to DISC
The operations are same as USB m ode, re fer to se e USB operation .
File Playback Operation
All the SD or MMC memory ca r playb ack ope ratio n function is same as the operation
on CD/MP3/WMA .
Please to “ MP3/WMA” op erati on for mo re deta ils .
-36-
Page 39
Touch Screen Operation
MP3/WMA/JPEG/MPEG4 PLAY
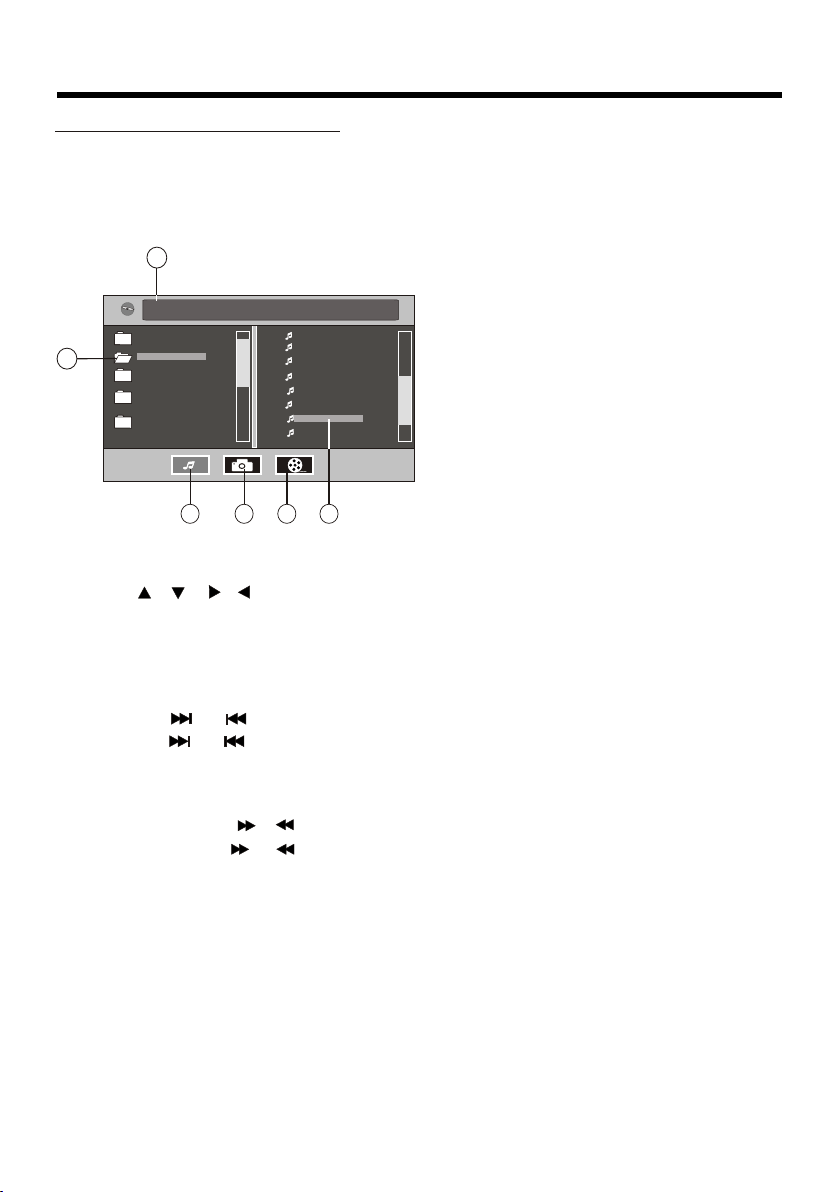
The unit is support MP3/WMA/ JPEG/ MPEG4 . When a disc is inserted into player,
the following picture will a ppear o n the mon itor . The uni t will pl ay the first track
automatically . You can touch to directly others mode (M P3/JP EG /MPE G4) to play .
EX. : when the MP3 mode is se lecte d .
2
[M P3][MP 3]
ITL E / SONG: T RACK 03 / ITL E / SONG: T RACK 03 /
WMAW MA
1
Mp3Mp3
001001
002002
003003
001001
002002
003003
004004
005005
006006
007007
007007
008008
3 4 5 6
Touch dire ctly to s elect t he play mode and then touch the desired trac k to play .
Or Use / / / on the remo te cont rol to se lect the play mode or item, then
press ENTER button on t he remo te cont rol to confirm.
MOVING TO ANOTHER TRACK :
1. Touch di rectly the desired song to start play .
2. Touch th e or range on the touch screen to skip a tr ack ahe ad or bac k.
3. Press the or button on t he remo te cont rol to skip a track ahead or back.
FAST FORWARD/FAST BACKWARD
1. Touch br iefly the “ / ” range on touch screen for f ast for ward / fa st backward.
2. Press shortly the or b utton o n the rem ote control for forward or backward .
1 Current type (highl ighte d bar) .
2 Current track (ID3 TAG disp lay) .
3 The current play mode (MP3) .
4 Select the play mode( JPEG) .
5 Select the play mode( MPEG4 ).
6 Current song in MP3 fol der .
REPEAT FUNCTION
Touch the screen of “REPEAT ” range or press longer “REP EAT” on the remote
control repeatedly can sel ect two k inds of r epeat play mode.
REP-ONE:
Play the same song over and over a gain.
REP AL L:
Play all songs on the disc, then r epeat s the ent ire disc over and over again .
NOTE:
in JPEG/MPEG4 mode, t he deta ils ope ratio ns as same as MP3/WMA opera tion .
-37-
Page 40

Specification
Generall :
Supply Voltage: 12V DC ( 11V-15V)
Current Consumption: Les s than1 0 A
Signal System: Comp ositi ve vide o 1.0Vp-p 75
Discs Played: (1)DIG ITAL-VIDE O Disc
5"(12 c m) sing le-si ded, si ngle-layer
5"(12 c m) sing le-si ded, do uble-layer
(2)Com pact Di sc (CD- DA, VID EO CD)
5"(12 cm) dis c
Audio Signal Output: 2ch&4 ch line o ut
Characteristics: (1)Fre quenc y Response 20 Hz - 20 KHz
(2)S/N R atio 90 d B (JIS)
(3)Wow and Flutter Below me asura ble lim its
RADIO Section :
For 2 Ban ds For 2 Ba nds
(Euro pe) (U. S.A.)
FM FM
Frequency Coverage: 87.5 t o108 MH z 87.5 to107.9 MHz
IF: 10.7 M Hz 10.7 M Hz
Sensitivity (S/N = 30 d B): 15 dBu 1 5dBu
MW AM
Frequency Coverage: 522 to 1620 KH z 530 to1710 KHz
IF: 450 KH z 450 KHz
Sensitivity (S/N = 20 d B): 40 dBu 4 0 dBu
BT:
BT spec ification: V1.2 Class 2
BT prof ile supported: Headset, Hands free an d A2DP & AVRC P profiles
Range of frequency: 2.4GHz S pectr um
TFT Monitor:
Monitor Screen Size: 7 Inch Wi de
Color System: NTSC/ PAL
NOTE:
Specification and design a re subj ect to mo dification, without notice, due to
improvements in technolo gy.
-38-
Page 41
Trouble Shooting
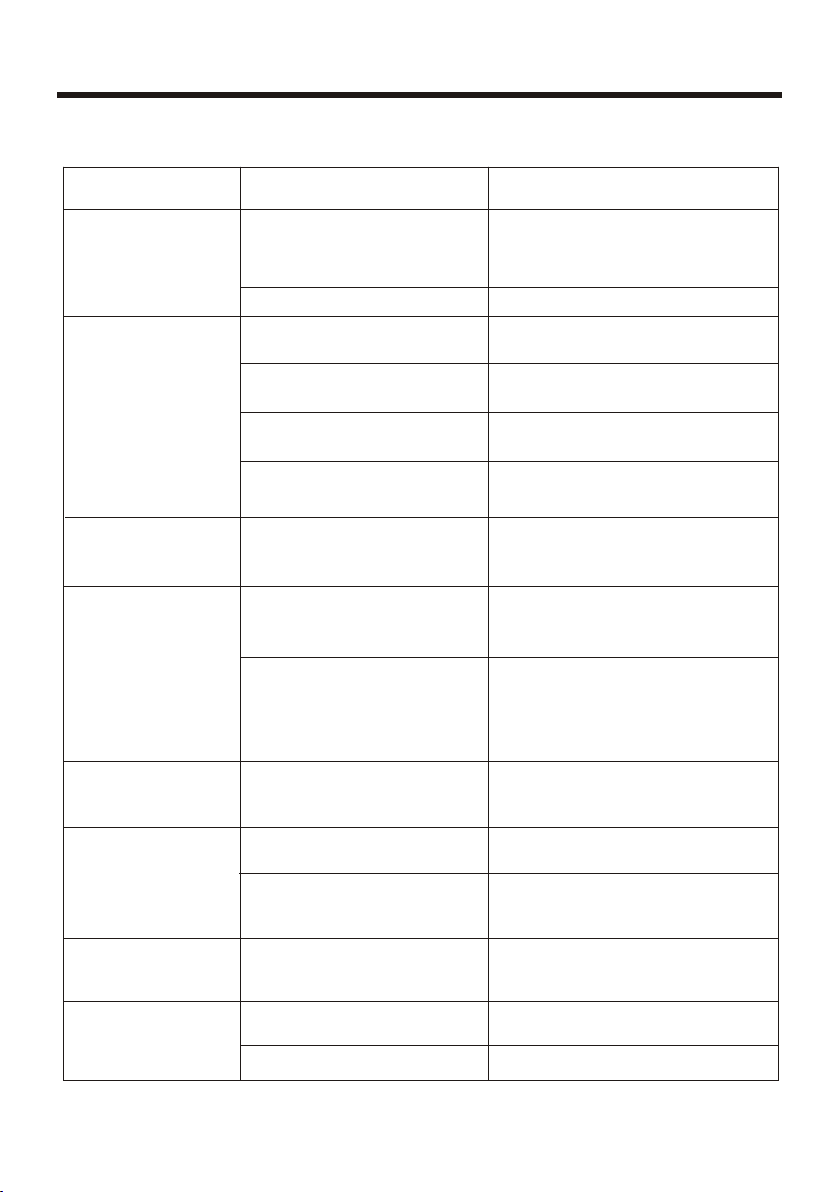
Before going through the che ck list , check w iring connection. If any of the problems
persist after check l ist has b een mad e, cons ult your nearest service dealer.
SYMPTOM CAUSE SOLUTION
If the power supply is properl y
connected to the car accesso ry
terminal,switch the igni tion ke y
to "ACC"
Replace the fuse
Remove the disc in the player,
then put a new one
Insert the compact di sc with
the label facing upward
Clean the disc or try to pl ay a
new one
Cool off or until the ambient
temperature return to norm al
Please switch to correct col or
system from menu
Make proper connection
according to wire connection “ ”
For safety reasons no v ideo/
images are displayed
while the vehicle is moving.
Engaging the parking brake w ill
cause images to be displayed .
Please the color system of
the choice accommodation
Change the disc
Change the disc Record JPEG
files using a compliant
application
Press the RESET button.
Front panel is not properly fi xed
into its place
Insert the antenna ca ble fir mly
Select a station manually
No power
Disc can not be
loaded or ejected
Video/image
appears
black-white
No video/image
appears
No color in picture
JPEG disc can
not be played
back
The operation keys
do not work
The radio does not
work
The car ignition switch is
not on
The fuse is blown
Presence of disc inside the
player.
Inserting the disc in revers e
direction
The disc is extremely dirty
or defective
Temperature inside the car
is too high
The color system is
set incorrectly
The unit is not connected
to the parking brake
detection switch
The parking brake is not
engaged
The dis c format is not
accordingto the TV-set
used (PAL /NTSC )
No JPEG files are recorded
on the disc.
JPEG files are not reco rded
in a compliant formant
The built-in microcomput er
is not operating properly
due to noise
The antenna cable is not
connected
The signals are too weak
MADE IN CHINA
88-J8316- 03
-39-
 Loading...