

Naxa NCD-707 User Manual

To ensure safety while driving
and to comply with laws,
drivers should not watch video or
operate the video device while driving.

Content
Precaution..... ..... ..... .......................
Safety Informatio n.... ..... ................
Disc Note........ ..... ..... .....................
Installation .... ..... ..... .................. ....
Electric Connecti on .... ..... .............
Remote Control... ..... ..... ...............
Basic Operation ... ..... ..... ...............
Loading/Ejecting a DISC .. ..... ..........
Open/Close Monitor and Angle
Adjustment...... ..... ..... ......... ........
TFT Mon itor Adjustment ............ ....
Setting animation..... ..... .................
Setting wallpaper...... ..... .................
Setting LED Light....... ..... ................
Audio Quality Adjustment .. ..... .........
Setting Time ....... ..... ..... .................
Setting Audio Mode ........ ..... ............
Reset Factory Setti ngs ... ..... ...........
Rear Vi ew Camera ................. ..... ..
Control Panel ..... ..... ..... .................
Unit keys ......... ..... ..... .....................
Radio Operation ... ..... ..... ..............
Listening to radio...... ..... .................
Storing and Listening to a mem ory
station ......... ..... ..... .................. ....
Automatic Memory St oring &
Program Scanning...... ..... ............
Media Operation.. ..... ..... ................
Basic Operation ... ..... ..... .................
2
Selecting Play Mode... ... ..... .............
3
On-Screen Display Functi on .... .........
4
Digital Video Special Function.... ....
5
Multi-Subtitle Languag e funct ion.. .....
9
Multi-audio language Fun ction ..... .....
10
Multi-angle Function.. ..... ..................
13
Tit le menu f uncti on... .................. ..... .
13
Media Setup Menu... ..... ..... .............
System Setup..... ..... ..... ...................
13
Language Setup........ ..... .................
14
Video S etup .................... ..... ...........
14
Digital Setup ..... ..... ..... ....................
15
AUX Operation ..... ..... ..... ................
15
USB Operation ..... ..... ..... ................
15
SD/MMC Card Operati on... ..... .........
15
MP3/WMA/JPEG/MP EG4 Pla y........ ..
16
Specification ... ..... ..... ....................
16
Troubleshooting. ..... ..... .................
16
17
17
20
20
20
21
22
23
23
25
26
26
26
26
26
27
27
29
30
31
32
33
34
35
36
37
-1-

Precaution
THANK YOU FOR PURCHASING THIS CAR D IGITAL VI DEO PLAYER .
Before oper ating the unit, read thi s manual thoroughly and keep it handy
for future re ference .
To avoid injury or accident , read the follo wing precautions before
installin g and operating the unit .
ON INSTALLATION
DO NOT install any receiver in loca tions where;
- it may obstru ct the steering wheel and gearshift lever operations, as th is
may result in a t raffic accident.
- it may obstru ct the operation of safe ty devices such as air bags, as this
may result in a f atal accident.
- it may obstru ct visibility.
DO NOT operate any receiver while m anipulating the steering wheel, a s
this may resu lt in a traffic accide nt.
The driver mu st not watch the monitor while driving.
IF THE DRIVER watches the monitor w hile driving, it may lead to
carelessn ess and cause an accident.
IF YOU NEED to operate the receive wh ile driving, be sure to look ahead
carefully o r you may be involved in a traffic accident.
IF THE PARKING BRAKE is not engaged.“ ParkingBrake” fl ashes on the
monitor, and n o playback picture will be shown.
- This warn ing appears only when th e parking brake wire is connected to
the parking b rake system built in the car ( refer to the electric connection )
ABOUT THE LIQ UID CRYSTAL DISPLAY (LCD) PANEL
Do not press on t he LCD panel on the unit as doing so can distort the
picture or ca use a malfunction . Th e picture may become unc lear , or the
LCD panel may b e damaged .
NOTES ON CLEA NING
-Clean the LC D panel with a slightly damp soft cloth.
-Do not use sol vents such as benzine, thinner, commercially available
cleaners or a ntistatic spray .
-Do not use alcohol to clean the screen .
If your car was p arked in a cold or hot place , the picture may not be clear .
The monitor is not damaged . The picture will become clea r the temper ature in your c ar becomes normal .
-2-

Safety Information
CAUTION:
THIS DI GITAL VIDEO PLAYER IS A CLASS I L ASER PR ODUCT. HO WEVER
THIS DIGITAL VIDEO PLAYER USES A VISIBLE/INVISIBLE LASER BEA M
WHICH COULD CAUSE .
HAZARDOUS RADIATION EXPOSURE IF DIREC TED. BE S URE TO OPERATE
THE DIG ITAL VIDEO PLAYER CORRE CTLY AS IN STRUC TED.
USE OF CONTROLS OR ADJUS TMENT S OR PERF ORMANCE OF
PROCEDURES OTHER THAN TH OSE SPECIFIED HEREIN MAY RESULT IN
HAZARDOUS RADIATION EXPOSURE.DO NOT OPEN COVERS AND DO NOT
REPAIR YOUR SELF. REF ER SERVICI NG TO QUALIFIED PERSONNEL.
WARNING:
TO RE DUCE THE RISK OF FIRE O R ELECT RIC SHO CK, DO NOT EXP OSE THI S
EQUIPMENT TO RAIN OR MOI STURE .
TO RE DUCE THE RISK OF FIRE O R ELECT RIC SHO CK, AND ANNOYING
INTERFERENCE, USE O NLY THE REC OMMEN DED ACCES SORIE S.
THIS DE VICE IS INTENDED FOR CONTINUOUS O PERATION.
REGION MANA GEMENT INFORMATIO N:
This Di gital Vide o Playe r is designed and manufactured to respon d to the Re gion
Management Inform ation t hat is re corde d on a Digital Video di sc. If the Region
number described on the Digi tal Video disc does n ot corr espon d to the Region
number of this Digital Video Player, this Digita l Video Player cann ot play t his dis c.
-3-
Disc Note
Disc format s supported by this
player
Digita l
Vid eo
VCD
CD
MP3
Digital
Video
VCD
CD
MP3
Audio and Video
Disc size 12 cm
Audio and Video
Disc size 12 cm
Audio
Disc size 12 cm
Audio
Disc size 12 cm
Discs which c annot be played
with this pla yer
Digital Video-RAM
CDV
CDG
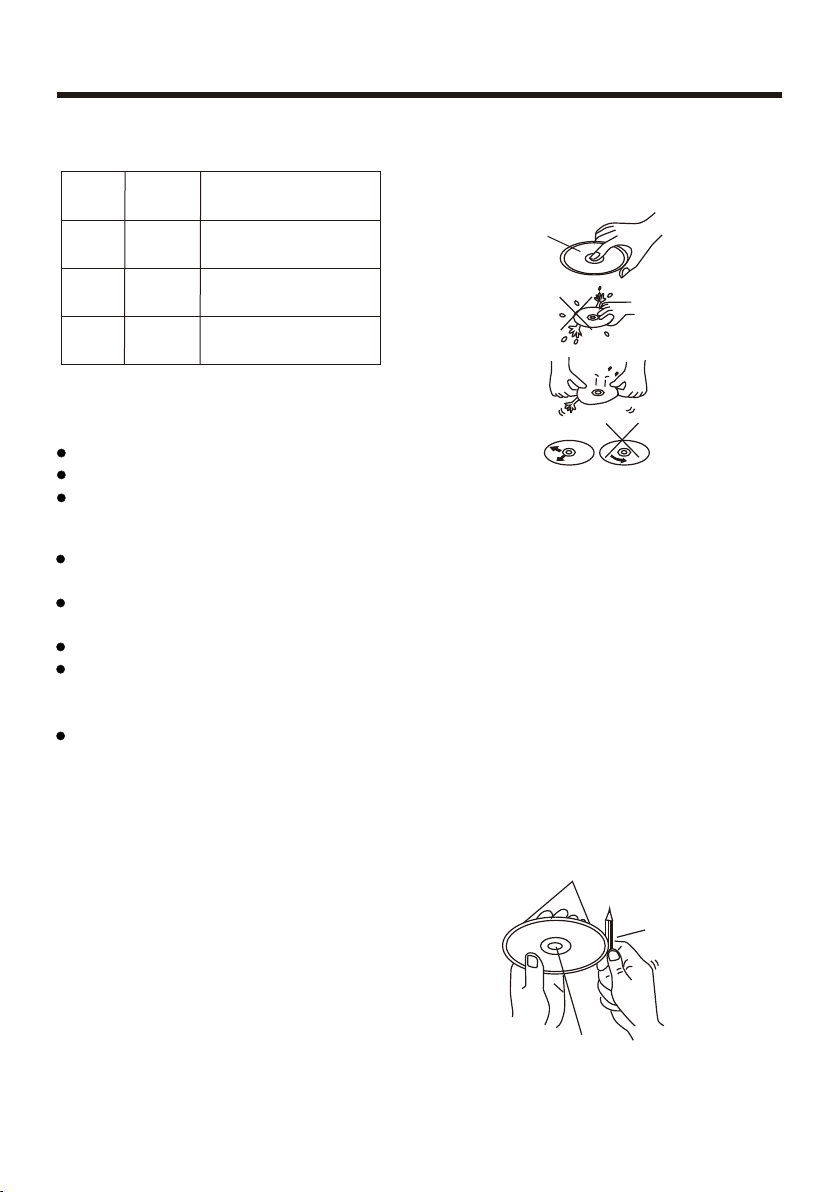
Handling an d Cleaning
Dirt, dust, scratch es and wa rping d isc
will cause misoperation.
Do not place stickers o r make
scratches on discs.
Do not warp discs.
A disc sh ould al ways be kept in its
case when not in use to pre vent fr om
damaging.
Do not place discs in the f ollow ing
places:
1.Direct sunlight
2.Dirty, dusty and damp areas
3.Near car heaters
4.On the seats or dashbo ard
Disc Cleani ng
Use a dry soft cloth to wip e the sur face.
If the disc is quite dirt y, use a soft cloth
slightly moistured with is oprop yl (rub bing)
alcohol. Never use solvent s such as
benzine, thinner or conven tiona l recor d
cleaners as they may mar the sur face of
the disc.
Note:
A disc may become somewhat scra tched
(although not enough to make i t
-4-
unusable) depending on you r handl e it
and conditions in the usage en viron ment.
Note these scratche s are not a n
indication of any problem wi th the pl ayer.
Lab el si de
up
Do no t tou ch
the
und ers ide
of th e dis c
Do no t
ben d
Wip e the disc fr om
center
tow ard t he out side
edg e
Preparing N ew Discs with Rough
Spots
A new disc ma y h av e r oug h e dg es on
its in side and ou ts ide ed ge s. If a d isc
with rou gh edges is us ed , t he prope r
setting w ill not be per fo rme d and th e
player will not p lay th e disc. Therefore,
remove the ro u gh edg e s i n ad v anc e
by using a ball point pen or penci l as
shown on the right. To rem o ve t he
rough edges, press the sid e o f th e pen
or pencil against the inside a nd outs ide
edges of the disc.
Rou gh spot s
on
out side ed ge
Bal l point p en
or pe ncil
Rou gh spot s
on in side
edg e
Installation
NOTES:
Choose the mounting locati on wher e the uni t will not interfere with the normal
driving function of the driv er.
Before finally inst allin g the uni t, conn ect the wiring temporarily and make sure
it is all connected up pr operl y and the u nit and t he system work properly.
Use only the parts incl uded wi th the un it to ens ure proper installation. The use
of unauthorized parts can ca use mal funct ions.
Consult with your nea rest de aler if i nstal lation requires the drilling of holes or
other modificatio ns of the v ehicl e.
Install the unit wher e it does n ot get in t he driv er s way and cannot injure the
passenger if there is a s udden s top, li ke an eme rgency stop.
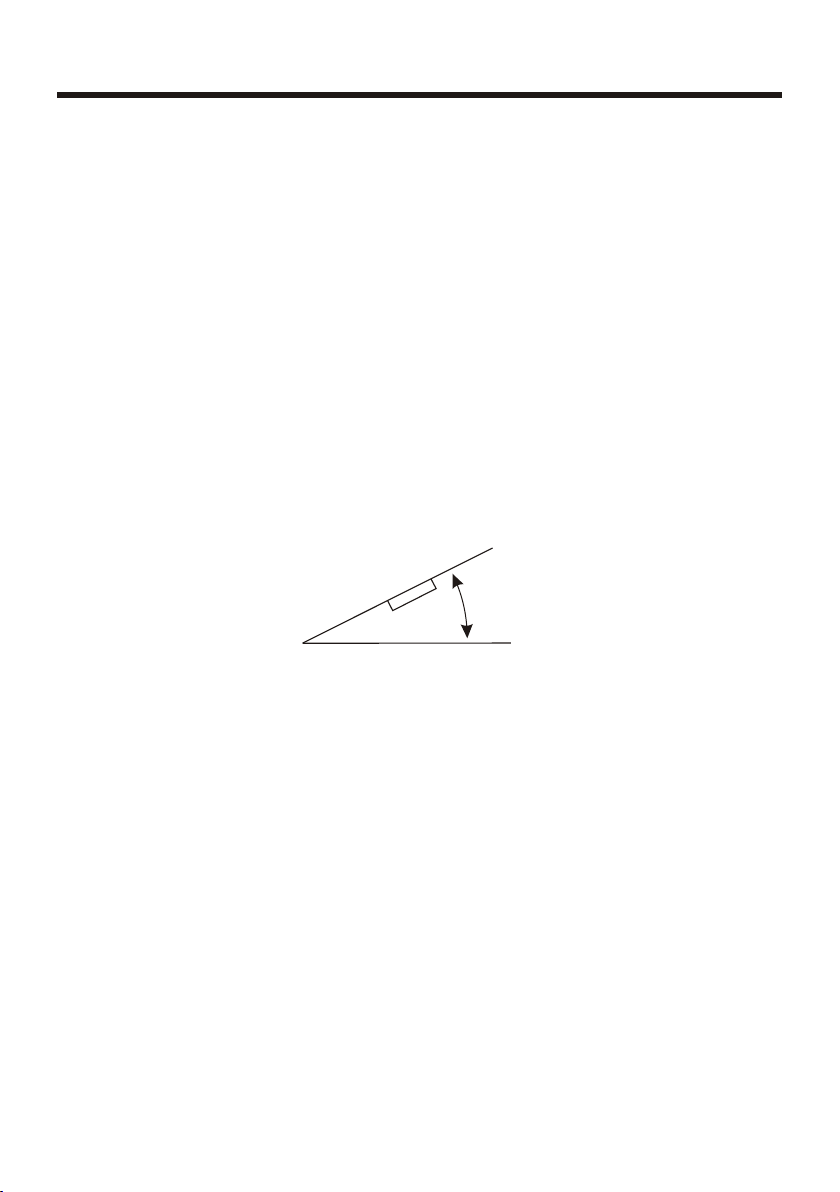
If installation ang le exce eds 30 fr om hori zontal, the unit might not give its
optimum performan ce.
'
30
Avoid in stalling the unit where it would be subjec t to high t emper ature, such
as from direct sunlig ht, or fr om hot ai r, from the heater, or where it would be
subject to dust, dirt o r exces sive vi brati on.
DIN FRONT/R EAR-MOUNT
This un it can be properly installed either from " Front "(con ventional DIN
Front-mount) or "Re ar"(D IN Rear -moun t installation, utilizing threaded
screw holes at the side s of the un it chas sis). For details, refer to the followin g
illustrated insta llati on meth ods.
-5-
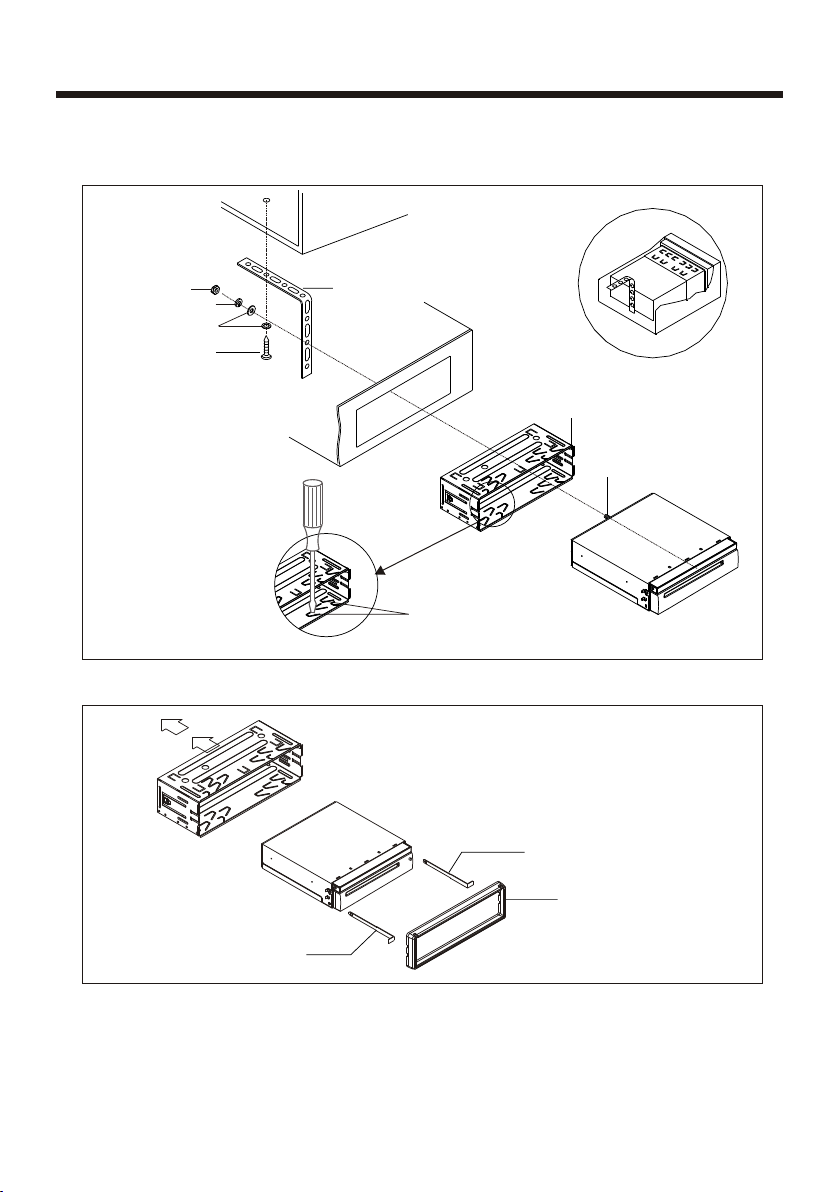
Installation
Installating the unit
DASH BOA RD
HEX NUT
SPRING WA SHER
PLAIN WAS HER
TAPP ING S CREW
SCREWD RIVER
METAL M OUNT ING
STRAP
TABS
CONSOL E
KEY PLATE
SLIDE BR ACKET
HOUSIN G
HEX BOLT
PLASTI C TRIM OUT
KEY PLATE
If you want to take CHASSIS out of the SLIDE BRACKET HOUSING, first remove
the PLASTIC TRIM OUT of the both sides away, then insert the two KEY PLATE into
left and right side of chassis as above illustration.
-6-
Installation
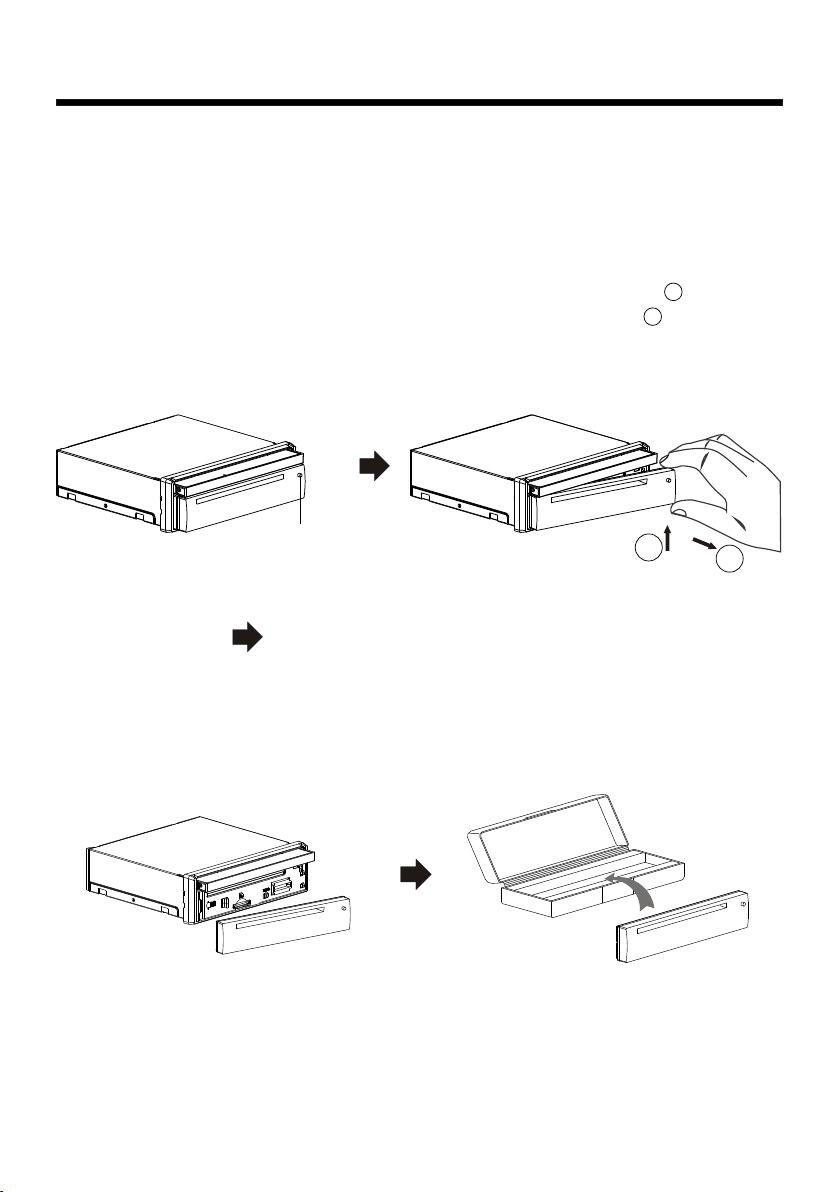
How To Remove And Install The Front Panel
When detaching or attachin g the con trol pa nel, be careful not to damage the
connectors on the back of the co ntrol p anel an d on the panel holder.
Detaching T he Front Panel
Before deta ching the control panel, be sure to turn off the p ower.
1). Press the “REL” rel ease bu tton an d the rig ht hand side of front pane will release
First pull up the panel as the directi on indi cated b y the arr ow (See )And then
taking out th e panel as th e direc tion in dicated by the arrow (See ).
1
2
REL button
2). Put the front panel i n the pro tecti ve case f or safe keeping.
1
protect ive case
2
-7-
Installation
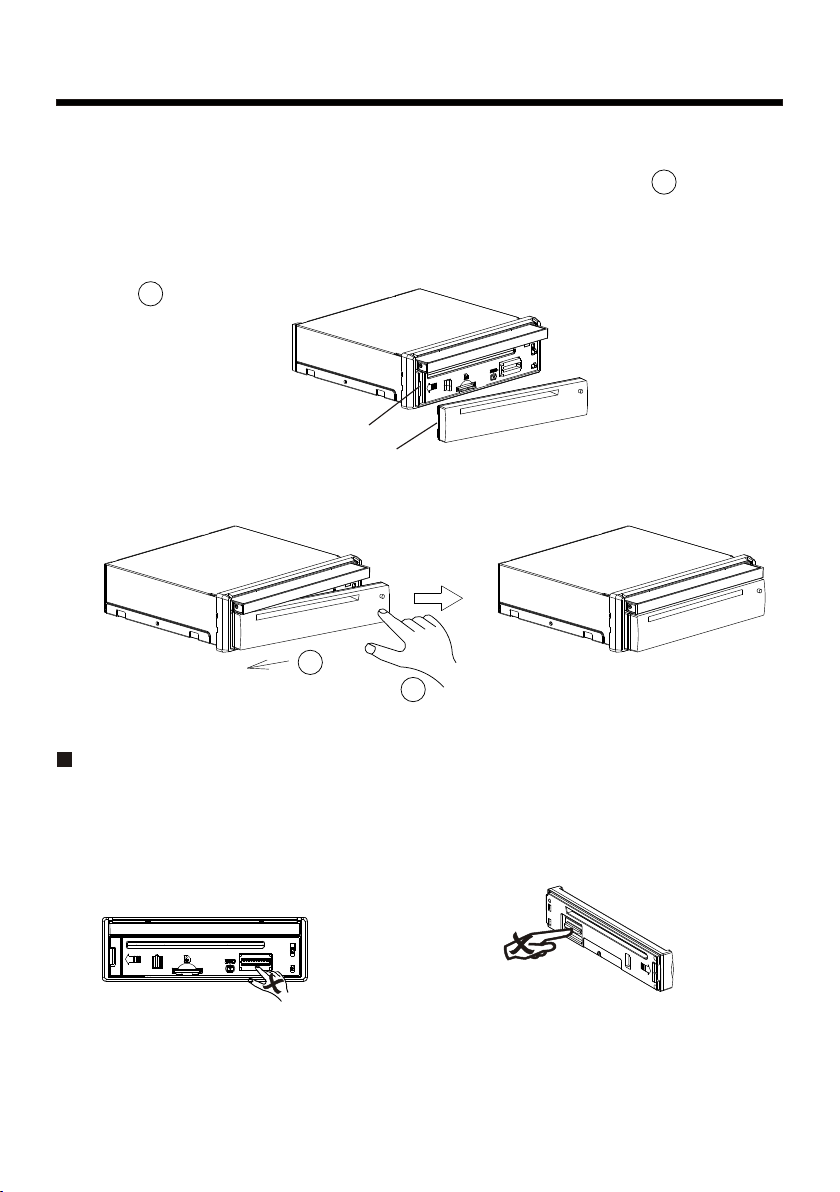
ATTACHING THE FRONT PANEL
1). First, insert the l eft sid e of the fr ont panel into the main unit(SEE ).
(Note: the “Hollow ” po int on th e front p anel must be attached into the “Bulge”
point of the unit . )
2). Gently push the rig ht-do wn hand s ide of th e front panel until you feel a “ Click” .
(SEE )
2
Bulge
Hollo w
1
1
2
Precautio ns
Do not touch the contacts on the f ront pa nel or th e unit body, si nce thi s may
result in poor electrical co ntact . If dirt o r dust accumulates on the contact s ,
wipe them with a clean, dry clot h .
-8-
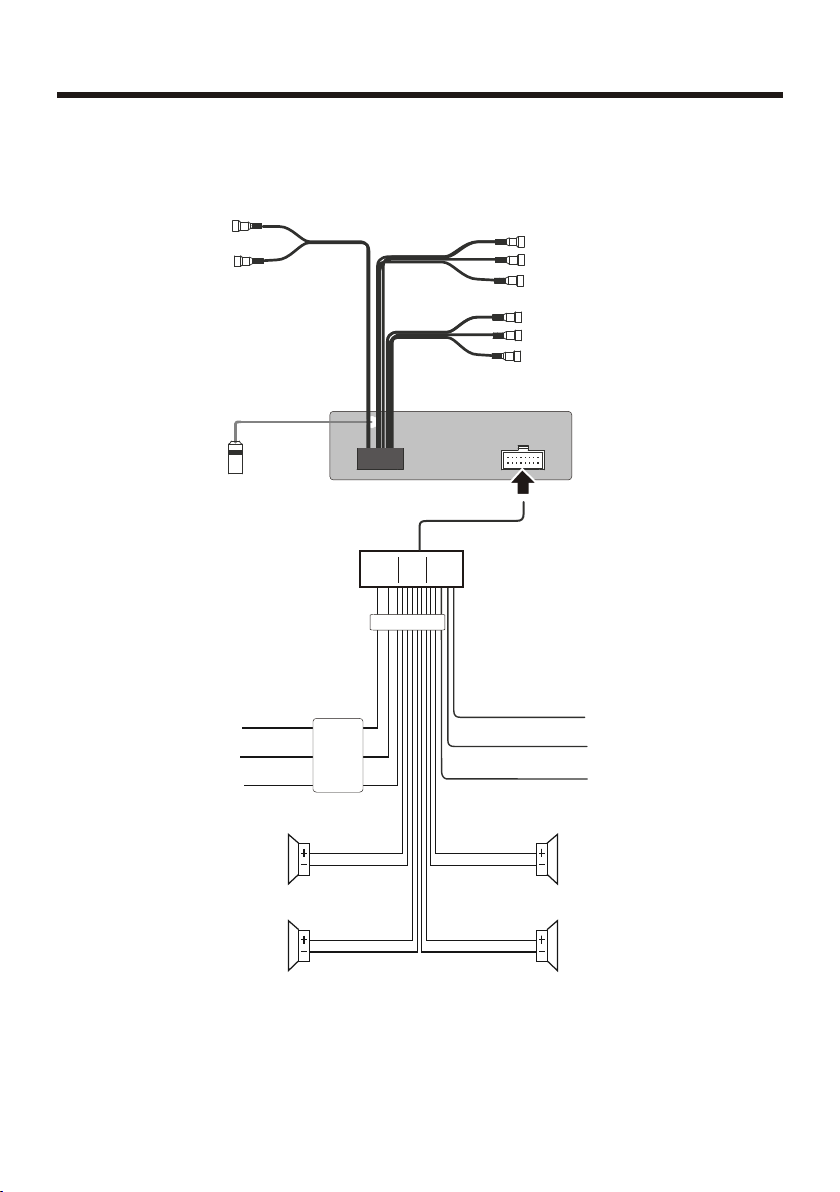
Electric Connection
WI RING CONNECTION
REA R RCA OUTP UT
RCH RED
LCH WHITE
RADIO ANTENN A JA CK
CAB LE
RCA CA BLE
FRO NT RCA OUT PUT
CAB LE
ISO CO NNECT OR
REAR CAMERA IN PUT Y ELLOW
SUBWOOFER G REY
VIDEO IN YE LLOW
FRONT RC A RE D R
VIDEO OUT YEL LOW
FRONT RC A WH ITE L
(B+)12V
REAR CAMERA SW ITC H
(B-)PAR KIN G BRAKE
AUTO AN TEN NA
FRONT
RCH SPK.
REAR
RCH SPK.
IGN ITI ON SWI TCH( B+)
MEM ORY BA CK-U P(B+ )
GRO UND (B-)
FRONT
LCH SPK.
LCH SPK.
REAR
RED
YEL LOW
BLA CK
CHO KE
BOX
WHI TE
WHI TE/BL ACK
GRE EN
GRE EN/BL ACK
PIN K
BROWN
BLUE
GRE Y
GRE Y/BLA CK
VIO LET
VIO LET/B LACK
Note:
the earth connection cable ( parki ng brak e B-) must be connected in order for
pictures to be played back to th e monit or. If the c able has not been correctly
connected, the message “PARKING BRAKE ” appea rs on the m onito r.
-9-
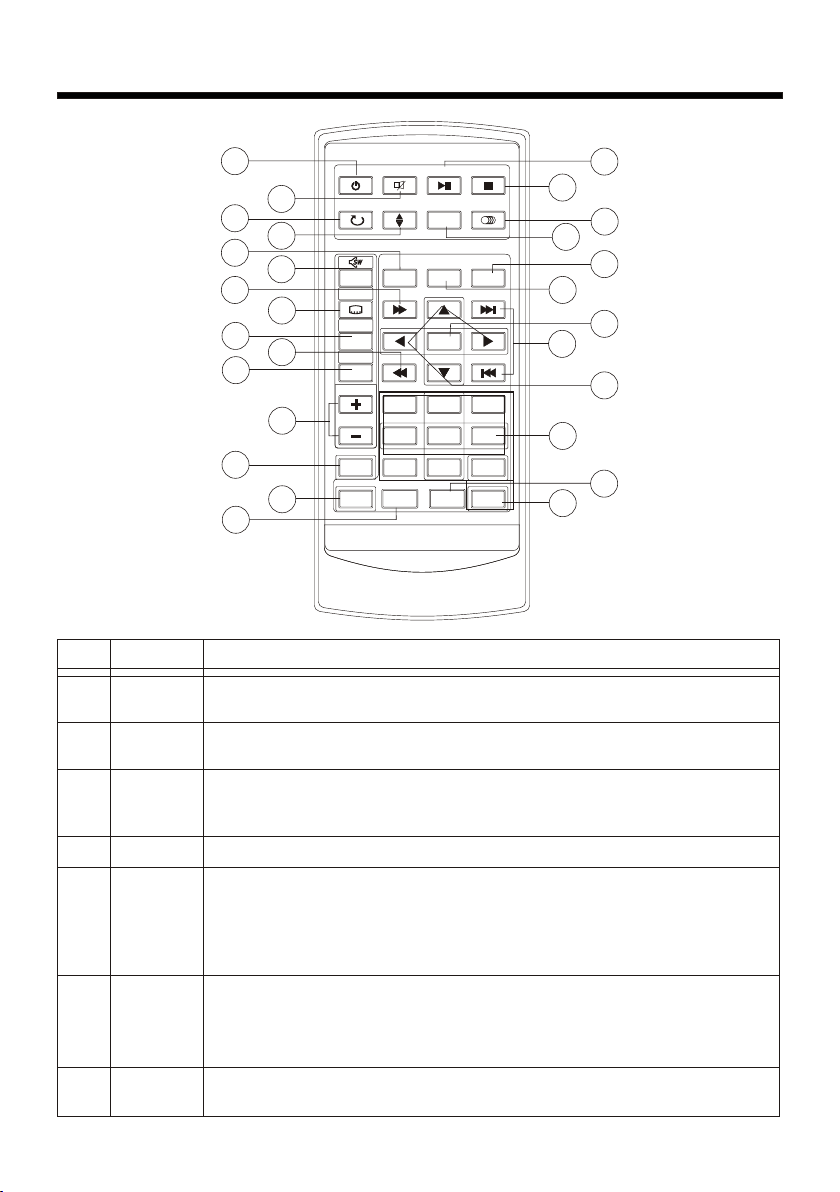
Remote Control
Ref #
1
2
3
4
5
6
7
Button
CLOCK
MODE
STOP
SETUP
MO/ST
(AUDIO)
SUBTI TLE
LOCAL /
DISTANT
REPEAT
15
22
14
18
10
PLA Y/PAU SEPLA Y/PAU SE
MUT EM UTE
POW ERPOWE R
17
7
REP EAT
ANG LEAN GLE
ZOO MZO OM
STO PSTO P
MO/ STMO/ ST
19
2
13
6
24
11
4
MEN UMEN U
LO/ DXL O/DX
OSDOSD
BAN DBA ND
TIT LE/PB CTIT LE/PB C
A/P SA/P S
VOLVOL
VOLVOL
SELSEL
SET UP SET UP
MOD E
TOP
11
RDM
44
77
GOT OG OTO
EQEQ
ENT ERENT ER
22
55 66
88
+1 0+ 10
CLKCL K
INT
33
99
00
16
3
5
20
1
21
23
9
12
27
26
25
8
Function
Press it briefly to vie w the clo ck time .
Press repeatedly to cycle th rough t he vari ous modes:
>RADIO > DISC > USB > CARD > AUX > .
Press once to pause playback . Press P LAY/PAUSE to resume
playback. Please note: if yo u press S TOP tw ice, pl ayback will
start at the beginning of the di sc.
Press this button to op en the SE TUP menu.
In Radio mode, press this butt on to cha nge bet ween Mono and
Stereo reception modes (wh en a stat ion is we ak, sometimes
switching to Mono will impro ve soun d quali ty). In Disc Playback
mode, pressing this button o pens th e AUDIO se tup menu for
making changes to the way the so undtr ack is re produced.
In Digital Video Disc Playback mode, pressing t his but ton wil l
allow you to change the subtit le lang uage on d iscs which have
this as an option. In Radio mode , press t his but ton to change the
radio reception sensitiv ity in st ation s are near or far.
Pressing this butto n will op en a menu p resen ting you with the
playback repeat options av ailab le for th at kind of disc.
-10-
 Loading...