

Page 1
Page 2

Legal disclaimer
Copyright
The content of this user manual is subject to copyright law. No part of this document shall be utilized for commercial purposes
without written permisission from NAVITEL s.r.o.
Trademarks
NAVITEL® and the NAVITEL logo are registered trademarks of NAVITEL s.r.o.
Google, Android, Google Play and other marks are trademarks of Google Inc. The Android robot is reproduced or modied from
work created and shared by Google and used according to terms described in the Creative Commons 3.0 Attribution License.
The Bluetooth® word mark and gure mark (stylized “B Design”) are registered trademarks owned by the Bluetooth SIG.
Wi-Fi is a registered trademark of the Wireless Fidelity Alliance, Inc.
microSDTM and the microSD logo are trademarks of the SD Card Association.
©2018 NAVITEL s.r.o. All rights reserved.
Page 3
1 | UŽIVATELSKÁ PŘÍRUČKA — T700 3G NAVI
Začínáme
CZ
Obsah balení 4
Fyzikální vlastnosti 4
Specikace hardwaru 4
Specikace softwaru 4
Používání zařízení ve vozidle 5
Bezpečnostní informace 5
Instalace a vyjmutí SIM karty 6
Instalace a vyjmutí SD karty 6
Domovská obrazovka 7
Hlavní tlačítka 7
Stavový řádek 7
Aplikace 7
Zástupce 8
Widgety 8
Tapety 8
Účty&Kontakty
Účty 10
Přidání účtu 10
Kontakty 10
Nový kontakt 10
Upravit kontakt 11
Smazat kontakt 11
Zálohovat kontakty 11
Importovat kontakty 11
Oblíbené kontakty 12
Hovory&Zprávy
Telefon 13
Volání 13
Příjem telefonního hovoru 13
Historie volání 13
Zprávy 14
Odeslání zprávy 14
Odpověď na zprávu 14
MMS 15
Sítě
Wi-Fi 16
Zapnutí a vypnutí Wi-Fi 16
Připojení k síti Wi-Fi 16
Mobilní síť 17
Bluetooth 17
Vypnutí a zapnutí Bluetooth 17
Page 4

UŽIVATELSKÁ PŘÍRUČKA — T700 3G NAVI | 2
Připojení zařízení přes Bluetooth 18
Tethering&Portable hotspot 18
Wi-Fi hotspot 18
USB tethering 19
Bluetooth tethering 19
Multimédia
Fotoaparát 20
Pořízení snímku 20
Nahrávání videa 20
Nastavení fotoaparátu 20
Zobrazení galerie 21
Sdílení obrázků a videí 21
Zvukový záznam 21
Nastavení
Bezdrátové sítě 22
Správa SIM karty 22
Wi-Fi 22
Bluetooth 22
Použití dat 22
Režim letadlo 23
Výchozí aplikace SMS 23
Tethering&Wi-Fi hotspot 23
VPN 23
Mobilní sítě 23
Zařízení 23
Audio proly 23
Displej 23
Úložiště 23
Baterie 24
Aplikace 24
Osobní 24
Poloha 24
Zabezpečení 24
Jazyk&zadávání 24
Záloha&obnovení 24
Účty 24
Systém 25
Datum&čas 25
Automatické zapnutí&vypnutí 25
Usnadnění 25
Tisk 25
Možnosti pro vývojáře 25
CZ
Page 5

3 | UŽIVATELSKÁ PŘÍRUČKA — T700 3G NAVI
CZ
O tabletu 25
Navitel Navigator
Představení 26
Programové rozhraní 26
Plánování trasy 30
Trasa ke zvolenému bodu na mapě 30
Navádění na přesnou adresu 30
Manuální nastavení trasy z jednoho bodu do
druhého 32
Online služby 33
Navitel.Dopravní Info 33
Navitel.Přátelé 33
Navitel.Události 33
Navitel.SMS 33
Navitel.Počasí 33
Navitel.Cloud 34
Navitel.Novinky 34
Page 6
UŽIVATELSKÁ PŘÍRUČKA — T700 3G NAVI | 4
Obsah balení
• NAVITEL T700 3G NAVI
Tablet
• Držák do auta
• Stojánek
• Adaptér do auta 12/24 V
• Nabíjecí adaptér
• Uživatelská příručka
• Záruční list
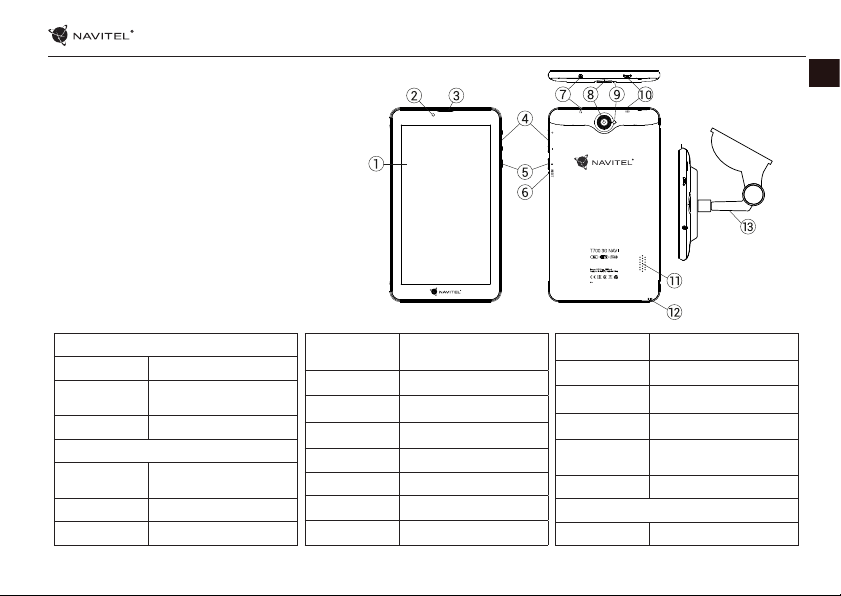
Vnější vzhled
1. Displej
2. Přední kamera
3. Reproduktor
4. Hlasitost
5. Tlačítko on/o
6. Reset
7. 3.5 mm jack
8. Zadní kamera
9. Blesk
10. Micro-USB - USB
11. Reproduktor
12. Mikrofon
13. Držák do auta
Technická specikace
Fyzikální vlastnosti
Typ baterie Li-Pol baterie, 2800 mAh / 3.7 V
Napájecí adaptér
Rozměry 108.8 × 188.8 × 11.7 mm
Procesor
DDR paměť 1 GB DDR
Flash paměť 16 GB
Vstup AC 100 V-240 V,
výstup Micro-USB 5 V, 2.0 A
Specikace hardwaru
MTK8321 Cortex-A7 Quad core
1.3 GHz
Rozlišení
obrazovky
Wi-Fi 802.11 b / g / n
Bluetooth Bluetooth 4.0
3G 900 / 2100 MHz
2G 850 / 900 / 1800 / 1900 MHz
GPS Ano
FM rádio Ano
Fotoaparát Přední 0.3 MP, zadní 2.0 MP
7.0’’ IPS 1024 × 600
SD slot microSD
Slot pro SIM kartu Duální SIM
Port pro nabíjení Micro-USB (5 V 2.0 A)
USB port Micro-USB
Konektor pro
sluchátka
G-sensor Ano
OS Android™ 7.0
3.5 mm
Specikace softwaru
CZ
Page 7

5 | UŽIVATELSKÁ PŘÍRUČKA — T700 3G NAVI
CZ
Používání zařízení ve vozidle
Držák na čelní sklo
Opatrně volte, kam držák umístíte. Neumisťujte držák na čelní sklo tak, že by mohl omezovat výhled řidiče. Pokud má čelní sklo
vozidla zabudované vyhřívání nebo UV ochranu, může být kvalita příjmu signálu nižší než obvykle.
Nastavení držáku na čelní sklo
Nejprve odstraňte ochrannou fólii zpřísavného držáku. Poté zvolte vhodné místo pro uchycení držáku. Ujistěte se, že prostor je
očištěn od prachu, nečistot a vlhkosti, a poté upevněte přísavný držák na čelní sklo. Za běžných podmínek přísavný držák drží
zařízení bezpečně. Nicméně pokud ho necháte připevněný přes noc, pevnost uchycení se může snížit vdůsledku kondenzace
vlhkosti způsobené poklesem teploty. Ztohoto důvodu, aby bylo předejito poškození zařízení a držáku, doporučujeme odstranit
zařízení a držák zčelního skla.
Bezpečnostní informace
• Nerozebírejte ani sami neopravujte zařízení. V případě poruchy zařízení se obraťte na servisní středisko.
• Přípustná teplota okolního prostředí v provozním režimu: -10 až +40 °С. Skladovací teplota: +5 až +55 °C. Relativní vlhkost: 5 %
až 90 % bez kondenzace (25 °C).
• Udržujte zařízení mimo dosah ohně, zabráníte tak výbuchu či požáru.
• Nevystavujte přístroj fyzickým nárazům.
• Výrobce není zodpovědný za poškození displeje uživatelem.
• Zabraňte kontaktu zařízení se zdroji elektromagnetického záření.
• Nepoužívejte k čištění zařízení chemikálie ani čistící prostředky; vždy před čištěním zařízení vypněte.
• Používejte pouze příslušenství schválené výrobcem.
Page 8

UŽIVATELSKÁ PŘÍRUČKA — T700 3G NAVI | 6
Instalace a vyjmutí SIM karty
Instalace SIM karty:
1. Vypněte zařízení.
2. Sejměte horní část zadního krytu přístroje, kde je umístěn slot pro SIM kartu.
3. Vložte SIM kartu do zařízení tak, aby kovové kontakty směřovaly dolů a zkosený roh směrem ven ze slotu.
Vyjmutí SIM karty:
1. Vypněte zařízení.
2. Sejměte horní část zadního krytu přístroje, kde je umístěn slot pro SIM kartu.
3. Opatrně vyjměte SIM kartu.
Instalace a vyjmutí SD karty
Instalace SD karty:
1. Vypněte zařízení.
2. Sejměte horní část zadního krytu přístroje, kde je umístěn slot pro SD kartu.
3. Vložte SD kartu do zařízení tak, aby kovové kontakty směřovaly dolů a zkosený roh směrem do slotu. Poté SD kartu zatlačte do
pozice SD karty, dokud neuslyšíte cvaknutí.
Vyjmutí SD karty:
1. Odpojte SD kartu přes Hlavní menu > Nastavení > Úložiště > Odpojit SD kartu.
2. Vypněte zařízení.
3. Sejměte horní část zadního krytu přístroje, kde je umístěn slot pro SD kartu.
4. Lehce zatlačte SD kartu dovnitř slotu a uvolněte, karta se vysune.
CZ
Page 9
7 | UŽIVATELSKÁ PŘÍRUČKA — T700 3G NAVI
CZ
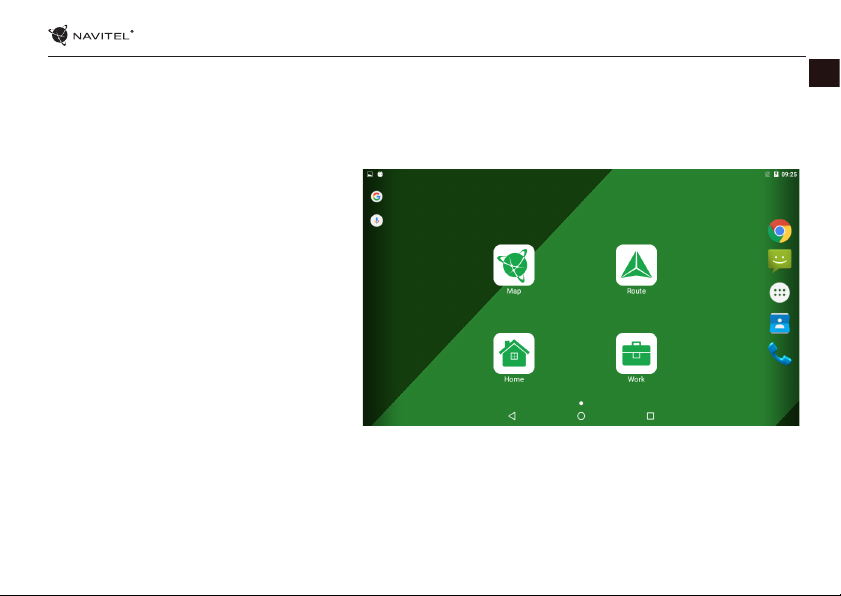
Domovská obrazovka
Domovská obrazovka obsahuje v horní části stavový řádek a panel rychlého nastavení, dále pak zástupce k řadě aplikací a funkcí
zařízení.
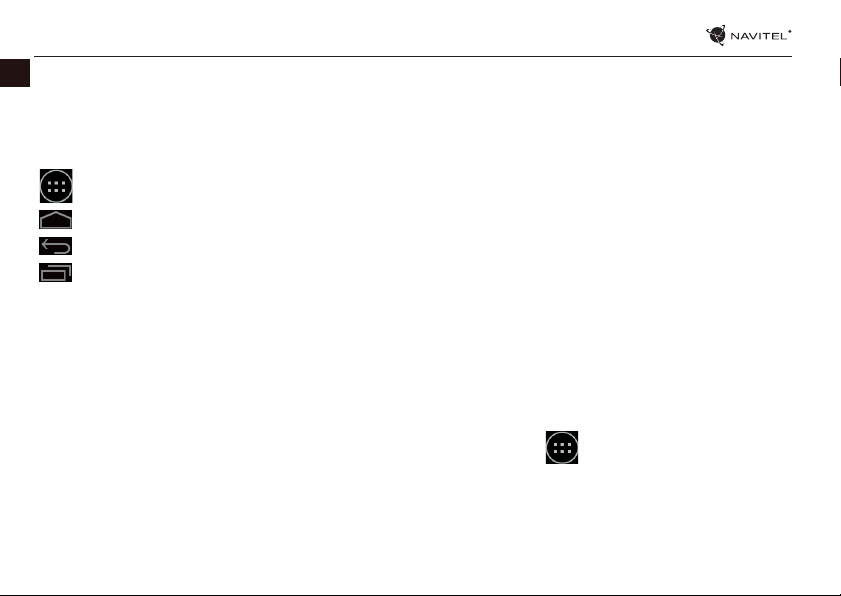
Hlavní tlačítka
- otevření hlavního menu.
- návrat na domovskou obrazovku.
- návrat na předchozí obrazovku.
- zobrazení seznamu naposledy používaných aplikací. Kliknutím na ikonu aplikace se aplikace spustí.
Stavový řádek
Stavový řádek zobrazuje výběr ikon popisující aktuální stav zařízení – například stav baterie, síla signálu, Wi-Fi a Bluetooth
připojení atd.
Pro zobrazení seznamu oznámení stiskněte levou polovinu stavového řádku a přejeďte prstem dolů; pro zobrazení menu rychlého
nastavení stiskněte pravou polovinu stavového řádku a přejeďte prstem dolů.
Aplikace
Vámi nainstalované aplikace jsou umístěny v hlavním menu, které otevřete stisknutím . Kliknutím na ikonu aplikace se aplikace spustí. Pro vymazání aplikace stiskněte dlouze ikonu dané aplikace a přesuňte ji do koše, který se nachází v levém horním
rohu.
Page 10
UŽIVATELSKÁ PŘÍRUČKA — T700 3G NAVI | 8
Zástupce
Pro nejčastěji používané aplikace můžete vytvořit zástupce, které lze umístit na libovolné místo na domovské obrazovce:
1. Otevřete menu aplikací.
2. Dlouze stiskněte ikonu vybrané aplikace a přetáhněte ji prstem na domovskou obrazovku.
Chcete-li zástupce odebrat, dlouze podržte ikonu
a přetáhněte ji na malý křížek umístěný v levém
horním rohu.
Widgety
Na domovskou obrazovku můžete umístit také widgety, například kalendář, hodiny, vyhledávač Google
a další. Provést to lze následujícím způsobem:
1. Dlouze stiskněte domovskou obrazovku dokud
se nezmenší. Zobrazí se tři nové ikony.
2. Klikněte na položku označenou “Widgety“.
Zobrazí se vám seznam dostupných widgetů.
3. Se seznamu si vyberte zvolený widget, dlouze
podržte a přesuňte jej na domovskou obrazovku.
Chcete-li widget odebrat, dlouze podržte a
přetáhněte jej na malý křížek umístěný v levém horním rohu.
CZ
Page 11

9 | UŽIVATELSKÁ PŘÍRUČKA — T700 3G NAVI
Tapety
CZ
Chcete-li změnit tapetu:
1. Dlouze stiskněte domovskou obrazovku dokud se nezmenší. Zobrazí se tři nové ikony.
2. Klikněte na položku označenou “Tapety“. Dostupné tapety se zobrazí v karuselu ve spodní části obrazovky.
3. Vyberte si obrázek z nabídky tapet nebo stiskněte “Vybrat obrázek“ (poslední obrázek vlevo v karuselu), pokud chcete jako
tapetu nastavit jiný obrázek uložený ve vašem zařízení. Poté stiskněte “Nastavit tapetu“ v levém horním rohu.
Page 12
UŽIVATELSKÁ PŘÍRUČKA — T700 3G NAVI | 10
Účty
Použijte vaše účty pro synchronizaci dat – e-maily, kontakty, kalendář atd.
Přidání účtu
Jděte na Application Menu > Nastavení, poté srolujte dolů do sekce “Účty”. Zvolte “Přidat účet”.
Můžete přidat následující typy účtů:
• Google – přidání účtu Gmail pro synchronizaci kalendáře, kontaktů, e-mailů, aplikačních dat, ale také služeb Google+.
• Firemní e-mail – přidání remního účtu.
• IMAP e-mail – přidání osobního účtu (IMAP protokol).
• POP3 e-mail - přidání osobního účtu (POP3 protokol).
Kontakty
Můžete ukládat kontakty, telefonní čísla, e-mailové adresy a další související informace.
Nový kontakt
Přidání nového kontaktu:
1. Jděte na Kontakty > Nový kontakt.
2. Zadejte informace o kontaktu.
3. Stiskněte “Hotovo“ (levý horní roh) pro uložení kontaktu.
CZ
Page 13
11 | UŽIVATELSKÁ PŘÍRUČKA — T700 3G NAVI
Upravit kontakt
CZ
1. Stiskněte pro otevření seznamu kontaktů.
2. Vyberte kontakt, který chcete upravit, poté stiskněte . Po dokončení úprav stiskněte “Hotovo“ pro uložení změn.
Smazat kontakt
1. Stiskněte pro otevření seznamu kontaktů.
2. Stiskněte , v seznamu vyberte “Smazat“.
3. Označte kontakty, které chcete smazat, poté stiskněte “OK”.
Zálohovat kontakty
Kontaktní údaje můžete exportovat na externí paměťovou kartu.
1. Stiskněte pro otevření seznamu kontaktů.
2. Stiskněte > “Import/Export“.
3. Vyberte možnost “Exportovat na úložiště“.
Importovat kontakty
1. Stiskněte pro otevření seznamu kontaktů.
Page 14

UŽIVATELSKÁ PŘÍRUČKA — T700 3G NAVI | 12
2. Stiskněte > “Import/Export“.
3. Vyberte možnost “Importovat z úložiště“.
Oblíbené kontakty
Speciální nebo často používané kontakty můžete označit jako oblíbené pro rychlejší přístup. Vyberte kontakt ze seznamu vašich
kontaktů, poté klikněte na ikonu hvězdičky vedle jména kontaktu.
Pro zobrazení vašich oblíbených kontaktů stiskněte “Všechny kontakty“ (levý horní roh) a vyberte z nabídky možnost “Oblíbené“.
CZ
Page 15
13 | UŽIVATELSKÁ PŘÍRUČKA — T700 3G NAVI
CZ
Telefon
Volání
1. Stiskněte .
2. Vyberte kontakt ze seznamu vašich kontaktů nebo stiskněte pro zadání čísla pomocí číselné klávesnice. Pro vymazání
poslední zadané číslice stiskněte .
3. Stiskněte pro uskutečnění hovoru.
Příjem telefonního hovoru
Při příchozím hovoru máte tři možnosti:
1. Přijmout hovor - stiskněte a přetáhněte ikonu na ikonu .
2. Nepřijmout hovor - stiskněte a přetáhněte ikonu na ikonu .
3. Nepřijmout hovor a napsat zprávu - stiskněte a přetáhněte ikonu na ikonu .
Historie volání
Pro zobrazení historie volání jděte na Telefon > Historie. Můžete si vybrat:
Page 16
UŽIVATELSKÁ PŘÍRUČKA — T700 3G NAVI | 14
• Příchozí hovory
• Odchozí hovory
• Zmeškané hovory
Zprávy
Odeslání zprávy
1. Přejděte na Zprávy > Nová zpráva.
2. Zadejte číslo příjemce nebo stiskněte a najděte adresáta v seznamu vašich kontaktů.
3. Napište text, který chcete poslat.
4. Stiskněte pro odeslání zprávy.
Odpověď na zprávu
Pokud dostanete novou zprávu, budete na ni upozorněni.
1. Přejděte na Zprávy.
2. Vyberte zprávu, na kterou chcete odpovědět.
3. Napište text, který chcete poslat.
CZ
Page 17
15 | UŽIVATELSKÁ PŘÍRUČKA — T700 3G NAVI
CZ
4. Stiskněte pro odeslání zprávy.
MMS
1. Přejděte na Zprávy > Nová zpráva.
2. Zadejte číslo příjemce nebo stiskněte a najděte adresáta v seznamu vašich kontaktů.
3. Stiskněte v levém horním rohu, poté vyberte jednu z následujících možností:
• Pořídit obrázek - pořídit snímek, který bude automaticky připojen ke zprávě.
• Pořídit video - pořídit video, které bude automaticky připojeno ke zprávě.
• Nahrát audio - nahrát zvukový soubor, který bude automaticky připojen ke zprávě.
• Obrázky - připojit obrázek uložený v zařízení.
• Video - připojit video soubor uložený v zařízení.
• Audio - připojit audio soubor uložený v zařízení.
• Prezentace - vytvořit obrazovou prezentaci a připojit ji ke zprávě.
4. Stiskněte pro odeslání zprávy.
Page 18
UŽIVATELSKÁ PŘÍRUČKA — T700 3G NAVI | 16
Wi-Fi
Zapnutí a vypnutí Wi-Fi
Wi-Fi lze zapnout přes domovskou obrazovku.
1. Stiskněte v menu rychlého nastavení. Ikona zbělá, pokud je Wi-Fi zapnutá.
2. Pokud stisknete ikonu znovu, Wi-Fi se vypne.
Alternativně:
1. Jděte na Hlavní menu > Nastavení.
2. V sekci “Bezdrátová připojení a sítě“ najděte položku “Wi-Fi”.
3. Použijte přepínač vpravo k zapnutí/vypnutí Wi-Fi.
Připojení k síti Wi-Fi
Pokud je Wi-Fi zapnutá, objeví se ve stavovém řádku ikona oznamující, že jsou k dispozici sítě Wi-Fi. Pro připojení k síti:
1. Klikněte na levou stranu stavového řádku a přejeďte prstem dolů k zobrazení seznamu oznámení.
2. Klikněte na “Wi-Fi sítě k dispozici“. Zobrazí se seznam dostupných sítí.
3. Vyberte ze seznamu vámi preferovanou síť. Pokud je síť chráněna heslem, budete vyzváni k jeho zadání.
Seznam dostupných sítí je k dispozici také v nastavení po stisknutí “Wi-Fi“.
Pokaždé, když se zařízení připojí k nové síti, uloží přihlašovací údaje a připojí se k síti automaticky, pokud je k dispozici. Pokud
nechcete, aby si zařízení pamatovalo přihlašovací údaje a nepřihlašovalo se automaticky k některé ze sítí, dlouze stiskněte název
této sítě a poté zvolte “Odstranit záznam sítě“.
Poznámka: s odstraněním záznamu sítě smažete i přihlašovací údaje k síti. Pokud se budete chtít znovu připojit k této síti, budete muset
CZ
Page 19
17 | UŽIVATELSKÁ PŘÍRUČKA — T700 3G NAVI
znovu zadávat přihlašovací údaje.
CZ
Mobilní síť
Chcete-li povolit přístup k mobilnímu internetu, otevřete menu rychlého nastavení a stiskněte . Stiskněte ikonu znovu pro
vypnutí mobilního internetu.
Mobilní internet můžete povolit také přes Hlavní menu > Nastavení > Správa SIM > Datové připojení.
Poznámka: pro možnost využití mobilního internetu musíte mít nainstalovanou SIM kartu s datovým tarifem.
Bluetooth
Vypnutí a zapnutí Bluetooth
Bluetooth lze zapnout přes domovskou obrazovku:
1. Stiskněte v menu rychlého nastavení. Ikona zbělá, pokud je Bluetooth zapnuto.
2. Pokud stisknete ikonu znovu, Bluetooth se vypne.
Alternativně:
1. Jděte na Hlavní menu > Nastavení.
2. Najděte položku “ Bluetooth ”.
3. Použijte přepínač vpravo k zapnutí/vypnutí Bluetooth.
Page 20

UŽIVATELSKÁ PŘÍRUČKA — T700 3G NAVI | 18
Připojení zařízení přes Bluetooth
1. Klikněte na položku Bluetooth pro vstup do nastavení Bluetooth. V horní části obrazovky se nachází název zařízení a jeho
viditelnost pro ostatní zařízení Bluetooth. Klikněte na položku pro přepnutí viditelnosti vašeho zařízení.
2. V sekci “Dostupná zařízení“ se zobrazí seznam zařízení, která jsou k dipozici. Klikněte na název zařízení, se kterým se chcete
spárovat. V další sekci s názvem “Spárované přístroje“ se zobrazí seznam všech přístrojů spárovaných s vaším zařízením.
3. Ke zrušení spárování zařízení stiskněte na pravé straně, poté stiskněte “Zrušit párování“.
Tethering&Portable hotspot
Datové připojení přístroje můžete sdílet s jinými zařízeními. Nejprve zapněte mobilní připojení k internetu. Poté jděte na
Hlavní menu > Nastavení a v sekci “Bezdrátová připojení a sítě“ stiskněte “Více...“, poté “Tethering&Wi-Fi hotspot“. Zobrazí
se několik možností sdílení.
Wi-Fi hotspot
1. Klikněte na položku “Wi-Fi hotspot”.
2. Stiskněte “Nastavit Wi-Fi hotspot“. Otevře se nové okno.
3. Vyberte název pro vaše zařízení a vložte ho do textového pole “Síť SSID“.
4. Vyberte bezpečnostní protokol pro vaši síť nebo ponechte pole prázdné.
5. Pokud chcete, zadejte heslo pro ochranu vaší sítě.
6. Nastavte maximální počet připojení (1-8).
7. Zvolte “Uložit“.
CZ
Page 21
19 | UŽIVATELSKÁ PŘÍRUČKA — T700 3G NAVI
8. Použijte přepínač v pravém horním rohu k vypnutí hotspotu.
CZ
USB tethering
Sdílení připojení k internetu mezi dvěma zařízeními pomocí USB kabelu.
1. Připojte vaše zařízení k jinému zařízení.
2. Ve stavovém řádku se objeví ikona USB. V seznamu oznámení uvidíte “Připojeno jako mediální zařízení“ (nebo jiný způsob
připojení). V případě USB tetheringu nezáleží na způsobu připojení.
3. Jděte na Hlavní menu > Nastavení, pod sekcí “ Bezdrátová připojení a sítě ” vyberte možnost “Více...”,poté zvolte
“Tethering&Wi-Fi hotspot“.
4. Zaškrtněte políčko “USB tethering“ na pravé straně.
Bluetooth tethering
Sdílení připojení k internetu mezi dvěma zařízeními spárovanými přes Bluetooth.
1. Zapněte Bluetooth na obou zařízeních.
2. Spárujte zařízení.
3. Chcete-li používat internetové připojení druhého zařízení, stiskněte u položky “Spárované přístroje”, poté zvolte
“Přístup k internetu“.
4. Chcete-li sdílet připojení k internetu s druhým zařízením, proveďte krok 3 na tomto zařízení (v případě nutnosti využijte
uživatelskou příručku druhého zařízení).
Page 22

UŽIVATELSKÁ PŘÍRUČKA — T700 3G NAVI | 20
Fotoaparát
Fotoaparát vám umožňuje pořizovat snímky a nahrávat video.
Pro přístup k fotoaparátu stiskněte ikonu na domovské obrazovce nebo jděte na Hlavní menu > Fotoaparát.
Stiskněte pro přepínání mezi přední a zadní kamerou.
Pořízení snímku
1. Zamiřte kamerou na vámi zvolený objekt.
2. Pro přiblížení uchopte obrazovku dvěma prsty a táhněte jimi směrem od sebe. Pro oddálení táhněte prsty k sobě.
3. Stiskněte pro pořízení snímku. Snímek se automaticky uloží do galerie.
Nahrávání videa
1. Stiskněte pro nahrávání videa. Ikona zčervená, v dolním rohu obrazovky se objeví červené kolečko indikující nahrávání
videa a časovač zobrazující délku nahrávaného záznamu.
2. Pro přiblížení a oddálení v rámci nahrávaného záznamu postupujte stejně jako v případě pořízení snímku.
3. Stiskněte ještě jednou pro ukončení nahrávání záznamu. Video se automaticky uloží do galerie.
Nastavení fotoaparátu
Stiskněte pro otevření menu nastavení fotoaparátu. Menu je rozděleno do tří záložek - Obecné, Foto, a
Video nastavení.
Stiskněte pro otevření dalšího menu, kde je možné nastavit úroveň expozice, barevný efekt, vyvážení bílé a denní/noční
CZ
Page 23
21 | UŽIVATELSKÁ PŘÍRUČKA — T700 3G NAVI
režim.
CZ
Po změně nastavení, klikněte kamkoliv na obrazovku pro opuštění menu nastavení.
Zobrazení galerie
Kliknutím na čtverce v horním pravém rohu se přesunete do galerie, kde jsou uloženy všechny vaše obrázky a videa.
Zde můžete upravovat všechny položky v galerii (například ořezávat, otáčet, mazat atd.). Zvolte položku z galerie, stiskněte
a vyberte ze seznamu, co s ní chcete provést.
Sdílení obrázků a videí
Zvolte položku z galerie, stiskněte v pravém horním rohu obrazovky a ze seznamu vyberte způsob sdílení. Stiskněte
pro sdílení souborů přes Gmail (jako přílohu).
Zvukový záznam
1. Jděte na Hlavní menu > Zvukový záznam.
2. Stiskněte pro začátek nahrávání.
3. Stiskněte pro pauzu nebo pro zastavení nahrávání.
4. Stiskněte pro přehrání záznamu.
5. Stiskněte “Uložit”, pokud chcete záznam uložit nebo “Zahodit“ pro smazání záznamu.
Page 24
UŽIVATELSKÁ PŘÍRUČKA — T700 3G NAVI | 22
Nastavení
Chcete-li otevřít menu Nastavení:
• Jděte na Hlavní menu > Nastavení.
• Klikněte na stavový řádek a v novém okně stiskněte .
Menu Nastavení je rozděleno do 5 sekcí:
1. Bezdrátové sítě – nastavení bezdrátových připojení jako je WiFi, Bluetooth, mobilní sítě atd.
2. Zařízení – motiv, zvuk, displej, možnosti úložiště atd.
3. Osobní - poloha, zabezpečení, jazyk, zálohování.
4. Účty - Google a emailové účty.
5. Systém - datum a čas, přístup, verze softwaru, právní informace atd.
Bezdrátové sítě
Správa SIM karty
Aktivace/deaktivace SIM karty pomocí tlačítek na pravé straně nebo úprava příslušných záznamů na SIM kartě po poklepání.
Wi-Fi
Připojení k bezdrátovým sítím, zobrazení či úprava nastavení připojení.
Bluetooth
Párování vašeho zařízení s jinými zařízeními Bluetooth v okolí.
CZ
Page 25

23 | UŽIVATELSKÁ PŘÍRUČKA — T700 3G NAVI
Použití dat
CZ
Zobrazení statistik použití dat.
(stiskněte “Více...“ pro přístup k níže uvedeným položkám)
Režim letadlo
Zakázání veškeré komunikace s jinými přístroji.
Výchozí aplikace SMS
Nastavení výchozí aplikace pro zasílání zpráv.
Tethering&Wi-Fi hotspot
Sdílení připojení k internetu s jinými zařízeními.
VPN
Kongurace virtuální privátní sítě.
Mobilní sítě
Povolení/zakázání mobilního datového připojení.
Zařízení
Audio proly
Tvorba, editace a použití audio prolů.
Displej
Výběr tapety, upozornění, jasu, velikosti písma atd.
Page 26

UŽIVATELSKÁ PŘÍRUČKA — T700 3G NAVI | 24
Úložiště
Výběr výchozího místa pro zápis na disk, zobrazení volného a využitého místa v paměti.
Baterie
Zobrazení stavu baterie – aktuální stav, zbývající čas, využití baterie procesy.
Aplikace
Zobrazení a správa vámi nainstalovaných aplikací.
Osobní
Poloha
Nastavení služby polohy.
Zabezpečení
Nastavení zámku obrazovky, ochrana SIM karty a další bezpečnostní parametry.
Jazyk&zadávání
Výběr preferovaného jazyka a metody zadávání.
Záloha&obnovení
Zálohování důležitých dat na serverech Google nebo obnovení továrního nastavení na vašem zařízení.
CZ
Page 27

25 | UŽIVATELSKÁ PŘÍRUČKA — T700 3G NAVI
CZ
Účty
Vytvoření, úprava a správa účtů Google a emailových účtů.
Systém
Datum&čas
Nastavení aktuálního data a času, data a formátu zobrazení času, časového pásma.
Automatické zapnutí&vypnutí
Nastavení automatického vypnutí/zapnutí zařízení v určitém čase.
Usnadnění
Možnosti usnadnění pro osoby zdravotně postižené.
Tisk
Služby tisku.
Možnosti pro vývojáře
Možnosti pro vývojáře Android.
O tabletu
Aktualizace, stav, číslo modelu, verze softwaru atd.
Page 28
UŽIVATELSKÁ PŘÍRUČKA — T700 3G NAVI | 26
Navitel Navigator
Tablet obsahuje předinstalovaný software Navitel Navigator a mapy 43 evropských zemí, Běloruska, Kazachstánu, Ruska a Ukrajiny.
Navitel Navigator je navigační aplikace umožňující adresní vyhledávání a plánování tras.
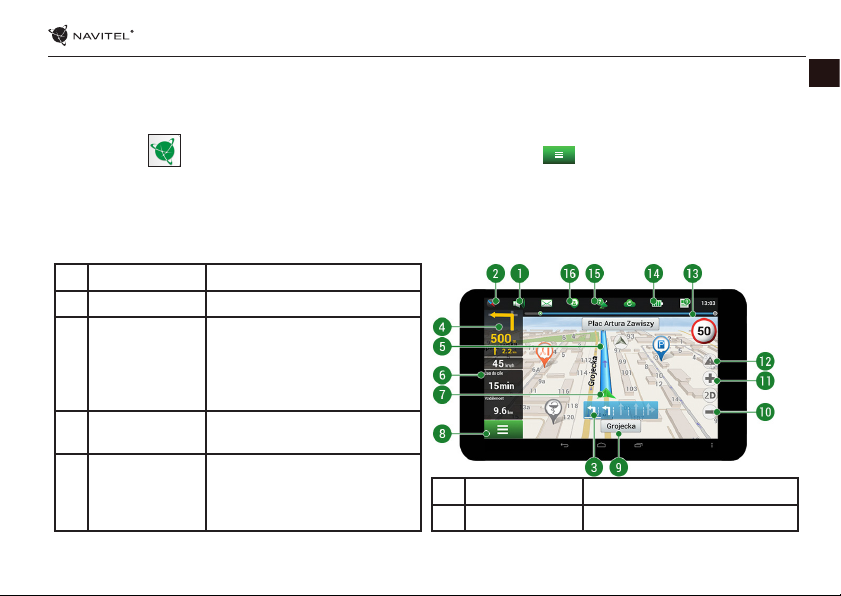
Stisknutím ikony na domovské obrazovce spustíte program. Stisknutím tlačítka otevřete možnosti vyhledávání a
nastavení aplikace.
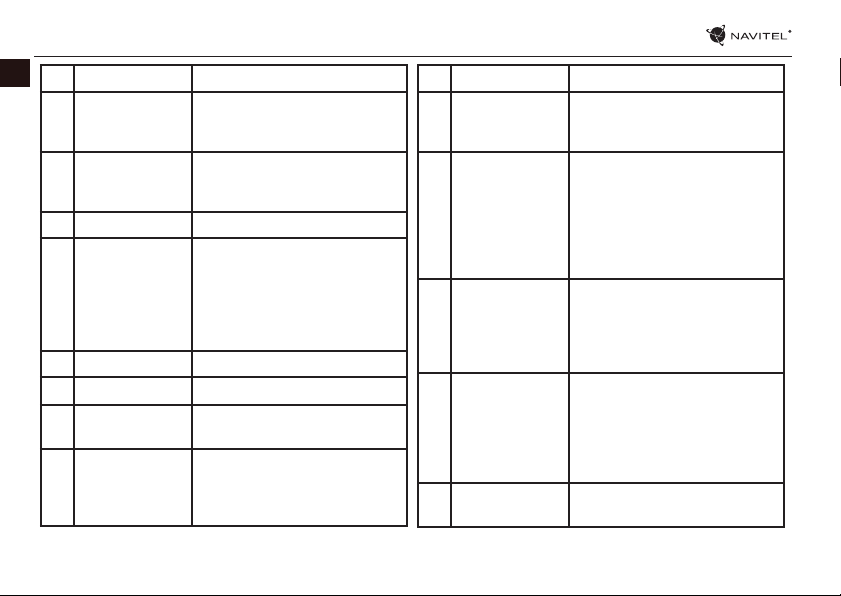
Programové rozhraní
# Název Funkce
1 Zvuk Otevře zvukové menu.
Otevře kontextové menu. Pomocí
2 Kompas
3 Jízdní pruhy
4 Informační panel
toho menu lze přepínat orientaci
mapy (“Na sever” nebo “Na trasu“),
typ pohledu (2D/3D), a režimy
(Noční/Denní/Automaticky).
Zobrazuje jízdní pruhy s možnými
manévry.
Ukazatel blížícího se manévru a
vzdálenosti k tomuto manévru.
Poklepáním na ukazatel se otevře
menu obsahující možnosti trasy.
# Název Funkce
5 Trasa Zobrazení aktuální trasy.
CZ
Page 29
27 | UŽIVATELSKÁ PŘÍRUČKA — T700 3G NAVI
CZ
# Název Funkce
6 Informační panel
7 GPS-kurzor
8 Menu Otevře hlavní nabídku.
9 Informační panel
10 Změna měřítka Oddálení
11 Změna měřítka Přiblížení
12 “Navitel.Události”
Indikátor
13
průběhu trasy
Panel ukazuje aktuální rychlost,
zbývající čas do cíle, vzdálenost do
cíle a předpokládaný čas příjezdu.
Ukazatel vaši pozice na mapě v
případě, že je váš GPS přijímač
zapnutý.
Panel ukazuje název ulice, kterou
právě projíždíte. Informace je
dostupná pouze za předpokladu
spojení GPS/GLONASS a existence
takové informace v mapě. Pokud
není název ulice, zobrazí se směr.
Tlačítko pro kontrolu služby “Navitel.Události”.
Barevně znázorňuje zbývající trasu, průjezdní body (jsou-li stanoveny) a pomocí barvy i hustotu
provozu na trase.
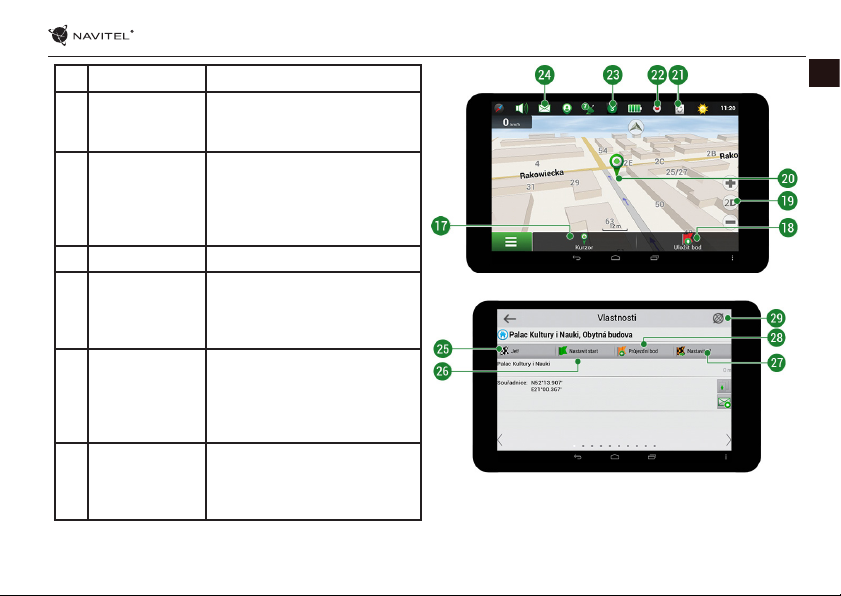
# Název Funkce
14 Baterie
15 GPS
16 “Navitel.Přátelé”
17 Tlačítko “Kurzor”
18 Uložit bod
Ikona ukazuje stav nabití baterie. Klepnutím se zobrazí volná
operační paměť zařízení.
Ikona detekce GPS/GLONASS spojení. Pokud je indikátor šedý - GPS
vypnuta; červený - GPS zapnuta,
ale spojení není navázáno; žlutý
- slabé spojení; zelený - spojení
navázáno. Číslo u ikony znamená
počet satelitů.
Ikona služby “Navitel.Přátelé”, při
poklepání na ikonu otevřete menu
služby. Zde si můžete přidat své
přátele, vidět je na mapě a konverzovat s nimi.
Poklepáním na tlačítko zobrazíte menu pro akce s bodem
označeným na mapě (můžete
přejít na obrazovku vlastností
nebo stisknutím tlačítka “Jet!” nastavit cílový bod).
Uloží bod znázorněný na mapě
jako cílový bod.
Page 30
UŽIVATELSKÁ PŘÍRUČKA — T700 3G NAVI | 28
# Název Funkce
19 2D/3D
20 Bod na mapě
21 Aktualizace Zobrazí dostupné aktualizace.
22 Záznam stopy
“Navitel.Dopravní
23
24 “Navitel.SMS”
Info”
Přepínání mezi klasickým 2D a
panoramatickým 3D zobrazením
map.
Krátké poklepání na mapě
znázorní bod a umožní s ním další
akce: uložit jako navigační bod,
přidat do trasy nebo zobrazit údaje o objektu a další.
Tlačítko pro záznam stopy:
červený bod – nahrávání je zapnuté, šedý bod – nahrávání je zastaveno.
Ikona zobrazuje aktuální dopravní
informace na deseti-bodové
stupnici. Poklepáním na tlačítko
zobrazíte menu pro ovládání
služby “Navitel.Dopravní Info”
Umožňuje čtení/posílání SMS
zpráv včetně zasílání souřadnic.
U ikony můžete vidět počet
nepřečtených zpráv.
CZ
Page 31

29 | UŽIVATELSKÁ PŘÍRUČKA — T700 3G NAVI
CZ
# Název Funkce
Klepnutím na tlačítko dáte pro-
25 “Jet!”
26 “Nastavit start”
27 “Nastavit cíl”
28 “Průjezdní bod”
29 Mapa Zpět na mapu.
gramu příkaz vypočítat trasu z aktuální pozice nebo ze zvoleného
počátečního bodu.
Klepnutím na tlačítko nastavíte
vybraný bod jako počáteční bod
trasy (přijímač GPS musí být vypnutý).
Tlačítko je aktivní pouze, pokud je
zadána trasa. Stisknutím tlačítka
nastavíte vybraný bod jako cílový.
Tlačítko je aktivní pouze, pokud je
zadána trasa. Stisknutím tlačítka
zahrnete vybraný bod do trasy. Poslední přidaný bod bude zařazen
jako první za bod startu.
Page 32

UŽIVATELSKÁ PŘÍRUČKA — T700 3G NAVI | 30
Plánování trasy
Trasa ke zvolenému bodu na mapě
Trasu můžete nastavit do bodu, který si najdete a označíte na mapě, a poté ho nastavíte jako cílový bod s tím, že jako počáteční
bod trasy bude brána aktuální pozice zařízení podle GPS. Pro vytvoření trasy klepněte v mapě pro označení bodu, vyberte “Kurzor”
[1], a pak “Jet!” [2]. Program nabídne 3 alternativní trasy s přibližnou vzdálenost a čas do cíle bodu [3]. Vyberte “Jet!” pro nasledování
trasy.
Obr. 1 Obr. 2 Obr. 3
Navádění na přesnou adresu
Pro vytvoření trasy k bodu, jehož adresu znáte, zvolte “Menu” v levém dolním rohu obrazovky [1] > “Najít” [2] > “Poštovní adresu”,
a poté stikněte “Vybrat zemi” [3] a vložte její název [4] a vyberte požadovanou zemi [5]. Možnosti “Vybrat město”, “Vybrat ulici”
a “Vybrat číslo budovy” se aktivují pouze v případě, že předchozí pole byla vyplněna [6]. Po vyplnění všech informací se objekt
zobrazí na mapě [7]. Stiskněte “Jet!”. Program automaticky vykreslí trasu z aktuální pozice na určenou adresu [8]. Nyní můžete
následovat trasu [9].
CZ
Page 33

31 | UŽIVATELSKÁ PŘÍRUČKA — T700 3G NAVI
CZ
Obr. 4 Obr. 5 Obr. 6
Obr. 7 Obr. 8 Obr. 9
Obr. 10 Obr. 11 Obr. 12
Page 34

UŽIVATELSKÁ PŘÍRUČKA — T700 3G NAVI | 32
Manuální nastavení všech bodů trasy
Pro plánování trasy, kde jsou počáteční a cílové body nastaveny manuálně, nejprve zvolte na mapě bod, který má být počáteční a
stiskněte “Kurzor” [1], čímž se zobrazí obrazovka “Moje trasa”. Klepněte na informační panel ve spodní části obrazovky [2]. Stiskněte
“Nastavit start” v obrazovce “Vlastnosti” [3]. GPS přijímač musí být vypnutý. Bod bude označen na mapě jako počáteční bod. Zvolte
cílový bod na mapě: klepněte na mapu pro označení bodu, stiskněte “Kurzor” [4] a poté “Jet! na obrazovce “Moje trasa” [5]. Program
automaticky vytvoří 3 alternativní trasy [6].
Obr. 1
Obr. 4
Obr. 2 Obr. 3
Obr. 5
Obr. 6
CZ
Page 35

33 | UŽIVATELSKÁ PŘÍRUČKA — T700 3G NAVI
CZ
Online služby
Navitel.Dopravní Info
Služba nabízí a zobrazuje informace o dopravní situaci v reálném čase. Je-li část trasy na mapě zeleně zvýrazněna znamená to, že
provoz na trase je plynulý, je-li zvýrazněna žlutě – provoz je poměrně hustý, oranžově – provoz je hustý, červeně – je zde dopravní
zácpa. Pro nastavení služby zvolte “Menu” > “Nastavení” > “On-line služby”.
Navitel.Přátelé
Navitel.Přátelé je interaktivní služba, která umožňuje sledovat na mapě polohu přátel v reálném čase, posílat zprávy nebo naplánovat trasu přímo k nim.
Navitel.Události
Nová bezplatná online služba, která dovoluje svým uživatelům označovat a vidět na mapě navigačního zařízení záznamy jiných
uživatelů o různých událostech na cestě.
Navitel.SMS
Služba Navitel.SMS umožňuje sdílet souřadnice mezi uživateli pro určení jejich aktuální polohy a sdílet souřadnice jakéhokoliv
objektu.
Zde můžete zadat informace, jako je číslo příjemce, název místa, jeho popis a přesné souřadnice. Existují dva typy SMS zpráv.
Odeslání vlastních souřadnic „Jsem tady“ a dotaz na souřadnice jiného uživatele – „Kde jsi?“.
Navitel.Počasí
Služba Navitel.Počasí umožňuje svým uživatelům sledovat předpověď počasí kdekoliv na světě. Informace o počasí jsou k dispozici 4 dny dopředu.
Page 36

UŽIVATELSKÁ PŘÍRUČKA — T700 3G NAVI | 34
Navitel.Cloud
Služba Navitel.Cloud vám umožní uložit vaše nastavení, cílové body a historii vyhledávání na cloudové datové úložiště. Data
uložená na cloudu pak mohou být obnovena v případě přeinstalování programu. Pokud používáte Navitel Navigator na několika
zařízení, cílové body a historie mohou být navzájem synchronizovány, což vám ušetří čas, protože potřebné soubory nemusíte
mezi zařízeními přenášet.
Pro fungování této služby je zapotřebí internetové připojení.
Pro synchronizaci s jiným zařízením:
1. Na obrazovce s mapou klepněte v panelu nástrojů na ikonu . Pokud se vám tato ikona nezobrazuje, zkuste změnit
orientaci obrazovky. Pokud se ani tak ikona nezobrazí, zvolte Menu > Nastavení > Rozhraní > Funkční tlačítka, a poté zapněte
zobrazení ikony Navitel.Cloud.
2. V nově otevřeném dialogovém okně zvolte Zapnout.
3. Vložte své přihlašovací údaje a heslo (stejné jako pro přihlášení na webových stránkách NAVITEL nebo do služby Navitel.
Přátelé).Případně se můžete přihlásit prostřednictvím vašeho účtu na VK, FB nebo Google Plus. Váš Navitel účet může být s
tímto účtem synchronizován.
4. V dialogovém okně Navitel.Cloud zvolte Nastavení, a poté zvolte data, která chcete synchronizovat.
5. Vraťte se zpět do dialogového okna Navitel.Cloud a klepněte na možnost Sesynchronizovat nyní.
6. Zopakujte tyto kroky i na dalším zařízení, se kterým chcete první zařízení synchronizovat.
CZ
Page 37

35 | UŽIVATELSKÁ PŘÍRUČKA — T700 3G NAVI
Navitel.Novinky
CZ
Prostřednictvím služby Navitel.Novinky budete dostávat důležité novinky o aktualizacích a program a upozornění na speciální
nabídky a slevy.
Pro otevření stránky této služby zvolte Menu > Můj Navitel > Novinky.
Chcete-li tuto funkci zapnout nebo vypnout zvolte Menu > Nastavení > On-line služby, najděte nabídku menu „Uk ázat upozornění
Navitel.Novinky”, a poté nastavte posuvník do požadované pozice.
Ikonu Navitel.Novinky lze také umístit do panelu nástrojů. Nastavení provedete prostřednictvím Menu > Nastavení > Rozhraní >
Funkční tlačítka, a poté zapněte zobrazení ikony Navitel.Novinky.
Obsah této uživatelské příručky a všechny přiložené demo materiály jsou vlastnictvím společnosti NAVITEL s.r.o. Jakékoliv
komerční využití této příručky musí být s písemným souhlasem společnosti NAVITEL s.r.o.
Page 38

BENUTZERHANDBUCH — T700 3G NAVI | 1
Anfangen
Lieferumfang 4
Geräteaufbau 4
Physikalische Eigenschaften 4
Hardware-Spezikation 4
Software-Spezikation 4
Verwendung des Geräts im Fahrzeug 5
Sicherheitsanforderungen 5
Einsetzen und Entfernen der SIM-Karte 6
Einsetzen und Entfernen der SD-Karte 6
Startbildschirm 7
Haupttasten 7
Statusleiste 7
Apps 7
Verknüpfungen 8
Widgets 8
Hintergrundbilder 8
Konten und Kontakte
Konten 10
Hinzufügen eines Kontos 10
Kontakte 10
Neuen Kontakt anlegen 10
Kontakte bearbeiten 11
Kontakte löschen 11
Kontakte sichern 11
Kontakte importieren 11
Bevorzugte Kontakte 12
Anrufe und Nachrichten
Anrufe 13
Ausgehende Anrufe 13
Eingehende Anrufe 13
Anrufhistorie 13
Nachrichten 14
Nachricht senden 14
Nachricht beantworten 14
MMS 15
Netzwerke
Wi-Fi 16
Aktivieren und Deaktivieren von Wi-Fi 16
Verbindung mit Wi-Fi-Netzwerk 16
Mobilfunknetz 17
Bluetooth 17
DE
Page 39

2 | BENUTZERHANDBUCH — T700 3G NAVI
Aktivieren und Deaktivieren von Bluetooth 17
Geräte über Bluetooth verbinden 18
DE
Tethering & mobiler Hotspot 18
Wi-Fi-Hotspot 18
USB-tethering 19
Bluetooth-tethering 19
Multimedien
Kamera 20
Bildaufnahme 20
Videoaufnahme 20
Kameraeinstellungen 20
Galerie ansehen 21
Bilder und Videos teilen 21
Tonaufnahmegerät 21
Einstellungen
Drahtlose Verbindung & Netzwerke 22
Verwaltung der SIM-Karte 22
Wi-Fi 22
Bluetooth 22
Datennutzung 22
Flugzeugmodus 23
Voreingestellte SMS-Anwendung 23
Tethering & mobiler Hotspot 23
VPN 23
Mobile Netzwerke 23
Gerät 23
Audioprole 23
Display 23
Speicher 23
Batterie 24
Apps 24
Persönliche Einstellungen 24
Standort 24
Sicherheit 24
Sprache & Eingabe 24
Backup & Zurücksetzen 24
Konten 24
System 25
Datum und Uhrzeit 25
Geplante Ein- und Ausschaltung 25
Zugänglichkeit 25
Drucken 25
Page 40

Entwickleroptionen 25
Über Tablet-PC 25
Navitel Navigator
Einleitung 26
Programmschnittstelle 26
Routen 30
Route zu einem manuell ausgewählten Punkt
auf der Karte 30
Route zu einer Adresse 30
Route zwischen zwei manuell ausgewählten
Punkten 32
Online-Dienste 33
Navitel.Verkehr 33
Navitel.Freunde 33
Navitel.Ereignisse 33
Navitel.SMS 33
Navitel.Wetter 33
Navitel.Cloud 33
Navitel.Nachrichten 34
BENUTZERHANDBUCH — T700 3G NAVI | 3
DE
Page 41

4 | BENUTZERHANDBUCH — T700 3G NAVI
Lieferumfang
• NAVITEL T700 3G NAVI
Tablet
DE
• Halterung an der
Windschutzscheibe
• Ständer
• Hauptladegerät 12/24 V
• Kfz-Ladegerät
• Benutzerhandbuch
• Garantieschein
Geräteaufbau
1. Bildschirm
2. Vordere Kamera
3. Lautsprecher
4. Lautstärke
5. Ein-/Ausschalter
6. Zurücksetzen
7. Stecker 3,5 mm
8. Hintere Kamera
9. Blitzlicht
10. Micro-USB - USB
11. Lautsprecher
12. Mikrofon
13. Halterung
Technische Spezikation
Physikalische Eigenschaften
Batterietyp Akku Li-Pol, 2800 mAh / 3.7 V
Netzteil
Abmessungen 108.8 × 188.8 × 11.7 mm
Hauptprozessor
DDR-Speicher 1 GB DDR
Flash-Speicher 16 GB
Eingang AC 100 V-240 V,
Ausgang Micro-USB 5 V, 2.0 A
Hardware-Spezikationen
MTK8321 Cortex-A7 Quad core
1.3 GHz
Bildschirmauösung
Wi-Fi 802.11 b / g / n
Bluetooth Bluetooth 4.0
3G 900 / 2100 MHz
2G 850 / 900 / 1800 / 1900 MHz
GPS Ja
FM radio Ja
Kamera vorne 0.3 MP, hinten 2.0 MP
7.0’’ IPS 1024 × 600
SD-Kartensteckplatz
SIM-Kartensteckplatz
Auadeanschluss Micro-USB (5 V 2.0 A)
USB-Anschluss Micro-USB
Kopfhörerbuchse 3.5 mm
G-sensor Ja
Betriebssystem Android™ 7.0
microSD
Dual SIM
Software-Spezikationen
Page 42

BENUTZERHANDBUCH — T700 3G NAVI | 5
Verwendung des Geräts im Fahrzeug
Halter für die Frontscheibe
Wählen Sie die Stelle für die Befestigung des Halters sorgfältig aus. Der Halter darf an der Frontscheibe nicht so platziert werden,
dass er die Sicht des Fahrers aus dem Fahrzeug einschränkt. Wenn die Frontscheibe des Fahrzeugs mit einer Heizung oder einem
Schutz gegen UV-Strahlung ausgestattet ist, kann dies die Empfangsqualität des Signals verringern.
Installation des Halters an der Frontscheibe
Entfernen Sie zuerst vom Saugnapf die Schutzfolie. Wählen Sie dann eine geeignete Stelle für die Befestigung des Halters aus.
Vergewissern Sie sich, dass kein Staub und keine Verschmutzungen an der ausgewählten Stelle sind und dass sie auch nicht feucht
ist. Platzieren Sie dann den Halter an der Frontscheibe. Unter normalen Bedingungen hält der Saugnapf das Gerät sicher. Wenn
Sie jedoch den Saugnapf an der Scheibe über Nacht lassen, kann sich die Festigkeit der Befestigung in Folge der Einwirkung der
Kondensation von Feuchtigkeit in Zusammenhang mit dem Temperaturrückgang verringern. Aus diesem Grund empfehlen wir,
das Gerät sowie den Halter von der Frontscheibe zu entfernen, damit eine mögliche Beschädigung des Geräts und des Halters
vermieden werden.
Sicherheitsanforderungen
• Sie dürfen das Gerät nicht selbst reparieren oder zerlegen. Wenden Sie sich im Falle eines Gerätefehlers an das Servicecenter.
• Zulässige Umgebungstemperatur im Betriebsmodus: 0°C bis +35°С. Lagerungstemperatur: +5°C bis +45°С. Relative
Luftfeuchtigkeit: 5% bis 90% ohne Kondensation (25°C).
• Halten Sie das Gerät von Feuerquellen fern, um Explosionen oder Brand zu vermeiden.
• Vermeiden Sie, das Gerät mit elektromagnetischen Strahlungsquellen in Kontakt zu bringen.
• Verwenden Sie keine Chemikalien oder Reinigungsmittel bei der Reinigung des Produkts. Schalten Sie das Gerät vor dem
Reinigen immer aus.
• Verwenden Sie nur Zubehör, das vom Hersteller zugelassen wurde.
• Use accessories only approved by manufacturer.
DE
Page 43

6 | BENUTZERHANDBUCH — T700 3G NAVI
Einsetzen und Entfernen der SIM-Karte
Einsetzen:
DE
1. Schalten Sie das Gerät aus.
2. Entfernen Sie den oberen Abdeckungsteil auf der Rückseite des Geräts, um den Zugang zum SIM-Kartensteckplatz zu
gewährleisten.
3. Setzen Sie die SIM-Karte so in den Steckplatz ein, dass die Goldkontakte nach unten gerichtet sind und die abgeschrägte Ecke
vom Steckplatz weg zeigt.
Entfernen:
1. Schalten Sie das Gerät aus.
2. Entfernen Sie den oberen Abdeckungsteil auf der Rückseite des Geräts, um den Zugang zum SIM-Kartensteckplatz zu
gewährleisten.
3. Entfernen Sie vorsichtig die SIM-Karte.
Einsetzen und Entfernen der SD-Karte
Einsetzen:
1. Schalten Sie das Gerät aus.
2. Entfernen Sie den oberen Abdeckungsteil auf der Rückseite des Geräts, um den Zugang zum SD-Kartensteckplatz zu
gewährleisten.
3. Setzen Sie die SD-Karte in den Steckplatz so ein, dass die Goldkontakte nach unten gerichtet sind und die abgeschnittene
Ecke zum Steckplatz zeigt. Drücken Sie die Karte hinein, bis sie einrastet.
Entfernen:
1. Deaktivieren Sie die SD-Karte, indem Sie „Anwendungsmenü > Einstellungen > Speicher > SD-Karte entfernen“ wählen.
2. Schalten Sie das Gerät aus.
3. Entfernen Sie den oberen Abdeckungsteil auf der Rückseite des Geräts, um den Zugang zum SD-Kartensteckplatz zu
gewährleisten.
4. Drücken Sie die SD-Karte leicht in den Steckplatz und lassen Sie sie herausgleiten.
Page 44

BENUTZERHANDBUCH — T700 3G NAVI | 7
Startbildschirm
Der Startbildschirm enthält die Statusleiste oben, Schnelleinstellungen und Verknüpfungen zu verschiedenen Anwendungen,
Menüs und Funktionen des Geräts.
Haupttasten
- Anwendungsmenü önen.
- Zurück zum Startbildschirm.
- Zurück zum vorigen Bildschirm.
- Zeigt die Liste der zuletzt verwendeten Apps an. Tippen Sie auf das Symbol, um das entsprechende Anwendung zu önen.
Statusleiste
Die Statusleiste zeigt eine Auswahl von Symbolen an, die den aktuellen Zustand des Geräts beschreiben, z. B. den Akkuladezustand, die Signalstärke, die Wi-Fi- bzw. Bluetooth-Verbindung usw.
Halten Sie den Finger auf der linken Hälfte der Statusleiste und ziehen Sie sie nach unten, um die Liste der Benachrichtigungen
anzuzeigen; zur Anzeige des Schnelleinstellungsmenüs das gleiche auf der rechten Hälfte der Statusleiste vornehmen.
Apps
Ihre installierten Apps benden sich im Anwendungsmenü, auf das Sie durch das Antippen von zugreifen können. Tippen
Sie auf das entsprechende Symbol, um die Anwendung zu önen.
Halten Sie den Finger auf dem Symbol und ziehen Sie es zum Papierkorb in der oberen linken Ecke, um die Anwendung zu
löschen.
DE
Page 45

8 | BENUTZERHANDBUCH — T700 3G NAVI
Verknüpfungen
Sie können Verknüpfungen zu den am häugsten verwendeten Apps herstellen und sie auf dem Startbildschirm nach Ihrem
Wunsch darstellen. Um dem Startbildschirm eine Anwendungsverknüpfung hinzuzufügen:
DE
1. Önen Sie das Anwendungsmenü.
2. Halten Sie den Finger lange auf dem Symbol
der gewählten Anwendung, ziehen Sie es
und danach lassen Sie es los, um es auf dem
Startbildschirm zu platzieren.
Um eine Verknüpfung zu löschen, halten den Finger lange darauf und ziehen Sie es dann auf das
kleine Kreuz in der oberen linken Ecke.
Widgets
Sie können Widgets, z. B. Kalender, Uhr, Akkusymbol, Google-Suche u.a., auf dem Startbildschirm
platzieren. Dazu:
1. Halten Sie den Finger lange auf dem
Startbildschirm, bis er schrumpft. Darunter
erscheinen drei neue Symbole.
2. Tippen Sie auf das Symbol „Widgets“. Danach erscheint die Liste der verfügbaren Widgets.
3. Wählen Sie ein Widget aus der Liste aus, indem Sie es berühren und halten, ziehen Sie es und danach lassen Sie es los, um es
auf dem Bildschirm zu platzieren.
Um ein Widget zu entfernen, halten Sie den Finger lange dem Symbol und ziehen Sie es dann auf das kleine Kreuz in der oberen
linken Ecke.
Page 46

BENUTZERHANDBUCH — T700 3G NAVI | 9
Hintergrundbilder
Um das Hintergrundbild zu wechseln:
1. Halten Sie den Finger lange auf dem Startbildschirm, bis er schrumpft. Darunter erscheinen drei neue Symbole.
2. Tippen Sie auf das Symbol „Hintergrundbild“. Am unteren Bildschirmrand werden die verfügbaren Hintergrundbilder im
Bildkarussell angezeigt.
3. Wählen Sie ein Bild aus dem Karussell oder tippen Sie auf „Bild auswählen“ (das erste Bild von links im Karussell), um ein
anderes auf Ihrem Gerät gespeichertes Bild auszuwählen. Dann tippen Sie auf „Hintergrundbild einstellen“ in der oberen
linken Ecke.
DE
Page 47

10 | BENUTZERHANDBUCH — T700 3G NAVI
Konten
Verwenden Sie Konten, um Ihre Daten – E-Mails, Kontakte, Kalender usw. – zu synchronisieren.
DE
Hinzufügen eines Kontos
Gehen Sie zu Anwendungsmenü > Einstellungen“ und blättern Sie dann nach unten zum Abschnitt „Konten“. Tippen
Sie auf „Konto hinzufügen“.
Sie können folgende Kontentypen hinzufügen:
• Google: fügen Sie ein Google-Mail-Konto hinzu, um Kalender, Kontakte, E-Mails, App-Daten und Google+ Dienste zu
synchronisieren.
• E-Mail des Unternehmens: fügen Sie ein E-Mail-Konto Ihrer Firma hinzu.
• IMAP-E-Mail: fügen Sie ein persönliches E-Mail-Konto (IMAP-Protokoll) hinzu.
• POP3-E-Mail: fügen Sie ein persönliches E-Mail-Konto (POP3-Protokoll) hinzu.
Kontakte
Sie können Kontakte, Telefonnummern, E-Mail-Adressen und andere relevante Informationen speichern.
Neuen Kontakt anlegen
So legen Sie einen neuen Kontakt an:
1. Gehen Sie zu Kontakte > Neuer Kontakt.
2. Geben Sie die Kontaktinformationen ein.
3. Tippen Sie auf „Fertig“ (in der oberen linken Ecke), um den Kontakt zu speichern.
Page 48

Kontakte bearbeiten
BENUTZERHANDBUCH — T700 3G NAVI | 11
1. Tippen Sie auf um die Kontaktliste zu önen.
2. Wählen Sie den Kontakt aus, den Sie bearbeiten möchten, und tippen Sie auf . Nach dem Bearbeiten tippen Sie auf
„Fertig“, um die Änderungen zu speichern.
Kontakte löschen
1. Tippen Sie auf um die Kontaktliste zu önen.
2. Tippen Sie auf , und wählen Sie in der Popup-Liste „Löschen“.
3. Markieren Sie die Kontakte, die Sie löschen möchten, und tippen Sie auf „OK“.
Kontakte sichern
Sie können Ihre Kontaktdaten auf eine externe Speicherkarte exportieren.
1. Tippen Sie auf um die Kontaktliste zu önen.
2. Tippen Sie auf > “Importieren/Exportieren“.
3. Wählen Sie „Auf Speicher exportieren“.
DE
Page 49

12 | BENUTZERHANDBUCH — T700 3G NAVI
Kontakte importieren
1. Tippen Sie auf um die Kontaktliste zu önen.
DE
2. Tippen Sie auf > “Importieren/Exportieren“.
3. Wählen Sie „Aus Speicher importieren“.
Bevorzugte Kontakte
Sie können häug verwendete Favoriten oder spezielle Kontakte auswählen, um schneller darauf zuzugreifen. Wählen Sie dazu
einen Kontakt aus Ihrer Liste und tippen Sie auf das Sternsymbol neben dem Namen.
Um Ihre Favoriten anzuzeigen, tippen Sie auf „Alle Kontakte“ (in der oberen linken Ecke) und wählen Sie „Favoriten“ in der Popup-Liste.
Page 50

BENUTZERHANDBUCH — T700 3G NAVI | 13
Anrufe
Ausgehende Anrufe
1. Tippen Sie auf .
2. Wählen Sie einen Kontakt aus Ihrer Kontaktliste oder tippen Sie auf um eine Nummer mit der Wähltastatur einzugeben.
Sie können auf tippen, um die zuletzt eingegebene Zier zu entfernen.
3. Tippen Sie auf um den Anruf vorzunehmen.
Eingehende Anrufe
Wenn Sie einen eingehenden Anruf erhalten, sind drei Optionen verfügbar:
1. Antworten: tippen Sie auf und ziehen Sie das Symbol .
2. Auegen: tippen Sie und ziehen Sie das Symbol auf das Symbol .
Auegen und Nachricht schreiben: tippen Sie und ziehen Sie das Symbol auf das Symbol .
Anrufhistorie
Um Ihre Anruiste zu sehen, gehen Sie zu Telefon > Historie. Sie können auswählen, dass nur folgende Information
angezeigt wird:
• eingehende Anrufe .
DE
Page 51

14 | BENUTZERHANDBUCH — T700 3G NAVI
• ausgehende Anrufe .
DE
• Anrufe in Abwesenheit .
Nachrichten
Nachricht senden
1. Gehen Sie zu Nachrichten > Neue Nachricht.
2. Geben Sie die Nummer des Empfängers ein oder tippen Sie auf und wählen Sie den Empfänger aus Ihrer Kontaktliste.
3. Geben Sie den Text der Nachricht ein.
4. Tippen Sie auf um die Nachricht zu senden.
Nachricht beantworten
Sie werden informiert, wenn Sie eine neue Nachricht erhalten.
1. Gehen Sie zu Nachrichten.
2. Wählen Sie die Nachricht aus, die Sie beantworten möchten.
3. Geben Sie den Text der Antwort ein.
4. Tippen Sie auf um die Nachricht zu senden.
Page 52

MMS
BENUTZERHANDBUCH — T700 3G NAVI | 15
1. Gehen Sie zu Nachrichten > Neue Nachricht.
2. Geben Sie die Nummer des Empfängers ein oder tippen Sie auf und wählen Sie den Empfänger aus Ihrer Kontaktliste.
3. Tippen Sie auf die untere linke Ecke und wählen Sie eine der folgenden Optionen:
• Bild aufnehmen: nehmen Sie ein Foto auf, das automatisch zur Nachricht beigefügt wird.
• Video aufnehmen: nehmen Sie ein Video auf, das automatisch zur Nachricht beigefügt wird.
• Audio aufnehmen: zeichnen Sie eine Audiodatei auf, die automatisch zur Nachricht beigefügt wird.
• Bilder: fügen Sie ein auf Ihrem Gerät gespeichertes Bild zu.
• Videos: fügen Sie ein auf Ihrem Gerät gespeichertes Video zu.
• Audio: fügen Sie eine auf Ihrem Gerät gespeicherte Audiodatei zu.
• Diaschau: erstellen Sie eine Bilder-Diaschau, um sie der Nachricht beizufügen.
4. Tippen Sie auf um die Nachricht zu senden.
DE
Page 53

16 | BENUTZERHANDBUCH — T700 3G NAVI
Wi-Fi
Aktivieren und Deaktivieren von Wi-Fi
DE
Wi-Fi kann über den Startbildschirm aktiviert werden.
1. Tippen Sie im Schnelleinstellungsmenü auf . Das Symbol wird weiß, wenn Wi-Fi eingeschaltet ist.
2. Tippen Sie erneut auf das Symbol, um Wi-Fi, bei Bedarf zu deaktivieren.
Alternative:
1. Gehen Sie zu Anwendungsmenü > Einstellungen.
2. Finden Sie im Abschnitt „Drahtlose Verbindung & Netzwerke“ die Position “Wi-Fi” .
3. Verwenden Sie den Schalter auf der rechten Seite, um Wi-Fi ein- bzw. auszuschalten.
Verbindung mit Wi-Fi-Netzwerk
Wenn Wi-Fi aktiviert ist, erscheint in der Statusleiste ein Informationssymbol das anzeigt, dass Wi-Fi-Netzwerke verfügbar
sind. Um die Verbindung zu einem Netzwerk herzustellen:
1. Halten Sie den Finger auf der linke Seite der Statusleiste und ziehen Sie nach unten, um die Liste der Benachrichtigungen zu
sehen.
2. Tippen Sie auf „Verfügbare Wi-Fi-Netzwerke“. Sie sehen eine Liste der verfügbaren Netzwerke.
3. Wählen Sie ein Netzwerk aus der Liste und tippen Sie auf den entsprechenden Eintrag. Wenn das Netzwerk passwortgeschützt
ist, werden Sie aufgefordert, das Passwort einzugeben.
Sie können auf die Liste der Netzwerke auch zugreifen, indem Sie in den Einstellungen auf „Wi-Fi“ tippen.
Jedes Mal, wenn das Gerät mit einem neuen Netzwerk verbunden wird, „erinnert“ sich das Gerät daran und stellt automatisch
Page 54

BENUTZERHANDBUCH — T700 3G NAVI | 17
die Verbindung her, wenn das Netzwerk verfügbar ist. Um Ihr Gerät ein Netzwerk „vergessen“ zu lassen, tippen Sie lange auf den
Netzwerknamen und wählen Sie dann in der Popup-Liste die Position „Netzwerk vergessen“ aus.
Hinweis: Da das „Vergessen“ eines Netzwerks auch das „Vergessen“ des Passworts beinhaltet, werden Sie bei einem erneuten Versucht
der Verbindung mit einem geschützten Netzwerk wieder das Passwort eingeben müssen.
Mobilfunknetz
Um den Zugang zum mobilen Internet zu aktivieren, önen Sie das Schnelleinstellungsmenü und tippen Sie auf . Tippen
Sie erneut um es zu deaktivieren.
Alternativ können Sie dazu auch zu Anwendungsmenü > Einstellungen > Verwaltung der SIM-Karte > Datenverbindung gehen.
Hinweis: damit das mobile Internet funktioniert, muss eine SIM-Karte eingesetzt sein.
Bluetooth
Aktivieren und Deaktivieren von Bluetooth
Bluetooth kann über den Startbildschirm aktiviert werden:
1. Tippen Sie im Schnelleinstellungsmenü. Das Symbol wird weiß, wenn Bluetooth eingeschaltet ist.
2. Tippen Sie erneut auf das Symbol, um Bluetooth zu deaktivieren.
Eine andere Möglichkeit zur Aktivierung von Bluetooth:
1. Gehen Sie zu Anwendungsmenü > Einstellungen.
DE
Page 55

18 | BENUTZERHANDBUCH — T700 3G NAVI
2. Wählen Sie die Position „Bluetooth“.
3. Verwenden Sie den Schalter auf der rechten Seite, um es ein- bzw. auszuschalten.
DE
Geräte über Bluetooth verbinden
1. Tippen Sie auf die Position „Bluetooth“, um die Bluetooth-Einstellungen zu sehen. Der Eintrag ganz oben enthält den Namen
Ihres Geräts und gibt an, ob es für andere Bluetooth-Geräte sichtbar ist. Tippen Sie auf den Eintrag, um die Sichtbarkeit Ihres
Geräts zu ändern.
2. Der Abschnitt „Verfügbare Geräte“ unten zeigt die Geräte, die Ihr Gerät momentan „sehen“ kann. Tippen Sie auf den Eintrag
eines Geräts, um Ihr Gerät mit ihm zu verbinden. Erscheint ein anderer Abschnitt mit dem Titel „Gepaarte Geräte“, in dem alle
Bluetooth-Verbindungen zu Ihrem Gerät angezeigt werden.
3. Um ein Gerät zu entkoppeln, tippen Sie auf den rechten Bereich des Geräteeintrags und wählen Sie danach „Entpaaren“.
Tethering & mobiler Hotspot
Sie können den Datenanschluss Ihres Geräts mit anderen Geräten teilen. Aktivieren Sie zuerst Ihre mobile Internetverbindung.
Dann gehen Sie zu Anwendungsmenü > Einstellungenund tippen Sie im Abschnitt „Drahtlose Verbindung & Netzwerke“ auf „Mehr ...“ und dann – auf „Tethering & mobiler Hotspot“. Sie werden mehrere Teilungsoptionen sehen.
Wi-Fi-hotspot
1. Tippen Sie auf den Eintrag, um Ihren Wi-Fi-Hotspot zu kongurieren.
2. Tippen Sie auf “Wi-Fi-Hotspot einstellen“. Ein Fenster wird eingeblendet.
3. Wählen Sie einen Namen für Ihr Netzwerk und geben Sie es in das Textfeld „Netzwerk SSID“ ein.
4. Wählen Sie ein Sicherheitsprotokoll für Ihr Netzwerk oder lassen Sie es oen.
5. Geben Sie ein Passwort ein, um Ihr Netzwerk ggf. zu schützen.
Page 56

BENUTZERHANDBUCH — T700 3G NAVI | 19
6. Stellen Sie die maximale Anzahl der Verbindungen ein (1-8).
7. Tippen Sie auf „Speichern“.
8. Verwenden Sie den Schalter in der oberen rechten Ecke, um den Hotspot einzuschalten.
USB-tethering
Sie können den Internetanschluss zwischen zwei Geräten über ein USB-Kabel teilen.
1. Verbinden Sie Ihr Gerät mit dem anderen Gerät.
2. In der Statusleiste wird ein USB-Symbol angezeigt. In der Liste der Benachrichtigungen sehen Sie „Verbunden als Mediengerät“
(oder einen anderen Verbindungsmodus). Für das Tethering hat es keine Bedeutung.
3. Gehen Sie zu Anwendungsmenü > Einstellungen, wählen Sie unter „Drahtlose Verbindung & Netzwerke“
„Mehr...“ und danach – „Tethering & mobiler Hotspot“.
4. Aktivieren Sie das Anwahlfeld in der Position „USB-Tethering“ rechts.
Bluetooth-tethering
Sie können den Internetanschluss zwischen zwei über Bluetooth gepaarten Geräten teilen.
1. Aktivieren Sie Bluetooth auf beiden Geräten.
2. Paaren Sie die Geräte.
3. Wenn Sie den Internetanschluss des anderen Geräts verwenden möchten, tippen Sie auf den Eintrag des Geräts im
Abschnitt „Gepaarte Geräte“ und wählen dann im Abschnitt „Prole“ die Position „Internet-Zugang“.
4. Wenn Sie Ihren Internetanschluss mit dem anderen Gerät teilen möchten, führen Sie den Schritt 3 auf dem anderen Gerät
durch (ziehen Sie ggf. das Benutzerhandbuch des Geräts zur Hilfe).
DE
Page 57

20 | BENUTZERHANDBUCH — T700 3G NAVI
Kamera
Mit der Kamera können Sie Bilder aufnehmen und Videos aufzeichnen.
DE
Um auf die Kamera zuzugreifen, tippen Sie im Startbildschirm, oder gehen Sie zu Anwendungsmenü >
Kamera.
Tippen Sie auf um zwischen der vorderen und hinteren Kamera zu wechseln.
Bildaufnahme
1. Richten Sie die Kamera auf das, was Sie aufnehmen möchten.
2. Um die Darstellung ggf. zu vergrößern oder zu verkleinern können Sie den Bildschirm „dehnen“ bzw. „zusammendrücken“.
3. Tippen Sie auf um ein Bild aufzunehmen. Es wird automatisch in der Galerie gespeichert.
Videoaufnahme
1. Tippen Sie auf um die Videoaufnahme zu starten. Das Symbol wird rot eingefärbt, und in der unteren linken
Bildschirmecke erscheint ein kleiner roter Kreis, der anzeigt, dass die Aufzeichnung gerade läuft. Ein Timer daneben zeigt die
Länge der Aufnahme an.
2. Bei Bedarf können Sie während der Aufnahme ein- und auszoomen, indem Sie den Bildschirm „dehnen“ bzw.
„zusammendrücken“.
3. Tippen Sie wieder auf um die Aufnahme zu stoppen. Das Video wird in der Galerie gespeichert.
Kameraeinstellungen
Tippen Sie auf um das Kameraeinstellungsmenü zu önen. Es ist in drei Registerkarten unterteilt - Allgemein,
Foto-, und Videoeinstellungen.
Page 58

BENUTZERHANDBUCH — T700 3G NAVI | 21
Tippen Sie auf um ein weiteres Menü zu önen, wo Sie die Belichtung, den Farbeekt, den Weißabgleich und den Tages-/
Nachts-Modus einstellen können.
Tippen Sie nach der Änderung der Einstellungen auf eine beliebige Stelle des Bildschirms, um das Einstellungsmenü zu verlassen.
Galerie ansehen
Tippen Sie auf den quadratischen Rahmen in der oberen rechten Bildschirmecke, um zu Ihrer Galerie zu gelangen, in der alle Bilder
und Videos gespeichert sind.
Sie können für die Objekte in Ihrer enthaltenen Galerie verschiedene Bearbeitungsschritte (z.B. Bearbeiten, Zuschneiden, Drehen,
Stummschalten, Löschen) ausführen. Wählen Sie dazu ein Objekt aus der Galerie, tippen Sie auf und wählen Sie einen
Bearbeitungsschritt aus der Liste.
Bilder und Videos teilen
Wählen Sie ein Objekt aus der Galerie aus, tippen Sie in der oberen rechten Ecke und wählen Sie eine Teilungsmethode aus
der Liste. Tippen Sie auf um die Datei (als Anhang) über G-Mail zu teilen.
Tonaufnahmegerät
1. Gehen Sie zu Anwendungsmenü > Tonaufnahmegerät.
2. Tippen Sie auf um die Aufnahme zu starten.
3. Tippen Sie auf oder um die Aufnahme anzuhalten bzw. zu unterbrechen.
4. Tippen Sie auf um ggf. die Wiedergabe der Aufnahme zu starten.
5. Tippen Sie auf „Speichern“, wenn Sie die Audiodatei speichern möchten, oder auf „Verwerfen“, um sie zu löschen.
DE
Page 59

22 | BENUTZERHANDBUCH — T700 3G NAVI
Einstellungen
Um das Einstellungsmenü zu önen:
DE
• Gehen Sie zu Anwendungsmenü > Einstellungen.
• Tippen Sie auf die Statusleiste und tippen Sie im Popup-Menü auf .
Das Einstellungsmenü ist in 5 Bereiche unterteilt:
1. Drahtlose Netzwerke: zum Festlegen der drahtlosen Verbindung Ihres Geräts, z.B. Wi-Fi, Bluetooth, Mobilfunk usw.
2. Gerät: Thema, Ton, Anzeige, Speicheroptionen usw.
3. Persönliche Einstellungen: Konten, Sicherheit, Sprache, Backup.
4. Konten: Google- und E-Mail-Konten.
5. System: Uhrzeit und Datum, Zugänglichkeit, Softwareversion, rechtliche Informationen usw.
Drahtlose Verbindung & Netzwerke
Verwaltung der SIM-Karte
Zum Aktivieren/Deaktivieren Ihrer SIM-Karten verwenden Sie die Schaltächen auf der rechten Seite oder bearbeiten Sie sie,
indem Sie auf die entsprechenden Einträge tippen.
Wi-Fi
Sie können die Verbindung zu drahtlosen Netzwerken herstellen sowie Ihre Verbindungseinstellungen ansehen und bearbeiten.
Bluetooth
Sie können Ihr Gerät mit anderen in der Nähe bendlichen Bluetooth-Geräten paaren.
Page 60

BENUTZERHANDBUCH — T700 3G NAVI | 23
Datennutzung
Sie können Ihre Datennutzungsstatistiken ansehen.
(Tippen Sie auf „Mehr...“, um auf die unten aufgeführten Menüs zuzugreifen.)
Flugzeugmodus
Sie können die gesamte Kommunikation mit Ihrem Gerät deaktivieren.
Voreingestellte SMS-Anwendung
Sie können Ihre Standard-Anwendung für Kurzmitteilungen einstellen.
Tethering & mobiler Hotspot
Sie können Ihren Internetzugang mit anderen Geräten teilen.
VPN
Sie können Sie Ihre virtuellen privaten Netzwerke kongurieren.
Mobile Netzwerke
Sie können die mobile Datenverbindung aktivieren/deaktivieren.
Gerät
Audioprole
Sie können Ihre Audioprole erstellen, bearbeiten und verwenden.
Display
Sie können Ihr Hintergrundbild wählen sowie Benachrichtigungen, Helligkeit, Schriftgröße usw. einstellen.
DE
Page 61

24 | BENUTZERHANDBUCH — T700 3G NAVI
Speicher
Sie können die Voreinstellung der Festplatte zur Speicherung festlegen sowie den verfügbaren und belegten Speicherplatz auf
Ihren Speichereinheiten ansehen.
DE
Batterie
Sie können den Batteriestatus – den aktuellen Ladezustand, die verbleibende Zeit, den Energieverbrauch pro Prozess – ansehen.
Apps
Sie können Ihre installierten Anwendungen ansehen und verwalten.
Persönliche Einstellungen
Standort
Sie können Einstellungen der Standortdienste festlegen.
Sicherheit
Sie können die Bildschirmsperre, den SIM-Kartenschutz u.a. Sicherheitsparameter einstellen.
Sprache & Eingabe
Sie können Ihre bevorzugte Sprache und Eingabemethode wählen.
Backup & Zurücksetzen
Sie können Ihre wichtigen Daten auf Google-Servern sichern oder das Gerät auf Werkseinstellungen zurücksetzen.
Page 62

BENUTZERHANDBUCH — T700 3G NAVI | 25
Konten
Sie können Ihre Google- und E-Mail-Konten einrichten, bearbeiten und verwalten.
System
Datum und Uhrzeit
Sie können das aktuelle Datum und die Uhrzeit, das Anzeigeformat für Datum und Uhrzeit und Ihre Zeitzone einstellen.
Geplante Ein- und Ausschaltung
Sie können Ihr Gerät so einstellen, dass es sich zu einer bestimmten Zeit automatisch ein- oder ausschaltet.
Zugänglichkeit
Zugänglichkeitsoptionen für Menschen mit Behinderungen.
Drucken
Druckdienste.
Entwickleroptionen
Verschiedene Optionen für Android-Entwickler.
Über Tablet-PC
Updates, Status, Modellnummer, Softwareversion usw.
DE
Page 63

26 | BENUTZERHANDBUCH — T700 3G NAVI
Navitel Navigator
Tablet enthält vorinstallierte Navitel Navigator-Software und Karten von 43 europäischen Ländern, Weißrussland, Kasachstan,
DE
Russland und der Ukraine. Navitel Navigator ist eine Navigationsanwendung zur Adresssuche und Routenplanung.
Drücken Sie auf dem Startbildschirm auf das Symbol, um das Programm auszuführen. Drücken Sie um die
Adresssuche und die Programmeinstellungen zu önen.
Programmschnittstelle
# Element Funktion
1 Ton
2 Kompass
3 Straßenspuren
4 Informationsfeld
Tippen Sie auf die Schaltäche,
um das Tonmenü zu önen.
Tippen Sie um das Kontextmenü
zu önen, in dem Sie die Ausrichtung („Norden oben“ oder „Weg
nach oben“), die Ansicht (2D/3D)
und das Skin (Nacht/Tag/Auto) der
Karten auswählen können.
Dieses Feld zeigt Straßen mit
möglichen Manövern.
Dieses Feld zeigt das bevorstehende Manöver und die Entfernung bis zu diesem. Tippen Sie auf
das Feld, um es zu önen
# Element Funktion
5 Route Visualisierung der aktuellen Route.
Dieses Feld zeigt die aktuelle Geschwindigkeit, die
6 Informationsfeld
7 GPS-cursor
8 Menü
verbleibende Zeit bis zum Zielpunkt, die Entfernung zum Zielpunkt und die voraussichtliche
Ankunftszeit.
Zeigt die aktuelle Position auf
der Karte an, wenn der GPS-Empfänger eingeschaltet ist.
Tippen Sie auf die Schaltäche,
um das Hauptmenü des Programms zu önen.
Page 64

# Element Funktion
Dieses Feld zeigt den Namen der
Straße an, auf der Sie sich gerade
benden. Die Information ist nur
9 Informationsfeld
10 Zoom-out-Taste
11 Zoom-in-Taste
12 Navitel.Ereignisse
Leiste des
13
Routen-
fortschritts
14 Batterie
verfügbar, wenn eine GPS-/GLONASS-Verbindung hergestellt wurde
und die Karte solche Information enthält. Wenn kein Straßenname vorhanden ist, wird die Bewegungsrichtung
angezeigt.
Tippen Sie zum Verkleinern der
Darstellung.
Tippen Sie zum Vergrößern der
Darstellung.
Taste zur Verwaltung des Dienstes
„Navitel. Ereignisse“.
Der Fortschrittsbalken zeigt die restliche Strecke der Route, die Wegpunkte
(falls vorhanden) und farblich markierte Verkehrsdichte auf der Route.
Das Symbol zeigt den Ladezustand.
Durch Antippen des Symbols wird der
freie Speicherraum des Geräts angezeigt.
BENUTZERHANDBUCH — T700 3G NAVI | 27
# Element Funktion
GPS-Verbindungsanzeige: grau
– GPS-/GLONASS-Empfänger ist
ausgeschaltet; rot – Empfänger ist
15 GPS
16 Navitel.Freunde
eingeschaltet, aber es besteht keine
Verbindung zu Satelliten; gelb –
schlechte Verbindung; grün – Verbindung ist hergestellt. Die Zahl auf dem
Symbol zeigt die Anzahl der Satelliten
an.
Symbol des Dienstes „Navitel.Freunde“. Tippen Sie darauf, um das Einstellungsmenü zu önen. Der Dienst
ist zum Hinzufügen von Freunden,
zur Anzeige ihres Standortes und
zum Nachrichtenaustausch mit ihnen
vorgesehen.
DE
Page 65

28 | BENUTZERHANDBUCH — T700 3G NAVI
# Element Funktion
DE
17 Taste „Cursor“
18
19 2D/3D
20
21 Aktualisierung
22
Taste
„WP Speichern“
Punkt auf der
Karte
Wegaufzeich-
nung
Durch Antippen der Schaltäche
wird ein Menü für Operationen
mit dem auf der Karte markierten Punkt angezeigt (Taste „Los!“
drücken, um ihn als Zielpunkt festzulegen, oder zum Einstellungsbildschirm wechseln).
Speichert den auf der Karte markierten Punkt als Wegpunkt.
Wechsel zwischen der 2D-Ansicht
und der 3D-Panorama-Ansicht der
Karten.
Kurzes Tippen auf die Karte markiert einen Punkt für weitere Operationen: speichern als Wegpunkt,
hinzufügen zur Route oder anzeigen der Objektdaten u.a.
Zugri auf den Bildschirm des
Programm- und Kartenaktualisierungsmenüs.
Taste für die Wegaufzeichnung:
roter Punkt – Aufzeichnung ist
eingeschaltet, grauer Punkt – die
Aufzeichnung wurde gestoppt.
# Element Funktion
Das Symbol zeigt die allgemeine
Verkehrsintensität mittels einer
23 Navitel.Verkehr
24 Navitel.SMS
10-Punkte-Skala an. Durch Antippen der Schaltäche wird das
Menü zur Verwaltung des Dienstes „Navitel.Verkehr“ angezeigt.
Das Symbol ermöglicht das Lesen/
Senden von Nachrichten mit
beigefügten Koordinaten. Es wird
auch die Anzahl der ungelesenen
Nachrichten angezeigt.
Page 66

BENUTZERHANDBUCH — T700 3G NAVI | 29
# Element Funktion
Durch Antippen der Schaltäche
erhält das Programm einen Befehl,
25 “Los!”
26 “Start einstellen”
27 “Ziel einstellen”
die Route von der aktuellen Position zu berechnen oder den Startpunkt an der gewählten Position
festzulegen.
Durch Antippen der Schaltäche
wird die ausgewählte Position als
Startpunkt der Route festgelegt
(GPS-Empfänger muss ausgeschaltet sein).
Die Schaltäche ist nur aktiv,
wenn eine bestehende Route vorhanden ist. Durch Antippen wird
die Route bis zum ausgewählten
Punkt fortgesetzt, und er wird zum
Zielpunkt der Route.
# Element Funktion
Die Schaltäche ist nur aktiv, wenn
eine bestehende Route vorhan-
“Route durch
28
anlegen”
29 Map Tap to return to the map.
den ist. Durch das Antippen wird
die ausgewählte Position als ein in
die Route aufzunehmende Punkt
markiert. Der letzte hinzugefügte
Punkt wird zum ersten Punkt der
Route nach dem Startpunkt.
DE
Page 67

30 | BENUTZERHANDBUCH — T700 3G NAVI
Manuelle Einstellung eines auf der Karte ausgewählten Punktes
Sie können eine Route bis zu einem Punkt planen, der auf der Karte gefunden und markiert, und dann als Ziel festgelegt
wird, während die aktuelle Position des Geräts, die vom GPS-System ermittelt wird, zum Ausgangspunkt wird. Um eine
DE
Route zu planen, tippen Sie auf die Karte, um den Punkt zu markieren, wählen Sie „Cursor“ [1] und danach – „Los!“ [2].
Das Programm bietet 3 alternative Routen [3] an. Wählen Sie die am meisten geeignete und tippen Sie auf „Los!“ [4].
Zchng. 1 Zchng. 2
Zchng. 3 Zchng. 4
Page 68

BENUTZERHANDBUCH — T700 3G NAVI | 31
DE
Zchng. 4
Zchng. 7 Zchng. 8 Zchng. 9
Zchng. 10
Zchng. 5 Zchng. 6
Zchng. 11
Zchng. 12
Page 69

32 | BENUTZERHANDBUCH — T700 3G NAVI
Manuelle Einstellung aller Routenpunkte
Um eine Route zu planen, bei der die Start- und Zielpunkte manuell festgelegt werden, markieren Sie zuerst auf der
DE
Karte einen Punkt, an dem Sie die Fahrt anfangen möchten, und tippen Sie auf „Cursor“ [1], um in den Bildschirm „Meine
Route“ zu gelangen. Tippen Sie auf das Informationsfeld am unteren Bildschirmrand [2]. Tippen Sie im Bildschirm
„Eigenschaften“ auf [Start]. Der GPS-Empfänger muss ausgeschaltet sein. Der Punkt wird auf der Karte als Startpunkt
markiert. Wählen Sie auf der Karte einen Zielpunkt: Tippen Sie auf die Karte, um den Punkt zu markieren, tippen Sie auf
„Cursor“ [4] und danach – auf „Los!“ im Bildschirm „Meine Route“ [5]. Das Programm bietet 3 alternative Routen [6] an.
Wählen Sie die am meisten geeignete und tippen Sie auf „Los!“.
Zchng. 1
Zchng. 4 Zchng. 5 Zchng. 6
Zchng. 2
Zchng. 3
Page 70

BENUTZERHANDBUCH — T700 3G NAVI | 33
Online-Dienste
Navitel.Verkehr
Dieser Dienst gewährleistet die Darstellung der Echtzeitinformationen zur Verkehrsdichte auf der Karte. Wenn ein Straßenabschnitt auf der Karte grün markiert ist, bedeutet dies, dass der Verkehr dort normal ist, wenn er gelb markiert ist, ist der Verkehr
ziemlich dicht, orange – der Verkehr ist langsam, rot – es gibt einen Stau. Um den Dienst zu kongurieren, wählen Sie „Menü >
Einstellungen > Online-Dienste“.
Navitel.Freunde
Der interaktive Dienst „Navitel.Freunde“ ermöglicht es, den Standort von Freunden auf der Karte in Echtzeit zu sehen, die Route
anhand ihrer Koordinaten zu planen, Koordinaten anderer Punkte zu teilen und Nachrichten auszutauschen. Um den Dienst
einzuschalten, wählen Sie „Menü > Einstellungen > Online-Dienste“ und schalten Sie den Schalter „Navitel.Freunde einschalten“
ein.
Navitel.Ereignisse
Der interaktive Dienst „Navitel.Ereignisse“ gewährleistet den Benutzern die Möglichkeit, auf der Karte verschiedene Straßenereignissen zu markieren und die von anderen Benutzern vorgenommenen Markierungen zu sehen.
Navitel.SMS
Der Dienst „Navitel.SMS“ ermöglicht Ihnen den Austausch von Koordinaten mit anderen Benutzern. Sie können Ihre Position oder
die Position eines Objektes senden oder auf der Karte markieren. Sie können die Telefonnummer, den Ortsnamen, die Beschreibung und die Koordinaten des Empfängers eingeben. Es gibt zwei Arten von Kurznachrichten: Ihre Koordinaten („Ich bin hier“)
und die Anfrage von Koordinaten anderer Benutzer („Wo bist du?“).
Navitel.Wetter
Der Dienst „Navitel.Wetter“ zeigt die Wettervorhersage für 4 Tage für jeden beliebigen Ort weltweit.
Navitel.Cloud
Der Dienst „Navitel.Datenwolke“ ermöglicht es Ihnen, Ihre Einstellungen, Wegpunkte und Suchverlauf im Wolken-Datenspeicher
zu speichern. Die dort gespeicherten Daten können anschließend wiederhergestellt werden, falls Sie das Programm erneut instal-
DE
Page 71

34 | BENUTZERHANDBUCH — T700 3G NAVI
liert haben. Wenn Sie Navitel Navigator auf mehreren Geräten verwenden, können Wegpunkte und Historiedaten zwischen allen,
wofür dies nützlich sein könnte, synchronisiert werden. So sparen Sie Zeit, die sonst zur Übertragung der notwendigen Dateien
erforderlich wäre.
DE
Die Internetverbindung ist erforderlich.
Synchronisierung mit einem anderen Gerät:
1. Tippen Sie im Kartenbildschirm in der Symbolleiste auf das Symbol .
2. Wenn dieses Symbol nicht angezeigt wird, drehen Sie den Bildschirm, um die Bildschirmausrichtung zu ändern. Wenn dies
nicht hilft und das Symbol immer noch nicht angezeigt wird, wählen Sie „Menü > Einstellungen > Schnittstelle > KartenSchaltächen“ und aktivieren Sie dann die Anzeige des Symbols „Navitel.Datenwolke“.
3. Wählen Sie in dem neu geöneten Dialogfeld die Position „Einschalten“.
4. Geben Sie Ihre Login- und Passwortdaten ein (wie auf der Webseite von Navitel oder im Dienst „Navitel.Freunde“). Alternativ
können Sie sich entweder durch VK, FB oder Google Plus anmelden. Ihr Navitel-Konto muss mit diesen synchronisiert sein.
5. Wählen Sie im Dialogfeld „Navitel.Datenwolke“ die Position „Einstellungen“ und dann die Daten aus, die Sie synchronisieren
möchten.
6. Kehren Sie zum Dialogfeld „Navitel.Datenwolke“ zurück und tippen Sie auf die Option „Jetzt synchronisieren“.
7. Wiederholen Sie diese Schritte auf dem anderen Gerät, mit dem Sie die Synchronisation vornehmen möchten.
Navitel.Nachrichten
Mit Hilfe des Dienstes „Navitel.Nachrichten“ liefern wir Ihnen wichtige Update- und Programmnachrichten und kündigen spezielle
Angebote und Rabatte an.
Um die Serviceseite zu önen, wählen Sie „Menü > Mein Navitel > Nachrichten“.
Wenn Sie diese Funktion aktivieren bzw. deaktivieren möchten, gehen Sie zu „Menü > Einstellungen > Onlinedienste“, wählen
Sie die Option „Benachrichtigungen von Navitel.Nachrichten anzeigen” und stellen Sie den Schalter auf die gewünschte Position.
Sie können das Symbol „Navitel.Nachrichten“ auch in der Symbolleiste platzieren. Gehen Sie zu „Menü > Einstellungen > Benutze-
roberäche > Karten-Schaltächen“ und aktivieren Sie die Symbolanzeige von „Navitel.Nachrichten“.
Page 72

T700 3G NAVI | 1
Getting Started
Package contents 4
Device layout 4
Physical characteristics 4
Hardware specications 4
Software specications 4
Using Device in Vehicle 5
Safety requirements 5
Installing and removing a SIM card 6
Installing and removing an SD card 6
Home Screen 7
Main buttons 7
Status Bar 7
Applications 7
Shortcuts 8
Widgets 8
Wallpapers 8
Accounts&Contacts
Accounts 10
Adding an account 10
Contacts 10
New contacts 10
Edit a contact 11
Delete a contact 11
Backup contacts 11
Import contacts 11
Favorite contacts 12
Calling&Messaging
Phone call 13
Making a phone call 13
Receiving a phone call 13
Call history 13
Message 14
Sending a message 14
Answering messages 14
MMS 15
Networks
Wi-Fi 16
Enabling and disabling Wi-Fi 16
Connecting to a Wi-Fi network 16
Mobile network 17
Bluetooth 17
EN
Page 73

2 | USER MANUAL - T700 3G NAVI
Enabling and disabling Bluetooth 17
Connecting devices via Bluetooth 18
Tethering&Portable hotspot 18
Wi-Fi hotspot 18
USB tethering 19
EN
Bluetooth tethering 19
Multimedia
Camera 20
Taking a picture 20
Recording a video 20
Camera settings 20
View gallery 21
Sharing pictures and videos 21
Sound recorder 21
Settings
Wireless&Networks 22
SIM management 22
Wi-Fi 22
Bluetooth 22
Data usage 22
Airplane mode 23
Default SMS app 23
Tethering&portable hotspot 23
VPN 23
Mobile networks 23
Device 23
Audio proles 23
Display 23
Storage 23
Battery 24
Apps 24
Personal 24
Location 24
Security 24
Language&input 24
Backup&reset 24
Accounts 24
System 25
Date&time 25
Scheduled power on&o 25
Accessibility 25
Printing 25
Page 74

Developer options 25
About tablet 25
Navitel Navigator
Introduction 26
Program interface 26
Routing 30
Route to a manually selected point on the
map 30
Route to an address 30
Route from one manually selected point to
another 32
Online services 33
Navitel.Trac 33
Navitel.Friends 33
Navitel.Events 33
Navitel.SMS 33
Navitel.Weather 33
Navitel.Cloud 33
Navitel.News 34
T700 3G NAVI | 3
EN
Page 75

4 | USER MANUAL - T700 3G NAVI
Package contents
• NAVITEL T700 3G NAVI
Tablet
• Car windcreen holder
• Stand
Device layout
1. Screen
EN
2. Front camera
3. Speaker
4. Volume
5. On/o button
6. Reset
7. 3.5 mm jack
Technical specications
Physical characteristics
Battery Type Li-Pol battery, 2800 mAh / 3.7 V
Power adaptor
Dimensions 108.8 × 188.8 × 11.7 mm
CPU
DDR Memory 1 GB DDR
Flash Memory 16 GB
Input AC 100 V-240 V,
output Micro-USB 5 V, 2.0 A
Hardware specications
MTK8321 Cortex-A7 Quad core
1.3 GHz
• Home charger 12/24 V
• Car charger
• User Manual
• Warranty Card
8. Rear camera
9. Flash
10. Micro-USB - USB
11. Speaker
12. Microphone
13. Holder
Screen Resolution 7.0’’ IPS 1024 × 600
Wi-Fi 802.11 b / g / n
Bluetooth Bluetooth 4.0
3G 900 / 2100 MHz
2G 850 / 900 / 1800 / 1900 MHz
GPS Yes
FM radio Yes
Camera Front 0.3 MP, rear 2.0 MP
SD slot microSD
SIM Card slot Dual SIM
Charging port Micro-USB (5 V 2.0 A)
USB port Micro-USB
Earphone jack 3.5 mm
G-sensor Yes
Software specications
OS Android™ 7.0
Page 76

T700 3G NAVI | 5
Using Device in Vehicle
Windscreen holder
Carefully select a place to attach the holder. Do not attach the holder to the windscreen in a way that limits the driver’s line of sight.
If the car windscreen contains a built-in heating system or UV protection, the quality of signal reception may be lower than usual.
Set-up of windscreen holder
First remove the protective layer from the vacuum cup. Then, select an appropriate place to attach the holder. Make sure the area
is clear of dust, dirt, and moisture, and then secure the vacuum cup on the windscreen. Under normal operating conditions, the
vacuum cup holder locks the device well. However, if you leave it there overnight, the holding strength may get weaker as a result
of moisture condensation due to temperature fall. For this reason, in order to prevent the device and holder from being damaged,
it is recommended to remove the device and holder from the windscreen.
Safety requirements
• Do not disassemble or repair tablet by yourself. In case of tablet failure, contact the service center.
• Permissible ambient temperature in operating mode: -10 to +40 °С. Storage temperature: +5 to +55 °С. Relative humidity: 5%
to 90% without condensation (25 °С).
• Put the tablet away from re sources to avoid explosion or re.
• Do not expose the tablet to physical impacts.
• The manufacturer is not responsible if the screen is damaged by the user.
• Avoid contacting the tablet with sources of electromagnetic radiation.
• Do not use chemicals or detergents to clean the product; always turn o the tablet before cleaning.
• Use accessories only approved by manufacturer.
EN
Page 77

6 | USER MANUAL - T700 3G NAVI
Installing and removing a SIM card
To install:
1. Shut o the device.
2. Remove the top part of the device’s back panel to nd the SIM card slot.
3. Insert the SIM card into the slot so that the gold contacts are facing down, and the cut-o corner is facing away from the slot.
EN
To remove:
1. Shut o the device.
2. Remove the top part of the device’s back panel to nd the SIM card slot.
3. Carefully remove the SIM card.
Installing and removing an SD card
To install:
1. Shut o the device.
2. Remove the top part of the device’s back panel to nd the SD card slot.
3. Insert the SD card into the slot so that the gold contacts are facing down and the cut-o corner is facing towards the slot. Push
it in until it clicks into place.
To remove:
1. Unmount the SD card by going to Application Menu > Settings > Storage > Unmount SD card.
2. Shut o the device.
3. Remove the top part of the device’s back panel to nd the SD card slot.
4. Lightly push the SD card into the slot and let it slide out.
Page 78

T700 3G NAVI | 7
Home Screen
The Home Screen contains the Status Bar at the top, the Quick Settings Panel, and shortcuts to various applications, menus, and
functions of the device.
Main buttons
- open the Application Menu.
- return to the Home Screen.
- return to the previous screen.
- show the list of recently used applications. Tap on an application icon to open it.
Status Bar
The Status Bar displays a selection of icons that describe the current state of the device - for example, battery level, signal strength,
Wi-Fi and Bluetooth connection, etc.
Press your nger against the left half of the status bar and swipe down to display the list of notications; do the same with the
right half to display the Quick Settings Menu.
Applications
Your installed apps are located in the Application Menu that can be accessed by pressing . Tap on an application icon to
open it.
Long press and drag the icon onto the trash bin in the top left corner to delete the application.
EN
Page 79

8 | USER MANUAL - T700 3G NAVI
Shortcuts
You can create shortcuts to your most used apps and position them however you like on the Home Screen. To add an application
shortcut to the Home Screen:
1. Open the Application Menu.
2. Long press on the icon of the app, then drag
and release to place it on the Home Screen.
EN
To remove a shortcut, long press, then drag and
drop it onto the little cross in the top left corner.
Widgets
You can place widgets on your Home Screen, i.e.
calendar, clock, battery, Google Search, and others.
To do that:
1. Long press on the Home Screen until it shrinks.
Below it you will see three new icons.
2. Tap on the one labeled “Widgets“. You will see
the list of available widgets.
3. Select a widget from the list by touching and
holding, then drag and release to place it on the screen.
To remove a widget, long press, then drag and drop it onto the little cross in the top left corner.
Page 80

T700 3G NAVI | 9
Wallpapers
To change the wallpaper:
1. Long press on the Home Screen until it shrinks. Below it you will see three new icons.
2. Tap on the one labeled “Wallpapers“. You will see the available wallpapers in the image carousel at the bottom of the screen.
3. Choose an image from the carousel, or press “Pick image“ (the leftmost picture in the carousel) to choose a dierent image
saved on your device. Then press “Set wallpaper“ in the top left corner.
EN
Page 81

10 | USER MANUAL - T700 3G NAVI
Accounts
Use accounts to synchronize your data - e-mails, contacts, calendar, etc.
Adding an account
Go to Application Menu > Settings, then scroll down to the “Accounts” section. Press “Add account”.
EN
You can add the following account types:
• Google - add a Gmail account to synchronize your calendar, contacts, mail, app data, as well as Google+ services.
• Corporate email - add a corporate email account.
• IMAP email - add a personal email account (IMAP protocol).
• POP3 email - add a personal email account (POP3 protocol).
Contacts
You can save contacts, phone numbers, email addresses, and other related information.
New contacts
To add a new contact:
1. Go to Contacts > New contact.
2. Enter the contact’s information.
3. Press “Done“ (top left corner) to save the contact.
Page 82

Edit a contact
1. Press to open the contact list.
2. Select the contact you want to edit, then press . After editing, press “Done“ to save the changes.
Delete a contact
1. Press to open the contact list.
2. Press , in the pop-up list select “Delete“.
3. Mark the contacts you want to delete, then press “OK” .
Backup contacts
You can export your contact data to an external memory card.
1. Press to open the contact list.
2. Press > “Import/Export“.
3. Select “Export to storage“.
T700 3G NAVI | 11
EN
Page 83

12 | USER MANUAL - T700 3G NAVI
Import contacts
1. Press to open the contact list.
2. Press > “Import/Export“.
3. Select “Import from storage“.
EN
Favorite contacts
You can favorite frequently used or special contacts to access them more quickly. To do that, select a contact from your list, then
press on the star icon next to their name.
To view your favorites, press “All contacts“ (top left corner), and select “Favorites“ in the pop-up list.
Page 84

Phone call
Making a phone call
1. Press .
T700 3G NAVI | 13
2. Select a contact from your contact list or press to enter a number using the dial pad. You can press to remove
the last entered digit.
3. Press to make the call.
Receiving a phone call
When you get an incoming call, three options are available:
1. Answer the phone - press and drag the icon onto the icon.
2. Hang up - press and drag the icon onto the icon.
Hang up and write a message - press and drag the icon onto the icon.
Call history
To view your call history, go to Phone > History. You can choose to only view:
EN
Page 85

14 | USER MANUAL - T700 3G NAVI
• Incoming calls .
• Outgoing calls .
• Missed calls .
EN
Message
Sending a message
1. Go to Messages > New message.
2. Enter the intended recipient’s number or press and nd the recipient in your contact list.
3. Write the text you want to send.
4. Press to send the message.
Answering messages
You will be notied when you receive a new message.
1. Go to Messages.
2. Select the message you want to reply to.
3. Enter the text you want to send.
Page 86

4. Press to send the message.
MMS
1. Go to Messages > New message.
2. Enter the recipient’s number or press and nd the recipient in your contact list.
3. Press in the bottom left corner, then select one of the following options:
• Capture picture - capture a photo that will be automatically attached to the message.
• Capture video - capture a video that will be automatically attached to the message.
• Record audio - record an audio le that will be automatically attached to the message.
• Pictures - attach a picture stored on your device.
• Videos - attach a video stored on your device.
• Audio - attach an audio le stored on your device.
• Slideshow - create a picture slideshow to attach to the message.
4. Press to send the message.
T700 3G NAVI | 15
EN
Page 87

16 | USER MANUAL - T700 3G NAVI
Wi-Fi
Enabling and disabling Wi-Fi
Wi-Fi can be turned on from the Home Screen.
1. Press in the Quick Settings Menu. The icon will turn white when Wi-Fi is on.
EN
2. Press on the icon again to disable Wi-Fi, if necessary.
Alternatively:
1. Go to Application Menu > Settings.
2. In the “Wireless&Networks“ section, nd the “Wi-Fi” entry.
3. Use the toggle on the right to turn Wi-Fi on/o.
Connecting to a Wi-Fi network
When Wi-Fi is turned on, a notication icon will appear in the Status Bar showing that there are available Wi-Fi networks.
To connect to a network:
1. Put your nger on the left side of the Status Bar and swipe down to display the list of notications.
2. Tap on “Wi-Fi network available“. You will be shown the list of available networks.
3. Choose a network from the list and tap on the corresponding entry. If the network is password protected, you will be
prompted to enter the password.
The list of networks can also be accessed by tapping on the “Wi-Fi“ entry in Settings.
Every time you connect to a new network, the device “remembers“ it and connects automatically when it is available. To make your
device “forget“ a network, long press on the network’s name, then select “Forget network“ from the pop-up list.
Page 88

T700 3G NAVI | 17
Note: “forgetting” a network includes “forgetting” the password, so, if you want to connect to a secured network again, you will have to
re-enter the password.
Mobile network
To enable mobile Internet access, open the Quick Settings Menu and press . Press again to disable it.
You can also do it by going to Application Menu > Settings > SIM management > Data connection.
Note: you need to have a SIM card installed for mobile Internet to work.
Bluetooth
Enabling and disabling Bluetooth
Bluetooth can be turned on from the Home Screen:
1. Press in the Quick Settings Menu. The icon will turn white when Bluetooth is on.
2. Press on the icon again to disable Bluetooth.
Another way to enable Bluetooth:
1. Go to Application Menu > Settings.
2. Find the “Bluetooth” entry.
3. Use the toggle on the right to turn it on/o.
EN
Page 89

18 | USER MANUAL - T700 3G NAVI
Connecting devices via Bluetooth
1. Tap on the Bluetooth entry to see the Bluetooth settings. The entry at the very top displays the name of your device and
indicates whether it is visible to other Bluetooth devices. Tap on the entry to toggle the visibility of your device.
2. The “Available devices“ section below shows the devices that your device can currently see. Tap on a device’s entry to pair with
it. Another section will appear, titled “Paired devices“, where all the Bluetooth connections to your device will be displayed.
3. To unpair a device, press on the right in the device’s entry, then press “Unpair“.
EN
Tethering&Portable hotspot
You can share your device’s data connection with other devices. First, enable your mobile Internet connection. Then, go to
Application Menu > Settings and in the “Wireless&Networks“ section press “More...“, then “Tethering&portable hotspot“.
You will see several sharing options.
Wi-Fi hotspot
1. Tap on the entry to congure your Wi-Fi hotspot.
2. Press “Set up Wi-Fi hotspot“. A window will pop up.
3. Choose a name for your network and type it in the “Network SSID“ text eld.
4. Choose a security protocol for your network or leave it open.
5. Enter a password to protect your network, if necessary.
6. Set the maximum number of allowed connections (1-8).
7. Press “Save“.
8. Use the toggle in the top right corner to turn on the hotspot.
Page 90

T700 3G NAVI | 19
USB tethering
Share Internet connection between two devices via USB cable.
1. Connect your device to the other device.
2. A USB icon will appear in the Status Bar. In the list of notications you will see “Connected as a media device“ (or other
connection mode). It does not matter for tethering.
3. Go to Application Menu > Settings, under “Wireless&Networks” select “More...”, then “Tethering&portable
hotspot“.
4. Tick the checkbox on the right in the “USB tethering“ entry.
Bluetooth tethering
Share Internet connection between two devices paired via Bluetooth.
1. Enable Bluetooth on both devices.
2. Pair the devices.
3. If you want to use the other device’s I nternet connection, press in the device’s entry under “Paired devices”, then, under
proles, select “Internet access“.
4. If you want to share your Internet connection with the other device, perform step 3 on said device (consult the user manual
for the device, if necessary).
EN
Page 91

20 | USER MANUAL - T700 3G NAVI
Camera
The camera allows you to take pictures and record videos.
To access the camera, tap on the icon on the Home Screen, or go to Application Menu > Camera.
Press to switch between front and rear cameras.
EN
Taking a picture
1. Point the camera at whatever you want to capture.
2. “Stretch” and “pinch” the screen to zoom in or out, if necessary.
3. Press to take a picture. It will be saved automatically to the gallery.
Recording a video
1. Press to start recording a video. The icon will turn red, and a small red circle will appear in the bottom left corner of the
screen indicating that the recording is in process. A timer next to it will show the length of the recording.
2. If necessary, you can zoom in and out while recording by “stretching” and “pinching” the screen.
3. Press once more to stop recording. The video will be saved to the gallery.
Camera settings
Press to open the Camera Settings Menu. It is divided into three tabs - General, Photo, and Video
settings.
Press to open another menu, where you can set up exposure level, color eect, white balance, and day/night mode.
Page 92

T700 3G NAVI | 21
After changing the settings, tap anywhere on the screen to exit the Camera Settings Menu.
View gallery
Tap on the square frame in the top right corner of the screen to go to your gallery, where all your pictures and videos are contained.
You can perform various actions (i.e. edit, crop, rotate, mute, delete) on the items in your gallery. To do that, select an item from
the gallery, then press and choose an action from the list.
Sharing pictures and videos
Select an item from the gallery, then press in the top right corner and choose a sharing method from the list. Press
to share the le via Gmail (as an attachment).
Sound recorder
1. Go to Application Menu > Sound recorder.
2. Press to start recording.
3. Press to pause, or to stop.
4. Press to play back the recording, if necessary.
5. Press “Save”, if you want to save the audio le, or press “Discard“ to delete it.
EN
Page 93

22 | USER MANUAL - T700 3G NAVI
Settings
To open the Settings Menu:
• Go to Application Menu > Settings.
• Tap on the Status Bar and in the pop-up menu press .
EN
The Settings Menu is divided into 5 sections:
1. Wireless networks - set your device’s wireless connection, such as WiFi, Bluetooth, mobile network, etc.
2. Device - theme, sound, display, storage options, etc.
3. Personal - location, security, language, backup.
4. Accounts - Google and email accounts.
5. System - time and date, accessibility, software version, legal information, etc.
Wireless&Networks
SIM management
Enable/disable your SIM cards using the toggles on the right, or edit them by tapping on their respective entries.
Wi-Fi
Connect to wireless networks, view and edit your connection settings.
Bluetooth
Pair your device with other Bluetooth devices in the vicinity.
Page 94

Data usage
View your data usage statistics.
(press “More...“ to access the menus listed below)
Airplane mode
Disable all communication with your device.
Default SMS app
Set your default messaging application.
Tethering&portable hotspot
Share your Internet access with other devices.
VPN
Congure your virtual private networks.
Mobile networks
Enable/disable mobile data connection.
Device
Audio proles
Create, edit and use your audio proles.
Display
Select your wallpaper, set up notications, brightness, font size, etc.
T700 3G NAVI | 23
EN
Page 95

24 | USER MANUAL - T700 3G NAVI
Storage
Choose a default write disk, view available and occupied space on your storage units.
Battery
View your battery status - current charge, time left, energy consumption per process.
Apps
EN
View and manage your installed applications.
Personal
Location
Location service settings.
Security
Set up screen lock, SIM card protection, and other security parameters.
Language&input
Select your preferred language and input method.
Backup&reset
Backup your important data to Google servers or perform factory reset on your device.
Page 96

Accounts
Create, edit, and manage your Google and email accounts.
System
Date&time
Set current date and time, date and time display format, your time zone.
Scheduled power on&o
Set your device to turn on or o automatically at a certain time.
Accessibility
Accesibility options for people with disabilities.
Printing
Printing services.
Developer options
Various options for Android developers.
About tablet
Updates, status, model number, software version, etc.
T700 3G NAVI | 25
EN
Page 97

26 | USER MANUAL - T700 3G NAVI
Navitel Navigator
Tablet includes pre-installed Navitel Navigator software and maps of 43 European countries, Belarus, Kazakhstan, Russia and
Ukraine. Navitel Navigator is navigation application for address search and route planning.
Press the icon in your home screen to run the program. Press to open address search and program settings.
EN
Program interface
# Element Function
1 Sound
2 Compass
3 Road lanes
Information
4
panel
Tap on the button to open the
sound menu.
Tap to open the context menu
where you can choose map orientation (“North up” or “Track
up“), map view (2D/3D), and skin
(Night/Day/Auto).
This panel displays road lanes with
possible maneuvers.
This panel shows the upcoming
maneuver and distance before it.
Tap on the panel to open
# Element Function
5 Route Visualization of the current route.
The panel shows current speed,
Information
6
7 GPS-cursor
8 Menu
panel
the remaining time to the destination point,
distance to the destination point,
and estimated time of arrival.
Indicates current position on the
map when the GPS receiver is
switched on.
Tap on the button to open the
main program menu.
Page 98

# Element Function
The panel shows the name of the
street you are currently on. The in-
Information
9
10 Zoom out button Tap to zoom out.
11 Zoom in button Tap to zoom in.
12 “Navitel.Events”
13
14 Battery
panel
Route progress
bar
formation is available only if GPS/
GLONASS connection is established and the map contains such
information. If there is no street
name, the movement direction
will be displayed.
Button for controlling the “Navitel.
Events” service.
The progress bar displays the remaining route, waypoints (if any),
and trac density on the route,
marked by color.
The icon indicates the level of battery charge. Tapping on the icon
shows free device memory.
T700 3G NAVI | 27
# Element Function
GPS-connection indicator. Grey indicator – GPS/GLONASS-receiver
is o; red – receiver is turned on,
15 GPS
16 “Navitel.Friends”
but there is no connection with
satellites; yellow – bad connection; green – connection is established. The number on the icon
indicates the number of satellites.
The icon of the “Navitel.Friends”
service. Tap on it to open the
settings menu. The service is intended for adding friends, viewing their location and exchanging
messages with them.
EN
Page 99

28 | USER MANUAL - T700 3G NAVI
# Element Function
Tapping on the button shows
the menu for operations with the
17 “Cursor” button
EN
18 “Save WP” button
19 2D/3D
20 Point on the map
21 Updates
22 Track recording
point marked on the map (making
it a destination point by pressing
“Go!” button or proceeding to the
properties screen).
Saves the point marked on the
map as a waypoint.
Switching between the plain 2D
and the panoramic 3D map views.
Short tap on the map marks the
point for further operations with
it: saving as a waypoint, adding to
the route or viewing the object’s
data, and others.
Provides access to the program
and map update menu screen.
Button for track recording: red dot
– recording is on, grey dot – recording is stopped.
# Element Function
The icon displays general trac in-
23 Navitel.Trac
24 Navitel.SMS
tensity on ten-point scale. Tapping
on the button shows the menu
for controlling the “Navitel.Trac”
service.
The icon allows reading/sending
messages with added coordinates. It also shows the number of
unread messages.
Page 100

# Element Function
Tapping on the button gives a
25 “Go!”
26 “Set start”
27 “Set nish”
28 “Route through”
29 Map Tap to return to the map.
command to the program to calculate a route from the current
position or the set initial point to
the selected point.
Tapping on the button determines
the selected point as a starting
point of the route (GPS-receiver
must be switched o).
The button is active only when
there is an existing route. Pressing
the button continues the route up
to the selected point making it the
destination point of the route.
The button is active only when
there is an existing route. Pressing the button marks the selected
point as a point to be included in
the route. The last added point
becomes the rst one in the route
after the starting point.
T700 3G NAVI | 29
EN
 Loading...