

Page 1

porsche design
mobile navigation
ß9611
Page 2

[
UK ] Table of contents
1 Introductions
1.1 About this manual ------------------------------------------------------------------------------------------ 55
1.2 Legal notice ------------------------------------------------------------------------------------------------- 55
1.3 Customer service ------------------------------------------------------------------------------------------- 55
2 Prior to commissioning
2.1 Package contents ------------------------------------------------------------------------------------------ 58
2.2 Initializing the device --------------------------------------------------------------------------------------- 58
2.3 Turning the device on and off, Reset --------------------------------------------------------------------- 62
2.4 Navigation with GPS --------------------------------------------------------------------------------------- 63
2.5 Important safety information ------------------------------------------------------------------------------ 63
3 Operating the Navigation Software
3.1 Volume ------------------------------------------------------------------------------------------------------ 65
3.2 Information -------------------------------------------------------------------------------------------------- 65
3.3 Software keyboard ----------------------------------------------------------------------------------------- 66
3.4 Lists ---------------------------------------------------------------------------------------------------------- 66
3.5 Options ------------------------------------------------------------------------------------------------------ 66
3.6 Menus ------------------------------------------------------------------------------------------------------- 66
4 Navigation
4.1 Starting P´ 9611 --------------------------------------------------------------------------------------------- 67
4.2 Specifying a new destination ------------------------------------------------------------------------------ 68
4.3 Select a stored destination -------------------------------------------------------------------------------- 70
4.4 Navigation homewards ------------------------------------------------------------------------------------ 71
4.5 Determining a destination on the map -------------------------------------------------------------------- 71
4.6 POI on your route ------------------------------------------------------------------------------------------- 71
4.7 Starting navigation ----------------------------------------------------------------------------------------- 72
5 Destination management
6 Routes with various stages
6.1 Planning routes --------------------------------------------------------------------------------------------- 74
6.2 Managing routes ------------------------------------------------------------------------------------------- 75
6.3 Navigation --------------------------------------------------------------------------------------------------- 75
-------------------------------------------------------------------------------------------
-------------------------------------------------------------------------------
------------------------------------------------------------------
----------------------------------------------------------------------------------------------
----------------------------------------------------------------------------
--------------------------------------------------------------------------
55
58
65
67
73
74
The crossed-through wheely bin symbol means that, within the European Union, the product must
be disposed of at a recycling center. This applies both to the product itself, and to all accessories
that carry this symbol. This product may not be disposed of with unsorted household waste.
52 –53
7 Options
8 Working with the map
8.1 Maps -------------------------------------------------------------------------------------------------------- 79
8.2 Map in Preview mode -------------------------------------------------------------------------------------- 79
8.3 Map in Navigation mode ----------------------------------------------------------------------------------- 80
8.4 Map in Destination search mode -------------------------------------------------------------------------- 81
9 Useful functions
-------------------------------------------------------------------------------------------------
--------------------------------------------------------------------------------
---------------------------------------------------------------------------------------
77
79
83
Page 3

[
UK ] Table of contents
01 Introductions
9.1 GPS status, store current location ------------------------------------------------------------------------ 83
9.2 TMC [ Traffic information ] ---------------------------------------------------------------------------------- 83
9.3 TMC Settings ----------------------------------------------------------------------------------------------- 83
10 Configuring P´ 9611
11 MP3 Player
11.1 MP3 settings ------------------------------------------------------------------------------------------------ 87
12 Hands-free Module
12.1 Connecting to a telephone -------------------------------------------------------------------------------- 87
12.2 Receiving a call --------------------------------------------------------------------------------------------- 88
12.3 Dialing ------------------------------------------------------------------------------------------------------- 88
12.4 During a conversation -------------------------------------------------------------------------------------- 88
12.5 Phone book ------------------------------------------------------------------------------------------------- 89
12.6 Recent calls ------------------------------------------------------------------------------------------------- 89
12.7 Configuring the hands-free module ----------------------------------------------------------------------- 89
12.8 Configuring a connection to a mobile phone ------------------------------------------------------------ 90
13 Appendix
13.1 Technical data ---------------------------------------------------------------------------------------------- 92
13.2 Restoring the contents of the memory card ------------------------------------------------------------- 92
13.3 Terms of guarantee ---------------------------------------------------------------------------------------- 92
13.4 Terms of licence -------------------------------------------------------------------------------------------- 94
14 Index
-----------------------------------------------------------------------------------------------
----------------------------------------------------------------------------------------------------
------------------------------------------------------------------------------------
---------------------------------------------------------------------------------------------
------------------------------------------------------------------------------------
85
86
87
92
97
By purchasing the P´ 9611 navigation system, you
have chosen the functional combination of quality
and design. The P´ 9611 has been conceived by
designers and rigorously developed by engineers.
Every part has been carefully tested and subjected
to NAVIGON AG’s strict and continuous quality
control. However, the service life of the device lies
partially in your hands. For this reason, we ask you
to read this manual carefully and to take note of the
instructions contained herein. Thank you.
1.1 About this manual
1.1.1 Symbols
The following symbols refer to specific passages of
text:
!
Instructions and tips for operating the software
i
Further detailed information and explanations
Warnings
!
1.2 Legal notice
1.2.1 Liability
The software and documentation are subject to
change without notice. NAVIGON AG is not liable
for the accuracy of the information contained in this
manual or for damages resulting from the use of this
manual.
To improve the quality of our products and our
services, we appreciate any suggestions or notice
of defects.
1.2.2 Trademarks
All brands and trademarks mentioned in this
document are possibly registered by third parties
and are subject to the current legislation and to the
rights of their respective owners without reservation.
All names of products, societies, or brands
mentioned may be registered trademarks of their
respective owners. Every right that is not explicitly
accorded is reserved.
The absence of explicit labelling of registered
trademarks does not imply that the brand is not
subject to the rights of third party.
– Navigon is a registered trademark of
NAVIGON AG.
– Porsche Design is a registered trademark
of PLH | Porsche Lizenz- und
Handelsges. mbH & Co. KG.
1.3 Customer service
Our service team employees are available via
telephone or email in many countries.
You can find additional information at the website
under NAVIGON AG [ www.navigon.com
“Service & Support” section.
Support via email
Danish: support.dk@navigon.com
German: support.de@navigon.com
English: support.uk@navigon.com
Finnish: support.fin@navigon.com
French: support.fr@navigon.com
Italian: support.it@navigon.com
Dutch: support.nl@navigon.com
Norwegian: support.no@navigon.com
Swedish: support.se@navigon.com
Spanish: support.es@navigon.com
] in the
54 –55
Page 4

01 Introductions
Telephone customer service
Country Telephone Service times Costs
Germany 01805-6284466 Monday to Saturday from € 0.14 / min.
8 a.m. to 8 p.m. CET
Belgium 0900-70016 Monday to Friday from € 0.45 / min. + € 0.05 per call
8 a.m. to 8 p.m. CET
Denmark 901-31033 Monday to Friday from DKK 3.00 / min.
8 a.m. to 8 p.m. CET
Finland 0600-413414 Monday to Friday from € 0.50 / min.
8 a.m. to 9 p.m.*
France 0891-650065 Monday to Friday from € 0.225 / min.
8 a.m. to 8 p.m. CET
Great Britain 0905-8480701 Monday to Friday from GBP 0.25 / min.
7 a.m. to 7 p.m.*
Italy 166-205301 Monday to Friday from € 0.40 / min. + € 0.09 per call
8 a.m. to 8 p.m. CET
Netherlands 0900-0400468 Monday to Friday from € 0.30 / min. + € 0.045 per call
8 a.m. to 8 p.m. CET
Norway 820-33050 Monday to Friday from NOK 3.26 / min.
8 a.m. to 8 p.m. CET
Austria 0820-240437 Monday to Friday from € 0.145 / min.
8 a.m. to 8 p.m. CET
Sweden 0900-1001110 Monday to Friday from SEK 4.00 / min.
8 a.m. to 8 p.m. CET
Country Telephone Service times Costs
U.S.A. +1-888-8480701 Monday to Friday from free of charge
6 a.m. to 2 p.m. EST
Other countries +49-221-2888-999 Monday to Friday from dependent on
8 a.m. to 8 p.m. CET telephone provider
!
Note: All quoted costs refer to calls made from a landline within the relevant country.
* local time
Switzerland 0848-662544 Monday to Friday from 8 a.m.– 5 p.m.: CHF 0.11 / min.
8 a.m. to 8 p.m. CET 5 p.m.–10 p.m.: CHF 0.09 / min.
10 p.m.– 8 a.m.: CHF 0.06 / min.
Spain 807-001205 Monday to Friday from 8 a.m.– 8 p.m.: € 0.356 / min.
8 a.m. to 8 p.m. CET + € 0.104 per call
8 p.m.– 8 a.m.: € 0.288 / min.
+ € 0.104 per call
56 –57
Page 5

02 Prior to commissioning
2.1 Package contents
Please check that the contents of the package are
complete. If this is not the case, please inform us
within 14 days of purchase. The package you have
purchased contains:
– The P´ 9611 navigation device
– Battery
– Car holder
– Car charging cable power supply cable for
12 V cigar lighter socket
– Mains charger cable
– USB cable
– [ Pre-installed ] SD Memory Card
– Manual
– Guarantee card
– DVD [ files for restoring the SD card and
manuals in pdf format
– Battery compartment cover
2.2 Initializing the device
The following steps are to be carried out before use:
– Insert battery
– Charge battery
– Insert Memory Card
– Install the holder in the car
– Switch the device on
2.2.1 Insert battery
1. Remove the battery from the packaging.
2. Remove the battery compartment cover.
3. Insert the battery into the battery compartment.
4. Close the battery compartment.
]
provided. [6]
1. Slide the adapter connector on the back side
into the guide of the mains adapter.
2. Insert the mini USB connector of the mains
cable into the power supply socket on the LEFT
SIDE of the device.
3. Insert the plug of the mains cable into a mains
socket.
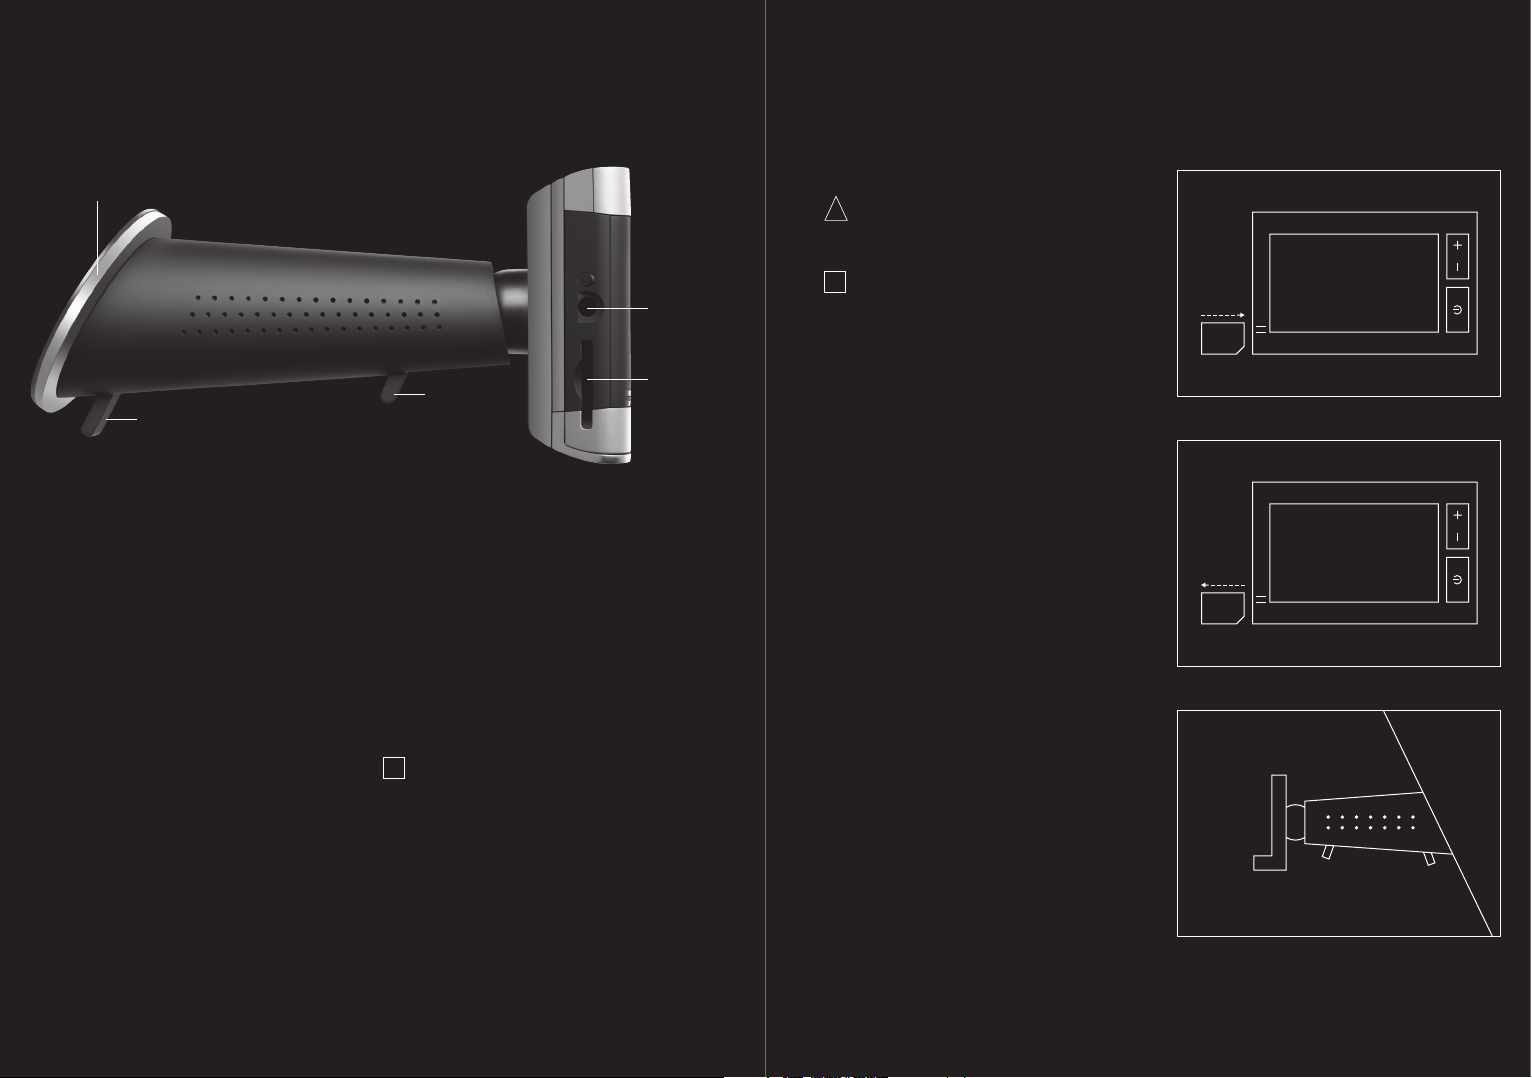
Front view
[
1 ] Hardware keys
Key INCREASE VOLUME
Key DECREASE VOLUME
Key ON / OFF
[
2 ] Touchscreen
[
3 ] Display external power supply and Bluetooth
display:
– The power supply display lights up ORANGE
when the device is connected to an external
power source.
– The Bluetooth display lights up BLUE when
the P´ 9611 has established a Bluetooth
connection to a mobile telephone.
Rear view
[
1 ] Battery compartment cover
connection
[ 1 ]
[ 2 ]
[ 3 ]
[
[
[
[
[
]
1
]
2
]
3
]
4
]
5
2.2.2 Charging the battery
!
Note: the battery is not supplied in a charged
state and must be fully charged before it is used
for the first time. When charging the battery for
the first time, it should remain connected to the
power supply for at least 12 hours.
The battery cannot be charged when the device
is switched off, or, when the device is
connected to a computer, via the USB cable
58 –59
[
2 ] Connection for an external GPS antenna
[
]
optional
[
3 ] Headphone connection
[
4 ] Reset button
[
5 ] SD slot
[
6 ] Power supply connection / USB cable
[
]
6
Page 6
02 Prior to commissioning
[
]
1
[
]
2
Side view left
[ 1 ]
Locking lever for suction cup
[ 2 ]
Suction cup
[ 3 ]
Locking lever for ball-and-socket joint
[ 4 ]
Headphones jack
[ 5 ]
SD slot
[
]
4
[
]
[
]
3
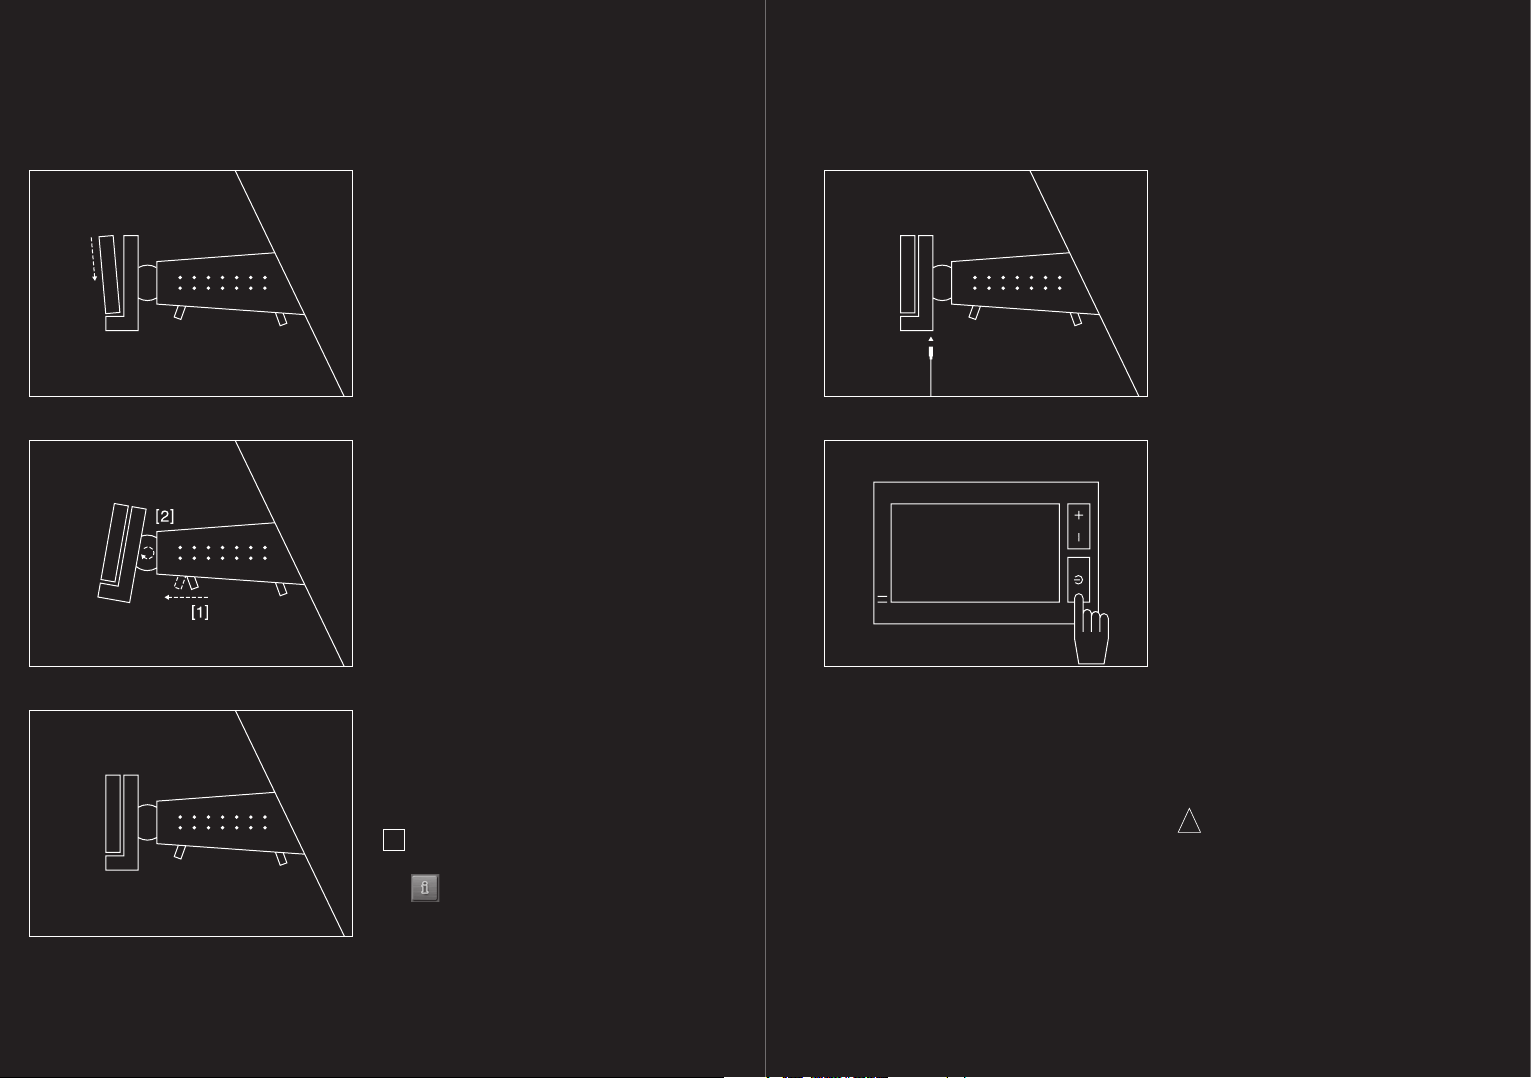
2.2.3 Insert Memory Card
1. Carefully remove the Memory Card from its
packaging, taking care not to touch or soil the
contacts.
2. Hold the Memory Card so that the cut-off edge
is positioned downwards and to the left.
3. Carefully push the Memory Card into the card
slot on the LEFT SIDE of the device, until it
locks into position.
2.2.4 Removing the Memory Card
5
2.2.5 Installing the car holder [ Fig. 3
Caution ! The car holder must be affixed to the
!
windscreen so that the view out of the
windscreen is not restricted.
!
Note: before installing the car holder, the
windscreen should be thoroughly cleaned with
a glass cleaner. The windscreen temperature
should not be below 15°C.
1. Place the holder with the suction cup onto the
windscreen. [ Fig. 3
2. Press the lever on the suction cup in the
direction of the windscreen until it sticks to the
windscreen.
3. Place the navigation device into the car holder.
[
]
Fig. 4
4. Press the device against the car holder until it
clicks audibly into place.
5. Insert the power supply connector into the
cigarette lighter socket.
6. Release the catch for the ball-and-socket joint.
[
]
Fig. 5
7. Position the holder so that the display can
easily be seen. [ Fig. 6
8. Press the catch for the ball-and-socket joint
back in the direction of the device.
9. Insert the mini USB connector of the car
charging cable into the power supply socket on
the back of the car holder. [ Fig. 7
]
]
]
]
Fig. 1
Fig. 2
60 –61
!
Note: all applications must be closed and the
navigation system turned off before the
Memory Card is removed.
1. Press lightly against the edge of the SD card
until the catch releases.
2. Pull the card out without touching the contacts.
[
]
Fig. 2
2.2.6 Switching on the navigation device
1. Press and hold the ON / OFF button for 1.5 sec.
[
]
Fig. 8
2. Select the desired language when prompted to
do so.
3. Touch the OK button. The START DISPLAY
appears.
4. Touch the NAVIGATION button in the START
DISPLAY in order to open the navigation
software.
5. Touch the MP3 PLAYER button in the START
DISPLAY in order to open the MP3 player.
Fig. 3
Page 7
02 Prior to commissioning
Fig. 4
Fig. 5
Fig. 6
6. Touch the SETTINGS button in the START
DISPLAY in order to adjust the language and
brightness settings or to calibrate the
touchscreen.
2.3 Turning the device on and off, Reset
General information on switching on and off
In order to minimize battery charge loss while
reducing switch-on time, the device also has a
standby mode.
Switching on
To switch on the device, press and hold the on/off
button down for 1.5 seconds. The device powers up
within 2 seconds from standby mode, or within 35
seconds from off mode.
Switching off
You can switch the device to standby mode by
pressing the on/off button briefly (recommended).
To switch to off mode, you must press and hold the
on/off button for 4 seconds. In this mode, the
device requires no power, but cannot be charged.
Reset
Should the device show signs of malfunction, then
please carry out a reset. To do this, press the reset
button on the back of the device. [page 59] The
device will then restart (warmstart). If this does not
work, or the malfunction persists, please carry out a
hardware reset (Coldstart). To do this, press and
hold the on/off button for 4 seconds when the
device is switched on. Wait a few seconds and then
switch on the device using the on/off button.
!
Note: you can get information regarding
changing individual settings by touching the
HELP button.
Fig. 7
Fig. 8
2.4 Navigation with GPS
GPS is based on a total of 24 satellites that circle the
earth and, in doing so, are constantly transmitting
their position and the current time. The GPS receiver
receives this data and calculates its own geographical position on the basis of the information
broadcast by the various satellites.
In order to determine position precisely, it is necessary
to obtain the data from at least three satellites. With
the data from 4 or more satellites, the altitude above
sea level can also be ascertained. Position is accurate
within 3 metres.
Once P´ 9611 has determined your position, this
position can be used as a starting point for a route
calculation.
The map data on your navigation device includes the
geographical coordinates of all digitally recorded
points of interest, streets and places. Using this
data, the system is able to calculate a route from any
given starting point to a destination.
The calculation of the current position and its
representation on the map takes place once every
second, so your current position is always shown on
the map.
2.5 Important safety information
In your own interest, read the following notices and
safety information carefully before starting up your
navigation system.
2.5.1 Navigation safety information
Use the navigation system at your own risk.
Caution !
!
– To prevent accidents, do not program the
navigation system while driving.
– Only look at the touchscreen when it is safe
to do so and the traffic situation allows it.
– Traffic regulations have priority over any
instructions from the navigation system.
62 –63
Page 8
02 Prior to commissioning
03 Operating the Navigation Software
– Do not follow the instructions of the
navigation system unless the circumstances and the traffic regulations allow
you to do so ! Should it be necessary to
deviate from the calculated route, the
navigation system will automatically
calculate a new route.
!
Note: should the spoken instructions not be
clear, the map and arrow display serves as an
additional aid to orientation.
2.5.2 Safety guidelines when installing in your car
Caution !
!
– Make sure you do not attach the holder
within the deployment zone of the airbag.
– When installing the holder, you should
ensure that it will not present a safety risk
in the event of an accident.
2.5.3 Safety instructions for the navigation device
Caution !
!
– The navigation device is to be kept dry as
it is not water resistant.
– Do not lay the cable directly next to safety-
relevant devices and supply lines.
– After installation, all safety-relevant
systems in the car should be checked.
– When leaving the car, pull the charging
cable connector out of the cigarette lighter
socket, otherwise the GPS receiver will
continually consume power and the car
battery could discharge.
– Please use only accessories designed for
this model.
– Please do not expose the device or the
battery to temperatures above 60°C.
!
Note:
– only use a moist cloth for cleaning and
do not use aggressive solvents. The case
of the navigation device may otherwise
be damaged.
– the connector should not be pulled out by
the cable as this may damage it !
– do not kink the cable and ensure that it
does not become damaged by sharp
objects.
3.1 Volume
The volume of the spoken driving instructions from
the P´ 9611 can be adjusted during navigation using
the volume control or software as follows.
You have started navigation. The map is in
NAVIGATION or DESTINATION SEARCH mode.
1. Touch the
VOLUME button.
The volume bar opens. It contains three
buttons for adjusting the volume.
LOUDER
QUIETER
VOLUME ON / OFF
2. Touch the
VOLUME button again.
The volume bar closes.
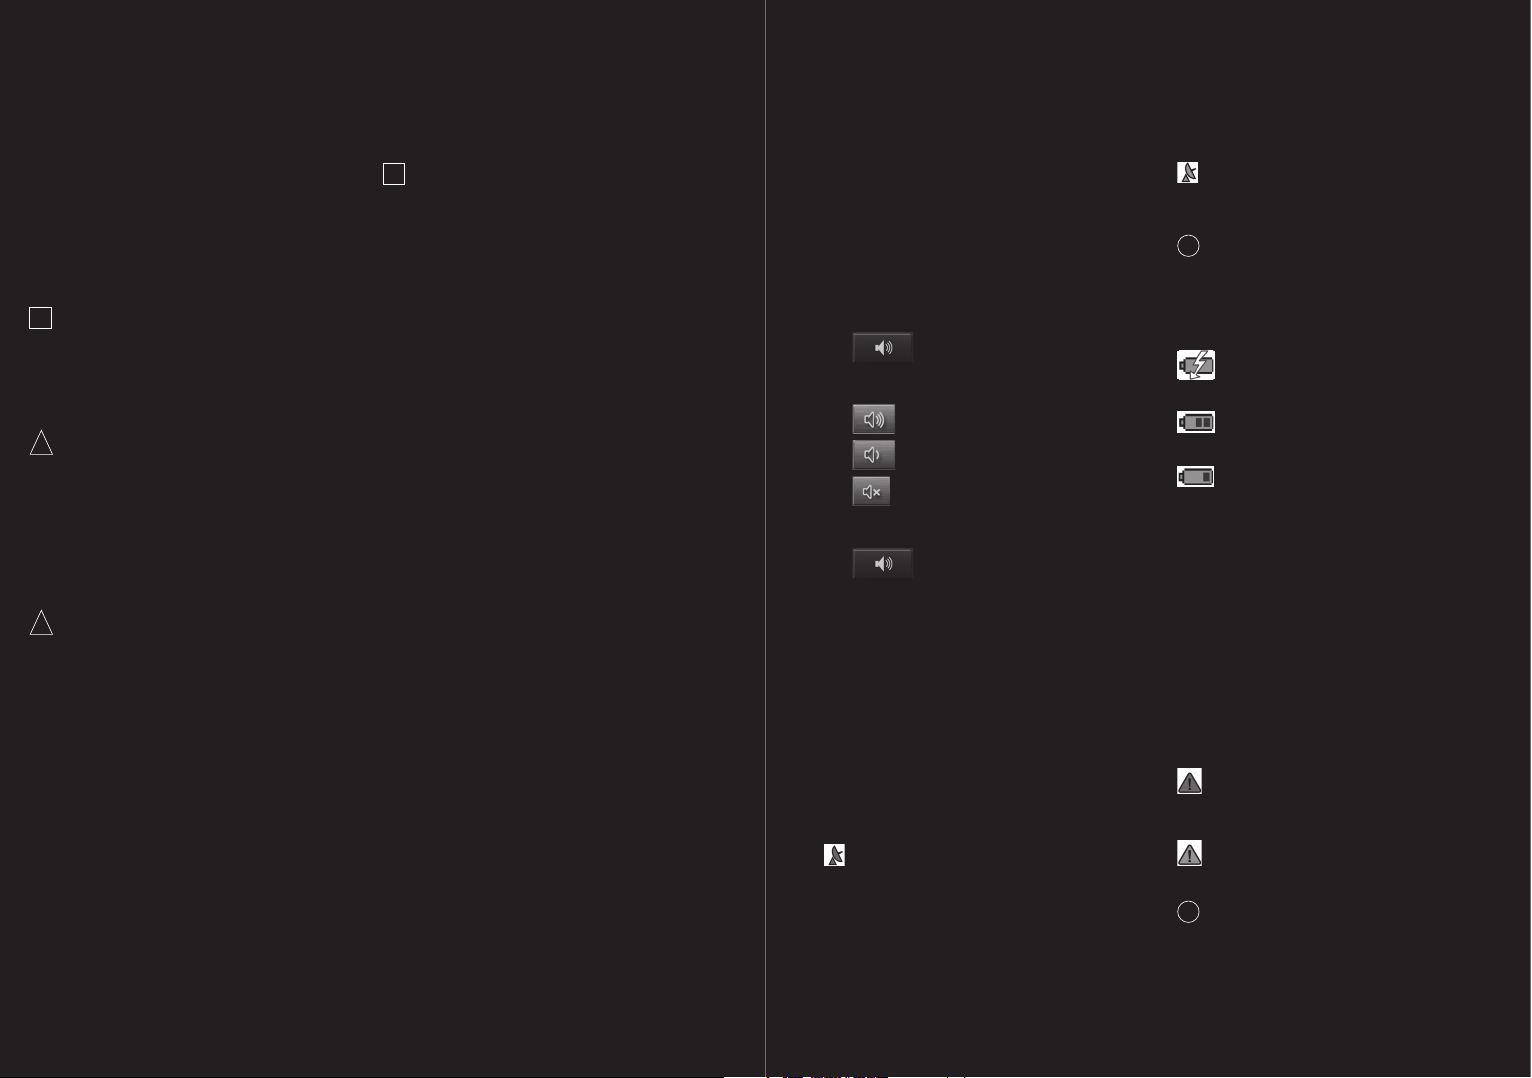
3.2 Information
Symbols located at the top of the screen are used
to display information.
GPS
The GPS symbol can show the following GPSreception status:
NO GPS: The built-in GPS receiver is not
operational. If this problem persists, consult
customer service.
NO SIGNAL (red): Data are being received from
less than three satellites. The position cannot be
calculated.
GPS READY (grey): Data are being received
from at least three satellites. The position can be
calculated.
i
Refer to chapter “GPS status” on page 83 for
detailed information regarding the GPS status.
Energy
The ENERGY symbol can display the following
conditions of the built-in battery:
The device is being supplied by an external
power source. The battery is being charged.
The device is being supplied by its internal
battery. The battery charge is sufficient.
The device is being supplied by its internal
battery. The battery charge is low.
Direction
The DIRECTION symbol shows you in which
direction you are currently moving. It can show the
following points of the compass: N, NE, E, SE, S,
SW, W, NW.
TMC [ Traffic information
The TMC symbol can display the following TMC
states:
NO SYMBOL: The built-in TMC receiver is not
operational. If this problem persists, consult
customer service.
TUNING (red): The TMC receiver is operational,
but cannot find a transmitter that is sending TMC
signals.
TMC ON STANDBY (grey): Traffic messages
can be received.
i
For details of the TMC functions, please refer to
chapter “TMC [ Traffic Information ]”, page 83.
]
64 –65
Page 9

03 Operating the Navigation Software
04 Navigation
3.3 Software keyboard
A software keyboard appears at the bottom of the
screen when text entries are necessary.
All entries can be made on the software keyboard
using your fingertips. Only capital letters can be
entered.
When entering the name of a town or street, it is not
necessary to enter any special characters or umlauts.
P´ 9611 replaces these characters automatically. If,
for example, you are searching for “Würzburg”, then
simply enter “WURZBURG”. You need not enter
special characters when entering a destination’s
town or street name, but they may be helpful for
entering names for saved destinations and
itineraries.
Special keys
enters a space character.
deletes the character to the left of the
cursor.
opens the numeric keypad.
opens the character keyboard.
opens the special character
keyboard. As soon as you have entered a special
character, the letter keyboard reappears.
3.4 Lists
There are many cases where you have to select an
entry from a list. This is the case, for example, when
you enter a location.
As soon as you enter the first letter, the largest city
in the given country that begins with this letter
appears.
As soon as you enter the second letter, a list
appears with all locations that begin with the given
letters.
If you enter additional letters, the list adapts to your
entries. This means that you will always be
presented with entries that begin with the letters
entered or entries that contain the entered letters in
their name.
To select an entry, proceed as follows:
1. You can move around in the list by means of the
UP and
DOWN buttons.
2. Touch the desired entry. The list will close as
soon as you have confirmed an entry.
3.5 Options
Some windows have options which lead to
additional functions.
For detailed information on the options, please refer
to chapter “Options” on page 77.
3.6 Menus
Some buttons have menus which open when
activated.
1. Touch a menu button to select its function.
2. Touch the same menu button to close the
window again.
Use navigation system at your own risk.
Caution ! Please be sure to refer to the safety
!
information in the “Important safety information”
chapter on page 62.
Obstructed GPS reception
If GPS reception is hindered, navigation will be
interrupted. The navigation software remains active.
As soon as GPS signals can be received, the
navigation system will determine your current
position and navigation can be continued.
Arriving at your destination
When you have reached the specified destination,
a message to this effect will be displayed.
Your current position will then be shown on the map
by a triangle in green.
4.1 Starting P´ 9611
1. Switch on the navigation device.
2. Touch the NAVIGATION button in the START
SCREEN.
The following message appears:
“Please note that the road traffic regulations
have priority over the instructions of the
navigation system. Please do not operate the
device while driving.”
3. Touch the CANCEL button in order to ignore
the message. This will close the navigation
software.
4. Otherwise, touch the OK button, in order to
accept. The main menu opens.
You can reach any of the navigation software
functions via the main window.
Touch the desired button in the bottom margin of the
screen:
player.
MP3 PLAYER in order to open the MP3
HANDS-FREE MODULE in order to bring
the hands-free module into the foreground.
START SCREEN in order to bring the
START SCREEN into the foreground.
4.1.1 Initialising the GPS receiver
!
Note: It can take up to 30 minutes to initialize
the GPS receiver for the first time.
Each time you switch on the receiver after this,
the GPS reception will start within one minute.
The next initialisation may take up to 30
minutes if the navigation device was not used
for a longer period of time, and/or the last
destination to which you navigated lies more
than 190 miles from your present location.
As soon as the navigation device has been switched
on, initialization of the GPS receiver will begin.
In the right-hand top corner of the display, you will
see the GPS symbol. As soon as data from at least
3 satellites are received, the symbol changes to
GPS READY (red).
!
Note: if the GPS symbol displays GPS READY
(red) after considerably less than 20 minutes, it
is advisable to switch off the receiver for at
least 15 minutes so as to ensure reliable
operation.
Caution ! When leaving the car, the power
!
supply is to be interrupted via the cigar lighter
socket. As the GPS receiver requires a
constant supply of power, it could drain the
vehicle’s battery.
Opening the main menu
Touch the NAVIGATION button in the START
SCREEN.
If another window is open, touch the
BACK button until the main window
appears.
66 –67
Page 10

04 Navigation
4.2 Specifying a new destination
New destinations for the P´ 9611 are all destinations
that you have not yet navigated, or you have not yet
stored.
You can enter an address here, select a special
destination, or select a destination from the quick
search function.
If you are entering a new destination for the first
time, the COVERED COUNTRIES list opens.
Tap on the country in which your destination lies.
4.2.1 Specify destination country
Above the right-hand upper corner of the
uppermost entry field of the window ADDRESS, POI
IN A CITY, and POI OF NATIONAL SIGNIFICANCE,
is the COUNTRY button. It shows the country code
of the country of which current navigation
destinations can be entered.
If your destination is in a different country, then
proceed as follows:
1. Touch the COUNTRY button. The COVERED
COUNTRIES list opens.
2. Touch the country in which the destination lies.
The COVERED COUNTRIES list closes again.
The symbol will display the country code of the
destination country.
!
Note: only countries which are displayed at
least partially can be selected from the current
map.
4.2.2 Address of destination
1. In the main menu, touch the NAVIGATE button.
2. Select ENTER AN ADDRESS. The ADDRESS
window opens.
3. Enter the name of the town or the postcode.
4. Enter the name of the street. Alternatively, you
can enter the name of a well-known object,
such as “Olympic Stadium” or “Eiffel Tower”.
5. Enter the house number [ optional ].
6. If a house number is not known, the name of a
side street can be entered in the field provided,
in order to navigate to the intersection of the
two streets.
!
Note: It is not necessary to enter all the
address details.
If you specify the town only, the navigation
system will calculate a route to the town center.
If you specify the town and street without
specifying a house number or side street, the
navigation system will calculate a route to the
center of the street entered.
7. Touch the START NAVIGATION button. The
map screen opens in PREVIEW mode.
!
Note: For detailed information on how to start
the navigation system, please refer to chapter
“Starting navigation” page 76.
4.2.3 Special destination
Special destinations, also known as to POIs [ Points
Of Interest ] are useful addresses that are catalogued
according to particular criteria.
Ports, airports, restaurants, hotels, gas stations,
public buildings, and others belong to the special
destinations.
Points of interest can be displayed on the map by
means of a symbol.
1. In the main menu, touch the OPTIONS button.
2. Select SETTINGS.
3. Touch POI in order to select which categories
are to be displayed on the map.
Special destinations nearby
Special destinations nearby are special destinations
that are located within a particular radius of your
current location. This means you can always find,
for example, the nearest gas station, no matter
where you are.
!
Note:
– The GPS-reception must be sufficient for
position determination. Suitable GPS
reception is designated by means of the
GPS READY (grey) symbol. For detailed
information, please refer to chapter “GPS
status” on page 83.
– In quick access mode, there are categories
of special destinations available from the
current vicinity, which can be searched
quickly and without additional entry. For
detailed information, please refer to
chapter “Quick Access Points of Interest”
on page 70.
1. In the main menu, touch the NAVIGATE button.
2. Select SEARCH FOR POI.
3. Touch NEARBY. The POI NEARBY window
opens.
4. Enter the category of the desired POI. If subcategories exist for the category you have
selected, the SUBCATEGORY list will open.
5. Enter the subcategory of the desired POI. The
NAME OF THE DESTINATION list opens. It
contains the nearest points of interest in the
specified category, sorted by distance.
6. Touch the name of the destination.
7. Touch the START NAVIGATION button. The
map screen opens in PREVIEW mode.
i
For detailed information on how to start the
navigation system, please refer to chapter
“Starting navigation” page 72.
Nationwide Points of Interest
Nationwide Points of Interest are airports, places of
interest, national monuments, large ports, etc. This
enables you to find places of interest, for example,
without having to know the name of the location.
1. In the main menu, touch the NAVIGATE button.
2. Select SEARCH FOR POI.
3. Touch NATIONWIDE. The POI OF NATIONAL
SIGNIFICANCE window opens.
4. Enter the category of the desired POI. The
NAME OF THE DESTINATION list opens. It
contains the nearest points of interest in the
specified category, sorted by distance.
5. Touch the name of the destination.
6. Touch the START NAVIGATION button. The
map screen opens in PREVIEW mode.
i
For detailed information on how to start the
navigation system, please refer to chapter
“Starting navigation” page 72.
Point of Interest in a given location
Points of Interest in a given location can be useful
when navigating in an unfamiliar town.
1. In the main menu, touch the NAVIGATE button.
2. Select SEARCH FOR POI.
3. Touch IN A CITY. The POI IN A CITY window
opens.
4. Enter the name of the town or the postcode.
5. Enter the category of the desired POI. If subcategories exist for the category you have
selected, the SUBCATEGORY list will open.
6. Enter the subcategory of the desired POI. The
NAME OF THE DESTINATION list opens. It
contains the special destinations from the
specified category, sorted alphabetically.
7. Touch the name of the destination.
8. Touch the START NAVIGATION button. The
map screen opens in PREVIEW mode.
i
For detailed information on how to start the
navigation system, please refer to chapter
“Starting navigation” page 72.
4.2.4 Information about the destination
For many destinations that you specify, there will be
further information available stored in the navigation
system’s database, e.g., telephone numbers of
restaurants.
From one of the destination entry windows
described above, proceed as follows:
68 –69
Page 11

04 Navigation
1. Touch the
DESTINATION INFO window opens. It contains
all information about the specified destination
that is stored in the navigation system’s
database.
– Touch the
– Touch the
– Touch the CANCEL button to close the
4.2.5 Quick Access Points of Interest
The quick access system contains three categories
of Points of Interest. Destinations in your vicinity
that correspond to these categories can be listed
quickly without the need for additional entries.
1. In the main menu, touch the OPTIONS button.
2. Select SETTINGS.
3. Touch POI in order to set which categories are
available in the quick access system.
!
Note: The GPS reception must be sufficient for
position determination. Suitable GPS reception
is designated by means of the GPS READY
symbol. For detailed information, please refer
to chapter “GPS status” on page 83.
1. In the main menu, touch the NAVIGATE button.
The NAVIGATE menu opens.
The symbols of the categories which have been
selected for quick access can be seen in the
menu at the bottom.
2. Enter the category of the desired POI. The
NAME OF THE DESTINATION list opens. It
contains the nearest points of interest in the
specified category, sorted by distance.
DESTINATION INFO button. The
SHOW ON MAP button in order to
show the destination on the map.
button to call the destination
directly.
DESTINATION INFO window.
3. Touch the name of the destination. The map
screen opens in PREVIEW mode.
i
For detailed information on how to start the
navigation system, please refer to chapter
“Starting navigation” page 76.
4.3 Select a stored destination
The following lists of destinations and addresses are
available for selection from MY DESTINATIONS in
P´ 9611.
– LAST DESTINATIONS: destinations that you
have previously navigated to.
– FAVORITES: all destinations that you have
stored in P´ 9611.
4.3.1 Last destinations
P´ 9611 saves the last 30 destinations to which you
have navigated, in the LAST DESTINATIONS list.
1. In the main menu, touch the MY DESTINATIONS button.
2. Select LAST DESTINATIONS.
3. Touch your desired destination.
4. Touch the START NAVIGATION button. The
map screen opens in PREVIEW mode.
i
For detailed information on how to start the
navigation system, please refer to chapter
“Starting navigation” page 76.
4.3.2 Favorites
Your favourite destinations can be saved in the
FAVORITES list. There is room for up to 500
destinations.
i
Information on how to store a destination can
be found in the “Saving a destination” chapter
on page 76.
1. In the main menu, touch the MY DESTINATIONS
button.
2. Select FAVORITES.
3. Touch your desired destination.
4. Touch the START NAVIGATION button. The
map screen opens in PREVIEW mode.
i
For detailed information on how to start the
navigation system, please refer to chapter
“Starting navigation” page 72.
4.4 Navigation homewards
In P´ 9611, you can save your address as the home
address. You can navigate to your home address by
touching a single button.
The first time you tap the TAKE ME HOME button,
you will be requested to enter your address.
i
Further information about entering your home
address can be found in chapter “Define
destination as home address” page 76.
1. In the main menu, touch the TAKE ME HOME
button. If you have not entered an address, a
pop-up window will notify you.
The navigation starts. The route profile of the
previous navigation applies.
4.5 Determining the destination on the map
You may indicate a destination directly on the map.
In addition to towns and streets, you may also
select special destinations quickly.
1. In the main menu, touch the OPTIONS button.
2. Select SHOW MAP. The map screen opens in
DESTINATION SEARCH mode.
3. Touch the point to which you want to navigate.
The destination that you have selected appears
under the crosshairs.
!
Note: Please refer to chapter “Map in
Destination search mode” on page 81 for
information about how to change the map view
so that your destination can easily be seen.
The geographical coordinates of the destination and
the corresponding address is shown in the bottom
third of the screen.
4. Touch the
OK button. The DESTINATION ON MAP
window opens. The detailed address data of
the selected destination is displayed in the lefthand upper corner.
5. Touch the TAKE ME THERE button. The map
screen opens in PREVIEW mode.
i
For detailed information on how to start the
navigation system, please refer to chapter
„Starting navigation“ page 76.
4.6 POI on your route
Whilst navigating you can view points of interest
[ that are located on your route ] from three specific
categories at any time. This way you can find out
quickly, e.g., where the next rest area is. You can
then, for example, insert this rest area as an interim
destination in your route.
The map is opened in Navigation mode.
1. Press any point on the map.
2. Press on the POI ON YOUR ROUTE button.
The POI ON YOUR ROUTE window opens. It shows
from each of the three categories the two next
points of interest that are located on or in the
vicinity of your route.
The points of interest are arranged according to
distance.
70 –71
Page 12

04 Navigation
05 Destination management
Specifying one of the points of interest as an
interim destination
If you wish to drive to one of the displayed points of
interest, then press the INTERIM DESTINATION
button to the right alongside its entry in the list.
The route is recalculated. The specified point of
interest is taken as the next route point.
4.7 Starting navigation
The map is open in PREVIEW mode.
The navigation destination is depicted by a small
flag. The route and the estimated trip time is
displayed. A so-called route profile forms the basis
of the route calculation.
Touch the ROUTE PROFILE button if you don’t
want to view or change the route profile.
!
Note: if you change the route options, these
remain valid for subsequent navigation. You
can get information regarding the individual route
profile settings by clicking on the corresponding
HELP button.
No GPS reception
When the received GPS signal is not sufficient,
the following message appears: “No GPS signal
available at present. Would you like to use the last
known position?”
You have the following possibilities:
– Touch the OK button. The route will be
calculated using the last known position as the
starting point. As soon as the GPS reception is
sufficient for determining the position, the route
will be recalculated and you can begin the
navigation.
– Touch the CANCEL button. The main menu
opens. The destination is now saved to the
LAST DESTINATIONS list.
Every destination that you enter and the destinations from the LAST DESTINATIONS list may be
added to the FAVORITES list. This makes sense if
you navigate frequently to the same destination.
5.1.1 Saving a destination
1. Enter the destination without pressing the
START NAVIGATION button.
2. Touch the OPTIONS button.
3. Select SAVE DESTINATION.
– OR –
1. Select the destination from the LAST
DESTINATIONS list, without touching the
START NAVIGATION button.
2. Touch the OPTIONS button.
3. Select SAVE AS FAVOURITE.
4. Enter a name for the destination.
5. If you want to define the destination as your
home address, touch the
TOGGLE button, so that the YES value is
highlighted in black.
6. Touch the SAVE button.
5.1.2 Define destination as home address
You can determine a destination from the
FAVORITES list as the home address, in order to
enable quick and easy navigation to this address via
the main window. In order to do so, touch the TAKE
ME HOME button. To save an address as home
address, proceed as follows:
1. Select the destination from the FAVORITES list
that is to be defined as the home address.
2. Touch the OPTIONS button.
3. Select HOME ADDRESS.
The selected destination has now been saved as
your home address. The home address is shown
in the FAVORITES list with the house symbol.
72 –73
Page 13

06 Routes with various stages
It is possible to plan routes at home without GPS
reception, in order to, for example, to plan a vacation
route based on a defined route.
6.1 Planning routes
1. In the main window, touch the OPTIONS button.
The options list opens.
2. Select ROUTE PLANNING. The ROUTE
PLANNING window opens.
6.1.1 Enter the starting point
The starting point of a route is the point at which
you want to begin your trip. This can differ from
your current location.
The starting point is only important if you want to
see a planned route on the map, but currently have
no GPS reception or you are not currently at the
planned starting point. The starting point that you
enter therefore has the flow number “0”.
As soon as you begin navigation, your current
location will be used as the basis for the route
calculation.
The first stage is therefore the trip to the route stage
with the flow number “1”.
1. Touch the SPECIFY STARTING POINT field.
The STARTING POINT menu opens.
If you want to enter your current location as the
starting point:
2. Tap on the CURRENT POSITION menu point.
If you want to enter a different starting point:
3. Touch the corresponding button.
4. Enter the desired starting point.
5. Touch the SET STARTING POINT button. The
selected starting point will now be shown next
to the 0 [ Starting point ] button.
Change the starting point
Touch the SPECIFY STARTING POINT field. The
STARTING POINT menu opens.
You can now enter a different starting point.
Proceed as described above.
6.1.2 Entering route stages
Route stages are points within the route that you
want to navigate to.
In front of every route stage is its flow number on a
button.
1. Touch the SPECIFY ROUTE POINT field.
The ROUTE POINT menu opens.
2. Select the type of destination entry.
3. Enter the route point.
4. Touch the ADD button. The selected route
stage will now be shown next to its flow
number.
Repeat this step for each additional destination that
you want to add to your route.
6.1.3 Editing route stages
Route stages can be deleted from a route. The
order of the route stages can be varied as you wish.
!
Note: the starting point cannot be moved or
deleted.
– Touch the route point that is to be edited.
The context menu contains the following buttons:
route stage up. [ e.g., route stage 2 will become
route stage 1 ]
selected route stage down. [ e.g., route point 2 will
become route point 3
ROUTE POINT UP: Moves the selected
ROUTE POINT DOWN: Moves the
]
DELETES the selected route stage.
A dialog box prompts you to confirm.
6.2 Managing routes
Each planned route can be saved under a particular
name.
!
Note: only the route starting points and the
route stages will be saved, not the calculated
route. If you load a route, you will have to
recalculate it.
Stored routes can be loaded, renamed or deleted.
6.2.1 Saving a route
The ROUTE PLANNING window is open. You have
entered the starting point and at least one route
stage.
1. Touch the OPTIONS button.
2. Select SAVE ROUTE.
3. Enter the name for the route.
4. Touch the SAVE button.
The destination is now entered into the SAVED
ROUTES list.
6.2.2 Loading a route
1. Touch the OPTIONS button.
2. Select SAVED ROUTES.
3. Touch your desired route.
4. Touch the LOAD ROUTE button. The ROUTE
PLANNING window opens. The starting point
and the route stages of the loaded route are
entered.
6.3 Navigation
In order to simulate a route, the system first has to
calculate the route.
6.3.1 Calculating and displaying the route
A route may be calculated and displayed on the
map even without GPS reception in order to get an
impression of the itinerary.
The ROUTE PLANNING window is open. The
starting point and at least one stage have been
entered.
1. Touch the SHOW ROUTE button. The map
screen opens in PREVIEW mode.The starting
point and the route stages are marked by flags.
For each stage, the distance and the estimated
trip time is given. These data are also given for
the entire trip.
6.3.2 Simulating the route
You can also simulate navigation.
!
Note: the reception of GPS signals is not
necessary for the simulation. Simulation is
restricted to routes of max 60 mi.
You have calculated and displayed a route.
1. Touch the OPTIONS button.
2. Select SIMULATION.
The route will be recalculated for simulation
purposes. Simulation starts when calculation
has finished.
Ending simulation
You may stop a simulation at any time.
1. Touch the
the simulation has been confirmed, the main
window opens.
BACK button. When cancellation of
74 –75
Page 14

06 Routes with various stages
07 Options
6.3.3 Starting navigation
You have calculated and displayed a route.
The calculation of a route is based on so-called route
options. In order to view or change these settings:
1. Touch the ROUTE PROFILE button.
!
Note: if you change the route profile, these chan-
ges remain valid for subsequent navigation. You
can get information regarding changing individual
route profiles by touching the corresponding
HELP button.
2. Select START NAVIGATION or just commence
your journey.
No GPS reception
If the GPS signal is too weak, you have the following
options:
– Touch the OK button in order to calculate the
route using the last known position as the
starting point. As soon as the GPS reception is
sufficient for determining the position, the route
will be recalculated and you can restart the
navigation.
– Touch the CANCEL button in the list in order
to store the destination in the LAST DESTINATIONS list.
Some windows have options which lead to
additional functions.
1. Touch the OPTIONS button to open the options
list.
2. Select the desired option.
3. Touch the OPTIONS button again in order to
close the list without selecting an option.
DELETE ALL: Deletes all destinations from the LAST
DESTINATIONS list. The list is then empty. The
delete process must be confirmed by means of a
dialog window.
SAVE AS FAVOURITE: Saves the given destination
to the FAVORITES list.
i
For detailed information, please refer to chapter
“Saving a destination” on page 73.
SHOW ON MAP: Shows the given address on the
map.
SETTINGS: Opens the SETTINGS window in which
the navigation system can be configured.
i
For detailed information, please refer to chapter
“Configuring P´ 9611” on page 85.
SAVED ROUTES: Opens a window in which a saved
route can be loaded.
GPS STATUS: Opens the GPS STATUS window. Details regarding GPS reception can be viewed here
and data regarding the current location can be stored.
i
For detailed information, please refer to chapter
“GPS status” on page 83.
HOME ADDRESS: Saves the selected destination
as your home address which can then be started
via the TAKE ME HOME button.
SHOW MAP: Opens the map screen in DESTINATION SEARCH mode. A navigation destination can be
determined directly on the map from here.
i
For detailed information, please refer to chapter
“Determining the destination on the map” on
page 71.
DELETE: Deletes the selected destination from the
FAVORITES list or the selected route from the
SAVED ROUTES list. The delete process must be
confirmed by means of a dialog window.
NEW ROUTE: Deletes the starting point and all
route stages from the ROUTE PLANNING window,
so that you can plan a new route. The previously
planned route should be saved under a different
name, if necessary.
PRODUCT INFO: Opens a window in which you can
obtain information regarding the installed software
as well as the time stored in the navigation system.
SAVE ROUTE: Opens a window in which a planned
route can be saved under a particular name.
i
For detailed information, please refer to chapter
“Saving a route” on page 75.
ROUTE PLANNING: Opens the ROUTE PLANNING
window. Routes can be planned, edited and
navigation for a planned route can be started from
here.
i
For detailed information, please refer to chapter
“Planning routes” on page 74.
ROUTE PROFILE: Opens the ROUTE PROFILE
window in which the options for route calculation
can be viewed and changed, if necessary.
76 –77
CALIBRATION: Opens a window in which the
touchscreen can be recalibrated, in the event that
it becomes imprecise to the touch.
Page 15

07 Options 08 Working with the map
SIMULATION: Simulates navigation based on the
displayed route. Simulation can only be carried out
for routes of max. 100 km. GPS reception is not
required for simulation.
TRAFFIC: Opens the TRAFFIC INFORMATION
window, in which pending reports can be listed.
i
For detailed information, please refer to chapter
“TMC [ Traffic information ]”, page 83.
STORE A VOICE COMMAND: Opens a window in
which a voice command for the selected destination
can be given to the device, when prompted. This
means that navigation to the destination can always
be started “on command”.
RENAME: Opens a window in which you can
change the name of the selected destination or
route.
FACTORY SETTINGS: Opens a window in which all
settings can be restored to their original factory
settings.
DELETE DESTINATION: Deletes the marked
destination from the LAST DESTINATIONS or
FAVORITES lists. The delete process must be
confirmed by means of a dialog window.
SAVE DESTINATION: Saves the given address in
the FAVORITES list.
i
For detailed information, please refer to chapter
“Saving a destination” on page 73.
ADD TO ROUTE: Opens the route planning. The
address entered will be entered as the first route stage
of a new route.
i
For detailed information, please refer to chapter
“Planning routes” on page 74.
8.1 Maps
Even if you have stored numerous navigation maps
on the navigation system’s memory card, P´ 9611
can only work with one map at a time. In order to
see which map is currently in use, proceed as
follows:
1. Touch the OPTIONS button.
2. Select SETTINGS.
3. Touch CURRENT MAP.
8.2 Map in Preview mode
You have entered a destination and touched on the
START NAVIGATION button.
– OR –
You have planned or loaded a route and touched
the SHOW ROUTE button.
The map screen opens in PREVIEW mode. You can
see the entire route. [ Fig. 9
If you display a route with several stages, you will
see this information for each stage.
In order to view or, if necessary, change the settings
which form the basis of a calculated route, proceed
as follows:
]
1. Touch the ROUTE PROFILE button.
2. Select START NAVIGATION in order to begin
the trip. When you display a planned or loaded
route, the route may be recalculated. Your
current location will be integrated into the
calculation. The navigation will initially guide
you to the first route stage entered.
In order to open the map screen in DESTINATION
SEARCH mode:
1. Touch the
DESTINATION SEARCH button.
[1]
The route is marked GREEN.
[ 2 ]
The destination is marked with a little flag.
When you have planned or loaded a route and
displayed it, the starting points and each route
stage will be marked with a small flag.
[ 3 ]
You will see the entire route in a small info box,
together with the estimated trip time and the
estimated time of arrival.
This information can be displayed or hidden as
follows:
78 –79
Fig. 9
[
]
1
[
]
2
[
]
3
[
]
4
Page 16

08 Working with the map
1. Touch the OPTIONS button.
2. Select SETTINGS.
3. Touch BASIC SETTINGS.
4. Show or hide information.
[ 4 ]
A GREEN triangle shows the current position.
If you display a planned or loaded route and the
given starting point is not the same as your
current location, then the current position may
not be shown on the preview.
8.3 Map in Navigation mode
After the route has been viewed in PREVIEW mode,
the navigation has been started. The map screen
opens in NAVIGATION mode. [ Fig. 10
[1]
Shows the signing that is to be followed.
[
2 ] Possible speed limits may be shown here.
[
3 ] If two maneuvers need to be executed quickly
this shows the maneuver to be executed
immediately after the next maneuver.
[
4 ] Shows a diagram of the next junction where
you should turn off. Underneath is the
remaining distance to this junction.
[
]
1
[
]
2
[
]
3
[
]
4
]
When you approach the junction, you will see
a spot diagram instead of the distance.
The nearer you are to the junction, the fewer
green spots are displayed.
If you don’t have to change direction for a
longer period, you will only see a forwardfacing arrow with the distance shown
underneath, which shows how long you are to
follow the current road.
[
5 ] The route is depicted in the GREEN.
[
6 ] A triangle in GREEN shows the current position
on the map. The displayed sector of the map
changes continually to show your current
position centered on the map whenever
possible.
[
7 ] The height above sea level and the current
speed is shown here.
[
8 ] Shows the route, the estimated trip duration,
and the estimated time of arrival.
[
9 ] Shows the entire route, the estimated trip
duration and the estimated time of arrival for
the current stage.
[
[
[
[
[
[
[
[
5
7
8
6
10
9
11
12
[
10 ] The traffic lanes that lead to your destination
are depicted in the GREEN.
[
11 ] The name of the route section that you need to
drive onto next is shown in the upper street
field.
[
12 ] The name of the street you are currently driving
on is shown in the lower street field.
!
Note:
– The displays for many of the above
mentioned areas can be configured via
OPTIONS > SETTINGS > BASIC
SETTINGS. A number of displays only
work when the corresponding information
is available on the map.
– If you touch the large arrow field, then the
current route instruction will be repeated.[4]
Quit navigation
In order to end navigation, proceed as follows:
1. Touch the
2. Confirm quitting.
Map functions in Navigation mode
When the map is open in the NAVIGATION mode,
touch any point on the map. Various buttons with
options will be displayed.
2D / 3D: Changes between 2D and 3D mode. The
symbol of the mode currently set is displayed in green.
]
]
]
]
]
]
]
]
DAY / NIGHT: Toggles between the DAY and NIGHT
touchscreen display modes. The symbol of the
mode currently set is displayed in green.
INTERIM DESTINATION: Opens the menu for
entering a way point.
The navigation system will then guide you to this
way point first. Afterwards, you can continue your
journey to your original destination.
BACK button.
SKIP ROUTE POINT: When this button is touched,
the next route point is omitted. This button is
inactive when less than 2 stages are pending.
BLOCK: Blocks a route stage in order to, e.g.,
avoid a traffic jam. The route will then be calculated
around the blocked route stage.
Touch this button once in order to remove the
block.
POI ON YOUR ROUTE: Touching this button
displays Points of Interest on the given route. A
destination shown here can also be selected as a
way point. In order to do so, touch the
INTERIM DESTINATION button.
8.4 Map in Destination search mode
The map is always in DESTINATION SEARCH
mode, when a pair of crosshairs are to be seen.
[
]
Fig. 10
When you are driving, the map does not change
direction. It is always oriented with north shown at
the top.
ZOOM OUT: The map section enlarges.
There are fewer details shown.
ZOOM IN: The map section shown
decreases in size. More details can be seen.
ZOOM MODE: If this button is active, the
map section can be traced with a finger or the pen
from top left to bottom right and afterwards zoomed
to screen size. If the map section is traced from
bottom right to top left, the map will zoom out.
Fig. 10
80 –81
Page 17

08 Working with the map
09 Useful functions
Fig. 11
PAN MODE: If this button is active, the map
section can be moved in the desired direction with a
finger or the pen.
ENTIRE ROUTE: Zooms the map so that the
entire route is visible.
CURRENT POSITION: Selects the map
section shown, so that the current location is
centered.
8.4.1 Working in Destination search mode
1. Touch the point to which you want to navigate.
The destination that you have selected appears
under the crosshairs.
The geographical coordinates of the destination
and the corresponding address are shown in
the field in the bottom third of the screen.
2. Touch the
OK button.
Buttons with various functions will appear.
TAKE ME THERE: Begins the navigation to the
selected point. Current navigation will be aborted.
INTERIM DESTINATION: Sets the current
destination as a way point. The navigation system
will then guide you to this way point first. Afterwards,
you can continue your journey to your original
destination. This function is only active when you
are currently navigating.
SET AS DESTINATION: Adds the selected point as
the last point in the route plan. If no route plan has
been opened, the selected point will become the
first point in a new route plan.
SAVE: Opens the SAVE DESTINATION AS …
window. A name can be entered here which will be
used to save the given point in the FAVORITES list.
i
For detailed information, please refer to chapter
“Saving a destination” on page 73.
NEIGHBORHOOD SEARCH: Opens the POI
NEARBY window. Destinations in the vicinity can be
searched for from here.
– Touch the
order to quit the DESTINATION SEARCH mode.
You will be returned to the window from which
you started this mode.
– Touch
window. If you are currently navigating, you will
be prompted to confirm quitting navigation.
DESTINATION SEARCH button in
BACK in order to return to the main
9.1 GPS status, store current location
In the GPS STATUS screen, you will find an overview
of the data the navigation system calculates from
the received GPS signals.
GPS status is available from the options of many
windows.
1. Touch OPTIONS.
2. Select GPS STATUS.
The current location can be stored in the
FAVORITES list.
3. Touch the SAVE POSITION button. The SAVE
DESTINATION AS ... dialog opens up. The
cursor blinks in the NAME field.
4. Enter a name for the destination.
5. If necessary, define the current position as the
home address.
6. Touch the SAVE button.
9.2 TMC [ Traffic information
Your device has an integrated TMC receiver. The
navigation system will only receive the latest traffic
reports once you have connected your cable to the
car charger. It can dynamically change the route in
order to avoid traffic jams, for example.
The current valid traffic reports are available via the
options of many windows.
1. Touch the OPTIONS button.
2. Select TRAFFIC. The TRAFFIC INFORMATION
window opens.
Via the list, the DISPLAYED INFORMATION
button shows which kind of traffic messaging
is listed and the number of messages received.
3. Touch the DISPLAYED INFORMATION button
to select which traffic messages should be
displayed.
For each traffic message, information about the
location and type of congestion will be shown.
4. Touch a message in order to show more
detailed information.
]
The navigation system can
AVOID or
IGNORE
congestion on the route. The button AVOID /
IGNORE shows the corresponding status.
Touch the
BACK button to close the TRAFFIC
INFORMATION window.
9.3 TMC Settings
In the TMC SETTINGS window, you can set and
configure the TMC sender, this will determine the
effect that the reception of a message concerning
your route will have on its calculation. Proceed as
follows:
1. Touch the OPTIONS button in the TRAFFIC
INFORMATION window.
2. Select TMC SETTINGS.
Tuning
Touch the TUNING button to determine which
sender should be set, from which you want to
receive traffic information.
AUTOMATIC: The arrow buttons near the sender
can be used to set a different sender. The system
will search for another sender if reception is weak.
HOLD STATION: The arrow buttons near the sender
can be used to set a different sender. The system
will search for the same sender on a different
frequency if the signal is weak.
HOLD FREQUENCY: The arrow buttons near the
sender can be used to set a different sender. The
system will not search for another sender if the
reception is weak.
82 –83
Page 18

09 Useful functions
10 Configuring P´ 9611
Recalculate Route
Touch RECALCULATE ROUTE to determine how new
messages concerning your route should be dealt with.
AUTOMATICALLY: An alternative route avoiding the
traffic obstruction will be calculated.
ON REQUEST: The message is displayed. This
window can be used to determine if a detour should
be calculated or not.
The SETTINGS window is the point from which you
can make any modifications to match your personal
preferences on the P´ 9611.
The settings can be reached from the options of
many windows.
1. Touch the OPTIONS button.
2. Select SETTINGS.
The SETTINGS window has several buttons:
CURRENT MAP, POI, BASIC SETTINGS and
ROUTE PROFILE.
3. Touch the corresponding button in order to
open the desired settings window.
The settings of the individual windows are
displayed on several screens.
You can toggle between them with the
TO THE LEFT and
TO THE RIGHT buttons.
Some settings can only accept two or three different
values. These settings are recognisable by means of
the
TOGGLE button. All possible values are
visible. The value that is currently valid is highlighted
in black.
1. Touch the
TOGGLE button to alternate between the
possible values.
Some settings can accept many different values.
These settings are recognisable by means of the
3. Touch the OK button. The list closes again.
The new value will be displayed.
For each setting, there is a
HELP button.
1. Touch the HELP button in order to call up a
detailed explanation of the relevant setting.
You can close the settings windows in two ways:
1. Touch the DONE button. Any changes you
have made will be stored.
2. Touch the CANCEL button. Any changes you
have made will not be stored.
The SETTINGS window opens again.
84 –85
LIST button. The value that is currently set is
shown.
1. Touch the
LIST button.
A list with all possible values opens up. The
value that is currently valid is marked.
2. Touch the desired value. It will now be marked.
Page 19

11 MP3 Player
12 Hands-free Module
The integrated MP3 player can be used to play MP3
files, even during navigation. In order to do so, MP3
files must first be copied onto the supplied memory
card.
Copy MP3 files onto the device
1. Turn on navigation device.
2. Plug enclosed USB cable into the navigation
device and your computer.
!
Note: The USB cable cannot be used to charge
the navigation device.
3. Windows creates a new drive containing a
folder called “mp3”.
4. Copy the desired MP3 files into this folder. You
can even copy entire folders, e.g. albums, into
this folder.
5. Restart the MP3 player to update the new
MP3s on the player view.
Open the MP3 player
1. Touch the MP3 PLAYER button in the START
SCREEN.
If the navigation software is active:
1. Touch the
margin of the screen.
The MP3 PLAYER window opens.
– Touch the
– Touch the
MP3 PLAYER button in the bottom
NAVIGATION button in order to
bring the navigation software into the
foreground.
START SCREEN in order to
bring the START SCREEN into the
foreground.
Playing MP3 files
Mark the directory or file in the list that you want to
play.
PLAY: plays the marked file or files within the
marked directory.
OPEN FOLDER: opens the marked directory.
UP ONE LEVEL: marks the overriding
directory.
SELECT NEXT: marks the next element in the
list.
SELECT PREVIOUS: marks the previous
element in the list.
PAUSE: pauses playback.
CONTINUE: continues play.
FAST FORWARD: fast forwards within the
current file.
REWIND: rewinds within the current file.
VOLUME: opens the volume bar.
Information
The screen displays the following information at the
top of the MP3 PLAYER window while a file is being
played:
1. The name of the file currently being played.
2. The name of the directory in which the file is
stored.
3. The play mode:
REPEAT ALL
REPEAT TRACK
INCLUDE SUBFOLDERS
SHUFFLE
11.1 MP3 settings
1. Touch SETTINGS.
Settings for the play modes can be undertaken
from the MP3 SETTINGS window.
2. Touch the
TOGGLE button next to the relevant setting
in order to alternate between the possible values.
The current value is highlighted in yellow.
The hands-free module allows to use P´ 9611
as a hands-free kit for your mobile phone.
Opening the hands-free module
Touch the
HANDS-FREE MODULE button in the
navigation software.
The HANDS-FREE MODULE window opens.
Operating the hands-free module
The volume of the hands-free kit can be adjusted
independently of the navigation system’s volume.
– Touch the
MP3 PLAYER button in order to
bring the MP3 player into the foreground.
– Touch the
NAVIGATION button in order to bring
the navigation software into the foreground.
– Touch
START SCREEN in order to bring the
START SCREEN into the foreground.
Note: you can get information regarding
!
changing individual settings by touching the
HELP button.
12.1 Connecting to a telephone
The telephone functions are only available when the
P´9611 is connected to a mobile phone. On starting
for the first time, the P´9611 is in „Discoverable by
others” mode. For information on how to change this
setting, refer to 12.7.1 Activate Bluetooth. (page 89)
Problems occurring when trying to establish a
Bluetooth connection can have various causes.
1. Bluetooth is deactivated in the P´ 9611 handsfree module. Activate Bluetooth. Ensure that
your mobile phone can be detected by other
Bluetooth devices. [ See “Activate Bluetooth”,
on page 88
2. Bluetooth is deactivated on the mobile phone,
or it is set to “Hidden”.
Activate Bluetooth on your mobile phone.
Ensure that your mobile phone can be detected
by other Bluetooth devices. For further
information, please refer to your mobile phone
manual.
3. P´ 9611 has never been connected to your
mobile phone. Initiate the connection manually.
[
See “Establishing a Bluetooth connection”, on
page 89
]
]
86 –87
Page 20

12 Hands-free Module
If P´9611 was previously connected to your mobile
phone, the connection will be established without
further prompting.
12.2 Receiving a call
When you receive a call, the INCOMING CALL window
opens. When the relevant information is available,
the name and number of the caller will be displayed.
1. Touch the PICK UP button in order to accept
the call. The CALL IN PROGRESS window
opens.
12.3 Dialing
There are different ways to make a call using
P´ 9611.
12.3.1 Dialing a telephone number
1. Touch the DIAL A NUMBER button in the
HANDS-FREE MODULE window.
2. Enter the required telephone number.
3. Touch the
button.
12.3.2 Dialing a number, calling home
4 speed call buttons can be configured.
1. In the HANDS-FREE MODULE window, touch
the appropriate speed call button.
12.3.3 Calling a contact from the Phone Book
!
Note: It is only possible to use the phone
book if your mobile phone supports the phone
book synchronization feature. The latest
compatibility list can be found at
www.navigon.com/porsche-design.
1. Touch the PHONE BOOK button in the
HANDS-FREE MODULE window.
2. Touch the desired entry.
12.3.4 Calling a Point of Interest
1. Touch the CALL POI button in the HANDSFREE MODULE window.
2. Enter the special destination. [ See “Point of
Interest in a given location”, on page 69
3. Touch the
button.
12.3.5 Calling your destination
!
Note: this function is only available when
navigating, and if the telephone number of your
destination is stored in the systems databank.
This is usually the case, especially with Points
of Interest.
1. Touch the OPTIONS button in the HANDSFREE MODULE window.
2. Select CALL DESTINATION.
12.3.6 Calling most recently dialed numbers
!
Note: the list contains outgoing, incoming and
missed calls. Incoming and missed calls can
only be dialed if the caller’s number was
transferred.
1. Touch the RECENT CALLS button in the
HANDS-FREE MODULE window.
2. Touch the desired entry.
12.4 During a conversation
You are calling using the hands-free module. The
CALL IN PROGRESS window is open.
12.4.1 Bring the navigation software into the
foreground
The navigation software can be brought into the
foreground at any time.
]
Proceed as follows:
– Touch the
NAVIGATION button.
– The
HANDS-FREE MODULE button
changes color when a call is in progress.
– Touch the
HANDS-FREE MODULE button to
open the CALL IN PROGRESS window again.
12.4.2 Entering numbers
During a conversation, you can enter numbers. This
might be necessary, for example, when a telephone
system is trying to connect you.
1. Touch the DIAL A NUMBER button.
2. Enter the required number.
3. Touch the
BACK button to open the CALL IN
PROGRESS window again.
12.4.3 Ending the call
Touch the HANG UP button in the CALL IN
PROGRESS window to end the call.
12.5 Phone book
P´ 9611 enables you to import the phone book of
the mobile phone with which you are connected.
The synchronization takes place automatically.
12.5.1 Opening the Phone Book
Touch the PHONE BOOK button in the HANDSFREE MODULE window.
12.6 Recent calls
P´ 9611 saves the list of calls from the connected
mobile telephone in the RECENT CALLS list.
12.6.1 Opening Recent Calls
Touch the RECENT CALLS button in the HANDSFREE MODULE window. The RECENT CALLS list
opens.
12.7 Configuring the hands-free module
The hands-free of P´ 9611 incorporates several
settings which you can configure according to your
own requirements.
1. Touch the HANDS-FREE SETTINGS button in
the HANDS-FREE MODULE window.
i
For detailed information, please refer to chapter
“Configuring P´ 9611” on page 85.
12.7.1 Activate Bluetooth
1. Touch OPTIONS in HANDS-FREE SETTINGS.
2. Select BLUETOOTH. The BLUETOOTH window
opens.
BLUETOOTH FUNCTION
Touch YES in order to activate Bluetooth. Otherwise,
touch NO. The hands-free module cannot connect
to a mobile phone when Bluetooth is deactivated.
DISCOVERABLE BY OTHERS
Determine whether P´ 9611 should be shown to
other Bluetooth devices [ esp. mobile phones ] [ YES ]
or not [ NO ]. This setting only takes effect when the
Bluetooth signal is activated. When recognition is
set to NO a Bluetooth connection can only be
established using P´ 9611 and not with a mobile
phone.
88 –89
Page 21

12 Hands-free Module
12.7.2 Speed call buttons
The P´ 9611 hands-free module has many quick dial
buttons which can be assigned individually.
1. Touch the PRESET button in the HANDS-FREE
SETTINGS window.
2. Touch the speed call that is to be edited.
Set up or edit a speed call
3. Touch the EDIT button.
4. Enter or change the name and number for the
selected speed call.
5. Touch the
OK button.
Transferring numbers from the Phone Book
3. Touch the FROM PHONE BOOK button. If the
telephone book contains no entries, the button
is deactivated.
4. Select the entry for the speed call that is to be
transferred.
5. Touch the
OK.
Deleting a speed call
3. Touch the CLEAR button.
4. When prompted to do so, confirm with OK. The
MODIFY PRESET window opens again. There
is no telephone number and no name under the
speed call you have selected.
12.8 Configuring a connection to a mobile phone
1. Touch the OPTIONS button in the HANDSFREE MODULE window.
2. Select HANDS-FREE SETTINGS. The HANDSFREE SETTINGS window opens.
12.8.1 Establishing a Bluetooth connection
P´ 9611 enables you to establish a connection to a
mobile phone.
!
Note: as a rule, P´ 9611 will automatically
establish a connection to the mobile phone to
which it was last connected. This function can,
however, be used to establish a connection to
another mobile phone while P´ 9611 is connected to a mobile phone. Please refer to the notes
in chapter “Connecting to a telephone”, on
page 87.
1. Touch the CONNECTION WITH MOBILE
PHONE button in the HANDS-FREE SETTINGS
window.
2. Select NEW CONNECTION.
3. Confirm the scan for new Bluetooth devices
with OK. All detected devices will be listed
once the search has been completed.
4. Touch the mobile phone to which you would
like to connect. The device will establish a
connection to the selected mobile phone.
5. When prompted, enter a code of any length.
6. Touch the
12.8.2 Ending a connection and deleting
connection data
The connection between P´ 9611 and the mobile
phone can be ended at any time.
!
Note: the connection does not have to be
ended manually. The connection is cut off
automatically when the mobile phone is further
than 10 m away from P´ 9611. In this event, the
connection data is stored so that the connection can be restored automatically when the
mobile phone is close enough to the P´ 9611.
1. Touch the CLEAR CONNECTION DATA button
in the CONNECTION WITH MOBILE PHONE
window.
2. When prompted to do so, confirm with OK.
Note: P´ 9611 is not able to establish an
!
automatic connection to a mobile phone once a
connection has been ended, even if it happens
to be the most recent connection. This is also
the case even when it is the same mobile
phone that was used for the previous connection. The next connection must be established
manually. [ please refer to “Establishing a
Bluetooth connection”, page 91
]
12.7.3 Call Settings
In the CALL SETTINGS window, you can modify the
settings for the P´ 9611 mobile phone functions of
the hands-free unit.
1. Touch the button in the window.
2. You can get information regarding changing
individual settings by touching the
HELP button.
90 –91
OK button.
7. When prompted, enter the previously
determined code into the mobile telephone. A
similar prompt also appears on the display of
the mobile phone.
8. Press the key on the mobile phone with which
you entered the last number.
9. Press OK when requested.
Page 22

13 Appendix
13.1 Technical data
Navigation device
Processor: Intel PXA 270, 520 MHz
Memory: 64 MB RAM, 64 MB ROM
Expanded memory: SD memory card
Power supply: 5VDC 2A [ max.
GPS: Integrated 3rd generation GPS receiver:
μ-blox Antaris 4 SuperSense
TMC: Integrated TMC-antenna
Display: Extra-large 4.3-inch touch-screen
display [WQVGA]
Speakers: Dual Audio System: in the device 0.5
watt, in the mounting, 2.0 watt
Hands-free set: High-quality Bluetooth hands-free set
Connections: Headphones, external GPS-antenna,
USB 1.1
Dimensions: 125 x 82 x 19mm [width x height x depth]
Weight: Approx. 250 g
Battery [ Li-Ion
Rated capacity: 1400 mAh
Charging cable:
Mains cable: 100–240 V
Charging cable: 10–30 V
13.2 Restoring the contents of the memory card
In the event of loss or damage to the supplied
memory card, you will find all necessary backup
files required for restoring the memory card on the
P´ 9611 DVD-ROM. You need a PC to do this.
1. Place a memory card with at least 4 GB storage
capacity into the card slot of a PC.
2. Insert the supplied DVD-ROM into the DVD
drive.
3. Select the DVD drive from Windows Explorer.
Copy the contents of the folder “Mobile
Navigator 6” onto the memory card.
4. Insert the memory card into the card slot on the
LEFT SIDE of the navigation device.
Note: Before connecting the device to a PC
!
with a USB cable, please make sure that the
device is turned on.
]
]
13.3 Terms of guarantee
The following terms of guarantee relate to the
Porsche design product with the type designation
“P´ 9611”, of which the guarantee card is enclosed
on purchase [ subsequently referred to as
“product” ].
NAVIGON AG, Berliner Platz 11, 97080 Würzburg
[
hereafter referred to as “NAVIGON” ] provides full
guarantee that this product shall exhibit no material
faults or faults of workmanship for the period of 24
months from the initial purchase. Should functional
faults occur during the guarantee period, that are
verifiably caused by faults of material and
workmanship, NAVIGON shall either repair the
product or replace its damaged components, free of
charge, in accordance with the following conditions.
NAVIGON may replace defective products or
components by new or exchange products
[
functionally equivalent, overhauled products ] or
with new replacement components or exchange
items. Replaced products or components will be the
property of NAVIGON. NAVIGON may arrange for
the above mentioned guarantee services to be
undertaken by third parties.
NAVIGON reserves the right to charge a processing
fee, should the product prove not to be a valid
guarantee claim in accordance with the following
conditions.
Terms of guarantee
1. The product, together with the required
documentation, is to be presented to the
specialist dealer who originally sold the product
within a period of thirty [ 30 ] days after
determination of the fault, if the end user
wishes to make a claim within the guarantee
period of the product.
2. The guarantee period amounts to 24 months
from the point in time of transfer to the initial
purchaser. Neither the indication of a fault, nor
the subsequent fulfilment shall give rise to an
extension. If NAVIGON repairs or replaces the
product, then the guarantee entitlement for the
repaired or replaced product shall be valid until
the end of the original guarantee period, or
three months after reception of the repaired or
replaced product, depending on which period
is the longer.
3. An obligation to fulfilment of the guarantee
services only exists where the faulty product is
presented within the guarantee period, together
with the original packaging and the original
invoice or cash register receipt, and a correctly
filled out guarantee card [ details of date of
purchase, model designation, device number,
name of the dealer ]. NAVIGON reserves the
right to refuse guarantee services if these documents are not presented or if they are
incomplete or unreadable. NAVIGION also
reserves the right to refuse guarantee services
in cases where the serial number on the
product has been changed, deleted, removed
or made unreadable.
4. Personal data as well as downloaded files and
other data may be lost during the fulfilment of
guarantee services by way of repair or
exchange of the product. In order to prevent
damage to removable storage media or
external data carriers or the loss or deletion of
data, please remove these and create back up
copies of all data stored on the product before
the product is presented for the fulfilment of
guarantee services. NAVIGON accepts no
liability for data loss of any kind and is not liable
for claims for compensation for such losses of
data.
5. The guarantee covers neither the costs for
transportation of your product to NAVIGON or
a third-party commissioned by NAVIGON, nor
the risks associated with such transportation.
6. The guarantee does not apply to the following
cases:
a. In the event of faults to the product created
by normal wear and tear, erroneous usage,
inappropriate or improper operation,
especially usages for which the product
was not designed, as well as in the event
of failure to observe NAVIGON’s instructions
and directions relating to deployment, care
and maintenance [ especially those relating
to handling, physical or surface damage or
cosmetic damage to the product or damage
to the liquid-crystal display or the jacks ].
b. Regular maintenance and repairs or the
replacement of components required due
to normal wear and tear.
c. For wearing parts [ components that are
subject to wear and tear and, as such, can
be expected to require regular replacement during the life-time of a product,
especially batteries, charging devices,
protective cases, memory card reading
devices ].
d. Damage or alterations to the product that
are the result of i ] virus infection, ii ] usage
of the product with software that was not
supplied with the product or is not
recommended by NAVIGON or was
installed in an improper manner; iii ] usage
of the product with accessories, I / O
devices and other products that are not
expressly recommended by NAVIGON or
were not developed to be used with the
product; Iv ] repairs or attempts at repair by
persons not authorized by NAVIGON; v ]
adaptations or alterations to the hardware
or software without the written consent or
recommendation of NAVIGON, especially
upgrading of the product over and above
the characteristics of the specifications
described in the operating instruction; vi ]
negligence; vii ] accidents, fire, dampness,
liquids, chemicals, other substances,
vibrations, excessive heat, excessive cold,
extreme variations of temperature,
insufficient ventilation, sudden voltage
spikes, excessive or reversed power or
input voltage, radiation, electrostatic
discharge including lightening, and other
forms of external energy and influences.
e. The brightness and color of the screen can
deviate slightly from one product to
another. Tiny bright or dark points that can
be found on the screen known as defective
pixels. These are individual faulty pixels
92 –93
Page 23

13 Appendix
which cannot be properly controlled. Two
faulty pixels are considered acceptable.
7. These conditions apply neither to software nor
to data or applications that are stored on the
memory card or other storage media. This
guarantee covers only the hardware components of the product.
8. There is no express guarantee, neither written
nor verbal, other than this printed limited
guarantee. All implicit guarantees, including –
without being limited to – commercial product
guarantees and suitability for a particular
purpose, only apply for the period of this limited
guarantee. NAVIGON and its licensor are,
insofar as exclusion of liability is legally allowed,
in no way liable for damages for secondary or
consequential damage of any kind, including –
and without being limited to – income profits
and economical disadvantages. In some
countries / states, the exclusion or limitation of
liability for secondary or consequential damage
or the limitation of the period of implicit
guarantee is not allowed. In this case, the
above mentioned limitations and exclusions do
not apply.
Protection of your statutory rights
Consumers possess particular statutory rights in
accordance with national laws relating to the sale of
consumer goods. This guarantee does not interfere
with your possible legal rights, or rights that may not
be excluded or limited, or legal claims on the person
from whom you purchased the product. You are
entitled to assert your rights at your own discretion.
Should your product malfunction, please contact
your service partner before laying claim to
guarantee services, in order that the functionality of
your product can be restored as quickly as possible.
13.4 Terms of licence
§ 1 Scope of the terms
This Agreement regulates the relations between the
user and NAVIGON AG, Schottmuellerstrasse 20 A,
20251 Hamburg, developer and proprietor of the
exclusive utilization rights to the NAVIGON software
[
“Software” ] as specified in the order. Subject
matter of this Agreement shall be deemed to be
copyright interests.
§ 2 Scope of utilization
[ 1 ]
NAVIGON grants the user the non-exclusive
right, unlimited by time and location, to utilize
the Software at a utilization volume as specified
in the order. The licensing includes the right to
install and use the Software in accordance with
the documentation and pursuant to these
regulations.
[ 2 ]
The user shall ensure that the above mentioned
restricted utilization rights are complied with.
[ 3 ]
Any kind of use which supersedes the
framework as stipulated in the Agreement
requires the written consent of NAVIGON. In
the event that such utilization should be
exploited without NAVIGON’s consent,
NAVIGON shall charge the amount accruing for
this extended utilization in accordance with the
valid price list at the time. NAVIGON shall
reserve the right to assert further reaching
claims for compensation of damages. The user
shall have the right to prove lower damages.
[ 4 ]
All the above mentioned utilization rights shall
only be transferred to the user after full and
final payment of the license fee.
§ 3 Copyright and intellectual property rights
[ 1 ]
The user recognises the copyright of NAVIGON
and thereby the exclusive utilization and usage
rights of the software. The exclusive utilization
and usage rights also apply to software
extensions or alterations that NAVIGON may
have created for the user in accordance with
the contract.
[ 2 ]
Any kind of not explicitly authorized copying of
the Software in its entirety or partially, any kind
of not expressly authorized passing on of the
Software and development of similar Software
or segments of such Software or utilization of
the contractual Software as master template
shall in particular be deemed to be judicially
and contractually prohibited.
[ 3 ]
Exclusive utilization and exploitation rights also
exist with regard to extended development of
the Software or amendments thereto, which
NAVIGON has created for the user compliant
with order. The user is forbidden from
removing, changing or in any other way
camouflaging the copyright notices and
identifications pertaining to existing protection
rights.
§ 4 Transfer of the software
[ 1 ]
The user is permitted to sell or give away the
Software and the user manual or any other
accompanying materials on a permanent basis
to third parties, under the proviso that the
acquiring third party is in accord that the
contractual terms and conditions at hand shall
henceforth be also be imposed on it.
[ 2 ]
In the event of passing on, the user shall hand
over to the new user all copies of the program,
including possible backup copies made or
destroy the copies not handed over. As a result
of imparting, the former user’s utilization rights
to the program shall extinguish.
[ 3 ]
The user is permitted to sell or give away the
Software and the user manual or any other
accompanying materials to third parties on a
temporary basis, if this is not done within the
framework of leasing or renting out for gainful
purposes, under the proviso that the acquiring
third party is in agreement that the contractual
terms and conditions at hand shall henceforth
also be imposed on it. For the period of
assignment of the Software to third parties, the
assigning user shall have no right to any kind of
utilization of the program. Renting out or
granting a lease for gainful purposes shall be
prohibited. In the event that regular storage of
the entire data base and the integrated
computer programs should be crucial for
security purposes or safeguarding a rapid
reactivation of the computer system after
complete breakdown, the user is permitted to
make the necessary number of essential backup copies.
[ 4 ]
The user may not assign the Software to third
parties if there should be any justified suspicion
that such third party could violate the
contractual terms and conditions, especially
making unlawful copies.
§ 5 Reproduction rights and access protection
[ 1 ]
The user may reproduce the Software, if the
respective copying should be necessary for
operations. Necessary reproduction shall be
deemed to be the installation of the program
from the original data carrier to the bulk
memory of the installed hardware as well as
loading the program into random access
memory.
[ 2 ]
Furthermore, the user is permitted to make
copies for backup purposes. However, only
one single backup copy may be made for safekeeping. The backup copy has to be identified
as such.
[ 3 ]
The user may create backup copies, restricted
to absolutely necessary numbers, should it be
necessary to do so due to reasons of data
security or the retention of a quick reactivation
of the computer system after a total failure of
the scheduled backup of the total data storage,
including the computer applications used. The
relevant data carriers are to be designated as
such. The backup copies may only be used for
archive purposes.
[ 4 ]
Further reproductions, which also include
release of the program code on a printer as well
as photocopying of the manual, may not be
made by the user. Any additional manuals
required by employees have to be obtained
from NAVIGON.
§ 6 Multiple usage and network operation
[ 1 ]
The user may operate the software on all of his
or her hardware. However, if the user swaps
the hardware, the software must be erased
from the previously used item of hardware. The
simultaneous storage, availability or usage on
94 –95
Page 24

13 Appendix
14 Index
more than one item of hardware is not
permissible.
[ 2 ]
The deployment of the entrusted Software
within a network or any other multiple
workstation computer system is not permissible, if thereby the possibility of simultaneous
multiple-shift usage should be facilitated.
Should the user select to use the Software
within network operations or any other multipleshift computer system, the user is obliged to
abstain from simultaneous multiple use by
integration of access protection devices or
compensate NAVIGON by payment of special
network license fees, which fee is calculated on
the basis of the number of users linked up with
the computer system. The user shall be
informed immediately by NAVIGON with regard
to network license fees to be raised in each
individual case as soon as the user has
informed NAVIGON in writing of the intended
network integration and the number of
integrated users. The implementation into such
kind of network or multiple workstation
computer system shall only be permissible after
full and final payment of the network licensing
fees.
§ 7 Third-party software
The Software contains third-party software
products, which have been integrated into the
contractual Software or supplied together with the
contractual Software. NAVIGON fundamentally only
awards such rights which are necessary for general
use of the programs as components of the
contractual Software and which NAVIGON is
authorized to grant. No modification rights or further
processing rights are incorporated therein.
§ 8 Decompiling and program alteration
The user is forbidden from retranslation of the
entrusted program code into other code configurations [ decompiling ] as well as any other kind of
inverted development of the diverse manufacturing
phases of the Software [ reverse engineering ] or
carrying out program amendments of any kind,
unless if such actions should serve purposes of
eliminating serious defects, especially such defects
which can not be avoided by organisational or any
other reasonable measure of remedy. Copyright
markings, serial numbers as well as other
characteristics serving purposes of identification of
the program, may not be eliminated or changed.
Any removal of copy protection or similar protective
routine measures is prohibited without the
knowledge and co-operation of NAVIGON.
§ 9 Final provisions
[ 1 ]
In the event that any provision contained in this
License Policy should be determined to be
invalid or become invalid, the effectiveness of
the other regulations shall not be affected
thereby. The said invalid provision shall be
replaced by a valid provision within the context
of the remaining contractual interpretation,
which comes as close to the intended
economical purpose of such invalid provision.
[ 2 ]
Amendments and supplements to these
regulations have to be in the written form and
have to be expressly identified as such. Verbal
ancillary agreements shall be deemed to be
ineffective. This requirement of written form
may only be renounced by written agreement.
[ 3 ]
If legally permissible, the Parties agree that the
laws of the Federal Republic of Germany shall
apply to all legal relations arising from these
contractual relations, under exclusion of UN
Purchase Law.
[ 4 ]
If the user should be a businessman within the
meaning of the Commercial Code, legal entity
under public law or special assets under public
law, all disputes which may arise in connection
with the accomplishment of these contractual
regulations shall fall under the jurisdiction of
Hamburg.
B
Block ------------------------------------------------ 81
Bluetooth
Connection with Mobile Phone -------------- 91
Bluetooth -------------------------------------------- 90
C
Calibration ------------------------------------------ 77
Call destination
Make a call ------------------------------------ 88
Call destination -------------------------------------- 88
Call Settings ---------------------------------------- 90
Connection with Mobile Phone
Clear Connection Data ----------------------- 91
Connected Device ---------------------------- 90
New Connection ------------------------------ 90
Connection with Mobile Phone ------------------- 90
Current position
Save -------------------------------------------- 83
Current position ------------------------------------ 83
D
Destination info
Direct Access ---------------------------------- 69
Enter an address ------------------------------ 71
Favorites --------------------------------------- 70
Home address -------------------------------- 71
Last destinations ------------------------------ 70
My destinations ------------------------------- 68
Navigate --------------------------------------- 68
Nationwide ------------------------------------ 69
Nearby ----------------------------------------- 68
POI --------------------------------------------- 68
In a City ----------------------------------- 69
Save ---------------------------------------------73
Start navigation ------------------------------- 68
Destination info ------------------------------------- 70
E
External power supply display -------------------- 58
F
Factory settings ------------------------------------ 78
G
GPS
Initialize ---------------------------------------- 67
Signals ----------------------------------------- 67
GPS -------------------------------------------------- 63
GPS status ------------------------------------------ 83
H
Hands-free Module
Call in Progress ------------------------------- 88
Dial a Number --------------------------------- 88
Hands-free Module --------------------------------- 90
Hang up
Call destination ------------------------------- 88
Call Settings ----------------------------------- 90
Clear Connection Data ----------------------- 91
Connected Device ---------------------------- 90
Connection with Mobile Phone -------------- 90
Dial a Number --------------------------------- 88
Ending the call --------------------------------- 89
Import Phone Book --------------------------- 89
Incoming Call ---------------------------------- 88
Make a call ------------------------------------ 88
Phone book ----------------------------------- 89
POI --------------------------------------------- 88
Preset ------------------------------------------ 90
Recent calls ----------------------------------- 89
Settings ------------------------------------ 77, 85
Show Map ------------------------------------- 71
Volume ----------------------------------------- 86
Hang up --------------------------------------------- 89
Hands-free Settings
Import Phone Book --------------------------- 89
New Connection ------------------------------ 91
Preset -------------------------------------------90
Show Map ------------------------------------- 71
Volume ---------------------------------------- 86
Hands-free Settings ------------------------------- 89
Hardware keys ------------------------------------- 58
Home address -------------------------------------- 71
Hotline ------------------------------------------- 56, 57
96 –97
Page 25

14 Index
I
Import Phone Book -------------------------------- 89
Interim destination ----------------------------- 81, 82
K
Keyboard -------------------------------------------- 66
Keys
Hardware -------------------------------------- 58
Keys ------------------------------------------------- 58
M
Main Window --------------------------------------- 67
Make a call
Call destination ------------------------------- 88
Dial a Number -------------------------------- 88
Phone book ----------------------------------- 89
POI -------------------------------------------- 88
Preset -------------------------------------------90
Recent calls ----------------------------------- 88
Make a call ----------------------------------------- 88
Manual
Symbols --------------------------------------- 55
Manual ---------------------------------------------- 55
Map
Destination search ---------------------------- 81
Navigation ------------------------------------- 80
Preview ---------------------------------------- 79
Map -------------------------------------------------- 79
Menu ------------------------------------------------- 66
MP3 player ----------------------------------------- 86
MP3 settings --------------------------------------- 86
My destinations ------------------------------------ 70
N
Navigate --------------------------------------------- 68
Navigation
Block ------------------------------------------- 81
Interim destination ------------------------ 81, 82
Navigation ------------------------------------------- 67
No GPS reception
POI on your route ----------------------------- 81
Skip route point ------------------------------- 81
Skip route point ------------------------------- 81
Start ---------------------------------------- 67, 71
Unblock --------------------------------------- 81
No GPS reception -----------------------------------72
O
Options ----------------------------------------- 66, 77
P
P´ 9611
Start -------------------------------------------- 67
Phone book
Import Phone Book --------------------------- 89
Make a call ------------------------------------ 88
Phone book ----------------------------------------- 89
POI
Direct Access --------------------------------- 70
In a City ---------------------------------------- 69
Make a call ------------------------------------ 88
Nationwide ------------------------------------ 69
Nearby ----------------------------------------- 68
On your route --------------------------------- 81
POI -------------------------------------------------- 68
Preset ----------------------------------------------- 90
Product info ---------------------------------------- 77
R
Recalculate Route ---------------------------------- 84
Recent calls ------------------------------------- 88, 89
Route planning ------------------------------------- 74
Route points
Delete ------------------------------------------ 77
Indicate ---------------------------------------- 71
Order ------------------------------------------- 74
Save -------------------------------------------- 75
Simulation mode ------------------------------ 75
Start navigation ------------------------------- 68
Starting point ---------------------------------- 74
Route points ---------------------------------------- 75
Routes
Calculate --------------------------------------- 75
Manage ---------------------------------------- 75
Planning ---------------------------------------- 74
Routes ----------------------------------------------- 74
S
Safety information ---------------------------------- 63
SD slot ------------------------------------------ 58, 60
Service ---------------------------------------------- 55
Settings
Calibration ------------------------------------- 77
Call Settings ----------------------------------- 90
Clear Connection Data ----------------------- 91
Connected Device ---------------------------- 90
Connection with Mobile Phone -------------- 90
Factory settings ------------------------------- 78
Hands-free Module --------------------------- 87
Hands-free Settings --------------------------- 89
Import Phone Book --------------------------- 89
New Connection ------------------------------ 90
Preset ------------------------------------------ 90
Product info ----------------------------------- 77
Volume ------------------------------------- 65, 86
Settings --------------------------------------------- 83
Simulation mode
Quit --------------------------------------------- 75
Simulation mode ----------------------------------- 75
Skip route point ------------------------------------- 81
Skip route point ------------------------------------- 81
Software keyboard --------------------------------- 66
Support --------------------------------------------- 55
Switching off the device
Coldstart --------------------------------------- 62
Warmstart -------------------------------------- 62
Reset ------------------------------------------- 62
Symbols used in this manual ---------------------- 55
T
Take me home -------------------------------------- 71
Telephone
Connection with Mobile Phone -------------- 91
Telephone ------------------------------------------- 87
Terms of Guarantee -------------------------------- 92
TMC
Recalculate Route ----------------------------- 84
Symbols ---------------------------------------- 65
Tuning ------------------------------------------ 83
TMC -------------------------------------------------- 83
TMC Settings
Recalculate Route ----------------------------- 84
TMC Settings ---------------------------------------- 83
Tuning ----------------------------------------------- 83
Touchscreen ---------------------------------------- 58
Trademarks ----------------------------------------- 55
Traffic information
Recalculate Route ----------------------------- 84
Traffic information ---------------------------------- 83
U
Unblock --------------------------------------------- 81
V
Volume ---------------------------------------------- 65
98 –99
 Loading...