

Page 1

NAVIGON 2100/2120
User’s Guide
English (US)
January 2008
Revision 1.0
Page 2

Imprint
NAVIGON, INC
200 W Madison Street
Suite 650
Chicago, IL 60606
The information contained herein may be changed at any time
without prior notification. This manual nor any parts thereof
may not be reproduced for any purpose whatsoever without the
express written consent of NAVIGON, INC, nor transmitted in
any form either electronically or mechanically, including photocopying and recording. All technical specifications, drawings,
etc. are subject to copyright law.
© 2007-2008, NAVIGON, INC
All rights reserved.
ii NAVIGON 2100/2120 User’s Guide January 2008
NAVIGON, INC. Revision 1.0
Page 3

End User License Agreement
End User License Agreement (“Agreement”) – This is a legal agreement between you, the end
user, and NAVIGON, Inc. (“NAVIGON”). By using all or any portion of the Software you are agreeing to be bound by the terms of this agreement. This Agreement applies to the use of software,
pre-installed software on any of our hardware devices and accompanying items, including on CDROM, floppy disc, memory card, download package or any other data carriers, and all contents
and contents programs (“Software”).
Please read this Contract carefully. By using this software you agree that this Agreement is
enforceable like any written negotiated Agreement signed by you. This Agreement is enforceable
against you and any legal entity that obtained the software.
If you do not agree to the terms of this Agreement, promptly return the unused software,
unopened disk package and the accompanying items to the place where you obtained them for a
full refund.
1. OWNERSHIP: It is hereby understood and agreed by you that NA VIGON is the owner of
all title, ownership rights, intellectual property rights and copyrights in and to the Software. The
Software shall remain the sole and exclusive property of NAVIGON and its licensors and NAVIGON and its licensors will retain all patent s, copyrights and other intellectual property right s in the
Software, as applicable. You also hereby understand and agree that NAVIGON and/or its third
party licensors own all right, title and interest in and to all content included in the Software, including, but not limited to, all intellectual property rights therein (the “Content”).
2. GRANT OF LICENSE: NAVIGON grants you the right to use one copy of the Software,
provided it is used on only one computer or hardware device at any time. The Software is in “use”
on a computer or hardware device when it is loaded into temporary memory (e.g., hard disk, CDROM, or other storage device) of that computer. This license does not grant any right to obtain
future upgrades, updates or supplements (“upgrades”) of the Software. Any updates are similarly
governed by this Agreement and any accompanying amendments. Updates may be subject to
additional costs and provisions.
3. OTHER RESTRICTIONS: Except for the initial loading of the Software onto a Hardware
Device or for archival/backup purposes as provided for above, you may not rent or lease, broadcast, present, transfer, or distribute the Software and accompanying written materials. You may
not reverse engineer, decompile, reverse engineer or disassemble the Software. If Software is an
upgrade, any transfer must include the upgrade and all pr ior versions. All rights not specifically
granted in this Agreement are reserved by NAVIGON.
4. TRANSFER:You may transfer the Software and this Agreement to another party to whom
you may transfer the hardware devices and accompanying items if the other party agrees to
accept the terms and conditions of this Agreement. If you transfer the Software, you must simultaneously either transfer all copies whether in printed or machine-readable form to the same party
or destroy any copies not transferred, including all modifications and portions of the program contained or merged into other programs.
You shall not sub-license, lease, assign, or transfer the Agreement or the Software except as
expressly provided in this Agreement. Any attempt otherwise to sublicense, lease, assign, or
transfer any of the rights, duties, or obligations hereunder renders this License VOID.
5. LIMITATION OF WARRANTIES AND LIABILITIES:EXCEPT FOR THE LIMITED WARRANTY DOCUMENT INCLUDED WITH THE HA RDWARE DEVICE, IF ANY, AND TO THE MAXIMUM EXTENT PERMITTED BY APPLICABLE LA W , ALL SOFTW ARE, OTHER COMPONENTS
THEREOF AND SERVICES ARE PROVIDED ON AN “AS IS” BASIS. YOU EXPRESSLY
ACKNOWLEDGE AND AGREE THAT YOUR USE OF THE SOFTWARE IS AT YOUR SOLE
January 2008 NAVIGON 2100/2120 User’s Guide iii
Revision 1.0 NAVIGON, INC.
Page 4

RISK AND THA T THE ENTIRE RISK AS TO SATISFACTORY QUALITY, PERFORMANCE,
ACCURACY AND EFFORT IS WITH YOU. EXCEP T AS OTHER WISE EXPRESSLY STATED IN
THIS AGREEMENT, NAVIGON DOES NOT MAKE, AND HEREBY EXPRESSLY DISCLAIMS,
ANY AND ALL EXPRESS AND/OR IMPLIED WARRANTIES, INCLUDING, BUT NOT LIMITED
TO, WARRANTIES OF MERCHANTABILITY, FITNESS FOR A PARTICULAR PURPOSE, NONINFRINGEMENT AND TITLE, AND ANY WARRANTIES ARISING FROM A COURSE OF DEALING, USAGE OR TRADE PRACTICE. YOU UNDERS TAND AND AGREE THAT THE USE OF
THE SOFTWARE IS DONE AT YOUR OWN DISCRETION AND RISK AND THAT YOU WILL BE
SOLELY RESPONSIBLE FOR ANY DAMAGES.
TO THE MAXIMUM EXTENT PERMITTED BY LAW AND EXCEPT AS OTHERWISE
EXPRESSLY STATED IN THIS AGREEMENT, NAVIGON WILL NOT BE LIABLE OR RESPONSIBLE TO YOU OR ANY OTHER PERSON OR ENTITY FOR ANY TYPE OF DI RECT, INCIDENTAL, SPECIAL, PUNITIVE, INDIRECT OR CONSEQUENTIAL DAMAGES, INCLUDING, BUT
NOT LIMITED TO, LOST REVENUE, LOST PROFITS, REPLACEMENT GOODS, LOSS OF
PROPRIETARY MATERIAL, RIGHTS OR SERVICES, BUSINESS INTERRUPTION, LOSS OR
CORRUPTION OF ELECTRONIC COMMUNICATIONS, OR INTERRUPTION OR LOSS OF USE
OF SERVICES OR EQUIPMENT, EVEN IF ADVISED OF THE POSSIBILITY OF SUCH DAMAGES, OTHER PECUNIARY LOSS, AND WHETHER ARISING UNDER THEORY OF CONTRACT, TORT (INCLUDING NEGLIGENCE), STRICT LIABILITY OR OTHERWISE, EVEN IF
NAVIGON HAS BEEN ADVISED OF THE POSSIBILITY OF SUCH DAMAGES, OR THEY ARE
FORESEEABLE. IN NO EVENT SHALL NAVIGON’S TOTAL LIAB ILITY (WHETHER ARISING
UNDER A THEORY OF CONTRACT, TOR T, INCLUDING NEGLIGENCE, STRICT LIABILITY OR
OTHERWISE) UNDER OR IN CONNECTION WITH THIS AGREEMENT OR BASED ON ANY
CLAIM FOR INDEMNITY OR CONTRIBUTION EXCEED THE AMOUNT OF PURCHASE PRICE
OF THE AGREEMENT. SOME JURISDICTIONS DO NOT ALLOW THE LIMIT ATION OF LIABILITY FOR PERSONAL INJURY, OR OF INCIDENTAL OR CONSEQUENTIAL DAMAGES, SO
THIS LIMITATION MAY NOT APPLY TO YOU.
6. CONFIDENTIALITY: You acknowle dge that the Software contains proprietary trade
secrets and you hereby agree to maintain the confidentiality of Software and not to disclose or
provide access thereto to any person.
7. THIRD PARTY SOFTWARE LICENSES: NAVIGON may make use of third party software. Notwithstanding the terms and conditions of this License, use of some third party materials
included in the Software may be subject to other terms and conditions.
8. TERMINATION: This Agreement automatically terminates if you fail to comply with the
terms hereof or if you attempt to assign the Agreement or transfer the Software to a third party
except as expressly permitted in this Agreement. If such should occur, you must destroy all copies of the Software and all of its component parts. All provisions of this Agreement, except for the
license grant above, survive the termination of this Agreement.
9. ENTIRE AGREEMENT: The terms and conditions of this Agreement, including any
addendum or agreement to it which may be included with the accompanying package of the Software (and/or Hardware), plus the Limited Warranty , if applicable, reflect the entire agreement
between You and NAVIGON with respect to the subject matter hereof and will supersede and
replace all prior understandings and agreements, in whatever form, regarding the subject matter.
This Agreement shall not be modified or amended except in writing signed by NAVIGON. This
Agreement shall take precedence over any other documents that may be in conflict therewith.
10. TRANSLATIONS: The original English version of this Agreement may have been
translated into other languages. The English version of this Agreement is the controlling version.
iv NAVIGON 2100/2120 User’s Guide January 2008
NAVIGON, INC. Revision 1.0
Page 5

11. JURISDICTION AND DISPUTES
This Agreement is governed by the laws of the State of Illinois without regard to its conflict of laws
rules.
All disputes hereunder shall be resolved in the applicable state or federal courts of the St ate of Illi-
nois located within Cook County, Illinois. To the extent permitted by law the parties consent to the
jurisdiction of such courts, agree to accept service of process by mail, and waive any jurisdictional
or venue defenses otherwise available.
12. SEVERABILITY
If at any time any one or more of the provisions of this Agreement become invalid, illegal or unen-
forceable in any respect for any reason, the validity, legality and enforceability of any such provision in every other respect and of the remaining provisions of this Agreement shall not be in any
way impaired.
13. ADDITIONAL TERMS AND CONDITIONS OF USE RELATING T O THE TOTAL TRAFFIC
NETWORK DATA PROVIDED WITH YOUR NAVIGON ENABLED PRODUCT:
A. Total Traffic Network, a division of Clear Channel Broadcasting, Inc., holds the
rights to the traffic incident data and RDS-TMC network through which it is delivered. You may not
modify, copy, scan or use any other method to reproduce, duplicate, republish, transmit or distribute in any way any portion of traffic incident data. You agree to indemnify, defend and hold harmless Clear Channel Broadcasting, Inc. (and its affiliates) against any and all claims, damages,
costs or other expenses that arise directly or indirectly out of (1) your unauthorized use of the traffic incident data or the RDS-TMC network, (2) your violation of this directive and/or (3) any unauthorized or unlawful activities by you in connection herewith.
B. Total T raf fic Network traffic data is informational only . User assumes all risk of use.
Total T raffic makes no representations about content, traffic and road conditions, route usability , or
speed.
C. TOTAL TRAFFIC NETWORK TRAFFIC DATA IS PROVIDED "AS IS," AND
"WHERE IS". TOT AL TRAFFIC NETWORK EXPRE SSL Y DISCLAIMS ALL W ARRANTIES WITH
RESPECT TO THE TRAFFIC DATA (INCLUDING, WITHOUT LIMITATION, THAT THE TRAFFIC
DATA WILL BE ERROR-FREE OR WILL OPERATE WITHOUT INTERRUPTION), EXPRESS,
IMPLIED OR STATUTORY, INCLUDING, WITHOUT LIMITATION, THE IMPLIED WARRANTIES
OF MERCHANTABILITY, NON-INFRINGEMENT, FITNESS FOR A PARTICULAR PURPOSE,
OR THOSE ARISING FROM A COURSE OF DEALING OR USAGE OF TRADE.
D. TOTAL TRAFFIC NETWORK WILL NOT BE LIABLE TO YOU FOR ANY INDIRECT, SPECIAL, CONSEQUENTIAL, EXE MPLAR Y, OR INCIDENT AL DAMAGES (INCLUDING,
WITHOUT LIMITATION, LOST REVENUES, ANTICIPATED REVENUES, OR PROFITS RELATING TO THE SAME) ARISING FROM ANY CLAIM RELATING DIRECTLY OR INDIRECTLY TO
USE OF THE TRAFFIC DATA, WHETHER A CLAIM FOR SUCH DAMAGES IS BASED ON
WARRANTY, CONTRACT, TORT (INCLUDING, WITHOUT LIMITATION, NEGLIGENCE OR
STRICT LIABILITY).
January 2008 NAVIGON 2100/2120 User’s Guide v
Revision 1.0 NAVIGON, INC.
Page 6

This page intentionally left blank.
vi NAVIGON 2100/2120 User’s Guide January 2008
NAVIGON, INC. Revision 1.0
Page 7

Table of Contents
End User License Agreement ................................................................................... iii
Introduction
About this manual....................................................................................1
Conventions........................................................................................1
Symbols ..............................................................................................1
Legal notice .............................................................................................2
Liability................................................................................................2
Trademarks.........................................................................................2
Customer Service....................................................................................2
Telephone Support..............................................................................2
E-mail..................................................................................................2
Welcome
Introducing Your NAVIGON 2100/2120...................................................3
About GPS navigation.........................................................................4
Getting Started
What’s included .......................................................................................5
Important safety information....................................................................6
Navigation safety information..............................................................6
Safety information for the navigation device.......................................7
Safety guidelines when installing in your car ......................................7
Preparing your NAVIGON 2100/2120 for use..........................................8
Charging the battery............................................................................8
Inserting a memory card .....................................................................8
Removing the memory card................................................................8
Securing the cradle.............................................................................9
Securing the navigation device to the cradle ......................................9
Supplying power to the navigation device.........................................10
Connecting an Optional GPS Antenna (Not Included)......................10
Optional Accessory Services.................................................................11
Activating an Optional Accessory Service.........................................11
Confirming Optional Traffic Accessory Service Activation................14
Confirming Optional Zagat POI Accessory Service Activation..........15
January 2008 NAVIGON 2100/2120 User’s Guide vii
Revision 1.0 NAVIGON, INC.
Page 8

Basic Operations
Starting the NAVIGON 2100/2120.........................................................17
The Main Window .............................................................................17
My Destinations..............................................................................................18
Take Me Home...............................................................................................18
Show Map.......................................................................................................18
The Options Button.........................................................................................18
Returning to the Main Window .......................................................................18
Initializing the GPS receiver..............................................................19
Setting the volume ............................................................................19
Using Standby Mode.........................................................................20
Turning the NAVIGON 2100/2120 Off...............................................20
Viewing device status............................................................................21
GPS ..................................................................................................21
Power ...............................................................................................21
TMC (Traffic Information)..................................................................22
Using software keyboards .....................................................................23
Alphabetic keyboard..........................................................................23
Numeric keyboard.............................................................................23
Special character/symbol keyboard..................................................23
Special keys......................................................................................24
Using menus..........................................................................................24
Security
The Password Lock Window .................................................................25
Setting a password............................................................................25
Changing a password .......................................................................25
Cancelling password protection........................................................26
Forgotten your password?..............................................................................26
Selecting Destinations
Using auto-complete to select a destination .....................................27
The Search Area Button....................................................................28
Selecting a Search Area........................................................................28
Ways to Search for Destinations ...........................................................29
Enter an Address............................................................................................29
Search for a POI.............................................................................................29
By Tapping on the Map ..................................................................................29
viii NAVIGON 2100/2120 Use r’s Guide January 2008
NAVIGON, INC. Revision 1.0
Page 9

Entering an address...............................................................................30
Specifying a city first .........................................................................30
Specifying a street first......................................................................31
Selecting a Point of Interest (POI) destination.......................................32
POIs nearby......................................................................................32
POIs in a specified city......................................................................34
Nationwide POIs ...............................................................................36
Direct Access POIs...........................................................................37
Specify Direct Access POI categories............................................................38
Information about the POI.................................................................39
Selecting a destination by tapping the map...........................................40
Starting navigation.................................................................................42
Quitting navigation ............................................................................42
No GPS reception.............................................................................42
Arriving at your destination....................................................................42
Zagat Points of Interest (POIs) (Optional Accessory)
Zagat POI Categories............................................................................43
Search for Zagat POIs ......................................................................43
View Zagat POI Information..............................................................44
My Destinations
Saving a destination ..............................................................................45
Saving the current location using GPS .............................................46
Saving your home address as a destination.....................................46
Selecting a saved destination................................................................48
Selecting a destination from the Favorites list...................................48
Selecting a destination from the Last Destinations list......................49
Navigating homewards..........................................................................50
Working With Routes
Accessing the Route Planning Window ............................................51
Entering the starting point.................................................................51
Changing the starting point...............................................................52
Entering route points.........................................................................52
Changing the order of route points....................................................52
January 2008 NAVIGON 2100/2120 User’s Guide ix
Revision 1.0 NAVIGON, INC.
Page 10

Managing routes....................................................................................53
Saving routes....................................................................................53
Loading routes ..................................................................................53
Navigation..............................................................................................54
Calculating and displaying routes .....................................................54
Viewing the Route Profile..................................................................54
Simulating routes...................................................................................55
Starting a route simulation ................................................................55
Ending simulation..............................................................................55
Viewing a Turn-by-Turn List...................................................................56
Blocking route sections.....................................................................56
Removing blocks and using original routes.......................................57
Working With Maps
NAVIGON 2100 Map.............................................................................59
NAVIGON 2120 Maps ...........................................................................59
View information on the current map.....................................................60
Selecting a different map (NAVIGON 2120 only)..............................60
Map in Preview mode............................................................................61
Map in Navigation mode........................................................................63
Map functions in Navigation mode....................................................65
Map in Destination search mode...........................................................66
Operating in Destination search mode..............................................67
Reality View (Junction View) .................................................................68
TMC (Traffic Information) (Optional Accessory)
Accessing the TMC (Traffic Information) Window.............................69
The TMC (Traffic Information) Window..................................................70
Types of Messages ........................................................................................70
Traffic Flow Severity Indicators ......................................................................71
Event or Incident Icons...................................................................................71
Displaying traffic messages ..............................................................72
Requesting a route recalculation.......................................................73
TMC Settings Window...........................................................................74
Select another station .......................................................................74
Select Tuning Mode Settings............................................................74
Specify the type of traffic messages to display................................. 75
Select Reroute Settings ....................................................................76
x NAVIGON 2100/2120 User’s Guide January 2008
NAVIGON, INC. Revision 1.0
Page 11

Logbook
Starting a recording...........................................................................77
Stopping the recording......................................................................77
Customizing Your NAVIGON 2100/2120
Accessing the Settings window.........................................................79
The Settings window..............................................................................79
Basic Settings ...................................................................................79
Current Map Settings........................................................................81
POI Settings......................................................................................81
Route Profile Settings .......................................................................81
Selecting options ...................................................................................83
Moving between pages.....................................................................83
Viewing a list of options for a setting.................................................83
Viewing information about a setting..................................................83
Toggling between options.................................................................84
Changing an option setting ...............................................................84
Legal Notices
NOTICE TO DRIVERS IN CALIFORNIA AND MINNESOTA ...........85
GPS...................................................................................................85
Technical Data
Specifications.........................................................................................87
Compliance Notices...............................................................................88
Index
January 2008 NAVIGON 2100/2120 User’s Guide xi
Revision 1.0 NAVIGON, INC.
Page 12

This page intentionally left blank.
xii NAVIGON 2100/2120 User’s Guide January 2008
NAVIGON, INC. Revision 1.0
Page 13

Introduction
About this manual
Conventions
For better legibility and clarification, the following styles are used in this manual:
Bold and italics: Registered names, company and product descrip-
MALL CAPITALS:WINDOW AND DIALOG BOX TITLES.
S
Bold: Highlighting of important parts in the text.
tions.
Symbols
Underlined
The following symbols refer to specific passages of text:
: Descriptions of button s, inp ut fields and other elements on
the user interface.
Warnings.
Instructions and tips for operating the software.
More detailed information and explanations.
January 2008 NAVIGON 2100/2120 User’s Guide 1
Revision 1.0 NAVIGON, INC.
Page 14

Introduction
Legal notice
Legal notice
Liability
The software and the manual are subject to change without notice. NAVIGON, INC is
not liable for the accuracy of the informat ion contained in this manual or for damages
resulting from the use of this manual.
Trademarks
All brands and trademarks mentioned in this document are possibly registered by third
parties and are subject to the current legislation and to the rights of their respective
owners without reservation. All mentioned names of products, societies, or brands
may be registered trademarks of their respective owners. Every right that is n ot expli citly accorded is reserved.
The absence of the explicit labelling of registered trademarks used in this manual
does not imply that the brand is not subject to the rights of a third party.
NAVIGON is a registered trademark of NAVIGON, INC.
Microsoft, Windows, and Excel are trademarks of the Microsoft Corporation.
NAVTEQ is a registered trademark of NAVTEQ.
ZagatSurvey is a registered trademark of Zagat Survey, LLC.
Total Traffic Network is a registered trademark of Total Traffic Network.
Clear Channel is a registered trademark of Clear Channel Communications.
ZENRIN is a registered trademark of ZENRIN EUROPE GmbH.
Customer Service
Our service team is available via telephone or E-mail.
Telephone Support
Telephone: (888) 848-0701 (Toll Free)
Service Hours: Monday through Friday, 9 a.m. to 8 p.m. CT
To ensure a timely response via e-mail, visit http://www.navigon.com and select:
US and Canada
(except official holidays)
> Support > Email
Customers will receive a response within 2 business days.
2 NAVIGON 2100/2120 User’s Guide January 2008
NAVIGON, INC. Revision 1.0
Page 15
Welcome
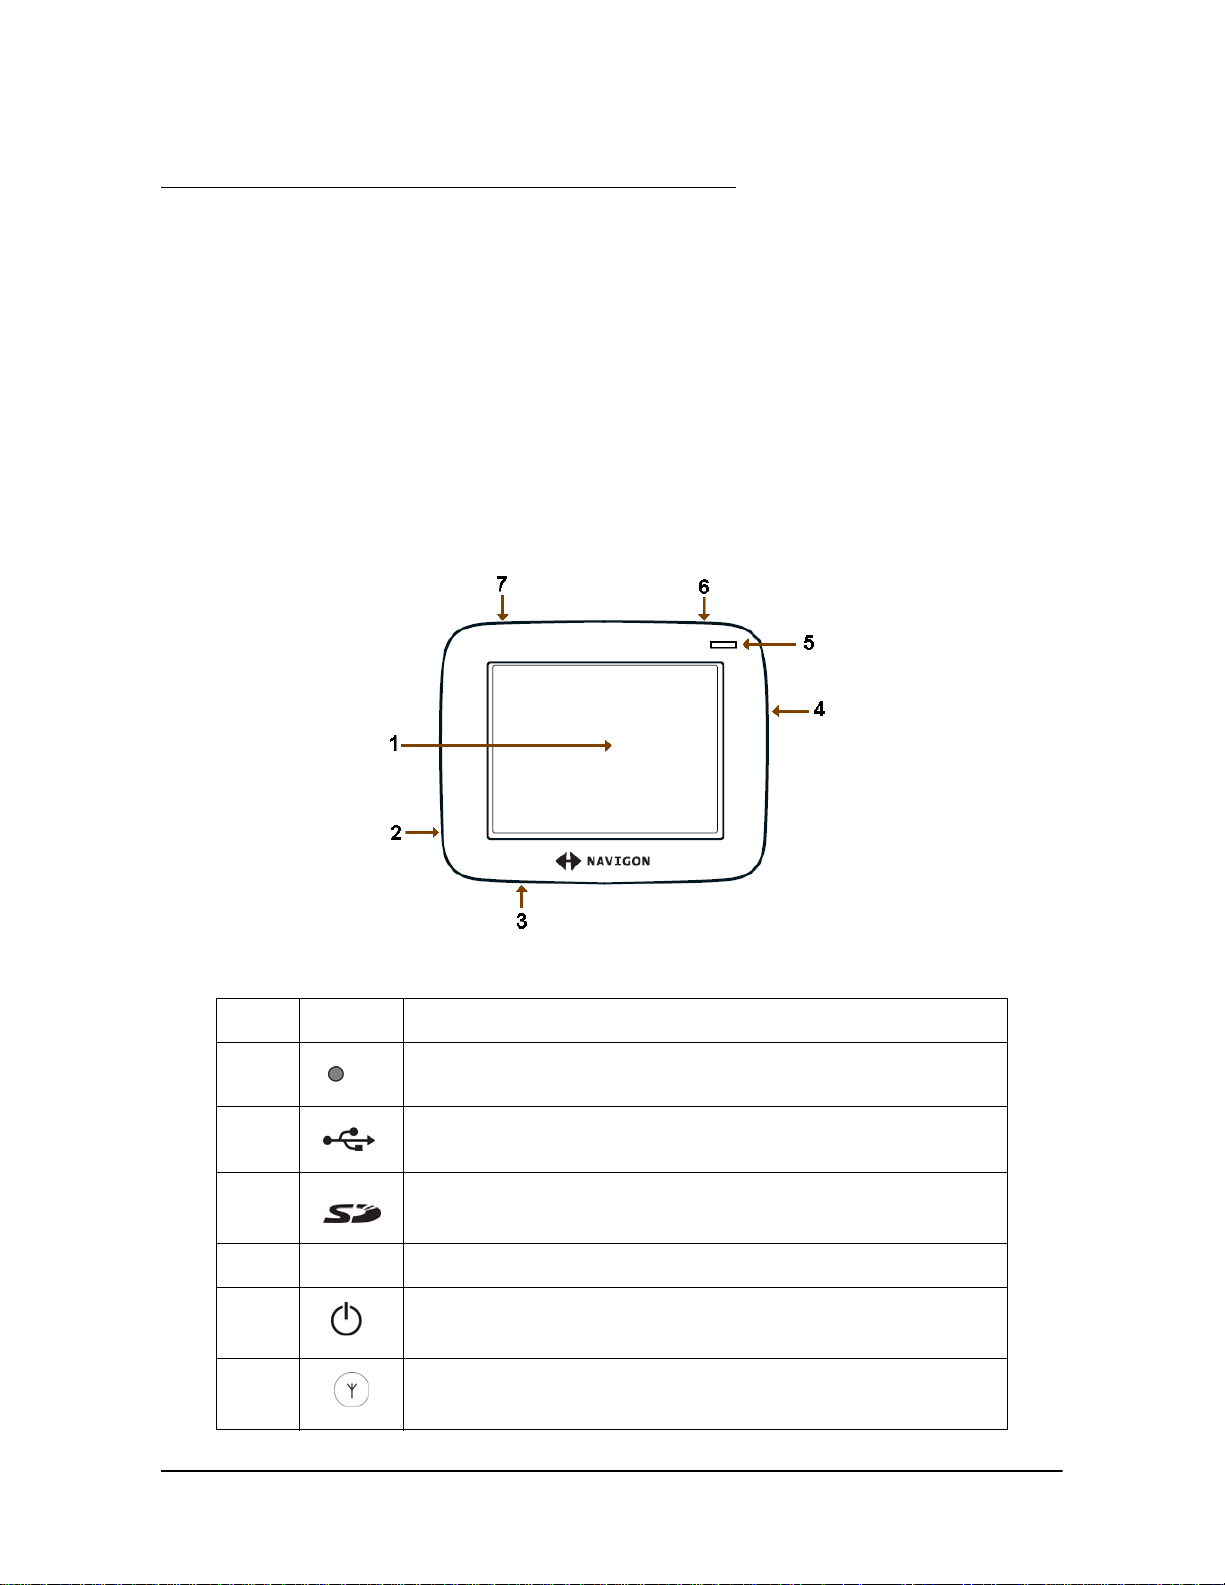
Introducing Your NAVIGON 2100/2120
Welcome to the exc iting world of handheld nav igation. The NAVIGON 2100/2120 offers
Global Positioning System (GPS)-based navigation and thousands of Points Of Interest (POIs).
With the optional lifetime TMC accessory service, your navigation system can receive
the latest traffic information available. If necessary, it can change your route dynamically in order to avoid traffic congestion.
With the optional lifetime Zagat POIs accessory service, you receive ratings on thousands of POIs from the world's leading provider of consumer survey-based dining,
travel and leisure information.
1 Touch screen
2
3
4
5 LED
6
7
January 2008 NAVIGON 2100/2120 User’s Guide 3
Revision 1.0 NAVIGON, INC.
Reset
Power Connector Port (with integrated TMC antenna)
SD memory card slot
On/Off/Hibernate
(Optional) External GPS antenna Socket
Page 16

Welcome
Introducing Your NAVIGON 2100/2120
About GPS navigation
GPS is based on a total of 24 satellites that circle the earth and are constantly transmitting their position. The GPS receiver uses this data and calculates its own geographical position on the basis of the information transmitted by the various satellites.
For a sufficiently precise positioning it is necessary to obtain the data from at least
three satellites. With the data from 4 or more satellites the altitude above sea level can
also be ascertained. The determination has an accuracy of about 3 yards.
Once the navigation device has determined your position, it can be used as a starting
point for route calculation.
The map data on your navigation device includes the geographical coordinates of all
digitally recorded Points Of Interest (POIs), streets and places. This enables the
device to calculate a route between a starting point and a destination.
The calculation of the current position and its representation on the map takes place
once every second so your current position is always shown on the map.
If GPS reception is impaired, navigation is interrupted. The navigation software
remains active.
As soon as GPS reception is restored, the navigation system calculates any change
of position which has occurred in the meantime. Navigation may simply be continued.
Caution! The United States government operates the Global Positioning System
(GPS) and is solely responsible for its accuracy and maintenance. Changes by the
United States government may affect the accuracy and performance of all GPS
equipment, including your personal navigation device.
Caution! Ordinances or laws may restrict use of certain abilities of your navigation
device on public or private land
.
4 NAVIGON 2100/2120 User’s Guide January 2008
NAVIGON, INC. Revision 1.0
Page 17

Getting Started
What’s included
Your NAVIGON 2100/2120 comes with the following accessories. If the contents are
incomplete, please notify us within 14 days of purchase. The purchased product
includes:
NAVIGON 2100/2120 navigation device
•
• Car cradle and device holder
• Car charger cable (12 volt adapter) with integrated TMC antenna.
• SD card containing software and navigation map(s)
January 2008 NAVIGON 2100/2120 User’s Guide 5
Revision 1.0 NAVIGON, INC.
Page 18
Getting Started
Important safety information
Important safety information
Please read the following notices and safety information carefully before starting to
use your navigation system.
Navigation safety information
Use this navigation system at your own risk.
Caution!
Caution! Do not look at the display unless it is absolutely safe to do so!
Caution! Traffic regulations have priority over any instructions from the navigation sys-
tem.
Caution! Follow the instructions of the navigation system only when the circumstances
and the road traffic regulations allow you to do so! The navigation system guides you to
your destination even if you deviate from the calculated route.
Caution! Check that the cradle is secured and adjusted properly before each journey.
Note: If you have not understood the spoken instructions, or you're not sure about what
to do next, you can briefly refer to the map or arrow view of your navigation system.
To prevent accidents, do not operate the navigation system while driving.
6 NAVIGON 2100/2120 User’s Guide January 2008
NAVIGON, INC. Revision 1.0
Page 19

Safety information for the navigation device
Caution! Protect the device from moisture. The device is not waterproof a nd is not p ro -
tected against water damage.
Caution! Do not run cables directly next to safety-relevant devices and supply lines.
Caution! After installation, check all safety-relevant equipment in the car.
Caution! Unplug the navigation device's power supply when you park the vehicle. The
navigation device requires power in standby mode, and may drain the vehicle's battery.
Caution! Do not open the navigation device's casing under any circumstances.
Caution! Do not expose the navigation device to extreme heat or cold. This may dam-
age the device or impair its function.
Caution! Use only the charger provided or one that has been approved by the manu-
facturer.
Caution! Connect the charger to a suitable power supply. The voltage requirements
can be found on the device case and/or the packaging.
Note: Ensure that there are no kinks in the cable and that it will not be damaged by any
sharp objects.
Note: To clean the navigation device, use a moist cloth only.
Note: Do not unplug by pulling on the cable. Doing so could damage the cable!
Note: Create a backup of the data contained on the memory card provided.
Note: The memory card must remain inserted in the device during operation of the na v-
igation system.
Note: Use SD or MMC memory cards only! Ensure that memory card contacts are
clean and undamaged.
Getting Started
Important safety information
Safety guidelines when installing in your car
Caution! Secure the cradle in such a way that the driver's visibility is not impaired.
Caution! Do not attach the cradle within the deployment zone of airbags.
Caution! When installing the cradle, ensure that it does not represent a risk in the
event of an accident.
Caution! Do not run cables directly next to safety-relevant devices and power supplies.
Caution! After installation, check all safety-relevant equipment in the car.
Caution! The car charger cable is to be connected to cigarette lighters with an operat-
ing voltage of 12V only.
January 2008 NAVIGON 2100/2120 User’s Guide 7
Revision 1.0 NAVIGON, INC.
Page 20
Getting Started
Preparing your NAVIGON 2100/2120 for use
Preparing your NAVIGON 2100/2120 for use
Use the navigation system at your own risk.
Caution!
on page 6.
Please be sure to see the safety information in “Important safety information”
Charging the battery
• Connect the car charger cable to the navigation device and to the vehicle’s cigarette lighter.
The LED of the
LED lights:
• No light, the battery is flat.
• Orange during charging.
• Green when the battery is fully charged.
Note: It takes approximately 6 hours to charge the device when the battery is flat.
A fully charged battery provides up to 3.5 hours of use.
NAVIGON 2100/2120 indicates the current battery charge. The
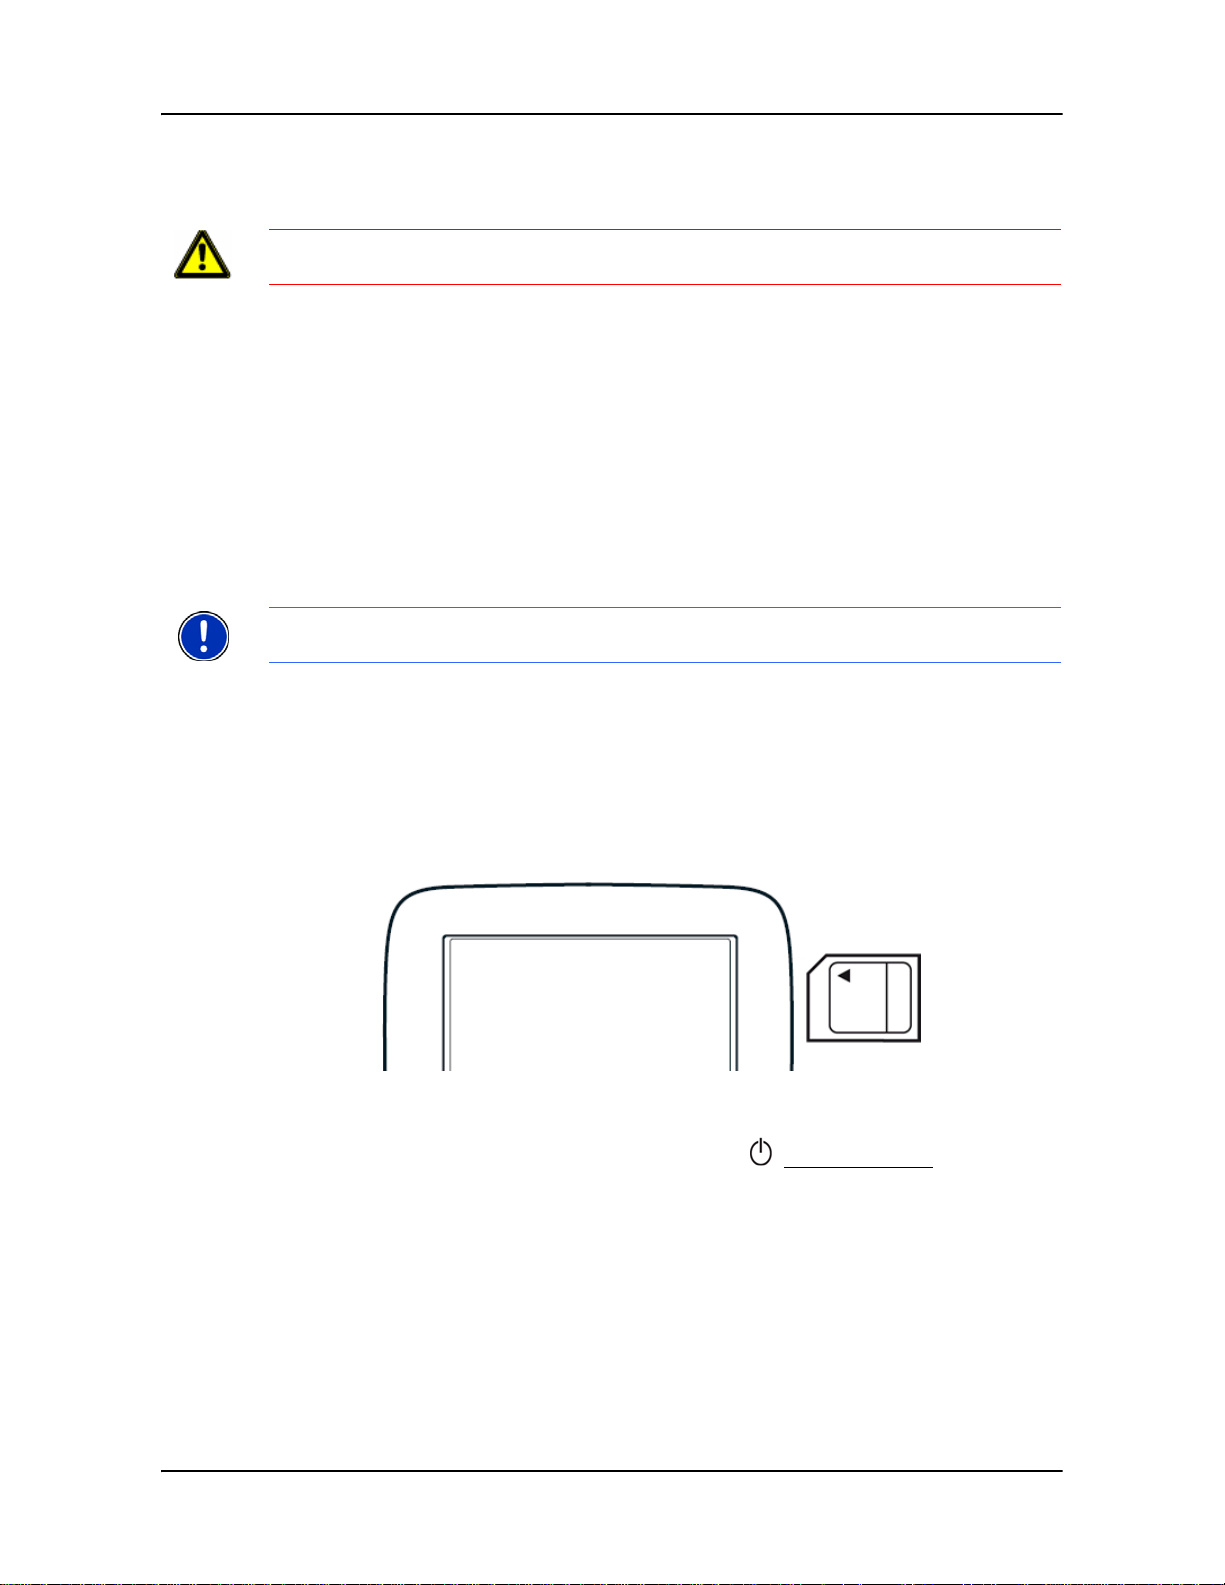
Inserting a memory card
The SD memory card contains maps and navigation software. It also stores saved
destinations, routes, and logbook entries.
• Insert the memory card provided into the slot on the side of the device. Press the
card into the device until it locks into place.
Removing the memory card
1. Switch the navigation device off by pressing the (On/Off/Standby) switch for at
least 6 seconds.
2. Press the memory card gently into the device until the lock disengages.
The card pops up slightly.
3. Gently slide the card out of the slot.
8 NAVIGON 2100/2120 User’s Guide January 2008
NAVIGON, INC. Revision 1.0
Page 21

Securing the cradle
Clean and dry the mounting surface and the suction cup on the base of the cradle.
These areas must be dry and free of dirt and grease.
1. Unscrew the holding screw from the cradle.
2. Align the back of the holder into the cradle.
3. Replace the screw and tighten to secure the holder in the cradle.
Getting Started
Preparing your NAVIGON 2100/2120 for use
4. Using the suction cup, fix the cradle provided to the mounting surface. The cradle
should be as level as possible.
5. Press the suction cup lever down.
Securing the navigation device to the cradle
The holder has two small projections on the bottom and one on the top. These projections are designed to fit into corresponding slots on the bottom and top of the
NAVIGON 2100/2120.
1. Insert the navigation device into the holder by aligning the two bottom projections
into the slots on the bottom of the device.
2. Tilt the device backward slightly until the top projection clicks into place in the top
slot.
3. Adjust the navigation device so that it can be seen easily.
January 2008 NAVIGON 2100/2120 User’s Guide 9
Revision 1.0 NAVIGON, INC.
Page 22

Getting Started
Preparing your NAVIGON 2100/2120 for use
Supplying power to the navigation device
Included in delivery of the NAVIGON 2100/2120 is a car charger cable with which
power can be supplied to the navigation device via the vehicle's cigarette lighter.
The car charger cable is connected to the
NAVIGON 2100/2120 via the power connec-
tion port on the bottom of the device.
Caution! The car charger cable is to be connected to cigarette lighters with an operat-
ing voltage of 12V only.
Connecting an Optional GPS Antenna (Not Included)
With the NAVIGON 2100/2120, you can also use an external GPS antenna (not pro-
vided with the device).
1. Connect the GPS antenna to the external antenna/headset socket on the
NAVIGON 2100/2120.
2. Secure the antenna to the mounting surface using the suction cups.
10 NAVIGON 2100/2120 User’s Guide January 2008
NAVIGON, INC. Revision 1.0
Page 23
Optional Accessory Services
Optional accessory services available for your NAVIGON 2100/2120 are:
• TMC (Traffic) Information
• Zagat Points of Interest (POIs)
Each optional service is purchased separately. Once activated, the service is provided
for the lifetime of your
Activating an Optional Accessory Service
At a retail outlet where NAVIGON 2100/2120 devices are sold:
1. Purchase an Accessory card for each service you want.
On the Accessory card is the 15 cha racter activati on key, three blocks of five characters separated by hyphens. This key is used to obtain a device unlock code.
NAVIGON 2100/2120.
Getting Started
Optional Accessory Services
On your
NAVIGON 2100/2120:
2. Switch on the device by pressing and holding the (On/Off/S tandby) switch for at
least 6 seconds.
AIN WINDOW displays.
The M
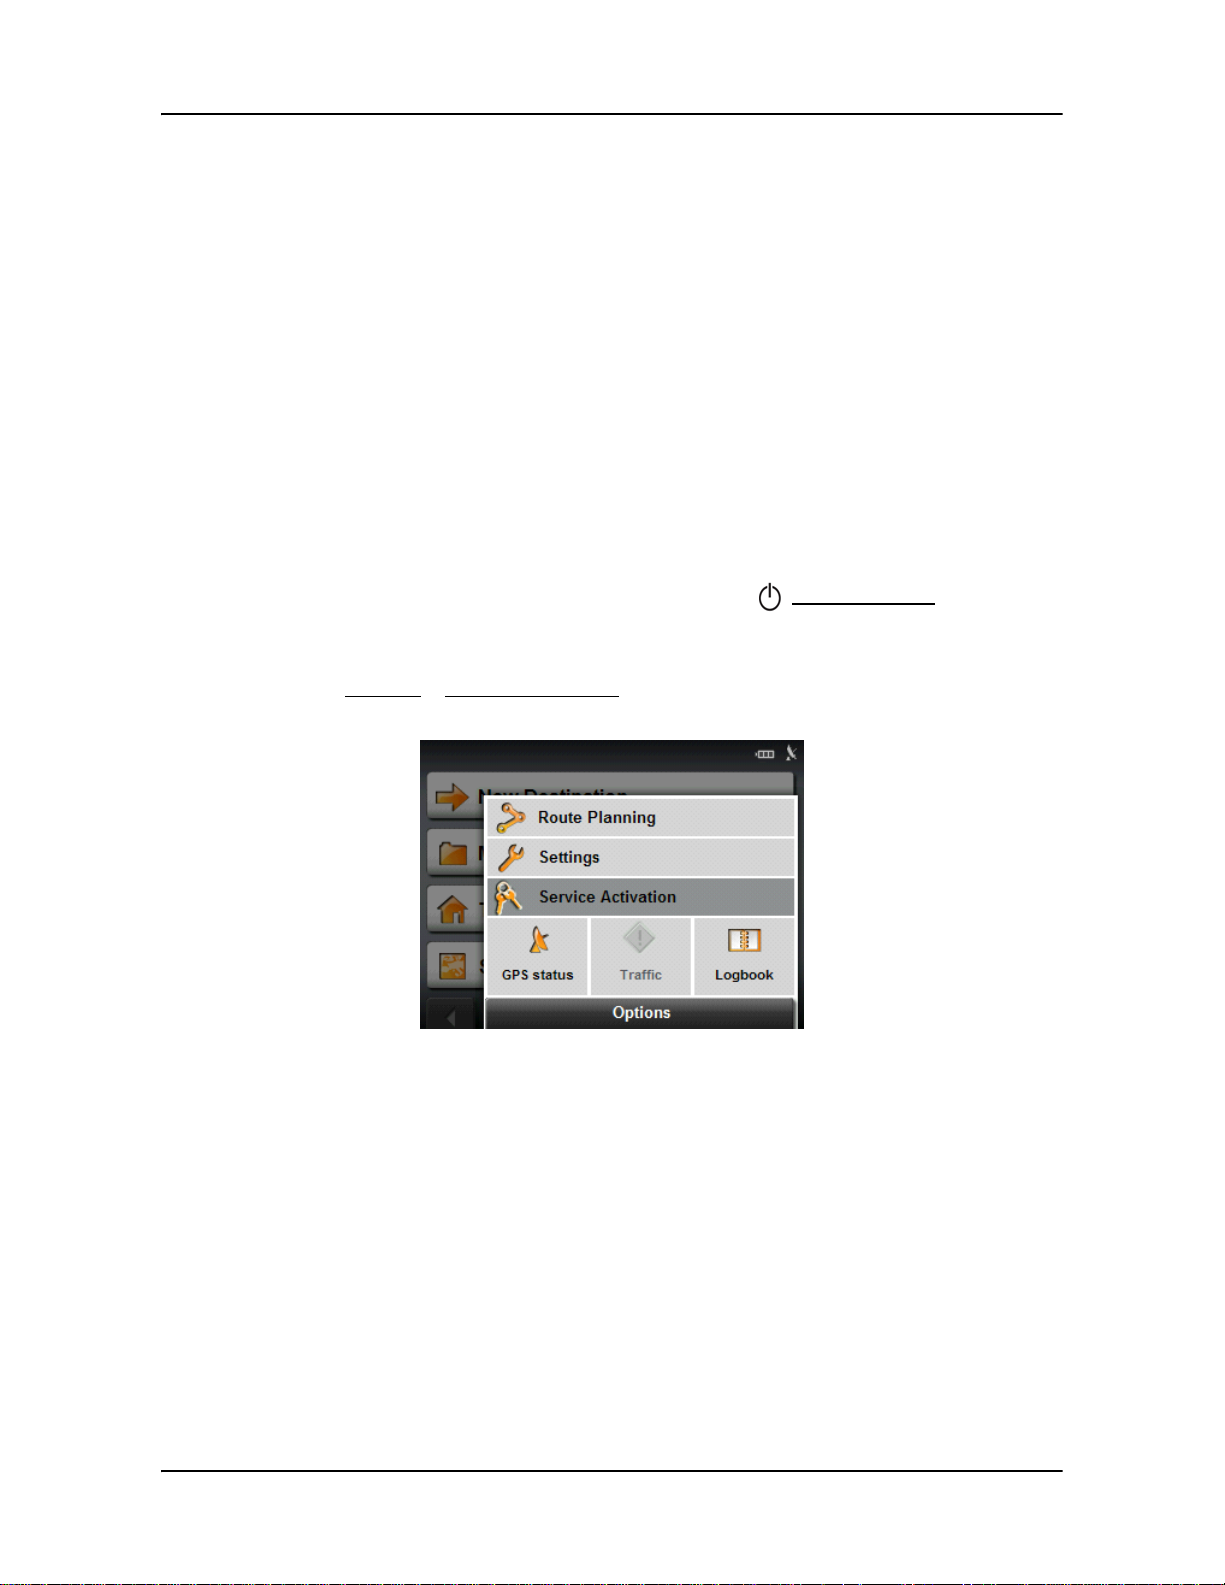
3. Tap
Options > Service Activation.
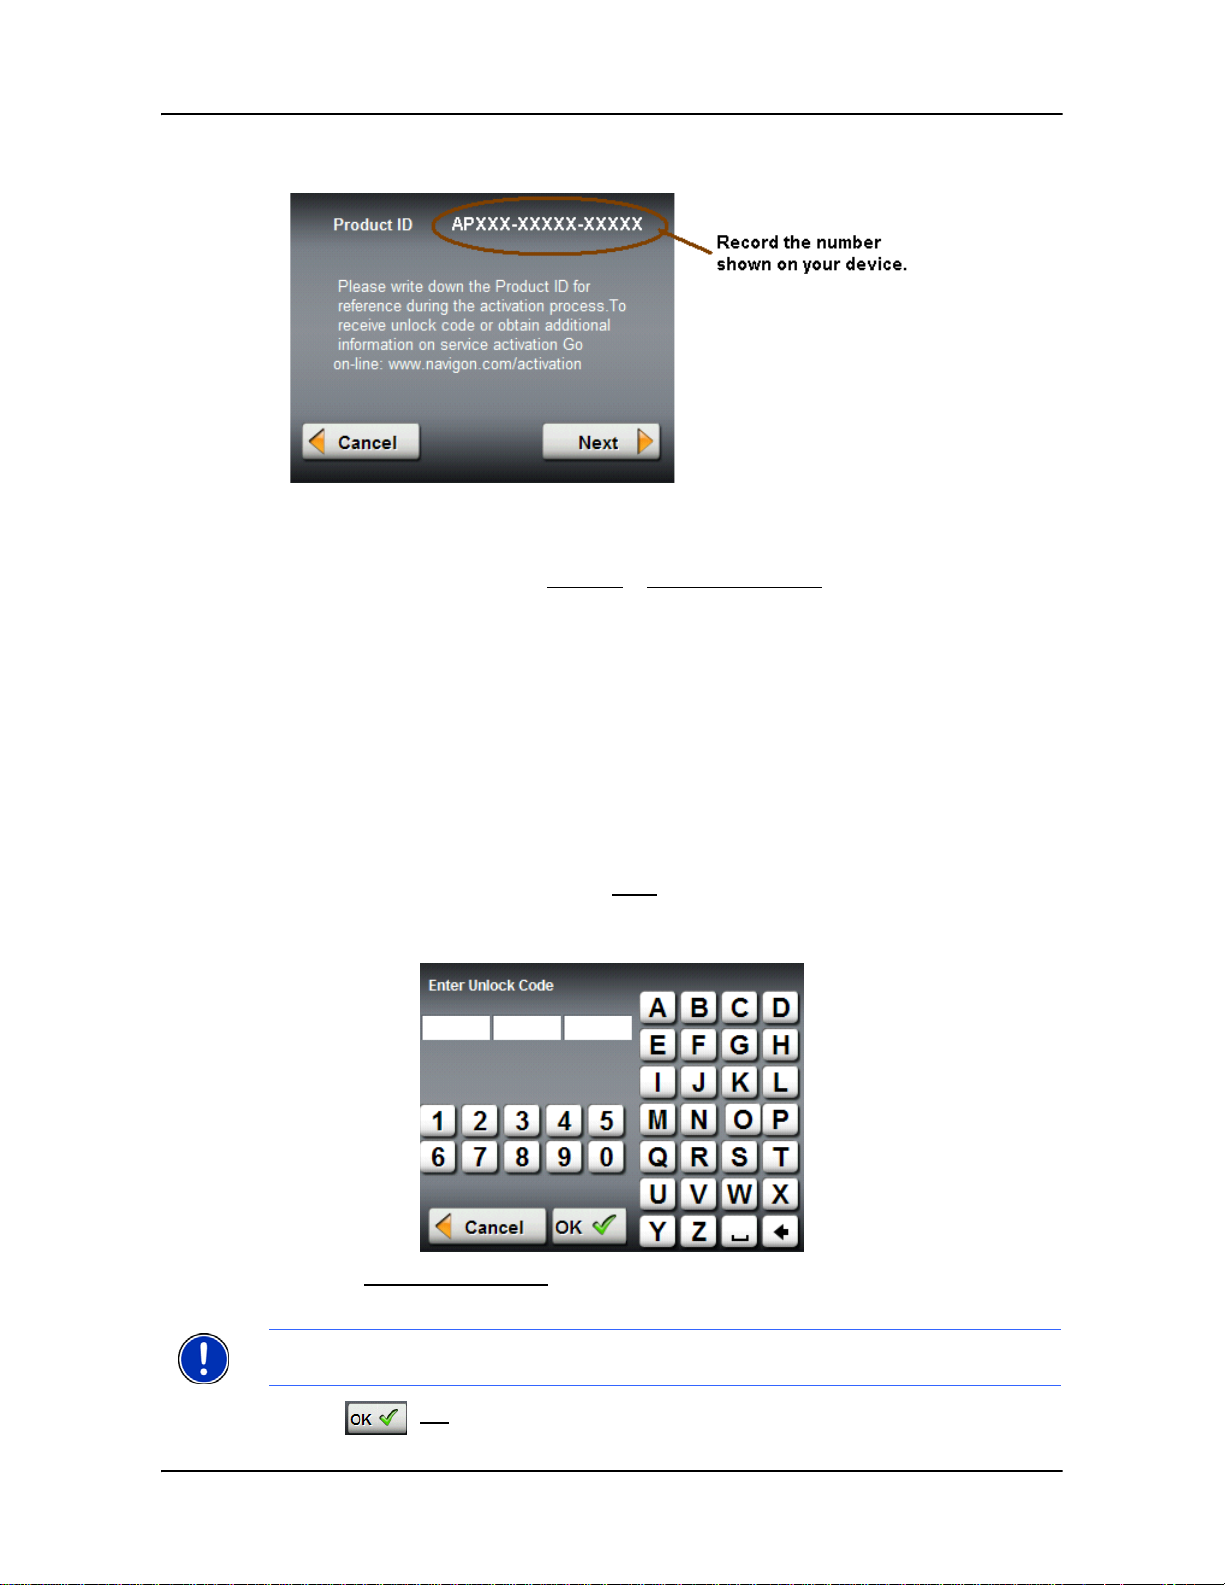
The P
RODUCT ID WINDOW displays the 15 character product ID.
- For a
- For a
NAVIGON 2100, the first two characters are “AP”.
NAVIGON 2120, the first two characters are “A2”.
January 2008 NAVIGON 2100/2120 User’s Guide 11
Revision 1.0 NAVIGON, INC.
Page 24
Getting Started
Optional Accessory Services
4. Record the product ID for the next step.
On a computer with internet access:
5. Go to
6. On the M
www.navigon.com/activation.
AIN MENU, select Options > Service Activation.
The website requests your e-mail address, NAVIGON 2100/2120 product ID, and
the Accessory card activation key.
7. Enter the requested information in the appropriate fields.
The website returns your device unlock code, used to unlock the service on the
device. The unlock code is also sent to your e-mail address.
8. If both accessory services have been purchased, enter the requested information
and the second Accessory card activation key.
The website returns a device unlock code for the second accessory service.
On your
9. On the P
NAVIGON 2100/2120:
RODUCT ID WINDOW, tap Next.
EVICE UNLOCK WINDOW displays.
The D
10. In the
Enter Unlock Code fields, enter the 18 character device unlock code, in
blocks of six characters.
Note: If both accessory services have been purchased , you can enter the device
unlock code for the second accessory to unlock both services automatically.
11. Tap (
12 NAVIGON 2100/2120 User’s Guide January 2008
OK).
NAVIGON, INC. Revision 1.0
Page 25
Getting Started
Optional Accessory Services
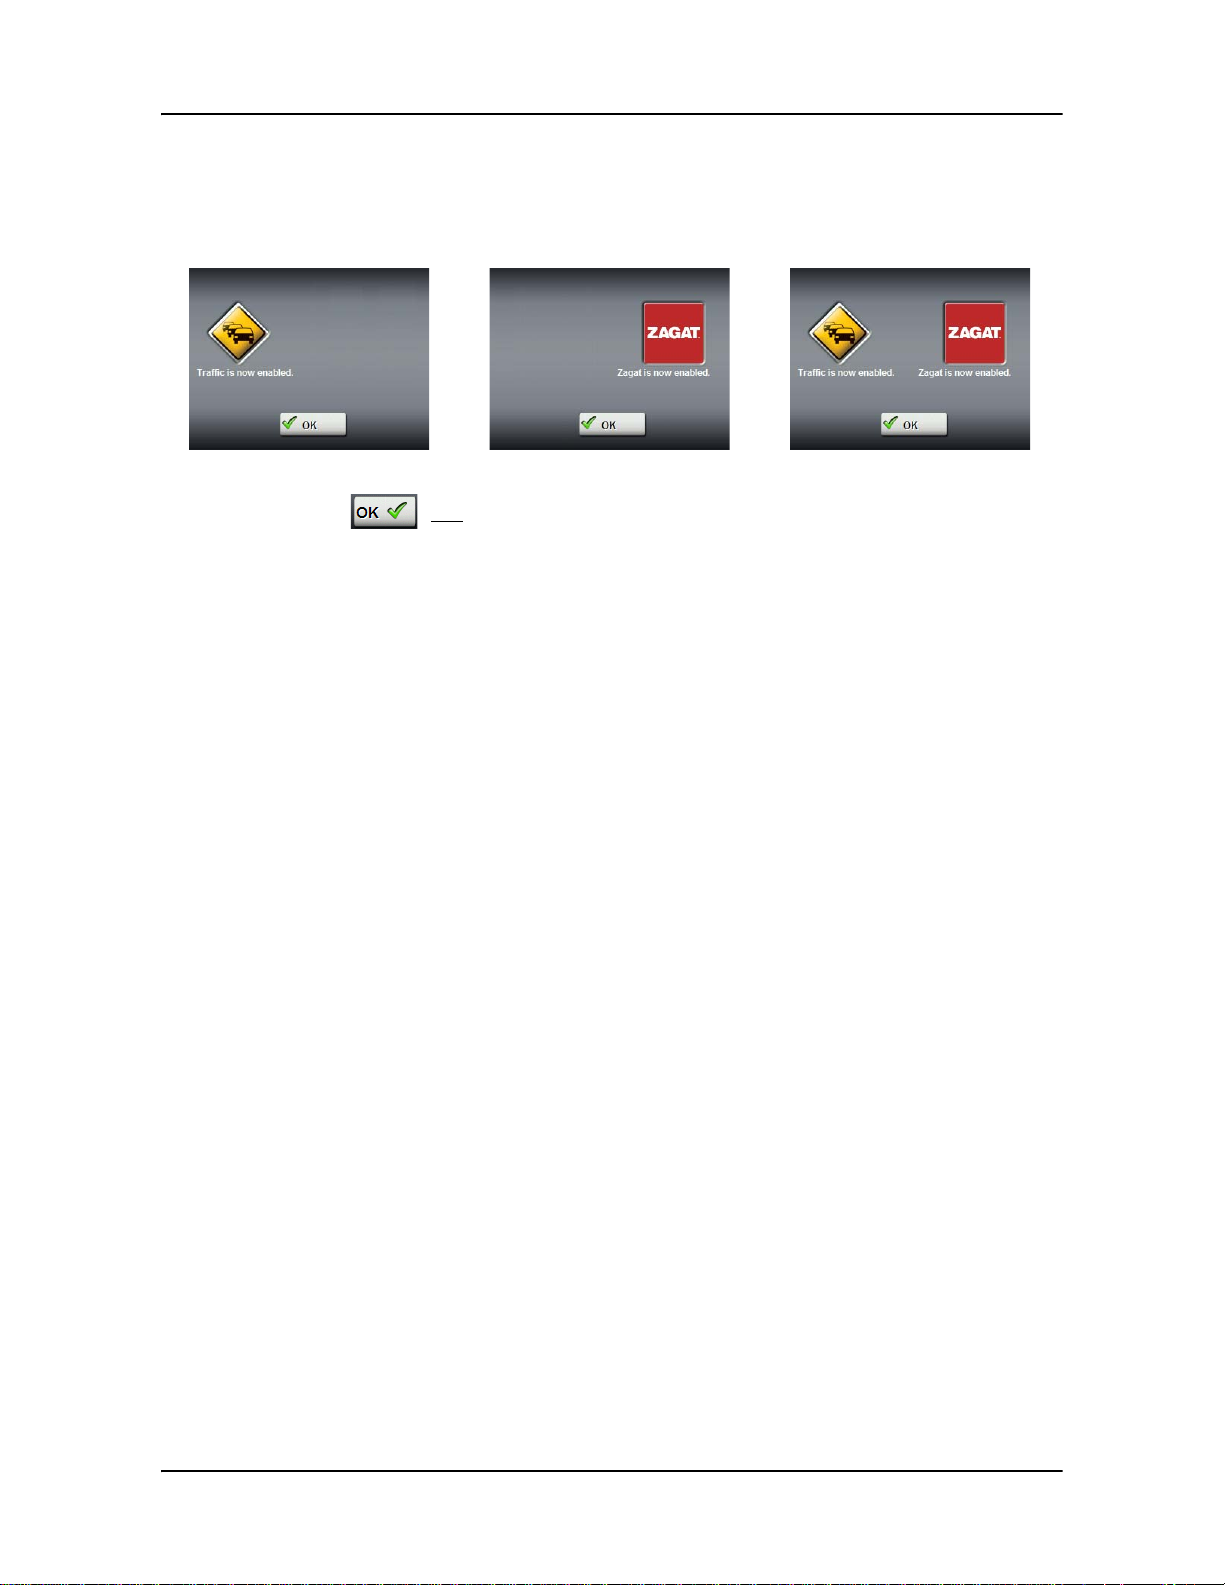
The ACTIVATION COMPLETE WINDOW displays. The purchased accessory is now
available for use.
If Traffic was activated: If Zagat POIs were activated: If both were activated:
12. Tap (
OK) to close the window.
January 2008 NAVIGON 2100/2120 User’s Guide 13
Revision 1.0 NAVIGON, INC.
Page 26

Getting Started
Optional Accessory Services
Confirming Optional Traffic Accessory Service Activation
Note: This function is only available if TMC traffic messages are being transmitted in
the map area in which you are travelling. Traffic messages are not available in all
areas.
Note: The charger cable does not need to be connected to the
for the antenna to be operational.
lighter
Note: Without the antenna, TMC messages may not be received when the device is
operating on battery power only.
On the MAIN WINDOW:
• In the upper right hand corner, the T raf fic service icon ( ) appears. The color of
the icon indicates the current status of the service. For more information, see “TMC
(Traffic Information)” on page 22.
•Tap Options. The Traffic button is now active. Tap the Traffic button to display the
T
RAFFIC INFORMATION WINDOW.
vehicle's cigarette
14 NAVIGON 2100/2120 User’s Guide January 2008
NAVIGON, INC. Revision 1.0
Page 27
Getting Started
Optional Accessory Services
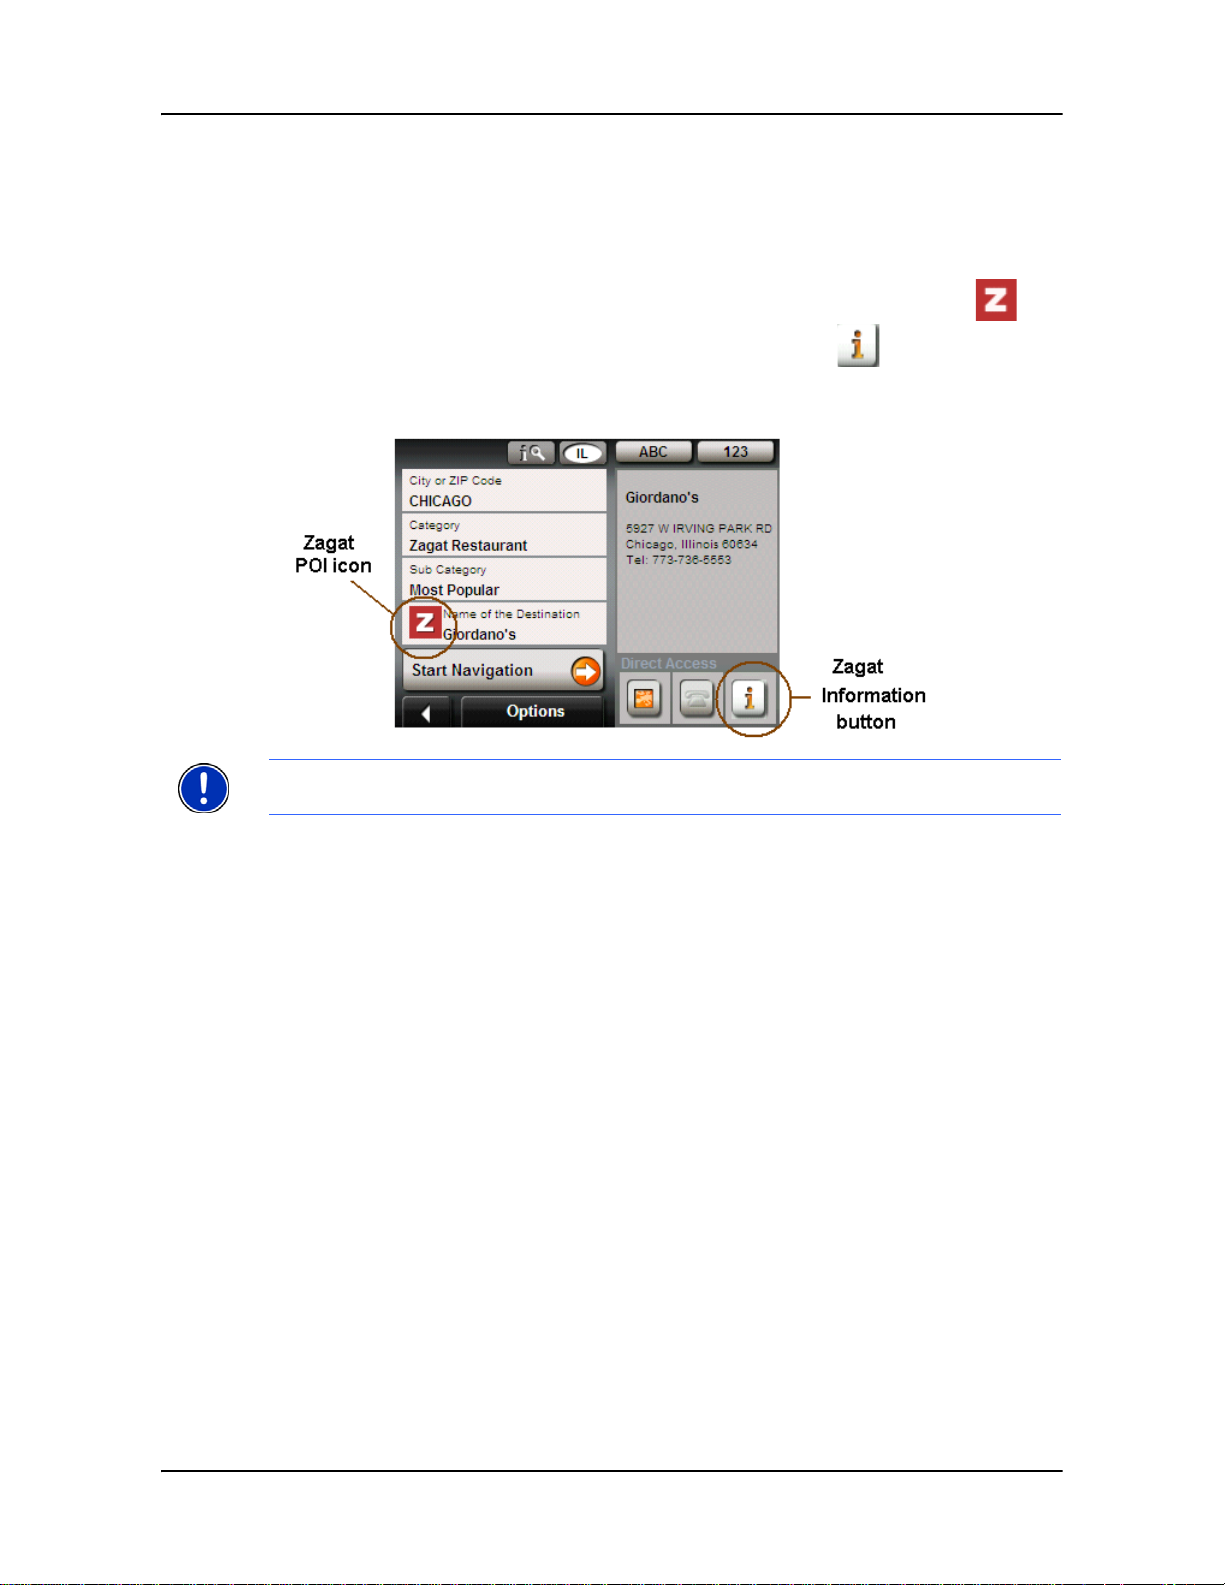
Confirming Optional Zagat POI Accessory Service Activation
Select a POI destination (as described in “Selecting a Point of Interest (POI) destination” on page 32). Zagat POIs are available for most major cities, such as Chicago,
Los Angeles, New York, etc.
All available Zagat POIs appear at the top of the returned list. A Zagat Icon ( )
appears in front of the POI and the Zagat information button ( ) can be used to
view POI details. For more information on Zagat POIs, see page 43.
Note:
Zagat POI information is not available for all locations.
January 2008 NAVIGON 2100/2120 User’s Guide 15
Revision 1.0 NAVIGON, INC.
Page 28

This page intentionally left blank.
16 NAVIGON 2100/2120 User’s Guide January 2008
NAVIGON, INC. Revision 1.0
Page 29
Basic Operations
Starting the NAVIGON 2100/2120
1. Press and hold the (On/Off/Standby) switch for at least 6 seconds.
• If password protection has been activated, the E
opens.
- Enter the password.
NTER PASSWORD WINDOW
- Tap the
See “Security” on page 25 for more information on using passwords.
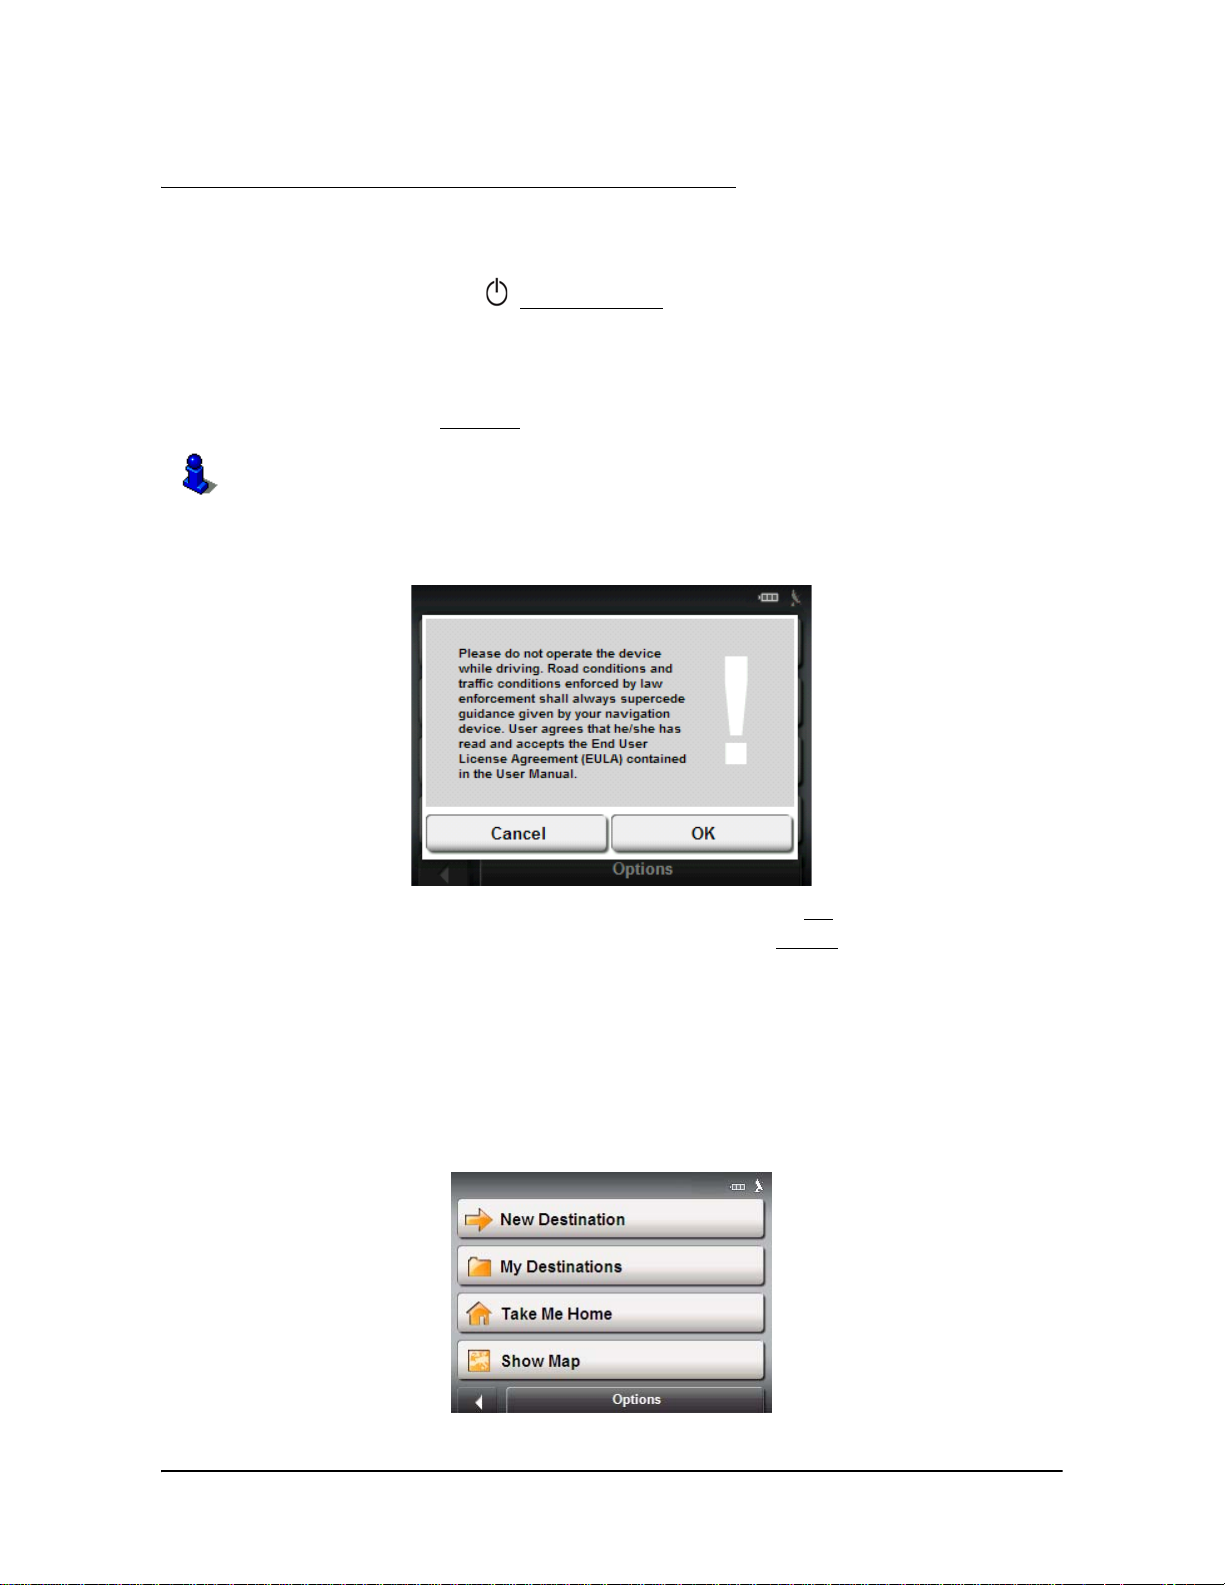
Each time the navigation device is turned on, the following message appears:
2. After you have read and fully understood the text, tap
Note: If you do not accept these instructions, tap
software.
AIN WINDOW displays.
The M
Continue button.
OK.
Cancel to exit the navigation
The Main Window
The MAIN WINDOW opens when the navigation software starts.
You can reach all of the navigation software functions from this window.
January 2008 NAVIGON 2100/2120 User’s Guide 17
Revision 1.0 NAVIGON, INC.
Page 30

Basic Operations
Starting the NAVIGON 2100/2120
New Destination
Tap this button to:
• Select an address by city or street. (See page 30.)
• Select a POI as a destination. (See page 32.)
• Select a destination by tapping on the map. (See page 40.)
My Destinations
Tap this button to select a destination from:
• A list of destinations you have saved. (See page 48.)
• A list of the most recently entered destinations. (See page 49.)
Take Me Home
Tap this button to:
• Specify your home address as a destination. (See page 4 6.)
• Quickly create a route back to your home address from your present location. (See
page 50.)
Show Map
Tap this button to:
• Show your location on the current map.
The Options Button
Tap this button to:
•Access R
OUTE PLANNING WINDOW to:
Create a route. (See page 51.)
Save a route. (See page 53.)
Load a saved route. (See page 53.)
•Access the S
ETTINGS WINDOW to set:
Basic Settings. (See page 79.)
Show information on the current map or change maps. (See page 81.)
POI settings. (See page 81.)
View or change route profile information. (See page 81.)
• Save the current location as a destination. (See page 46.)
• View the TMC T
RAFFIC WINDOW information. (Only available if the TMC accessory
service has been purchased. (See page 72.)
• Go to the L
OGBOOK WINDOW. (See page 77.)
Returning to the Main Window
To return to the Main Window from any other window:
•Tap (
18 NAVIGON 2100/2120 User’s Guide January 2008
Back) repeatedly, until the MAIN WINDOW redisplays.
NAVIGON, INC. Revision 1.0
Page 31

Initializing the GPS receiver
Note: GPS initialization requires data from at least three satellites. If GPS data is
not available, the receiver will not initialize.
Note: It can take up to 20 minutes to initialize the integrated GPS receiver for the first
time.
Note: Each time you turn on the device, GPS receiver initialization beg ins. When GPS
data is available, reception starts with in one minute.
If the navigation device has been switched off for more than a week, the next initialization can take up to 10 minutes.
In the upper right-hand corner of the display, the GPS symbol appears. As soon as
data from at least 3 satellites is received, the symbol changes to GPS Ready.
Basic Operations
Starting the NAVIGON 2100/2120
Note: If the GPS
utes, it is advisable to leave the receiver switched on for at least an additional 15 minutes to ensure reliable operation.
Caution! If you have connected the navigation device to the power supply via the
vehicle's cigarette lighter, remove the connector before you leave the vehicle standing
for a longer period of time.
As the GPS receiver requires a constant supply of power, it could drain the vehicle´s
battery.
Setting the volume
The volume of the spoken driving instructions can be adjusted during navigation.
With a map displayed:
1. Tap (
The volume bar opens. It contains three buttons for adjusting the volume:
(Louder), (Softer), (Volume on/off).
2. Tap (
The volume bar closes.
symbol displays GPS Ready after considerably less than 20 min-
Volume).
Volume) again.
January 2008 NAVIGON 2100/2120 User’s Guide 19
Revision 1.0 NAVIGON, INC.
Page 32

Basic Operations
Starting the NAVIGON 2100/2120
Using Standby Mode
When switched to standby, the device requires virtually no power and conserves battery time.
• Press the (On/Off/Standby) button briefly.
To switching the Device back on from Standby
• Press the (On/Off/Standby) button briefly.
Note: If a password has been created for the device, the ENTER PASSWORD WINDOW
appears when the device is switched back on from S t andby. See “Security” on page 25
for more on using passwords.
Turning the NAVIGON 2100/2120 Off
• Press and hold the (On/Off/Standby) switch for at least 6 seconds.
20 NAVIGON 2100/2120 User’s Guide January 2008
NAVIGON, INC. Revision 1.0
Page 33

Viewing device status
Symbols located at the top of the screen are used to display information.
GPS
The GPS symbol can show the following GPS reception status:
No Symbol The built-in GPS receiver is not operational. Contact customer
service if the problem persists.
Basic Operations
Viewing device status
Power
No Signal Data is being received from less than three satellites. Position
cannot be calculated.
GPS Ready Data is being received from at least three satellites. Position can
be calculated.
For more information, see “About GPS navigation” on page 4.
The Power symbol can display the following conditions of the built-in battery:
The device is powered by an external power source. The battery is charging.
The device is powered by its internal battery. Battery is fully charged.
The device is powered by its internal battery. Battery charge is sufficient.
The device is powered by its internal battery. Battery charge is low.
January 2008 NAVIGON 2100/2120 User’s Guide 21
Revision 1.0 NAVIGON, INC.
Page 34

Basic Operations
Viewing device status
TMC (Traffic Information)
Traffic functionality is available as an accessory option. If
this service has not been purchased and activated, the
TMC icon does not display.
For more information, see page 69.
The NA VIGON 2100/2120, with a car charger cable with integrated TMC antenna,
provides the navigation system with up to date traffic messages. If necessary, it can
alter the route dynamically in order to avoid a traffic jam.
Note: This function is only available if TMC traffic messages are being transmitted in
the map area in which you are travelling. Traffic messages are not available in all
areas.
Note: The charger cable does not need to be connected to the
for the antenna to be operational.
lighter
Note: Without the antenna, TMC messages may not be received when the device is
operating on battery power only.
Important Note
vehicle's cigarette
TMC symbol can display the following TMC reception status:
The
No Symbol TMC is not operational. Can also indicate the the purchased TMC
accessory service has not been activated successfully. See “Activating an Optional Accessory Service” on page 11 for more information.
Tuning TMC is operational, but cannot find a station that is transmitting
TMC signals.
TMC Ready Traffic messages can be received.
For more information, see “Displaying traffic messages” on page 72.
22 NAVIGON 2100/2120 User’s Guide January 2008
NAVIGON, INC. Revision 1.0
Page 35

Using software keyboards
Software keyboards appear on the screen when text entries are necessary . All entries
can be made on the software keyboard using the fingertips. Only capital letters can be
entered. Three keyboards are available for entering destination information.
Alphabetic keyboard
Basic Operations
Using software keyboards
Tap to display the alphabetic
keyboard.
Only capital letters can be entered.
Numeric keyboard
Tap to display the numeric
keyboard.
Special character/symbol keyboard
Tap to display the special
character keyboard.
As soon as you have entered a special character, the letter keyboard
reappears automatically.
January 2008 NAVIGON 2100/2120 User’s Guide 23
Revision 1.0 NAVIGON, INC.
Page 36

Basic Operations
Using menus
Special keys
On the Alphabetic keyboard, enters a space character.
On the Alphabetic and Numeric keyboards, deletes the previous character and
moves the cursor back one space.
On the Alphabetic and Special Character keyboards, opens the Numeric keyboard.
On the Numeric and Special Character keyboards, opens the Alphabetic keyboard.
On the Alphabetic and Numeric keyboards, opens the Special Character keyboard.
Using menus
Some buttons have menus which open when activated.
To select a function:
• Tap on a menu button to execute its function.
To close a menu without selecting a function:
• Tap on the button you used to open the menu.
24 NAVIGON 2100/2120 User’s Guide January 2008
NAVIGON, INC. Revision 1.0
Page 37

Security
By using a password, you can protect your navigation system from unauthorized use.
Note:
switched off or switched to standby mode. See “Turning the NAVIGON 2100/2120 Off”
on page 20 and “Using Standby Mode” on page 20.
Password protection takes effect the next time the NAVIGON 2100/2120 is
The Password Lock Window
Setting a password
Note: The password must be exactly 4 digits.
In the MAIN WINDOW:
1. Tap Options > Settings
The SETTINGS WINDOW opens.
2. Tap
3. In the
4. Re-type the new password in the
5. Tap
Options > Password Lock.
The P
ASSWORD LOCK WINDOW opens.
New password field, type the password.
Save password.
Changing a password
In the MAIN WINDOW:
1. Tap
2. Tap
3. Type the current password in the
4. Tap the
5. Type the new password in the
6. Re-type the new password in the
7. Tap the
Options > Settings
The SETTINGS WINDOW opens.
Options > Password Lock.
ASSWORD LOCK WINDOW opens.
The P
Change Password button.
Continue button.
Confirm new password field.
Enter Password field.
New password field.
Confirm new password.
January 2008 NAVIGON 2100/2120 User’s Guide 25
Revision 1.0 NAVIGON, INC.
Page 38

Security
The Password Lock Window
Cancelling password protection
In the MAIN WINDOW:
1. Tap Options > Settings
The SETTINGS WINDOW opens.
2. Tap
Options > Password Lock.
ASSWORD LOCK WINDOW opens.
The P
3. Type the current password in the
4. Tap the
Deactivate button.
Forgotten your password?
If you have forgotten your password, do the following:
On any password window:
1. Tap the (
2. Call the number displayed in the window.
3. Follow the instructions given by the service personnel.
Enter Password field.
Info) button.
26 NAVIGON 2100/2120 User’s Guide January 2008
NAVIGON, INC. Revision 1.0
Page 39

Selecting Destinations
Use the navigation system at your own risk.
Caution! Please be sure to refer to the safety information in “Important safety information” on page 6.
New destinations for the NAVIGON 2100/2120 are destinations that you have not yet nav-
igated to or those that you have not yet stored.
You can enter an address, select a POI, or select a destination from the quick search function.
Using auto-complete to select a destination
Lists often appear from which you can select an entr y. This is the case, for exam ple, when
you enter a location. After you type the first letter, the largest city in the search area
appears. Once you type a second letter, the list shows all map areas that begin with the
typed letters.
As you enter additional letters, the list shortens, only containing entries that begin with the
typed characters. The more characters you enter, the shorter the returned list becomes.
You can move though a list using (Up
To accept an entry from the list:
) and (Down).
• Tap on the entry.
The list closes once an entry is accepted.
January 2008 NAVIGON 2100/2120 User’s Guide 27
Revision 1.0 NAVIGON, INC.
Page 40

Selecting Destinations
Selecting a Search Area
The Search Area Button
The (Search Area) button, used to select a map area, is located at the top of a
location entry window. Once an area is selected, a code on the button reflects the selec-
tion. For example, if Illinois is selected, “IL” appears on the button.
Selecting a Search Area
When you enter a new destination for the first time, the SEARCH AREA list opens. To select
an area that is different from the one currently sh own, do the following:
1. Tap (Search Area).
EARCH AREA list opens.
The S
2. Tap on the map area in which your destination lies.
The button displays the code for the selected destination area.
Note: Only areas that are represented in the currently loaded map can be selected.
3. Tap (
OK).
28 NAVIGON 2100/2120 User’s Guide January 2008
NAVIGON, INC. Revision 1.0
Page 41

Ways to Search for Destinations
Enter an Address
To find an address, you can specify a:
City first If you do not know the exact street address.
Street first If you do not know the actual city.
Search for a POI
Selecting Destinations
Ways to Search for Destinations
Note:
Optional lifetime Zagat POIs accessory service is available. For more infor-
mation see “Zagat Points of Interest (POIs) (Optional Accessory)” on page 43.
Points of Interest, (POIs) are useful addresses that are organized according to particular
criteria. POIs include airports, restaurant s, hotels, gas stations, government offices, banks,
hospitals, shopping centers, etc. Icons representing the POIs can be displayed on the
map.
Nearby POIs nearby are special destinations that are located within a
given radius of your current location. This means you can
always find the nearest gas station, for example, no matter
where you are.
In a City POIs in a given location can be useful when navigating in an
unfamiliar town.
Nationwide POIs of national significance include airports, national parks,
historic sites, etc. This enables you to find places of interest
without having to know exactly where it is located.
Direct Access POI direct access system contains three categories of special
destinations. POIs in your vicinity that correspond to these categories can be listed quickly, without the need for additional entry .
Note: Only areas that are represented in the currently loaded map can be selected.
By Tapping on the Map
You may indicate a destination directly on the map. In addition to towns and streets, you
may also select POIs.
January 2008 NAVIGON 2100/2120 User’s Guide 29
Revision 1.0 NAVIGON, INC.
Page 42

Selecting Destinations
Entering an address
Entering an address
When searching for a location, you do not have to enter all of the address details.
If you do not know the house number, leave the field blank to display the Inter section
In this field, enter the name of a nearby side street and the navigation system calculates a
route to the intersection of the specified streets.
Additionally, if you only specify the:
• City - a route is calculated to the town center.
• City and street - a route is calculated to the center of the street.
Specifying a city first
In the MAIN WINDOW:
1. Tap New Destination > Enter an Address.
2. Select (
City First).
field.
The ADDRESS WINDOW opens.
3. Enter the name of the city or the postal code of the destination location.
4. Enter the name of the destination street.
5. Enter the house number. If you don't know the number of the house, leave this
field blank to display the
6. If you don't know the house number, tap in the
Intersection field.
Intersection field and enter the
name of this street.
7. Tap the
The map opens in
For more information, see “Starting navigation” on page 42.
Start Navigation button.
Preview mode.
30 NAVIGON 2100/2120 User’s Guide January 2008
NAVIGON, INC. Revision 1.0
Page 43

Specifying a street first
In the MAIN WINDOW:
1. Tap New Destination > Enter an Address.
2. Select (
The A
3. Enter the name of the destination street.
Street First).
DDRESS WINDOW opens.
Selecting Destinations
Entering an address
4. Enter the house number. If you don't know the number of the house, leave the
field blank to display the
5. If you don't know the house number, tap on the
Intersection field.
Intersection field and enter the
name of this street.
6. Tap the
The map opens in
For more information, see “Starting navigation” on page 42.
Start Navigation button.
Preview mode.
January 2008 NAVIGON 2100/2120 User’s Guide 31
Revision 1.0 NAVIGON, INC.
Page 44
Selecting Destinations
Selecting a Point of Interest (POI) destination
Selecting a Point of Interest (POI) destination
POIs nearby
Note: GPS reception must be sufficient to dete rmine your cu rrent position. You can see
if GPS reception is sufficient by looking at the (GPS Ready) symbol. For more infor-
mation, see “GPS ” on page 21.
In the MAIN WINDOW:
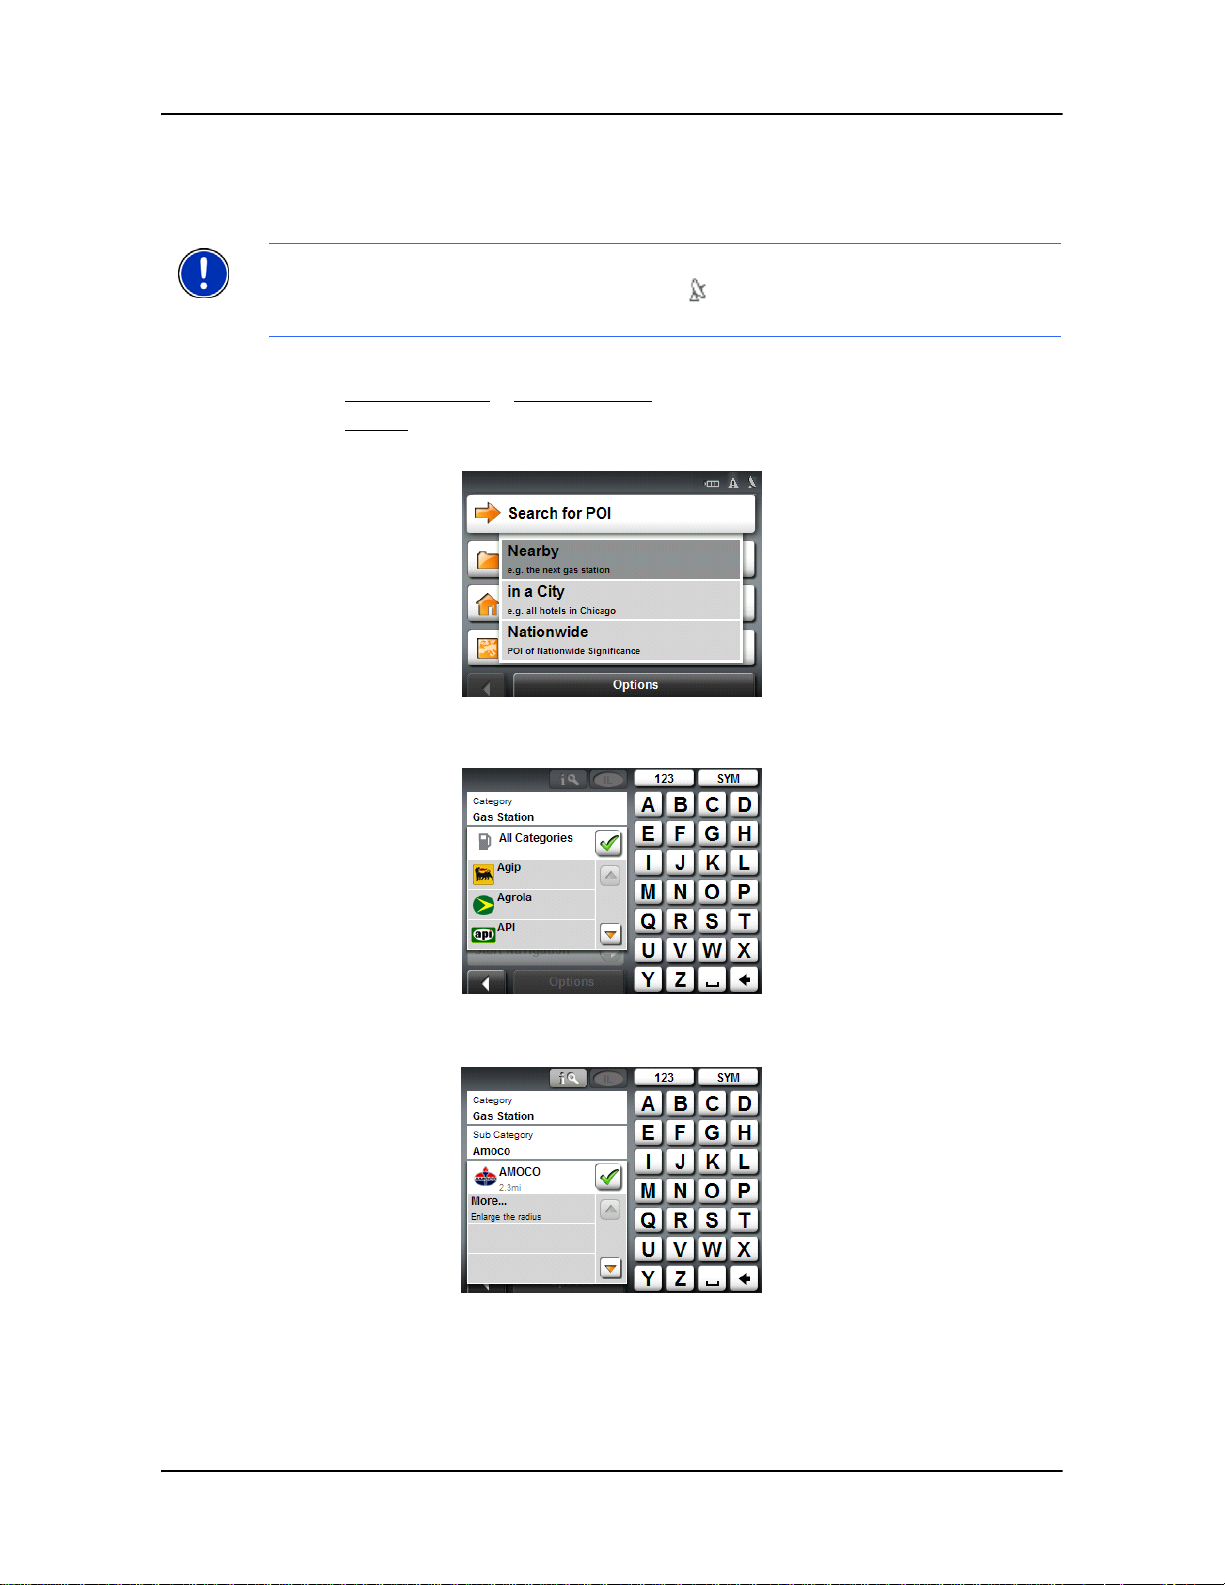
1. Tap New Destination > Search for POI.
2. Tap Nearby.
3. Specify a category from which you would like to select a POI.
4. If a sub-category exists, specify a sub-category.
32 NAVIGON 2100/2120 User’s Guide January 2008
NAVIGON, INC. Revision 1.0
Page 45

Selecting Destinations
Selecting a Point of Interest (POI) destination
The Name of the Destination list opens. It contains the nearest POIs in the specified category, sorted by distance.
5. Tap on the name of the destination.
6. Tap the
The map opens in
Start Navigation button.
Preview mode.
For more information, see “Starting navigation” on page 42.
January 2008 NAVIGON 2100/2120 User’s Guide 33
Revision 1.0 NAVIGON, INC.
Page 46

Selecting Destinations
Selecting a Point of Interest (POI) destination
POIs in a specified city
On the MAIN WINDOW:
1. Tap New Destination > Search for POI.
2. Tap in a City.
3. Enter the name or the postal code of the destination location.
4. Specify a category from which you would like to select a POI.
5. If sub-categories exist for the category, specify a sub-category.
Name of the Destination list opens. It contains POIs from the specified cate-
The
gory, sorted alphabetically.
Note: Enter the first characters from the beginning of the POI name to shorten the
returned list of POIs.
34 NAVIGON 2100/2120 User’s Guide January 2008
NAVIGON, INC. Revision 1.0
Page 47

6. Tap on the name of the destination.
Selecting Destinations
Selecting a Point of Interest (POI) destination
7. Tap the
The map opens in
Start Navigation button.
Preview mode.
For more information, see “Starting navigation” on page 42.
January 2008 NAVIGON 2100/2120 User’s Guide 35
Revision 1.0 NAVIGON, INC.
Page 48

Selecting Destinations
Selecting a Point of Interest (POI) destination
Nationwide POIs
In the MAIN WINDOW:
1. Tap New Destination > Search for POI.
2. Tap Nationwide.
The POI
OF NATIONAL SIGNIFICANCE WINDOW opens.
3. Specify a category from which you would like to select a POI.
Name of the Destination list opens. It contains a list of national POIs, sorted by
The
distance.
Note: Enter the first characters from the beginning of the POI name to shorten the
returned list of POIs.
4. Tap on the name of the destination.
5. Tap the
The map opens in
For more information, see “Starting navigation” on page 42.
36 NAVIGON 2100/2120 User’s Guide January 2008
Start Navigation button.
Preview mode.
NAVIGON, INC. Revision 1.0
Page 49

Direct Access POIs
Note: Sufficient GPS reception is required for Direct Access POIs. You can check GPS
reception by looking at the (GPS Ready) symbol.
In the MAIN WINDOW:
1. Tap the New Destination button.
Selecting Destinations
Selecting a Point of Interest (POI) destination
The N
EW DESTINATION MENU opens.
The symbols of the categories which have been selected for direct access can be
seen in the menu at the bottom.
Note:
Stations, and Parking. To change these categories, see
categories” on page 38
When first used, the default direct access categories are Restaurants, Gas
“Specify Direct Access POI
.
2. Tap on a category from which you would like to select a POI.
Name of the Destination list opens. It contains the nearest POIs in the speci-
The
fied category, sorted by distance.
January 2008 NAVIGON 2100/2120 User’s Guide 37
Revision 1.0 NAVIGON, INC.
Page 50

Selecting Destinations
Selecting a Point of Interest (POI) destination
3. Tap on the name of the destination.
The map opens in Preview mode.
For more information, see “Starting navigation” on page 42.
Specify Direct Access POI categories
In the MAIN WINDOW:
1. Tap Options > Settings
2. Tap POI.
3. In the Direct Access 1 field, tap (List) and select a POI category.
4. Repeat the above step in the
5. When finished, tap
38 NAVIGON 2100/2120 User’s Guide January 2008
Done to save the changes.
Direct Access 2 and Direct Access 3 fields.
NAVIGON, INC. Revision 1.0
Page 51

Information about the POI
For many POI destinations, additional information is available. For example, telephone
numbers are provided for many restaurants, allowing you to call the restaurant and
reserve a table ahead of time.
Selecting Destinations
Selecting a Point of Interest (POI) destination
On the
DESTINATION SELECTION WINDOW, the following buttons are available:
Opens the DESTINATION INFO WINDOW and shows
Destination Info
basic information about a POI, including address
and phone number.
On the window, tap the
(
To the Right) to view information on other POIs
(To the Left) and
returned from the search.
Show the POI on a map relative to your current
Show on Map
Call the POI
Zagat Information
location. (GPS reception required.)
Not available with NAVIGON 2100/2120.
Displays Zagat survey information about the POI.
(Only available if the Zagat POI accessory service
has been purchased. See page 43.)
January 2008 NAVIGON 2100/2120 User’s Guide 39
Revision 1.0 NAVIGON, INC.
Page 52

Selecting Destinations
Selecting a destination by tapping the map
Selecting a destination by tapping the map
You can select towns, streets, and even POIs by tapping on the map.
On the MAIN WINDOW:
1. Tap (Show on Map).
2. Tap (
The map opens in
For more information on using destination search tools, see “Map in Destination search
mode” on page 66.
Destination search).
Destination search mode.
3. Tap on the point to which you wish to navigate.
The selected destination is centered in the map and appears under the cross
hairs.
4. Tap (
40 NAVIGON 2100/2120 User’s Guide January 2008
OK).
NAVIGON, INC. Revision 1.0
Page 53

Selecting Destinations
Selecting a destination by tapping the map
The DESTINATION ON MAP WINDOW opens. Detailed address information for the
selected destination displays in the upper left-hand corner.
5. Tap the
The map opens in
Take Me There button.
Preview mode and shows the route calculated from your cur-
rent location to this destination.
For more information, see “Starting navigation” on page 42.
January 2008 NAVIGON 2100/2120 User’s Guide 41
Revision 1.0 NAVIGON, INC.
Page 54

Selecting Destinations
Starting navigation
Starting navigation
With the map open in Preview mode, the destination is shown as a small flag. The
route and the estimated trip time are displayed.
With the map open in Preview mode:
• Tap the
Start Navigation button or simply start driving.
Quitting navigation
•Tap (Back) to quit navigation.
A window prompts you to confirm.
No GPS reception
When GPS signal is interrupted, the following message appears:
You can:
• Wait until GPS reception resumes for determining position. Navigation begins
automatically once GPS reception is sufficient.
• Tap the
LAST DESTINATIONS list.
• Tap the
tion as starting point. The simulation of the calculated route begins. Tap
(
Back) to end the demonstration.
Cancel button. The MAIN WINDOW opens. Your destination is saved in the
Demo button. The route is calculated using the center of the specified loca-
Arriving at your destination
A message displays when you have reached your destination.
Your current position (indicated by an orange triangle) is shown on the map.
42 NAVIGON 2100/2120 User’s Guide January 2008
NAVIGON, INC. Revision 1.0
Page 55

Zagat Points of Interest (POIs) (Optional Accessory)
Zagat POIs can be purchased for the NAVIGON 2100/2120
as an optional accessory service.
Once purchased, Zagat information is provided for the lifetime
of your NAVIGON 2100/2120 device at no additional charge.
For more on purchasing and activating this accessory, see
“Optional Accessory Services” on page 11.
With lifetime Zagat POIs, your NAVIGON 2100/2120 can select from thousands of
POIs and view customer survey ratings for a selected POI.
Zagat POI Categories
Zagat survey information features over 30,000 points of interest (POIs) in hundreds of
cities
The NAVIGON 2100/2120 offe rs Zagat survey information for th e following five catego ries:
Attractions Shopping centers and entertainment venues.
Golf Courses Public, semi-private and resort courses.
Hotels Hotels, resorts and spas.
Nightlife Nightspots and dance clubs.
Restaurants Food, decor, service, and cost.
Search for Zagat POIs
Once the Zagat POI accessory service is purchased and activated, Zagat POIs are
returned with any POI search.
Note: Zagat POI information is not available for all locations.
Zagat categories appear first in the list of returned locations. A
in front of a Zagat category.
(Zagat POI) appears
January 2008 NAVIGON 2100/2120 User’s Guide 43
Revision 1.0 NAVIGON, INC.
Page 56

Zagat Points of Interest (POIs) (Optional Accessory)
Zagat POI Categories
View Zagat POI Information
On a POI DESTINATION SELECTION WINDOW:
1. Tap on a Zagat POI category.
2. If sub-categories exist for the category, tap the subcategory.
3. Tap on the name of a POI.
ESTINATION INFO WINDOW opens and displays basic POI information.
The D
4. Tap (
The Z
Zagat Information) to view Zagat survey information about the POI.
AGAT DETAIL WINDOW opens and displays detail information for the POI
including hours of operation, costs, offered services, etc.
5. Tap (
Zagat Survey Results) to view an explanation of Zagat Survey results.
6. When finished, tap (
44 NAVIGON 2100/2120 User’s Guide January 2008
OK).
NAVIGON, INC. Revision 1.0
Page 57

My Destinations
Every destination that you enter and the destinations from the LAST DESTINATIONS list
can be saved to the
destination.
Saving a destination
1. Enter a destination. (See “Selecting Destinations” on page 27.)
Do not tap the
2. Tap
- OR –
Options > Save Destination.
Start Navigation button!
FAVORITES list. This is useful if you often navigate to a particular
1. Select a destination from the
Do not tap the
2. Tap
3. Enter the name for the destination. (You must enter at least two characters.)
4. If you want to define the destination as your home address, tap (Toggle) so
5. Tap the
Options > Save as Favorite.
that the value
Save button.
Start Navigation button!
Yes is highlighted in black.
LAST DESTINATIONS LIST. (See page 49.)
January 2008 NAVIGON 2100/2120 User’s Guide 45
Revision 1.0 NAVIGON, INC.
Page 58

My Destinations
Saving a destination
Saving the current location using GPS
The GPS STATUS WINDOW provides you with an overview of the data the navigation sys-
tem calculates from the received GPS signals.
GPS status is available via the options of several windows.
In the
GPS STATUS WINDOW:
1. Tap
Options > GPS status.
The current location can be stored in the FAVORITES list.
2. Tap the Save Position button.
The SAVE DESTINATION AS... WINDOW opens. The cursor blinks in the Name field.
3. Enter the name for the destination. (You must enter at least two characters.)
4. Specify whether your current position should be stored as the home address.
5. Tap the Save button.
Saving your home address as a destination
You can begin navigation to this destination quickly by tapping the Take Me Home but-
ton in the
your home address.
MAIN WINDOW. Only one destination from the FAVORITES list can be defined as
On the
1. Tap the
MAIN WINDOW:
Take Me Home button.
The following message displays:
2. Take the OK button.
46 NAVIGON 2100/2120 User’s Guide January 2008
NAVIGON, INC. Revision 1.0
Page 59

My Destinations
Saving a destination
The HOME ADDRESS WINDOW opens.
3. Enter your home address.
4. Tap the
Home Address button.
The selected destination is saved as your home address. On the FAVORITES list, a
house icon is shown next to your home address.
January 2008 NAVIGON 2100/2120 User’s Guide 47
Revision 1.0 NAVIGON, INC.
Page 60

My Destinations
Selecting a saved destination
Selecting a saved destination
The following lists of destinations and addresses are available under My Destinations.
FAVORITES Destinations you have stored in NAVIGON 2100/2120.
LAST DESTINATIONS Destinations you have previously navigated to.
Selecting a destination from the Favorites list
Destinations to which you often travel can be saved in the FAVORITES list.
In the
FAVORITES list, up to 300 destinations can be saved.
Information on how to store a destination can be found in “Saving a destination” on
page 45.
MAIN WINDOW:
In the
1. Tap
My Destinations > Favorites.
2. Tap the destination to which you would like to navigate.
3. Tap the
The map opens in Preview mode.
For more information, see “Starting navigation” on page 42.
48 NAVIGON 2100/2120 User’s Guide January 2008
Start Navigation button.
NAVIGON, INC. Revision 1.0
Page 61

Selecting a saved destination
Selecting a destination from the Last Destinations list
NAVIGON 2100/2120 saves the last 30 destinations to which you have navigated in
LAST DESTINATIONS list.
the
In the
MAIN WINDOW:
My Destinations
1. Tap
My Destinations > Last Destinations.
2. Tap the destination to which you would like to navigate.
3. Tap the
Start Navigation button.
The map opens in Preview mode.
For more information, see “Starting navigation” on page 42.
January 2008 NAVIGON 2100/2120 User’s Guide 49
Revision 1.0 NAVIGON, INC.
Page 62

My Destinations
Navigating homewards
Navigating homewards
With NAVIGON 2100/2120 you can save an address as a home address. You can nav-
igate to your home address at anytime by activating a single button.
The first time you tap the
For more information, see “Saving your home address as a destination” on page 46.
MAIN WINDOW:
In the
• Tap the
If you have not yet entered your home address, a window displays.
Navigation, using the current route profile information to calculate the route, begins.
For more information, “Starting navigation” on page 42.
Take Me Home button.
Take Me Home button, you are asked to enter your address.
50 NAVIGON 2100/2120 User’s Guide January 2008
NAVIGON, INC. Revision 1.0
Page 63
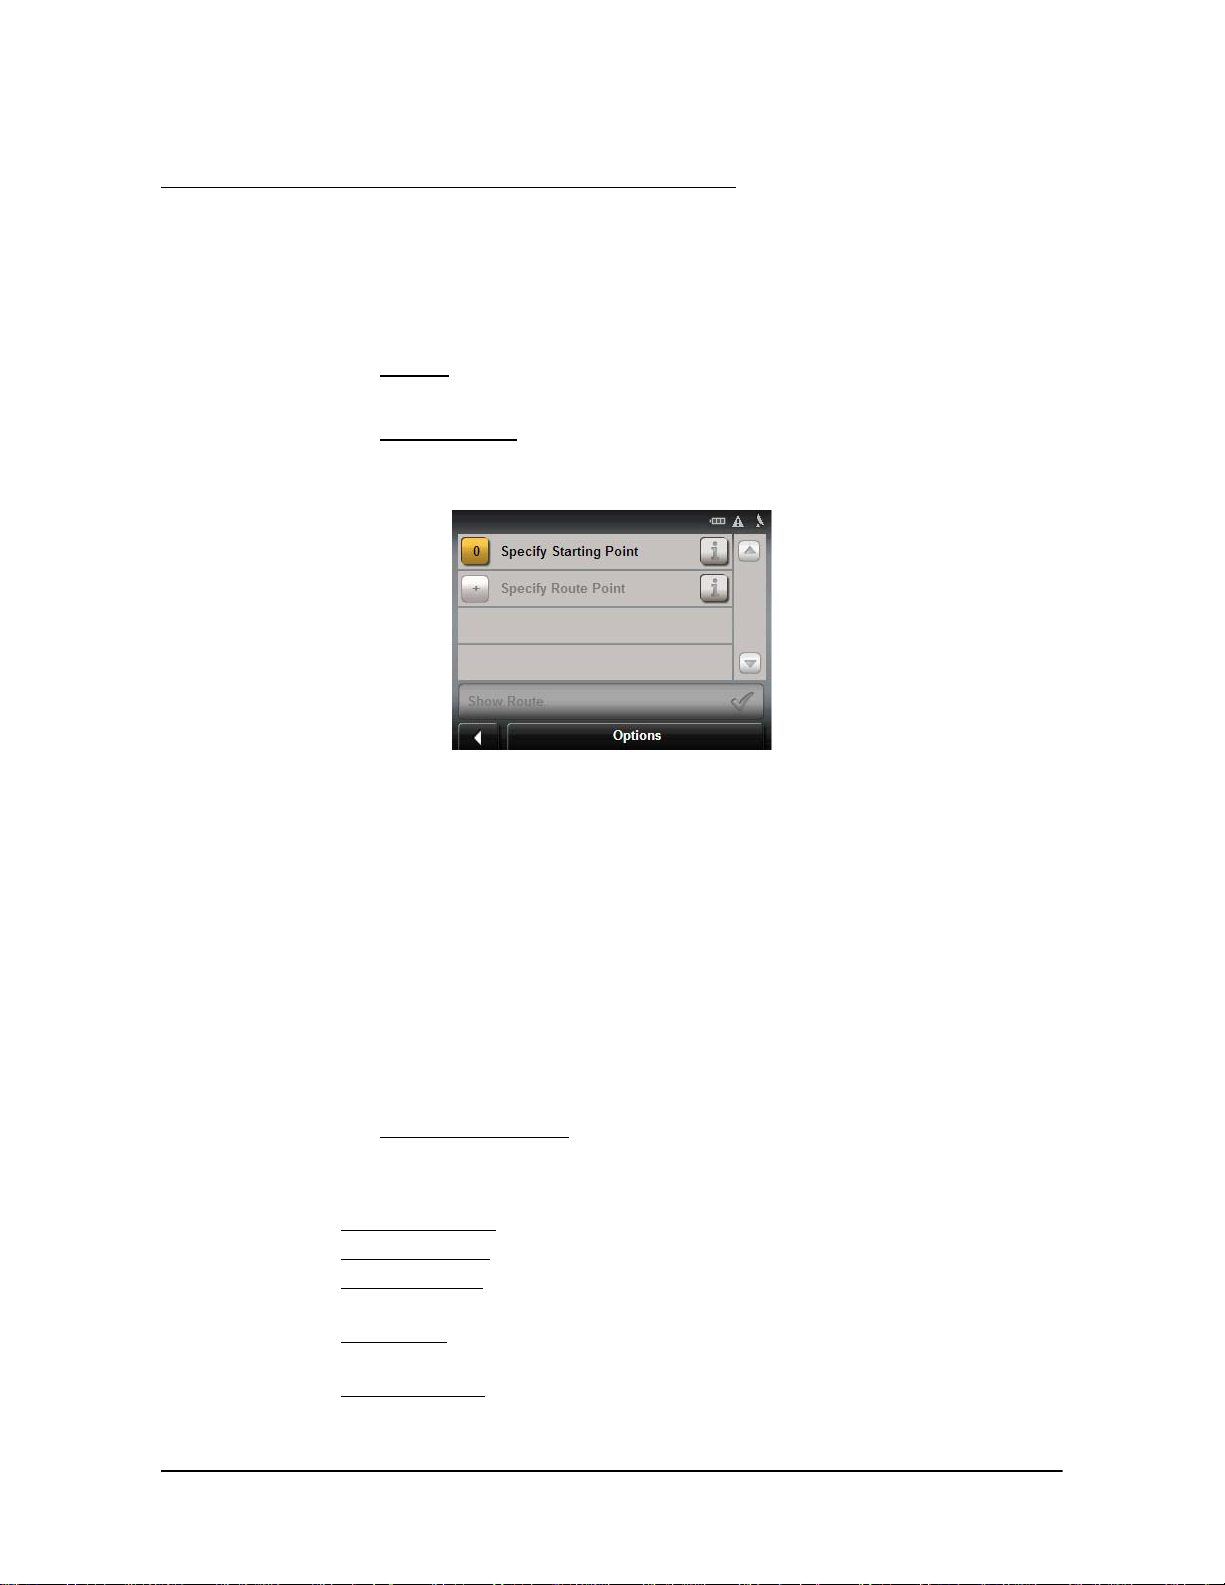
Working With Routes
With the NAVIGON 2100/2120, you can preplan routes. Planned routes can be saved for
later use, allowing you to create as many routes as you like.
Accessing the Route Planning Window
In the MAIN WINDOW:
1. Tap the Options button.
The options list opens.
2. Tap the
The
Route Planning option.
ROUTE PLANNING WINDOW opens.
Entering the starting point
The starting point of a route, is the point at which you want to begin your trip. This does not
need to be the current location. If you are at home planning a route for your vacation, you
could, for example, enter your hotel as the starting point.
The starting point is only important if you want to see a planned route on the map, but currently have no GPS reception, or you are not currently at the planned starting point. The
starting point that you enter has the flow number "0".
As soon as you begin navigation, your current location is used as the starting point fo r the
route calculation.
Route calculation to the first route point is shown as flow number "1".
On the R
OUTE PLANNING WINDOW:
1. Tap the Specify Starting Point button.
STARTING POINT menu opens.
The
2. Select:
Enter an Address to search for a location address.
•
•
Search for a POI to search for a POI.
My Destinations to select a location from the FAVORITES or LAST DESTINATIONS
•
lists.
My Address to select your home address. (Only available if you have already
•
specified a home address.)
Current Position to specify your current position as the starting point.
•
January 2008 NAVIGON 2100/2120 User’s Guide 51
Revision 1.0 NAVIGON, INC.
Page 64

Working With Routes
3. Enter the starting point. (See the corresponding section of “Selecting Destinations” on page 27.)
4. Tap the
Set Starting Point button.
The selected destination appears next to the 0
Point of the route.
Changing the starting point
On the ROUTE PLANNING WINDOW:
1. Tap the Specify Starting Point button.
STARTING POINT menu opens.
The
2. Select a different starting point by following the above steps.
Entering route points
Route points are destinations on the route that you want to navigate to.
The flow number for each route point can be found on a button in front of it.
, indicating that it is the Starting
On the R
OUTE PLANNING WINDOW:
1. Tap the Add Route Point field.
OUTE POINT menu opens.
The R
2. Tap on the button for the desired destination entry type.
3. Enter the route point. (See the corresponding section of “Ways to Search for Destinations” on page 29.)
4. Tap the
Add button.
The selected route point is shown next to its flow number.
5. Repeat these steps for each additional destination that you want to add to your
route.
Changing the order of route points
Route points can be deleted from a route. The order of the route points can be varied as
you wish.
Note: The starting point (flow number "0") cannot be moved nor deleted.
On the R
• Tap on the route point that you want to edit.
OUTE PLANNING WINDOW:
The context menu contains the following buttons:
Route Point Up: Moves the selected route stage forwards. (Example:
route point 2 becomes route point 1).
Route Point Down: Moves the selected route point backwards.
(Example: route point 2 becom es route point 3).
Delete: Deletes the selected route point. A window prompts you to
confirm deletion.
52 NAVIGON 2100/2120 User’s Guide January 2008
NAVIGON, INC. Revision 1.0
Page 65

Managing routes
You can save each planned route under a particular name.
Note: Only the start point and route points are saved. The calculated route is not. If you
load a route that has been saved, it must be recalculated before navigation can begin.
You can load, rename or delete stored routes.
Saving routes
You can save a route after you ha ve entered the st a rting point an d at lea st one ro ute point.
Working With Routes
Managing routes
On the R
1. Tap Options > Save Route.
2. Enter a name for the route. (You must enter at least two characters.)
3. Tap the Save button.
The route is saved to the
Loading routes
On the ROUTE PLANNING WINDOW:
1. Tap Options > Saved Routes.
2. Tap the route you want to load.
3. Tap the
The
ROUTE PLANNING WINDOW displays the starting point and the route points of the
selected route.
OUTE PLANNING WINDOW:
SAVED ROUTES list.
Load Route button.
January 2008 NAVIGON 2100/2120 User’s Guide 53
Revision 1.0 NAVIGON, INC.
Page 66

Working With Routes
Navigation
Navigation
After the route is calculated, you can begin navigation or view a simulation of the route.
Calculating and displaying routes
With the NAVIGON 2100/2120, you can preplan routes. Planned routes can be saved for
later use, allowing you to create as many routes as you like.
On the R
OUTE PLANNING WINDOW:
1. Load a saved route.
- OR -
2. Enter a starting point and at least one route point.
3. Tap the
Show Route button.
The map opens in Preview mode.
The starting point and the route points are marked by flags. For each stage, the
distance and the estimated trip time is given. This information is also displayed for
the entire route.
4. Tap the
Start Navigation button or simply start driving.
Viewing the Route Profile
The calculation of a route is based on route options.
On the R
1. Create a route or load a previously saved route.
2. Tap the Show Route button.
3. Tap
OUTE PLANNING WINDOW:
The map opens in Preview mode and displays the calculated route.
Options > Route Profile.
You can view and, if necessary, change any of the displayed options.
Note: Once options are changed, they remain in effect for all subsequent routes.
You can get information regarding changing individual route profiles by tapping the cor-
responding (Help
54 NAVIGON 2100/2120 User’s Guide January 2008
) button.
NAVIGON, INC. Revision 1.0
Page 67

Simulating routes
You can also view a simulation of a calculated route.
Note: GPS signal reception is not required for simulation. Simulations are restricted to
routes of a maximum of 93 miles.
Starting a route simulation
You have calculated and displayed a route.
With the route displayed in Map Preview mode:
•Tap Options > Simulation.
The route is recalculated for simulation purposes. Simulation starts when calcula-
tion has finished.
Ending simulation
You can end simulation at any time.
While viewing the route simulation:
•Tap (Back).
A window prompts you to confirm your decision to cancel navigation.
Working With Routes
Simulating routes
ROUTE PLANNING WINDOW redisplays.
The
January 2008 NAVIGON 2100/2120 User’s Guide 55
Revision 1.0 NAVIGON, INC.
Page 68

Working With Routes
Viewing a Turn-by-Turn List
Viewing a Turn-by-Turn List
You can display detailed directions of the calculated route before starting navigation or at
any time during navigation. This list displays all of the driving instructions in table form.
With the route displayed in Preview mode:
• Tap the Show Turn-by-Turn List button.
- or -
With the route displayed in Navigation mode or Reality View mode:
•Tap Options > Show Turn-By-Turn List.
TURN-BY-TURN LIST WINDOW opens.
The
1. Distance to this junction.
2. Schematic depiction of the next junction where you must turn.
3. Name of the street onto which you must turn.
4. Indicates whether you want to travel on the section of the route.
(Allow) Include this section in the route.
(
Forbid) Exclude this section from the route.
Blocking route sections
On the TURN-BY-TURN LIST WINDOW:
1. Tap on the route section you do not want to travel on, so that the (Forbid)
symbol appears next to them.
2. Tap (
The navigation system calculates an alternative route avoiding (if possible) the
route sections selected. The new driving instructions are displayed in the
T
URN LIST WINDOW.
3. Tap (
Modify Route).
Back) to close the TURN-BY-TURN LIST WINDOW.
TURN-BY-
56 NAVIGON 2100/2120 User’s Guide January 2008
NAVIGON, INC. Revision 1.0
Page 69

Removing blocks and using original routes
Section blocks can be removed at anytime.
Working With Routes
Viewing a Turn-by-Turn List
On the T
URN-BY-TURN LIST WINDOW:
•Tap Options > Calculate original route.
January 2008 NAVIGON 2100/2120 User’s Guide 57
Revision 1.0 NAVIGON, INC.
Page 70

This page intentionally left blank.
58 NAVIGON 2100/2120 User’s Guide January 2008
NAVIGON, INC. Revision 1.0
Page 71

Working With Maps
NAVIGON 2100 Map
Your NAVIGON 2100 comes with a United S tates map of the 48 contiguous states.
NAVIGON 2120 Maps
Your NAVIGON 2120 comes with maps of the 48 contiguous United States, Alaska,
Hawaii, Puerto Rico and the Virgin Islands, and all 13 Canadian provinces/territories.
January 2008 NAVIGON 2100/2120 User’s Guide 59
Revision 1.0 NAVIGON, INC.
Page 72
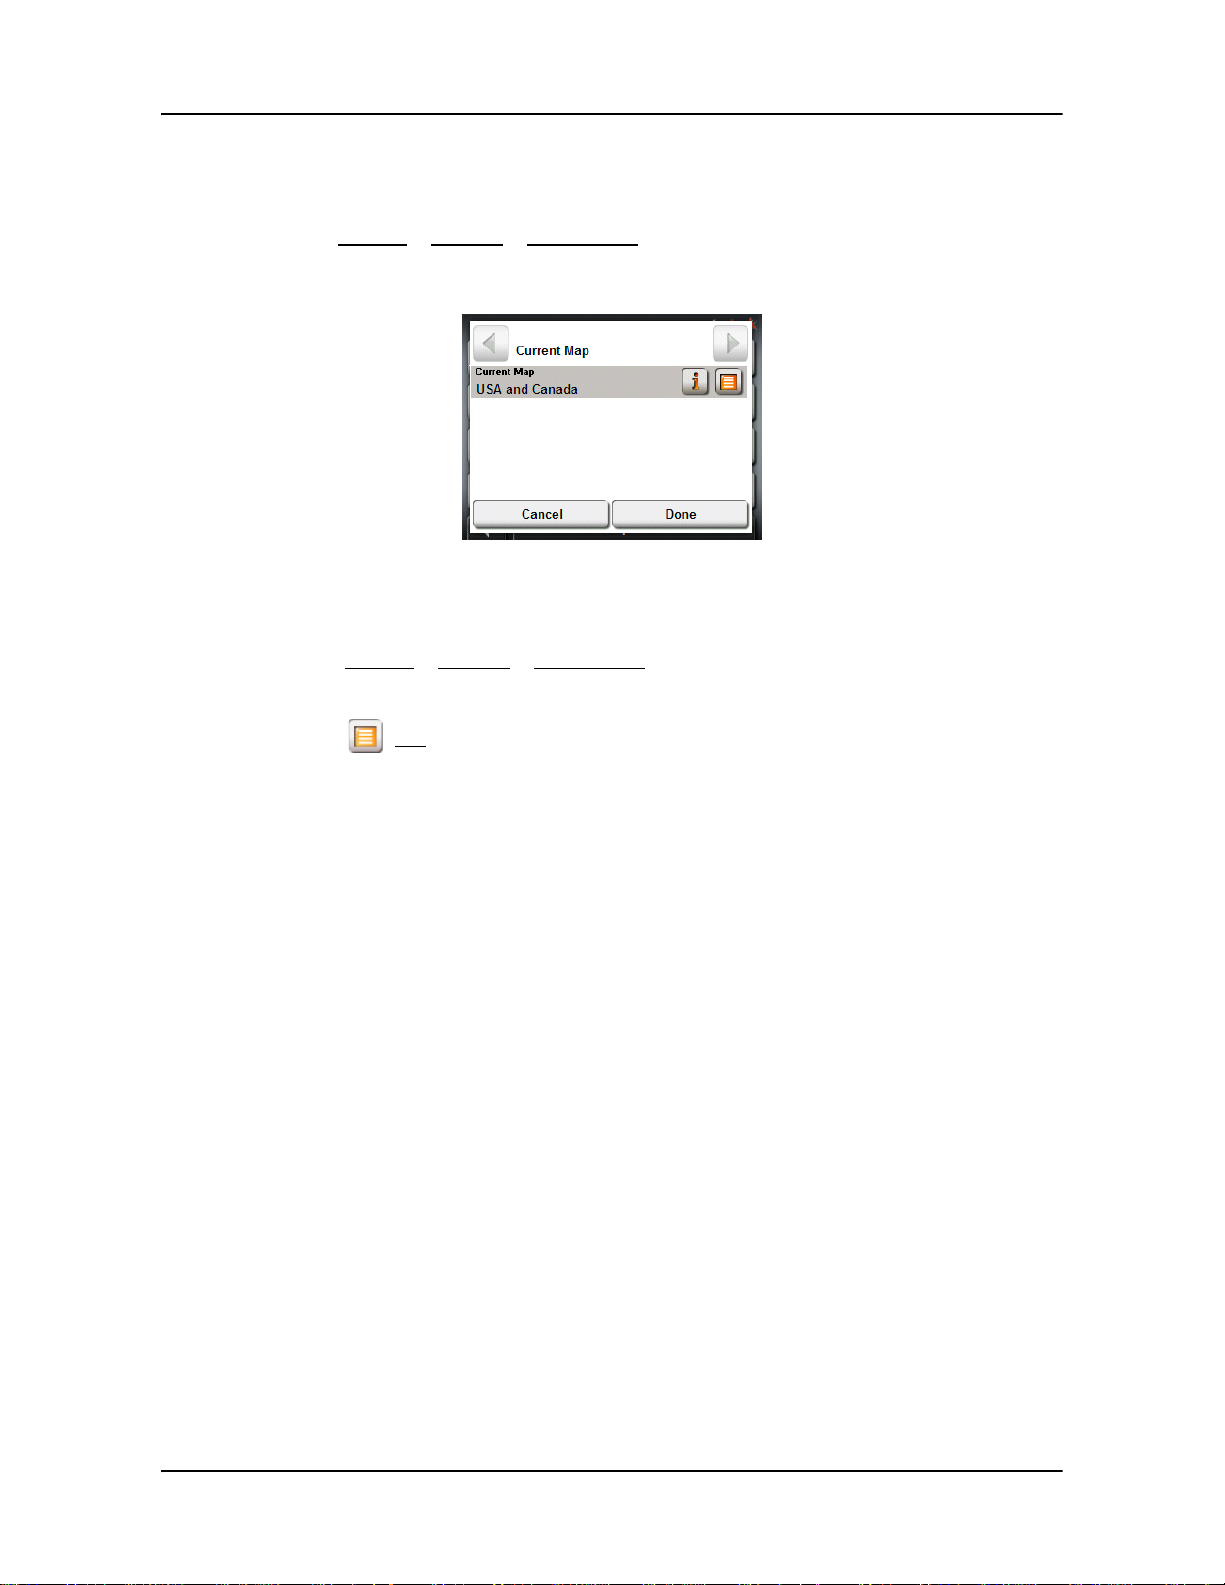
Working With Maps
View information on the current map
View information on the current map
On the MAIN WINDOW:
•Tap
Options > Settings > Current Map.
The
CURRENT MAP WINDOW opens.
Selecting a different map (NAVIGON 2120 only)
On the MAIN WINDOW:
1. Tap
2. Tap (
Options > Settings > Current Map.
CURRENT MAP WINDOW opens.
The
List) and select a different map.
60 NAVIGON 2100/2120 User’s Guide January 2008
NAVIGON, INC. Revision 1.0
Page 73

Map in Preview mode
You have entered a destination and tapped the Start Navigation button.
- OR –
Working With Maps
Map in Preview mode
Create a route or load a saved route, then tap the
The map opens in
Preview mode. The entire route is visible.
Show Route button.
3. The route is highlighted in orange.
4. A triangle in orange shows your current position.
If you display a route and the specified starting point is not the same as your cur-
rent location, the current position may not be shown on the preview.
5. The destination is marked with a small flag.
When you have planned or loaded a route and displayed it, the starting point and
each route point is marked with a small flag.
6. The total distance for the route is shown in a small information box, together with
the estimated trip time and the estimated time of arrival.
This information can be displayed or hidden by tapping on
Basic Settings.
Options > Settings >
If you display a route with several stages, information for each stage is shown.
7. Tap:
• The
Show Turn-by-Turn button to view detailed directions for the route. (See
“Viewing a Turn-by-Turn List” on page 56.)
• The
Start Navigation button to begin the journey.
When you display a planned or loaded route, the route may be recalculated.
St ar ti ng poi nt for t he ca lcul at ion is you r cur re nt loc atio n. Onc e th e ro ute is ca lculated, you are guided to the first route point.
Options > Route Profile to view or change settings used to calculate the route.
•
January 2008 NAVIGON 2100/2120 User’s Guide 61
Revision 1.0 NAVIGON, INC.
Page 74

Working With Maps
Map in Preview mode
• (Destination search) to view the map in Destination search mode.
For more information on using this feature, see “Map in Destination search mode” on
page 66.
62 NAVIGON 2100/2120 User’s Guide January 2008
NAVIGON, INC. Revision 1.0
Page 75
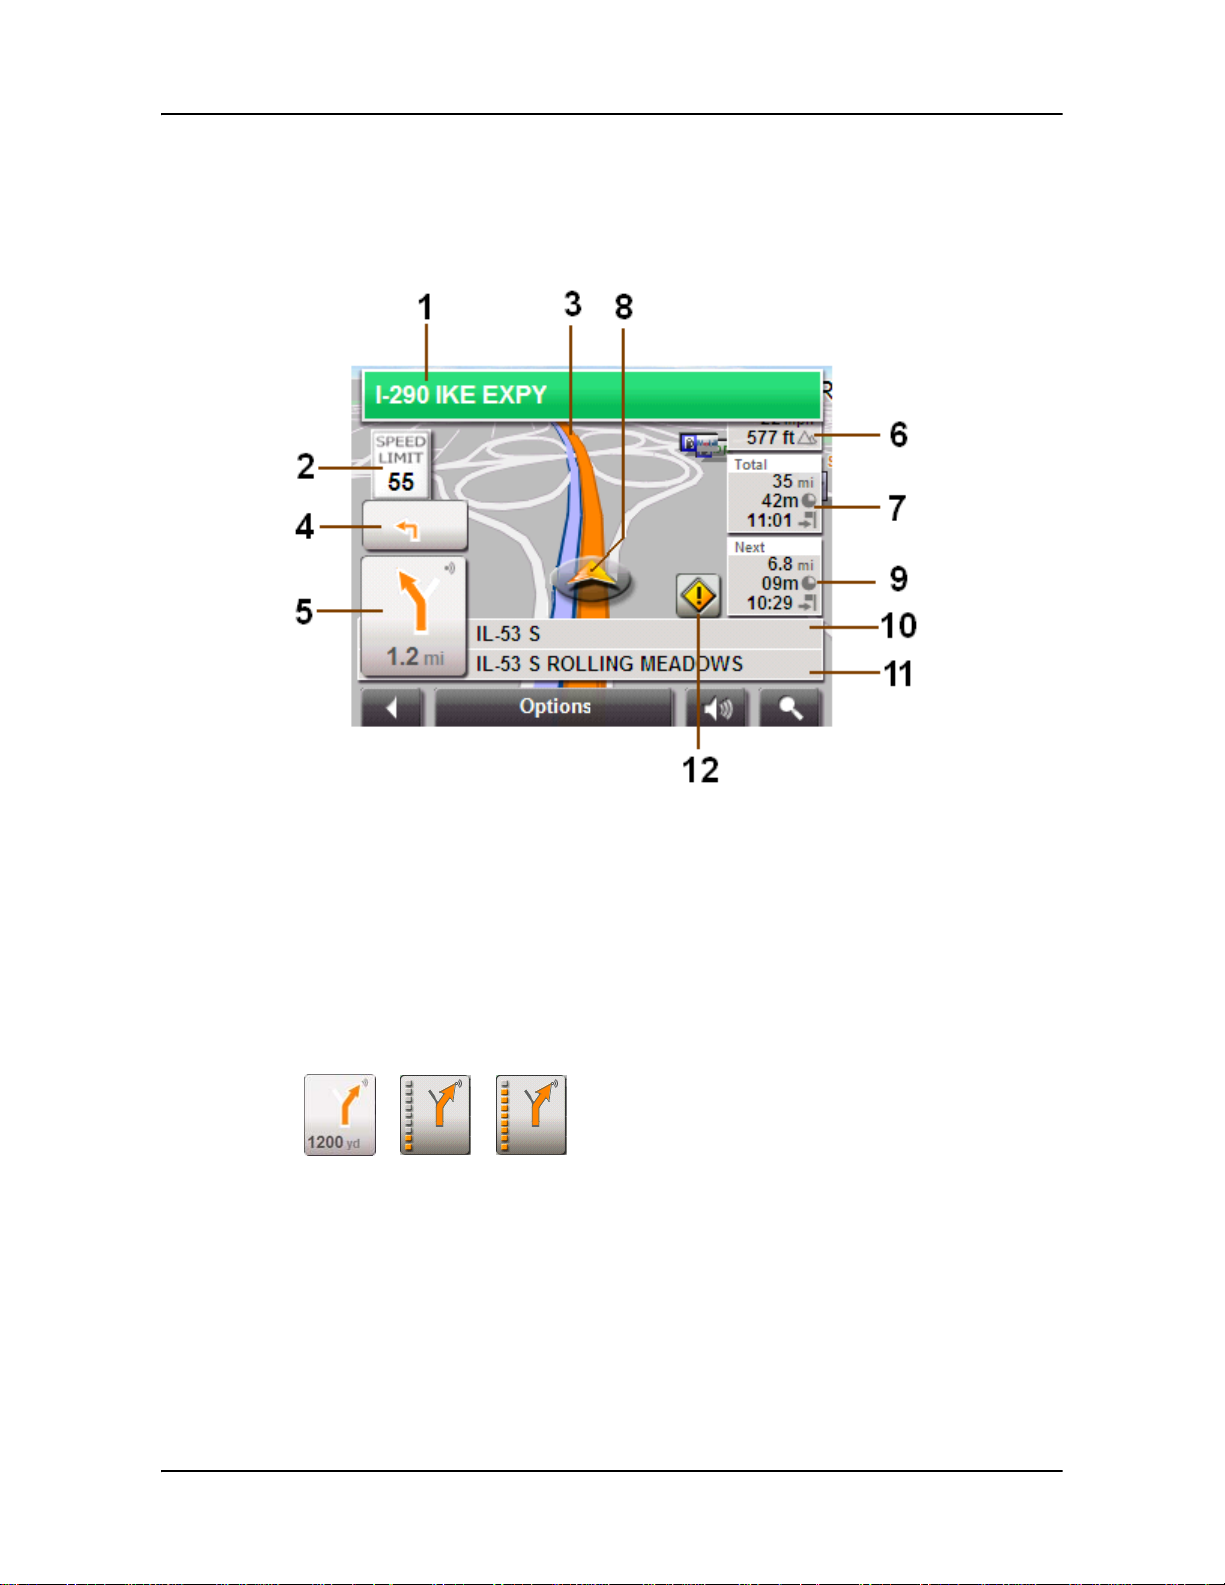
Map in Navigation mode
After the route has been viewed in Preview mode, navigation starts.
Working With Maps
Map in Navigation mode
Navigation is shown in
Navigation mode.
1. Signposting to be followed is displayed here.
2. Posted speed limits are displayed here (where available).
3. The route is marked in orange.
4. When two maneuvers need to be executed in quick succession, the small arrow
field indicates the second maneuver to be executed.
5. The large arrow field shows a schematic depiction of the next maneuver. The
remaining distance to the junction is displayed below the arrow.
As you get closer to the junction, the spot diagram, rather than the distance, is
shown.
The nearer you get to the junction, the more yellow spots are displayed.
If you don't have to change direction for a longer period, you see only a forward-
facing arrow. The distance you travel on the road you are on displays beneath the
arrow.
• Tap the large arrow field to hear current route instructions.
6. Y our current speed and the height above sea level are displayed here. (Not shown
with default settings. To display this information see “Customizing Your NAVIGON
2100/2120” on page 79.)
January 2008 NAVIGON 2100/2120 User’s Guide 63
Revision 1.0 NAVIGON, INC.
Page 76

Working With Maps
Map in Navigation mode
7. The remaining distance to the destination, the estimated duration of the trip, and
the estimated time of arrival are shown.
8. An orange triangle shows your current position. The displayed map area continually changes so that your current position is always centered on the map.
9. If you are navigating a route with several stages, you see the remaining distance,
estimated duration of the trip, and the estimated time of arrival for the next interim
destination in the
10. The name of the next stretch of road that you must travel on is displayed in the
upper street field.
11. The name of the street you are currently travelling on is displayed in the lower
street field.
TMC shortcut button. (Only shown if the TMC (traffic) accessory service has been
12.
purchased. See page 69 for more information.) The TMC shortcut button displays
when traffic messages have been received and are currently available. Tap the
button to display the
Note: The displays for many of the above mentioned fields can be configured via
Options
information is available on the map.
Note: If you tap on the large arrow field, the current route instruction is repeated.
Next field.
TRAFFIC INFORMATION WINDOW.
> Settings > Basic Settings. Some displays only function if the corresponding
•Tap
Options > Show Turn-by- Turn List to view detailed directions for the route. (See
“Viewing a Turn-by-Turn List” on page 56.)
•Tap (
Destination search) to view the map in Destination search mode. (See
“Map in Destination search mode” on page 66.)
•Tap (Back) to quit navigation.
64 NAVIGON 2100/2120 User’s Guide January 2008
NAVIGON, INC. Revision 1.0
Page 77
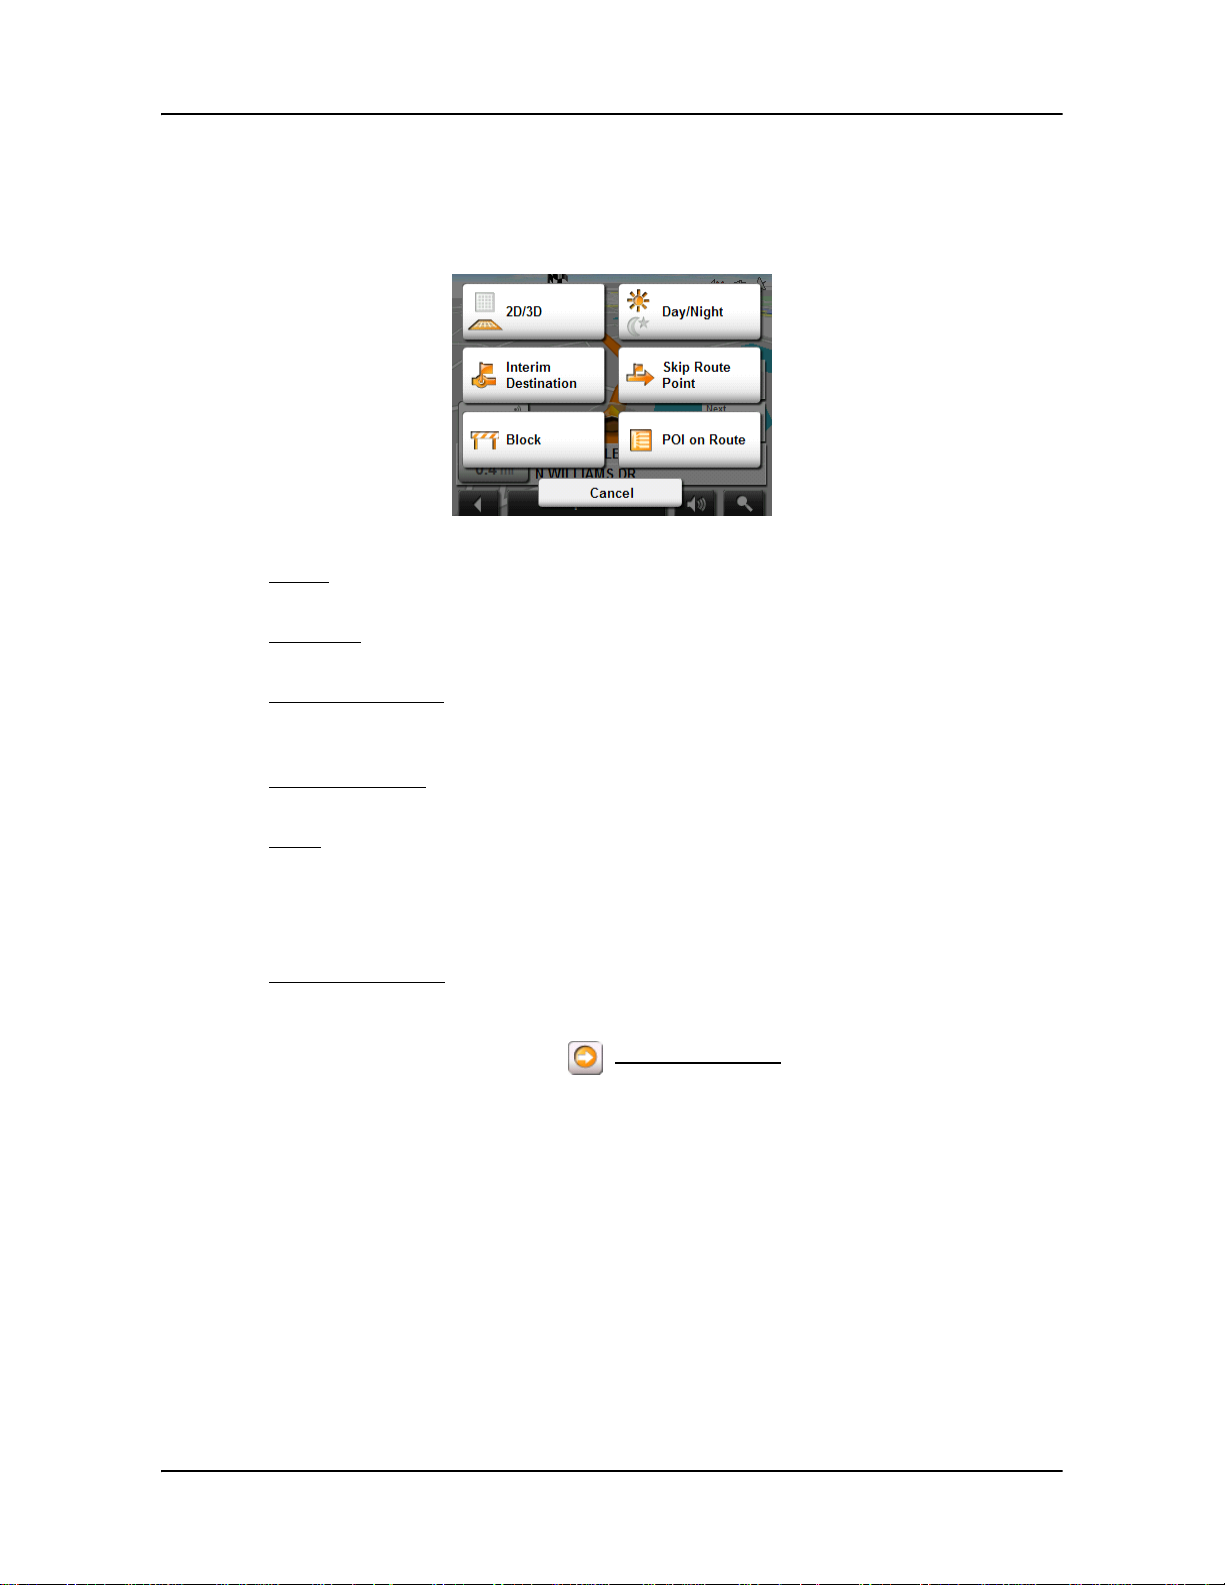
Map functions in Navigation mode
When the map is open in Navigation mode, tap any point on the map. Buttons with
various functions are displayed.
: Changes between 2D and 3D mode. The symbol for the mode
2D/3D
that is currently set is marked orange.
Working With Maps
Map in Navigation mode
Day/Night
Interim Destination
Skip Route Point
Block
POI on Your Route
Changes between "day" and "night" display modes. The symbol
for the mode that is currently set is marked orange.
Opens a menu for entering an interim destination. The navigation
system first guides you to this interim destination. Afterwards,
you can simply continue navigation to your original destination.
Tap this button to omit the next route point. This button is inactive
when less than 2 route points are pending.
Tap this button in order to block a section of the route that lies in
front of you, i.e. to recalculate the route in order to avoid this section of the route, e.g. if you have heard of a traffic jam relating to
this section on the radio.
Tap this button again to remove the block.
Tap this button to display POIs on your route. This enables you to
find out, for example, how far it is to the nearest services. A destination shown here can be added as an interim destination by
tapping the (
Interim Destination) button to the right of its entry
in the list.
January 2008 NAVIGON 2100/2120 User’s Guide 65
Revision 1.0 NAVIGON, INC.
Page 78

Working With Maps
Map in Destination search mode
Map in Destination search mode
The map is always in Destination search mode when a pair of cross hairs can be
seen.
When you are driving, the map's orientation does not change. It is always oriented
with north at the top.
Destination search tools include:
Zoom Out The map section shown becomes larger, but fewer details
are shown.
Zoom In The map section becom es smaller, but sho ws mor e de tails.
Zoom Mode When this button is active, you can plot a map section with
your finger.
Plot the map section from upper left to bottom right and it
zooms to fit the size of the screen.
Plot the map section from bottom right to top left, and the
map zooms out.
Pan Mode When this button is active, you can move the map section
with your finger. Tap on the map and drag it in the desired
direction.
Entire Route Zooms the map so that the entire route is visible.
Current Position Show your current position on the map.
66 NAVIGON 2100/2120 User’s Guide January 2008
NAVIGON, INC. Revision 1.0
Page 79
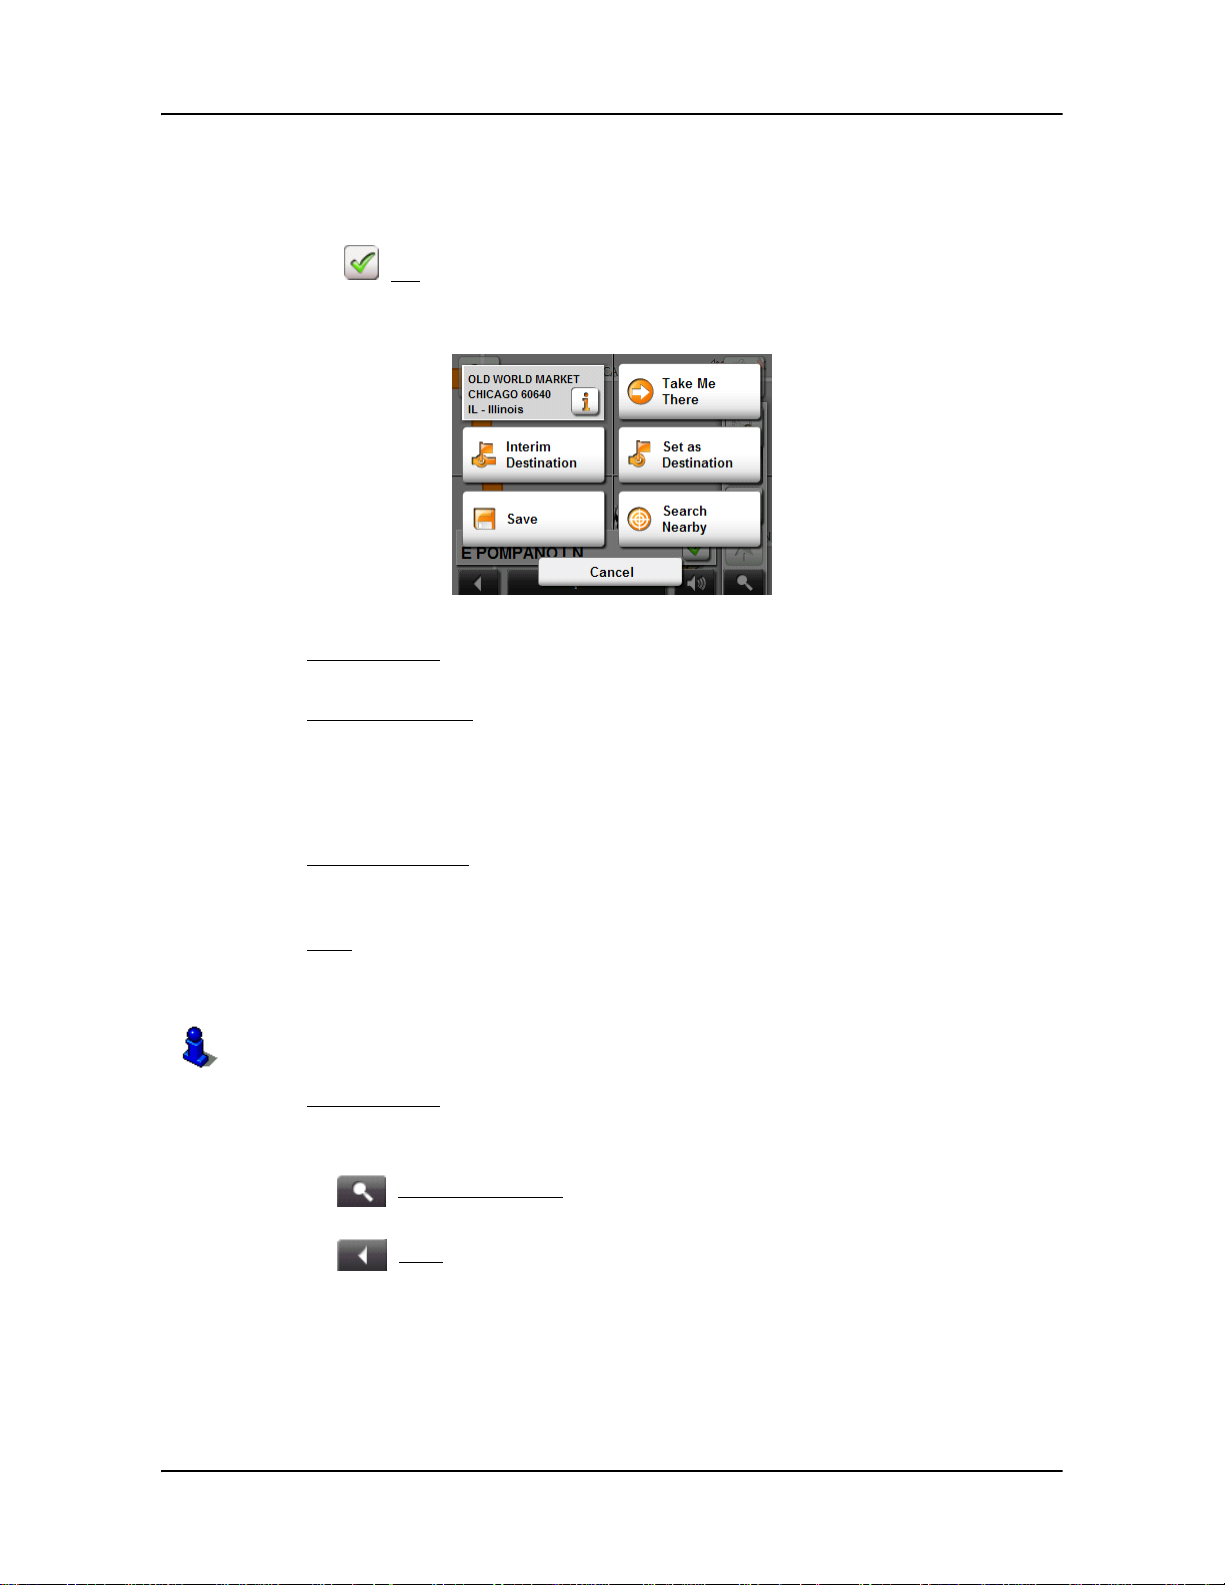
Operating in Destination search mode
1. Tap on the point to which you wish to navigate.
The destination that you have selected appears under the cross hairs.
Working With Maps
Map in Destination search mode
2. Tap (
OK).
Buttons with various functions appear.
Take Me There Begins navigation to the selected point. If you are currently
navigating, navigation stops.
Interim Destination Sets the selected point as an interim destination. The navi-
gation system first guides you to this interim destination.
Afterwards, you can continue navigation to your original
destination.
This function is only active during navigation.
Set as Destination Adds the selected point as the last point in the route plan. If
no route plan was open, the selected point becomes the first
point in a new route plan.
Save Opens the SAVE DESTINATION AS... WINDOW. You can enter a
name for the selected point to be stored in the
FAVORITES
list.
For more information, see “Starting navigation” on page 42.
Search Nearby Opens the POI NEARBY WINDOW. Here you can search for
destinations near the specified point. (See “POIs nearby” on
page 32.)
•Tap (
Destination search) to quit the Destination search mode. You are
returned to the window from which you started this mode.
•Tap (
Back) to return to the MAIN WINDOW. If you are currently navigating, you
are prompted to confirm your decision to quit navigation.
January 2008 NAVIGON 2100/2120 User’s Guide 67
Revision 1.0 NAVIGON, INC.
Page 80

Working With Maps
Reality View (Junction View)
Reality View (Junction View)
When, during navigation, you approach a highway junction, the map changes to Real-
ity View
The
displays until you pass the highway junction. Once past the junction, the map returns
to
mode.
Reality View mode shows the signposting and lanes you must follow. This mode
Navigation mode.
While traveling through the highway junction:
• To change from Reality View back to
• To change from Navigation Mode back to Reality View , tap the
Navigation mode, tap anywhere on the map.
Next Maneuver
button.
Note: Reality View mode is not available for every highway junction. Availability is
dependent on the map data currently in use.
68 NAVIGON 2100/2120 User’s Guide January 2008
NAVIGON, INC. Revision 1.0
Page 81

TMC (Traffic Information) (Optional Accessory)
TMC (Traffic) Information can be purchased for the NAVIGON
2100/2120 as an optional accessory.
Once purchased, TMC information is provided for the lifetime
of your NAVIGON 2100/2120 device at no additional charge.
For more on purchasing and activating this accessory service,
see “Optional Accessory Services” on page 11.
Lifetime TMC Information allows your NAVIGON 2100/2120 to receive the latest traffic
information available. If necessary, it can change your route dynamically in order to
avoid a traffic jam.
Accessing the TMC (Traffic Information) Window
All currently available traffic information can be viewed from the Options button on the
MAIN WINDOW, ROUTE PLANNING WINDOW and any of the map views.
From any of the above windows:
1. Tap
The
Options > Traffic.
TRAFFIC INFORMATION WINDOW opens.
January 2008 NAVIGON 2100/2120 User’s Guide 69
Revision 1.0 NAVIGON, INC.
Page 82

TMC (Traffic Information) (Optional Accessory)
The TMC (Traffic Information) Window
The TMC (Traffic Information) Window
Types of Messages
All traffic information Information on all traffic events (severe and moder-
ate traffic jams and obstructions) and weather warnings received in the area, based on TMC antenna
reception.
On route Information on all traffic events (severe and moder-
ate traffic jams and obstructions) and weather warnings occurring along the route.
Not on route: all Information on all traffic events (severe and moder-
ate traffic jams and obstructions) and weather warnings not occurring on the route, based on TMC
antenna reception.
Not on route: traffic jams Information on severe traffic events (traffic jams) not
occurring on the route, based on TMC antenna
reception.
Not on route: obstructions Information on moderate traffic events (obstructions)
not occurring on the route, based on TMC antenna
reception.
Not on route: weather warnings Information on weather warnings not occurring on
the route, based on TMC antenna reception.
70 NAVIGON 2100/2120 User’s Guide January 2008
NAVIGON, INC. Revision 1.0
Page 83

T raffic Flow Severity Indicators
The color of the severity indicator reflects the impact of the traffic occurrence on traffic
flow:
Red Heavy traffic, expect delays.
Yellow Slow moving traffic.
Green Normal traffic flow.
Event or Incident Icons
On the Traffic Information window, the following icons are used to represent traffic
events or incidents:
Slow traffic. Construction.
TMC (Traffic Information) (Optional Accessory)
The TMC (Traffic Information) Window
Accident. Slippery road due to weather
(snow, ice, rain, etc.).
General problem affecting
traffic flow.
Lane closures. Flooding.
Road closed or blocked. Informational only. No nega-
Ramp problems. On- or offramp closures, etc.
Wind.
tive affect on traffic flow.
January 2008 NAVIGON 2100/2120 User’s Guide 71
Revision 1.0 NAVIGON, INC.
Page 84

TMC (Traffic Information) (Optional Accessory)
The TMC (Traffic Information) Window
Displaying traffic messages
The traffic reports that are currently valid are available via the options of several windows.
On the
1. Tap
MAIN WINDOW:
Options > Traffic.
RAFFIC INFORMATION WINDOW opens.
The T
Above the list, the
Traffic information button indicates the type of traf fic information
listed (on-route, off-route, etc.) and how many messages of this type are listed.
For each traffic message in the list, information about the location and type of traf-
fic obstruction is displayed.
2. Tap a message to view more information on the traffic event.
TMC DETAIL WINDOW displays.
The
3. When finished, tap the B
ack button to return to the TRAFFIC INFORMATION WINDOW.
72 NAVIGON 2100/2120 User’s Guide January 2008
NAVIGON, INC. Revision 1.0
Page 85

Requesting a route recalculation
TMC (Traffic Information) (Optional Accessory)
The TMC (Traffic Information) Window
Note:
to On Request
This procedure is only available when the TMC Setting Recalculate Route is set
. For more information, see “Select Reroute Settings” on page 76.
During navigation, a message displays when a traffic message indicates a traffic
event exists on your current route. Details of the event are shown on the
WINDOW.
On the
TMC DETAIL WINDOW:
TMC DETAIL
1. Select how you want the traffic block to be handled. Options are:
Avoid Traffic The navigation software recalculates a route to avoid the traf-
fic obstruction. A (
ment on the
TMC (TRAFFIC MESSAGE) WINDOW.
Avoid) appears next to the traffic seg-
Ignore The navigation software ignores the traffic message and
remains on the current route. A (
the traffic segment on the
TMC (TRAFFIC MESSAGE) WINDOW.
Ignore) appears next to
2. Tap the button to select the alternative setting.
3. Tap (Back
) to close the TRAFFIC INFORMATION WINDOW.
January 2008 NAVIGON 2100/2120 User’s Guide 73
Revision 1.0 NAVIGON, INC.
Page 86

TMC (Traffic Information) (Optional Accessory)
TMC Settings Window
TMC Settings Window
In the TMC SETTINGS WINDOW, you can set and configure the TMC receiver, these settings determine how received traffic messages will affect subsequent routing.
On the
1. Tap
2. Tap
MAIN WINDOW:
Options > Traffic.
Options > TMC Settings.
Select another station
On the TMC SETTINGS WINDOW:
• Tap or to tune into another station.
Select Tuning Mode Settings
On the TMC SETTINGS WINDOW:
1. In the T
Automatically The system searches for another station if reception becomes
Hold station The system searches for the same station on a different fre-
Hold frequency The system does not search for another station if reception
2. Tap (
3. Tap the
uning Mode field, select an option:
poor.
quency if the signal becomes poor.
becomes poor.
List) to view the list and select an option.
Done button to save your changes.
74 NAVIGON 2100/2120 User’s Guide January 2008
NAVIGON, INC. Revision 1.0
Page 87

TMC (Traffic Information) (Optional Accessory)
Specify the type of traffic messages to display
On the MAIN WINDOW:
TMC Settings Window
1. Tap
Options > Traffic.
The TRAFFIC INFORMATION WINDOW opens.
On the Navigation map, the (TMC shortcut) button can also be used to display the
RAFFIC INFORMATION WINDOW. The TMC shortcut b utton displa ys when tr affic messages
T
have been received and are currently available. See “Map in Navigation mode” on
page 63.
Traffic Messages button shows the type of traffic messages listed and how
The
many messages of this type are listed.
2. Tap the
Traffic information button to view a list of available traffic message types.
3. Tap on the type of error messages to display.
4. Tap the OK button to save your changes.
January 2008 NAVIGON 2100/2120 User’s Guide 75
Revision 1.0 NAVIGON, INC.
Page 88

TMC (Traffic Information) (Optional Accessory)
TMC Settings Window
Select Reroute Settings
You can select whether the navigation software recalculates a route automatically
when a TMC message indicates that a problem exists on your current route.
On the TMC S
1. Tap
ETTINGS WINDOW:
Options > TMC Settings
2. In the Recalculate Route, select how you want to set route recalculation:
Automatically
The navigation system determines when to recalculate a route
and when to ignore a traffic event, based on the severity of the
impact on traffic flow. When a traffic message is received that
severely impacts your current route, the navigation software displays a message indicating that it has recalculated a route
avoiding the event.
On request
Each received traffic message displays on screen. You can
specify whether to calculate an alternative route.
3. Tap (
Toggle) to switch between options.
The selected value is in bold.
4. Tap the
Done button to save your changes.
76 NAVIGON 2100/2120 User’s Guide January 2008
NAVIGON, INC. Revision 1.0
Page 89

Logbook
You can use the NAVIGON 2100/2120 to record your vehicle mileage for tax purp oses or
for expense reports. The logbook is recorded in the Logbook.xls
with Microsoft Excel spreadsheet program. Each recorded trip is added at the bottom of
the spreadsheet as a new entry.
file. You can open the file
When first used, the Logbook.xls
igation device's memory card. If you delete or move this file, a new file is created when you
next record a trip.
The device supports various types of trips for which one could record mileage. You can
record mileage for Business, Personal, Commutes to work, etc.
Note:
when you are not navigating.
When logbook recording starts, every moveme nt of the vehicle is recorded, even
Starting a recording
From the MAIN WINDOW:
1. Tap Options > Logbook.
2. Enter the required details.
3. Tap the Start button.
file is created in the MN6\Logbook directory on the nav-
Stopping the recording
From the MAIN WINDOW:
1. Tap Options > Logbook.
2. Tap the
Note: A window opens when you have reached your destination. Specify whether you
would like to end logbook recording.
January 2008 NAVIGON 2100/2120 User’s Guide 77
Revision 1.0 NAVIGON, INC.
Stop button.
Page 90

This page intentionally left blank.
78 NAVIGON 2100/2120 User’s Guide January 2008
NAVIGON, INC. Revision 1.0
Page 91

Customizing Your NAVIGON 2100/2120
Accessing the Settings window
The settings can be reached via the options of several windows.
•Tap
Options > Settings.
The Settings window
The SETTINGS WINDOW is where you can customize your NAVIGON 2100/2120 to suit
your personal needs and preferences.
The S
ETTINGS WINDOW has several buttons.
• Tap a button to open the corresponding settings window.
Basic Settings
These settings include:
Language Select the language to be displayed on screen and
to be used with spoken directions. Options are
English, Spanish, or French.
Speak Street Names Indicate whether street names are spoken during
navigation.
Reality View Indicate whether Reality View displays a visual
representation of an approaching junction. Highway signs and the lane to be used are indicated.
(This feature is dependent on the selected map
and may not be available in all areas.)
2D Zoom Factor Indicate how auto-zoom behaves by default when
a 2D view mode is selected. The zoom changes,
based on speed. When driving slower, the map
scale gets smaller. When driving faster, the map
scale gets larger. Options are no automatic zoom,
smaller or larger map sections, or standard.
3D Map:Show Street Names Indicate whether to show street names on maps
displayed in 3D view mode.
January 2008 NAVIGON 2100/2120 User’s Guide 79
Revision 1.0 NAVIGON, INC.
Page 92

Customizing Your NAVIGON 2100/2120
The Settings window
2D Map:Show Street Names Indicate whether to show street names on maps
2D Map Orientation Indicate the orientation of maps shown in 2D map
Show Altitude and Speed Show or hide the altitude and current speed on a
Display Compass Show or hide a small compass on screen during
Show Remaining Distance Show or hide the distance remaining to the desti-
Show Duration of Journey Show or hide the travel time rem aining to the des ti-
Show Time of Arrival Show or hide the time of arrival at the destination
Info When Crossing Borders Show or hide local speed restrictions when cross-
displayed in 2D view mode.
view mode. Options are Direction of Travel (at the
top of the map), or Always North (magnetic North
at the top of the map).
displayed map.
navigation.
nation or an interim destination, if applicable.
nation or an interim destination, if applicable.
or an interim destination, if applicable.
ing a country border.
Show Speed Limits Select whether to show highway speed limits.
Options are always, only when exceeding the
speed limit, or never.
Warnings Within Urban Areas Indicate whether a warning displays when exceed-
ing the speed limit in densely populated areas.
Options are to never warn, or to display a warning
when 5, 10, 15 or 20 mph over the stated speed
limit.
Warnings Outside of Urban Areas Indicate whether a warning displays when exceed-
ing the speed limit in less densely populated or
rural areas. Options are to never warn, or to display a warning when 5, 10, 15 or 20 mph over the
posted speed limit.
Warn Against Certain Speed Limits Show or hide speed limit restrictions in force dur-
ing special situations, such as rain, snow, time of
day restrictions, etc.
Menu Animation Indicate whether the opening of menus is ani-
mated.
Distance Unit Indicate the distance unit to be used, either Miles
or Kilometers.
Time Format Indicate how times are displayed, either a 12 hour
format (with am and pm), or a 24 hour format.
Coordinates Display Show or hide coordinates.
Coordinate Format If coordinates are shown, indicate whether they
display in decimal format or in minutes and seconds format.
Brightness Day Indicate the display brightness for use during the
80 NAVIGON 2100/2120 User’s Guide January 2008
NAVIGON, INC. Revision 1.0
Page 93

Brightness Night Indicate the display brightness for use at night.
Speed-Dependent Volume Indicate whether you want the volume level to
In-Store Demo Enable or disable the in-store demo . ( Wh e n
Current Map Settings
These settings include:
Current Map Displays information on the currently displayed
POI Settings
These settings include:
Customizing Your NAVIGON 2100/2120
The Settings window
daytime. Options are from 1 (less bright) to 8 (most
bright).
Options are from 1 (less bright) to 8 (most bright).
increase when your speed increases. Options are
never, yes with a low amplification, or yes with a
high amplification.
enabled, the demo starts after 5 minutes.)
map.
Categories Shown Specify the number of POI categories that are
Direct Access 1 Select the first POI category to display for use with
Direct Access 2 Select a second POI category to display for use
Direct Access 3 Select a third POI category to display for use with
Route Profile Settings
These settings include:
Speed Profile Select the type of transport: car, bicycle, or pedes-
Type of Route Select the type of route to be calculated: Fast,
Consider Traffic Information Select whether TMC (traffic information) is used
shown on the displayed map.
the POI direct access.
with the POI direct access.
the POI direct access.
trian. This is used for calculating routes and arrival
times.
Optimum (uses both fast and short sections in the
route calculation), Short, or Scenic.
when calculating a route. (This requires a TMC
reception and may not be available in all areas.)
Note: This option is only available if the TMC (traffic) optional accessory service has been purchased and activated.
Highways Select whether highways are considered in a cal-
culated route.
Toll Roads Select whether toll roads are considered in a cal-
January 2008 NAVIGON 2100/2120 User’s Guide 81
Revision 1.0 NAVIGON, INC.
Page 94

Customizing Your NAVIGON 2100/2120
The Settings window
Ferries Select whether ferries are considered in a calcu-
Calculate the Next Stage For routes with multiple stages. After reaching a
U-turn allowed Select whether u-turns are considered when calcu-
culated route.
lated route.
route point, select whether the next stage is calculated automatically.
lating a route.
82 NAVIGON 2100/2120 User’s Guide January 2008
NAVIGON, INC. Revision 1.0
Page 95

Selecting options
Customizing Your NAVIGON 2100/2120
Selecting options
Moving between pages
Some NAVIGON 2100/2120 settings required several windows, as shown in the exam-
ple above (Page 1 of 7). To move between windows:
•Tap (
To the Left) and (To the Right).
Viewing a list of options for a setting
Some settings have several values. A value can be selected from a list. The value that
is currently valid is shown.
1. Tap (
A list with all potential values opens. The value that is currently valid is marked.
2. Tap the desired value. It is now marked.
3. Tap the
The list closes. The new value is displayed.
List).
Accept button.
Viewing information about a setting
For each setting there is a (Help) button. Tap the button to view an explanation of
of the setting.
January 2008 NAVIGON 2100/2120 User’s Guide 83
Revision 1.0 NAVIGON, INC.
Page 96

Customizing Your NAVIGON 2100/2120
Selecting options
Toggling between options
Some settings can only accept two or three different values. All values are displayed
with the currently selected value shown in black.
•Tap (
Toggle) to alternate between the potential values.
Changing an option setting
After changing an option setting:
• To save the change, tap the
• To discard the change, tap the
The S
ETTINGS WINDOW redisplays.
Done button.
Cancel button.
84 NAVIGON 2100/2120 User’s Guide January 2008
NAVIGON, INC. Revision 1.0
Page 97

Legal Notices
NOTICE TO DRIVERS IN CALIFORNIA AND MINNESOTA
State law prohibits drivers in California and Minnesota from using mounts on their
windshields while operating motor vehicles. NAVIGON does not take any responsibility for any fines, penalties, or damages that may be incurred as a result of disregarding this notice. (See California Vehicle Code Section 26708(a); Minnesota Statutes
2005, Section 169.71)
GPS
Underwriters Laboratories Inc. (“UL”) has not tested the performance or reliability of
the Global Positioning System (“GPS”) hardware, operating software or other aspects
of this product. UL has only tested for fire, shock or casualties as outlined in UL’s
Standard(s) for Safety for Information Technology Equipment (UL 60950-1, cUL 991).
UL Certification does not cover the performance or reliability of the GPS hardw are and
GPS operating software. UL MAKES NO REPRESENTATIONS, WARRANTIES OR
CERTIFICATIONS WHATSOEVER REGARDING THE PERFORMANCE OR RELIABILITY OF ANY GPS RELATED FUNCTIONS OF THIS PRODUCT.
January 2008 NAVIGON 2100/2120 User’s Guide 85
Revision 1.0 NAVIGON, INC.
Page 98

This page intentionally left blank.
86 NAVIGON 2100/2120 User’s Guide January 2008
NAVIGON, INC. Revision 1.0
Page 99

Technical Data
Specifications
Dimensions 4.05” x 3.09” x .72”
Weight 5.4 ounces
Operating conditions Operating temperature -10°C to 60°C
Storage temperature -20°C to 70°C
Humidity 0% to 90%, non-precipitating
CPU Samsung 400Mhz
Operating System Microsoft Windows CE Net 5.0
Display 3.5”-LCD-Color display with resistive Touch-Panel
320 x 240 pixels (WQVGA)
Landscape format, permeable
Memory ROM 64 MB
RAM 64 MB
GPS Built-in (SiRF Star III)
TMC Built-in (GNS FM6)
I/O Keyboard Software keyboard
Loudspeaker Built-in
Memory card SD, compatible with MMC/SD
USB USB 1.1
Rechargeable battery Type Li-Ion, 1100 mAh
Period of operation
Charging Electronic Built-in
Duration Approx. 6 hours
Car charger cable Type With integrated TMC antenna
Input 12V = (Direct current, DC)
Output 5V =, 1A (Direct current, DC)
1. Some NAVIGON 2100/2120 features can reduce battery operation time. These include TMC accessory service, GPS antenna reception, Daytime backlight feature, etc. When on full power mode, battery time is approx. 2-3 hours.
Up to 3.5 hours
1
January 2008 NAVIGON 2100/2120 User’s Guide 87
Revision 1.0 NAVIGON, INC.
Page 100

Technical Data
Compliance Notices
Compliance Notices
The NAVIGON 2100/2120 complies with Part 15 of the FCC interference limits for
Class B digital devices fo r h ome or office use.
“Operation is subject to the following two conditions: (1) this device may not cause
interference,and (2) this device must accept any interference, including interference
that may cause undesired operation of the device.”
(Carrier frequency: 1575.42MHz, receiver only)
88 NAVIGON 2100/2120 User’s Guide January 2008
NAVIGON, INC. Revision 1.0
 Loading...