


NAVCAM
-
717D
USER
MANUAL
1

NAVCAM
-
717D
USER
MANUAL
2
TABLE OF CONTENTS
IMPORTANT SAFETY INSTRUCTIONS AND PRECAUTIONS 3
WHAT’S IN THE BOX 3
MICRO SD CARD REQUIREMENTS 3
CAMERA BUTTON AND HARDWARE OVERVIEW 4
WHAT DO THE BUTTONS DO? 5
WHAT DO THE LED INDICTORS MEAN? 6
OPERATING THE NAVCAM-717D FOR THE FIRST TIME 6
POWER ON/OFF (AUTO ON/OFF) 6
ABOUT GPS SIGNAL RECEPTION 6
RECORDING FILES
6
PLAYING BACK A RECORDED FILE 7
DELETING A FILE 7
EMERGENCY VIDEO RECORDING 7
AUTO BUMP FILE RECORD (G SENSOR) - SAVING RECORDING VIDEO FILES 7
TAKING A STILL PICTURE 7
USB CONNECTION / MASS STORAGE / PC CAMERA 7
USER SETTINGS 8
SYSTEM SETTINGS 9
TRACKING SOFTWARE – QUICK GUIDE 10
THE GPS SOFTWARE – OVERVIEW 10
FAQ
11
PRODUCT SPECIFICATIONS 12

NAVCAM
-
717D
USER
MANUAL
3
IMPORTANT SAFETY INSTRUCTIONS AND PRECAUTIONS
- Read all instructions carefully before use.
- Retain manuals for future reference.
- Use this product only in the manner described.
- Only use a water-dampened soft-cloth to clean the surface of this product.
- The following will damage this product: any liquid such as water or moisture, extreme heat; cold;
humidity, dusty or sandy environments.
- The NAVCAM-717D is designed to be mounted on a vehicle windscreen, as high as possible, to
ensure a maximum viewpoint. Please ensure that any attached cables are secured and will not
cause the device to fall.
- There are no user serviceable parts in this product.
- Un-authorized attempts to dismantle or repair this product will void product warranty
WHAT’S IN THE BOX
1) NAVCAM-717D
2) This user manual
3) Micro USB Charge and data transfer cable
MICRO SD CARD REQUIREMENTS
The NAVCAM-717D requires a Micro SD card (not included) to record video/image content. For
optimal performance, we recommend using a Class 10 micro SD card UHS 3 (minimum) to ensure
fast data transfer rates
Note: Some “Extreme Speed” class 10 UHS 2 cards will not work correctly with the
NAVCAM-717D. Other low speed cards are not recommended and the user many
experience constant intermittent faults.

NAVCAM
-
717D
USER
MANUAL
4
CAMERA BUTTON AND HARDWARE OVERVIEW
1
OK button
9
USB interface
2
Menu button
10
Cabin Camera
3
Up button
11
GPS Antenna socket
4
Down button
12
Speaker
5
MODE Button
13
Lens
6
Power button
14
LED screen
7
Reset (R)
15
Windscreen Mount socket
8
Micro SD card slot
16
LED indicator lamp
15

NAVCAM
-
717D
USER
MANUAL
5
WHAT DO THE BUTTONS DO?
Button
Button
Name
Video Mode
Photo Mode
Playback Mode
Menu
Navigation
Power
On / Off – Press
and hold to turn
On and Off
On / Off –
Press and hold
to turn On and
Off
On / Off –
Press and hold
to turn On and
Off
[No
function]
Menu
Pause recording
(under standby
mode)
Enter Menu
settings
Enter Menu
settings
[Then]
Switch to
hardware
settings
Mode
Pause recording
(under standby
mode)
Switch modes Switch modes
Exit menu
mode
Page Up Zoom in Zoom in Next file
Scroll up
through
menu
settings
OK
Start /Stop
recording
Take a photo Confirm
Enter menu
setting /
Select
Page Down
Zoom out Zoom out Previous file
Scroll down
through
menu
settings

NAVCAM
-
717D
USER
MANUAL
6
WHAT DO THE LED INDICTORS MEAN?
Indicator Status
Left indicator
- Solid Green
Camera is turned On.
Left indicator
- Flashing Green
Camera is recording
Right indicator
- Red Charging / connected to power
Right indicator
– Off (Not Red)
Not Charging / not connecte
d to power
OPERATING THE NAVCAM-717D FOR THE FIRST TIME
Connect a USB car charger to the car’s 12v Cigarette lighter socket and the other end to the Micro
USB port on the NAVCAM-717D. Insert a Micro SD card into the Micro SD slot and turn the device
on. When the ignition is turned on, the NAVCAM-717D will turn on.
POWER ON/OFF (AUTO ON/OFF)
When connected to power, the NAVCAM-717D will turn ON or OFF automatically when the car’s
ignition is turned ON or OFF. If the NAVCAM-717D does not turn off immediately it means the device
is completing the file save process before turning off (usually only a few seconds).
To turn the NAVCAM-717D ON, press and hold the power button on the side of the device. To turn
off, press and hold the power button again.
If power is “constant on” (in some European vehicles), then the NAVCAM-717D will need to be
turned ON/OFF manually using the power switch.
ABOUT GPS SIGNAL RECEPTION
For convenience, your NAVCAM-717D will automatically connect to GPS satellites when in range.
Just like all PND (Portable Navigation Devices) this may take a few minutes (especially the first time).
The signal can also be affected by driving through tunnels for example. The GPS connection however
will reconnect when the GPS satellites come back into range.
Until GPS is re-connected, the following features may not be displayed properly:
- Driving speed display
- Tracking details used by the GPS Player such as speed, longitude, Latitude and Date and Time.
AUTO RECORD WHEN TURNED ON
When the NAVCAM-717D is turned on (via the auto on feature) the device will automatically begin
recording. To stop recording, press the OK button or turn the device OFF using the power button.
RECORDING FILES
Turn on the NAVCAM-717D. Recording should start automatically, if not press the OK button. When
recording has started a timer indicator will display at the top right hand side of the unit. The screen
will also display a count up timer for the recording at the top.
The recorded files are saved to micro SD Card. Recording can be stopped, by either pressing the OK
button or by turning the car ignition off (stopping power to the device)
The NAVCAM-717D supports cycle recording. It will overwrite the oldest video files with new ones.
Depending on the size of the memory card and the speed rating of the card, there may be as much as
a 3 second pause whilst old files are selected and overwriting begins with newer files. This pause time
will not be recorded.

NAVCAM
-
717D
USER
MANUAL
7
PLAYING BACK A RECORDED FILE
From the main screen (and while not recording), press the “P” button to toggle to the PLAYBACK
mode. Then, select the video you wish to view using the up and down arrow keys and the OK button
to confirm.
DELETING A FILE
When in playback mode, select the video you wish to delete, then press the M button. Select delete
and then press OK. Lastly select CURRENT or ALL.
Note: Once files are deleted you cannot get them back.
EMERGENCY VIDEO RECORDING
You can press the MENU button at any time to preserve a file from being overwritten. The lock icon
will be showed on the display as well.
AUTO BUMP FILE RECORD (G SENSOR) - SAVING RECORDING VIDEO FILES
Due to the “cycle recording” nature of this technology, older recorded files will be overwritten
(depending on the chosen resolution settings and the memory capacity of the memory card).
Alternately the G sensor will trigger an auto save lock if it senses a bump (sensitivity is selectable via
the user settings), so that the file being recorded is not overwritten in the cycle record process. Such
files will be saved to the folder called EVENT.
TAKING A STILL PICTURE
While not in record mode, press the “P” button to toggle to CAMERA mode. Press the OK button to
take a photo.
USB CONNECTION
Connect the NAVCAM-717D to a Windows PC with a Micro USB to USB cable. The screen will then
display "Mass storage" and "PC camera". [Please select an option for you.]
MASS STORAGE
Find the device Under “My computer” or “Windows Explorer”; find the newly connected drive.
Recorded files and images are recorded in the MOVIE, PHOTO folder, while preserved files are
recorded in the MOVIE/RO folder. Files can be played back using Windows Media player, VLC or a
compatible .AVI media player or an image viewer (for JPG images).
PC CAMERA
Connected as a web camera for your PC.
NAVCAM
-
717D
USER
MANUAL
8
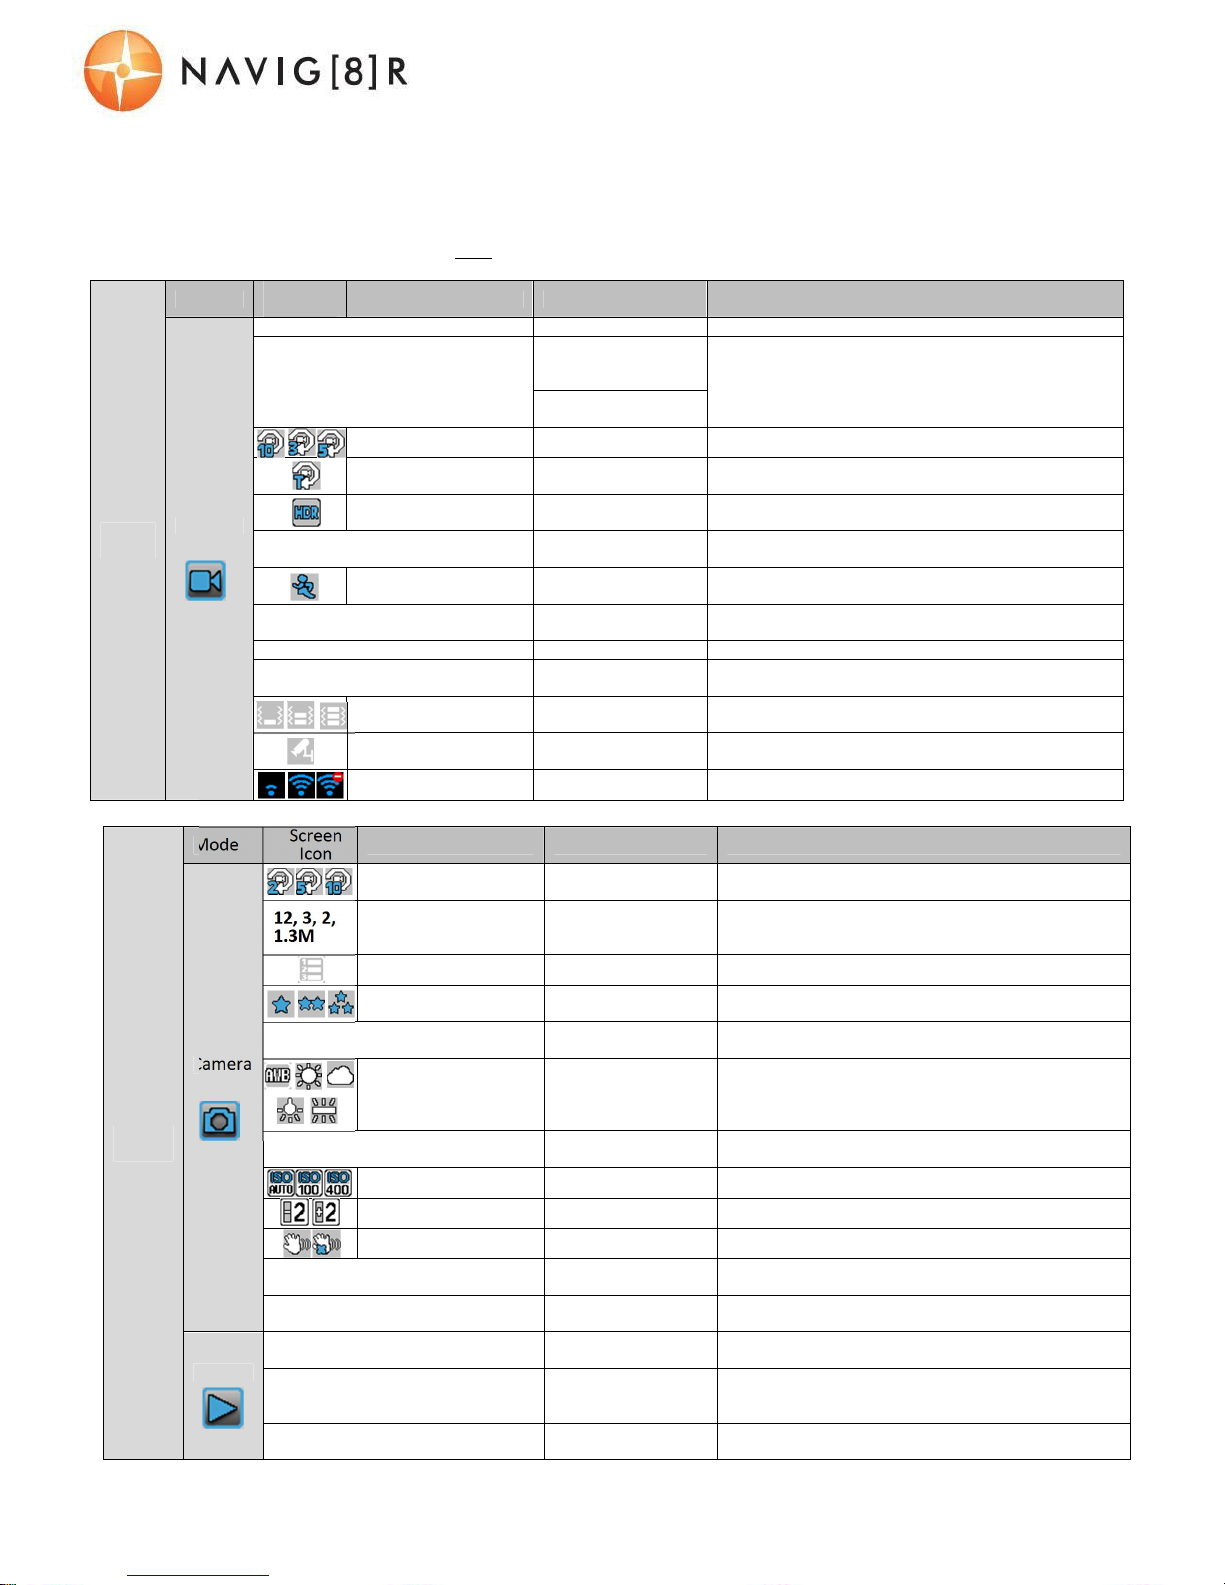
USER SETTINGS
From the main screen, press the MODE button to select between VIDEO or CAMERA MODE menu
settings. Then using a combination of the arrow keys and the OK button to confirm your choice, from
the following options list.
Note: Press the MODE button twice, first, to access SYSTEM SETTINGS as shown on the following page.
Menu
Setting
Mode
Screen
Icon
Menu Options Description
Video
Update Time Zone
Off, [Various]
Set the time settings to your time zone
Resolution
1080FHD
1920x1080
720P 1280x720
Change the resolution of recorded files (Note:
Higher Resolution files take up more storage space)
1080P 1440x1080
720P 1280x720
Loop recording Off, 3, 5, 10 mins Select the length of each recorded file
Time Lapse
Record
Off, 100, 200,
500ms
Change the length of recorded video
HDR Off, On
Better image quality with High Dynamic Range
(HDR)
Exposure +2.0 to -2.0
Fill light according to different light source intensity
in
different
environment.
Motion
detection
Off, On
When power is connecte
d, begin recording when
motion is
detected.
Record sound Off, On
Record the sounds/voices from inside your car
whilst
recording
Date stamp
Off, On
Overlay the date and time on recorded files
Plate number
Off, On [Select 7
characters]
Overlay the license plate number on recorded files
Gravity sensor
Off, High, Medium,
Low
Adjust the level of impact required to preserve
recorded incident
files.
Parking monitor Off, On
Set camera to turn on if car is bumped, while
parked (and power turned
off)
GPS Off, On Turn the GPS feature Off or On
Menu
settings
Mode
Screen
Icon
Menu Options Description
Camera
Capture mode
Single, 2sec, 5sec,
10sec
Single shot or delayed shot timer
12, 3, 2,
1.3M
Resolution
12, 10, 8, 5, 3, 2,
1.3M, VGA
Change the resolution of recorded files
(Note:
Higher Resolution files take up more storage
space)
Sequence Off, On Take multiple images in succession
Quality
High quality,
standard, economy
Adjust compression for better image quality
Sharpness
Strong, standard,
soft
Sharpness of recorded files
White balance
Automatic, sun,
cloudy, tungsten,
filament lamp,
fluorescent
Adjust colour scheme for recorded files
Colour
Colour white, black,
brown
Adjust colour scheme for recorded files
ISO Auto, 100, 200, 400 Adjust camera to various light sensitivities
Exposure -2 to +2 Adjust exposure time for recorded files
Anti-shaking Off, On Smooths out bumpiness of recorded files
Quick Review Off, 2sec, 5sec
Playback
files as slide show with a delay
between
Date Stamp Off, Date, Date/Time
Select On / Off to add a time
-
stamp to the
recorded
video
Play
Delete
Delete current,
delete all
Delete files directly from device
Protect
Lock Current, Unlock
current, lock all,
Unlock all
Change the preservation settings of saved
files
Slide Play 2sec, 5sec, 8sec
Playback files as slide show with a delay
between

NAVCAM
-
717D
USER
MANUAL
9
SYSTEM SETTINGS
From the main screen, press the MENU button, then using a combination of the arrow keys and the OK button to confirm your
choice, select settings from the following options list:
System settings
Menu
Options
Description
Date/time
MM/DD/YY, DD/MM
/YY, YY/MM/DD
Select the preferred date orientation
Auto power off
Off, 3, 5, 10mins
Turn device
off after a set period of time
Beep Sound
Off, On
Audible beep on key press
Language
Various
Choose preferred system language
Frequency
50Hz, 60Hz
[Adjust to 50Hz for Australia power supply]
Format SD Card
Format SD card (Note: Permanently erases
all
data on card. Note: the unit cannot be used until
formatting is complete, which usually takes about
20seconds depending on the size of your card.)
Screen Saver
Off, 30sec, 1mins,
2mins
If no buttons have been pressed and if
no
recording is taking place, the unit can be shut off
automatically after set periods of time
Lamp settings
Day Mode, Night Mode
Day mode IR Lamps ON, Night mode IR LED OFF
Delay shutdown
Off, 5sec, 10sec, 30sec
Keep camera on after car is turned off
Default setting
Cancel,
OK Perform a factory reset
Version
Used when checking to see if a new firmware is released.
NAVCAM
-
717D
USER
MANUAL
10
Map and
plotting
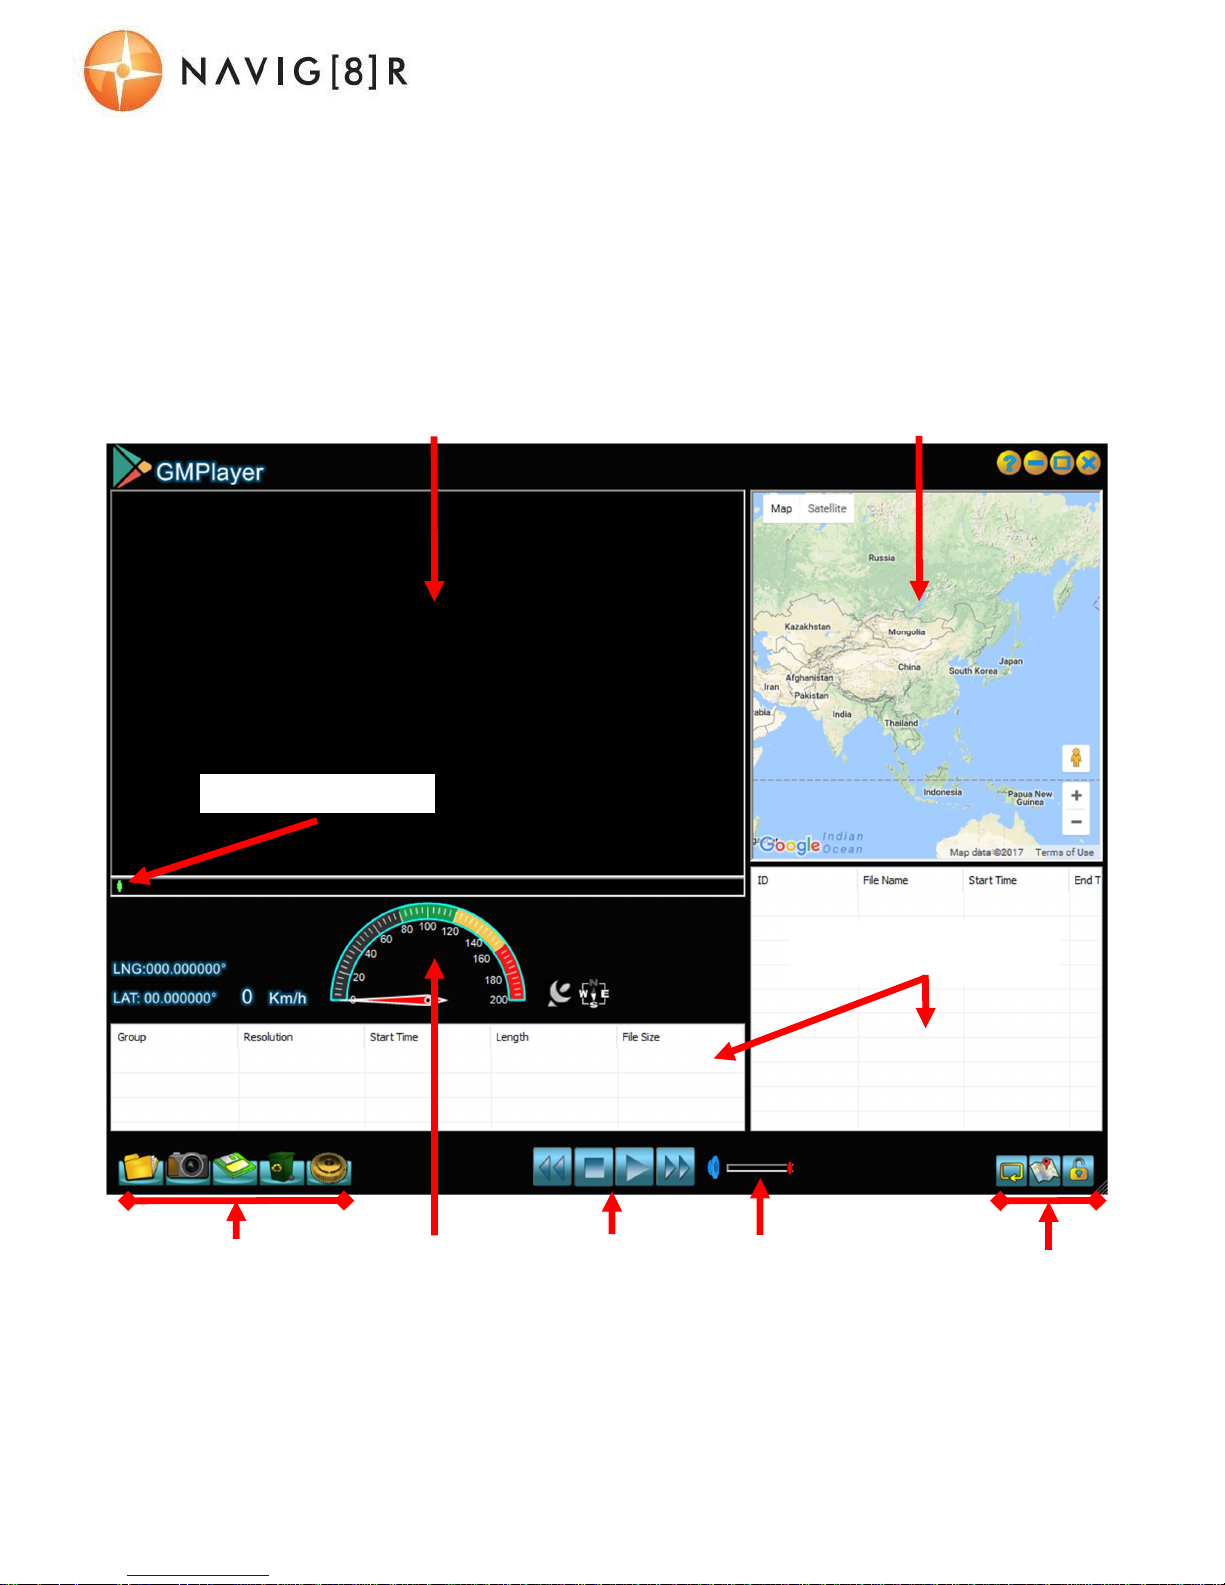
TRACKING SOFTWARE – QUICK GUIDE
INSTALLING THE SOFTWARE
Please visit our web site and search for the NAVCAM-717D. Click on the DOWNLOADS tab
and download the GPS Player software.
THE GPS SOFTWARE - OVERVIEW
V
ideo playback
screen
Speedo
visualisation
Select a file
for playback,
Pause and Stop
Playback
list
(File names and details)
P
layback
controls
Adjust
Volume
Play all files /
Display or Hide
Map, Lock or Unlock file
Playback
duration
bar Map
plotting
(GPS Coordinates)

NAVCAM
-
717D
USER
MANUAL
11
FAQ
Fault Suggestion
The device has frozen /
stopped working.
Check the speed of your memory card. We recomme
nd class
10 for faster transfer rates, especially If the record file size is
bigger (say 15 min recording increments at 1080Full HD).
Alternately, check the car’s internal temperature. The device
will enter standby mode if the ambient vehicle temperature is
below 0 or above 30 degrees C.
The device will not start
recording, or stop recording or
has other intermittent faults
Most common cause of intermittent faults is an under rated
SD card. We recommend a class 10 card for this device as
recording at 1080P
resolution requires a superior speed card.
The speaker warning sounds
are a little loud. Can you turn
them off?
Yes. Just go the user settings screen and select speaker. Then
turn the speaker to OFF.
Device does not turn off
If in vehicle: check that the 12V socket is not still powered (on)
when the key is removed (as with some European cars).
Wait 10 seconds for finalization and closure. Disconnect power
lead to device Press “ok” to stop recording, then turn off.
Cant playback the .MOV video
files
Upgrade your windows media player version or use an
alternate media player such as VLC media player
My video/pictures of an
incident are NOT there
Check the capacity of your memory card, the files may have
been overwritten in the record cycle process. If the Bump file
record feature did not automatically preserve the footage, then
be sure to manually save the footage next time by pressing the
Can’t see the device in my
computer
Check the USB c
able connection to the device and USB port. Try
another USB port, possibly directly to the PC/notebook (rather
than through a USB hub)
NAVCAM
-
717D
USER
MANUAL
12
PRODUCT SPECIFICATIONS
LCD Screen
3.0 inch TFT (960 x 240)
Video Resolution Up to 1920 x 1080P 30 frames/s
Photo Resolution Up to 12MP
Built-in Speaker /
Microphone
Yes / Yes
Auto Recording on
power-up
Yes. Recording starts on ignition power (Charging socket)
Date / Time stamp Supported – on video and on photos
GPS location and Speed
stamp
Supported – on video
Power off auto save Yes. Current file will auto save when power is turned off.
Auto power on/off Yes – when ignition turned on / off (5, 10, 30sec)
Motion detection Yes
Auto Bump Record Yes. Adjustable sensitivity (low/medium/high)
Lens Viewing angle 170 degree wide angle
Cycle recording times 3, 5, 10 mins
File Format Image: JPG Video : .MOV H.264
Micro SD Memory Card Class 10 UHS3 or above recommended. Max capacity 64GB
Language System English and various
For further product information please visit our product web page at www.laserco.com.au or email
support@laserco.com.au
Please note: As continual improvements are made to this product, slight operational differences
may occur. For the most up-to-date user manual, please visit our web site.

NAVCAM
-
717D
USER
MANUAL
13
Warranty Against Defects
Laser Corporation Pty Ltd (“Laser”) warrants your new product to be free from defects in materials
and workmanship for 12 months, from the date of purchase, provided that the product is used in
accordance with accompanying recommendations or instructions where provided. The benefit of
this warranty is in addition to your rights under the Australian Consumer Law and to other rights
and remedies of the consumer under a law in relation to the goods or services to which the
warranty relates.
Through a network of retailers and resellers, Laser will provide you with your choice of a refund,
repair or exchange (where possible) for this product if it becomes defective within the warranty
period. This warranty will no longer apply where the defect is a result of alteration, accident,
misuse, abuse, normal wear and tear, neglect or improper storage.
Please retain your receipt as proof of purchase
How to make a product warranty claim:
Step 1: Find your receipt which proves the date of purchase. Where the date of purchase
cannot be verified, your place of purchase or Laser will make an assessment based on the date of
manufacture, the condition of the Laser Product and the type of defect.
Step 2a): Contact your place of purchase. They will assess the nature of the fault and refund or
replace the product as per their store refund or warranty policy.
Step 2b): If your place of purchase cannot be contacted, then you can contact Laser. Customer
Service with details of your defective Laser Product: Phone: (02) 9870 3388; or Email:
service@laserco.com.au or online www.laserco.com.au/warranty (click on “Consumers (End
Users)”). Our business address is at 1/6-8 Byfield Street, North Ryde, NSW 2113
Step 3: Laser will issue you with a Return Authorisation (RA) number within 48 hours. When
requested, send us the defective Product and a copy of your receipt. Laser will cover the cost of
the return delivery.
Step 4: Wait for us to contact you. Once we have received your defective Laser Product for
inspection, we will inform you of our assessment of your claim within 7 days. When we contact you,
we will firstly let you know whether you have a valid claim under this Warranty, and if so, we will
inform you whether your defective Laser Product will be replaced or repaired, together with the
number of days you can expect to wait to receive your replaced or repaired Laser Product.
Our goods come with guarantees that cannot be excluded under the Australian Consumer Law.
You are entitled to a replacement or refund for a major failure and compensation for any other
reasonably foreseeable loss or damage. You are also entitled to have the goods repaired or
replaced if the goods fail to be of acceptable quality and the failure does not amount to a major
failure.
 Loading...