

NAVC-817D USER MANUAL
1
Navc-817D Manual Ver 2.3 06/2017
Crash Camera FHD Front and Rear View
with GPS and Wi-Fi App Viewer

NAVC-817D USER MANUAL
2
Navc-817D Manual Ver 2.3 06/2017
Table of Contents
Important Safety Instructions and Precautions 3
Battery Warning 3
Notes on Installation 3
Caution 4
What’s in The Box 5
Buttons and Connections 5
On Screen Display 6
Power On/Off Function (Auto On/Off) 7
Setting the Time Zone 7
Memory Card Required For Operation 7
Video/Photos Storage Capacity 7
Recording Crash Cam Footage 8
Taking A Still Photo (DSC) 8
Saved File Options 8
Camera and File Playback 9
Installation the Front Camera 10
Installing the Rear Camera 11
Parking Camera Mode (Connecting the RED Lead) 12
Flip Parking Camera Image (Reverse Image) 12
Menu Settings and Options 13
App – Android 14
[Connect Your Device and App Via Wi-Fi] 14
Navigating the App 14
App – Apple ios 15
[Connect Your Device and App Via Wi-Fi] 15
Navigating the App 15
GPS Player Software – Overview 16
Trouble Shooting / Q & A 17
Product Specifications 18

NAVC-817D USER MANUAL
3
Navc-817D Manual Ver 2.3 06/2017
Important Safety Instructions And Precautions
- Read all instructions carefully before use.
- Retain manuals for future reference.
- Use this product only in the manner described.
- Only use a water-dampened soft-cloth to clean the surface of this product.
- The following will damage this product: any liquid such as water or moisture, extreme
heat, cold, humidity and dusty or sandy environments.
- The Crash Cam is designed to be mounted on a vehicle windscreen, as high as possible, to
ensure the maximum viewpoint. Please ensure that any attached cables are secured and will
not cause the device to fall.
- During charging or extended use, the product may become warm. This is normal.
- There are no user serviceable parts in this product.
- Unauthorised attempts to dismantle or repair this product will void the product warranty.
Battery Warning
- Never dismantle, crush, or pierce the battery, or allow the battery to short-circuit. Do not
expose battery being placed in high temperature environment, if battery leaks or bulges,
stop continue to use.
- Always charge using the system. Risk of explosion if battery is replaced by an incorrect
type.
- Keep the battery out of reach of children.
- Batteries may explode if exposed to open fire. Never dispose of batteries in a fire.
- Never replace the battery on your own; have the dealer do it for you.
- Disposed of used batteries observing local regulations.
Notes on Installation
- Please measure the front windshield viewing area, make sure not to block driver's front
view, install the camcorder below the rear view mirror (the central, higher right position of
the front windshield). And we recommend that the sky and the land occupied by the screen
50%, fix the car holder and then adjust the camcorder so that the lane is aligned with the
screen. Proper installation enables the camcorder to maximize the efficiency also can
enhance the accuracy of LDWS.
- Make sure that the lens is within the wiping range of the windscreen wiper to ensure a
clear view even when it rains.
- Do not touch the lens with your fingers. Finger grease may be left on the lens and will
result in unclear videos or pictures. Clean the lens on a regular basis.
- Do not install the camcorder on a tinted window. Doing so may damage the tint film.
- Make sure that the installation position is not hindered by the tinted window.
- This product is suitable for light windshield or light colour heat-resistant film windows, it
will affect video quality if installed on dark windows or dark heat-resistant film windows.
- Use the products with the supplied charger only. Using the incorrect charger may result in
damage and or a major device failure.
- The suction cup bracket is designed for temporary mounting and will require periodic reinstallation. The adhesive bracket is designed for one time and long term installation. We
recommend using the adhesive bracket if a permanent installation is desired. Please install
the bracket on the best open-field view. Do NOT install the bracket in a location that may
obstruct your field of view and impact driving safety.

NAVC-817D USER MANUAL
4
Navc-817D Manual Ver 2.3 06/2017
Caution
- Due to local laws and vehicles safety considerations, do not operate the Crash Camera
while driving.
- Set up time zone, time and date accurately before you use this camcorder.
- The firmware function of this crash camera is for reference only, drivers are advised to
exercise discretion based on actual road conditions.
- The results of GPS positioning are only for reference, and should not affect the actual
driving situation. The crash camera cannot guarantee 100% positioning accuracy.
- GPS positioning accuracy may differ depending on weather and location such as high
buildings, tunnels, undergrounds, or forests. GPS satellite signals cannot pass through solid
materials (except glass). Tinted window will also affect the performance of the GPS
Satellite reception.
- GPS reception performance on each crash camera may differ. The camcorder cannot
determine the accuracy of the positioning results from different hardware.
- The values displayed in this crash camera, such as speed and position, may be inaccurate
due to the influence of surrounding environment. They are for your reference only.
- This product is used only for non-commercial use, within the maximum limits permitted by
applicable law. We do not take any responsibilities for the loss of use of the product.
- This crash camera can get warm when in use and this is normal.
- Improper use or operation of the product may result in damage of the product or its
accessories and void the warranty.

NAVC-817D USER MANUAL
5
Navc-817D Manual Ver 2.3 06/2017
What’s in the Box
Navig8r Crash Cam NAVC-871D (Monitor with Built in Front Cameras), GPS Antenna module
with lead (hardwired to car charger), Windscreen Suction-cup Mount, Rear Camera with
self-adhesive mount and extension lead, USB Car Charger, User Manual
Buttons and Connections
No. Function Description Action
1 Micro USB Socket Rear Camera AV input
Insert parking camera lead into this
socket into this socket
2 Mount Windscreen suction mount
Connect your windscreen suction mount
to your camera
3 Mini USB Socket DC Power input
Insert power cable from car DC power
supply into this socket
4 Micro SD Card Slot Used as External memory Insert SD card for memory storage
5 “Up” button Used to navigate menu settings
Press to navigate between MENU
settings or MODES
6 Mode button Select between different modes
Press to change between different
modes
7 “Down” button Used to navigate menu settings
Press to navigate between MENU
settings or MODES
8 “OK” button
The OK is used like “enter” on a
keyboard
Press to confirm MENU settings or when
selecting a MODE
9 Menu Camera settings Press to access camera MENU settings
10 Lock Protect from overwrite
PRESS during recording to protect a file
from being overwritten
11 Power Turn On or Off Press and hold to turn device ON or OFF.
1 3 5 6 7 10
11
4 8 9
NAVC-817D USER MANUAL
6
Navc-817D Manual Ver 2.3 06/2017
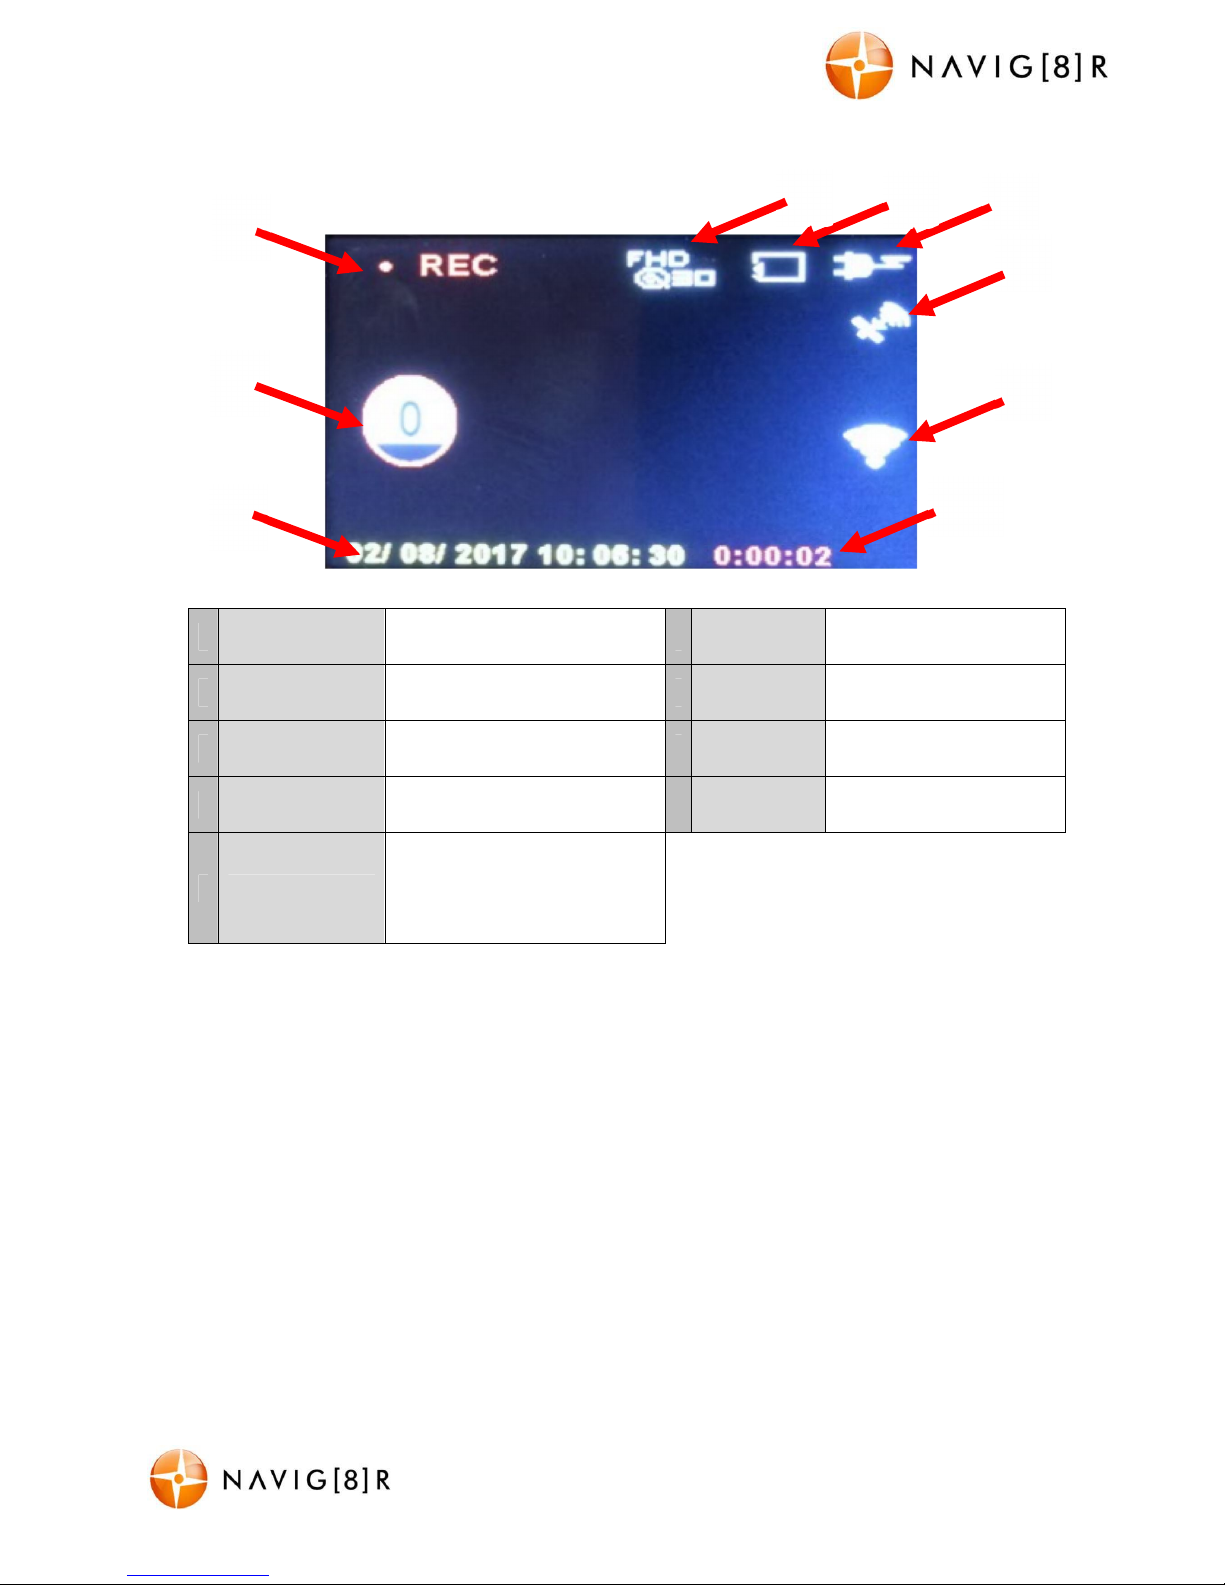
On Screen Display
1
Date and time
Display
Date, time 6
Power
supply
Displays when
connected to power
2
GPS Speed
Indicator
Current GPS speed display
(when GPS connected)
7
GPS
Connection
Displays when GPS
connection complete
3
Recording
status
STBY: Standby
REC: Record
8
Wi-Fi
Connection
Displays when Wi-Fi
connection complete
4
Resolution and
frame rate
FHD (1080P) 30fps 9 Timer
Shows elapsed time
during recording
5 Micro SD Card
Shown as an open box
when inserted and a
crossed out box when not
inserted.
2
7
9
1
8
3
4 5 6

NAVC-817D USER MANUAL
7
Navc-817D Manual Ver 2.3 06/2017
Power On/Off function (auto on/off)
To turn ON/OFF the NAVC-817D, press and hold the power button. When connected to the
car charger (cigarette socket) of your car, the NAVC-817D will turn ON and OFF
automatically when the car’s ignition is turned ON or OFF. If the NAVC-817D does not turn
off immediately it means the device is completing the file save process before turning off
(usually only a few seconds).
Note: If the car charger car charger socket is “constant on” (in some European vehicles), then
the NAVC-817D will need to be turned ON/OFF manually by the power button or by
removing the car charger plug.
Whilst connected to the car charger DC socket (or from a powered USB hub or PC USB port)
and the camera is turned OFF, the LED indicator will glow RED (battery is charging) and will
turn OFF once the battery is fully charged. (Note – the device’s battery will not charge if
connected to a PC USB port)
Setting the Time Zone
From the main Video recording screen, press and hold the MENU button. You will then be
prompted to “Set Time Zone”.
Select YES using the Up and down arrow buttons then press OK. This shortcut will then take
you directly to the Time Zone menu setting, where you can scroll through and select your
location.
Press the OK button, then the MENU button to take you back to the Video recording screen.
Memory Card required for operation
The NAVC-817D requires a Micro SD card (not included) to record video/image content.
For optimal performance, we recommend using a Class 10 Micro SD card to ensure fast data
transfer rates.
See below for a table showing micro SD card capacity and the relevant amount of video
content able to be stored.
Video/Photos Storage Capacity
Resolution 16GB 32GB
Video
1920*1080 (1080p) 4 Hours 8 Hours
1040*720 (720p) 5 Hours 10 Hours
Note: Actual recording times may vary depending on the content of your recording.

NAVC-817D USER MANUAL
8
Navc-817D Manual Ver 2.3 06/2017
Recording crash cam footage
Turn on your NAVC-817D and press the REC button (unless auto REC on has been set with
ignition on). When recording commences, the LED indicator will flash BLUE and RED and
there will be a flashing RED dot on screen. (A timer will also start “ticking over” on screen).
The recorded file is then saved onto the Micro SD Card. You can manually stop recording by
pressing the OK button or turning the car ignition off (stopping power to the device).
Note: If G-Sensor is selected, recording will start automatically when there is movement
detected. This setting is ideal for when the car is parked or unattended. Note that if left on
battery power (car is turned off), the standby time and record time will be dependent on the
level of charge on the battery.
If the motion detection feature is selected whilst driving, the camera will stop recording
when no movement is detected, such as when stopped at a traffic light, but will recommence
recording when the car moves again.
Taking a Still Photo (DSC)
Select CAMERA MODE using the MODE button.
Press OK to take a still image
Saved file options
From any playback screen PRESS and HOLD the menu button to access the DELETE and
PROTECT controls. Navigate these MENUs and option using the 1) UP and DOWN arrows
and the OK to select your choice.
When finished, use the MENU button to return back to the main Video recording screen.
Note: The Hardware settings can also be accessed in this options MENU
In the event of an incident/accident – Use Auto Bump File Save.
- Due to the “cycle recording” nature of this technology, older recorded files will be overwritten
(depending on the resolution settings and the memory capacity of the Micro SD card).
- Should you wish to KEEP (protect) the video footage of an incident from not being overwritten, press
the MENU button during recording. A “pad lock” confirmation icon will appear at the bottom right of
the screen.
- Alternately the in-built G sensor will trigger an auto save lock if it senses a bump (sensitivity is
selectable via the Menu), so that the file being recorded is not overwritten in the cycle record
process. The on-screen car icon will then begin flashing.

NAVC-817D USER MANUAL
9
Navc-817D Manual Ver 2.3 06/2017
1 2 3 2
Camera and File playback
There are 3 screens for video and still image playback.
1) Browser Videos, 2) Browser Event [Video’s] 3) Browser Photos
No.
Name Description
1 File Name Displays file name of recorded file
2 Playback feature icon Type of media selected for playback
3 File counter [number of screens] Amount of recorded files [number of screens]
4 Date and Time Date and time details of the recorded file
5 Elapsed time Total length of file in hours, minutes, seconds

NAVC-817D USER MANUAL
10
Navc-817D Manual Ver 2.3 06/2017
Installation the Front Camera
The NAVC-817D works best when mounted centrally and high up on the windscreen
(typically behind or close to the rear vision mirror for the front camera). Use the supplied
windscreen suction mount to affix the NAVC-817D to the windscreen and then adjust the
mount until you can see a clear view of the road ahead on the Monitor. Note: Be sure to
remove the plastic cover from the silicone suction pad and ensure the glass surfaces are
clean, dry and lint free.
Note: The above wiring diagram above is only a suggestion.
1) NAVC-817D device mounted behind the rear vision mirror.
2) Car charger cable routed behind rear vision mirror.
3) GPS antenna module discretely hidden behind sun visor
4) Cable hidden behind roof headlining.
5) Cable hidden behind “A” pillar – beware of airbag equipped cars.
6) Cable is routed beside the dashboard/near the door hinges.
7) Cable is passed under the passenger carpet (or under the dashboard).
8) Car charger plug is connected to the car’s “cigarette socket”.

NAVC-817D USER MANUAL
11
Navc-817D Manual Ver 2.3 06/2017
Installing the Rear Camera
Installing the rear camera is done in much the same fashion, however the cable is run under
the carpet of:
1) the front passenger side foot well (near feet)
2) around the seat belt anchor points on the floor
3) past the rear passenger side foot well (near feet) and lastly
4) Behind the rear seat and out through to the exterior
The video output from the rear camera, when connected successfully, will appear
automatically inside the current front-facing camera image, called “picture-in-picture”.
Note: Below are some camera location suggestions.
Example 1: Note.
Make sure the camera
is far enough away
that the wipers do not
touch it when in use.
Example 2: Note. You
may choose to mount
the camera next to a
number plate light
Example 3: Note. If
mounted directly above,
be sure to not abstruct the
view of your number plate
Example 4: Note. Be
sure to replace any
weather proof seals to
avoid water leaks and
damage to your car
The final position for
the camera mnust allow
for a 45 degree angle,
for best coverage
NAVC-817D USER MANUAL
12
Navc-817D Manual Ver 2.3 06/2017
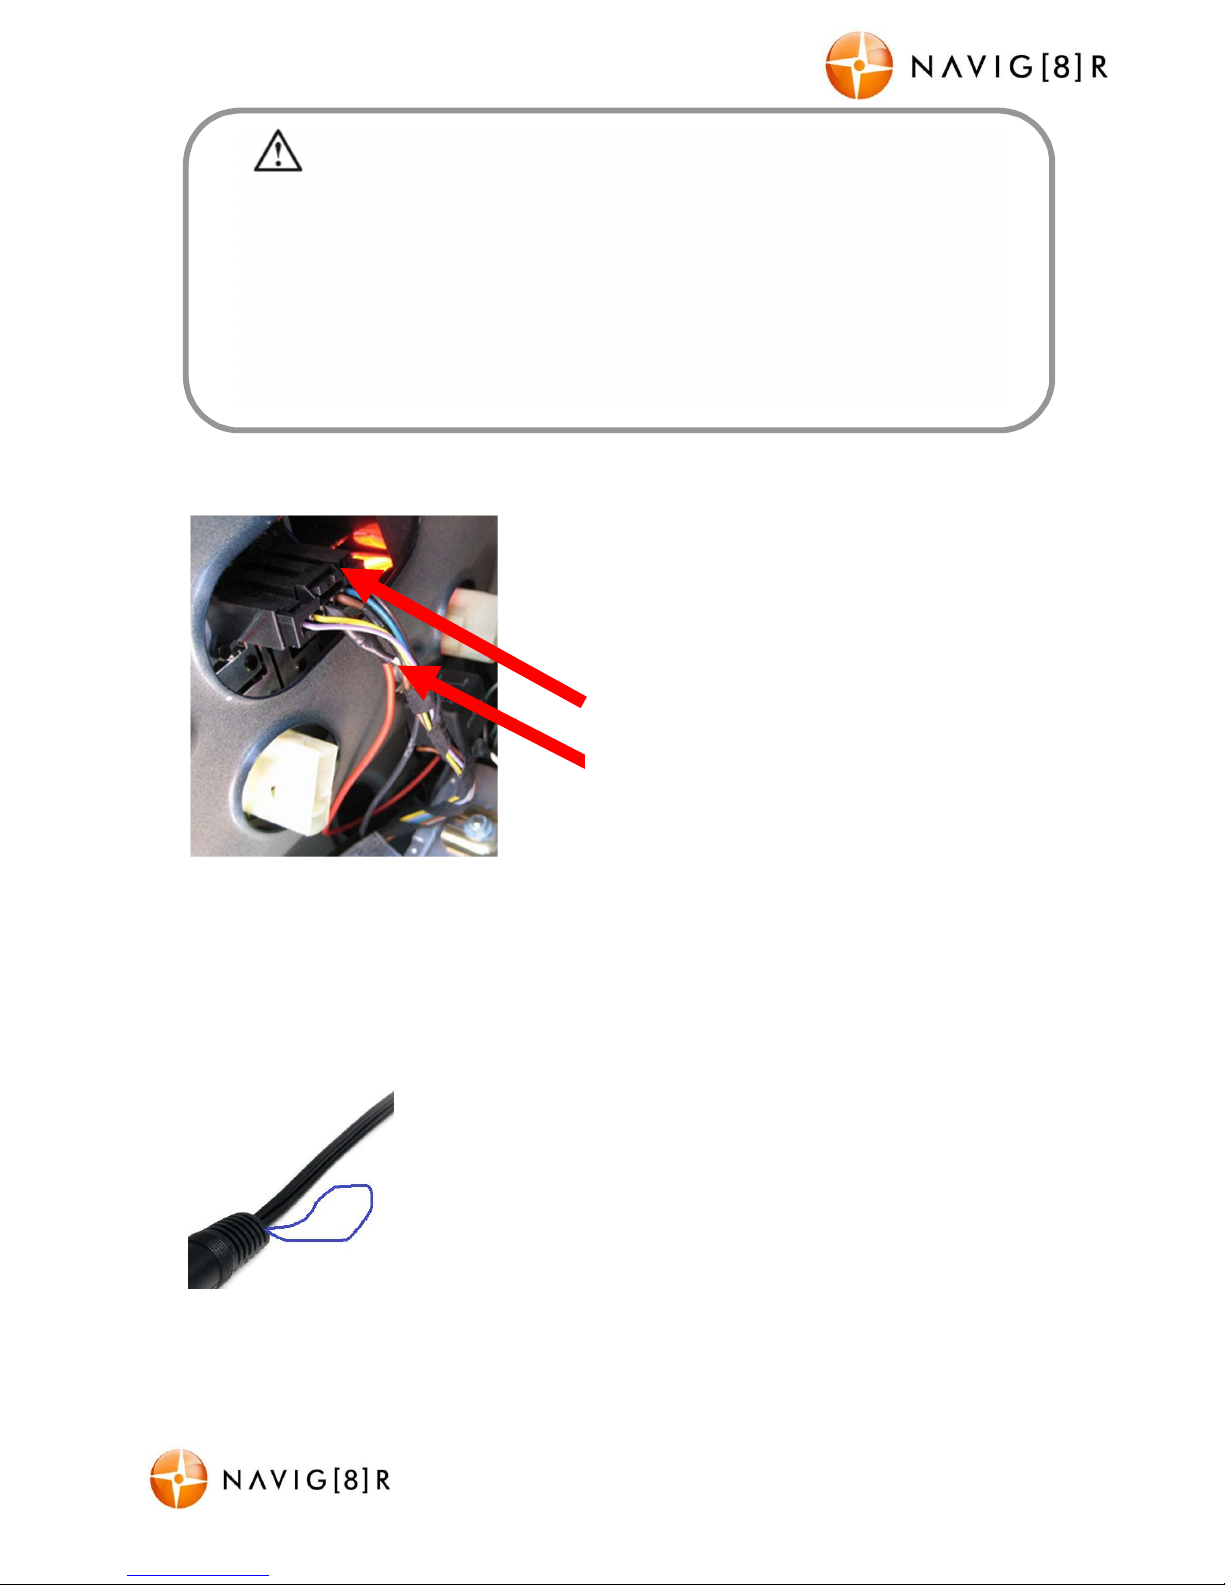
Parking camera mode (connecting the RED lead)
To trigger the Parking camera mode, the RED trigger
cable needs to be connected to the reverse lights cable
(only active when reverse gear selected) on your vehicle.
This is the RED lead at the end of the cable for the rear
camera.
Note: Image for demonstration purpose only. The colours of cables may not match your
vehicle. Please seek the advice of an experienced automotive enthusiast or automotive
electrician if required. The end user assumes all responsibility for the safe installation of this
device.
Flip parking camera image (reverse image)
Viewing footage from the rear camera together with footage from
the front camera can be a little confusing, as the images are not
orientated the same way (left is right or vice versa)
To correct this and according to personal preference, the image can
be reversed by severing the blue loop cable (when the unit is not
connected to power). The blue trigger cable is located at the end of
the rear camera cable, at the plug joint.
This will default the camera to reverse the image, which may be easier to view. This can be
reverted back by simply reconnecting the blue cable (while the camera is not connected to
power)
Once the wiring and installation of the NAVC-817D has been completed, please check
the following:
- With the car’s ignition on (or engine started), the Blue LED indicator on the NAVC-817D will light
up and the LCD screen should turn on. Recording should start automatically. This will indicate a
successful installation.
- When the car’s ignition is turned off, the device should turn off within 20 seconds with the
“Navig8r” logo appearing on the LCD screen. If this doesn’t happen then power is still being
supplied to the car charger socket and the device will need to be switched off manually.
Rear Brake light / Reverse light housing and cable harness
Connected RED reversing camera trigger cable

NAVC-817D USER MANUAL
13
Navc-817D Manual Ver 2.3 06/2017
Menu Settings and Options
From any screen, press the MENU button to access MENU settings.
Option
Option Selection
Option Description
Time Zone
Select
GMT
-
12:00 /
-
11 /-10 /-9 -8 /-7
/-6 /-5 /-4 /-3.30 /
-
3 /-2 /-1
Select your current time zone, to ensure the
correct time date stamp
WA /NT /SA /QLD /NSW /ACT
/TAS /VIC /SA DST /NSW DST
/ACT DST /TAS DST /VIC DST
/NZT /CHAST /NZDT /TKT
/CHADT /GMT
GMT+01:00 /+2 /+3 /+3:30
/+4 /+4:30 /+5 /+5:30 /+5:45
/+6:00 /+6:30 /+7 /+8 /+9
/+9:30 /+10 /+11 /+12 /+13
Movie Clip Time 1min, 3min, 5min
This setting determines the length of the
video file before a new file is started. The
video length can be set from 1 to 5 minutes
long.
Sound Record On, Off
Turns the built
-
in microphone On or Off. For
privacy this can be turned off so that no audio
is recorded.
LDWS On, Off
Turn Lane Divergence Warning system On or
Off
FCWS On, Off
Turn Frontal Collision Warning system On or
Off Volume
1 to 10
Adjust the volume of the sound
Delete
Delete One, Delete All
Delete
specific file from memory
Protect
Protect One, Unprotect
One, Protect All, Unprotect
All
Beep
On, Off
Turn button sounds On or Off
Clock Settings
YYYY MM DD; HH MM SS
Set the Date and Time
Date format
None, YYYY MM DD, MM
DD YYYY, DD MM YYYY
Select
[Off, Date, Date/Time this will place
the date and/or time on the recorded video /
photo.
Language
English [and Various]
Select to Change the Language
Flicker
50 Hz, 60 Hz
Select 50 Hz for use in Australia
LCD Power Save Off, 1min, 3min
Turn screen off
after set period. Especially
useful when driving at night.
Protect Level Off, High, Middle, Low
Select the level of sensitivity for the auto
bump file record feature.
“Low” sensitivity would detect a BIG bump /
knock / shock and trigger the auto save
feature.
“High” sensitivity would detect a relatively
SMALL bump / knock / shock and trigger the
auto save feature.
Parking
Monitoring
On, Off Turn rear (parking) camera function On or Off
Motion
Detection
On, Off
Select the sensitivity to trigger motion
detection recording
GPS Status
GPS Connection [1 to 12]
Reset Setup
Yes, No
Select to Restore Defaults
Format SD Card
Yes, No
Select to Format the memory card
FW Version [Display Firmware Version]
Display firmware version (Only used for
support
situation)

NAVC-817D USER MANUAL
14
Navc-817D Manual Ver 2.3 06/2017
Browse
recorded
files
Download files
onto your
connected smart
device
Camera
preview
and
control
App – Android
ANDROID DEVICES
For Android devices, visit the Google Play Store and search for “Navcam
WiFi” and install the app.
Connect your Device and App via WiFi
The steps to connecting your smart device to your App are as follows:
1) Switch on the Wi-Fi feature on your Smart Device
2) Switch on your 817D crash camera.
3) Search and wait for the Device named NAVC-817D to appear.
4) Connect using the password “1234567890” if required.
5) After a successful connection, you can now view and save footage from your Crash
6) Camera, direct to your smart device and share footage via social media.
ANDROID APP
NAVIGATION
Adjust
configuration
and settings

NAVC-817D USER MANUAL
15
Navc-817D Manual Ver 2.3 06/2017
Camera
preview
and
control
Browse
recorded
files
Download files
onto your
connected smart
device
App – Apple IOS
IOS DEVICES (APPLE)
For Apple IOS devices, visit the App Store and search for “Navcam WiFi”
and install the App.
Connect your Device and App via WiFi
The steps to connecting your smart device to your App are as follows:
1) Switch on the Wi-Fi feature on your Smart Device
2) Switch on your 817D crash camera.
3) Search and wait for the Device named NAVC-817D to appear.
4) Connect using the password “1234567890” if required.
5) After a successful connection, you can now view and save footage from your Crash
6) Camera, direct to your smart device and share footage via social media.
APPLE IOS APP NAVIGATION
Adjust
configuration
and settings

NAVC-817D USER MANUAL
16
Navc-817D Manual Ver 2.3 06/2017
GPS Player software – Overview
1 Preview screen Displays video for playback
2 Compass Displays direction during video playback
3 Speedo Displays speed during video playback
4 Select MOV File
Click to choose an MOV file for playback. Note: Files for playback
should be saved to the local hard drive.
5 File name Playback file name
6 Progress bar Displays length of file and time elapsed
7 Control Bar Commands such as Play, Pause, Next, Previous, Stop, Time, Volume
8 Sound meter Displays sound graph during playback
9 G-Sensor Displays shifts in gravity during playback
10 Global Map Tracks your trip via Google Maps during playback

NAVC-817D USER MANUAL
17
Navc-817D Manual Ver 2.3 06/2017
Trouble Shooting/Q & A
Fault Suggestion
Device does not turn off
If in vehicle: check that the Car charger socket is not still
powered (on) when the key is removed (as with some European
cars).
Wait 20 seconds for file finalisation/closure.
Disconnect power lead to device.
Press “ok” to stop recording, then press power to turn off.
Cant playback the .MOV video
files
Upgrade your windows media player version or use an alternate
media player such as VLC media player. (www.videolan.org)
My video/pictures of an
incident are NOT there
Check the capacity of your micro SD card, the files may have
been overwritten in the record cycle process.
The device has
frozen/stopped working
Check the speed of your Micro SD card. We recommend class 10
for faster transfer rates, especially if the record file size is bigger
If the ambient temperature is excessive, you may need to wait
for a few minutes.
The date/time is incorrect
Reset the date/time in the settings menu. If the battery runs
completely flat, then the date/time will need to be reset.
The suction cup keeps coming
off
Ensure the windscreen and surface area of the suction cup is
clean.
In wet or very hot weather, the suction cup mount may need to
be reapplied. Do not apply the suction mount on the portion of a
windscreen which is not glass (eg; some vehicles may have a
coating)
The captured image is not
stored
Your Micro SD card might be full or the file may not have been
saved before power was turned off to the unit. Make sure to
stop recording before shutting down.
I cannot turn my device on
Try charging the battery for 10 minutes and try again. The
battery may be completely exhausted.
My screen keeps turning off
When not connected to power (charging) the unit will always
turn off after 30 seconds to conserve power. This function
cannot be changed.
I cannot take any photos Your Micro SD might be full. Try removing some files.
Recording seems to stop by
itself
Make sure you are using the right class 10 micro SD card as
noted in this user manual.
I get an error message when I
try to play back files
You might have some corrupt sectors on your micro SD card. Try
re-formatting it and trying again.
The video images are hazy Make sure the lens is clean and free from debris.
There are horizontal stripes
interference on the image
A) Set the frequency setting according to the local power
supply– 50Hz
B) Ensure you are using the original (high capacity) car charger.
There are a lot of features not
available on this model even
though they are mentioned in
this manual. Why?
Just like buying a car, there are certain models with full features
and some with lesser features. As the NAVC-817D model is
renewable and re-released in the coming years, some of these
features will become available and even newer features will also
be added.

NAVC-817D USER MANUAL
18
Navc-817D Manual Ver 2.3 06/2017
Product Specifications
Note: Please use the supplied Hi current 5V 2Amp USB car charger as
supplied with this product.
Voltage input 12 to 24VDC (Cars and Trucks)
USB Port For Power only
TV Standard PAL or NTSC selectable [50 / 60Hz]
Audio Recording Supported
Screen size 3.0 inch TFT Screen
Date / Time stamp Supported – on video and on photos
Motion Detection
Supported – whilst stationery as well as moving
and connected to power
Video Resolution 1920 x 1080 30fps
Auto Bump Record (G sensor)
Supported. Adjustable sensitivity
(High, Middle, Low)
Lens viewing angle Front: 150 degrees Rear: 120 degrees
Cycle recording times 1 or 3 or 5 Minutes
File Format Image: JPG Video : .MOV Compression: H.264
Memory Card
Micro SD cards supported. Class 10
recommended. Maximum capacity is 32GB
Language System English [plus various]
For further product information on this and other products please visit our product web
page at www.laserco.com.au or email support@laserco.com.au
Disclaimer
Certain conditions may prevent the forward collision warnings from operating correctly. Glare, harsh
reflections, low light conditions, rain, fog, dirt, snow on windscreen and on the road can impact how
this feature functions. Forward collision will only operate in normal daylight conditions not lower
than the light conditions on a cloudy day.
Lane Departure Warnings require correct calibration to capture road markings and is recommended
to be used on main roads with good visible road markings. Glare, harsh reflections, low light
conditions, rain, fog, dirt, snow on windscreen and on road markings can impact how this feature
functions. Lane departure warnings will work best on straight roads like motorways and highways,
and performance may be limited on bends and windy roads. Changing lanes may also trigger the
alerts.

NAVC-817D USER MANUAL
19
Navc-817D Manual Ver 2.3 06/2017
Warranty Against Defects
Laser Corporation Pty Ltd (“Laser”) warrants your new product to be free from defects in materials and workmanship for
12 months, from the date of purchase, provided that the product is used in accordance with accompanying
recommendations or instructions where provided. The benefit of this warranty is in addition to your rights under the
Australian Consumer Law and to other rights and remedies of the consumer under a law in relation to the goods or services
to which the warranty relates.
Through a network of retailers and resellers, Laser will provide you with your choice of a repair, exchange (where possible)
or refund (within Dead on Arrival period) for this product if it becomes defective within the warranty period.
This warranty will no longer apply where the defect is a result of alteration, accident, misuse, abuse, normal wear and tear,
neglect or improper storage. Please retain your receipt as proof of purchase
How to make a product warranty claim:
Step 1: Find your receipt which proves the date of purchase. Where the date of purchase cannot be verified, your place of
purchase or Laser will make an assessment based on the date of manufacture, the condition of the Laser Product and the
type of defect.
Step 2a): Contact your place of purchase. They will assess the nature of the fault and repair, replace or fund the product as
per their store refund or warranty policy.
Step 2b): If your place of purchase cannot be contacted, then you can contact Laser customer service with details of your
Laser Product: Phone: (02) 9870 3388; or Email: support@laserco.com.au or online www.laserco.com.au/warranty (click on
“Consumers. Our business address is at 1/6-8 Byfield Street, North Ryde, NSW 2113
Step 3: Laser will issue you with a Return Authorisation (RA) number within 48 hours. When requested, send us the
defective Product and a copy of your receipt. Laser will cover the cost of the return delivery.
Step 4: Wait for us to contact you. Once we have received your defective Laser Product for inspection, we will inform you
of our assessment of your claim within 7 days. When we contact you, we will firstly let you know whether you have a valid
claim under this Warranty, and if so, we will inform you whether your defective Laser Product will be replaced or repaired,
together with the number of days you can expect to wait to receive your replaced or repaired Laser Product.
Step 5: For further details on warranty cover and returns, please check Terms and Conditions for Warranty Returns
section on http://www.laserco.com.au/warranty
Our goods come with guarantees that cannot be excluded under the Australian Consumer Law. You are entitled to a
replacement or refund for a major failure and compensation for any other reasonably foreseeable loss or damage. You are
also entitled to have the goods repaired or replaced if the goods fail to be of acceptable quality and the failure does not
amount to a major failure.
 Loading...