


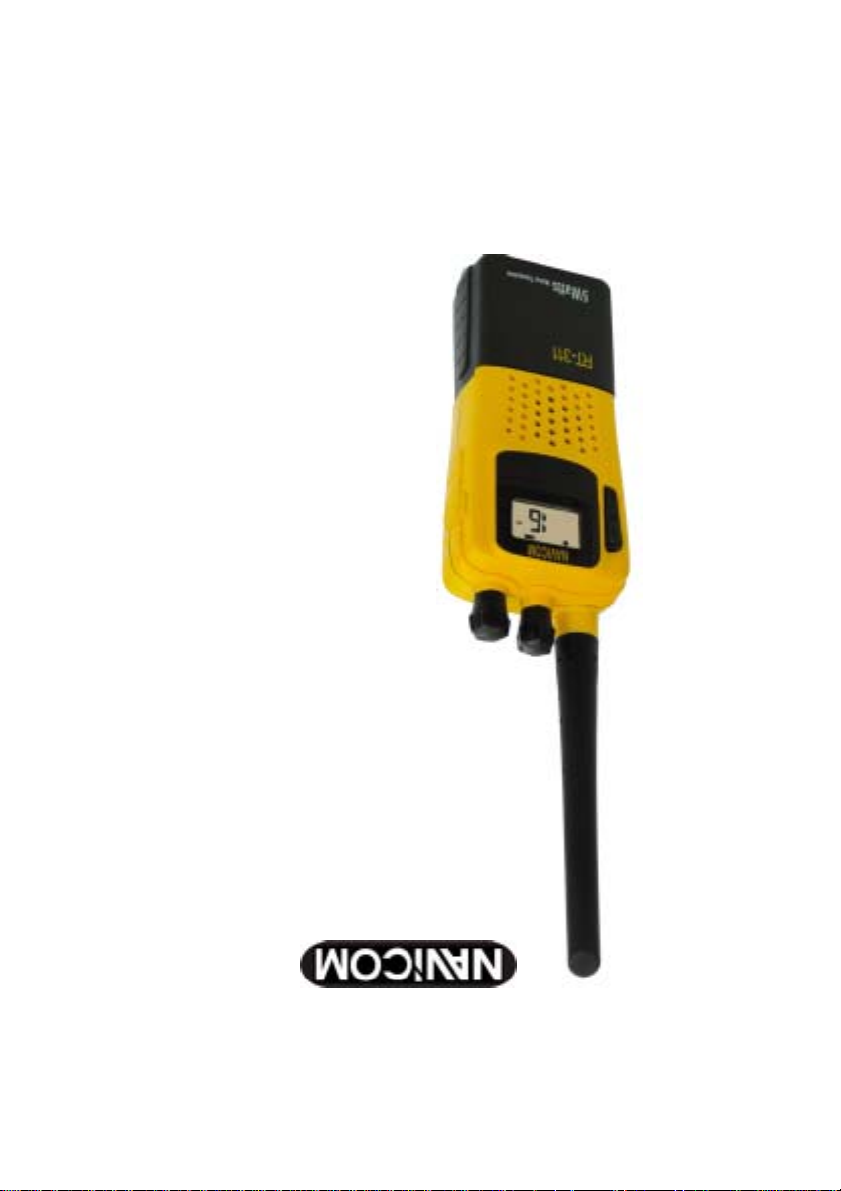
VHF Marine Radio
PACK RT-31 1
INSTALLATION
AND OPERATION GUIDE
Navicom plaisance: Z.A. des Boutries, 78700 Conflans Ste Honorine
Tel: 01.39.72.19.90 Fax: 01.39.19.28.98
Navicom Pro: 3, rue J. Cugnot, Z.A.C Petit Guelen, 29000 Quimper
Tel: 02.98.94.64.70 Fax: 02.98.94.69.71

TABLE OF CONTENTS
Equipment Description…………………………………....……….…..…2
Introduction….…………………………………..………..………………..2
Safety Information……………………………………………….………..3
Using The Radio…………………………………………....…….…….…3
Display...………………………………………………………….……......3
Function And Location Of The Controls……………………….…….….4
Basic Operation………………………………………..……….…........…4
Turning On/Off Your Transceiver……………………………….……….5
Adjusting Squelch…………………………………...…...…………….…5
Selecting High/Low Power or Lock keypad………………...............…5
Selecting a Channel………………………………………………………5
Transmitting and Receiving………………………………………………5
Scanning Features………………………………………………………..6
Adding Channels to Memory………………………………………........7
Using the Monitor Modes………………………………………….……..7
Dual Watch…………………………………………………………....…...7
Tri Watch……………………………………………………………...…...8
Resetting the Radio……………………………………………………....8
Attaching and Charging Your Battery Pack……………………..........9
Using the Belt Clip………………………………………………..…......9
Technical Specifications……...…………………………………..…….10
Frequency Charts…….…………………………………………......11
Cigarette Lighter Battery compartment, Cigarette Lighter Battery
Charging and Earphone Manual……………………………………….12
1

Equipment Description
INTRODUCTION
Your marine transceiver PACK RT311 represents the state-of-the-art
in high-tech engineering. Designed for international operation. This
allows you to transmit and receive on all international channels in the
VHF marine band, as assigned by the international Union (ITU). This
unit is a quality piece of electronic equipment, skillfully constructed
with the finest components. It is approved with commercial-grade
standards to give you clear, reliable communication.
Your transceiver is designed for many years of reliable, trouble-free
performance. It is under control of a microprocessor resulting in
enhanced features and performance. The microprocessor controls
not only the marine band tuning but also dual watch, memory
channels, and a host of other useful features.
Your transceiver has the following features:
Channel 16 Switch -------- provides quick access to channel 16, the
universal marine frequently used channel.
PLL (Phase Lock Loop) Controlled Circuitry ---- Provides accurate
and stable channel selection.
Squelch Adjustment ----------------------- help eliminate noise between
transmissions.
Key Lock ----------- lets you lock the keypad in order to prevent the
controls from accidental pressing.
High/Low Power Selection ---- lets you save power by selecting a
suitable transmitting power for long or short distances.
Battery Level Indicator ---- shows the battery pack’s condition.
Supplied Battery Charge ------ lets you conveniently recharge your
2

transceiver’s battery pack.
Backlit LCD Display -------- allows you to operate the transceiver in
dark environment.
Memory Channels ---- lets you store channels as memory channels.
Du/Tri ---- lets you to select DW/normal mode or Tri/normal mode.
We recommend you record your transceiver’s serial number here.
This number is on the transceiver’s back panel.
Serial Number_______________________
SAFETY INFORMATION
Your hand-held marine VHF radio contains a low power transmitter.
When the Push-To-Talk (PTT) button is pushed it sends out radio
frequency (RF) signals.
USING THE RADIO
DISPLAY
Your radio comes with a multifunctional display.
3
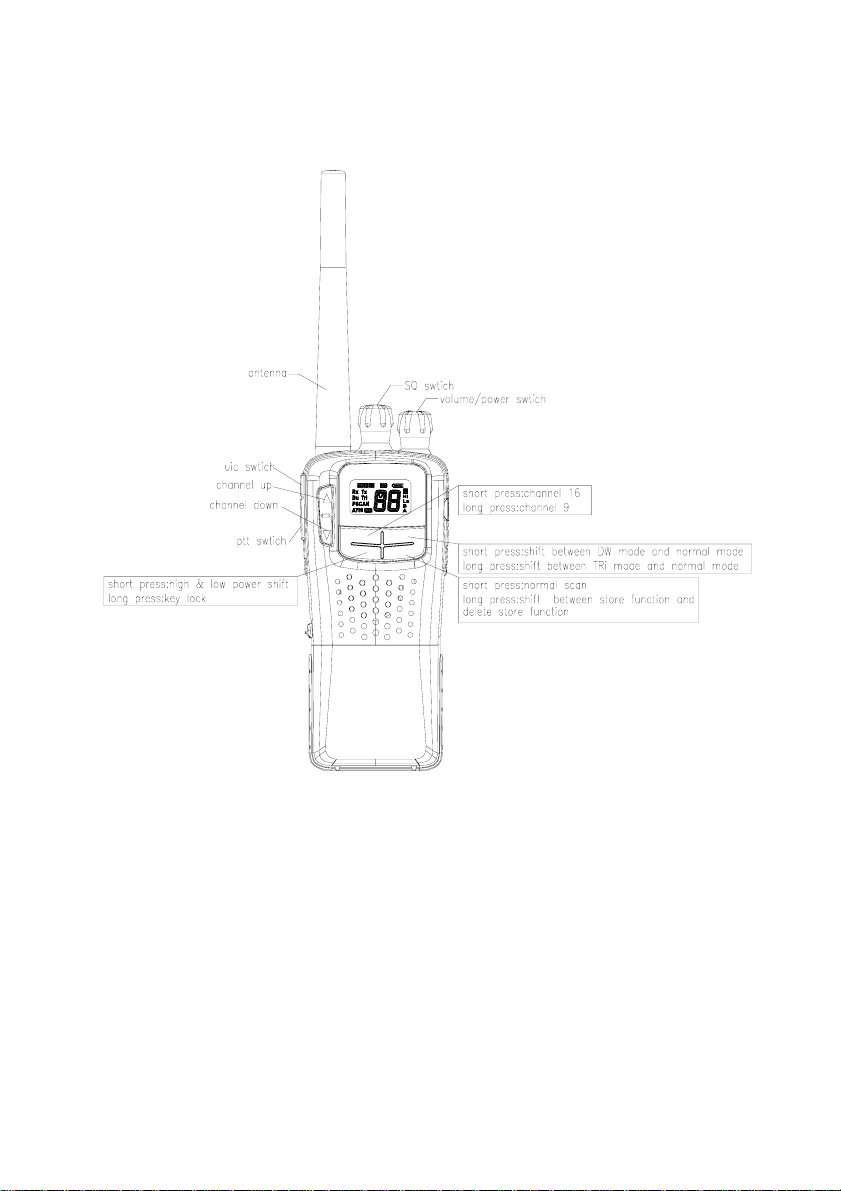
FUNCTION AND LOCATION OF THE CONTROLS
DU/TRI
16
HL
SCAN
BASIC OPERATION
Before operating your transceiver, you should make the following
preparations. You should install the battery pack on to the main unit
and fully charge your 7.2V Ni-MH battery pack or charge it separately
before its being attached onto the radio, then you can use it after
making sure to attach the antenna on your radio.
4

Turning On/Off Your Transceiver
Rotate VOLUME knob to turn the transceiver on or off with an
indicating voice of click. And adjust the volume to a comfortable level.
Adjusting Squelch
Rotate SQ knob to adjust squelch threshold level.
Squelch is used to eliminate static and background noise and allows
for silent operation of the PACK RT311 until a transmission is
received. If the squelch is too high, only the strongest transmissions
can be heard, and when too low, intermittent static and noise are
heard.
Selecting High/Low Power or Lock keypad
Press and release this key to toggle the transmit power between high
and low. When the unit is operating at low power, “Lo” appears on
LCD and “Hi” appears on LCD when operating at high power.
You also can lock your radio keypad to avoid accidental pressing of
keys by activating the key lock. Pressing and holding HL button until
key lock icon will appear on LCD if it is enabled. The function is
effective to all other knobs/keys except PTT and HL buttons.
Selecting a Channel
Press the
channels.
Note: Not all channel numbers are available in INT bands.
Transmitting and Receiving
▲/▼ (UP/DOWN) button to scroll through the available
Press and hold the Push-To-Talk (PTT) key to transmit on the
selected channel, then release to receive. The TX indicator appears
while transmitting.
5

SCANNING FEATURES
The PACK RT311 is equipped with three types of scan options: All
Scan, Saved(Memory) Scan and Priority Scan. If there are no
channels in memory, the default is All Scan. This function
automatically searches for transmissions on the channel set being
scanned. If a TX signal is received, the scan stops on the receiving
channel as long as it is present and the SCAN indicator flashes. If the
signal is lost for five seconds, the radio resumes scanning. During the
Scan Modes:
Press the Channel
direction. UP increments the channel while DOWN decrements it.
Press and release the SCAN button to terminate the SCAN mode.
Du/TRI button do not function and sound an error beep if pressed.
Note: Scan modes are disabled when the ATIS operation is active.
All Scan
Press and release the SCAN button when no channels are stored in
memory to activate the All Scan function. The SCAN indicator
appears on the LCD during All Scan. In All Scan mode, all channels
in the channel set are scanned in sequence, assuming no channels
have been stored in memory. After the last channel number has been
scanned, the cycle repeats.
▲/▼ (UP/DOWN) button to change the scan
Saved (Memory) Scan
Press and release the SCAN button when there is at least one
channel in memory to activate the Saved Scan function. In Saved
Scan Mode, the SAVED and SCAN indicators appear on the LCD. In
Saved Scan mode, only the channels that have been saved in
memory are scanned in sequence. After the last saved channel
number has been scanned, the cycle repeats.
6

Adding Channels to Memory
The PACK RT311 can store any channel (including Private Channels).
The stored channels are the ones scanned in the Saved (Memory)
Scan mode.
To Add Channels to Memory
1. During normal operation mode, use the UP/DOWN key to select
the desired channel for programming.
2. Press and hold the
The SAVED icon appears to indicate the current channel has been
saved in memory. Any number of channels can be saved as memory
channels.
To Delete Channels from Memory
1. During the normal mode, use the UP/DOWN key to select the
channel to be deleted.
2. Press and hold the
The selected channel is deleted from memory.
scan key for 3 seconds.
scan key for 3 seconds.
Using the Monitor Modes
The Watch Modes monitor the programmed Priority Channel and
other user selected channel(s). The watch is halted when activity is
detected on a monitored channel. The PACK RT311 is equipped with
2 types of monitor operations: Dual Watch and Tri Watch.
Note: Monitor modes are disabled when the ATIS operation is active.
Dual Watch
Press and release the Du/TRI button to activate the Dual Watch
mode. The DUAL indicator appears on the LCD. Dual Watch monitors
the current working channel and Channel 16 in cycle. Dual Watch is
demonstrated in the figure to the left; the sample working channel is
CH 72.
Press and release the Du/TRI button to terminate Dual Watch and
return to the previous working channel.
7

Press and hold the Du/TRI button to terminate Dual Watch mode
and go into Tri Watch mode.
Press and release the 16 button to terminate Dual Watch mode and
switch to the Priority channel.
Note: During Dual Watch mode, the SCAN and Channel ▲/▼ (UP/DOWN)
button are inactive and sounds an error beep if pressed.
Tri Watch
Press and hold the Du/TRI key for 3 seconds to activate Tri Watch
mode. The TRI indicator appears on the LCD. Tri Watch monitors in
cycle Channel 16, the current working channel and the channel you
have set as the Favourite (PLUS) Channel. Tri Watch is
demonstrated in the figure to the left; the sample working channel is
CH 72.
Press and release the Du/TRI button to terminate Tri Watch and
return to the previous working channel.
Press and release the 16 button to terminate Tri Watch mode and
switch to the Priority Channel.
Note: During Tri Watch Mode, the SCAN, and Channel ▲/▼ (UP/DOWN)
keys are inactive and sounds an error beep if pressed.
Resetting the Radio
You can reset many radio settings back to their factory defaults, this
will:
• Erase any channels stored in memory
• Return to International channels, if another mode is selected
• Turn OFF the Weather Alert setting, if active
• Return power settings to their original state
To perform the reset:
1. Turn the radio OFF.
2. Simultaneously press and hold the SCAN & UIC button.
3. While continuing to hold these keys, power the radio ON.
The LCD remains blank for 2 seconds, and then the unit switches to
channel 16.
8

Attaching and Charging Your Battery Pack
Before attaching the pack, you should detach the belt clip first, then
aligningly place the pack on the unit and secure it using the supplied
screw.
The design of the battery pack let you can charge it either when it is
attached on the radio or being detached. You should use the supplied
specialized wall charger to charge it (7.2V Ni-MH battery pack) for
14~15hrs. For charging the battery pack, Connect the AC wall
adapter into a standard wall socket and insert the plug into the charge
jack on the side of the battery pack to start the charging.
Note: The charging can not stop itself without prevention, even when the
battery pack has been fully charged. Do not forget to take the radio/battery
pack out of the charger cradle when it has been fully charged.
Overcharging batteries may result in damage to both the battery pack and
radio.
Using the Belt Clip
The supplied belt clip lets you easily attach the transceiver to
your belt. To attach the belt clip, put it onto the back of your
transceiver aligning the fitting groove and use a standard
PHILIP screw driver to secure.
9

TECHNICAL SPECIFICATIONS
Channels…………………………………..All International Channels
Frequency Method………………………….………….Phase Lock Loop
Frequency Range…………………………..TX 156.025~157.425 MHz
RX 156.300~162.000 MHz
Antenna Impedance……………..……………………………....50 Ohm
Power Supply…………………………………………..………7.2VDC
Operating Temperature……………………….....-20℃ to +55℃
Dimensions (HWD)………………..…… (With 7.2V Battery Pack)
‘ 148mm(H)*60mm(W)*39mm(D)
Weight (with Battery Pack)…….… (With 7.2V Battery Pack) 421.5g
TRANSMITTER
Power Output……………….………0.8 or 5 Watts (Switch Selectable)
Modulation Type……………………………………….…….…...…….FM
Hum and Noise Attenuation……………………………….……..…35dB
Audio Distortion.................................………........…........................5%
Spurious Suppression....................................…………….............70dB
RECEIVER
Sensitivity at 12dB Sinad...........................…………...….......0.3μV
S/N Ratio (20dB)...............................…....……………………….0.8μV
Squelch Sensitivity.......…………...….......Threshold –12dBμV(EMF)
Adjacent Channel Rejection...................................……..……….. 70dB
Audio Power Output………………………………250mW at 10% THD
Spurious Response Attenuation………….........…………...………70dB
Hum and Noise Attenuation………………………………………40dB
Modulation Acceptance Bandwidth………………+/- 7.0KHz Minimum
Note: The data are typical, and the practical ones may be varied.
10

FREQUENCY CHARTS
Unit: MHz
INT
TX RX TX RX
1 156.050 160.650
2 156.100 160.700
3 156.150 160.750 60 156.025 160.625
4 156.200 160.800 61 156.075 160.675
5 156.250 160.850 62 156.125 160.725
6 156.300 156.300 63 156.175 160.775
7 156.350 160.950 64 156.225 160.825
8 156.400 156.400 65 156.275 160.875
9 156.450 156.450 66 156.325 160.925
10 156.500 156.500 67 156.375 156.375
11 156.550 156.550 68 156.425 156.425
12 156.600 156.600 69 156.475 156.475
13 156.650 156.650
14 156.700 156.700 71 156.575 156.575
15 156.750 156.750 72 156.625 156.625
16 156.800 156.800 73 156.675 156.675
17 156.850 156.850 74 156.725 156.725
18 156.900 161.500 75 156.775 156.775
19 156.950 161.550 76 156.825 156.825
20 157.000 161.600 77 156.875 156.875
21 157.050 161.650 78 156.925 161.525
22 157.100 161.700 79 156.975 161.575
23 157.150 161.750 80 157.025 161.625
24 157.200 161.800 81 157.075 161.675
25 157.250 161.850 82 157.125 161.725
26 157.300 161.900 83 157.175 161.775
27 157.350 161.950 84 157.225 161.825
28 157.400 162.000 85 157.275 161.875
86 157.325 161.925
87 157.375 157.375
88 157.425 157.425
11

PACK RT311 Cigarette Lighter Battery compartment, Cigarette Lighter
Battery Charging and Earphone Manual
PACK RT311 Cigarette Lighter Battery comp artment using:
PACK RT311 Earphone using:
1. Install the battery case with DC-DC supply to the main
2. Plug the Cigarette Lighter Battery compartment into the
socket of the battery.
3. Rotate the VOLUME knob to turn the radio ON.
4. You can start to use the radio.
unit.
1. Plug the earphone jack into the socket of the main unit.
2. Insert the earphone into the ear; and hold somewhere on
your cloth with the clip of the earphone.
3. You can hear the voice signals through the earphone.
4. Press PTT key on the earphone cable to send callings. At
this moment, PTT on the main radio does not work.
12


12
la VHF qui est alors désactivée.
pour émettre. Cette touche est prioritaire sur la touche [PTT] de
4. Appuyez sur la touche [PTT] située sur le câble de l’écoteur
l’écouteur.
3. Vous pouvez alors entendre les signaux vocaux par le biais de
vêtements à l’aide de la pince fournie.
2. Insérez l’écouteur dans votre oreille et fixez le fil à vos
côté droit de la VHF (comme indiqué sur le schéma).
1. Connectez la prise jack de l’écouteur dans la prise située sur le
Pack RT-311 : Utilisation de l’écouteur
Vous pouvez commencer à utiliser la VHF normalement.
4.
3. Tournez le bouton [VOLUME] pour mettre la VHF sous tension.
comme indiqué sur le schéma ci-contre.
2. Connectez le cordon allume-cigare dans la prise de la batterie,
1. Installez le boîtier batterie pour alimentation cc/cc sur la VHF.
Pack RT-311 : Alimentation sur prise allume-cigare
batterie sur prise allume-cigare & utilisation de l’écouteur
PACK RT-311 – Alimentation sur prise allume-cigare, Charge de la

11
88 157.425 157.425
87 157.375 157.375
86 157.325 161.925
28 157.400 162.000 85 157.275 161.875
27 157.350 161.950 84 157.225 161.825
26 157.300 161.900 83 157.175 161.775
25 157.250 161.850 82 157.125 161.725
24 157.200 161.800 81 157.075 161.675
23 157.150 161.750 80 157.025 161.625
22 157.100 161.700 79 156.975 161.575
21 157.050 161.650 78 156.925 161.525
20 157.000 161.600 77 156.875 156.875
19 156.950 161.550 76 156.825 156.825
18 156.900 161.500 75 156.775 156.775
17 156.850 156.850 74 156.725 156.725
16 156.800 156.800 73 156.675 156.675
15 156.750 156.750 72 156.625 156.625
14 156.700 156.700 71 156.575 156.575
13 156.650 156.650
12 156.600 156.600 69 156.475 156.475
11 156.550 156.550 68 156.425 156.425
10 156.500 156.500 67 156.375 156.375
9 156.450 156.450 66 156.325 160.925
8 156.400 156.400 65 156.275 160.875
7 156.350 160.950 64 156.225 160.825
6 156.300 156.300 63 156.175 160.775
5 156.250 160.850 62 156.125 160.725
4 156.200 160.800 61 156.075 160.675
3 156.150 160.750 60 156.025 160.625
2 156.100 160.700
1 156.050 160.650
TX RX TX RX
INT
Unité : MHz
Tableau de fréquences

10
légèrement des données réelles.
Les valeurs indiquées ici sont des données type et peuvent varier
Note :
Largeur de la bande d’acceptation de modulation..+/- 7.0 kHz minimum
Atténuation du bruit........................................................................40 dB
Atténuation de réponse parasite....................................................70 dB
Puissance de sortie audio.......................................250 mW à 10% THD
Rejet des canaux adjacents...........................................................70 dB
Sensibilité squelch.............................................. ..seuil -12 dB µV (EMF)
Rapport S/N (20 dB).................................................. ........ .......... ..0.8 µV
Sensibilité à 12 dB Sinad..............................................................0.3 µV
Récepteur
Suppression des bruits parasites...................................................70 dB
Distorsion audio.................................................................................5%
Atténuation du bruit........................................................................35 dB
Type de modulation................................................... .........................FM
Puissance de sortie.............0.8 ou 5 Watts (sélection par commutateur)
Emetteur
Poids (avec pack batterie de 7.2 V).............................................421.5 g
Dimensions (avec pack batterie de 7.2 v)...................148 x 60 x 39 mm
Température de fonctionnement..........................................-20 à +5 5°C
Alimentation.......................................... ..................................... .7.2 V cc
Impédance de l’antenne............................................................50 Ohms
RX : 156.300 à 162.000 MHz
Echelle de fréquence................................TX : 156.025 à 157.425 MHz
Méthode de fréquence................................................Phase Lock Loop
Canaux................................................. .T ous les ca naux internationaux.
Spécifications techniques

9
VHF, puis fixez-le à l’aide d’un tourne vis PHILIP standard.
ceinture. Pour fixer le clip de ceinture, positionnez-le à l’arrière de la
Le clip de ceinture fourni permet de porter simplement la VHF à la
Utilisation du clip de ceinture
sur le pack batterie, comme sur la VHF.
effectuée. La surcharge de la batterie peut entraîner des dommages
pack batterie de son support de charge une fois la charge totalement
a été totalement chargée. N’oubliez donc pas de retirer la VHF ou le
La charge ne s’arrête pas automatiquement, même lorsque la batterie
Note :
dans la prise jack dédiée à la charge, sur le côté de la batterie.
l’adaptateur mural ca à une prise standard, puis insérez le conne c teur
charge complète prend 14 à 15 heures).Pour ce faire, connectez
lorsqu’elle est fixée à la VHF ou indépendamment de cette dernière (la
La conception du pack batterie vous permet de procéder à la charge
ensuite la batterie en place avant de la fixer à l’aide de la vis fournie.
Avant d’installer le pack batterie, retirez le clip de ceinture. Mettez
Installation et charge du pack batterie
secondes, puis l’appareil se cale sur le canal 16.
sous tension. L’afficheur LCD reste alors vierge pendant 2
3. Tout en maintenant ces deux touches enfoncées, mettez la VHF
maintenez-les enfoncées.
2. Appuyez simultanément sur les touches [SCAN] et [UIC], et
1. Mettez la VHF hors tension.
Pour procéder à une réinitialisation :
- Les réglages de puissance sont ramenés à leur valeur par défaut.
- Le réglage d’alerte météo, si actif, est désactivé.

/T] sont
S
8
est autre.
- La VHF revient aux canaux internationaux, si le mode sélectionné
- Les canaux mémorisés sont effacés.
défaut. Dans ce cas :
Nombre de réglages de la VHF peuvent être ramenés à leur valeur par
Réinitialisation de la VHF
désactivées, et un bip d’erreur est émis lorsqu’elles sont enfoncées.
En mode de triple veille, les touches [SCAN] et [
Note :
(Canal 16), appuyez sur la touche [16] et relâchez-la.
Pour quitter le mode de triple veille et passer sur le canal prioritaire
précédemment, appuyez sur la touche [Du/TRI] et relâchez-la.
Pour mettre fin à la triple veille, et revenir au canal utilisé
et du canal réglé par l’utilisateur comme canal favori (PLUS).
surveillance en alternance du canal 16, du canal en cours d’utilisation,
s’affiche alors à l’écran LCD. La fonction de triple veille permet la
secondes pour activer le mode de triple veille. La mention ‘TRI’
Appuyez sur la touche [Du/TRI] et maintenez-la enfoncée pendant 3
Triple veille
et un bip d’erreur est émis lorsqu’elles sont enfoncées.
S
/T] sont désactivées,
En mode double veille, les touches [SCAN] et [
Note :
(Canal 16), appuyez sur la touche [16] et relâchez-la.
Pour quitter le mode double veille et passer sur le canal prioritaire
appuyez sur la touche [Du/TRI] et maintenez-la enfoncée.
Pour quitter le mode de double veille et passer au mode triple veille,
relâchez-la.
précédemment, appuyez à nouveau sur la touche [Du/TRI], puis
Pour mettre fin à la double veille et revenir au canal utilisé
canal 16.
veille permet la surveillance en alternance du canal sélectionné et du

7
Dual Watch. La mention ‘Du’ s’affiche alors à l’écran LCD. La double
Appuyez sur la touche [Du/TRI] et relâchez-la pour activer le mode
Double veille
activée.
Les modes de veille sont désactivés lorsque la fonction ATIS est
Note :
(Dual Watch) et mode de triple veille (Tri Watch).
La VHF Pack RT311 permet deux modes de veille : Mode de double veille
veille s’interrompt lorsqu’une activité est détectée sur un canal surveillé.
programmés et les autres canaux sélectionnés par l’utilisateur. La
Les modes de veille permettent de surveiller les canaux prioritaires
Utilisation des modes de veille
mémoire.
3 secondes. Le canal sélectionné est alors supprimé de la
2. Appuyez sur la touche [SCAN] et maintenez-la enfoncée pendant
supprimer à l’aide de la touche [S/T].
1. En mode normal d’utilisation, sélectionnez le canal mémoire à
Procédure de suppression des canaux de la mémoire :
souhaités.
sauvegarder comme canaux mémoire autant de canaux que
le canal sélectionné a été sauvegardé en mémoire. On peut
3 secondes. Une icône apparaît alors à l’écran pour indiquer qu e
2. Appuyez sur la touche [SCAN] et maintenez-la enfoncée pendant
l’aide de la touche [S/T].
1. En mode normal d’utilisation, sélectionnez le canal à mémoriser à
Procédure de mémorisation des canaux :
‘Saved Scan’.
privés. Les canaux mémorisés sont ceux qui sont balayés en mode
La VHF Pack RT311 peut mémoriser tous les canaux, y compris les canaux
Mémorisation des canaux
canal mémorisé balayé, le cycle de balayage se répète.
mémorisés font partie de la séquence de balayage. Une fois le dernier

6
s’affichent à l’écran LCD. En mode Saved Scan, seuls les canaux
balayage ‘Saved Scan’ est en cours, les mentions ‘SAVED’ et ‘SCAN’
et relâchez-la pour activer la fonction ‘Saved Scan’. Lorsque le
Lorsqu’au moins un canal est mémorisé, appuyez sur la touche [SCAN]
Saved Scan (balayage des canaux mémorisés)
balayé, le cycle de balayage se répète.
qu’aucun canal n’ait été mémorisé. Une fois le dernier canal du groupe
Scan’, tous les canaux du groupe sont balayés tour à tour, à condition
en cours, la mention ‘SCAN’ s’affiche à l’écran LCD. En mode ‘All
relâchez-la pour activer la fonction ‘All Scan’. Lorsque le balayage est
Lorsqu’aucun canal n’est mémorisé, appuyez sur la touche [SCAN] et
All Scan (balayage de tous les canaux)
ATIS.
Les modes de balayage sont désactivés lorsqu’on utilise la fonction
Note :
bip d’erreur se fait entendre si on l’enfonce.
de balayage (SCAN). La touche [Du/TRI] ne fonctionne pas, et un
- Appuyez sur la touche [SCAN] et relâchez-la pour quitter le mode
décroissant.
[S] génère un balayage croissant des canaux, et [T] un balayage
- Appuyez sur la touche [S/T] pour changer de sens du balayage.
balayage :
la VHF reprend son balayage. Lorsque l’appareil est en mode de
clignote à l’écran. Si le signal est perdu pendant au moins 5 secondes,
réception tant que le signal y est présent, et l’indicateur ‘SCAN’
transmission (TX) est reçu, le balayage s’interrompt sur le canal de
transmissions sur le groupe de canaux balayés. Si un signal de
Scan’. Cette fonction permet de rechercher automatiquement les
Scan). Si il n’y a aucun canal en mémoire, le réglage par défaut est ‘All
mémoire (Saved Scan) et balayage des canaux prioritaires (Priority
Balayage de tous les canaux (All Scan), balayage des canaux
La VHF Navicom Pack RT311 dispose de trois types d’options de balayage :
Caractéristiques de balayage

5
‘TX’ s’affiche à l’écran lors de l’émission.
sur le canal sélectionné, puis relâchez-la pour la réception. La ment ion
Appuyez sur la touche [PTT] et maintenez-la enfoncée pour émettre
Emission et réception
internationales.
Tous les numéros de canaux ne sont pas disponibles sur les bandes
Note :
Appuyez sur la touche [S/T] pour faire défiler les canaux disponibles.
Sélection du canal
toutes les touches, à l’exception des touches [PTT] et [HL].
verrouillage apparaisse sur l’afficheur LCD. Le verrouillage concerne
touche [HL] et maintenez-la enfoncée jusqu’à ce que l’icône de
d’éviter toute manipulation accidentelle. Pour ce faire, appuyez sur la
Cette touche permet aussi de verrouiller le clavier de la VHF afin
utilisée en haute puissance.
s’affiche à l’écran LCD, et la mention ‘Hi’ s’affiche lorsque la VHF est
Lorsque l’appareil est utilisé en basse puissance, la mention ‘Lo’
puissance d’émission entre haute puissance et basse puissance.
Appuyez sur la touche [HL] puis relâchez-la pour faire alterner la
verrouillage clavier
Sélection de puissance Haute / Basse ou
faible, les bruits parasites ne sont pas supprimés.
transmissions les plus puissantes peuvent être reçues, et si il est trop
transmission. Si le niveau de squelch est trop élevée, seules les
pour une utilisation silencieuse de la Pack RT311 jusqu’à la réception d’une
squelch. Le squelch permet d’éliminer les bruits statiques et de fond,
Tournez le bouton rotatif [SQ] pour ajuster le niveau de seuil du
Ajustement du squelch
4
confortable.
hors tension (clic indicatif), puis ajustez le volume à un niveau d’écoute
Tournez le bouton rotatif [VOLUME] pour mettre l’appareil sous ou
Mise sous / hors tension de la VHF
l’antenne sur le boîtier, vous pouvez utiliser la VHF.
séparément avant de l’installer sur la VHF. Ceci fait, et après avoir fixé
VHF puis mettez cette dernière en charge, ou chargez la batterie
suivantes. Installez le pack batterie 7.2 V Ni-MH sur le corps de la
Avant toute utilisation de votre VHF, procédez aux préparations
Utilisation de base
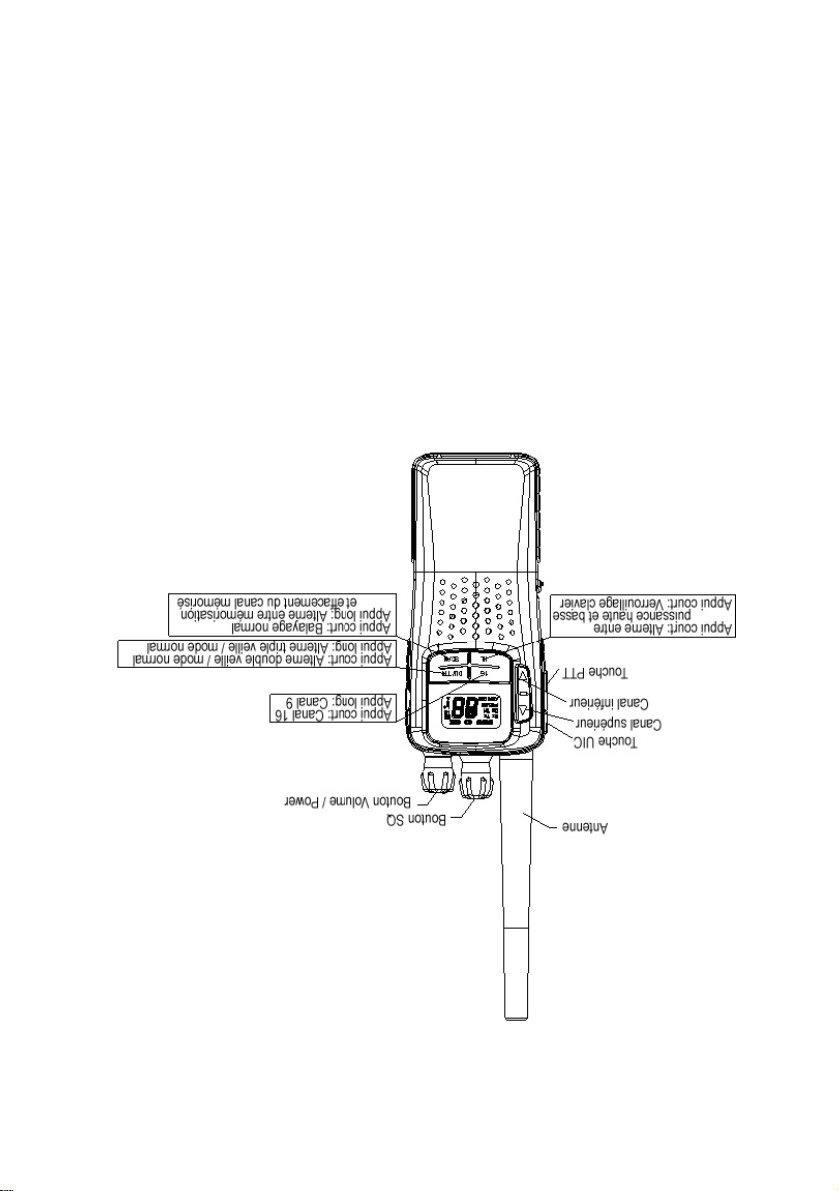
Fonction et localisation des commandes

3
Votre VHF est équipée d’un afficheur multifonctions.
Affichage
Utilisation de la VHF
d’un mode triple veille / normal.
canaux mémoire.
signaux de fréquence radio (RF).
Lorsqu’on appuie sur la touche d’émission [PTT], ce dernier émet des
Votre VHF marine portable contient un émetteur basse puissance.
Informations de sécurité
Numéro de série : __________________________
VHF. Ce numéro se trouve sur le panneau arrière de l’appareil.
Nous vous recommandons de noter ici le numéro de série de votre
- Du / TRI – Permet la sélection d’un mode double veille / normal ou
- Canaux mémoire – Permet de mémoriser des canaux comme

2
environnement sombre.
- Ecran LCD rétro éclairé – Permet l’utilisation de la VHF dans un
l’appareil.
- Indicateur du niveau de batterie – Indique l’état du pack batterie de
d’émission adaptée aux distances courtes ou longues.
d’économiser de l’énergie en sélectionnant une puissance
- Sélection de la puissance Haute / Basse (Hi / Low). Permet
afin d’empêcher toute manipulation accidentelle.
- Verrouillage clavier (Key Lock) – Permet de verrouiller le clavier
transmissions.
- Ajustement du squelch – Aide à supprimer les bruits entre les
canal précise et stable.
- Circuit contrôlé PLL (Phase Lock Loop) – Fournit une sélection de
marin universel fréquemment utilisé.
- Touche Canal 16 permettant un accès rapide au canal 16, le canal
Votre VHF Pack RT311 présente les caractéristiques suivantes :
caractéristiques utiles.
double veille, les canaux mémorisés et nombre d’autres
contrôle pas uniquement l’accord de la bande marine, mais aussi la
fonctionnement fiable et sans problème. Le microprocesseur ne
Votre émetteur –récepteur est conçu pour fournir des années de
marchande pour vous fournir des communications claires et fiables.
les meilleurs composants. Il répond aux standards de la marine
électronique de grande qualité, construit dans les règles de l’art avec
l’union internationale (ITU). Cet appareil est un équipement
canaux internationaux de la bande VHF Marine, tels que spécifiés par
internationale, il vous permet d’émettre et de recevoir sur tous les
utilisant des technologies de pointe. Conçu pour une utilisation
Votre émetteur–récepteur marin Pack RT311 de Navicom a été conçu en
Introduction
Description de I’ équipement

1
batterie sur prise allume-cigare & utilisation de l’écouteur..............12
Alimentation sur prise allume-cigare Charge de la
Tableau de fréquences………………………......…......................11
Spécifications techniques………………………...............................10
Utilisation du clip de ceinture............................................................9
Installation et charge du pack batterie…….........…..…............…...9
Réinitialisation de la VHF……………………………..…...….............8
Triple veille…………………………………….…………..….......…...8
Double veille………………………………….....………..…….............7
Utilisation des modes de veille………………………….…................7
Mémorisation des canaux…………………......…….....….................7
Caractéristiques de balayage………………………….….............….6
Emission et réception……………….................…...………...............5
Sélection du canal……………………........................……..........…..5
Sélection de puissance Haute/Basse ou verrouillage clavier...........5
Ajustement du squelch…………………..……………............….....…5
Mise sous / hors tension de la VHF…………………........…....…..…4
Utilisation de base…………………………………….........….....……4
Fonction et localisation des commandes……...........................……4
Affichage……………………….…………………….........…….....…..3
Utilisation de la VHF……………………………….............…..………3
Informations de sécurité……………………………...........……....…..3
Introduction………………………………….......…..........…..……......2
Description de I’ équipement…………………............……....…....…2
Table des matières
Tel: 02.98.94.64.70 Fax: 02.98.94.69.71
Navicom Pro: 3, rue J. Cugnot, Z.A.C Petit Guelen, 29000 Quimper
Tel: 01.39.72.19.90 Fax: 01.39.19.28.98
Navicom plaisance: Z.A. des Boutries, 78700 Conflans Ste Honorine
AND OPERATION GUIDE
INSTALLATION
PACK RT-31 1
VHF Marine Radio
 Loading...