

Page 1

Halo24 Radar
Installation Manual
ENGLISH
www.lowrance.com
www.simrad-yachting.com
www.bandg.com
Page 2

Page 3

Preface
!
Disclaimer
As Navico is continuously improving this product, we retain the right to make changes to the
product at any time which may not be reflected in this version of the manual. Please contact
your nearest distributor if you require any further assistance.
It is the owner’s sole responsibility to install and use the equipment in a manner that will
not cause accidents, personal injury or property damage. The user of this product is solely
responsible for observing maritime safety practices.
NAVICO HOLDING AS AND ITS SUBSIDIARIES, BRANCHES AND AFFILIATES DISCLAIM ALL
LIABILITY FOR ANY USE OF THIS PRODUCT IN A WAY THAT MAY CAUSE ACCIDENTS, DAMAGE
OR THAT MAY VIOLATE THE LAW.
This manual represents the product as at the time of printing. Navico Holding AS and its
subsidiaries, branches and affiliates reserve the right to make changes to specifications
without notice.
Governing language
This statement, any instruction manuals, user guides and other information relating to
the product (Documentation) may be translated to, or has been translated from, another
language (Translation). In the event of any conflict between any Translation of the
Documentation, the English language version of the Documentation will be the official
version of the Documentation.
Copyright
Copyright © 2018 Navico Holding AS.
Warranty
The warranty card is supplied as a separate document.
In case of any queries, refer to the brand web site of your display or system:
www.lowrance.com
www.simrad-yachting.com
www.BandG.com
Compliance statement
Europe
This equipment complies with CE under RED Directive 2014/53/EU. The relevant Declaration
of conformity is available in the product’s section at the following websites:
www.lowrance.com
www.simrad-yachting.com
www.BandG.com
United States of America
Part 15 of the FCC Rules. Operation is subject to the following two conditions: (1) this device
may not cause harmful interference, and (2) this device must accept any interference
received, including interference that may cause undesired operation.
Warning: The user is cautioned that any changes or modifications not expressly
approved by the party responsible for compliance could void the user’s authority to
operate the equipment.
RF emissions notice
This equipment complies with FCC radiation exposure limits set forth for an uncontrolled
environment. This device’s antenna must be installed in accordance with provided
instructions; and it must be operated with minimum 2 m (6.6 ft)* spacing between the
Preface | Halo24 Radar Installation Manual
| 3
Page 4

antennas and all person’s body (excluding extremities of hands, wrist and feet) during
operation. Further, this transmitter must not be co-located or operated in conjunction with
any other antenna or transmitter.
* Based on theoretical calculation
¼ Note: This equipment has been tested and found to comply with the limits for a Class B digital
device, pursuant to Part 15 of the FCC Rules. This equipment generates, uses and can radiate
radio frequency energy and, if not installed and used in accordance with the instructions,
may cause harmful interference to radio communications. However, there is no guarantee
that the interference will not occur in a particular installation. If this equipment does cause
harmful interference to radio or television reception, which can be determined by turning
the equipment off and on, the user is encouraged to try to correct the interference by one or
more of the following measures:
• Reorient or relocate the receiving antenna
• Increase the separation between the equipment and receiver
• Connect the equipment into an outlet on a circuit different from that of the receiver is
connected
• Consult the dealer or an experienced technician for help
Canada
This device complies with Industry Canada’s license-exempt RSSs. Operation is subject to the
following two conditions:
(1) This device may not cause interference; and
(2) This device must accept any interference, including interference that may cause undesired
operation of the device.
Le présent appareil est conforme aux CNR d’Industrie Canada applicables aux appareils radio
exempts de licence. L’exploitation est autorisée aux deux conditions suivantes:
(1) l’appareil ne doit pas produire de brouillage, et.
(2) l’utilisateur de l’appareil doit accepter tout brouillage radioélectrique subi, même si le
brouillage est susceptible d’en compromettre le fonctionnemen.
Industry Canada Statement
Under Industry Canada regulations, this radio transmitter may only operate using an antenna
of a type and maximum (or lesser) gain approved for the transmitter by Industry Canada.
To reduce potential radio interference to other users, the antenna type and its gain should
be so chosen that the equivalent isotropically radiated power (e.i.r.p.) is not more than that
necessary for successful communication.
Conformément à la réglementation d’Industrie Canada, le présent émetteur radio peut
fonctionner avec une antenne d’un type et d’un gain maximal (ou inférieur) approuvé pour
l’émetteur par Industrie Canada. Dans le but de réduire les risques de brouillage
radioélectrique à l’intention des autres utilisateurs, il faut choisir le type d’antenne et son gain
de sorte que la puissance isotrope rayonnée quivalente (p.i.r.e.) ne dépassepas l’intensité
nécessaire à l’établissement d’une communication satisfaisante.
This radio transmitter (identify the device by certification number, or model number if
Category I) has been approved by Industry Canada to operate with the antenna types listed
below with the maximum permissible gain and required antenna impedance for each
antenna type indicated. Antenna types not included in this list, having a gain greater than the
maximum gain indicated for that type, are strictly prohibited for use with this device.
4 |
Le présent émetteur radio (identifier le dispositif par son numéro de certification ou son
numéro de modèle s’il fait partie du matériel de catégorie I) a été approuvé par Industrie
Canada pour fonctionner avec les types d’antenne énumérés ci-dessous et ayant un gain
admissible maximal et l’impédance requise pour chaque type d’antenne. Les types d’antenne
non inclus dans cette liste, ou dont le gain est supérieur au gain maximal indiqué, sont
Preface | Halo24 Radar Installation Manual
Page 5

strictement interdits pour l’exploitation de l’émetteur.
!
Halo
Antennas
000-14544-001 Halo24 Radar 23.5 dBi Not applicable
Description
Max. permissible
antenna gain (dBi)
Impedance
Radio Frequency (RF) Exposure table
System 100 W/m2 occupational safe
distance
Halo24 Radar 0.6 m (2.0 ft) * 2 m (6.6 ft)*
* Based on theoretical calculation
10 W /m2 public safe
distance
Trademarks
Navico® is a registered trademark of Navico.
Lowrance® is a registered trademark of Navico Holding AS.
Simrad® is used by license from Kongsberg.
B&G® is a registered trademark of Navico Holding AS.
About this manual
This manual is a reference guide for installing the Halo dome radar.
Important text that requires special attention from the reader is emphasized as follows:
¼ Note: Used to draw the reader’s attention to a comment or some important information.
Warning: Used when it is necessary to warn personnel that they should proceed
carefully to prevent risk of injury and/or damage to equipment/personnel.
Preface | Halo24 Radar Installation Manual
| 5
Page 6

Contents
7 Introduction
7 Parts included
8 Installation
8 Choose the scanner location
9 Considerations for direct roof mounting
12 Mounting the scanner
13 Wiring
13 Wiring guidelines
14 Scanner connection
15 Ethernet connection
16 Power connection
17 Power control connection
19 Setup and conguration
20 Maintenance
21 Replacing a Broadband 3G/4G Radar
21 Dimensions
22 Troubleshooting
22 Error messages
23 Error codes
24 Status LED
25 Drawings
25 Dimensions
25 Bottom view
26 Technical specications
26 Halo24 Radar
6 |
Contents | Halo24 Radar Installation Manual
Page 7

1
Introduction
Parts included
Installation Manual
ENGLISH
Installation Manual
ENGLISH
Installation Manual
ENGLISH
Installation Manual
ENGLISH
bandg.com
bandg.com
bandg.com
bandg.com
A
D
A Halo Radar
B Mounting screws and washers
Screw (M8x30), 4x
Flat washer, 4x
Spring washer, 4x
Documentation pack
C
Interconnection cable
D
Ethernet adapter RJ45 to 5-pin, 1.5m (4.9 ft)
E
Waterproof cable boot for the Ethernet adapter
F
Cable retainer kit
G
Cable retainer clip, 2x
Screw (M2.5x8), 4x
E F G
B
C
Introduction | Halo24 Radar Installation Manual
| 7
Page 8
Installation
!
¼ Note: The Halo Radar is factory sealed. Removing the cover will void the factory warranty.
2
Choose the scanner location
The radar’s ability to detect targets greatly depends on the position of its scanner. The ideal
location for the scanner is high above the vessel’s keel line where there are no obstacles.
A higher installation position increases the radar ranging distance, but it also increases the
minimum range around the vessel where targets cannot be detected. Higher installation
height also reduces the ability of the radar to detect targets in sea clutter.
When you are deciding on the location, consider the following
The length of the interconnection cable supplied with your radar is usually sufficient. If you
think you’ll need a longer cable, consult your dealer before installation. Optional cable lengths
are 5 m (16 ft) 10 m (33 ft), 20 m (65.5 ft) and 30 m (98 ft).
If you mount the scanner on a pedestal or base, ensure that rain and sea spray can drain away
rapidly, and the breather hole (A) in the base can operate.
A
The scanner is usually installed parallel to the line of the keel.
Do not install the scanner:
• too high up (eg at the top of a mast), which may cause degradation of the radar picture
over short ranges
• close to lamps or exhaust outlets. The heat emissions may damage the dome. Soot and
smoke will degrade the performance of the radar
• close to the antennas of other equipment such as direction finders, VHF antennas, GPS
equipment, as it may cause or be subject to interference
• where a large obstruction (such as an exhaust stack) is at the same level as the beam, the
obstruction is likely to generate false echoes and/or shadow zones
• where it will be subjected to strong vibrations. Vibrations could degrade the performance
or service life of the radar
• directly on to a large flat roof area. Use a pedestal to elevate the scanner for radar beams to
clear roof line. Refer to “Considerations for direct roof mounting” on page 9
Warning: For dual radar installations, ensure Halo Radar is not installed in the beam of
a pulse radar at any time.
8 |
Installation | Halo24 Radar Installation Manual
Page 9

Compass
(6 ft) Min.
0.7 m (2.3 ft) Min.
2 m
Halo Radar
Pulse Radar
TX
11
11
STBY
Minimum distance to install near the
ships compass is 0.7 m (2.3 ft).
If possible, ensure that the location site
provides the scanner with a clear view
all round the vessel.
Do not install the Halo Radar on the same beam
plane as a conventional pulse radar. A pulse radar
must be set to STBY or OFF any time the Halo
Radar is being operated.
If installed on power boats that have a steep
planing angle, it is recommended to tilt the
scanner angle down at the front. (Beam angle is
11° either side of center).
Considerations for direct roof mounting
When deciding a suitable mounting location for the Halo Radar, be aware that the vertical
radar beam extends to 22° either side of horizontal, with 50% of the power projecting in
a beam 11° off horizontal. If the radar beams cannot clear the roof line, this will decrease
performance of the radar. Depending on the size of the hard top of the vessel, it is
recommended to elevate the antenna to allow the radar beams to clear the roof line.
¼ Note: Where the mounting surface is constructed of any form of metal you must elevate the
radar so that the beam has complete clearance, else performance will be severely impaired.
Determine scanner height
This is a guide to determine scanner height in relation to the furthest forward corner of the
hard top.
Measure the distance (A) from the Halo Radar to the furthest forward corner of the hard top.
BOW BOW BOW
A
A
A
Use the illustrations below to determine the height of the scanner in relation to distance (A).
Installation | Halo24 Radar Installation Manual
| 9
Page 10

Possible performance loss
50% of beam power
22°
11°
50% of beam power
11°
22°
Above illustrates an installation with the Halo Radar mounted directly on to a large hard
top. This installation could suffer decreased performance as the radar energy is either
reflected or absorbed by the hard top.
¼ Note: Where the mounting surface is constructed of any form of metal you must elevate the
dome so that the beam has complete clearance, else performance will be severely impaired.
Good performance
Above illustrates that raising the radar scanner off the hard top allows most of the radar
energy to clear the hard top.
0.80 m
1.00 m
1.20 m
1.40 m
1.80 m
1.60 m
320 mm
360 mm
A
400 mm
2.80 m
11°
2.60 m
2.40 m
2.20 m
2.00 m
For every increase of 200 mm (7.87”) of dimension (A), increase the height (B) by 40 mm
(1.6”).
40 mm
80 mm
120 mm
160 mm
200 mm
240 mm
280 mm
B
10 |
Installation | Halo24 Radar Installation Manual
Page 11

Optimum performance
!
For best performance, the radar should be positioned to allow the beams to clear the
superstructure of the boat.
0.38 m
0.60 m
0.80 m
1.00 m
1.20 m
22°
1.80 m
2.00 m
2.20 m
2.40 m
2.60 m
2.80 m
For every increase of 200 mm (7.87”) of dimension (A), increase the height (B) by 80 mm
(1.6”).
1.40 m
1.60 m
88 mm
170 mm
250 mm
330 mm
410 mm
490 mm
570 mm
650 mm
730 mm
810 mm
890 mm
970 mm
BA
Halo light
The Halo Radar has a blue accent light that can be activated from the display unit. Refer to
“Setup and configuration” on page 19.
Warning: Halo Radar’s lighting may not be approved for use in your boating location.
Please check your local boating regulations before turning the blue accent lights ON.
Installation | Halo24 Radar Installation Manual
| 11
Page 12

Mounting the scanner
¼ Note: If replacing an already installed Broadband 3G/4G Radar, refer to ”Replacing a Broadband
3G/4G Radar” on page 21.
Use the supplied mounting template and tape it securely to the chosen location. Before
drilling, check that:
• you have oriented the mounting template correctly so that the front of the scanner unit
will face the front of the vessel
• clearance to other objects in all directions is >315 mm ( 12.5”) from the center of the
product as indicated on the mounting template
• the thickness of chosen mounting surface is not more than 18 mm (0.7”). If the location is
thicker, longer bolts than those supplied will be required
¼ Note: The bolts supplied are M8 x 30 mm. If you need to use longer bolts make sure they are
marine grade stainless steel and allow for minimum of 8 mm (0.3”) and maximum of 18 mm
(0.7”) of thread contact.
1. Use a 9.5 mm (3/8”) drill bit to drill the four holes where shown on the mounting template
2. Connect the scanner interconnection cable
3. Route the connection cable through the cable retention channel. Refer to “Scanner
connection details” on page 15
4. Position the scanner carefully over the bolt holes so that they are aligned
5. Place a lock washer and a plain washer onto each bolt
6. Insert bolt into drill hole and locate into scanners threaded mounting holes and tighten
securely
¼ Note: The torque settings for the mounting bolts are 12 Nm – 18 Nm (8.9 lb ft – 13.3 lb ft)
12 |
Installation | Halo24 Radar Installation Manual
Page 13

C
A
E
B
F
D
3
Wiring
Run the interconnection cable between the scanner and the display unit or Ethernet switch.
A Halo Radar
B Scanner connector
C Interconnection cable
D Ethernet connector
E Power wires
F Ethernet adapter RJ45 to 5-pin (optional)
Wiring guidelines
Do not:
• make sharp bends in the cables
• run cables in a way that allows water to flow down into the connectors
• run the data cables adjacent to radar, transmitter, or large/high current carrying cables or
high frequency signal cables
• run cables so they interfere with mechanical systems
• run cables over sharp edges or burrs
• attach a mouse line to the Ethernet cable or connector directly as this will loosen and
damage the connector and the radar will malfunction when power is applied
• bend the Ethernet cable back on itself as this will cause damage to the Ethernet cable and
the radar will malfunction when power is applied
Do:
• connect a mouse line to the outer jacket of the cable so that the strain of pulling is
transferred to the stronger outer jacket of the cable. Use some small cable ties to secure
the mouse line to the outer jacket as well if there is sufficient clearance
• tape the RJ45 connector to the mouse line so that it does not get caught and bent
backwards
• cover the RJ45 and the conductors with tape to protect them as they are pulled thorough
the run
• make drip and service loops
• use cable-tie on all cables to keep them secure
• solder/crimp and insulate all wiring connections if extending or shortening the cables
• keep joins as high as possible to minimize possibility of water immersion
• leave room adjacent to connectors to ease plugging and unplugging of cables
Wiring | Halo24 Radar Installation Manual
| 13
Page 14

A
!
!
B B
A
C
B
B
A Mouse line
B Electrical tape
C Cable tie
Warning: Before starting the installation, be sure to turn electrical power off. If power
is left on or turned on during the installation, fire, electrical shock, or other serious injury
may occur. Be sure that the voltage of the power supply is compatible with the unit.
Warning: The positive supply wire (red) should always be connected to (+) DC with
the supplied fuse or a circuit breaker (closest available to fuse rating).
Scanner connection
¼ Note: If replacing an already installed Broadband 3G/4G Radar, refer to ”Replacing a Broadband
3G/4G Radar” on page 21
The scanner interconnection cable connects to the scanner using an 8 pin connector
1. Insert cable connector on to the male 8 pin plug on the scanner. Take care to align the
connector correctly to avoid bending the pins
2. Secure the locking collar by rotating clockwise until it clicks
3. Feed and secure the cable into the cable retention channel
4. Install the 2 cable retainers (A), the screws should be gently tightened
A
14 |
Wiring | Halo24 Radar Installation Manual
Page 15

Scanner connection details
8
1
2
3
4
Scanner socket Interconnection cable (scanner end)
Pin-out Wire color Description
1 Black DC negative
2 Yellow Power control
3 Green Data Receive -
4 White / Green Data Receive +
5 Orange Data Transmit -
6 White / Orange Data Transmit +
7 Red +12/24 V DC
8 Drain Shield
7
6
5
7
6
5
8
1
2
3
4
Ethernet connection
The scanner can be connected either directly to a RJ45 Ethernet connector or to a 5-pin
Ethernet connector via the supplied Ethernet adapter.
A
Ethernet Ethernet
D
Key Description
A Display unit or Ethernet switch with a 5-pin Ethernet socket
B Display unit or Ethernet switch with a RJ45 Ethernet socket
C Ethernet cable plug (RJ45)
D Ethernet adapter cable (RJ45 to 5-pin)
E Power and power control wires
F Interconnection cable to scanner
C
B
C
F
E
Wiring | Halo24 Radar Installation Manual
| 15
Page 16

RJ45 Ethernet connector details
1 8
Ethernet switch socket Interconnection cable (RJ45 plug)
Pin-out Wire color Description
1 White/Orange Data transmit +
2 Orange Data transmit -
3 White/Green Data receive +
4 Blue Not used
5 White/Blue Not used
6 Green Data receive -
7 White/Brown Not used
8 Brown Not used
18
Ethernet adapter cable
The ethernet adapter cable can be used to connect the scanner to a 5-pin Ethernet
connector. Use the supplied waterproof cable boot to seal the connection between the
interconnection cable and the Ethernet adapter cable.
Waterproof cable boot
1. Slide the boot part over the cable
2. Connect the cables together and lock the cable boot to the adapter cable
3. Tighten the boot gland
16 |
Wiring | Halo24 Radar Installation Manual
Page 17

Ethernet adapter cable details
5
1 8
4
3
5-pin plug RJ45 socket
5-pin plug RJ45 socket Wire color Description
1 1 Orange / White Data transmit +
2 2 Orange Data transmit -
3 3 Blue / White Data receive +
4 6 Blue Data receive -
5 Shield -- Drain
-- 4-5 -- Not used
-- 7-8 -- Not used
1
Power connection
The unit is designed to be powered by a 12 or 24 V DC system.
It is protected against reverse polarity, under voltage, and over voltage (for a limited duration
of time).
A fuse should be fitted to the positive supply, for recommended fuse rating refer to “Technical
specifications” on page 26.
D
C
A B
Key Color Description
A Black DC negative
B Red +12/24 V DC
C Yellow Power control wire
D -- Data cable
E -- Interconnection cable to scanner
E
Wiring | Halo24 Radar Installation Manual
| 17
Page 18

Power control connection
The yellow wire in the power cable must be used to control how the unit is turned on and off.
Power control by supply power
The scanner will turn on/off when power is applied/removed. Connect the yellow wire to the
red wire after the fuse.
A
Key Wire color Description
A Yellow Power control wire, connected to supply power
Power on by switch
The unit will be turned on as long as the switch is closed.
A
B
Key Wire color Description
A Yellow Power control wire
B Power switch
Power controlled
The scanner can be connected to a common power control bus, and will turn on when
power is applied to the bus by a display unit.
For Lowrance displays connect the yellow wire of the power connector cable to the bus.
For Simrad and B&G displays connect the yellow wire of the power connector cable to the
bus and set all displays intended to power on/off the system to be master.
For more information, refer to the documentation supplied with your display unit.
A
B
A
Key Wire color Description
A Yellow Power control wire
B Master slave bus
18 |
Wiring | Halo24 Radar Installation Manual
Page 19

!
4
Setup and conguration
Setup and configuration of the Halo Radar has been simplified compared to traditional pulse
radars. There is no zero range adjustment (time delay), no warm up time and no burn in
required.
Make the following settings before use. Refer to the documentation supplied with your
display unit.
Adjust bearing alignment
Aligns the heading marker on the screen with the center line of the vessel. This ensures that
MARPA targets and bearings taken with the EBL are displayed accurately.
Antenna height adjustment
The antenna height is the height of the antenna above the water line. Set the antenna height
correctly, this affects the sea clutter function. Do not set the height to zero.
Sector Blanking
Used to stop the radar transmitting in the direction of structures that could cause unwanted
reflections or interference to appear on the radar image. Four sectors can be set, the bearing
of which is measured from the bow of the vessel to the center line of the sector.
Side lobe suppression
¼ Note: This control should only be adjusted by experienced radar users. Target loss in harbor
environments may occur if this control is not adjusted correctly.
By default this control is set to Auto. Increase the suppression if there is significant metallic
clutter around the radar.
Halo light
Determines the light level of the LED accent light.
Warning: Halo Radar’s lighting may not be approved for use in your boating location.
Please check your local boating regulations before turning the blue accent lights ON.
Setup and conguration | Halo24 Radar Installation Manual
| 19
Page 20

5
Maintenance
Clean the radome using soapy water and a soft cloth. Avoid using abrasive cleaning products.
Do not use solvents such as gasoline, acetone, M.E.K etc. as this will damage the dome
surface.
20 |
Maintenance | Halo24 Radar Installation Manual
Page 21

6
Replacing a Broadband 3G/4G Radar
An adapter cable must be used if the Halo Radar is connected through an already installed
Broadband 3G/4G Radar interconnection cable.
A Broadband 3G/4G Radar to
Halo24 Radar adapter cable
(00014551-001)
A
B Existing installed Broadband
3G/4G Radar interconnection
cable
Dimensions
B
3G/4G:
Halo24:
280 mm (11.02”)
225 mm (8.9”)
Halo24: 610 mm (24”)
3G/4G: 488.6 mm (19.24”)
Replacing a Broadband 3G/4G Radar | Halo24 Radar Installation Manual
| 21
Page 22

7
Troubleshooting
Error messages
If any of the following messages appear, power off/on the radar unit.
If problems persists check that the software is up to date. Check the following websites for the
latest version of the radar and display unit software:
www.lowrance.com
www.simrad-yachting.com
www.BandG.com
Unknown Radar
Generally seen when overlaying the radar on the chart.
Recommendations
Ensure that the correct radar source is selected and configured in the display unit. Refer to the
display unit’s documentation.
No radar
Indicates the display does not see the radar.
Recommendations
• Check/select radar in Radar Sources
• Power cycle the system
• Check all connections
• Check voltage to the yellow power control wire
• Insufficient power supply
• Missing or intermittent Ethernet connection, check for damage of the RJ45 connector
• Faulty Ethernet cable
• Try another Ethernet port on the display or switch
No scanner
Sometimes seen before the “No Radar” message above:
Recommendations
• Check voltage/current
• If persistent, power cycle the system, check the scanner cable / RJ45
• Possible internal fault with the radar, contact service
No spoke data
Sometimes seen before the “No Scanner” message above:
Recommendations
• Check voltage/current
• If persistent, power cycle the system, check the scanner cable / RJ45
• Possible internal fault with the radar, contact service
22 |
Troubleshooting | Halo24 Radar Installation Manual
Page 23

Error codes
If any of the error codes below are encountered, power cycle the radar. If the error code
repeats, please refer to list below.
Error code Description Recommendation
0x00000001 Radar saved settings corrupted Radar will revert to factory defaults. Re-enter
your settings including installation settings
0x0001000C Scanner not detected 1. Check the pedestal interconnection cable
connections
2. Power cycle the radar
3. Check input Voltage
0x0001000D Transmitter overheat (soft) 1. Try changing to shorter ranges <6 NM
2. Switch to STBY, Allow unit cool
0x0001000E Transmitter overheat (hard) Switch to STBY, Isolate power to the radar
and contact service
0x0001000F Signal processing error Unit should revert to STBY. Select transmit
If problem persists. power cycle the radar
0x00010017 Scanner failure Contact service
Power supply
0x00010010 Power supply overheating Switch to STBY, Allow unit cool then retry
0x00010011 Power supply voltage error Check scanner cable for connections for
corrosion or damage
0x00010012 Power supply overload Contact service
0x00010013 Power supply hardware fault Contact service
0x00010014 Power supply comms fault Contact service
0x00010019 Low battery voltage (Supply
voltage low)
0x00010016 LED Lighting fault Turn accent lighting off then retry
0x00010018 Radar interface box fault Check the interconnection cable for damage
Mechanical
0x00010001 Zero bearing sensor fault Contact service
0x00010002 Bearing sensor fault Contact service
0x00010015 Mechanical transmission fault Contact service
0x00010003 Motor drive fault Contact service
0x0001001A Motor or antenna has stalled Contact service
1. Recharge and check supply voltage
2. Restart the radar
Troubleshooting | Halo24 Radar Installation Manual
| 23
Page 24

Status LED
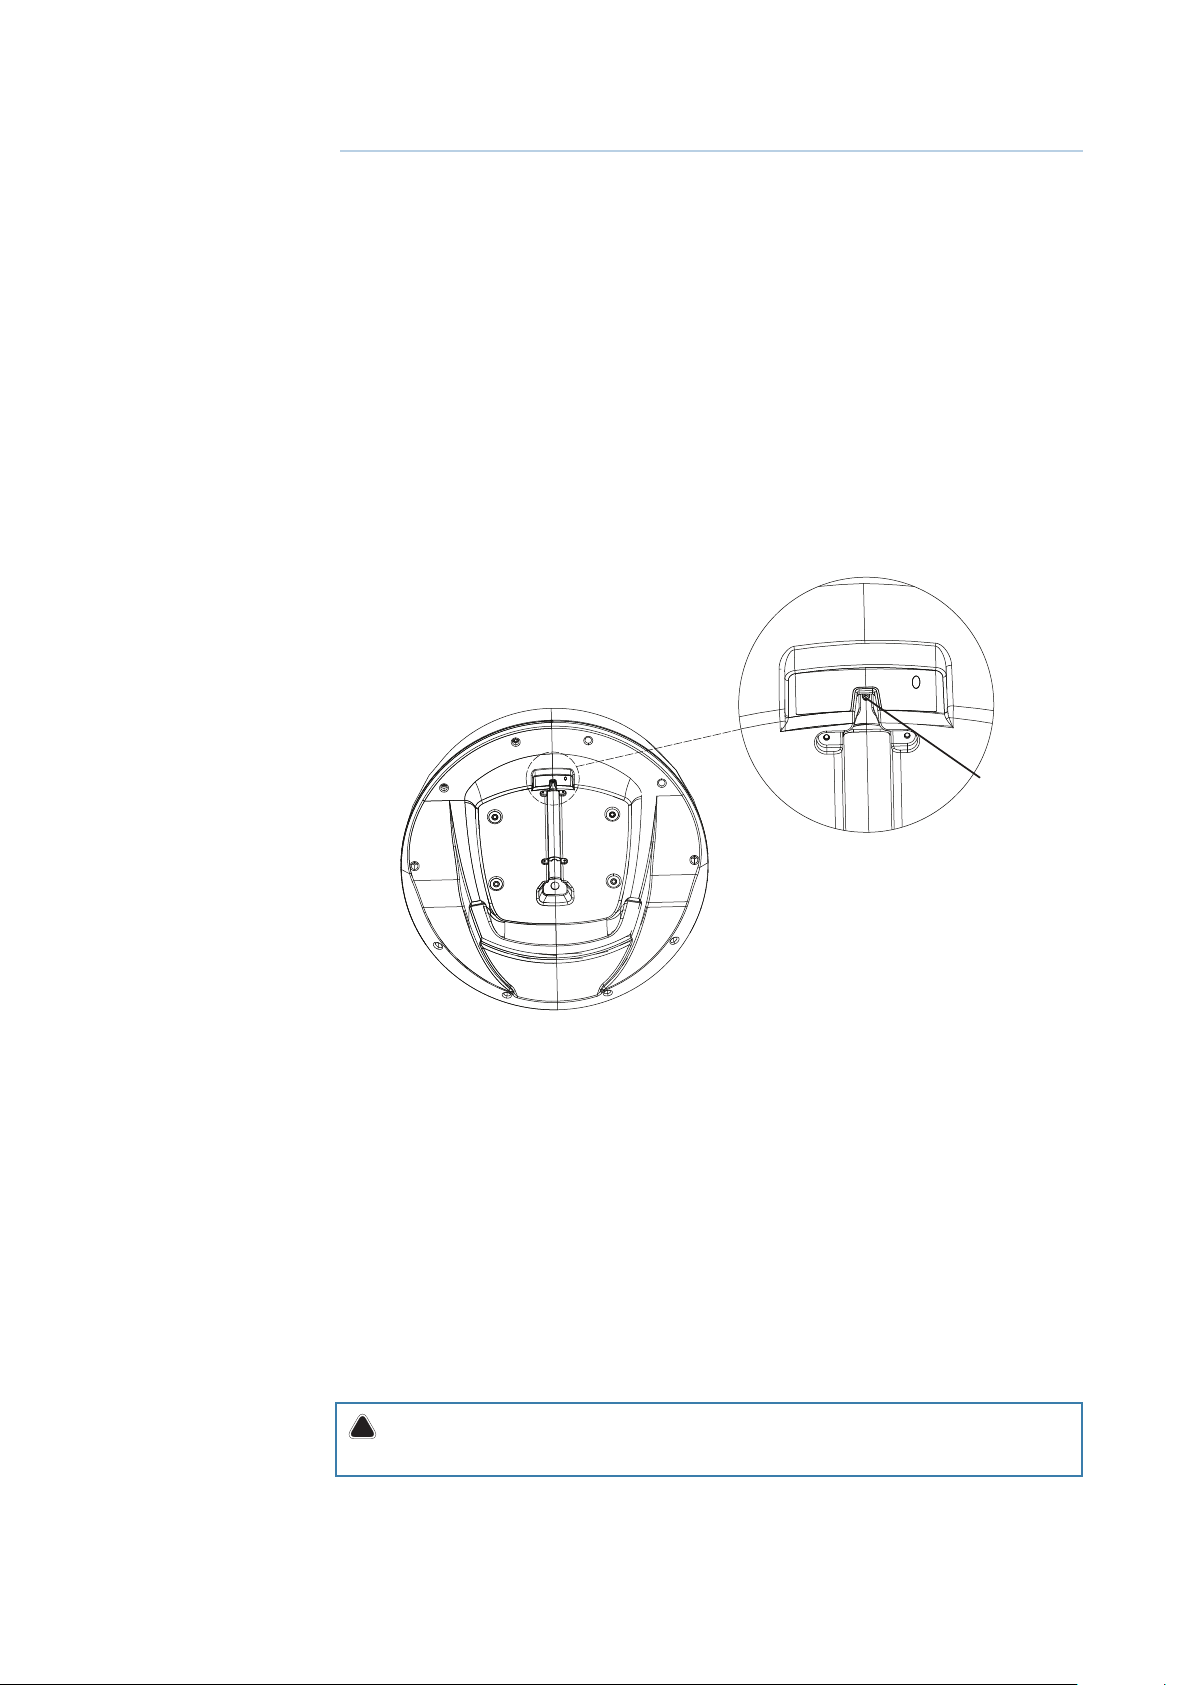
There is a status LED (A) at the back of the scanner that indicates the status of the scanner.
A
Condition Flash repeat sequence Priority
Booting-up/Upgrading Continuous ON 1 (highest)
Fault Rapidly flashing 2
Low voltage 3 quick flashes then long gap 3
No Ethernet/Physical link 2 quick flashes then long gap 4
Operating normally Slow flash 5
¼ Note: If more than one condition exists simultaneously, the condition with the highest priority
will be indicated.
24 |
Troubleshooting | Halo24 Radar Installation Manual
Page 25

225 mm (8.9”)
8
Drawings
Dimensions
Ø 610 mm (24”)
Bottom view
D
Key Description
A Cable entry area
B Cable retention channel
C 4 Bolt holes M8 x 30 mm
D LED accent light
C
B
A
D
Drawings | Halo24 Radar Installation Manual
| 25
Page 26

9
Technical specications
Halo24 Radar
Characteristic
Environmental IEC60945 : 2002
Operating Temperature: -25° to +55°C (-13° to +130°F)
Relative humidity: +35° C (95° F), 95% RH
Waterproof: IPX6
Max relative wind velocity 51 m/sec (100 Knots)
Power
DC input 10.5-31.2 V with reverse polarity protection
Power consumption
Recommended fuse rating 5 A
Transmitter source (pre-heating
time )
Outside dimensions Refer to ”Drawings” on page 25
Scanner weight (no cable) 6.9 kg (15.22 lbs)
Radar and Antenna parameters
Radar ranges 100 m (328 ft) to 89 km (48 nm) with 18 range settings
Rotation (mode dependent) 20 - 60 rpm (mode and MFD dependent)
Transmitter frequency
Transmitter source (warm-up time) No Magnetron – all solid state. Instant On™
Plane of polarization Horizontal Polarization
Transmitter peak power output 25 W
Minimum range 6 m (19.7 ft)
Sweep repetition frequency 700-2400 Hz (mode dependent)
Pulse length 0.04 - 64 usec +/- 10%
Sweep bandwidth 48 MHz max
Horizontal beam width (Tx and Rx
antenna)
Target Separation Control OFF: 3.9°+/-10% (-3 dB width nominal)
Vertical beam width (Tx and Rx
antenna)
Side lobe level (Tx and Rx antenna) Below -18 dB (within ±10°);Below -24 dB (outside ±10°)
Noise figure Less than 5 dB nominal
Communications/Cabling
Protocol Ethernet 100 Base T
Maximum interconnecting cable
length
Operating: 25W at 13.8VDC ~1.84A
Standby: 3.9 W (Typ.) at 13.8 V DC
No magnetron – Instant On
(nm/sm/km)
X-Band - USA (FCC) 9300-9500 Mhz
X-Band - Canada (ISED) 9225-9500 Mhz
3.9° nominal (-3 dB width)
LOW: ~3.4°+/-10% (-3 dB width nominal)
MED: ~2.5°+/-10% (-3 dB width nominal)
HIGH: ~2.0°+/-10% (-3 dB width nominal)
22° (-3B width nominal)
30 m (98.5 ft) – available as option
26 |
Technical specications | Halo24 Radar Installation Manual
Page 27

Technical specications | Halo24 Radar Installation Manual
| 27
Page 28

*988-12307-001*
www.lowrance.com
www.simrad-yachting.com
www.bandg.com
 Loading...