

Page 1

EVR-100
VHF Marine Radio
Owner’s Manual
1 of 13
Page 2
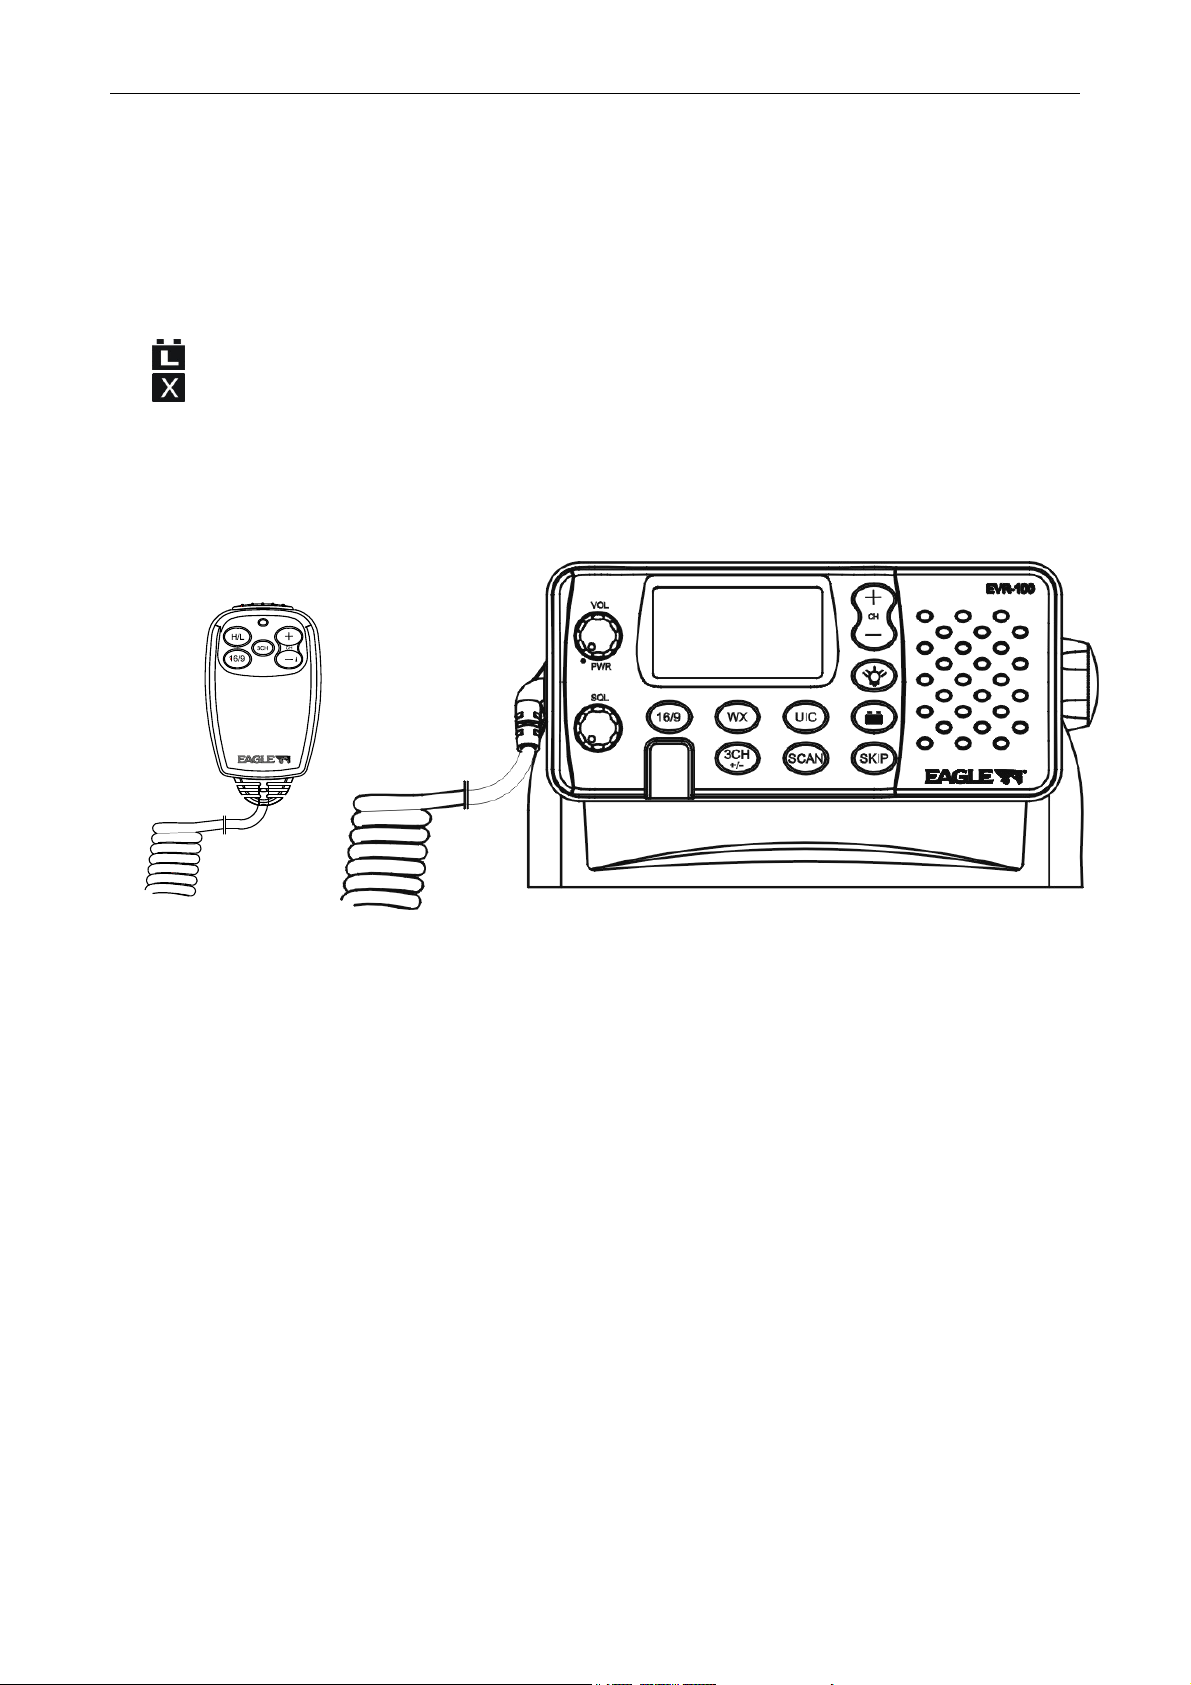
1. Your radio has the following features:
Congratulations on your purchase of a Eagle EVR-100 marine band VHF radio. It provides the following
useful features:
Prominent channel display
Adjustable keypad backlighting for easy night-time use
Waterproof and submersible to comply with JIS-7
Choice of High or Low (7 W or 1 W) transmission power
Top centered PTT button for comfortable left- or right-handed use
Powerful 4 W external audio output
Access to all currently-available marine VHF channel bands (USA, Canada, International) including
Weather channels where available
Special CH16 or CH16/9 key for quick access to the priority (international distress) channel
Special 3CH key to select your three favorite channels
Weather alert facility where available
Squelch Adjustment to help eliminate noise between transmissions.
Battery Level Indicator ----shows the battery condition.
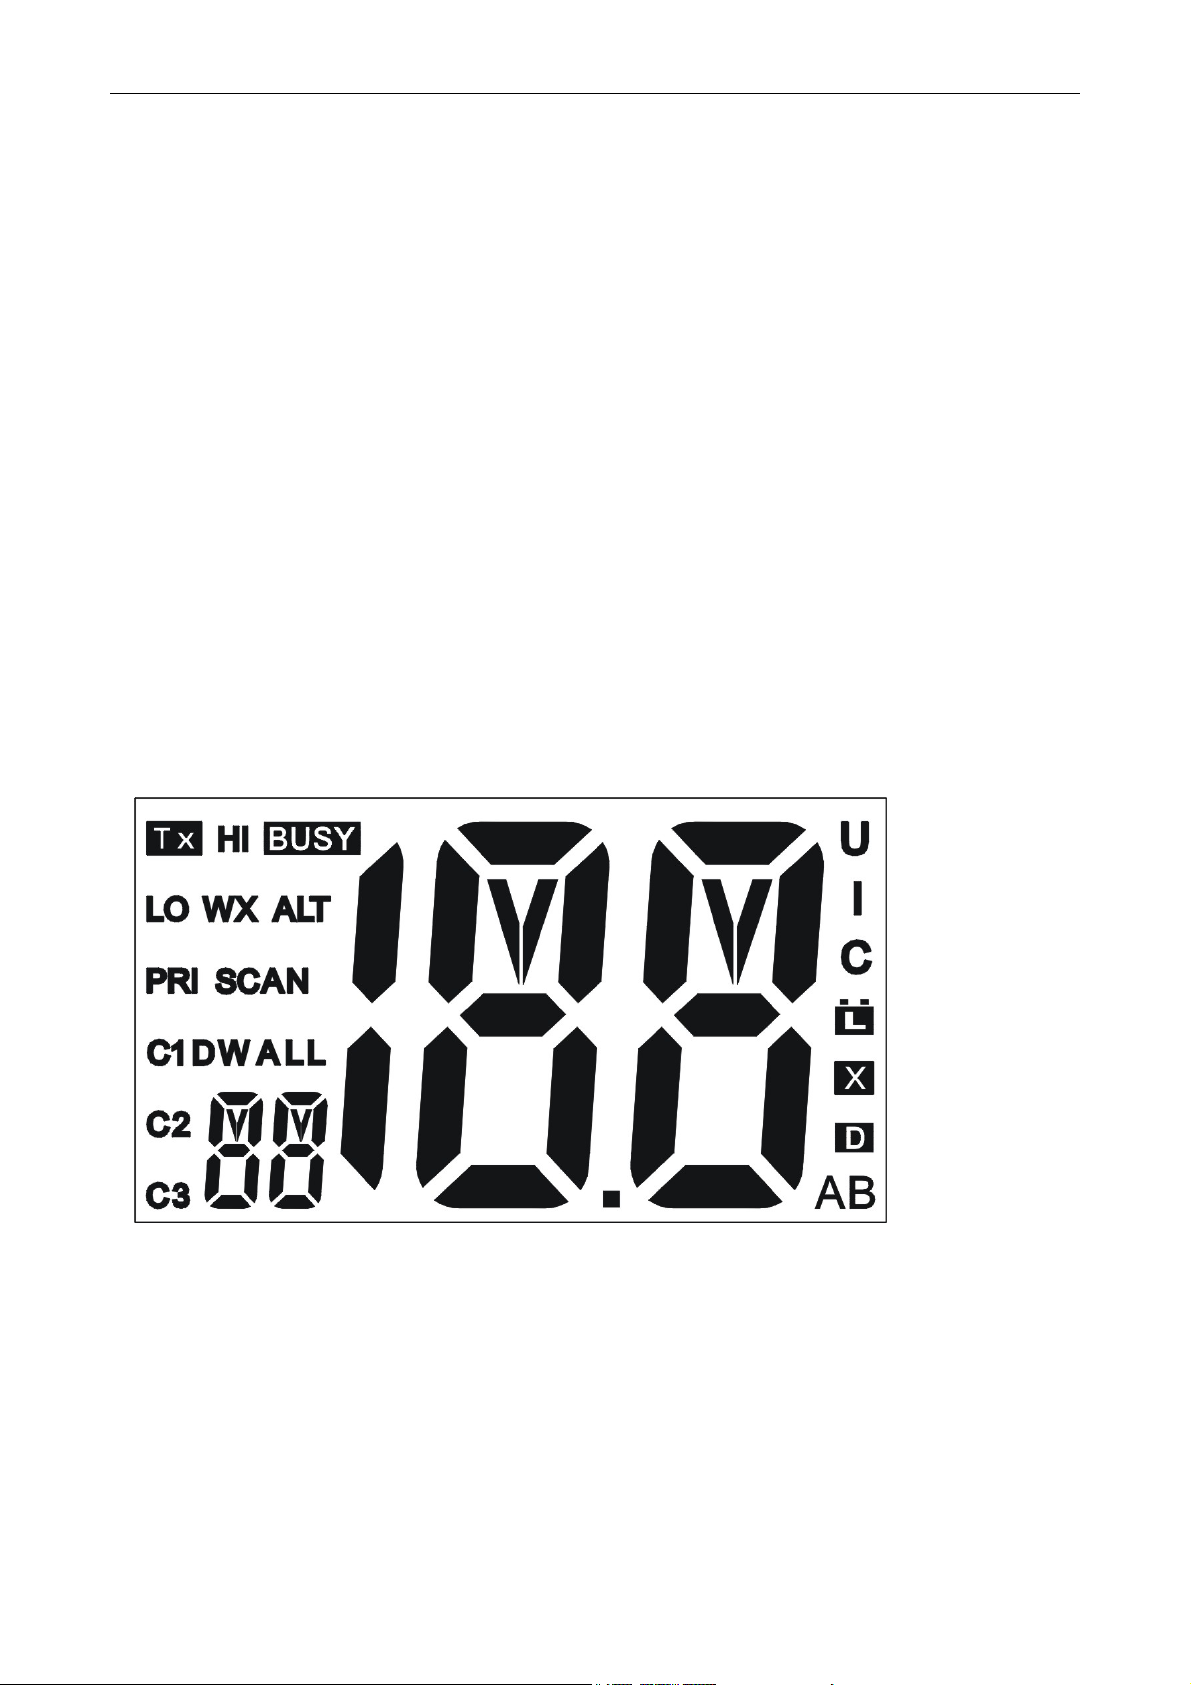
2. LCD Symbols and Meanings
Symbol Meaning
TX Transmitting
HI LO Transmission power, High (H) 7W or Low (LO) 1W.
BUSY Receiver busy with an incoming signal
WX Weather channel
WX ALT Weather Alert. Alarm beeps will sound.
PRI Priority channel is selected
SCAN Scanning channels
DW Dual Watch mode
2 of 13
Page 3
ALL ALL channels scan mode
C1 C2 C3 Shows which of the 3 favourite channels, if any, are
selected. Otherwise blank
88 (small)
18.8 (BIG) Channel selected
U I C Selected Channel bank for VHF radio operations and
A B Channel suffix, if applicable
regulations ( USA, International, Canada)
Low Battery warning (activates at 10.5V)
Channel is temporarily deleted from the ALL SCAN
operation
3. Basic Operation and Key Functions
Key Function
VOL/PWR
SQL
16/9
WX
Volume and Power. Turn clockwise to power on. Continue to turn until a
comfortable volume is reached. VOL/PWR will also adjust the settings of an external
speaker, if connected
Squelch or Threshold Level. Sets the threshold level for the minimum receiver
signal. Turn fully counterclockwise until random noise is heard, then turn slowly
clockwise until the random noise disappears. Make another 1/4 turn clockwise for
best reception in open sea conditions.
In areas of high noise (e.g. close to large cities) reception may improve if sensitivity
is reduced. Either turn SQL slowly clockwise or use the LOCAL setting. See section
2.3.
Priority Channel. Also on the microphone. Press to cancel all other modes and to
tune into the priority channel. Press again to return to your original channel.
The default is Channel 16. To make Channel 09 the priority channel, hold down 16/9
until a beep sounds and 09 is displayed.
Weather Channel. In USA and Canadian waters, press to hear the most recently
selected weather station. The WX symbol is displayed on the LCD.
Press + or - to change to a different weather channel. Press WX again to return to
the most recent channel.
If the weather alert mode (ALT) is ON and an alert tone of 1050Hz is broadcast from
3 of 13
Page 4

UIC
3CH +/-
SCAN
+ CH -
SKIP
H/L
the weather station, it is picked up automatically and the alarm sounds. Press any
key to hear the weather alert voice message.
Channel Bank. Press to toggle between USA, International or Canadian channel
banks. The selected channel bank is displayed on the LCD along with the last used
channel. All the channel charts are shown in Appendix.
Three Favourite Channels. Also on the microphone. Press to toggle between
your favourite channels. The C1, C2, or C3 symbol appears on the LCD to show
which favourite channel is selected.
To scan only one of your favourite channels, press 3CH then immediately press and
release SCAN. If you want to scan all three favourite channels, press 3CH then
immediately press and hold SCAN.
To add a favourite channel for the first time, select that channel then hold 3CH to
store it in the CH1 location. Repeat the procedure to store two more favourite
channels in the CH2 and CH3 locations respectively.
If you try and add another favourite channel it will overwrite the existing CH1. CH2
and CH3 remain unless you delete them.
To delete a favourite channel, select that channel then hold down 3CH until the C1,
C2 or C3 symbol disappears on the LCD.
Scan. Press to scan between your current channel and the priority channel in DUAL
or TRI WATCH mode. The weather channel is also scanned if the USA channel
bank is selected and the weather alert mode (ALT) is ON.
Hold down SCAN to enter ALL SCAN mode where the priority channel is checked
every 1.5 seconds.
When a signal is received, scanning stops at that channel and BUSY appears on the
screen. If the signal ceases for more than 5 seconds, the scan restarts.
Press ENT to temporarily skip over (lock out) an “always busy” channel when in ALL
SCAN mode and resume the scan. An X is shown on the screen to designate a
skipped channel. Note that it is not possible to skip over the priority channel.
Press SCAN again to stop at the current channel.
Channel Select. Also on the microphone. The current channel is shown on the
screen in BIG digits with an appropriate designator suffix A or B in small letters
below the channel number.
Press + or - to step through the available channels one at a time, or hold down to
scroll rapidly through all the available channels. See Appendix for a listing of
channel charts.
Backlight switch Press to turn on the backlighting, press again to turn off
Battery Level Check Press to check the input battery voltage, battery level will
appears on the LCD, 5 seconds later will disappears automatically
Escape from ALL scan To temporarily deleted the channel in ALL scan, select the
channel then press the SKIP, the channel will be skipped in the later scanning,
symbol appears on the LCD. Press SKIP again to cancel the escape of the channel.
Transmission Power. On the microphone ONLY High (HI) 7W or Low (LO) 1W.
Press to toggle between high or low transmission power for the entire channel bank.
The HI or LO selection is shown on the LCD.
Some channels allow only low power transmissions. Error beeps will sound if the
4 of 13
Page 5

power transmission setting is incorrect.
Some channels allow only low power transmissions initially, but can be changed to
high power by holding down H/L and PTT at the same time. See Appendix for a
complete listing of channel charts.
PTT
Push To Talk. On the microphone ONLY Push to start the transmitting
4. Radio Operation
Turning On/Off Your Radio
Rotate Power/volume knob to turn the radio on or off with an indicating voice of click. And adjust the volume
to a comfortable level.
Adjusting Squelch
Rotate SQL fully counterclockwise in advance, After VOL rotated to adjust the audio output level, then
Rotate SQL clockwise until the noise disappears
Squelch is used to eliminate static and background noise and allows for silent operation of your radio
until a transmission is received. If the squelch is too high, only the strongest transmissions can be
heard, and when too low, intermittent static and noise are heard.
Selecting High/Low Power
Press and release this key to toggle the transmit power between high and low. When the unit is operating at
low power, “Lo” appears on LCD and “Hi” appears on LCD when operating at high power.
[Some channels allow only low power transmissions. Error beeps will sound if the power
transmission setting is incorrect. Some channels allow only low power transmissions initially, but can
be changed to high power by holding down H/L and PTT at the same time. See Appendix for a
complete listing of channel charts.]
Selecting Channels
Press the
Transmitting and Receiving
Press and hold the Push-To-Talk (PTT) key to transmit on the selected channel, then release to receive. The
TX indicator appears while transmitting.
Scanning Features
Your radio is equipped with 2 types of scan options: All Scan, 3CH Scan (Favourite Channel Scan). If there
are no channels added as favourite channels, the default is All Scan. This function automatically searches for
transmissions on the channel set being scanned. If a TX signal is received, the scan stops on the receiving
channel as long as it is present and the SCAN indicator flashes. If the signal is lost for 3 seconds, the radio
resumes scanning.
During the Scan Modes:
Press the Channel
Press SCAN button again to terminate the SCAN mode.
/ (UP/DOWN )button to scroll through the available channels.
Note: Not all channel numbers are available in INT bands.
/ (UP/DOWN) will escape from the SCAN mode.
All Scan
5 of 13
Page 6

Press and release the SCAN button to activate the All Scan function. The SCAN and ALL indicator appears
on the LCD during All Scan. In All Scan mode, all channels in the channel set are scanned in sequence
except the channel set as Cancel channel using SKIP button operation. After the last channel number has
been scanned, the cycle repeats.
3CH Scan ( Favourite Channels Scan)
Press 3CH button into 3CH shortcuts button when there is at least one favourite channel
Press and release the SCAN button to start 3CH Scan , the SCAN indicators appear on the LCD. Only the
favourite channels and priority channels (CH16) are scanned in sequence.
Your radio can store up to three favourite channels. The favourite channels are the ones scanned in
the 3CH Scan mode. Press 3CH shortly can access these favourite channels as shortcuts
To Add Channels to 3CH List
During normal operation mode, use the UP or DOWN key to select the desired channel for
programming.
Press and hold the 3CH button for 3 seconds. The "C1" icon appears to indicate the current channel
has been saved in first favourite channel. The similar to the second and third favourite as C2 and C3
respectively. Any number of channels can be saved as favourite channels
To Delete Channels from 3CH List
Press 3CH shortly into 3CH shortcuts mode, press 3CH repeatedly until the channel to be deleted.
Press and Hold 3CH button more than 3 seconds until the “Cn” disappears
Monitor Modes (Dual Watch)
The Watch Modes monitor the programmed Priority Channel (CH16) and other user selected channel. The
watch is halted when activity is detected on a monitored channel.
Press SCAN shortly to activate the Dual Watch mode. The "DW" indicator appears on the LCD. Dual Watch
monitors the current working channel and Channel 16 in cycle. Press SCAN button to terminate Dual Watch
and return to the previous working channel.
Note: During Dual Watch mode, the SCAN and Channel
/ (UP/DOWN) button are inactive and
sounds an error beep if pressed.
Monitor modes are terminated when the PTT once pressed.
NOAA WEATHER CHANNELS
To receive a NOAA weather channel, press the [WX] key from any channel. The transceiver will go to the
last selected weather channel.
Press the
/ (UP/DOWN )button to scroll through the available channels.
To exit from the NOAA weather channels, press the [WX] key. The transceiver returns to the channel it was
on prior to a weather channel. Or press 16/9 to access the priority channels
NOAA WEATHER ALERT
In the event of extreme weather disturbances, such as storms and hurricanes, the NOAA (National Oceanic
and Atmospheric Administration) sends a weather alert accompanied by a 1050 Hz tone and subsequent
weather report on one of the NOAA weather channels.
When the Weather Alert feature is enabled, the transceiver is capable of receiving this alert
In the Weather channel, Press and hold Wx button more than 3 seconds to active the Alert function, LCD will
appears “ALT”. To cancel the alert function, Press and hold WX button more than 3 seconds again, the “ALT”
6 of 13
Page 7

will disappears on the LCD.
NOAA WEATHER ALERT TESTING
NOAA tests the alert system ever Wednesday between 11AM and 1PM. To test the QUANTUM
NOAA Weather feature, on Wednesday between 11AM and 1PM, setup as in description above and
confirm the alert is heard.
EMERGENCY (CHANNEL 16 USE)
Channel 16 is known as the Hail and Distress Channel. An emergency may be defined as a threat to life or
property. In such instances, be sure the transceiver is on and set to CHANNEL 16. Then use the following
procedure:
1. Press the microphone push-to-talk switch and say
’
vessel
s name).
“
Mayday, Mayday, Mayday. This is , , ” (your
’
s
2. Then repeat once:
3. Now report your position in latitude/longitude, or by giving a true or magnetic bearing (state which) to a
well-known landmark such as a navigation aid or geographic feature such as an island or harbor entry.
4. Explain the nature of your distress (sinking, collision, aground, fire, heart attack, life-threatening injury,
etc.).
5. State the kind of assistance your desire (pumps, medical aid, etc.).
6. Report the number of persons aboard and condition of any injured.
7. Estimate the present seaworthiness and condition of your vessel.
8. Give your vessel
total transmission should not exceed 1 minute.
9. End the message by saying
10. If there is no answer, repeat the above procedure. If there is still no response, try another channel.
Resetting your Radio
You can reset many radio settings back to the factory defaults, all user setting such as favourite channels,
current channel, channel bank .etc. will be cleared. To perform the reset:
1. Turn the radio OFF.
2. Simultaneously press and hold the SCAN & UIC buttons.
3. While continuing to hold these keys, power the radio ON. Until LCD appears “CC”, release the two
buttons to finish the resetting, the LCD switches to channel 16.
“
Mayday, ” (your vessel’s name).
’
s description: length, design (power or sail), color and other distinguishing marks. The
“
OVER”. Release the microphone button and listen.
7 of 13
Page 8

Appendix A – Technical Specification
TECHNICAL SPECIFICATIONS
Eagle EVR-100
GENERAL
Power Supply: 13.8V DC.
Current drain:
Transmit 1.5 A at 7 W Tx / 0.6A at 1W Tx
Receive Less than 250mA in standby
Useable channels: International, USA, Canada, Weather (country speci.c)
Mode: 16K0G3E (FM)
PHYSICAL
LCD display (viewing): 41(H) x 53(W) mm
Dimming control: Yes
Antenna connector: SO-239 (50 ohm)
Temperature Range: -15
Waterproof: JIS-7
Dimensions: 161(W) x 75(H) x 147(D) mm - without bracket
Weight: 1.29 kg (2.8 lbs) - without microphone
Frequency stability: +/- 10ppm
Frequency control: PLL
GPS/NMEA input: No
Comm. port: 1200 baud
DSC: No
FEATURES
Flush Mount kit and
dust cover: Yes
Local/Distant control: No
Position polling: No
Group Call: No
Channel Naming: No
Dual watch, Favourite channel scan, All scan: Yes
TRANSMITTER
Frequency: 156.025 - 157.425MHz
Output power: 7 W / 1 W selectable
Transmitter protection: Open / short circuit of antenna
Max Freq deviation: +/- 5kHz
Spurious & harmonics: better than 2.5μ W
Modulation distortion: Less than 4%@ 1kHz for a +/-3kHz deviation
RECEIVER
Frequency: 156.025 - 163.275 MHz
12dB SINAD sensitivity: 0.25uV
20db SINAD sensitivity: 0.35uV
Adjacent CH selectivity: more than 65db
Spurious response: more than 65 db
Inter-modulation Rejection ratio: more than 65 db
Residual Noise level: more than -40 db un-squelched
Audio output power: 2 W (with 8 ohm at 10% distortion)
Compass safe distance: 0.5 m (1.5')
Specification are subject to change without notice.
℃
to +50℃
4 W with 4 ohm external speaker
8 of 13
Page 9

Appendix B – Troubleshooting
1. The transceiver will not power up.
A fuse may have blown OR there is no voltage getting to the transceiver.
a) Check the power cable for cuts, breaks, or squashed sections.
b) After checking the wiring, replace the 7 Amp fuse (1 spare fuse is supplied).
c) Check the battery voltage. This must be greater than 10.5V.
2. The transceiver blows the fuse when the power is switched on.
The power wires may have been reversed.
a) Check that the red wire is connected to the positive battery terminal, and the black wire is
connected to the negative battery terminal.
3. The speaker makes popping or whining noises when the engine is running.
Electrical noise may be interfering with the transceiver.
a) Re-route the power cables away from the engine.
b) Add a noise suppressor to the power cable.
c) Use resistive spark plug wires and/or use an alternator whine filter
4. No sound from the external speaker.
a) Check that the external speaker cable is physically connected.
b) Check the soldering of the external speaker cable.
5. Transmissions are always on low power, even when high (HI) power is selected.
The antenna may be faulty.
a) Test the transceiver with a different antenna.
b) Have the antenna checked out.
6. Battery symbol is displayed.
The power supply is too low or too high.
a) Check the battery voltage. This should be at least 10.5V ± 0.5V DC.
b) Check the alternator on the vessel.
9 of 13
Page 10

Frequency List
156.050
156.100
156.150
156.200
156.250
156.300
156.350
156.400
156.450
156.500
156.550
156.600
156.650
156.700
156.750
156.800
156.850
156.900
156.950
157.000
157.050
157.100
157.150
157.200
157.250
157.300
157.350
157.400
CH
FREQUENCY (MHz) FREQUENCY (MHz)
INT INT
CH
1
2
3
4
5
6
7
8
9
10
11
12
13
TX RX MODE
160.650 D 60 156.025 160.625 D
160.700 D 61 156.075 160.675 D
160.750 D 62 156.125 160.725 D
160.800 D 63 156.175 160.775 D
160.850 D 64 156.225 160.825 D
156.300 S 65 156.275 160.875 D
160.950 D 66 156.325 160.925 D
156.400 S 67 156.375 156.375 S
156.450 S 68 156.425 156.425 S
156.500 S 69 156.475 156.475 S
156.550 S 70 156.525 156.525 S DSC
156.600 S 71 156.575 156.575 S
156.650 S 72 156.625 156.625 S
REMARK
TX RX MODE
REMARK
14
15
16
17
18
19
20
21
22
23
24
25
26
27
156.700 S 73 156.675 156.675 S
156.750 S 1W Only 74 156.725 156.725 S
156.800 S 77 156.875 156.875 S
156.850 S 1W Only 78 156.925 161.525 D
161.500 D 79 156.975 161.575 D
161.550 D 80 157.025 161.625 D
161.600 D 81 157.075 161.675 D
161.650 D 82 157.125 161.725 D
161.700 D 83 157.175 161.775 D
161.750 D 84 157.225 161.825 D
161.800 D 85 157.275 161.875 D
161.850 D 86 157.325 161.925 D
161.900 D 87 157.375 161.975 D
161.950 D 88 157.425 162.025 D
28
162.000 D
10 of 13
Page 11

156.050
156.150
156.250
156.300
156.350
156.400
9 156.450
156.500
156.550
156.600
156.650
156.700
156.800
156.850
156.900
156.950
157.000
157.000
157.050
157.100
157.150
157.200
157.250
157.300
157.350
157.400
CH
01A
03A
05A
6
07A
8
10
11
USA USA
FREQUENCY (MHz) FREQUENCY (MHz)
TX RX MODE
156.050 S 61A 156.075 156.075 S
156.150 S 63A 156.175 156.175 S
156.250 S 64A 156.225 156.225 S
156.300 S 65A 156.275 156.275 S
156.350 S 66A 156.325 156.325 S
156.400 S 67 156.375 156.375 S 1W Only, Override
156.450 S 68 156.425 156.425 S
156.500 S 69 156.475 156.475 S
156.550 S 70 156.525 156.525 S DSC
REMARK
CH
TX RX MODE
REMARK
12
13
14
15
16
17
18A
19A
20
20A
21A
22A
23A
24
156.600 S 71 156.575 156.575 S
156.650 S 1W Only, Override 72 156.625 156.625 S
156.700 S 73 156.675 156.675 S
- 156.750
Rx Only 74 156.725 156.725 S
156.800 S 77 156.875 156.875 S 1W Only
156.850 S 1W Only 78A 156.925 156.925 S
156.900 S 79A 156.975 156.975 S
156.950 S 80A 157.025 157.025 S
161.600 D 81A 157.075 157.075 S
157.000 S 82A 157.125 157.125 S
157.050 S 83A 157.175 157.175 S
157.100 S 84 157.225 161.825 D
157.150 S 85 157.275 161.875 D
161.800 D 86 157.325 161.925 D
25
26
27
28
161.850 D 87 157.375 161.975 D
161.900 D 88 157.425 162.025 D
161.950 D 88A 157.425 157.425 S
162.000 D
11 of 13
Page 12

156.050
156.100
156.150
156.200
156.250
156.300
156.350
156.400
156.450
156.500
156.550
156.600
156.650
156.700
156.750
156.800
156.850
156.900
156.950
157.000
157.050
157.050
157.100
157.150
157.200
157.250
157.300
157.350
157.400
CH
1
2
3
04A
05A
6
07A
8
9
10
11
CAN CAN
FREQUENCY (MHz) FREQUENCY (MHz)
TX RX MODE
160.650 D 28B - 162.000
160.700 D 60 156.025 160.625 D
160.750 D 61A 156.075 156.075 S
156.200 S 62A 156.125 156.125 S
156.250 S 64 156.225 160.825 D
156.300 S 64A 156.225 156.225 S
156.350 S 65A 156.275 156.275 S
156.400 S 66A 156.325 156.325 S 1W Only
156.450 S 67 156.375 156.375 S
156.500 S 68 156.425 156.425 S
156.550 S 69 156.475 156.475 S
REMARK
CH
TX RX MODE
REMARK
Rx Only
12
13
14
15
16
17
18A
19A
20
21
21A
21B
22A
23
24
156.600 S 70 156.525 156.525 S DSC
156.650 S 1W Only, Override 71 156.575 156.575 S
156.700 S 72 156.625 156.625 S
156.750 S 1W Only 73 156.675 156.675 S
156.800 S 74 156.725 156.725 S
156.850 S 1W Only 77 156.875 156.875 S 1W Only
156.900 S 78A 156.925 156.925 S
156.950 S 79A 156.975 156.975 S
161.600 D 1W Only 80A 157.025 157.025 S
161.650 D 81A 157.075 157.075 S
157.050 S 82A 157.125 157.125 S
- 161.650
Rx Only 83 157.175 161.775 D
157.100 S 83A 157.175 157.175 S
161.750 D 83B - 161.775
161.800 D 84 157.225 161.825 D
Rx Only
25
25B
26
27
28
161.850 D 85 157.275 161.875 D
- 161.850
Rx Only 86 157.325 161.925 D
161.900 D 87 157.375 161.975 D
161.950 D 88 157.425 162.025 D
162.000 D
12 of 13
Page 13

CH
FREQUENCY (MHz) FREQUENCY (MHz)
TX RX MODE
WX01 - 162.550
WX02 - 162.400
WX03 - 162.475
WX04 - 162.425
WX05 - 162.450
WX WX
CH
REMARK
WX06
WX07
WX08
WX09
WX10
TX RX MODE
- 162.500
- 162.525
- 161.650
- 161.775
- 163.275
REMARK
13 of 13
 Loading...