

Page 1
1
Quick Setup Guide V1.0
NR620G Router
Quick Setup Guide
Page 2

2
Quick Setup Guide V1.0
Table of Contents
TABLE OF CONTENTS........................................................................................................................... 2
FCC CAUTION........................................................................................................................................... 4
CHAPTER 1 NAVI NR620G’S ROUTER MODE QUICK SETUP.......................................... 5
1.1 ROUTER MODE’S QUICK SETUP INSTRUCTION.................................................................. 5
1.2 THE INTRODUCTION OF ROUTER MODE’S QUICK SETUP................................................. 9
1.2.1 WAN Setup.................................................................................................................. 10
1.2.1.1 WAN Setup–Static IP....................................................................................................... 11
1.2.1.2 WAN Setup–Dynamic IP................................................................................................12
1.2.1.3 WAN Setup–PPPoE............................................................................................................12
1.2.1.4 WAN Setup–PPTP .............................................................................................................. 13
1.2.2 LAN Setup.................................................................................................................... 14
1.2.3 Wireless Setup.......................................................................................................... 16
1.2.4 Time Server Setup.................................................................................................. 17
1.2.5 Change Password.................................................................................................... 17
1.2.6 Router Basic Setup Finish.................................................................................. 18
1.3 ROUTER MODE’S APPLICATION SETUP OF QUICK SETUP.............................................. 19
1.3.1 Folder Management Setup................................................................................. 20
1.3.2 User Account Management Setup................................................................. 22
1.3.3 Firewall Setup........................................................................................................... 23
1.3.4 QoS Configuration Setup.................................................................................... 24
1.3.5 FTP Server Setup..................................................................................................... 25
1.3.6 Printer Server Setup ............................................................................................. 26
1.3.7 Web Camera Server Setup................................................................................. 27
1.3.8 Download Server Setup....................................................................................... 28
1.3.9 Samba Server Setup.............................................................................................. 29
1.3.10 Application Setup Finish..................................................................................... 30
CHAPTER 2 NAVI NR620G’S AP MODE QUICK SETUP.....................................................31
2.1 AP MODE’S QUICK SETUP INSTRUCTION......................................................................... 31
2.2 THE INTRODUCTION OF AP MODE’S QUICK SETUP ........................................................ 34
2.2.1 LAN Setup.................................................................................................................... 35
2.2.2 Wireless Setup.......................................................................................................... 37
2.2.3 Time Server Setup.................................................................................................. 38
2.2.4 Change Password.................................................................................................... 38
2.2.5 AP Basic Setup Finish........................................................................................... 39
2.3 AP MODE’S APPLICATION SETUP OF QUICK SETUP ....................................................... 40
Page 3

3
Quick Setup Guide V1.0
2.3.1
Folder Management Setup................................................................................. 41
2.3.2 User Account Management Setup................................................................. 43
2.3.3 FTP Server Setup..................................................................................................... 44
2.3.4 Printer Server Setup ............................................................................................. 45
2.3.5 Web Camera Server Setup................................................................................. 46
2.3.6 Download Server Setup....................................................................................... 47
2.3.7 Samba Server Setup.............................................................................................. 48
2.3.8 Application Setup Finish..................................................................................... 49
Page 4

4
Quick Setup Guide V1.0
Federal Communication Commission Interference Statement
This equipment has been tested and found to comply with the limits for a Class B
digital device, pursuant to Part 15 of the FCC Rules. These limits are designed to
provide reasonable protection against harmful interference in a residential
installation.
This equipment generates uses and can radiate radio frequency energy and, if not
installed and used in accordance with the instructions, may cause harmful
interference to radio communications. However, there is no guarantee that
interference will not occur in a particular installation. If this equipment does cause
harmful interference to radio or television reception, which can be determined by
turning the equipment off and on, the user is encouraged to try to correct the
interference by one of the following measures:
. Reorient or relocate the receiving antenna.
. Increase the separation between the equipment and receiver.
. Connect the equipment into an outlet on a circuit different from that to which the
receiver is connected.
. Consult the dealer or an experienced radio/TV technician for help.
FCC Caution: To assure continued compliance, any changes or modifications not
expressly approved by the party responsible for compliance could void the user's
authority to operate this equipment. (Example - use only shielded interface cables
when connecting to computer or peripheral devices).
FCC Radiation Exposure Statement
This equipment complies with FCC RF radiation exposure limits set forth for an
uncontrolled environment. This equipment should be installed and operated with a
minimum distance of 20 centimeters between the radiator and your body.
This transmitter must not be co-located or operating in conjunction with any other
antenna or transmitter.
The antennas used for this transmitter must be installed to provide a separation
distance of at least 20 cm from all persons and must not be co-located or operating
in conjunction with any other antenna or transmitter.
This device complies with Part 15 of the FCC Rules. Operation is subject to the
following two conditions:
(1) This device may not cause harmful interference, and (2) This device must
accept any interference received, including interference that may cause undesired
operation.
Page 5
5
Quick Setup Guide V1.0
Chapter 1 Navi NR620G’s Router Mode Quick Setup
1.1 Router Mode’s Quick Setup Instruction
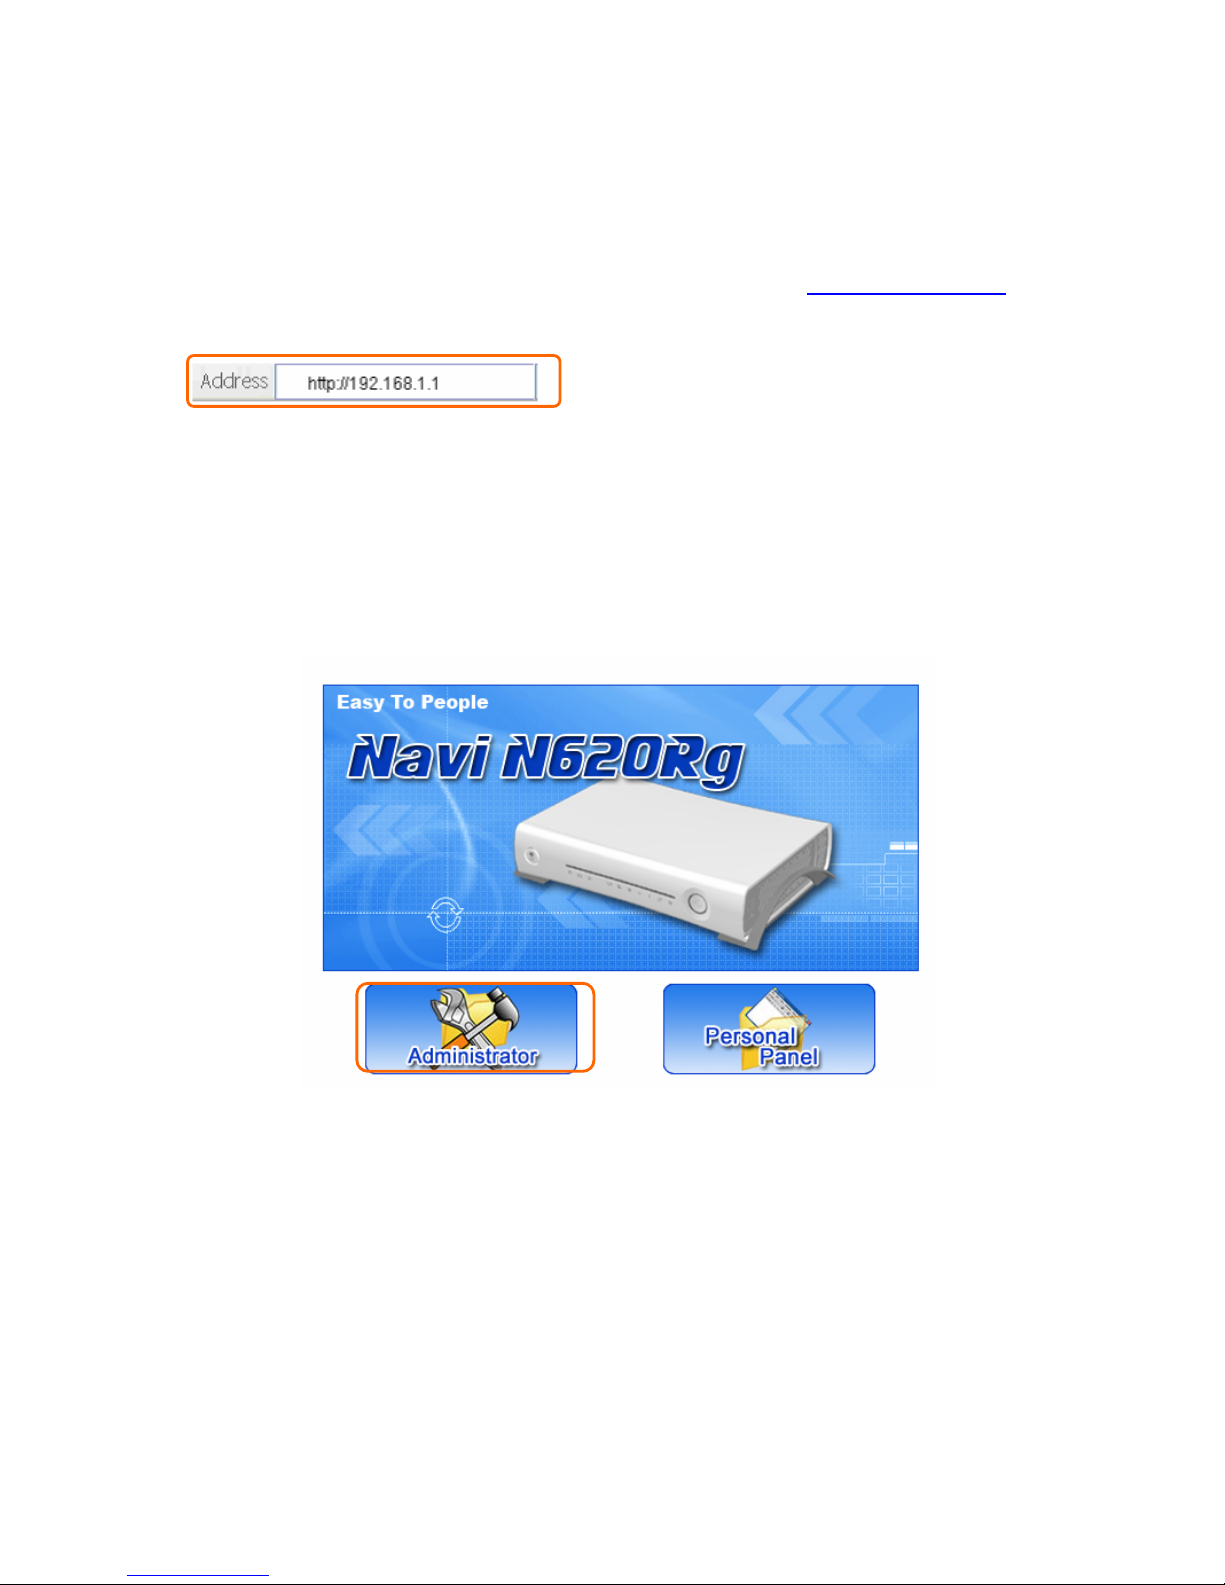
Please open a Microsoft Internet Explorer, and enter http://192.168.1.1
(Default Gateway) into browser’s blank:
Then you will see the configuration page below:
Product Home Page
Please click on Administrator button to login to setup at first time, also can
change any settings in future. Only the Administrator has the right to set and
change all settings.
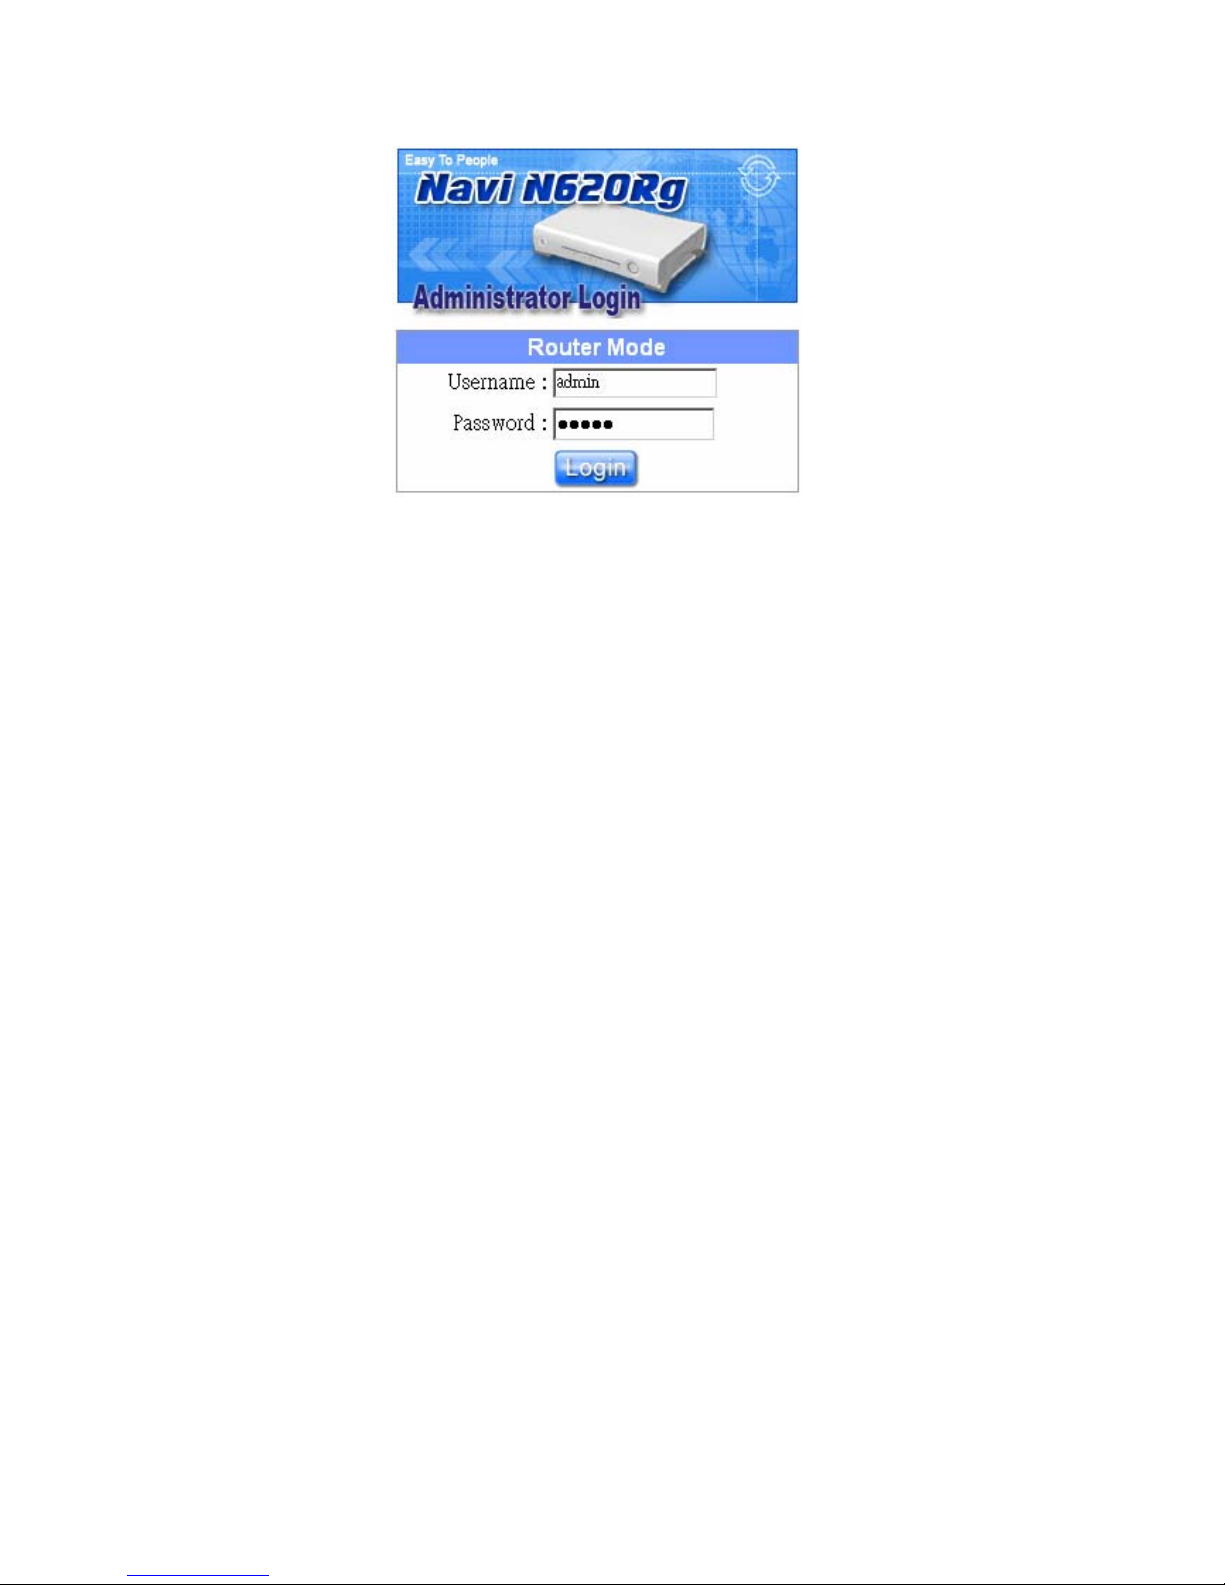
User Name and Password
Page 6
6
Quick Setup Guide V1.0
Please input in the blanks, the factory default values for User Name and Password
are “admin” and “admin” (all in lowercase letters); after inputting, please click on
“Login” to enter the homepage as below:
Page 7
7
Quick Setup Guide V1.0
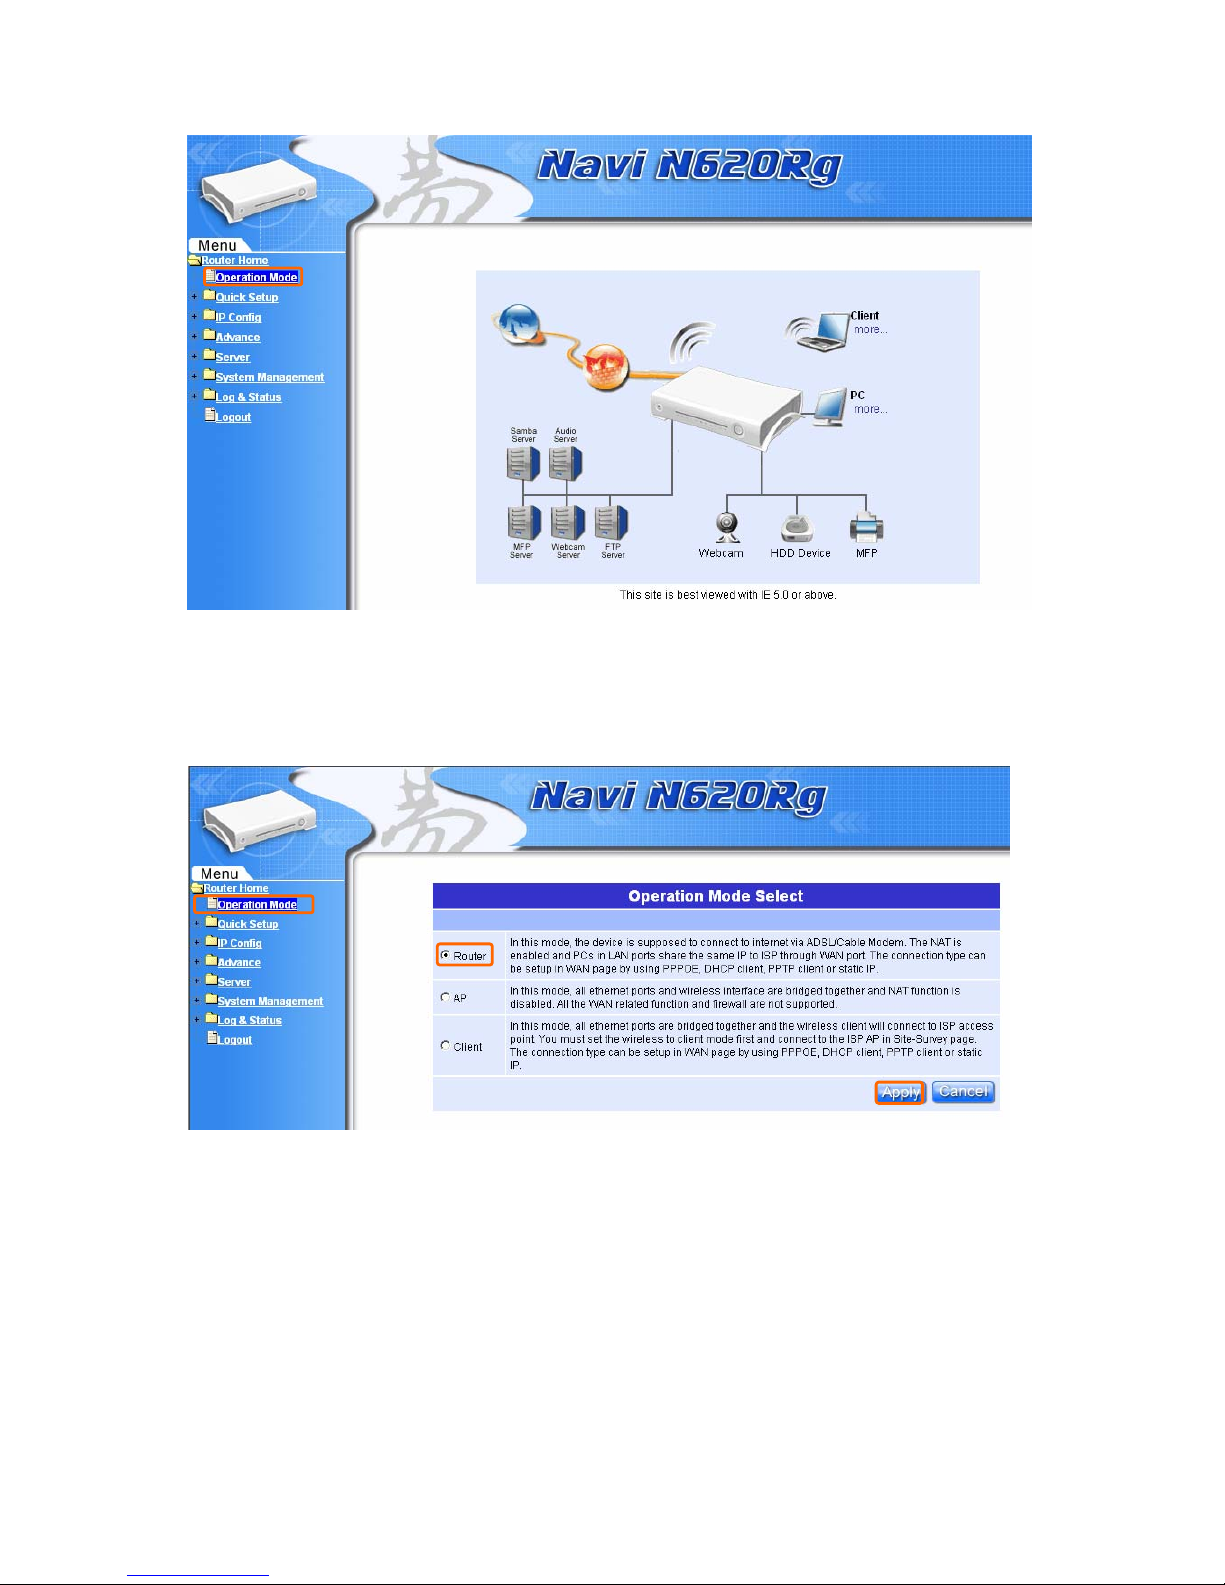
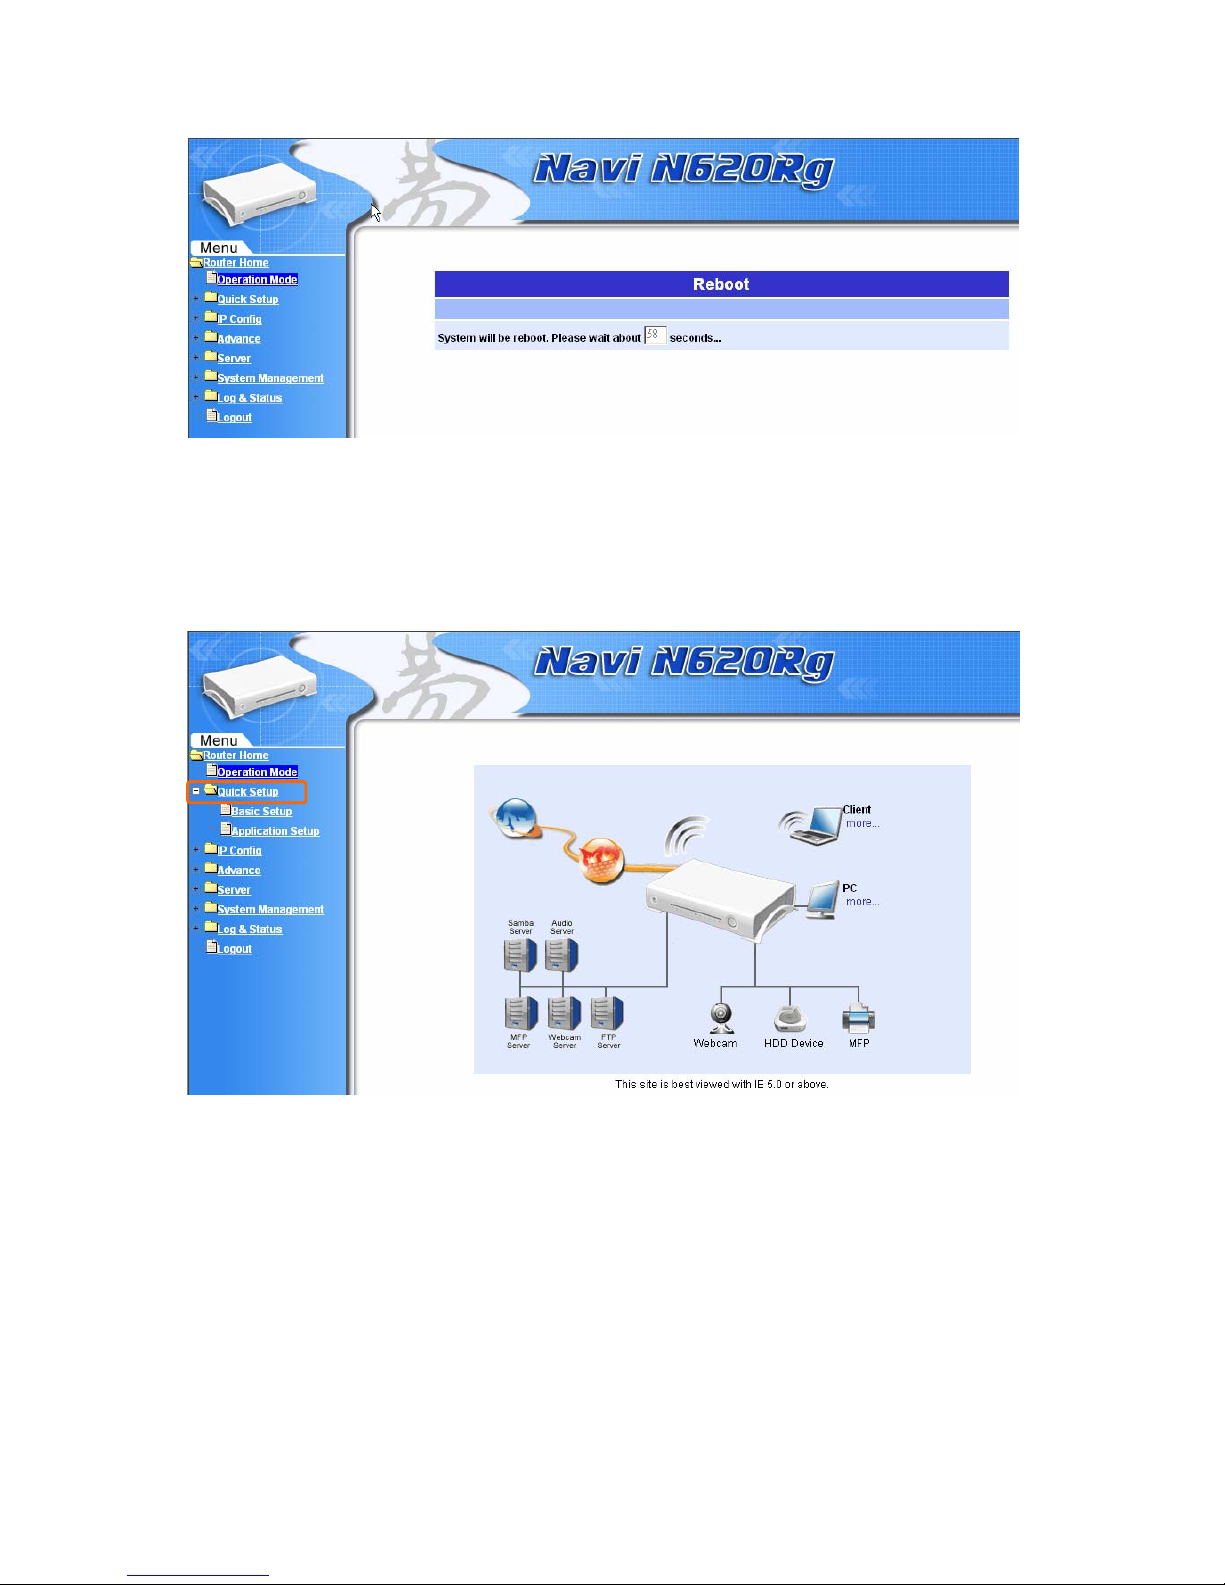
Please select the “Operation Mode” , and then select “Router” and click on “Apply”:
Then you will go to the page of “Reboot”.
Page 8
8
Quick Setup Guide V1.0
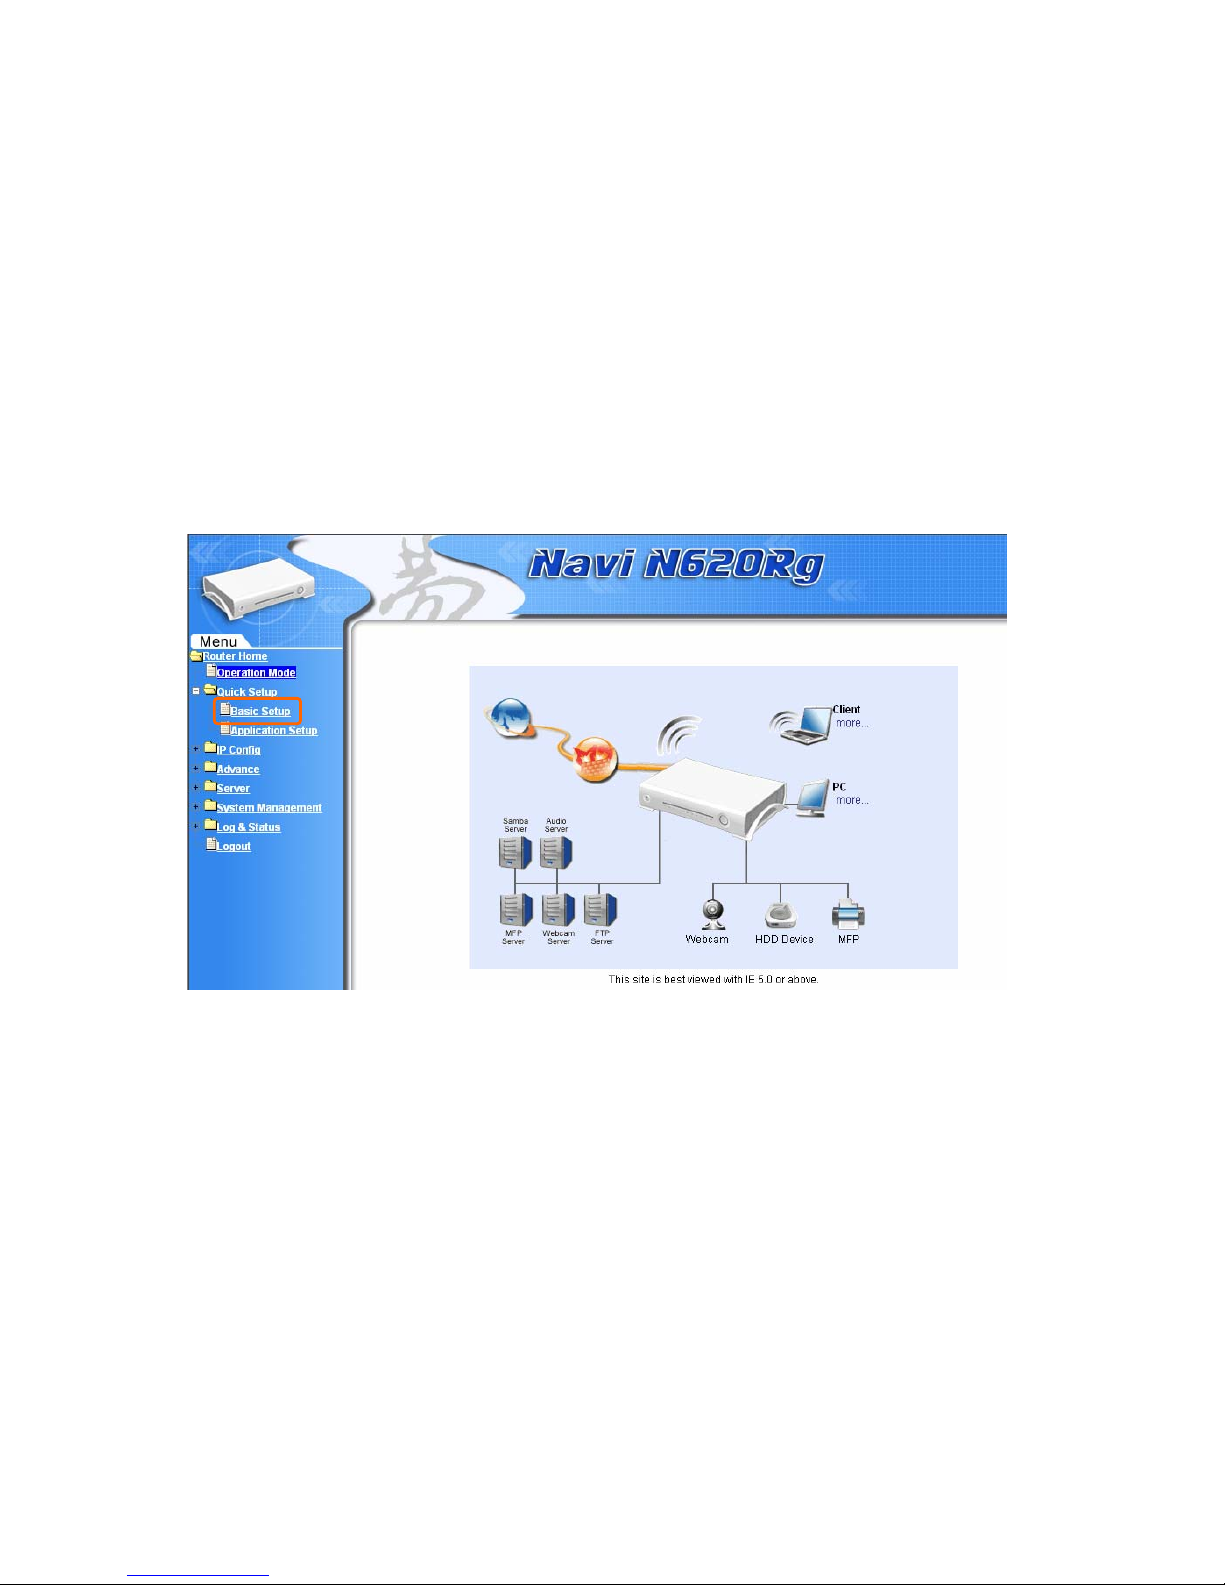
After 65 seconds, you will go back to the homepage, then please click on “Quick
Setup”, which leads you to start the step of “Router mode Quick Setup”.
Page 9
9
Quick Setup Guide V1.0
1.2 The Introduction of Router mode’s Quick Setup
The typical homepage of NR620G consists of two separate frames. The left
frame contains all available means for device configuration. Menus are indicated
by file icons, and related menus are grouped into categories.
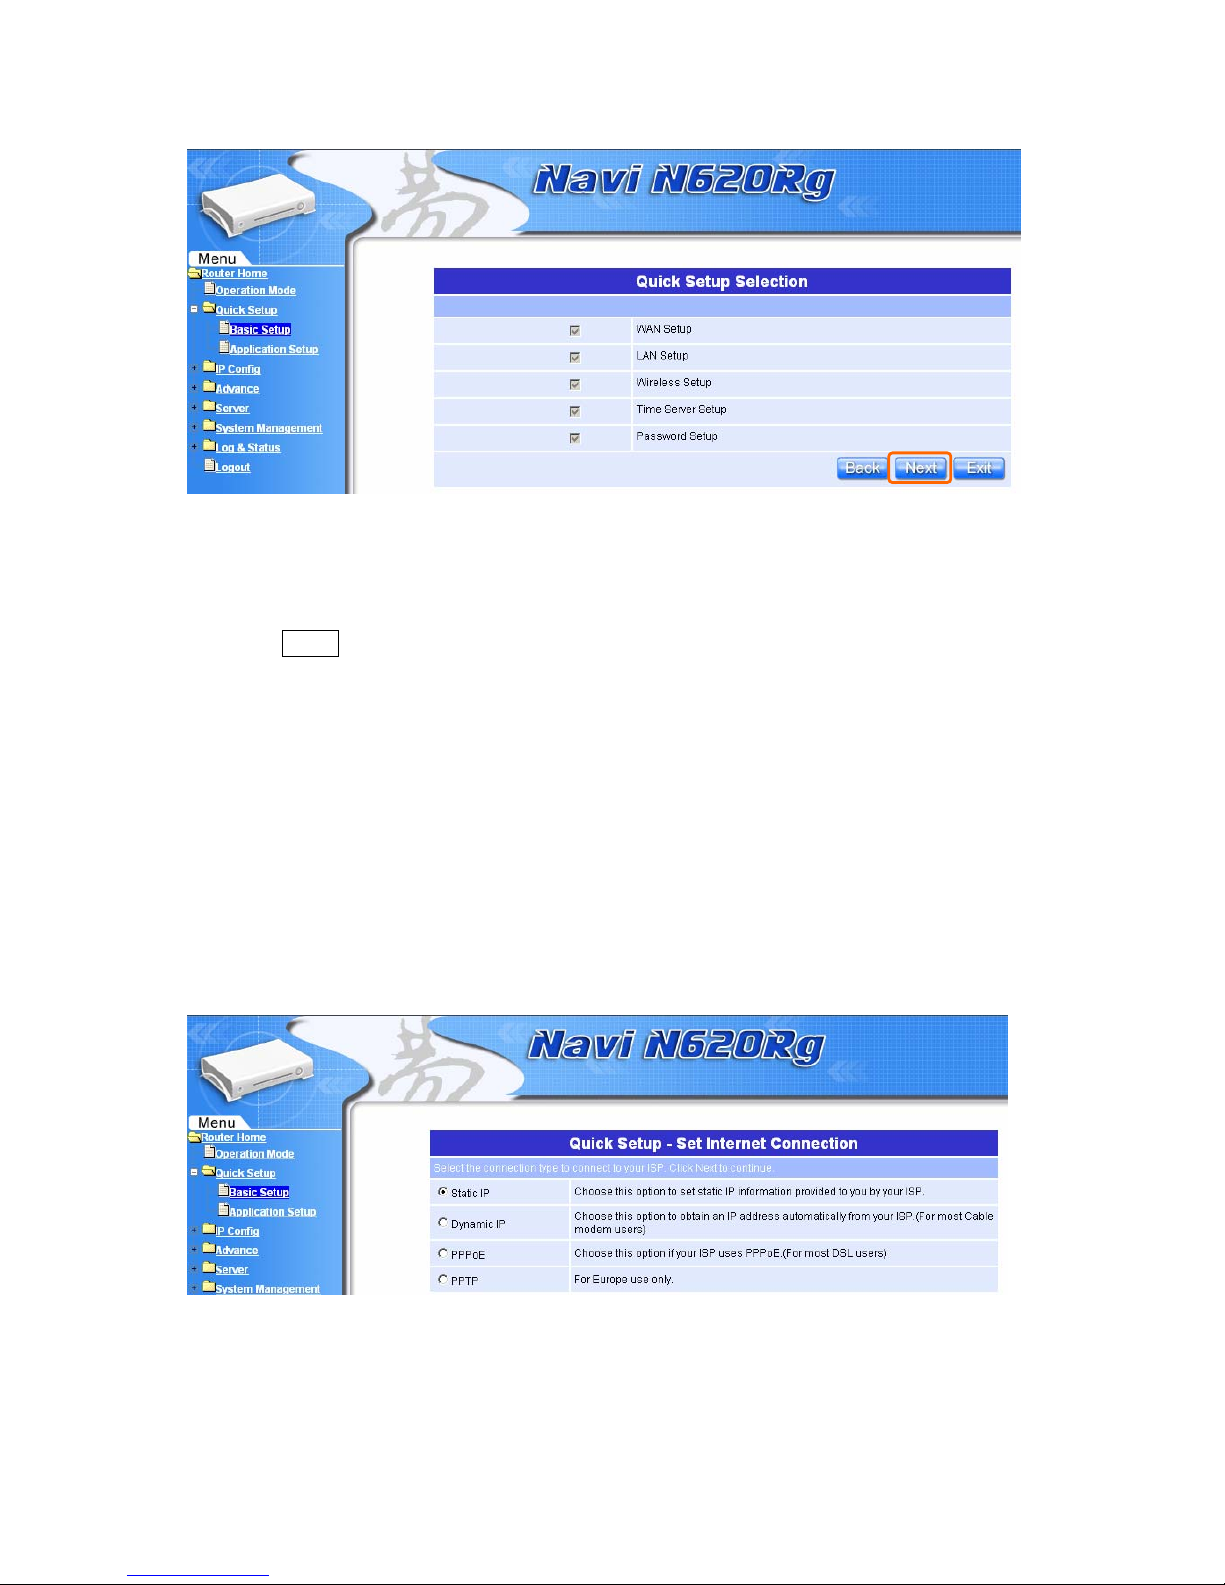
Click on Basic Setup at the left screen of the main menu. Then you’ll see the
full function selected screen appears and do the setting for each items.
Router Basic Setup full action table list:
Page 10
10
Quick Setup Guide V1.0
All of the 5 major items must be set in configur ing Router Basic Setup. Please
click on “Next” button to start configuring.
1.2.1 WAN Setup
The WAN settings can be referred to as the Public setting. All IP information in
the WAN settings is public IP addresses which are accessible on the Internet.
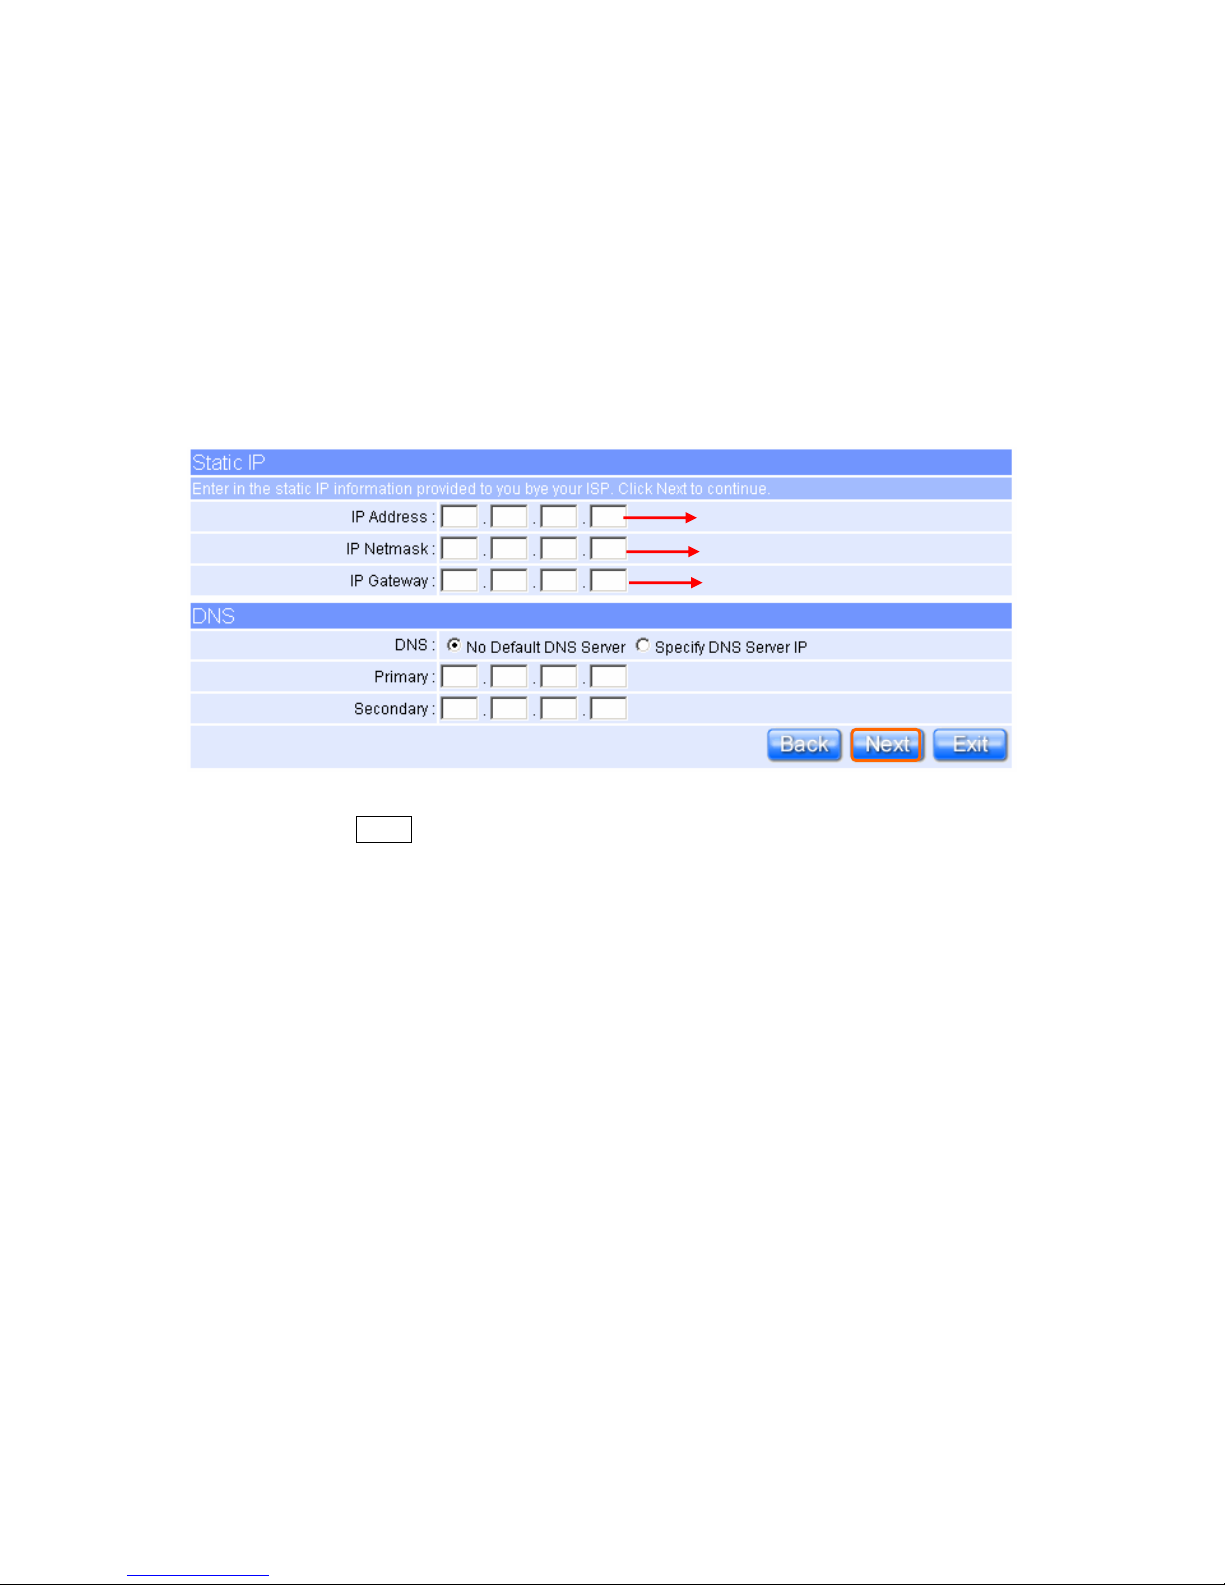
The NR620G supports 4 connection types to WAN. Select one of the WAN
connection modes required by your ISP in following Internet Connection
Configuration page, the WAN setting pages will differ from depending on what
kind of WAN Type you select.
Page 11
11
Quick Setup Guide V1.0
1.2.1.1 WAN Setup–Static IP
Choose Static IP Address if all WAN IP information is provided to you by your ISP.
Yo u will need to enter in the IP address, IP Netmask, IP Gateway and DNS
address(es) provided by your ISP . Each IP address entered in the fields must be
in the appropriate IP form, which are four IP octets separated by a dot (x.x.x.x).
The Router will not accept the IP address if it is not in this format.
Please click on “Next” button to connect to next step.
Input the data provided by ISP
Input the data provided by ISP
Input the data provided by ISP
Page 12
12
Quick Setup Guide V1.0
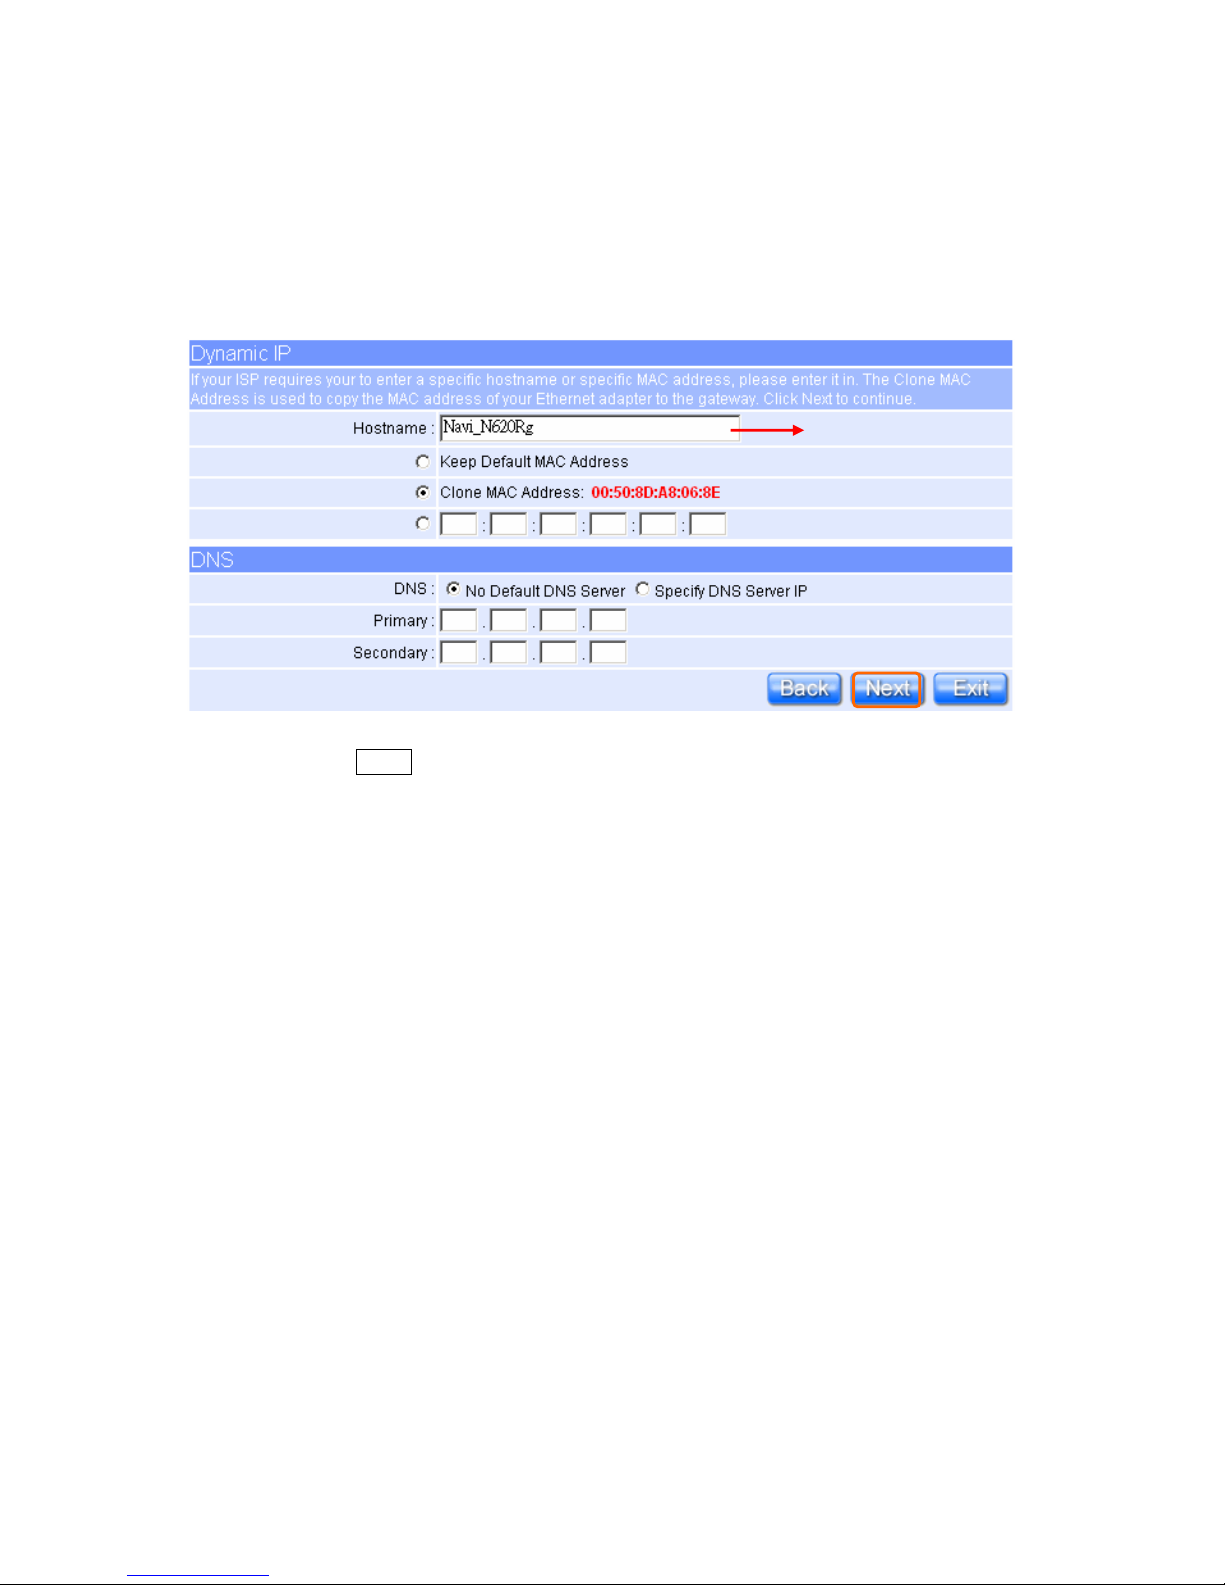
1.2.1.2 WAN Setup–Dynamic IP
Fill Host Name in if required by your ISP. The default MAC address is set to keep
the WAN’s physical interface MAC address on the Router. It is not recommended
that you change the default MAC address unless required by your ISP.
Please click on “Next” button to connect to next step.
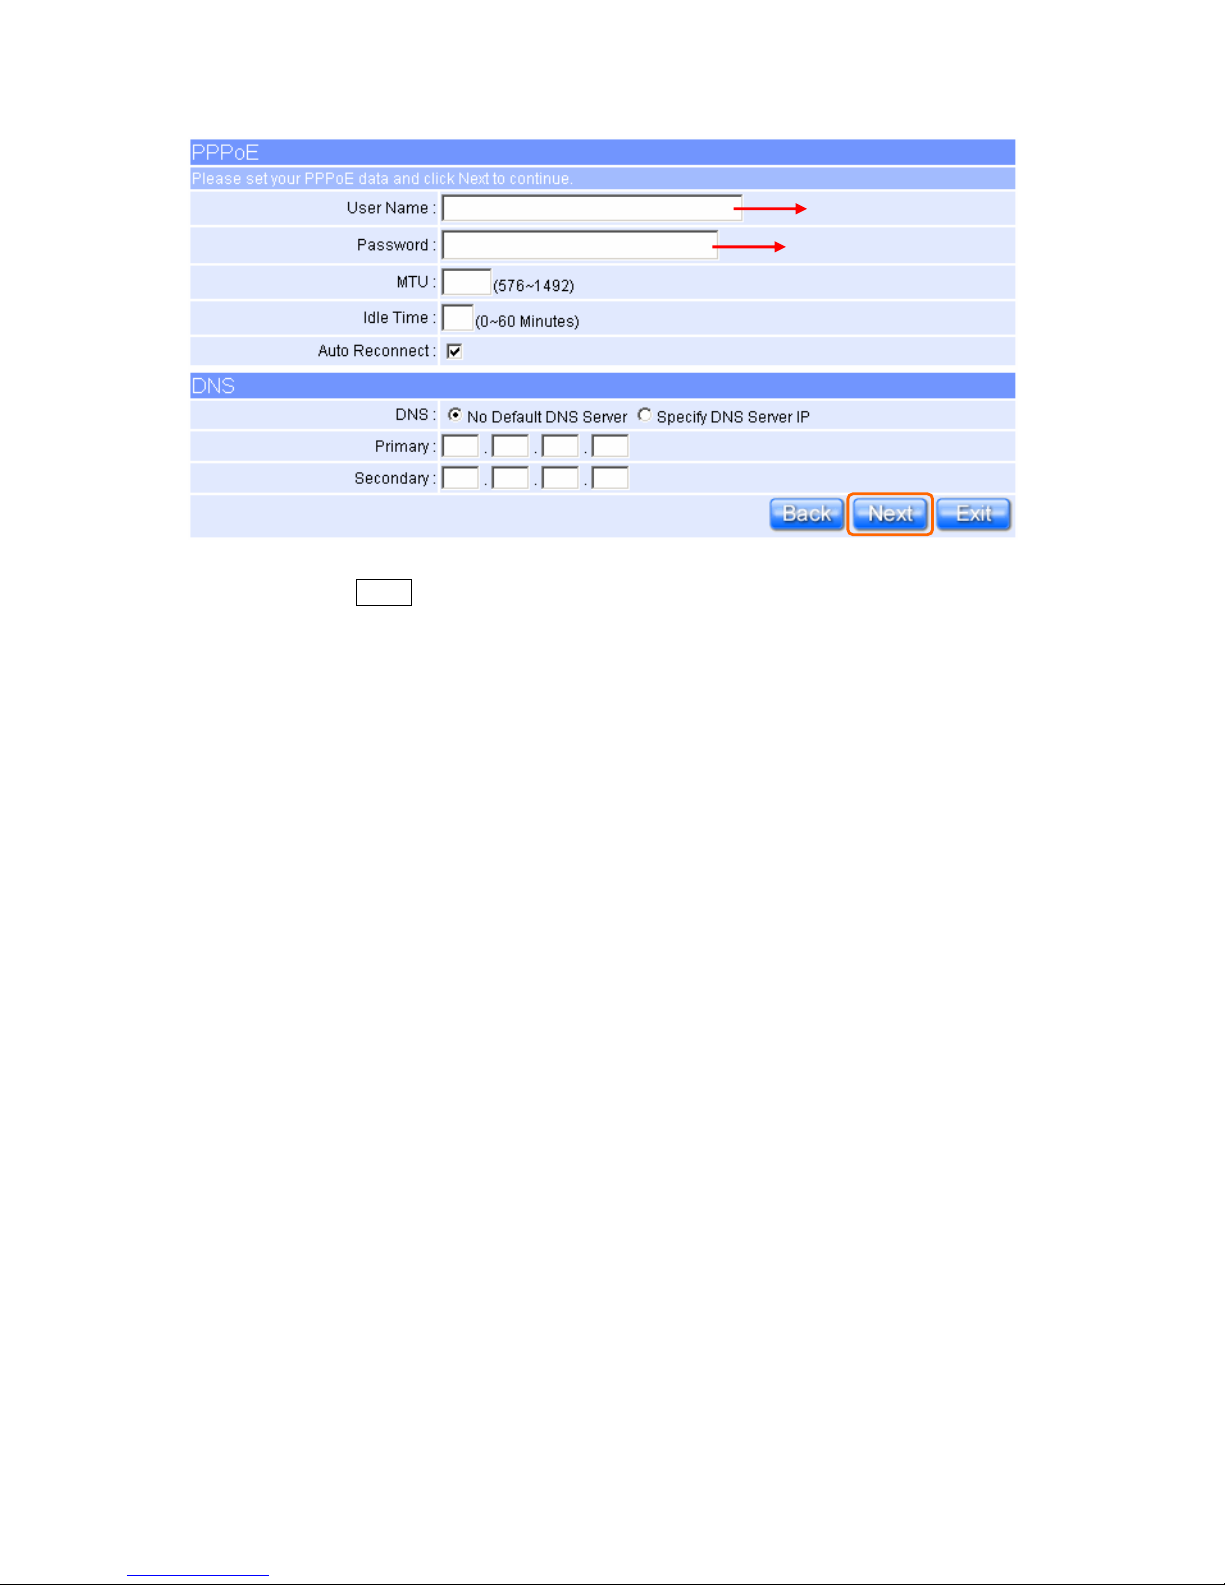
1.2.1.3 WAN Setup–PPPoE
Choose PPPoE (Point to Point Protocol over Ethernet) if your ISP uses PPPoE
connection. Your ISP will provide you with a username and password. This
option is typically used for DSL services.
It’s suggested to use
Page 13
13
Quick Setup Guide V1.0
Please click on “Next” button to connect to next step.
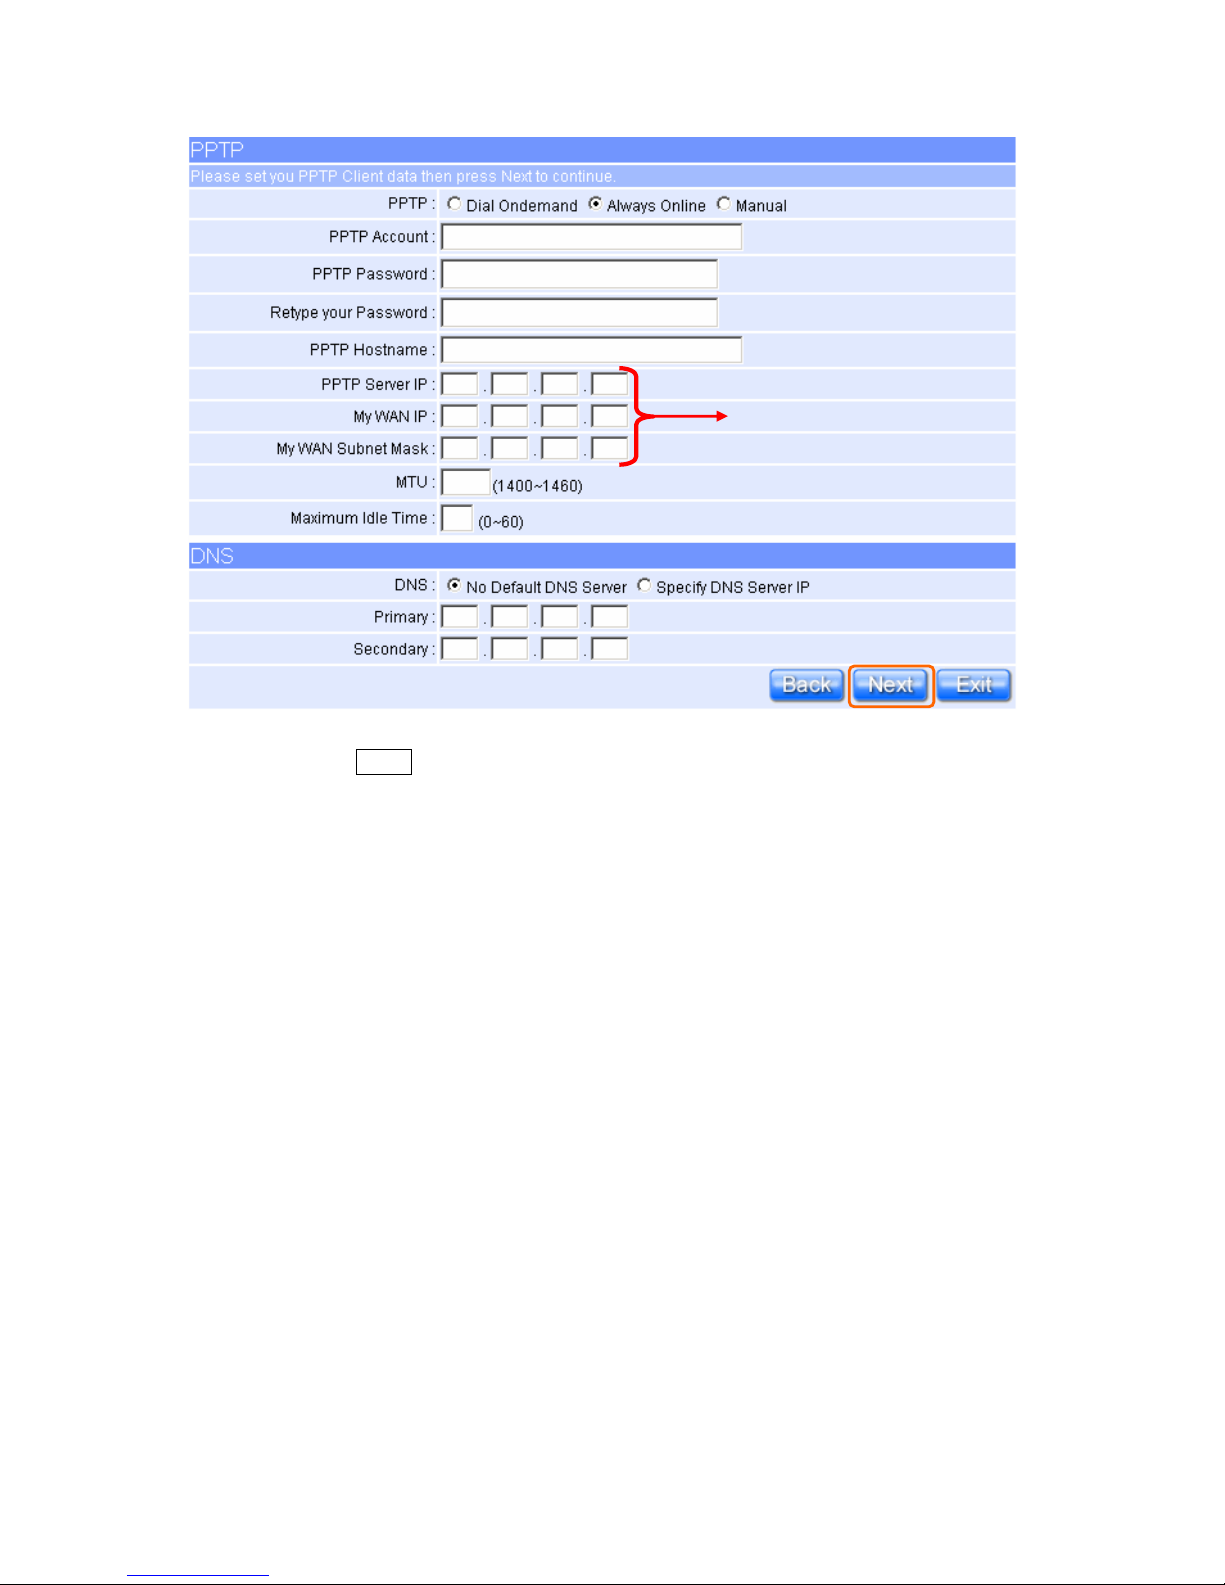
1.2.1.4 WAN Setup–PPTP
Some DSL service providers supply a special DSL modem in Europe or Big P ond
Cable in Australia. This kind of modem only supports the PPTP tunnel to access
the Internet; Please enter the account’s information of Account and Password
which provided by your ISP.
Input it by your ISP provided.
Input it by your ISP provided.
Page 14
14
Quick Setup Guide V1.0
Please click on “Next” button to connect to next step.
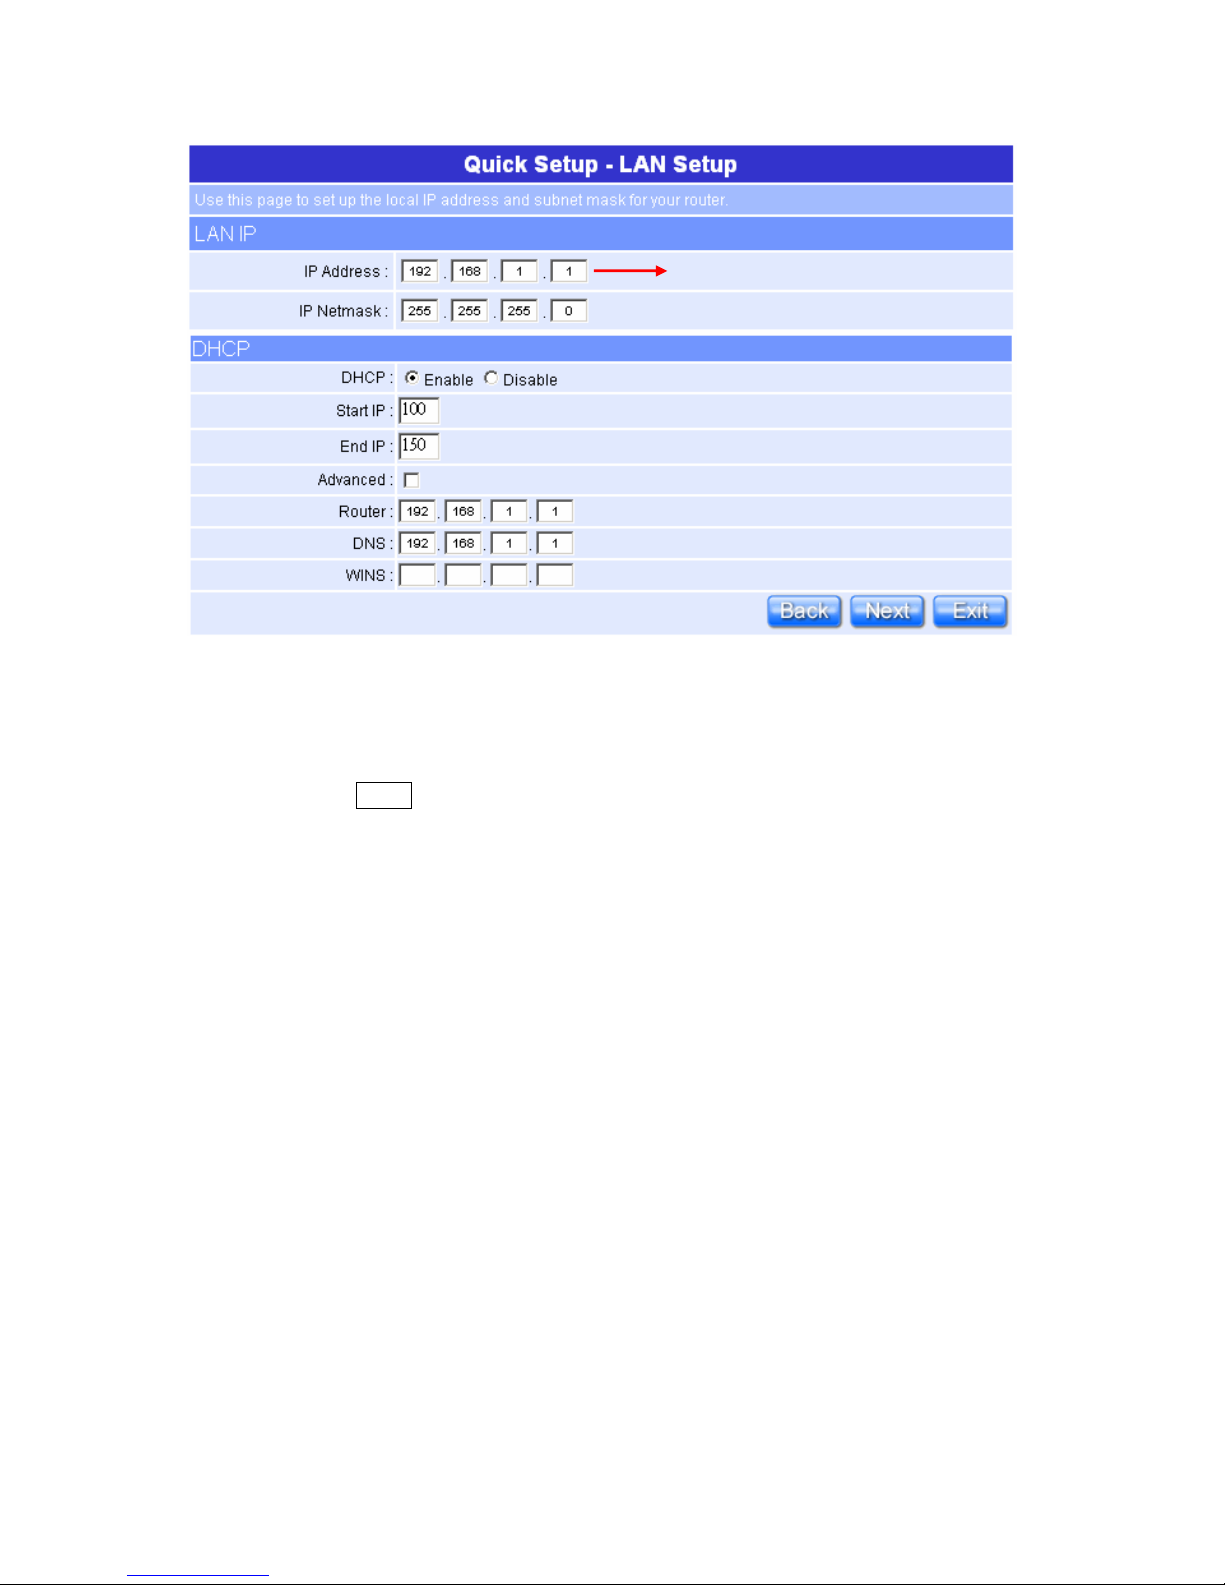
1.2.2 LAN Setup
If you are using the NR620G with multiple PCs on your LAN, you must connect
the LAN via the Ethernet ports on the built-in Ethernet switch. You must assign
a unique IP address to each device residing on your LAN. The LAN IP address
identifies the router as a node on your network; that is, its IP address must be
in the same subnet as the PCs on your LAN. The default LAN IP for the NR620G
is 192.168.1.1.
My WAN IP, Server IP and My
WAN Subnet Mask are all
input as necessary.
Page 15
15
Quick Setup Guide V1.0
Please don’t change the default LAN IP settings at this point until you have
completed the rest of the configurations and confirm that your Internet
connection is working.
Please click on “Next” button to connect to next step.
Default Gateway IP Address.
Page 16
16
Quick Setup Guide V1.0
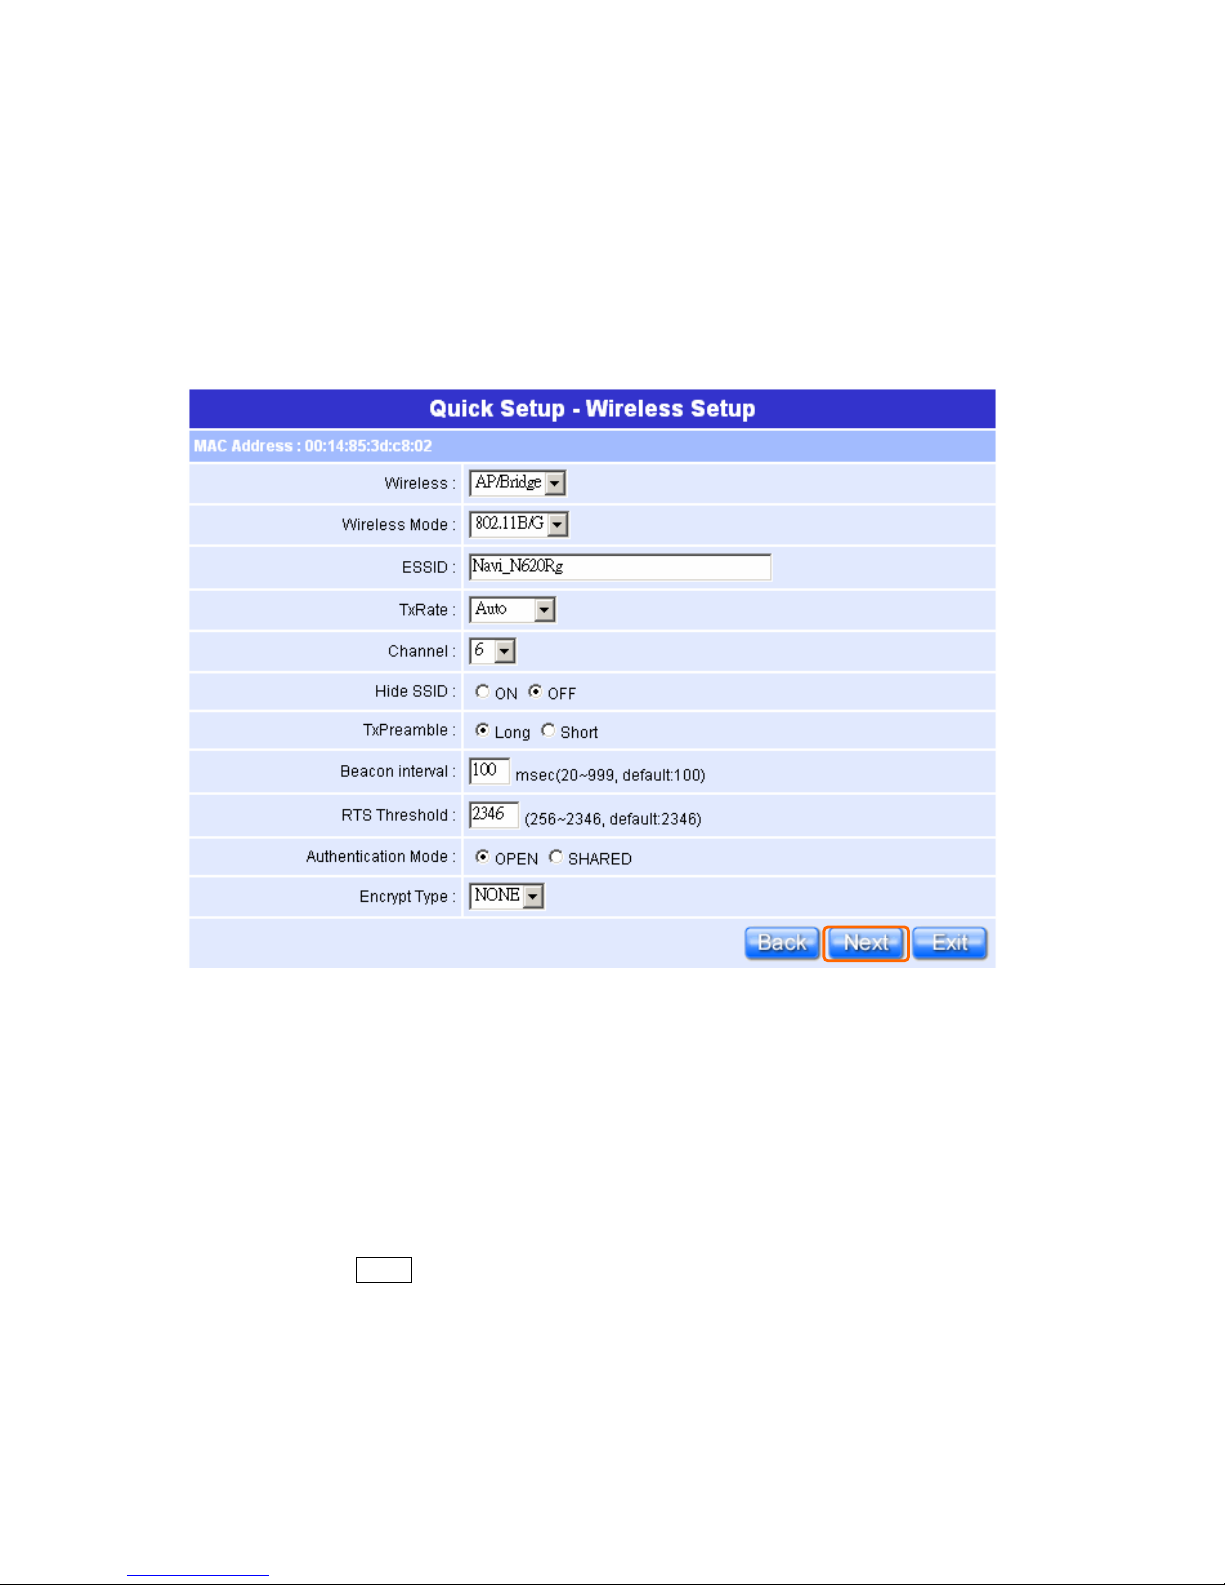
1.2.3 Wireless Setup
NR620G is based on industry standards to provide easy-to-use and compatible
high-speed wireless connectivity, which means the router will allow you to
access the data you want, when and where yo u want it.
You can use the default ESSID and Channel unless more than one NR620G or
AP is deployed in the same area. The Wireless Mode indicates the mode of the
802.11g interface. And the TxRate allows you to specify the transmission rate.
Authentication is the security function to prevent the connect requests from
unauthorized wireless clients. As the Encryption Type, enable WEP and WPA
can protect your data from eavesdroppers, if you do not need this feature, select
“None” to skip the following setting.
Please click on “Next” button to connect to next step.
Page 17
17
Quick Setup Guide V1.0
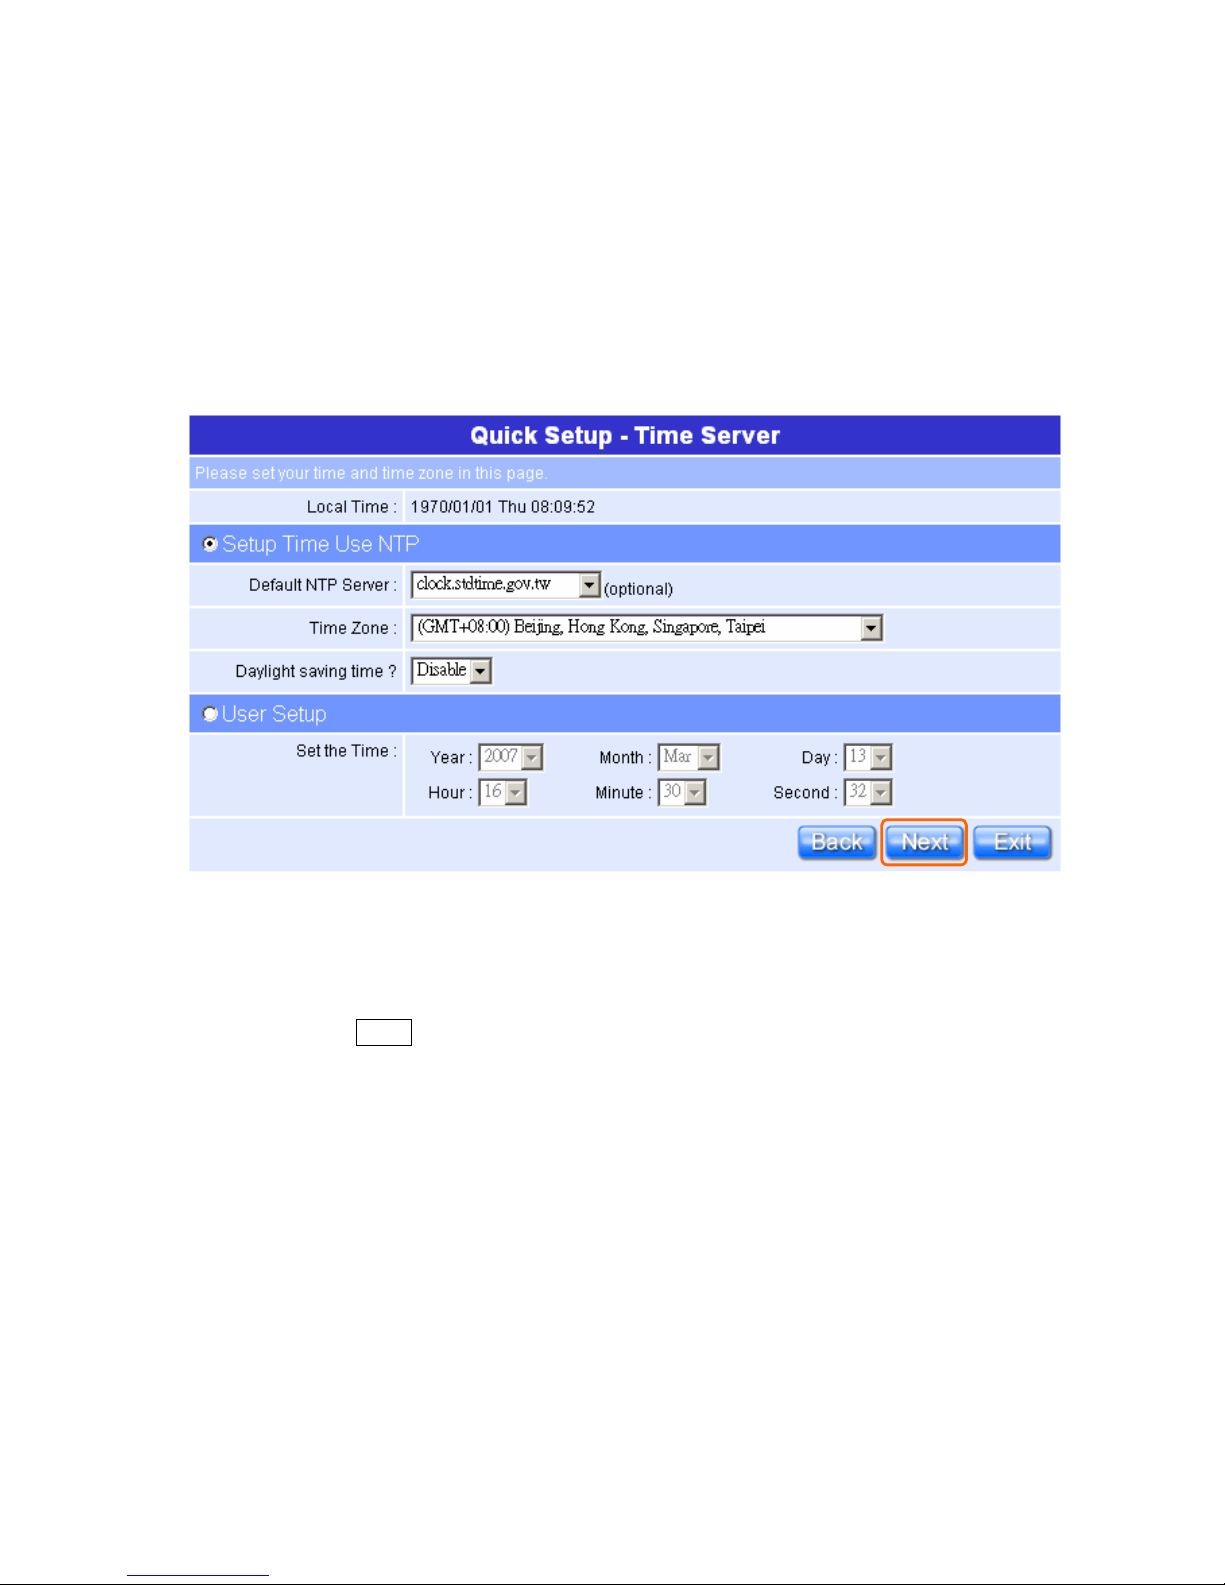
1.2.4 Time Server Setup
The section provides to change the Time. The Router keeps a record of the
current date and time, which it uses to calculate and report various performance
data, but to change the router’s date and time does not affect the date and time
on your PCs.
Select your time zone from the “Time Zone” drop-down list, there is no real time
clock inside the router, the system date and time are maintained by external
network time server.
Please click on “Next” button to connect to next step.
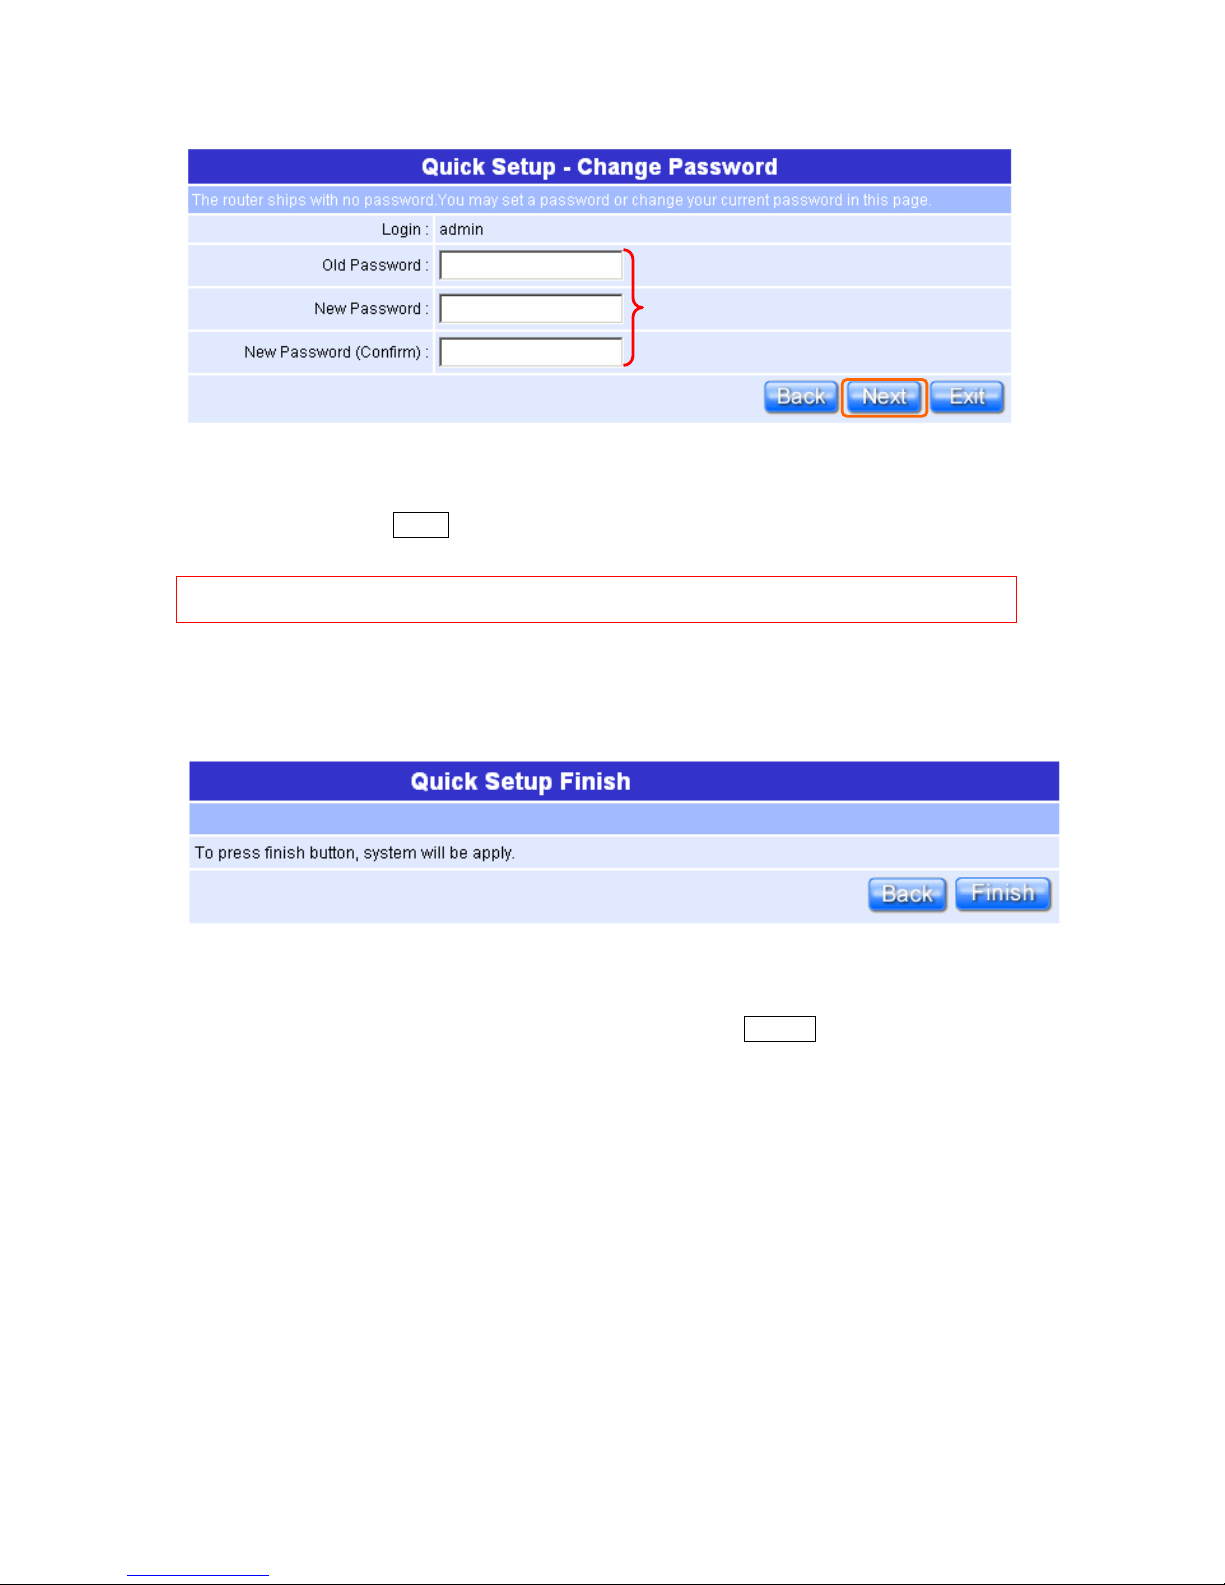
1.2.5 Change Password
Here suggest changing the password for logging into the configuration manager
under security reason.
Page 18
18
Quick Setup Guide V1.0
For changing password, please fills the password information into above blanks,
and then clicks on “Next” button.
Notice: Only the password can be changed, the user name for administrator is “admin” and can’t
be changed.
1.2.6 Router Basic Setup Finish
The Router Basic Setup has been completed successfully when seeing this
screen. To apply your new settings, please click on “ Finish” button to reboot
system automatically and goes to the Product’s Homepage.
The password may consist of A-Z, a-z,
0-9, underscores, and a single dot (.)
Page 19
19
Quick Setup Guide V1.0
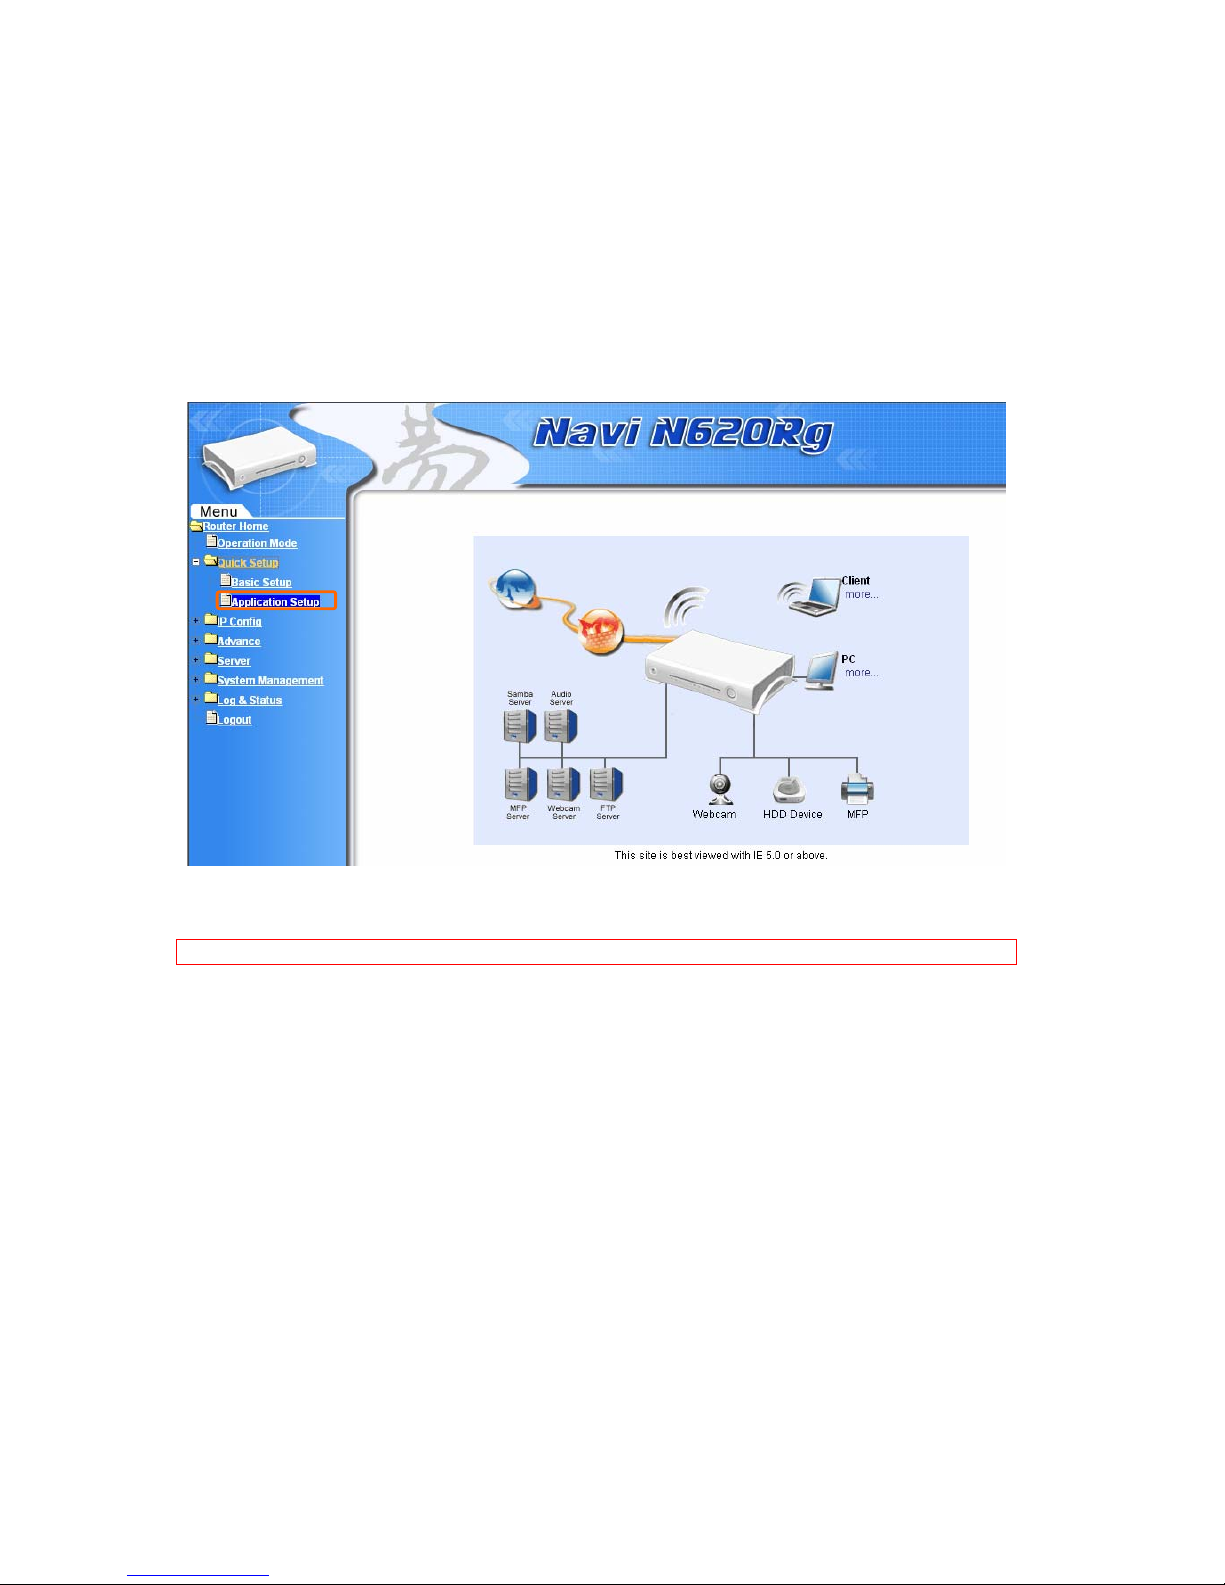
1.3 Router mode’s Application Setup of Quick Setup
Please login to the Product’s homepage by Administrator, and click on the
“Application Setup” from main Menu in the left side, the full function selecting
screen will appear.
Notice: The Router Basic Setup should be done before setting the Application Setup.
Application Setup full function table list:
Page 20
20
Quick Setup Guide V1.0
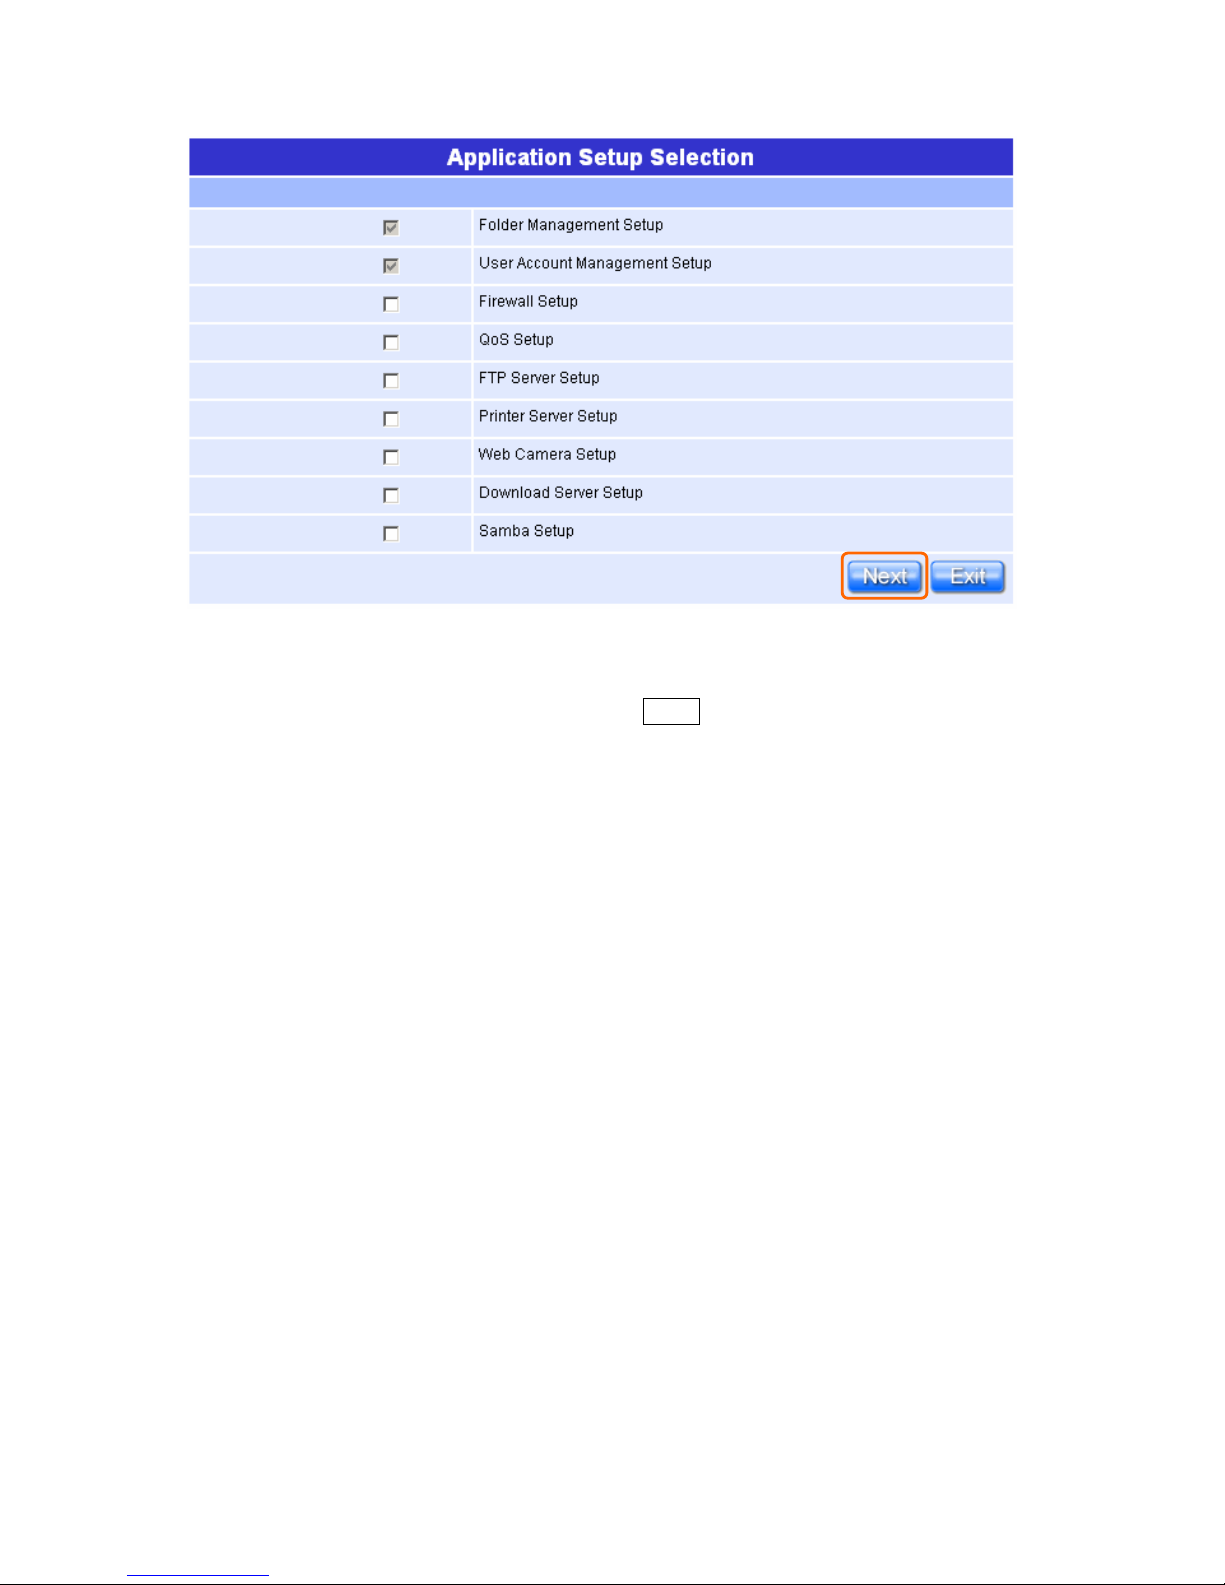
Except the “Folder management Setup” , “User Account Management Setup” the
other 7 major items can be optionally set in configuring Router Application
Setup under your demand. Please click on “Next” button to start configuring.
1.3.1 Folder Management Setup
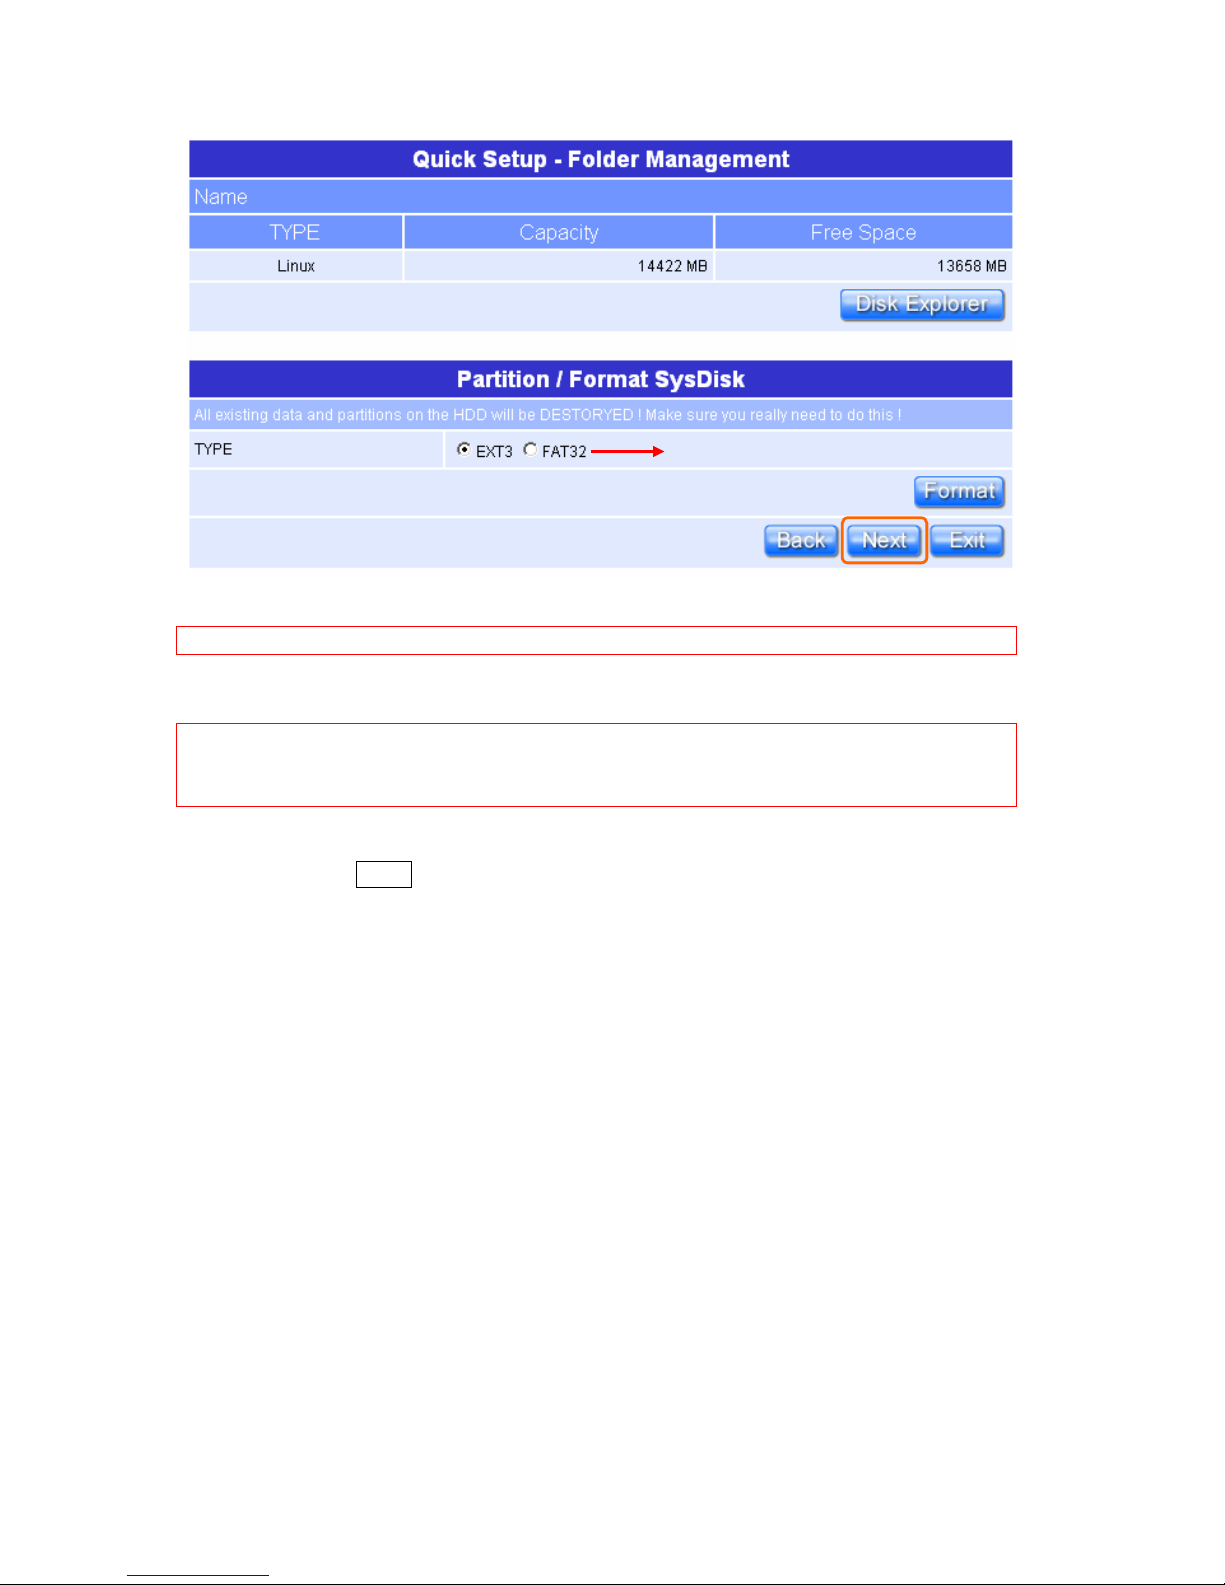
You can do the HDD partition into each folder and manage the space
arrangement for the folders by enabling this function, which you can save and
apply all the user’s files in each folder, and you can click on “Disk Explorer” to
manage the folders.
Page 21
21
Quick Setup Guide V1.0
Warning: The HDD will be formatted if doing above folder setting.
Notice: Before setup the Folder Management, please install the IDE into the Product.
Notice: After instal l HDD, if th e “Device Free Space” shows 0MB at beginning, please make sure
that your HDD has been installed and connected firmly.
Please click on “Next” after confirming.
You can select the disk type for each
partition
Page 22
22
Quick Setup Guide V1.0
1.3.2 User Account Management Setup
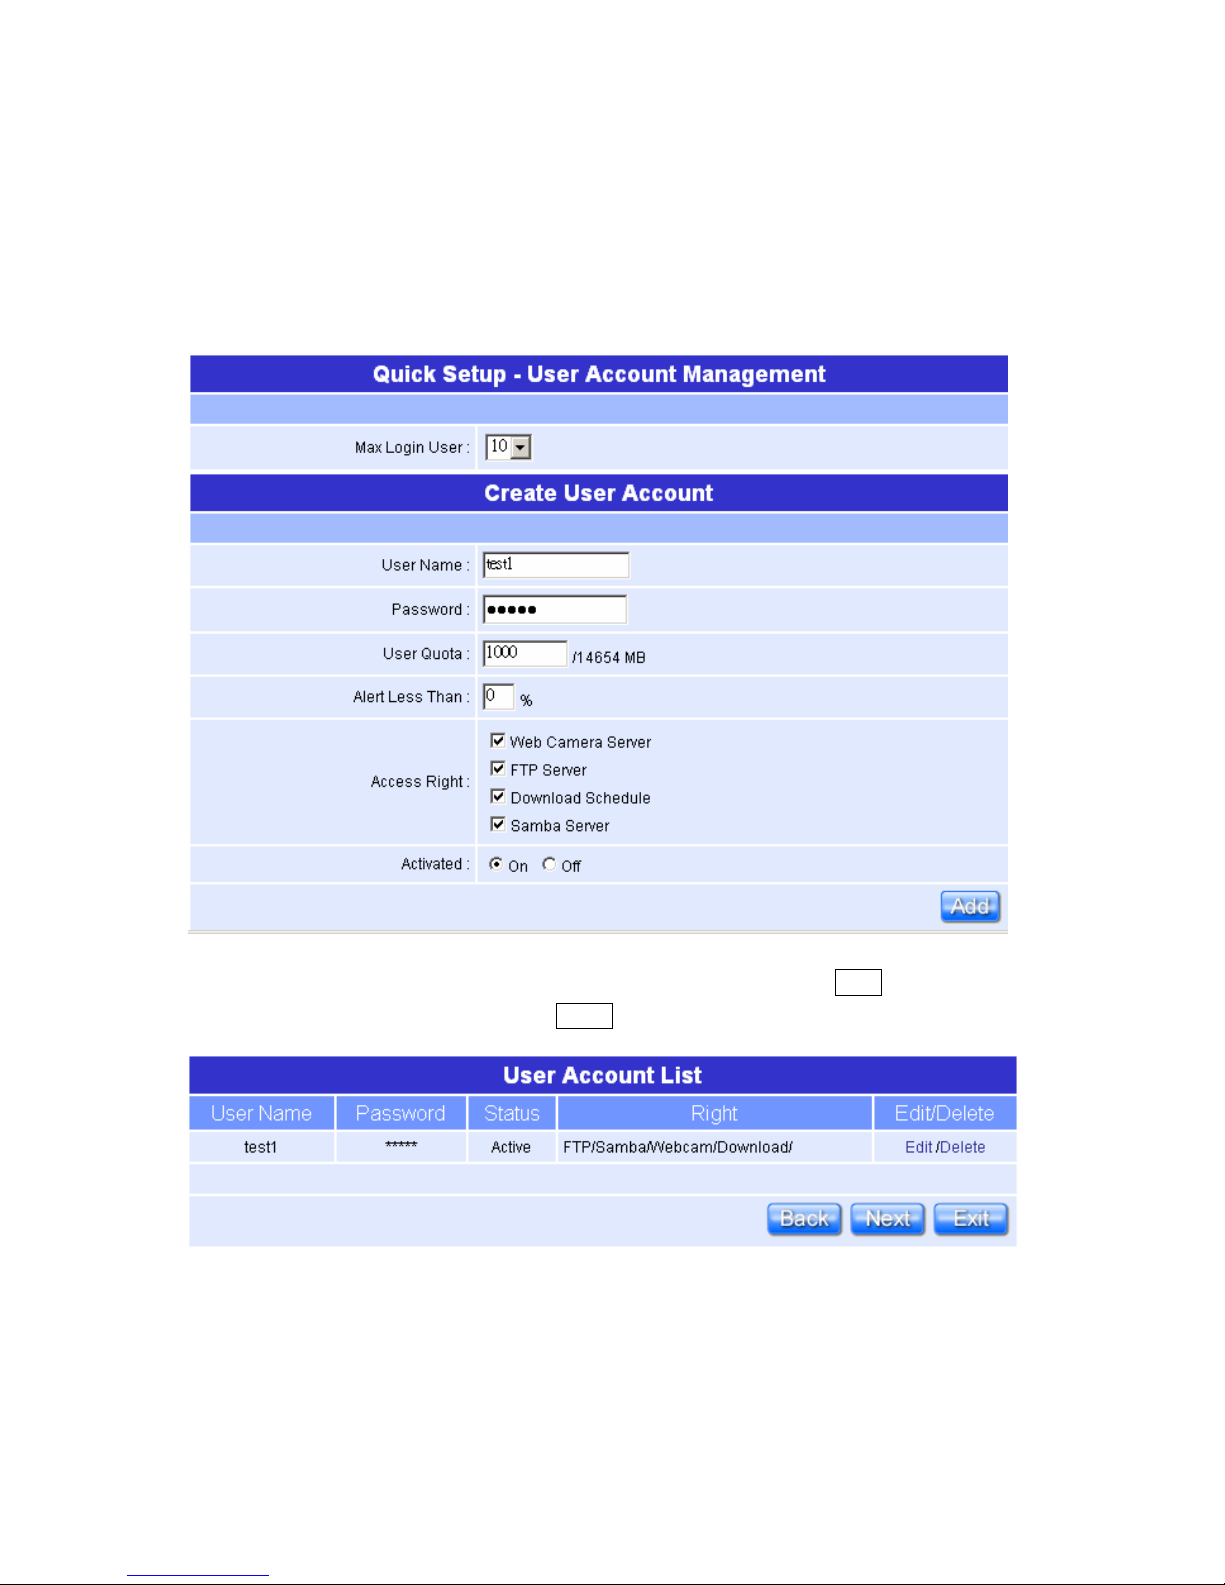
Personal users can use each individual application by setting up these rights as
Web camera Server, FTP Server, Download Schedule and Samba Server. This
section is to set the user’s right.
Set each user’s right and space arrangement, then click on “ Add” button for
saving user’s setting, and click on “Next ” button after finishing.
All the users right will be shown in User Account List.
Page 23
23
Quick Setup Guide V1.0
1.3.3 Firewall Setup
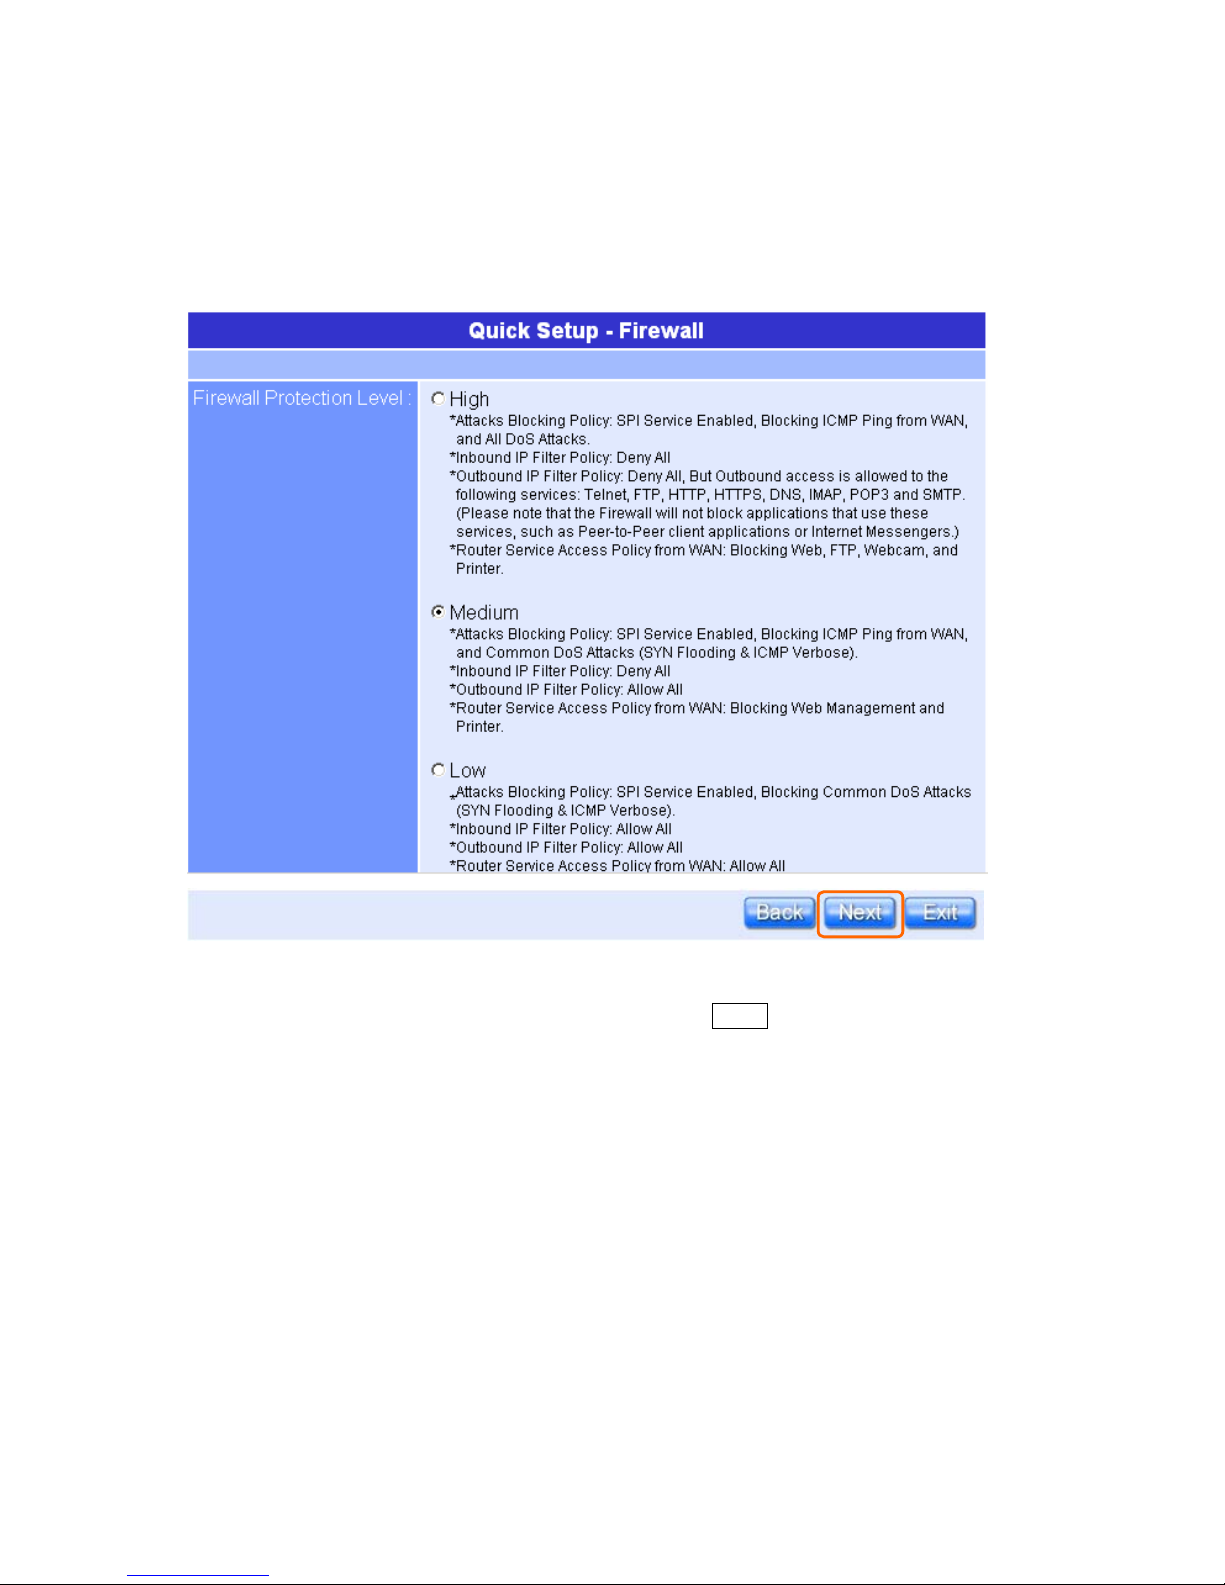
The Firewall rules of NR620G are an advance feature used to deny or allow
traffic from passing through the router.
The Firewall Protection level security has Low level, Medium level and High level,
please select it under your demand. And click on “Next” button to next step.
Page 24
24
Quick Setup Guide V1.0
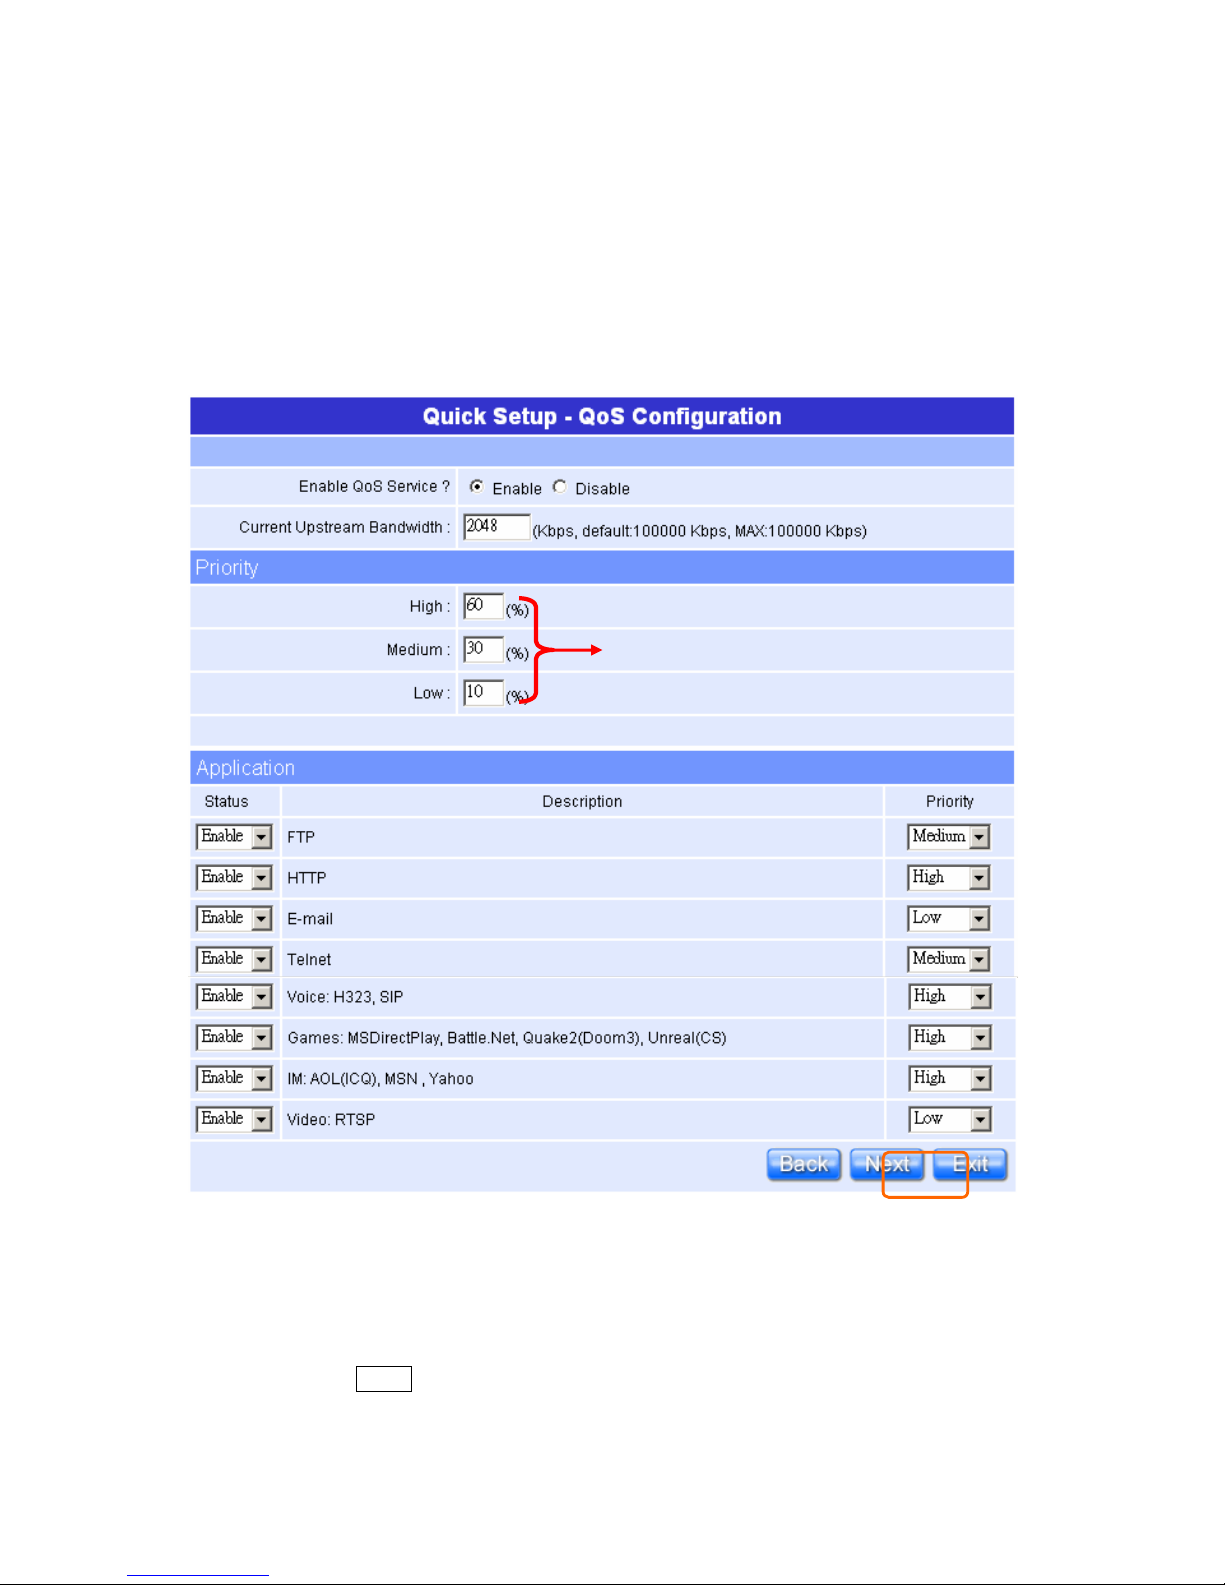
1.3.4 QoS Configuration Setup
QoS management helps to set and evaluate QoS policies and goals. It is the
particular concern for the continuous transmission of high-bandwidth video and
multimedia information. T ransmitting this kind of content dependably is difficult
in public networks using ordinary best effort protocols.
Make sure your connecting bandwidth with ISP and set the Priority percentage.
Once setting the QoS service, the transmitting performance will be affected, so
please ensure your connecting setting before doing this setup.
Please click on “Next” button to connect to next step.
Input the figures under your demand to decide
the priority order you want.
Page 25
25
Quick Setup Guide V1.0
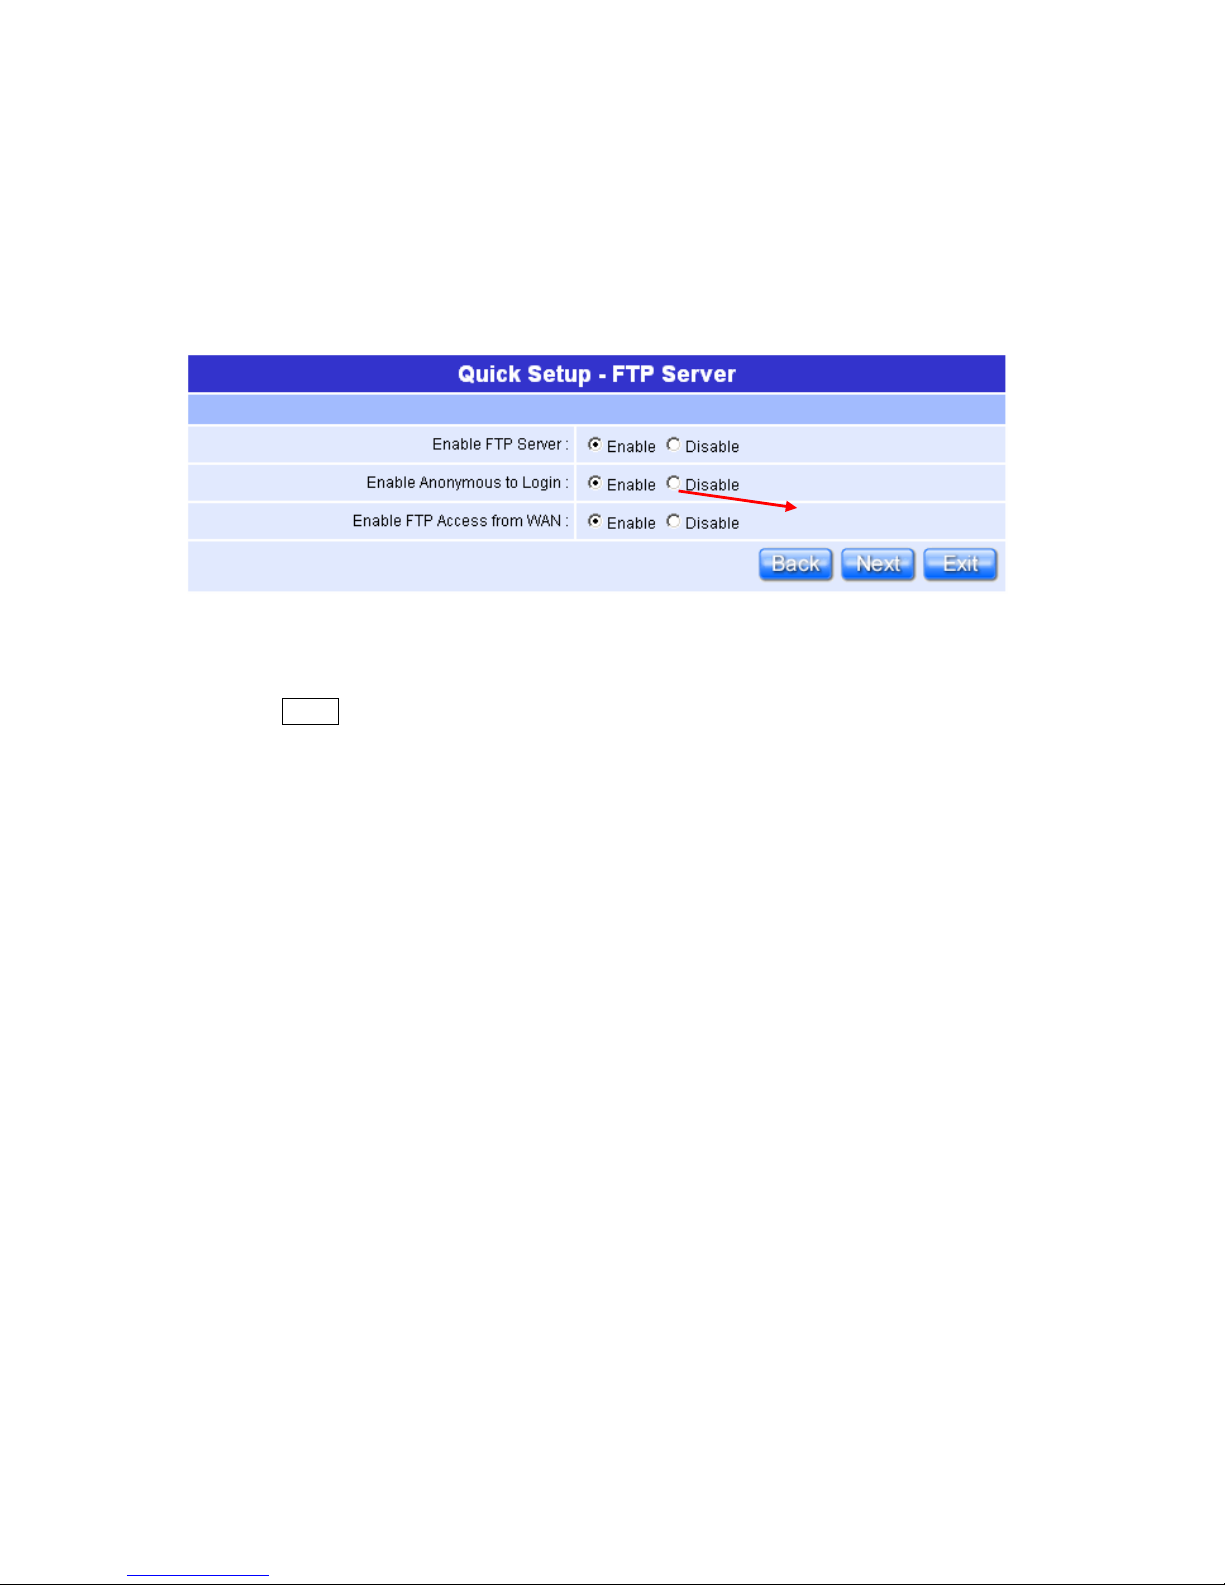
1.3.5 FTP Server Setup
NR620G can be the FTP Server provides users to transmit files into their own
FTP folder, also for the guest can download the files from the FTP anonymous
folder.
Set the FTP Server and related setting. Enable the function as your demand, and
click on “Next” button to continue.
Allow unknown guest to login for
Read Only.
Page 26
26
Quick Setup Guide V1.0
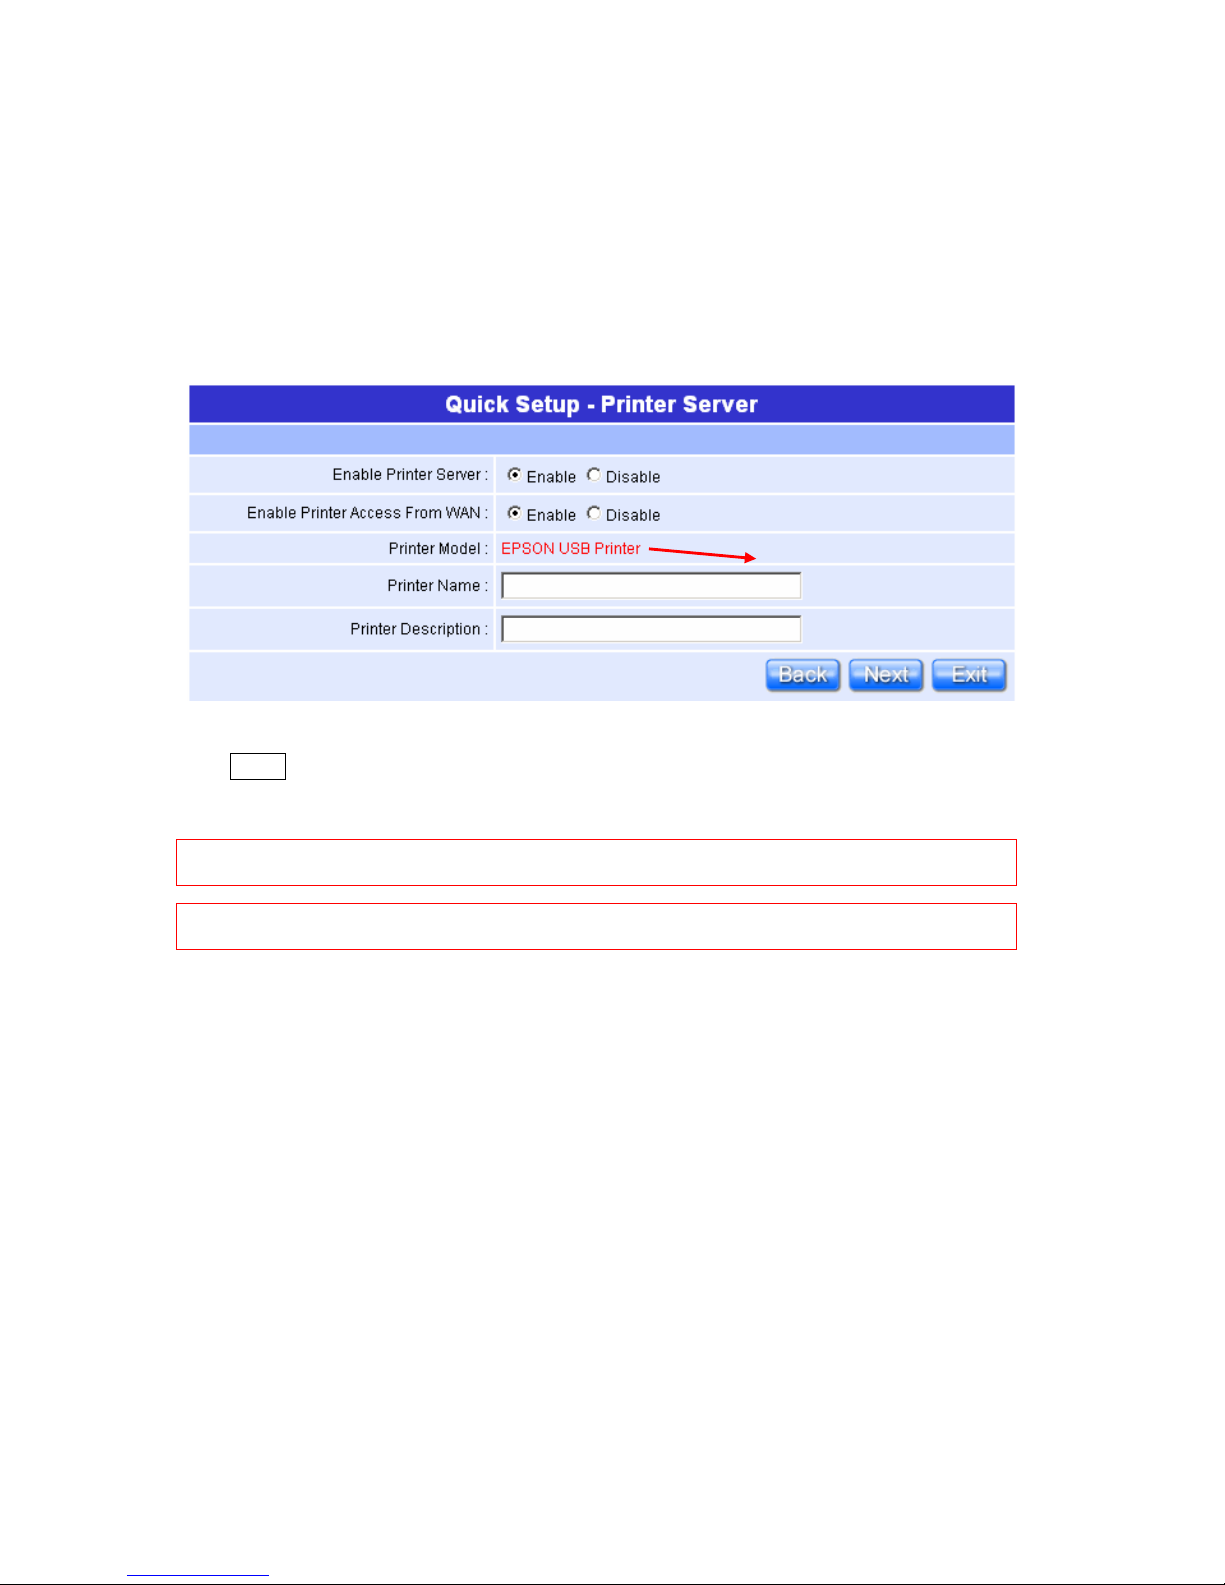
1.3.6 Printer Server Setup
NR620G, an Internet access solution for your LAN, which provides you the
shared web surfing and countless value-added features; by doing this printer
server setup, any users in the same subnet of NR620G or from WAN side can
print their document via the network printer.
Enable the printer and the Printer Model will be shown when plug in. Please click
on “Next” button to connect to next setup.
Notice: Before Printer Server enable, please make sure the printer had connected to the Product,
otherwise, the “Enable” selection can’t be checked.
Notice: After Printer Server setup finish, please setup the printer device of your computer
including install the driver.
The name of printer model will be
shown if connected.
Page 27
27
Quick Setup Guide V1.0
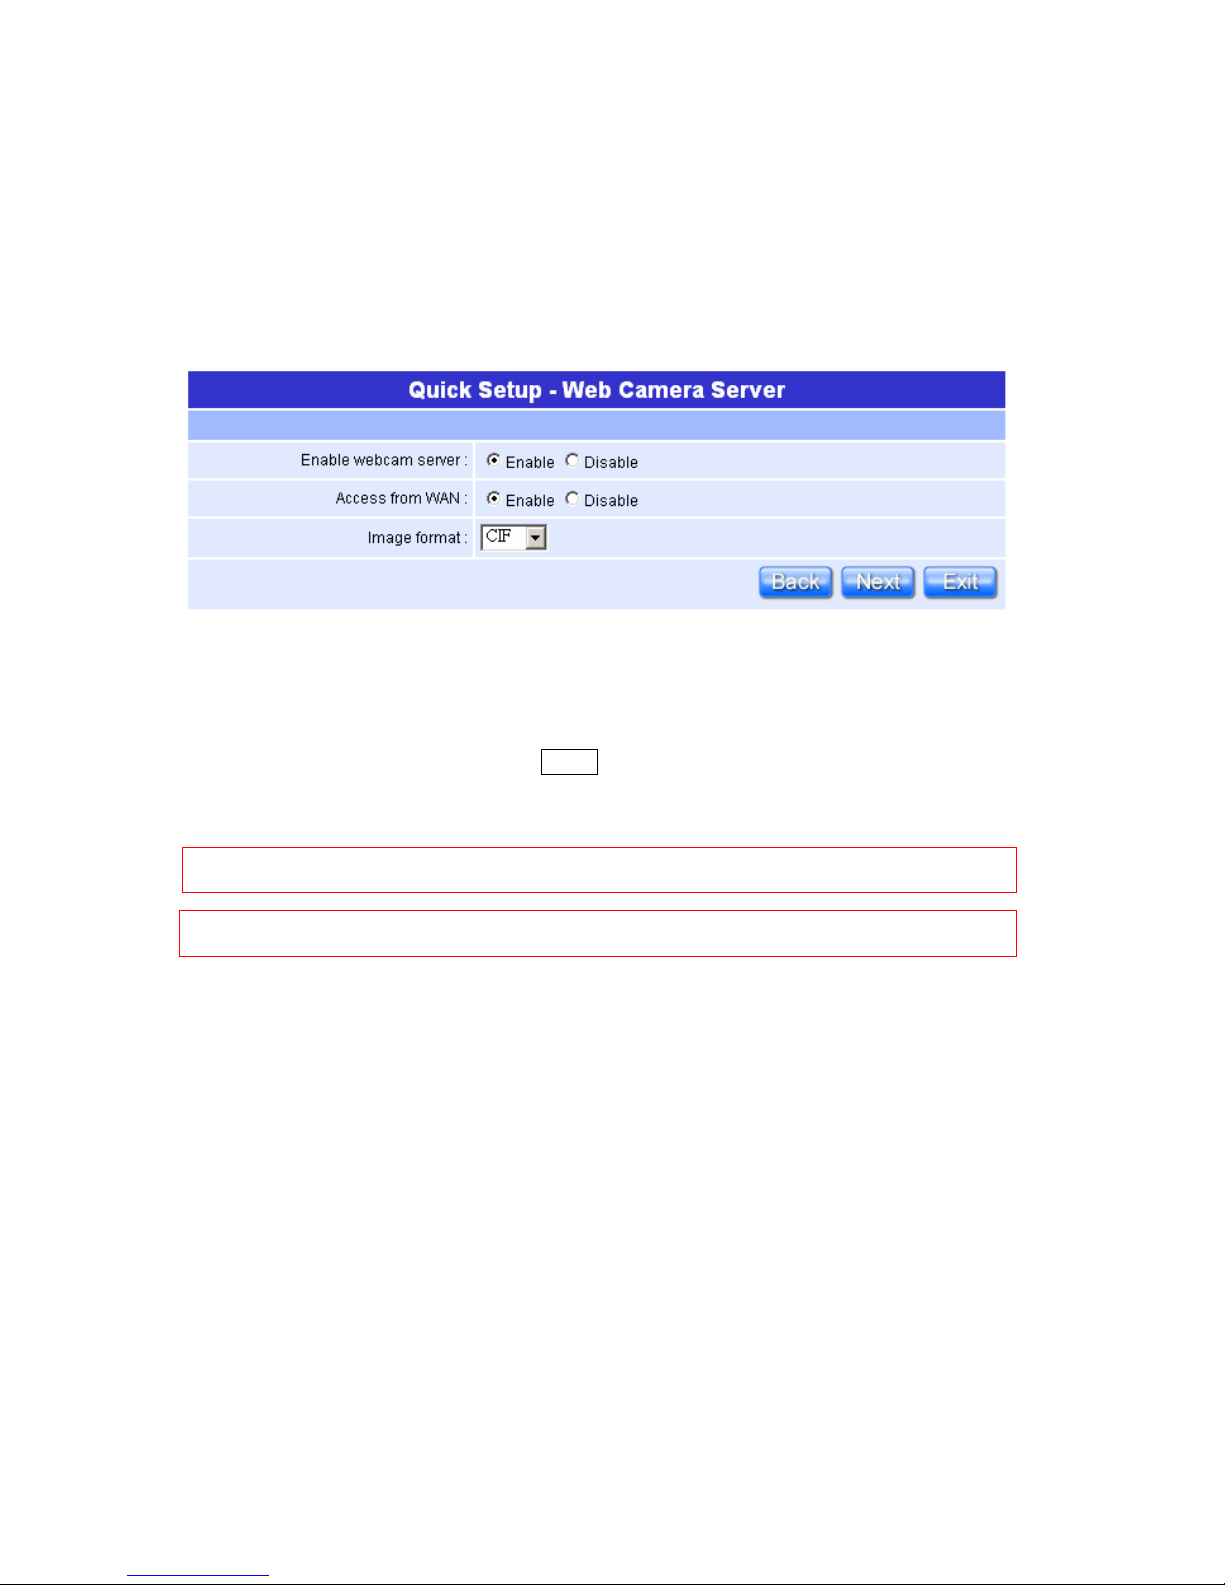
1.3.7 Web Camera Server Setup
This field indicates the mode of web camera you use. By connecting webcam to
the router , it allows user to monitor their home or office from remote locations.
Plug in the Webcam, and you will be able to click on “Enable” to start the
function of webcam, and you can also choose the image format. After enabling
on your demand, please click on “Next” button to continue to next step.
Notice: Before Webcam Server enable, please make sure the webcam had connected to the
Product, otherwise, the “Enable” selection can’t be checked.
Notice: After above setting finished, the step “1.3.2 User Account Management Setup” needs
to be created the right of Webcam Server for allowing the users to use this function.
Page 28
28
Quick Setup Guide V1.0
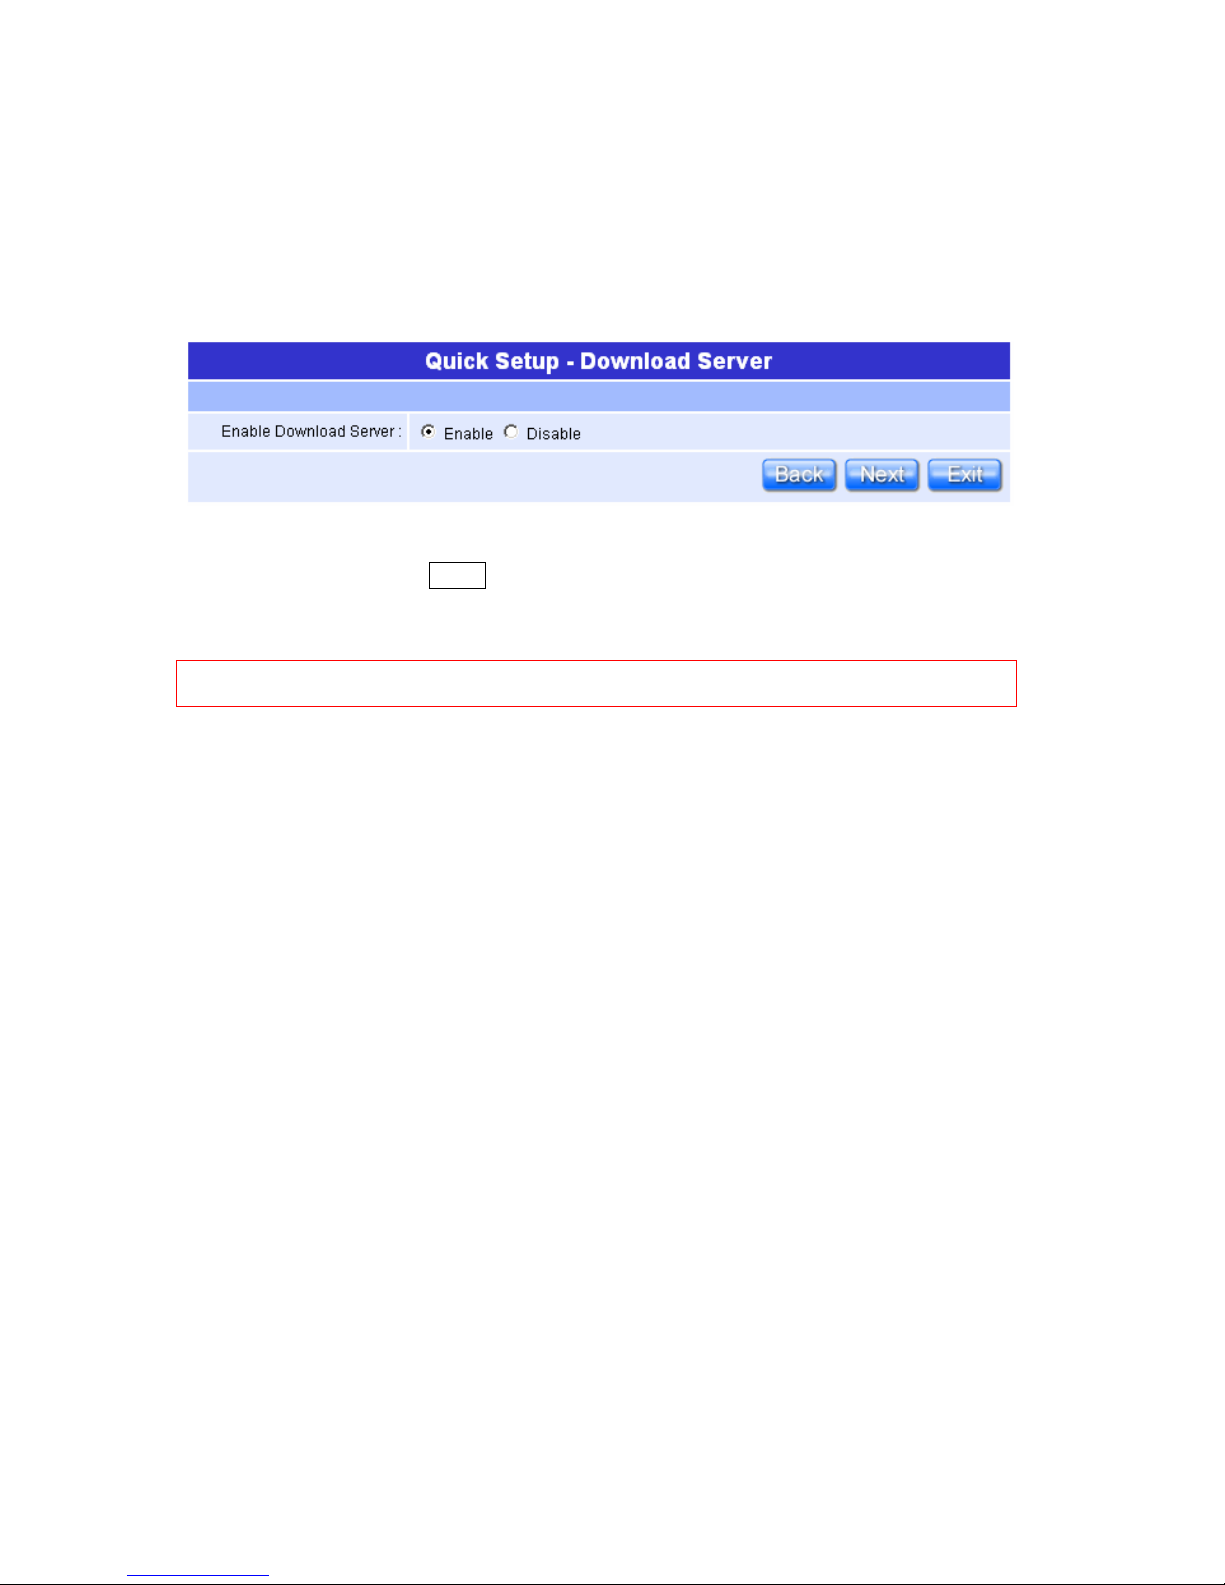
1.3.8 Download Server Setup
You can arrange the download schedule which setup to download information
from assigned website on time under your setting. It’s very useful for backup
the files or data from the same website.
Enable the Download Server, and the detail setting information is described in
User Manual. Click on “Next” button to next step.
Notice: For each user to use Download Server, please select the item of Download Server in step
“1.3.2 User Account Management Setup” at first.
Page 29
29
Quick Setup Guide V1.0
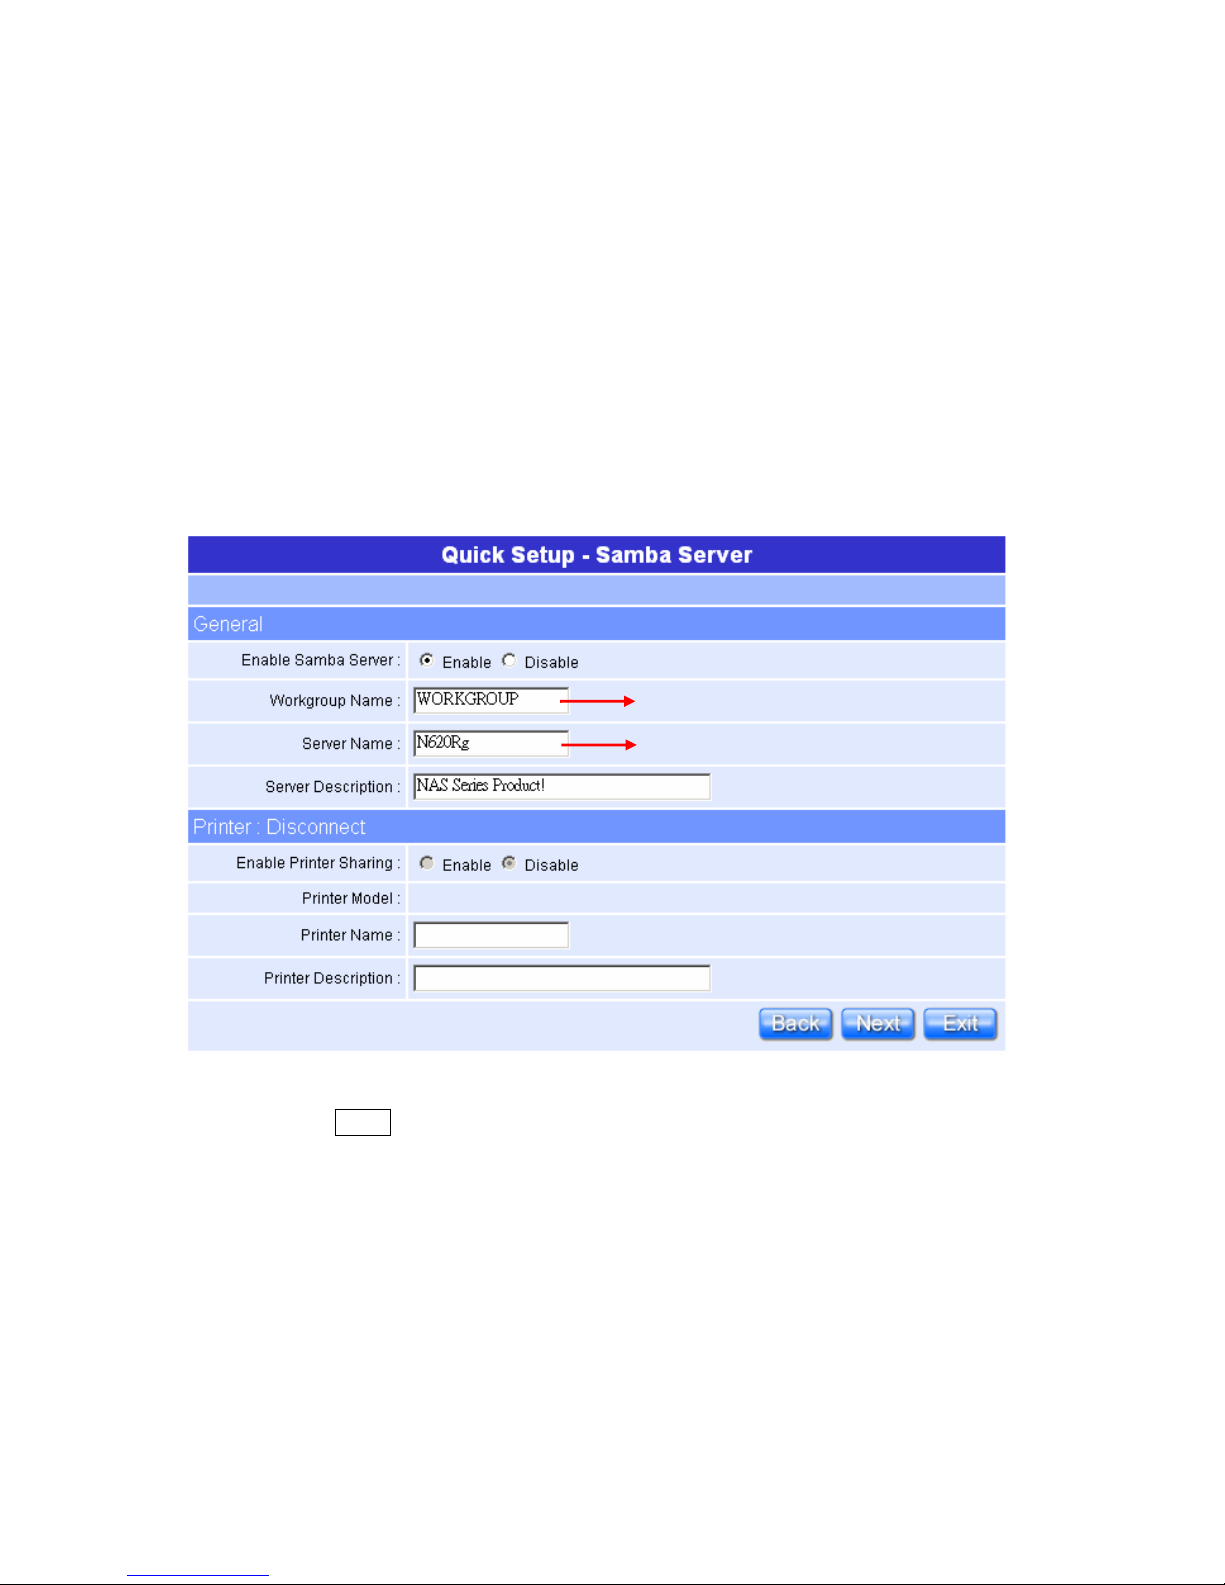
1.3.9 Samba Server Setup
Samba Server provides file and printer services for clients using some variants
of SMB (Server Message Block) protocol. A printer shared by the Samba Server
shows up in the list of shares offered in the Network Neighborhood. If the printer
is registered on the client machine and the client has the correct printer driver
installed, the client can send easily print jobs to a printer attached to a Samba
Server. For each user to access the Samba Server and share the file; that will be
the right of “Full-control”, as for using the USB flash disk; that will be just
attached to the sub-directory of Samba Server.
To set Samba Server by entering the information for group setting and printer,
then click on “Next” button to connect to next setup after confirming. The name
of printer in “Printer Server” and “Samba Server” can’t be the same.
The workgroup will be shown in Network Neighborhood.
This name will be shown as a Server title.
Page 30
30
Quick Setup Guide V1.0
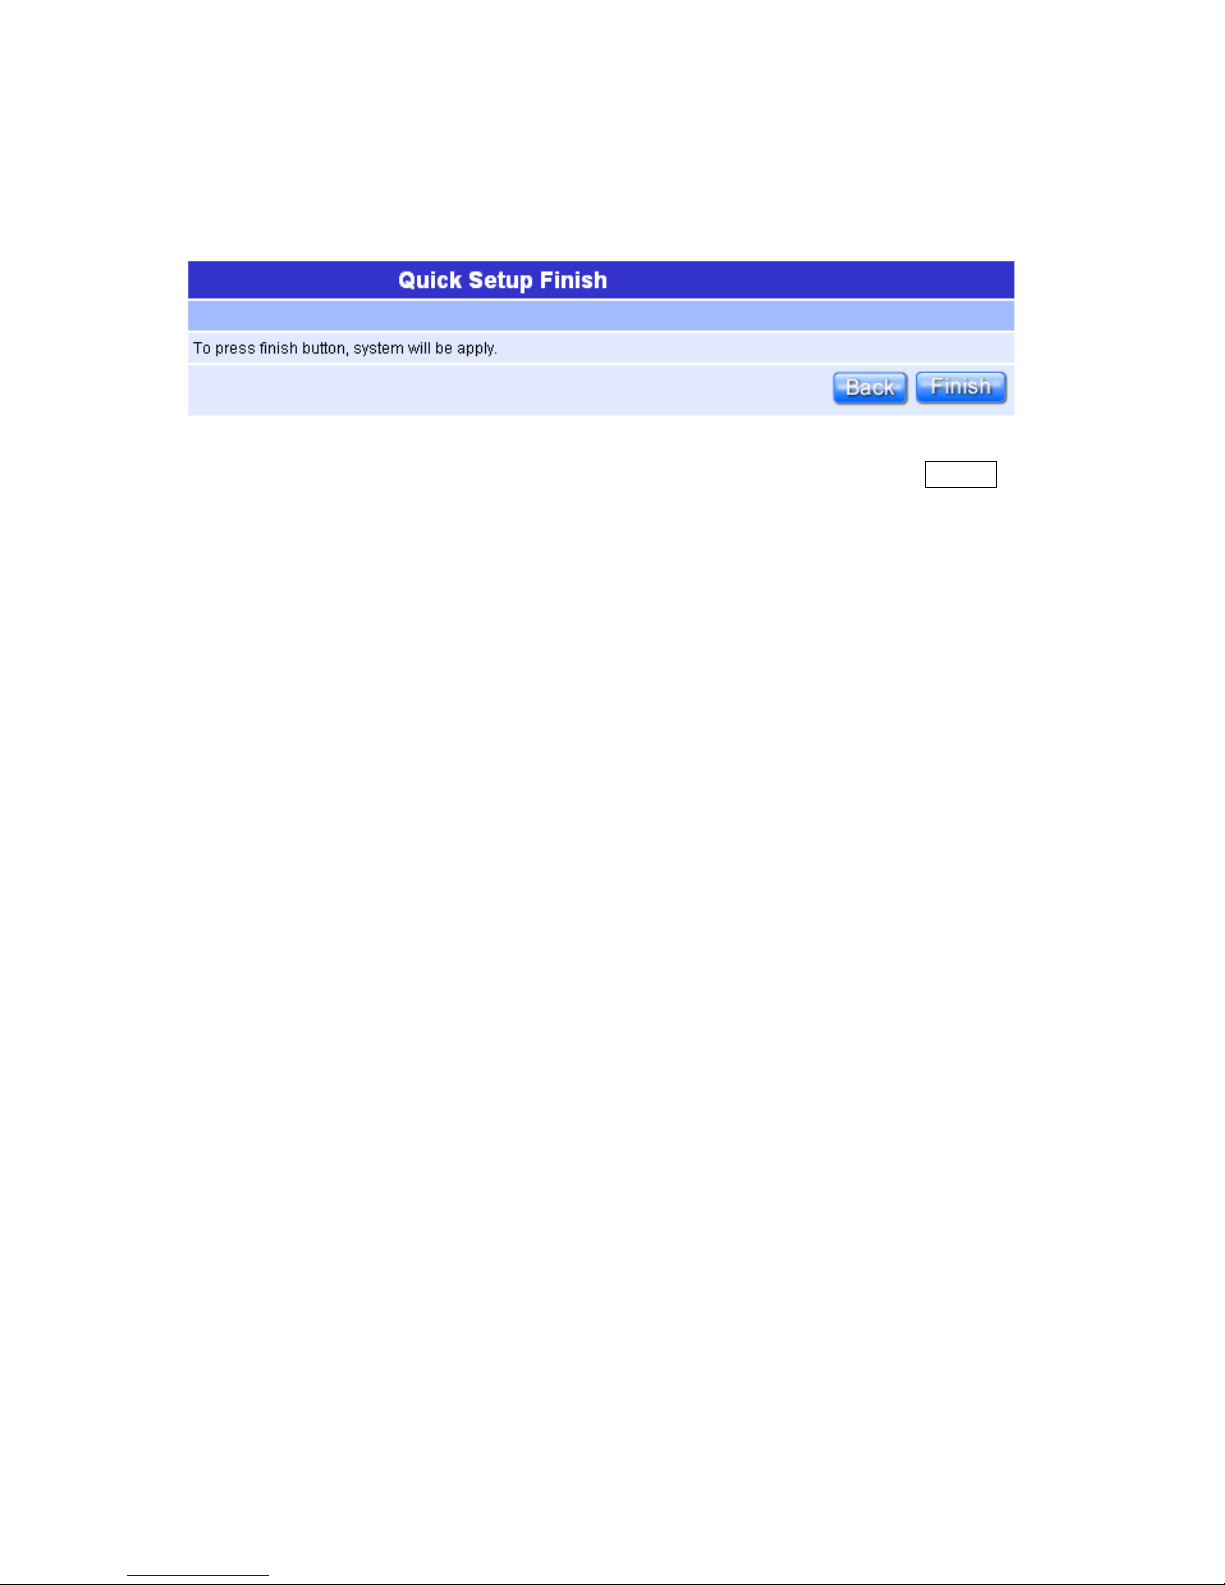
1.3.10 Application Setup Finish
All the Quick Setup is finished when this screen appeared. Click on “ Finish”
button and then back to the Product’s homepage.
Page 31
31
Quick Setup Guide V1.0
Chapter 2 Navi NR620G’s AP Mode Quick Setup
2.1 AP Mode’s Quick Setup Instruction
Please open a Microsoft Internet Explorer, and enter http://192.168.1.254
(Default Gateway) into browser’s blank:
Then you will see the configuration page below:
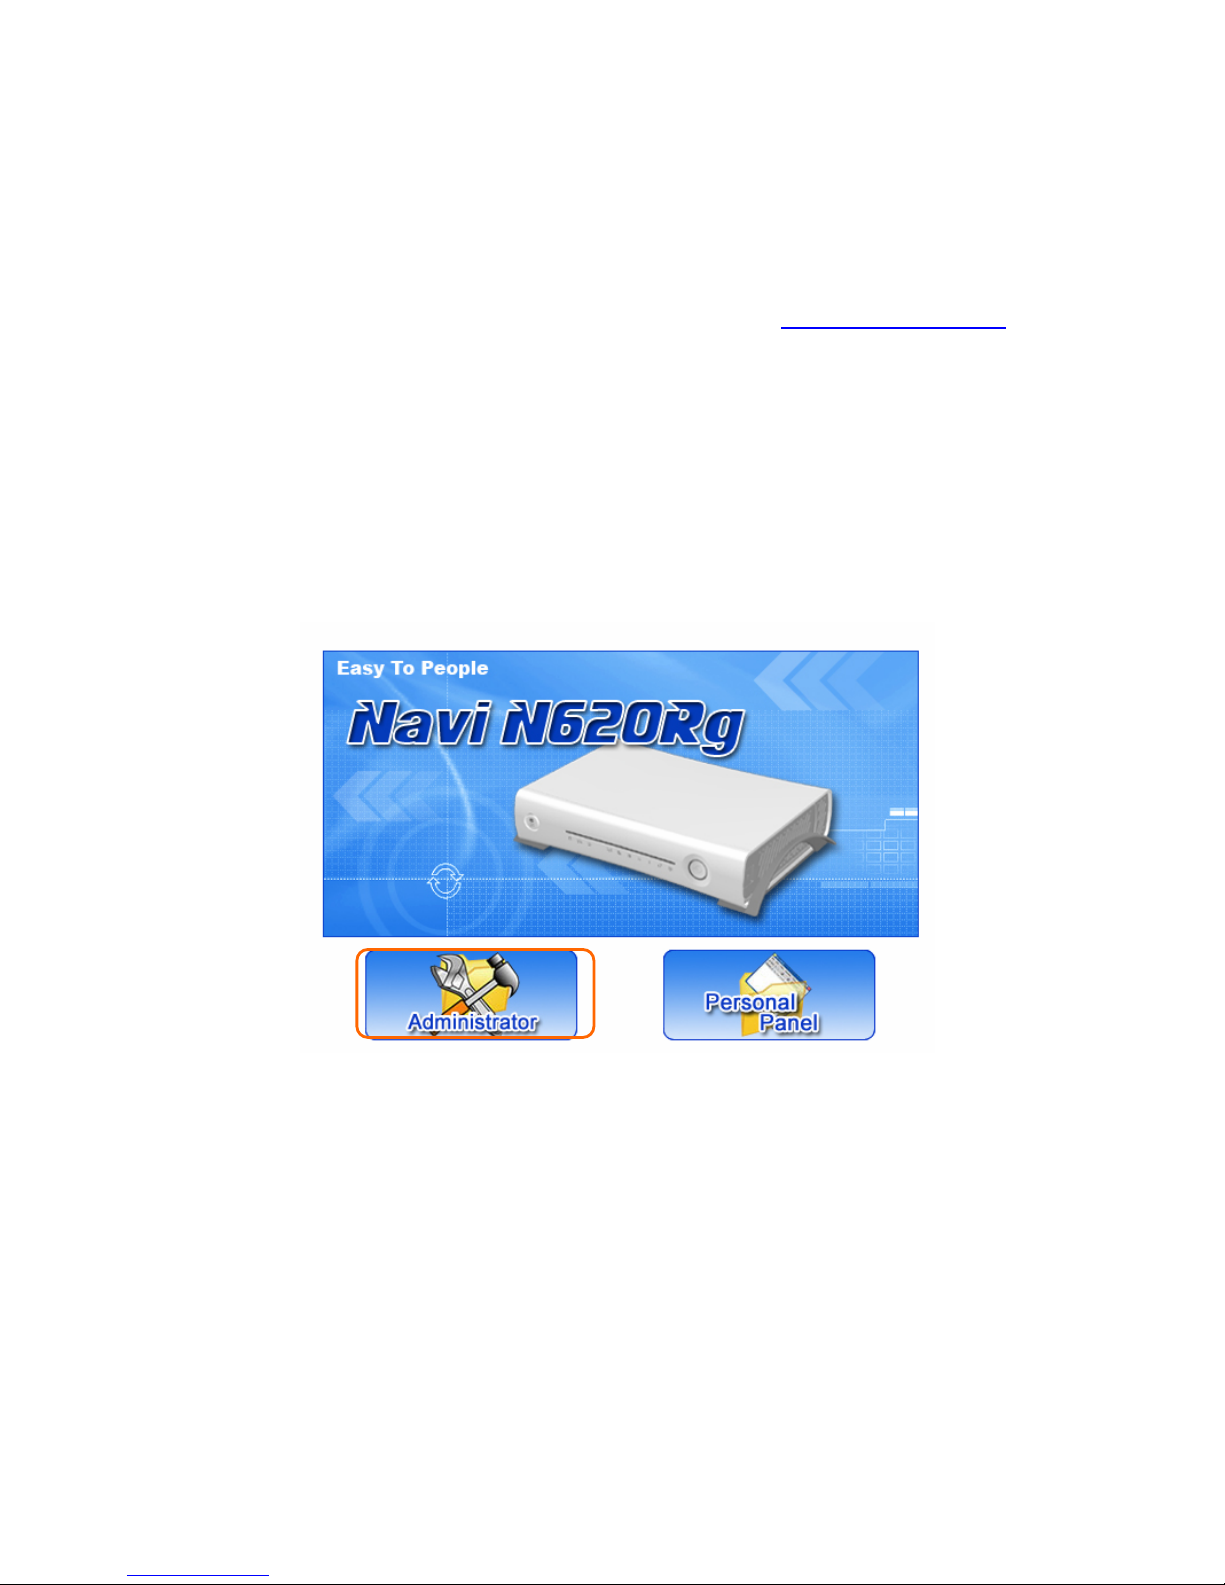
Product Home Page
Please click on Administrator button to login to setup at first time, also can
change any settings in future. Only the Administrator has the right to set and
change all settings.
User Name and Password
Page 32
32
Quick Setup Guide V1.0
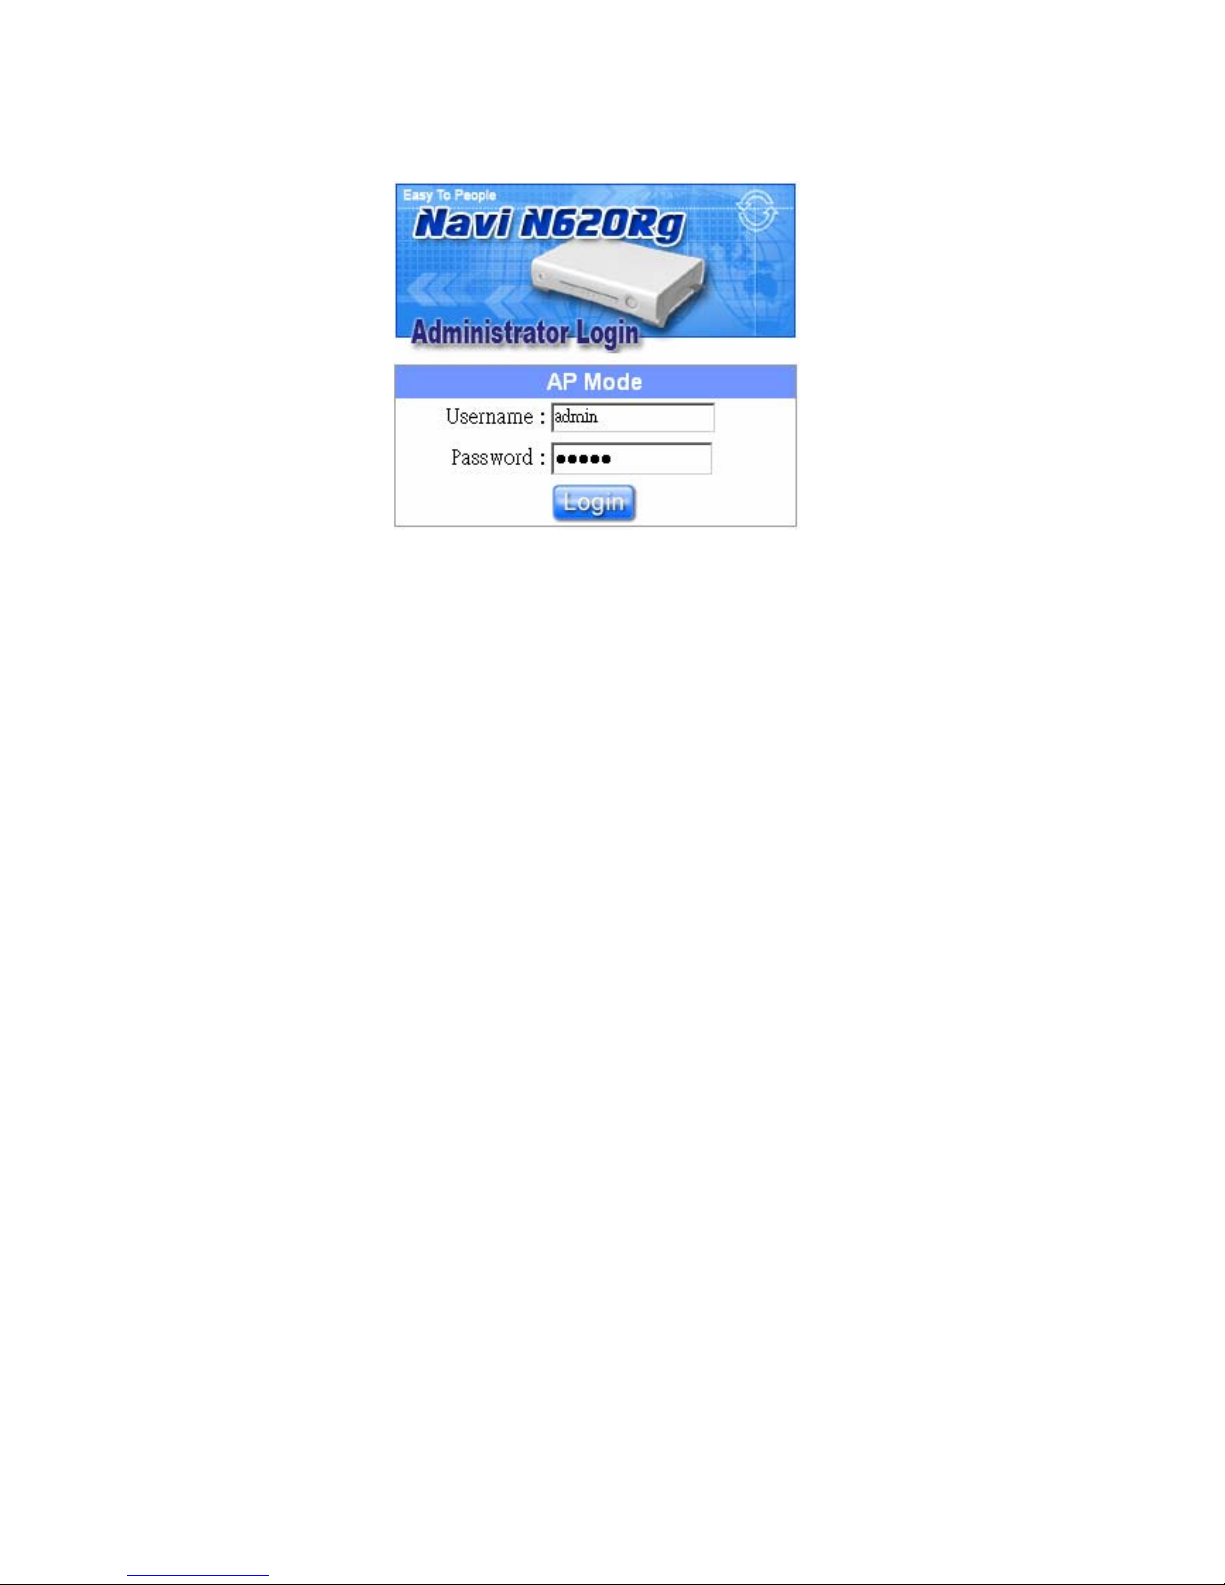
Please input in the blanks, the factory default values for User Name and Password
are “admin” and “admin” (all in lowercase letters); after inputting, please click on
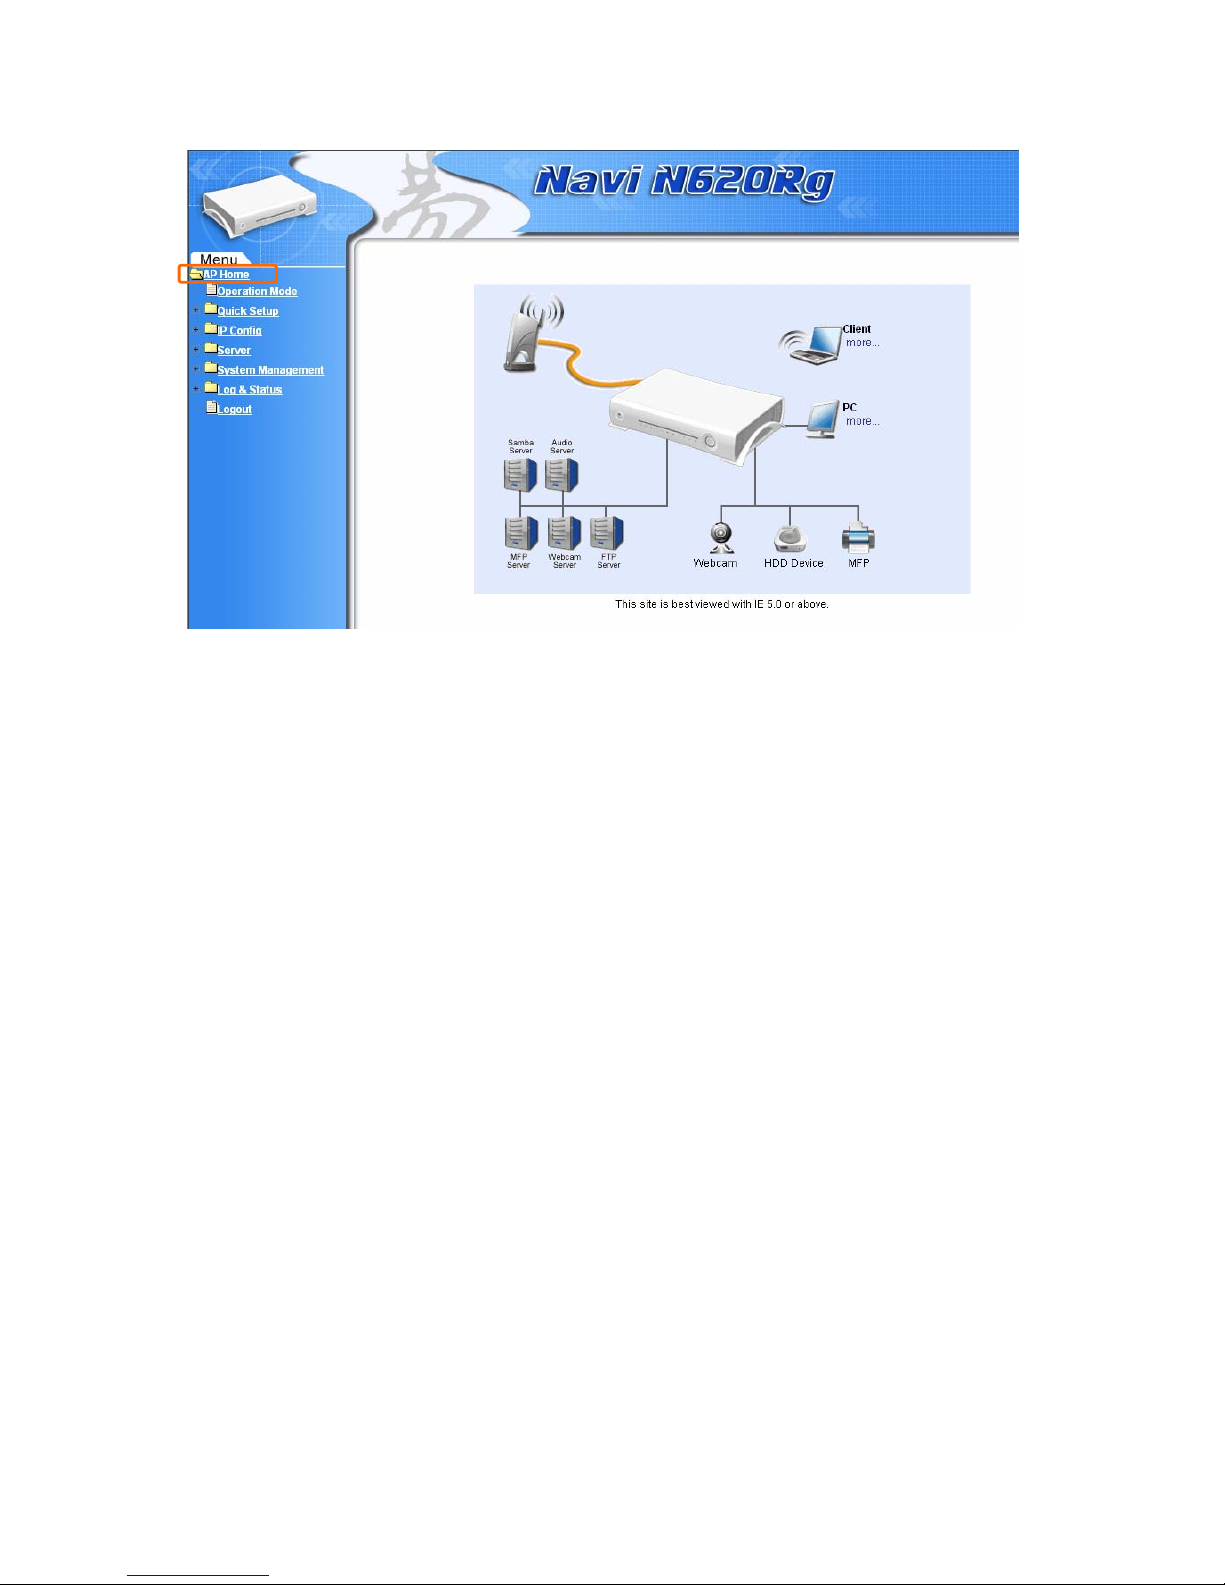
“Login” to enter the homepage as below:
Page 33
33
Quick Setup Guide V1.0
Page 34
34
Quick Setup Guide V1.0
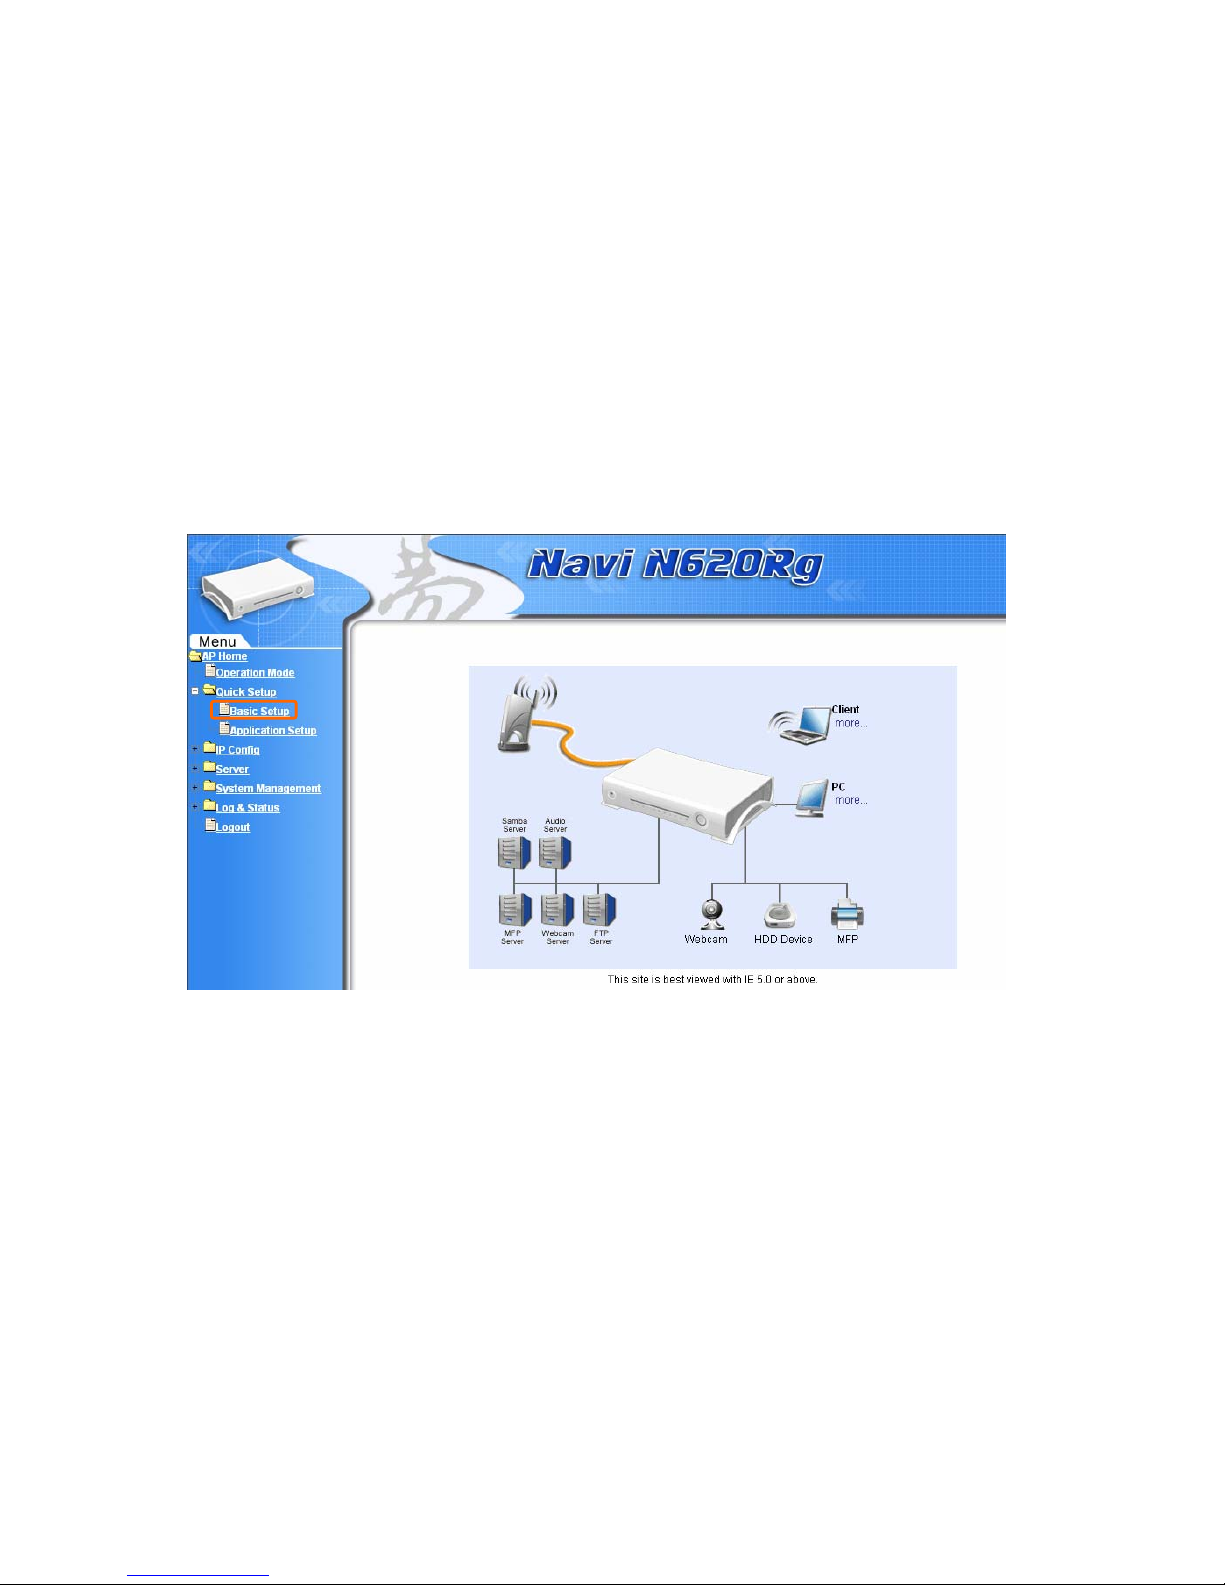
2.2 The Introduction of AP mode’s Quick Setup
The typical homepage of NR620G consists of two separate frames. The left
frame contains all available means for device configuration. Menus are indicated
by file icons, and related menus are grouped into categories.
Click on Basic Setup at the left screen of the main menu. Then you’ll see the
full function selected screen appears and do the setting for each items.
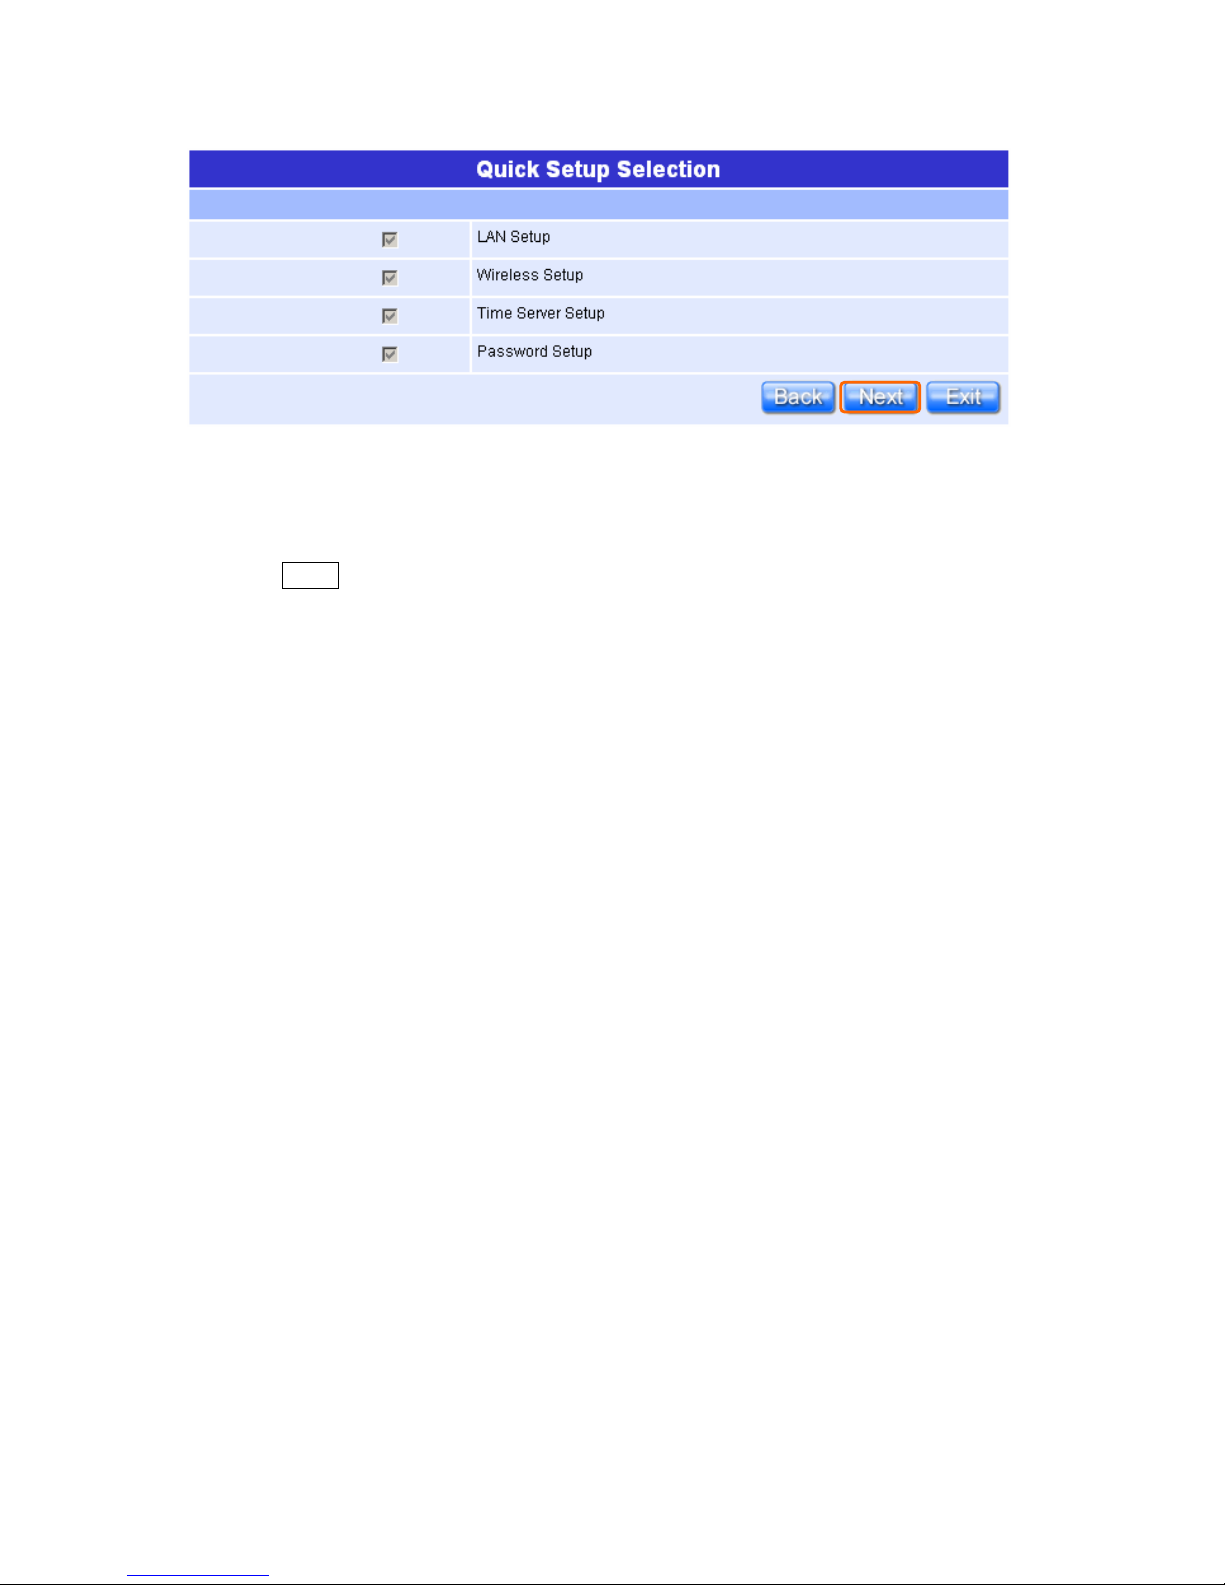
Router Basic Setup full action table list:
Page 35
35
Quick Setup Guide V1.0
All of the 4 major items must be set in configur ing Router Basic Setup. Please
click on “Next” button to start configuring.
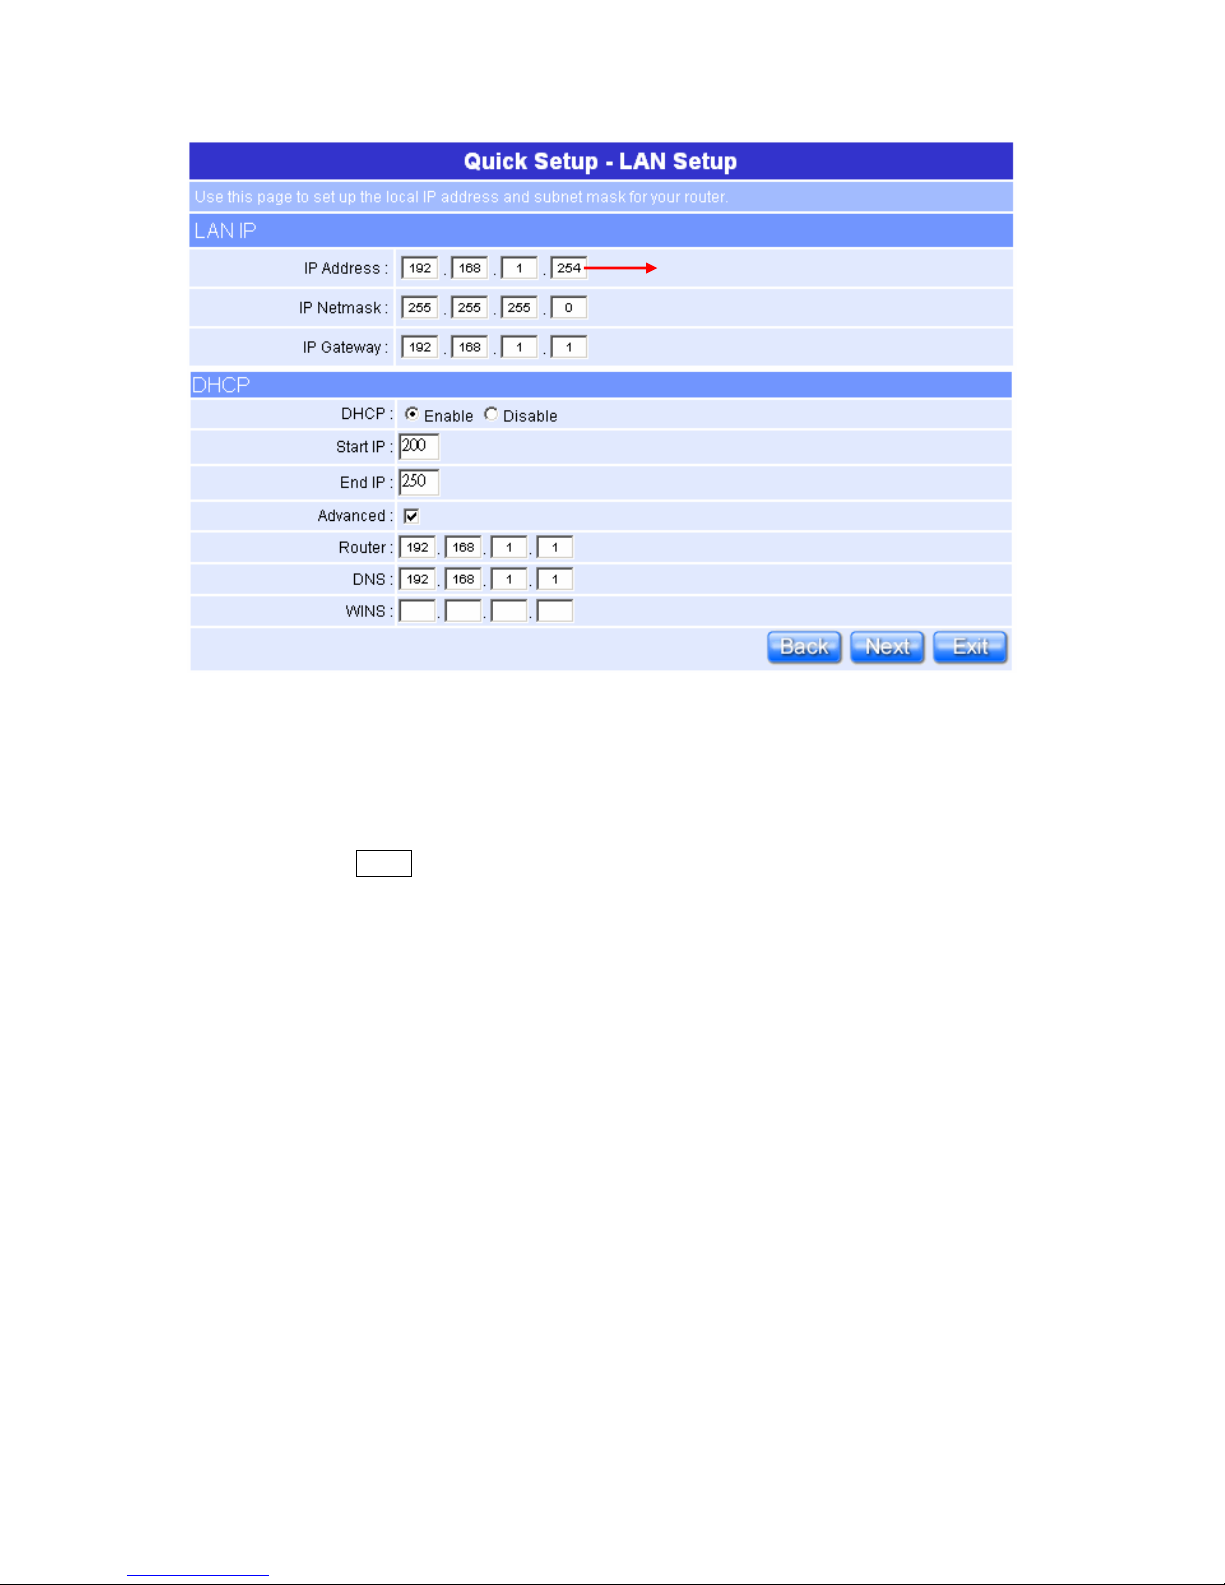
2.2.1 LAN Setup
If you are using the R620g with multiple PCs on your LAN, you must connect the
LAN via the Ethernet ports on the built-in Ethernet switch. You must assign a
unique IP address to each device residing on your LAN. The LAN IP address
identifies the router as a node on your network; that is, its IP address must be
in the same subnet as the PCs on your LAN. The default LAN IP is
192.168.1.254.
Page 36
36
Quick Setup Guide V1.0
Please don’t change the default LAN IP settings at this point until you have
completed the rest of the configurations and confirm that your Internet
connection is working.
Please click on “Next” button to connect to next step.
Default Gateway IP Address.
Page 37
37
Quick Setup Guide V1.0
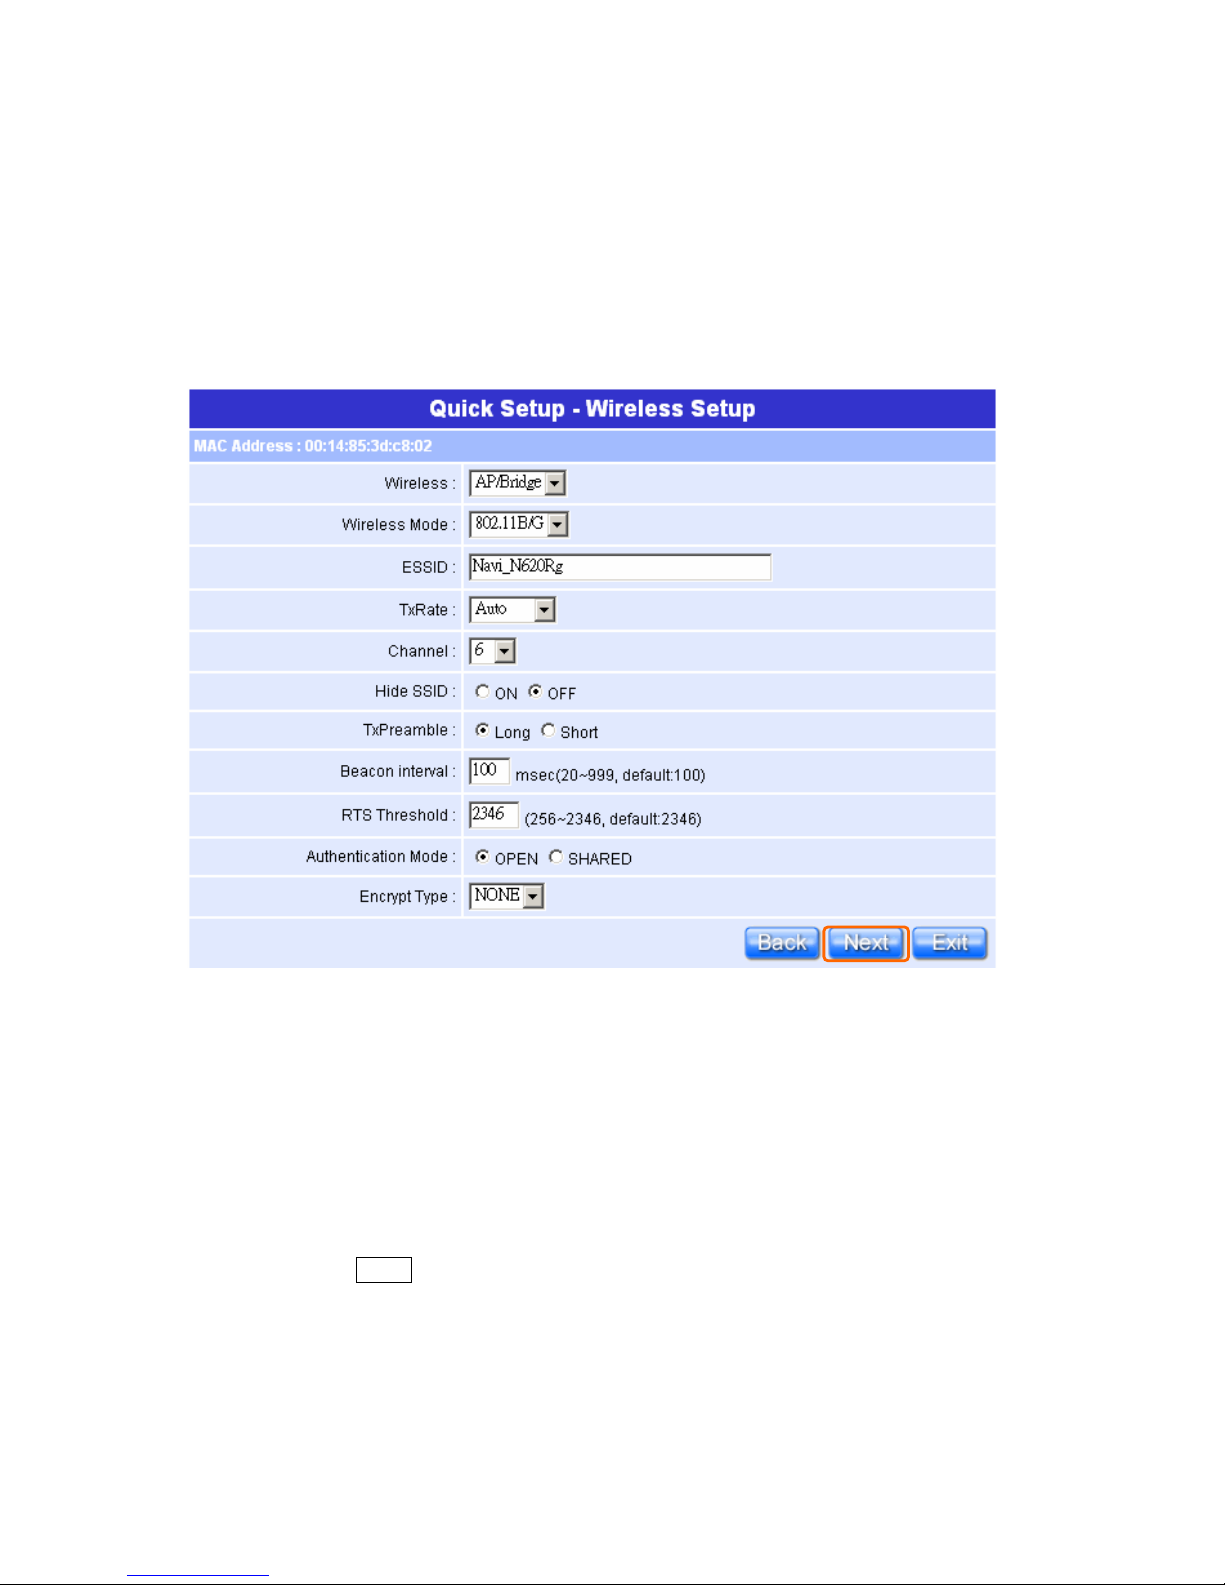
2.2.2 Wireless Setup
NR620G is based on industry standards to provide easy-to-use and compatible
high-speed wireless connectivity, which means the router will allow you to
access the data you want, when and where yo u want it.
You can use the default ESSID and Channel unless more than one NR620G or
AP is deployed in the same area. The Wireless Mode indicates the mode of the
802.11g interface. And the TxRate allows you to specify the transmission rate.
Authentication is the security function to prevent the connect requests from
unauthorized wireless clients. As the Encryption Type, enable WEP and WPA
can protect your data from eavesdroppers, if you do not need this feature, select
“None” to skip the following setting.
Please click on “Next” button to connect to next step.
Page 38
38
Quick Setup Guide V1.0
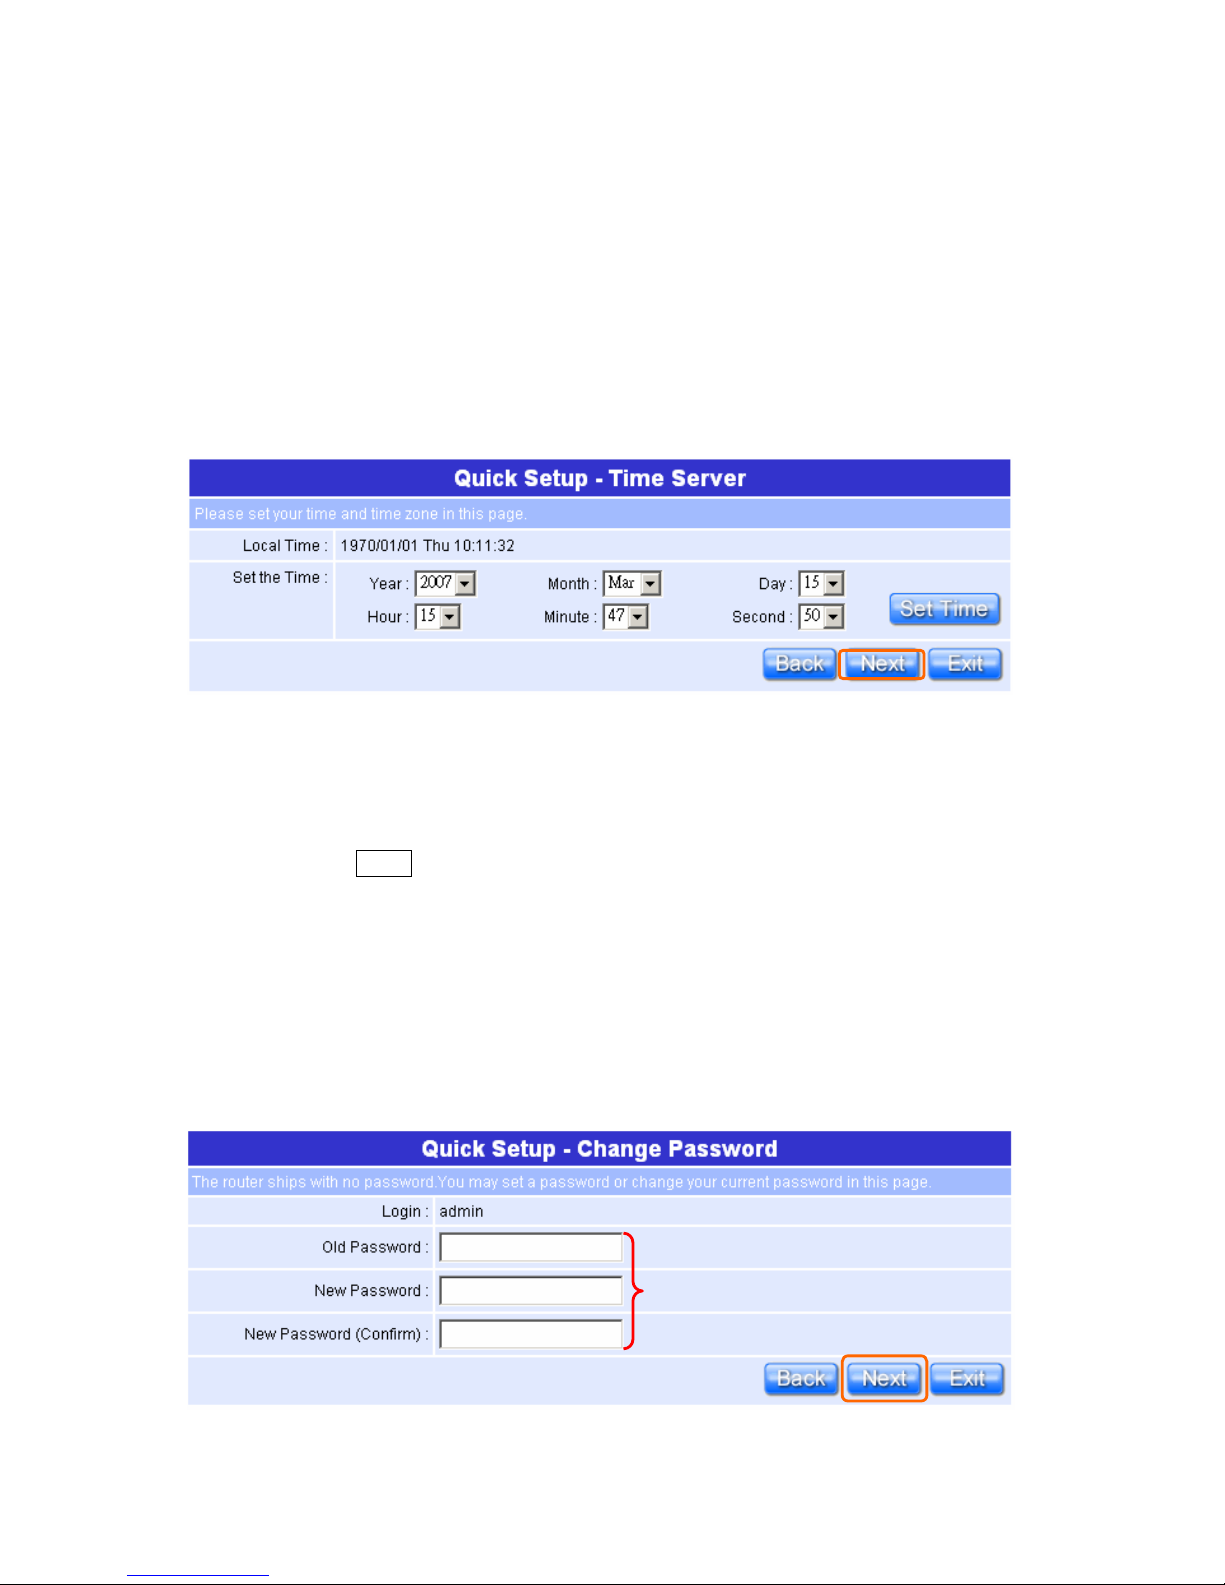
2.2.3 Time Server Setup
The section provides to change the Time. The Router keeps a record of the
current date and time, which it uses to calculate and report various performance
data, but to change the router’s date and time does not affect the date and time
on your PCs.
Select your time from the “Set the Time” drop-down list, there is no real time
clock inside the router, the system date and time are maintained by external
network time server.
Please click on “Next” button to connect to next step.
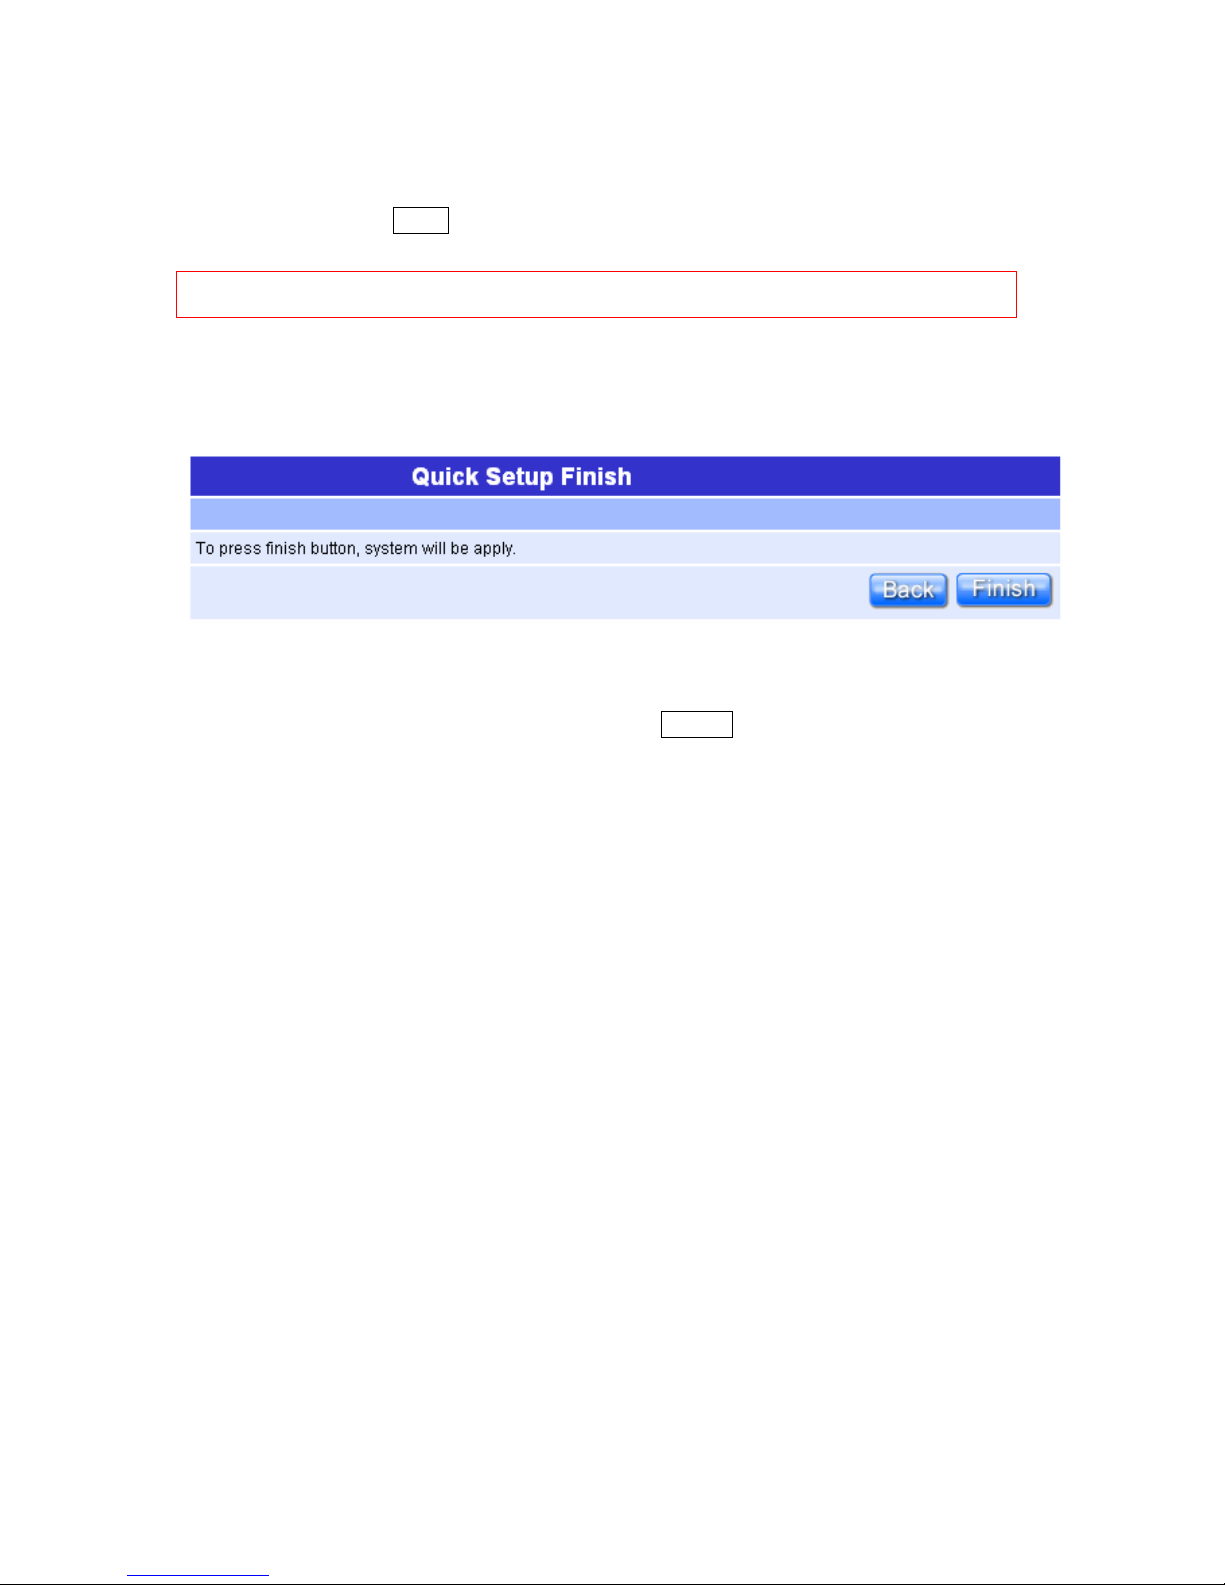
2.2.4 Change Password
Here suggest changing the password for logging into the configuration manager
under security reason.
The password may consist of A-Z, a-z,
0-9, underscores, and a single dot (.)
Page 39
39
Quick Setup Guide V1.0
For changing password, please fills the password information into above blanks,
and then clicks on “Next” button.
Notice: Only the password can be changed, the user name for administrator is “admin” and can’t
be changed.
2.2.5 AP Basic Setup Finish
The AP Basic Setup has been completed successfull y when seei ng this screen.
To apply your new settings, please click on “Finish ” button to reboot system
automatically and goes to the Product’s Homepage.
Page 40
40
Quick Setup Guide V1.0
2.3 AP mode’s Application Setup of Quick Setup
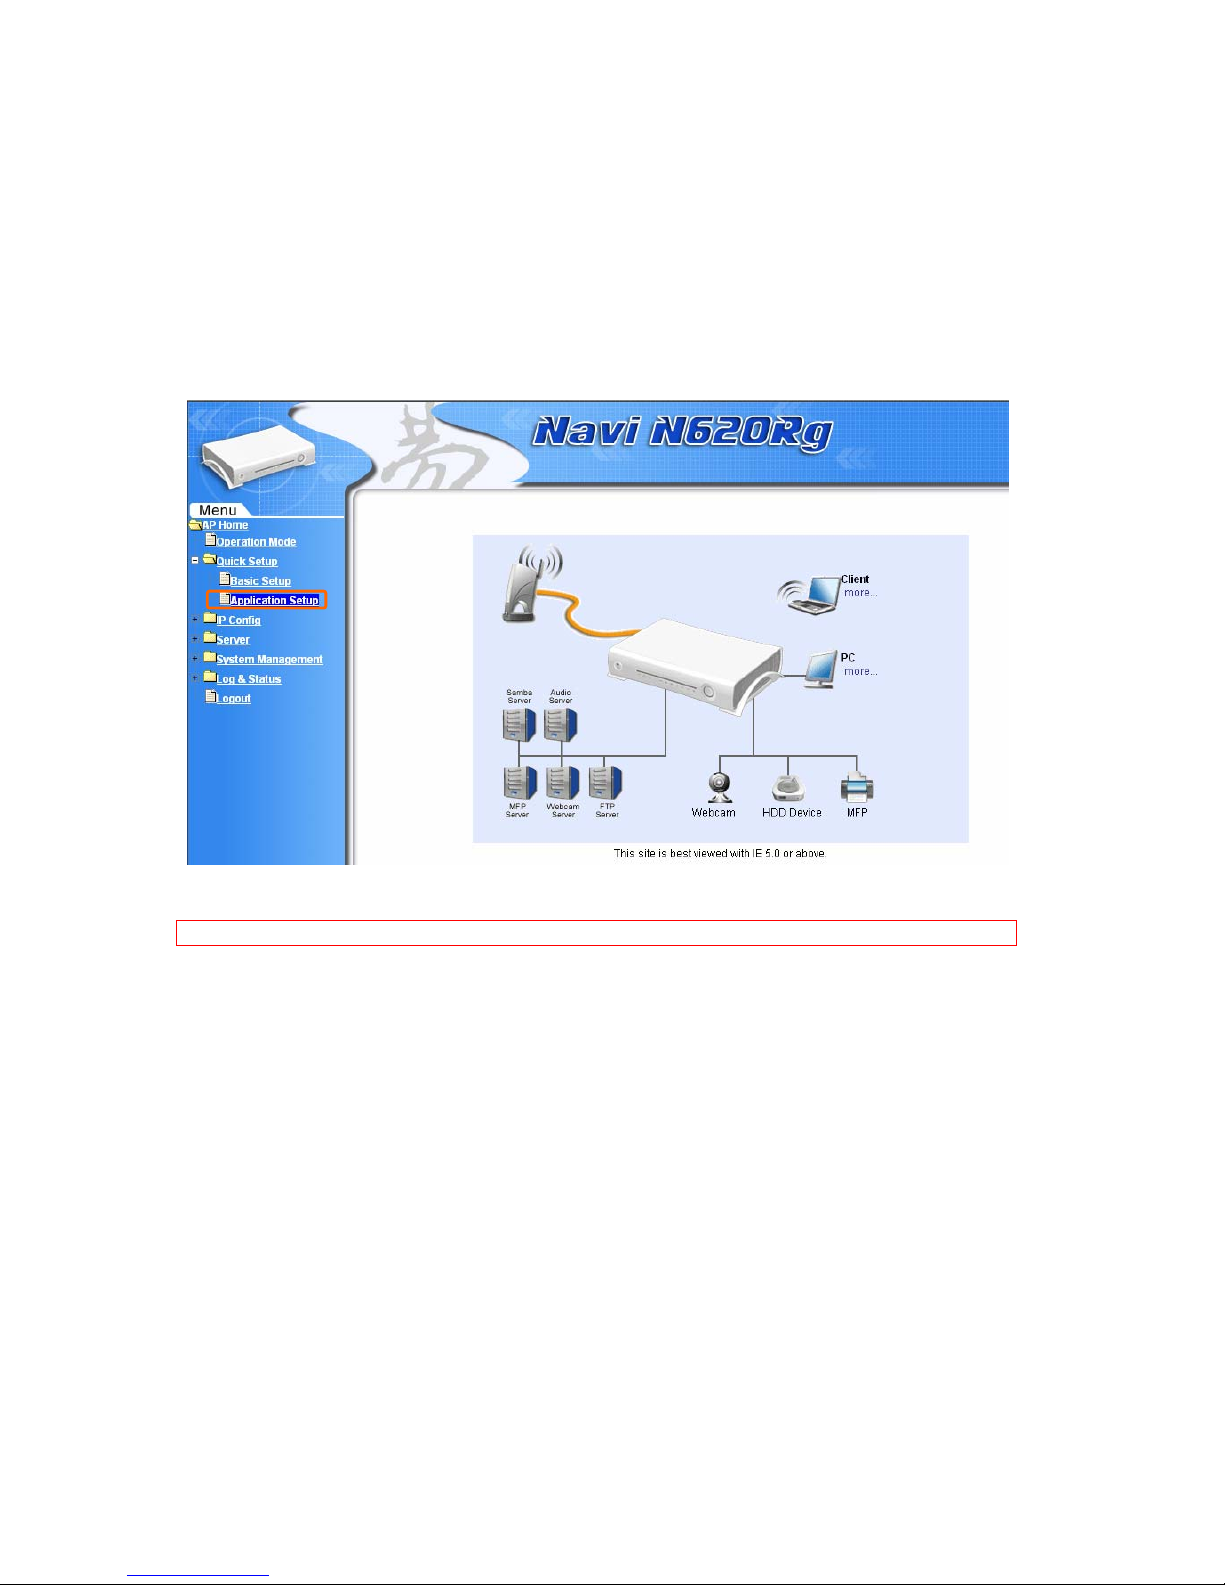
Please login to the Product’s homepage by Administrator, and click on the
“Application Setup” from main Menu in the left side, the full function selecting
screen will appear.
Notice: The Router Basic Setup should be done before setting the Application Setup.
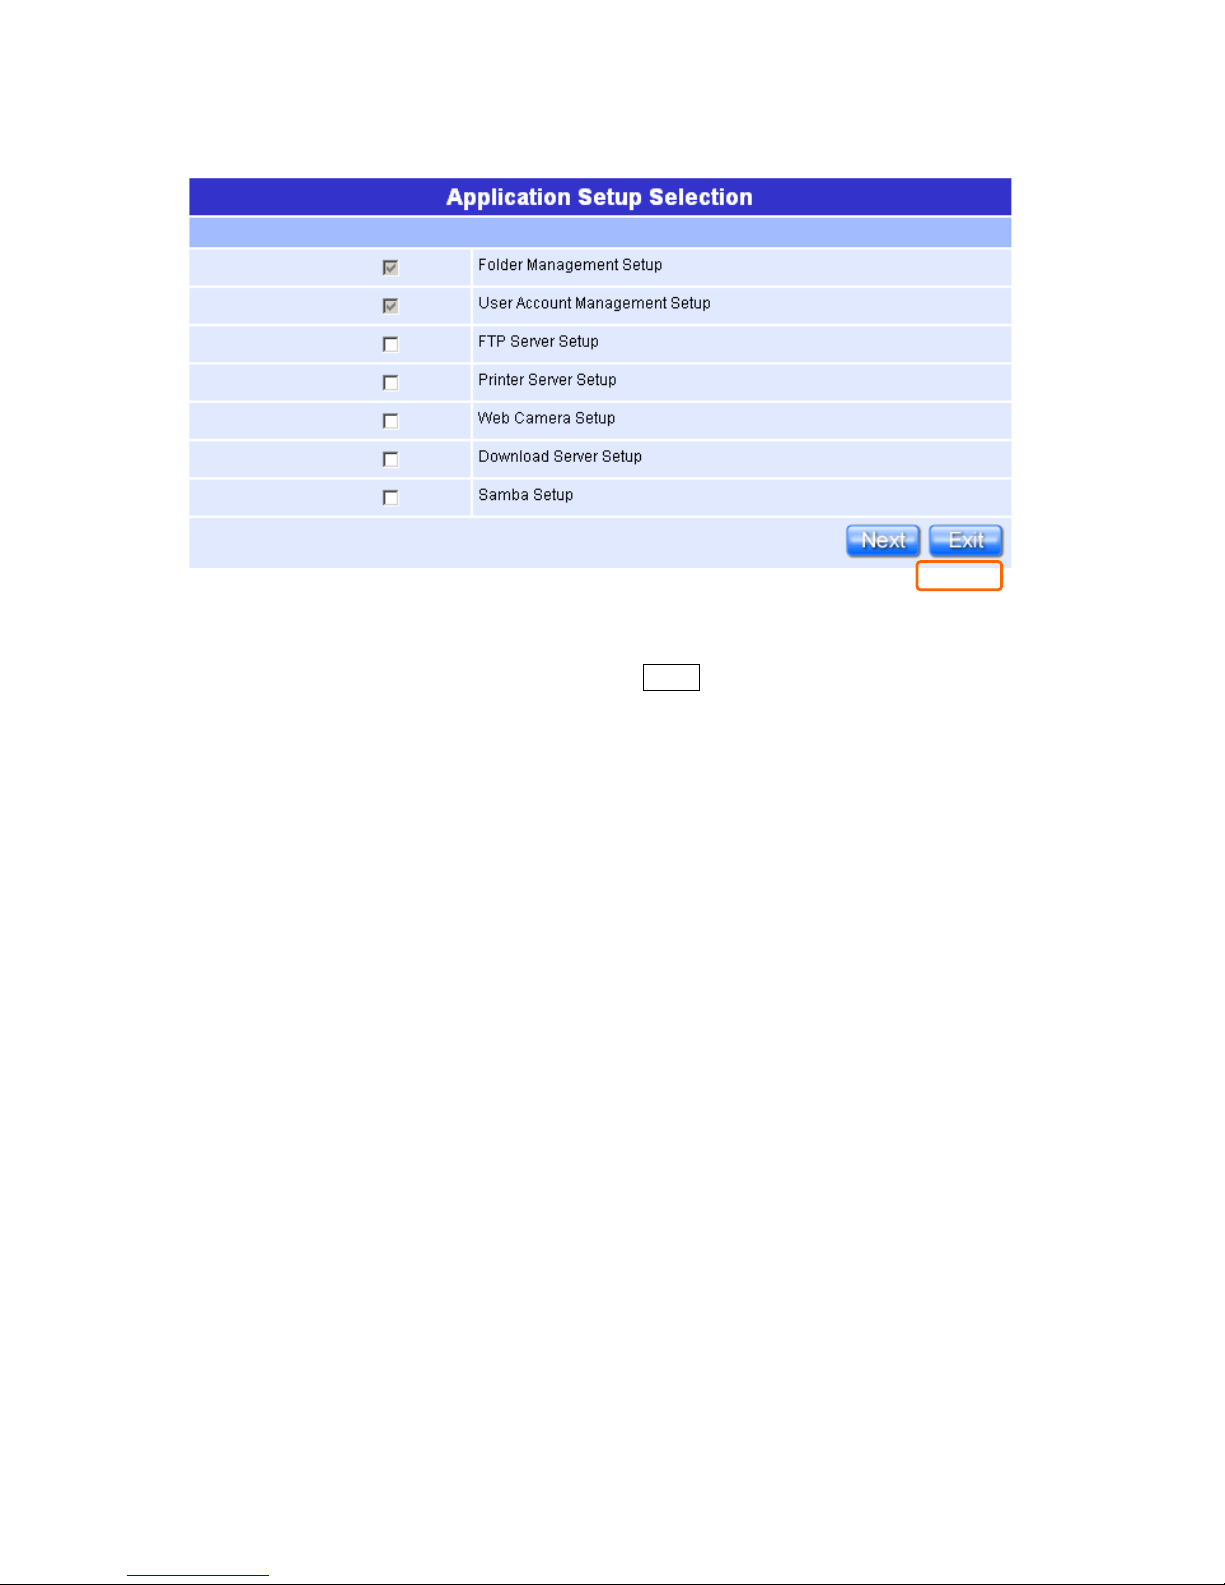
Application Setup full function table list:
Page 41
41
Quick Setup Guide V1.0
Except the “Folder management Setup”, “User Account Management Setup”;
the other 5 major items can be optionally set in configuring Router Application
Setup under your demand. Please click on “Next” button to start configuring.
2.3.1 Folder Management Setup
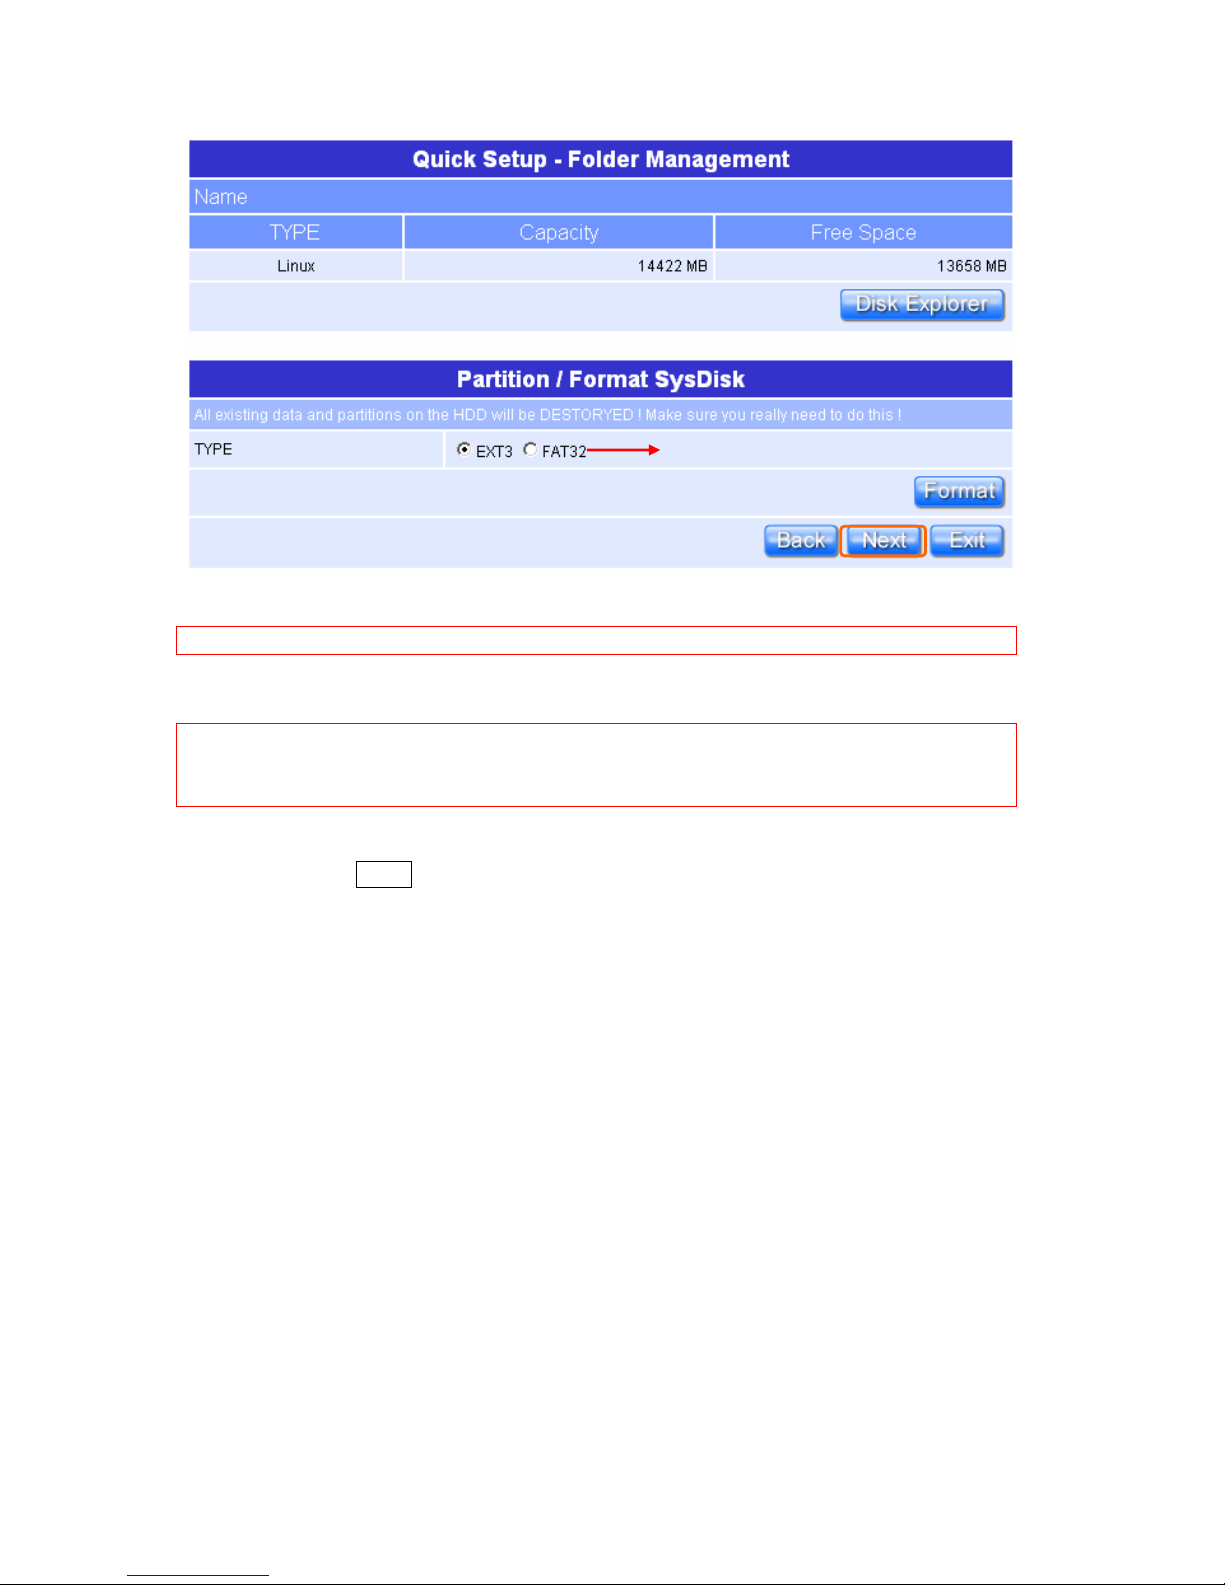
You can do the HDD partition into each folder and manage the space
arrangement for the folders by enabling this function, which you can save and
apply all the user’s files in each folder, and you can click on “Disk Explorer” to
manage the folders.
Page 42
42
Quick Setup Guide V1.0
Warning: The HDD will be formatted if doing above folder setting.
Notice: Before setup the Folder Management, please install the IDE into the Product.
Notice: After instal l HDD, if th e “Device Free Space” shows 0MB at beginning, please make sure
that your HDD has been installed and connected firmly.
Please click on “Next” after confirming.
You can select the disk type for each
partition
Page 43
43
Quick Setup Guide V1.0
2.3.2 User Account Management Setup
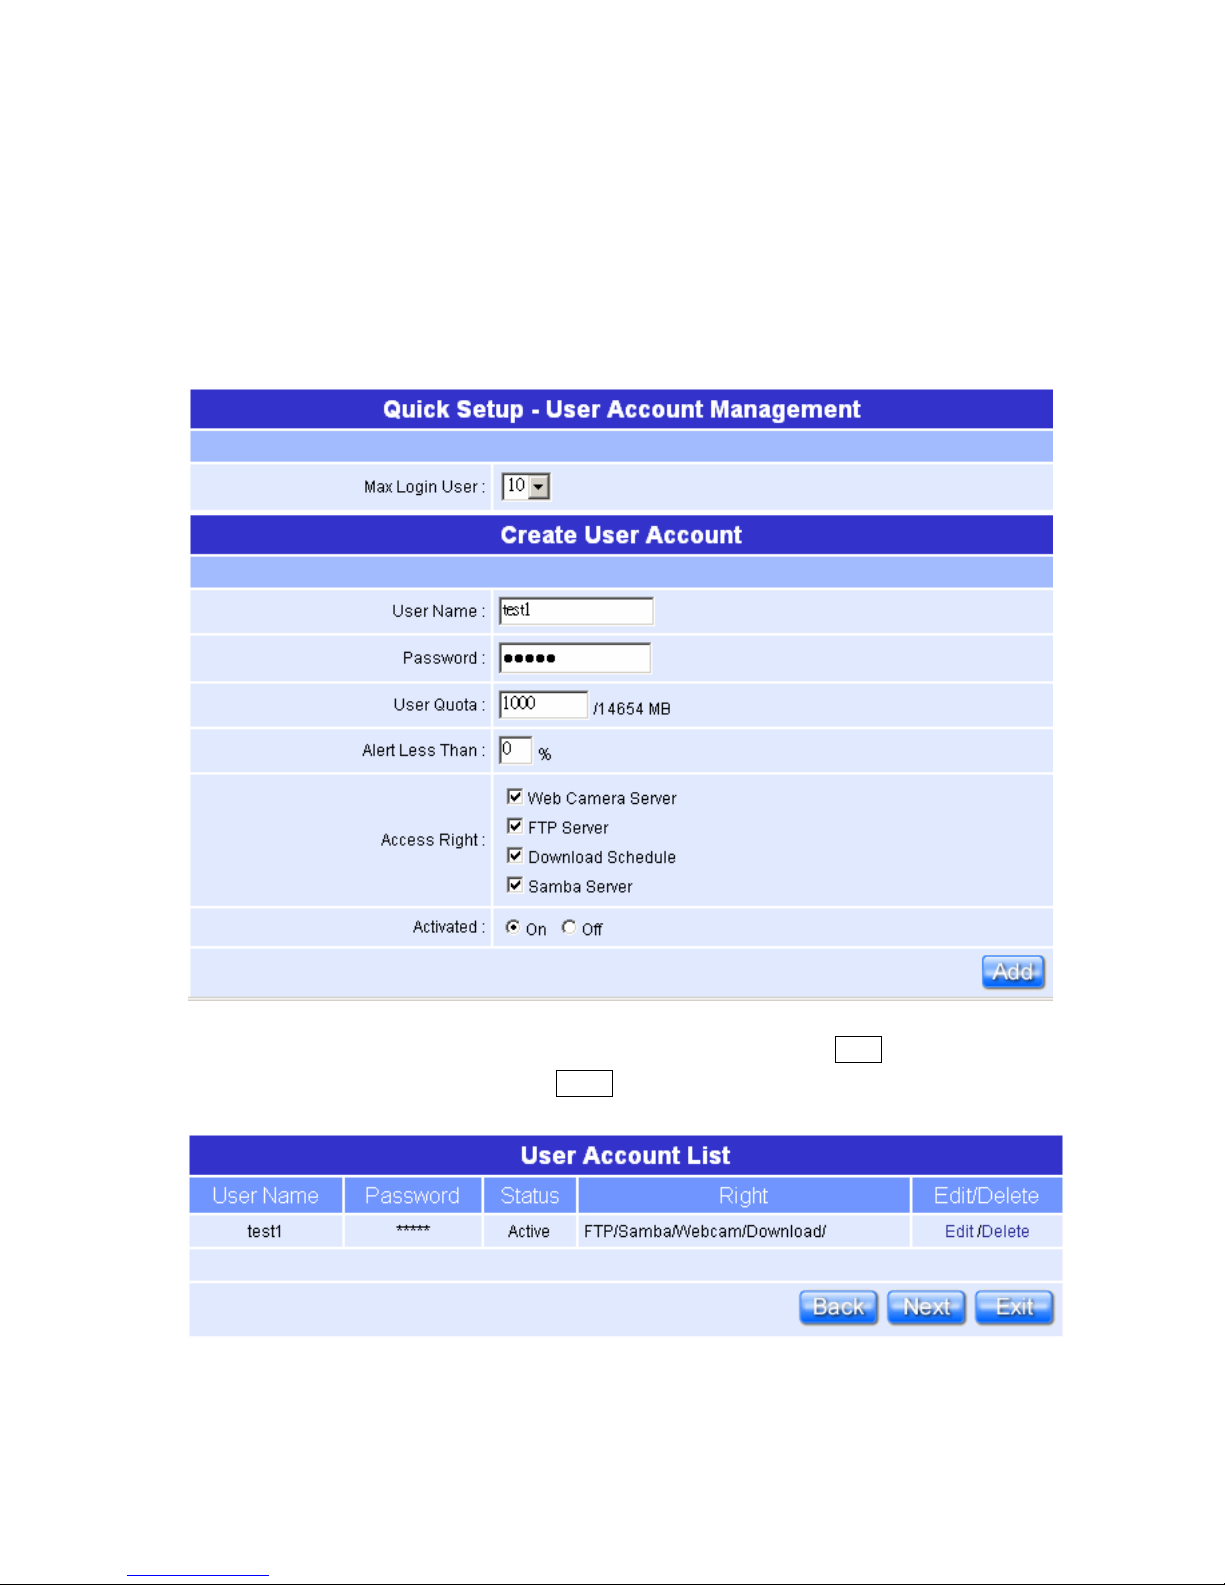
Personal users can use each individual application by setting up these rights as
Web camera Server, FTP Server, Download Schedule and Samba Server. This
section is to set the user’s right.
Set each user’s right and space arrangement, then click on “ Add” button for
saving user’s setting, and click on “Next ” button after finishing.
All the users right will be shown in User Account List.
Page 44
44
Quick Setup Guide V1.0
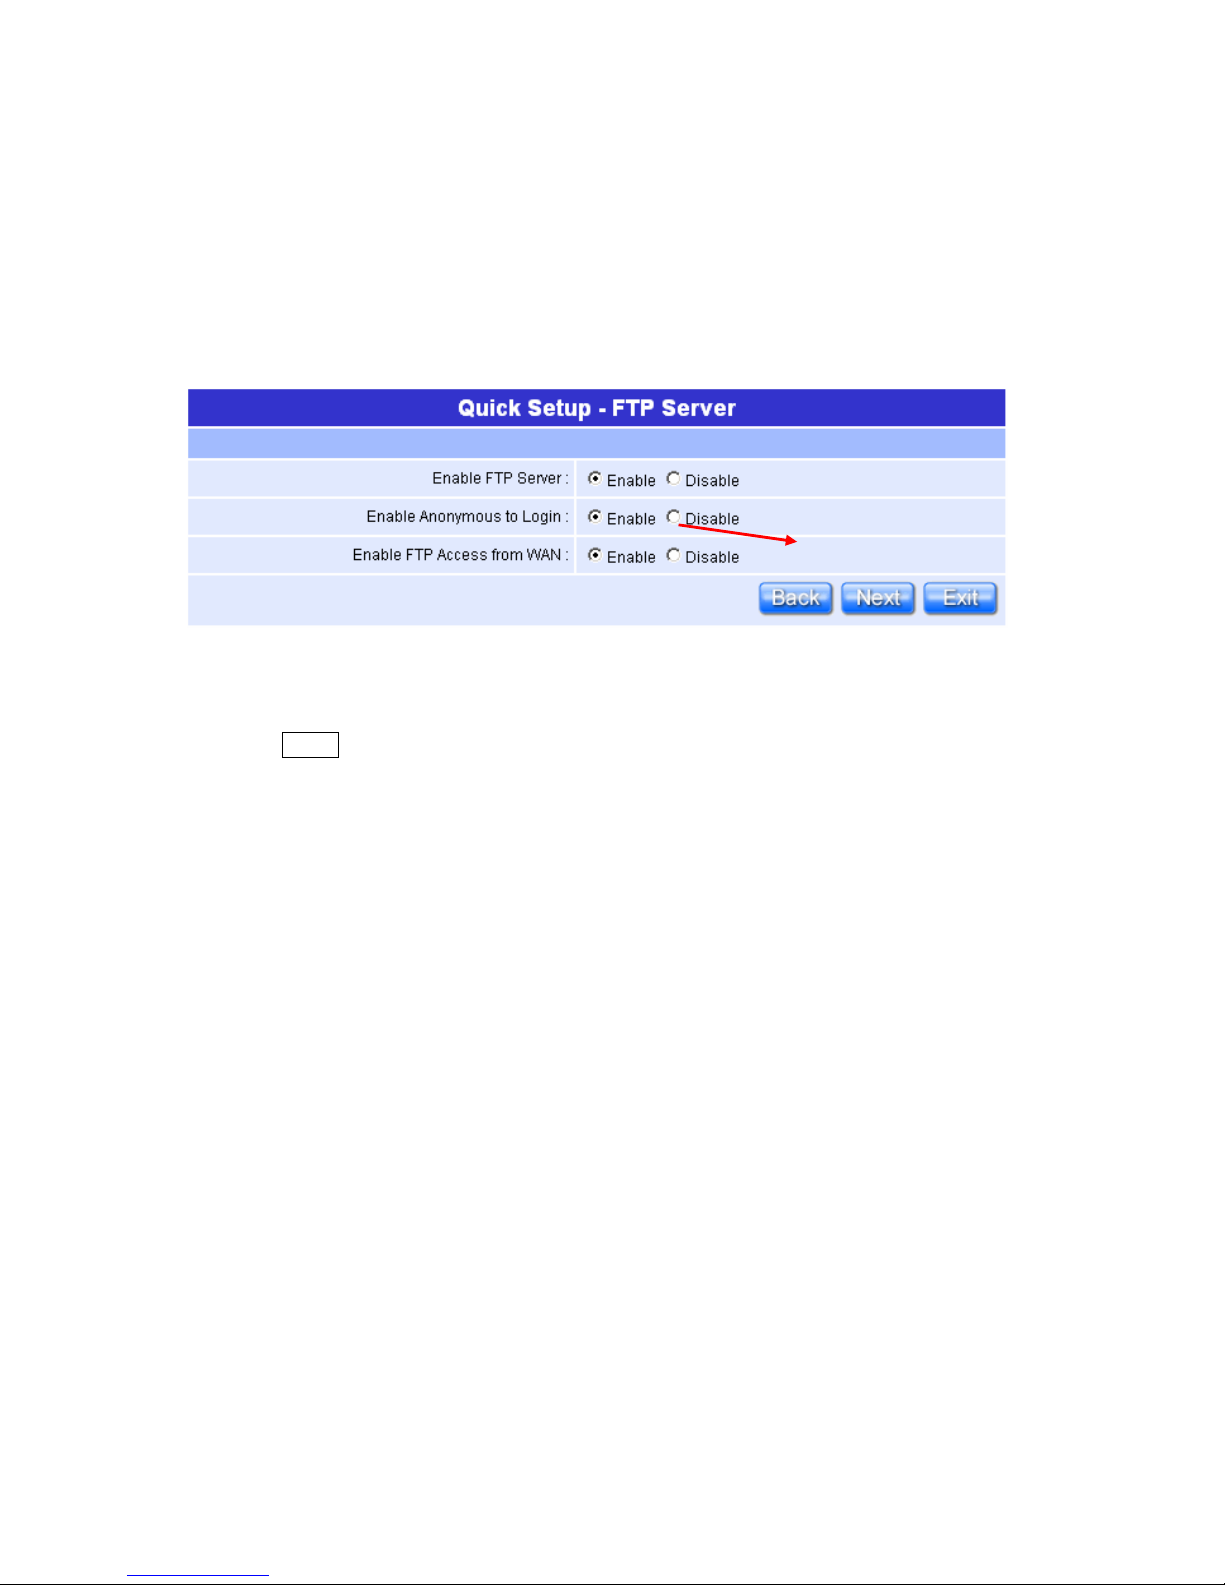
2.3.3 FTP Server Setup
NR620G can be the FTP Server provides users to transmit files into their own
FTP folder, also for the guest can download the files from the FTP anonymous
folder.
Set the FTP Server and related setting. Enable the function as your demand, and
click on “Next” button to continue.
Allow unknown guest to login for
Read Only.
Page 45
45
Quick Setup Guide V1.0
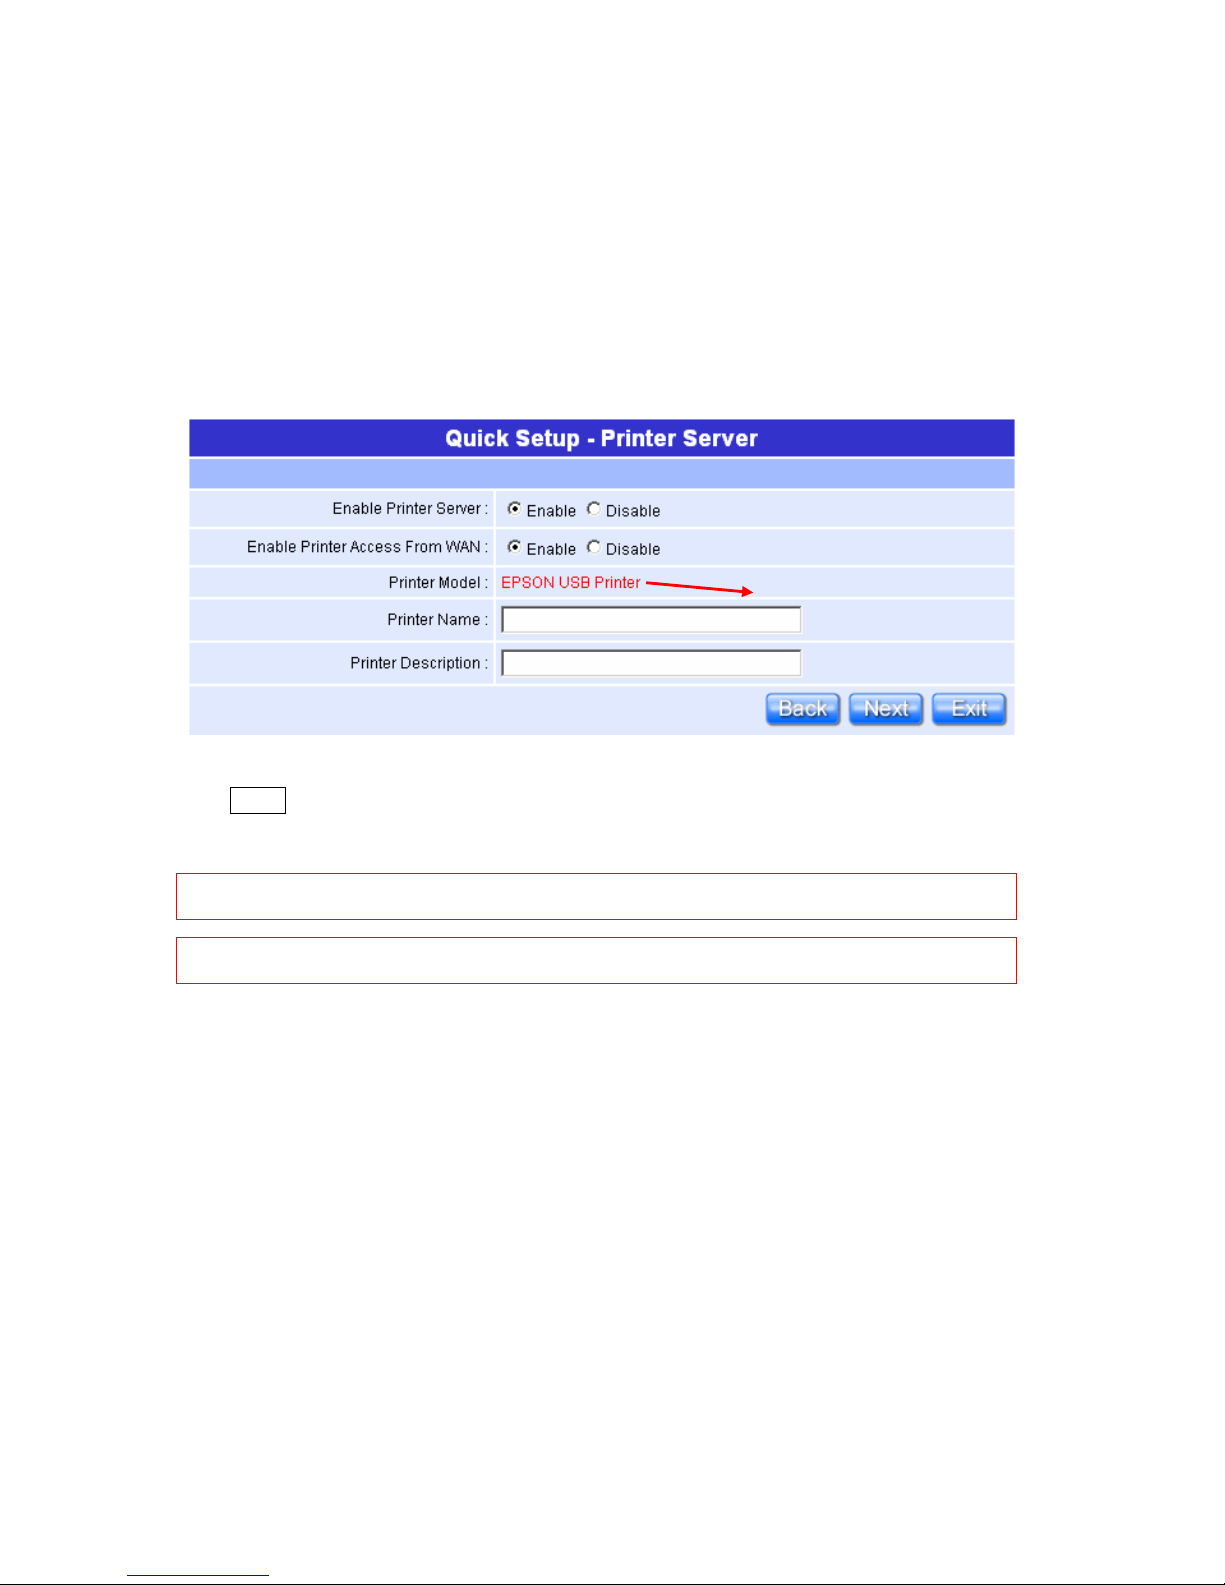
2.3.4 Printer Server Setup
NR620G, an Internet access solution for your LAN, which provides you the
shared web surfing and countless value-added features; by doing this printer
server setup, any users in the same subnet of NR620G or from WAN side can
print their document via the network printer.
Enable the printer and the Printer Model will be shown when plug in. Please click
on “Next” button to connect to next setup.
Notice: Before Printer Server enable, please make sure the printer had connected to the Product,
otherwise, the “Enable” selection can’t be checked.
Notice: After Printer Server setup finish, please setup the printer device of your computer
including install the driver.
The name of printer model will be
shown if connected.
Page 46
46
Quick Setup Guide V1.0
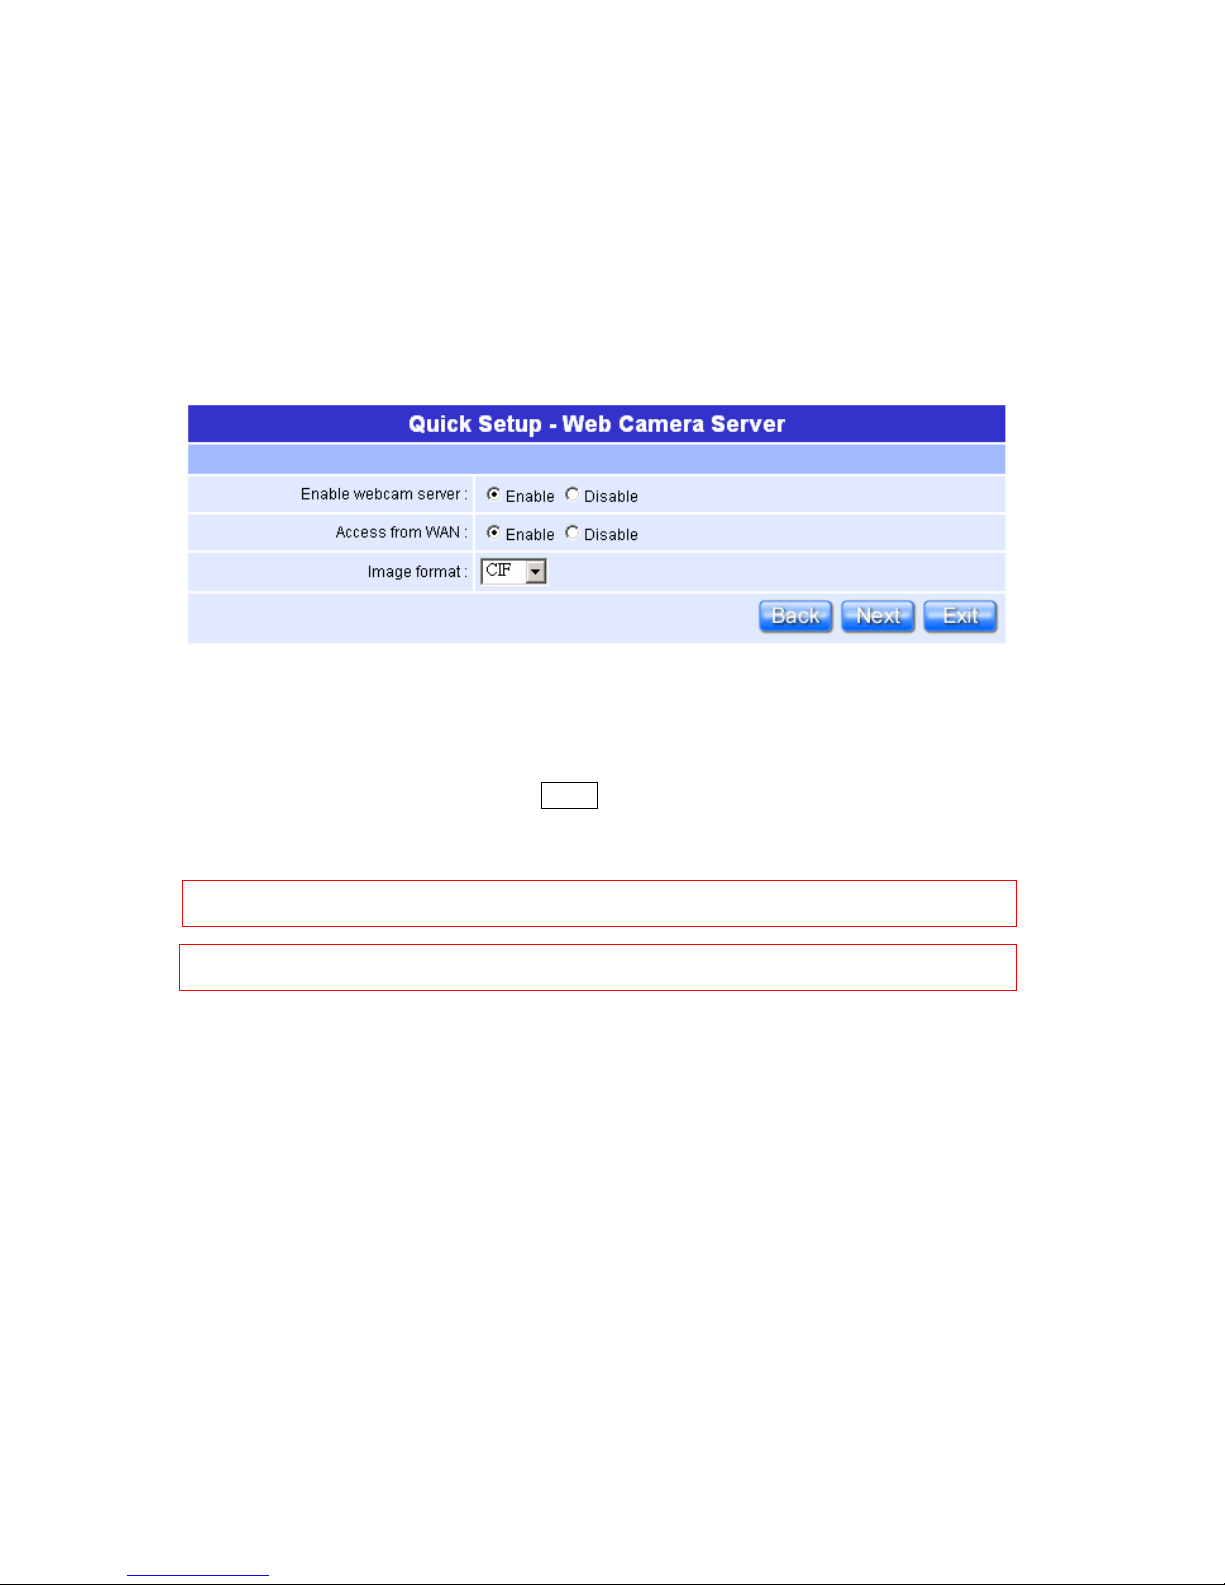
2.3.5 Web Camera Server Setup
This field indicates the mode of web camera you use. By connecting webcam to
the router , it allows user to monitor their home or office from remote locations.
Plug in the Webcam, and you will be able to click on “Enable” to start the
function of webcam, and you can also choose the image format. After enabling
on your demand, please click on “Next” button to continue to next step.
Notice: Before Webcam Server enable, please make sure the webcam had connected to the
Product, otherwise, the “Enable” selection can’t be checked.
Notice: After above setting finished, the step “2.3.1 User Account Management Setup” needs
to be created the right of Webcam Server for allowing the users to use this function.
Page 47
47
Quick Setup Guide V1.0
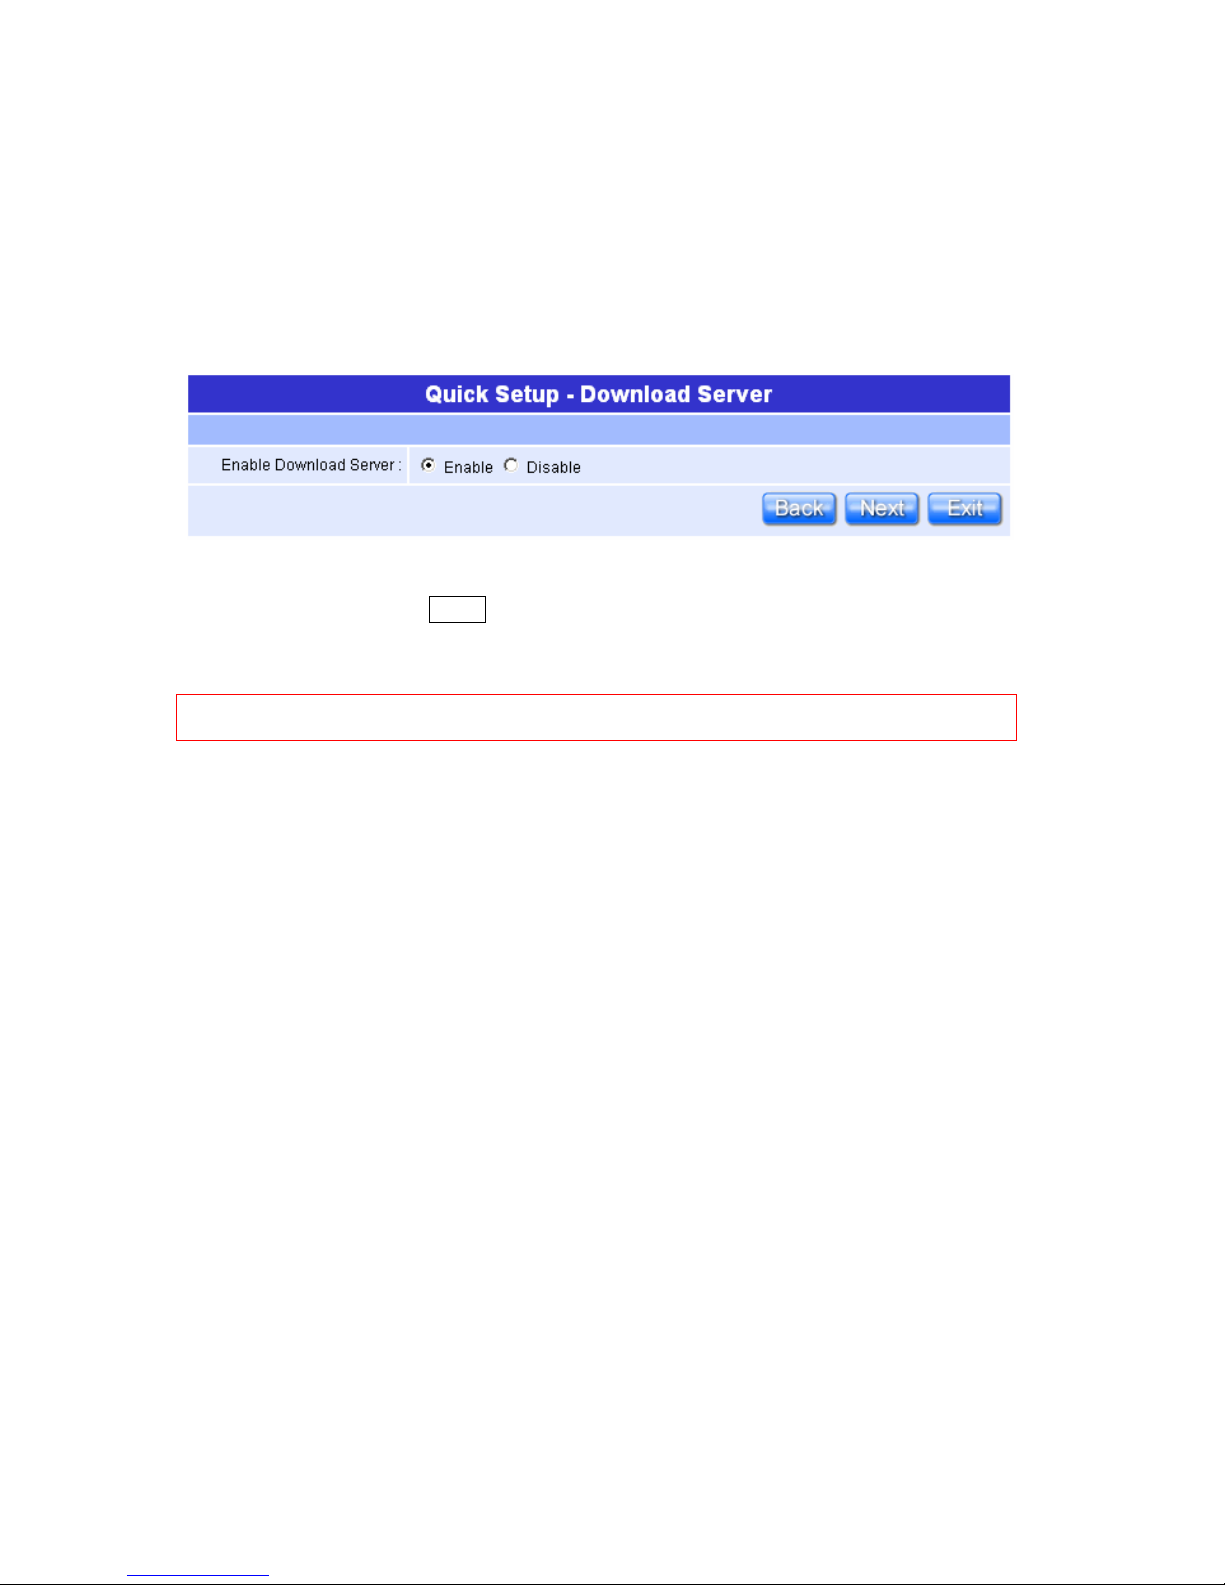
2.3.6 Download Server Setup
You can arrange the download schedule which setup to download information
from assigned website on time under your setting. It’s very useful for backup
the files or data from the same website.
Enable the Download Server, and the detail setting information is described in
User Manual. Click on “Next” button to next step.
Notice: For each user to use Download Server, please select the item of Download Server in step
“2.3.1 User Account Management Setup” at first.
Page 48
48
Quick Setup Guide V1.0
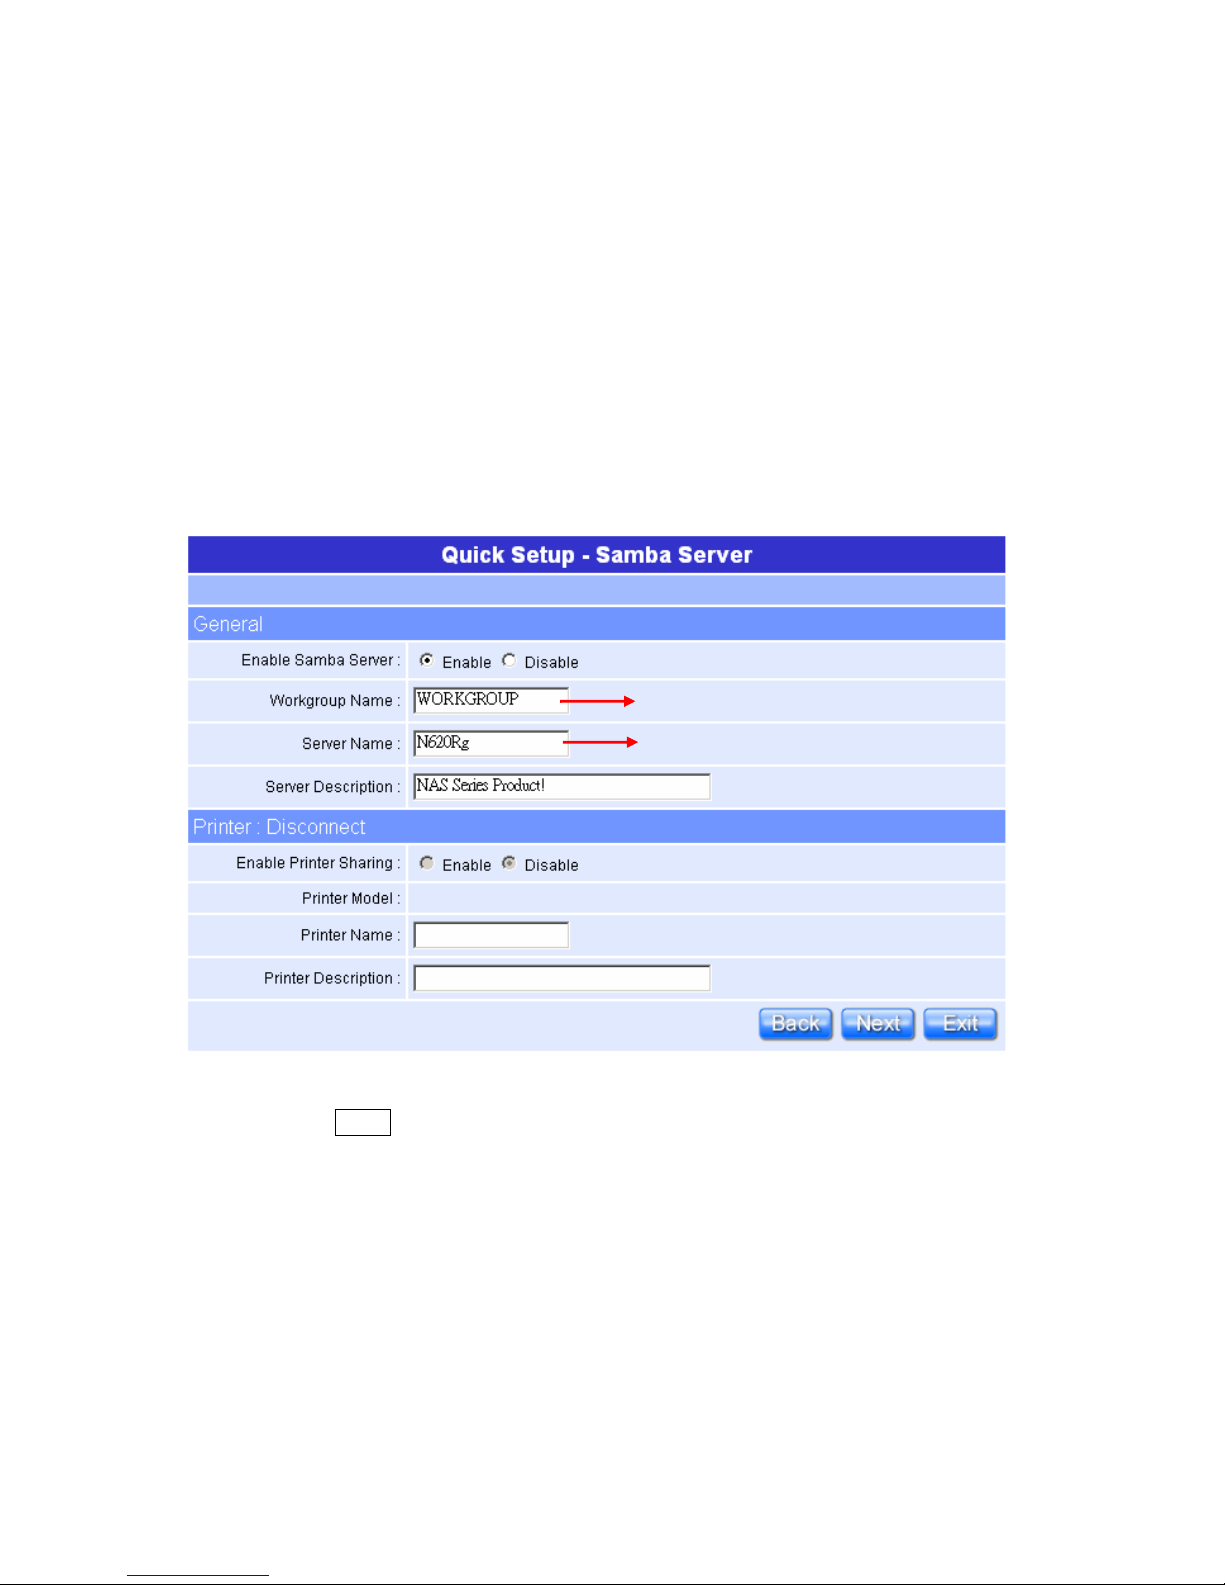
2.3.7 Samba Server Setup
Samba Server provides file and printer services for clients using some variants
of SMB (Server Message Block) protocol. A printer shared by the Samba Server
shows up in the list of shares offered in the Network Neighborhood. If the printer
is registered on the client machine and the client has the correct printer driver
installed, the client can send easily print jobs to a printer attached to a Samba
Server. For each user to access the Samba Server and share the file; that will be
the right of “Full-control”, as for using the USB flash disk; that will be just
attached to the sub-directory of Samba Server.
To set Samba Server by entering the information for group setting and printer,
then click on “Next” button to connect to next setup after confirming. The name
of printer in “Printer Server” and “Samba Server” can’t be the same.
The workgroup will be shown in Network Neighborhood.
This name will be shown as a Server title.
Page 49
49
Quick Setup Guide V1.0
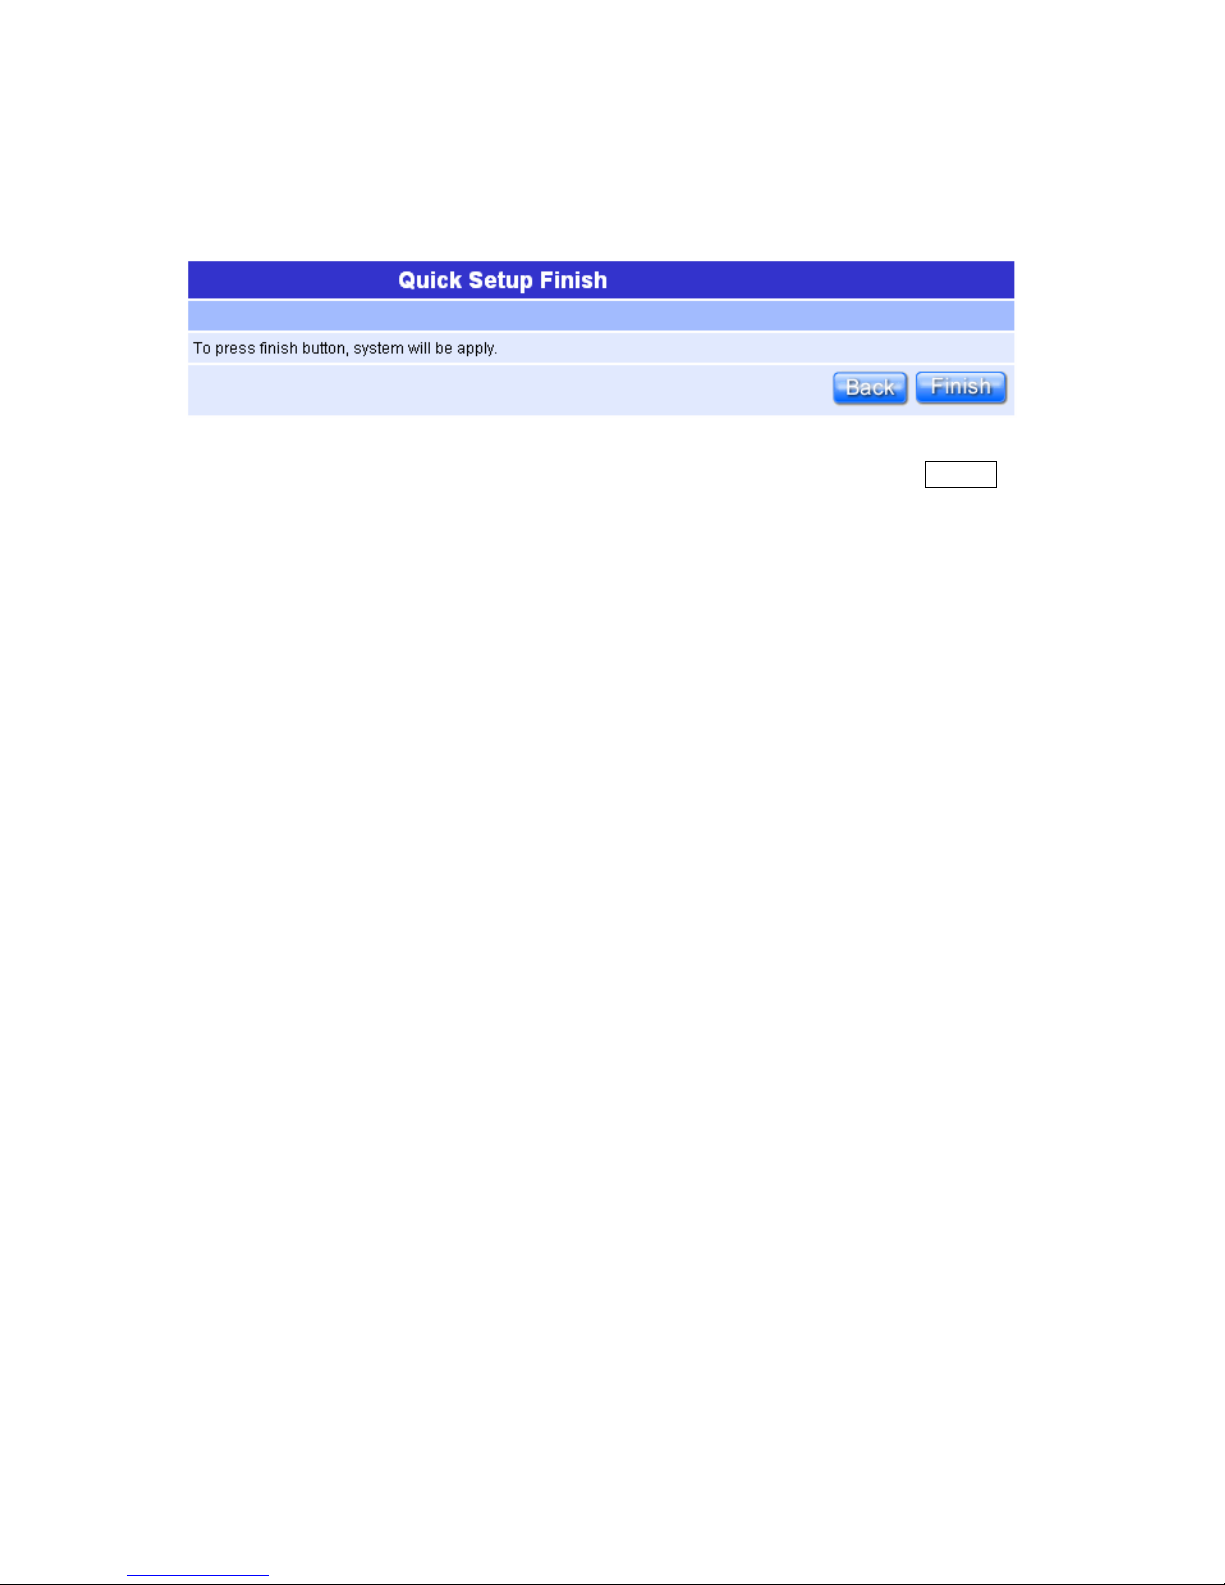
2.3.8 Application Setup Finish
All the Quick Setup is finished when this screen appeared. Click on “ Finish”
button and then back to the Product’s homepage.
 Loading...