

Page 1

StarPac™
User Guide
NavCom Technology, Inc.
20780 Madrona Avenue
Torrance, CA 90503
USA
Tel: +1 310.381.2000
Fax: +1 310.381.2001
sales@navcomtech.com
www.navcomtech.com
Page 2

iii
Page 3

StarPac™ User Guide - Rev A
Table of Contents
Table of Contents....................................................................................................iii
Tables & Figures .....................................................................................................iii
Notices................................................................................................................... iv
Copyright................................................................................................................................................................. iv
Trademarks............................................................................................................................................................... iv
FCC Notice............................................................................................................................................................... iv
User Notice............................................................................................................................................................... iv
Limited Warranty....................................................................................................................................................... v
USG FAR .................................................................................................................................................................... v
Global Positioning System ......................................................................................................................................... v
Use of this Document ............................................................................................................................................... vi
Chapter 1 Introduction ........................................................................................ 7
Purpose of this Document............................................................................................................7
Chapter 2 Getting Started (Installation) ................................................................ 8
Chapter 3 Extracting Data .................................................................................... 8
Using Logged Data for Conversion...............................................................................................9
Downloading Data From an Attached Receiver ............................................................................9
Converting Files.........................................................................................................................10
Chapter 4 StarPac™ Utility ..................................................................................11
Creating a New Project..............................................................................................................12
Adding Decoded Files ................................................................................................................12
Loading a .FSB File................................................................................................................................................... 12
Loading a .GPB File.................................................................................................................................................. 13
Adding .STA Files.....................................................................................................................................................13
Chapter 5 Exporting............................................................................................13
Tables & Figures
Table 1: NavCom Binary to Waypoint File Conversion Chart ............................................................7
Figure 2.1: Hardware Key Error Message..........................................................................................8
Figure 3.1: Extract NavCom Icon .....................................................................................................9
Figure 3.2: Extract NavCom Option.................................................................................................9
Figure 3.3: Extract NavCom Window...............................................................................................9
Figure 3.4: Connected Receiver Status Screen................................................................................10
Figure 3.5: Not Connected Receiver Status Screen......................................................................... 10
Figure 3.6: Default Decoding Options............................................................................................10
Figure 3.7: Extract NavCom Output Options .................................................................................11
Figure 4.1: Default StarPac Utility Screen .......................................................................................11
Figure 4.2: New Project Icon .........................................................................................................12
Figure 4.3: New Project Menu Option ...........................................................................................12
Figure 5.1: Export Wizard .............................................................................................................. 13
Figure 5.2: Modifying an Export Profile.......................................................................................... 14
Figure 5.3: Adding Solution Type ..................................................................................................14
Table 2: Navigation Mode; ID YY...................................................................................................15
Page 4

StarPac™ User Guide - Rev A
Notices
StarPac User Guide
P/N 96-310016-3001
Revision A March 2006
Copyright
© 2006 by NavCom Technology, Inc.
All rights reserved. No part of this work or the computer programs described herein may be
reproduced or stored or transmitted by any means, without the written permission of the copyright
holders. Translation in any language is prohibited without the permission of the copyright holders.
Trademarks
The ‘find your way’, ‘NavCom Globe’ and NAVCOM TECHNOLOGY logos are trademarks of NavCom
Technology, Inc.
brand names are trademarks or registered trademarks of their respective holders.
StarFire™
is a registered trademark of Deere & Company. All other product and
FCC Notice
This device complies with Part 15 of the FCC Rules. Operation is subject to the following two
conditions:
(1) this device may not cause harmful interference, and
(2) this device must accept any interference received, including interference that may cause
undesired operation.
User Notice
NAVCOM TECHNOLOGY, INC. SHALL NOT BE RESPONSIBLE FOR ANY INACCURACIES, ERRORS, OR
OMISSIONS IN INFORMATION CONTAINED HEREIN, INCLUDING, BUT NOT LIMITED TO,
INFORMATION OBTAINED FROM THIRD PARTY SOURCES, SUCH AS PUBLICATIONS OF OTHER
COMPANIES, THE PRESS, OR COMPETITIVE DATA ORGANIZATIONS.
THIS PUBLICATION IS MADE AVAILABLE ON AN “AS IS” BASIS AND NAVCOM TECHNOLOGY, INC.
SPECIFICALLY DISCLAIMS ALL ASSOCIATED WARRANTIES, WHETHER EXPRESS OR IMPLIED. IN NO
EVENT WILL NAVCOM TECHNOLOGY, INC. BE LIABLE FOR DIRECT, INDIRECT, SPECIAL,
INCIDENTAL, OR CONSEQUENTIAL DAMAGES IN CONNECTION WITH THE USE OF OR RELIANCE
ON THE MATERIAL CONTAINED IN THIS PUBLICATION, EVEN IF ADVISED OF THE POSSIBILITY OF
SUCH DAMAGES. NAVCOM TECHNOLOGY, INC. RESERVES THE RIGHT TO MAKE IMPROVEMENTS
OR CHANGES TO THIS PUBLICATION AND THE PRODUCTS AND SERVICES HEREIN DESCRIBED AT
ANY TIME, WITHOUT NOTICE OR OBLIGATION.
iv
Page 5

StarPac™ User Guide - Rev A
Limited Warranty
NavCom Technology, Inc., warrants that its products will be free from defects in workmanship at the
time of delivery. Under this limited warranty parts found to be defective or defects in workmanship
will be repaired or replaced at the discretion of NavCom Technology, Inc., at no cost to the Buyer,
provided that the Buyer returns the defective product to NavCom Technology, Inc. in the original
supplied packaging and pays all transportation charges, duties, and taxes associated with the return
of the product. Parts replaced during the warranty period do not extend the period of the basic
limited warranty.
This provision does not extend to any NavCom Technology, Inc. products, which have been
subjected to misuse, accident or improper installation, maintenance or application, nor does it
extend to products repaired or altered outside the NavCom Technology, Inc. production facility
unless authorized in writing by NavCom Technology, Inc.
THIS PROVISION IS EXPRESSLY ACCEPTED BY THE BUYER IN LIEU OF ANY OR ALL OTHER
AGREEMENTS, STATEMENTS OR REPRESENTATIONS, EXPRESSED OR IMPLIED, IN FACT OR IN LAW,
INCLUDING THE IMPLIED WARRANTIES OF MERCHANTABILITY AND FITNESS FOR A PARTICULAR
PURPOSE AND OF ALL DUTIES OR LIABILITIES OF NAVCOM TECHNOLOGY, INC. TO THE BUYER
ARISING OUT OF THE USE OF THE GOODS, AND NO AGREEMENT OR UNDERSTANDING VARYING
OR EXTENDING THE SAME WILL BE BINDING UPON NAVCOM TECHNOLOGY, INC. UNLESS IN
WRITING, SIGNED BY A DULY-AUTHORIZED OFFICER OF NAVCOM TECHNOLOGY, INC.
This limited warranty period is one (1) year from date of purchase.
Technical Data Declaration (Jan 1997)
USG FAR
The Contractor, NavCom Technology, Inc., hereby declares that, to the best of its knowledge and
belief, the technical data delivered herewith under Government contract (and subcontracts, if
appropriate) are complete, accurate, and comply with the requirements of the contract concerning
such technical data.
Global Positioning System
Selective availability (S/A
government has stated that present
any time end or change operation of these satellites without warning.
The U.S. Department of Commerce Limits
Requirements state that all exportable
cannot be used to threaten the security of the United States. Access to satellite measurements and
navigation results will be limited from display and recordable output when predetermined values of
velocity and
expected operational parameters of the NCT-2100
altitude
code) was disabled on 2nd May 2000 at 04:05
GPS
users do so at their own risk. The US Government may at
GPS
products contain performance limitations so that they
are exceeded. These threshold values are far in excess of the normal and
GPS
Sensor.
UTC
. The United States
v
Page 6

StarPac™ User Guide - Rev A
Use of this Document
This User Guide is intended for use by someone familiar with the concepts of
ing equipment.
Note indicates additional information to make better use of the product.
Indicates a caution, care, and/or safety situation.
GPS
and satellite survey-
vi
Page 7

StarPac™ User Guide - Rev A
Chapter 1 Introduction
StarPac™ is a customized version of Waypoint’s GrafNav software package, providing several userfriendly tools for aerial survey applications. StarPac™ enables users to parse through logged mission
data containing StarFire™ positions and export them into the appropriate format required by postmission tools (e.g. mapping software). StarPac™ also interpolates positions based on event records
triggered by aerial Photogrammetry cameras and other external devices. Additional features and
tools included are mission planning, RINEX conversion, datum conversion, trajectory plotting and
Quality/Figure of Merit for each position.
StarPac™ will take NavCom binary data records and convert them into Waypoint readable files
according to the chart below.
Description of Records
Measurement Records xB0 .GPB
Ephemeris Records x81 .EPP
Event Records xB4 .STA
StarFire Position Records xB1 .FSP
Almanac Records x44 .EPP
NavCom
Messages
Table 1: NavCom Binary to Waypoint file conversion
StarPac™ has the capability to connect to the VueStar™ receiver and download files directly from the
internal multi-media card (MMC), or import a logged data file stored locally. Once NavCom binary
data is converted into StarPac™ readable file extensions, the user can import the files into the
workspace and chart the StarFire™ trajectory data (.FSP file) as well as overlay event records (.STA)
and export the results into the available output forms.
Waypoint
Format
Purpose of This Document
StarPac™ has several functions that are identical to or limited versions of options available in
Waypoint’s GrafNav software program. This user guide focuses on steps and information regarding
features that are exclusive to the StarPac™ program. This StarPac™ User Guide when used in
conjunction with Waypoint Consulting Inc’s User’s Manual for GrafNav/GrafNet, GrafNav Lite,
GrafMov and Inertial Explorer combine (Waypoint User Guide) provides the user with a complete
ensemble of technical information required to utilize all features within the StarPac™ software. Any
features that are included in both StarPac™ as well as Waypoint’s GrafNav are not include herein and
it is recommended that users use the Waypoint User Guide as a resource for information regarding
these features. The Waypoint User Guide is included as part of the StarPac™ program and can be
located under the Help menu.
Page 8

StarPac™ User Guide - Rev A
Chapter 2 Getting Started (Installation)
Begin installation by running the StarPac™ Setup executable file. The default location for the
program will be in the program files directory. Follow the onscreen instructions to complete
installation.
After installation is complete a StarPac™ folder will be added to the Programs section of the Start
Menu. There are 4 program options.
1. Copy User Files
2. Data Extraction
3. StarPac
4. Upgrade Hardware Lock
In order for Programs 1-3 to load correctly, the USB Hardware key must be attached to a USB port on
the system running the program. If the Hardware key is not attached or if there is a problem with the
USB Port that is not allowing the Hardware key to work, the error message in figure 1.1 will display.
Figure 2.1: Hardware Key Error Message
If this error message appears recheck that the correct hardware key is connected to an available USB
port. If the hardware key is correctly attached there may be a problem with the USB Port, or the
system itself, please consult your computer hardware reference manual to troubleshoot this problem.
For information on the programs: Upgrade Hardware Lock and Copy User Files, please consult
the Waypoint User Guide located in under the Help menu option
Chapter 3 Extracting Data
In order to execute the NavCom Data Extraction utility select:
Windows Start button > Programs > StarPac > Data Extraction
This program is also available within the StarPac
button on the toolbar (Figure 3.1), or by selecting File> Extract NavCom. (Figure 3.2)
™ program by clicking the NavCom logo
8
Page 9

StarPac™ User Guide - Rev A
The default settings for the dialogue box are shown in Figure 3.3. StarPac™ will decode a data file that
is already downloaded from a NavCom receiver or a file stored internally in a receiver’s MMC.
Figure 3.1 Extract NavCom Icon
Figure 3.2: Extract NavCom Option
Figure 3.3: Extract NavCom Window
Using Logged Data for Conversion
If the data needing conversion has already been logged to a computer as a Raw Binary NavCom data
file, it can be imported into StarPac™ for conversion using the Select button in the upper right corner
of the menu (Figure 3.3) and then locate the directory in which the data file is stored.
Downloading Data From an Attached Receiver
If the data needing conversion is stored inside the internal MMC of the receiver, this utility can
download the file directly from the receiver.
• Attach the receiver to the computer using the receiver’s serial cable. Connect the LEMO connector
of the serial cable to communications port 1 (COM 1) of the receiver, and the other serial connector
to an available serial port on the computer.
9
Page 10

StarPac™ User Guide - Rev A
Make sure the receiver is powered ON before attempting to download files.
In order for a connection to be made the serial cable MUST be connected to COM 1 on the
receiver.
• Select the option for Serial.
• Select the correct Comport and Baud Rate (115200 is recommended) for the PC.
• Click Connect.
The utility will attempt to connect with the receiver. Once connected, a list of files stored within the
receiver’s MMC will be displayed in the Files box (Figure 3.4). Files can be individually selected for
decoding.
Figure 3.4: Connected Receiver Status Screen
If no connection can be made:
Figure 3.5: Not Connected Receiver Status Screen
• Click Disconnect.
• Make sure the serial cable is inserted into the receiver’s COM 1 port
• Verify that the correct Comport and Baud Rate settings for the computer are selected.
• Attempt to connect again.
Converting Files
Once a file is selected, it can be decoded into several different StarPac™ readable file formats. The
default options are shown in figure 3.6. The only records needed are 0xB4 and 0xB1, for postprocessing 0xB0, 0x44, and 0xB1 records are also required.
Figure 3.6: Default Decoding Options
Select the file for conversion from the file box, verify the records to decode, and then select the output options (Figure 3.7). The default file name is the same as the input name, however this can be
changed by un-checking the “Use file name for prefix” box and typing in a new filename prefix.
10
Page 11
NCT-2100DP/D Integration Guide - Rev A
Figure 3.7: Extract NavCom Output Options
Once the file name and output path are chosen, select Decode. The NavCom Decoding box will be
displayed and StarPac™ will begin decoding the file.
Once the decoding is complete select Close to close the NavCom Decoding box. If there are more
files that need decoding, select them and again click decode, otherwise select Close on the decoding
window. The decoding process created the specified files in the selected output directory.
prefix while using StarPac™. Some functions of StarPac™ will automatically detect and
import needed files if they are within the same directory and of the same filename.
ITRF00 in StarPac ™menus options). This can be changed using the Datum shift feature
included in StarPac™. For more information about this feature please consult the Waypoint
User Guide located under the help menu.
The decoded files can now be integrated, analyzed, and exported with StarPac™.
This process can take up to several minutes depending on the speed of the system and size of
the file.
It is recommended to keep all the decoded files located in the same directory with the same
Data files downloaded from NavCom receivers are in the ITRF 2000 Datum (Referred to as
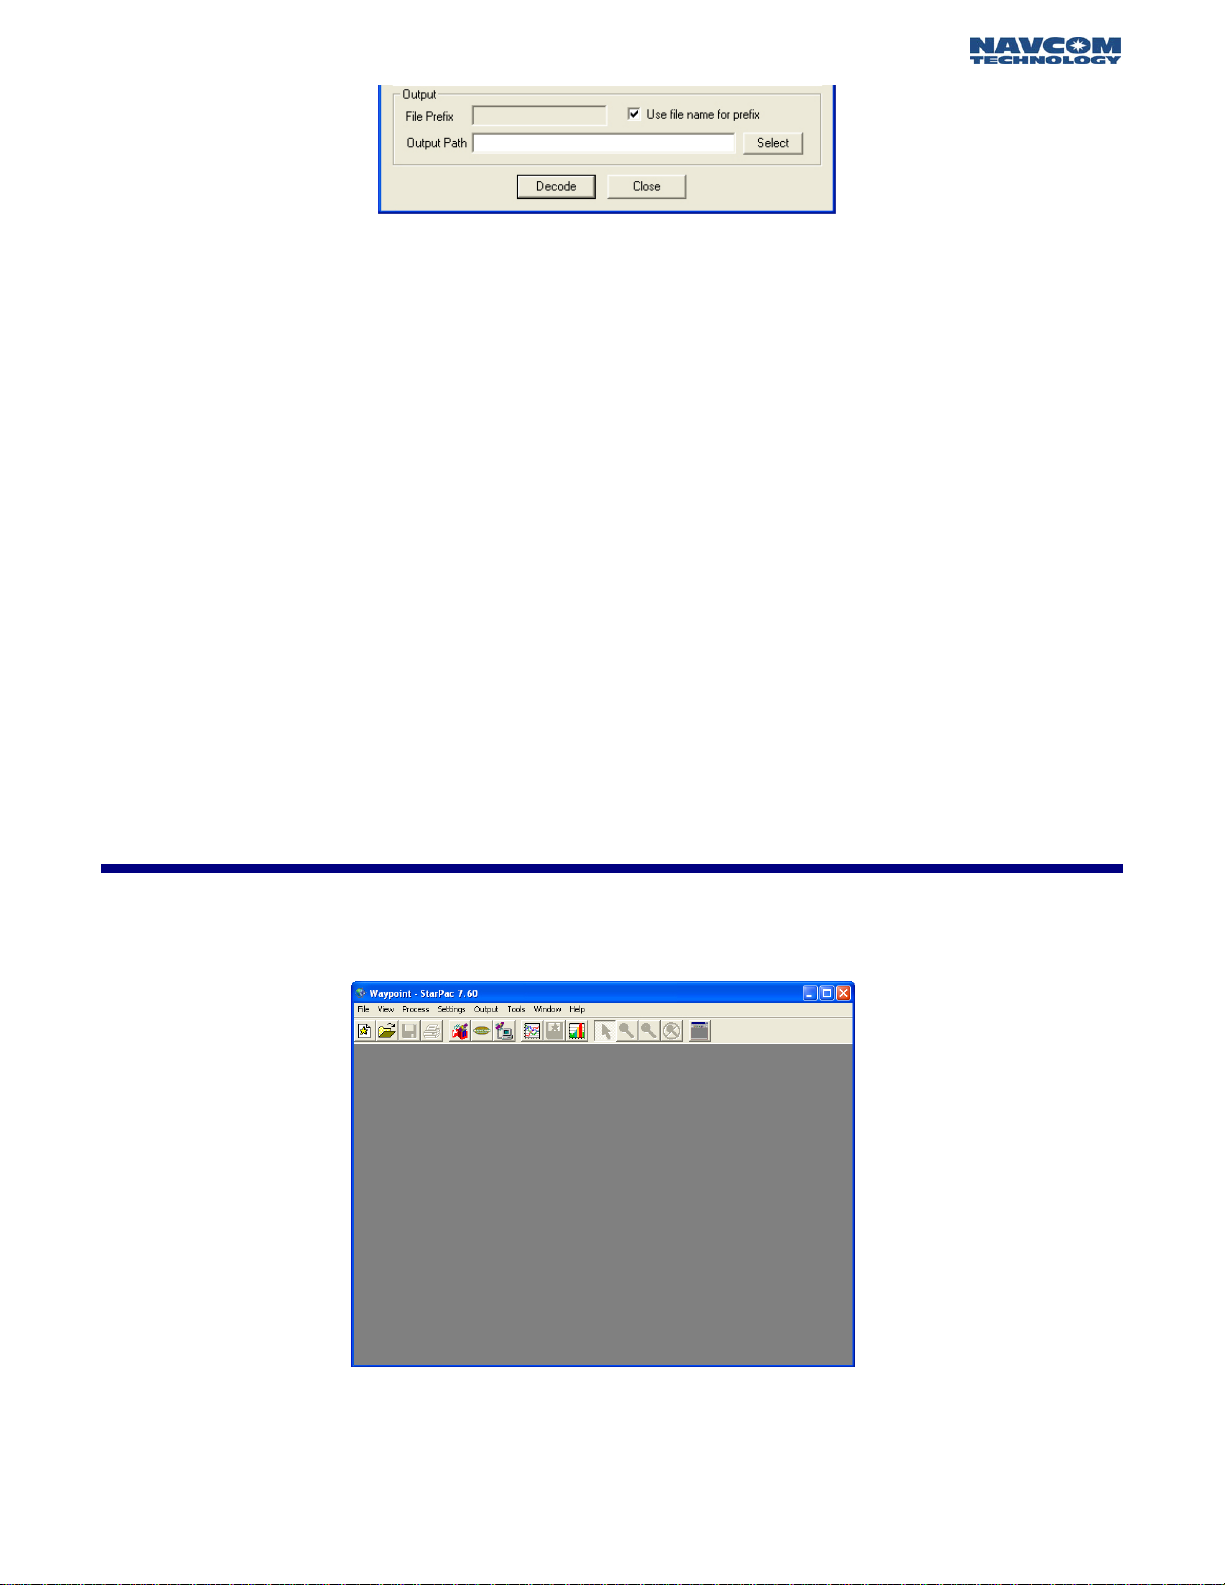
Chapter 4 StarPac™ Utility
The default StarPac™ startup screen should look similar to Figure 4.1.
Figure 4.1: Default StarPac™ Utility Screen
The button on the far right side of the toolbar switches the view from all buttons, to a simple button
layout, depending on what is preferred.
11
Page 12

StarPac™ User Guide - Rev A
Creating a New Project
There are two ways to create a new project, either by selecting the new project icon as seen in figure
4.2, or by selecting File > New Project > File Name. (Figure 4.3)
• Select a directory for the new project file to be stored.
• Type a name for the new project file.
• Click SAVE.
Adding Decoded Files
Once a new project is selected many features previously disabled are now enabled. Many of these
icons and menu selections are identical to or limited features of options available in the full version of
Waypoint’s GrafNav. Information about these features can be found in the Waypoint User Guide
located under the Help menu.
Although the new project has been created, the file will not be saved locally on the system until
it is manually saved again. This can be accomplished by selecting File > Save Project or by
clicking the Save icon on the title bar.
When VueStar™ receivers are shipped from the factory the receivers are set to log 0xB5
messages by default. Although these messages are not decoded, they are required by
StarPac™ to derive the position quality and must be logged at the time of testing.
Figure 4.2: New Project Icon Figure 4.3: New Project Menu Option
Loading a decoded .FSB file
Once a NavCom binary data file has been decoded, the decoded file can be uploaded into StarPac™
for analysis and export.
• Select File > Add StarFire™ Trajectory
• Select the appropriate .FSB file that was created after the decoding the original data file.
• Select OK.
StarPac™ will now display a StarFire™ forward map featuring the positions for all epochs. To read an
exact position, click on any displayed epoch.
If your project requires the use of a .GPB file (0xB0 Messages) skip to the next section; Loading
a .GPB file. .GPB file MUST be uploaded prior to .FSB files.
12
Page 13

StarPac™ User Guide - Rev A
Loading a decoded .GPB File
If your project requires a .GPB file (0xB0 Messages) it MUST be uploaded prior to uploading the .FSB
file.
• Select File > Add Remote .GPB File.
• Select the appropriate .GPB file that was created after decoding the original data file.
• Enter the Remote Antenna Height when prompted.
• For More Information about the Remote Antenna Height function please consult the
Waypoint User Guide.
• Select OK.
StarPac™ will automatically add and display any .STA files located in the same directory as the .GPB
file, provided they share the same filename. The events, if present, are overlaid on the course and
numbered according to occurrence. The positional accuracy of these events, and the displayed
epochs, are not available until combined with a StarFire™ trajectory (.FSB).
Adding .STA Files
Instructions for adding a separate .STA file can be located in the Waypoint User guide located under
the help menu.
Chapter 5 Exporting
Now that the NavCom binary data has been decoded and converted into StarPac™ readable files,
you can export this data into a format readable by many other post processing programs. The Export
Wizard included with StarPac™ is identical to the Export Wizard feature included with GrafNav. The
Export Profiles listed within the Export Wizard screen (Figure 5.1) DO NOT include the navigation
solution mode, standard deviation, or combined standard deviation. If these fields are required in the
output file they must be added manually. Information about manually adding fields is include in
brief, further detail can be found by consulting the Waypoint User Guide.
In order add the solution mode variable to a existing profile select Output > Export Wizard. The
window in figure 5.1 will display.
Figure 5.1: Export Wizard
13
Page 14

StarPac™ User Guide - Rev A
From here select the Export Profile needed, create a copy, and then select modify to modify the fields
outputted with that profile. (Figure 5.2)
Figure 5.2: Modifying an Export Profile
In order to add the navigation solution mode, standard deviation, or combined standard deviation select Source Variables in the upper left corner of the menu bar, and scroll down to and select Statistics
to add solution type (Nav solution mode) (Figure 5.3), or Standard Deviation to add standard deviation
or combined standard deviation.
Figure 5.3: Adding Solution Type
The solution type (Navigation Solution Mode) field will be output according to Table 2.
14
Page 15

StarPac™ User Guide - Rev A
ID (YY) GPS CORRECTION SIGNAL
00 Non dGPS
01 dGPS, RTCM type 1 or 9, Single Freq
02 WAAS/EGNOS, Single Freq., (See GSA for SBAS Id in use)
03 WAAS/EGNOS Dual Freq., (See GSA for SBAS ID in use)
04 StarFire WCT, Single freq.
05 StarFire WCT, Dual freq.
06 StarFire RTG, single freq. (no ‘Tide’ Adjustment)
07 -reserved-
08 -reserved-
09 -reserved-
10 dGPS, RTCM type 1 or 9, Dual Freq.
11 StarFire RTG dual freq. (no ‘Tide’ Adjustment)
12 Code base Nav, Single Frequency, NCT Proprietary Format
13 Code base Nav, Single Frequency, RTCM 18/19
14 Code base Nav, Single Frequency, RTCM 20/21
15 Code base Nav, Single Frequency, CMR
16 Code base Nav, Dual Frequency, NCT Proprietary Format
17 Code base Nav, Dual Frequency, RTCM 18/19
18 Code base Nav, Dual Frequency, RTCM 20/21
19 Code base Nav, Dual Frequency, CMR
20 RTK Mode, NCT Proprietary Format (5e/5c or 5b/5c)
21 RTK Mode, RTCM 18/19
22 RTK Mode, RTCM 20/21
23 RTK Mode, CMR
24 StarFire RTG, single freq., Adjusted for ‘Tide’
25 StarFire RTG, dual freq., Adjusted for ‘Tide’
26 RTK Extend
Table 2: Navigation Mode; ID YY
For further information about modifying profiles, adding variables and exporting data please consult
the Waypoint User Guide. Located under the Help menu.
15
 Loading...