

Page 1
SF-3040 Quick Start Guide
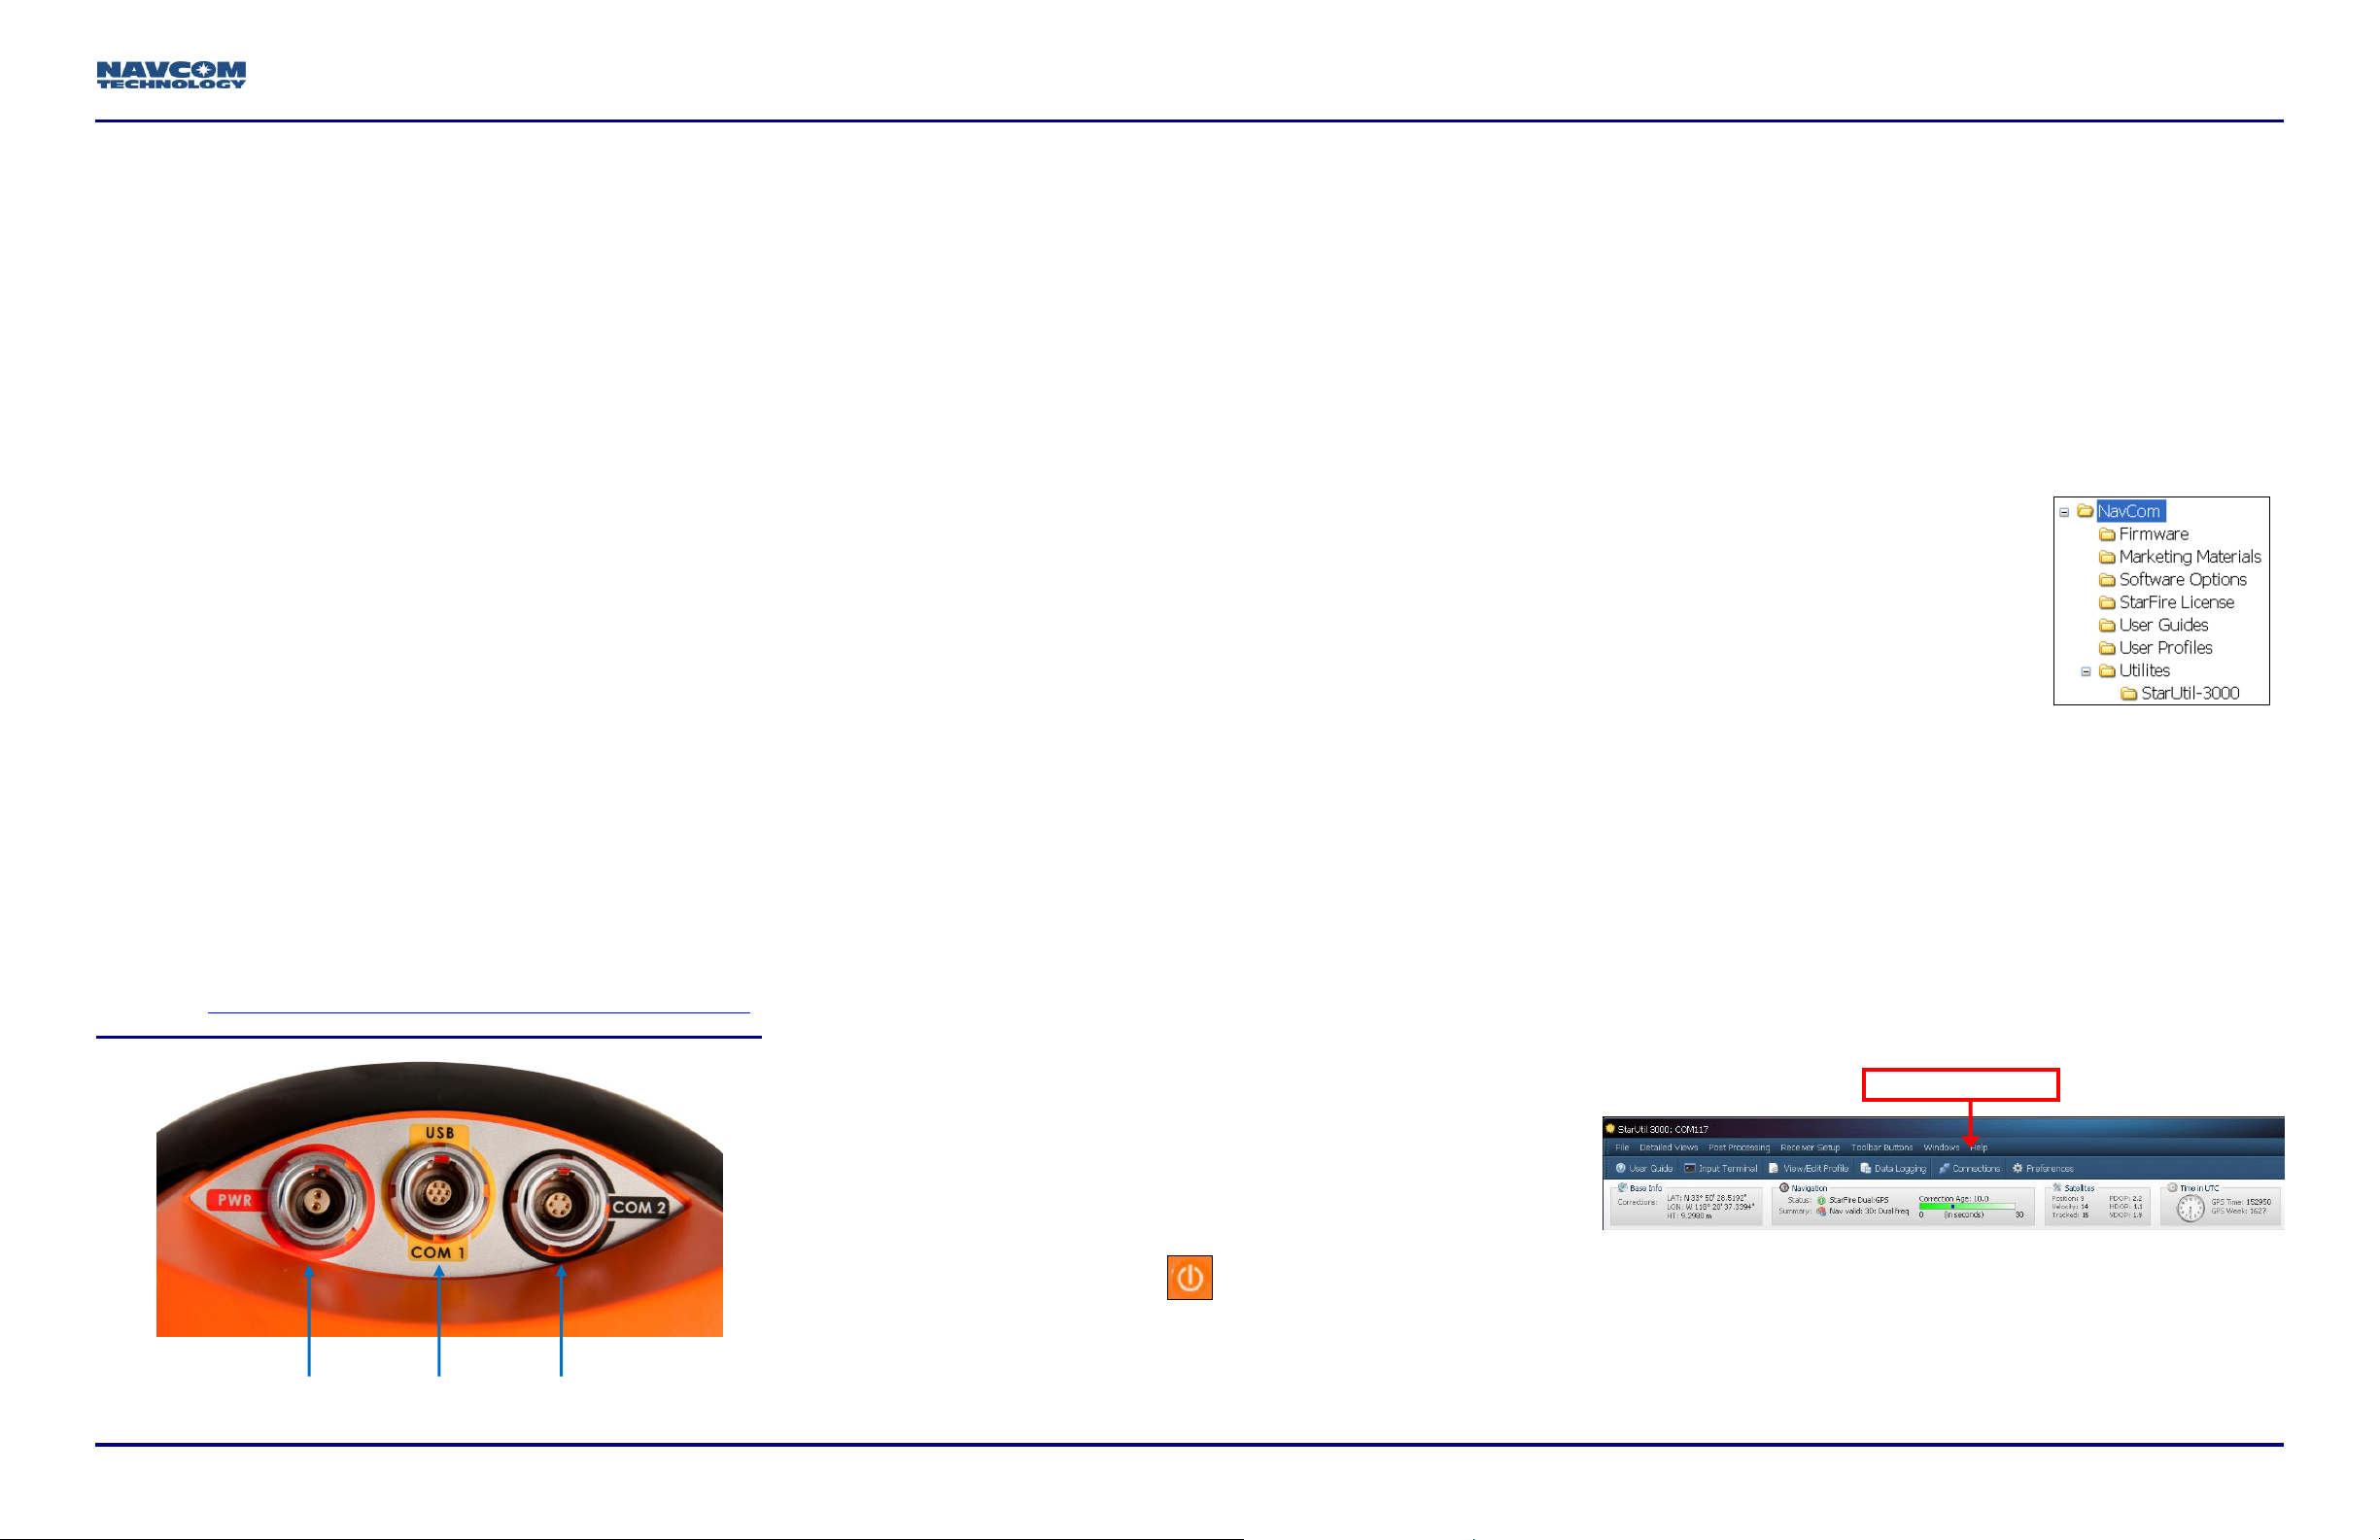
Connections button
POWER
COM2
USB – COM1
Follow this Quick Start Guide to enable the robust
functionality of the SF-3040.
By opening, assembling, and using this product, you
agree to the terms of the License Agreement contained
in the SF-3040 GNSS Product User Guide.
Important: This device will not track satellites until after
the option file is loaded in the receiver. See instructions
contained in this guide.
Consult your dealer to determine if the SF-3040 is fully
configured. If it is, the SF-3040 is ready to use. Refer
only to these sections: Connect Equipment and
Factory Default User Profile.
If the SF-3040 is not dealer-configured, the receiver is
not operational until the steps in this guide are
performed.
The supplied SF-3040 Product Configuration USB Flash
Drive (PN 82-043000-0001) includes all the files needed to
set up the ordered configuration of the SF-3040. It also
includes guides with complete product information:
SF-3040 GNSS Product User Guide
StarUtil 3000 User Guide
Sapphire Technical Reference Manual
NavCom Customer Support:
Telephone: +1 (310) 381-2000
Web: http://www.navcomtech.com/Contact/ContactSupport.cfm
Connect Equipment
StarUtil 3000 is designed to be operated on a Windows XP
operating system.
1. Use one of the two supplied data cables for
communications:
USB Device cable (PN 96-212238-01): Connect the 7-pin
LEMO connector end to the USB-COM1 port on the bottom of
the SF-3040. Plug the USB end into the PC.
Or
COM 2 serial cable (optional) (PN 96-212169-01): Connect the
6-pin LEMO connector end to COM2 port at the bottom of the
SF-3040. Connect the DB9S end to the PC.
An optional COM1 serial cable
(PN 96-212170-01) is also supported.
Bluetooth connectivity is also available. Refer to
the StarUtil 3000 User Guide for detailed
instructions on connecting a Bluetooth device.
Loading firmware via Bluetooth is not supported.
An optional UHF radio modem is also available.
Refer to the SF-3040 GNSS Receiver Product
User Guide for complete instructions.
2. Locate the antenna in an area with a 360 clear view of
the sky.
3. Fully charge the battery packs in the supplied battery
charger for at least 12 hours, regardless of the LED
indicator on the charger, prior to first use.
4. Install the battery packs in the side battery slots.
Refer to the SF-3040 GNSS Receiver Product
User Guide for complete instructions on charging
and installing the battery packs.
Save Folder/Files to PC
The SF-3040 Product Configuration USB Flash Drive
(PN 82-043000-0001) includes the following:
Root Directory: Software Options File and StarFire License
(if purchased)
NavCom Folder: Includes these sub-folders: Firmware,
Marketing Materials, User Guides, User Profiles, Utilities
(The contents of the NavCom folder are subject to change.)
6. Plug the SF-3040 Product Configuration USB Flash
Drive into the PC.
7. Browse to the USB Flash Drive.
8. Save the Software Options File,
StarFire License (if purchased),
and NavCom folder to the PC.
Create two folders in the NavCom
folder for the Options File and
StarFire License.
Establish Communications
9. Browse to Navcom\Utilities\StarUtil-3000 on the PC.
10. Ensure that these files are in the StarUtil-3000 folder:
“Starutil-3k_v1_0_x.exe”, “navcomx1c45x3040.inf” (USB
driver), and 96-312007-3001.pdf.
The USB driver must be in the same folder as StarUtil-
3000 for the USB port to auto-recognize the SF-3040.
11. Double-click “Starutil-3k_v1_0_x.exe” to open the
program.
96-310035-3001, Rev. C 1 of 4
Three optional power cables are also available.
12. Click the Connections button to establish communications
5. Press the On/Off switch on the front Indicator Panel
to turn on the SF-3040. All front panel LEDs illuminate
for 3 to 5 seconds during power-up. The Indicator Panel
status LEDs change from red to green.
between the PC and the SF-3040. The Port Configuration
window opens.
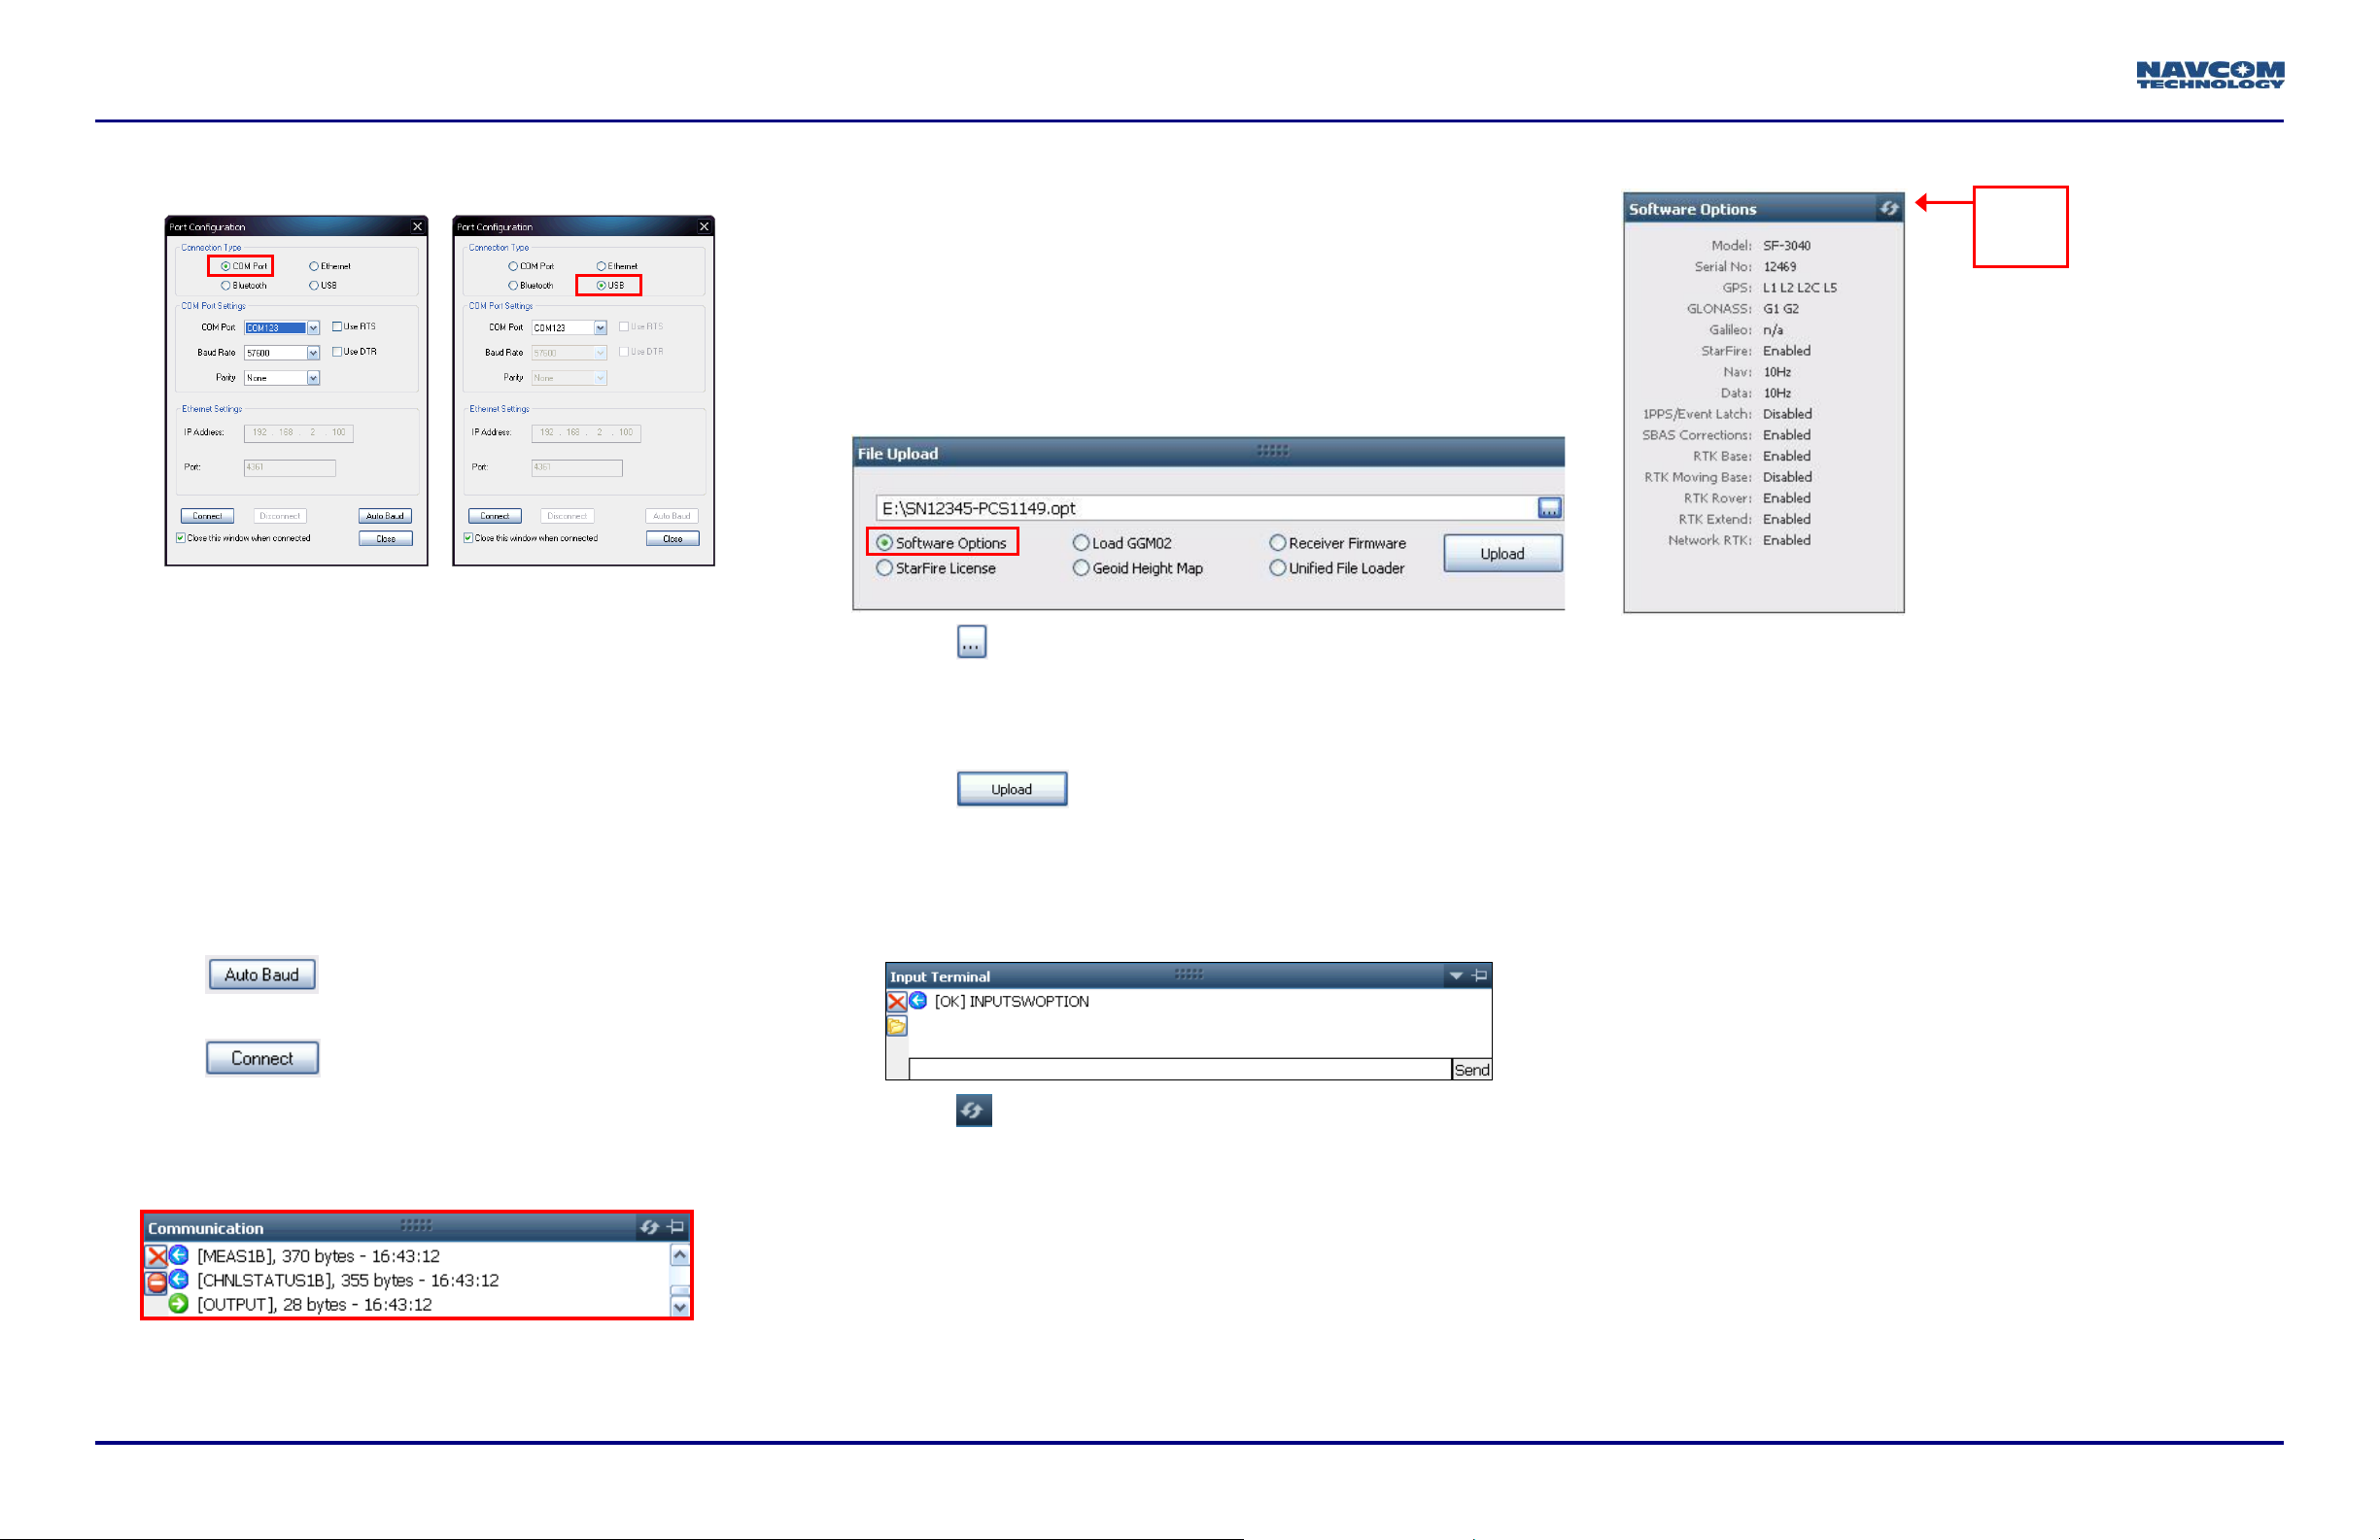
13. Depending on the current Connection Type, do not
change the default option, COM Port, or select USB after
Page 2
COM Port Settings
USB Settings
Click the
Refresh
button
reading about the USB driver installation in the SF-3040
Product User Guide.
14. Set the appropriate options according to the Connection
Type:
COM Port:
COM Port: The appropriate PC COM Port
Baud Rate: 57600 (keep the default)
Parity: None (keep the default)
Or
USB Port:
COM Port: The appropriate virtual PC COM Port
Upload Software Options
Software Options must be uploaded before the
StarFire License (if purchased) is loaded and
software updated to ensure proper file-type selection.
Important: This device will not track satellites until after
the option file is loaded in the receiver.
18. Select Software Options on the File Upload window.
19. Click and browse to the NavCom folder on the PC.
20. Select the software options file (the file extension is
*.opt). The path to the software options file is displayed
in the upload field.
21. Click . At the end of the upload, a confirmation
box opens. Click OK.
The Input Terminal window also displays the
outcome of the upload. In the example below, the
load is successful:
If any of the
purchased software
options are not displayed
in the Software Options
window, refer to the
section “Use the Input
Terminal to Upload
Software Options” in the
StarUtil-3000 User Guide.
Also refer to the Sapphire Technical Reference
Manual for detailed information on the
[INPUTSWOPTION] command.
“StarFire: Enabled” indicates that the StarFire
Software Option is loaded; it does not indicate
that a StarFire License is installed. Do not close
StarUtil-3000. Perform one of these steps after
loading the appropriate option file:
If a StarFire License is purchased, go to the Upload
StarFire License section.
15. Click to ensure the baud rate is correct for the
selected port.
16. Click .
17. Verify that the SF-3040 is connected to the PC:
Messages scrolling in the Communication window
indicate that the connection is established:
Blue arrows indicate received messages.
Green arrows indicate sent messages.
2 of 4 SF-3040 Quick Start Guide, Rev. C
22. Click on the Software Options window to display the
loaded software options.
Determine Firmware Versions
The user determines that the firmware installed in the
SF-3040 is the most current. The version of the installed
firmware is important to the proper operation of the receiver.
23. On the Detailed Views menu, click Receiver Options to
If a StarFire License is not purchased, go to the
Factory Default User Profile section.
open the Receiver Options tab.
Page 3

SF-3040 Quick Start Guide
Firmware in Receiver
Current NAV Firmware
NAV Firmware
Click the
Refresh
button
Firmware Info Window
Click the
Refresh
button
NAV Unified
Firmware File
24. Click (refresh) on the Firmware Info window to
display the installed options.
30. Select the unified firmware file (UFL) to upload (the file
extension is: .s19). The path to the UFL file is displayed
in the upload field.
31. Click . The files to be uploaded are checked on
the Ready to Downline Load File window.
In the example above, the NAV firmware in the
receiver matches the firmware in the folder.
27. Perform one of the steps below:
If the NAV firmware installed in the receiver is the
most current version, go to the Upload StarFire
License section.
25. Browse to the NavCom\Firmware folder on the PC. The
Firmware folder is copied from the SF-3040 Product
Configuration USB Flash Drive. It contains the most
current firmware. The firmware file extension is *.s19.
Open the Readme.txt file for additional information.
The *.s19 file may begin with ‘SP’ instead of ‘OC’
after January 2012.
26. Compare the current NAV Firmware version in the
Firmware folder with the installed version displayed in
the Firmware Info window.
If the NAV firmware installed in the receiver is not the
most current version:
Check the versions of the other firmware.
Write down all the firmware that must be updated.
Go to the Upload Firmware section below.
Upload Firmware
Upload a Unified Firmware File
28. Select Unified File Loader on the File Upload window.
StarUtil 3000 will auto-read the reciever and select files
to load. Check or uncheck firmware files if necessary
(based on existing loaded version numbers).
32. Click and the upload progress window
updates.
33. When the upload is complete, click .
34. If any file fails to upload, verify which files loaded and
uncheck those files, then reload the remaining files. If
this fails, contact NavCom Customer Support for further
guidance.
Do not close StarUtil-3000. Continue to the next section.
Upload the StarFire License
29. Click and browse to the NavCom\Firmware on the
PC.
For the initial configuration, the StarFire license
must be installed via data cable. Subsequent
renewals of the license can be transmitted to the
96-310035-3001, Rev. C 3 of 4
Page 4

receiver via radio broadcast. Refer to the SF-3040
GNSS Receiver Product User Guide.
The receiver must be tracking GPS satellites and
providing a valid position solution at the time of
the StarFire license upload to accept the license.
35. Select StarFire License on the File Upload window.
Factory Default User Profile
Further configuration is not necessary for the initial use of
the SF-3040. The receiver is preconfigured with a factory
default user profile that includes settings for the various port
assignments/parameters, navigation parameters, and output
message lists.
36. Click and browse to the NavCom folder on the PC.
37. Select the StarFire license file (the file extension is *.lic).
The path to the StarFire license file is displayed in the
upload field.
Confirm StarFire Navigation
40. Click Position, Velocity, Time on the Detailed Views
menu to determine if the receiver is navigating in
StarFire mode. The PVT tab opens.
38. Click . At the end of the upload, a confirmation
box opens. Click OK.
The Input Terminal window also displays the
outcome of the upload. In the example below, the
upload is successful.
39. Ensure that the purchased StarFire License is loaded.
These tabs provide license information:
Receiver Options tab: StarFire Licenses and Cancel
License Status windows
StarFire tab: License Info window
To open the StarFire tab, click StarFire on the
Detailed Views menu.
The receiver enters StarFire mode in
approximately 3 minutes after it is first turned on;
then the convergence period starts.
Newer software versions: The Nav Mode StarFire Dual:GPS,
indicates that the receiver is navigating in the old StarFire
format, accurate to <10cm. The Nav Mode StarFire
Dual:GNSS, indicates that the receiver is navigating in the
new StarFire format which supports GLONASS, accurate to
<5cm.
Older software versions: The Nav Mode StarFire Dual:RTG:
3D: Dual freq, indicates that the receiver is navigating in
StarFire dual frequency with a 3D position fix, which is very
accurate. RTG is another term for StarFire.
If the SF-3040 does not function properly, refer to
these online tools:
Troubleshooting Guides
User Manuals
Contact the authorized dealer or NavCom Customer
Support.
If desired, replace the factory default user profile
with a predefined profile, or create a profile. Refer
to the StarUtil-3000 User Guide.
4 of 4 SF-3040 Quick Start Guide, Rev. C
 Loading...