

Page 1

L
96-310030
300
A
N
L
A
N
D--
D
P
A
P
K
A
UUsseerr GGuuiidde
K
™
™
e
NavCom Technology, Inc.
20780 Madrona Avenue
Torrance, California 90503 USA
Tel: +1 310.381.2000
Fax: +1 310.381.2001
sales@navcomtech.com
www.navcomtech.com
P/N:
-
1
Page 2

Page 3

LAND-PAK™ User Guide – Rev. C
This page is left blank intentionally
Page 4

Page 5

LAND-PAK™ User Guide – Rev. C
Table of Contents
List of Figures.........................................................iv
List of Tables ........................................................viii
Notices ..........................................................ix
Copyright...................................................................ix
Trademarks ...............................................................ix
FCC Notice.................................................................x
User Notice.................................................................x
Limited Warranty .......................................................xi
StarFire™ Licensing.................................................xii
USG FAR.................................................................. xii
Global Positioning System ....................................... xii
Revision History....................................................xiv
Use of this Document............................................xv
Related Documents......................................................xv
StarUtil User Guide...................................................xv
Technical Reference Manual...................................xvi
RINEXUtil User Guide............................................. xvi
Integrators Toolkit.................................................... xvi
NavCom Release Notes..........................................xvi
Related Standards...................................................... xvii
ICD-GPS-200 ......................................................... xvii
RTCM-SC-104........................................................ xvii
CMR, CMR+........................................................... xvii
NMEA-0183............................................................ xvii
Publicly-Operated SBAS Signals ........................... xvii
RTCA/DO-229D................................................. xvii
WAAS (Wide Area Augmentation System)........xviii
EGNOS (European Geostationary Navigation
Overlay Service).................................................xviii
MSAS (MTSAT Satellite-based Augmentation
System)..............................................................xviii
GAGAN (GPS Aided Geo Augmented
Navigation).........................................................xviii
Chapter 1 Introduction ....................................19
Unique Features.......................................................... 19
Typical Applications..................................................... 21
System Description...................................................... 21
NavCom SF-2040 GPS Sensors..............................21
Base Station and Rover Radio Modems..................23
i
Page 6

LAND-PAK™ User Guide – Rev. C
Explorer 600+ Data Collector...................................25
SurvCE Software......................................................27
TruBlu™ Module ......................................................29
Office Software.........................................................30
The LAND-PAK Interfacing.......................................... 31
The LAND-PAK Configurations................................... 31
The LAND-PAK LM..................................................31
The LAND-PAK 869.................................................32
Chapter 2 Inventory Check.............................35
Base Station Inventory.............................................36
Rover Inventory........................................................39
Office Supplies Inventory .........................................42
Chapter 3 Battery Charging............................45
SF-2040 GPS Sensor Battery Packs........................... 45
3ASd Epic Radio Modem Bag Battery......................... 49
3ASd and 3ASd 869 Radio Modem Battery................ 51
Carlson Explorer 600+ Battery Pack........................... 54
Chapter 4 Function Test Setup ...................... 59
Radio Modem Configuration........................................ 60
Soft Keys..................................................................61
Operating Modes......................................................62
Configuration............................................................63
RF Frequency Configuration....................................64
RF Power Output......................................................66
Signal Threshold ......................................................68
Addressing Settings .................................................69
Serial Port Settings...................................................69
Handshaking ............................................................71
Additional..................................................................71
Base Station Test Setup.............................................. 74
Rover Test Setup......................................................... 83
Chapter 5 SurvCE Software Operation..........89
Overview...................................................................... 89
File Types.................................................................89
File Management......................................................90
SurvCE Window Icons..............................................90
Getting Started............................................................. 91
Create A New Job....................................................91
Job Settings..............................................................93
GPS Base Setup......................................................99
Assign a Base Position...........................................105
Verify GPS Base Setup..........................................107
ii
Page 7

LAND-PAK™ User Guide – Rev. C
Static Data Collection.............................................107
GPS Rover Setup...................................................108
Verify GPS Rover Setup.........................................113
GPS Utilities ...........................................................114
Monitor/Skyplot.......................................................116
Configure................................................................119
Tolerances..............................................................122
Survey Menu (Measuring Point Positions).............123
Store Points............................................................125
Additional SurvCE Options........................................126
Localization.............................................................126
Stake Points ...........................................................129
Points......................................................................132
Feature Code List...................................................133
COGO Menu...........................................................133
Chapter 6 Data Transfer ................................135
Installation.................................................................. 135
Introduction................................................................ 136
Exercises................................................................... 137
Menus & Commands.................................................144
Add Menu...............................................................144
Process (Compute Points) Menu ...........................146
Chapter 7 Equipment Maintenance..............151
Transport................................................................151
Maintenance...........................................................151
Battery Disposal .....................................................151
Safety First .............................................................152
A The LAND-PAK 869 Inventory Check ............153
Base Station Inventory...........................................154
Rover Inventory......................................................157
Office Supplies Inventory .......................................160
B Additional Base Position Options..................163
From New Position Tab............................................. 163
From Known Position Tab ......................................... 165
C TruBlu Configuration ......................................167
D Static Data Collection......................................171
Collect Static Data..................................................... 171
Download Static Data File ......................................... 173
iii
Page 8

LAND-PAK™ User Guide – Rev. C
List of Figures
Figure 1: SF-2040, Viewed From Bottom................ 22
Figure 2: Radio Modem LED Indicators .................. 23
Figure 3: Carlson Explorer 600+ User Interface......26
Figure 4: The LAND-PAK Interfacing ...................... 31
Figure 5a: Base Transit Case Supplied Equipment.36
Figure 5b: Base Transit Case Supplied Equipment.37
Figure 6: Base Bag Supplied Equipment.................38
Figure 7a: Rover Transit Case Supplied Equipment39
Figure 7b: Rover Transit Case Supplied Equipment40
Figure 8: Rover Bag Supplied Equipment...............41
Figure 9: Office Supplies Transit Case....................42
Figure 10: Battery Locking Clips.............................. 47
Figure 11: NavCom Base Cable..............................50
Figure 12: AC/DC Adapter Input Plug ..................... 55
Figure 13: Battery Charger/Charging Cable............ 55
Figure 14: Explorer 600+ Charger Connection........ 56
Figure 15: CHG LED ............................................... 56
Figure 16: Radio Modem Soft Keys......................... 61
Figure 17: LCD Display – Data Transfer Mode ....... 62
Figure 18: LCD Display – Programming Mode........62
Figure 19: Data Transfer Mode ............................... 64
Figure 20: Active Channel.......................................65
Figure 21: Next Digit................................................65
Figure 22: Set Frequency........................................ 66
Figure 23: Main Menu – Radio Settings..................67
Figure 24: TX level option........................................67
Figure 25: RF Power Output Settings...................... 67
Figure 26: Main Menu – Radio Settings..................68
Figure 27: Sig. Threshold option ............................. 68
Figure 28: Main Menu – Port 1 Setting....................69
Figure 29: Baud Rate Setting..................................70
Figure 30: Baud Rate Setting Change..................... 70
Figure 31: Main Menu – Additional Setting.............. 72
Figure 32: Error Correction and Error Checking......72
Figure 33: SL-Commands and Priority....................73
Figure 34: Save Changes........................................73
iv
Page 9

LAND-PAK™ User Guide – Rev. C
Figure 35: Base Station Tripod – Leg Adjustments .75
Figure 36: Base Station Tripod................................75
Figure 37: Mounting Tribrach & Tribrach Adapter....76
Figure 38: Mounting the Radio Antenna Bracket.....77
Figure 39: Mounting the Antenna and Cable...........78
Figure 40: Avoiding Radiation Hazard.....................79
Figure 41: Mounting the Radio and Bag Battery......80
Figure 42: Mounting Cable to the Radio Modem.....81
Figure 43: Mounting Base SF-2040.........................81
Figure 44: NavCom Base Cable Connections.........82
Figure 45: Mounting the Rover Pole to the Bipod....84
Figure 46: Rover Pole and Bipod.............................84
Figure 47: Mounting the Carlson Explorer 600+......85
Figure 48: Mounting Radio Modem..........................86
Figure 49: NavCom Rover Cable Connections........87
Figure 50: Rover Pole Knob and Locking Pin..........88
Figure 51: Coiled Serial Cable.................................91
Figure 52: Desktop with SurvCE Icon......................91
Figure 53: SurvCE Job Selection Box......................92
Figure 54: Coordinate Files Window........................92
Figure 55: File Menu – Job Settings........................93
Figure 56: Job Settings Submenu – New Job Tab ..94
Figure 57: Job Settings Submenu – System Tab ....94
Figure 58: Coordinate Projection Window ...............95
Figure 59: Job Settings Submenu – Format Tab.....96
Figure 60: Job Settings Submenu – Options Tab....97
Figure 61: Job Settings Submenu – Stake Tab.......98
Figure 62: Equip Menu – GPS Base........................99
Figure 63: GPS Base Submenu – Current Tab .....100
Figure 64: GPS Base Submenu – Comms Tab.....100
Figure 65: GPS Base Submenu – Receiver Tab ...101
Figure 66: USER Antenna Type ............................102
Figure 67: GPS Base Submenu – RTK Tab ..........103
Figure 68: Configure Satel Radio Window............. 104
Figure 69: From New Position Options..................105
Figure 70: Average GPS Window..........................105
Figure 71: Base Configuration Window .................106
Figure 72: Equip Menu – GPS Rover ....................108
Figure 73: GPS Rover Submenu – Current Tab....109
v
Page 10

LAND-PAK™ User Guide – Rev. C
Figure 74: GPS Rover Submenu – Comms Tab...109
Figure 75: GPS Rover Submenu – Receiver Tab . 110
Figure 76: GPS Rover Submenu – RTK Tab ........ 112
Figure 77: Configure Satel Radio Window ............ 113
Figure 78: Equip Menu – GPS Utilities.................. 114
Figure 79: GPS Utilities Submenu Options ........... 114
Figure 80: Equip Menu – Monitor/Skyplot ............. 116
Figure 81: Monitor/Skyplot Submenu – Quality..... 116
Figure 82: Monitor/Skyplot Submenu – Position ... 118
Figure 83: Monitor/Skyplot Submenu – SATView . 118
Figure 84: Monitor/Skyplot Submenu – SATInfo...119
Figure 85: Equip Menu – Configure....................... 119
Figure 86: Configure Submenu – General Tab ..... 120
Figure 87: Configure Submenu – View Pt Tab...... 121
Figure 88: Equip Menu – Tolerances .................... 122
Figure 89: Tolerances Submenu Options..............122
Figure 90: Store Points Interface........................... 123
Figure 91: Survey Menu – Store Points................. 125
Figure 92: Equip Menu – Localization...................126
Figure 93: Localization Submenu Options.............127
Figure 94: Localization Submenu – System Tab...127
Figure 95: Localization Submenu – GPS Tab.......128
Figure 96: Localization Submenu – Points Tab.....128
Figure 97: Localization Submenu – By Helmert....128
Figure 98: Survey Menu – Stake Points................ 129
Figure 99: Stake Points Window ........................... 130
Figure 100: File Menu – Points..............................132
Figure 101: Points Submenu................................. 132
Figure 102: File Menu – Feature Code List........... 133
Figure 103: X-Port Data Editors ............................ 136
Figure 104: Import Point Data Window.................. 138
Figure 105: SurvCE Data Transfer Window..........139
Figure 106: Set Geoid Area Window..................... 141
Figure 107: Print Coordinates Window..................143
Figure 108: Process Options Window...................147
Figure 109a: Base Transit Case Supplied Equip... 154
Figure 109b: Base Transit Case Supplied Equip... 155
Figure 110: Base Bag Supplied Equipment........... 156
Figure 111a: Rover Transit Case Supplied Equip.157
vi
Page 11

LAND-PAK™ User Guide – Rev. C
Figure 111b: Rover Transit Case Supplied Equip..158
Figure 112: Rover Bag Supplied Equipment..........159
Figure 113: Office Supplies Transit Case..............160
Figure 114: Base Configuration Window ...............163
Figure 115: Enter Lat/Lon Window ........................164
Figure 116: Grid Coordinate Window.....................164
Figure 117: From Known Position Tab ..................165
Figure 118: Surveyed Point Window......................165
Figure 119: Local Point Window............................166
Figure 120: Base Station File Window...................166
Figure 121: TruBlu Baud Rate Setting...................168
Figure 122: Bluetooth Devices Window.................169
Figure 123: Verification of TruBlu Connection.......170
Figure 124: Survey Menu – Log Raw GPS............171
Figure 125: NavCom Setup Window......................172
Figure 126: Files on Receiver Window..................173
vii
Page 12

LAND-PAK™ User Guide – Rev. C
List of Tables
Table 1: Radio Modem LED Indications.................. 24
Table 2: Base Transit Case Parts List..................... 36
Table 3: Base Bag Parts List................................... 38
Table 4: Rover Transit Case Parts List....................39
Table 5: Rover Bag Parts List..................................41
Table 6: Office Supplies Transit Case Parts List..... 42
Table 7: Sensor Battery Charger LEDs................... 46
Table 8: Bag Battery Charger LEDs........................ 49
Table 9: Rover Radio Modem Battery LED.............51
Table 10: Radio Modem Soft Key Functions........... 61
Table 11: FEC Signal Thresholds............................71
Table 12: SurvCE Window Icons.............................90
Table 13: Store Points Interface Icons .................. 124
Table 14: Base Transit Case Parts List................. 154
Table 15: Base Bag Parts List............................... 156
Table 16: Rover Transit Case Parts List................157
Table 17: Rover Bag Parts List..............................159
Table 18: Office Supplies Transit Case Parts List. 160
viii
Page 13

LAND-PAK™ User Guide – Rev. C
Notices
LAND-PAK™
All-in-One RTK Land Survey Solution User Guide
P/N 96-310030-3001
Revision C
February 2008
Serial Number:
Date Delivered:
Purchased From:
Copyright
© 2008 by NavCom Technology, Inc.
All rights reserved. No part of this work or the
computer program(s) described herein may be
reproduced, stored, or transmitted by any means,
without the expressed written consent of the copyright
holders. Translation in any language is prohibited
without the expressed written consent of the copyright
holders.
Trademarks
‘find your way’, ‘NavCom Globe’ and ‘NAVCOM
TECHNOLOGY’ logos are trademarks of NavCom
Technology, Inc. StarFire™ is a registered trademark
of Deere & Company. All other product and brand
names are trademarks or registered trademarks of
their respective holders.
ix
Page 14

LAND-PAK™ User Guide – Rev. C
FCC Notice
The NavCom manufactured products comply with
Part 15 of the FCC Rules. Operation is subject to the
following two conditions:
1. This device may not cause harmful
interference, and
2. This device must accept any interference
received, including interference that may
cause undesired operation.
The NavCom manufactured products have been
tested in accordance with FCC regulations for
electromagnetic interference. This does not
guarantee non-interference with other equipment.
Additionally, the products may be adversely affected
by nearby sources of electromagnetic radiation.
The Global Positioning System is under the control of
the United States Air Force. Operation of the GPS
satellites may be changed at any time and without
warning.
The FCC compliance of other components within this
system can be found inside the respective user
guides or by contacting the manufacturer directly.
User Notice
NavCom Technology, Inc. shall not be responsible for
any inaccuracies, errors, or omissions in information
contained herein, including, but not limited to,
information obtained from third party sources, such as
publications of other companies, the press, or
competitive data organizations.
This publication is made available on an “as is” basis
and NavCom Technology, Inc. specifically disclaims
all associated warranties, whether express or implied.
In no event will NavCom Technology, Inc. be liable for
x
Page 15

LAND-PAK™ User Guide – Rev. C
direct, indirect, special, incidental, or consequential
damages in connection with the use of or reliance on
the material contained in this publication, even if
advised of the possibility of such damages. NavCom
Technology, Inc. reserves the right to make
improvements or changes to this publication and the
products and services herein described at any time,
without notice or obligation.
Limited Warranty
NavCom Technology, Inc., warrants that its products
will be free from defects in workmanship at the time of
delivery. Under this limited warranty, parts found to
be defective or defects in workmanship will be
repaired or replaced at the discretion of NavCom
Technology, Inc., at no cost to the Buyer, provided
that the Buyer returns the defective product to
NavCom Technology, Inc. in the original supplied
packaging and pays all transportation charges,
duties, and taxes associated with the return of the
product. Parts replaced during the warranty period
do not extend the period of the basic limited warranty.
This provision does not extend to any NavCom
Technology, Inc. products, which have been
subjected to misuse, accident or improper installation,
maintenance or application, nor does it extend to
products repaired or altered outside the NavCom
Technology, Inc. production facility unless authorized
in writing by NavCom Technology, Inc.
This provision is expressly accepted by the buyer in
lieu of any or all other agreements, statements or
representations, expressed or implied, in fact or in
law, including the implied warranties of
merchantability and fitness for a particular purpose
and of all duties or liabilities of NavCom Technology,
Inc. To the buyer arising out of the use of the goods,
and no agreement or understanding varying or
xi
Page 16

LAND-PAK™ User Guide – Rev. C
extending the same will be binding upon NavCom
Technology, Inc. unless in writing, signed by a dulyauthorized officer of NavCom Technology, Inc.
This limited warranty period is one (1) year from date
of purchase.
StarFire™ Licensing
The StarFire™ signal requires a subscription that
must be purchased in order to access the service.
Licenses are non-transferable, and are subject to the
terms of the StarFire™ Signal License agreement.
For further details on the StarFire™ Signal Network,
its capabilities, terms and conditions visit
www.navcomtech.com
sales@navcomtech.com
or send an email inquiry to
USG FAR
Technical Data Declaration (Jan 1997)
The Contractor, NavCom Technology, Inc., hereby
declares that, to the best of its knowledge and belief,
the technical data delivered herewith under
Government contract (and subcontracts, if
appropriate) are complete, accurate, and comply with
the requirements of the contract concerning such
technical data
Global Positioning System
Selective availability (S/A code) was disabled on 02
May 2000 at 04:05 UTC. The United States
government has stated that present GPS users use
the available signals at their own risk. The US
Government may at any time end or change
operation of these satellites without warning.
The U.S. Department of Commerce Limits
Requirements state that all exportable GPS products
xii
Page 17

LAND-PAK™ User Guide – Rev. C
contain performance limitations so that they cannot
be used to threaten the security of the United States.
Access to satellite measurements and navigation
results will be limited from display and recordable
output when predetermined values of velocity and
altitude are exceeded. These threshold values are far
in excess of the normal and expected operational
parameters of the SF-2040 GPS Sensor.
xiii
Page 18

LAND-PAK™ User Guide – Rev. C
Revision History
Rev A (Sep. 2007) Initial release
Update Satel radio configuration
settings
Added Signal Threshold
Rev B (Dec. 2007)
Rev C (Feb. 2008)
Added Address Settings
Added Handshaking
Updated FEC modes
Added SL-Commands
New Carlson Explorer Universal
Battery Charger
Updated P/N for Charger Kit
Revised Battery Charging
Instructions
Added updated photo of
LM & 869 Office Supplies
which shows new charger
Added the option of a 220V
Battery Charger for the Satel
3ASd Radio Modem Battery
(LM & 869)
Added MSAS & GAGAN to
Related Standards
xiv
Page 19

LAND-PAK™ User Guide – Rev. C
Use of this Document
This User Guide is intended to be used by someone
familiar with the concepts of GPS and satellite
surveying equipment.
Note indicates additional information
to make better use of the product.
This symbol means Reader Be
Careful. Indicates a caution, care,
and/or safety situation. The user might
do something that could result in
equipment damage or loss of data.
This symbol means Danger. The user
is in a situation that could cause bodily
injury. Before working on any
equipment, be aware of the hazards
involved with electrical and RF circuitry
and be familiar with standard practices
for preventing accidents.
Revisions to this User Guide can be obtained in a
digital format from
http://www.navcomtech.com/Support/
Related Documents
StarUtil User Guide P/N 96-310008-3001
Describes the operation and use of NavCom’s
Windows based control program (included on CD)
xv
Page 20

LAND-PAK™ User Guide – Rev. C
Technical Reference Manual P/N 96-3120001-3001
Describes the control and output data message
formats utilized by this instrument (for customer
programming purposes; included on CD)
RINEXUtil User Guide P/N 96-310021-2101
Describes the conversion program used for NavCom
proprietary output data message formats to RINEX
ver 2.10 observation and navigation files (for
customer programming purposes; included on CD)
Integrators Toolkit P/N 97-310020-3001
Provides additional instruction and tools for
developing control programs for this instrument (not
included in the packaging material; contact
http://www.navcomtech.com/Support/
for a copy)
NavCom Release Notes
Describes software updates for NavCom products.
Current and archived Release Notes are available on
the NavCom web site:
http://www.navcomtech.com/Support/DownloadCente
r.cfm?category=releasenotes.
NavCom Customer Support provides software
updates described in the Release Notes. Submit a
request for software updates via the Request Support
web page.
xvi
Page 21

LAND-PAK™ User Guide – Rev. C
Related Standards
ICD-GPS-200
NAVSTAR GPS Space Segment / Navigation User
Interfaces Standard. ARINC Research Corporation;
2250 E. Imperial Highway; El Segundo, California
90245
RTCM-SC-104
Recommended Standards For Differential GNSS
Service. Radio Technical Commission For Maritime
Services; 1800 N. Kent St, Suite 1060; Arlington,
Virginia 22209
CMR, CMR+
Compact Measurement Record; Trimble Navigation
Limited; 935 Stewart Drive; Sunnyvale, CA 94085
NMEA-0183
National Marine Electronics Association Standard For
Interfacing Marine Electronic Devices. NMEA
National Office; 7 Riggs Avenue; Severna Park,
Maryland 21146
Publicly-Operated SBAS Signals
RTCA/DO-229D
The Radio Technical Commission for Aeronautics
(RTCA) develops consensus-based
recommendations regarding communications,
navigation, surveillance, and air traffic management
(CNS/ATM) system issues.
RTCA. 1828 L Street, NW, Suite 805, Washington,
DC 20036.
xvii
Page 22

LAND-PAK™ User Guide – Rev. C
These organizations implement the RTCA/DO-229D
standard set by RTCA:
WAAS (Wide Area Augmentation System)
U.S. Department of Transportation. Federal Aviation
Administration. 800 Independence Ave, SW,
Washington, DC 20591
EGNOS (European Geostationary Navigation Overlay Service)
European Space Agency. 8, 10 rue Mario-Nikis,
F-75738 Paris Cedex 15, France.
MSAS (MTSAT Satellite-based Augmentation System)
Japan Civil Aviation Bureau. Ministry of Transport.
Kasumigaseki 2-1-3, Chiyoda-ku, Tokyo 100, Japan.
GAGAN (GPS Aided Geo Augmented Navigation)
Indian Space Research Organization. Antariksh
Bhavan, New Bel Road, Bangalore - 560 094, India.
xviii
Page 23

LAND-PAK™ User Guide – Rev. C
Chapter 1 ..............................Introduction
The LAND-PAK™ is a complete NavCom-qualified
end-user system designed for land survey
applications. The LAND-PAK pairs NavCom products
with complimentary technologies and solutions,
providing land surveyors a complete turn-key system
that does everything from field data collection to office
processing.
Unique Features
The LAND-PAK has many unique features:
A Solution that Works
The LAND-PAK’s controller solution from Carlson
provides cutting edge hardware with the most popular
and easy to use software on the market, SurvCE.
Satel’s powerful radio modems give the LAND-PAK a
wider coverage area, allowing longer distances
between stations.
Higher accuracy and reliability
With Satel’s radio modems and the RTK option on the
SF-2040 receivers, the LAND-PAK is capable of
performing centimeter accurate RTK surveys. The
RTK algorithm developed by NavCom provides fast
initialization and the NCT ultra compact binary data
format for RTK ensures robust data throughput. The
sensor can utilize NCT, RTCM, CMR and CMR+ data
streams from other base stations to minimize base
rover separation and allow for flexibility with preexisting GPS survey systems.
2-19
Page 24

LAND-PAK™ User Guide – Rev. C
1
GPS Performance
The NavCom SF-2040 receivers use the NavCom
NCT-2100D GPS Engine including the fourth
generation Touchstone™ ASIC family, of which more
than 40,000 are in use worldwide. Incorporated are
NavCom patented interference suppression and
multi-path mitigation, a 5Hz raw data rate (up to 50Hz
optional), and 5Hz geodetic-quality positioning (up to
25Hz optional).
RTK Extend™
1
RTK Extend™ enables continuous RTK-level
positioning accuracy during radio communication
outages by utilizing NavCom’s global StarFire™
corrections.
Traditionally, when an RTK rover loses
communication with the base station, it is unable to
continue to provide position updates for more than a
few seconds, resulting in user down-time and
reduced productivity. With RTK Extend™, a NavCom
StarFire™ receiver operating in RTK mode, can
transition to RTK Extend™ mode and maintain
centimeter level positioning during communication
loss for up to 15 minutes. RTK Extend™ allows more
efficient and uninterrupted work, enabling focused
concentration on the work rather than the tools.
A complete portable system
The LAND-PAK is a highly integrated solution
designed for productivity with minimal setup time and
maximum portability. Covering the entire land survey
process, it contains a complete base and rover
system for field data collection. Optional software for
data analysis and processing is also available.
Separate Software Option Required
2-20
Page 25

LAND-PAK™ User Guide – Rev. C
Typical Applications
9 Cadastral (Boundary) Surveys
9 Geodetic Surveys (Control) Surveys
9 Topographic Surveys
9 Stake-Out Surveys
9 As-Built Surveys
System Description
NavCom SF-2040 GPS Sensors
The LAND-PAK includes
the NavCom SF-2040
Sensor for both the base
station and rover. The SF-2040 is a 24-channel dual
frequency precision GPS sensor with two additional
channels for receiving Satellite Based Augmentation
System (SBAS) signals and an L-Band demodulator
for reception of NavCom’s StarFire™ Network
correction service, for autonomous decimeter-level
position accuracy, anywhere in the world, anytime.
The sensor can output proprietary raw data as fast as
50Hz (optional) and Position Velocity Time (PVT)
data as fast as 25Hz (optional) through two 115kbps
serial ports with less than 20ms latency.
The SF-2040 has a built-in L-Band demodulator for
reception of NavCom’s StarFire™ Network correction
service. The sensor simultaneously accepts
additional DGPS corrections (WAAS/EGNOS)
assuring seamless position output.
2-21
Page 26
LAND-PAK™ User Guide – Rev. C
Integrated GPS and L-Band Antenna
The all-in-one housing incorporates our compact GPS
antenna with excellent tracking performance and a
stable phase center for GPS L1 and L2. The robust
assembly features a standard 5/8” BSW thread for
mounting directly to a surveyor’s pole, tripod, or mast.
Communications
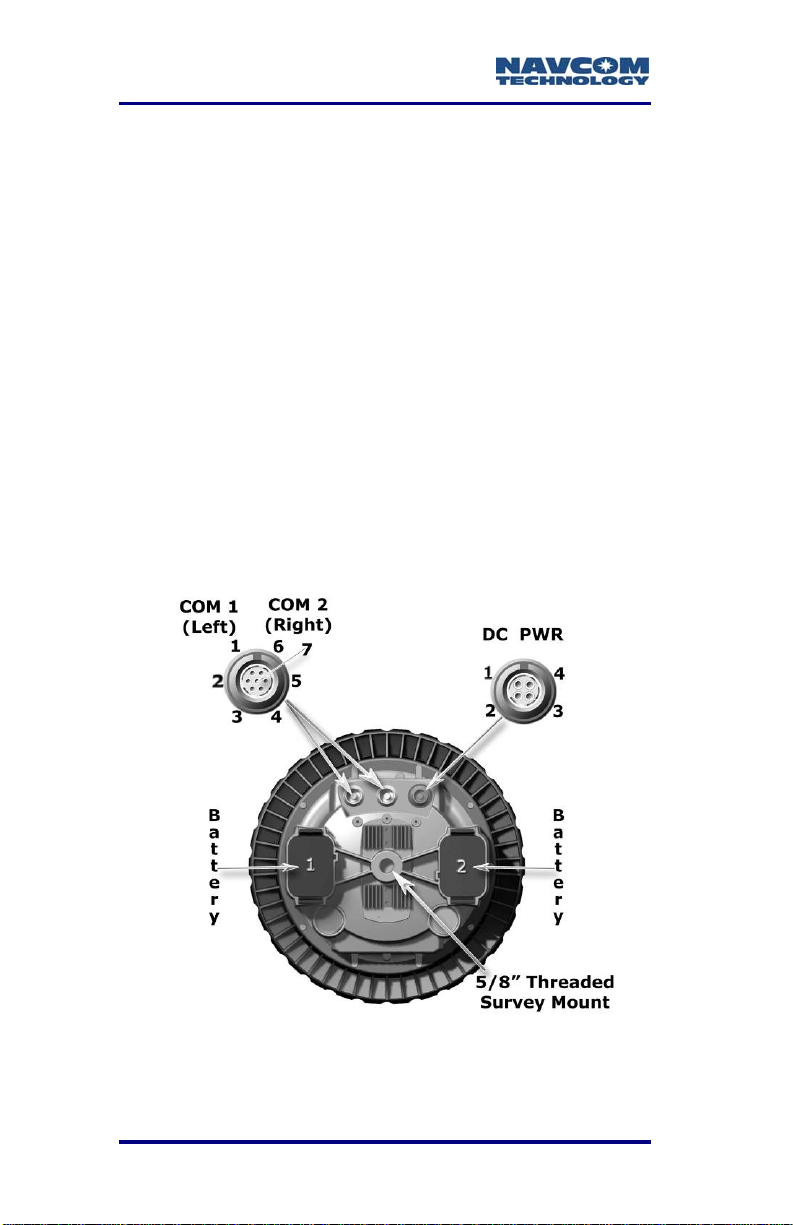
The SF-2040 provides two 7-pin female LEMO
connector communication ports, labeled COM1 and
COM2, located at the bottom front of the sensor (as
shown in Figure 1). Each conforms to the EIA RS232
standard with data rates from 1.2 to 115.2kbps.
COM1 is the control port, and COM2 is the data port
(see Figure 4 for a schematic of the LAND-PAK
interfacing).
2-22
Figure 1: SF-2040, Viewed From Bottom
Page 27

LAND-PAK™ User Guide – Rev. C
Refer to the supplied SF-2040 GPS
Product User Guide for further
information about the SF-2040.
Base Station and Rover Radio Modems
The LAND-PAK includes a
base station and a rover radio
modem.
Refer to The LAND-
PAK Configurations
section below for the
specific radio modems used in the
current LAND-PAK configurations.
Set the radio modems only to a
licensed frequency. It must comply
with local regulatory authorities.
User Interface
The LAND-PAK radio modems are configurable via
SurvCE software on the Explorer 600+ controller.
Additionally, the radio modems are configurable
without any external device via the integrated LCD
display and four soft keys. The soft keys access onscreen menus.
During operation, the LCD display shows RF
frequency, battery status, data port speed, and signal
strength (in dBm).
LED Indicators
Figure 2: Radio Modem LED Indicators
2-23
Page 28

LAND-PAK™ User Guide – Rev. C
The LED indicators provide a quick status view of
both the radio channel and the serial interface with
the GPS.
The CTS LED illuminates when the radio modems
are powered on. Refer to Table 1 for LED indications.
Table 1: Radio Modem LED Indications
LED
RTS
CTS
TD
RD
CD
Description
Request To Send
Clear To Send
Transmit Data
(Input of the data
to be transmitted
from the DTE to
the radio modem.)
Receive Data
(Output of the
data received
from the radio
modem to the
DTE.)
Carrier Detect
(radio status)
Active Status
Red
Red
Red = data transmit
Green = test Tx active
Red
Red = transmission
Orange = noise
Green = reception
2-24
Page 29

LAND-PAK™ User Guide – Rev. C
Explorer 600+ Data Collector
The Carlson Explorer 600+ high-speed (624 MHz),
hand-held data collector features a liquid crystal 320
x 240 QVGA-TFT color, sunlight-readable display
with a touch screen and LED backlight. It is equipped
with 128MB of SDRAM and 512MB of internal
compact flash memory.
Carlson SurvCE data collection software for land
surveying applications is installed on the Windows CE
.NET Professional operating system.
The supplied rechargeable Nickel Metal Hydride
(NiMH) battery pack can provide up to twelve hours of
operating time on a full charge (depending on power
management and use).
The Explorer 600+ provides WiFi and Bluetooth, a
USB port and a Serial port, and a Compact Flash
(CF) slot.
The weather resistant shell, rated to withstand winddriven rain, has a keyboard designed for surveyors
and six LED Indicators, including a charge/low battery
indicator. The Explorer 600+ comes with a cradle for
attachment to the rover pole.
Refer to the supplied Carlson Explorer
600+ user manual for further
information.
Always use the supplied stylus to
interact with the Explorer 600+ touch
screen. Never use sharp objects. Use
the supplied screen protectors to
increase the life of the touch screen.
2-25
Page 30
LAND-PAK™ User Guide – Rev. C
User Interface
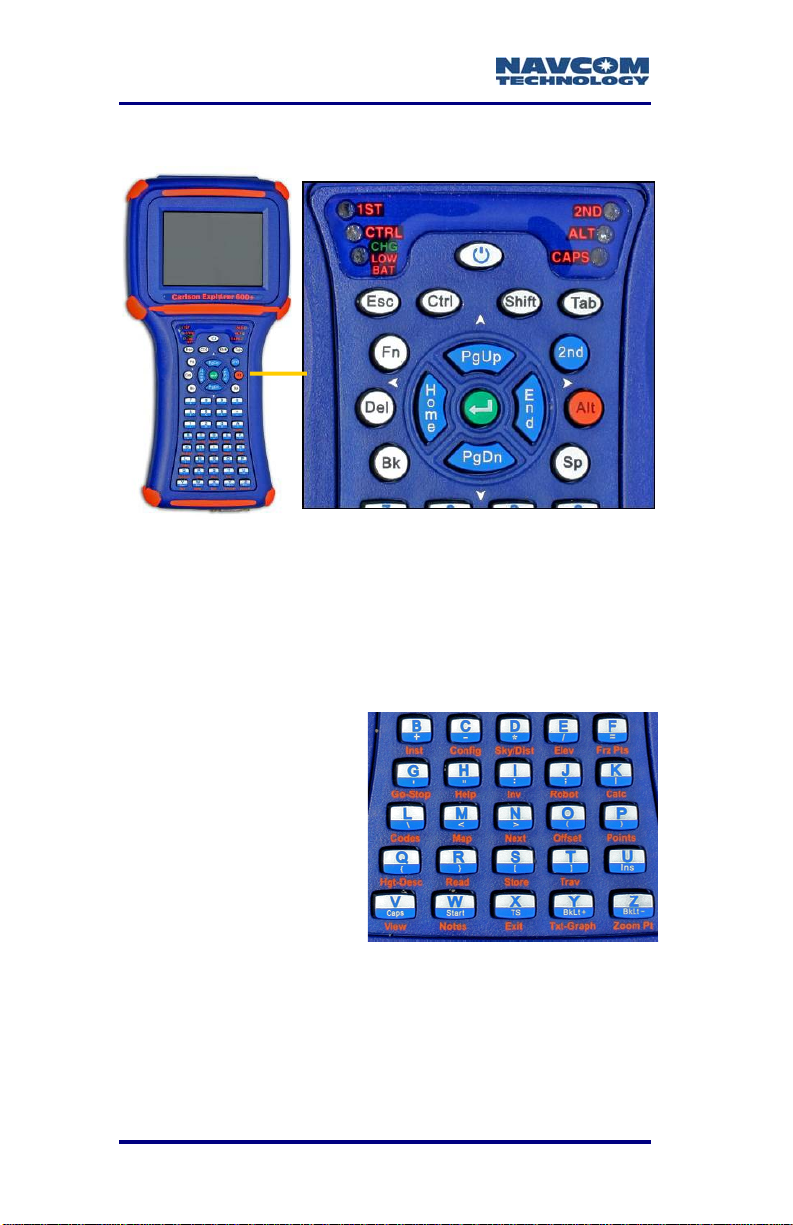
Figure 3: Carlson Explorer 600+ User Interface
The Carlson Explorer 600+ has a 53-key keypad. It
provides the functionality of a full-sized keyboard
through the use of multi-functional modifier keys. Four
LEDs located to the left and right of the power button
indicate the active state of the modifier keys.
9 2nd Key: Press to
access the
characters and
functions in the
blue bottom half of
the keys.
9 Alt Key: Press to
access the orange
letter hot keys
below the Alpha Letters A thru Z. For detailed
information about the hot keys, refer to the
supplied Carlson SurvCE manual.
The functions of the Fn key and the 1
are not applicable to the LAND-PAK.
2-26
st
LED
Page 31

LAND-PAK™ User Guide – Rev. C
Operation
9 Power Off: Press and hold the power button for
approximately 10 seconds. This action terminates
active applications, and ceases serial port
operations.
9 Suspend Mode: Press and immediately release
the power button. The display turns off, but active
applications are not shut down (except serial port
operations). To exit suspend mode, press and
release the power button. The display turns on,
suspended applications resume running, but
serial port operations must be restarted. Use
suspend mode to conserve battery power.
9 Warm Re-Boot: In Windows CE, select Start >
Programs > Tools > Warm Re-Boot.
SurvCE Software
Carlson SurvCE is a complete data collection system
for Real Time (RTK) GPS.
Refer to Chapter 5 SurvCE Software
Operation for a quick start setup and
operation of SurvCE. Refer to the
supplied Carlson SurvCE manual for
details not covered in this guide.
SurvCE Upgrade
Contact NavCom Technology prior to
upgrading the factory installed version
of SurvCE on the Explorer 600+. If
appropriate, download the latest
version of Carlson SurvCE from the
Carlson web site at
http://www.carlsonsw.com
To install SurvCE on the Explorer 600+, a PC requires
Microsoft ActiveSync on Windows XP or earlier, or the
2-27
.
Page 32

LAND-PAK™ User Guide – Rev. C
Windows Mobile Device Center on Windows Vista.
ActiveSync is on the supplied SurvCE CD. The latest
versions of either program are available from Microsoft.
SurvCE Installation on Windows XP or earlier:
9 Boot-up Windows CE on the Explorer 600+. If
Windows CE is already running, close any open
applications.
9 Run PC Link from the desktop. The PC Link
window opens and closes quickly.
9 Connect the PC and the Explorer 600+ with the
supplied USB cable. (The USB cable is in the
office transit case).
o ActiveSync starts automatically. The New
Partnership window opens.
9 Select No.
9 Click the Next button.
o The ActiveSync window opens. A guest
connection is indicated.
9 Click the Explore button.
9 Browse to the folder with the downloaded SurvCE
exe file.
9 Double-click the exe file.
o The SurvCE setup wizard opens. Follow the
on-screen instructions. When asked to check
the mobile device for additional steps, a box
with a stopped progress bar will be open on
the Explorer 600+.
9 Tap the OK button in the top right corner of the box.
o Installation continues. When the box
disappears, the installation is complete.
9 On the PC, close the wizard and ActiveSync.
2-28
Page 33

LAND-PAK™ User Guide – Rev. C
TruBlu™ Module
The TruBlu™ module is a wireless
transceiver that provides wireless
connectivity with the Bluetooth®
enabled Explorer 600+ data collector
within a range of 100 feet (30 meters).
Features
9 Water-resistant, sealed unit
9 Internal flashing blue LED clearly indicates
operation
9 FCC & CE certified when used with NavCom GPS
Receivers
9 Contains Bluetooth-certified components
No wires
TruBlu™ delivers the convenience of wireless control
and logging of up to 10Hz position records in the
Explorer 600+. Use a serial cable to download the
internal memory and for real-time position / data
transfers greater than 10Hz.
No batteries required
TruBlu™ is powered directly by its host NavCom GPS
unit, so it requires no additional batteries for usage.
Its power needs are minimal; for example, when the
SF-2040 is powered by NavCom batteries, power life
will be reduced by less than 10% from TruBlu™ use.
Compact size
TruBlu™ is only 41mm x 28mm x 22mm (1 5/8” x 1
1/8” x 7/8”), taking up very little space.
2-29
Page 34

LAND-PAK™ User Guide – Rev. C
Office Software
9 Carlson X-Port – This program is a file transfer
and data editing utility. In the office, X-Port is used
to communicate with the Explorer 600+ data
collector, transfer files, process coordinates, and
convert coordinates and raw data formats.
Refer to Chapter 6 Data Transfer for a
quick start to the use of X-Port. The
Carlson X-Port manual may be
obtained from the Carlson web site:
http://www.carlsonsw.com
9 NavCom St arUtil – This program is designed to
setup and view many (but not all) of the SF-2040
functions. In addition to its setup capabilities,
StarUtil can capture and log data, upload new
software and licenses to the three internal
processors, and query and display various
receiver performance functions. The StarUtil
software and user guide is supplied on the CD in
the office supplies transit case.
.
2-30
Page 35

LAND-PAK™ User Guide – Rev. C
The LAND-PAK Interfacing
GPS / StarFire Antenna
NCT-2100D IOP
Com
Data rate
38400
8 1 NP
Data rate
19200
8 1 NP
Controller
19.2K 19.2K
115K
2 Com1 1PPS
TruBlu
Satel
Radio
Modem
Bluetooth
Carlson
Explorer
600+
Data rate
19200
8 1 NP
115K
Event
CAN
NCT-2100D IOP
Com2 Com1 1PPS
Satel
Radio
Modem
LBM
SF-2040
19.2K 19.2K
115K
Data rate
38400
8 1 NP
TruBlu
GPS / StarFire Antenna
115K
Event
CAN
07-00060-B
Figure 4: The LAND-PAK Interfacing
The LAND-PAK Configurations
The LAND-PAK currently has two configurations:
LBM
SF-2040
9 The LAND-PAK LM
9 The LAND-PAK 869
Refer to the supplied Satelline-3ASd
user guide for detailed information on
the radio modems described below.
The LAND-PAK LM
The LAND-PAK LM configuration includes the
SATELLINE-3ASd Epic high power 10-Watt
2-31
Page 36

LAND-PAK™ User Guide – Rev. C
transmitter for the base station assembly and the
SATELLINE-3ASd for the rover assembly. They are
set to communicate at 38400 baud. The operating RF
frequency range of the LAND-PAK LM configuration
is 450 MHz to 470 MHz.
When ordering the LAND-PAK LM
configuration, the user must specify
the desired operating frequency of the
radio modems. The specified
frequency is set at the factory. It is the
responsibility of the user to ensure
that the requested frequency complies
with local regulatory authorities.
The factory set central RF frequency is listed
with the serial number on the radio modem.
The RF frequency can be set within 1MHz of
the central frequency, at 25KHz increments.
If retuning beyond 1 MHz is necessary, the
user must ship the radio to the manufacturer’s
factory for hardware modification. Any
shipping and customs charges are the
responsibility of the customer.
The LAND-PAK 869
The LAND-PAK 869 configuration includes two
SATELLINE-3ASd 869 radio modems for the base
station assembly and for the rover assembly. They
are set to communicate at 38400 baud. The 3ASd
869 radio modem is capable of transmitting up to
500 mW. The operating RF frequency range of the
LAND-PAK 869 configuration is 869.400 MHz to
869.650 MHz.
The 3ASd 869 radio modem is currently type
approved in Austria, Belgium, Croatia,
Czechoslovakia, Denmark, Estonia, Finland, France,
Germany, Greece, Hungary, Iceland, Ireland, Italy,
2-32
Page 37

LAND-PAK™ User Guide – Rev. C
Latvia, Malta, Norway, The Netherlands, Poland,
Portugal, Romania, Slovakia, Spain, Sweden,
Switzerland, Turkey, and The United Kingdom.
Please check with local regulatory
authorities to ensure compliance.
2-33
Page 38

LAND-PAK™ User Guide – Rev. C
This page is left blank intentionally
2-34
Page 39

LAND-PAK™ User Guide – Rev. C
Chapter 2 ........................Inventory Check
This chapter provides the complete system inventory
for the LAND-PAK LM configuration.
Refer to Appendix A for the complete
system inventory for the LAND-PAK
869 configuration.
The Inventory Check is divided into three sections:
Base Station Inventory, Rover Inventory, and Office
Supplies Inventory.
The system is shipped in five boxes, which contain
the transit cases and bags listed below. The transit
cases are labeled on the top. The bags are labeled
under the NAVCOM logo.
9 Base Station Transit Case
9 Base Bag
9 Rover Transit Case
9 Rover Bag
9 Office Supplies Transit Case
Carefully remove equipment from
transit cases and bags. If any items
are missing or damaged, immediately
contact NavCom Customer Support:
Telephone: +1 (310) 381-2000
Web:
http://www.navcomtech.com/Contact/Contact
Support.cfm
2-35
Page 40

LAND-PAK™ User Guide – Rev. C
Base Station Inventory
This section lists all the supplied equipment in the
Base Transit Case and the Base Bag.
Figure 5a: Base Transit Case Supplied Equipment
Table 2: Base Transit Case Parts List
SF-2040 GIS PM Sensor
(P/N 92-310045-3001)
Included and Installed Software Options:
1
RTK Software
(P/N 97-310041-3006)
RTK Extend
(P/N 97-310041-3009)
Two Lithium-Ion Battery Packs, 10.8 VDC, 4.4 Ah
2
(P/N 59-020102-3001 each)
Tribrach, w/ Optical Plummet, black
3
(P/N 60-990007-0001)
Adaptor, Tribrach, Fixed
4
(P/N 60-990008-0001)
Base Transit Case {Not Shown}
5
(P/N 79-100106-3001)
Continued on next page
2-36
Page 41

LAND-PAK™ User Guide – Rev. C
Figure 5b: Base Transit Case Supplied Equipment
Base Transit Case Parts List continued
3ASd EPIC Radio Modem, 10W o/p Power
6
(P/N 82-042001-0002)
Bag for 3ASd EPIC Radio Modem
7
(P/N 79-700005-0001)
12V 8Ah Bag Battery for 3ASd EPIC Radio Modem
8
(P/N 59-020152-0001)
Antenna, Gainflex 435-470 MHz, TNC
9
(P/N 82-001015-0003)
Radio Antenna Cable, 12 ft (3.7m)
(P/N 94-310058-3012)
10
NavCom Base Cable 10 ft (3m)
11
(P/N 73-100002-0001)
Tape Measure & Pocket Rod Combo, 12ft (3.7m)
12
(P/N 60-990009-0001)
2-37
Page 42

LAND-PAK™ User Guide – Rev. C
Figure 6: Base Bag Supplied Equipment
Table 3: Base Bag Parts List
Bag, Tripod {Not Shown}
1
(P/N 79-700003-0001)
Tripod, Dual Lock, Fiberglass, Waterproof, 72 in Legs
2
(P/N 60-430002-0001)
Bracket, Radio Antenna To Tripod
3
(P/N 60-500001-0001)
Snap-Lock Radio Antenna Pole, 6ft
4
(P/N 60-440002-0001)
Pole Extension, 6 inch: 1 inch diameter
5
(P/N 60-440003-0001)
Radio Antenna Adaptor
6
(P/N 88-310055-3002)
2-38
Page 43

LAND-PAK™ User Guide – Rev. C
Rover Inventory
This section lists all the supplied equipment in the
Rover Transit Case and the Rover Bag.
Figure 7a: Rover Transit Case Supplied Equipment
Table 4: Rover Transit Case Parts List
SF-2040 GIS PM Sensor
(P/N 92-310045-3001)
Included and Installed Software Options:
1
RTK Software
(P/N 97-310041-3006)
RTK Extend
(P/N 97-310041-3009)
Two Lithium-Ion Battery Packs, 10.8 VDC, 4.4 Ah
2
(P/N 59-020102-3001 each)
Serial Cable, 6 Ft Coiled
3
(P/N 94-310090-3003)
TruBlu™ Module
4
(P/N 92-210182-3001)
Carlson Explorer 600+, Carlson SurvCE w/GPS
5
(P/N 82-061001-0001) {Supplied USB Cable Not Shown}
Rover Transit Case {Not Shown}
6
(P/N 79-100107-3001)
Continued on next page
installed
2-39
Page 44

LAND-PAK™ User Guide – Rev. C
Figure 7b: Rover Transit Case Supplied Equipment
Rover Transit Case Parts List continued
Extra Orange Styli (Set of 3) for Carlson Explorer 600+
7
(P/N 60-990010-0001)
Screen Protectors for Carlson Explorer 600+, Set of 5
8
(P/N 60-220001-0001)
Vehicle Charger for Carlson Explorer 600+
9
(P/N 59-800004-0001)
3ASd Radio Modem, 1W o/p Power
10
(P/N 82-042001-0001)
3ASd Battery Cradle
11
(P/N 60-990011-0001)
3ASd Battery with switch
12
(P/N 59-020201-0001)
Bag for 3ASd Radio Modem
13
(P/N 79-700005-0002)
Antenna, Gainflex 435-470 MHz, TNC {The antenna is
stored in the lower portion of the rover transit case lid.}
14
(P/N 82-001015-0003)
NavCom Cable, DB-9
15
(P/N 73-100002-0002)
2-40
Page 45

LAND-PAK™ User Guide – Rev. C
Figure 8: Rover Bag Supplied Equipment
Table 5: Rover Bag Parts List
Rover Bag {Not Shown}
1
(P/N 79-700002-0002)
Pole, Carbon Fiber and Aluminum, 8.5 ft (2.6m)
2
(P/N 60-430001-0002)
Bipod, Carbon Fiber, Open Clamp
3
(P/N 60-430001-0001)
Cradle for Carlson Explorer 600+
4
(P/N 60-570002-0001)
2-41
Page 46

LAND-PAK™ User Guide – Rev. C
Office Supplies Inventory
This section lists all the supplied equipment in the
Office Supplies Transit Case.
Figure 9: Office Supplies Transit Case
Table 6: Office Supplies Transit Case Parts List
Battery Charger Kit for SF-2040 GIS PM Sensor
(P/N 92-310092-3001)
Kit Includes:
1
4-Bay Battery Charger w/ Cable (P/N 92-310046-3001)
Charger Power Supply (P/N 82-02003-5001)
Battery Charger Kit for Carlson Explorer 600+
2
(P/N 59-810001-3001)
Battery Charger for EPIC Radio Modem Bag Battery
3
(P/N 59-800002-0001)
Option:
110V Battery Charger for 3ASd Radio Modem Battery
(P/N 59-800001-0001)
4
Or
220V Battery Charger for 3ASd Radio Modem Battery
(P/N 59-800001-0002) {Not Shown}
Office Supplies Transit Case {Not Shown}
5
(P/N 79-100108-3001)
Continued on next page
2-42
Page 47

LAND-PAK™ User Guide – Rev. C
Office Supplies Transit Case Parts List continued
User Guide, LAND-PAK
6
(P/N 96-310030-3001)
User Guide, SF-2040 GIS PM Sensor
7
(P/N 96-310003-3001)
User Guide, Carlson Explorer 600+
8
(P/N 96-000001-0001)
User Guide, Carlson SurvCE
9
(P/N 96-000001-0002)
User Guide, SATELLINE -3ASd Radio Modems
(P/N 96-000001-0003)
10
CD containing User Guides, Reference Material, and
StarUtil Utility Software/User Guide
11
(P/N 96-310006-3001)
2-43
Page 48

LAND-PAK™ User Guide – Rev. C
This page is left blank intentionally
2-44
Page 49

LAND-PAK™ User Guide – Rev. C
Chapter 3 .......................Battery Charging
This chapter provides guidance on battery charging
for optimum performance. All the battery chargers are
in the transit case labeled Office Supplies.
All the LAND-PAK batteries must be
charged before the test setup of the
system. Refer to Chapter 4 Function
Test Setup.
For optimum battery life and
performance, it is important that all
batteries receive a full charge before
first use.
Refer to Chapter 7 Equipment
Maintenance for safety instructions
regarding battery use, storage, and
disposal.
SF-2040 GPS Sensor Battery Packs
The LAND-PAK includes two SF-2040 GPS Sensors,
each supplied with two lithium-ion battery packs. The
battery charger has four independent charging bays
for simultaneous charging.
Refer to the supplied SF-2040 GPS
Product User Guide for details on
battery use, safety, and disposal.
Charge the battery packs only with the
supplied battery charger (P/N 92-
310046-3001) and supplied charger
power supply (P/N 82-02003-5001);
otherwise, damage to the battery
packs could occur.
4-45
Page 50

LAND-PAK™ User Guide – Rev. C
Battery Charger LEDs
Table 7: Sensor Battery Charger LEDs
LED Status
Power
Battery Bays
Battery Charging
Power On
Charging
Charging Complete
The SF-2040 battery packs are
shipped in a partially charged state.
Complete one full charge cycle (8-10
hours) before battery use.
Refer to Figure 9, item 1 for battery charger kit photo.
1. Connect the power cable to the AC to DC power
supply.
2. Connect the power supply jack to the battery
charger assembly.
3. Plug the power cable into an AC receptacle. The
green power LED illuminates.
4. Insert four battery packs into the charger. The
LED status is shown in Table 7.
5. Charge battery packs until the green LED below
each bay illuminates.
Do not short circuit battery contacts.
Do not store battery packs above 60
deg C (140 deg F). Do not
disassemble battery packs. Do not
expose to fire (explosive hazard).
4-46
Page 51

LAND-PAK™ User Guide – Rev. C
If the battery packs are left charging
for longer than 5 days, the charging
indicator LEDs will shut off. If this
occurs, place the battery packs in the
SF-2040 GPS Sensor and power on
for 10-15 minutes in order to slightly
discharge the batteries.
Remove the battery packs from both
SF-2040 GPS Sensors if the sensors
will not be used for over 1 week.
Battery Installation
The SF-2040 GPS Sensor battery packs are keyed to
prevent improper installation. There are two locking
clips on either side of the battery end (see Figure 10).
Figure 10: Battery Locking Clips
The bottom of the sensor has two battery chambers.
Install each battery pack by sliding it into a chamber.
Align the channel on the chamber to match the
battery notch. Press the end firmly until the locking
clips click. Verify both locking clips are locked in
place.
If both locking clips are not locked in
place, a battery pack could
inadvertently drop to the ground.
4-47
Page 52

LAND-PAK™ User Guide – Rev. C
Battery Removal
Using the thumb and the middle finger, depress the
two locking clips firmly. The battery pack should pop
out enough to be pulled free of the chamber.
Battery Testing
Refer to the supplied SF-2040 GPS Product User
Guide for details on testing the battery packs in the
sensor.
4-48
Page 53

LAND-PAK™ User Guide – Rev. C
3ASd Epic Radio Modem Bag Battery
The LAND-PAK LM configuration includes the 3ASd
Epic radio modem for the base station. A 12V 8Ah
bag battery powers the 3ASd Epic radio modem.
Charge the bag battery only with the
supplied bag battery charger (P/N 59-
800002-0001); otherwise, damage to
the battery could occur.
Battery Charger LEDs
Table 8: Bag Battery Charger LEDs
LED Status
Charging
Charging Complete
The LED functions printed on the
battery charger, Fast Charge and
Float Charge, do not apply to this
procedure.
Battery Charging
Refer to Figure 9, item 3 for battery charger photo.
1. Connect the LEMO 2-pin connector end of the
bag battery charger to the female LEMO
connector on the bag battery.
2. Plug the opposite end of the bag battery charger
into an AC receptacle. The red LED on the
charger illuminates. If the green LED illuminates,
the battery is already fully charged, or if not fully
charged, the battery is malfunctioning.
3. Charge the bag battery until the green LED
illuminates. One full charge cycle requires 9-12
hours to complete.
4-49
Page 54

LAND-PAK™ User Guide – Rev. C
4. Unplug the battery charger.
LEMO 2-Pin
Male 15-Pin
Serial
Connector
Figure 11: NavCom Base Cable
Refer to Figure 11 for the steps below:
5. Verify the bag battery is fully charged. Power on
the radio modem to check the battery voltage:
a. Connect the serial 15-pin end of the NavCom
base cable to the female serial connector on
the bottom right of the radio modem.
LEMO 7-Pin
b. Connect the LEMO 2-pin end of the base
cable to the bag battery. The radio modem
powers on. (The LEMO 2-pin connector is
fitted to the red fuse-fit and black cables.)
The LCD display shows the battery status and
other settings. The supply voltage is in the top
right (see Figure 17). A full charge is 13.5V to
14.70V.
The LEMO 7-Pin end of the base
cable is not used in this procedure.
6. Disconnect the bag battery if it is fully charged.
4-50
Page 55

LAND-PAK™ User Guide – Rev. C
1
3ASd and 3ASd 869 Radio Modem Battery
A 9.6V 2Ah NiMh battery powers both the 3ASd and
the 3ASd 869 radio modems. The battery is attached
to a cradle on the back of the radios. The battery
charger is the same for both types of radio modem.
The LAND-PAK LM configuration includes one
battery charger
The LAND-PAK 869 configuration includes two
battery chargers
1
for the 3ASd radio modem (rover).
1
, one for each 3ASd 869 radio
modem (base and rover).
There is no charging indicator on the battery charger.
The top of the battery has an on/off switch and a red
LED. The illuminated red LED indicates power on and
battery charging.
Charge the batteries only with the
supplied battery charger; otherwise,
damage to the battery could occur.
Battery LED
Table 9: Rover Radio Modem Battery LED
LED Status
Battery Charging/Radio Modem Power On
Battery Charging
Refer to Figure 9, item 4 for battery charger photo.
1. Connect the serial 9-pin end of the battery
charger to the female connector on the bottom of
the radio.
2. Plug the opposite end of the battery charger into
an AC receptacle.
Battery Charger Option:
110V (P/N 59-800001-0001) or 220V (P/N 59-800001-0002)
4-51
Page 56

LAND-PAK™ User Guide – Rev. C
3. Turn on the switch at the top of the radio modem
battery. The red LED illuminates.
The on/off switch must be on to
charge the battery. If the switch is not
on, the charger powers the radio (the
LCD display is on), but does not
charge the battery.
4. Charge the battery for 12 hours.
The LED does not indicate when the
charge cycle is complete. When the
battery is on, the LED is always a
steady red. Do not charge the rover
radio modem for more than 72 hours.
5. Verify the battery is fully charged. A full charge is
10.5V to 11.1V. The voltage of the battery is
indicated on the top right of the LCD display (see
Figure 17).
6. Turn off the battery and unplug the battery
charger if the charge cycle is complete. When the
battery is off, the LED is not lit.
It is very important to turn off the
battery. If the battery remains on, it
immediately begins to power the radio
modem when the charger is
unplugged. The battery will eventually
drain completely if not turned off.
Battery Installation
The radio modem has a 4-pin power
connector on the back. It connects to
the female power connector on the
back of the battery.
1. Turn off the switch on the top of the battery if it is
on.
4-52
Page 57

LAND-PAK™ User Guide – Rev. C
2. Loosen the screw on the bottom of the battery.
3. Insert the slots at the top of the battery into the 2
hooks at the top of the battery cradle.
4. Lower the bottom of the battery into the bracket at
the bottom of the battery cradle.
5. Carefully press the bottom of the battery to
connect the female and male power connectors.
The battery snaps into place.
6. Tighten the screw on the bottom of the battery.
7. Verify battery function. Turn on the switch on the
top of the battery. The red LED illuminates. At
power-on, the LCD display shows the setup
screen.
Battery Removal
1. Turn off the switch at the top of the battery if it is
on. The red LED turns off. Unplug the battery
charger if it is connected.
2. Loosen the screw on the bottom of the battery.
3. Grasp the battery at the bottom.
4. Carefully pull the battery up from the bottom until
it is free from the bottom bracket of the cradle and
the 4-pin power connector on the back of the
radio.
5. Slowly continue to pull the battery up from the
bottom. The battery will disengage from the 2
hooks at the top of the cradle.
6. After the battery is removed, re-tighten the screw
on the bottom of the battery to avoid its accidental
loss.
4-53
Page 58

LAND-PAK™ User Guide – Rev. C
Carlson Explorer 600+ Battery Pack
This section provides steps to:
9 Charge the battery pack for the Carlson Explorer
600+ data collector.
9 Boot up Windows CE to verify functionality and to
verify Carlson SurvCE software is installed.
A 7.2V 2500mAh NiMH battery pack powers the
Carlson Explorer 600+. It can provide approximately 8
to 12 hours of operating time on a full charge
(depending on power management and use).
There is no charging indicator on the Explorer 600+
battery charger. The CHG LED on the Explorer 600+
front panel indicates battery charging status.
Charge the battery pack only with the
supplied battery charger kit (P/N 59-
810001-3001); otherwise, damage to
the battery pack could occur.
For optimum battery performance,
refer to the supplied Carlson Explorer
600+ user manual, Power
Recommendations section.
A vehicle charger (P/N 59-800004-
0001) for the Explorer 600+ is
supplied for use in the field.
If the battery pack is lost, six AA
batteries can provide power to the
Explorer 600+ for approximately 2 to 3
hours. If TruBlu™ wireless is being
used, battery life is less.
4-54
Page 59

LAND-PAK™ User Guide – Rev. C
Battery Charging
The battery pack is shipped fully
charged and installed in the Explorer
600+. Some battery dissipation occurs
during shipping. Charge the battery
pack in the Explorer 600+ for
approximately four hours before first
use.
1. Assemble the battery charger kit:
a. Fit the input plug into the AC/DC adapter (see
Figure 12).
Figure 12: AC/DC Adapter Input Plug
b. Plug the battery charger jack into the rear
power connector on the female connector end
of the charging cable (see Figure 13).
Figure 13: Battery Charger/Charging Cable
2. Connect the female connector end of the charging
cable to the 9-pin male connector on the bottom
of the Explorer 600+ (see Figure 14).
4-55
Page 60

LAND-PAK™ User Guide – Rev. C
Figure 14: Explorer 600+ Charger Connection
3. Plug the battery charger into an AC receptacle.
The CHG LED on the Explorer 600+ front panel
illuminates green (see Figure 15).
Figure 15: CHG LED
The 9-pin male connector end of the
charging cable is not used in this
procedure.
4. Charge the battery until the green CHG LED
blinks (approximately four hours).
5. Unplug the battery charger and disconnect the
charging cable from the Explorer 600+.
Verify functionality:
6. Press the Explorer 600+ power button
boot up the Windows CE desktop. The icon for
Carlson SurvCE is on the desktop (see Figure
52).
7. Shut down Windows CE. Press and hold the
Explorer 600+ power button for at least 10
seconds.
4-56
to
Page 61

LAND-PAK™ User Guide – Rev. C
Battery Pack Installation and Removal
The battery compartment door is on the back of the
Explorer 600+.
• Install the battery pack with the orange label face
up. The label identifies the top and bottom of the
battery pack.
• Pull the cloth strip at the bottom of the battery
pack to remove the battery pack.
4-57
Page 62

LAND-PAK™ User Guide – Rev. C
This page is left blank intentionally
4-58
Page 63

LAND-PAK™ User Guide – Rev. C
Chapter 4 ..................Function Test Setup
This chapter provides a test setup of the LAND-PAK
before field operation to ensure system functionality.
The function test setup involves:
9 Radio modem configuration
9 Hardware setup
System inventory and battery charging must be
completed before this test setup. Refer to Chapter 2
Inventory Check and Chapter 3 Battery Charging.
The function test setup does not
involve satellite communication. Refer
to Chapter 5 SurvCE Software
Operation for a quick start guide to
initialize the system and start
collecting computed positions in three
dimensions.
NavCom male and female LEMO
connectors feature a red dot for easy
connection alignment.
4-59
Page 64

LAND-PAK™ User Guide – Rev. C
Radio Modem Configuration
This section provides steps to initially configure the
LAND-PAK radio modems. Configuration is almost
identical for both the base station and rover radio
modems, differing only in RF power output settings.
Refer to the supplied Satelline-3AS
user guide for additional information
on radio modem configuration.
After the initial configuration, generally
only the RF frequency and the base
station RF power output settings need
to be changed to accommodate job
needs. These settings are generally
changed using SurvCE software on
the Explorer 600+ data collector. Refer
to Chapter 5 SurvCE Software
Operation.
4-60
Page 65

LAND-PAK™ User Guide – Rev. C
Soft Keys
Figure 16: Radio Modem Soft Keys
By using the four soft keys below the LCD display, all
configurable settings are accessible through onscreen menus (see Figure 16).
The function of each soft key, which varies depending
on menu requirements, appears at the bottom of the
LCD display (see Table 10).
Table 10: Radio Modem Soft Key Functions
Soft Key Function
CANCEL/BACK/EXIT: Cancel changes. Go
back to a previous screen. Exit the main
menu. Upon exiting the main menu, a
confirmation screen opens for saving or
discarding changes to settings.
UP/DOWN: Move through menus and
options. Change numerical values.
SETUP/SELECT/CHANGE/SET/NEXT:
Setup the radio modem configuration – the
main menu opens. Select a menu or option.
Change an option setting. Set changes. For
numerical values, move to the next digit.
4-61
Page 66

LAND-PAK™ User Guide – Rev. C
Operating Modes
The radio modems operate in data tr
default. Prog
radio modem
Dat Tra
In data trans wer-up,
ramming mode is used to configure the
s.
nsfer Mode
a
fer mode, which appears at po
ansfer mode by
the LCD display shows the operating settings of the
radio modem, signal strength, and battery status (see
Figure 17).
Figure 17: LCD Display – Data Transfer Mode
Programming Mode
Programming mode is accessed from the data
programming mode main menu opens (see Figure
18). The cursor “>” indicates the active option.
Figure 18: LCD Display – Programming Mode
4-62
transfer mode screen. Press the Setup soft key. The
Page 67

LAND-PAK™ User Guide – Rev. C
Configuration
The sections following provide steps to configure
these radio menu items:
9 RF Frequency
9 RF Power Output (set for base station only)
9 Signal Threshold (set for rover only)
9
Addressing Settings
9
Serial Port Settings
9
Handshaking
Additional
9
Configure the base station radio modem. Then repeat
the configuration steps for the rover radio modem.
1. Power on the radio modem:
• Base Station Radio Modem:
• The LAND-PAK LM configuration (3ASd
Epic radio modem): There is no on/off
switch on the 3ASd Epic radio modem.
Connect the serial 15-Pin end of the
NavCom base cable to the female serial
connector on the bottom right of the radio
modem. Connect the LEMO 2-Pin end to
ag battery (see Figure 11).
the b
• The LAND-PAK 869 configuration (3AS
d
869 radio modem): Turn on the switch at
the top of th e battery. The red LED
illuminate
s.
• Rover Radio Modem:
• The rover radio modems in th
LM and 869 co
type of battery.
nfigurations use the same
Turn on the switch at the
e LAND-PAK
4-63
Page 68

LAND-PAK™ User Guide – Rev. C
top of th
illuminat
e battery. The red LED
es.
During this initial configuration, the
signal strength setting in data transfer
mode is blank (see Figure 19).
Figure 19: Data Transfer Mode
2. Acc ss
key e
sho
ver n
app r
At
programming mode. Press the Setup soft
e
e
(s
Figure 19). The display temporarily
the radio modem model and the firmware
ws
. Then the main menu automatica
sio lly
ea s (see Figure 18).
any time during configuration, press
the soft ke
Cancel/Back
changes if necessary, t
previous scr
menu.
een, or to exit the main
y to cancel
o return to a
RF requ
nly to a
nitial
4-64
ency Configuration F
Set the radio modems o
licensed frequency. It must comply
with local regulations.
A label on both radios lists the i
(center) frequency. The label is on the
front of the base station radio. It is on
the rear of the rover radio, above the
battery. The frequency can be set
within 1MHz of the center frequency,
at 25KHz increments.
Page 69

LAND-PAK™ User Guide – Rev. C
1. Press t equency
from the mai
he Select soft key to select RF fr
n menu (see Figure 18). The
frequency of the active channel is displayed (see
Figure 20).
Figure 20: Active Channel
ss the C2. Pre hange soft key to e the
frequency. The center freque
a cursor pointing up to t
an
c not be changed.
et uency:
3. S q
the radio modem to the licensed fre
cursor to
Press the next soft key
a. to move the
chang
ncy is
he first digit.
displayed with
The first digit
the next digit (see Figure 21).
Figure 21: Next Digit
b. Press the up or down arrow soft key to
change the value of the digit, if needed.
c. Repeat steps a and b above for each
configurable digit.
When the cursor is at the last configurable
digit, the Set option appears in the bottom
right of the LCD display (see Figure 22).
4-65
Page 70

LAND-PAK™ User Guide – Rev. C
Figure 22: Set Frequency
Change the value of the last cod. nfigurable digit,
if needed.
e. Press the Set soft key to set the frequency
changes. Or, press the Cancel soft key to
cancel the changes.
• If the frequency is set within the
acce ation message
ptable range, a confirm
is disp en the main
menu returns.
• If the frequency is set outside the
acceptable range, an error messag
displayed te
menu returns. No change is made to th
center frequency. Repeat the RF
frequency configuration procedure to
change the frequency.
layed temporarily. Th
mporarily. Then the main
e is
e
• If the frequency changes are canceled, the
display returns to the main menu.
4. Continue to the next section, to configure the RF
power output.
RF Power O
Perform this setting only on the base station radio
modem e rover radio modem is being configured,
go
to the next section below, Signal Threshold.
1. Pre sor
4-66
ss the down arrow soft key to move the cur
down the main menu to
Figure 23).
utput
. If th
Radio settings (see
Page 71

LAND-PAK™ User Guide – Rev. C
uFig
re 23: Main Menu – Radio Settings
2. Press t .
A subm
he Select soft key to select Radio settings
enu is displayed with the cursor at the
pt ,
TX level (see Figure 24). o ion
Figure 24: TX level option
soft key to change the TX level. 3. Press the Change
A submenu is displayed with RF power output
settings. Figure 25 shows the RF power output
settings for the 3ASd Epic radio modem (the
LAND-PAK LM configuration).
Figure 25: RF Power Output Settings
4. Pre
ss the up or down
sor to a desired RF power output.
cur
arrow soft key to move the
• 3ASd Epic radio modem (the LAND-PAK LM
configuration): The RF power output options
are 1, 2, 5, or 10 watts. The 10 watt setting
provides the maximum range and ca
uses the
4-67
Page 72

LAND-PAK™ User Guide – Rev. C
maximum discharge on the battery. Select a
lower setting for surveys over small areas.
• 3ASd 869 radio modem (the LAND-PAK 869
configuration): The RF power output options
are from 10 mW to 500 mW.
5. Press the ower output.
The display
Set soft key to set the RF p
returns to the submenu with the
cursor at TX level.
6. nu.
Press the Back soft key to return to the main me
Continue to the next section.
Signal Threshold
Perform this setting only on the rover radio modem. If
the base station radio modem is being configured, go
to the section below, Serial Port Settings.
Press the down arrow soft key to move the cursor
1.
dow n the main menu to Radio settings (se
Figure 26).
Figure 26: Main Menu – Radio Settings
ss the Select soft key to select Radio setting2. e . Pr s
A submenu is displayed with the cursor at the
op ion, TX level (see Figure 27). t
e
4-68
Figure 27: Sig. Threshold option
Page 73

LAND-PAK™ User Guide – Rev. C
3. Press the down
down the main menu to
4. Press the Change soft key to change the Signal
Threshold level. A submenu is displayed with
available negative dBm settings.
a. Set the threshold to -116dBm.
• This is equivalent to the Low threshold set
using SurvCE and should cause optimum
performance.
5. Press the Set soft key to set the threshold level.
The display returns to the submenu with the
cursor at TX level.
6. Pre
ss the Back soft key to return to the main
me
nu.
arrow soft key to move the cursor
Sig. Threshold.
Addressing Settings
The Addressing remains at factory default with
everything set to Off.
Serial Port Settings
1. Press the down arrow soft key to move the cursor
down the main menu to Port 1 (see igu
Figure 28: Main Menu – Port 1 Setting
2.
Press the Select soft key to select
b
su menu is displayed. The cursor po
sta
tus of Port 1. The default is ON. Do not change
the def
4-69
ault.
F re 28).
Port 1. A
ints to the
Page 74

LAND-PAK™ User Guide – Rev. C
3. Press the down arrow soft key to move the curso
to the next setting on the submenu. It is for the
currently set baud rate (see Figure 29).
Figure 29: Baud Rate Setting
4. Press the Change
rate. A submenu appears with a list of baud rates.
5. Press the down arrow soft key to move the cursor
to 38400 bit/s (see Figure 30).
Figure 30: Baud Rate Setting Change
soft key to change the baud
r
6. Press the Set soft key to set the baud rate to
38400 bit/s. The previous submenu returns with
38400 bit/s listed as the current baud rate.
The SF-2040 GPS sensors’ RTK
corrections com port will be configured
to the same baud rate (see Figure 67).
7. Press the Back soft key once to return to the main
menu.
8. Continue to the next section.
4-70
Page 75

LAND-PAK™ User Guide – Rev. C
Handshaking
The Handshaking menu functions remain at the
default settings: CTS: Clear To Send, CD: RSSI, and
S: Ignored. RT
Additional
Error correction and error checking increase the
reliability of data transfer via radio modem.
The receiver sensitivity is bas on the
channel spacing of the radio modem
data rate of the radio interface) and the
(
mode of the FEC (forward error
correction) as indicated in the table
below. This radio is typically operated at
25 kHz channel spacing.
Table 11: FEC Signal Thresholds
Channel FEC Off FEC On
Spacing
25 kHz -110 dBm -113 dBm
20 kHz -112 dBm -115 dBm
12.5 kHz -112 dBm -115 dBm
The setting for error correction must
be the same on all radio modems that
will communicate with each other. If
ransmitting radio modem and the
the t
receiving radio modem have different
settings, data will not be received
correctly.
ed
e ursor
1. Pr ss the down arrow soft key to move the c
down the main menu to Additional (see Figur
31)
.
4-71
e
Page 76

LAND-PAK™ User Guide – Rev. C
Fi ain – Additional
gure 31: M Menu Setting
2. Pres ct el l.
Refer to
3. Pre
4. Pre cursor
5. Pre
s the Sele soft key to s ect Additiona
a. A nts to
submenu
E
rror corr.
Figure 32 and Figure 33 for the steps b
ss the Change soft key to turn error cor
ON
.
is Th
displayed. e cursor poi
elow.
rection
ss the down arrow soft key to move the
wn the submenu to Error check.
do
ss the Change soft key to turn error checking
ON.
Figure 32: Error Correction and Error Checking
6. Press the down arrow soft key to move the cursor
odawn the submenu to SL-commands.
On the both the base and rover radio, set .
SL-commands to ON by pressing the Change
key.
4-72
Page 77

LAND-PAK™ User Guide – Rev. C
Figure 33: SL-Commands and Priority
7. Press the down arrow soft key to move the cursor
down the submenu to Priority.
a. On the Base radio, set Priority o TX by t
pressing the Change key.
b. On the Rover radio, Set Priority to RX by
pressing the Change key.
The radio operates in Half-duplex (simplex)
mode. The base radio can always be
communicated with via SurvCE, regardless of
it’s transmit state. However, the rover must
not be receiving corrections from the base
when attempting to program the rover via
SurvCE. This may necessitate turning the
base radio off during programming, or at
minimum, removing temporarily the rover
antenna (which may or may-not completely
remove the base signal)
8. Press the Back soft key twice. Save changes? is
displayed (see Figure 34).
Figure 34: Save Changes
4-73
Page 78

LAND-PAK™ User Guide – Rev. C
9. Press the soft key to select the Yes option. All the
configuration changes are saved. The display
returns to the setup screen. (see Figure 17).
10. Perform one of the following steps:
Repeat the sections above, except for
• RF
P e
io
r on
Power Output, to configure the rover rad
modem.
• If both the base station and rover radio
modems have been configured, verify
communication between the radios. ow
both radio modems. The CD
on both radios to indicate carrier detect.
B e
as Station Test Setup
LED illuminates
This se
up the
area fo
An out
transit
1. o setup the
The following steps use equipment from the base
bag:
2. Unbuckle th
ction provides steps to correctly and safely set
base station. It is important to select an open
r the test setup.
door setup requires the transport of the base
case and the base bag, both of which contain
base station equipment. all the
The base station tripod leg points may
damage soft materials, including
indoor carpets.
Find a safe, open, and flat location t
base station.
e strap that holds the tripod legs
together. Store the strap in the base bag.
4-74
Page 79

LAND-PAK™ User Guide – Rev. C
3. Open the tripod legs until the tripod is stable. Use
the tripod leg levers and the tripod wing screws to
adjust the height and secure the tripod (see
Figure 35). Leveling the tripod by eye is suff ci ient.
Figure 35: Base Station Tripod – Leg Adjustments
Figure 36: Base Station Tripod
Refer to Figure 36 for the steps below:
4. Remove the tripod cap by unscrewing the trib
rach
fastener.
4-75
Page 80

LAND-PAK™ User Guide – Rev. C
Use the two Allen wrenches (4mm and/or 5mm,
respectively) on the top plate of the tripod to
tighten the hex screws at the top of the tripod if
needed.
5. Store the two Allen wrenches in the
and discard
Figure 37: Mounting Tribrach & Tribrach Adapter
Refer to Figure 37 for the steps below:
6. Mount the tribrach to the top of the tripod as
follows:
• Position the tribrach so it fits evenly on the top
plate and is flat.
the protective paper cover.
base bag,
• Screw the tribrach fastener into the tribrach
until it is secure.
The tribrach has a leveling bubble a
three adjustment knobs to make fine
adjustments.
7. Mount the tribrach adapter into the three holes of
the tribrach, and then lock it in place by turning
down the knob on the side of the tribrach.
4-76
nd
Page 81

LAND-PAK™ User Guide – Rev. C
OPTIONAL STEP: Screw the pole
extension into the tribrach adapter. The
pole extension provides easier access to
the connectors and exchange of the
batteries on the SF-2040 GIS PM Sensor.
The pole extension is in the base bag.
Figure 38: Mounting the Radio Antenna Bracket
Refer to Figure 38 for the steps below:
8. Mount the radio antenna bracket to the tripod:
a. Unscrew the rear knob of the bracket and
remove the rear plate.
b. Place the bracket against the opening on a
tripod leg.
Do not mount the bracket to the tripod
leg on which the shoulder strap is
attached.
c. At the back of the tripod leg, place the rear
plate through the bracket screw.
4-77
Page 82

LAND-PAK™ User Guide – Rev. C
d. Turn the knob onto the bracket screw until the
bracket is secure.
Over tightening may cause damage to
the tripod leg finish.
9. Lev
Ref
10.
el the bracket by eye. Loosen the knob on t
side of the bracket to make the adjustment. This
ensures that the radio an
when mounted.
Figure 39: Mounting the Antenna and Cable
er to Figure 39 for the steps below:
Screw the antenna adapter to the top of the radio
antenna pole.
tenna pole will be vertical
he
Th
e following steps use equipment from the base
transit ca
11. Screw the radio modem antenna to the ant
12. n of
4-78
se:
enna
ada na pole.
pter on the top of the radio anten
Co nect the straight male TNC connector end
the RG58/U radio antenna cable to the bottom of
the antenna adapter.
Page 83

LAND-PAK™ User Guide – Rev. C
13. Extend the radio antenna pole to the maximum
height possible.
Extending the radio antenna pole
increases the radio modem range,
isolates the sensor sig als from the
radio modem, and avoids radiation
hazard.
To avoid radi
ation hazard when
performing a survey, user and
bystanders’ heads must be more than
25cm (10 inches) away from the
transmitting antenna (see Figure 40).
n
Figure 40: Avoiding Radiation Hazard
14. Screw the radio antenna pole onto the round
ounting m plate of the radio antenna bracket (see
Figure 38). Make sure that there are no
obstructions overhead.
15. Attach the bag bracket to the 3ASd EPIC radio
bag (the LAND-PAK LM configuration). The bag
bracket is in the base transit case below the 3ASd
EPIC radio modem.
4-79
Page 84

LAND-PAK™ User Guide – Rev. C
The LAND-PAK 869 configuration: the
bag bracket is already attached to th
3ASd 869 radio modem bag.
Figure 41: Mounting the Radio and Bag Battery
e
Refer to Figure 41 for the steps below:
16. Using the strap and the bracket on the radio bag,
mount the radio modem to the tripod leg above
the radio antenna bracket.
17. The Hang the
18.
LAND-PAK LM configuration only:
12V 8Ah bag battery in a safe and secure posit
on the tripod, within easy access of the 3ASd
EPIC radio modem.
Connect the right angle male TNC connector end
of the radio antenna cable to the top
TNC connector of the 3ASd EPIC rad
(see Figure 42).
left female
io modem
ion
The TNC connector on the right
(above the display) is used for
4-80
Page 85

LAND-PAK™ User Guide – Rev. C
diversity receive only, which is not
used in this application. Connecting to
this port will prevent RTK corrections
being broadcast to the rover.
The LAND-PAK 869 configuration:
The 3ASd 869 radio modem has only
one female TNC connector on the top.
Figure 42: Mounting Cable to the Radio Modem
19. Insert the two lithium-ion
battery packs into the SF2040 GIS PM Sensor.
Refer to Chapter 3 Battery
Charging for details on
battery pack installation.
0. 2 Screw the sensor onto the
antenna pole extension, if
mounted, or onto the
tribrach adapter. When
securing the sensor, make
sure that the front display
faces the radio modem for
easy access.
Figure 43: Mounting Base SF-2040
4-81
Page 86

LAND-PAK™ User Guide – Rev. C
COM2
Figure 44: NavCom Base Cable Connections
Refer to Figure 44 for the steps below:
. Connect the NavCom se cable (the L ND-PAK
21
LM configuration):
ba A
Connect the serial 15-P
•
the female serial conne
right of the radio modem
• Connect the LEMO 7COM 2 of the SF-2040Pi
The LEMO 2-Pin power
of the cable is not used
procedure.
figuration:
The LAND-PAK 869 con
Use the NavCom DB-9
connect the
COM 2 of the SF-2040 GIS PM
Sensor.
22. This concludes
Carefully, disassemble t
repack all the equipment into the base transit
case and base bag.
3ASd 869 radio modem to
the base station test setup.
in end of the cable to
ctor on the bottom
.
n end of the cable to
GIS PM Sensor.
connector end
in this
cable to
he base station, and
4-82
Page 87

LAND-PAK™ User Guide – Rev. C
Rover Test Setup
This section provides the steps to correctly and safely
set up the rover. It is important to select an open area
for the test setup.
An outdoor setup requires the transport of the rover
transit case and the rover bag, both of which contain
all the rover equipment.
The outer section of the rover pole is
carbon fiber. The inner extension is
aluminum, with dual graduations in
feet and meters.
The rover pole and bipod leg points
may damage so ft materials, including
indoor carpets.
Over tightening attachment
carbon fiber of the rover pole may
cause damage.
s to the
The bipod is intended to make
installation easier, but it is not as
stable as a tripod.
d a safe, 1. Fi open, and flat location to setup the
n
rover.
The fol
bag:
2. Remove the strap that holds together the bipo
3.
4-83
lowing steps use equipment from the rover
d
legs. Store the strap in the rover bag.
Position the bipod upright on the floor or ground.
Do not open the bipod le
gs.
Page 88

LAND-PAK™ User Guide – Rev. C
u
Fig re 45: Mounting the Rover Pole to the
Bipod
Re r t
4.
5. Pla
o Figure 45 for the steps below:
fe
Loosen the clamping kn
op
t of the bipod.
ob in the bracket at the
ce the rover pole vertically in the brack
tighten the knob. Do not over tighten.
et and
4-84
Figure 46: Rover Pole and Bipod
Page 89

LAND-PAK™ User Guide – Rev. C
Refer to Figure 46 for the steps below:
6. Adjust the rover pole and bipod assembly:
a. Pivot the bipod legs out.
b. Adjust the height of the bipod legs. With the
leg points on the floor or ground, press the
bipod thumb releases and lift up. At the
desired height, release the thumb releases.
If the bipod legs are suspended when
the thumb releases are pressed, the
legs drop quickly, and the leg points
may cause damage.
c. Adjust the rover pole and bipod assembly un
it is stable. It tidoes not have to be level.
Figure 47: Mounting the Carlson Explorer 600+
Refer to Figure 47 for the steps below:
7. Mount the cradle for the Carlson Explorer 600+:
• Loosen the knob on the small cradle clamp.
• Mount the small cradle clamp to the carbon
fiber section of the rover pole, near the top
bracket. The rover setup is mo stable if the re
l
4-85
Page 90

LAND-PAK™ User Guide – Rev. C
radio modem and Carlson Explo
bipod legs by shifting the offset
rer bise
weight t
same side as the bipod legs. Tighten th
knob. Do not over tighten
Th
e following steps use equipment from the rover
tra
nsit case:
8. Mo
unt the Carlson Explorer 600+ to the crad
la
mp below the LCD display. Verify the Explore
600
+ is secure.
.
Figure 48: Mounting Radio Modem
ct the
o the
e
le
r c
Refer to Figure 48 for the steps below:
9. Screw the radio modem antenna to the female
TNC connector on the top of the 3ASd radio
modem.
Using the strap and the clamp on the radio bag,
10.
mount the 3ASd radio modem to the rover pole
below the Carlson Explorer 600+ cradle. The
rover setup is more stable if the radio modem
bisects the bipod legs by shifting the offset weigh
to he same side as the bipod legs.
t
In ert the two lithium-ion battery packs into the
11. s
-2040 GIS PM Sensor. Refer to Chapter 3
SF
tery Charging for details.
Bat
4-86
t
Page 91

LAND-PAK™ User Guide – Rev. C
12. Scr
ew the sensor onto the rover pole. When
sec
uring the sensor, make sure that the front
dis
play faces the radio modem for easy access.
COM2
Figure 49: NavCom Rover Cable Connections
Refer to Figure 49 for the steps below:
13. Connect the NavCom rover radio modem cable:
• Connect the serial 9-Pin end of the cable to
the female serial connector on the bottom of
the radio modem.
• C
onnect the LEMO 7-Pin end of the cable to
COM 2 of the SF-2040 GIS PM
14. Extend the aluminum extension of the rover pol
Sensor.
e
to the maximum height possible.
4-87
Page 92

LAND-PAK™ User Guide – Rev. C
Figure 50: Rover Pole Knob and Locking Pin
Refer to Figure 50 for the steps below:
15. Tighten the rover pole knob to secure the pole
extension. If extended to 1.8 m, 2 m, or 2.2 m,
also insert the attached locking pin i
extension hole.
nto the
Extending the rover pole isolates the
sensor signals from the radio modem.
And reduces the possibility of satellite
signal bloc age byk passing
pedestrians or vehicles.
This concludes the rover test setup. Carefully, 16.
disassemble the rover attachments, and repack
all the equipment into the rover tra
rover bag.
4-88
nsit case and
Page 93

LAND-PAK™ User Guide – Rev. C
Chapter 5 ......SurvCE Software Operation
This chapter provides an introduction to the basic
operation of the LAND-PAK using Carlson SurvCE
Software on the Explorer 600+ data collector. After
the system is set up as described in Chapter 4
Function Test Setup, follow the Getting Started
section which follows to initialize the system and
begin collecting measured positions in three
dimensions.
The settings in this chapter are suggested for a
al RTK survey, in which:
typic
9 The base receiver is setup on an unknown poin
9 A navigation position in WGS84 is assigned to t
base point to support real time positioning in th
satellite coordinate system
A coordinate syst9 em is established for the proje
by assigning an assumed grid coordinate t
base point
Refer to the supplied Carlson SurvCE
manual for additional inform
ation.
e
o the
Overview
Fil
e Types
urvCE creates a number of files for supporting a
S
roject in the field. Two primary files are created to
p
manage each project. The coordinate file appended
with .crd contains the measured or computed
coordinates for the job, and the raw data file
appended with .rw5 contains the survey
measurement details.
t
he
ct
5-89
Page 94

LAND-PAK™ User Guide – Rev. C
File Management
The Carlson X-Port utility is an office application used
to convert files and communicate with the Explorer
600+ as described in Chapter 6 Data Transfer. Text
files containing coordinates can be converted to a
.crd format and transferred to or from the Explorer
600+. A geoid file can be created and transferred to
the Explorer 600+.
SurvCE Window Icons
Table 12: SurvCE Window Icons
Icon Description
Hot List Menu – Tap the icon to access help
and other menu options. The options vary
depending o
open.
n the SurvCE window that is
5-90
Accept
Cancel
Return
Battery Status
GPS Base Mode – Tap the icon to access
the mode menu, which includes the options,
GPS Rover mode and GPS Simulation.
Map View – Toggle between the open
window and Map View.
Page 95

LAND-PAK™ User Guide – Rev. C
Getting Started
Create A New Job
Female 9-Pin
LEMO 7-Pin
Figure 51: Coiled Serial Cable
1. For this initial operation of the LAND-PAK,
connect the Explorer 600+ controller to COM1
(the LAND-PAK control port) of the base station
SF-2040 GPS sensor. Use the supplied 6 ft.
coiled serial cable (see Figure 51).
Serial
Connector
If wireless connectivity is desired in
the future, refer to Appendix C for the
configuration of the TruBlu™ module.
Figure 52: Desktop with SurvCE Icon
5-91
Page 96

LAND-PAK™ User Guide – Rev. C
2. Boot up the Explore
Figure 52).
3. Double tap the SurvCE icon on the Explorer 600+
desktop. The SurvCE job selection box opens in
front of the main menu (see Figure 53).
Figure 53: SurvCE Job Selection Box
the Sel4. Tap ect New/Existing Job button to create
a new file (job). The Coordinate Files window
p ns (see F
o e igure 54).
e > Job to access the
Select Fil
Coordinate Files window from the
main menu.
r 600+ desktop (see
5-92
Figure 54: Coordinate Files Window
Page 97

LAND-PAK™ User Guide – Rev. C
5. Create a new c
in the Name
.crd extension is
Coordinate files are stored in the
\SystemCF\Data folder to avoid data
loss in case of a system failure.
Folders may be created for organizing
jobs.
Points are st
first loo
depending o
desi
gnated control file.
oordinate file. Enter the file name
field. Tap
appended automatically.
ored in coordinate files
a search for poin
ks in
a *.crd file. Then,
n settings, looks in a
to save the file. The
ts, SurvCE
Job Settings
.
During
Figure 55: File Menu – Job Settings
1. Select File > Job Settings to configure data
collection options that will remain set from job to
job (see Figure 55). The Job Settings submenu
opens (see Figure 56).
5-93
Page 98

LAND-PAK™ User Guide – Rev. C
2. Check the Prompt for Units option to be prom
at the start of a new job to set the units for the job
(see Figure 56
).
Submenu – New Job Tab Figure 56: Job Settings
Figure 57 for the steps below: Refer to
3. Tap the System tab.
pted
Figure 57: Job Settings Submenu – System Tab
4. Select the appropriate settings:
• Distance: Set the units to be used on a job,
US Feet, International Feet, or Metric. If US
Feet or International Feet are selected, set the
units as Decimal Feet or Feet and Inches
(Inches).
5-94
Page 99

LAND-PAK™ User Guide – Rev. C
Distance is a display property only. It
does not change the format of the
data recorded to the raw file.
• Angle: Set degrees (360 degree circle,
seconds to a minute, 60 minutes to a d
or gons \ grads (a 400 unit circle fully
decimal). In other words, an angle of
397.9809 gons is equivalent to 358 d
1 utes and 58 seconds.
0 min
The Angle setting affects commands
where a direction is displayed or
entered, such as Inverse, Travers
Sideshot, Input-Edit Centerline.
• Zero Az
zero azimuth,
• Projection: Select a coordinate projection for
the area of the survey from the drop-down list.
If the needed projection is not in the dropdown list, tap the Edit Projection List button.
The Coordinate Projection window opens (see
Figure 58).
imuth Setting: Select the direction for
North or South.
e,
60
egree)
egrees,
Figure 58: Coordinate Projection Window
5-95
Page 100

LAND-PAK™ User Guide – Rev. C
Add a predefined or user defined coordinate
projection. Tap the arrow button in the top right of
the window. The System tab returns with the
added projection selecte
d in the drop-down list.
Refer to Figure 59 for the steps belo
5. Tap the Format tab.
Figure 59: Job Setting
6. Select the appropriate settings.
s Submenu – Format Tab
w:
Angle Entry and Display: This option
applies to numerous commands, such
as prompting and displays in Sideshot
Traverse, Intersections and Inverse.
Distance Observation Display and
Slope Entry and Display apply to total
stations.
5-96
 Loading...