

Page 1
n
IIn
stt
s
allll
a
Uttiilliitt
U
y
y
UUsseerr GGuuiidde
e
NavCom Technology, Inc.
20780 Madrona Avenue
Torrance, California 90503 USA
Tel: +1 310.381.2000
Fax: +1 310.381.2001
sales@navcomtech.com
www.navcomtech.com
P/N: 96-310012-3001
Page 2

Install Utility User Guide – Rev. C
This page is left blank intentionally
Page 3

Install Utility User Guide – Rev. C
Table of Contents
List of Figures.............................................................................................................................ii
List of Tables...............................................................................................................................ii
Notices........................................................................................................................................iii
Copyright..............................................................................................................................................iii
Trademarks ..........................................................................................................................................iii
User Notice...........................................................................................................................................iii
Limited Warranty ..................................................................................................................................iii
StarFire™ Licensing.............................................................................................................................iv
USG FAR..............................................................................................................................................iv
Global Positioning System....................................................................................................................iv
Revision History..........................................................................................................................v
Use of this Document................................................................................................................vi
Related Documents .................................................................................................................................vi
StarUtil Users Guide.............................................................................................................................vi
Technical Reference Manual................................................................................................................vi
RINEXUtil User Guide..........................................................................................................................vi
Integrators Toolkit.................................................................................................................................vi
NavCom Release Notes.......................................................................................................................vi
Related Standards..................................................................................................................................vii
ICD-GPS-200 ......................................................................................................................................vii
RTCM-SC-104.....................................................................................................................................vii
CMR, CMR+........................................................................................................................................vii
NMEA-0183.........................................................................................................................................vii
Publicly-Operated SBAS Signals ........................................................................................................vii
RTCA/DO-229D..............................................................................................................................vii
WAAS (Wide Area Augmentation System).....................................................................................vii
EGNOS (European Geostationary Navigation Overlay Service)....................................................vii
MSAS (MTSAT Satellite-based Augmentation System).................................................................vii
GAGAN (GPS Aided Geo Augmented Navigation) ........................................................................vii
Chapter 1 Introduction .........................................................................................................9
Install Utility Overview..............................................................................................................................9
Save Software Ensemble and Run Install Utility..................................................................................9
Install Utility GUI................................................................................................................................. 10
Chapter 2 Establish Communications ..............................................................................11
Chapter 3 Install Module Software ....................................................................................13
Software Updates – GPS Model Configuration.....................................................................................13
Install Module Software..........................................................................................................................13
Chapter 4 Install Receiver Options ...................................................................................15
How to Purchase Receiver (Software) Options.....................................................................................15
Install Options........................................................................................................................................ 16
Chapter 5 Install LBM License (StarFire™) ......................................................................19
Description of the StarFire™ Network...................................................................................................19
How to Access the StarFire™ Service...................................................................................................19
StarFire™ Licensing Terminology .........................................................................................................20
Install LBM License................................................................................................................................21
i
Page 4

Install Utility User Guide – Rev. C
List of Figures
Figure 1: Install Utility Window....................................................................................................10
Figure 2: Configure COM Port....................................................................................................11
Figure 3: PC COM Configuration Window..................................................................................11
Figure 4: User Input – Install Software........................................................................................13
Figure 5: Install Software Confirmation.......................................................................................14
Figure 6: Module Software Versions...........................................................................................14
Figure 7: User Input – Install Options/License............................................................................16
Figure 8: Options File Name Change .........................................................................................16
Figure 9: Options Upload............................................................................................................17
Figure 10: Install Options/License Confirmation Window ...........................................................17
Figure 11: Error Message – Can’t Open License File.................................................................17
Figure 12: Installed Receiver Options.........................................................................................18
Figure 13: User Input – Install Options/License..........................................................................21
Figure 14: LBM License File Name Change...............................................................................21
Figure 15: No Files Available......................................................................................................22
Figure 16: Install Options/License Confirmation Window ...........................................................22
Figure 17: Error Message – Can’t Open License File.................................................................22
Figure 18: Installed LBM (StarFire™) License............................................................................23
List of Tables
Table 1: GPS Model Configuration.............................................................................................13
Table 2: StarFire™ Licensing Terminology .................................................................................20
ii
Page 5

Install Utility User Guide – Rev. C
Notices
Install Utility User Guide
96-310012-3001
Revision C
May 2008
Copyright
© 2008 by NavCom Technology, Inc.
All rights reserved. No part of this work or the computer program(s) described herein may be
reproduced, stored, or transmitted by any means, without the expressed written consent of the
copyright holders. Translation in any language is prohibited without the expressed written
consent of the copyright holders.
Trademarks
‘find your way’, ‘NavCom Globe’ and ‘NAVCOM TECHNOLOGY’ logos are trademarks of
NavCom Technology, Inc. StarFire™ is a registered trademark of Deere & Company. All other
product and brand names are trademarks or registered trademarks of their respective holders.
User Notice
NavCom Technology, Inc. shall not be responsible for any inaccuracies, errors, or omissions in
information contained herein, including, but not limited to, information obtained from third party
sources, such as publications of other companies, the press, or competitive data organizations.
This publication is made available on an “as is” basis and NavCom Technology, Inc. specifically
disclaims all associated warranties, whether express or implied. In no event will NavCom
Technology, Inc. be liable for direct, indirect, special, incidental, or consequential damages in
connection with the use of or reliance on the material contained in this publication, even if
advised of the possibility of such damages. NavCom Technology, Inc. reserves the right to
make improvements or changes to this publication and the products and services herein
described at any time, without notice or obligation.
Limited Warranty
NavCom Technology, Inc., warrants that its products will be free from defects in workmanship at
the time of delivery. Under this limited warranty, parts found to be defective or defects in
workmanship will be repaired or replaced at the discretion of NavCom Technology, Inc., at no
cost to the Buyer, provided that the Buyer returns the defective product to NavCom Technology,
Inc. in the original supplied packaging and pays all transportation charges, duties, and taxes
associated with the return of the product. Parts replaced during the warranty period do not
extend the period of the basic limited warranty.
This provision does not extend to any NavCom Technology, Inc. products, which have been
subjected to misuse, accident or improper installation, maintenance or application, nor does it
extend to products repaired or altered outside the NavCom Technology, Inc. production facility
unless authorized in writing by NavCom Technology, Inc.
This provision is expressly accepted by the buyer in lieu of any or all other agreements,
statements or representations, expressed or implied, in fact or in law, including the implied
warranties of merchantability and fitness for a particular purpose and of all duties or liabilities of
NavCom Technology, Inc. To the buyer arising out of the use of the goods, and no agreement
iii
Page 6

Install Utility User Guide – Rev. C
or understanding varying or extending the same will be binding upon NavCom Technology, Inc.
unless in writing, signed by a duly-authorized officer of NavCom Technology, Inc.
This limited warranty period is one (1) year from date of purchase.
StarFire™ Licensing
The StarFire™ signal requires a subscription that must be purchased in order to access the
service. Licenses are non-transferable, and are subject to the terms of the StarFire™ Signal
License agreement. For further details on the StarFire™ Signal Network, its capabilities, terms
and conditions visit www.navcomtech.com
or send an email inquiry to sales@navcomtech.com.
USG FAR
Technical Data Declaration (Jan 1997)
The Contractor, NavCom Technology, Inc., hereby declares that, to the best of its knowledge
and belief, the technical data delivered herewith under Government contract (and subcontracts,
if appropriate) are complete, accurate, and comply with the requirements of the contract
concerning such technical data
Global Positioning System
Selective availability (S/A code) was disabled on 02 May 2000 at 04:05 UTC. The United States
government has stated that present GPS users use the available signals at their own risk. The
US Government may at any time end or change operation of these satellites without warning.
The U.S. Department of Commerce Limits Requirements state that all exportable GPS products
contain performance limitations so that they cannot be used to threaten the security of the
United States.
Access to satellite measurements and navigation results will be limited from display and
recordable output when predetermined values of velocity and altitude are exceeded. These
threshold values are far in excess of the normal and expected operational parameters of the
NCT-2000D and NCT-2100D family of products.
iv
Page 7

Revision History
Install Utility User Guide – Rev. C
Rev C (May 2008)
Format change
Added Revision History
v
Page 8

Install Utility User Guide – Rev. C
Use of this Document
This User Guide is intended to be used by someone familiar with the concepts of GPS and
satellite surveying equipment.
Note indicates additional information to make better use of the product.
This symbol means Reader Be Careful. Indicates a caution, care, and/or safety
situation. The user might do something that could result in equipment damage or
loss of data.
This symbol means Danger. You are in a situation that could cause bodily injury.
Before you work on any equipment, be aware of the hazards involved with
electrical and RF circuitry and be familiar with standard practices for preventing
accidents.
Revisions to this User Guide can be obtained in a digital format from
http://www.navcomtech.com/Support/DownloadCenter.cfm?category=manuals
Related Documents
StarUtil Users Guide P/N 96-310008-3001
Describes the operation and use of NavCom’s Windows based control program (included on
CD).
Technical Reference Manual P/N 96-3120001-3001
Describes the control and output data message formats utilized by this instrument (for customer
programming purposes; included on CD).
RINEXUtil User Guide
P/N 96-310021-2101
Describes the conversion program used on NavCom proprietary output data message formats
to RINEX ver 2.10 observation and navigation files (for customer programming purposes;
included on CD).
Integrators Toolkit P/N 97-310020-3001
Provides additional instruction and tools for developing control programs for this instrument (not
included in the packaging material; contact http://www.navcomtech.com/Support/
for a copy).
NavCom Release Notes
Describes software updates for NavCom products. Current and archived Release Notes are
available on the NavCom web site:
http://www.navcomtech.com/Support/DownloadCenter.cfm?category=releasenotes
NavCom Customer Support provides software updates described in the Release Notes. Submit
a request for software updates via the Request Support web page.
vi
.
Page 9

Install Utility User Guide – Rev. C
Related Standards
ICD-GPS-200
NAVSTAR GPS Space Segment / Navigation User Interfaces Standard. ARINC Research
Corporation; 2250 E. Imperial Highway; El Segundo, California 90245
RTCM-SC-104
Recommended Standards For Differential GNSS Service. Radio Technical Commission For
Maritime Services; 1800 N. Kent St, Suite 1060; Arlington, Virginia 22209
CMR, CMR+
Compact Measurement Record; Trimble Navigation Limited; 935 Stewart Drive; Sunnyvale, CA
94085
NMEA-0183
National Marine Electronics Association Standard For Interfacing Marine Electronic Devices.
NMEA National Office; 7 Riggs Avenue; Severna Park, Maryland 21146
Publicly-Operated SBAS Signals
RTCA/DO-229D
The Radio Technical Commission for Aeronautics (RTCA) develops consensus-based
recommendations regarding communications, navigation, surveillance, and air traffic
management (CNS/ATM) system issues.
RTCA. 1828 L Street, NW, Suite 805, Washington, DC 20036.
These organizations implement the RTCA/DO-229D standard set by RTCA:
WAAS (Wide Area Augmentation System)
U.S. Department of Transportation. Federal Aviation Administration. 800 Independence Ave,
SW, Washington, DC 20591
EGNOS (European Geostationary Navigation Overlay Service)
European Space Agency. 8, 10 rue Mario-Nikis, F-75738 Paris Cedex 15, France.
MSAS (MTSAT Satellite-based Augmentation System)
Japan Civil Aviation Bureau. Ministry of Transport. Kasumigaseki 2-1-3, Chiyoda-ku, Tokyo 100,
Japan.
GAGAN (GPS Aided Geo Augmented Navigation)
Indian Space Research Organization. Antariksh Bhavan, New Bel Road, Bangalore - 560 094,
India.
vii
Page 10

Install Utility User Guide – Rev. C
This page is left blank intentionally
viii
Page 11

Install Utility User Guide – Rev. C
Chapter 1 ...................................................................................Introduction
Install Utility Overview
Install Utility is a NavCom developed program designed to upload software into NavCom GPS
receivers:
9 Module Software Updates
9 Purchased Receiver (Software) Options
Install Utility and Software Options in StarUtil. The terms are interchangeable.
9 LBM License (StarFire™ Subscription Service License)
: These options are called Receiver Options in
The user may upload the software, options, and/or license via Install Utility or the
NavCom program, StarUtil. This guide only includes instructions for installation via
Install Utility. Use of StarUtil to install the options and the LBM license is
recommended. StarUtil provides a more robust interface for those installations. Refer
to the StarUtil User Guide (see Related Documents in the fore-matter).
Install Utility is provided with the module software updates in a software
ensemble zip file. It runs on PCs only. No special drivers are required, nor any
unique receiver settings. The upload of software does not change the receiver
configuration.
Refer to Table 1 in Chapter 3 for the module software available for GPS models.
The receiver must be navigating during upload to accept the software, options,
and/or license.
Save Software Ensemble and Run Install Utility
The software ensemble contains two Install Utility files, an Install.EXE executable file and an
Install.INI file. The EXE and INI files, the module software, and any new options/license files
must be saved in the same folder.
It is important to isolate previous versions of the EXE, and INI files. Although the
EXE file most likely will not change, the INI file is specifically written for the
version of software supplied with Install Utility. Creation of a unique folder to hold
each different version of software received is recommended. This also facilitates
the reinstallation of a previous version for troubleshooting purposes if required.
9 Save the software ensemble (includes the Install Utility EXE and INI files) to a folder.
Save a new software options file or a new LBM (StarFire™) license file to the
same folder with the Install Utility EXE and INI files.
9 Double-click the Install Utility EXE file. Install Utility opens.
1-9
Page 12
Install Utility User Guide – Rev. C
Install Utility GUI
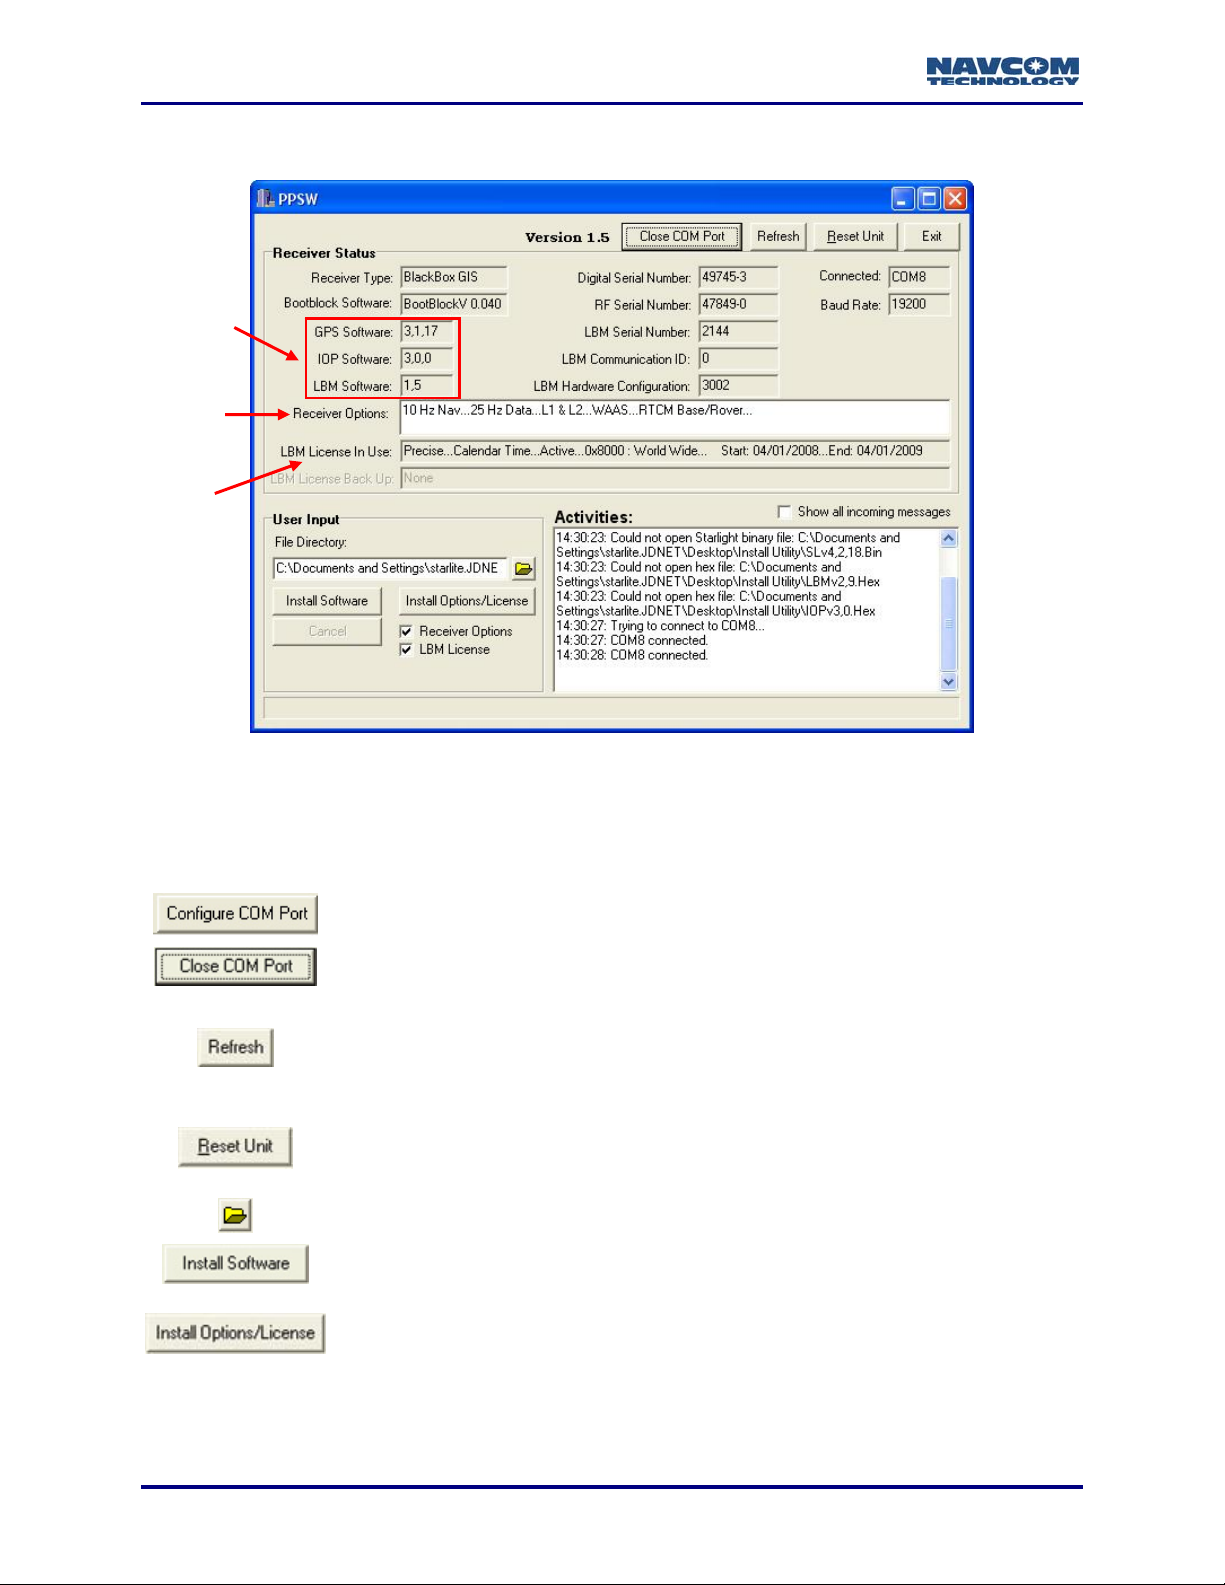
Installed
Software
Versions
Installed
Options
StarFire™
License
Figure 1: Install Utility Window
Purchased options are called Receiver Options in Install Utility and Software
Options in StarUtil. The terms are interchangeable.
Click to select the COM port and connect to the GPS receiver. During
operation, click to close the connection.
Click to refresh data in fields if the window does not display newly loaded
module software versions, receiver options, or LBM license. Click to
refresh if an error message opens after upload, for example, “Did not get
result for installing LBM license.”
Resets the GPS receiver. After software, options, or license installation, do
not use this button to reset the unit. Manually cycle power on the unit for a
proper reset.
Select directory with software, options, and/or license to install.
Install module software in the selected directory to the GPS receiver.
Install receiver options and/or the LBM (Starfire™) license to the GPS
receiver. The Receiver Options and/or LBM License boxes below the
button must be checked.
1-10
Page 13

Install Utility User Guide – Rev. C
Chapter 2 ............................................................Establish Communications
This chapter provides instructions to establish communications between a PC running Install
Utility and the GPS receiver.
Figure 2: Configure COM Port
9 Click the
9 Select the PC COM port that the receiver is connected to.
9 Click the OK button to establish communications. After a successful connection, the Install
Utility window displays the current software module versions, receiver options, and, if a
license is installed, LBM (Starfire™) license information, plus the baud rate and other
receiver information (see Figure 1).
button. The PC COM Configuration window opens (see Figure 3).
Figure 3: PC COM Configuration Window
2-11
Page 14

Install Utility User Guide – Rev. C
This page is left blank intentionally
2-12
Page 15

Install Utility User Guide – Rev. C
Chapter 3 .................................................................Install Module Software
This chapter provides guidance to install module software updates to the NavCom GPS receiver.
Software Updates – GPS Model Configuration
Periodically check NavCom Release Notes for descriptions of software updates to receiver
software. Current and archived Release Notes are available on the NavCom web site:
http://www.navcomtech.com/Support/DownloadCenter.cfm?category=releasenotes
NavCom Customer Support provides software updates described in the Release Notes. Submit
a request for software updates via the Request Support web page. Depending on GPS model
and module to be updated, the user may receive three files, one .BIN and two .HEX files in the
software ensemble (refer to Table 1).
Table 1: GPS Model Configuration
.
GPS Model
SF-2050
SF-2040
NCT-2030M
RT-3010
RT-3020
NCT-2000D
NCT-2100D
Install Module Software
Module
GPS IOP
LBM (StarFire™)
9 9 9
9 9 9
9 9
9 9
9 9
9
9
Figure 4: User Input – Install Software
3-13
Page 16

Install Utility User Guide – Rev. C
The receiver must be navigating during upload to accept the software.
Refer to Figure 4 for the steps below:
9 In the User Input section of the window, click the
directory with the module software update files. The path to the directory is displayed.
9 Click the Install Software button. The Install Software Confirmation window opens (see
Figure 5). The window provides the current software versions installed on the computer and
the available updates.
button to browse to and select the
If there is a new version of module software, the
module at the bottom of the window is checked by
default to be installed. If the update software is the
same version as currently installed, the module is not
checked to be installed.
LBM is not displayed in the example to the right
because the StarFire™ license is not currently
installed on the receiver. As a result, there is no LBM
software to upload.
Figure 5: Install Software Confirmation
9 Accept the default(s) or change the software to be installed (check or uncheck the box next
to a module). If desired, the same version of software can be reinstalled. After the Install
button is clicked, a window will open to confirm the reinstallation.
9 Click the Install button. A bar shows the progress of the installation and the Activities section
of the window shows the upload status. A window notifies the user of a successful upload or
if an error occurred.
9 Manually cycle power to the unit after a successful upload to reset the unit. Do not use the
button to reset the unit.
9 Confirm that the new software is installed. The versions are
displayed in the Receiver Status section of the Install Utility
window (see Figure 6).
If the window does not display the newly loaded software
versions, click the
button.
Figure 6: Module Software Versions
3-14
Page 17

Install Utility User Guide – Rev. C
Chapter 4 ................................................................Install Receiver Options
The user may install receiver options via Install Utility or the NavCom program, StarUtil.
Installation via StarUtil is recommended. StarUtil provides a more robust interface. Refer
to the StarUtil User Guide (see Related Documents in the fore-matter).
This chapter provides guidance to install purchased receiver options to the NavCom GPS
receiver via Install Utility:
• Fast Update Rates – Position (10Hz >)
• Fast Update Rates – Raw Data (10Hz >)
• NCT RTK/UltraRTK™ – NCT RTK is for surveys under 10 km. NCT UltraRTK™ is for
surveys from 10 km to 40 km. UltraRTK™ requires GPS software version 4.2 or higher.
• RTK Extend™ – A software option only available in NavCom Technology receivers
that are StarFire™ capable and use the NCT-2100 GPS engine.
• Other features that may become available at future dates
Purchased options are called Receiver Options in Install Utility and Software
Options in StarUtil. The terms are interchangeable.
How to Purchase Receiver (Software) Options
Contact a NavCom authorized representative, or the NavCom Sales Department
(sales@navcomtech.com) to purchase receiver options. The user receives a receiver options
file via email to install purchased options.
The receiver options file is receiver dependant and cannot be uploaded into
multiple receivers. Archive the options file in case a reload is necessary.
4-15
Page 18

Install Utility User Guide – Rev. C
Install Options
Figure 7: User Input – Install Options/License
The receiver must be navigating during upload to accept the receiver
options/LBM license.
Options and the LBM (Starfire™) license may be uploaded at the same time.
Both files must be in the same directory as the Install Utility EXE and INI files.
In version 1.5 of this utility, the Options and LBM file naming format must be:
gps.lic and lbm.lic.
9 Open the directory with the options file. Make sure that the directory displays file extensions.
9 Change the name of the options file to gps.lic. (Also change the LBM license file name to
lbm.lic if the file is in the directory.)
As shown in the example in Figure 8, the name of the options file is 49745.lic. To
install the options, the user must change the file name from 49745.lic to gps.lic.
Figure 8: Options File Name Change
9 Open Install Utility if it isn’t already open.
9 In the User Input section of the window, click the
directory with the options file (see Figure 7). The path to the directory is displayed.
4-16
button to browse to and select the
Page 19

Install Utility User Guide – Rev. C
9 Confirm that the Install Options/License button is active and that the options file is available
(see Figure 9). If the file is not in the selected directory, the words, “Receiver Options”, and
the checked box next to it are grey. The button is also inactive (the
words on it are grey.)
If a LBM license file is not in the selected directory, the words,
“LBM License”, and the checked box next to it are grey.
Figure 9: Options Upload
9 Click the Install Options/License button. The Install Options/License Confirmation window
opens (see Figure 10). The window provides the current receiver options installed on the
computer and the available updates. It also provides issue dates for the LBM license if a
license is also available for upload.
Figure 10: Install Options/License Confirmation Window
9 Confirm that the options to be installed in the receiver are correct. (If a LBM license also is to
be installed, confirm that the update is correct.)
9 Click the Install button. A window notifies the user of a successful upload.
If the error message “Can’t open license file [path to file]” opens, the options file
is not named correctly. Open the directory with the options file, and change the
name to gps.lic. Then repeat the steps above.
Figure 11: Error Message – Can’t Open License File
If an error message opens, for example, “Did not get result for installing LBM
license”, click the OK button on the message window and continue to the next step.
9 Manually cycle power to the unit after a successful upload to reset the unit. Do not use the
button to reset the unit.
4-17
Page 20

Install Utility User Guide – Rev. C
9 Confirm that the new receiver options are installed. The options are displayed in the Install
Utility window (see Figure 12).
If the window does not display the newly loaded receiver options, click the
button.
Figure 12: Installed Receiver Options
4-18
Page 21

Install Utility User Guide – Rev. C
Chapter 5 ...................................................Install LBM License (StarFire™)
The user may install an LBM license via Install Utility or the NavCom program, StarUtil.
Installation via StarUtil is recommended. StarUtil provides a more robust interface. Refer
to the StarUtil User Guide (see Related Documents in the fore-matter).
This chapter provides guidance to install an LBM license (StarFire™ Subscription Service
License) via Install Utility.
LBM is the abbreviation for the StarFire™ L-Band Module.
Description of the StarFire™ Network
The StarFire™ Network is a global system for the distribution of SBAS corrections giving the
user the ability to measure his position anywhere in the world with exceptional reliability and
unprecedented accuracy of better than 10cm (3.9 inches). Because the SBAS corrections are
broadcast via INMARSAT geo-stationary satellites, the user needs no local reference stations or
post-processing to get this exceptional accuracy. Furthermore, the same accuracy is available
virtually anywhere on the earth's surface on land or sea from 76°N to 76°S latitude, due to the
worldwide coverage of these geo-stationary satellites.
How to Access the StarFire™ Service
StarFire™ is a subscription service. The user pays a subscription, which licenses the use of the
service for a predetermined period of time.
Subscriptions are available via a NavCom authorized representative, or by contacting NavCom
Sales Department (sales@navcomtech.com).
An authorized subscription provides an encrypted key, which is specific to the serial number of
the NavCom receiver to be authorized. Typically the initial license is preinstalled at the factory,
and the user installs subsequent licenses with Install Utility or StarUtil. The user receives the
StarFire™ license file via email.
5-19
Page 22

Install Utility User Guide – Rev. C
StarFire™ Licensing Terminology
Table 2 lists the StarFire™ licensing terminology.
™
Table 2: StarFire
Terms Description
Licensing Terminology
Precise
World Wide or Land Only
Calendar Time or
Run-Time (Elapsed Time)
Active or Inactive
Canceled or Expired
Indicates that the license type is a StarFire™ license.
Indicates the license type in regard to valid areas of StarFire™ operation:
• World Wide: Valid globally.
• Land Only: Valid only on land (or near land as defined by NavCom).
Indicates the license type in regard to duration of StarFire™ operation:
• Calendar Time: The receiver is licensed for a specified duration.
• Run-Time: The receiver is licensed at a per day rate.
Indicates the current status of the StarFire™ license.
Indicates how the StarFire™ license was terminated:
• Canceled: Terminated by the user.
• Expired: The end date for the license is reached or all the
run-time days are used.
4-20
Page 23

Install LBM License
Install Utility User Guide – Rev. C
Figure 13: User Input – Install Options/License
The receiver must be navigating during upload to accept the LBM license/receiver
options.
The LBM (Starfire™) license and receiver options may be uploaded at the same
time. Both files must be in the same directory as the Install Utility EXE and INI files.
In version 1.5 of this utility, the LBM and Options file naming format must be:
lbm.lic and gps.lic.
9 Open the directory with the LBM license file. Make sure that the directory displays file
extensions.
9 Change the name of the LBM license file to lbm.lic. (Also change the receiver options file
name to gps.lic if the file is in the directory.)
As shown in the example in Figure 14, the name of the LBM license file is
2144.lic. To install the LBM license, the user must change the file name from
2144.lic to lbm.lic.
Figure 14: LBM License File Name Change
9 Open Install Utility if it isn’t already open.
9 In the User Input section of the window, click the
directory with the LBM license file (see Figure 13). The path to the directory is displayed.
5-21
button to browse to and select the
Page 24

Install Utility User Guide – Rev. C
9 Confirm that the Install Options/License button is active and that the LBM license file is
available.
If the file is not in the selected directory, the words, “LBM
License”, and the checked box next to it are grey (see
Figure 15).
9 Click the Install Options/License button. The Install Options/License
Confirmation window opens (see Figure 16). The window provides
issue dates for the current LBM license and the update. It also
provides the current receiver options installed on the computer and
the updates if available for upload.
Figure 15: No Files Available
Figure 16: Install Options/License Confirmation Window
9 Confirm that the issue date for the LBM license update is correct. (If receiver option updates
are available, confirm that they are correct.)
9 Click the Install button. A window notifies the user of a successful upload.
If the error message “Can’t open license file [path to file]” opens, the LBM
license file is not named correctly. Open the directory with the LBM license file,
and change the name to lbm.lic. Then repeat the steps above.
Figure 17: Error Message – Can’t Open License File
If the error message “Did not get result for installing LBM license” opens, click the
OK button on the message window and continue to the next step.
9 Manually cycle power to the unit after a successful upload to reset the unit. Do not use the
button to reset the unit.
4-22
Page 25

Install Utility User Guide – Rev. C
9 Confirm that the new LBM license is installed. The LBM license in use is displayed in the
Install Utility window, with its start and end dates (see Figure 18). Refer to Table 2 for an
explanation of StarFire™ licensing terminology.
If the window does not display the newly loaded LBM license, click the
button.
Figure 18: Installed LBM (StarFire™) License
5-23
Page 26

Install Utility User Guide – Rev. C
This page is left blank intentionally
4-24
 Loading...