

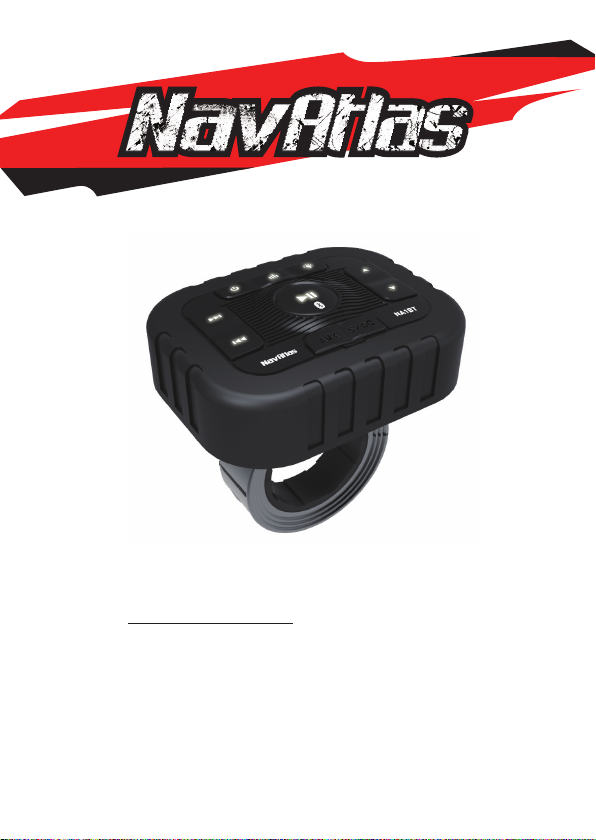
NA1BT
INSTALLATION/OWNER'S MANUAL
Digital Bluetooth Controller
®
NA1BT
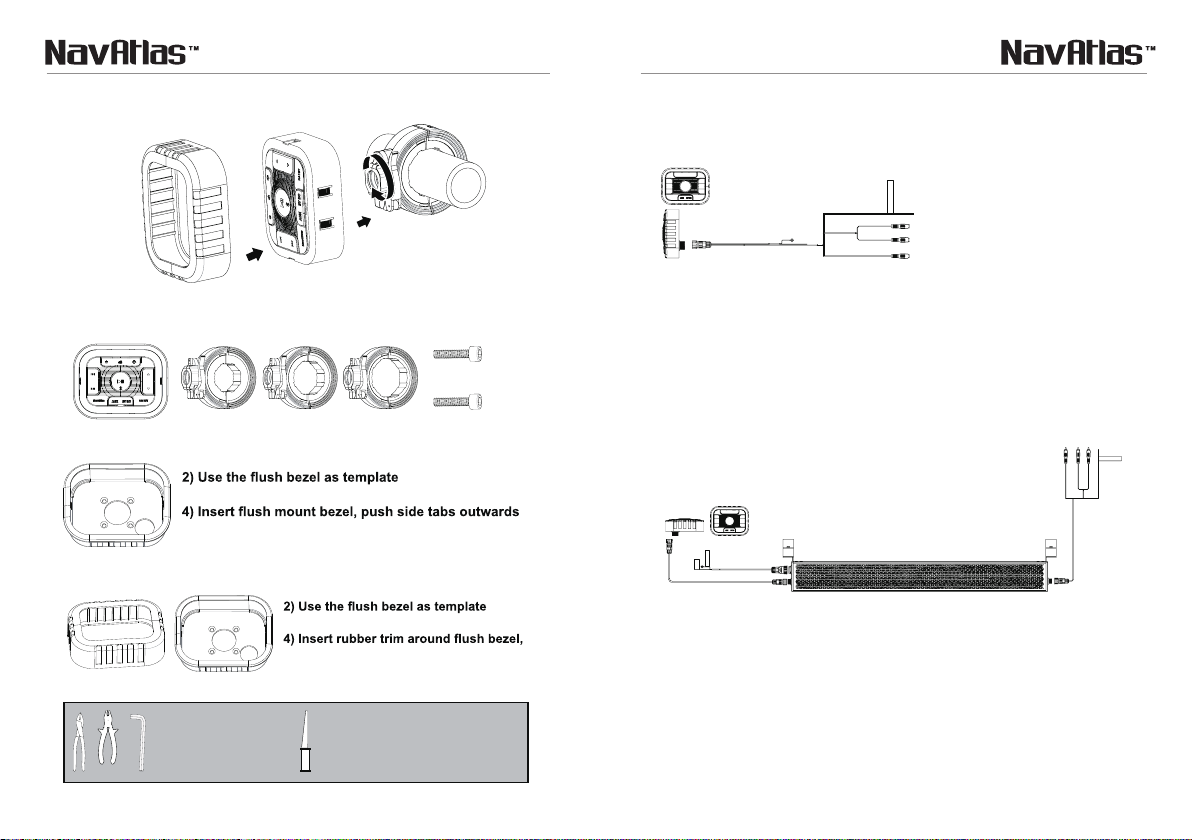
CONTROLLER MOUNTING
Allen Head
NA1BT
UNIVERSAL INSTALLATION
ROLLBAR / CAGE MOUNT
FLUSH MOUNT
SURFACE MOUNT
1) Always check mounting depth before cutting
3) Cutout hole exactly
5) Use optional silicon glue to give extra hold
6) Insert
YOU can rotate 90o for the
best mounting position
1.5” 1.75” 2.00”
CONTROLLER
1) Check mounting depth before drilling
3) Drill or cut wire hole exactly
screw in place
5) Insert
CONTROLLER
4mm
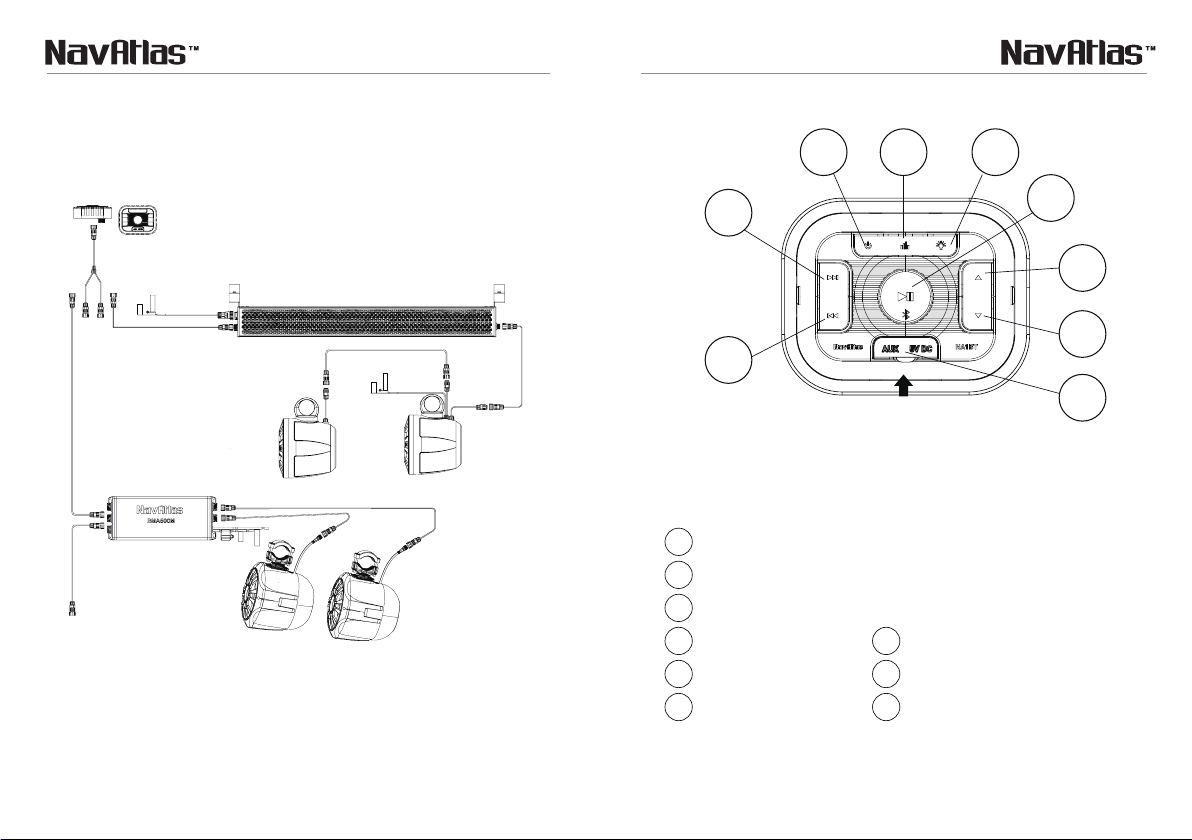
AFTERMARKET SYSTEM
UNIVERSAL CABLE
8 pin waterproof DIN connector
R
L
Digital out
POWER
RED - 12V+ACC
BLACK - CHASSIS GROUND
LED ON/OFF
BLUE - OPTIONAL LED CONTROL
AUDIO
RED RCA - ANALOG RIGHT
WHITE RCA - ANALOG LEFT
GREY RCA- DIGITAL CO-AXIAL OUTPUT
ANALOG INSTALLATION W/AFTERMARKET AMPS
WHEN USING AFTERMARKET AMPLIFIERS WITH SOUNDBARS, YOU MUST USE ANALOG
CABLES FOR DASIY CHAIN FUNCTION TO WORK, A 2A CABLE(SOLD SEPARATELY) IS
REQUIRED FOR ANALOG AUDIO OUTPUT TO WORK I N THIS SETUP.
NA1BT/NA2BT/NA30C
NA81MDVR
12V +
A2A CABLE
10 Feet (18GA) for
Soundbar
2 pin waterproof DIN connecto
Ground(-)
10 Feet (10GA)
8 pin waterproof DIN connecto
r
r
NS14A/27A/35A
*DIGITAL OUT NOT
USED
DigitaRL
l
AMPLIFIER
(BASS AMP, ECT...)
8 pin waterproof
DIN connector
LED ON /OFF
UNIVERSAL CABLE TO
AFTERMARKET
TOOLS NEEDED:
- Crimp Tool
- Wrench or Pliers
2 3
- 4mm Allen Wrench
OPTIONAL TOOLS NEEDED:
- Hand saw or Jigsaw
NA1BT
GETTING STARTED
6
VOLUME DOWN
9
NEXT TRACK
USB 1
CHARGING
NOT FOR
NOTE: TO AVOID WATER
DAMAGE, PLEASE KEEP
AUX/USB COVER CLOSED
WHEN NOT IN USE
EXAMPLE OF DAISY CHAIN DIGITAL CONFIGURATIONS FOR
ANY VEHICLE
*OPTIONAL ACCESSORIES ARE D2Y AND D2D CABLES (SOLD SEPARATELY)
1
2
NA1BT
3
Y ADAPTER CABLE
D2D CABLE
D2D CABLE
10 Feet (18GA) for soundbar
D2D CABLE
OUTPUT CAN CONNECT TO ANY MODEL
(NS14A/27A/35A, NT650AT, BMA500M, ECT...)
NA1BT/NA2BT/NA30C
NA81MDVR
2 pin waterproof DIN connector
Ground(-)
12V +
10 Feet (10GA)
8 pin waterproof DIN connector
BMA500M
CONNECTING CABLE
Ground(-)
12V +
NS14A/27A/35A
CONNECTING CABLE
Ground(-)
10 Feet (12GA)
12V +
4 inch(18ga)
NT65AT
NT308W
4 pin waterproof DIN connector
8 pin waterproof DIN connector
8 pin waterproof
DIN connector
9
A
AUDIO PLAYBACK
A2A CABLE
4
5
6
8
OPEN
.
POWER ON
1
EQ MODES: FLAT - LOW - MID - HIGH
2
LED LIGHT ON/OFF
3
PLAY/PAUSE/MUTE
4
VOLUME UP
5
*NOTE: WHEN USING EQ MODES, SOME MUSIC CAN DISTORT AT MAX VOLUME
ON CERTAIN PHONES/DEVICES
7
8
*
AUX INPUT/USB CHARGING
PREVIOUS TRACK
7
4 5

NA1BT
N
CONTROLLER
BLUETOOTH OPERATION
RECONNECTION
1) Power on the
2) Ensure you are within range of the
reconnect
3) If the device is out of range from the
a
4) If your device was previously paired with the
paired device:
4) Long press
5) Long press
NOTE:
reconnection once the devices
Bluetooth
OFF / ON
NA1BT
1
2
BLUETOOTH OPERATION
PAIRING & DISCOVERING A NEW BLUETOOTH CONNECTIO
1) Power on the CONTROLLER by short-pressing the 1 Power button
NOTE: You have 2 minutes before you must restart this procedure over again.
2) The CONTROLLER is now in pairing mode:
ANDROID users:
a. Go into the Settings Menu of your device
b. Enter the Bluetooth Menu
c. TURN ON Bluetooth and press SCAN
d. “NA1BT ” will now be displayed under AVAILABLE DEVICES
iOS users:
a. Go into the Settings Menu of your iOS device
b. Enter the Bluetooth Menu
c. TURN ON Bluetooth
d. “NA1BT” will now be displayed
3) If NA1BT is not seen, repeat the above steps to refresh the “Device List”
4) When the connection is successful a tone will be heard, and the Bluetooth LED
indicator will light solid, you are now ready to stream music from your player to the
6 7
. The
range
a. Ensure no other devices are currently paired
b. Enter the Bluetooth Menu on your device being paired
c. “NA1BT” will display under AVAILABLE DEVICES
d. Choose the “NA1BT” to reconnect
Some devices may require a manual Bluetooth
is powered
CONTROLLER and your last paired device Bluetooth.
CONTROLLER , the unit will now automatically
CONTROLLER will reconnect automatically to your device when in
2
EQ button 3~6 seconds, reset paired device list.
4
PLAY/PAUSE button 3~6 seconds, enter pairing mode .
CONTROLLER , it will disconnect automatically:
and/or back in range
4
CONTROLLER , but it wasn’t the last

NA1BT
STREAMING MUSIC
NA1BT
1
2
3
BLUETOOTH OPERATION
1) Press the
button from your devices touch screen
2) To skip songs or advance, press the
3) To select the previous song, press the
VOLUME CONTROL
4) To raise the volume press the
5) To lower the volume press the
controls
NOTE: Some devices use an independent volume control, for most devices the
volume control on the controller will adjust the phone volume, in other cases you will
need to raise the phone volume to max in order hear the music clearly.
WARNING:
1
PLAY/PAUSE once to start playing music or press the PLAY
2
NEXT TRACK button
3
PREVIOUS TRACK button
4
VOLUME UP button or use your devices controls
5
VOLUME DOWN button or use your devices
DO NOT USE AUX AND BLUETOOTH AT THE SAME TIME.
AUX-INPUT
1
YOUR
DEVICE
4
5
4
CONTROLLER AUX-IN OPERATION
1) Power on the
button for 3 seconds
2) Disconnect any paired Bluetooth
devices Settings Menu
3) Connect your 3.5mm AUX-IN cable located on front side of the CONTROLLER
to your devices headphone jack
4) Route the wire back to CONTROLLER , secure your device in a safe location
VOLUME CONTROL
5) To raise the volume press the
6) To lower the volume press the
(Cable not included)
CONTROLLER by pressing and holding down the 1POWER
INSERT
VOLUME UP button
2
VOLUME DOWN button
3
YOU CAN PLAY AUDIO
FROM ANY DEVICE
THAT HAS A 3.5MM
HEADPHONE JACK
Bluetooth in your
2
3
NOTE: Bluetooth HD Streaming available on devices/phones that support
*NOTE:
this function/codec
8 9

NA1BT
FCC Compliance
is device complies with part 15 of the FCC Rules. Operation is subject to
the condition that this device does not cause harmful interference (1) this
device may not cause harmful interference, and (2) this device must accept
any interference received, including interference that may cause undesired
operation.
Changes or modications not expressly approved by the party responsible for
compliance could void the user's authority to operate the equipment.
is equipment has been tested and found to comply with the limits
NOTE:
for a Class B digital device, pursuant to Part 15 of the FCC Rules. ese limits
are designed to provide reasonable protection against harmful interference
in a residential installation. This equipment generates, uses and can radiate
radio frequency energy and, if not installed and used in accordance with
the instructions, may cause harmful interference to radio communications.
However, there is no guarantee that interference will not occur in a particular
installation.
If this equipment does cause harmful interference to radio or television
reception, which can be determined by turning the equipment off and on,
the user is encouraged to try to correct the interference by one or more of the
following measures:
-- Reorient or relocate the receiving antenna.
-- Increase the separation between the equipment and receiver.
-- Connect the equipment into an outlet on a circuit different from that to
which the receiver is connected.
-- Consult the dealer or an experienced radio/TV technician for help.
NA1BT
To maintain compliance with FCC’s RF Exposure guidelines, This equipment
should be installed and operated with minimum distance between 20cm the
radiator your body: Use only the supplied antenna.
10 11

Support Line: 1-562-946-7471
9AM-5PM PST Monday-Friday
www.navatlas.com
All rights reserved.
NSA0318-V01
Printed in China
 Loading...