

Page 1
Mobia Mobia
Mobia
™ ™
™
Fitness Fitness
Fitness
Machine Machine
Machine
Assembly Assembly
Assembly
Instructions Instructions
Instructions
003–3300.101509.C
Nautilus,Inc.,WorldHeadquarters,16400SENautilusDr.Vancouver,WA,USA98683,(800)NAUTILUS/(800)628-8458,www.NautilusInc.com-CustomerService:NorthAmerica
(800)605-3369,tcinquiries@nautilus.com|Europe,MiddleEast&Africa490220320200,technics@nautilus.com|Germany&Austria+490220320200,Switzerland+4126
4607766,UnitedKingdom+441908267345,AsiaPacific&LatinAmerica(360)859-5180,technics-APLA@nautilus.com|Patentinformation:Thisproductmaybecovered
byUSandForeignPatentsandPatentsPending.SeeProductformoreinformation.|PrintedinChina|©2009Nautilus,Inc.,Allrightsreserved.™and®indicatea
trademarkorregisteredtrademark.Nautilus,Inc.(www.nautilus.com)trademarksincludeNAUTILUS®,BOWFLEX®,STAIRMASTER®,SCHWINN®andUNIVERSAL®and
respectivelogos.Othertrademarksarethepropertyoftheirrespectiveowners.
www www
www
.mobia.com/quickstart .mobia.com/quickstart
.mobia.com/quickstart
Viewthiswebsitefora“gettingstarted”video,assemblytips,andthelatestaccessoriesforyourMobia
™
fitness
machine.
Important Important
Important
Safety Safety
Safety
Instructions Instructions
Instructions
Thisiconmeansapotentiallyhazardoussituationwhich,ifnotavoided,couldresultindeathorseriousinjury.Obeythefollowingwarnings:
• ••Readandunderstandallwarningsonthismachine.• ••CarefullyreadandunderstandtheAssemblyManual.• ••Keepbystandersandchildrenawayfromtheproductyouare
assemblingatalltimes.• ••Donotconnectpowersupplytothemachineuntilinstructedtodoso.• ••Donotassemblethismachineoutdoorsorinawetormoistlocation.• •
•
Makesureassemblyisdoneinanappropriateworkspaceawayfromfoottrafficandexposuretobystanders.• ••Somecomponentsofthemachinecanbeheavyorawkward.
Useasecondpersonwhendoingtheassemblystepsinvolvingtheseparts.Donotdostepsthatinvolveheavyliftingorawkwardmovementsonyourown.• ••Setupthis
machineonasolid,level,horizontalsurface.• ••Donottrytochangethedesignorfunctionalityofthismachine.Thiscouldcompromisethesafetyofthismachineandcanvoid
thewarranty.• ••IfreplacementpartsarenecessaryuseonlygenuineNautilus
®
replacementpartsandhardware.Failuretousegenuinereplacementpartscancauseariskto
users,keepthemachinefromoperatingcorrectly,orvoidthewarranty.• ••Donotuseorputthemachineintoserviceuntilthemachinehasbeenfullyassembledandinspected
forcorrectperformanceinaccordancewiththeOwner’sManual.• ••ReadandunderstandthecompleteOwner’sManualsuppliedwiththismachinebeforefirstuse.Keepthe
Owner’sandAssemblyManualsforfuturereference.• ••Doallassemblystepsinthesequencegiven.Incorrectassemblycanleadtoinjury.
Before Before
Before
Assembly Assembly
Assembly
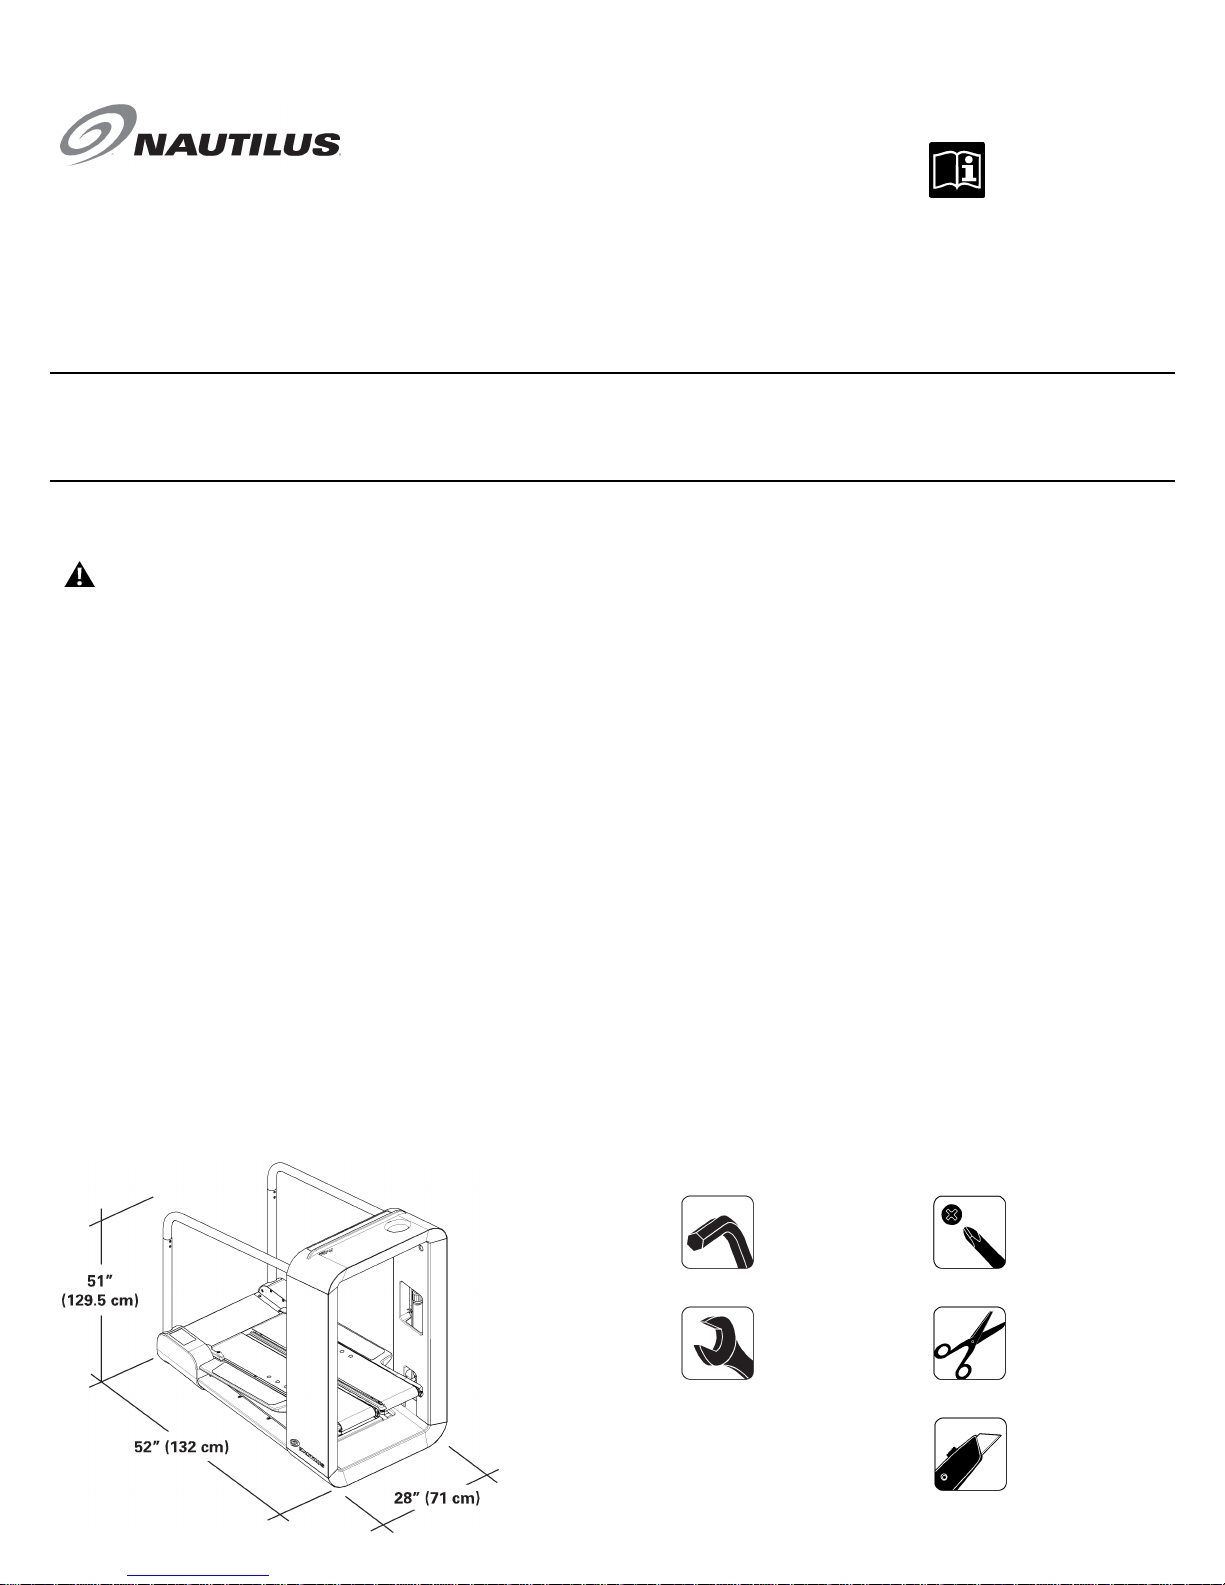
Selecttheareawhereyouaregoingtosetupandoperateyourmachine.Forsafeoperation,thelocationmustbeonahard,levelsurface.Allowaminimumworkoutarea
of67”x150.5”(170cmx380cm).
Followthesebasicpointswhenyouassembleyourmachine:
1.Readandunderstandthe“ImportantSafetyInstructions”beforeassembly.
2.Collectallthepiecesnecessaryforeachassemblystep.
3.Usingtherecommendedwrenches,turntheboltsandnutstotheright(clockwise)totighten,andtheleft(counterclockwise)toloosen,unlessinstructed
otherwise.
4.Whenattaching2pieces,lightlyliftandlookthroughtheboltholestohelpinserttheboltthroughtheholes.
5.Theassemblyrequires2people.
1 1
1
Specifications Specifications
Specifications
and and
and
T TTools ools
ools
Included Included
Included
Not Not
Not
Included Included
Included
3mm
4mm
5mm
#2
10mm
13mm
(recommended)
(recommended)
Page 2

Parts Parts
Parts
( ((2 22BOXES BOXES
BOXES
) )
)
BOX BOX
BOX
1 1
1
Item Item
Item
Qty Qty
Qty
Description Description
Description
Item Item
Item
Qty Qty
Qty
Description Description
Description
11
ConsoleAssembly
9
1
HandBar,LowerRight
2
1
RearStep
10
1
HandBar,LowerLeft
3
1
RearUprightSupportBracket
11
2
HandBar,Upper
4
2
Cylinder
12
1
UprightCover,Right
51
BarCover,Right
13
1
UprightCover,Left
6
1
BarCover,Left
141
PowerCord
71
RearSideCover,Left
151
HardwareCard
8
1
RearSideCover,Right
16
1
ManualPack
BOX BOX
BOX
2 2
2
2 2
2
Item Item
Item
Qty Qty
Qty
Description Description
Description
171
TreadleAssembly
Page 3

Hardware Hardware
Hardware
Item Item
Item
Qty Qty
Qty
Description Description
Description
Item Item
Item
Qty Qty
Qty
Description Description
Description
A
2
FlatWasher,M8WideBlackJ
2
ButtonHeadHexScrew,M8x1.25x25Black
B
4
FlatWasher,M8BlackK
2
ButtonHeadHexScrew,M8x1.25x40Black
C
16
FlatWasher,M6BlackL
8
ButtonHeadHexScrew,M6x1.0x35Black
D
6
FlatWasher,M6WideBlackM
4
ButtonHeadHexScrew,M6x1.0x25Black
E
2
FlatHeadScrew,M6
N
4
Washer,M6
F
10
Nut,M6Black
O
8
ButtonHeadHexScrew,M5x0.8x16
G
2
Nut,M8BlackP
16
PhillipsHeadSelfDrillScrew
H
4
PhillipsHeadSelfDrillScrewBlackQ
4
ButtonHeadHexScrew,M6x1.0x12
I
8
PhillipsHeadScrew
R
4
Plug
Assembly Assembly
Assembly
1. 1.1.Attach Attach
Attach
Console Console
Console
Assembly Assembly
Assembly
to totoT TTreadle readle
readle
Assembly Assembly
Assembly
Note: Note:
Note:
Donottightenhardwarecompletely.
Thissteprequirestwopeople.
BesuretoremovetheplasticwrapandseparatetheUprightCoversfromtheConsoleAssembly.
3 3
3
Page 4

2. 2.2.Secure Secure
Secure
Console Console
Console
Assembly Assembly
Assembly
to totoT TTreadle readle
readle
Assembly Assembly
Assembly
Note: Note:
Note:
Donottightenhardwarecompletely.
3. 3.3.Set Set
Set
Bar Bar
Bar
Covers Covers
Covers
on on
on
Lower Lower
Lower
Hand Hand
Hand
Bars Bars
Bars
4 4
4
Page 5

4. 4.4.Run Run
Run
Console Console
Console
Cable Cable
Cable
through through
through
the the
the
Upper Upper
Upper
and and
and
Lower Lower
Lower
Right Right
Right
Hand Hand
Hand
Bars Bars
Bars
Note: Note:
Note:
DonotcrimptheConsoleCable.
5. 5.5.Attach Attach
Attach
Upper Upper
Upper
and and
and
Lower Lower
Lower
Hand Hand
Hand
Bars Bars
Bars
Note: Note:
Note:
DonotcrimptheConsoleCable.
5 5
5
Page 6

6. 6.6.Attach Attach
Attach
Hand Hand
Hand
Bar Bar
Bar
Assemblies Assemblies
Assemblies
to totoMain Main
Main
Assembly Assembly
Assembly
Note: Note:
Note:
DonotcrimptheConsoleCable.
Donottightenhardwarecompletely.
6 6
6
7. 7.7.Attach Attach
Attach
Rear Rear
Rear
Upright Upright
Upright
Support Support
Support
Bracket Bracket
Bracket
to totoMain Main
Main
Assembly Assembly
Assembly
Note: Note:
Note:
Installhardwareandthentightenall all
all
hardwarefromprevioussteps.Besuremachineisstilllevel.
Page 7

8. 8.8.Attach Attach
Attach
Rear Rear
Rear
Side Side
Side
Covers Covers
Covers
to totoMain Main
Main
Assembly Assembly
Assembly
7 7
7
9. 9.9.Attach Attach
Attach
Rear Rear
Rear
Step Step
Step
to totoMain Main
Main
Assembly Assembly
Assembly
Page 8

10. 10.
10.
Attach Attach
Attach
Cylinders Cylinders
Cylinders
to totoT TTreadles readles
readles
and and
and
then then
then
Uprights Uprights
Uprights
Note: Note:
Note:
Thesingle,whitearrowontopofthecylindersmustpointupandtotheinsideofthemachine.AttachtoTreadlesbeforetheUprights.
8 8
8
11. 11.
11.
Attach Attach
Attach
Upright Upright
Upright
Covers Covers
Covers
to totoMain Main
Main
Assembly Assembly
Assembly
Note: Note:
Note:
Placelowertabsfirst,andflextheUprightCovertosettheuppertabs.
Page 9

12. 12.
12.
Secure Secure
Secure
Upright Upright
Upright
Covers Covers
Covers
to totoMain Main
Main
Assembly Assembly
Assembly
9 9
9
13. 13.
13.
Connect Connect
Connect
Power Power
Power
Cord Cord
Cord
to totoMain Main
Main
Assembly Assembly
Assembly
Note: Note:
Note:
TheMobia
™
fitnessmachineisdesignedtoplugdirectlyintoaproperlywiredandgroundedthreeprong120Voutlet
Final Final
Final
Inspection Inspection
Inspection
Inspectyourmachinetoensurethatallfastenersaretightandcomponentsareproperlyassembled.
DonotuseorputthemachineintoserviceuntilthemachinehasbeenfullyassembledandinspectedforcorrectperformanceinaccordancewiththeOwner’s
Manual.
 Loading...