


1

F
ORWARD
Thank you for your purchase of a NAUTICAM housing.
At NAUTICAM, we pride ourselves in the ability to recognize the requirements of professional
as well as amateur underwater photographers and fulfill them through the innovative designs
of our products. We strive to achieve a high level of user-friendliness by allowing stress-free
installation and easy operation of all important functions of the camera.
Each housing is individually inspected and water pressure tested to ensure optimum quality.
Please read this manual carefully before using the housing, this will maximize its performance
as well as its lifetime.
2

T
ABLE OF
C
ONTENTS
Warranty ……………………………………………………………………………………………………………. 4
Package Contents ………………………………………………………………………………………………. 5
Precautions ………………………………………………………………………………………………………… 6
Specifications …………………………………………………………………………………………………….. 8
Identification of Parts ………………………………………………………………………………………… 9
Opening and Locking the Housing ……………………………………………………………………… 13
Preparation of the Housing ………………………………………………………………………………… 15
Installing the Monitor ………………………………………………………………………………………… 21
Connecting to the Camera Housing ……………………………………………………………………. 23
Optional: SDI Output to Surface Monitor……………………………………………………………. 29
Care and Maintenance ………………………………………………………………………………………. 30
Optional Accessories ………………………………………………………………………………………….. 31
3

W
ARRANTY
All NAUTICAM Products are warranted against any material and manufacturing defects for two years from
the date of purchase for consumer use, and exceptionally HDMI and SDI cables are limited to one year. The
warranty period is defined by the invoicing or payment date by the customer. Alternatively, the warranty
period would be assumed from the day that the product is shipped from our facility. This warranty only
applies to products purchased from authorized NAUTICAM dealers and does not extend beyond the original
retail purchaser.
To return your product for service, please contact your regional authorized service center(s). Please note
that this warranty only applies when the product is purchased in the territory where the service center is
located.
NAUTICAM accepts no liability for any damage to and defects in the housing caused by improper use and/or
poor maintenance; it is the responsibility of the owner to carefully follow the instructions in our manuals.
NAUTICAM does not hold responsibility for damage, of any nature, to any equipment used with and/or
placed within our products.
NAUTICAM accepts no liability for any loss of captured images or the inability to capture images even if it is
due to the malfunctioning of our products.
Unauthorized modifications and/or repairs of our products will automatically invalidate the warranty.
4

P
ACKAGE
C
ONTENTS
Depend on Camera
models
, different HDMI2.0 cables a
re required.
• NA-Nauticam Atomos Flame Housing
• 25625 M16 Vacuum Valve (pre-installed)
• 90138 Housing O-ring
• 25632 Hand Pump for Vacuum Valve
• O-ring Remover
• CR2032 Battery (pre-insalled)
• Lubricant
• Padded Travel Case
For 17910 Nauticam Atomos Flame Housing (with SDI input)
1. 90163 SDI Cable in 0.85m length (for connection from SDI bulkhead and Shogun flame
2. 25058 M16 SDI Bulkhead
3. 25060 SDI Cable in 0.3m length (for connection from camera to underside of SDI Bulkhead)
monitor) – (Pre-installed)
For
17909 Nauticam Atomos Flame Housing
(with HDMI 1.4 input)
1.
25033 Standard HDMI bulkhead with M16
thread
2.
25036 HDMI(D-C) cable in 190mm length
(for connection from HDMI bulkhead to camera)
3.
25046 HDMI(D-D) cable in 200mm length
(for connection from HDMI bulkhead to camera)
4.
25071 HDMI Cable (A-D) in 0.75m length
(for connection from Shogun housing to HDMI
bulkhead) - (Pre-installed)
For
17909N Nauticam Atomos Flame Housing
(with HDMI 2.0 input)
1.
Cables are not included.
5

P
RECAUTIONS
• A water-tight test without the monitor inside the housing is highly recommended when
• Do not use lubricants from other brands with the silicone rubber O-ring on this housing,
• Discontinue use immediately should you notice any leakage.
• Store the housing in a robust, shock-proof container during transportation; avoid
• When travelling by air, do not close the housing as this may lead to a pressure difference
• Care must be taken when opening the housing, as pressure may build up inside the
using the system for the first time and after the changing of port and O-ring(s).
only use the lubricant provided by NAUTICAM.
transporting with any equipment, such as a camera, inside the housing.
between the atmosphere and inside the housing.
housing which increases the opening force.
6

• Do not open the product in a wet or sandy environment. Protect the interior from
moisture and debris in order to prevent malfunction or leakage.
• Do not store the product in an environment of high humidity.
• Do not leave the housing and the monitor in direct sunlight for prolonged periods.
• Keep out of reach of children, failure to do so could result in injury.
• Defective products should be shipped to our distributors for service, unauthorized
disassembling and/or modifications could result in malfunction or leakage.
• Use only recommended battery with this product, do not mix different specifications or
old and new batteries.
• Do not place excessive stress on your HDMI cable connector.
• Do not bend or twist your HDMI cable.
7

S
PECIFICATIONS
Construction
Dimensions
Weight in Air 2.35kg (17909 and 17910), 2.24kg (17909N)
Weight in Water -0.4Kg (17909 and 17910), -0.52kg (17909N)
Depth rating 60 m
Compatible
monitor
Housing body: Aluminum alloy
Surface treatment: Hard anodized
Display window: Abrasion resistant polycarbonate
Width: 289mm
Height: 177mm
Depth: 105mm
1) 17909 : Atomos Ninja Flame/Shogun Flame/Ninja Inferno/Shogun
Inferno 7'' 10-bit 4K/HD SDI / HDMI Recorder/Monitor/Player
2) 17909N: Atomos Ninja Flame/Shogun Flame/Ninja
Inferno/Shogun Inferno 7'' 10-bit 4K/HD SDI / HDMI
Recorder/Monitor/Player
2) 17910: Atomos Ninja Flame/Shogun Flame/Shogun Inferno 7''
10-bit 4K/HD SDI / HDMI Recorder/Monitor/Player
8
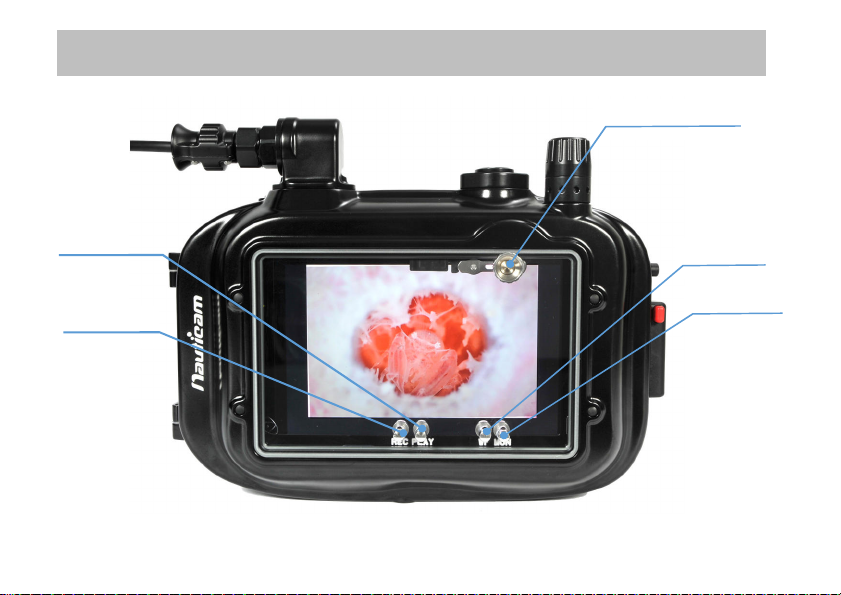
REC Button
PLAY Button
WF Button
MON Button
Multi Selector Lever
I
DENTIFICATION OF PARTS
9

Moisture Alarm Window
M16 A
ccessory Port
Attaching Point for Mounting Ball
M16 Vacuum Valve II
Fan LED Window
HDMI or SDI cable
*17909N
include
s M28 Accessory Port
10

Monitor ON/OFF
FAN ON/OFF
Housing Lock Safety Button
*17909N doesn’t include a cable.
Cable Cap
11

Attaching Point for Mounting Ball
Sacrificial zinc anode
12

O
PENING AND
L
OCKING THE
H
OUSING
To open the housing:
1. Press the housing lock safety
button.
2. Turn the housing lock 270°,
counter clockwise, until the lock
reaches the “Open” position as
shown.
13

position.
To lock the housing:
3. Close the housing while the
housing lock is in the “Open”
4. Turn the housing lock 270°
clockwise until the lock reaches
the “lock” position as shown.
Confirm that the white indicator
line on the safety button is visible.
14

P
REPARATION OF THE
H
OUSING
1. After verifying that the main O-ring is in
good condition, lightly coat it with the
lubricant provided.
2. Make sure the O-ring groove located in
the front part of the housing is free from
any foreign material; the groove can be
cleaned with the aid of a microfiber cloth.
4. Setting up the moisture alarm:
3. Place the main O-ring into the groove,
first at the corners, then the whole
perimeter.
1. Ensure that remove an insulation
film before install a battery.
Then install the battery provided
into the battery compartment on
the circuit board inside the housing.
15

*
Use onl
y recomme
nded battery with this product
Insert the battery as shown above and
P
ress
To remove the battery, press the metal
P
ress
Battery Installation:
then press down the battery.
plate as indicated and the battery will pop
out.
16

2. Switch the alarm on. The LED light
will flash blue once and turn blue
for five seconds indicating the
battery is normal. Then it goes into
flashing blue light standby mode.
3. Test the alarm by connecting the
two wires near the bottom of the
housing with a damp cotton bud;
the alarm should start giving out a
repeating “beep” sound along with
a flashing red light. The “beep”
sound and the light should keep on
going for 5 seconds after the
removal of the damp cotton bud.
17

Vacuum valve:
Vacuum valve is pre-install to the housing for conducting a vacuum seal test. Please refer to
the manual of the vacuum valve for details of the operation.
LED status identification:
On start up
LED indicator Status
Flash “Blue” light once Indicates a 2nd generation PCB
Steady "Blue" light
"Blue" and "Red" lights
alternating
Steady "Red" light Battery empty, replace battery.
Battery is normal, goes into flashing "Blue"
light standby mode after 5 seconds.
Battery low. Replace battery as soon as
possible. Goes into standby mode after 5
seconds.
18
After start up
LED indicator Status
Standby mode. The moisture alarm is active,
Flashing "Blue" light
Flashing "Red" light
with beeping sound
Flashing "Yellow" light
Steady "Green" light Target vacuum level is reached.
Rapidly flash "Yellow"
light
Rapidly flashing "Red"
light
and the system is ready for vacuum indication
whenever a vacuum is detected.
Moisture is detected.
Some vacuum is detected, target vacuum level
is not reached.
Vacuum is dropping. (Will occur only after
target vacuum level is reached)
Vacuum is totally lost. Circuit stalled until
switched off. (Will occur only after target
vacuum level is reached)
19

5. Setting up fans:
1. Then install Sony NP-F570 battery
into the battery compartment on
the housing.
2. To remove the battery, press the square
button as indicated.
20
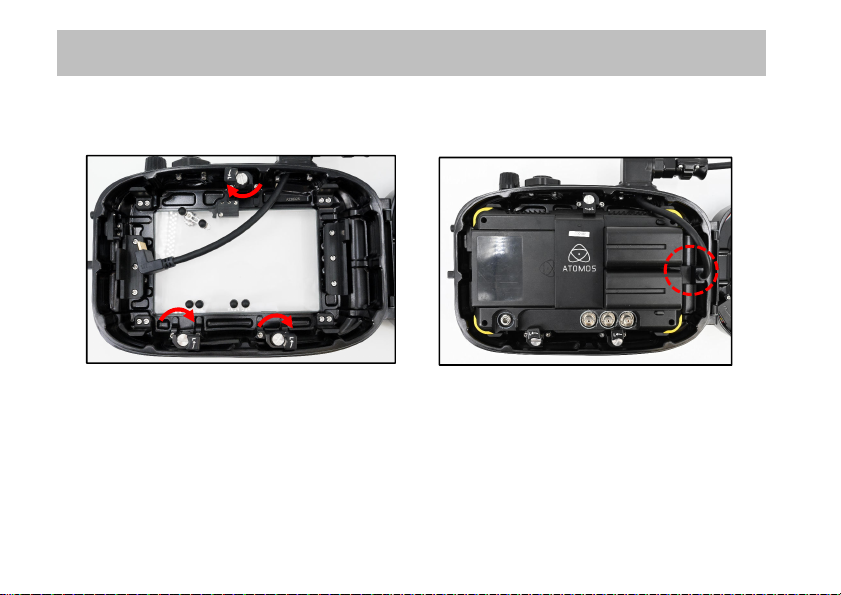
I
NSTALLING THE
M
ONITOR
To install the monitor into to the housing:
1. Turn the three locking levers in the
direction as shown.
2. Connect the HDMI cable with
"L" connector to the monitor’s
HDMI IN socket as shown above
or HD-SDI cable to the monitor’s
SDI IN socket.
21

3. Place the monitor inside the
housing and secure the monitor
by turning the three locking
levers towards the monitor as
shown.
22
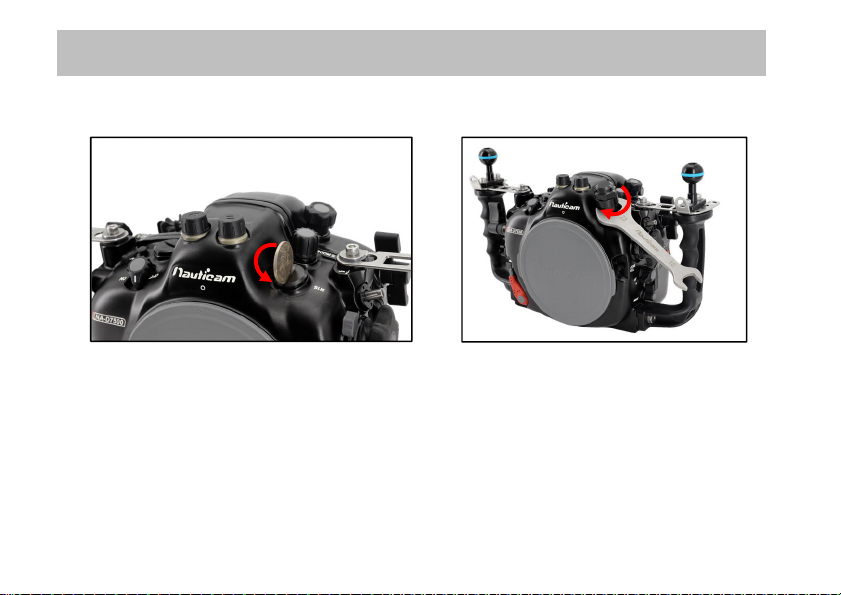
Connect
C
ONNECTING TO THE
C
AMERA
H
OUSING
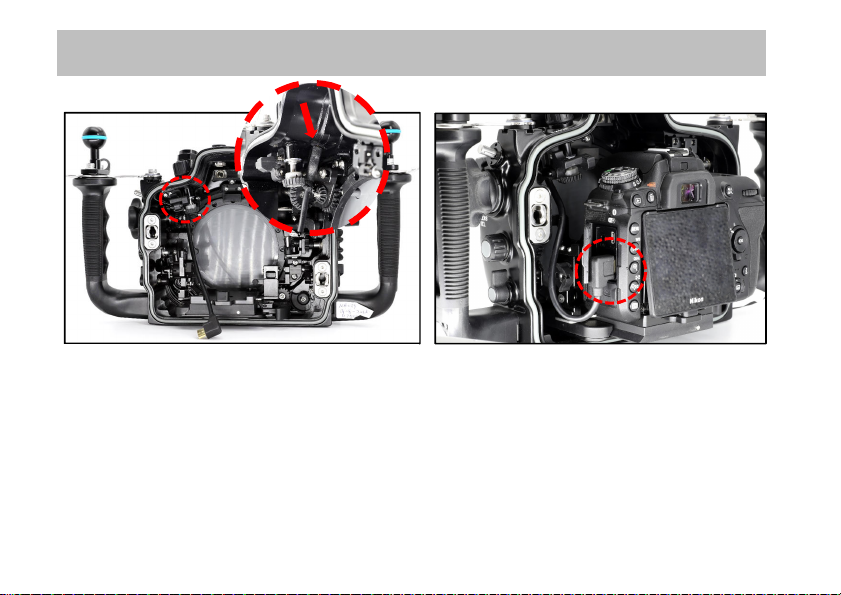
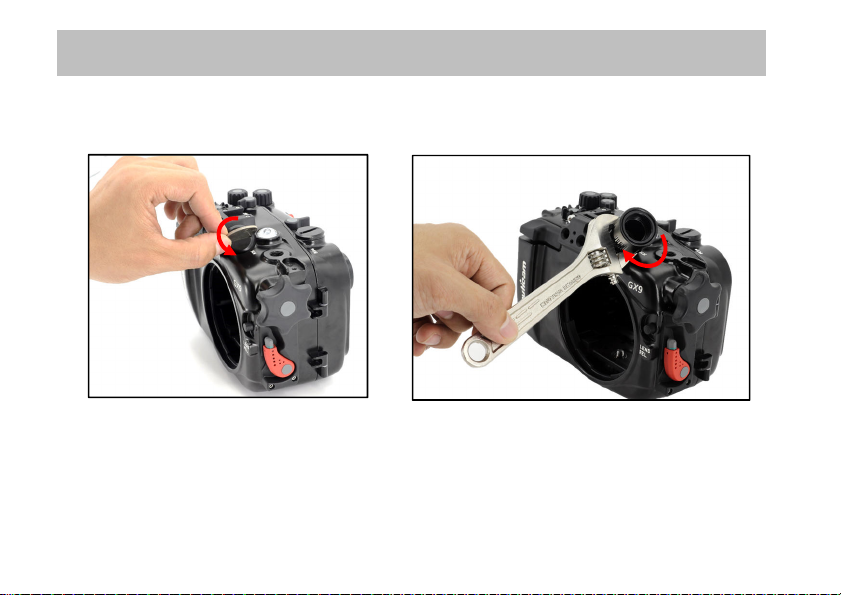
For installing the standard HDMI bulkhead with M16 thread or M16 SDI bulkhead:
1. Unscrew the M16 plug from the
threaded hole with a coin.
2. Tighten the HDMI or HD-SDI
bulkhead with a spanner.
23
3. Connect the HDMI /HD-SDI cable to the
HDMI /HD-SDI bulkhead.
4. Connect the HDMI / HD-SDI cable to
the camera's HDMI / HD-SDI socket.
24
For installing the custom HDMI bulkhead to use with extension:
1. Unscrew the M16 plug from
the accessory port with a coin.
2. Tighten the socket extension to the
camera housing with a spanner.
25

3. Insert the HDMI cable through the
threaded hole from inside of the
housing, and connect the HDMI
cable to the HDMI bulkhead.
4. Tighten the HDMI bulkhead by
turning the threaded ring on the
socket extension.
26

5. Connect the HDMI cable to the
camera's HDMI connector.
27

To connect the monitor housing to HDMI / SDI bulkhead:
1. Unscrew the cap off the HDMI /SDI
bulkhead.
2. Unscrew the cap off the HDMI
/HD-SDI cable, and Align and
plug the HDMI /HD-SDI cable in
the HDMI /HD-SDI bulkhead.
Tighten the connection by
turning the threaded ring on the
HDMI /HD-SDI cable
28

O
PTIONAL
: SDI O
UTPUT TO
S
URFACE
M
ONITOR
Nauticam Atomos Flame Housing (with SDI input) features SDI Pass-through, and HDMI to
HD-SDI cross convert, which allow a video signal to be sent topside to a director’s monitor.
1. Attach and Tighten the M16 SDI
bulkhead with a spanner on the
housing.
2. Connect the SDI cable to the SDI
bulkhead and to the monitor SDIout socket, and connect SDI input
cable to the monitor SDI-IN
socket
29

C
ARE AND
M
AINTENANCE
• Soak the housing system in fresh water after each salt water use, during which all control
• Carefully press the housing lock safety button for a few times to avoid the accumulation
• After each day of diving, it is advisable to have the main O-ring in the front part of the
• Replace the main O-ring annually. It is recommended that you ship the housing to our
buttons/knobs should be operated a few times to avoid the accumulation of salt residue;
wipe the housing with a towel before opening.
of salt residue.
housing removed from its groove with the O-ring remover and inspected for damage. Also
check that the O-ring retains its original circular shape; never stretch the O-ring excessively
or remove it with a sharp object. The O-ring groove should be cleaned to ensure it is free
from any salt deposit or foreign material; lightly coat the O-ring with the provided
lubricant before reinstalling it in the groove. A damaged O-ring should be discarded
immediately and replaced only with one that is provided by NAUTICAM.
distributor for a complete overhaul every year or after every 200 dives.
30

P.N. 17954
P.N. 17955
P.N. 16226
Housing
P.N. 17919
P.N. 17951
P.N. 17952
P.N. 17953
O
PTIONAL
A
CCESSORIES
-
Mounting System
Nauticam Atomos Shogun
housing mounting system
A7S/GH4/A7II/GH5/A9
Tripod plate for NA-
Mounting ball for NA-
Shogun/Flame housing
Nauticam Atomos Shogun
housing mounting adaptor for
Mounting Brackets for
Shogun/Flame on Epic LT
Nauticam Atomos Shogun
housing mounting adaptor for
NA-GH4/GH5S/V
Monitor Hood for Nauticam
Atomos /Shogun/Flame
Housing
31

P.N. 25033
P.N. 25075
P.N. 16243
(Internal Cable)
P.N. 25077
P.N. 25079
P.N. 25078
-
HDMI 1.4 Input
M24D1R205-M28A1R170 HDMI 2.0
Standard HDMI bulkhead
with M16 thread
-
HDMI 2.0 Input
HDMI (D-A) Cable in 190mm Length for
NA-GH5/G9
(for internal connection from
HDMI bulkhead to camera)
HDMI A-D Cable in o.5m Length
for RED DSMC2/C200/EVA1
Cable
(for NA-T3 to use with Ninja V
housing)
M28A1R225-M28A1R170 HDMI 2.0
Cable
(for NA-BMPCCII/S1R to use with
Ninja V housing)
M28A2R210-M28A1R170 HDMI
2.0 Cable
(for NA-GH5V to use with
Ninja V housing)
32

P.N. 25060
P.N. 25059
P.N.
25084
P.N.
25085
P.N. 25058
M24D1R270-M28A1R170 HDMI 2.0
Cable
(for NA-EM1X to use with Ninja V
-
SDI Output
housing)
M16 SDI bulkhead
M28C1R200-M28A1R170 HDMI 2.0
Cable
(for NA-Z7V to use with Ninja V
housing)
SDI cable extension adaptor
SDI cable in 0.4m length
33

P.N. 25062/25063
P.N. 25064 / 25065
SDI surface monitor cable in 15m/45m
length
(for connection from SDI Bulkhead to
Surface Monitor on land)
SDI cable in 5m/30m length
(for connection between SDI
Bulkheads)
34

35
 Loading...