

Page 1
Small Undermount Sink Kit Installation Instructions
Native Trails - Rim Undermount
Tools Needed:
Phillips Head
Screw Driver
or Drill
7/16" Nut Driver
or Ratchet
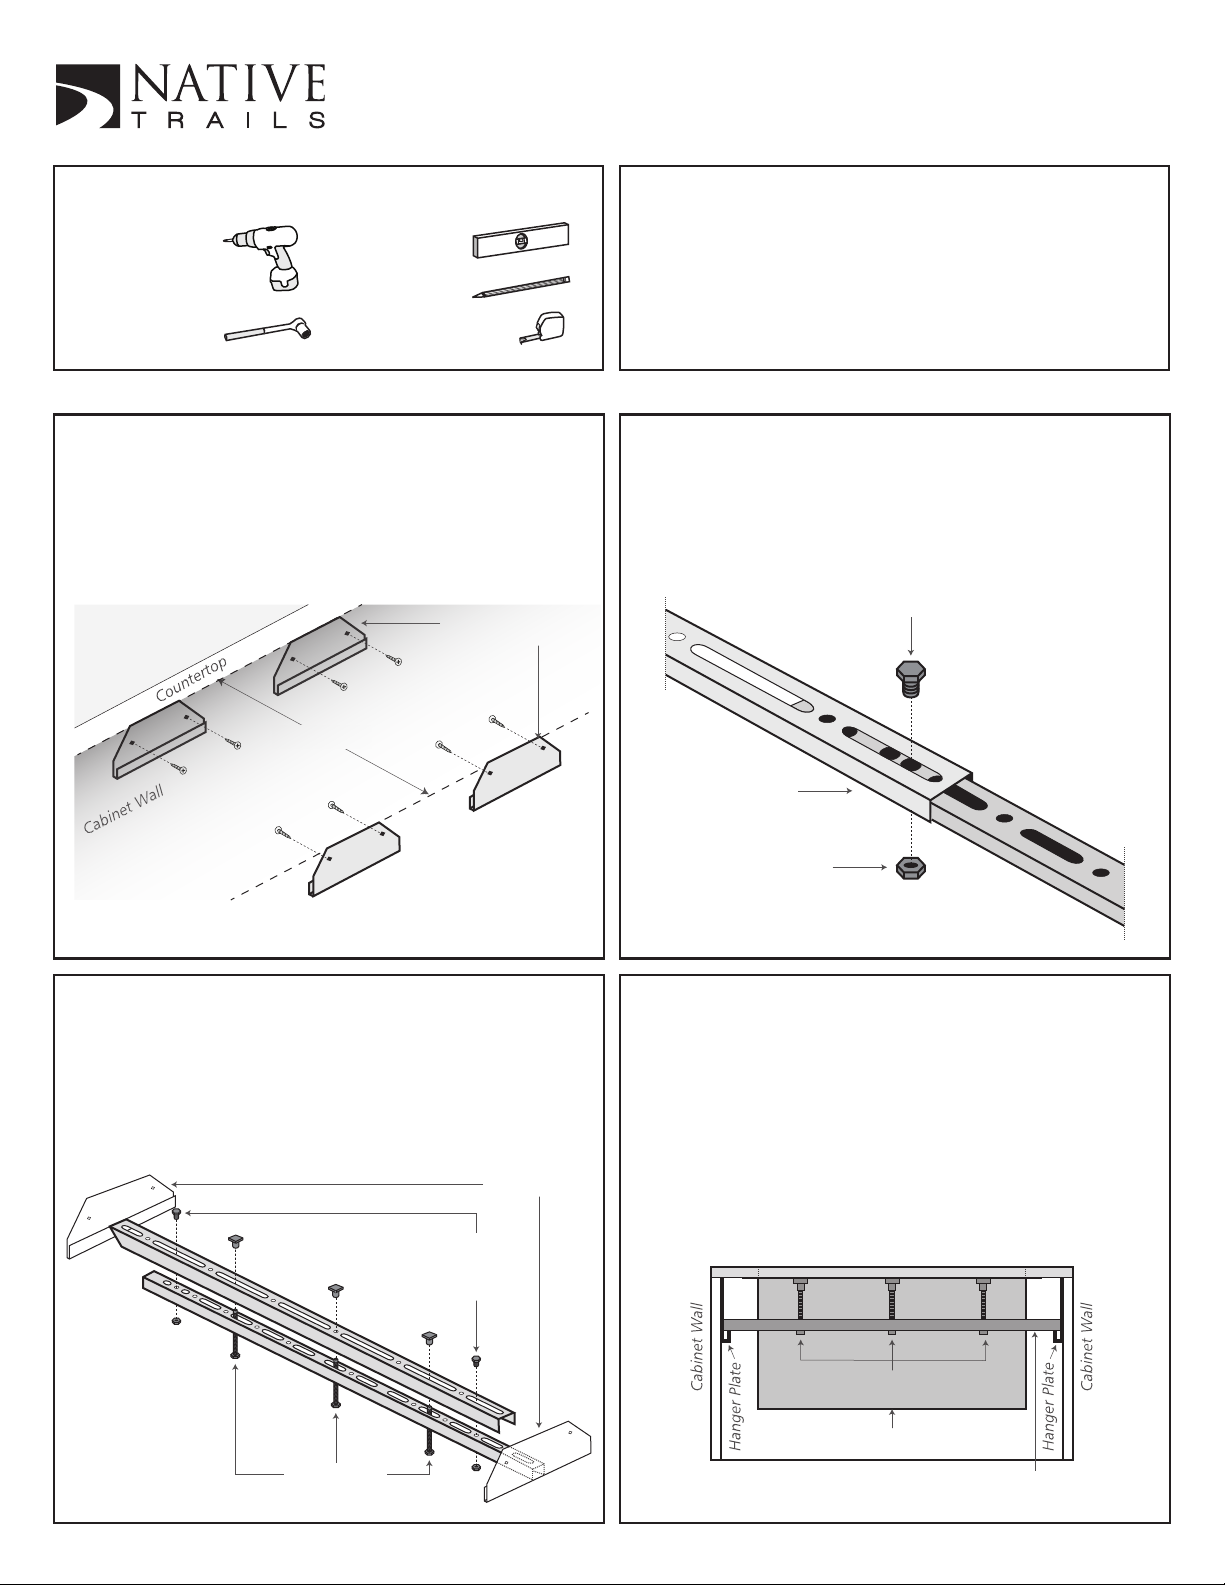
1. Determine the best way to support your sink, either side-to-side
or front-to-back.
2. Mount the hanger plates to the ends of the cabinet using the
supplied screws, making the top of the hanger plate flush with
the top of the cabinet. (See Figure 1)
Sink Width
Level
Pencil
Measuring Tape
*Licensed Installer Recommended*
Hanger Plates
Materials Included:
(2) Inner Channels
(2) Outer Channels
(8) Wood Screws
(4) 1/4" dia. x 3/4" Bolts
3. Slide two channel pieces together (one inside the other) and
open them up to set tight against the walls of the cabinet. Place
a 1/4" bolt at each end at the farthest point possible where the
bolt goes through the top half and into the threaded lower
channel. For the longest extensions, you may want to use one
of the bolts with a nut through both slots in the pieces to leave
room for the leveling bolt. (See Figure 2)
(2) 1/4" Nuts *(use if needed)
(6) Sets of 3 1/2" Leveling
Bolts and Caps
(4) Hanger Plates
1/4" Bolt
Figure 1
4. Thread the leveling bolts up through the holes in a pattern
that will support the sink evenly. It works well to space the
leveling bolts at 4" centers if possible. Raise the heights of
the leveling bolts to approximately 1 1/2". (See Figure 3)
5. Repeat steps 3 and 4 for the other set of channels.
6. Taking the sink drain position into account, move the channels
into the final proper position to best support your sink.
Hanger Plates
1/4" Bolts
*(use 1/4" nuts
if needed)
Channel Assembly
1/4" Nut
*(use if needed)
Figure 2
7. Place the metal leveling bolt caps on the tops of the leveling
bolts. Then, using a level, make sure your leveling bolts are all
at the same height. Place your sink on the raised leveling bolts.
8. Install your countertop (with the pre-cut sink opening)
as desired.
9. Apply a line of silicone around the top of your sink.
10. Using a nut driver/ratchet raise your sink into position
by raising the leveling bolts.
11. Check your sink for level to ensure proper drainage.
Countertop
Figure 3
Leveling Bolts
Leveling Bolts
Sink
Channel Assembly
Figure 4
Page 2

Small Undermount Sink Kit Installation Instructions
Native Trails - Bottom Undermount
Tools Needed:
Phillips Head
Screw Driver
or Drill
7/16" Nut Driver
or Ratchet
1. Determine the best way to support your sink, either side-to-side
or front-to-back.
2. Measure the height of your sink to determine the location of the
Hanger Plates.
3. In your cabinet, measure the height of your sink down from the
top edge (either on the sides of the cabinet or the front and
back depending on your installation type). Mark this line with a
level. Install the hanger plates using the supplied screws making
the top of the hanger plate flush with the line. (See Figure 1)
Sink Height
Level
Pencil
Measuring Tape
*Licensed Installer Recommended*
Hanger Plates
Materials Included:
(2) Inner Channels
(2) Outer Channels
(8) Wood Screws
(4) 1/4" dia. x 3/4" Bolts
4. Slide two channel pieces together (one inside the other) and
open them up to set tight against the walls of the cabinet. Place
a 1/4" bolt at each end at the farthest point possible where the
bolt goes through the top half and into the threaded lower
channel. For the longest extensions, you may want to use one
of the bolts with a nut through both slots in the pieces to leave
room for the leveling bolt. (See Figure 2)
(2) 1/4" Nuts *(use if needed)
(6) Sets of 3 1/2" Leveling
Bolts and Caps
(4) Hanger Plates
1/4" Bolt
Sink Width
Figure 1
5. Thread the leveling bolts up through the holes in a pattern
that will support the sink evenly. It works well to space the
leveling bolts at 4" centers if possible. Raise the heights of
the leveling bolts to approximately 1 1/2". (See Figure 3)
6. Repeat steps 4 and 5 for the other set of channels.
7. Taking the sink drain position into account, move the channels
into the final proper position to best support your sink.
Hanger Plates
1/4" Bolts
*(use 1/4" nuts
if needed)
Channel Assembly
1/4" Nut
*(use if needed)
Figure 2
8. Place the metal leveling bolt caps on the tops of the leveling
bolts. Then, using a level, make sure your leveling bolts are all
at the same height. Place your sink on the raised leveling bolts.
9. Install your countertop (with the pre-cut sink opening)
as desired.
10. Apply a line of silicone around the top of your sink.
11. Using a nut driver/ratchet raise your sink into position
by raising the leveling bolts.
12. Check your sink for level to ensure proper drainage.
Countertop
Sink
Figure 3
Leveling Bolts
Figure 4
Leveling Bolts Channel Assembly
 Loading...