

National Instruments USRP-2950, USRP-2953, USRP-2952, USRP-2954, USRP-2955 Getting Started Manual
Page 1

GETTING STARTED GUIDE
USRP-2950/2952/2953/2954/2955
Software Defined Radio Reconfigurable Device
This document explains how to install, configure, and test the following USRP RIO devices:
• USRP-2950R Software Defined Radio Reconfigurable Device (USRP-2950)
• USRP-2952R Software Defined Radio Reconfigurable Device (USRP-2952)
• USRP-2953R Software Defined Radio Reconfigurable Device (USRP-2953)
• USRP-2954R Software Defined Radio Reconfigurable Device (USRP-2954)
• USRP-2955 Software Defined Radio Reconfigurable Device (USRP-2955)
The USRP RIO can send and/or receive signals for use in various communications
applications. The device ships with the NI-USRP instrument driver, which you can use to
program the device.
Contents
Electromagnetic Compatibility Guidelines...............................................................................2
Verifying the System Requirements..........................................................................................2
Unpacking the Kit..................................................................................................................... 3
Verifying the Kit Contents................................................................................................ 3
Preparing the Environment....................................................................................................... 4
Installing the Software.............................................................................................................. 5
Installing USRP RIO Devices...................................................................................................5
Synchronizing Multiple USRP RIO Devices (Optional).................................................. 6
Preparing the USRP-2955 for LO Sharing (Optional)......................................................7
Programming the USRP RIO....................................................................................................8
NI-USRP Instrument Driver............................................................................................. 8
NI-USRP Sample Projects................................................................................................ 9
NI-USRP Examples........................................................................................................ 10
Verifying the Device Connection (Optional).................................................................. 10
Troubleshooting.......................................................................................................................11
Should I Update Device Firmware and FPGA Images?................................................. 11
Why Doesn't the Device Power On?...............................................................................11
Why Doesn't the USRP Device Appear in the NI-USRP Configuration Utility?...........11
Why Does USRP2 Appear Instead of USRP RIO in the NI-USRP Configuration
Utility?...................................................................................................................... 12
Why Don't NI-USRP Examples Appear in the NI Example Finder?............................. 12
Front Panels, Back Panels, and Connectors............................................................................12
Direct Connections to the USRP RIO.............................................................................12
USRP-2950..................................................................................................................... 13
USRP-2952..................................................................................................................... 16
Page 2
USRP-2953..................................................................................................................... 20
USRP-2954..................................................................................................................... 24
USRP-2955..................................................................................................................... 27
GPIO Connector..............................................................................................................32
Where to Go Next................................................................................................................... 33
Worldwide Support and Services............................................................................................ 33
Electromagnetic Compatibility Guidelines
This product was tested and complies with the regulatory requirements and limits for
electromagnetic compatibility (EMC) stated in the product specifications. These requirements
and limits provide reasonable protection against harmful interference when the product is
operated in the intended operational electromagnetic environment.
This product is intended for use in industrial locations. However, harmful interference may
occur in some installations, when the product is connected to a peripheral device or test object,
or if the product is used in residential or commercial areas. To minimize interference with
radio and television reception and prevent unacceptable performance degradation, install and
use this product in strict accordance with the instructions in the product documentation.
Furthermore, any changes or modifications to the product not expressly approved by National
Instruments could void your authority to operate it under your local regulatory rules.
Caution To ensure the specified EMC performance, operate this product only with
shielded cables and accessories.
Caution To ensure the specified EMC performance, the length of all I/O cables
except those connected to the Ethernet and GPS antenna ports must be no longer
than 3 m (10 ft).
Caution This product is not approved or licensed for transmission over the air
using an antenna. As a result, operating this product with an antenna may violate
local laws. Ensure that you are in compliance with all local laws before operating
this product with an antenna.
Verifying the System Requirements
To use the NI-USRP instrument driver, your system must meet certain requirements.
Refer to the product readme, which is available online at ni.com/manuals, for more
information about minimum system requirements, recommended system, and supported
application development environments (ADEs).
2 | ni.com | USRP-2950/2952/2953/2954/2955 Getting Started Guide
Page 3
Unpacking the Kit
LINK
PWR
TX OUTPUT MAX +20 dBm, RX INPUT MAX -15 dBm, ALL RF PORTS 50 W
TX1 RX1
RX2
GPS
PPS
REF
TX1 RX1
RX2
AUX I/O
3.3 VDC MAX
RF 0
RF 1
NI USRP-2943R
1.2 GHz - 6 GHz
NI USRP-2943R
1.2 GHz - 6 GHz
Designed by Ettus ResearchDesigned by Ettus Research
JTAG
1
54
3
2
Caution To prevent electrostatic discharge (ESD) from damaging the device,
ground yourself using a grounding strap or by holding a grounded object, such as
your computer chassis.
1. Touch the antistatic package to a metal part of the computer chassis.
2. Remove the device from the package and inspect the device for loose components or any
other sign of damage.
Caution Never touch the exposed pins of connectors.
Note Do not install a device if it appears damaged in any way.
3. Unpack any other items and documentation from the kit.
Store the device in the antistatic package when the device is not in use.
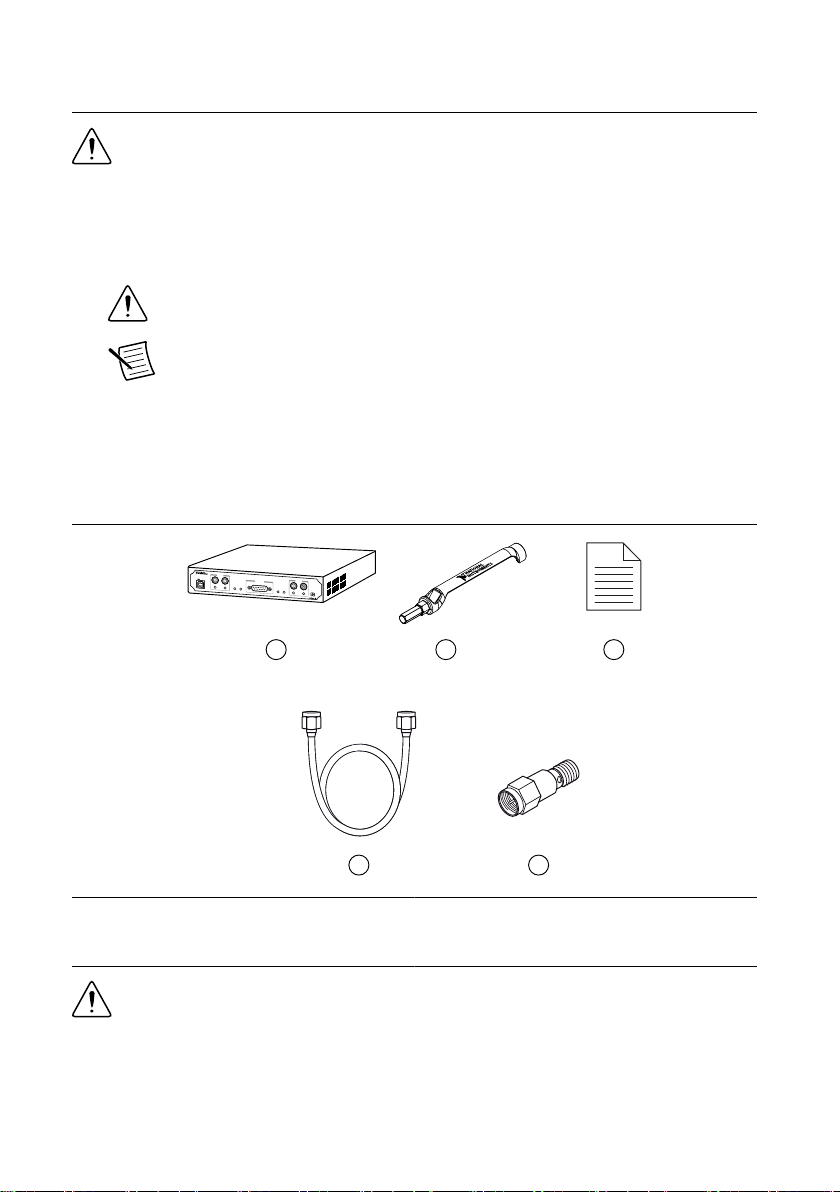
Verifying the Kit Contents
Figure 1. Kit Contents
1. USRP RIO Device
2. SMA Driver Bit (USRP-2955 Only)
3. Getting Started Guide (This Document)
4. SMA (m)-to-SMA (m) Cable
5. 30 dB SMA Attenuator (Not Included with
USRP-2955)
Caution If you directly connect or cable a signal generator to your device, or if
you connect multiple USRP RIO devices together, you must connect a 30 dB
attenuator to the RF input (RX1 or RX2) of each receiving USRP RIO device.
USRP-2950/2952/2953/2954/2955 Getting Started Guide | © National Instruments | 3
Page 4
Other Required Item(s)
In addition to the kit contents, you must provide the following additional item(s):
• An MXI Express interface card. You can purchase an MXI Express interface kit for your
USRP RIO device, which contains an MXI Express interface card, at ni.com.
Optional Items
• LabVIEW Modulation Toolkit (MT), available for download at ni.com/downloads and
included in LabVIEW Communications System Design Suite, which includes MT VIs
and functions, examples, and documentation
Note You must install the LabVIEW Modulation Toolkit for proper operation
of the NI-USRP Modulation Toolkit example VIs.
• LabVIEW Digital Filter Design Toolkit, available for download at ni.com/downloads and
included in LabVIEW Communications System Design Suite
• LabVIEW MathScript RT Module, available for download at ni.com/downloads
• Additional SMA (m)-to-SMA (m) cables to use the REF IN and PPS IN signals
• GPS antenna for devices with GPS disciplined oscillator (GPSDO) support
• PCIe - MXI Express Interface Kit for USRP RIO to connect to a desktop computer
• ExpressCard Slot - MXI Express Interface Kit for USRP RIO to connect to a laptop
computer
• PXIe - MXI Express Interface Kit for USRP RIO to connect to a PXI Express chassis
• CDA-2990 Clock Distribution Device for synchronizing multiple devices
• CPS-8910 Switch Device for PCI Express for large multiple-input, multiple-output
(MIMO) expansion configurations
Preparing the Environment
Ensure that the environment you are using the USRP RIO in meets the following
specifications.
Ambient temperature range 0 °C to 55 °C
Operating temperature 23 °C ± 5 °C
Operating humidity 10% to 90% relative humidity, noncondensing
Pollution Degree 2
Maximum altitude 2,000 m
Indoor use only.
Caution Do not operate the USRP RIO in a manner not specified in this document.
Product misuse can result in a hazard. You can compromise the safety protection
4 | ni.com | USRP-2950/2952/2953/2954/2955 Getting Started Guide
Page 5
built into the product if the product is damaged in any way. If the product is
damaged, return it to NI for repair.
Installing the Software
You must be an Administrator to install NI software on your computer.
1. Install an ADE, such as LabVIEW or LabVIEW Communications System Design Suite.
Note LabVIEW Communications System Design Suite does not support the
USRP-2955.
2. Visit ni.com/info and enter the Info Code usrpdriver to access the driver download
page for the latest NI-USRP software.
3. Download the NI-USRP driver software.
4. Follow the instructions in the installation prompts.
Note Windows users may see access and security messages during
installation. Accept the prompts to complete the installation.
5. When the installer completes, select Restart in the dialog box that prompts you to restart,
shut down, or restart later.
Installing USRP RIO Devices
Install all the software you plan to use before you install the hardware. Ensure that the
USRP RIO device and computer are off before installing.
1. Attach the antenna or cable to the front panel terminals of the USRP RIO device as
desired.
2. Use the MXI Express Interface Kit to connect the USRP RIO device to the computer.
a) Identify which MXI Express Interface Kit you want to use.
• If you are using the desktop connectivity kit or the PXI chassis connectivity kit,
follow the installation instructions in the Hardware Installation section of the
Set Up Your MXI™ Express ×4 System document included in that kit.
• If you are using the laptop connectivity kit, touch the ExpressCard-8360 for
USRP and outer metal case of the USRP RIO device simultaneously.
b) Connect the MXI device to the USRP RIO device using the included cable.
If you are using the laptop connectivity kit, refer to the following figure.
USRP-2950/2952/2953/2954/2955 Getting Started Guide | © National Instruments | 5
Page 6
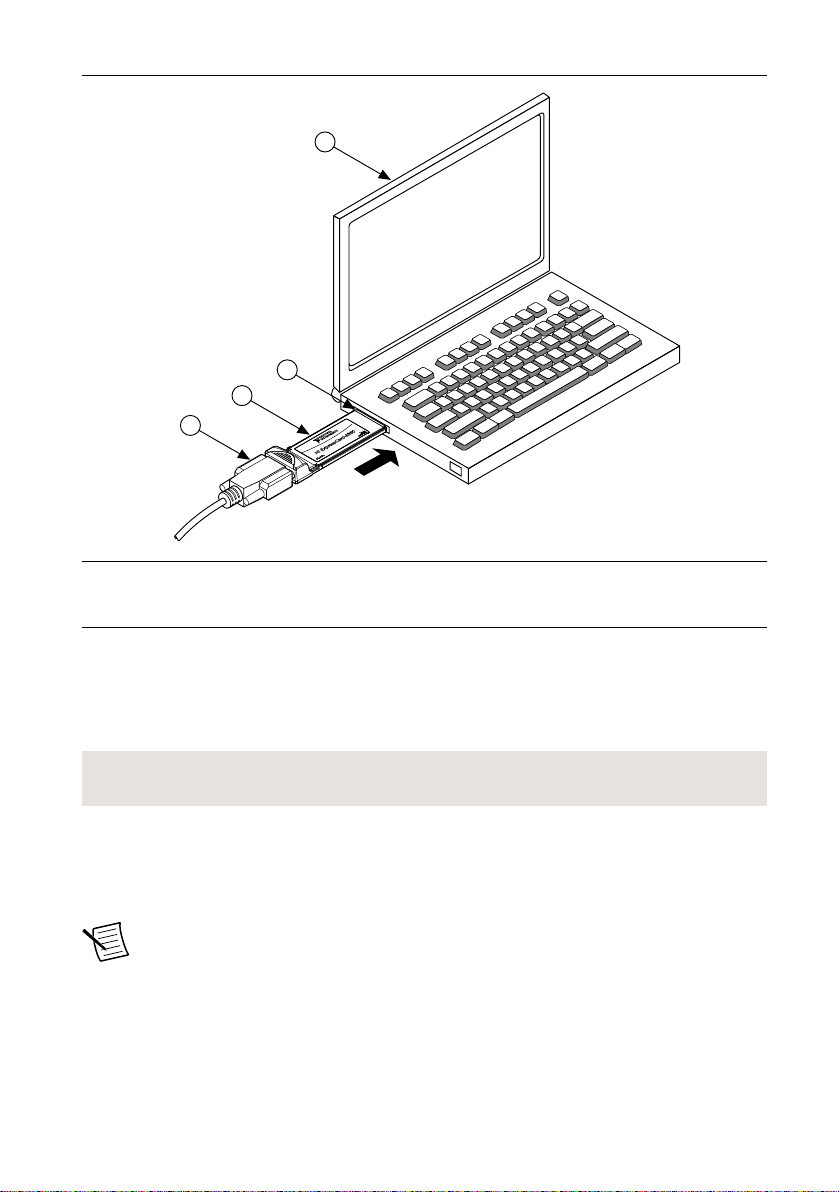
Figure 2. Connecting the USRP RIO Device with a Laptop Connectivity Kit
4
2
1
3
1. Cable Included with ExpressCard Interface Kit
2. ExpressCard-8360 for USRP Device for PXI
Remote Control
3. ExpressCard Slot
4. Laptop Computer
3. Connect the AC/DC power supply to the USRP RIO device.
4. Plug the power supply into a wall outlet. Press the PWR button.
5. Power on the computer.
Windows automatically recognizes the USRP RIO device.
Related Information
Refer to the Set Up Your MXI™ Express ×4 System document for installation instructions.
Synchronizing Multiple USRP RIO Devices (Optional)
To set up a higher channel-count system, you can synchronize two or more USRP RIO devices
so that they share clock and PPS signals.
Note Synchronizing multiple USRP RIO devices requires a CDA-2990 accessory.
Ensure that all hardware is set up as previously indicated.
1. Connect the REF IN port of the USRP RIO device to the first 10 MHz OUT port of the
CDA-2990 using a standard SMA (m)-to-SMA (m) cable.
2. Connect the PPS TRIG IN port of the USRP RIO device to the PPS OUT port of the
CDA-2990 using a standard SMA (m)-to-SMA (m) cable.
6 | ni.com | USRP-2950/2952/2953/2954/2955 Getting Started Guide
Page 7
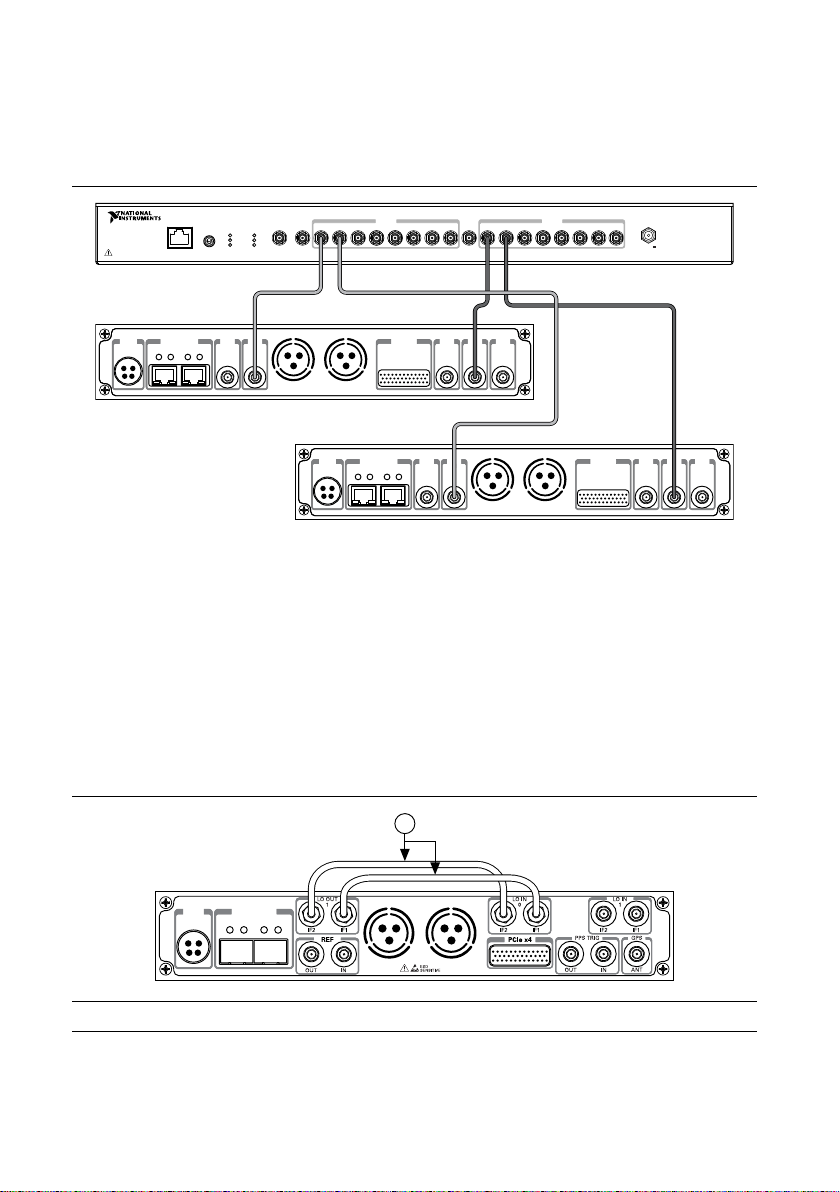
3. Repeat steps 1 and 2 to synchronize additional USRP RIO devices using the additional
CDA-2990
Designed by Ettus ResearchDesigned by Ettus Research
3 4 5 621
7
8 7 83 4 5 621
PPS OUT10 MHz OUT PPS OUT
POWER
GPS LOCK
PPS
STATUS
EXTERNAL
INTERNAL
ETHERNET
GPS ANT
INPUT
PRIMARY REF
INTERNAL
EXTERNAL
EXT 10 MHz
INPUT
EXT PPS
INPUT
POWER
8 Channel Clock Distribution Module
6 – 15 V
6 W MAX
0 1
PWR
REF
IN
PPS
OUT
TRIG
5V DC
REF
OUT
1G/10G ETH
3.3 V +15 dBm
MAX
9-16V DC
7.5 A MAX
SFP+Ports
PCIe x4
TRIG
3.3VIN5V MAX
PPS GPS
ANT
–15 dBm
MAX
0 1
PWR
REF
IN
PPS
OUT
TRIG
5V DC
REF
OUT
1G/10G ETH
3.3 V +15 dBm
MAX
9-16V DC
7.5 A MAX
SFP+Ports
PCIe x4
TRIG
3.3VIN5V MAX
PPS GPS
ANT
–15 dBm
MAX
Standard
SMA-SMA
Cables
10 MHz
PPS
0 1
PWR
1G/10G ETH
9-16V DC
7.5 A MAX
SFP+Ports
1
ports on the CDA-2990 (optional).
The completed hardware setup for two USRP RIO devices is shown in the following
figure.
Figure 3. Synchronizing Multiple USRP RIO Devices with the CDA-2990
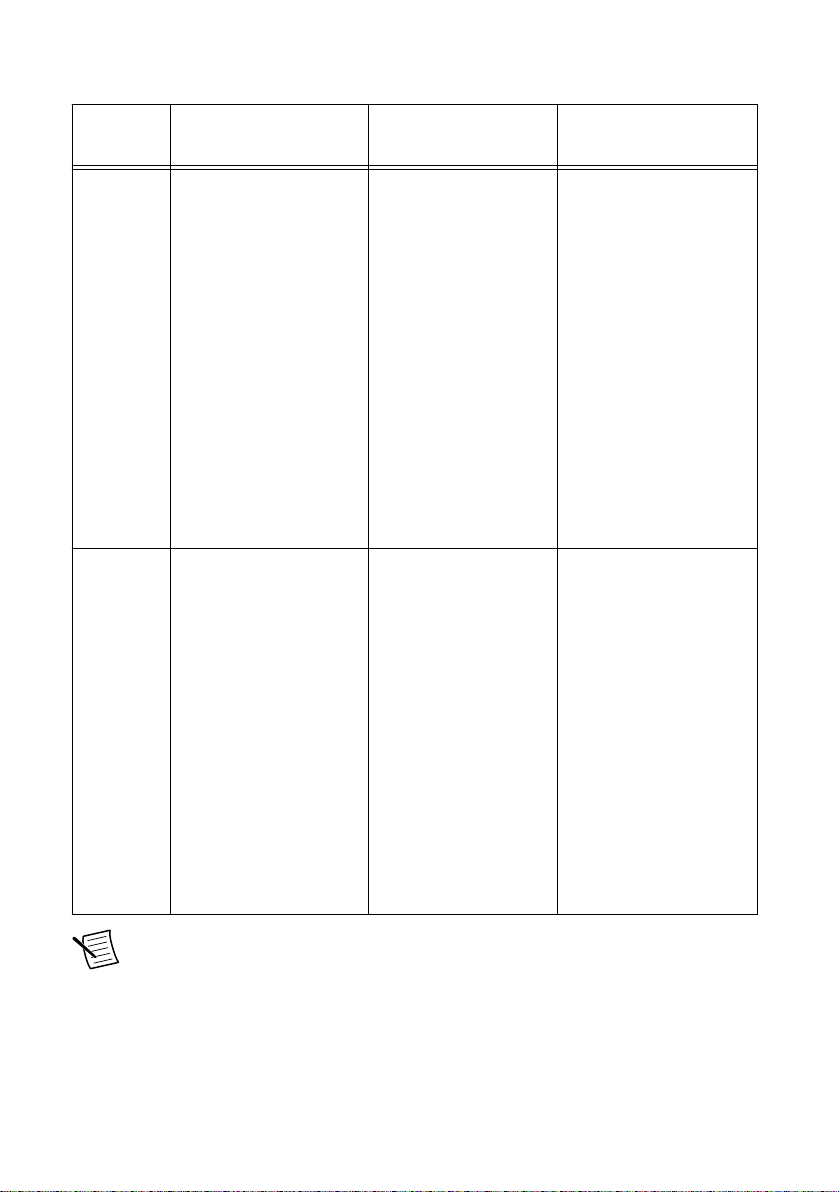
Preparing the USRP-2955 for LO Sharing (Optional)
Complete the following steps to prepare a single USRP-2955 device to share local oscillators
(LOs) among all four channels in the device.
1. Connect the LO OUT 1 IF2 connector of the USRP-2955 back panel to the LO IN 0 IF2
connector of the same USRP-2955 back panel using an SMA(m)-to-SMA(m) cable.
2. Connect the LO OUT 1 IF1 connector of the USRP-2955 back panel to the LO IN 0 IF1
connector of the same USRP-2955 back panel using an SMA(m)-to-SMA(m) cable.
The completed hardware setup is shown in the following figure.
Figure 4. USRP-2955 Single Device LO Sharing
1. SMA(m)-to-SMA(m) Cables
USRP-2950/2952/2953/2954/2955 Getting Started Guide | © National Instruments | 7
Page 8

Programming the USRP RIO
You can use the NI-USRP instrument driver to create communications applications for the
USRP RIO.
USRP RIO devices are LabVIEW FPGA targets, which support creating custom FPGAs and
configuring the device using Instrument Design Libraries. Use a sample project as a starting
point for application development.
Note You must use the PCIe x4 connector if you want to program the FPGA. You
cannot use the 1G/10G ETH connector to program the FPGA.
NI-USRP Instrument Driver
NI-USRP features a set of VIs and properties that exercise the functionality of the USRP RIO,
including configuration, control, and other device-specific functions. Refer to the
NI-USRP Help for information about using the instrument driver in your applications.
Software Options
NI provides two software options for programming the USRP RIO device: the NI-USRP API
and the USRP RIO instrument design library (IDL).
8 | ni.com | USRP-2950/2952/2953/2954/2955 Getting Started Guide
Page 9
Software
Option
Table 1. USRP RIO Software Options
Description Use Case Palette Location
NI-USRP
API
USRP RIO
IDL
Provides an API for
interacting with your
USRP RIO device.
Provides the standard,
CPU-based host
operation needed for
most SDR applications.
Allows you to interface
with the FPGA of your
USRP RIO device for
advanced programming
and digital signal
processing (DSP).
Uses the USRP RIO
Sample Projects, which
allow you to take
common measurements
with your device. USRP
RIO Sample Projects are
included in the
installation.
Create custom
measurements or
applications that require
in-phase/quadrature
modulation (I/Q) data.
Use with the
Modulation Toolkit to
develop SDR
transmitters and
receivers.
Use with the
Modulation Toolkit to
create and generate
modulated signals.
Use with the LabVIEW
FPGA Module to
customize the behavior
of the device FPGA to
create applicationspecific instrument
designs.
LabVIEW
Communications System
Design Suite: Diagram»
Hardware Interfaces»
NI-USRP
LabVIEW: Functions»
Instrument I/O»
Instrument Drivers»NIUSRP
LabVIEW
Communications System
Design Suite: Diagram»
Hardware Interfaces»
USRP RIO
LabVIEW: Functions»
Instrument I/O»
Instrument Drivers»
USRP RIO
Note You cannot use the USRP RIO IDLs with the NI-USRP API.
NI-USRP Sample Projects
The NI-USRP software contains sample projects that are a starting point for application
development.
USRP-2950/2952/2953/2954/2955 Getting Started Guide | © National Instruments | 9
Page 10
Table 2. NI-USRP Sample Projects
ADE Instructions
LabVIEW
Communications System
Design Suite
LabVIEW Open the projects in LabVIEW by selecting File»Create
Open the projects in LabVIEW Communications System
Design Suite by selecting the Projects tab and choosing a
USRP sample project from the array.
Project»NI-USRP.
You must install the LabVIEW FPGA Module to customize the
behavior of the device FPGA.
NI-USRP Examples
The instrument driver examples are instructional tools that demonstrate some of the
functionality of the USRP RIO. You can use these examples separately or integrate them into
your systems. NI-USRP includes examples for getting started and other SDR functionality.
You can access the NI-USRP examples from the following locations:
• In LabVIEW Communications System Design Suite at Learning»Examples»Hardware
Input and Output.
• From the Start menu at Start»All Programs»National Instruments»NI-USRP»
Examples.
• In LabVIEW from Functions»Instrument I/O»Instrument Drivers»NI‑USRP»
Examples palette.
You can access additional examples from the code sharing community at ni.com/usrp.
Note The NI Example Finder does not include NI-USRP examples.
Verifying the Device Connection (Optional)
Using LabVIEW Communications System Design Suite
Run a VI to confirm that the device transmits and receives signals and is connected correctly
to the host computer.
Note The USRP-2955 is not supported in LabVIEW Communications System
Design Suite.
1. Navigate to Learning»Examples»Hardware Input and Output to create an example.
2. Select the Single-Device Streaming project template for your device.
3. Run Tx and Rx Streaming (Host).gvi.
If the device is transmitting and receiving signals, the front panel graphs display
waveform data.
10 | ni.com | USRP-2950/2952/2953/2954/2955 Getting Started Guide
Page 11

4. Click STOP to conclude the test.
Using LabVIEW
Run a VI to confirm that the device transmits and/or receives signals and is connected
correctly to the host computer.
1. Create a sample project in LabVIEW by selecting File»Create Project»NI-USRP.
2. Select the NI-USRP Simple Streaming sample project template and click Next.
3. Run the appropriate streaming VI according to your USRP RIO device.
Device VI
USRP-2950/2952/2953/2954 Tx and Rx Streaming Host VI
USRP-2955 Rx Streaming (Host) VI
If the device is transmitting and/or receiving signals, the front panel graphs display
waveform data.
4. Click STOP to conclude the test.
Troubleshooting
If an issue persists after you complete a troubleshooting procedure, contact NI technical
support or visit ni.com/support.
Should I Update Device Firmware and FPGA Images?
USRP RIO devices ship with firmware and FPGA images compatible with NI-USRP driver
software. You may need to update the device for compatibility with the latest version of the
software.
The driver software media also includes the NI-USRP Configuration Utility, which you can
use to update the devices.
Why Doesn't the Device Power On?
• Verify that the power supply is functional by substituting a different adapter.
• Verify that the power switch on the front of the device is engaged.
Why Doesn't the USRP Device Appear in the NI-USRP Configuration Utility?
Check the connection between the USRP device and the computer. Ensure that the USRP
device is powered on and connected to a computer before you power on the computer.
USRP-2950/2952/2953/2954/2955 Getting Started Guide | © National Instruments | 11
Page 12

Why Does USRP2 Appear Instead of USRP RIO in the NI-USRP Configuration Utility?
An incorrect IP address on the computer may cause this error. Check the IP address and run
the NI-USRP Configuration Utility again.
An old FPGA or firmware image on the device may also cause this error. Upgrade the FPGA
and firmware using the NI-USRP Configuration Utility.
Why Don't NI-USRP Examples Appear in the NI Example Finder?
NI-USRP does not install examples into the NI Example Finder.
You can access the NI-USRP examples from the following locations:
• In LabVIEW Communications System Design Suite at Learning»Examples»Hardware
Input and Output.
• From the Start menu at Start»All Programs»National Instruments»NI-USRP»
Examples.
• In LabVIEW from Functions»Instrument I/O»Instrument Drivers»NI‑USRP»
Examples palette.
Front Panels, Back Panels, and Connectors
Direct Connections to the USRP RIO
The USRP RIO is an RF instrument that is sensitive to ESD and transients. Ensure you take
the following precautions when making direct connections to the USRP RIO to avoid
damaging the device.
Caution Apply external signals only while the USRP RIO is powered on.
Applying external signals while the device is powered off may cause damage.
• Ensure you are properly grounded when manipulating cables or antennas connected to the
USRP RIO TX 1 RX 1, RX 1, or RX 2 connector.
• If you are using nonisolated devices, such as a nonisolated RF antenna, ensure the devices
are maintained in a static-free environment.
• If you are using an active device, such as a preamplifier or switch routed to the
USRP RIO TX 1 RX 1, RX 1, or RX 2 connector, ensure that the device cannot generate
signal transients greater than the RF and DC specifications of the USRP RIO TX 1 RX 1,
RX 1, or RX 2 connector.
12 | ni.com | USRP-2950/2952/2953/2954/2955 Getting Started Guide
Page 13

USRP-2950
LINK
TX OUTPUT MAX +20 dBm, RX INPUT MAX -15 dBm, ALL RF PORTS 50 Ω
TX1 RX1 RX2GPSPPSREF
TX1 RX1 RX2
JTAG
PWR
Figure 5. USRP-2950 Front Panel
Table 3. USRP-2950 Module Front Panel Connectors
Connector Use
JTAG A USB port that connects the host computer to the device FPGA for
recovery purposes. This port can be used with the Xilinx iMPACT
configuration tool to temporarily load a new bitfile.
RF 0 TX1 RX1 Input and output terminal for the RF signal. TX1 RX1 is an SMA (f)
connector with an impedance of 50 Ω and is a single-ended input or output
channel.
RX2 Input terminal for the RF signal. RX2 is an SMA (f) connector with an
impedance of 50 Ω and is a single-ended input channel.
AUX I/O General-purpose I/O (GPIO) port. AUX I/O is controlled by the FPGA.
RF 1 TX1 RX1 Input and output terminal for the RF signal. TX1 RX1 is an SMA (f)
connector with an impedance of 50 Ω and is a single-ended input or output
channel.
RX2 Input terminal for the RF signal. RX2 is an SMA (f) connector with an
impedance of 50 Ω and is a single-ended input channel.
Note The LED indications described in the following table occur only when you
use the NI-USRP API with the default API image. When you use LabVIEW FPGA,
you customize the LED indications.
USRP-2950/2952/2953/2954/2955 Getting Started Guide | © National Instruments | 13
Page 14

Table 4. USRP-2950 Module LEDs
LED Description Color State Indication
RF 0 TX1
RX1
Indicates the transmit
status of the module.
RX2 Indicates the receive
status of the module.
REF Indicates the status of
the reference signal.
PPS Indicates the pulse per
second (PPS).
OFF — The module is not active.
Red Solid The module is transmitting
data.
Green Solid The module is receiving
data.
OFF — The module is not
receiving.
Green Solid The module is receiving.
OFF — There is no reference
signal, or the device is not
locked to the reference
signal.
Green Blinking The device is not locked to
the reference signal.
Solid The device is locked to the
reference signal.
OFF — There is no PPS timing
reference signal, or the
device is not locked to the
reference signal.
Green Blinking The device is locked to the
GPS Indicates whether the
OFF — There is no GPSDO or the
GPSDO is locked.
Green Solid The GPSDO is locked.
LINK Indicates the status of
OFF — There is no link to a host
the link to a host
computer.
Green,
yellow, or
red
14 | ni.com | USRP-2950/2952/2953/2954/2955 Getting Started Guide
PPS timing reference
signal.
GPSDO is not locked.
computer.
Solid The host is actively
communicating with the
device.
Page 15

Table 4. USRP-2950 Module LEDs (Continued)
0 1
PWR
REF
IN
PPS
OUT
TRIG
5V DC
REF
OUT
1G/10G ETH
3.3 V +15 dBm
MAX
9-16V DC
7.5 A MAX
SFP+Ports
PCIe x4
TRIG
3.3VIN5V MAX
PPS GPS
ANT
–15 dBm
MAX
LED Description Color State Indication
RF 1 TX1
RX1
Indicates the transmit
status of the module.
OFF — The module is not active.
Red Solid The module is transmitting
data.
Green Solid The module is receiving
data.
RX2 Indicates the receive
status of the module.
OFF — The module is not
receiving.
Green Solid The module is receiving.
Figure 6. USRP-2950 Module Back Panel
Table 5. USRP-2950 Module Back Panel Connectors
Connector Use
PWR Input that accepts a 9 V to 16 V, 6 A external DC power connector.
1G/10G ETH Two SFP+ input terminals used for 1G ETH or 10G ETH connectivity with
the host driver. Not currently supported in LabVIEW FPGA.
REF OUT Output terminal for an external reference signal for the LO on the device.
REF OUT is a female SMA connector with an impedance of 50 Ω, and it is
a single-ended reference output. The output signal at this connector is
10 MHz at 3.3 V.
REF IN Input terminal for an external reference signal for the LO on the device.
REF IN is a female SMA connector with an impedance of 50 Ω, and it is a
single-ended reference input. REF IN accepts a 10 MHz signal with a
minimum input power of 0 dBm (0.632 Vpk-pk) and a maximum input
power of 15 dBm (3.56 Vpk-pk) for a square wave or sine wave.
PCIe x4 Port for a PCI Express Generation 1, x4 bus connection through an MXI
Express four-lane cable.
USRP-2950/2952/2953/2954/2955 Getting Started Guide | © National Instruments | 15
Page 16

Table 5. USRP-2950 Module Back Panel Connectors (Continued)
LINK
TX OUTPUT MAX +20 dBm, RX INPUT MAX -15 dBm, ALL RF PORTS 50 Ω
TX1 RX1 RX2GPSPPSREF
TX1 RX1 RX2
JTAG
PWR
Connector Use
PPS TRIG OUT Output terminal for the pulse per second (PPS) timing reference. PPS
TRIG OUT is a female SMA connector with an impedance of 50 Ω, and it
is a single-ended input. The output signal is 0 V to 3.3 V TTL. You can
also use this port as triggered output (TRIG OUT) that you program with
the PPS Trig Out I/O signal.
PPS TRIG IN Input terminal for pulse per second (PPS) timing reference. PPS TRIG IN
is a female SMA connector with an impedance of 50 Ω, and it is a singleended input channel. PPS TRIG IN accepts 0 V to 3.3 V TTL and 0 V to
5 V TTL signals. You can also use this port as a triggered input (TRIG IN)
that you control using NI-USRP software.
GPS ANT Input terminal for the GPS antenna signal. GPS ANT is a female SMA
connector with a maximum input power of -15 dBm and an output of
DC 5 V to power an active antenna.
Caution Do not terminate the GPS ANT port if you do not use
it.
USRP-2952
Figure 7. USRP-2952 Front Panel
16 | ni.com | USRP-2950/2952/2953/2954/2955 Getting Started Guide
Page 17

Table 6. USRP-2952 Module Front Panel Connectors
Connector Use
JTAG A USB port that connects the host computer to the device FPGA for
recovery purposes. This port can be used with the Xilinx iMPACT
configuration tool to temporarily load a new bitfile.
RF 0 TX1 RX1 Input and output terminal for the RF signal. TX1 RX1 is an SMA (f)
connector with an impedance of 50 Ω and is a single-ended input or output
channel.
RX2 Input terminal for the RF signal. RX2 is an SMA (f) connector with an
impedance of 50 Ω and is a single-ended input channel.
AUX I/O General-purpose I/O (GPIO) port. AUX I/O is controlled by the FPGA.
RF 1 TX1 RX1 Input and output terminal for the RF signal. TX1 RX1 is an SMA (f)
connector with an impedance of 50 Ω and is a single-ended input or output
channel.
RX2 Input terminal for the RF signal. RX2 is an SMA (f) connector with an
impedance of 50 Ω and is a single-ended input channel.
Note The LED indications described in the following table occur only when you
use the NI-USRP API with the default API image. When you use LabVIEW FPGA,
you customize the LED indications.
Table 7. USRP-2952 Module LEDs
LED Description Color State Indication
RF 0 TX1
RX1
Indicates the transmit
status of the module.
OFF — The module is not active.
Red Solid The module is transmitting
data.
Green Solid The module is receiving
data.
RX2 Indicates the receive
status of the module.
OFF — The module is not
receiving.
Green Solid The module is receiving.
USRP-2950/2952/2953/2954/2955 Getting Started Guide | © National Instruments | 17
Page 18

Table 7. USRP-2952 Module LEDs (Continued)
LED Description Color State Indication
REF Indicates the status of
the reference signal.
PPS Indicates the pulse per
second (PPS).
GPS Indicates whether the
GPSDO is locked.
LINK Indicates the status of
the link to a host
computer.
OFF — There is no reference
signal, or the device is not
locked to the reference
signal.
Green Blinking The device is not locked to
the reference signal.
Solid The device is locked to the
reference signal.
OFF — There is no PPS timing
reference signal, or the
device is not locked to the
reference signal.
Green Blinking The device is locked to the
PPS timing reference
signal.
OFF — There is no GPSDO or the
GPSDO is not locked.
Green Solid The GPSDO is locked.
OFF — There is no link to a host
computer.
Green,
yellow, or
red
Solid The host is actively
communicating with the
device.
RF 1 TX1
RX1
Indicates the transmit
status of the module.
OFF — The module is not active.
Red Solid The module is transmitting
Green Solid The module is receiving
RX2 Indicates the receive
OFF — The module is not
status of the module.
Green Solid The module is receiving.
18 | ni.com | USRP-2950/2952/2953/2954/2955 Getting Started Guide
data.
data.
receiving.
Page 19

Figure 8. USRP-2952 Module Back Panel
0 1
PWR
REF
IN
PPS
OUT
TRIG
5V DC
REF
OUT
1G/10G ETH
3.3 V +15 dBm
MAX
9-16V DC
7.5 A MAX
SFP+Ports
PCIe x4
TRIG
3.3VIN5V MAX
PPS GPS
ANT
–15 dBm
MAX
Table 8. USRP-2952 Module Back Panel Connectors
Connector Use
PWR Input that accepts a 9 V to 16 V, 6 A external DC power connector.
1G/10G ETH Two SFP+ input terminals used for 1G ETH or 10G ETH connectivity with
the host driver. Not currently supported in LabVIEW FPGA.
REF OUT Output terminal for an external reference signal for the LO on the device.
REF OUT is a female SMA connector with an impedance of 50 Ω, and it is
a single-ended reference output. The output signal at this connector is
10 MHz at 3.3 V.
REF IN Input terminal for an external reference signal for the LO on the device.
REF IN is a female SMA connector with an impedance of 50 Ω, and it is a
single-ended reference input. REF IN accepts a 10 MHz signal with a
minimum input power of 0 dBm (0.632 Vpk-pk) and a maximum input
power of 15 dBm (3.56 Vpk-pk) for a square wave or sine wave.
PCIe x4 Port for a PCI Express Generation 1, x4 bus connection through an MXI
Express four-lane cable.
PPS TRIG OUT Output terminal for the pulse per second (PPS) timing reference. PPS
TRIG OUT is a female SMA connector with an impedance of 50 Ω, and it
is a single-ended input. The output signal is 0 V to 3.3 V TTL. You can
also use this port as triggered output (TRIG OUT) that you program with
the PPS Trig Out I/O signal.
USRP-2950/2952/2953/2954/2955 Getting Started Guide | © National Instruments | 19
Page 20

Table 8. USRP-2952 Module Back Panel Connectors (Continued)
LINK
TX OUTPUT MAX +20 dBm, RX INPUT MAX -15 dBm, ALL RF PORTS 50 Ω
TX1 RX1 RX2GPSPPSREF
TX1 RX1 RX2
RF 0 RF 1
JTAG
AUX I/O
3.3 VDC MAX
NI USRP-2953R
1.2 GHz - 6 GHz
NI USRP-2953R
1.2 GHz - 6 GHz
PWR
Connector Use
PPS TRIG IN Input terminal for pulse per second (PPS) timing reference. PPS TRIG IN
is a female SMA connector with an impedance of 50 Ω, and it is a singleended input channel. PPS TRIG IN accepts 0 V to 3.3 V TTL and 0 V to
5 V TTL signals. You can also use this port as a triggered input (TRIG IN)
that you control using NI-USRP software.
GPS ANT Input terminal for the GPS antenna signal. GPS ANT is a female SMA
connector with a maximum input power of -15 dBm and an output of
DC 5 V to power an active antenna.
Caution Do not terminate the GPS ANT port if you do not use
it.
USRP-2953
Figure 9. USRP-2953 Front Panel
Table 9. USRP-2953 Module Front Panel Connectors
Connector Use
JTAG A USB port that connects the host computer to the device FPGA for
recovery purposes. This port can be used with the Xilinx iMPACT
configuration tool to temporarily load a new bitfile.
RF 0 TX1 RX1 Input and output terminal for the RF signal. TX1 RX1 is an SMA (f)
connector with an impedance of 50 Ω and is a single-ended input or output
channel.
RX2 Input terminal for the RF signal. RX2 is an SMA (f) connector with an
impedance of 50 Ω and is a single-ended input channel.
AUX I/O General-purpose I/O (GPIO) port. AUX I/O is controlled by the FPGA.
20 | ni.com | USRP-2950/2952/2953/2954/2955 Getting Started Guide
Page 21

Table 9. USRP-2953 Module Front Panel Connectors (Continued)
Connector Use
RF 1 TX1 RX1 Input and output terminal for the RF signal. TX1 RX1 is an SMA (f)
connector with an impedance of 50 Ω and is a single-ended input or output
channel.
RX2 Input terminal for the RF signal. RX2 is an SMA (f) connector with an
impedance of 50 Ω and is a single-ended input channel.
Note The LED indications described in the following table occur only when you
use the NI-USRP API with the default API image. When you use LabVIEW FPGA,
you customize the LED indications.
Table 10. USRP-2953 Module LEDs
LED Description Color State Indication
RF 0 TX1
RX1
Indicates the transmit
status of the module.
RX2 Indicates the receive
status of the module.
REF Indicates the status of
the reference signal.
OFF — The module is not active.
Red Solid The module is transmitting
data.
Green Solid The module is receiving
data.
OFF — The module is not
receiving.
Green Solid The module is receiving.
OFF — There is no reference
signal, or the device is not
locked to the reference
signal.
Green Blinking The device is not locked to
the reference signal.
Solid The device is locked to the
reference signal.
USRP-2950/2952/2953/2954/2955 Getting Started Guide | © National Instruments | 21
Page 22

Table 10. USRP-2953 Module LEDs (Continued)
0 1
PWR
REF
IN
PPS
OUT
TRIG
5V DC
REF
OUT
1G/10G ETH
3.3 V +15 dBm
MAX
9-16V DC
7.5 A MAX
SFP+Ports
PCIe x4
TRIG
3.3VIN5V MAX
PPS GPS
ANT
–15 dBm
MAX
LED Description Color State Indication
PPS Indicates the pulse per
second (PPS).
GPS Indicates whether the
GPSDO is locked.
LINK Indicates the status of
the link to a host
computer.
RF 1 TX1
RX1
Indicates the transmit
status of the module.
OFF — There is no PPS timing
reference signal, or the
device is not locked to the
reference signal.
Green Blinking The device is locked to the
PPS timing reference
signal.
OFF — There is no GPSDO or the
GPSDO is not locked.
Green Solid The GPSDO is locked.
OFF — There is no link to a host
computer.
Green,
yellow, or
red
Solid The host is actively
communicating with the
device.
OFF — The module is not active.
Red Solid The module is transmitting
data.
Green Solid The module is receiving
data.
RX2 Indicates the receive
status of the module.
Figure 10. USRP-2953 Module Back Panel
22 | ni.com | USRP-2950/2952/2953/2954/2955 Getting Started Guide
OFF — The module is not
receiving.
Green Solid The module is receiving.
Page 23

Table 11. USRP-2953 Module Back Panel Connectors
Connector Use
PWR Input that accepts a 9 V to 16 V, 6 A external DC power connector.
1G/10G ETH Two SFP+ input terminals used for 1G ETH or 10G ETH connectivity with
the host driver. Not currently supported in LabVIEW FPGA.
REF OUT Output terminal for an external reference signal for the LO on the device.
REF OUT is a female SMA connector with an impedance of 50 Ω, and it is
a single-ended reference output. The output signal at this connector is
10 MHz at 3.3 V.
REF IN Input terminal for an external reference signal for the LO on the device.
REF IN is a female SMA connector with an impedance of 50 Ω, and it is a
single-ended reference input. REF IN accepts a 10 MHz signal with a
minimum input power of 0 dBm (0.632 Vpk-pk) and a maximum input
power of 15 dBm (3.56 Vpk-pk) for a square wave or sine wave.
PCIe x4 Port for a PCI Express Generation 1, x4 bus connection through an MXI
Express four-lane cable.
PPS TRIG OUT Output terminal for the pulse per second (PPS) timing reference. PPS
TRIG OUT is a female SMA connector with an impedance of 50 Ω, and it
is a single-ended input. The output signal is 0 V to 3.3 V TTL. You can
also use this port as triggered output (TRIG OUT) that you program with
the PPS Trig Out I/O signal.
PPS TRIG IN Input terminal for pulse per second (PPS) timing reference. PPS TRIG IN
is a female SMA connector with an impedance of 50 Ω, and it is a singleended input channel. PPS TRIG IN accepts 0 V to 3.3 V TTL and 0 V to
5 V TTL signals. You can also use this port as a triggered input (TRIG IN)
that you control using NI-USRP software.
GPS ANT Input terminal for the GPS antenna signal. GPS ANT is a female SMA
connector with a maximum input power of -15 dBm and an output of
DC 5 V to power an active antenna.
Caution Do not terminate the GPS ANT port if you do not use
it.
USRP-2950/2952/2953/2954/2955 Getting Started Guide | © National Instruments | 23
Page 24

USRP-2954
LINK
TX OUTPUT MAX +20 dBm, RX INPUT MAX -15 dBm, ALL RF PORTS 50 Ω
TX1 RX1 RX2GPSPPSREF
TX1 RX1 RX2
RF 0 RF 1
JTAG
AUX I/O
3.3 VDC MAX
Designed by Ettus Research
PWR
NI USRP-2954R
10 MHz - 6 GHz, GPS-Disciplined Clock (160 MHz BW)
Figure 11. USRP-2954 Front Panel
Table 12. USRP-2954 Module Front Panel Connectors
Connector Use
JTAG A USB port that connects the host computer to the device FPGA for
recovery purposes. This port can be used with the Xilinx iMPACT
configuration tool to temporarily load a new bitfile.
RF 0 TX1 RX1 Input and output terminal for the RF signal. TX1 RX1 is an SMA (f)
connector with an impedance of 50 Ω and is a single-ended input or output
channel.
RX2 Input terminal for the RF signal. RX2 is an SMA (f) connector with an
impedance of 50 Ω and is a single-ended input channel.
AUX I/O General-purpose I/O (GPIO) port. AUX I/O is controlled by the FPGA.
RF 1 TX1 RX1 Input and output terminal for the RF signal. TX1 RX1 is an SMA (f)
connector with an impedance of 50 Ω and is a single-ended input or output
channel.
RX2 Input terminal for the RF signal. RX2 is an SMA (f) connector with an
impedance of 50 Ω and is a single-ended input channel.
Note The LED indications described in the following table occur only when you
use the NI-USRP API with the default API image. When you use LabVIEW FPGA,
you customize the LED indications.
24 | ni.com | USRP-2950/2952/2953/2954/2955 Getting Started Guide
Page 25

Table 13. USRP-2954 Module LEDs
LED Description Color State Indication
RF 0 TX1
RX1
Indicates the transmit
status of the module.
RX2 Indicates the receive
status of the module.
REF Indicates the status of
the reference signal.
PPS Indicates the pulse per
second (PPS).
OFF — The module is not active.
Red Solid The module is transmitting
data.
Green Solid The module is receiving
data.
OFF — The module is not
receiving.
Green Solid The module is receiving.
OFF — There is no reference
signal, or the device is not
locked to the reference
signal.
Green Blinking The device is not locked to
the reference signal.
Solid The device is locked to the
reference signal.
OFF — There is no PPS timing
reference signal, or the
device is not locked to the
reference signal.
GPS Indicates whether the
GPSDO is locked.
LINK Indicates the status of
the link to a host
computer.
USRP-2950/2952/2953/2954/2955 Getting Started Guide | © National Instruments | 25
Green Blinking The device is locked to the
PPS timing reference
signal.
OFF — There is no GPSDO or the
GPSDO is not locked.
Green Solid The GPSDO is locked.
OFF — There is no link to a host
computer.
Green,
yellow, or
red
Solid The host is actively
communicating with the
device.
Page 26

Table 13. USRP-2954 Module LEDs (Continued)
0 1
PWR
REF
IN
PPS
OUT
TRIG
5V DC
REF
OUT
1G/10G ETH
3.3 V +15 dBm
MAX
9-16V DC
7.5 A MAX
SFP+Ports
PCIe x4
TRIG
3.3VIN5V MAX
PPS GPS
ANT
–15 dBm
MAX
LED Description Color State Indication
RF 1 TX1
RX1
Indicates the transmit
status of the module.
OFF — The module is not active.
Red Solid The module is transmitting
data.
Green Solid The module is receiving
data.
RX2 Indicates the receive
status of the module.
OFF — The module is not
receiving.
Green Solid The module is receiving.
Figure 12. USRP-2954 Module Back Panel
Table 14. USRP-2954 Module Back Panel Connectors
Connector Use
PWR Input that accepts a 9 V to 16 V, 6 A external DC power connector.
1G/10G ETH Two SFP+ input terminals used for 1G ETH or 10G ETH connectivity with
the host driver. Not currently supported in LabVIEW FPGA.
REF OUT Output terminal for an external reference signal for the LO on the device.
REF OUT is a female SMA connector with an impedance of 50 Ω, and it is
a single-ended reference output. The output signal at this connector is
10 MHz at 3.3 V.
REF IN Input terminal for an external reference signal for the LO on the device.
REF IN is a female SMA connector with an impedance of 50 Ω, and it is a
single-ended reference input. REF IN accepts a 10 MHz signal with a
minimum input power of 0 dBm (0.632 Vpk-pk) and a maximum input
power of 15 dBm (3.56 Vpk-pk) for a square wave or sine wave.
PCIe x4 Port for a PCI Express Generation 1, x4 bus connection through an MXI
Express four-lane cable.
26 | ni.com | USRP-2950/2952/2953/2954/2955 Getting Started Guide
Page 27

Table 14. USRP-2954 Module Back Panel Connectors (Continued)
Connector Use
PPS TRIG OUT Output terminal for the pulse per second (PPS) timing reference. PPS
TRIG OUT is a female SMA connector with an impedance of 50 Ω, and it
is a single-ended input. The output signal is 0 V to 3.3 V TTL. You can
also use this port as triggered output (TRIG OUT) that you program with
the PPS Trig Out I/O signal.
PPS TRIG IN Input terminal for pulse per second (PPS) timing reference. PPS TRIG IN
is a female SMA connector with an impedance of 50 Ω, and it is a singleended input channel. PPS TRIG IN accepts 0 V to 3.3 V TTL and 0 V to
5 V TTL signals. You can also use this port as a triggered input (TRIG IN)
that you control using NI-USRP software.
GPS ANT Input terminal for the GPS antenna signal. GPS ANT is a female SMA
connector with a maximum input power of -15 dBm and an output of
DC 5 V to power an active antenna.
Caution Do not terminate the GPS ANT port if you do not use
it.
USRP-2955
Figure 13. USRP-2955 Front Panel
Table 15. USRP-2955 Module Front Panel Connectors
Connector Use
JTAG A USB port that connects the host computer to the device FPGA for recovery
purposes. This port can be used with the Xilinx iMPACT configuration tool to
temporarily load a new bitfile.
RF 0 RX1 Input terminal for the RF signal. RX1 is an SMA (f) connector with an
impedance of 50 Ω and is a single-ended input or output channel.
RX2 Input terminal for the RF signal. RX2 is an SMA (f) connector with an
impedance of 50 Ω and is a single-ended input channel.
USRP-2950/2952/2953/2954/2955 Getting Started Guide | © National Instruments | 27
Page 28

Table 15. USRP-2955 Module Front Panel Connectors (Continued)
Connector Use
AUX I/O General-purpose I/O (GPIO) port. AUX I/O is controlled by the FPGA.
RF 1 RX1 Input terminal for the RF signal. RX1 is an SMA (f) connector with an
impedance of 50 Ω and is a single-ended input or output channel.
RX2 Input terminal for the RF signal. RX2 is an SMA (f) connector with an
impedance of 50 Ω and is a single-ended input channel.
Note The LED indications described in the following table occur only when you
use the NI-USRP API with the default API image. When you use LabVIEW FPGA,
you customize the LED indications.
Table 16. USRP-2955 Module LEDs
LED Description Color State Indication
RF 0 RX1 Indicates the receive
status of the module.
RX2 Indicates the receive
status of the module.
REF Indicates the status of the
reference signal.
PPS Indicates the pulse per
second (PPS).
OFF — The module is not receiving.
Green Solid The module is receiving data.
OFF — The module is not receiving.
Green Solid The module is receiving.
OFF — There is no reference signal,
or the device is not locked to
the reference signal.
Green Blinking The device is not locked to
the reference signal.
Solid The device is locked to the
reference signal.
OFF — There is no PPS timing
reference signal, or the
device is not locked to the
reference signal.
Green Blinking The device is locked to the
PPS timing reference signal.
28 | ni.com | USRP-2950/2952/2953/2954/2955 Getting Started Guide
Page 29

Table 16. USRP-2955 Module LEDs (Continued)
0 1
PWR
1G/10G ETH
9-16V DC
7.5 A MAX
SFP+Ports
LED Description Color State Indication
GPS Indicates whether the
OFF — There is no GPSDO or the
GPSDO is locked.
Green Solid The GPSDO is locked.
LINK Indicates the status of the
OFF — There is no link to a host
link to a host computer.
Green,
yellow, or
red
RF 1 RX1 Indicates the receive
status of the module.
RX2 Indicates the receive
status of the module.
OFF — The module is not active.
Green Solid The module is receiving data.
OFF — The module is not receiving.
Green Solid The module is receiving.
Figure 14. USRP-2955 Module Back Panel
Table 17. USRP-2955 Module Back Panel Connectors
Connector Use
GPSDO is not locked.
computer.
Solid The host is actively
communicating with the
device.
PWR Input that accepts a 9 V to 16 V, 6 A external DC power connector.
1G/10G ETH Two SFP+ input terminals used for 1G ETH or 10G ETH connectivity with
the host driver. Not currently supported in LabVIEW FPGA.
LO OUT 1 IF2 Output terminal for the IF LO signal exported by RF 1. LO OUT 1 IF2 is a
female SMA connector with an impedance of 50 Ω.
LO OUT 1 IF1 Output terminal for the RF LO signal exported by RF 1. LO OUT 1 IF1 is a
female SMA connector with an impedance of 50 Ω.
USRP-2950/2952/2953/2954/2955 Getting Started Guide | © National Instruments | 29
Page 30

Table 17. USRP-2955 Module Back Panel Connectors (Continued)
Connector Use
REF OUT Output terminal for an external reference signal for the LO on the device.
REF OUT is a female SMA connector with an impedance of 50 Ω, and it is
a single-ended reference output. The output signal at this connector is
10 MHz at 3.3 V.
REF IN Input terminal for an external reference signal for the LO on the device.
REF IN is a female SMA connector with an impedance of 50 Ω, and it is a
single-ended reference input. REF IN accepts a 10 MHz signal with a
minimum input power of 0 dBm (0.632 Vpk-pk) and a maximum input
power of 15 dBm (3.56 Vpk-pk) for a square wave or sine wave.
LO IN 0 IF2 Terminal for an external signal to the IF LO input on the RF 0
daughterboard. This signal can be used as the LO source for an RF 0
channel by selecting external on that channel's LO source setting. LO IN 0
IF2 is a female SMA connector with an impedance of 50 Ω.
LO IN 0 IF1 Terminal for an external signal to the IF LO input on the RF 0
daughterboard. This signal can be used as the LO source for an RF 0
channel by selecting external on that channel's LO source setting. LO IN 0
IF1 is a female SMA connector with an impedance of 50 Ω.
PCIe x4 Port for a PCI Express Generation 1, x4 bus connection through an MXI
Express four-lane cable.
LO IN 1 IF2 Terminal for an external signal to the IF LO input on the RF 0
daughterboard. This signal can be used as the LO source for an RF 0
channel by selecting external on that channel's LO source setting. LO IN 1
IF2 is a female SMA connector with an impedance of 50 Ω.
LO IN 1 IF1 Terminal for an external signal to the IF LO input on the RF 0
daughterboard. This signal can be used as the LO source for an RF 0
channel by selecting external on that channel's LO source setting. LO IN 1
IF1 is a female SMA connector with an impedance of 50 Ω.
PPS TRIG
OUT
Output terminal for the pulse per second (PPS) timing reference. PPS TRIG
OUT is a female SMA connector with an impedance of 50 Ω, and it is a
single-ended input. The output signal is 0 V to 3.3 V TTL. You can also use
this port as triggered output (TRIG OUT) that you program with the PPS
Trig Out I/O signal.
30 | ni.com | USRP-2950/2952/2953/2954/2955 Getting Started Guide
Page 31

Table 17. USRP-2955 Module Back Panel Connectors (Continued)
Connector Use
PPS TRIG IN Input terminal for pulse per second (PPS) timing reference. PPS TRIG IN is
a female SMA connector with an impedance of 50 Ω, and it is a singleended input channel. PPS TRIG IN accepts 0 V to 3.3 V TTL and 0 V to
5 V TTL signals. You can also use this port as a triggered input (TRIG IN)
that you control using NI-USRP software.
GPS ANT Input terminal for the GPS antenna signal. GPS ANT is a female SMA
connector with a maximum input power of -15 dBm and an output of
DC 5 V to power an active antenna.
Caution Do not terminate the GPS ANT port if you do not use
it.
USRP-2950/2952/2953/2954/2955 Getting Started Guide | © National Instruments | 31
Page 32

GPIO Connector
8
7
6 5 4 3 2 1
15 14 13 12 11 10 9
Table 18. USRP RIO GPIO Connector Pin Assignments
AUX I/O Connector Pin
NI-USRP Terminal
Name
USRP RIO (LV FPGA) IO Node
Terminal Name
1 3.3 V 3.3 V
2 GPIO 0 AUX I/O 0
3 GPIO 1 AUX I/O 1
4 GPIO 2 AUX I/O 2
5 GPIO 3 AUX I/O 3
6 GPIO 4 AUX I/O 4
7 GPIO 5 AUX I/O 5
8 GPIO 6 AUX I/O 6
9 GPIO 7 AUX I/O 7
10 GPIO 8 AUX I/O 8
11 GPIO 9 AUX I/O 9
12 GPIO 10 AUX I/O 10
32 | ni.com | USRP-2950/2952/2953/2954/2955 Getting Started Guide
13 GPIO 11 AUX I/O 11
14 0 V 0 V
15 0 V 0 V
Page 33

Where to Go Next
more about your products through ni.com.
*This item is also installed with the driver software.
EXPLORE LEARN
CREATE
DISCOVER
LabVIEW Help
NI-USRP Help*
NI USRP-29xx
Specifications*
Located online at ni.com/manuals
AUX I/O
3.3 VDC MAX
RF 0
RF 1
Designed by Ettus ResearchDesigned by Ettus Research
NI-USRP Sample Projects*
NI-USRP Help*
NI-USRP Instrument Driver
custom applications within
an application programming
interface (API).
about hardware features
or review device
specifications.
the application
development environment (ADE)
for your application.
RF Solutions
ni.com/rf
Services
ni.com/services
Updates
ni.com/updates
Refer to the following figure for information about other product tasks and associated
resources for those tasks.
Tip The NI-USRP Help is an HTML version of a traditional user manual that
includes detailed information about RF fundamentals, device features, and
programming with NI-USRP.
Worldwide Support and Services
The NI website is your complete resource for technical support. At ni.com/support, you have
access to everything from troubleshooting and application development self-help resources to
email and phone assistance from NI Application Engineers.
Visit ni.com/services for NI Factory Installation Services, repairs, extended warranty, and
other services.
Visit ni.com/register to register your NI product. Product registration facilitates technical
support and ensures that you receive important information updates from NI.
A Declaration of Conformity (DoC) is our claim of compliance with the Council of the
European Communities using the manufacturer’s declaration of conformity. This system
affords the user protection for electromagnetic compatibility (EMC) and product safety. You
can obtain the DoC for your product by visiting ni.com/certification. If your product supports
calibration, you can obtain the calibration certificate for your product at ni.com/calibration.
USRP-2950/2952/2953/2954/2955 Getting Started Guide | © National Instruments | 33
Page 34

NI corporate headquarters is located at 11500 North Mopac Expressway, Austin, Texas,
78759-3504. NI also has offices located around the world. For telephone support in the United
States, create your service request at ni.com/support or dial 1 866 ASK MYNI (275 6964). For
telephone support outside the United States, visit the Worldwide Offices section of ni.com/
niglobal to access the branch office websites, which provide up-to-date contact information,
support phone numbers, email addresses, and current events.
Refer to the NI Trademarks and Logo Guidelines at ni.com/trademarks for information on NI trademarks. Other product and
company names mentioned herein are trademarks or trade names of their respective companies. For patents covering NI
products/technology, refer to the appropriate location: Help»Patents in your software, the patents.txt file on your media, or the
National Instruments Patent Notice at ni.com/patents. You can find information about end-user license agreements (EULAs)
and third-party legal notices in the readme file for your NI product. Refer to the Export Compliance Information at ni.com/
legal/export-compliance for the NI global trade compliance policy and how to obtain relevant HTS codes, ECCNs, and other
import/export data. NI MAKES NO EXPRESS OR IMPLIED WARRANTIES AS TO THE ACCURACY OF THE INFORMATION
CONTAINED HEREIN AND SHALL NOT BE LIABLE FOR ANY ERRORS. U.S. Government Customers: The data contained in
this manual was developed at private expense and is subject to the applicable limited rights and restricted data r ights as set forth
in FAR 52.227-14, DFAR 252.227-7014, and DFAR 252.227-7015.
© 2015—2016 National Instruments. All rights reserved.
376355C-01 Dec16
 Loading...