

Page 1

USER GUIDE
U
NIVERSAL
Contents
M
OTION INTERFACE
This user guide describes how to use the UMI-7764, UMI-4A, UMI-Flex6,
and UMI-Flex4 accessories.
Introduction.............................................................................................2
What You Need to Get Started ...............................................................2
UMI-7764................................................................................................4
Motion I/O Terminal Block.............................................................5
Amplifier/Driver Terminal Block....................................................5
Encoder Terminal Block..................................................................6
Limit Switch Terminal Block..........................................................8
Analog Input Terminal Block..........................................................9
Breakpoint Output/Trigger Input Terminal Block...........................9
Shutdown/Inhibit All Terminal Block.............................................10
Power Input Terminal Block............................................................ 10
UMI-7764 Specifications........................................................................11
UMI-4A...................................................................................................13
Amplifier/Driver Terminal Block....................................................13
Encoder Terminal Block..................................................................15
Limit Switch Terminal Block..........................................................16
Digital I/O Terminal Blocks............................................................17
Power Input Terminal Block............................................................ 18
UMI-4A Specifications........................................................... ................19
UMI-Flex6 ..............................................................................................21
Amplifier/Driver Terminal Block....................................................21
Encoder Terminal Block..................................................................22
Limit Switch Terminal Block..........................................................24
Analog Input Terminal Blocks ........................................................25
Breakpoint Output Terminal Block .................................................26
Power Input Terminal Block............................................................ 26
UMI-Flex6 Specifications................................ .......................................27
UMI-Flex4 ..............................................................................................28
Amplifier/Driver Terminal Block....................................................28
Encoder Terminal Block..................................................................30
Limit Switch Terminal Block..........................................................32
Analog Input Terminal Block..........................................................32
Breakpoint Output Terminal Block .................................................33
Power Input Terminal Block............................................................ 33
UMI-Flex4 Specifications................................ .......................................34
(UMI) A
CCESSORY
FlexMotion ™ and ValueMotion ™ are trademarks of National Instruments Corporation. Product and company names mentioned herein are
trademarks or trade names of their respective companies.
321941B-01 © Copyright 1998, 1999 National Instruments Corp. All rights reserved. August 1999
Page 2

Introduction
Note
Throughout this document, overlined text indicates that a signal is active-low.
The UMI products are connectivity accessories you can use with your
motion control boards for up to four or six axes of simultaneous or
independent control. Ideally suited to industrial and laboratory
applications, UMI accessories connect power supplies, servo amplifiers
or stepper drivers, motors, encoders, and limit switches to National
Instruments plug-in motion control boards.
A UMI accessory simplifies field wiring with separate encoder, limit
switch, and amplifier/driver terminal blocks per axis. All terminal blocks
are industry standard and do not require any special tools for wire
installation. The UMI accessory connects to the motion controller via a
single interface cable. The UMI accessory has a host bus monitor power
interlock that automatically disables the amplifiers if the host computer is
shut down or the interface cable is disconnected.
The UMI-4A and UMI-Flex4 come with an integrated DIN-rail mounting
base. The UMI-Flex6 is encased in metal and comes with attached rubber
feet for desktop use; a DIN-rail mounting kit is available separately. The
UMI-7764 is encased in a metal box with a hinged lid and comes with
attached rubber feet for desktop use.
What You Need to Get Started
To set up and use your UMI accessory, you will need the following items:
❑ One of the following UMI accessories:
–UMI-7764
–UMI-4A
–UMI-Flex6
–UMI-Flex4
❑ Universal Motion Interface (UMI) Accessory User Guide
UMI Accessory User Guide 2 www.natinst.com
Page 3

❑ One of the following National Instruments cables:
UMI Accessory Cable Motion Controller
UMI-7764 SH68-C68-S All 7344 controllers,
PCI-7324, PCI-7314
UMI-7764 SH68-68-S PXI-7324, PXI-7 314
UMI-4A SH50-50 , NB1 50-pin ValueMotion
controllers
UMI-Flex6,
UMI-Flex4
SH-Flex-100 100-pin FlexMotion
controllers
❑ +5 V power supply
❑ (Optional) Auxiliary power supply (UMI-4A only)
❑ (Optional) ISO power supply (UMI-Flex4 and UMI-Flex6 only)
Detailed specifications for each of the UMI accessories are in the
Specifications section for each device.
© National Instruments Corporation 3 UMI Accessory User Guide
Page 4
UMI-7764
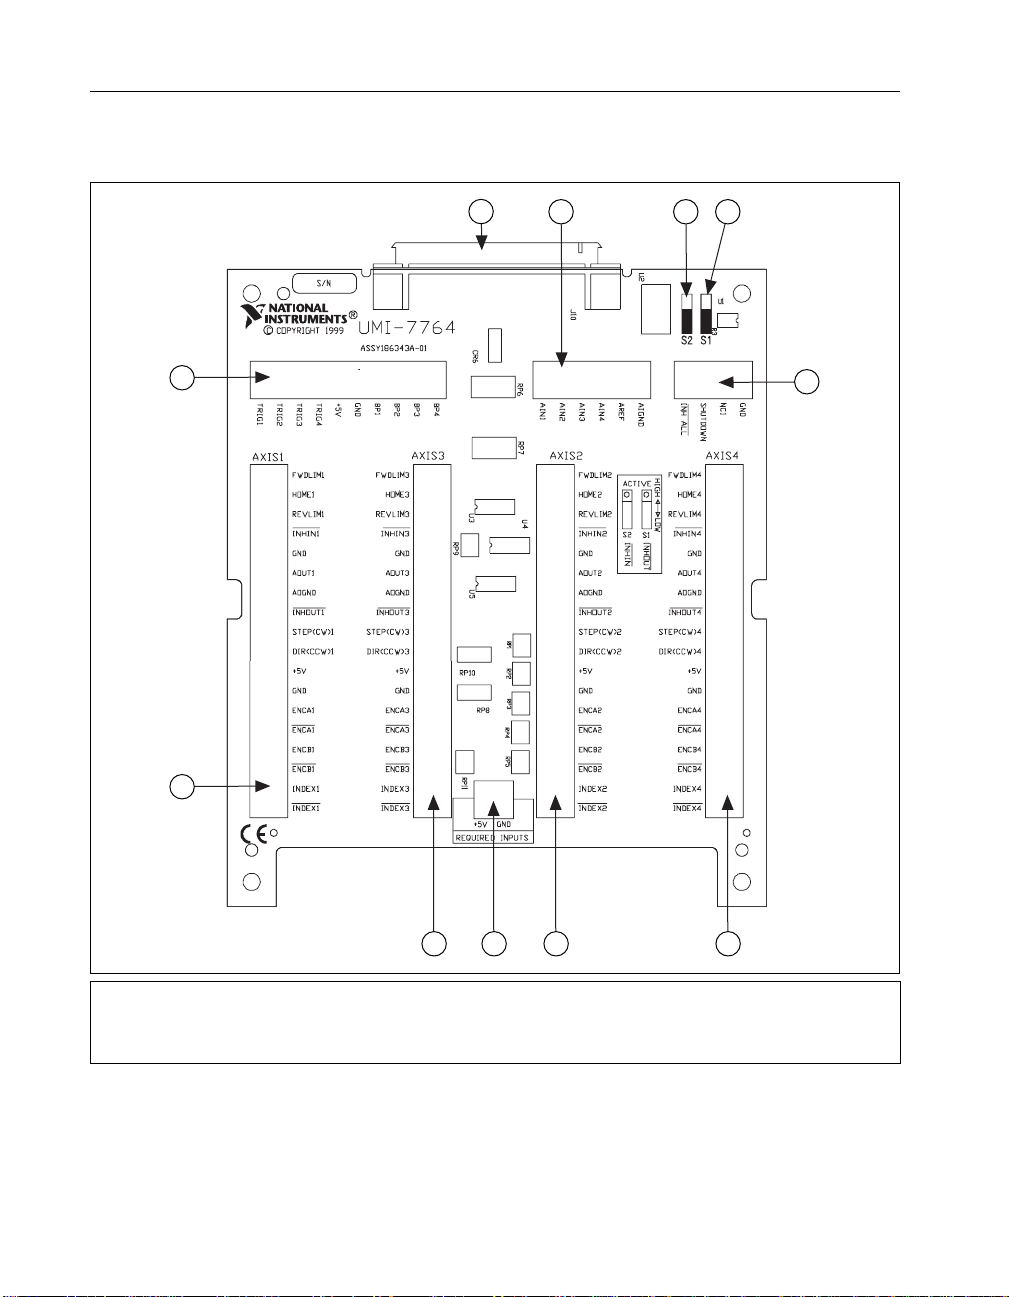
This section describes the UMI-7764 terminal block. Refer to Figure 1 to
help you locate the different parts of the UMI-7764 accessory.
11
10
1
9 8 7
6
2 3 45
1 Axis 1 Motion I/O Terminal Block
2 Axis 3 Motion I/O Terminal Block
3 Axis 2 Motion I/O Terminal Block
4 Axis 4 Motion I/O Terminal Block
UMI Accessory User Guide — UMI-7764 4 www.natinst.com
5 Power Input Terminal Block
6 Shutdown/Inhibit All Terminal Block
7 Inhibit Output Polarity Switch (S1)
8 Inhibit Input Polarity Switch (S2)
Figure 1.
UMI-7764 Parts Locator Diagram
9 Analog Input Terminal Block
10 68-Pin Motion I/O Connector
11 Breakpoint/Trigger Terminal
Block
Page 5
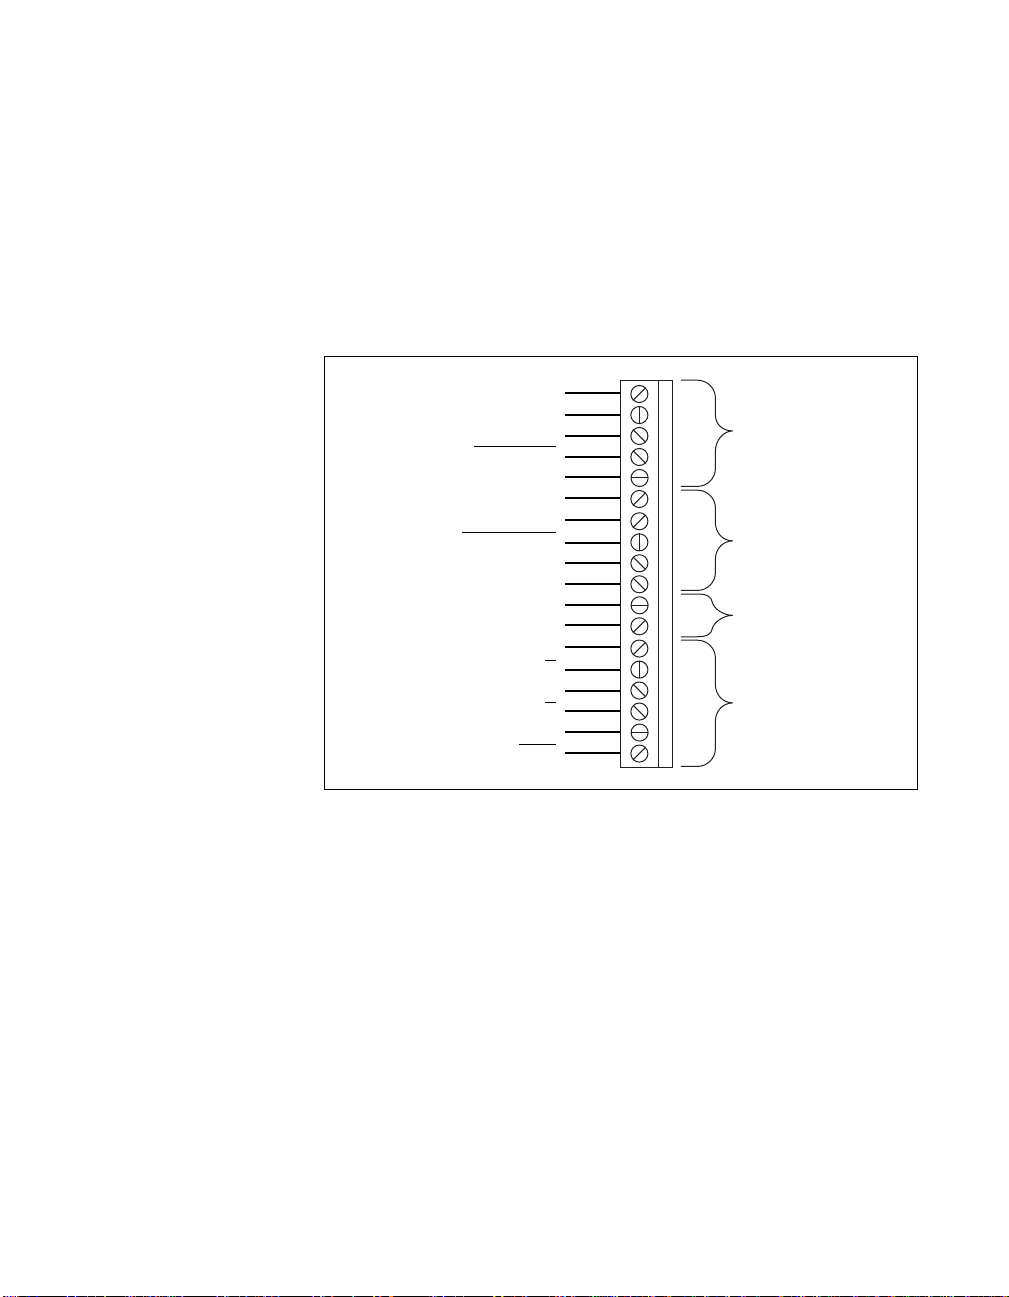
Motion I/O Terminal Block
Each axis connected to the UMI-7764 has a motion I/O terminal block to
which the following signals are wired:
• Amplifier/driv er connections
• Encoder connections
• Limit switch connections
• Distributed power connections
Figure 2 shows which portions of the terminal block are used for different
functionality.
Forward Limit
Home Input
Reverse Limit
Inhibit Input
Digital Ground
Analog Output
Analog Output Ground
Inhibit Output
Step (CW)
Dir (CCW)
+5 V (Output)
Digital Ground
Encoder Phase A
Encoder Phase A
Encoder Phase B
Encoder Phase B
Encoder Index
Encoder Index
Limit Switch
Terminals
Amplifier/Driver
Terminals
Distributed
Power
Encoder
Terminals
Figure 2.
UMI-7764 Motion I/O Terminal Block
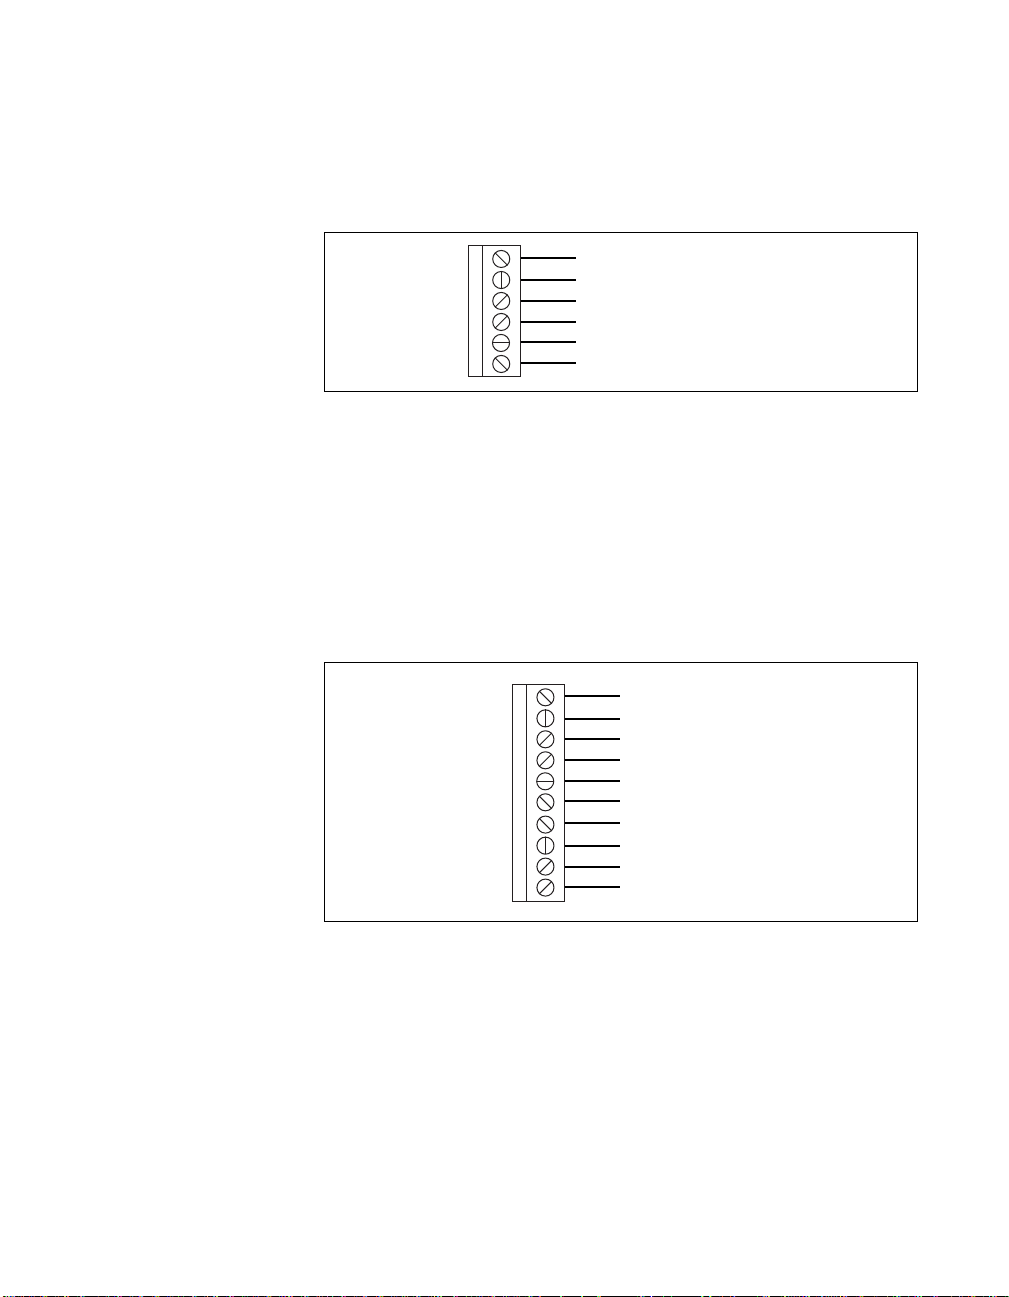
Amplifier/Driver Terminal Block
Each UMI-7764 axis motion I/O terminal block has five terminals for
amplifier/driver connections. Refer to Figures 1 and 2 to locate the
amplifier/driver terminals on your UMI-7764 accessory. Figure 3 shows
the UMI-7764 amplifier/driver terminal block pin assignment for the
servo/stepper axes.
© National Instruments Corporation 5 UMI Accessory User Guide — UMI-7764
Page 6

Analog Output
Analog Output Ground
Inhibit Output
Step (CW)
Dir (CCW)
Figure 3. UMI-7764 Axes Amplifier/Driver Terminal Block Pin Assignments
The Analog Output signals are used as command outputs to a servo
amplifier or as general-purpose voltage outputs. The Step and Dir signals
are used as command outputs to a stepper driver.
The Inhibit Output signals are used to disable the amplifier/driver for that
axis. The UMI combines the host bus interlock circuit, the Inhibit All
signal, the per axis Inhibit Input signals, and the per axis controller Inhibit
Output to create the per axis Inhibit Output signal. The host bus interlock
monitors the +5 V pin from the motion controller to verify that the
controller is powered and properly connected to the UMI. If the host bus
interlock detects a problem, if the Inhibit All signal is asserted, or if the
Inhibit Input signal or the controller Inhibit Output signal for that axis is
asserted, the Inhibit Output from the UMI-7764 for that axis is asserted.
You can configure the axis Inhibit Out signal as active-low or active-high
output using switch S1. Setting S1 to the bottom configures the signal as
active-low; setting S1 to the top configures the signal as active-high.
Note You must configure the controller’s Inhibit Output signals as active-low for proper
operation of the inhibit circuitry.
Encoder Terminal Block
Each UMI-7764 axis motion I/O terminal block has six terminals for
incremental encoder connections. The UMI-7764 accepts either
single-ended TTL or differential line driver inputs. You can connect
open-collector encoders to the UMI-7764 accessory by installing a 2.2 kΩ
pull-up resistor to +5 V.
Note Encoders with line driver outputs are recommended for all applications and must be
used if the encoder cable length is greater than 10 feet.
UMI Accessory User Guide — UMI-7764 6 www.natinst.com
Page 7
Power for the encoders is internally routed from the power input terminal
block and is available on the +5 V terminal on each axis motion I/O
terminal block. You must supply a +5 V source to the power input terminal
block for proper operation. Refer to Figures 1 and 2 to help you locate the
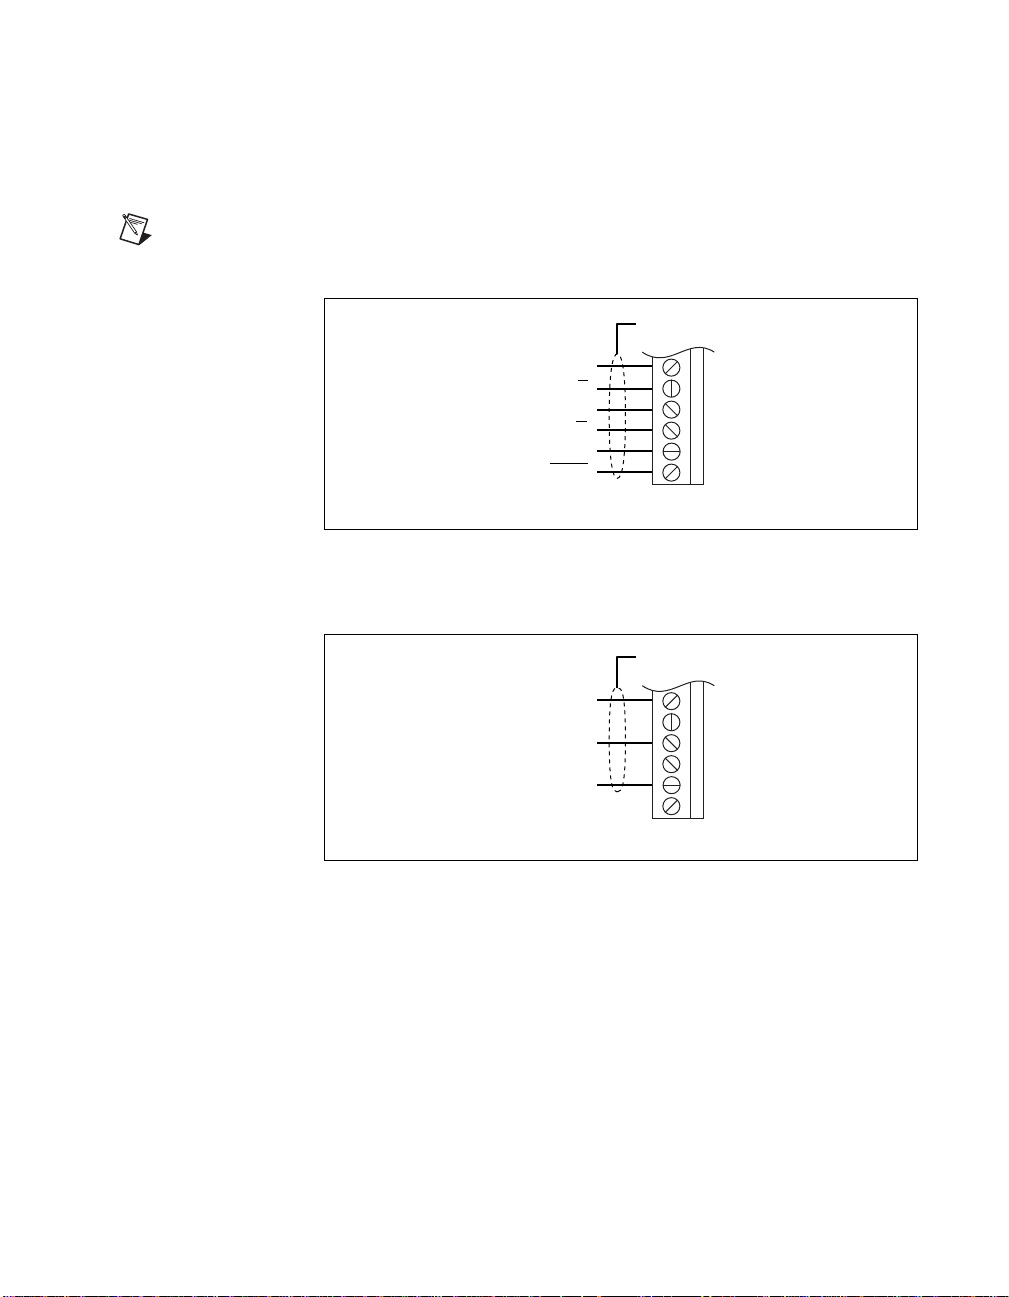
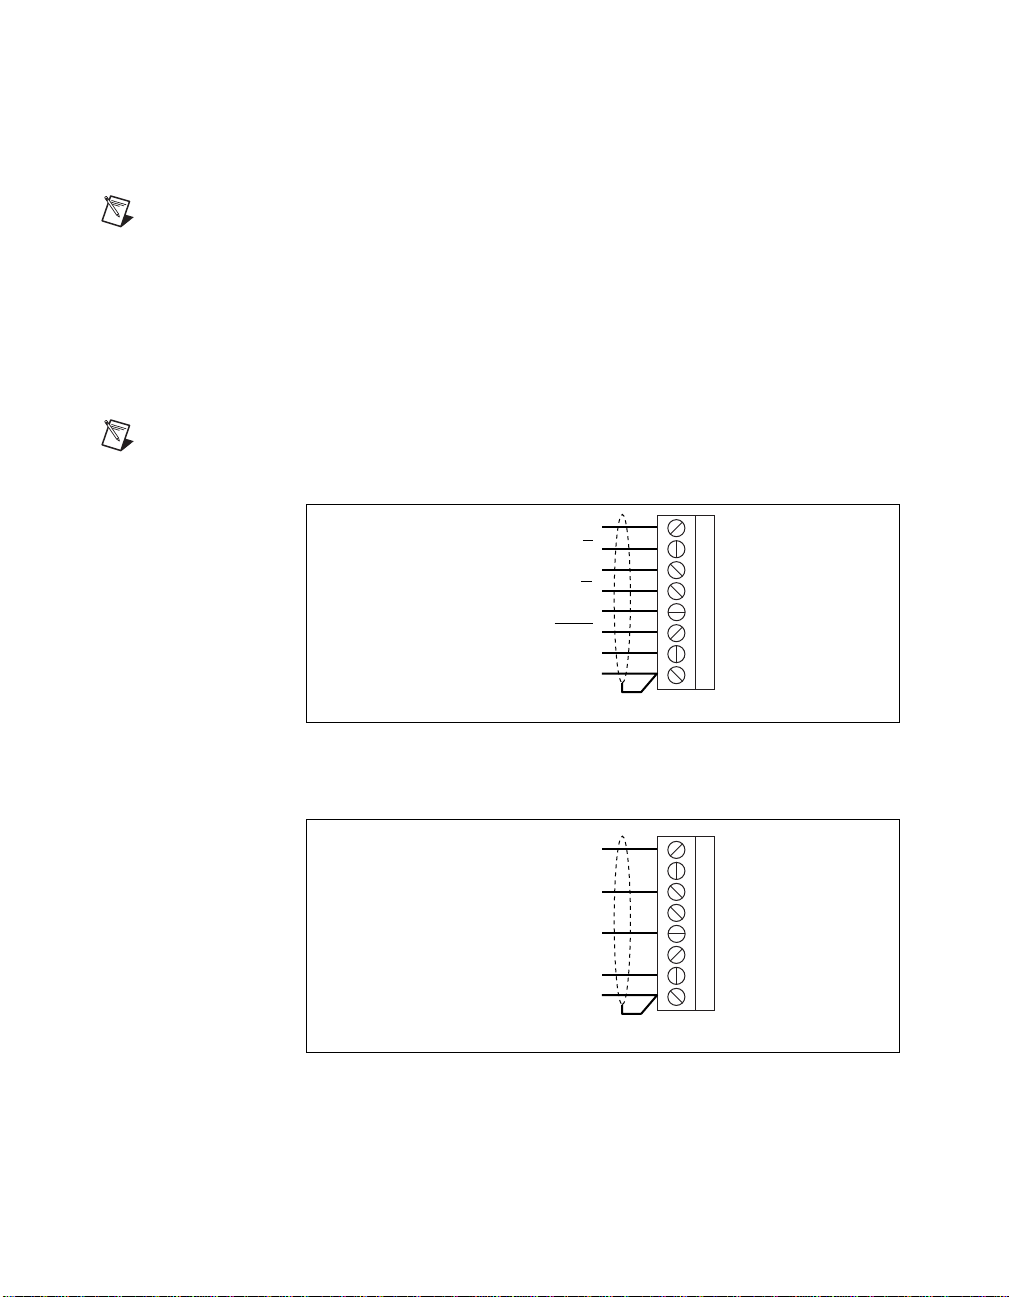
encoder terminals on your UMI-7764 accessory. Figure 4 shows the wiring
for a differential encoder.
Note The dotted loop indicates a shielded cable.
Phase A
Phase A
Phase B
Phase B
Index
Index
1
Connect to Digital Ground
Figure 4. Differential Encoder Wiring
Figure 5 shows the wiring for the single-ended encoder.
Shield
1
1
Shield
Phase A
Phase B
Index
1
Connect to Digital Ground
Figure 5. Single-Ended Encoder Wiring
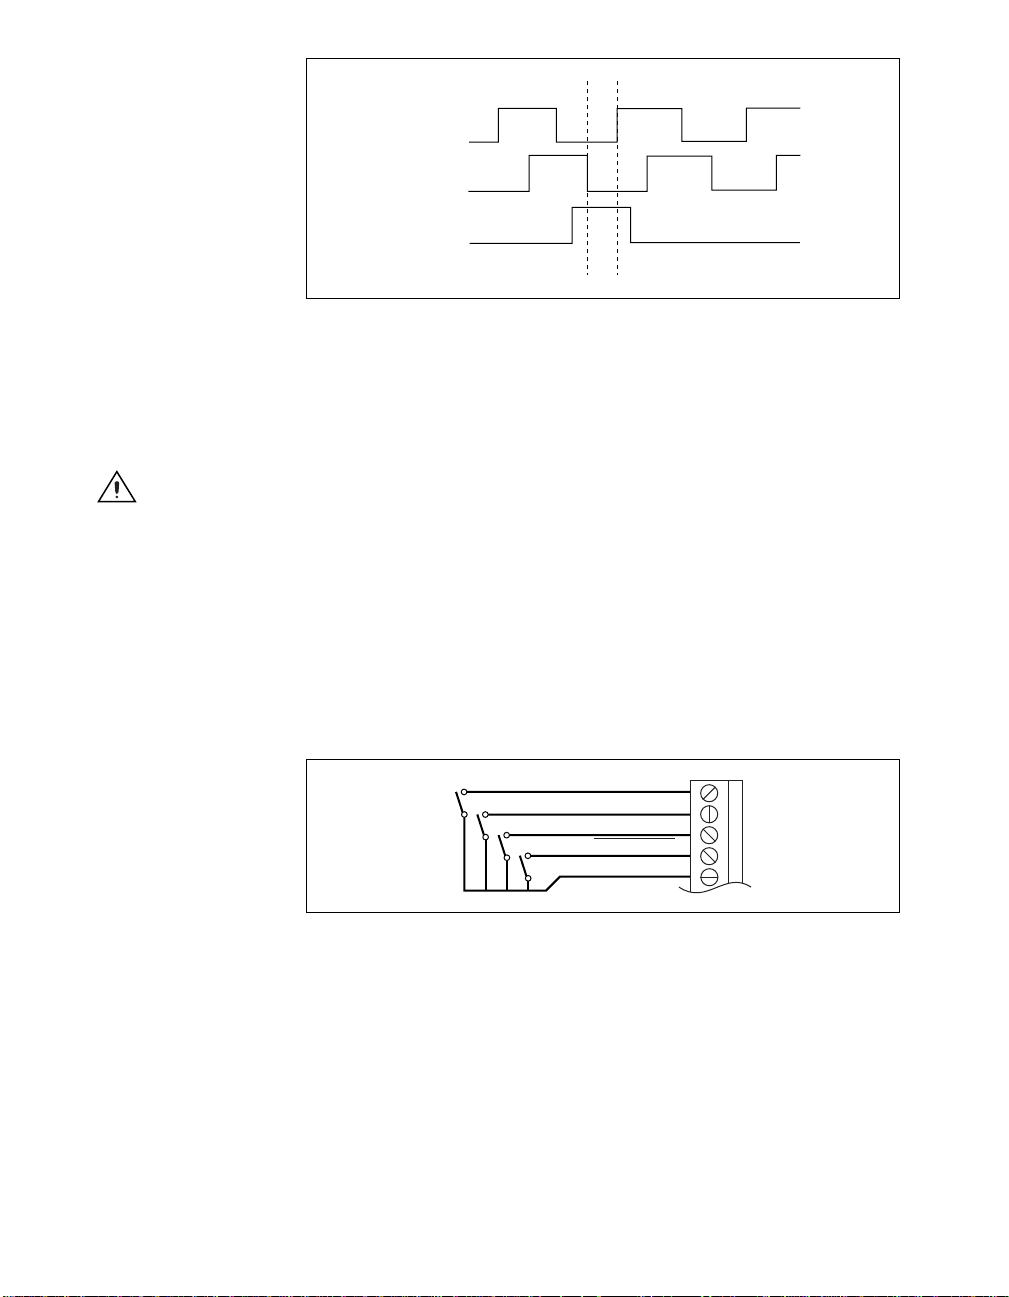
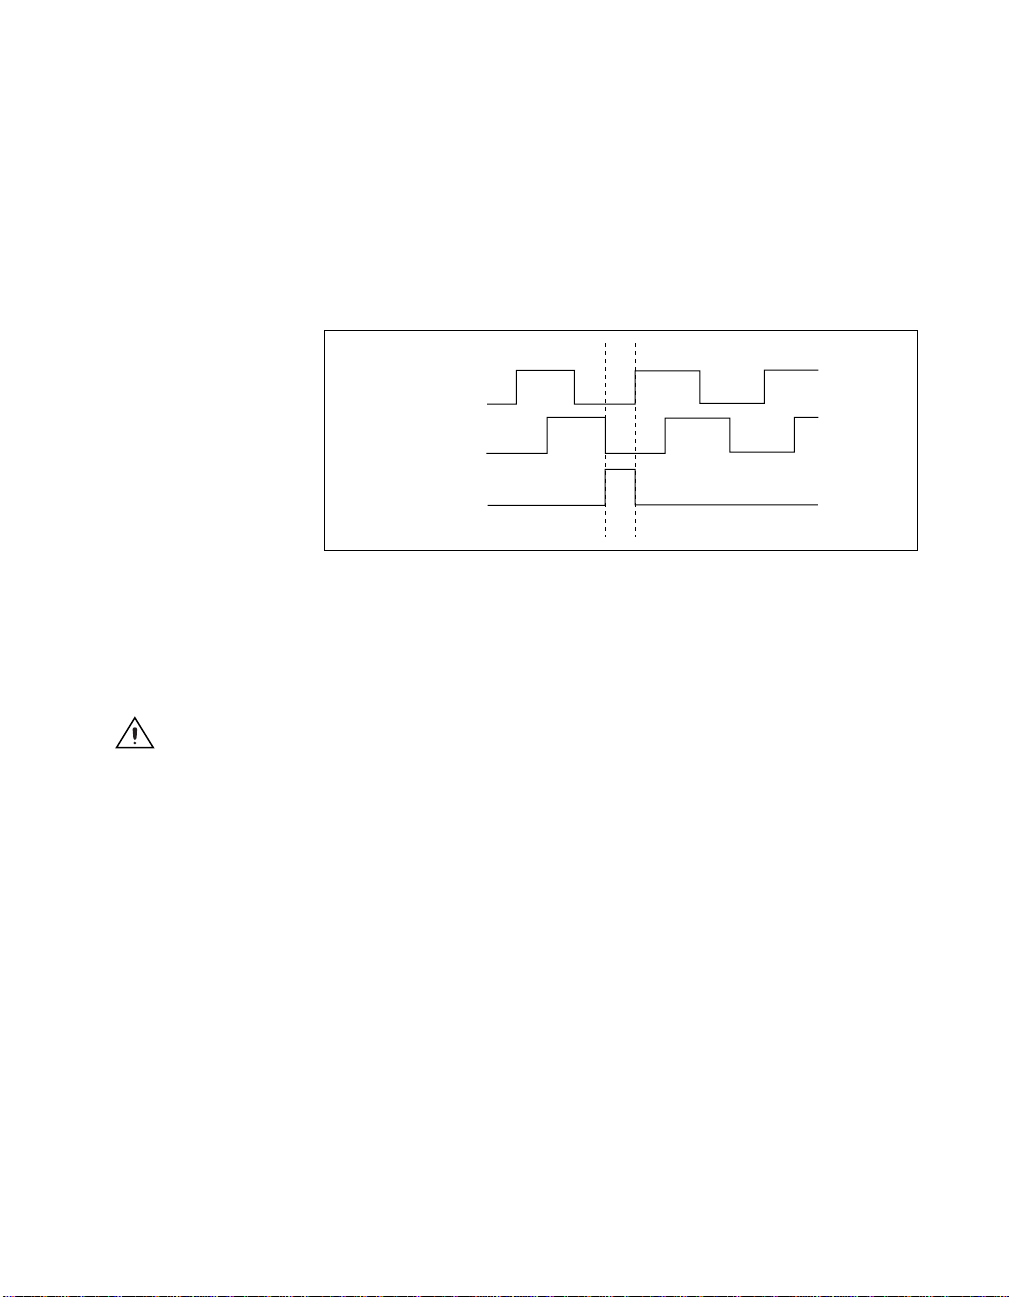
The UMI-7764 accessory allows for differential inputs for Phase A,
Phase B, and Index signals. You can easily accommodate encoders with
phase relationships different from Figure 6 by swapping the signals as
required by the specific application. The Inde x pulse must occur when both
Phase A and Phase B signals are logic low as shown in Figure 6. Servo and
closed-loop stepper applications require encoder feedback and consistent
directional polarity between the motor and encoder for stable operation.
The UMI-7764 uses the following standards for motor direction:
• Positive = forward = Clockwise (CW) facing motor shaft
• Negativ e = reverse = Counter-clockwise (CCW) facing motor shaft
© National Instruments Corporation 7 UMI Accessory User Guide — UMI-7764
Page 8
The encoder inputs are filtered by both analog and digital noise filters. You
must use cables with twisted pairs and an overall shield for improved noise
immunity . When connecting the encoder to the UMI-7764, you should use
at least 24-AWG wire.
Caution Using an unshielded cable allows noise to corrupt the encoder signals, which
results in lost counts, reduced accuracy, and other erroneous encoder and controller
operations.
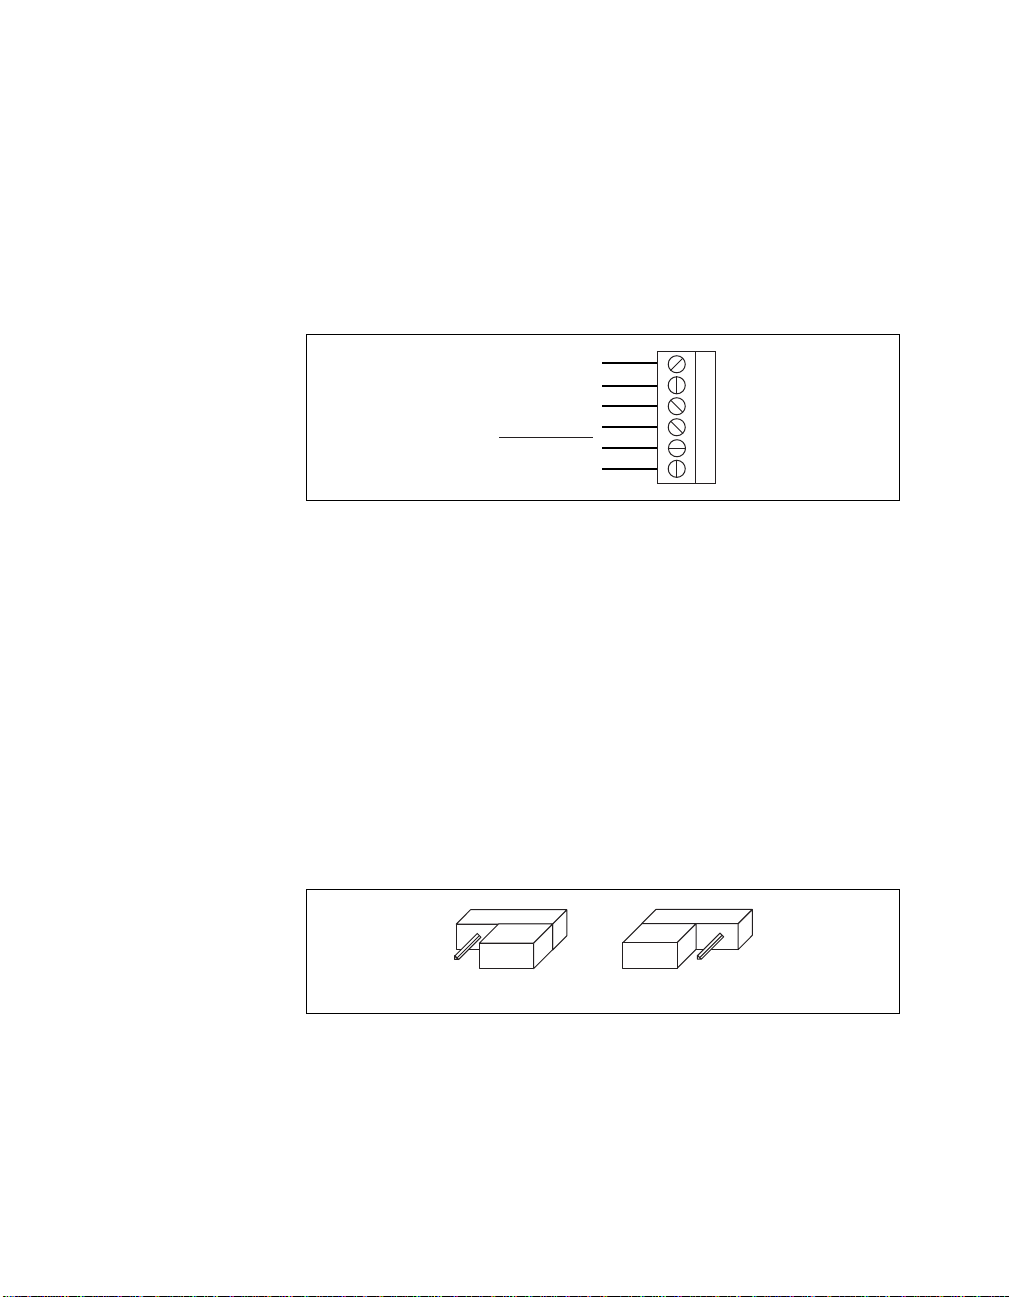
Limit Switch Terminal Block
Each UMI-7764 axis motion I/O terminal block has five terminals for
Forward and Reverse Limit and Home Input switch connections. Refer to
Figures 1 and 2 to help you locate the limit switch terminals on your
UMI-7764 accessory. See Figure 7 for the UMI-7764 limit switch terminal
block pinout.
Phase A
Phase B
Index
Figure 6. Encoder Signal Phasing—CW Rotation
Forward Limit
Home Input
Reverse Limit
Inhibit Input
Digital Ground
Figure 7. UMI-7764 Limit Switch Terminal Block Pin Assignment
Y ou can conf igure the axis Inhibit Input signals as active-lo w or active-high
inputs using switch S2. Setting S2 to the bottom configures the signal as
active-low; setting S2 to the top configures the signal as active-high. The
Inhibit Input signals include a 3.3 kΩ pull-up resistor on their inputs.
UMI Accessory User Guide — UMI-7764 8 www.natinst.com
Page 9
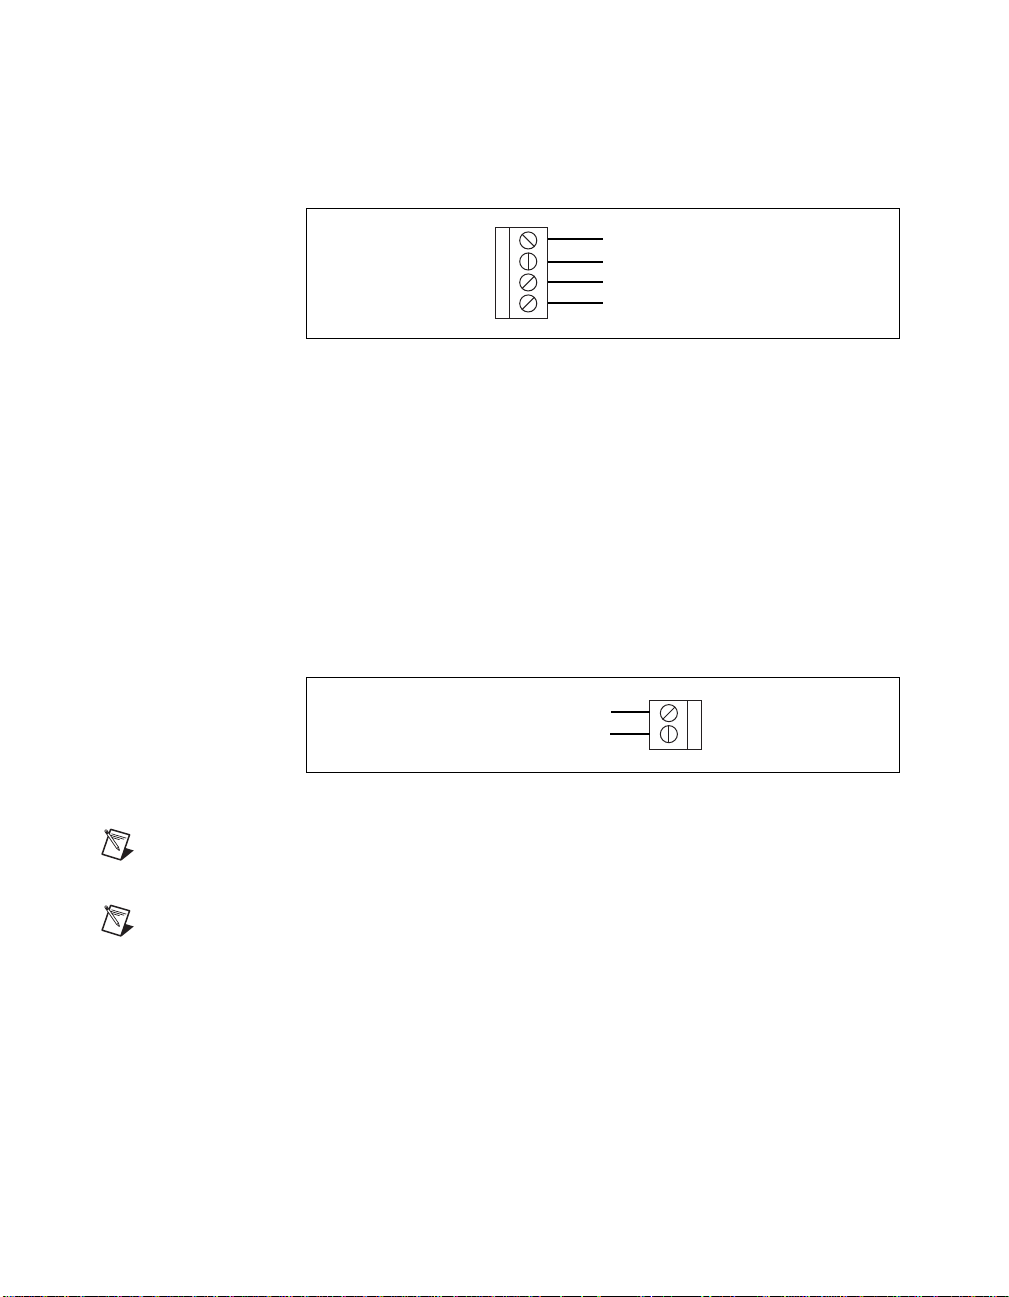
Analog Input Terminal Block
For analog input wiring, the UMI-7764 has a 6-position terminal block,
which provides access to the four analog input channels on your motion
controller. Refer to Figure 1 to help you locate the analog input terminal
block on your UMI-7764 accessory. See Figure 8 for analog input terminal
block pinout information.
Analog Input Ground
Analog Reference (Output)
Analog Input 4
Analog Input 3
Analog Input 2
Analog Input 1
Figure 8.
UMI-7764 Analog Input Terminal Block Pin Assignments
Breakpoint Output/Trigger Input Terminal Block
For breakpoint output and trigger input wiring, the UMI-7764 has a
10-position terminal block. This terminal block provides access to the four
breakpoint outputs and the four trigger inputs. Refer to Figure 1 to help you
locate the breakpoint output/trigger input terminal block on your
UMI-7764 accessory. See Figure 9 for more information on breakpoint
output and trigger input wiring.
Figure 9.
UMI-7764 Breakpoint/Trigger Terminal Block Pin Assignments
Breakpoint 4
Breakpoint 3
Breakpoint 2
Breakpoint 1
Digital Ground
+5 V (Output)
Trigger 4
Trigger 3
Trigger 2
Trigger 1
© National Instruments Corporation 9 UMI Accessory User Guide — UMI-7764
Page 10
Shutdown/Inhibit All Terminal Block
The UMI accessory has a 4-position terminal block for shutdown and
inhibit all wiring. Refer to Figure 1 to help you locate the shutdown/inhibit
all terminal block on your UMI-7764 accessory. See Figure 10 for more
information on shutdown/inhibit all wiring.
Digital Ground
NC
Shutdown
Inhibit All
Figure 10.
The Inhibit All signal acts as a global inhibit, and, when asserted, activ ates
the Inhibit Outputs. The Inhibit All signal includes a 3.3 kΩ pull-up resistor
on its input. The Shutdown signal is passed through to the motion controller
and is typically used to disable the controller.
Power Input Terminal Block
The UMI-7764 has a 2-position terminal block for wiring power to the unit.
Refer to Figure 1 to help you locate the power input terminal block on your
UMI-7764 accessory. Figure 11 shows the 2-position terminal block
pinout.
Figure 11.
Note
To properly operate your UMI-7764 accessory, you must supply a +5 V source to
the power input terminal block.
Note
The +5 V power is redistributed to other terminal blocks as an output power source.
Shutdown/Inhibit All Terminal Block Pin Assignments
+5 V
Digital Ground
2-Position Power Input Terminal Block Pin Assignment
UMI Accessory User Guide — UMI-7764 10 www.natinst.com
Page 11

UMI-7764 Specifications
The following specifications apply only to the UMI-7764 accessory. To
obtain a system specification, you must account for your motion controller.
Please refer to your controller specifications to determine overall system
specifications.
Some signals have compatibility defined as signal pass-through. This
means the UMI-7764 may have passive filtering on these signals but will
not affect the voltage range or current handling capability. Consult your
motion controller specifications to determine the allowable voltage range
and logic level compatibility of the signal.
These specifications are typical at 25 °C unless otherwise specified. Refer
to your motion controller user manual for detailed specifications on
encoder inputs, limit and home switch inputs, breakpoint outputs, trigger
inputs, and analog inputs.
Encoder Interface (Each Axis)
Inputs......................................................Quadrature, incremental
Differential input threshold....................±0.3 V (typical)
Single-ended input threshold .................TTL/CMOS
Voltage range.........................................0 to 5 VDC
Noise filter (RC time constant)..............100 ns
Max quadrature frequency .....................1 MHz
Limit and Home Switch Inputs (Each Axis)
Noise filter (RC time constant)..............10 µs
Compatibility .........................................Signal pass-through
Trigger Inputs
Noise filter (RC time constant)..............100 ns
Compatibility .........................................Signal pass-through
© National Instruments Corporation 11 UMI Accessory User Guide — UMI-7764 Specifications
Page 12

Inhibit and Inhibit All Inputs
Voltage range..........................................0 to 12 VDC
Input voltage threshold...........................TTL/CMOS
Input pull-up resistor ..............................3.3 kΩ
Compatibility.................................... .. ....Signal pass-through
Analog Inputs
Noise filter (RC time constant)...............10 µs
Compatibility.................................... .. ....Signal pass-through
Axis Inhibit Out
Voltage range..........................................0 to 5 VDC
Output low voltage .................................0.5 V at 16 mA
Output high voltage ................................2.4 V at 3.2 mA
Operating Environment
Temperature............................................0 to 55 °C
Storage temperature................................–20 to 70 °C
Relative humidity ...................................10 to 90% (noncondensing)
Power Requirements
+5 VDC...................................................0.2 amps + user-defined encoder
and limit power
Host Bus Voltage Interlock
Voltage....................................................5 VDC ± 5%
Physical
Dimensions.............................................19.5 by 15.2 by 4.5 cm
(7.7 by 6.0 by 1.8 in.)
UMI Accessory User Guide — UMI-7764 Specifications 12 www.natinst.com
Page 13

UMI-4A
This section describes the UMI-4A terminal block. Refer to Figure 12 to
help you locate the different parts of the UMI-4A accessory.
14
17
Amplifier
Connectors
1 Axis 1 (J13)
2 Axis 2 (J14)
3 Axis 3 (J15)
4 Axis 4 (J16)
15
20 9 19 10 18 11
Encoder
Connectors
5 Axis 1 (J2)
6 Axis 2 (J4)
7 Axis 3 (J6)
8 Axis 4 (J8)
1 2 36
Limits
Connectors
9 Axis 1 (J3)
10 Axis 2 (J5)
11 Axis 3 (J7)
12 Axis 4 (J9)
5
Other
Connectors
13 I/O Bits 1–4 (J10)
I/O Bits 5–8 (J11)
14 Opto 22 Compatible (J19)
15 Power (J18)
Figure 12.
7
12 1613
Miscellaneous
16 ValueMotion Controller (J1)
17 Jumpers (Axes 1–4)
18 Assembly Number
19 Serial Number
20 Reserved—Do not remove
UMI-4A Parts Locator Diagram
48
Amplifier/Driver Terminal Block
For amplifier/driver wiring, each UMI-4A axis has a separate 6-position
terminal block. Refer to Figure 12 to help you locate the amplifier/driver
terminal block on your UMI-4A accessory. Figure 13 shows the terminal
block pin assignment for the UMI-4A amplifier/driver used with a servo
board.
Analog Output
Analog Output Ground
+5 V (Output)
Digital Ground
System Inhibit
I/O Bit (Axis #)
Figure 13.
© National Instruments Corporation 13 UMI Accessory User Guide — UMI-4A
UMI-4A Amplifier/Driver with Servo Terminal Block Pin Assignment
1
2
3
4
5
6
Page 14
The analog output signals are used as command outputs to a servo
amplifier. The System Inhibit output signals are used to disable all of the
amplifiers. The UMI accessory combines the host bus interlock circuit and
the Enable Input signals to create the global System Inhibit signals. The
host bus interlock monitors the +5 V pin from the motion controller to
verify that the controller is powered and properly connected to the UMI. If
the host bus interlock detects a problem, or if both Enable Input signals are
deasserted, the System Inhibit signals are asserted.
Figure 14 shows the UMI-4A amplifier/driver terminal block pin
assignment used with a stepper board.
Step (CW)
Dir (CCW)
+5 V (Output)
Digital Ground
Inhibit Output
I/O Bit (Axis #)
Figure 14. UMI-4A Amplifier/Driver with Stepper Terminal Block Pin Assignment
1
2
3
4
5
6
The Step and Dir signals are used as command outputs to a stepper driver.
The Inhibit Output signals are used to disable the driver for that axis. The
UMI accessory combines the host bus interlock circuit, the Enable Input
signals, and the per axis controller Inhibit Output to create the per axis
Inhibit Output signal. If the voltage drops to the host bus interlock circuit,
if both Enable Inputs are deasserted, or if the controller Inhibit Output for
that axis is asserted, the Inhibit Output signal for that axis is asserted.
To configure your UMI-4A accessory for servo, move all four jumpers to
the right. T o conf igure your accessory for stepper , mo ve all four jumpers to
the left. See Figure 15 for more information on configuring your UMI-4A
jumpers. Refer to Figure 12 to help you locate the jumpers on your
UMI-4A accessory.
Servo Stepper
Figure 15. UMI-4A Jumper Configuration
UMI Accessory User Guide — UMI-4A 14 www.natinst.com
Page 15

Encoder Terminal Block
For incremental encoder connections, each UMI-4A axis has a separate
8-position terminal block. UMI-4A accepts either single-ended TTL or
differential line driver inputs. You can connect open-collector encoders to
the UMI-4A accessory by installing a 2.2 kΩ pull-up resistor to +5 V.
Note
Encoders with line driver outputs are recommended for all applications and must be
used if the encoder cable length is greater than 10 feet.
Power for the encoders is internally routed from the power input terminal
block and is available on pin 7 (+5 V). You must supply a +5 V source to
the power input terminal block for proper operation. Refer to Figure 12 to
help you locate the encoder terminal blocks on your UMI-4A accessory.
Figure 16 shows the wiring for the differential encoder.
Note
The dotted loop indicates a shielded cable.
Phase A
Phase A
Phase B
Phase B
+5 V (Output)
Digital Ground
Figure 16.
Index
Index
Shield
Differential Encoder Wiring
1
2
3
4
5
6
7
8
Figure 17 shows the wiring for the single-ended encoder.
+5 V (Output)
Digital Ground
Figure 17.
Phase A
Phase B
Index
Shield
Single-Ended Encoder Wiring
1
2
3
4
5
6
7
8
© National Instruments Corporation 15 UMI Accessory User Guide — UMI-4A
Page 16

The UMI-4A accessory allows for diff erential inputs for Phase A, Phase B,
and Index signals. You can easily accommodate encoders with phase
relationships different from Figure 18 by swapping the signals as required
by the specific application. The Index pulse must occur when both Phase A
and Phase B signals are logic low as shown in Figure 7. Servo and
closed-loop stepper applications require encoder feedback and consistent
directional polarity between the motor and encoder for stable operation.
The UMI-4A uses the following standards for motor direction:
• Positive = forward = Clockwise (CW) facing motor shaft
• Negativ e = reverse = Counter-clockwise (CCW) facing motor shaft
Phase A
Phase B
Index
Figure 18. Encoder Signal Phasing—CW Rotation
The encoder inputs are filtered by both analog and digital noise filters. You
must use cables with twisted pairs and an overall shield for improved noise
immunity . When connecting the encoder to the UMI-4A, you should use at
least 24-AWG wire.
Caution Using an unshielded cable allows noise to corrupt the encoder signals, which
results in lost counts, reduced accuracy, and other erroneous encoder and controller
operations.
Limit Switch Terminal Block
For forward and reverse limit and home switch connections, each UMI-4A
has a separate 6-position terminal block per axis. All limit and home switch
inputs are filtered on the UMI-4A to enhance noise immunity.
The UMI-4A supports active and passive limit switches. You can use
auxiliary VDC on pin 4 to power active, open-collector limit switches. To
use the auxiliary VDC you must supply a voltage to the auxiliary VDC
input (pin 2 of the power input terminal block). Refer to Figure 12 to help
you locate the limit switch terminal block on your UMI-4A accessory.
Figure 19 shows an example of a passive limit switch terminal block
pinout.
UMI Accessory User Guide — UMI-4A 16 www.natinst.com
Page 17

Figure 19. UMI-4A Limit Switch Terminal Block Pin Assignment
Digital I/O Terminal Blocks
The UMI-4A has two I/O connectors: a 34-pin male box header (J19),
which is compatible with standard Opto 22 I/O racks, and two 6-pin
removable screw terminal blocks (J10 and J11) for all other I/O
configurations. You can use both I/O configurations separately or in
parallel.
Pin 5 of each terminal block (J10 and J11) is an Enable Input connection.
This connection controls a system enable–system inhibit function. If your
configuration uses the inhibit output signal available on each per-axis
driver/amplifier terminal block, the enable input on J10 or J11 must be
connected to the common (ground) signal to enable the driver/amplifier.
Note You do not need to duplicate the switch on both J10 and J11; use only one or the
other for the Enable Input.
Forward Limit
Home Switch
Reverse Limit
Aux. VDC
+5 V (Output)
Digital Ground
1
2
3
4
5
6
(Passive Limit Switch Connection Example)
J10 J11
I/O 1
I/O 2
I/O 3
I/O 4
Enable Input
Digital Ground
1
Reserved when used with a stepper board. Do not connect anything to these pins.
1
2
3
4
5
6
or
Enable Input
Digital Ground
I/O 5
I/O 6
I/O 7
I/O 8
1
1
1
1
1
2
3
4
5
6
Figure 20. Using Available Pins On J10 and J11
Caution
If you connect the enable input to the common signal and bypass the
enable/disable function, you need to provide enable/disable control of the
drivers/amplifiers elsewhere in the system.
© National Instruments Corporation 17 UMI Accessory User Guide — UMI-4A
Page 18

Figure 21 shows the 34-pin Opto 22 compatible connector.
Figure 21. 34-Pin Opto 22 Compatible Connector Pin Assignment
Power Input Terminal Block
The UMI-4A has a 4-position terminal block for wiring power to the unit.
Refer to Figure 12 to help you locate the power input terminal block on
your UMI-4A accessory. Figure 11 shows the 4-position terminal block
pinout.
N/C
N/C
N/C
N/C
N/C
N/C
N/C
N/C
I/O Bit 8
I/O Bit 7
I/O Bit 6
I/O Bit 5
I/O Bit 4
I/O Bit 3
I/O Bit 2
I/O Bit 1
N/C
12
34
56
78
910
11 12
13 14
15 16
17 18
19 20
21 22
23 24
25 26
27 28
29 30
31 32
33 34
Digital Ground
Digital Ground
Digital Ground
Digital Ground
Digital Ground
Digital Ground
Digital Ground
Digital Ground
Digital Ground
Digital Ground
Digital Ground
Digital Ground
Digital Ground
Digital Ground
Digital Ground
Digital Ground
Digital Ground
+5 V
Aux. VDC
NC
Digital Ground
1
2
3
4
Figure 22. 4-Position Power Input Terminal Block Pin Assignment
Note
To properly operate your UMI-4A accessory, you must supply a +5 V source to the
power input terminal block.
Note The auxiliary VDC input on the power input terminal block is optional and is
redistributed to other terminal blocks as an output power source.
UMI Accessory User Guide — UMI-4A 18 www.natinst.com
Page 19

UMI-4A Specifications
The following specifications apply only to the UMI-4A accessory. To
obtain a system specification, you must account for your motion controller.
Please refer to your controller specifications to determine overall system
specifications.
Some signals have compatibility defined as signal pass-through. This
means the UMI-4A may have passive f iltering on these signals but will not
affect the voltage range or current handling capability . Consult your motion
controller specifications to determine the allowable voltage range and logic
level compatibility of the signal.
These specifications are typical at 25 °C unless otherwise specified. Refer
to your motion controller user manual for detailed specifications on
encoder inputs, limit and home switch inputs, breakpoint outputs, trigger
inputs, and analog inputs.
Encoder Interface (Each Axis)
Inputs......................................................Quadrature, incremental
Differential input threshold....................±0.3 V (typical)
Single-ended input threshold .................TTL/CMOS
Voltage range.........................................0 to 5 VDC
Noise filter (RC time constant)..............100 ns
Max quadrature frequency .....................1 MHz
Limit and Home Switch Inputs (Each Axis)
Noise filter (RC time constant)..............10 µs
Compatibility .........................................Signal pass-through
Configurable I/O
Compatibility .........................................Signal pass-through
Opto 22 compatible................................via J19 connector
© National Instruments Corporation 19 UMI Accessory User Guide — UMI-4A Specifications
Page 20

Operating Environment
Temperature ............................................0 to 55 °C
Storage temperature................................–20 to 70 °C
Relative humidity ...................................10 to 90% (noncondensing)
Power Requirements
+5 VDC...................................................0.2 A + user-defined encoder
Aux. VDC...............................................User-defined limit switch power
Host Bus Voltage Interlock
Voltage....................................................5 VDC ± 5%
Physical
Dimensions.............................................23.62 by 10.03 cm
power
(9.3 by 3.95 in.)
Universal DIN-rail base
(supplied)
UMI Accessory User Guide — UMI-4A Specifications 20 www.natinst.com
Page 21

UMI-Flex6
This section describes the UMI-Flex6 terminal block. Refer to Figure 23 to
help you locate the different parts of the UMI-Flex6 accessory.
23
*
25
Amplifier
Connectors
1 Axis 1 (J18)
2 Axis 2 (J19)
3 Axis 3 (J20)
4 Axis 4 (J21)
5 Axis 5 (J22)
6 Axis 6 (J23)
18 1617
Encoder
Connectors
7 Axis 1 (J2)
8 Axis 2 (J4)
9 Axis 3 (J6)
10 Axis 4 (J8)
11 Axis 5 (J10)
12 Axis 6 (J12)
5
Limits
Connectors
13 Axis 1 (J3)
14 Axis 2 (J5)
15 Axis 3 (J7)
16 Axis 4 (J9)
17 Axis 5 (J11)
18 Axis 6 (J13)
46
Figure 23.
14
2
7911
1
19
24
1315
Miscellaneous
21 Breakpoint Connector (J15)
22 Power Connector (J26)
23 FlexMotion Controller (J1)
24 Switches
25 Assembly and serial
number (bottom)
3
81012
Analog Input
Connectors
19 1-4 (J14)
20 5-8 (J16)
UMI-Flex6 Parts Locator Diagram
20
21
22
Amplifier/Driver Terminal Block
For amplifier/driver wiring, each UMI-Flex6 axis has a separate 5- or
7-position terminal block. Refer to Figure 23 to help you locate the
amplifier/driver terminal blocks on your UMI-Flex6 accessory. Figure 24
shows the UMI-Flex6 amplifier/driver terminal block pin assignment for
the servo and combined servo/stepper axes. The 5-position UMI-Flex6
terminal block supports the servo axes, and the 7-position terminal block
adds stepper support.
© National Instruments Corporation 21 UMI Accessory User Guide — UMI-Flex6
Page 22

Analog Output
Analog Output Ground
+5 V (Output)
Digital Ground
Inhibit Output
Axes 1–4 Axes 5–6
Figure 24. UMI-Flex6 Axes Amplifier/Driver Terminal Block Pin Assignments
The Analog Output signals are used as command outputs to a servo
amplifier or as general-purpose voltage outputs. The Step and Dir signals
are used as command outputs to a stepper driver.
The Inhibit Output signals are used to disable the amplifier/driver for that
axis. The UMI combines the host bus interlock circuit, the Inhibit Input
signals, and the per axis controller Inhibit Output to create the per axis
Inhibit Output signal. The host bus interlock monitors the +5 V pin from
the motion controller to verify that the controller is powered and properly
connected to the UMI. If the host bus interlock detects a problem, or if any
Inhibit Input signal is asserted, or the controller Inhibit Output signal for
that axis is asserted, the Inhibit Output for that axis is asserted.
You can configure the Axis Inhibit Out signal as active-low or active-high
outputs using switch SW2. Setting SW2 to the right configures the signal
as active-low; setting SW2 to the left configures the signal as active-high.
Analog Output Ground
1
2
3
4
5
Analog Output
+5 V (Output)
Digital Ground
Inhibit Output
Step (CW)
Dir (CCW)
1
2
3
4
5
6
7
Note You must configure the controller’s Inhibit Output signals as active low for proper
operation of the inhibit circuitry.
Encoder Terminal Block
For incremental encoder connections, each UMI-Flex6 axis has a separate
8-position terminal block. UMI-Flex6 accepts either single-ended TTL or
differential line driver inputs. You can connect open-collector encoders to
the UMI-Flex6 accessory by installing a 2.2 kΩ pull-up resistor to +5 V.
Note Encoders with line driver outputs are recommended for all applications and must be
used if the encoder cable length is greater than 10 feet.
UMI Accessory User Guide — UMI-Flex6 22 www.natinst.com
Page 23

Power for the encoders is internally routed from the power input terminal
block and is available on pin 7 (+5 V). You must supply a +5 V source to
the power input terminal block for proper operation. Refer to Figure 23 to
help you locate the encoder terminal blocks on your UMI-Flex6 accessory .
Figure 25 shows the wiring for the differential encoder.
Note The dotted loop indicates a shielded cable.
Phase A
Phase A
Phase B
Phase B
Index
Index
+5 V (Output)
Digital Ground
Shield
1
2
3
4
5
6
7
8
Figure 25. Differential Encoder Wiring
Figure 26 shows the wiring for the single-ended encoder.
Phase A
Phase B
Index
+5 V (Output)
Digital Ground
Shield
Figure 26. Single-Ended Encoder Wiring
1
2
3
4
5
6
7
8
The UMI-Flex6 accessory allows for differential inputs for Phase A,
Phase B, and Index signals. You can easily accommodate encoders with
phase relationships different from Figure 27 by swapping the signals as
required by the specific application. The Inde x pulse must occur when both
Phase A and Phase B signals are logic low as sho wn in Figure 27. Servo and
closed-loop stepper applications require encoder feedback and consistent
directional polarity between the motor and encoder for stable operation.
The UMI-Flex6 uses the following standards for motor direction:
• Positive = forward = Clockwise (CW) facing motor shaft
• Negativ e = reverse = Counter-clockwise (CCW) facing motor shaft
© National Instruments Corporation 23 UMI Accessory User Guide — UMI-Flex6
Page 24

The encoder inputs are filtered by both analog and digital noise filters. You
must use cables with twisted pairs and an overall shield for improved noise
immunity . When connecting the encoder to the UMI-Flex6, you should use
at least 24-AWG wire.
Caution Using an unshielded cable allows noise to corrupt the encoder signals, which
results in lost counts, reduced accuracy, and other erroneous encoder and controller
operations.
Limit Switch Terminal Block
For Forward and Reverse Limit and Home Input switch connections, each
UMI-Flex6 axis has a separate 6-position terminal block. All limit and
home switch inputs are connected to the Opto-coupled inputs on the
FlexMotion board. Refer to Figure 23 to help you locate the limit switch
terminal block on your UMI-Flex6 accessory. See Figure 28 for the
UMI-Flex6 limit switch terminal block pinout.
Phase A
Phase B
Index
Figure 27. Encoder Signal Phasing—CW Rotation
Forward Limit
Home Input
Reverse Limit
Trigger Input
Inhibit Input
ISO Common
1
NC on Axis 5 and 6
1
1
2
3
4
5
6
Figure 28. UMI-Flex6 Limit Switch Terminal Block Pin Assignment
UMI Accessory User Guide — UMI-Flex6 24 www.natinst.com
Page 25

You can configure the functionality of the Inhibit Inputs using switches
SW1 and SW3. These inputs can be configured as a group as active low
global inhibits or as active high global E-Stops. When configured as global
inhibits, an active low signal applied to any input asserts the inhibit output
lines on the UMI. When configured as global E-Stops, an active high signal
applied to any input asserts the inhibit output lines on the UMI and asserts
the E-Stop signal back to the FlexMotion controller . See Table 1 for switch
SW1 and SW3 settings.
SW1 SW3 Inhibit Input Configuration
Right Right Enable active low global inhibits
Left Left Enable active high global E-Stops
Left Right Disable active high global E-Stops
Right Left Reserved, do not select.
*
This grounds the input signal on the board. Do not connect a source to the input pin that
cannot tolerate a short to ground.
Analog Input Terminal Blocks
For analog input wiring, the UMI-Flex6 has two, 6-position terminal
blocks. Each connector provides access to four of the eight analog input
channels on the FlexMotion boards. Refer to Figure 23 to help you locate
the analog input terminal blocks on your UMI-Flex6 accessory. See
Figures 29 and 30 for analog input terminal block pinout information.
Table 1.
Analog Reference (Output)
Inhibit Input Configuration
Analog Input 1
Analog Input 2
Analog Input 3
Analog Input 4
Analog Input Ground
*
1
2
3
4
5
6
Figure 29.
Figure 30.
© National Instruments Corporation 25 UMI Accessory User Guide — UMI-Flex6
UMI-Flex6 Analog Input Channels 1 through 4
Analog Input Channel 5
Analog Input Channel 6
Analog Input Channel 7
Analog Input Channel 8
Analog Reference (Output)
Analog Input Ground
UMI-Flex6 Analog Input Channels 5 through 8
1
2
3
4
5
6
Page 26

Breakpoint Output Terminal Block
For breakpoint output wiring, the UMI-Flex6 has a 6-position terminal
block. This terminal block also provides access to the four breakpoint
outputs as well as the isolated voltage input. See Figure 31 for more
information on breakpoint output and isolated voltage input wiring.
Figure 31.
The opto-couplers on the FlexMotion board can be powered either from an
external source or from the FlexMotion board itself. If you want to use an
external source for the isolated voltage, you must configure the Fle xMotion
board for this setting prior to connecting the external source.
Caution
Failure to configure the board properly for an external power source may damage
your UMI and FlexMotion board.
Power Input Terminal Block
The UMI-Flex6 has a 4-position terminal block for wiring power to the
unit. Refer to Figure 23 to help you locate the power input terminal block
on your UMI-Flex6 accessory. Figure 32 shows the 4-position terminal
block pinout.
Breakpoint 1
Breakpoint 2
Breakpoint 3
Breakpoint 4
Isolated Voltage (Input)
Isolated Common
UMI-Flex6 Breakpoint Output Channels 1 through 4
1
2
3
4
5
6
+5 V
NC
NC
Digital Ground
Figure 32.
Note
To properly operate your UMI-Flex6 accessory, you must supply a +5 V source to
4-Position Power Input Terminal Block Pin Assignment
1
2
3
4
the power input terminal block.
Note
The +5 V power is redistributed to other terminal blocks as an output power source.
UMI Accessory User Guide — UMI-Flex6 26 www.natinst.com
Page 27

UMI-Flex6 Specifications
The following specifications apply only to the UMI-Flex6 accessory. To
obtain a system specification, you must account for your motion controller.
Please refer to your controller specifications to determine overall system
specifications.
These specifications are typical at 25 °C unless otherwise specified. Refer
to your motion controller user manual for detailed specifications on
encoder inputs, limit and home switch inputs, high speed inputs, breakpoint
outputs, and analog inputs.
Axis Inhibit Out
Voltage range.........................................0 to 5 VDC
Output current........................................16 mA sink max.
Operating Environment
Temperature...........................................0 to 55 °C
Storage temperature . ..............................–20 to 70 °C
Relative humidity...................................10 to 90% (noncondensing)
Power Requirements
+5 VDC..................................................0.2 A + user-defined encoder and
limit power
+ISO
Voltage...................................................5 to 24 VDC
Current ...................................................User-defined isolated signals
Host Bus Voltage Interlock
Voltage...................................................5 VDC ± 5%
Physical
Dimensions.............................................26.67 by 11.18 cm
(10.5 by 4.4 in)
© National Instruments Corporation 27 UMI Accessory User Guide — UMI-Flex6 Specifications
Page 28

UMI-Flex4
This section describes the UMI-Flex4 terminal block. Refer to Figure 33 to
help you locate the different parts of the UMI-Flex4 accessory.
17
Amplifier
Connectors
1 Axis 1 (J13)
2 Axis 2 (J14)
3 Axis 3 (J15)
4 Axis 4 (J16)
4
19
Encoder
Connectors
5 Axis 1 (J2)
6 Axis 2 (J4)
7 Axis 3 (J6)
8 Axis 4 (J8)
8
12
Limits
Connectors
9 Axis 1 (J3)
10 Axis 2 (J5)
11 Axis 3 (J7)
12 Axis 4 (J9)
18
7
3
11
2
6
5
10
Other
Connectors
13 Analog Input (J10)
14 Breakpoint Output
(J11)
15 Power (J18)
9
1
13
14 20
Miscellaneous
16 FlexMotion Controller (J1)
17 Jumpers
18 Assembly Number
19 Serial Number
20 Reserved—Do not remove
1516
Figure 33.
UMI-Flex4 Parts Locator Diagram
Amplifier/Driver Terminal Block
For amplifier/driver wiring, the UMI-Flex4 has four separate 6-position
terminal blocks. Figure 34 shows a UMI-Flex4 terminal block pin
assignment. The first two terminal blocks (items 1 and 2 in Figure 33) are
dedicated to servo axes 1 and 2. The third terminal block (item 3 in
Figure 33) is jumper configurable to support servo axes 3 and 5 and stepper
axis 5. The fourth terminal block (item 4 in Figure 33) is jumper
configurable to support servo axes 4 and 6 and stepper axis 6. See Figure 35
for more information on configuring these jumpers.
UMI Accessory User Guide — UMI-Flex4 28 www.natinst.com
Page 29

Analog Output or Step
Analog Output Ground or Dir
+5 V (Output)
Digital Ground
Inhibit Output
NC
1
2
3
4
5
6
Figure 34. UMI-Flex4 Axes Amplifier/Driver Terminal Block Pin Assignment
The Analog Output signals are used as command outputs to a servo
amplifier or as general-purpose voltage outputs. The Step and Dir signals
are used as command outputs to a stepper driver.
The Inhibit Output signals are used to disable the amplifier/driver for that
axis. The UMI combines the host bus interlock circuit, the per axis Inhibit
Input signals, and the per axis controller Inhibit Output to create the per
axis Inhibit Output signal. The host bus interlock monitors the +5 V pin
from the motion controller to verify that the controller is powered and
properly connected to the UMI. If the host bus interlock detects a problem,
or if the Inhibit Input signal or the controller Inhibit Output signal for that
axis is asserted, the Inhibit Output for that axis is asserted.
Note You must configure the controller’s Inhibit Output signals as active-low for proper
operation of the inhibit circuitry.
Axis 3
Analog Output
Analog Output Ground
JP2 Jumper Configuration for J15
Axis 4
Analog Output
Analog Output Ground
JP3 Jumper Configuration for J16
Axis 5
Analog Output
Analog Output Ground
Axis 6
Analog Output
Analog Output Ground
Axis 5
Step
Dir
Axis 6
Step
Dir
Figure 35. UMI-Flex4 Jumper Configuration
© National Instruments Corporation 29 UMI Accessory User Guide — UMI-Flex4
Page 30
Encoder Terminal Block
For incremental encoder connections, each UMI-Flex4 axis has a separate
8-position terminal block. UMI-Flex4 accepts either single-ended TTL or
differential line driver inputs. You can connect open-collector encoders to
the UMI-Flex4 accessory by installing a 2.2 kΩ pull-up resistor to +5 V.
Note
Encoders with line driver outputs are recommended for all applications and must be
used if the encoder cable length is greater than 10 feet.
Power for the encoders is internally routed from the power input terminal
block and is available on pin 7 (+5 V). You must supply a +5 V source to
the power input terminal block for proper operation. Refer to Figure 33 to
help you locate the encoder terminal blocks on your UMI-Flex4 accessory .
Figure 36 shows the wiring for the differential encoder.
Note
The dotted loop indicates a shielded cable.
Phase A
Phase A
Phase B
Phase B
+5 V (Output)
Digital Ground
Figure 36.
Index
Index
Shield
Differential Encoder Wiring
1
2
3
4
5
6
7
8
Figure 37 shows the wiring for the single-ended encoder.
+5 V (Output)
Digital Ground
Figure 37.
Phase A
Phase B
Index
Shield
Single-Ended Encoder Wiring
1
2
3
4
5
6
7
8
UMI Accessory User Guide — UMI-Flex4 30 www.natinst.com
Page 31
The UMI-Flex4 accessory allows for differential inputs for Phase A,
Phase B, and Index signals. You can easily accommodate encoders with
phase relationships different from Figure 38 by swapping the signals as
required by the specific application. The Inde x pulse must occur when both
Phase A and Phase B signals are logic low as sho wn in Figure 38. Servo and
closed-loop stepper applications require encoder feedback and consistent
directional polarity between the motor and encoder for stable operation.
The UMI-Flex4 uses the following standards for motor direction:
• Positive = forward = Clockwise (CW) facing motor shaft
• Negativ e = reverse = Counter-clockwise (CCW) facing motor shaft
Phase A
Phase B
Index
Figure 38. Encoder Signal Phasing—CW Rotation
The encoder inputs are filtered by both analog and digital noise filters. You
must use cables with twisted pairs and an overall shield for improved noise
immunity . When connecting the encoder to the UMI-Flex4, you should use
at least 24-AWG wire.
Caution Using an unshielded cable allows noise to corrupt the encoder signals, which
results in lost counts, reduced accuracy, and other erroneous encoder and controller
operations.
© National Instruments Corporation 31 UMI Accessory User Guide — UMI-Flex4
Page 32

Limit Switch Terminal Block
For Forward and Reverse Limit and Home Input switch connections, the
UMI-Flex4 accessory has a separate 6-position terminal block per axis. All
limit and home switch inputs are connected to the opto-coupled inputs on
the FlexMotion board. Refer to Figure 33 to help you locate the limit switch
terminal block on your UMI-Flex4 accessory. See Figure 39 for the
UMI-Flex4 limit switch terminal block pinout.
Figure 39.
Analog Input Terminal Block
For analog input wiring, the UMI-Flex4 has one, 6-position terminal block.
The connector provides access to four of the eight analog input channels on
the FlexMotion boards. Refer to Figure 33 to help you locate the analog
input terminal blocks on your UMI-Flex4 accessory. See Figure 40 for
analog input terminal block pinout information.
Forward Limit
Home Input
Reverse Limit
Trigger Input
Inhibit Input
ISO Common
1
2
3
4
5
6
UMI-Flex4 Limit Switch Terminal Block Pin Assignment
Analog Input 1
Analog Input 2
Analog Input 3
Analog Input 4
Analog Reference (Output)
Analog Input Ground
Figure 40.
UMI-Flex4 Analog Input Channels 1 through 4
1
2
3
4
5
6
UMI Accessory User Guide — UMI-Flex4 32 www.natinst.com
Page 33

Breakpoint Output Terminal Block
For breakpoint output wiring, the UMI-Flex4 has a 6-position terminal
block. This terminal block also provides access to the four breakpoint
outputs as well as the isolated voltage input. See Figure 41 for more
information on breakpoint output and isolated voltage input wiring.
Figure 41.
The opto-couplers on the FlexMotion board can be powered either from an
external source or from the FlexMotion board itself. If you want to use an
external source for the isolated voltage, you must configure the Fle xMotion
board for this setting prior to connecting the external source.
Caution
Failure to configure the board properly for an external po wer source may damage
your UMI and FlexMotion board.
Power Input Terminal Block
The UMI-Flex4 has a 4-position terminal block for wiring power to the
unit. Refer to Figure 33 to help you locate the power input terminal block
on your UMI-Flex4 accessory. Figure 42 shows the 4-position terminal
block pinout.
Breakpoint 1
Breakpoint 2
Breakpoint 3
Breakpoint 4
Isolated Voltage (Input)
Isolated Common
UMI-Flex4 Breakpoint Output Channels 1 through 4
1
2
3
4
5
6
+5 V
NC
NC
Digital Ground
Figure 42.
Note
To properly operate your UMI-Flex4 accessory, you must supply a +5 V source to
4-Position Power Input Terminal Block Pin Assignment
1
2
3
4
the power input terminal block.
Note
The +5 V power is redistributed to other terminal blocks as an output power source.
© National Instruments Corporation 33 UMI Accessory User Guide — UMI-Flex4
Page 34

UMI-Flex4 Specifications
The following specifications apply only to the UMI-Flex4 accessory. To
obtain a system specification, you must account for your motion controller.
Please refer to your controller specifications to determine overall system
specifications.
These specifications are typical at 25 °C unless otherwise specified. Refer
to your motion controller user manual for detailed specifications on
encoder inputs, limit and home switch inputs, high speed inputs, breakpoint
outputs, and analog inputs.
Axis Inhibit Out
Voltage range..........................................0 to 5 VDC
Output current.........................................16 mA sink max.
Operating Environment
Temperature ............................................0 to 55 °C
Storage temperature................................–20 to 70 °C
Relative humidity ...................................10 to 90% (noncondensing)
Power Requirements
+5 VDC...................................................0.2 A + user-defined encoder
power
+ISO
Voltage....................................................5 to 24 VDC
Current....................................................User-defined isolated signals
Host Bus Voltage Interlock
Voltage....................................................5 VDC ± 5%
Physical
Dimensions.............................................23.62 by 10.03 cm
(9.3 by 3.95 in.)
Universal DIN-rail base
(supplied)
UMI Accessory User Guide — UMI-Flex4 Specifications 34 www.natinst.com
Page 35

 Loading...