

Page 1

TM
SCXI
SCXI-1581 User Manual
April 2006
323074C-01
Page 2

Worldwide Technical Support and Product Information
ni.com
National Instruments Corporate Headquarters
11500 North Mopac Expressway Austin, Texas 78759-3504 USA Tel: 512 683 0100
Worldwide Offices
Australia 1800 300 800, Austria 43 0 662 45 79 90 0, Belgium 32 0 2 757 00 20, Brazil 55 11 3262 3599,
Canada 800 433 3488, China 86 21 6555 7838, Czech Republic 420 224 235 774, Denmark 45 45 76 26 00,
Finland 385 0 9 725 725 11, France 33 0 1 48 14 24 24, Germany 49 0 89 741 31 30, India 91 80 41190000,
Israel 972 0 3 6393737, Italy 39 02 413091, Japan 81 3 5472 2970, Korea 82 02 3451 3400,
Lebanon 961 0 1 33 28 28, Malaysia 1800 887710, Mexico 01 800 010 0793, Netherlands 31 0 348 433 466,
New Zealand 0800 553 322, Norway 47 0 66 90 76 60, Poland 48 22 3390150, Portugal 351 210 311 210,
Russia 7 095 783 68 51, Singapore 1800 226 5886, Slovenia 386 3 425 4200, South Africa 27 0 11 805 8197,
Spain 34 91 640 0085, Sweden 46 0 8 587 895 00, Switzerland 41 56 200 51 51, Taiwan 886 02 2377 2222,
Thailand 662 278 6777, United Kingdom 44 0 1635 523545
For further support information, refer to the Signal Conditioning Technical Support Information document.
To comment on National Instruments documentation, refer to the National Instruments Web site at
and enter the info code
feedback.
ni.com/info
© 2001–2006 National Instruments Corporation. All rights reserved.
Page 3

Important Information
Warranty
The SCXI-1581 is warranted against defects in materials and workmanship for a period of one year from the date of shipment, as evidenced
by receipts or other documentation. National Instruments will, at its option, repair or replace equipment that proves to be defective during the
warranty period. This warranty includes parts and labor.
The media on which you receive National Instruments software are warranted not to fail to execute programming instructions, due to defects in
materials and workmanship, for a period of 90 days from date of shipment, as evidenced by receipts or other documentation. National Instruments
will, at its option, repair or replace software media that do not execute programming instruc tions if National Instruments receives notice of such defects
during the warranty period. National Instruments does not warrant that the operation of the software shall be uninterrupted or error free.
A Return Material Authorization (RMA) number must be obtained from the factory and clearly marked on the outside of the package before any
equipment will be accepted for warranty work. National Instruments will pay the shipping costs of returning to the owner parts which are covered by
warranty.
National Instruments believes that the information in this document is accurate. The document has been carefully reviewed for technical accuracy. In
the event that technical or typographical errors exist, National Instruments reserves the right to make changes to subsequent editions of this document
without prior notice to holders of this edition. The reader should consult National Instruments if errors are suspected. In no event shall National
Instruments be liable for any damages arising out of or related to this document or the information contained in it.
E
XCEPT AS SPECIFIED HEREIN, NATIONAL INSTRUMENTS MAKES NO WARRANTIES, EXPRESS OR IMPLIED, AND SPECIFICALLY DISCLAIMS ANY WARRANTY OF
MERCHANTABILITY OR FITNESS FOR A PARTICULAR PURPOSE. CUSTOMER’S RIGHT TO RECOVER DAMAGES CAUSED BY FAULT OR NEGLIGENCE ON THE PART OF NATIONAL
I
NSTRUMENTS SHALL BE LIMITED TO THE AMOUNT THERETOFORE PAID BY THE CUSTOMER. NATIONAL INSTRUMENTS WILL NOT BE LIABLE FOR DAMAGES RESULTING
FROM LOSS OF DATA, PROFITS, USE OF PRODUCTS, OR INCIDENTAL OR CONSEQUENTIAL DAMAGES, EVEN IF ADVISED OF THE POSSIBILITY THEREOF. This limitation of
the liability of National Instruments will apply regardless of the form of action, whether in contract or tort, including negligence. Any action against
National Instruments must be brought within one year after the cause of action accrues. National Instruments shall not be liable for any delay in
performance due to causes beyond its reasonable control. The warranty provided herein does not cover damages, defects, malfunctions, or service
failures caused by owner’s failure to follow the National Instruments installation, operation, or maintenance instructions; owner’s modification of the
product; owner’s abuse, misuse, or negligent acts; and power failure or surges, fire, flood, accident, actions of third parties, or other events outside
reasonable control.
Copyright
Under the copyright laws, this publication may not be reproduced or transmitted in any form, electronic or mechanical, including photocopying,
recording, storing in an information retrieval system, or translating, in whole or in part, without the prior written consent of National
Instruments Corporation.
National Instruments respects the intellectual property of others, and we ask our users to do the same. NI software is protected by copyright and other
intellectual property laws. Where NI software may be used to reproduce software or other materials belonging to others, you may use NI software only
to reproduce materials that you may reproduce in accordance with the terms of any applicable license or other legal restriction.
Trademarks
National Instruments, NI, ni.com, and LabVIEW are trademarks of National Instruments Corporation. Refer to the Terms of Use section
on
ni.com/legal for more information about National Instruments trademarks.
Other product and company names mentioned herein are trademarks or trade names of their respective companies.
Patents
For patents covering National Instruments products, refer to the appropriate location: Help»Patents in your software, the patents.txt file
on your CD, or
ni.com/patents.
WARNING REGARDING USE OF NATIONAL INSTRUMENTS PRODUCTS
(1) NATIONAL INSTRUMENTS PRODUCTS ARE NOT DESIGNED WITH COMPONENTS AND TESTING FOR A LEVEL OF
RELIABILITY SUITABLE FOR USE IN OR IN CONNECTION WITH SURGICAL IMPLANTS OR AS CRITICAL COMPONENTS IN
ANY LIFE SUPPORT SYSTEMS WHOSE FAILURE TO PERFORM CAN REASONABLY BE EXPECTED TO CAUSE SIGNIFICANT
INJURY TO A HUMAN.
(2) IN ANY APPLICATION, INCLUDING THE ABOVE, RELIABILITY OF OPERATION OF THE SOFTWARE PRODUCTS CAN BE
IMPAIRED BY ADVERSE FACTORS, INCLUDING BUT NOT LIMITED TO FLUCTUATIONS IN ELECTRICAL POWER SUPPLY,
COMPUTER HARDWARE MALFUNCTIONS, COMPUTER OPERATING SYSTEM SOFTWARE FITNESS, FITNESS OF COMPILERS
AND DEVELOPMENT SOFTWARE USED TO DEVELOP AN APPLICATION, INSTALLATION ERRORS, SOFTWARE AND HARDWARE
COMPATIBILITY PROBLEMS, MALFUNCTIONS OR FAILURES OF ELECTRONIC MONITORING OR CONTROL DEVICES,
TRANSIENT FAILURES OF ELECTRONIC SYSTEMS (HARDWARE AND/OR SOFTWARE), UNANTICIPATED USES OR MISUSES, OR
ERRORS ON THE PART OF THE USER OR APPLICATIONS DESIGNER (ADVERSE FACTORS SUCH AS THESE ARE HEREAFTER
COLLECTIVELY TERMED “SYSTEM FAILURES”). ANY APPLICATION WHERE A SYSTEM FAILURE WOULD CREATE A RISK OF
HARM TO PROPERTY OR PERSONS (INCLUDING THE RISK OF BODILY INJURY AND DEATH) SHOULD NOT BE RELIANT SOLELY
UPON ONE FORM OF ELECTRONIC SYSTEM DUE TO THE RISK OF SYSTEM FAILURE. TO AVOID DAMAGE, INJURY, OR DEATH,
THE USER OR APPLICATION DESIGNER MUST TAKE REASONABLY PRUDENT STEPS TO PROTECT AGAINST SYSTEM FAILURES,
INCLUDING BUT NOT LIMITED TO BACK-UP OR SHUT DOWN MECHANISMS. BECAUSE EACH END-USER SYSTEM IS
CUSTOMIZED AND DIFFERS FROM NATIONAL INSTRUMENTS' TESTING PLATFORMS AND BECAUSE A USER OR APPLICATION
DESIGNER MAY USE NATIONAL INSTRUMENTS PRODUCTS IN COMBINATION WITH OTHER PRODUCTS IN A MANNER NOT
EVALUATED OR CONTEMPLATED BY NATIONAL INSTRUMENTS, THE USER OR APPLICATION DESIGNER IS ULTIMATELY
RESPONSIBLE FOR VERIFYING AND VALIDATING THE SUITABILITY OF NATIONAL INSTRUMENTS PRODUCTS WHENEVER
NATIONAL INSTRUMENTS PRODUCTS ARE INCORPORATED IN A SYSTEM OR APPLICATION, INCLUDING, WITHOUT
LIMITATION, THE APPROPRIATE DESIGN, PROCESS AND SAFETY LEVEL OF SUCH SYSTEM OR APPLICATION.
Page 4

Conventions
The following conventions are used in this manual:
<> Angle brackets that contain numbers separated by an ellipsis represent
a range of values associated with a bit or signal name—for example,
AO <3..0> .
» The » symbol leads you through nested menu items and dialog box options
to a final action. The sequence File»Page Setup»Options directs you to
pull down the File menu, select the Page Setup item, and select Options
from the last dialog box.
This icon denotes a note, which alerts you to important information.
This icon denotes a caution, which advises you of precautions to take to
avoid injury, data loss, or a system crash. When this symbol is marked on
the product, refer to the Read Me First: Safety and Radio-Frequency
Interference document, shipped with the product, for precautions to take.
When symbol is marked on a product it denotes a warning advising you to
take precautions to avoid electrical shock.
When symbol is marked on a product it denotes a component that may be
hot. Touching this component may result in bodily injury.
bold Bold text denotes items that you must select or click in the software, such
as menu items and dialog box options. Bold text also denotes parameter
names.
italic Italic text denotes variables, emphasis, a cross-reference, or an introduction
to a key concept. Italic text also denotes text that is a placeholder for a word
or value that you must supply.
monospace Text in this font denotes text or characters that you should enter from the
keyboard, sections of code, programming examples, and syntax examples.
This font is also used for the proper names of disk drives, paths, directories,
programs, subprograms, subroutines, device names, functions, operations,
variables, filenames and extensions, and code excerpts.
monospace bold Bold text in this font denotes the messages and responses that the computer
automatically prints to the screen. This font also emphasizes lines of code
that are different from the other examples.
Page 5

Contents
Chapter 1
About the SCXI-1581
What You Need to Get Started ......................................................................................1-1
National Instruments Documentation ............................................................................1-2
Installing Application Software, NI-DAQ, and the E/M Series DAQ Device ..............1-3
Installing the SCXI-1581 Module into the SCXI Chassis...............................1-4
Verifying the SCXI-1581 Installation............................................................................1-4
Configuring the SCXI System Software .........................................................1-4
Calibrating the SCXI-1581 ............................................................................................1-5
Chapter 2
Connecting Signals
Pin Assignments ............................................................................................................2-1
Chapter 3
Theory of Operation
Scanning Other SCXI Modules Through the SCXI-1581 .............................................3-2
Chapter 4
Using the SCXI-1581
Operation of the Current Sources ..................................................................................4-1
Connecting Resistive Devices to the SCXI-1581 ..........................................................4-1
4-Wire Configuration ......................................................................................4-2
2-Wire Configuration ......................................................................................4-3
3-Wire Resistive Sensor Connected in a 2-Wire Configuration .....................4-4
Lead-Resistance Compensation Using a 3-Wire Resistive Sensor
and Two Matched Current Sources ..............................................................4-5
Lead-Resistance Compensation Using a 3-Wire Resistive Sensor
and Two Differential Amplifiers ..................................................................4-6
Configuring Sensors in Software...................................................................................4-7
Creating an RTD Virtual Channel Using NI-DAQmx ....................................4-7
Creating a Thermistor Virtual Channel Using NI-DAQmx ............................4-8
Measuring Temperature with Resistive Transducers.....................................................4-9
RTDs................................................................................................................4-9
RTD Measurement Errors.................................................................4-9
The Relationship Between Resistance and Temperature
in RTDs ..........................................................................................4-10
© National Instruments Corporation v SCXI-1581 User Manual
Page 6

Contents
Thermistors ..................................................................................................... 4-13
Thermistor Measurement Circuits .................................................... 4-15
Resistance/Temperature Characteristic of Thermistors.................... 4-16
Appendix A
Specifications
Appendix B
Removing the SCXI-1581
Appendix C
Common Questions
Glossary
Index
Figures
Figure 1-1. SCXI-1581 to DMM Connections ........................................................ 1-4
Figure 3-1. Block Diagram of SCXI-1581 .............................................................. 3-1
Figure 4-1. 4-Wire Resistive Sensor Connected in a 4-Wire Configuration........... 4-2
Figure 4-2. 2-Wire Resistive Sensor Connected in a 2-Wire Configuration........... 4-3
Figure 4-3. 3-Wire Resistive Sensor Connected in a 2-Wire Configuration........... 4-4
Figure 4-4. 3-Wire Configuration Using Matched Current Sources ....................... 4-5
Figure 4-5. 3-Wire Configuration Using Two Differential Amplifiers ................... 4-6
Figure 4-6. 2-Wire RTD Measurement ................................................................... 4-10
Figure 4-7. Resistance-Temperature Curve for a 100 Ω Platinum RTD,
α = 0.00385..........................................................................................4-11
Figure 4-8. Resistance-Temperature Curve for a 2,252 Ω Thermistor.................... 4-14
Figure 4-9. Thermistor Measurement with Constant Current Excitation ................ 4-15
Figure A-1. SCXI-1581 Dimensions........................................................................ A-2
Figure B-1. Removing the SCXI-1581..................................................................... B-2
SCXI-1581 User Manual vi ni.com
Page 7

Tables
Contents
Table 2-1. Front Signal Pin Assignments ..............................................................2-2
Table 2-2. Signal Descriptions................................................................................2-3
Table 2-3. Rear Signal Pin Assignments ................................................................2-4
Table 2-4. SCXI-1581 Communication Signals .....................................................2-5
Table 4-1. Platinum RTD Types.............................................................................4-12
Table C-1. SCXI-1581 Digital Signals....................................................................C-3
© National Instruments Corporation vii SCXI-1581 User Manual
Page 8

About the SCXI-1581
The SCXI-1581 module provides 32 channels of 100 µA current excitation.
You can use the SCXI-1581 in any application that requires 100 µA fixed
current excitation. For example you can use the SCXI-1581 to provide
excitation to resistive transducers such as RTDs and thermistors. This
enables other input devices such as the SCXI-1102/B/C to measure the
output of the transducers.
What You Need to Get Started
To set up and use the SCXI-1581, you need the following items:
❑ Hardware
– SCXI-1581 module
– One of the following terminal blocks:
• SCXI-1300
terminal connectivity.
• SCXI-1310—custom kit for custom connectivity.
• BNC-2095—rack-mount terminal block for BNC
connectivity.
• TBX-96—DIN EN mount terminal block with screw terminal
connectivity.
– SCXI or PXI/SCXI combo chassis
– E/M Series DAQ device
– Computer
– Cabling, cable adapter, and sensors as required for your
application
1
1
—front-mount terminal block with screw
1
When connected to an SCXI-1581, you cannot measure the onboard temperature sensor.
© National Instruments Corporation 1-1 SCXI-1581 User Manual
Page 9

Chapter 1 About the SCXI-1581
❑ Software
– NI-DAQ 7.0 or later
– Application software, such as LabVIEW, LabWindows
Measurement Studio, or other programming environments
❑ Documentation
– Read Me First: Safety and Radio-Frequency Interference
– DAQ Getting Started Guide
– SCXI Quick Start Guide
– SCXI-1581 User Manual
– Documentation for your hardware
– Documentation for your software
❑ Tools
– Wire cutter
– Wire stripper
– Flathead screwdriver
– Phillips screwdriver
™
/CVI™,
National Instruments Documentation
The SCXI-1581 User Manual is one piece of the documentation set for data
acquisition (DAQ) systems. You could have any of several types of
manuals depending on the hardware and software in the system. Use the
manuals you have as follows:
• The SCXI Quick Start Guide—This document contains a quick
overview for setting up an SCXI chassis, installing SCXI modules and
terminal blocks, and attaching sensors. It also describes setting up the
SCXI system in MAX.
• SCXI or PXI/SCXI chassis manual—Read this manual for
maintenance information on the chassis and for installation
instructions.
• The DAQ Getting Started Guide—This document has information on
installing NI-DAQ and the E/M Series DAQ device. Install these
before you install the SCXI module.
• The SCXI hardware user manuals—Read these manuals for detailed
information about signal connections and module configuration. They
SCXI-1581 User Manual 1-2 ni.com
Page 10

Chapter 1 About the SCXI-1581
also explain, in greater detail, how the module works and contain
application hints.
• Accessory installation guides or manuals—Read the terminal block
and cable assembly installation guides. They explain how to physically
connect the relevant pieces of the system. Consult these guides when
you are making the connections.
• The E/M Series DAQ device documentation—This documentation has
detailed information about the DAQ device that plugs into or is
connected to the computer. Use this documentation for hardware
installation and configuration instructions, specification information
about the DAQ device, and application hints.
• Software documentation—You may have both application software
and NI-DAQ software documentation. National Instruments (NI)
application software includes LabVIEW, LabWindows/CVI, and
Measurement Studio. After you set up the hardware system, use either
your application software documentation or the NI-DAQ
documentation to help you write your application. If you have a large,
complex system, it is worthwhile to look through the software
documentation before you configure the hardware.
• One or more of the following help files for software information:
– Start»Programs»National Instruments»NI-DAQ»
NI-DAQmx Help
– Start»Programs»National Instruments»NI-DAQ»
Traditional NI-DAQ User Manual
– Start»Programs»National Instruments»NI-DAQ»
Traditional NI-DAQ Function Reference Help
You can download NI documents from
the latest version of NI-DAQ, click Download Software at
ni.com/manuals. To download
ni.com.
Installing Application Software, NI-DAQ, and the E/M Series DAQ Device
Refer to the DAQ Getting Started Guide packaged with the NI-DAQ
software to install your application software, NI-DAQ driver software, and
the DAQ device to which you will connect the SCXI-1581. NI-DAQ 7.0 or
later is required to configure and program the SCXI-1581 module. If you
do not have NI-DAQ 7.0 or later, you can either contact an NI sales
representative to request it on a CD or download the latest NI-DAQ version
from
ni.com.
© National Instruments Corporation 1-3 SCXI-1581 User Manual
Page 11

Chapter 1 About the SCXI-1581
Note Refer to the Read Me First: Safety and Radio-Frequency Interference document
before removing equipment covers or connecting or disconnecting any signal wires.
Installing the SCXI-1581 Module into the SCXI Chassis
Refer to the SCXI Quick Start Guide to install your SCXI-1581 module.
Verifying the SCXI-1581 Installation
The SCXI-1581 has no software configurable settings in MAX for use with
either NI-DAQmx or Traditional NI-DAQ (Legacy).
To verify the functionality of the SCXI-1581 complete the following steps
while referring to Figure 1-1:
1. Connect a high-precision DMM to each Ex (x)+ and Ex (x)– channel,
configured in current measurement mode.
2. Verify that the output is 100 µA and is within the specifications listed
in Appendix A, Specifications.
3. If any channel is not within specifications, ensure that the SCXI
chassis is functioning properly.
4. If the module is still not within specifications, contact NI for further
technical assistance. NI contact information is listed in the Technical
Support Information document.
DMM
Current In
COM/GND
Figure 1-1. SCXI-1581 to DMM Connections
SCXI-1581
Ex (x )+
Ex (x )–
Configuring the SCXI System Software
Refer to the SCXI Quick Start Guide and the user manuals of the modules
in your application to configure and verify them in software.
SCXI-1581 User Manual 1-4 ni.com
Page 12

Calibrating the SCXI-1581
The SCXI-1581 is within the specifications described in Appendix A,
Specifications, when it is shipped. You can verify that the SCXI-1581 is
within the specification using a DMM of appropriate accuracy for your
application. If a current source on the SCXI-1581 drifts out of specification
over time, a subcomponent has likely failed. If the SCXI-1581 fails to
operate according to the published specifications, send it back to NI for
repair or replacement. For information about contacting NI, refer to the
Technical Support Information document.
Chapter 1 About the SCXI-1581
© National Instruments Corporation 1-5 SCXI-1581 User Manual
Page 13

Connecting Signals
This chapter discusses signal connections to using the SCXI-1581 module.
Pin Assignments
The pin assignments for the SCXI-1581 front signal connector are shown
in Table 2-1.
Note Do not make any connections to RSVD pins.
2
© National Instruments Corporation 2-1 SCXI-1581 User Manual
Page 14

Chapter 2 Connecting Signals
Table 2-1. Front Signal Pin Assignments
Front Connector Diagram Pin Number Column A Column B Column C
32 NC EX0– EX0+
Column
A B C
32
31
30
29
28
27
26
25
24
23
22
21
20
19
18
17
16
15
14
13
12
11
10
9
8
7
6
5
4
3
2
1
NC means no connection 2 CGND EX30– EX30+
RSVD means reserved 1 RSVD EX31– EX31+
31 NC EX1– EX1+
30 NC EX2– EX2+
29 NC EX3– EX3+
28 RSVD EX4– EX4+
27 RSVD EX5– EX5+
26 RSVD EX6– EX6+
25 RSVD EX7– EX7+
24 NC EX8– EX8+
23 NC EX9– EX9+
22 NC EX10– EX10+
21 NC EX11– EX11+
20 RSVD EX12– EX12+
19 RSVD EX13– EX13+
18 NC EX14– EX14+
17 NC EX15– EX15+
16 NC EX16– EX16+
15 NC EX17– EX17+
14 NC EX18– EX18+
13 NC EX19– EX19+
12 NC EX20– EX20+
11 NC EX21– EX21+
10 NC EX22– EX22+
9 NC EX23– EX23+
8 NC EX24– EX24+
7 NC EX25– EX25+
6 NC EX26– EX26+
5 NC EX27– EX27+
4 NC EX28– EX28+
3 NC EX29– EX29+
SCXI-1581 User Manual 2-2 ni.com
Page 15

Chapter 2 Connecting Signals
Table 2-2. Signal Descriptions
Pin Signal Name Description
A1, A19, A20,
A25–28
RSVD Reserved—this pin is reserved. Do not connect
any signal to this pin.
A2 CGND Chassis Ground—connects to the SCXI chassis.
B1–32 EX<0..31>– Negative Excitation—connects to the channel
ground reference. This is the return path for the
corresponding EX+ channel.
C1–32 EX<0..31>+ Positive excitation—connects to the positive
current output of the channel.
The rear signal connector, shown in Table 2-3, is used for analog signal
connectivity and communication between the SCXI-1581 and the
E/M Series DAQ device. Grounding signals AIGND and OUTREF provide
reference signals needed in the various analog input referencing modes on
the E/M Series DAQ device. In multiplexed mode, the CH0 signal pair is
used for sending analog signals from other modules to the connected
E/M Series DAQ device. If the module is directly connected to the
E/M Series DAQ device, the other analog channels of the E/M Series DAQ
device are available for general-purpose analog input because they are not
connected to the SCXI-1581 in multiplexed mode.
The communication signals between the E/M Series DAQ device and the
SCXI system are SERDATIN, SERDATOUT, DAQD*/A, SLOT0SEL*,
SERCLK, and SCANCLK. The digital ground, DIGGND on pins
24 and 33, provides a separate ground reference for the communication
signals. SERDATIN, SERDATOUT, DAQD*/A, SLOT0SEL*, and
SERCLK are the communication lines for programming the SCXI-1581.
The SCANCLK and SYNC signals are the signals necessary for
multiplexed mode scanning. If the E/M Series DAQ device is connected to
the SCXI-1581, these digital lines are unavailable for general-purpose
digital I/O.
© National Instruments Corporation 2-3 SCXI-1581 User Manual
Page 16

Chapter 2 Connecting Signals
Rear Connector
Diagram
12
34
56
78
910
11 12
13 14
15 16
17 18
19 20
21 22
23 24
25 26
27 28
29 30
31 32
33 34
35 36
37 38
39 40
41 42
43 44
45 46
47 48
49 50
Table 2-3. Rear Signal Pin Assignments
Signal Name Pin Number Pin Number Signal Name
AI GND 1 2 AI GND
CH 0 + 3 4 CH 0 –
— 5 6 —
— 7 8 —
— 9 10 —
— 11 12 —
— 13 14 —
— 15 16 —
— 17 18 —
OUT REF 19 20 —
— 21 22 —
— 23 24 DIG GND
SER DAT IN 25 26 SER DAT OUT
DAQ D*/A 27 28 —
SLOT 0 SEL* 29 30 —
— 31 32 —
DIG GND 33 34 —
— 35 36 AI HOLD COMP,
AI HOLD
SER CLK 37 38 —
— 39 40 —
— 41 42 —
— 43 44 —
— 45 46 SYNC
— 47 48 —
— 49 50 —
SCXI-1581 User Manual 2-4 ni.com
Page 17

Chapter 2 Connecting Signals
The communication signals between the DAQ device and the SCXI system
are listed in Table 2-4. If the DAQ device is connected to the SCXI-1581,
these digital lines are unavailable for general-purpose digital I/O.
Table 2-4. SCXI-1581 Communication Signals
NI-DAQmx
SCXI
Pin
24, 33 DIG GND D GND DGND — Digital ground—these
25 SER DAT IN P0.0 DIO0 Input Serial data in—this
26 SER DAT OUT P0.4 DIO4 Output Serial data out—this
27 DAQ D*/A P0.1 DIO1 Input Board data/address
29 SLOT 0 SEL* P0.2 DIO2 Input Slot 0 select—this
Signal Name
Device Signal
Name
Traditional NI-DAQ
(Legacy) Device
Signal Name
Direction Description
pins supply the
reference for
E/M Series DAQ device
digital signals and are
connected to the
module digital ground.
signal taps into the
SCXIbus MOSI line to
send serial input data to
a module or Slot 0.
signal taps into the
SCXIbus MISO line to
accept serial output data
from a module.
line—this signal taps
into the SCXIbus D*/A
line to indicate to the
module whether the
incoming serial stream
is data or address
information.
signal taps into the
SCXIbus INTR* line to
indicate whether the
information on MOSI is
being sent to a module
or Slot 0.
© National Instruments Corporation 2-5 SCXI-1581 User Manual
Page 18

Chapter 2 Connecting Signals
Table 2-4. SCXI-1581 Communication Signals (Continued)
NI-DAQmx
SCXI
Pin
36 SCAN CLK AI HOLD COMP,
37 SER CLK EXT STROBE* EXTSTROBE* Input Serial clock—this
Signal Name
Device Signal
Name
AI HOLD
Traditional NI-DAQ
(Legacy) Device
Signal Name
SCANCLK Input Scan clock—a rising
Direction Description
edge indicates to the
scanned SCXI module
that the E/M Series
DAQ device has taken a
sample and causes the
module to advance
channels.
signal taps into the
SCXIbus SPICLK line
to clock the data on the
MOSI and MISO lines.
SCXI-1581 User Manual 2-6 ni.com
Page 19

Theory of Operation
This chapter provides a brief overview and a detailed discussion of the
circuit features of the SCXI-1581 module. Refer to Figure 3-1 while
reading this section.
3
SCXI-1300
Terminal Block
CH 0 +
CH 0 –
Screw
Terminals
to
Field
Wiring
CH31 +
CH31 –
SCXI-1581 Module
100
100
Buffer
To
Analog
Bus
Analog Bus
Switch
Digital Interface
and Control
CH 0 +
CH 0 –
Scan
Clock
AB 0 +
AB 0 –
Rear Signal Connector
SCXIbus Connector
Figure 3-1. Block Diagram of SCXI-1581
© National Instruments Corporation 3-1 SCXI-1581 User Manual
Page 20

Chapter 3 Theory of Operation
Scanning Other SCXI Modules Through the SCXI-1581
When connected as the cabled module in an SCXI chassis, the SCXI-1581
can route the multiplexed signals from other SCXI modules to the
E/M Series DAQ device. The SCXI-1581 routes multiplexed signals from
other SCXI modules to the E/M Series DAQ device even though the
SCXI-1581 does not have any analog-input channels. Refer to the user
manuals for your other SCXI modules for details about scanning those
modules in multiplexed mode.
SCXI-1581 User Manual 3-2 ni.com
Page 21

Using the SCXI-1581
This chapter makes suggestions for developing your application.
Operation of the Current Sources
The current sources on the SCXI-1581 continuously provide 32 channels
of 100 µA current excitation. These current sources are on whenever the
SCXI chassis is powered-on. The current sources on the SCXI-1581 are
designed to be accurate to within ±0.05% of the specified value with a
temperature drift of no more than ±5 ppm/°C. The high accuracy and
stability of these current sources makes them especially well suited to
measuring resistance to a high degree of accuracy.
Connecting Resistive Devices to the SCXI-1581
You can connect resistive devices to the SCXI signal conditioning system
in a 4-, 2-, or 3-wire configuration. The SCXI-1102/B/C modules are
32-channel analog-input modules that are ideally suited for measuring DC
or slowly varying voltages. Figures 4-1 through 4-5 illustrate various ways
to connect sensors for current excitation and voltage measurements using
the SCXI-1581 and the SCXI-1102B/C modules.
4
Refer to the appropriate ADE and SCXI documentation for information
concerning setting appropriate voltage gains for the analog inputs.
You can use the SCXI-1300 terminal block to make signal connections to
the SCXI-1581 and SCXI-1102 modules. When using the SCXI-1300
terminal block, terminals EX<0..31>+ and EX<0..31> – map to terminals
CH<0..31>+ and CH<0..31>– respectively on the SCXI-1300 terminal
block.
© National Instruments Corporation 4-1 SCXI-1581 User Manual
Page 22

Chapter 4 Using the SCXI-1581
4-Wire Configuration
The 4-wire configuration, also referred to as a Kelvin connection, is shown
in Figure 4-1. The 4-wire configuration uses one pair of wires to deliver the
excitation current to the resistive sensor and uses a separate pair of wires to
sense the voltage across the resistive sensor. Because of the high input
impedance of the differential amplifier, negligible current flows through
the sense wires. This results in a very small lead-resistance voltage drop
error. The main disadvantage of the 4-wire connection is the greater
number of field wires required.
R
L1
R
L2
R
T
R
L3
R
L4
RL1, RL2, RL3, and R
are not required to be equal
L4
SCXI-1300
EX0+
EX0–
SCXI-1300
CH0+
CH0–
SCXI-1581
SCXI-1102
+
–
Figure 4-1. 4-Wire Resistive Sensor Connected in a 4-Wire Configuration
SCXI-1581 User Manual 4-2 ni.com
Page 23

2-Wire Configuration
The basic 2-wire configuration is shown in Figure 4-2. In this configuration
an error voltage (V
excitation current (I
R
the error voltage is:
This is the most commonly used configuration for connecting thermistors
to a signal conditioning system because the large sensitivity of thermistors
usually results in the introduction of a negligible error by the lead
resistances.
RTDs typically have a much smaller sensitivity and nominal resistance than
thermistors, therefore a 2-wire configuration usually results in the
introduction of larger errors by the lead resistance.
Chapter 4 Using the SCXI-1581
) is introduced into the measurement equal to the
E
) times the sum of the two lead resistances, RL1 and
EX
. If we assume equal lead resistances, RL1= RL2= RL, the magnitude of
L2
V
2RLI
=
E
EX
R
L1
R
T
R
L2
Add These
Connections
In this configuration, the lead resistance due to R
and RL2 can introduce measurement error.
Figure 4-2. 2-Wire Resistive Sensor Connected in a 2-Wire Configuration
SCXI-1300
EX0+
EX0–
SCXI-1300
CH0+
CH0–
L1
SCXI-1581
SCXI-1102
+
–
© National Instruments Corporation 4-3 SCXI-1581 User Manual
Page 24

Chapter 4 Using the SCXI-1581
3-Wire Resistive Sensor Connected in a 2-Wire Configuration
If you are using a 3-wire resistive sensor, you can reduce the error voltage
by one-half over the 2-wire measurement by connecting the device as
shown in Figure 4-3. In this configuration, very little current flows through
R
and therefore RL1 is the only lead resistance that introduces an error into
L3
the measurement. The resulting measurement error is:
VE RL1I
=
EX
An advantage of this configuration is that it only requires a single jumper
wire from the SCXI-1581 EX0+ terminal to the SCXI-1102B/C CH0+
terminal.
R
L1
R
T
R
L2
Add This
Connection
R
L3
In this configuration, the lead resistance due to
R
can introduce measurement error.
L1
Figure 4-3. 3-Wire Resistive Sensor Connected in a 2-Wire Configuration
EX0+
EX0–
CH0+
CH0–
SCXI-1300
SCXI-1300
SCXI-1581
SCXI-1102
+
–
SCXI-1581 User Manual 4-4 ni.com
Page 25

Chapter 4 Using the SCXI-1581
Lead-Resistance Compensation Using a 3-Wire Resistive Sensor and
Two Matched Current Sources
You can compensate for the errors introduced by lead-resistance voltage
drops by using a 3-wire resistive sensor and two matched current sources
connected as shown in Figure 4-4.
Assume
R
= R
L1
L2
R
T
Add These
Connections
R
L1
R
L2
R
L3
SCXI-1300
EX0+
EX1+
EX0–
SCXI-1300
CH0+
CH0–
SCXI-1581
SCXI-1102
+
–
Figure 4-4. 3-Wire Configuration Using Matched Current Sources
In this configuration, the lead-resistance voltage drop across RL3 is
converted into a common-mode voltage that is rejected by the differential
amplifier. Also, the polarity of the lead-resistance voltage drops across R
and R
are series opposing, relative to the inputs of the differential
L2
amplifier, eliminating their effect on the voltage measured across R
L1
.
T
Note R
and RL2 are assumed to be equal.
L1
The effectiveness of this method depends on the matching of the current
sources. Each current source on the SCXI-1581 has an accuracy of ±0.05%.
This accuracy results in a worst-case matching of ±0.1%. Refer to the
Measuring Temperature with Resistive Transducers section for accuracy
considerations of RTDs and thermistors.
© National Instruments Corporation 4-5 SCXI-1581 User Manual
Page 26

Chapter 4 Using the SCXI-1581
Lead-Resistance Compensation Using a 3-Wire Resistive Sensor and
Two Differential Amplifiers
If the accuracy obtained by using a 3-wire device and matched current
sources is not sufficient for your application, you can eliminate the error
due to the mismatch of the current sources by using only one current source
and two differential amplifiers. The 3-wire, 2-amplifier configuration is
illustrated in Figure 4-5.
Add These
Connections
R
L1
R
T
R
L2
R
L3
SCXI-1300
EX0+
EX0–
SCXI-1300
CH0+
CH0–
CH1+
CH1–
SCXI-1581
SCXI-1102
+
–
V
1 = VRL1 + VRT
+
–
V
Figure 4-5. 3-Wire Configuration Using Two Differential Amplifiers
In this configuration, two separate measurements are taken; the first,
labeled V
resistance R
R
is denoted as V
T
in Figure 4-5, is the sum of the voltage drops across the lead
1
and the resistive device RT. If the voltage drop across RL1 and
L1
and VRT respectively, the expression for V1 becomes:
RL1
2 = VRL2
V1V
SCXI-1581 User Manual 4-6 ni.com
+=
RL1VRT
Page 27

Chapter 4 Using the SCXI-1581
The second measurement, labeled V2 in Figure 4-5, is equal to the voltage
drop across the lead resistance R
, denoted as V
L2
V
=
V
2
RL2
; therefore:
RL2
If the lead resistances R
and RL2 are assumed equal, you can remove in
L1
software the error voltages due to the lead resistances by subtracting V
from V
. In most 3-wire device applications the lead wires are all the same
1
length and made of the same material, therefore substantiating the
assumption of equal lead resistances.
Configuring Sensors in Software
You can create a virtual channel to convert RTD voltages into temperature
readings. To create an RTD virtual channel, refer to the Creating an RTD
Virtual Channel Using NI-DAQmx section.
Creating an RTD Virtual Channel Using NI-DAQmx
To create an RTD virtual channel using NI-DAQmx, complete the
following steps:
1. Launch MAX.
2. Right-click Data Neighborhood and select Create New.
3. Select NI-DAQmx Global Virtual Channel and click Next.
4. Select Analog Input»Temperature»RTD.
5. Select the analog input device and channel to use, and click Next.
6. Enter a name for the virtual channel and click Finish.
7. In the configuration window that opens, set the following properties:
• Signal input range—set the min and max to correspond to the
measurement range of your application in terms of units that you
select under Scaled Units.
• RTD type—refer to Table 4-1 for a list of RTD types.
•R
—the nominal resistance value of the RTD.
0
• Configuration—how the RTD is connected.
•I
source—select External when connected to an SCXI-1581.
ex
value (A)—100 µ when connected to the SCXI-1581.
•I
ex
2
© National Instruments Corporation 4-7 SCXI-1581 User Manual
Page 28

Chapter 4 Using the SCXI-1581
8. Click the device tab and set any device specific properties that are
applicable for the measurement device.
9. To test the NI-DAQmx RTD virtual channel, click the Test button.
You have finished creating the NI-DAQmx virtual channel. You can access
the channel by expanding Data Neighborhood»NI-DAQmx Channels.
For more information about incorporating the virtual channel into a task
with the application, refer to the user manual of the analog input device to
which the sensor connects.
Creating a Thermistor Virtual Channel Using NI-DAQmx
To create an thermistor virtual channel using NI-DAQmx, complete the
following steps:
1. Launch MAX.
2. Right-click Data Neighborhood and select Create New.
3. Select NI-DAQmx Global Virtual Channel and click Next.
4. Select Analog Input»Temperature»Iex Thermistor.
5. Select the analog input device and channel to which the sensor
connects, and click Next.
6. Enter a name for the virtual channel and click Finish.
7. In the configuration window that opens, set the following properties:
• Signal input range—set the min and max to correspond to the
measurement range of your application in terms of units that you
select under Scaled Units.
• A, B, C—these scaling coefficients are obtained from the
thermistor manufacturer, or calculated
resistance-versus-temperature curves.
•I
source—select External when connected to an SCXI-1581
ex
•I
value (A)—100 µ when connected to the SCXI-1581.
ex
• Configuration—the wire configuration of the sensor.
8. Click the device tab and set any device specific properties that are
applicable for the measurement device.
9. To test the NI-DAQmx thermistor virtual channel, click the Test
button.
You have finished creating the NI-DAQmx virtual channel. You can access
the channel by expanding Data Neighborhood»NI-DAQmx Channels.
SCXI-1581 User Manual 4-8 ni.com
Page 29

Chapter 4 Using the SCXI-1581
For more information about incorporating the virtual channel into a task
with the application, refer to the user manual of the analog input device to
which the sensor connects.
Measuring Temperature with Resistive Transducers
This section discusses RTDs and thermistors, and describes accuracy
considerations when connecting resistive transducers to the signal
conditioning system.
RTDs
A resistive-temperature detector (RTD) is a temperature-sensing device
whose resistance increases with temperature. An RTD consists of a wire
coil or deposited film of pure metal. RTDs are made of different metals and
have different resistances, but the most popular RTD is made of platinum
and has a nominal resistance of 100 Ω at 0 °C.
RTDs are known for their excellent accuracy over a wide temperature
range. Some RTDs have accuracies as high as 0.01 Ω (0.026 °C) at 0 °C.
RTDs are also extremely stable devices. Common industrial RTDs drift less
than 0.1 °C/year, and some models are stable to within 0.0025 °C/year.
RTDs are sometimes difficult to measure because they have relatively low
nominal resistance (commonly 100 Ω) that changes only slightly with
temperature (less than 0.4 Ω/°C). To accurately measure these small
changes in resistance, you must use special configurations that minimize
measured errors caused by lead-wire resistance.
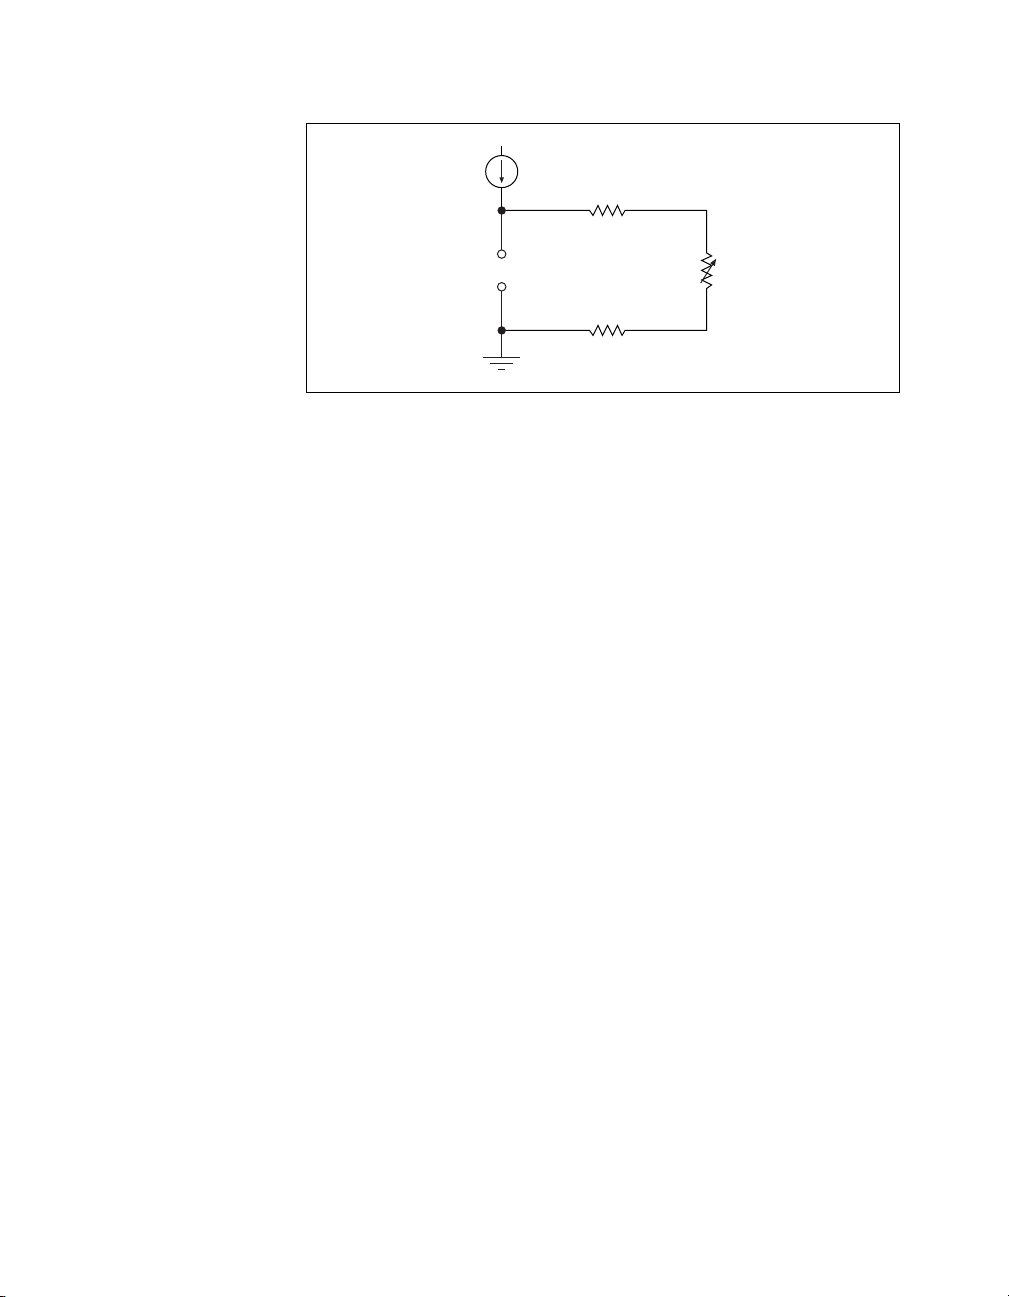
RTD Measurement Errors
Because the RTD is a resistive device, you must pass a current through the
device and monitor the resulting voltage. However, any resistance in the
lead wires that connect the measurement system to the RTD adds error to
the readings. For example, consider a 2-wire RTD element connected to a
measurement system that also supplies a constant current, I
RTD. As shown in Figure 4-6, the voltage drop across the lead resistances
(labeled R
© National Instruments Corporation 4-9 SCXI-1581 User Manual
) adds an error voltage to the measured voltage.
L
, to excite the
EX
Page 30
Chapter 4 Using the SCXI-1581
I
EX
+
V
0
–
Figure 4-6. 2-Wire RTD Measurement
R
L
R
T
R
L
The maximum resistance of the thermistor is determined from the current
excitation value and the maximum voltage range of the input device. When
using the SCXI-1581 with an SCXI-1102/B/C, the maximum measurable
resistance is 100 kΩ. Refer to Appendix A, Specifications, for the
maximum ratings.
For example, a lead resistance of 0.3 Ω in each wire adds a 0.6 Ω error to
the resistance measurement. For a platinum RTD at 0 °C with α = 0.00385,
the lead resistance equates to an error of approximately
0.6 Ω
----------------------------- 1.6 °C=
0.385 Ω/ °C
The Connecting Resistive Devices to the SCXI-1581 section describes
different ways of connecting resistive devices to the SCXI system.
The Relationship Between Resistance and Temperature in RTDs
Compared to other temperature-measurement devices, the output of an
RTD is relatively linear with respect to temperature. The temperature
coefficient, called alpha (α), differs between RTD curves. Although
various manufacturers specify alpha differently, alpha is most commonly
defined as the change in RTD resistance from 0 to 100 °C, divided by the
resistance at 0 °C, divided by 100 °C:
R
–
αΩ Ω⁄°C()⁄()
SCXI-1581 User Manual 4-10 ni.com
-----------------------------=
R
0
100R0
100 °C×
Page 31

Chapter 4 Using the SCXI-1581
where
R
is the resistance of the RTD at 100 °C.
100
R
is the resistance of the RTD at 0 °C.
0
For example, a 100 Ω platinum RTD with α = 0.003911 has a resistance of
139.11 Ω at 100 °C.
Figure 4-7 displays a typical resistance-temperature curve for a 100 Ω
platinum RTD.
480
400
320
240
160
80
320 400 480 560 640 720 800 8800 80 160 240 960
Figure 4-7. Resistance-Temperature Curve for a 100 Ω Platinum RTD, α = 0.00385
Although the resistance-temperature curve is relatively linear, accurately
converting measured resistance to temperature requires curve fitting. The
following Callendar-Van Dusen equation is commonly used to approximate
the RTD curve:
RTR01 AT BT2CT 100–()
++ +[]=
3
© National Instruments Corporation 4-11 SCXI-1581 User Manual
Page 32

Chapter 4 Using the SCXI-1581
where
R
is the resistance of the RTD at temperature T.
T
R
is the resistance of the RTD at 0 °C.
0
A, B, and C are the Callendar-Van Dusen coefficients shown in
Tabl e 4 -1 .
T is the temperature in °C.
Table 4-1 lists the RTD types and their corresponding coefficients.
Table 4-1. Platinum RTD Types
Standard
IEC-751
DIN 43760
BS 1904
ASTM-E1137
Temperature Coefficient of
Resistance (TCR, PPM)
3851 100 Ω
Typical R
1000 Ω
Callendar-Van Dusen
0
Coefficient
A = 3.9083 × 10
B = –5.775 × 10
C = –4.183 × 10
EN-60751
Low cost vendor
compliant
1
3750 1000 Ω A = 3.81 × 10
B = –6.02 × 10
C = –6.0 × 10
–3
–12
JISC 1604 3916 100 Ω A = 3.9739 × 10
B = –5.870 × 10
–12
US Industrial
Standard D-100
American
C = –4.4 × 10
3920 100 Ω A = 3.9787 × 10
B = –5.8686 × 10
C = –4.167 × 10
US Industrial
Standard American
3911 100 Ω A = 3.9692 × 10
B = –5.8495 × 10
C = –4.233 × 10
ITS-90 3928 100 Ω A = 3.9888 × 10
B = –5.915 × 10
C = –3.85 × 10
1
No standard. Check TCR.
–3
–7
–12
–7
–3
–7
–3
–7
–12
–3
–7
–12
–3
–7
–12
SCXI-1581 User Manual 4-12 ni.com
Page 33

Thermistors
Chapter 4 Using the SCXI-1581
For temperatures above 0 °C, coefficient C equals 0, reducing this equation
to a quadratic. If you pass a known current, I
measure the output voltage developed across the RTD, V
, through the RTD and
EX
, you can solve
0
for T as follows:
V
0
-------
R
–
0
I
T
------------------------------------------------------------------------------------------------=
–0.5 R
AR
0
EX
2
A24R0BR
–+
0
V
0
-------–
0
I
EX
where
V
is the measured RTD voltage.
0
I
is the excitation current.
EX
A thermistor is a piece of semiconductor made from metal oxides, pressed
into a small bead, disk, wafer, or other shape, sintered at high temperatures,
and finally coated with epoxy or glass. The resulting device exhibits an
electrical resistance that varies with temperature.
There are two types of thermistors: negative temperature coefficient (NTC)
thermistors, whose resistance decreases with increasing temperature, and
positive temperature coefficient (PTC) thermistors, whose resistance
increases with increasing temperature. NTC thermistors are more
commonly used than PTC thermistors, especially for temperature
measurement applications.
A main advantage of thermistors for temperature measurement is their
extremely high sensitivity. For example, a 2,252 Ω thermistor has a
sensitivity of –100 Ω/°C at room temperature. Higher resistance
thermistors can exhibit temperature coefficients of –10 kΩ/°C or more.
In comparison, a 100 Ω platinum RTD has a sensitivity of only 0.4 Ω/°C.
Also, the physically small size and low thermal mass of a thermistor bead
allows a very fast response to temperature changes.
Another advantage of the thermistor is its relatively high resistance.
Thermistors are available with base resistances (at 25 °C) ranging from
hundreds to millions of ohms. This high resistance diminishes the effect of
inherent resistances in the lead wires, which can cause significant errors
with low resistance devices such as RTDs. For example, while RTD
measurements typically require 3- or 4-wire connections to reduce errors
© National Instruments Corporation 4-13 SCXI-1581 User Manual
Page 34

Chapter 4 Using the SCXI-1581
10 M
caused by lead-wire resistances, 2-wire connections to thermistors are
usually adequate.
The major trade-off for the high resistance and sensitivity of the thermistor
is its highly nonlinear output and relatively limited operating range.
Depending on the type of thermistor, the upper range is typically limited to
around 300 °C. Figure 4-8 shows the resistance-temperature curve for a
2,252 Ω thermistor. The curve of a 100 Ω RTD is also shown for
comparison.
1 M
100 k
10 k
1 k
Resistance (Ω)
100
10
1
–200 –150 –100 –50 0 50 100 150 200 250 300 350 400
Thermistor
(2,252 Ω at 25 °C)
Temperature (°C)
RTD
(PT 100 Ω)
Figure 4-8. Resistance-Temperature Curve for a 2,252 Ω Thermistor
The thermistor has been used primarily for high-resolution measurements
over limited temperature ranges. However, continuing improvements in
thermistor stability, accuracy, and interchangeability have prompted
increased use of thermistors in a variety of applications.
SCXI-1581 User Manual 4-14 ni.com
Page 35

Chapter 4 Using the SCXI-1581
Thermistor Measurement Circuits
This section details information about thermistor measurement circuits.
The most common technique is to use a current-source, and measure the
voltage developed across the thermistor. Figure 4-9 shows the measured
voltage V
The level of the voltage output signal depends directly on the thermistor
resistance and magnitude of the current excitation. Do not use a higher level
of current excitation in order to produce a higher level output signal
because the current causes the thermistor to heat internally, leading to
temperature-measurement errors. This phenomena is called self-heating.
When current passes through the thermistor, power dissipated by the
thermistor equaling (I
equals IEX × RT.
0
I
EX
+
V
0
–
V0 = I
x R
EX
R
T
Thermistor
T
Figure 4-9. Thermistor Measurement with Constant Current Excitation
2
RT), heats the thermistor.
EX
Thermistors, with their small size and high resistance, are particularly
prone to these self-heating errors. Manufacturers typically specify this
self-heating as a dissipation constant, which is the power required to heat
the thermistor 1 °C from ambient temperature (mW/°C). The dissipation
constant depends heavily on how easily heat is transferred away from the
thermistor, so the dissipation constant can be specified for different
media—in still air, water, or oil bath. Typical dissipation constants range
anywhere from less than 0.5 mW/°C for still air to 10 mW/°C or higher for
a thermistor immersed in water. A 2,252 Ω thermistor powered by a
100 µA excitation current dissipates:
I2R 100 µA22,252 Ω× 0.0225 mW==
If this thermistor has a dissipation constant of 10 mW/°C, the thermistor
self-heats 0.00225 °C so the self-heating from the 100 µA source of the
© National Instruments Corporation 4-15 SCXI-1581 User Manual
Page 36

Chapter 4 Using the SCXI-1581
SCXI-1581 is negligible for most applications. It is still important to
carefully read self-heating specifications of the thermistors.
Resistance/Temperature Characteristic of Thermistors
The resistance-temperature behavior of thermistors is highly dependent
upon the manufacturing process. Therefore, thermistor curves are not
standardized to the extent that thermocouple or RTD curves are
standardized. Typically, thermistor manufacturers supply the
resistance-versus-temperature curves or tables for their particular devices.
You can, however, approximate the thermistor curve relatively accurately
with the Steinhart-Hart equation:
T(°K )
------------------------------------------------------------------=
abln R
++
1
()[]c ln RT()[]
T
3
where
T(°K) is the temperature in degrees Kelvin, equal to T(°C) + 273.15.
R
is the resistance of the thermistor.
T
a, b, and c are coefficients obtained from the thermistor manufacturer
or calculated from the resistance-versus-temperature curve.
SCXI-1581 User Manual 4-16 ni.com
Page 37

Specifications
This appendix lists the specifications for the SCXI-1581 modules.
These specifications are typical at 25 °C unless otherwise noted.
Stability
Recommended warm-up time ................ 10 minutes
Excitation
Channels................................................. 32 single-ended outputs
Current output ........................................100 µA
Accuracy ................................................±0.05%
Temperature drift ................................... ±5 ppm/°C
Output voltage compliance .................... 10 V
Maximum resistive load......................... 100 kΩ
A
Overvoltage protection........................... ±40 VDC
Measurement Category .......................... CAT I
Power Requirements From SCXI Backplane
V+........................................................... 18.5 to 25 VDC, 75 mA
V–........................................................... –18.5 to –25 VDC, 23 mA
+5 V........................................................ +4.75 to 5.25 VDC, 20.2 mA
© National Instruments Corporation A-1 SCXI-1581 User Manual
Page 38

Appendix A Specifications
Environmental
Physical
Operating temperature ............................0 to 50 °C
Storage temperature ................................–20 to 70 °C
Humidity.................................................10 to 90% RH, noncondensing
Maximum altitude...................................2,000 meters
Pollution Degree (indoor use only) ........2
3.0 cm
(1.2 in.)
17.2 cm
(6.8 in.)
18.8 cm
(7.4 in.)
Figure A-1. SCXI-1581 Dimensions
Weight ....................................................731 gm (25.8 oz)
SCXI-1581 User Manual A-2 ni.com
Page 39

Safety
The SCXI-1581 is designed to meet the requirements of the following
standards of safety for electrical equipment for measurement, control,
and laboratory use:
• IEC 61010-1, EN 61010-1
• UL 61010-1
• CAN/CSA-C22.2 No. 61010-1
Note For UL and other safety certifications, refer to the product label or visit
ni.com/certification, search by model number or product line, and click the
appropriate link in the Certification column.
Electromagnetic Compatibility
Emissions ............................................... EN 55011 Class A at 10 m
Immunity................................................ EN 61326:1997 + A2:2001,
EMC/EMI............................................... CE, C-Tick, and FCC Part 15
Appendix A Specifications
FCC Part 15A above 1 GHz
Table 1
(Class A) Compliant
Note For EMC compliance, operate this device with shielded cabling.
CE Compliance
The SCXI-1581 meets the essential requirements of applicable European
Directives, as amended for CE marking, as follows:
Low-Voltage Directive (safety) ............. 73/23/EEC
Electromagnetic Compatibility
Directive (EMC) .................................... 89/336/EEC
Note Refer to the Declaration of Conformity (DoC) for this product for any additional
regulatory compliance information. To obtain the DoC for this product, visit
ni.com/certification, search by model number or product line, and click the
appropriate link in the Certification column.
© National Instruments Corporation A-3 SCXI-1581 User Manual
Page 40

Removing the SCXI-1581
This appendix explains how to remove the SCXI-1581 from MAX and an
SCXI chassis or PXI/SCXI combination chassis.
Removing the SCXI-1581 from MAX
To remove a module from MAX, complete the following steps after
launching MAX:
1. Expand Devices and Interfaces.
2. Click the + next to NI-DAQmx and/or Traditional NI-DAQ Devices
to expand the list of installed chassis.
3. Click the + next to the appropriate chassis to expand the list of installed
modules.
4. Right-click the module or chassis you want to delete and click Delete.
5. A confirmation window opens. Click Yes to continue deleting the
module or chassis or No to cancel this action.
B
Note Deleting the SCXI chassis deletes all modules in the chassis. All configuration
information for these modules is also lost.
The SCXI chassis and/or SCXI module(s) should now be removed from the
list of installed devices in MAX.
Removing the SCXI-1581 from a Chassis
Consult the documentation for the chassis and accessories for additional
instructions and precautions. To remove the SCXI-1581 module from a
chassis, complete the following steps while referring to Figure B-1:
Note Figure B-1 shows an SCXI chassis, but the same steps are applicable to a PXI/SCXI
combination chassis.
© National Instruments Corporation B-1 SCXI-1581 User Manual
Page 41

Appendix B Removing the SCXI-1581
1. Power off the chassis. Do not remove the SCXI-1581 module from a
2. If the SCXI-1581 is the module cabled to the E/M Series DAQ device,
3. Remove any terminal block that connects to the SCXI-1581.
4. Rotate the thumbscrews that secure the SCXI-1581 to the chassis
Remove the SCXI-1581 by pulling steadily on both thumbscrews until the
module slides completely out.
chassis that is powered on.
disconnect the cable.
counterclockwise until they are loose, but do not completely remove
the thumbscrews.
6
5
4
S
C
X
I
1
1
0
0
1 Cable
2 SCXI Module Thumbscrews
3
3 SCXI-1581
4 Terminal Block
®
5
4
3
2
1
ADDRESS
SCXI
M
A
I
N
F
R
A
M
E
2
Figure B-1. Removing the SCXI-1581
1
5 SCXI Chassis Power Switch
6 SCXI Chassis
SCXI-1581 User Manual B-2 ni.com
Page 42

Common Questions
This appendix lists common questions related to the use of the SCXI-1581.
Which version of NI-DAQ works with the SCXI-1581, and how do I get
the most current version of NI-DAQ?
C
You must have NI-DAQ 7.0 or later. Visit the NI Web site at
select Download Software»Drivers and Updates»Search Drivers and
Updates. Enter the keyword
for your operating system.
Can the SCXI-1581 be the cabled module when there are also
multiplexed analog-input modules in the chassis?
Yes, unless one or more of the multiplexed analog-input modules in the
same chassis feature simultaneous sampling (such as the SCXI-1140,
SCXI-1520, SCXI-1530, or SCXI-1531). In that case, you must cable to a
simultaneous-sampling module.
Can the SCXI-1581 current outputs be interactively controlled in
MAX or programmatically controlled using NI-DAQ function calls,
LabVIEW, or Measurement Studio?
No. The current-output level is 100 µA as long as the chassis is powered on.
You cannot power off or adjust the current output using MAX, NI-DAQ
function calls, or an ADE such as LabVIEW or Measurement Studio. If you
require this functionality, consider using an SCXI-1124 module or NI 670X
device instead.
Can I create virtual channels for an SCXI-1581 current-output
channel?
NI-DAQ to find the latest version of NI-DAQ
ni.com and
No. As discussed above, you cannot programmatically control the current
outputs.
© National Instruments Corporation C-1 SCXI-1581 User Manual
Page 43

Appendix C Common Questions
Can I connect N current-output channels in parallel to create a
precision current source that provides N × 100 µA?
Yes, you can connect the current output in parallel. When connecting the
output in parallel, connect the appropriate EX+ terminals together and the
corresponding EX– terminals together.
Can I connect N current-output channels in series to achieve a higher
terminal-voltage compliance limit?
No. Each current source is ground referenced. Therefore, you cannot place
multiple current-outputs in series.
Are the SCXI-1581 current output channels isolated with respect to
each other, the E/M Series DAQ device, or ground?
No. The SCXI-1581 does not contain any isolation circuitry. All current
outputs are referenced to chassis ground. If you require isolated current
outputs, consider the SCXI-1124 module instead.
Can I modify the SCXI-1581 circuitry to generate current at a level
different than 100 µA?
No. Do not attempt to modify any circuitry in the SCXI-1581.
Are there any user-serviceable parts inside the SCXI-1581?
No. There are no fuses, potentiometers, switches, socketed resistors, or
jumpers inside the module. Disassembly of the module for any reason can
void its warranty and nullify its accuracy specification.
Can I access the unused analog-input channels of the E/M Series DAQ
device if it is directly cabled to the SCXI-1581 in a single-chassis
system?
Yes. E/M Series DAQ device channels 1 through 7 are available to measure
unconditioned signals. Use an SCXI-1180 or the 50-pin breakout connector
on the SCXI-1346 or SCXI-1349 cable adapter to route signals to these
channels.
SCXI-1581 User Manual C-2 ni.com
Page 44

Appendix C Common Questions
Which digital lines are unavailable on the E/M Series DAQ device if I
am cabled to an SCXI-1581 module?
Table C-1 shows the digital lines that are used by the SCXI-1581 for
communication and scanning. These lines are unavailable for
general-purpose digital I/O if the SCXI-1581 is connected to the
DAQ device.
Table C-1. SCXI-1581 Digital Signals
DAQ
Signal Name
SCXI
Signal Name
50-Pin
Connector
68-Pin
Connector
Direction
DIO0 SERDATIN 25 52 Output
DIO4 SERDATOUT 26 19 Input
DIO1 DAQD*/A 27 17 Output
DIO2 SLOT0SEL* 29 49 Output
SCANCLK SCANCLK 36 46 Output
1
With respect to the E/M Series DAQ device.
Does short-circuiting a current-output channel do any damage to the
SCXI-1581?
No. The SCXI-1581 delivers 100 µA into any load from 0 Ω to 100 kΩ.
Does open-circuiting a current-output channel damage the
SCXI-1581? What is the open-circuit voltage level?
No. An SCXI-1581 current-output channel is not damaged if no load is
connected. The open-circuit voltage is 12.4 VDC.
How can I tell if the SCXI-1581 is working?
1
Disconnect all loads from the channel you are testing. Measure the
current-output value using an ammeter. If the ammeter has a fuse, ensure
that the fuse is not blown before performing the measurement.
Alternatively, place a known resistance R (<100 kΩ) across the current
output and use a voltmeter to measure the voltage drop across it. If the
current output is functioning, you should measure
V 100 106–A×()R×=
where R is given in Ω.
© National Instruments Corporation C-3 SCXI-1581 User Manual
Page 45

Appendix C Common Questions
How does the screw-terminal labeling on the SCXI-1300 relate to the
front signal connector on the SCXI-1581? In other words, if I want to
use current-output channel x, where do I connect wires in the
SCXI-1300?
CH x + corresponds to EX x +. Likewise, CH x – corresponds to EX x –.
You cannot use any screw terminals in the SCXI-1300 other than CH x +,
CH x –, and chassis ground.
Can I use the BNC-2095 as an accessory for the SCXI-1581?
Yes. However, you must set all the slide switches on the back of the
BNC-2095 for no bias-resistor connections to ground and no pull-up
resistor connections to +5 V. In other words, set all switches on the rear of
the BNC-2095 to the OFF (down) position.
When using an SCXI-1300 or BNC-2095 with the SCXI-1581, can I
read the CJC sensor on these accessories?
No.
Can I use an SCXI-1303 terminal block as an accessory for the
SCXI-1581?
NI does not recommend this combination. The SCXI-1303 is optimized for
temperature measurement using thermocouples. The SCXI-1303 works
with the SCXI-1581, but only if you remove all of the resistor packs. Refer
to the SCXI-1303 32-Channel Isothermal Terminal Block Installation
Guide for more information. As with the SCXI-1300 and BNC-2095, you
cannot measure the CJC sensor.
SCXI-1581 User Manual C-4 ni.com
Page 46

Glossary
Symbol Prefix Value
µ micro 10
m milli 10
k kilo 10
Mmega10
Numbers/Symbols
% percent
+ positive of, or plus
– negative of, or minus
± plus or minus
< less than
–6
–3
3
6
/per
°degree
Ω ohms
+5 V (signal) +5 VDC source signal
A
A amperes
ADE application development environment such as LabVIEW,
LabWindows/CVI, Visual Basic, C, and C++
AI analog input
AIGND analog input ground signal
© National Instruments Corporation G-1 SCXI-1581 User Manual
Page 47

Glossary
B
bit one binary digit, either 0 or 1
C
CE European emissions control standard
CGND chassis ground signal
CH channel
channel pin or wire lead to which you apply, or from which you read, an analog or
digital signal. Analog signals can be single-ended or differential. For digital
signals, channels (also known as lines) are grouped to form ports.
chassis the enclosure that houses, powers, and controls SCXI modules
CLK clock input signal
common-mode voltage voltage that appears on both inputs of a differential amplifier
current excitation a source that supplies the current needed by a sensor for its proper operation
D
D/A digital-to-analog
D*/A Data/Address
DAQ data acquisition—(1) collecting and measuring electrical signals from
sensors, transducers, and test probes or fixtures and processing the
measurement data using a computer; (2) collecting and measuring the same
kinds of electrical signals with A/D and/or DIO devices plugged into a
computer, and possibly generating control signals with D/A and/or DIO
devices in the same computer
DAQ device a data acquisition device. Examples are E/M Series data acquisition
devices.
DAQD*/A the data acquisition device data/address line signal used to indicate whether
the SERDATIN pulse train transmitted to the SCXI chassis contains data or
address information
SCXI-1581 User Manual G-2 ni.com
Page 48

Glossary
device a plug-in data acquisition device, module, card, or pad that can contain
multiple channels and conversion devices. SCXI modules are distinct from
devices, with the exception of the SCXI-1200, which is a hybrid.
DGND digital ground signal
differential amplifier an amplifier with two input terminals, neither of which are tied to a ground
reference, whose voltage difference is amplified
DIN Deutsche Industrie Norme (German Industrial Standard)
DIO digital input/output
DoC Declaration of Conformity
drivers/driver
software
software that controls a specific hardware device such as an E/M Series
DAQ device
E
EMC electromagnetic compliance
EMI electromagnetic interference
EX+ positive excitation channel
EX– negative excitation channel
excitation a voltage or current source used to energize a sensor or circuit
EXTCLK external clock signal
G
gain the factor by which a signal is amplified, sometimes expressed in decibels
© National Instruments Corporation G-3 SCXI-1581 User Manual
Page 49

Glossary
I
ID identifier
in. inch or inches
input impedance the measured resistance and capacitance between the input terminals of a
circuit
J
jumper a small rectangular device used to connect two adjacent posts on a circuit
board. Jumpers are used on some SCXI modules and terminal blocks to
either select certain parameters or enable/disable circuit functionality.
L
lead resistance the small resistance of a lead wire. The resistance varies with the lead
length and ambient temperature. If the lead wire carries excitation current,
this varying resistance can cause measurement error.
M
m meters
M (1) Mega, the standard metric prefix for 1 million or 10
units of measure such as volts and hertz; (2) mega, the prefix for 1,048,576,
20
or 2
, when used with B to quantify data or computer memory
MISO master-in-slave-out signal
MOSI master-out-slave-in signal
multiplex to route one of many input signals to a single output
multiplexed mode an SCXI operating mode in which analog input channels are multiplexed
into one module output so that the cabled E/M Series DAQ device has
access to the multiplexed output of the module as well as the outputs of all
other multiplexed modules in the chassis
SCXI-1581 User Manual G-4 ni.com
6
, when used with
Page 50

Glossary
N
NC not connected (signal)
NI-DAQ the driver software needed in order to use National Instruments E/M Series
DAQ devices and SCXI components
NI-DAQmx
The latest NI-DAQ driver with new VIs, functions, and development tools
for controlling measurement devices.
O
output voltage
compliance
OUTREF output reference signal
the largest voltage that can be generated across the output of a current
source without the current going out of specification
P
ppm parts per million
PXI PCI eXtensions for Instrumentation—an open specification that builds on
the CompactPCI specification by adding instrumentation-specific features
R
R
L
RMA Return Material Authorization
lead resistance
RSVD reserved bit, pin, or signal
RTD resistance-temperature detector
S
s seconds
S samples
© National Instruments Corporation G-5 SCXI-1581 User Manual
Page 51

Glossary
scan one or more analog samples taken at the same time, or nearly the same time.
Typically, the number of input samples in a scan is equal to the number of
channels in the input group. For example, one scan, acquires one new
sample from every analog input channel in the group.
SCANCLK scan clock signal used to increment to the next channel after each
E/M Series DAQ device analog-to-digital conversion
SCXI Signal Conditioning eXtensions for Instrumentation
SCXIbus located in the rear of an SCXI chassis, the SCXIbus is the backplane that
connects modules in the same chassis to each other
sensor a type of transducer that converts a physical phenomenon into an electrical
signal
SERCLK serial clock signal used to synchronize digital data transfers over the
SERDATIN and SERDATOUT lines
SERDATIN serial data input signal
SERDATOUT serial data output signal
signal conditioning the manipulation of signals to prepare them for digitizing
Slot 0 refers to the power supply and control circuitry in the SCXI chassis
SLOT0SEL slot 0 select signal
SPICLK serial peripheral interface clock signal
T
thermistor a thermally sensitive resistor
Traditional NI-DAQ
(Legacy)
transducer a device capable of converting energy from one form to another
An upgrade to the earlier version of NI-DAQ. Traditional NI-DAQ
(Legacy) has the same VIs and functions and works the same way as
NI-DAQ 6.9.x. You can use both Traditional NI-DAQ (Legacy) and
NI-DAQmx on the same computer, which is not possible with
NI-DAQ 6.9.x.
SCXI-1581 User Manual G-6 ni.com
Page 52

Glossary
U
UL Underwriters Laboratory
V
Vvolts
VAC volts, alternating current
VDC volts, direct current
VI virtual instrument—(1) a combination of hardware and/or software
elements, typically used with a PC, that has the functionality of a classic
stand-alone instrument; (2) a LabVIEW software module (VI), which
consists of a front panel user interface and a block diagram program
virtual channels channel names that can be defined outside the application and used without
having to perform scaling operations
W
Wwatts
© National Instruments Corporation G-7 SCXI-1581 User Manual
Page 53

Index
Numerics
2-wire configuration of resistive devices, 4-3
3-wire resistive sensor
connected in 2-wire configuration, 4-4
lead-resistance compensation
with two differential amplifiers, 4-6
with two matched current sources, 4-5
4-wire configuration of resistive devices, 4-2
B
BNC-2905 rack-mount accessory, questions
about, C-4
C
CE compliance specifications, A-3
common questions, C-1
connecting resistive devices to SCXI-1581
2-wire configuration, 4-3
3-wire resistive sensor connected in 2-wire
configuration, 4-4
4-wire configuration, 4-2
lead-resistance compensation
using 3-wire resistive sensor
and two differential amplifiers, 4-6
and two matched current
sources, 4-5
connectors, rear signal connector
communication signals, 2-3
conventions used in the manual, viii
current output channels, questions
about, C-1, C-3
current sources, operating, 4-1
D
DAQ device
accessing unused analog input
channels, C-2
digital signals unavailable with DAQ device
connected (table), C-3
E
electromagnetic compatibility
specifications, A-3
environment specifications, A-2
excitation specifications, A-1
F
front connector, pin assignments (table), 2-2
I
installation, into SCXI chassis, 1-4
M
Measurement & Automation Explorer, removing
the SCXI-1581, B-1
multiplexed scanning, scanning other SCXI
modules through SCXI-1581, 3-2
N
NI-DAQ version required, C-1
© National Instruments Corporation I-1 SCXI-1581 User Manual
Page 54

Index
O
operation of current sources, 4-1
P
physical specifications, A-2
pin assignments, front connector (table), 2-2
power requirements from SCXI
backplane, A-1
Q
questions and answers, C-1
R
rear signal connector, communications
signals, 2-3
removing the SCXI-1581 from Measurement
& Automation Explorer, B-1
resistive devices, connecting to SCXI-1581
2-wire configuration, 4-3
3-wire resistive sensor connected to
2-wire configuration, 4-4
4-wire configuration, 4-2
lead-resistance compensation
using 3-wire resistive sensor and two
differential amplifiers, 4-6
using 3-wire resistive sensor and two
matched current sources, 4-5
RTDs (resistive-temperature detectors)
measurement errors, 4-9
overview, 4-9
relationship between resistance and
temperature, 4-10
resistance-temperature curve
(figure), 4-11
S
safety specifications, A-3
SCXI-1303 terminal block, C-4
SCXI-1581
common questions, C-1
digital signals unavailable signals with
DAQ device connected (table), C-3
removing (figure), B-2
removing from SCXI chassis, B-1
taking measurements. See measurements
signal connections, front connector
pin assignments (table), 2-2
software, NI-DAQ version required, C-1
specifications
CE compliance, A-3
electromagnetic compatibility, A-3
environment, A-2
excitation, A-1
physical, A-2
power requirements from SCXI
backplane, A-1
safety, A-3
stability, A-1
stability specifications, A-1
SCXI-1581 User Manual I-2 ni.com
Page 55

Index
T
taking measurements. See measurements
temperature measurement with resistive
transducers, 4-9
connecting resistive devices to
SCXI-1581, 4-1
2-wire configuration, 4-3
3-wire resistive sensor connected in
2-wire configuration, 4-4
4-wire configuration, 4-2
lead resistance compensation
using 3-wire resistive sensor and two
differential amplifiers, 4-6
using 3-wire resistive sensor and two
matched current sources, 4-5
RTDs
measurement errors, 4-9
overview, 4-9
relationship between resistance and
temperature, 4-10
resistance temperature curve
(figure), 4-11
thermistors
measurement circuits, 4-15
overview, 4-13
resistance/temperature
characteristics, 4-16
resistance-temperature curve
(figure), 4-14
© National Instruments Corporation I-3 SCXI-1581 User Manual
 Loading...