

Page 1

Signal Conditioning
SC-2345/2350 Carrier User Manual
SC-2345/2350 Carrier User Manual
July 2007
371064F-01
Page 2

Support
Worldwide Technical Support and Product Information
ni.com
National Instruments Corporate Headquarters
11500 North Mopac Expressway Austin, Texas 78759-3504 USA Tel: 512 683 0100
Worldwide Offices
Australia 1800 300 800, Austria 43 662 457990-0, Belgium 32 (0) 2 757 0020, Brazil 55 11 3262 3599,
Canada 800 433 3488, China 86 21 5050 9800, Czech Republic 420 224 235 774, Denmark 45 45 76 26 00,
Finland 358 (0) 9 725 72511, France 01 57 66 24 24, Germany 49 89 7413130, India 91 80 41190000,
Israel 972 3 6393737, Italy 39 02 413091, Japan 81 3 5472 2970, Korea 82 02 3451 3400,
Lebanon 961 (0) 1 33 28 28, Malaysia 1800 887710, Mexico 01 800 010 0793, Netherlands 31 (0) 348 433 466,
New Zealand 0800 553 322, Norway 47 (0) 66 90 76 60, Poland 48 22 3390150, Portugal 351 210 311 210,
Russia 7 495 783 6851, Singapore 1800 226 5886, Slovenia 386 3 425 42 00, South Africa 27 0 11 805 8197,
Spain 34 91 640 0085, Sweden 46 (0) 8 587 895 00, Switzerland 41 56 2005151, Taiwan 886 02 2377 2222,
Thailand 662 278 6777, Turkey 90 212 279 3031, United Kingdom 44 (0) 1635 523545
For further support information, refer to the Technical Support Information document that shipped with the device.
To comment on National Instruments documentation, refer to the National Instruments Web site at
and enter the info code
feedback.
ni.com/info
© 1997–2007 National Instruments Corporation. All rights reserved.
Page 3

Important Information
Warranty
The SC-2345/2350 carrier is warranted against defects in materials and workmanship for a period of one year from the date of shipment, as
evidenced by receipts or other documentation. National Instruments will, at its option, repair or replace equipment that proves to be defective
during the warranty period. This warranty includes parts and labor.
The media on which you receive National Instruments software are warranted not to fail to execute programming instructions, due to defects
in materials and workmanship, for a period of 90 days from date of shipment, as evidenced by receipts or other documentation. National
Instruments will, at its option, repair or replace software media that do not execute programming instructions if National Instruments receives
notice of such defects during the warranty period. National Instruments does not warrant that the operation of the software shall be
uninterrupted or error free.
A Return Material Authorization (RMA) number must be obtained from the factory and clearly marked on the outside of the package before
any equipment will be accepted for warranty work. National Instruments will pay the shipping costs of returning to the owner parts which are
covered by warranty.
National Instruments believes that the information in this document is accurate. The document has been carefully reviewed for technical
accuracy. In the event that technical or typographical errors exist, National Instruments reserves the right to make changes to subsequent
editions of this document without prior notice to holders of this edition. The reader should consult National Instruments if errors are suspected.
In no event shall National Instruments be liable for any damages arising out of or related to this document or the information contained in it.
E
XCEPT AS SPECIFIED HEREIN, NATIONAL INSTRUMENTS MAKES NO WARRANTIES, EXPRESS OR IMPLIED, AND SPECIFICALLY DISCLAIMS ANY WARRANTY OF
MERCHANTABILITY OR FITNESS FOR A PARTICULAR PUR POSE. CUSTOMER’S RIGHT TO R ECOVER DAMAGES CAUSED BY FAULT OR NEGLIGENCE ON THE PART OF
NATIONAL INSTRUMENTS SHALL BE LIMITED TO THE AMOUNT THERETOFORE PAID BY THE CUSTOMER. NATIONAL INSTRUMENTS WILL NOT BE LIABLE FOR
DAMAGES RESULTING FROM LOSS OF DATA, PROFITS, USE OF PRODUCTS, OR INCIDENTAL OR CONSEQUENTIAL DAMAGES, EVEN IF ADVISED OF THE POSSIBILITY
THEREOF. This limitation of the liability of National Instruments will apply regardless of the form of action, whether in contract or tort, including
negligence. Any action against National Instruments must be brought within one year after the cause of action accrues. National Instruments
shall not be liable for any delay in performance due to causes beyond its reasonable control. The warranty provided herein does not cover
damages, defects, malfunctions, or service failures caused by owner’s failure to follow the National Instruments installation, operation, or
maintenance instructions; owner’s modification of the product; owner’s abuse, misuse, or negligent acts; and power failure or surges, fire,
flood, accident, actions of third parties, or other events outside reasonable control.
Copyright
Under the copyright laws, this publication may not be reproduced or transmitted in any form, electronic or mechanical, including photocopying,
recording, storing in an information retrieval system, or translating, in whole or in part, without the prior written consent of National
Instruments Corporation.
National Instruments respects the intellectual property of others, and we ask our users to do the same. NI software is protected by copyright and other
intellectual property laws. Where NI software may be used to reproduce software or other materials belonging to others, you may use NI software only
to reproduce materials that you may reproduce in accordance with the terms of any applicable license or other legal restriction.
Trademarks
National Instruments, NI, ni.com, and LabVIEW are trademarks of National Instruments Corporation. Refer to the Terms of Use section
on
ni.com/legal for more information about National Instruments trademarks.
Product and company names mentioned herein are trademarks or trade names of their respective companies.
Members of the National Instruments Alliance Partner Program are business entities independent from National Instruments and have no
agency, partnership, or joint-venture relationship with National Instruments.
Patents
For patents covering National Instruments products, refer to the appropriate location: Help»Patents in your software, the patents.txt file
on your CD, or
ni.com/patents.
WARNING REGARDING USE OF NATIONAL INSTRUMENTS PRODUCTS
(1) NATIONAL INSTRUMENTS PRODUCTS ARE NOT DESIGNED WITH COMPONENTS AND TESTING FOR A LEVEL OF
RELIABILITY SUITABLE FOR USE IN OR IN CONNECTION WITH SURGICAL IMPLANTS OR AS CRITICAL COMPONENTS IN
ANY LIFE SUPPORT SYSTEMS WHOSE FAILURE TO PERFORM CAN REASONABLY BE EXPECTED TO CAUSE SIGNIFICANT
INJURY TO A HUMAN.
(2) IN ANY APPLICATION, INCLUDING THE ABOVE, RELIABILITY OF OPERATION OF THE SOFTWARE PRODUCTS CAN BE
IMPAIRED BY ADVERSE FACTORS, INCLUDING BUT NOT LIMITED TO FLUCTUATIONS IN ELECTRICAL POWER SUPPLY,
COMPUTER HARDWARE MALFUNCTIONS, COMPUTER OPERATING SYSTEM SOFTWARE FITNESS, FITNESS OF COMPILERS
AND DEVELOPMENT SOFTWARE USED TO DEVELOP AN APPLICATION, INSTALLATION ERRORS, SOFTWARE AND
HARDWARE COMPATIBILITY PROBLEMS, MALFUNCTIONS OR FAILURES OF ELECTRONIC MONITORING OR CONTROL
DEVICES, TRANSIENT FAILURES OF ELECTRONIC SYSTEMS (HARDWARE AND/OR SOFTWARE), UNANTICIPATED USES OR
MISUSES, OR ERRORS ON THE PART OF THE USER OR APPLICATIONS DESIGNER (ADVERSE FACTORS SUCH AS THESE ARE
HEREAFTER COLLECTIVELY TERMED “SYSTEM FAILURES”). ANY APPLICATION WHERE A SYSTEM FAILURE WOULD
CREATE A RISK OF HARM TO PROPERTY OR PERSONS (INCLUDING THE RISK OF BODILY INJURY AND DEATH) SHOULD
NOT BE RELIANT SOLELY UPON ONE FORM OF ELECTRONIC SYSTEM DUE TO THE RISK OF SYSTEM FAILURE. TO AVOID
DAMAGE, INJURY, OR DEATH, THE USER OR APPLICATION DESIGNER MUST TAKE REASONABLY PRUDENT STEPS TO
PROTECT AGAINST SYSTEM FAILURES, INCLUDING BUT NOT LIMITED TO BACK-UP OR SHUT DOWN MECHANISMS.
BECAUSE EACH END-USER SYSTEM IS CUSTOMIZED AND DIFFERS FROM NATIONAL INSTRUMENTS' TESTING
PLATFORMS AND BECAUSE A USER OR APPLICATION DESIGNER MAY USE NATIONAL INSTRUMENTS PRODUCTS IN
COMBINATION WITH OTHER PRODUCTS IN A MANNER NOT EVALUATED OR CONTEMPLATED BY NATIONAL
Page 4

INSTRUMENTS, THE USER OR APPLICATION DESIGNER IS ULTIMATELY RESPONSIBLE FOR VERIFYING AND VALIDATING
THE SUITABILITY OF NATIONAL INSTRUMENTS PRODUCTS WHENEVER NATIONAL INSTRUMENTS PRODUCTS ARE
INCORPORATED IN A SYSTEM OR APPLICATION, INCLUDING, WITHOUT LIMITATION, THE APPROPRIATE DESIGN,
PROCESS AND SAFETY LEVEL OF SUCH SYSTEM OR APPLICATION.
Page 5
Conventions
The following conventions are used in this manual:
<> Angle brackets that contain numbers separated by an ellipsis represent
a range of values associated with a bit or signal name—for example,
AO <3..0>.
» The » symbol leads you through nested menu items and dialog box options
to a final action. The sequence File»Page Setup»Options directs you to
pull down the File menu, select the Page Setup item, and select Options
from the last dialog box.
This icon denotes a note, which alerts you to important information.
This icon denotes a caution, which advises you of precautions to take to
avoid injury, data loss, or a system crash. When this symbol is marked
on the product, refer to the Read Me First: Safety and Radio-Frequency
Interference document shipped with the product for precautions to take.
When symbol is marked on a product, it denotes a warning advising you to
take precautions to avoid electrical shock.
When symbol is marked on a product, it denotes a component that may be
hot. Touching this component may result in bodily injury.
bold Bold text denotes items that you must select or click in the software, such
as menu items and dialog box options. Bold text also denotes parameter
names.
italic Italic text denotes variables, emphasis, a cross-reference, or an introduction
to a key concept. Italic text also denotes text that is a placeholder for a word
or value that you must supply.
monospace Text in this font denotes text or characters that you should enter from the
keyboard, sections of code, programming examples, and syntax examples.
This font is also used for the proper names of disk drives, paths, directories,
programs, subprograms, subroutines, device names, functions, operations,
variables, filenames, and extensions.
monospace italic
Italic text in this font denotes text that is a placeholder for a word or value
that you must supply.
Page 6

Contents
Chapter 1
Setting up the SC-2345/2350 Carrier
About the SCC Hardware ..............................................................................................1-1
SC-2345 Carrier...............................................................................................1-1
SC-2350 Carrier...............................................................................................1-2
What You Need to Get Started ......................................................................................1-2
Installing the Driver Software........................................................................................1-3
Connecting the SC-2345/2350 Carrier to the DAQ Device ..........................................1-4
Configuring the SC-2345 Carrier as a DAQ Accessory ................................................1-4
Configuring the SC-2350 Carrier as a DAQ Accessory ................................................1-6
TEDS .............................................................................................................................1-9
Importing TEDS Information..........................................................................1-10
Importing Virtual TEDS Sensor Information..................................................1-12
Affixing the Quick Reference Label to the SC-2345 Carrier ........................................1-15
Connecting Power to the SC-2345/2350 Carrier ...........................................................1-15
SCC-PWR01....................................................................................................1-17
SCC-PWR02....................................................................................................1-18
SCC-PWR03....................................................................................................1-19
Installing SCC Modules in the SC-2345/2350 Carrier....................................1-19
Chapter 2
Connecting Signals to the Terminal Block of the SC-2345/2350 Carrier
Rack-Mounting and Stack-Mounting Options...............................................................2-2
Installing the Rack-Mount Kit.........................................................................2-2
Installing the Stack-Mount Kit ........................................................................2-3
Appendix A
Specifications
Appendix B
Carrier Socket Signal Assignments
Appendix C
SCC Power Requirements and Solutions
© National Instruments Corporation vii SC-2345/2350 Carrier User Manual
Page 7

Contents
Appendix D
Common Questions
Glossary
Index
SC-2345/2350 Carrier User Manual viii ni.com
Page 8

Setting up the SC-2345/2350
Carrier
This document assumes you have already installed, configured, and tested
the SC carrier, SCC modules, and the DAQ device to which they are
connected. If you have not done so, follow the instructions in the DAQ
Getting Started Guide and SCC Quick Start Guide, included with the
hardware, before continuing. The SCC Quick Start Guide and DAQ Getting
Started Guide are also available at
Start»Programs»National Instruments»NI-DAQ»Browse Device
Documentation after you install the DAQ documentation browser.
About the SCC Hardware
ni.com/manuals or accessible from
1
SC-2345 Carrier
The SC-2345/2350 carrier transfers signals to and from 68-pin E/M Series
data acquisition (DAQ) devices, referred to as the DAQ device in this
manual. When used with SCC Series modules and a shielded 68-pin cable,
the SC-2345/2350 carrier offers easy-to-use, rugged, low-noise signal
conditioning on a per-channel basis. The SC-2345/2350 carrier also has
42 screw terminals for direct connection to the DAQ device digital signals.
Some SC-2345 carrier enclosures are available with configurable
connectors to maximize I/O flexibility through the use of panelettes.
All SC-2345/2350 carriers are portable enclosures for laptop and desktop
applications.
Optional rack-mount and stack-mount accessories enable you to mount
the SC-2345/2350 carrier with configurable connectors to suit your
application. The rack-mount option is available for standard 19 in. racks.
The SC-2345 carrier supports analog I/O and digital I/O SCC modules. The
SC-2345 is available in the following forms:
• SC-2345 connector block—the SC-2345 connector block requires you
to pass input signal wires through a strain relief
© National Instruments Corporation 1-1 SC-2345/2350 Carrier User Manual
Page 9

Chapter 1 Setting up the SC-2345/2350 Carrier
• SC-2345 carrier with configurable connectors and a rear cable
connector
• SC-2345 carrier with configurable connectors and a side cable
connector
Note Refer to Figure 1-9 and the SCC Quick Start Guide for more information about all
these carrier forms.
SC-2350 Carrier
The SC-2350 carrier supports analog I/O SCC modules. The SC-2350
carrier supports reading from and writing to Transducer Electronic Data
Sheet (TEDS) Class II sensors for its analog input SCC modules. The
SC-2350 carrier is available with configurable connectors and a side cable
connector. Refer to Figure 1-9 and the SCC Quick Start Guide for more
information.
What You Need to Get Started
To set up and use the SC-2345/2350 carrier, you need the following items:
❑ Hardware
– SC-2345/2350 carrier with one of the following factory-installed
power modules:
• SCC-PWR01
• SCC-PWR02 and the PS01 power supply
• SCC-PWR03 (requires a 7 to 42 VDC power supply,
not included)
– 68-pin E/M Series DAQ device with a shielded 68-pin cable of
less than 2 m length
or
– 100-pin E Series DAQ device with an SH1006868 cable
(to connect 100-pin devices to two 68-pin connectors)
– One or more SCC modules
– Rack-mount or stack-mount kit (optional)
Note You cannot use the I/O panelettes on the SC-2345 carrier with connector block.
SC-2345/2350 Carrier User Manual 1-2 ni.com
– One or more I/O panelettes
Page 10

Chapter 1 Setting up the SC-2345/2350 Carrier
❑ Software
– NI-DAQ 7.4 or later for Windows 2000/NT/XP
Note Software scaling of measurements is not supported on the Macintosh operating
system.
❑ Documentation
– SCC Quick Start Guide
– 100-pin or 68-pin E/M Series DAQ device documentation
– DAQ Getting Started Guide
– Read Me First: Safety and Radio-Frequency Interference
– SC-2345 carrier Quick Reference Label, if you have an SC-2345
carrier
❑ Tools
– 1/8 in. flathead screwdriver
– Numbers 1 and 2 Phillips screwdrivers
– Wire insulation strippers
Installing the Driver Software
Install your application development environment (ADE) software and/or
NI application software, if you have not already done so, according to their
instructions.
Install NI-DAQ, which came with the DAQ device, if you have not already
done so. If you do not have version NI-DAQ 7.4 or later, you can either
download it from the National Instruments Web site at
downloads
Follow the software prompts to install NI-DAQ. If you do not see the Install
NI-DAQ screen when you insert the CD, go to the Windows Start»Run.
Type
x
installer detects the language of your operating system and the screens
appear in that language.
or contact a sales representative to request a CD.
:\setup.exe (
x
is the letter of your CD drive). The NI-DAQ
ni.com/
© National Instruments Corporation 1-3 SC-2345/2350 Carrier User Manual
Page 11

Chapter 1 Setting up the SC-2345/2350 Carrier
Connecting the SC-2345/2350 Carrier to the DAQ Device
Caution Refer to the Read Me First: Safety and Radio-Frequency Interference document
before removing equipment covers or connecting or disconnecting any signal wires.
Use a 68-pin shielded cable to connect the SC-2345/2350 carrier to the
E/M Series DAQ device. Use connector J24 on the SC-2345/2350 carrier.
The pin assignment of J24 is defined by the DAQ device MIO front
connector. Refer to Figure 1-9 for the location of connector J24.
The chassis ground terminal on the SC-2345 carrier and the
electromagnetic interference (EMI) gasket attached to the strain
relief of the SC-2345 carrier are for grounding a floating source
(1 mA maximum). Do not use these terminals as safety earth grounds.
Configuring the SC-2345 Carrier as a DAQ Accessory
Complete the following steps to run Measurement & Automation Explorer
(MAX) and configure the SCC system:
1. Open MAX.
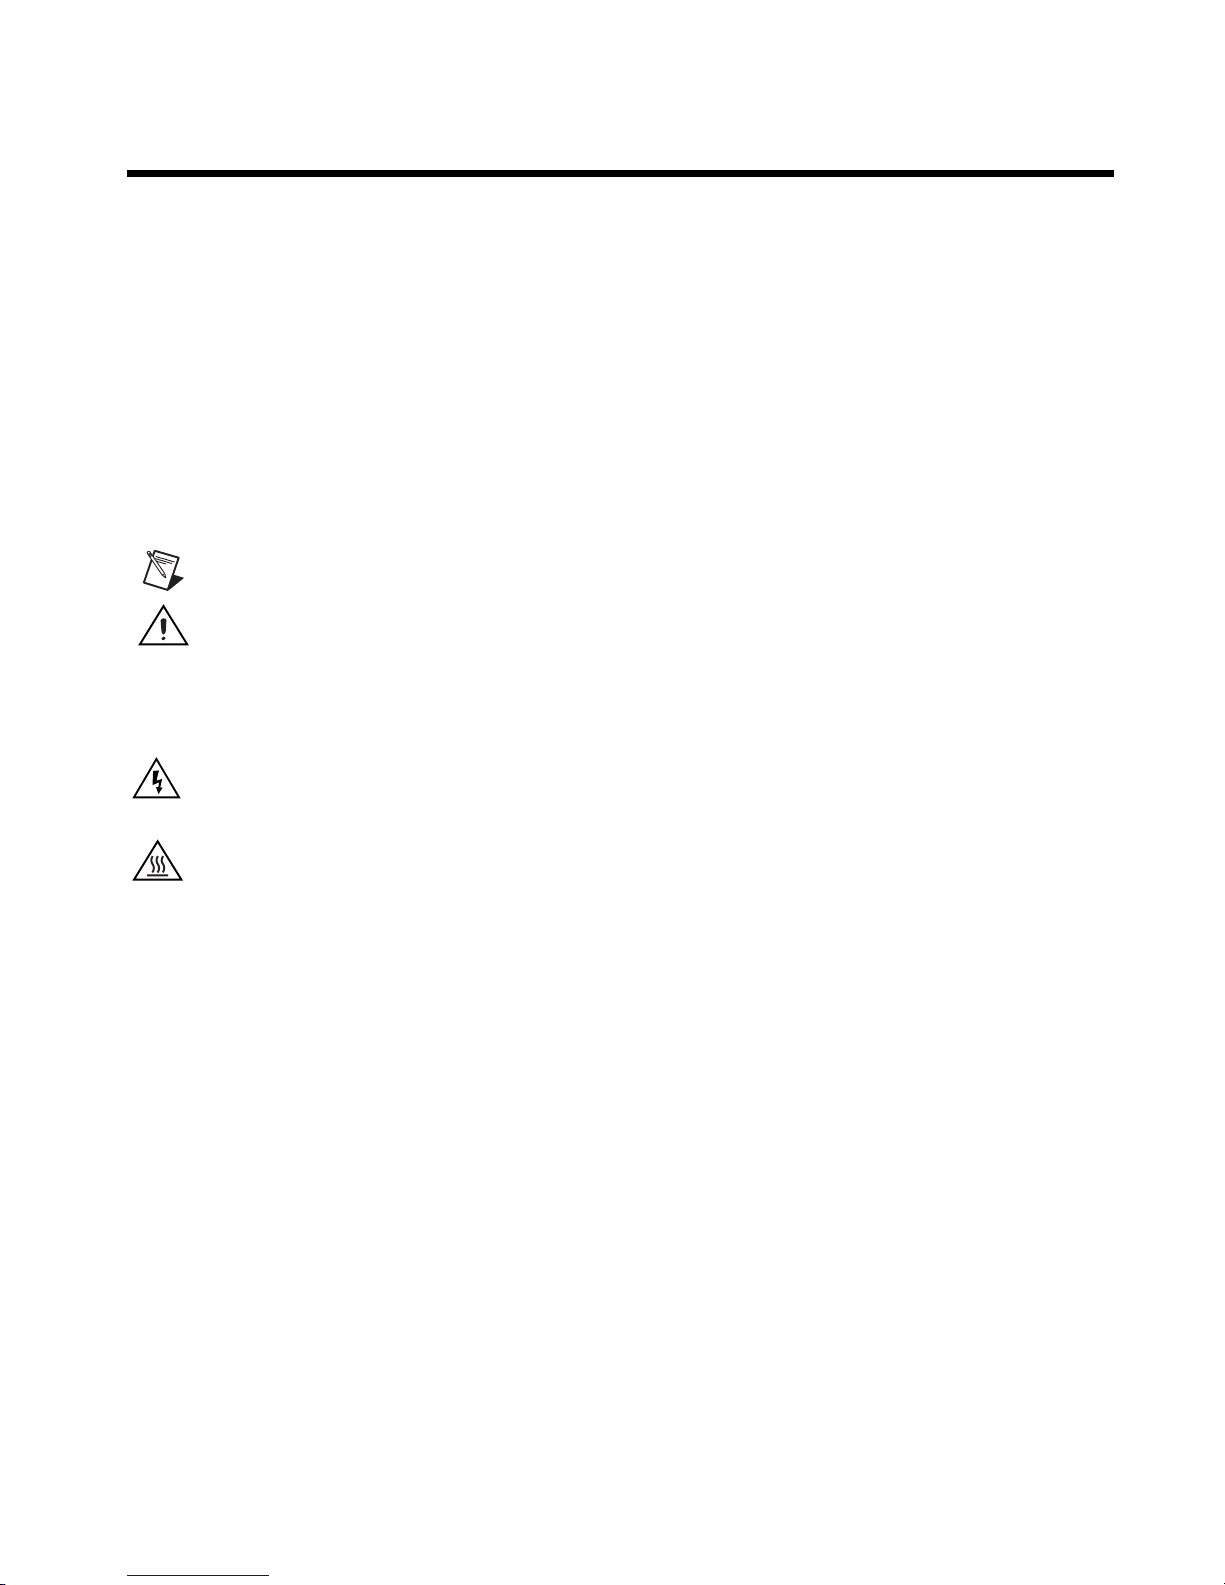
2. Right-click Devices and Interfaces and select Create New.
3. Under NI-DAQmx SCC Connector Block, select SC-2345. Click
Finish.
4. In the SCC Connector Block Configuration window, configure the
SCC system as follows.
SC-2345/2350 Carrier User Manual 1-4 ni.com
Page 12

Chapter 1 Setting up the SC-2345/2350 Carrier
© National Instruments Corporation 1-5 SC-2345/2350 Carrier User Manual
Figure 1-1. SCC Connector Block Configuration Window
a. Specify the SCC Carrier Type. The location of the SCC sockets
changes depending on the SCC carrier type.
b. In the drop-down listbox under DAQ Device, select the
E/M Series DAQ device that is connected to the SC-2345 carrier.
c. Type the SCC Connector Block ID. The default value is
SCC1.
d. In the J21 drop-down listbox next to Power, select the correct
SC-2345 power configuration. Refer to Connecting Power to the
SC-2345/2350 Carrier section for information about power
configurations.
Page 13

Chapter 1 Setting up the SC-2345/2350 Carrier
e. For each SCC module physically installed in the SC-2345 carrier,
add a corresponding entry in the SC-2345 Connector Block
Configuration window. Click the drop-down listbox and select the
correct module. If the module name does not appear in the list,
either the module is not allowed in that location or you do not have
NI-DAQ 7.4 or later. If you do not have the current version of
NI-DAQ, download it from
5. Click OK after completing all SCC module entries.
6. Click OK to complete the configuration process and close MAX.
You have completed the steps to configure the SC-2345 carrier as an
E/M Series DAQ device accessory.
Note Configuring the SCC system using MAX automatically sets the E/M Series DAQ
device analog input mode to NRSE. If you are configuring digital SCC modules, the
configuration automatically sets individual digital lines to the appropriate direction, input
or output.
ni.com/downloads.
Configuring the SC-2350 Carrier as a DAQ Accessory
Complete the following steps to run MAX and configure the SCC system:
1. Open MAX.
2. Right-click Devices and Interfaces and select Create New.
3. Under NI-DAQmx SCC Connector Block, select SC-2350.
SC-2345/2350 Carrier User Manual 1-6 ni.com
Page 14
Chapter 1 Setting up the SC-2345/2350 Carrier
Figure 1-2. MAX Window with the SC-2350 Carrier Selected
4. Click Finish. The SC-2350 Configuration window opens.
© National Instruments Corporation 1-7 SC-2345/2350 Carrier User Manual
Page 15
Chapter 1 Setting up the SC-2345/2350 Carrier
5. To configure the SCC system, complete the following steps:
SC-2345/2350 Carrier User Manual 1-8 ni.com
Figure 1-3. SC-2350 Configuration Window
a. In the drop-down listbox located under DAQ Device, select the
E/M Series DAQ device that is connected to the SC-2350 carrier.
b. Type the SCC Connector Block ID. The default value is
SCC1.
c. In the J21 drop-down listbox next to Power, select the correct
SC-2350 carrier power configuration. Refer to the Connecting
Power to the SC-2345/2350 Carrier section for information about
power configurations.
Page 16

Chapter 1 Setting up the SC-2345/2350 Carrier
d. For each SCC module physically installed in the SC-2350 carrier,
add a corresponding entry in the SC-2350 Configuration window.
Click the drop-down listbox and select the correct module. If the
module name does not appear in the list, either the module is not
allowed in that location or you do not have NI-DAQ 7.4 or later. If
you do not have the current version of NI-DAQ, download it from
ni.com/downloads.
e. MAX automatically scans the SCC modules you select for IEEE
P1451.4 sensors that are compatible with TEDS. If MAX finds a
TEDS, MAX scans and maps a TEDS icon and information under
the SCC module in MAX. For more information, refer to the
TEDS section.
6. Click OK after completing all SCC module entries.
7. Click OK to complete the configuration process and close MAX.
You have completed the steps to configure the SC-2350 carrier as an
E/M Series DAQ device accessory.
TEDS
Note Configuring the SCC system using MAX automatically sets the E/M Series DAQ
device analog input mode to NRSE.
This section describes TEDS.
IEEE P1451.4 specifies two classes of TEDS sensors:
• Class I—Uses the same two wires for both analog and digital signals
(such as accelerometers and microphones).
• Class II—Separates analog and digital signals on different wires. In
addition to the analog signal wires, uses two wires for digital signals.
The SC-2350 carrier uses Class II TEDS.
On IEEE P1451.4 TEDS-compatible sensors, the manufacturer places
an EEPROM on the sensor that stores a TEDS. The TEDS includes vendor
and calibration information, sensor constants, and user-defined data.
TEDS-compatible hardware, like the SC-2350 carrier, can read the TEDS
data. Software can use TEDS data to streamline measurement setup.
Advantages and disadvantages to using TEDS-compatible sensors include
the following:
• Smart, or hardware, TEDS—Provides easier connectivity. You can
© National Instruments Corporation 1-9 SC-2345/2350 Carrier User Manual
plug it in and automatically set up your measurement system.
Page 17

Chapter 1 Setting up the SC-2345/2350 Carrier
• Virtual, or software, TEDS (also part of the IEEE P1451.4
specification)—Obtains sensor information from a vendor Web site,
instead of an EEPROM. The information is free and does not require a
hardware upgrade. However, you must manually select the correct
channel and sensor.
The following resources provide additional information about
IEEE P1451.4 TEDS-compatible smart sensors:
• SCXI-1314T TEDS Bridge Sensor Terminal Block Installation Guide
• Refer to
–
rd2350
– rdsenr
– rdpnpy
– rdpnsn
– rdtntg
• ni.com/devzone
For information about how to configure channels and tasks with the
SC-2350 carrier, refer to the SCC Quick Start Guide.
Importing TEDS Information
To import smart hardware TEDS sensor information into MAX, first install
and configure the SCC modules. Refer to the SCC Quick Start Guide for
more information about how to install and configure the SCC modules.
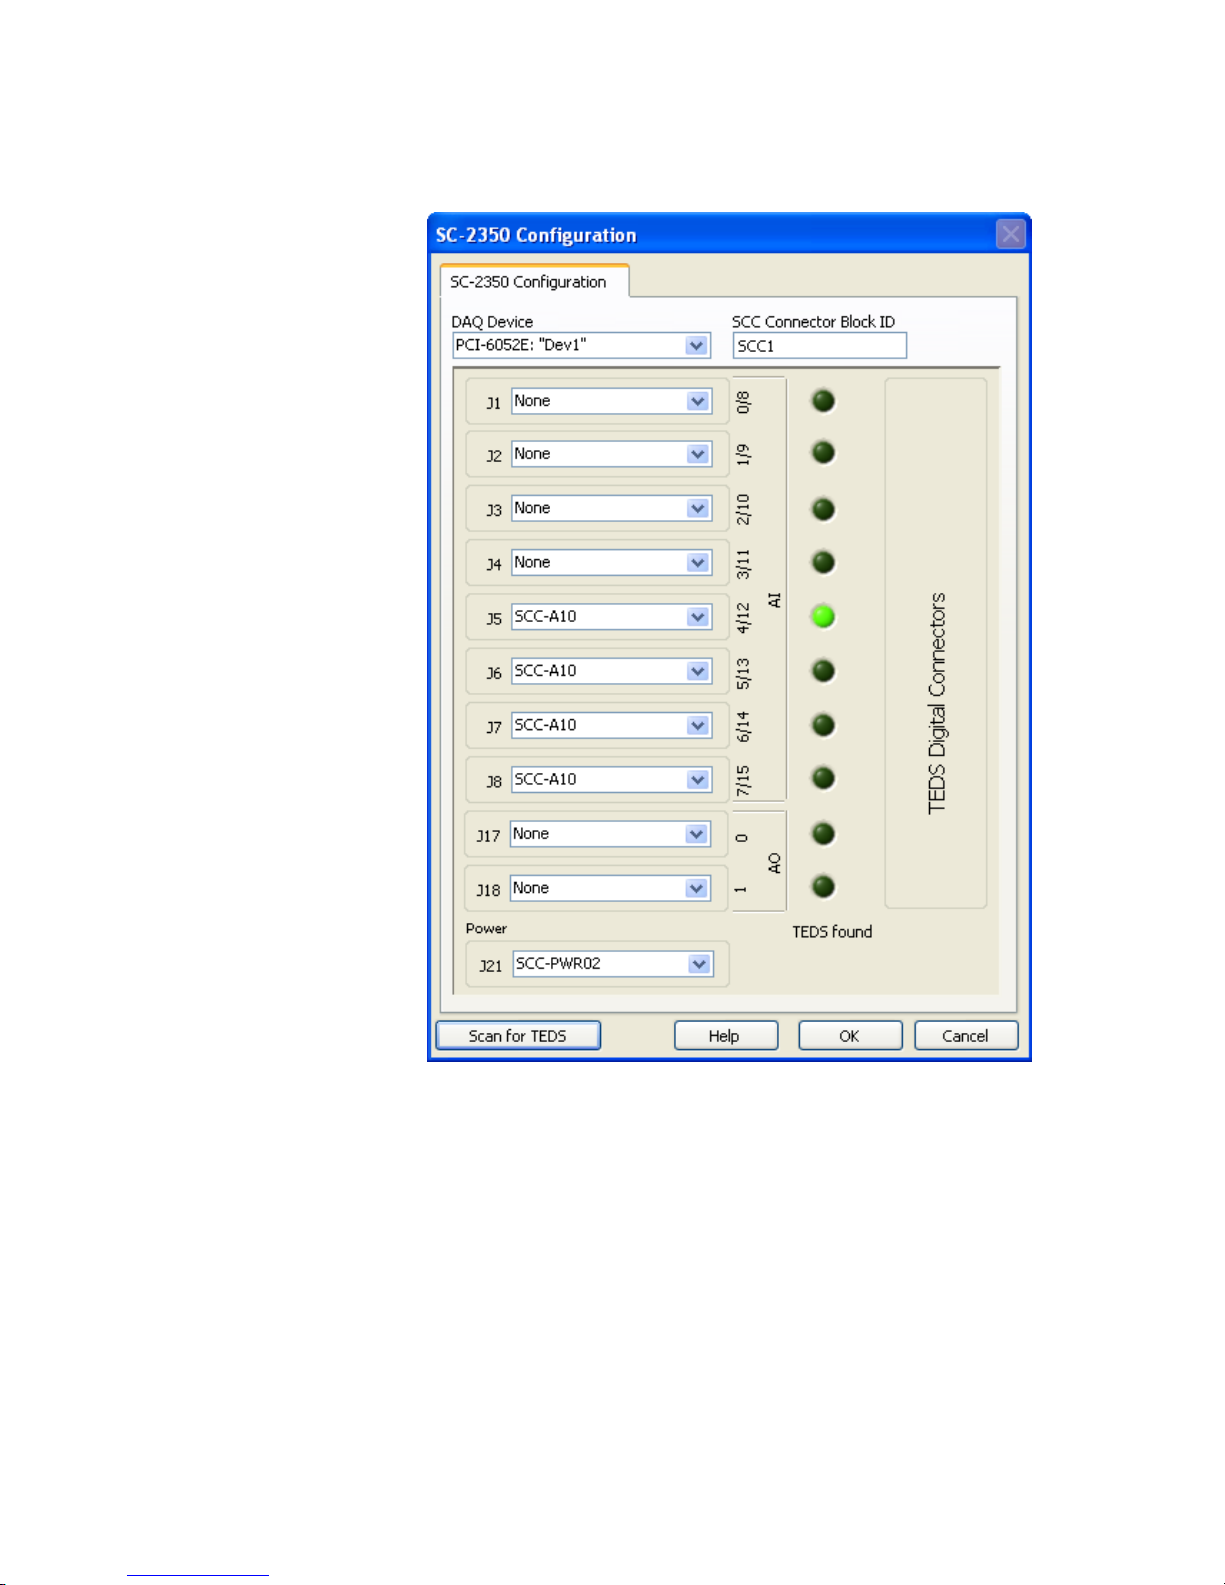
If your system has smart hardware TEDS, MAX automatically scans and
maps the TEDS sensor information into MAX. If MAX finds a TEDS
associated with the SCC module, the LED lights up as shown in Figure 1-4.
ni.com/info, and enter any of the following info codes:
If you later add SCC modules to your system that have TEDS-compatible
sensors physically wired to them, click Scan for TEDS to import the TEDS
sensor information into MAX and refresh the configuration tree.
SC-2345/2350 Carrier User Manual 1-10 ni.com
Page 18
Chapter 1 Setting up the SC-2345/2350 Carrier
As shown in Figure 1-4, MAX scans and maps the TEDS information
under the SC-2350 carrier.
© National Instruments Corporation 1-11 SC-2345/2350 Carrier User Manual
Figure 1-4. TEDS Sensor Information Scanned and Mapped Into MAX
Page 19
Chapter 1 Setting up the SC-2345/2350 Carrier
To view the TEDS sensor data sheet, click the TEDS listing under the
SC-2350 in MAX. The TEDS sensor data sheet opens as shown in
Figure 1-5.
Figure 1-5. TEDS Sensor Data Sheet
Verify that the TEDS data is correctly imported. Next, create an
NI-DAQmx Global Channel or Task using the channel that has a TEDS
sensor associated to it. Refer to
ni.com/info and enter rd2350, for more
information about how to create an NI-DAQmx Global Channel or Task for
a TEDS sensor.
Importing Virtual TEDS Sensor Information
To import Virtual TEDS sensor information into MAX, first install and
configure the SCC modules. Refer to the SCC Quick Start Guide, for more
information about how to install and configure the SCC modules.
SC-2345/2350 Carrier User Manual 1-12 ni.com
Page 20
Chapter 1 Setting up the SC-2345/2350 Carrier
To import Virtual TEDS sensor information into MAX, right-click the SCC
module that you want a Virtual TEDS sensor associated to and select
Configure TEDS.
The Configure TEDS window opens as shown in Figure 1-6.
1. Click Import Virtual TEDS.
© National Instruments Corporation 1-13 SC-2345/2350 Carrier User Manual
Figure 1-6. Configure TEDS Window
Page 21
Chapter 1 Setting up the SC-2345/2350 Carrier
2. The virtual TEDS directory opens as shown in Figure 1-7.
Figure 1-7. Virtual TEDS Directory
3. Press <Ctrl> and select the virtual TEDS file you want to import into
MAX to associate with the SCC module.
4. Click OK.
MAX scans and maps the TEDS sensor information into MAX. The
LED turns green.
5. To verify that the TEDS sensor information imported correctly, click
the TEDS sensor icon in the configuration tree. The TEDS sensor data
sheet opens as shown in Figure 1-5.
6. Next, you need to create an NI-DAQmx Global Channel or Task
using the channel that has a TEDS sensor associated to it.
Note Refer to ni.com/info and enter rd2350, for more information about how to create
a NI-DAQmx Global Channel or Task for a TEDS sensor.
You have configured the SC-2350 carrier in MAX.
SC-2345/2350 Carrier User Manual 1-14 ni.com
Page 22
Chapter 1 Setting up the SC-2345/2350 Carrier
Affixing the Quick Reference Label to the SC-2345
Carrier
Note Only the SC-2345 carrier is shipped with a Quick Reference Label.
Affix the Quick Reference Label to the inside cover of the SC-2345 carrier.
You will refer to the Quick Reference Label when installing the SCC
modules.
Connecting Power to the SC-2345/2350 Carrier
The SC-2345/2350 shielded carrier has one of the following power
modules factory-installed in socket J21:
•SCC-PWR01
•SCC-PWR02
•SCC-PWR03
4
3
2
1
1 Negative or GND of External Supply
2J1
3 Positive of External +5 VDC Supply
Figure 1-8. SCC-PWR0X Parts Locator Diagram
4S1
5 Product Name
5
Each power module supplies digital power (+5 V) for the SC-2345/2350
carrier only and analog power (±15 V) to SCC modules in the
SC-2345/2350 carrier. LEDs on the SC-2345/2350 indicate whether the
+5 V and ±15 V power supplies are functioning properly. If the LEDs do
not light when you connect power to the SC-2345/2350 carrier, refer to
Appendix C, SCC Power Requirements and Solutions. Figure 1-9 shows
the locations of sockets J24 and J25 on each of the three types of SC-2345
carrier enclosures and the SC-2350 carrier enclosure.
© National Instruments Corporation 1-15 SC-2345/2350 Carrier User Manual
Page 23

Chapter 1 Setting up the SC-2345/2350 Carrier
2
6
4
5
3
5
1
1 SC-2345 Carrier
2 SC-2345 Carrier with Configurable
Connectors, Side Cabled
3 SC-2350 Carrier with Configurable
Connectors, Side Cabled
4 SC-2345 Carrier with Configurable
Connectors,
Rear Cabled
6
5
6
6
5
5 Connector J24 (Connects to 68-Pin
E/M Series DAQ Device)
6 Connector J25 (Connects to PS01 Power Supply
for Use with SCC-PWR02 Power Module)
SC-2345/2350 Carrier User Manual 1-16 ni.com
Figure 1-9. SC-2345/2350 Enclosures
Page 24

SCC-PWR01
Chapter 1 Setting up the SC-2345/2350 Carrier
The SCC-PWR01 converts +5 V to ±15 V, which is the analog power
supply that SCC modules use. Set switch S1 on the SCC-PWR01 to select
the source of the +5 V as either ESER (E/M Series) or EXT (external). If
you select ESER, the SCC-PWR01 uses +5 V power from the E/M Series
DAQ device. If you select EXT, you must connect a +5 V supply (user
supplied) to the screw terminals of J1 on the SCC-PWR01. Wire the
positive lead to the screw terminal labeled
+
5V and wire the negative lead
to the screw terminal labeled GND. If you are using the SC-2345 carrier,
pass the leads through the strain relief on the front of the enclosure. If you
are using an SC-2345/2350 with configurable connectors, use a strain-relief
panelette for the leads.
1
1 SC-2345/2350 Carrier
2 5 VDC Power Supply (User-Supplied, Optional)
3DAQ Device
4J24
3
4
5
2
5 Positive Lead to +5 V Screw Terminal
on SCC-PWR01 Connector J1
6 Negative Lead to GND Screw Terminal
on SCC-PWR01 Connector J1
Figure 1-10. Using the SCC-PWR01
© National Instruments Corporation 1-17 SC-2345/2350 Carrier User Manual
Page 25

Chapter 1 Setting up the SC-2345/2350 Carrier
SCC-PWR02
The SCC-PWR02 is a two-part system that consists of a desktop power
supply (PS01) and a filtering component (SCC-PWR02 inside the carrier
enclosure). The PS01 is a 15 W switching supply powered by 90 to
264 VAC (50/60 Hz 1.0 A). To install the PS01, plug the 6-position
connector of the PS01 into connector J25 on the SC-2345/2350.
3
4
1 SC-2345/2350 Carrier
2 PS01 Power Supply
3 DAQ Device
5
2
1
4 To Connector J24
5 To Connector J25
Figure 1-11. Using the SCC-PWR02
SC-2345/2350 Carrier User Manual 1-18 ni.com
Page 26

SCC-PWR03
Chapter 1 Setting up the SC-2345/2350 Carrier
The SCC-PWR03 converts an external voltage of 7 to 42 VDC to +5 V and
±15 V and requires an external user-supplied DC power source. Attach the
voltage source to the screw terminals of J1 on the SCC‘-PWR03. Wire the
positive lead to the screw terminal labeled 7– 42 V and wire the negative
lead to the screw terminal labeled GND. If you are using the SC-2345
carrier, pass the leads through the strain relief on the front of the enclosure.
If you are using an SC-2345/2350 carrier with configurable connectors, use
a strain-relief panelette for the leads. You can power the SCC-PWR03 with
any appropriate 7 to 42 VDC source.
3
4
6
(–) (+)
5
1
1 SC-2345/2350 Carrier
2 7–42 VDC Source (User-Supplied)
3 DAQ Device
4 To Connector J24
5 Negative Lead to GND Screw Terminal
on SCC-PWR03 Connector J1
6 Positive Lead to +5 V Screw Terminal
on SCC-PWR03 Connector J1
Figure 1-12. Using the SCC-PWR03
Installing SCC Modules in the SC-2345/2350 Carrier
For instructions about how to install SCC modules in the SC-2345/2350
carrier and information about signal conditioning with SCC modules, refer
to the SCC Quick Start Guide.
2
© National Instruments Corporation 1-19 SC-2345/2350 Carrier User Manual
Page 27

Connecting Signals to the
Terminal Block of the
SC-2345/2350 Carrier
The SC-2345/2350 carrier has a 42-position, triple-row screw-terminal
block for connecting to E/M Series DAQ device digital signals. The
SC-2345 Quick Reference Label identifies the location of each signal on
the terminal rows A to C. The terminal label numbers correspond to the pin
number location of each signal on the 68-pin E/M Series connector. Refer
to the E Series Help or M Series Help for more information about this
connector. The E Series Help and the M Series Help are available for
download at
National Instruments»NI-DAQ»Browse Device Documentation after
you install the DAQ documentation browser.
ni.com/manuals or accessible from Start»Programs»
2
Figure 2-1 shows the locations of the digital signals on the SC-2345 and
SC-2350 terminal block when using an E Series or M Series connector 0.
Refer to the M Series Help, for specific pinout descriptions for M Series
devices when using connector 1.
© National Instruments Corporation 2-1 SC-2345/2350 Carrier User Manual
Page 28

Chapter 2 Connecting Signals to the Terminal Block of the SC-2345/2350 Carrier
Not Used
Not Used
PFI 14/FREQ OUT
PFI 12/CTR 0 OUT
PFI 8/CTR 0 SOURCE
PFI 6/AO START TRIG
PFI 4/CTR 1 GATE
PFI 2/AI CONV CLK
PFI 0/AI START TRIG
+ 5 V
P0.6
P0.4
P0.2
P0.0
A
1
2
37
5
41
43
11
14
16
19
49
52
Not Used
D GND
D GND
D GND
D GND
D GND
D GND
D GND
D GND
D GND
D GND
D GND
D GND
D GND
B
35
4
36
39
7
9
44
12
13
15
50
18
53
Not Used
AI SENSE
PFI 10/EXTSTROBE*
PFI 13/CTR 1 OUT
PFI 9/CTR 0 GATE
PFI 7/AI SAMP CLK
PFI 5/AO SAMPLE CLK
PFI 3/CTR 1 SOURCE
PFI 1/AI REF TRIG
PFI 11/AI HOLD COMP
P0.7
P0.5
P0.3
P0.1
C
62
45
40
3
38
6
42
10
46
48
51
47
17
Figure 2-1. Terminal Block I/O Connector Pin Assignments E Series
and M Series Connector 0
Rack-Mounting and Stack-Mounting Options
To use the SC-2345/2350 carrier with configurable connectors in a
standard 19 in. rack-mount configuration, install the optional CA-1000
rack-mount kit. To use the SC-2345/2350 carrier with configurable
connectors in a desktop stacking configuration, install the optional
CA-1000 stack-mount kit.
Installing the Rack-Mount Kit
Refer to Figure 2-2 and complete the following steps to install the CA-1000
rack-mount kit on the SC-2345/2350 carrier with configurable connectors:
1. Remove the rubber feet from the bottom of the SC-2345/2350 carrier
enclosure.
2. Attach a rack-mount bracket to both ends of the enclosure with
four 4-40 × 1/4 in. screws from the rack-mount kit.
SC-2345/2350 Carrier User Manual 2-2 ni.com
Page 29

Chapter 2 Connecting Signals to the Terminal Block of the SC-2345/2350 Carrier
1
2
1
14-40× 1/4 in. Screws 2 Rack-Mount Brackets
Figure 2-2. Rack-Mount Option
Installing the Stack-Mount Kit
Refer to Figure 2-3 and complete the following steps to install the CA-1000
stack-mount kit on the SC-2345/2350 carrier with configurable connectors:
1. Remove the rubber feet from all except the bottom enclosure.
2. Attach the stack-mount brackets to both ends of the lower
enclosure with the 4-40 × 1/4 in. flathead screws from the
stack-mount kit.
3. Place the upper enclosure on top of the lower enclosure.
4. Attach the stack-mount brackets to both ends of both enclosures with
the 4-40 × 1/4 in. flathead screws from the stack-mount kit.
2
© National Instruments Corporation 2-3 SC-2345/2350 Carrier User Manual
Page 30

Chapter 2 Connecting Signals to the Terminal Block of the SC-2345/2350 Carrier
1
2
1
3
1
3
1
14-40× 1/4 in. Screws 2 Stack-Mount Brackets 3 Handle Screws
Figure 2-3. Stack-Mount Option
You can stack additional enclosures by using additional stack-mount kits.
You can remove the stack-mount kit handles, if necessary, by removing the
four screws that attach the handles.
2
SC-2345/2350 Carrier User Manual 2-4 ni.com
Page 31

Specifications
These ratings are typical at 25 °C unless otherwise stated.
SC-2345 Carrier
Analog Input and Output
I/O connections ...................................... Sixteen, 20-pin connectors for
Digital Input and Output
A
analog-input SCC modules
(eight are shared with digital);
two 20-pin connectors for
analog-output SCC modules
I/O connections ...................................... Eight, 20-pin connectors for
Onboard Voltage Reference
Output voltage........................................ 5.000 V ±2.5 mV
Output voltage drift................................ 5 ppm/°C max (at 0 to 70 °C)
Long-term stability................................. ±15 ppm/1,000 h
Output noise (0.1 to 10 Hz).................... 4 μV
Load regulation
Sourcing 0 < I
Sinking –10 < I
Quiescent current ...................................2 mA
digital (shared with analog input)
42-position, triple-row terminal
block for digital and counter
< 10 mA............. 100 μV/mA
OUT
< 0 mA............. 400 μV/mA
OUT
p-p
Power consumption................................ 30 mW, 15 V
© National Instruments Corporation A-1 SC-2345/2350 Carrier User Manual
Page 32

Appendix A Specifications
LED Power Requirements
6.5 mA at 5 V .........................................32.5 mW
9 mA at 15 V ..........................................135 mW
9 mA at –15 V ........................................135 mW
Maximum Working Voltage
Cautions Refer to your DAQ device documentation for the voltage specifications for your
DAQ device.
Ensure that signals connected to SCC modules are used within the voltage ratings of the
modules to which they are connected. Refer to your SCC-XX user manual for the voltage
specifications for your SCC module.
Maximum working voltage refers to the signal voltage plus the
common-mode voltage.
Physical
Channel-to-earth .....................................11 VDC
Measurement Category I
Caution Do not use the SCC-2345 for connections to signals or for measurements within
Categories II, III, or IV.
Field-wiring diameter
(terminal block) ......................................26 to 16 AWG
SC-2345/2350 Carrier User Manual A-2 ni.com
Page 33

SC-2345 Connector Block
Appendix A Specifications
24.77 cm
(9.75 in.)
4.4 cm
(1.73 in.)
26.2 cm
(10.31 in.)
Figure A-1. SC-2345 Connector Block Dimensions
Weight.................................................... 1.66 kg (3 lb 10 oz)
I/O connectors ........................................ One 68-pin male SCSI connector;
one 6-pin male power connector
© National Instruments Corporation A-3 SC-2345/2350 Carrier User Manual
Page 34

Appendix A Specifications
SC-2345 with Configurable Connectors
(Rear and Side Cabled)
25.4 cm
(10.00 in.)
4.9 cm
(1.93 in.)
30.75 cm
(12.11 in.)
Figure A-2. SC-2345 With Configurable Connectors Dimensions
Weight ....................................................1.51 kg (3 lb 5 oz)
I/O connectors.........................................User-defined panelettes;
one 68-pin male SCSI connector;
one 6-pin male power connector
SC-2345/2350 Carrier User Manual A-4 ni.com
Page 35

Environmental
Safety
Appendix A Specifications
Operating temperature............................ 0 to 50 °C
Storage temperature ............................... –20 to 70 °C
Humidity ................................................ 10 to 90% RH, noncondensing
Maximum altitude .................................. 2,000 m
Pollution Degree (indoor use only) ........ 2
This product is designed to meet the requirements of the following
standards of safety for electrical equipment for measurement, control,
and laboratory use:
• IEC 61010-1, EN-61010-1
• UL 61010-1, CSA 61010-1
Note For UL and other safety certifications, refer to the product label or visit ni.com/
certification
in the Certification column.
, search by model number or product line, and click the appropriate link
Electromagnetic Compatibility
This product is designed to meet the requirements of the following
standards of EMC for electrical equipment for measurement, control,
and laboratory use:
• EN 61326 EMC requirements; Minimum Immunity
• EN 55011 Emissions; Group 1, Class A
• CE, C-Tick, ICES, and FCC Part 15 Emissions; Class A
Note For EMC compliance, operate this device according to product documentation.
© National Instruments Corporation A-5 SC-2345/2350 Carrier User Manual
Page 36

Appendix A Specifications
⬉ᄤֵᙃѻક∵ᶧࠊㅵ⧚ࡲ⊩ ˄Ё
˅
Ёᅶ᠋
CE Compliance
This product meets the essential requirements of applicable European
Directives, as amended for CE marking, as follows:
• 2006/95/EC; Low-Voltage Directive (safety)
• 2004/108/EEC; Electromagnetic Compatibility Directive (EMC)
Note Refer to the Declaration of Conformity (DoC) for this product for any additional
regulatory compliance information. To obtain the DoC for this product, visit
certification
, search by model number or product line, and click the appropriate link
in the Certification column.
Environmental Management
National Instruments is committed to designing and manufacturing
products in an environmentally responsible manner. NI recognizes that
eliminating certain hazardous substances from our products is beneficial
not only to the environment but also to NI customers.
ni.com/
For additional environmental information, refer to the NI and the
Environment Web page at
ni.com/environment. This page contains the
environmental regulations and directives with which NI complies, as well
as any other environmental information not included in this document.
Waste Electrical and Electronic Equipment (WEEE)
EU Customers At the end of their life cycle, all products must be sent to a WEEE recycling
center. For more information about WEEE recycling centers and National Instruments
WEEE initiatives, visit
ni.com/environment/weee.htm.
RoHS
National Instruments
݇Ѣ
National Instruments
(For information about China RoHS compliance, go to
Ё
ヺড়Ё⬉ᄤֵᙃѻકЁ䰤ࠊՓ⫼ᶤѯ᳝ᆇ⠽䋼ᣛҸ
ড়㾘ᗻֵᙃˈ䇋ⱏᔩ
RoHS
(RoHS)
ni.com/environment/rohs_china
ni.com/environment/rohs_china
DŽ
DŽ
.)
SC-2345/2350 Carrier User Manual A-6 ni.com
Page 37

SC-2350
Analog Input and Output
I/O connections ...................................... Eight, 20-pin connectors and
Typical maximum smart TEDS
sensor cable length ................................. 61 m (200 ft)
IEEE P1451.4 compliance ..................... Tier 2 (standard system
Appendix A Specifications
eight 2-channel TEDS screw
terminal blocks for analog-input
SCC modules;
two, 20-pin connectors for analog
output SCC modules
capability)
Note Future releases of NI-DAQmx might contain support for TEDS analog ouput
devices.
Onboard Voltage Reference
Output voltage........................................ 5.000 V ±2.5 mV
Output voltage drift................................ 5 ppm/°C max (at 0 to 70 °C)
Long-term stability................................. ±15 ppm/1,000 h
Output noise (0.1 to 10 Hz).................... 4 μV
Load regulation
Sourcing 0 < I
Sinking –10 < I
Quiescent current ...................................2 mA
Power consumption................................ 30 mW
< 10 mA............. 100 μV/mA
OUT
< 0 mA............. 400 μV/mA
OUT
p-p
LED Power Requirements
6.5 mA at 5 V......................................... 32.5 mW
9 mA at 15 V.......................................... 135 mW
9 mA at –15 V........................................ 135 mW
© National Instruments Corporation A-7 SC-2345/2350 Carrier User Manual
Page 38

Appendix A Specifications
Maximum Working Voltage
Cautions Refer to your DAQ device documentation for the voltage specifications for your
DAQ device.
Ensure that signals connected to SCC modules are used within the voltage ratings of the
modules to which they are connected. Refer to your SCC-XX user manual for the voltage
specifications for your SCC module.
Maximum working voltage refers to the signal voltage plus the
common-mode voltage.
Channel-to-earth .....................................11 VDC
Measurement Category I
Caution Do not use the SCC-2350 for connections to signals or for measurements within
Categories II, III, or IV.
SC-2345/2350 Carrier User Manual A-8 ni.com
Page 39

Physical
Appendix A Specifications
Field-wiring diameter
(terminal block)...................................... 26 to 16 AWG
SC-2350 with Configurable Connectors
(Side Cabled)
4.9 cm
(1.93 in.)
25.4 cm
(10.00 in.)
30.9 cm
(12.17 in.)
Figure A-3. SC-2350 Dimensions
Weight.................................................... 1.60 kg (3 lb 8.8 oz)
I/O connectors ........................................ User-defined panelettes;
one 68-pin male SCSI connector;
one 6-pin male power connector;
one 50-pin male test header
© National Instruments Corporation A-9 SC-2345/2350 Carrier User Manual
Page 40

Appendix A Specifications
Environmental
Safety
Operating temperature ............................0 to 50 °C
Storage temperature ................................–20 to 70 °C
Humidity.................................................10 to 90% RH, noncondensing
Maximum altitude...................................2,000 m
Pollution Degree (indoor use only) ........2
This product is designed to meet the requirements of the following
standards of safety for electrical equipment for measurement, control,
and laboratory use:
• IEC 61010-1, EN-61010-1
• UL 61010-1, CSA 61010-1
Note For UL and other safety certifications, refer to the product label or visit ni.com/
certification
in the Certification column.
, search by model number or product line, and click the appropriate link
Electromagnetic Compatibility
This product is designed to meet the requirements of the following
standards of EMC for electrical equipment for measurement, control,
and laboratory use:
• EN 61326 EMC requirements; Minimum Immunity
• EN 55011 Emissions; Group 1, Class A
• CE, C-Tick, ICES, and FCC Part 15 Emissions; Class A
Note For EMC compliance, operate this device according to product documentation.
SC-2345/2350 Carrier User Manual A-10 ni.com
Page 41

CE Compliance
⬉ᄤֵᙃѻક∵ᶧࠊㅵ⧚ࡲ⊩ ˄Ё
˅
Ёᅶ᠋
This product meets the essential requirements of applicable European
Directives, as amended for CE marking, as follows:
• 2006/95/EC; Low-Voltage Directive (safety)
• 2004/108/EEC; Electromagnetic Compatibility Directive (EMC)
Note Refer to the Declaration of Conformity (DoC) for this product for any additional
regulatory compliance information. To obtain the DoC for this product, visit
certification
, search by model number or product line, and click the appropriate link
in the Certification column.
Environmental Management
National Instruments is committed to designing and manufacturing
products in an environmentally responsible manner. NI recognizes that
eliminating certain hazardous substances from our products is beneficial
not only to the environment but also to NI customers.
Appendix A Specifications
ni.com/
For additional environmental information, refer to the NI and the
Environment Web page at
ni.com/environment. This page contains the
environmental regulations and directives with which NI complies, as well
as any other environmental information not included in this document.
Waste Electrical and Electronic Equipment (WEEE)
EU Customers At the end of their life cycle, all products must be sent to a WEEE recycling
center. For more information about WEEE recycling centers and National Instruments
WEEE initiatives, visit
ni.com/environment/weee.htm.
RoHS
National Instruments
݇Ѣ
National Instruments
(For information about China RoHS compliance, go to
Ё
ヺড়Ё⬉ᄤֵᙃѻકЁ䰤ࠊՓ⫼ᶤѯ᳝ᆇ⠽䋼ᣛҸ
ড়㾘ᗻֵᙃˈ䇋ⱏᔩ
RoHS
(RoHS)
ni.com/environment/rohs_china
ni.com/environment/rohs_china
DŽ
DŽ
.)
© National Instruments Corporation A-11 SC-2345/2350 Carrier User Manual
Page 42

Appendix A Specifications
SCC Power Modules
SCC-PWR01
Input
DC input voltage
From external power source ............+5 VDC ±5%
From E/M Series DAQ device ........+5 VDC ±5%
DC input power ......................................500 mW without SCC modules
Output
Maximum Power Output by Voltage Level
+5 VDC
(+4.17 to
Voltage Source
AT/PCI/PXI E/M Series
DAQ Device
1
DAQCard/DAQPad
E Series DAQ Device
2
External +5 VDC Supply 6.97 W
1
These power calculations apply to E/M Series DAQ devices that provide +5 VDC at 1 A at the I/O connector. Refer to the
specifications for the E/M Series DAQ device. Tests were performed using a 1 m cable. Longer cables yield a lower level of
power, but the difference is negligible for cables of 2 m or less in length.
2
These power calculations apply to E Series DAQ devices that provide +5 VDC at 250 mA at the I/O connector. Refer to the
specifications for the E Series DAQ device. Tests were performed using a 1 m cable. Longer cables yield a lower level of
power, but the difference is negligible for cables of 2 m or less in length.
*
Subtract 0.08 W for the SC-2350 carrier due to its TEDS circuitry.
+5.25 VDC)
4.18 W
0.80 W
*
*
*
Nominal
Voltage Level
Efficiency Line Regulation Load Regulation
+15 VDC
(+14.20 to
+15.25 VDC)
–15 VDC
(–14.20 to
–15.25 VDC)
0.87 W 0.87 W
0.24 W 0.24 W
0.87 W 0.87 W
Ripple and Noise
(DC to 10 MHz)
+5 VDC 100% System-dependent System-dependent System-dependent
+15 VDC 62% ±0.5% typ ±0.1% typ 15 mV
–15 VDC 62% ±0.5% typ ±0.1% typ 20 mV
SC-2345/2350 Carrier User Manual A-12 ni.com
rms
rms
typ
typ
Page 43

SCC-PWR02
Appendix A Specifications
Physical
Screw-terminal wiring diameter
(J1 connector)......................................... 24 to 16 AWG
PS01 Power Supply
AC input voltage .................................... 100 to 240 VAC
AC input frequency................................ 47 to 63 Hz
AC input current (steady state) .............. 1.0 A max
In-rush current (at cold start) ................. 30 A max
Max output ............................................. 45 W
Efficiency ............................................... 65% typ
Switching frequency .............................. 50 kHz nominal
Measurement Category .......................... II
Output (SCC-PWR02 Module)
Maximum
Power
Voltage Range
Available
+5 VDC (+4.64 to +5.25 VDC) 6.97 W
*
Line
Regulation
Load
Regulation
±1% ±9% 20 mV
+15 VDC (+14.45 to +15.25 VDC) 4.37 W ±5% ±10% 20 mV
–15 VDC (–14.45 to –15.25 VDC) 4.37 W ±5% ±10% 20 mV
*
Subtract 0.08 W for the SC-2350 carrier due to its TEDS circuitry.
Output Noise
(DC to
10 MHz)
Other Features (PS01)
rms
rms
rms
typ
typ
typ
Short-circuit protection .......................... Yes
Overvoltage protection........................... 343 VAC (130%)
Dimensions of the external supply......... 15.5 cm × 8.5 cm × 4.8 cm
© National Instruments Corporation A-13 SC-2345/2350 Carrier User Manual
(6.1 in. × 3.3 in. × 1.9 in.)
Page 44

Appendix A Specifications
SCC-PWR03
Environment for External Supply
Operating temperature ............................0 to 40 °C
Storage temperature ................................–20 to 80 °C
Relative humidity ...................................10 to 90%, noncondensing
Maximum altitude...................................2,000 m
Pollution Degree (indoor use only) ........2
Input
DC input voltage.....................................7 to 42 VDC
Reverse-voltage protection .....................–42 VDC max
Power ......................................................325 mA at 12 VDC
Output
Maximum
Power
Voltage Range
Available
+5 VDC (+4.36 to +5.25 VDC) 6.55 W
*
Line
Regulation
Load
Regulation
±1% ±12% 20 mV
+15 VDC (+14.25 to +15.75 VDC) 0.87 W ±5% ±10% 20 mV
–15 VDC (–14.45 to –15.75 VDC) 0.87 W ±5% ±10% 20 mV
* Subtract 0.08 W for the SC-2350 carrier due to its TEDS circuitry.
Output Noise
(DC to
10 MHz)
Physical
Screw-terminal wiring diameter
(J1 connector on module) .......................24 to 16 AWG
rms
rms
rms
typ
typ
typ
SC-2345/2350 Carrier User Manual A-14 ni.com
Page 45

Carrier Socket Signal
Assignments
This appendix contains descriptions of all the signals carried by the 20-pin
sockets on the SC-2345/2350 carrier. The pins are laid out on SCC modules
as shown in Figure B-1. For more information about the SC-2345/2350
carrier connector locations, refer to the SCC Quick Start Guide.
B
4 1
5
1Pin 1 2Pin 2 3PWB Key 4Pin 19 5Pin 20
Figure B-1. SCC Module Bottom View
3
2
© National Instruments Corporation B-1 SC-2345/2350 Carrier User Manual
Page 46

Appendix B Carrier Socket Signal Assignments
SC-2345 Carrier
Table B-1. SC-2345 Carrier—Sockets J1–J16
Pin Number
J9–J16: Digital I/O or
Single-Stage Analog Input
J1–J8: Single- or
Dual-Stage Analog Input
1 AI (X)+ to second stage AI (X) to DAQ device
2 AI (X)– to second stage —
3 AI SENSE AI SENSE
4 AI (X+8)+ to second stage AI (X+8) to DAQ device
5 AI SENSE —
6 AI GND AI GND
7 P0.(X) PFI 7/AI SAMP CLK
8 AI (X+8)– to second stage —
9 +5 V +5 V
10 GND GND
11 A GND A GND
12 REF 5 V REF 5 V
13 +15 V +15 V
14 –15 V –15 V
15 — AI SENSE
16 To second stage To firs t sta ge
17 — AI (X)– from first stage
18 — AI (X+8)+ from first stage
19 — AI (X)+ from first stage
20 — AI (X+8)– from first stage
SC-2345/2350 Carrier User Manual B-2 ni.com
Page 47

Appendix B Carrier Socket Signal Assignments
Table B-2. SC-2345 Carrier—Sockets J17–J18
Pin Number J17–J18: Analog Output DAC0 J17–J18: Analog Output DAC1
1 AO 0 AO 1
2 AO GND AO GND
3 AO 1 AO 0
4 AO GND AO GND
5 APFI 0/AO EXT REF APFI 0/AO EXT REF
6 PFI 5/AO SAMP CLK PFI 5/AO SAMP CLK
7 — —
8 PFI 6/AO START TRIG PFI 6/AO START TRIG
9 +5 V +5 V
10 GND GND
11 A GND A GND
12 REF 5 V REF 5 V
13 +15 V +15 V
14 –15 V –15 V
15 — —
16 — —
17 — —
18 — —
19 — —
20 — —
© National Instruments Corporation B-3 SC-2345/2350 Carrier User Manual
Page 48

Appendix B Carrier Socket Signal Assignments
Table B-3. SC-2345 Carrier—Sockets J19–J20
Pin Number J19–J20: GPCTR 0 J19–J20: GPCTR 1
1 PFI 12/CTR0 OUT PFI 13/CTR1 OUT
2 PFI 14/FREQ OUT PFI 14/FREQ OUT
3 PFI 9/CTR 0 GATE PFI 4/ CTR 1 GATE
4 P0.6 P0.7
5 PFI 8/CTR 0 SOURCE PFI 3/CTR 1 SOURCE
6 — —
7 — —
8 — —
9 +5 V +5 V
10 GND GND
11 A GND A GND
12 REF 5 V REF 5 V
13 +15 V +15 V
14 –15 V –15 V
15 — —
16 — —
17 — PFI 1/AI REF TRIG
18 PFI 5/AO SAMP CLK PFI 11/AI HOLD COMP
19 PFI 0/AI START TRIG PFI 0/AI START TRIG
20 PFI 6/AO START TRIG PFI 10/EXTSTROBE
SC-2345/2350 Carrier User Manual B-4 ni.com
Page 49

SC-2350
Appendix B Carrier Socket Signal Assignments
Table B-4. SC-2350—Socket J1–J8
Pin Number J1–J8: Analog Input
1 AI (X) to DAQ device
2 —
3 AI SENSE
4 AI (X+8) to DAQ device
5 —
6 AI GND
7 PFI 7/AI SAMP CLK
8 —
9 +5 V
10 GND
11 A GND
12 REF 5 V
13 +15 V
14 –15 V
15 1-Wire (X+8)
16 1-Wire (X)
17 —
18 —
19 —
20 —
© National Instruments Corporation B-5 SC-2345/2350 Carrier User Manual
Page 50

Appendix B Carrier Socket Signal Assignments
Table B-5. SC-2350—Sockets J17–J18
Pin Number J17: Analog Output DAC0 J18: Analog Output DAC1
1 AO 0 AO 1
2 AO GND AO GND
3 AO 1 AO 0
4 AO GND AO GND
5 APFI 0/AO EXT REF APFI 0/AO EXT REF
6 PFI 5/AO SAMP CLK PFI 5/AO SAMP CLK
7 — —
8 PFI 6/AO START TRIG PFI 6/AO START TRIG
9 +5 V +5 V
10 GND GND
11 A GND A GND
12 REF 5 V REF 5 V
13 +15 V +15 V
14 –15 V –15 V
15 1-Wire (AO 1) 1-Wire (AO 0)
16 1-Wire (AO 0) 1-Wire (AO 1)
17 — —
18 — —
19 — —
20 — —
SC-2345/2350 Carrier User Manual B-6 ni.com
Page 51

SC-2345/2350 Carrier
Appendix B Carrier Socket Signal Assignments
Table B-6. SC-2345/2350 Carrier—Socket J21
Pin Number Signal
1 A GND
2 A GND/AI GND
3 +15 V
4 –15 V
5 +5 V
6 —
7 External +5 VDC
8 External chassis GND
9 External +5 VDC
10 External chassis GND
11 External +15 VDC
12 External common
13 External –15 VDC
14 External common
15 DAQ device +5 VDC
16 DAQ device GND
17 DAQ device +5 VDC
18 DAQ device GND
19 DAQ device +5 VDC
20 DAQ device GND
© National Instruments Corporation B-7 SC-2345/2350 Carrier User Manual
Page 52

Appendix B Carrier Socket Signal Assignments
Table B-7. SC-2345/2350 Carrier—SCC-PWR0X Module Pin Signal Assignments (Socket J21)
Pin
Number
1 A GND A GND A GND Ground reference for
2 AI GND AI GND AI GND Signal ground from E/M Series
3 +15 V out +15 V out +15 V out +15 V supply to all SCC modules
4 –15 V out –15 V out –15 V out –15 V supply to all SCC modules
5 — External +5 V out — +5 V supply to all SCC modules
6 — — — —
7 — External +5 VDC — From external supply
8 — — — —
9 — External +5 VDC — From external supply
PWR01 Signal PWR02 Signal PWR03 Signal Signal Description
±15 V supply
DAQ device
10 — — — —
11 — External +15 VDC — From external supply
12 — External common DC — From external supply
13 — External –15 VDC — From external supply
14 — External common DC — From external supply
15 DAQ device +5 V — — From E/M Series DAQ device
16 DAQ device GND — — From E/M Series DAQ device
17 DAQ device +5 V — — From E/M Series DAQ device
18 DAQ device GND — — From E/M Series DAQ device
19 DAQ device +5 V — — From E/M Series DAQ device
20 DAQ device GND — — From E/M Series DAQ device
SC-2345/2350 Carrier User Manual B-8 ni.com
Page 53

Connector
Diagram
12
34
56
78
910
11 12
13 14
15 16
17 18
19 20
21 22
23 24
25 26
27 28
29 30
31 32
33 34
35 36
37 38
39 40
41 42
43 44
45 46
47 48
49 50
Appendix B Carrier Socket Signal Assignments
Table B-8. SC-2350 TEDS Test Header Pin Signal Assignments (Socket J35)
Signal Name Pin Number Pin Number Signal Name
AI TEDS CHDATA (0) 1 2 AI TEDS CHRTN (0)
AI TEDS CHDATA (8) 3 4 AI TEDS CHRTN (8)
AI TEDS CHDATA (1) 5 6 AI TEDS CHRTN (1)
AI TEDS CHDATA (9) 7 8 AI TEDS CHRTN (9)
AI TEDS CHDATA (2) 9 10 AI TEDS CHRTN (2)
AI TEDS CHDATA (10) 11 12 AI TEDS CHRTN (10)
AI TEDS CHDATA (3) 13 14 AI TEDS CHRTN (3)
AI TEDS CHDATA (11) 15 16 AI TEDS CHRTN (11)
AI TEDS CHDATA (4) 17 18 AI TEDS CHRTN (4)
AI TEDS CHDATA (12) 19 20 AI TEDS CHRTN (12)
AI TEDS CHDATA (5) 21 22 AI TEDS CHRTN (5)
AI TEDS CHDATA (13) 23 24 AI TEDS CHRTN (13)
AI TEDS CHDATA (6) 25 26 AI TEDS CHRTN (6)
AI TEDS CHDATA (14) 27 28 AI TEDS CHRTN (14)
AI TEDS CHDATA (7) 29 30 AI TEDS CHRTN (7)
AI TEDS CHDATA (15) 31 32 AI TEDS CHRTN (15)
AO TEDS C HDATA (0) 33 34 AO TEDS CHRTN (0)
AO TEDS C HDATA (1) 35 36 AO TEDS CHRTN (1)
NC 37 38 NC
NC 39 40 NC
NC 41 42 NC
NC 43 44 NC
NC 45 46 NC
NC 47 48 NC
NC = No
Connect
© National Instruments Corporation B-9 SC-2345/2350 Carrier User Manual
NC 49 50 NC
Page 54

SCC Power Requirements
and Solutions
Installing new SCC modules in the SC-2345/2350 carrier increases the
power requirements of the SCC system. Depending on the number and
types of modules you are using, the power requirements of an SCC system
can eventually exceed the amount of power available from the SCC-PWR
module. Copy the following worksheets and use them to recalculate the
power requirements of the SCC system when you add new SCC modules.
To calculate the analog and digital power requirements for all the SCC
modules in each SC-2345/2350 carrier, complete the following steps:
1. Enter the number of modules of each type that you plan to use in
Tabl e C -1, Number of Modules per Carrier.
2. For each module type, multiply Number of Modules per Carrier by
Maximum Analog Power Required (mW) and enter the product in
Analog Power Required by Module Type.
C
3. For each module type, multiply Number of Modules per Carrier by
Maximum Digital Power Required (mW) and enter the product in
Digital Power Required by Module Type.
4. In Table C-2, total Analog Power Required by Module Type and enter
the sum as Total Analog Power Required per Carrier.
5. In Table C-2, total Digital Power Required by Module Type and enter
the sum as Total Digital Power Required per Carrier.
6. Use Table C-3 and the sections that follow to determine which power
option works for your system. The calculated power requirement must
be lower than the available power for each power type.
© National Instruments Corporation C-1 SC-2345/2350 Carrier User Manual
Page 55

Appendix C SCC Power Requirements and Solutions
Table C-1. Power Requirements of SCC Modules by Module Type
Maximum
Digital Power
Required
(mW)
SCC Module
Maximum Analog
Power Required
(mW)
SCC-A10 90 0
SCC-AIXX 375 525
SCC-AO10 180 1150
SCC-CI20 75 0
SCC-CO20 175 645
SCC-CTR01 0 140
SCC-DI01 0 61
SCC-DO01 0 70
SCC-FT01 — —
SCC-FV01 60 0
SCC-ACC01 80 330
SCC-LP01,
135 0
SCC-LP02
Number of
Modules per
Carrier
Analog Power
Required by
Module Type
Digital Power
Required by
Module Type
SCC-LP03,
475 0
SCC-LP04
SCC-RLY01 0 300
SCC-RTD01 135 153
SCC-SG0X 103 115
SCC-SG11 0 0.1
SCC-SG24 340 930
SCC-TCXX 60 0
Tota l =
SC-2345/2350 Carrier User Manual C-2 ni.com
Page 56

Appendix C SCC Power Requirements and Solutions
Table C-2. Total Power Requirements per Carrier
Total Analog Power
Required per Carrier
Total Digital Power
Required per Carrier
Table C-3. SC-2345/2350 Carrier: Power Available from SCC-PWR Modules
SCC-PWR Module
PWR01 with AT/PCI/PXI
1
PWR01 with DAQCard/DAQPad
PWR01 with External
+5 VDC Supply
3
Maximum
Analog Power
Available, P
2
AMax
1.74 W 4.18 W
0.49 W 0.80 W
1.74 W 6.97 W
Maximum
Digital Power
Available, P
PWR02 8.74 W 6.97 W
PWR03 with External
1.74 W 6.55 W
7–42 VDC Supply
Total Combined Power
Required per Carrier
Power Available
from Power
DMax
*
*
*
*
*
Supply, P
5.00 W
1.25 W
External
N/A
External
S
1
These power calculations apply to E/M Series DAQ devices that provide +5 VDC at 1 A at the I/O connector. Refer to the
specifications for the E/M Series DAQ device. Tests were performed using a 1 m cable. Longer cables yield a lower level of
power, but the difference is negligible for cables of 2 m or less in length.
2
These power calculations apply to E Series DAQ devices that provide +5 VDC at 250 mA at the I/O connector. Refer to the
specifications for the E Series DAQ device. Tests were performed using a 1 m cable. Longer cables yield a lower level of
power, but the difference is negligible for cables of 2 m or less in length.
3
Refer to the Calculating the Power Available from the SCC-PWR01 section.
* Subtract 0.08 W for the SC-2350 carrier due to its TEDS circuitry.
© National Instruments Corporation C-3 SC-2345/2350 Carrier User Manual
Page 57

Appendix C SCC Power Requirements and Solutions
Calculating the Power Available from the SCC-PWR01
To maximize the amount of power available from the SCC-PWR01, use
an external +5 VDC power supply with a minimum rating of 10.2 W.
Analog power available is limited by the 2 W DC–DC converter on the
SC-2345/2350 carrier and cannot exceed 1.74 W.
SC-2345 Carrier
For the SCC-PWR01 to supply enough power for your SCC configuration
in the SC-2345 carrier, the following three conditions must be true:
P
≤ P
A
AMax
and
P
≤ P
D
DMax
and
where
P
is the total analog power required by your SCC configuration,
A
in watts;
P
AMax
Tabl e C -3;
P
is the total digital power required by your SCC configuration,
D
in watts;
P
DMax
Tabl e C-3 ; a nd
P
is the rating of the power supply in watts.
S
P
/0.62 + PD + 0.45 W ≤ P
A
S
is the maximum analog power available in watts, from
is the maximum digital power available in watts, from
SC-2345/2350 Carrier User Manual C-4 ni.com
Page 58

SC-2350 Carrier
Appendix C SCC Power Requirements and Solutions
For the SCC-PWR01 to supply enough power for your SCC configuration
in the SC-2350 carrier, the following three conditions must be true:
P
≤ P
A
AMax
and
P
≤ P
D
DMax
and
P
/0.62 + PD + 0.53 W ≤ P
A
S
where
P
is the total analog power required by your SCC configuration,
A
in watts;
P
is the maximum analog power available in watts, from
AMax
Tabl e C -3;
P
is the total digital power required by your SCC configuration,
D
in watts;
P
is the maximum digital power available in watts, from
DMax
Tabl e C-3 ; a nd
P
is the rating of the power supply in watts.
S
Calculating the Power Available from the SCC-PWR02
The following section discusses the conditions which must be met for the
SCC-PWR02 to supply enough power for the SCC configuration on the
SC carriers.
© National Instruments Corporation C-5 SC-2345/2350 Carrier User Manual
Page 59

Appendix C SCC Power Requirements and Solutions
SC-2345/2350 Carrier
For the SCC-PWR02 to supply enough power for your SCC configuration
on the SC-2345/2350 carrier, the following two conditions must be true:
and
where
P
is the total analog power required by your SCC configuration,
A
in watts;
P
is the maximum analog power available in watts, from
AMax
Tabl e C -3;
P
is the total digital power required by your SCC configuration,
D
in watts; and
P
is the maximum digital power available in watts, from
DMax
Tabl e C -3.
P
≤ P
A
AMax
P
≤ P
D
DMax
Calculating the Power Available from the SCC-PWR03
The following section discusses the conditions which must be met for the
SCC-PWR03 to supply power to the SCC configuration on the SC carriers.
SC-2345 Carrier
For the SCC-PWR03 to supply enough power for your SCC configuration
in the SC-2345 carrier, the following three conditions must be true:
P
≤ P
A
AMax
and
P
/0.62 + PD ≤ P
and
where
A
P
/0.62 + PD + 0.45 W ≤ 0.75P
A
P
is the total analog power required by your SCC configuration,
A
in watts;
DMax
S
SC-2345/2350 Carrier User Manual C-6 ni.com
P
is the maximum analog power available in watts, from
AMax
Tabl e C -3;
Page 60

SC-2350 Carrier
Appendix C SCC Power Requirements and Solutions
PD is the total digital power required by your SCC configuration,
in watts;
P
is the maximum digital power available in watts, from
DMax
Tabl e C-3 ; a nd
P
is the rating of the power supply in watts.
S
For the SCC-PWR03 to supply enough power for your SCC configuration
in the SC-2350 carrier, the following three conditions must be true:
P
≤ P
A
AMax
and
P
/0.62 + PD ≤ P
A
DMax
and
P
/0.62 + PD + 0.53 W ≤ 0.75P
A
S
where
P
is the total analog power required by your SCC configuration,
A
in watts;
P
is the maximum analog power available in watts, from
AMax
Tabl e C -3;
P
is the total digital power required by your SCC configuration,
D
in watts;
P
is the maximum digital power available in watts, from
DMax
Tabl e C-3 ; a nd
P
is the rating of the power supply in watts.
S
© National Instruments Corporation C-7 SC-2345/2350 Carrier User Manual
Page 61

Common Questions
Which power option should I use for my application?
Refer to Appendix C, SCC Power Requirements and Solutions, to
determine which option to use.
I am sampling a very-low-voltage, noisy signal. How should I condition
the signal?
If the signal is within the ±50 mV range, use an SCC-AI07 isolated analog
input module. If the signal is of higher amplitude, but still within the
±100 mV range, use an SCC-AI06. Each of these modules has a 10 kHz
lowpass filter. The SCC-AI07 applies a gain of 200, and the SCC-AI06
applies a gain of 100.
Why should I amplify a noisy, low-amplitude analog signal using an
SCC module? Can’t I just amplify it using my E/M Series DAQ device?
D
One reason to amplify low-level signals close to the signal source instead
of at the E/M Series DAQ device is to increase the signal-to-noise ratio. If
you use the E/M Series DAQ device to amplify the signal, the E/M Series
DAQ device also measures and digitizes any noise that enters the lead wires
along the signal path. However, if you amplify the signal closer to the signal
source, the ratio of signal voltage to noise voltage that enters the lead wires
is larger. Therefore, the noise has a less destructive effect on the signal.
I need to sample a 24 V signal. Which SCC module(s) should I use?
Use an SCC-AI01 isolated analog input module. The SCC-AI01 has an
input range of ±42 V and applies a gain of 0.2, yielding a signal of ±8.4 V.
This produces a signal within the input range of the E/M Series DAQ
device.
© National Instruments Corporation D-1 SC-2345/2350 Carrier User Manual
Page 62

Appendix D Common Questions
I am taking measurements from a strain gage mounted on a motor, and
I am concerned that voltages from the motor might damage my
E/M Series DAQ device. What can I use for isolation?
In this case, to make an isolated-strain measurement, use two SCC
modules.
• Use an isolated analog output module to provide excitation.
• If remote sense is desired, use a third module such as an SCC-AIXX
• To measure the return voltage from the strain gage, use the appropriate
module. Use an isolated analog input module with appropriate range
to monitor the excitation voltage (remote sense the voltage). For
example, use the SCC-AI03 to perform remote sense if you are using
10 V
. If you are using 5 VEX, use the SCC-AI04 to perform remote
EX
sense. Use the remote sense voltage measurements to scale the strain
measurements. Use the remote sense configuration option. Refer to
the NI-DAQmx Help, click Search, and enter
remote sense for more
information about remote sensing.
range isolated analog input module. For example, if the strain gauge
returns a ±2 mV signal/V
, then the maximum signal output is
EX
±20 mV. Use the SCC-AI07, which has a ±50 mV range, and the gain
from the E/M Series DAQ device to completely utilize the A/D range
and achieve maximum accuracy with isolation. Isolation amplifiers
inherently contain noise, therefore NI recommends averaging a buffer
of measurements for maximum accuracy. Use the offset adjust screw
potentiometer on the SCC-AI07 to perform an offset null.
Which modules should I use for a feedback system? I want to send an
AO signal to an external object, read an AI signal from the object, and
adjust the AO based on the AI signal. When a certain condition is
reached in the AI, I want a DO module to turn on an alarm or LED.
Can you tell me how to configure and wire this system?
For the AO, use an SCC-CO20 isolated current output module, or design
and build a circuit on the SCC-FT01 that produces the type of output signal
you need. Use socket J17 or J18 for the analog output and control the output
using AO 0 or AO 1 on the E/M Series DAQ device. Refer to the
SCC-CO20 Isolated Current Output Module User Guide for instructions on
wiring the module to the external circuit. For the AI, the module you use
depends on the type of signal you are reading from the external object
(circuit). For example, plug an SCC-AIXX module into socket J1 and the
module sends one signal to AI 0 and one signal to AI 8 on the E/M Series
DAQ device. Refer to the SCC-AI Series Isolated Analog Input Modules
User Guide for instructions on wiring the module to the external circuit.
Plug an SCC-DI01 module into socket J9, and it is controlled by
SC-2345/2350 Carrier User Manual D-2 ni.com
Page 63

Appendix D Common Questions
E/M Series DAQ device digital (P0.0) channel. Only the SC-2345 carrier
can support a digital module. Use software to associate the channels with
one another.
How can I use the SC-2350 carrier to write to the IEEE P1451.4
TEDS-compatible sensor?
Refer to
ni.com/info and enter info code rdtntg for more information
about using the SC-2350 carrier with TEDS-compatible sensors.
Where can I find more information about TEDS-compatible sensors?
For more information about TEDS, refer to the following locations:
• SCXI-1314T TEDS Bridge Sensor Terminal Block Installation Guide
•
ni.com/devzone
• Refer to ni.com/info, and enter any of the following info codes:
–
rd2350
– rdsenr
– rdpnpy
– rdpnsn
– rdtntg
© National Instruments Corporation D-3 SC-2345/2350 Carrier User Manual
Page 64

Glossary
Symbol Prefix Value
ppico10
nnano10
µ micro 10
m milli 10
k kilo 10
Mmega10
Ggiga10
Ttera10
Symbols
% percent
+ positive of, or plus
–12
–9
–6
–3
3
6
9
12
/per
°degree
Ω ohm
A
A amperes
AI analog input channel signal
AI GND analog input ground signal
AI HOLD COMP scan clock signal
AI SAMP CLOCK start clock signal
© National Instruments Corporation G-1 SC-2345/2350 Carrier User Manual
Page 65

Glossary
AI SENSE analog input sense signal
AO SAMP CLK update signal
AO GND analog output ground signal
AT used in the product names of E Series DAQ devices based on the ISA bus
architecture, for example, AT-MIO-16E
AWG American Wire Gauge
C
CCelsius
CH channel
channel pin or wire lead to which you apply or from which you read the analog or
digital signal. Analog signals can be single-ended or differential. For digital
signals, you group channels to form ports. Ports usually consist of either
four or eight digital channels.
connector block same as carrier, as in SC-2345/2350 carrier
counter/timer a circuit that counts external pulses or generates clock pulses (timing)
CTR 0 GATE general purpose counter/timer 0 gate signal
CTR 0 OUT general purpose counter/timer 0 output signal
CTR 0 SOURCE general purpose counter/timer 0 clock source signal
CTR 1 GATE general purpose counter/timer 1 gate signal
CTR 1 OUT general purpose counter/timer 1 output signal
CTR 1 SOURCE general purpose counter/timer 1 clock source signal
SC-2345/2350 Carrier User Manual G-2 ni.com
Page 66

Glossary
D
DAC digital-to-analog converter—an electronic device, often an integrated
circuit, that converts a digital number into a corresponding analog voltage
or current
DAQ data acquisition—(1) collecting and measuring electrical signals from
sensors, transducers, and test probes or fixtures and inputting them to a
computer for processing; (2) collecting and measuring the same kinds of
electrical signals with A/D and/or DIO boards plugged into a computer,
and possibly generating control signals with D/A and/or DIO boards in the
same computer
DAQ device a plug-in data acquisition board, card, or pad that can contain multiple
channels and conversion devices. Plug-in boards and PCMCIA cards are
examples of DAQ devices.
DAQCard a data acquisition device on a PCMCIA card
DAQPad a data acquisition device that uses the IEEE 1394 bus architecture
DC direct current
drop-down listbox a graphical box with a down arrow button that lets you select values or
options from a list. To select a value or option in the selection box, click the
down arrow for a complete list values or options, then use your arrow keys
or mouse to select a value or option from the list.
E
E Series a standard architecture for instrumentation-class, multichannel data
acquisition devices
EMI electromagnetic interference
EXT REF external reference signal
EXTSTROBE external strobe signal
© National Instruments Corporation G-3 SC-2345/2350 Carrier User Manual
Page 67

Glossary
F
F
c
filtering a type of signal conditioning that allows you to filter unwanted signals from
FREQ OUT frequency output signal
frequency cutoff
the signal you are trying to measure
G
g a unit of acceleration equal to 9.80 m/s
gain the factor by which a signal is amplified, sometimes expressed in decibels
2
H
h hour
hardware the physical components of a computer system, such as the circuit boards,
plug-in boards, chassis, enclosures, peripherals, cables, and so on
Hz hertz—the number of scans read or updates written per second
I
I/O input/output—the transfer of data to/from a computer system involving
communications channels, operator interface devices, and/or data
acquisition and control interfaces
IEEE P1451 family of IEEE standards defining a variety of smart transducer interfaces.
All of the standards within this family support the concept of a TEDS, that
provides self-identification and plug and play operation to transducers.
IEEE P1451.4 an IEEE standard that defines the concept of plug-and-play sensors with
analog signals. This is accomplished with the addition of a TEDS in
memory, typically an EEPROM, embedded within the sensor and
communicated through a simple, low-cost serial connection.
SC-2345/2350 Carrier User Manual G-4 ni.com
Page 68

Glossary
K
KKelvin
L
LED light-emitting diode
M
M Series An architecture for instrumentation-class, multichannel data acquisition
devices based on the earlier E Series architecture with added new features.
Maxim/Dallas
Semiconductor
1-Wire Protocol
measurement The quantitative determination of a physical characteristic. In practice,
a very simple, low-cost, master-slave serial communication protocol,
requiring that a single master device, such as the data acquisition system,
supply power and initiate each transaction with each node according to a
defined transaction timing sequence, on a single wire and return
measurement is the conversion of a physical quantity or observation to a
domain where a human being or computer can determine the value.
N
NI-DAQ National Instruments driver software for DAQ hardware
noise an undesirable electrical signal—noise comes from external sources such
as the AC power line, motors, generators, transformers, fluorescent lights,
soldering irons, CRT displays, computers, electrical storms, welders, radio
transmitters, and internal sources such as semiconductors, resistors, and
capacitors. Noise corrupts signals you are trying to send or receive.
NRSE nonreferenced single-ended mode—all measurements are made with
respect to a common (NRSE) measurement system reference, but the
voltage at this reference can vary with respect to the measurement system
ground
© National Instruments Corporation G-5 SC-2345/2350 Carrier User Manual
Page 69

Glossary
P
P
A
analog power
pad a hole in the PWB used by the customer for signal connection
panelette small panels fitted with one or more connectors, controls, or indicators
PCI Peripheral Component Interconnect—a high-performance plug-and-play
expansion bus architecture used in some E Series DAQ devices
P
D
digital power
peak to peak a measure of signal amplitude; the difference between the highest and
lowest excursions of the signal
PFI programmable function input
plug & play sensor a transducer with an associated TEDS—includes both Virtual TEDS and
smart TEDS sensors
P0. digital input/output
p-p See peak to peak
pp peak to peak
ppm parts per million
PXI PCI eXtensions for Instrumentation—a rugged, open system for modular
instrumentation based on CompactPCI, with special mechanical, electrical,
and software features. See also PCI.
R
rms root mean square—the square root of the average value of the square of the
instantaneous signal amplitude; a measure of signal amplitude
RSE referenced single-ended mode—all measurements are made with respect
to a common reference measurement system or a ground. Also called a
grounded measurement system.
SC-2345/2350 Carrier User Manual G-6 ni.com
Page 70

Glossary
S
s seconds
scan one or more analog or digital input samples. Typically, the number of input
samples in a scan is equal to the number of channels in the input group. For
example, one pulse from the scan clock produces one scan which acquires
one new sample from every analog input channel in the group.
SCC signal conditioning component
SCC-LP refers to all versions in the LP series
SCC-PWR refers to an SCC power module
SCC-TC refers to both the SCC-TC01 and the SCC-TC02
SCSI small computer system interface
SE single-ended—a term used to describe an analog input that is measured
with respect to a common ground
sensor a device that responds to a physical stimulus (heat, light, sound, pressure,
motion, flow, and so on), and produces a corresponding electrical signal
signal conditioning the manipulation of signals to prepare them for digitizing
smart TEDS sensor a transducer with a built-in self-identification EEPROM that provides
the TEDS
T
TEDS Transducer Electronic Data Sheet—self-identification and calibration
information, such as sensor identification information, sensitivity,
calibration parameters, location ID, and custom user data, stored in an
EEPROM embedded in an analog sensor. For information on IEEE P1451.4
TEDS-compatible smart sensors, refer to
ni.com/zone.
© National Instruments Corporation G-7 SC-2345/2350 Carrier User Manual
Page 71

Glossary
TEDS Class I sensor a smart TEDS sensor with a constant-current powered transducer with
a two-wire interface such as an accelerometer. Class 1 transducers also
include diodes or analog switches with which the multiplexing of the
analog signal with the digital TEDS information on the single-pair of
wires is possible. The digital portion of the mixed-mode interface
(Class 1 or Class 2) is based on the 1-Wire protocol from Maxim/Dallas
Semiconductor
TEDS Class II sensor a smart TEDS sensor with separate wires for the analog and digital portions
of the TEDS mixed-mode interface. The analog input/output of the
transducer is left unmodified, and the digital TEDS circuit is added in
parallel, such as thermocouples, RTDs and bridge-based sensors. The
digital portion of the mixed-mode interface (Class 1 or Class 2) is based
on the 1-Wire protocol from Maxim/Dallas Semiconductor.
For more information, refer to Maxim/Dallas Semiconductor
1-Wire Protocol.
thermocouple a temperature sensor created by joining two dissimilar metals. The junction
produces a small voltage as a function of the temperature.
threshold a reference voltage, that when compared to another voltage, triggers an
event
TRIG trigger signal
V
Vvolts
V
COM
V
DC
V
IN
virtual TEDS Transducer Electronic Data Sheet, not directly built into the transducer
voltage input signal reference
volts direct current
voltage input signal
itself, but accessible through a computer file, which has been downloaded
from the internet or created locally
V
SS
SC-2345/2350 Carrier User Manual G-8 ni.com
voltage supply signal
Page 72

Glossary
W
Wwatts
working voltage the highest voltage that should be applied to a product during normal use,
normally well under the breakdown voltage for safety margin
© National Instruments Corporation G-9 SC-2345/2350 Carrier User Manual
Page 73

Index
A
analog input, 1-2, 1-6, 1-9, A-1, A-7, B-2, D-1,
D-2, G-1
analog output, D-2
C
configuration and connectivity
terminal-block signal connections, 2-1
conventions used in the manual, v
D
documentation, conventions used in the
manual, v
drivers, software, 1-3
I
I/O connector pins
pin signal connections, B-1
table, B-2
IEEE 1451.4, 1-9, 1-10
IEEE P1451.4, 1-10
info codes, 1-10
installation
SCC into SC-2345 with configurable
connectors
mounting options, 2-2
rack-mount option (figure), 2-3
stack-mount option (figure), 2-4
isolated analog input, D-1
M
mounting options, 2-2
rack-mount option (figure), 2-3
stack-mount option (figure), 2-4
N
ni.com
downloads, 1-3
info, 1-10
NI-DAQ software, 1-3
P
panelette, 1-1, 1-2, 1-17, 1-19, A-4, A-9
pin assignments, SC-2345 terminal block
(figure), 2-2
pin signal connections (table), B-2
power modules, 1-2, 1-15
SCC-PWR01, 1-15, 1-17, A-12
SCC-PWR02, 1-15, 1-18, A-13
SCC-PWR03, 1-15, 1-19, A-14
power requirements
calculating, C-1
specifications, A-2, A-7
Q
quick reference label, 1-3, 1-15, 2-1
R
rack mounting, 1-2, 2-2
requirements for getting started, 1-2
S
SCC modules
SCC power requirements and
solutions, C-1
SCC socket configuration and color codes
(figure), 2-1
© National Instruments Corporation I-1 SC-2345/2350 Carrier User Manual
Page 74

Index
SCC-PWR power modules
parts locator diagram, 1-15
SCC-PWR01
overview, 1-17
specifications, A-12
SCC-PWR02
overview, 1-18
specifications, A-14
SCC-PWR03
overview, 1-19
specifications, A-14
signal connections
terminal-block signal connections, 2-1
specifications
SC-2345, A-1
SC-2350, A-7
SCC PWR power modules
SCC-PWR01, A-12
SCC-PWR02, A-13
SCC-PWR03, A-14
T
TEDS, 1-2, 1-10, 1-13, 1-14
Class I, 1-9
Class II, 1-9
terminal block
input/output
connector pin assignments,
connector pin assignments,
input/output, 2-2
terminal-block signal connections
pin assignments (figure), 2-2
V
virtual TEDS, 1-10
W
Web, National Instruments, 1-3
SC-2345/2350 Carrier User Manual I-2 ni.com
 Loading...