

Page 1

INSTALLATION GUIDE
Installing Your PCI-GPIB,
PXI-GPIB, or PMC-GPIB
and NI-488.2 for Solaris
This document describes how to install and configure your GPIB hardware and
NI-488.2 software. Refer to the section that describes the installation for your
particular board. Other documentation, including the software reference manual,
is available on your NI-488.2 software for Solaris CD in the
folder.
Before you install your GPIB controller, consult the manual that came with your
workstation for specific instructions and warnings. You must have superuser
privileges to install the hardware and software.
October 2003
323726A-01
\documentation
Page 2

Installing the PCI-GPIB
Caution Electrostatic discharge can damage several components on
your GPIB board. To avoid electrostatic damage when you handle the
module, touch the antistatic plastic package to a metal part of your
computer chassis before you remove the board from the package.
Complete the following steps to install the PCI-GPIB.
1. Log on as superuser. To become a superuser, type
su root and enter the root
password.
2. Shut down your system by typing the following commands at the command
line prompt:
sync;sync;shutdown
3. Power off your computer after it has shut down. Keep the computer plugged
in so that it remains grounded while you install the PCI-GPIB.
4. Remove the top cover (or other access panels) to give yourself access to the
computer expansion slots.
5. Find an unused PCI slot in your computer.
6. Remove the corresponding slot cover.
7. Insert the PCI-GPIB into the slot with the GPIB connector sticking out of the
opening on the back panel, as shown in Figure 1. It might be a tight fit, but do
not force the board into place.
8. Replace the top cover (or the access panel to the PCI slot).
9. Power on your computer. The PCI-GPIB interface board is now installed.
Installing Your GPIB Hardware and NI-488.2 for Solaris 2 ni.com
Page 3
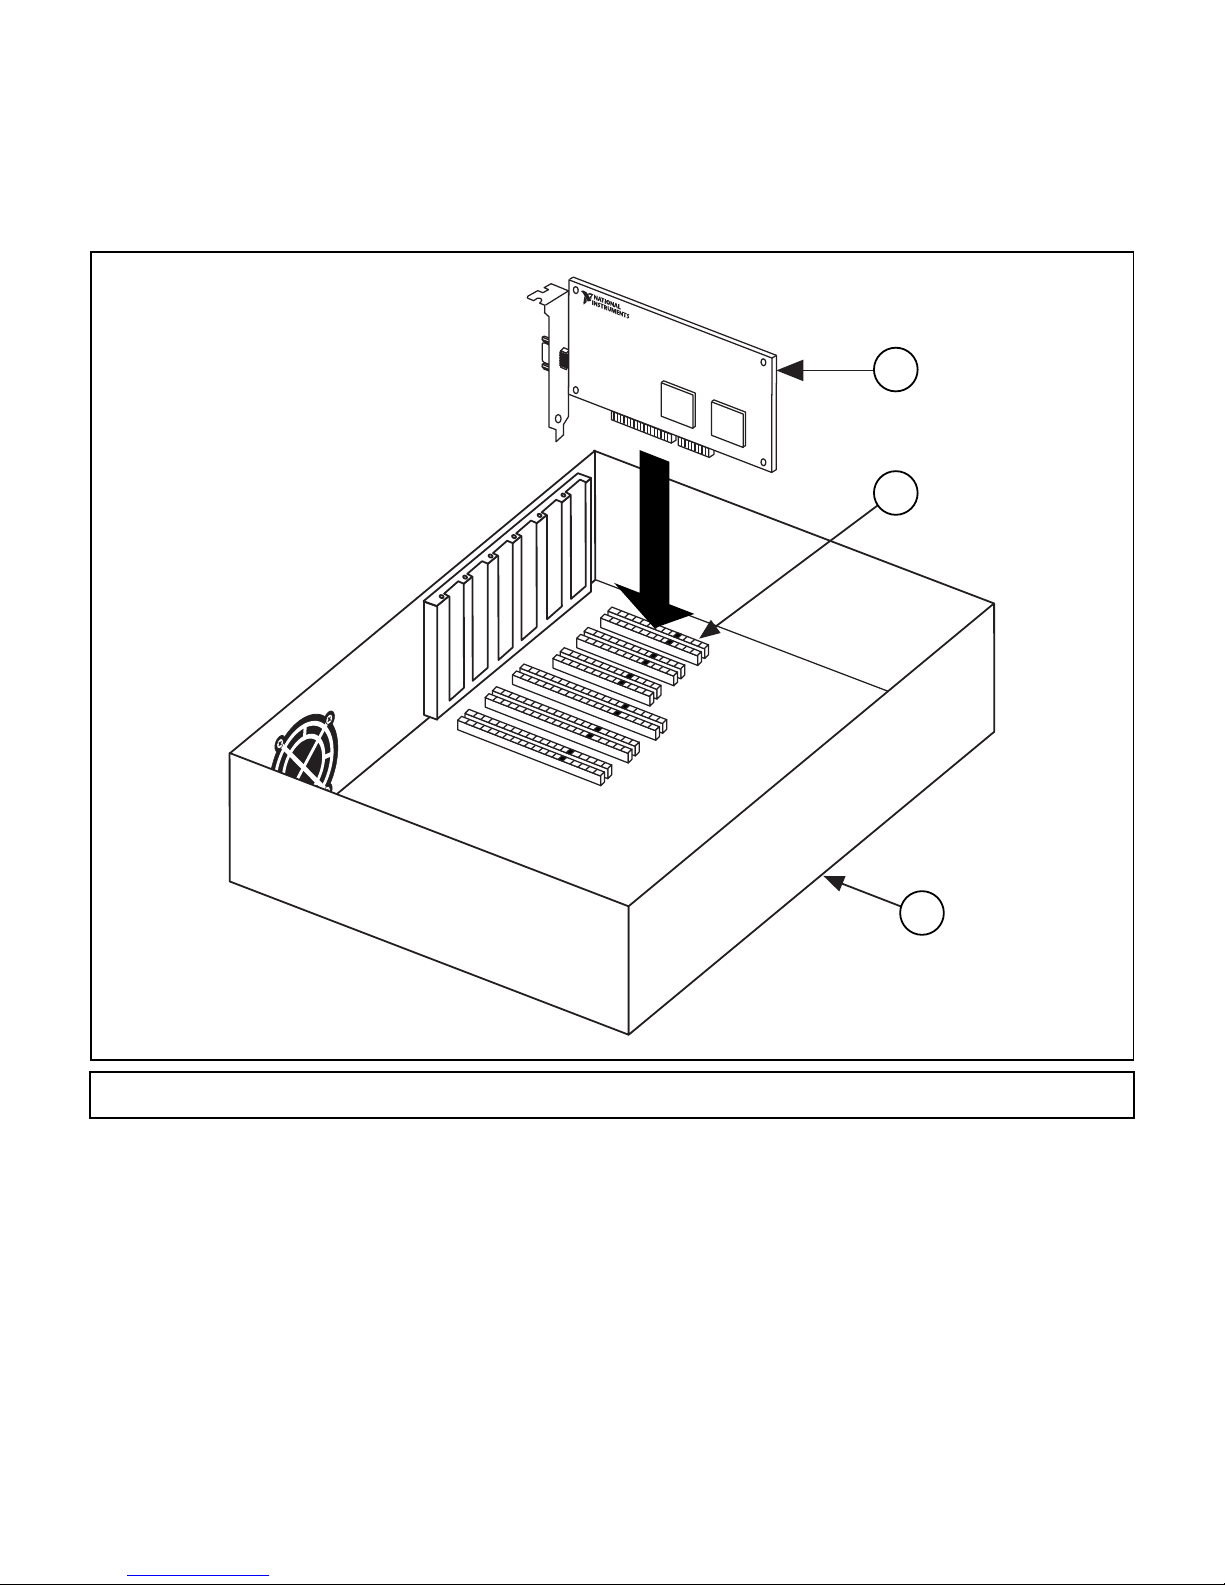
1
2
3
1 PCI Board 2PCI Slot 3 Personal Computer
© National Instruments Corporation 3 Installing Your GPIB Hardware and NI-488.2 for Solaris
Figure 1. Installing the PCI-GPIB
Page 4

Installing the PXI-GPIB
Caution Electrostatic discharge can damage several components on
your GPIB board. To avoid electrostatic damage when you handle the
module, touch the antistatic plastic package to a metal part of your
system chassis before you remove the board from the package.
Complete the following steps to install the PXI-GPIB.
1. Log on as superuser. To become a superuser, type
su root and enter the root
password.
2. Shut down your system by typing the following commands at the command
line prompt:
sync;sync;shutdown
3. Power off your PXI or CompactPCI chassis after it has shut down. Keep the
chassis plugged in so that it remains grounded while you install the PXI-GPIB.
4. Choose an unused PXI or CompactPCI peripheral slot. For maximum
performance, the PXI-GPIB has an onboard DMA controller that can only
be used if the board is installed in a slot that supports bus master cards.
National Instruments recommends installing the PXI-GPIB in such a slot.
If you install the board in a non-bus master slot, you must disable the
PXI-GPIB onboard DMA controller using the board-level call
ibdma.
Refer to the NI-488.2M Software Reference Manual for a complete
description of
ibdma.
5. Remove the filler panel for the peripheral slot you have chosen.
Installing Your GPIB Hardware and NI-488.2 for Solaris 4 ni.com
Page 5

6. Touch a metal part on your chassis to discharge any static electricity that might
be on your clothes or body.
7. Insert the PXI-GPIB into the selected slot. Use the injector/ejector handle to
fully inject the device into place. Figure 2 shows how to install the PXI-GPIB
into a PXI or CompactPCI chassis.
8. Screw the front panel of the PXI-GPIB to the front-panel mounting rail of the
PXI or CompactPCI chassis.
9. Power on your PXI or CompactPCI chassis. The PXI-GPIB interface board
is now installed.
© National Instruments Corporation 5 Installing Your GPIB Hardware and NI-488.2 for Solaris
Page 6

3
ON
STAND
BY
1
2
3
4
5
6
7
8
2
4
3
1 Injector/Ejector Handle (in Down Position)
2 PXI-GPIB Board
Installing Your GPIB Hardware and NI-488.2 for Solaris 6 ni.com
3 PXI Chassis
4 Injector/Ejector Rail
Figure 2. Installing the PXI-GPIB
Page 7

Installing the PMC-GPIB
Caution Electrostatic discharge can damage several components on
your GPIB board. To avoid electrostatic damage when you handle the
module, touch the antistatic plastic package to a metal part of your
computer chassis before you remove the board from the package.
Complete the following steps to install the PMC-GPIB.
1. Log on as superuser. To become a superuser, type
su root and enter the root
password.
2. Shut down your system by typing the following commands at the command
line prompt:
sync;sync;shutdown
3. Power off your system.
4. Find an unused PMC slot in your system. You may need to remove the host
from the system to access the slot.
5. Remove the corresponding slot filler panel from the host.
6. Touch a metal part on your chassis to discharge any static electricity that might
be on your clothes or body.
7. Insert the PMC-GPIB into the slot as shown in Figure 3. It might be a tight fit,
but do not force the board into place.
8. Use the mounting hardware provided to fasten the PMC-GPIB to the host.
9. Reinstall the host, if you removed it to install the PMC-GPIB.
10. Power on your system. The PMC-GPIB interface board is now installed.
© National Instruments Corporation 7 Installing Your GPIB Hardware and NI-488.2 for Solaris
Page 8

2
1
1 Host Face Plate 2 PMC-GPIB Board 3 Mounting Screws
Installing Your GPIB Hardware and NI-488.2 for Solaris 8 ni.com
3
Figure 3. Installing the PMC-GPIB
Page 9

Installing NI-488.2
Complete the following steps to install NI-488.2 for Solaris.
1. Insert the NI-488.2 for Solaris installation CD-ROM.
2. You must have superuser privileges before you can install NI-488.2 for
Solaris. If you are not already a superuser, type
su root and enter the
root password.
3. Add NI-488.2 to the operating system by doing the following:
a. The CD automatically mounts as soon as you insert the CD. If this feature
is disabled on your workstation, you must mount the CD by typing the
following command:
/usr/sbin/mount -o ro -F hsfs /dev/dsk/c0t6d0s2
/cdrom/cdrom0
b. Enter the following command to add NI-488.2 to your system:
/usr/sbin/pkgadd -d /cdrom/cdrom0 NIpcigpib
4. Follow the instructions on your screen to complete the installation.
Configuring the Software with ibconf (Optional)
ibconf is an interactive utility you can use to examine or modify the
configuration of the driver. You might want to run
ibconf to change the settings
of the software parameters. You must have superuser privilege to run
ibconf is largely self explanatory and contains help screens that explain all
commands and options. For more information on using
NI-488.2M Software Reference Manual.
© National Instruments Corporation 9 Installing Your GPIB Hardware and NI-488.2 for Solaris
ibconf.
ibconf, refer to the
Page 10

Complete the following steps to change the default parameters of your
NI-488.2 software. The driver should not be in use while you run
ibconf.
1. Log on as superuser (root).
2. Type the following command to start
ibconf
ibconf:
After you have installed and configured the software, you should verify the
installation. Refer to the Verify the Installation section.
Removing NI-488.2 (Optional)
If you ever decide to stop using your PCI-GPIB, PXI-GPIB, or PMC-GPIB, you
can remove the board and the NI-488.2 software. To remove NI-488.2 from the
kernel configuration, you must have superuser privilege and the driver must not
be in use. Enter the following command to unload the software:
pkgrm NIpcigpib
Verify the Installation
This section describes how to verify the software installation.
Verifying the System Boot Messages
If a message in the following format displays on the console or in the
command tool window during software installation, the driver has established
communication with the hardware device and recognized it.
Installing Your GPIB Hardware and NI-488.2 for Solaris 10 ni.com
Page 11

NI-488.2 GPIB Device Driver, Version 2.x
Copyright (c) 2003 National Instruments Corp.
All Rights Reserved.
National Instruments PCI-GPIB (gpibx, slot y, S/N
where
indicating the driver is capable of DMA I/O transfers, or
nnn
is the serial number of the board; and
XXXXXXX
*** NON-DMA ***,
could either be blank,
nnn) XXXXXXX
indicating the driver is not capable of DMA I/O transfers.
Running the Software Installation Test
The software installation test has two parts: ibtsta and ibtstb.
• ibtsta checks for correct nodes /dev/gpib and /dev/gpib0 and correct
access to the device driver.
• ibtstb checks for correct DMA and interrupt operation. ibtstb requires a
GPIB analyzer, such as the National Instruments GPIB analyzer. You can omit
this test if an analyzer is not available.
Complete the following steps to run the software verification test.
1. Type the following command to verify the software installation:
ibtsta
2. If ibtsta completes without errors and you have a bus analyzer, connect the
bus analyzer to the GPIB board and run
command:
ibtstb
If no error occurs, the NI-488.2 driver is installed correctly. If an error occurs, refer
to the Troubleshooting Error Messages section for troubleshooting information.
© National Instruments Corporation 11 Installing Your GPIB Hardware and NI-488.2 for Solaris
ibtstb by typing the following
Page 12

Troubleshooting Error Messages
If ibtsta fails, the program generates common error messages that appear
on your screen. These error messages explain what went wrong when you
ran
ibtsta and describe how you can correct the problem. For example, the
following message might appear on your screen if you forgot to disconnect
all your GPIB cables:
The fact that the ENOL error was not received when expected
indicates the possible presence of other devices on the bus.
Please disconnect ALL GPIB cables from the GPIB board, then
run this test again.
If you are still unable to run ibtsta and/or ibtstb successfully after you follow
the recommended actions from the error messages, contact National Instruments.
Using NI-488.2 with Solaris
This section helps you get started with NI-488.2 for Solaris.
Using ibic
The NI-488.2 software includes the Interface Bus Interactive Control utility, ibic.
You can use
known as NI-488.2 routines) interactively and display the results of the function
calls automatically. Without writing an application, you can use ibic to do the
following:
• Verify GPIB communication with your device quickly and easily
• Become familiar with the commands of your device
• Receive data from your GPIB device
Installing Your GPIB Hardware and NI-488.2 for Solaris 12 ni.com
ibic to enter NI-488 functions and IEEE 488.2-style functions (also
Page 13

• Learn new NI-488.2 functions and routines before integrating them into your
application
• Troubleshoot problems with your application
Enter the following command to run
ibic
ibic:
For more information about ibic, refer to Chapter 6, ibic, of the NI-488.2M
Software Reference Manual.
Programming Considerations
Depending on the programming language you use to develop your application,
you must include certain files, statements, or global variables at the beginning of
your application. For example, you must include the header file sys/ugpib.h in
your source code if you are using C/C++.
You must link the language interface library with your compiled source code. Link
the GPIB C language interface library using one of the following commands,
where
cc example.c -lgpib
example.c is your application name:
or
cc example.c -dy -lgpib
or
cc example.c -dn -lgpib
-dy
specifies dynamic linking, which is the default method. It links the application
to
libgpib.so. -dn specifies static linking in the link editor. It links the
© National Instruments Corporation 13 Installing Your GPIB Hardware and NI-488.2 for Solaris
Page 14

application to libgpib.a. For more information about compiling and linking,
refer to the
man pages for cc and ld.
For information about each NI-488 function and IEEE 488.2-style function,
choosing a programming method, developing your application, or compiling and
linking, refer to the NI-488.2M Software Reference Manual.
Common Questions
What is wrong if ibfind returns a –1?
The driver may not be installed correctly, or the nodes may not have been created
when the driver was loaded. Try removing and reinstalling NI-488.2 from the
CD-ROM.
Also, the file may require read/write privileges you do not have, or you may have
renamed a device. Make sure that the device names in your application program
match the device names in ibconf.
What information should I have before I call National Instruments?
Have the results of the diagnostic test ibtsta. You also should have run ibic
to try to find the source of your problem.
Does this driver work with 64-bit Solaris?
Yes. NI-488.2 for Solaris works with either 32-bit or 64-bit Solaris. Also, you can
create 32-bit or 64-bit applications. The driver installs both 32-bit and 64-bit
language interface libraries on the system. For information on using the NI-488.2
language interfaces, refer to the Using NI-488.2 with Solaris section.
Installing Your GPIB Hardware and NI-488.2 for Solaris 14 ni.com
Page 15

Will my PCI-GPIB, PXI-GPIB, or PMC-GPIB work in a 64-bit slot?
Yes. The current versions of all three boards will work in 32 or 64-bit slots, as well
as 3.3V or 5Vslots.
Technical Support and Professional Services
Visit the following sections of the National Instruments Web site at ni.com for
technical support and professional services:
• Support—Online technical support resources include the following:
– Self-Help Resources—For immediate answers and solutions, visit our
extensive library of technical support resources available in English,
Japanese, and Spanish at ni.com/support. These resources are
available for most products at no cost to registered users and include
software drivers and updates, a KnowledgeBase, product manuals,
step-by-step troubleshooting wizards, conformity documentation,
example code, tutorials and application notes, instrument drivers,
discussion forums, a measurement glossary, and so on.
– Assisted Support Options—Contact NI engineers and other
measurement and automation professionals by visiting
ni.com/support. Our online system helps you define your question
and connects you to the experts by phone, discussion forum, or email.
• Training—Visit
ni.com/training for self-paced tutorials, videos, and
interactive CDs. You also can register for instructor-led, hands-on courses
at locations around the world.
• System Integration—If you have time constraints, limited in-house technical
resources, or other project challenges, NI Alliance Program members can
help. To learn more, call your local NI office or visit
© National Instruments Corporation 15 Installing Your GPIB Hardware and NI-488.2 for Solaris
ni.com/alliance.
Page 16

• Declaration of Conformity (DoC)—A DoC is our claim of compliance
with the Council of the European Communities using the manufacturer’s
declaration of conformity. This system affords the user protection for
electronic compatibility (EMC) and product safety. You can obtain the
DoC for your product by visiting
ni.com/hardref.nsf.
• Calibration Certificate—If your product supports calibration, you can
obtain the calibration certificate for your product at
ni.com/calibration.
If you searched ni.com and could not find the answers you need, contact your
local office or NI corporate headquarters. Phone numbers for our worldwide
offices are listed at the front of this manual. You also can visit the Worldwide
Offices section of
ni.com/niglobal to access the branch office Web sites,
which provide up-to-date contact information, support phone numbers, email
addresses, and current events.
National Instruments™, NI™, ni.com™, NI-488™, NI-488.2™, and NI-488.2M™ are trademarks of National Instruments Corporation. Product
and company names mentioned herein are trademarks or trade names of their respective companies. For patents covering National Instruments
products, refer to the appropriate location: Help»Patents in your software, the patents.txt file on your CD, or ni.com/patents.
©
2003 National Instruments Corp. All rights reserved.
 Loading...