

Page 1
USER GUIDE
NI sbRIO-960x
Single-Board RIO OEM Devices
This document provides dimensions, pinouts, connectivity information,
and specifications for the National Instruments sbRIO-9601 and
sbRIO-9602. The devices are referred to inclusively in this document as
the sbRIO-960x.
Caution National Instruments makes no product safety, electromagnetic compatibility
(EMC), or CE marking compliance claims for the sbRIO-960x. The end-product supplier
is responsible for conformity to any and all compliance requirements.
Caution Exercise caution when placing the sbRIO-960x inside an enclosure. Auxiliary
cooling may be necessary to keep the device under the maximum ambient temperature
rating of 55 °C.
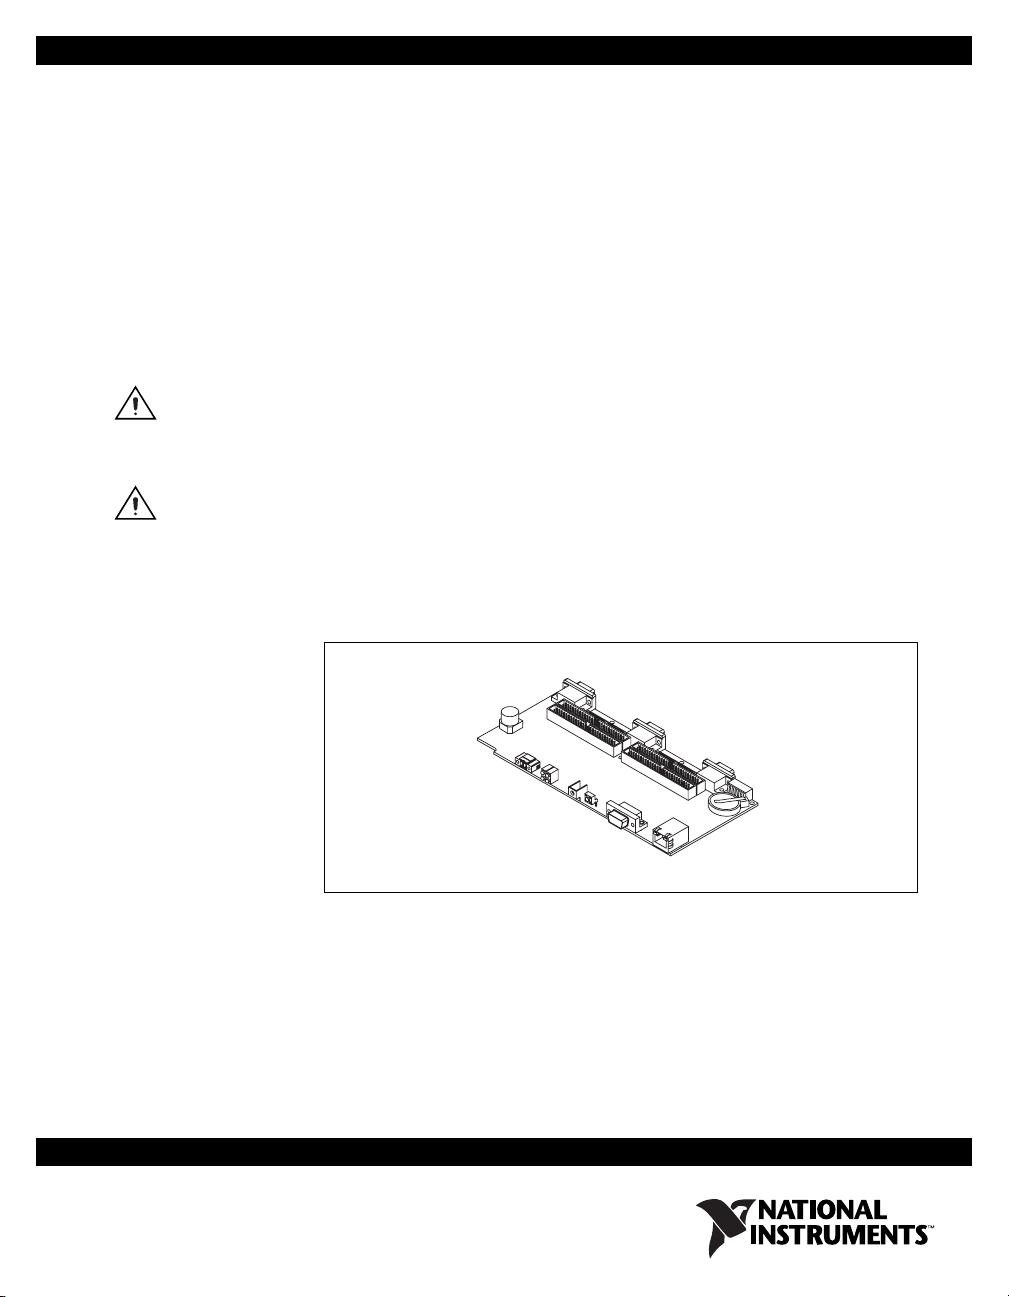
The following figure shows the sbRIO-960x.
Figure 1. sbRIO-960x
Page 2

What You Need to Get Started
This section lists the software and hardware you need to start programming
the sbRIO-960x.
Software Requirements
You need a development computer with the following software installed
on it. Go to
for information about software version compatibility.
❑ LabVIEW
❑ LabVIEW Real-Time Module
❑ LabVIEW FPGA Module
❑ NI-RIO Software
Hardware Requirements
You need the following hardware to use the sbRIO device.
❑ sbRIO-960x
❑ 19–30 VDC power supply
ni.com/info and enter the info code rdsoftwareversion
❑ Ethernet cable
NI sbRIO-960x 2 ni.com
Page 3

Dimensions
Note The plated mounting holes are all connected to P1, the ground lug. Connect P1 or
one of the plated mounting holes securely to earth ground.
This section contains dimensional drawings of the sbRIO devices. For
three-dimensional models, go to
Resource tab for the sbRIO device you are using.
ni.com/singleboard and look on the
© National Instruments Corporation 3 NI sbRIO-960x
Page 4
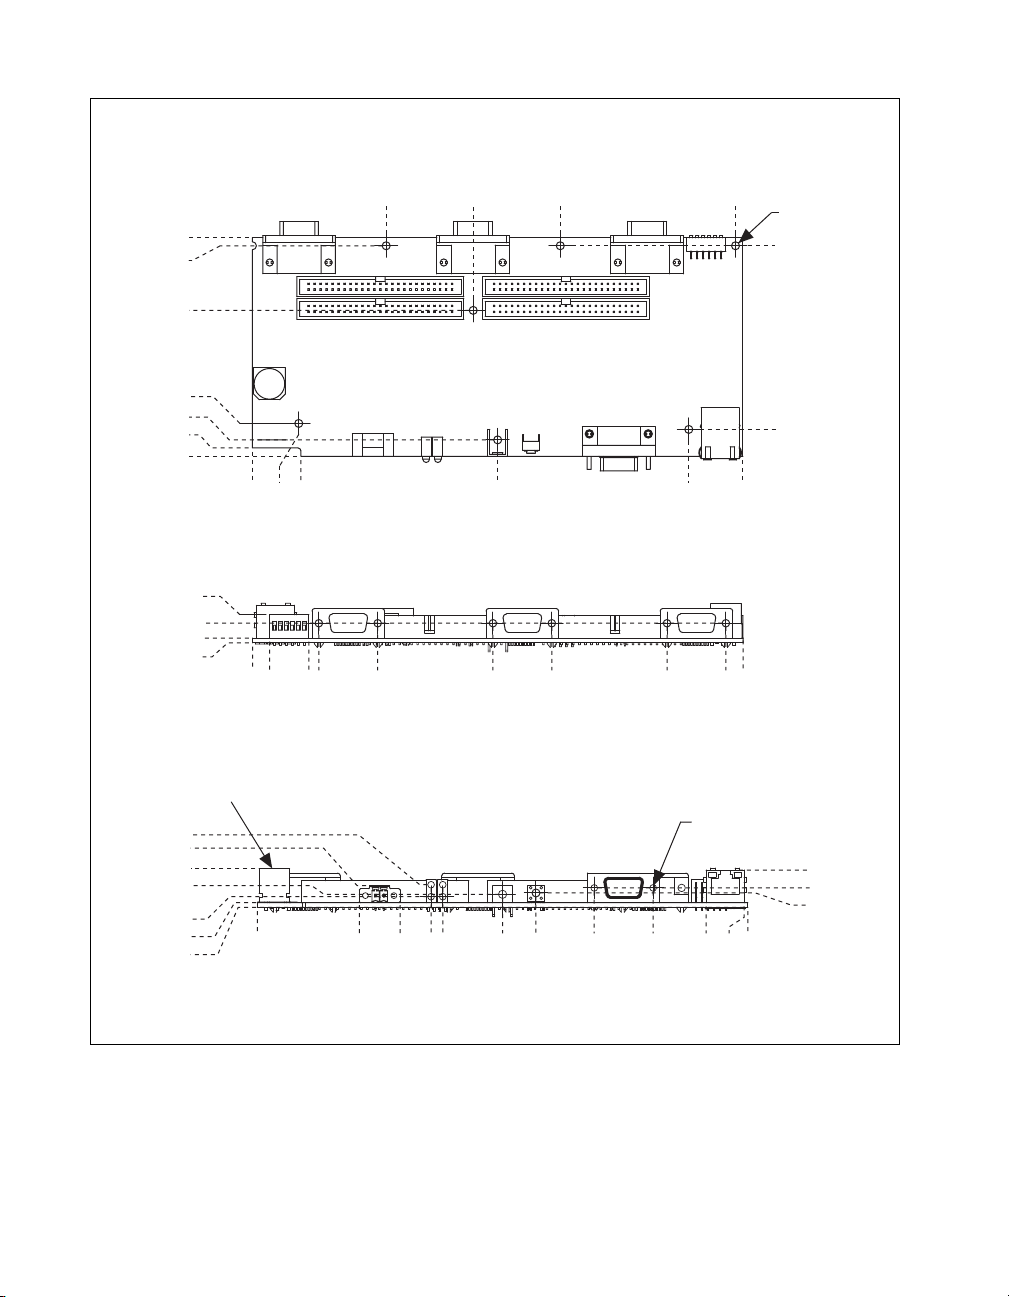
The following figure shows the dimensions of the sbRIO-960x.
3.650 (92.71)
3.520 (89.41)
2.440 (61.98)
.550 (13.97)
.275 (6.99)
.140 (3.56)
.000 (0)
.469 (11.91)
.327 (8.31)
.080 (2.03)
.000 (0)
.000 (0)
.775 (19.69)
.000 (0)
.286 (7.26)
.810 (20.57)
.940 (23.88)
1.107 (28.12)
2.237 (56.81)
2.091 (53.11)
3.691 (93.75)
4.100 (104.14)
4.017 (102.03)
5.147 (130.72)
5.001 (127.03)
8.076 (205.13)
7.295 (185.29)
8.200 (208.28)
6.927 (175.95)
7.911 (200.94)
7X Ø
.134 (3.4)
3.520 (89.41)
.450 (11.43)
8.200 (208.28)
2MM CLEARANCE REQUIRED
ABOVE THIS CAPACITOR
.380 (9.65)
.365 (9.28)
.651 (16.54)
.220 (5.59)
.180 (4.57)
.080 (2.03)
.000 (0)
.000(0)
1.705 (43.31)
2.386 (60.61)
2.905 (73.79)
3.100 (78.74)
4.100 (104.14)
4.659 (118.33)
5.633 (143.07)
2X 4-40 THREADS
7.502 (190.55)
6.617 (168.06)
8.137 (206.68)
.625 (15.88)
.327 (8.31)
.242 (6.16)
8.200 (208.28)
Figure 2. sbRIO-960x Dimensions in Inches (Millimeters)
NI sbRIO-960x 4 ni.com
Page 5
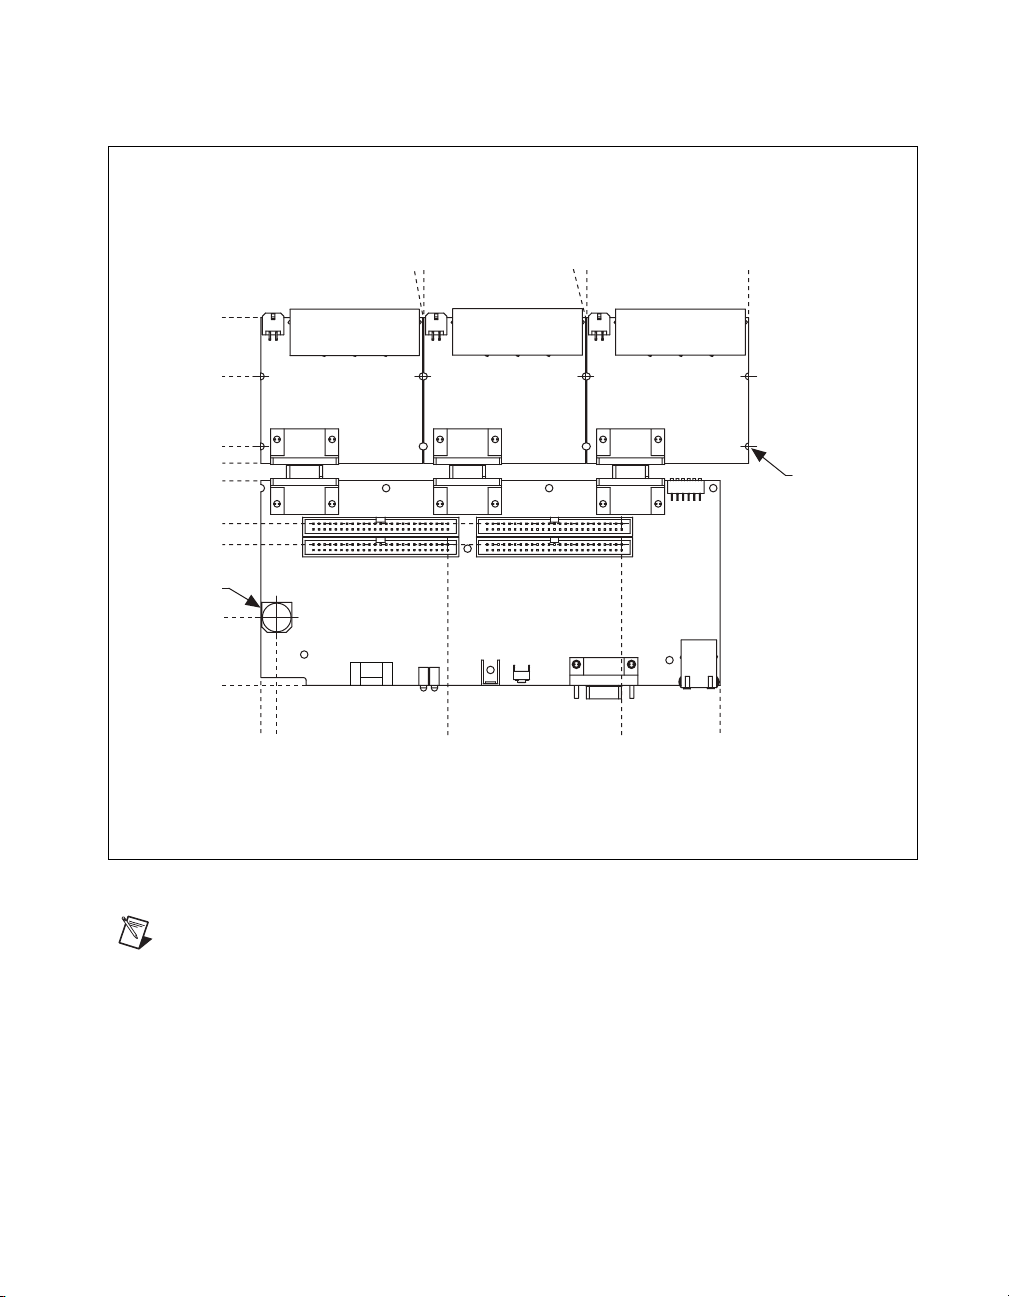
You can install up to three board-only C Series I/O modules on the
sbRIO-960x. The following figure shows the dimensions of the
sb-RIO-960x with three board-only C Series I/O modules installed.
6.565 (166.75)
5.515 (140.08)
4.265 (108.33)
3.965 (100.71)
3.650 (92.71)
2.885 (73.28)
2.514 (63.86)
Ø.512 (13)
1.212 (30.78)
.000 (0)
.000 (0)
.285 (7.23)
2.889 (73.38)
2.910 (73.91)
3.340 (84.84)
5.799 (147.29)
5.820 (147.83)
6.442 (163.63)
8.709 (221.21)
8X Ø .125 (3.18)
8.200 (208.28)
Figure 3. sbRIO-960x with C Series Modules, Dimensions in Inches (Millimeters)
To maintain isolation clearances on the C Series modules, do not use mounting
Note
hardware larger than 0.240 in. (6.1 mm) in diameter and maintain an air gap of at least
0.200 in. (5.0 mm) from the modules to anything else.
© National Instruments Corporation 5 NI sbRIO-960x
Page 6
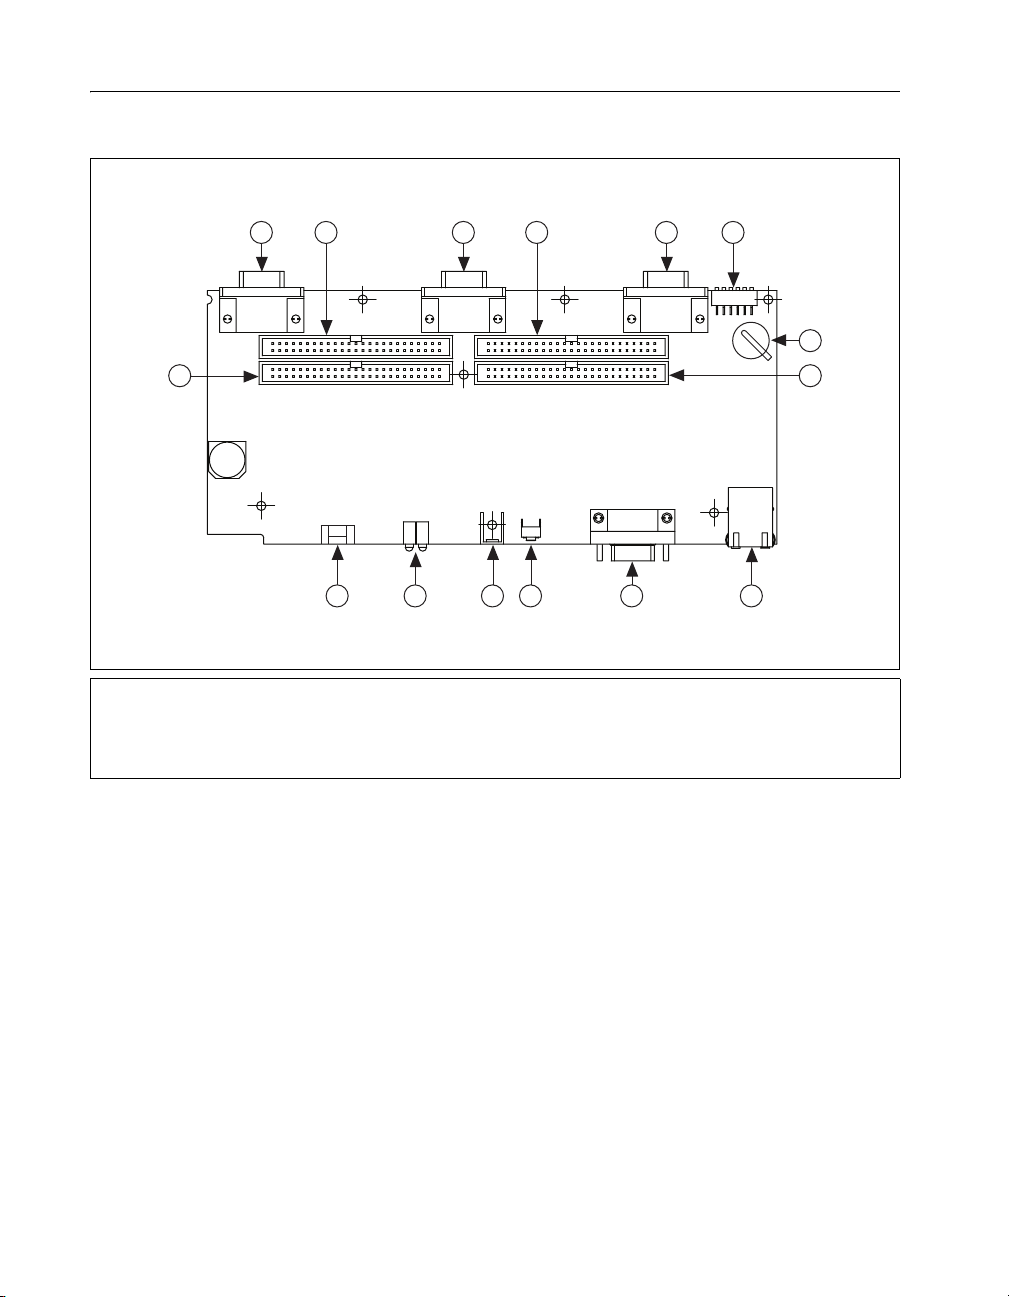
I/O and Other Connectors on the sbRIO Device
The following figure shows the locations of parts on the sbRIO device.
1 2 3 4 5 6
7
815
91011121314
1 J11, Connector for C Series Module
2P5, 3.3 V Digital I/O
3 J10, Connector for C Series Module
4P4, 3.3 V Digital I/O
5 J9, Connector for C Series Module
6DIP Switches
7 Backup Battery
8 P2, 3.3 V Digital I/O
9 J5, RJ-45 Ethernet Port
10 J1, RS-232 Serial Port
11 Reset Button
12 P1, Ground Lug
13 LEDs
14 J3, Power Connector
15 P3, 3.3 V Digital I/O
Figure 4. sbRIO-960x Parts Locator Diagram
NI sbRIO-960x 6 ni.com
Page 7
The following table lists and describes the connectors on sbRIO devices
and lists the part number and manufacturer of each connector. Refer to the
manufacturer for information about using and matching these connectors.
Table 1. sbRIO Connector Descriptions
Connector Description Part Number and Manufacturer
J3, Power 2-position MINI-COMBICON header
and plug, 0.285 in. (7.24 mm) high
J1, RS-232
Serial Port
9-Pin DSUB plug, 0.318 in. (8.08 mm)
high, with 4-40 jacksockets
P2, P3, P4, P5 50-pin polarized header plug,
0.100 × 0.100 in. (2.54 × 2.54 mm)
1727566 from Phoenix Contact;
accepts 1714977 from Phoenix
Contact (Included)
5747840-6 from Amphenol
N2550-6002RB from 3M
© National Instruments Corporation 7 NI sbRIO-960x
Page 8
The following figures show the pinouts of the I/O connectors on the sbRIO
devices.
Pin 50
Pin 1
D GND
D GND
D GND
D GND
D GND
D GND
D GND
D GND
D GND
D GND
D GND
D GND
D GND
D GND
Port6/DIOCTL
D GND
D GND
D GND
D GND
D GND
5V
D GND
5V
Port5/DIO9
Port5/DIOCTL
50 49
48 47
46 45
44 43
42 41
40 39
38 37
36 35
34 33
32 31
30 29
28 27
26 25
24 23
22 21
20 19
18 17
16 15
14 13
12 11
10 9
8 7
6 5
4 3
2 1
Port2/DIO8
Port2/DIO7
Port2/DIO6
Port2/DIO5
Port2/DIO4
Port6/DIO8
Port6/DIO7
Port6/DIO6
Port6/DIO5
Port6/DIO4
Port6/DIO3
Port6/DIO2
Port6/DIO1
Port6/DIO0
Port6/DIO9
Port5/DIO8
Port5/DIO7
Port5/DIO6
Port5/DIO5
Port5/DIO4
Port5/DIO3
Port5/DIO2
Port5/DIO1
Port5/DIO0
D GND
Figure 5. Pinout of I/O Connector P2, 3.3 V Digital I/O
NI sbRIO-960x 8 ni.com
Page 9

Pin 50
Pin 1
D GND
5V
D GND
5V
D GND
D GND
D GND
D GND
D GND
Port9/DIOCTL
D GND
D GND
D GND
D GND
D GND
D GND
D GND
D GND
D GND
Port8/DIOCTL
D GND
D GND
D GND
D GND
Port7/DIO4
50 49
48 47
46 45
44 43
42 41
40 39
38 37
36 35
34 33
32 31
30 29
28 27
26 25
24 23
22 21
20 19
18 17
16 15
14 13
12 11
10 9
8 7
6 5
4 3
2 1
Port9/DIO8
Port9/DIO7
Port9/DIO6
Port9/DIO5
Port9/DIO4
Port9/DIO3
Port9/DIO2
Port9/DIO1
Port9/DIO0
Port9/DIO9
Port8/DIO8
Port8/DIO7
Port8/DIO6
Port8/DIO5
Port8/DIO4
Port8/DIO3
Port8/DIO2
Port8/DIO1
Port8/DIO0
Port8/DIO9
Port7/DIO8
Port7/DIO7
Port7/DIO6
Port7/DIO5
D GND
Figure 6. Pinout of I/O Connector P3, 3.3 V Digital I/O
© National Instruments Corporation 9 NI sbRIO-960x
Page 10

Pin 50
Pin 1
D GND
D GND
D GND
D GND
Port2/DIOCTL
D GND
D GND
D GND
D GND
D GND
D GND
D GND
D GND
D GND
Port1/DIOCTL
D GND
D GND
D GND
D GND
D GND
5V
D GND
5V
Port0/DIO9
Port0/DIOCTL
50 49
48 47
46 45
44 43
42 41
40 39
38 37
36 35
34 33
32 31
30 29
28 27
26 25
24 23
22 21
20 19
18 17
16 15
14 13
12 11
10 9
8 7
6 5
4 3
2 1
Port2/DIO3
Port2/DIO2
Port2/DIO1
Port2/DIO0
Port2/DIO9
Port1/DIO8
Port1/DIO7
Port1/DIO6
Port1/DIO5
Port1/DIO4
Port1/DIO3
Port1/DIO2
Port1/DIO1
Port1/DIO0
Port1/DIO9
Port0/DIO8
Port0/DIO7
Port0/DIO6
Port0/DIO5
Port0/DIO4
Port0/DIO3
Port0/DIO2
Port0/DIO1
Port0/DIO0
D GND
Figure 7. Pinout of I/O Connector P4, 3.3 V Digital I/O
NI sbRIO-960x 10 ni.com
Page 11

Pin 50
Pin 1
D GND
5V
D GND
5V
D GND
D GND
D GND
D GND
D GND
Port4/DIOCTL
D GND
D GND
D GND
D GND
D GND
D GND
D GND
D GND
D GND
Port3/DIOCTL
D GND
D GND
D GND
Port7/DIO9
Port7/DIOCTL
50 49
48 47
46 45
44 43
42 41
40 39
38 37
36 35
34 33
32 31
30 29
28 27
26 25
24 23
22 21
20 19
18 17
16 15
14 13
12 11
10 9
8 7
6 5
4 3
2 1
Port4/DIO8
Port4/DIO7
Port4/DIO6
Port4/DIO5
Port4/DIO4
Port4/DIO3
Port4/DIO2
Port4/DIO1
Port4/DIO0
Port4/DIO9
Port3/DIO8
Port3/DIO7
Port3/DIO6
Port3/DIO5
Port3/DIO4
Port3/DIO3
Port3/DIO2
Port3/DIO1
Port3/DIO0
Port3/DIO9
Port7/DIO3
Port7/DIO2
Port7/DIO1
Port7/DIO0
D GND
Figure 8. Pinout of I/O Connector P5, 3.3 V Digital I/O
The following figure and table show the signals on J1, the RS-232 serial
port.
Pin 1 Pin 5
Pin 6 Pin 9
Figure 9. J1, RS-232 Serial Port
© National Instruments Corporation 11 NI sbRIO-960x
Page 12

Table 2. RS-232 Serial Port Pin Descriptions
Pin Signal
1 DCD
2 RXD
3 TXD
4 DTR
5 GND
6 DSR
7 RTS
8 CTS
9 RI
Connecting the sbRIO Device to a Network
Use a standard Category 5 (CAT-5) or better Ethernet cable to connect the
RJ-45 Ethernet port to an Ethernet network.
Caution To prevent data loss and to maintain the integrity of your Ethernet installation,
do not use a cable longer than 100 m.
If you need to build your own cable, refer to the Cabling section for more
information about Ethernet cable wiring connections.
The host computer communicates with the device over a standard Ethernet
connection. If the host computer is on a network, you must configure
the device on the same subnet as the host computer. If neither the host
computer nor the device is connected to a network, you can connect the
two directly using a crossover cable.
If you want to use the device on a subnet other than the one the host
computer is on, first connect the device on the same subnet as the host
computer. Use DHCP to assign an IP address or reassign a static IP address
for the subnet where you want it to be and physically move it to the other
subnet. Refer to the Measurement & Automation Explorer Help for more
information about configuring the device in Measurement & Automation
Explorer (MAX).
NI sbRIO-960x 12 ni.com
Page 13

Powering the sbRIO Device
The sbRIO device requires a power supply connected to J3. The supply
voltage and current must meet the specifications in the Power
Requirements section of this document, but the actual power requirement
depends on how the device is physically configured, programmed, and
used. To determine the power requirement of your application, you must
measure the power consumption during execution, and add 20% to your
estimates to account for transient and startup conditions.
Note Select a high-quality power supply with less than 20 mV ripple. The sbRIO device
has some internal power-supply filtering on the positive side, but a low-quality power
supply can inject noise into the ground path, which is unfiltered.
Four elements of the sbRIO device can require power: sbRIO internal
operation; 3.3 V DIO; 5 V output; and board-only C Series modules
installed on the device. Refer to the Power Requirements section for
formulas and examples for calculating power requirements for different
configurations and application types.
Complete the following steps to connect a power supply to the device.
1. Remove the MINI-COMBICON plug from connector J3 of the
sbRIO-960x. Refer to Figure 4 for the location of J3.
2. Connect the positive lead of the power supply to the V terminal of
the MINI-COMBICON plug.
3. Connect the negative lead of the power supply to the C terminal of
the MINI-COMBICON plug.
4. Re-install the MINI-COMBICON connector in connector J3.
Powering On the sbRIO Device
When you apply power to the sbRIO-960x, the device runs a power-on self
test (POST). During the POST, the Power and Status LEDs turn on. The
Status LED turns off, indicating that the POST is complete. If the LEDs do
not behave in this way when the system powers on, refer to the
Understanding LED Indications section.
You can configure the device to launch an embedded stand-alone
LabVIEW RT application each time it is booted. Refer to the Running a
Stand-Alone Real-Time Application (RT Module) topic of the LabVIEW
Help for more information.
© National Instruments Corporation 13 NI sbRIO-960x
Page 14

Boot Options
Table 3 lists the reset options available on sbRIO devices. These options
determine how the FPGA behaves when the device is reset in various
conditions.
Table 3. sbRIO Reset Options
Reset Option Behavior
Do Not Autoload VI Does not load the FPGA bit stream from flash memory.
Autoload VI on Device Power-Up Loads the FPGA bit stream from flash memory to the FPGA
when the device powers on.
Autoload VI on Device Reboot Loads the FPGA bit stream from flash to the FPGA when you
reboot the device either with or without cycling power.
Note If you want a VI to run when loaded to the FPGA, complete the following steps.
1. Right-click the FPGA Target item in the Project Explorer window in
LabVIEW.
2. Select Properties.
3. In the General category of the FPGA Target Properties dialog box,
place a check in the Run when loaded to FPGA checkbox.
4. Compile the FPGA VI.
Connecting Serial Devices to the sbRIO Device
The sbRIO-960x has an RS-232 serial port to which you can connect
devices such as displays or input devices. Use the Serial VIs to read from
and write to the serial port from a LabVIEW RT application. For more
information about using the Serial VIs, refer to the Serial VIs and
Functions topic of the LabVIEW Help.
Using the Internal Real-Time Clock
The system clock of the sbRIO device gets the date and time from the
internal real-time clock at startup. This synchronization provides
timestamp data to the device.
NI sbRIO-960x 14 ni.com
Page 15

Configuring DIP Switches
AMP 0650
1-5435802-7
OFF
SAFE MODE Switch
1 SAFE MODE
2CONSOLE OUT
3 IP RESET
4NO APP
Figure 10. DIP Switches
5USER1
6 NO FPGA
All of the DIP switches are in the OFF (up) position when the sbRIO device
is shipped from National Instruments.
The position of the SAFE MODE switch determines whether the embedded
LabVIEW Real-Time engine launches at startup. If the switch is in the OFF
position, the LabVIEW Real-Time engine launches. Keep this switch in the
OFF position during normal operation. If the switch is in the ON position
at startup, the sbRIO device launches only the essential services required
for updating its configuration and installing software. The LabVIEW
Real-Time engine does not launch.
Push the SAFE MODE switch to the ON position if the software on the
sbRIO device is corrupted. Even if the switch is not in the ON position, if
there is no software installed on the device, the device automatically boots
into safe mode. The SAFE MODE switch must be in the ON position to
reformat the drive on the device. Refer to the Measurement & Automation
Explorer Help for more about installing software and reformatting the
drive.
CONSOLE OUT Switch
With a serial-port terminal program, you can use the serial port to read the
IP address and firmware version of the sbRIO device. Use a null-modem
cable to connect the serial port on the device to a computer. Push the
CONSOLE OUT switch to the ON position. Make sure that the serial-port
terminal program is configured to the following settings:
• 9,600 bits per second
• Eight data bits
• No parity
© National Instruments Corporation 15 NI sbRIO-960x
Page 16

IP RESET Switch
NO APP Switch
• One stop bit
• No flow control
Keep this switch in the OFF position during normal operation. If
CONSOLE OUT is enabled, LabVIEW RT cannot communicate with the
serial port.
Push the IP RESET switch to the ON position and reboot the sbRIO device
to reset the IP address to
the IP RESET switch is in the ON position, the device appears in MAX
with IP address
device in MAX. Refer to the Resetting the Network Configuration of the
sbRIO Device section for more information about resetting the IP address.
Push the NO APP switch to the ON position to prevent a LabVIEW RT
startup application from running at startup. If you want to permanently
disable a LabVIEW RT application from running at startup, you must
disable it in LabVIEW. To run an application at startup, push the NO APP
switch to the OFF position, create an application using the LabVIEW
Application Builder, and configure the application in LabVIEW to launch
at startup. For more information about automatically launching VIs at
startup and disabling VIs from launching at startup, refer to the Running a
Stand-Alone Real-Time Application (RT Module) topic of the LabVIEW
Help.
0.0.0.0. You can configure a new IP address for the
0.0.0.0. If the device is on your local subnet and
USER1 Switch
You can define the USER1 switch for your application. To define the
purpose of this switch in your embedded application, use the RT Read
Switch VI in your LabVIEW RT embedded VI. For more information
about the RT Read Switch VI, refer to the LabVIEW Help.
NO FPGA Switch
Push the NO FPGA switch to the ON position to prevent a LabVIEW
FPGA application from loading at startup. The NO FPGA switch overrides
the options described in the Boot Options section. After startup you can
download bit files to flash memory from a LabVIEW project regardless of
switch position. If you already have an application configured to launch at
startup and you push the NO FPGA switch from ON to OFF, the startup
application is automatically enabled.
NI sbRIO-960x 16 ni.com
Page 17

Using the Reset Button
Pressing the Reset button reboots the processor. The FPGA continues to
run unless you select the Autoload VI on Device Reboot boot option.
Refer to the Boot Options section for more information.
Understanding LED Indications
FPGA LED
USER LED
POWER LED
1
2
1FPGA
2USER
Figure 11. sbRIO-960x LEDs
You can use the FPGA LED to help debug your application or easily
retrieve application status. Use the LabVIEW FPGA Module and NI-RIO
software to define the FPGA LED to meet the needs of your application.
Refer to LabVIEW Help for information about programming this LED.
You can define the USER LED to meet the needs of your application. To
define the LED, use the RT LEDs VI in LabVIEW. For more information
about the RT LEDs VI, refer to the LabVIEW Help.
The POWER LED is lit while the sbRIO device is powered on. This LED
indicates that the 5 V and 3.3 V rails are stable.
3 POWER
4 STATUS
3
4
STATUS LED
The STATUS LED is off during normal operation. The sbRIO device
indicates specific error conditions by flashing the STATUS LED a certain
number of times as shown in Table 4.
© National Instruments Corporation 17 NI sbRIO-960x
Page 18

Table 4. Status LED Indications
Number of Flashes Indication
1 The device is unconfigured. Use MAX to configure the device. Refer to
the Measurement & Automation Explorer Help for information about
configuring the device.
2 The device has detected an error in its software. This usually occurs
when an attempt to upgrade the software is interrupted. Reinstall
software on the device. Refer to the Measurement & Automation
Explorer Help for information about installing software on the device.
3 The device is in safe mode because the Safe Mode DIP switch is in
the ON position. Refer to the Configuring DIP Switches section for
information about the Safe Mode DIP switch.
4 The software has crashed twice without rebooting or cycling power
between crashes. This usually occurs when the device runs out of
memory. Review your RT VI and check the memory usage. Modify
the VI as necessary to solve the memory usage issue.
Continuous flashing
or solid
The device may be configured for DHCP but unable to get an IP address
because of a problem with the DHCP server. Check the network
connection and try again. If the problem persists, contact National
Instruments.
Resetting the Network Configuration of the sbRIO Device
If the sbRIO device is not able to communicate with the network, you can
use the IP RESET switch to manually restore the device to the factory
network settings. When you restore the device to the factory network
settings, the IP address, subnet mask, DNS address, gateway, and Time
Server IP are set to
VIs are unaffected.
Complete the following steps to restore the device to the factory network
settings.
1. Move the IP RESET DIP switch to the ON position.
2. Press the Reset button.
3. Move the IP RESET switch to the OFF position.
0.0.0.0. Power-on defaults, watchdog settings, and
NI sbRIO-960x 18 ni.com
Page 19

The network settings are restored. You can reconfigure the settings in MAX
from a computer on the same subnet. Refer to the Measurement &
Automation Explorer Help for more information about configuring the
device.
Note If the device is restored to the factory network settings, the LabVIEW run-time
engine does not load. You must reconfigure the network settings and reboot the device for
the LabVIEW run-time engine to load.
Integrated 3.3 V Digital I/O
The four 40-pin IDC headers, P2–P5, provide connections for
110 low-voltage DIO channels, 82 DGND, and eight +5 V voltage outputs.
The following figure represents a single DIO channel.
Spartan III FPGA
U1
+5 V
D1
R1
User
Connection
D2
1 U1: 5 V to 3.3 V Level Shifter, SN74CBTD3384CDGV from Texas Instruments
2 D1 and D2: ESD Rated Protection Diodes, NUP4302MR6T1G from On Semiconductor
3 R1: Current-Limiting Posistor, PRG18BB330MS1RB from Murata
Figure 12. Circuitry of One 3.3 V DIO Channel
I/O Protection
The 33 Ω current-limiting posistor, R1, and the protection diodes, D1 and
D2, protect each DIO channel against externally applied voltages of ±20 V
and ESD events. The combination of R1 and D1 protects against
overvoltage, and the combination of R1 and D2 protects against
undervoltage. The resistance of R1 increases rapidly with temperature.
© National Instruments Corporation 19 NI sbRIO-960x
Page 20

Drive Strength
Signal Integrity
During overvoltage conditions, high current flows through R1 and into the
protection diodes. High current causes internal heating in the posistor,
which increases the resistance and limits the current. Refer to the
Specifications section for current-limiting and resistance values.
The sbRIO devices were tested with all 110 DIO channels driving 3 mA
DC loads, for a total of 330 mA sourcing from the FPGA. The FPGA uses
minimum 8 mA drivers, but the devices are not characterized for loads
higher than 3 mA.
The sbRIO boards were designed with 60 Ω characteristic trace impedance.
The characteristic impedance of most IDC ribbon cables is 110 Ω, which is
grossly mismatched from the board. However, headers P2–P5 were
designed such that the signals are interwoven with ground
(signal/ground/signal/ground, etc.), which greatly improves the signal
integrity. This is sufficient for most applications
For the best possible signal integrity, use 3M
has a characteristic impedance of 65 Ω. This cable has a ground plane that
connects to the ground plane of the board at pin 1 and pin 50. The internal
ground plane of this cable also reduces noise and radiated emissions.
Using +5 V Power from 3.3 V DIO Headers P2–P5
Each of the four DIO headers has two pins to provide +5 V power for
external applications. This +5 V outputs are referenced to DGND on the
headers and are connected directly to the internal 5 V power plane of the
sbRIO device. The +5 V source has current limiting and overvoltage
clamps. Nevertheless, sudden current steps and noisy loads can inject
high-frequency transients into the power planes of the device. Such
transients can cause intermittent failures in the digital timing and lead to
unexpected behavior. Add filters and/or additional current limiting
between the external load and the +5 V output if the external load is not a
quiet, slowly ramping DC load. An LC filter of 6.8 μH and 100 μF per
200 mA load should be sufficient, but the OEM user is responsible for final
requirements and testing.
The sbRIO power supply is designed for a total of 2 A external load at 5 V.
This total includes 200 mA per installed C Series module. For example, if
three C Series modules are installed, only 2 A – (3 × 0.2) = 1.4 A is
available for use on headers P2–P5. Each pin on the headers is rated for 2 A,
but a typical 28 AWG ribbon cable is rated for only 225 mA per conductor.
™
ribbon cable #3353, which
NI sbRIO-960x 20 ni.com
Page 21

Specifications
Network
Processor Speed
The OEM user is responsible for determining cabling requirements and
ensuring that current limits are not exceeded.
The following specifications are typical for the range –20 to 55 °C unless
otherwise noted.
Network interface................................... 10BaseT and 100BaseTX
Ethernet
Compatibility ......................................... IEEE 802.3
Communication rates ............................. 10 Mbps, 100 Mbps,
auto-negotiated
Maximum cabling distance ....................100 m/segment
sbRIO-9601............................................266 MHz
sbRIO-9602............................................400 MHz
Memory
Non-volatile memory
sbRIO-9601..................................... 128 MB
sbRIO-9602..................................... 256 MB
System memory
sbRIO-9601..................................... 64 MB
sbRIO-9602..................................... 128 MB
Xilinx Spartan 3 Reconfigurable FPGA
Number of logic cells
sbRIO-9601..................................... 17,280
sbRIO-9602..................................... 46,080
Available embedded RAM
sbRIO-9601..................................... 432 kbits
sbRIO-9602..................................... 720 kbits
© National Instruments Corporation 21 NI sbRIO-960x
Page 22

3.3 V Digital I/O
Number of DIO channels........................110
Maximum tested current per channel .....3 mA
Maximum total current, all lines.............330 mA
Maximum tested DIO frequency ............10 MHz
Input logic levels
Input high voltage, V
Input low voltage, V
....................2.0 V min; 5.25 V max
IH
......................0 V min; 0.8 V max
IL
Output logic levels
Output high voltage, V
OH
,
sourcing 3 mA .................................2.7 V min; 3.3 V max
Output low voltage, V
OL
,
sinking 3 mA ...................................0.07 V min; 0.54 V max
Overvoltage protection
at –20 to 70 °C........................................±20 V (maximum 2 pins
in overvoltage)
Posistor (PRG18BB330MS1RB from Murata)
Maximum peak
abnormal-condition current .............760 mA
Maximum hold current at 25 °C......36 mA
Maximum hold current at 70 °C......20 mA
Trip current at 25 °C........................71 mA
Resistance at 25 °C..........................33 Ω ±20%
NI sbRIO-960x 22 ni.com
Page 23

Resistance-temperature characteristics, typical curve
1000
100
10
Resistance Change (R/R25)
1
Resistance-Temperature Characteristics
Typical Curve
Graph-1
0.1
–40 –20 0 20 40 60 80 100 120 140 160
Te mp e r ature (°C)
© National Instruments Corporation 23 NI sbRIO-960x
Page 24

Power Requirements
The sbRIO device requires a power supply connected to connector J3.
Refer to Figure 4 for the location of J3. Refer to the Powering the sbRIO
Device section for information about connecting the power supply.
Power supply voltage range....................19–30 VDC
1
Power supply current limit .....................1.8 A
Power connector internal fuse ................2 A non-replaceable
where P
Total power requirement = P
is the consumption by sbRIO internal operation
int
P
is the consumption by the 3.3 V DIO
DIO
P
is the consumption by the 5 V voltage output
5V
P
is the consumption by installed board-only C Series
CSer
int
+ P
+ P5V + P
DIO
CSer
,
modules.
Note You must add 20% to the calculated or measured total power requirement to account
for transient and startup conditions.
Maximum P
Maximum P
P
DIO
Maximum P
P
5V
.........................................6.0 W
int
.......................................1.28 W
DIO
= Total DIO Current × 3.3 V/ 0.85
.........................................11.1 W
5V
= Total 5 V Output Current × 5V/0.9
Maximum P
.......................................3.3 W; each installed C Series
CSer
module consumes up to 1.1 W
1
The sbRIO device is 1–2% more efficient with a 19 V supply than with a 30 V supply.
NI sbRIO-960x 24 ni.com
Page 25

Example power requirement calculations
For an sbRIO-9602 with three installed board-only C Series modules,
20 mA total current through 3.3 V DIO pins, and 1 A of current through
5 V output, calculate the total power requirement as follows:
P
= 6.0 W
int
P
= 3.30 W
CSer
P
= 0.08 W
DIO
P
= 5.55 W
5V
Adding 20% for transient conditions, 14.93 W × 1.2 = 17.92 W
Total power requirement = 17.92 W
For an sbRIO-9601 with one installed board-only C Series module,
330 mA total current through 3.3 V DIO pins, and no 5 V output used,
calculate the total power requirement as follows:
P
= 6.0 W
int
P
= 1.10 W
CSer
P
= 1.28 W
DIO
P
= 0.00 W
5V
Adding 20% for transient conditions, 8.38 W × 1.2 = 10.06 W
Total power requirement = 10.06 W
Backup battery ....................................... 3 V lithium coin cell, BR2032
Working I/O Voltages
Connect only voltages that are within these limits.
V terminal to C terminal ........................ 35 VDC max,
Measurement Category I
Caution Do not connect the system to signals or use for measurements within
Measurement Categories II, III, or IV.
Environmental Management
National Instruments is committed to designing and manufacturing
products in an environmentally responsible manner. NI recognizes that
eliminating certain hazardous substances from our products is beneficial
not only to the environment but also to NI customers.
© National Instruments Corporation 25 NI sbRIO-960x
Page 26

EU Customers At the end of their life cycle, all products must be sent to a WEEE recycling
⬉ᄤֵᙃѻક∵ᶧࠊㅵ⧚ࡲ⊩ ˄Ё
˅
Ёᅶ᠋
center. For more information about WEEE recycling centers and National Instruments
WEEE initiatives, visit
݇Ѣ
National InstrumentsЁRoHS
(For information about China RoHS compliance, go to
Environmental
For additional environmental information, refer to the NI and the
Environment Web page at
ni.com/environment. This page contains the
environmental regulations and directives with which NI complies, as well
as other environmental information not included in this document.
Waste Electrical and Electronic Equipment (WEEE)
ni.com/environment/weee.htm.
RoHS
National Instruments
The sbRIO-960x is intended for indoor use only.
Ambient temperature in enclosure
(IEC 60068-2-1, IEC 60068-2-2).................– 20 to 55 °C
Storage temperature
(IEC 60068-2-1, IEC 60068-2-2).................– 40 to 85 °C
ヺড়Ё⬉ᄤֵᙃѻકЁ䰤ࠊՓ⫼ᶤѯ᳝ᆇ⠽䋼ᣛҸ
ড়㾘ᗻֵᙃˈ䇋ⱏᔩ
ni.com/environment/rohs_china
ni.com/environment/rohs_china
(RoHS)
DŽ
DŽ
.)
Operating humidity
(IEC 60068-2-56) ......................................10 to 90% RH, noncondensing
Storage humidity
(IEC 60068-2-56) ......................................5 to 95% RH, noncondensing
Maximum altitude...................................2,000 m
Pollution Degree (IEC 60664) ................2
Physical Characteristics
Torque for screw terminals on J3 ...........0.5 to 0.6 N · m
(4.4 to 5.3 lb · in.)
Weight ....................................................198.45 g (7.0 oz)
NI sbRIO-960x 26 ni.com
Page 27

Cabling
C
C
Table 5 shows the standard Ethernet cable wiring connections for both
normal and crossover cables.
Table 5. Ethernet Cable Wiring Connections
Pin 1
onnector 1
Pin Connector 1
Connector 2
(Normal)
Connector 2
(Crossover)
1 white/orange white/orange white/green
2 orange orange green
3 white/green white/green white/orange
4 blue blue blue
5 white/blue white/blue white/blue
6 green green orange
7 white/brown white/brown white/brown
8 brown brown brown
onnector 2
Pin 1 Pin 8Pin 8
© National Instruments Corporation 27 NI sbRIO-960x
Figure 13. Ethernet Connector Pinout
Page 28

Where to Go for Support
The National Instruments Web site is your complete resource for technical
support. At
troubleshooting and application development self-help resources to email
and phone assistance from NI Application Engineers.
National Instruments corporate headquarters is located at
11500 North Mopac Expressway, Austin, Texas, 78759-3504.
National Instruments also has offices located around the world to help
address your support needs. For telephone support in the United States,
create your service request at
instructions or dial 512 795 8248. For telephone support outside the United
States, contact your local branch office:
Australia 1800 300 800, Austria 43 662 457990-0,
Belgium 32 (0) 2 757 0020, Brazil 55 11 3262 3599,
Canada 800 433 3488, China 86 21 5050 9800,
Czech Republic 420 224 235 774, Denmark 45 45 76 26 00,
Finland 358 (0) 9 725 72511, France 01 57 66 24 24,
Germany 49 89 7413130, India 91 80 41190000, Israel 972 3 6393737,
Italy 39 02 41309277, Japan 0120-527196, Korea 82 02 3451 3400,
Lebanon 961 (0) 1 33 28 28, Malaysia 1800 887710,
Mexico 01 800 010 0793, Netherlands 31 (0) 348 433 466,
New Zealand 0800 553 322, Norway 47 (0) 66 90 76 60,
Poland 48 2 2 3390150 , Portugal 351 210 311 210, Russia 7 495 783 6851,
Singapore 1800 226 5886, Slovenia 386 3 425 42 00,
South Africa 27 0 11 805 8197, Spain 34 91 640 0085,
Sweden 46 (0) 8 587 895 00, Switzerland 41 56 2005151,
Taiwan 886 02 2377 2222, Thailand 662 278 6777,
Turkey 90 212 279 3031, United Kingdom 44 (0) 1635 523545
ni.com/support you have access to everything from
ni.com/support and follow the calling
National Instruments, NI, ni.com, and LabVIEW are trademarks of National Instruments Corporation.
Refer to the Terms of Use section on ni.com/legal for more information about National
Instruments trademarks. Other product and company names mentioned herein are trademarks or trad e
names of their respective companies. For patents covering National Instruments products, refer to the
appropriate location: Help»Patents in your software, the patents.txt file on your media, or
ni.com/patents.
© 2008 National Instruments Corporation. All rights reserved.
374991A-01 Aug08
 Loading...