

Page 1

USER GUIDE
NI PXI-1042 Series
Power Supply Shuttle
The NI PXI-1042 Series power supply shuttle is a replacement part for the
NI PXI-1042 Series chassis.
Introduction
To minimize downtime caused by a power-supply failure, the
NI PXI-1042 Series chassis has a modular power supply shuttle. This
power supply shuttle includes the chassis power supply, cooling fans, and
fan-control circuitry. Key features of the power supply shuttle include:
• Universal AC input with automatic voltage and frequency ranging
• Over-current protection via push-reset circuit breaker
• Remote power monitoring and inhibit via a rear-panel connector
• Temperature-sensing module that can adjust fan speed based on
air-intake temperature to minimize audible noise
• Circuitry to control a front-panel LED that indicates power supply
failure
Unpacking
Carefully inspect the shipping container and the power supply shuttle for
damage. Check for visible damage to the metal work. Check to make sure
all handles, hardware, and switches are undamaged. Visually inspect the
inside of the shuttle for any possible damage, debris, or detached
components. If damage appears to have been caused during shipment, file
a claim with the carrier. Retain the packing material for possible inspection
and/or reshipment.
Page 2
What You Need to Get Started
❑ NI PXI-1042 Series chassis (the unit being repaired)
❑ NI PXI-1042 Series power supply shuttle
❑ Read Me First: Safety and Radio-Frequency Interference
❑ NI PXI-1042 User Manual (provided with the chassis; also available at
ni.com/support)
❑ #1 Phillips screwdriver
Description
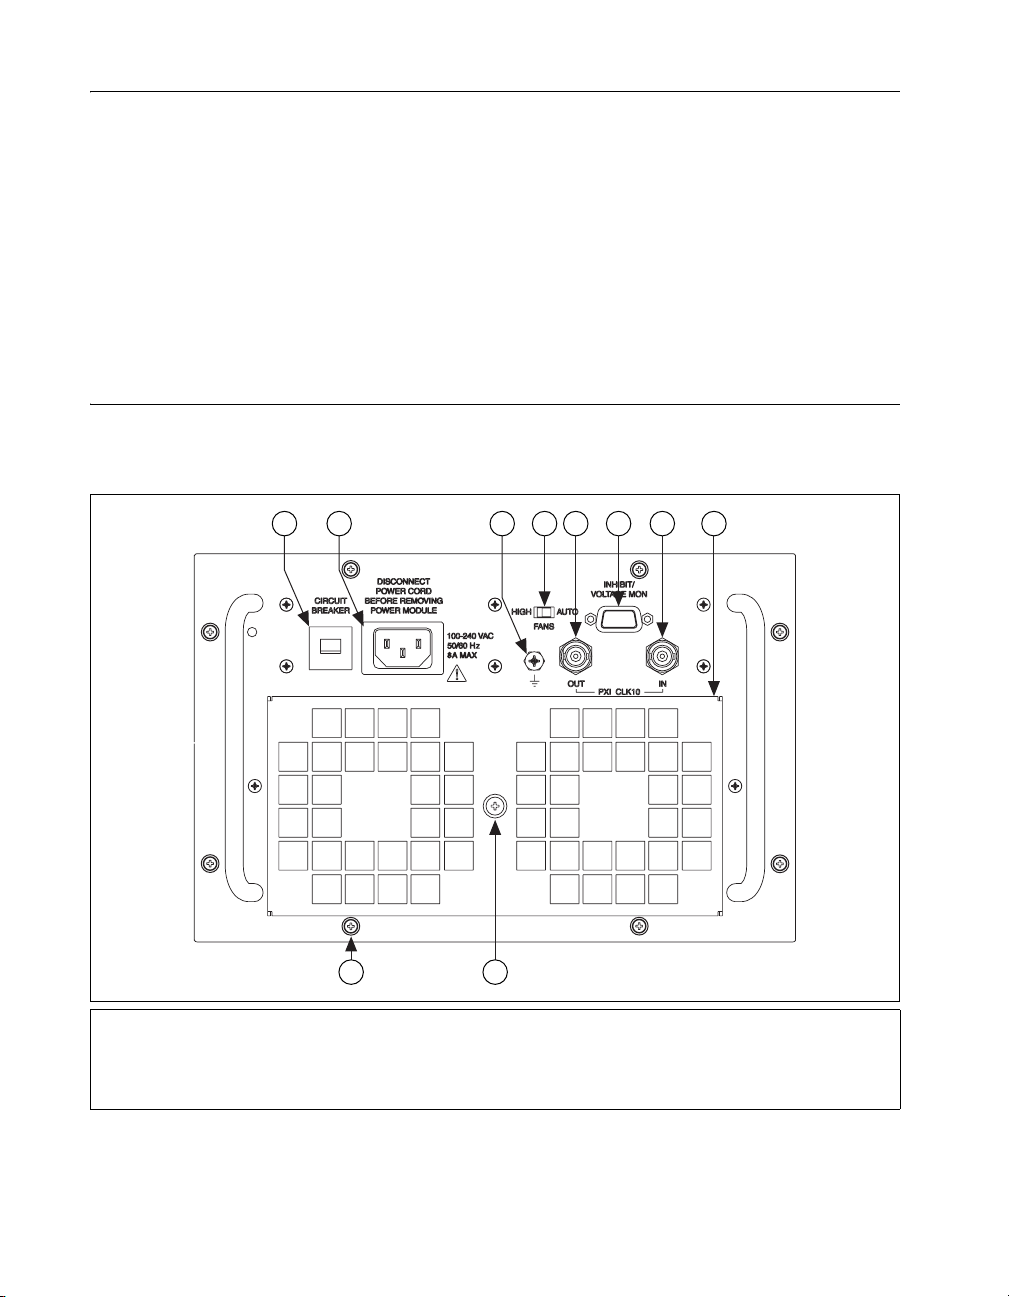
Refer to Figure 1 to locate user-accessible components on the power supply
shuttle.
1 2 3 4 5 6 7 8
10 9
1 Circuit Breaker
2 Universal AC Inlet
3 Chassis Grounding Screw
4 Fan Speed Selector Switch
5 PXI_CLK10 OUT BNC
NI PXI-1042 Series Power Supply Shuttle User Guide 2 ni.com
6 Remote Inhibit and Voltage Monitoring Connector
7 PXI_CLK10 IN BNC
8 Filter Cover
9 Filter Retainer Screw
10 Mounting Screws (8X)
Figure 1. NI PXI-1042 Series Power Supply Shuttle Rear Panel
Page 3
Installation and Maintenance
The information in this section is for qualified service personnel only. Read
the Read Me First: Safety and Radio-Frequency Interference document
included with your kit before using the power supply shuttle.
Caution Many components within the NI PXI-1042 Series chassis under repair are
susceptible to static discharge damage. Service the chassis only in a static-free
environment. Observe standard handling precautions for static-sensitive devices while
servicing the chassis. Always wear a grounded wrist strap, or equivalent, while servicing
the chassis.
Caution Always disconnect the AC power cable before cleaning or servicing the chassis.
Caution Never connect the AC power cable to the power supply shuttle until you install it
in an NI PXI-1042 Series chassis. Do not use, test, or configure the power supply shuttle
outside of a chassis.
The power supply shuttle is a replacement part for the NI PXI-1042 Series
chassis. The NI PXI-1042 User Manual contains all of the most up-to-date
chassis service procedures, including removal and replacement of power
supply shuttles. The chassis includes a hardcopy of the NI PXI-1042 User
Manual; additionally, you can download a softcopy from
support
.
ni.com/
Removal
Before attempting to replace the power supply shuttle, verify that there is
adequate clearance behind the chassis. Set the power switch on the front
panel to the Off (nonrecessed) position and disconnect the power cable
from the power supply shuttle on the back of the chassis. Identify the eight
captive mounting screws that attach the power supply shuttle to the chassis.
Refer to Figure 1 for the mounting screw locations. Using a Phillips
screwdriver, loosen the captive mounting screws. Pull on the two rear
handles of the power supply shuttle to remove it from the back of the
chassis.
Installation
Ensure that there is no visible damage to the new power supply shuttle.
Verify that the housing and connector on the new power supply shuttle
have no foreign material inside. Remove the protective cap on the
PXI_CLK10 connector. Install the new power supply shuttle into the
opening on the rear of the chassis. Tighten the eight captive mounting
screws with a Phillips screwdriver.
© National Instruments Corporation 3 NI PXI-1042 Series Power Supply Shuttle User Guide
Page 4

Configuration
The fan-speed selector switch is on the rear panel of the power supply
shuttle. Refer to Figure 1 to locate the fan-speed selector. Select HIGH for
maximum cooling performance (recommended) or AUTO for quieter
operation. When set to AUTO, air-intake temperature determines the fan
speed.
Connecting Safety Ground
Caution The power supply shuttle is designed with a three-position NEMA 5-15 jack that
connects the ground line to the chassis ground. To minimize shock hazard, make sure the
electrical power outlet you use to power the chassis has an appropriate earth safety ground.
If your power outlet does not have an appropriate ground connection, you
must connect the premise safety ground to the chassis grounding screw.
Refer to Figure 1 to locate the chassis grounding screw. To connect the
safety ground, complete the following steps:
1. Connect a 16 AWG (1.3 mm) wire to the chassis grounding screw
using a grounding lug. The wire must have green insulation with a
yellow stripe or must be noninsulated (bare).
2. Attach the opposite end of the wire to permanent earth ground using
toothed washers or a toothed lug.
Specifications
AC Input
Input voltage range .................................100 to 240 VAC
Operating voltage range
Input frequency.......................................50/60 Hz
Operating frequency range
Input current rating .................................8 A
Over-current protection ..........................10 A circuit breaker
Line regulation
3.3 V ................................................<±0.2%
5 V ...................................................<±0.1%
±12 V...............................................<±0.1%
1
The operating range is guaranteed by design.
NI PXI-1042 Series Power Supply Shuttle User Guide 4 ni.com
1
........................90 to 264 VAC
1
....................47 to 63 Hz
Page 5

DC Output
Efficiency ............................................... 70% typical
Power disconnect ................................... The AC power cable provides
main power disconnect. The
chassis front-panel power switch
causes the power supply to
provide DC power to
the CompactPCI/PXI backplane.
DC current capacity (IMP)
NI PXI-1042 NI PXI-1042Q
Voltage
0–50 °C 0–55 °C 0–40 °C
+3.3 V 20 A 18 A 20 A
+5 V 29 A 25 A 29 A
+12 V Peripheral slots 3.5 A 3.5 A 3.5 A
+12 V System slot 0.5 A 0.5 A 0.5 A
–12 V 2 A 2 A 2 A
Load regulation
Vo lt a ge Load Regulation
+3.3 V <5%
+12 V <5%
+5 V <5%
–12 V <5%
Maximum ripple and noise (20 MHz bandwidth)
Vo lt a ge Maximum Ripple and Noise
+3.3 V 50 mV
pp
+12 V 120 mV
+5 V 50 mV
–12 V 120 mV
© National Instruments Corporation 5 NI PXI-1042 Series Power Supply Shuttle User Guide
pp
pp
pp
Page 6

Over-current protection ..........................All outputs protected from short
Over-voltage protection
3.3 V and 5 V...................................Clamped at 20 to 30% above
+12 V and –12 V .............................Clamped at 26 to 29 V difference
Power supply shuttle MTTR...................Replacement in under 5 minutes
Compliance and Certifications
Safety
This product meets the requirements of the following standards of safety
for electrical equipment for measurement, control, and laboratory use:
• IEC 61010-1, EN 61010-1
• UL 61010-1, CSA 61010-1
Note For UL and other safety certifications, refer to the product label or the Online
Product Certification section.
circuit and overload with
automatic recovery
nominal output voltage
between +12 and –12 V outputs
Electromagnetic Compatibility
This product meets the requirements of the following EMC standards for
electrical equipment for measurement, control, and laboratory use:
• EN 61326 (IEC 61326): Class A emissions; Basic immunity
• EN 55011 (CISPR 11): Group 1, Class A emissions
• AS/NZS CISPR 11: Group 1, Class A emissions
• FCC 47 CFR Part 15B: Class A emissions
• ICES-001: Class A emissions
Note For the standards applied to assess the EMC of this product, refer to the Online
Product Certification section.
Note For EMC compliance, operate this product according to the documentation.
NI PXI-1042 Series Power Supply Shuttle User Guide 6 ni.com
Page 7

Online Product Certification
⬉ᄤֵᙃѻક∵ᶧࠊㅵ⧚ࡲ⊩ ˄Ё
˅
Ёᅶ᠋
Refer to the product Declaration of Conformity (DoC) for additional
regulatory compliance information. To obtain product certifications and
the DoC for this product, visit
number or product line, and click the appropriate link in the Certification
column.
CE Compliance
This product meets the essential requirements of applicable European
Directives as follows:
• 2006/95/EC; Low-Voltage Directive (safety)
• 2004/108/EC; Electromagnetic Compatibility Directive (EMC)
Environmental Management
National Instruments is committed to designing and manufacturing
products in an environmentally responsible manner. NI recognizes that
eliminating certain hazardous substances from our products is beneficial
not only to the environment but also to NI customers.
For additional environmental information, refer to the NI and the
Environment Web page at
environmental regulations and directives with which NI complies, as well
as other environmental information not included in this document.
ni.com/certification, search by model
ni.com/environment. This page contains the
Waste Electrical and Electronic Equipment (WEEE)
EU Customers At the end of their life cycle, all products must be sent to a WEEE recycling
center. For more information about WEEE recycling centers and National Instruments
WEEE initiatives, visit
ni.com/environment/weee.htm.
RoHS
National Instruments
݇Ѣ
National Instruments
(For information about China RoHS compliance, go to
© National Instruments Corporation 7 NI PXI-1042 Series Power Supply Shuttle User Guide
ヺড়Ё⬉ᄤֵᙃѻકЁ䰤ࠊՓ⫼ᶤѯ᳝ᆇ⠽䋼ᣛҸ
Ё
ড়㾘ᗻֵᙃˈ䇋ⱏᔩ
RoHS
ni.com/environment/rohs_china
ni.com/environment/rohs_china
(RoHS)
DŽ
DŽ
.)
Page 8

National Instruments, NI, ni.com, and LabVIEW are trademarks of National Instruments Corporation.
Refer to the Terms of Use section on ni.com/legal for more information about National
Instruments trademarks. Other product and company names mentioned herein are trademarks or trad e
names of their respective companies. For patents covering National Instruments products/technology,
refer to the appropriate location: Help»Patents in your software, the patents.txt file on your
media, or the National Instruments Patent Notice at ni.com/patents.
© 2008 National Instruments Corporation. All rights reserved.
372653A-01 Sep08
 Loading...