

Page 1

Getting Started
NI 9503 C Series Stepper Drive
Modules and SoftMotion Module
Note If you are a new user of LabVIEW or are unfamiliar with LabVIEW, refer to
the Getting Started with LabVIEW manual for information about LabVIEW and
LabVIEW terminology.
This document explains how to use an NI 9503 C Series drive module with
LabVIEW NI SoftMotion Module User-Defined Variable (UDV) axes, using an NI 9503
C Series drive module example to demonstrate concepts and programming best practices.
Tip If you encounter any problems during setup, refer to the Tips and
Troubleshooting section for assistance.
Contents
What You Need to Get Started ................................................................................................. 2
Hardware .......................................................................................................................... 2
Software............................................................................................................................ 3
SoftMotion Module Overview.................................................................................................. 4
Hardware and Software Installation ......................................................................................... 5
Step 1: Set Up the Real Time System............................................................................... 5
Step 2: Connect NI 9503 to the Stepper Motor ................................................................ 5
Step 3: Connect the NI 9503 to the NI PS-16 Power Supply ........................................... 6
Step 4: Connect the System to AC Power ........................................................................ 6
Step 5: Install Software on and Configure the NI RT Controller..................................... 6
Using NI 9503 with SoftMotion............................................................................................... 7
SoftMotion UDV Axes and Configuration Data .............................................................. 7
SoftMotion Engine to FPGA Communication ................................................................. 8
Compile and Run the Example ......................................................................................... 10
Setting Up and Using Optional Hardware................................................................................ 12
Adding and Connecting Additional Modules................................................................... 13
Additional UDVs and FPGA VI Loops............................................................................ 15
Tips and Troubleshooting......................................................................................................... 16
Drive Fault on Enable....................................................................................................... 16
Interactive Test Panel does not get updated ..................................................................... 17
Where to Go Next ..................................................................................................................... 17
Worldwide Support and Services ............................................................................................. 18
Page 2

What You Need to Get Started
You need the following items to get started.
Hardware
NI 9503 C Series stepper drive module
NI CompactRIO Real-Time controller and chassis
24 V power supply (such as the NI PS-15) for the CompactRIO controller
(NI part number 781093-01)
24 V power supply (such as the NI PS-16) for the NI 9503 module
Note NI recommends the NI PS-16 power supply, which is designed for motor bus
power, for use with the NI 9503 module. Refer to Regeneration Consideration Using
the NI C Series Drive Modules at zone.ni.com for more information.
Ethernet connection and cable for the CompactRIO controller
NI or third-party stepper motor
Note NI offers NEMA 17 and NEMA 23 stepper motors compatible with the
NI 9503. Go to
ni.com for more information.
Optional Hardware
NI or third-party encoder
Note NI offers encoders for NEMA 17 and NEMA 23 stepper motors. Go to
ni.com for more information. Some NI stepper motors include integrated encoders.
NI 9411 digital input module for encoder connections
(NI part number 779005-01)
NI 9935 15-pin D-SUB connector kit for connecting the NI 9411
(NI part number 779016-01)
NI 9401 high-speed bidirectional digital I/O module for position compare and position
capture operations
(NI part number 779351-01)
2 | ni.com | NI 9503 C Series Stepper Drive Modules and SoftMotion Module
Page 3

NI 9924 25-pin D-SUB connector kit for connecting the NI 9401
Ethernet
Cable
Motor Connections
NI RT Controller
(NI cRIO-9014 shown)
with NI 9503 modules
+24 V Power Supply
(NI PS-15 Shown)
9 to 30 V Power Supply
(NI PS-16 Shown)
Stepper Motor
(NI part number 781922-01)
NI 9423 sinking digital input module for home, limit, and digital input connections
(NI part number 779009-01)
NI 9472 sourcing digital output module for digital output connections
(NI part number 779004-01)
Software
LabVIEW 2014 or later
LabVIEW 2014 Real-Time Module or later
LabVIEW 2014 FPGA Module or later
LabVIEW 2014 SoftMotion Module or later
NI-RIO Device Drivers 2014 or later
Figure 1 shows the system setup without optional hardware. The Setting Up and Using Optional
Hardware section discusses optional hardware, including a connection diagram and example
walkthrough of optional functionality.
Figure 1. SoftMotion Module with NI 9503 UDV Axis System Overview
NI 9503 C Series Stepper Drive Modules and SoftMotion Module | © National Instruments | 3
Page 4
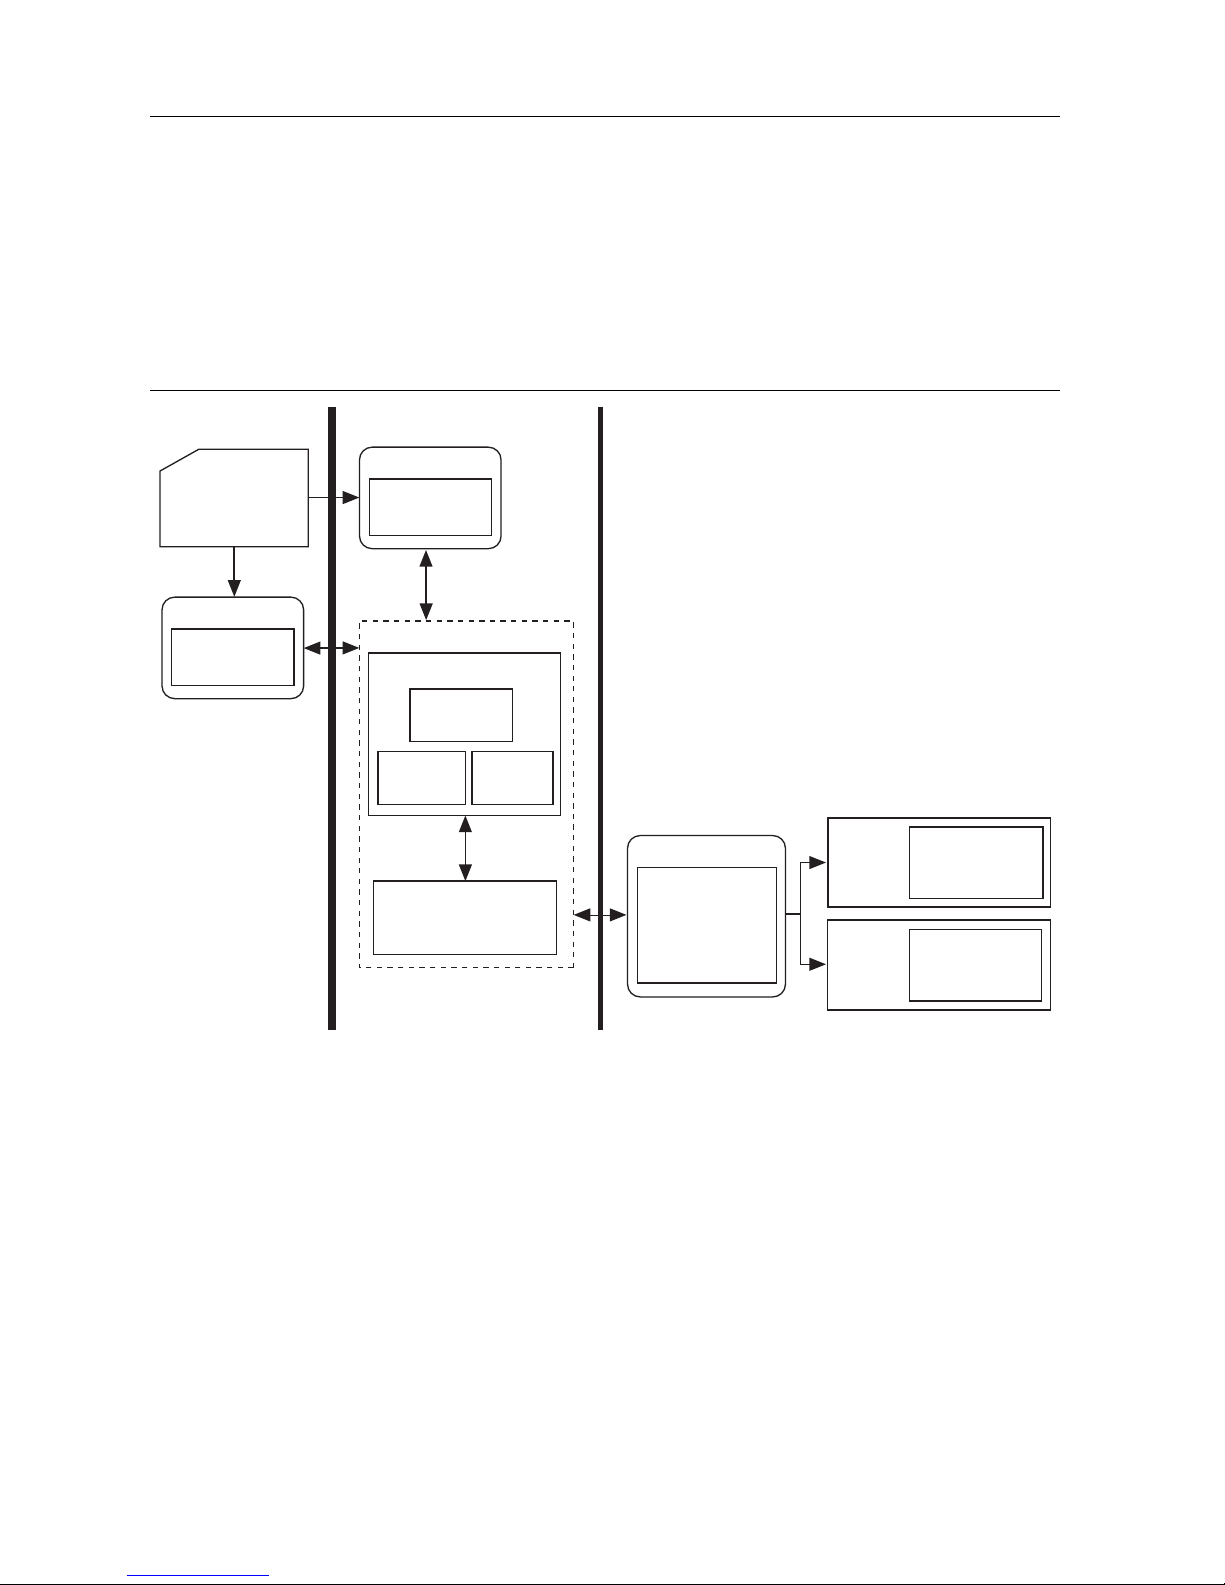
SoftMotion Module Overview
SoftMotion Module UDV axes allow you to implement an interface for communication between
the SoftMotion Engine and the LabVIEW FPGA Module. This is achieved using user-defined
variables that you add to the project, making it easier to use C Series modules in FPGA mode
with the SoftMotion Module.
The following figure shows the SoftMotion architecture when you use the SoftMotion Module
with UDV axes and the LabVIEW FPGA Module.
Figure 2. SoftMotion Module with UDV Axes
Non Real-Time LabVIEW Real-Time Module
Host HMI and
Axis Settings:
LabVIEW Project
User VI
NI SoftMotion
APIs
User VI
NI SoftMotion
APIs
NI SoftMotion
NI SoftMotion Engine
Supervisory
Control
Tr ajectory
Generator
User-Defined Variable
Communication
Axis
Interface
Module
LabVIEW FPGA with
NI Scan Engine Supported Platform
User VI
Motor Control,
Drive Interface,
and Sync VIs
cRIO
Chassis
cRIO
Chassis
C Series
Module(s)
NI 950x
C Series
Module(s)
You use the LabVIEW Project to configure your axis settings and test your configuration. When
your hardware configuration is complete, you use SoftMotion APIs to create move profiles.
Communication to the LabVIEW FPGA Module is handled through user-defined variables. You
use the SoftMotion Drive Interface VIs to implement an interface for communication between
the SoftMotion Engine and the LabVIEW FPGA Module. When you use the Drive Interface VIs
with UDV axes you communicate using a predefined set of UDVs. Refer to Adding
User-Defined Variables for Use With a UDV Axis in the SoftMotion Module Help, available by
selecting Help»LabVIEW Help for information about the predefined UDVs. Refer to the Using
NI 9503 with SoftMotion section for more information about the NI SoftMotion Drive
Interface VIs.
4 | ni.com | NI 9503 C Series Stepper Drive Modules and SoftMotion Module
Page 5

Hardware and Software Installation
Ph
ase A+
(Black)
Phase A–
(Orange)
Phase B+
(Red)
Phase B–
(Yellow)
This section covers the hardware setup for the Real Time system and NI 9503 C Series drive
module.
Step 1: Set Up the Real Time System
Complete the following steps to set up the Real Time system depending on your hardware.
1. Refer to the Getting Started guide included with the Real-Time Controller to assemble it,
connect it to power, discover it on the network, and install the software in NI MAX.
Note Older Model chasis, such as cRIO-902x, cRIO 907x, cRIO-908x, NI 9144,
and NI 9148 have HSI support only on slots 1 through 4. Refer to your chassis
documentation for more information about HSI support.
Step 2: Connect NI 9503 to the Stepper Motor
1. Connect the stepper motor to the NI 9503. Figure 3 shows a typical bipolar stepper motor
connection. Refer to the NI 9503 Operating Instructions and Specifications for important
connection information, including information about EMC compliance and connecting
6- or 8-wire stepper motors.
Figure 3. NI 9503 Bipolar Stepper Motor (2-Phase Type) Connection
Phase A+
Phase A–
Phase B+
Phase B–
Phase A+
Phase A–
Phase B+
Phase B–
Reserved
Reserved
Reserved
COM
Vsup
0
1
2
3
4
5
6
7
8
9
NEMA 17 and NEMA 23 stepper motors from NI use the following wire color scheme.
Figure 4. Stepper Motor Wiring
NI 9503 C Series Stepper Drive Modules and SoftMotion Module | © National Instruments | 5
Page 6

Step 3: Connect the NI 9503 to the NI PS-16
Power Supply
Tip Refer to the NI PS-16 Power Supply User Manual and Specifications for more
information about connecting and using the NI PS-16 power supply.
Complete the following steps to connect the NI 9503 module to the NI PS-16 power supply.
Tip Refer to the NI 9503 Operating Instructions and Specifications for more
information about module power supply requirements.
1. Connect the NI 9503 Vsup (pin 8) to one of the two (+) terminals on the NI PS-16.
2. Connect the NI 9503 COM (pin 7) to one of the two (-) terminals on the NI PS-16.
3. Connect the power supply to AC power.
Step 4: Connect the System to AC Power
Complete the following steps to power on the system.
1. Connect the controller power supply (such as the NI PS-15) to AC power.
Step 5: Install Software on and Configure the
NI RT Controller
This step covers installing and configuring the software for the NI 9503 stepper drive module.
It assumes that all required software from the What You Need to Get Started section is installed
on the host machine.
Complete the following steps to configure the controller and install software on it.
Note The NI Measurement & Automation Explorer (MAX) user interface may not
match these steps exactly depending on which version of MAX you are using.
1. Launch Measurement & Automation Explorer (MAX) on the development computer by
clicking the MAX icon on the desktop, or by selecting Start»All Programs»
National Instruments»NI MAX.
2. Select the controller under Remote Systems in the Configuration pane. If you do not see
the controller, you may need to disable the firewall on the development computer.
3. Verify that the Serial Number in the Identification section matches the serial number on
the device.
4. Expand the controller item in the tree, right-click Software, and select Add/Remove
Software.
5. Highlight your device.
6 | ni.com | NI 9503 C Series Stepper Drive Modules and SoftMotion Module
Page 7

Note If you do not see the controller, you may need to disable the firewall on the
development computer. Go to
for more information.
6. Verify that the Serial Number in the System Settings section matches the serial number
on the device.
7. Select a recommended software set that includes NI CompactRIO 14.0 or later. Click Help
if you need information about installing recommended software sets.
8. Click Next.
9. Select LabVIEW SoftMotion Module from the add-ons list.
10. Click Next to install the selected software on the controller.
11. Make a note of the IP address assigned to the controller, to use when adding the target in
LabVIEW.
12. Close MAX.
ni.com/info and enter RIOMAXTroubleshoot
Using NI 9503 with SoftMotion
The following tutorial walks you through using an NI 9503 UDV axis using the 9503 Stepper
Drive (NI 9503)
UDV axis using the LabVIEW project and contains all required UDVs for use with the NI 9503.
sample project. This project shows how to configure the NI 9503 for a
1. Select File » Create Project» Sample Projects» SoftMotion » Stepper Drive (NI 9503)
to access the sample project provided for the NI 9503
2. Select Position Profile as the Project Type in the Create Project window and click
Finish.
3. Right-click the RT CompactRIO Target item in the Project Explorer window and select
Properties from the shortcut menu to open the real-time target properties dialog box.
4. On the General page, enter the IP address you configured in Step 4: Connect the System to
AC Power.
5. Click OK.
6. Right-click the target and select Connect from the shortcut menu. The RT target icon in the
Project Explorer window changes to indicate a front panel connection with the RT target.
SoftMotion UDV Axes and Configuration Data
This section describes each UDV used in the example and explains how module configuration
data is communicated from the LabVIEW Project to the LabVIEW FPGA Module.
1. Expand the RTCompactRIO Target item in the Project Explorer window.
2. Expand the Chassis item, then expand the User-Defined Variables item to display the
UDVs used in the example. Figure 5 shows the UDVs displayed in Project Manager.
NI 9503 C Series Stepper Drive Modules and SoftMotion Module | © National Instruments | 7
Page 8

Figure 5. 9503 Stepper Drive (Getting Started) User-Defined Variables
The following table briefly describes each UDV used in the project. Refer to Adding
User-Defined Variables for Use With a UDV Axis in the SoftMotion Module Help for more
information about each UDV.
Table 1. Stepper Drive (Getting Started) UDV Descriptions
UDV Name Description
Axis 1.Control Register Contains information used to control the state and operating
mode of the device.
Axis 1.Mailbox
(FPGA to Host)
Axis 1.Mailbox
(Host to FPGA)
Contains information used to provide configuration and other
data from FPGA to the SoftMotion Engine.
Contains information used to provide configuration and other
data from the SoftMotion Engine to FPGA.
Axis 1.Position Setpoint Specifies the position setpoint.
Axis 1.Status Register Contains information used to report status and operation mode
information from the device to the system.
Axis 1.Steps Generated Returns the current step count of the stepper generator taking
into account the direction. This value is based on actual steps
generated, not feedback position, and may not exactly match the
feedback position.
SoftMotion Engine to FPGA Communication
Each User-Defined Variable communicates information between the SoftMotion Engine and the
LabVIEW FPGA Module. These UDVs are used directly with the Drive Interface FPGA VIs in
specific loops on the block diagram. Complete the following steps to open the FPGA VI and
display the block diagram.
1. Expand the FPGA Target item in the LabVIEW Project Explorer window.
2. Double-click the Stepper Drive (Getting Started) - FPGA.vi item to open the VI.
3. Select Window»Show Block Diagram to open the FPGA VI block diagram.
The following table briefly describes each FPGA VI loop used in the project.
8 | ni.com | NI 9503 C Series Stepper Drive Modules and SoftMotion Module
Page 9

Table 2. Stepper Drive (Getting Started) Loop Descriptions
Table 3.
FPGA Loop Name Description
Fault Monitoring Loop The Fault Monitoring loop sends fault information, including
user-defined faults, to the NI SoftMotion engine and sends the
state machine implemented in the Control Status Loop into a
fault state.
Control Status Loop The Control Status Loop interprets the Control Register UDV
and recognizes state changes, executes the appropriate action on
a state change, and generates the Status Register UDV that
returns information to the SoftMotion Engine.
Reset Monitoring Loop The Reset Monitoring Loop latches the reset variable so that it
only changes on a rising edge of the Scan Clock. This allows
proper operation of the SoftMotion Motor Control VIs with a
reset input.
Mailbox Loop The Mailbox Loop transfers axis configuration and other data
between the SoftMotion Engine and the LabVIEW FPGA
Module. The transferred data is written to FPGA memory and
accessed using the Read Motion Memory and Write Motion
Memory Drive Interface VIs. This loop is required to be
implemented as-is for proper operation
Synchronization Loop The Synchronization Loop synchronizes the FPGA clock
(slave) to the RT clock (master) to correct for drift and jitter.
This is the preferred synchronization method to use with the
NI SoftMotion Module. The Synchronization Loop is required
to be implemented as-is for proper operation.
Position Loop and
Current Loop
The Position Loop receives position setpoints from the
SoftMotion trajectory generator and uses the Spline
Interpolation VI to generate intermediate setpoints, resulting in
smoother motion. It converts the position setpoints to an
electrical angle, which is used to generate phase A and phase B
current setpoints. The Position Loop sends current setpoints to
the Current Loop
PWM Loop The PWM Loop takes the A+, A-, B+ and B- duty cycles and
converts them into digital signals that control H-bridges on the
drive. The PWM Loop also triggers the Current Loop to run at
the midpoint of the high phase of the PWM duty cycle.
NI 9503 C Series Stepper Drive Modules and SoftMotion Module | © National Instruments | 9
Page 10

Compile and Run the Example
Complete the following steps to compile and run the example.
1. Right-click the axis in the Project Explorer window and select Properties from the shortcut
menu to open the Axis Configuration dialog box. The Axis Configuration dialog box
includes configuration options for stepper drive command signals, feedback devices,
motion and digital I/O, trajectory, and axis setup.
Figure 6 shows the parts of the Axis Configuration dialog box for NI 9503 UDV axes.
Refer to the NI SoftMotion Module section of the LabVIEW Help for detailed information
about each configuration option.
Figure 6. Axis Configuration Dialog Box for NI 9503 UDV Axes
Note The Axis Configuration dialog box user interface may not match this image
exactly depending on which version of the LabVIEW SoftMotion Module you are
using.
2. For NI steppper motors, select the motor name from the drop down list. The motor
parameters are included with SoftMotion and do not require customization. For third party
stepper motors, set the Rated Phase Current and other motor parameters accordingly.
3. Click OK to close the Axis Configuration dialog box.
10 | ni.com | NI 9503 C Series Stepper Drive Modules and SoftMotion Module
Page 11

4. Right-click the Chassis item in the Project Explorer window and select Deploy from the
shortcut menu.
5. Click the Run button on the 9503 Stepper Drive (Getting Started) -
FPGA.vi
. Clicking the Run button compiles the VI only if the VI or project has changed
since you last compiled the VI.
Note The compilation process goes through several stages. Compiling FPGA VIs
can take from a few minutes to a few hours. National Instruments recommends
testing and debugging an FPGA VI before you compile it. Refer to Introduction to
Debugging FPGA VIs on an FPGA Target in the FPGA Module Help for more
information.
6. Verify that the FPGA VI is running. When a VI runs, the Run button ( ) changes to a
darkened arrow ( ) to indicate that the VI is running. If the VI is not running, press the
Run button.
7. Right-click the axis in the Project Explorer window and select Interactive Test Panel
from the shortcut menu.
Note If the Scan Engine was not automatically transitioned from Configuration to
Active mode, close the Interactive Test Panel and perform these steps: right click on
the CompactRIO target in the project » Utilities » Scan Engine Mode »
Configuration, then repeat this step to change to Active. Once this is complete,
the axis parameters will be sent to the FPGA VI and SoftMotion’s engine will be
activated.
8. Click the Enable button ( ) on the bottom of the dialog box to enable the drive.
9. Click the Start button ( ) on the bottom of the dialog box to start the move with the
configured options. If you encounter any errors or faults, refer to the Tips and
Troubleshooting section for possible solutions.
10. Use the Status and Plots tabs to monitor the move while it is in progress.
11. Click the Stop button ( ) to stop a move in progress.
12. Click the Disable button ( ) on the bottom of the dialog box to disable the drive when
you are finished testing it.
NI 9503 C Series Stepper Drive Modules and SoftMotion Module | © National Instruments | 11
Page 12

Setting Up and Using Optional Hardware
Feedback
Connections
Ethernet
Cable
Motor Connections
NI RT Controller
(NI 9074 shown)
with C Series Modules
+24 V Power Supply
(NI PS-15 Shown)
9 to 30 V Power Supply
(NI PS-16 Shown)
Stepper Motor
and Encoder
Limit, Home, and Digital Input Connections
Digital Output Connections
Compare and Capture Connections
This section describes how to configure and use the NI 9503 with additional hardware to provide
encoder feedback, limit and home inputs, digital I/O, and compare and capture operations. The
Stepper Drive (with Encoder) example contains four additional modules and additional UDVs
and FPGA loops to support these operations. Figure 7 shows the system setup with the additional
hardware.
Figure 7. SoftMotion Module with NI 9503 UDV Axis System Overview
Table 4 shows the additional modules and what they are used for in the Stepper Drive (with
Encoder) example.
Table 4. Additional C Series Modules Used in the Stepper Drive (with Encoder) Example
NI 9423 Sinking Digital Input Module 2 Limits, Home, and Digital Inputs
NI 9472 Sourcing Digital Output
Module
NI 9401 High-Speed Bidirectional
Module
NI 9411 Digital Input Module 5 Encoder Inputs
12 | ni.com | NI 9503 C Series Stepper Drive Modules and SoftMotion Module
C Series Module
Slot
Number
3 Digital Outputs
4 Position Compare and Position
Capture
Purpose
Page 13

Adding and Connecting Additional Modules
Add and Connect an NI 9423 Digital Input Module
1. Install and connect an NI 9423 digital input module in slot 2 of the chassis.
2. Connect the forward, reverse, and home switch to the NI 9423 as follows:
Table 5. NI 9411 Limit and Home Connections
NI 9423 Signal Function
DI5 Reverse Limit
DI6 Forward Limit
DI7 Home Switch
3. Connect additional digital inputs to the following channels.
Table 6. NI 9411 Digital Input Connections
NI 9423 Signal Function
DI0 Digital Input 0
DI1 Digital Input 1
DI2 Digital Input 2
DI3 Digital Input 3
DI4 Digital Input 4
Add and Connect an NI 9472 Digital Output Module
1. Install and connect an NI 9472 digital output module in slot 3 of the chassis.
2. Connect digital output devices to the NI 9472.
3. Connect the NI 9472 to the NI PS-16 power supply.
a. Connect an available NI 9472 Vsup terminal to one of the two (+) terminals on the
NI PS-16.
b. Connect an available NI 9472 COM terminal to one of the two (-) terminals on the
NI PS-16
NI 9503 C Series Stepper Drive Modules and SoftMotion Module | © National Instruments | 13
Page 14
Add and Connect an NI 9401 High-Speed Bidirectional Module
1. Install and connect an NI 9401 digital I/O module in slot 4 of the chassis.
2. Connect the position compare and position capture signals as follows:
Table 7. NI 9401 Position Capture and Position Compare Connections
NI 9401 Signal Function
DIO0 Position Capture Input
DIO4 Position Compare Output
Add and Connect an NI 9411 Digital Input Module
1. Install an NI 9411 digital input module in slot 5 of the chassis.
2. Connect the encoder to the NI 9411. The NI 9411 also provides a +5 V supply for encoder
power. The Stepper Drive (with Encoder) example uses the following NI 9411 signals for
the corresponding encoder signals.
Table 8. NI 9411 Encoder Connections
NI 9411 Signal Encoder Signal
DI0 Encoder Phase A
DI1 Encoder Phase B
DI2 Encoder Index
3. Connect the NI 9411 to the NI PS-16 power supply.
a. Connect the NI 9411 Vsup terminal to one of the two (+) terminals on the NI PS-16.
b. Connect the NI 9411 COM terminal to one of the two (-) terminals on the NI PS-16.
14 | ni.com | NI 9503 C Series Stepper Drive Modules and SoftMotion Module
Page 15

Additional UDVs and FPGA VI Loops
The Stepper Drive (with Encoder) example contains several additional UDVs and loops to
implement the new functionality. In addition to the UDVs described in Table 1, the Stepper
Drive (with Encoder) example uses the following new UDVs. Refer to Adding User-Defined
Variables for Use With a UDV Axis in the SoftMotion Module Help for more information about
each UDV.
Table 9. Stepper Drive (with Encoder) Additional UDV Descriptions
UDV Name Description
Axis 1.DIO Control (Port A) Contains the values of digital outputs 0 through 3 as well as
information to clear input latches for limits, home, and
digital inputs 0 through 3.
Axis 1.DIO Control (Port B) Contains the values of digital outputs 4 through 7 as well as
information to enable position compare and position
capture operations and clear input latches for digital inputs
4 through 7.
Note Because the same digital input module is
used for digital inputs and for home and limit
connections, the Stepper Drive (with Encoder)
example only uses digital inputs 0 through 4. Digital
inputs 5 though 7 are not used in the example.
Axis 1.DIO Status (Port A) Contains information used to report value and latching
information for limits, home, and digital inputs 0 through 3.
Axis 1.DIO Status (Port B) Contains information used to report value and latching
information for position capture, position compare, and
digital inputs 4 through 7.
Axis 1.Position Feedback Specifies the feedback position from the encoder.
Axis 1.Velocity Feedback Returns the filtered encoder velocity.
NI 9503 C Series Stepper Drive Modules and SoftMotion Module | © National Instruments | 15
Page 16

Table 10. Stepper Drive (with Encoder) Additional FPGA Loop Descriptions
Table 11.
FPGA Loop Name Description
Position Loop When used with encoder feedback, the Position Loop
calculates interpolated positions, filters the encoder velocity
using the user-specified filter settings, and returns the
feedback position and filtered velocity feedback
information to the SoftMotion Engine.
Encoder Loop The encoder loop uses the signals from the NI 9411 module
to generate position and velocity feedback. Position Capture
operations are included in the encoder loop to perform the
Index capture operation for use with the SoftMotion Find
Index routine.
DIO Config (Port A) The DIO Config Port A loop manages the DIO contained in
DIO Port A. This includes the Forward Limit, Reverse
Limit, Home Switch, and Digital Inputs 0 though 3 from the
NI 9423 C Series module, and Digital Outputs 0 through 3
that are sent to the NI 9472 C Series module.
DIO Config (Port B) The DIO Config Port B loop manages the DIO contained in
DIO Port B. This includes the Position Capture Input and
Position Compare Output from the NI 9401 C Series
module, Digital Inputs 4 though 7 from the NI 9423 C
Series module, and Digital Outputs 4 through 7 that are sent
to the NI 9472 C Series module.
Tips and Troubleshooting
Drive Fault on Enable
If you receive fault 7180 when you enable the NI 9503, verify that the Rated Phase Current
setting is set to the appropriate value for your motor in Amps/Phase. Refer to Table 2 for
information about how to determine this value.
Complete the following steps to correct the setting:
1. Set the Rated Phase Current in the Axis Configuration dialog box and click OK when
you are done.
2. Right-click the axis in the Project Explorer window and select Deploy from the shortcut
menu to deploy the updated setting.
16 | ni.com | NI 9503 C Series Stepper Drive Modules and SoftMotion Module
Page 17

Interactive Test Panel does not get updated
If the Scan Engine is not transitioned from Configuration to Active mode after the FPGA VI is
run, SoftMotion will display a number of errors.
1. Make sure the FPGA VI is running either in Iteractive mode or started using the Open
FPGA VI Reference VI.
2. Transition the Scan Engine from Configuration to Active mode. If the Scan Engine was not
automatically transiotioned from Configuration to Active mode, close the Interactive Test
Panel and perform the following steps:
a. Right Click on the CompactRIO target in the project.
b. Select Utilities » Scan Engine Mode » Configuration.
c. Repeat this step to change the mode to Active. Once this is complete, the axis
parameters will be sent to the FPGA VI and SoftMotion’s engine will be
activated.
3. Launch the Interactive Test Panel.
Where to Go Next
The following documents contain additional information that you may find helpful. All
referenced documents ship with the product and are available at
ni.com/manuals.
• Operating instructions for the controller
• NI 9503 Operating Instructions and Specifications—Use this document to learn how to use
the National Instruments 9503, including specifications and pin assignments for the
NI 9503.
• NI 9411 Operating Instructions and Specifications—Use this document to learn how to use
the National Instruments 9411, including specifications and pin assignments for the
NI 9411.
• LabVIEW SoftMotion Module Help—Use this help file to learn about using the
NI SoftMotion Module in LabVIEW including information about function blocks and
using the SoftMotion Module with the LabVIEW Project. To access this help file from
LabVIEW, select Help»LabVIEW Help, then expand the LabVIEW SoftMotion Module
book on the Contents tab.
• LabVIEW Help—Use the LabVIEW Help to access information about LabVIEW
programming concepts, step-by-step instructions for using LabVIEW, and reference
information about LabVIEW VIs, functions, palettes, menus, tools, properties, methods,
events, dialog boxes, and so on. The LabVIEW Help also lists the LabVIEW documentation
resources available from National Instruments. Access the LabVIEW Help by selecting
Help»LabVIEW Help.
• NI PS-16 Power Supply User Manual and Specifications—Use this document to learn
about the features and specifications of the NI PS-16 power supply and information about
installing the power supply.
NI 9503 C Series Stepper Drive Modules and SoftMotion Module | © National Instruments | 17
Page 18

Worldwide Support and Services
The National Instruments website is your complete resource for technical support. At ni.com/
support
self-help resources to email and phone assistance from NI Application Engineers.
Visit ni.com/services for NI Factory Installation Services, repairs, extended warranty, and
other services.
Visit
facilitates technical support and ensures that you receive important information updates from NI.
A Declaration of Conformity (DoC) is our claim of compliance wi th the Council of the European
Communities using the manufacturer’s declaration of conformity. This system affords the user
protection for electromagnetic compatibility (EMC) and product safety. You can obtain the DoC
for your product by visiting
you can obtain the calibration certificate for your product at ni.com/calibration.
National Instruments corporate headquarters is located at 11500 North Mopac Expressway,
Austin, Texas, 78759-3504. National Instruments also has offices located around the world. For
telephone support in the United States, create your service request at
1 866 ASK MYNI (275 6964). For telephone support outside the United States, visit the
Worldwide Offices section of
provide up-to-date contact information, support phone numbers, email addresses, and current
events.
you have access to everything from troubleshooting and application development
ni.com/register to register your National Instruments product. Product registration
ni.com/certification. If your product supports calibration,
ni.com/support or dial
ni.com/niglobal to access the branch office websites, which
Information is subject to change without notice. Refer to the NI Trademarks and Logo Guidelines at ni.com/trademarks for more information
on NI trademarks. Other product and company names mentioned herein are trademarks or trade names of their respective companies. For patents
covering NI products/technology, refer to the appropriate location: Help»Patents in your software, the patents.txt file on your media, or the
National Instruments Patents Notice at ni.com/patents. You can find information about end-user license agreements (EULAs) and third-party
legal notices in the readme file for your NI product. Refer to the Export Compliance Information at ni.com/legal/export-compliance
for the NI global trade compliance policy and how to obtain relevant HTS codes, ECCNs, and other import/export data. NI MAKES NO EXPRESS OR
IMPLIED WARRANTIES AS TO THE ACCURACY OF THE INFORMATION CONTAINED HEREIN AND SHALL NOT BE LIABLE FOR ANY ERRORS. U.S.
Government Customers: The data contained in this manual was developed at private expense and is subject to the applicable limited rights and
restricted data rights as set forth in FAR 52.227-14, DFAR 252.227-7014, and DFAR 252.227-7015.
© 2014–2018 National Instruments. All rights reserved.
374673B-01 Jul18
 Loading...