

Page 1
GETTING STARTED GUIDE
NI 9253
8 AI, ±20 mA, 24 bit, 50 kS/s/ch Simultaneous
Page 2
This document explains how to connect to the NI 9253.
Note Before you begin, complete the software and
hardware installation procedures in your chassis
documentation.
Note The guidelines in this document are specific to
the NI 9253. The other components in the system might
not meet the same safety ratings. Refer to the
documentation for each component in the system to
determine the safety and EMC ratings for the entire
system.
2 | ni.com | NI 9253 Getting Started Guide
Page 3
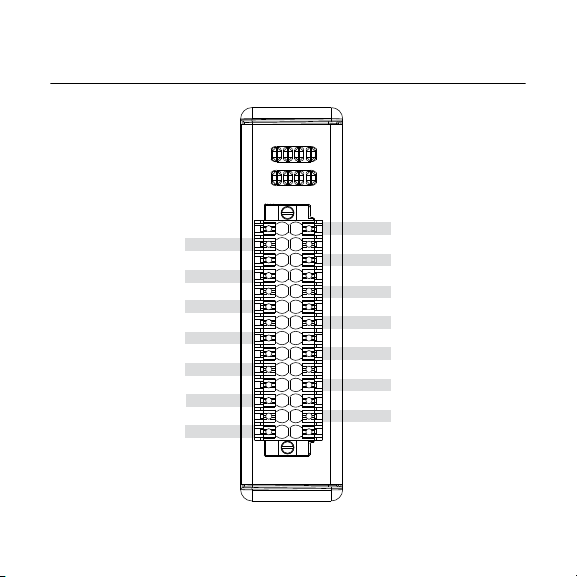
NI 9253 Pinout
AI0
AI1
AI2
AI3
AI4
AI5
AI6
AI7
COM
COM
V
sup
NC
NC
1
2
3
4
5
6
7
8
9
10
11
12
13
14
15
16
17
18
19
20
21
22
23
24
25
26
27
28
COM
V
sup
V
sup
V
sup
V
sup
V
sup
V
sup
V
sup
V
sup
COM
COM
COM
COM
COM
COM
NI 9253 Getting Started Guide | © National Instruments | 3
Page 4
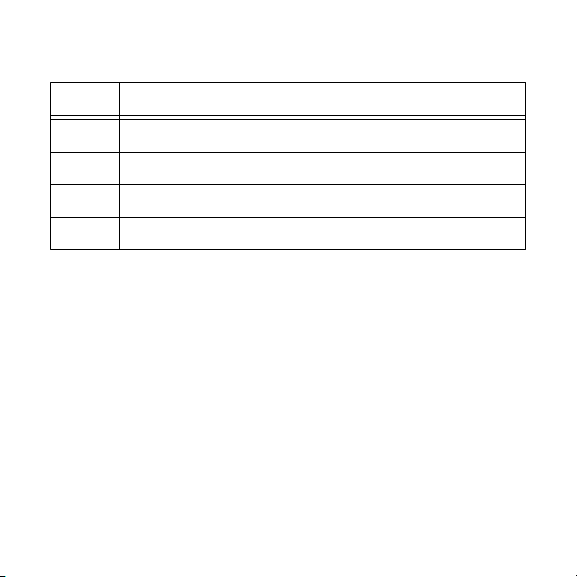
Table 1. Signal Descriptions
Signal Description
AI Analog input signal connection
V
Voltage supply connection
sup
COM Common reference connection to isolated ground
NC No connection
4 | ni.com | NI 9253 Getting Started Guide
Page 5
NI 9253 LEDs
Status Color Indication
ON Green
1
The channel is in the over-current state and/or the data has exceeded userdefined input limits.
• Channel is operational with input limits
detection enabled
• V
is in range if field side power fault
sup
detection is enabled
• Channel is in fault condition
Red
• V
is in range if field side power fault
sup
detection is enabled
NI 9253 Getting Started Guide | © National Instruments | 5
1
Page 6

Status Color Indication
OFF None
• Channel is operational without input
limits detection enabled
• V
is in range if field side power
sup
detection is enabled
• Master timebase is absent
Flashing Green
• Channel is operational
• V
is out of range if field side power
sup
detection is enabled
• Channel is in fault condition
Red
• V
is out of range if field side power
sup
detection is enabled
Alternating
flashing rows
6 | ni.com | NI 9253 Getting Started Guide
• Module is powered on
Green
• First acquisition is not initiated
1
Page 7

Connecting an External Power Supply
You can connect an external power supply to the NI 9253. This
power supply provides the current for the devices you connect to
the module. Connect the positive lead of the power supply to a
V
pin and the negative lead of the power supply to COM.
sup
Install a 2 A maximum, fast-acting fuse between the external
power supply and the V
Note The V
other. You can connect only one external voltage
supply to the device.
Caution Do not remove or insert modules if the
external power supply connected to the V
pins is powered on.
Attention Ne retirez ou n'insérez pas de modules si
l'alimentation externe connectée aux broches V
COM est sous tension.
NI 9253 Getting Started Guide | © National Instruments | 7
pin.
sup
pins are internally connected to each
sup
and COM
sup
sup
et
Page 8

Connecting a Loop-Powered Current
NI 9253
+
–
AI0
External
Power
Supply
Loop-Powered
Current
Transducer
V
sup
COM
V
sup
2 A
Max
Transducer
8 | ni.com | NI 9253 Getting Started Guide
Page 9

Connecting a Three-Wire Current
NI 9253
V
sup
COM
+
–
COM
V
sup
AI0
External
Power
Supply
Three-Wire
Current
Transducer
2 A
Max
OUT
+
–
Transducer
NI 9253 Getting Started Guide | © National Instruments | 9
Page 10

NI 9253 Connection Guidelines
• Make sure that devices you connect to the NI 9253 are
compatible with the module specifications.
• You must use 2-wire ferrules to create a secure connection
when connecting more than one wire to a single terminal on
the NI 9253 with spring terminal.
• Push the wire into the terminal when using a solid wire or a
stranded wire with a ferrule.
• Open the terminal by pressing the push button when using
stranded wire without a ferrule.
High-Vibration Application Connections
If your application is subject to high vibration, NI recommends
that you use the NI 9963 backshell kit to protect connections to
the NI 9253 with spring terminal.
10 | ni.com | NI 9253 Getting Started Guide
Page 11

You must follow these guidelines to meet the shock and vibration
performance specifications stated in the device datasheet on
ni.com/manuals.
• Panel mount the system.
• Provide strain relief for the module by securing the cabling to
a supporting fixture no more than 8 cm (3 in.) away from the
opening of the connector backshell.
• Ensure that the supporting fixture for strain relief is stiff and
rigidly coupled to the chassis mounting surface.
• Ensure that you do not directionally bias the module when
applying strain relief.
Overvoltage Protection
The NI 9253 provides overvoltage protection for each channel.
Note Refer to the device datasheet on ni.com/manuals
for more information about overvoltage protection.
NI 9253 Getting Started Guide | © National Instruments | 11
Page 12

Where to Go Next
RELATED INFORMATION
C Series Documentation
& Resources
ni.com/info cseriesdoc
Services
ni.com/services
CompactRIO
Located at ni.com/manuals Installs with the software
CompactDAQ
NI 9253 Datasheet
NI-RIO Help
LabVIEW FPGA Help
NI 9253 Datasheet
NI-DAQmx Help
LabVIEW Help
12 | ni.com | NI 9253 Getting Started Guide
Page 13

Worldwide Support and Services
The NI website is your complete resource for technical support.
At ni.com/support, you have access to everything from
troubleshooting and application development self-help resources
to email and phone assistance from NI Application Engineers.
Visit ni.com/services for information about the services NI offers.
Visit ni.com/register to register your NI product. Product
registration facilitates technical support and ensures that you
receive important information updates from NI.
NI corporate headquarters is located at
11500 North Mopac Expressway, Austin, Texas, 78759-3504. NI
also has offices located around the world. For support in the
United States, create your service request at ni.com/support or
dial 1 866 ASK MYNI (275 6964). For support outside the
United States, visit the Worldwide Offices section of ni.com/
niglobal to access the branch office websites, which provide up-
to-date contact information.
NI 9253 Getting Started Guide | © National Instruments | 13
Page 14

Information is subject to change without notice. Refer to the NI Trademarks and Logo Guidelines
at ni.com/trademarks for information on NI trademarks. Other product and company names
mentioned herein are trademarks or trade names of their respective companies. For patents
covering NI products/technology, refer to the appropriate location: Help»Patents in your software,
the patents.txt file on your media, or the National Instruments Patent Notice at ni.com/
patents. You can find information about end-user license agreements (EULAs) and third-par ty
legal notices in the readme file for your NI product. Refer to the Export Compliance Information at
ni.com/legal/export-compliance for the NI global trade compliance policy and how to obtain
relevant HTS codes, ECCNs, and other import/export data. NI MAKES NO EXPRESS OR
IMPLIED WARRANTIES AS TO THE ACCURACY OF THE INFORMATION CONTAINED
HEREIN AND SHALL NOT BE LIABLE FOR ANY ERRORS. U.S. Government Customers: The
data contained in this manual was developed at private expense and is subject to the applicable
limited rights and restricted data rights as set forth in FAR 52.227-14, DFAR 252.227-7014, and
DFAR 252.227-7015.
© 2019 National Instruments. All rights reserved.
378060A-01 May 8, 2019
 Loading...