

Page 1

PXI
NI CardBus-8310-to-PXI Expansion User Manual
NI CardBus-8310-to-PXI Expansion User Manual
August 2005
371665A-01
Page 2

Support
Worldwide Technical Support and Product Information
ni.com
National Instruments Corporate Headquarters
11500 North Mopac Expressway Austin, Texas 78759-3504 USA Tel: 512 683 0100
Worldwide Offices
Australia 1800 300 800, Austria 43 0 662 45 79 90 0, Belgium 32 0 2 757 00 20, Brazil 55 11 3262 3599,
Canada 800 433 3488, China 86 21 6555 7838, Czech Republic 420 224 235 774, Denmark 45 45 76 26 00,
Finland 385 0 9 725 725 11, France 33 0 1 48 14 24 24, Germany 49 0 89 741 31 30, India 91 80 51190000,
Israel 972 0 3 6393737, Italy 39 02 413091, Japan 81 3 5472 2970, Korea 82 02 3451 3400,
Lebanon 961 0 1 33 28 28, Malaysia 1800 887710, Mexico 01 800 010 0793, Netherlands 31 0 348 433 466,
New Zealand 0800 553 322, Norway 47 0 66 90 76 60, Poland 48 22 3390150, Portugal 351 210 311 210,
Russia 7 095 783 68 51, Singapore 1800 226 5886, Slovenia 386 3 425 4200, South Africa 27 0 11 805 8197,
Spain 34 91 640 0085, Sweden 46 0 8 587 895 00, Switzerland 41 56 200 51 51, Taiwan 886 02 2377 2222,
Thailand 662 278 6777, United Kingdom 44 0 1635 523545
For further support information, refer to the Technical Support and Professional Services appendix. To comment
on National Instruments documentation, refer to the National Instruments Web site at ni.com/info and enter
the info code feedback.
© 2005 National Instruments Corporation. All rights reserved.
Page 3

Important Information
Warranty
The NI CardBus-8310-to-PXI Expansion hardware is warranted against defects in materials and workmanship for a period of one year from
the date of shipment, as evidenced by receipts or other documentation. National Instruments will, at its option, repair or replace equipment that
proves to be defective during the warranty period. This warranty includes parts and labor.
The media on which you receive National Instruments software are warranted not to fail to execute programming instructions, due to defects
in materials and workmanship, for a period of 90 days from date of shipment, as evidenced by receipts or other documentation. National
Instruments will, at its option, repair or replace software media that do not execute programming instructions if National Instruments receives
notice of such defects during the warranty period. National Instruments does not warrant that the operation of the software shall be
uninterrupted or error free.
A Return Material Authorization (RMA) number must be obtained from the factory and clearly marked on the outside of the package before
any equipment will be accepted for warranty work. National Instruments will pay the shipping costs of returning to the owner parts which are
covered by warranty.
National Instruments believes that the information in this document is accurate. The document has been carefully reviewed for technical
accuracy. In the event that technical or typographical errors exist, National Instruments reserves the right to make changes to subsequent
editions of this document without prior notice to holders of this edition. The reader should consult National Instruments if errors are suspected.
In no event shall National Instruments be liable for any damages arising out of or related to this document or the information contained in it.
E
XCEPT AS SPECIFIED HEREIN, NATIONAL INSTRUMENTS MAKES NO WARRANTIES, EXPRESS OR IMPLIED, AND SPECIFICALLY DISCLAIMS ANY WARRANTY OF
MERCHANTABILITY OR FITNESS FOR A PARTICULAR PURPOSE . CUSTOMER’S RIGHT TO RECOVER DAMAGES CAUSED BY FAULT OR NEGLIGENCE ON THE PART OF
N
ATIONAL INSTRUMENTS SHALL BE LIMITED TO THE AMOUNT THERETOFORE PAID BY THE CUSTOMER. NATIONAL INSTRUMENTS WILL NOT BE LIABLE FOR
DAMAGES RESULTING FROM LOSS OF DATA, PROFITS, USE OF PRODUCTS, OR INCIDENTAL OR CONSEQUENTIAL DAMAGES, EVEN IF ADVISED OF THE POSS IBILITY
THEREOF. This limitation of the liability of National Instruments will apply regardless of the form of action, whether in contract or tort, including
negligence. Any action against National Instruments must be brought within one year after the cause of action accrues. National Instruments
shall not be liable for any delay in performance due to causes beyond its reasonable control. The warranty provided herein does not cover
damages, defects, malfunctions, or service failures caused by owner’s failure to follow the National Instruments installation, operation, or
maintenance instructions; owner’s modification of the product; owner’s abuse, misuse, or negligent acts; and power failure or surges, fire,
flood, accident, actions of third parties, or other events outside reasonable control.
Copyright
Under the copyright laws, this publication may not be reproduced or transmitted in any form, electronic or mechanical, including photocopying,
recording, storing in an information retrieval system, or translating, in whole or in part, without the prior written consent of National
Instruments Corporation.
Trademarks
National Instruments, NI, ni.com, and LabVIEW are trademarks of National Instruments Corporation. Refer to the Terms of Use section
on
ni.com/legal for more information about National Instruments trademarks.
Other product and company names mentioned herein are trademarks or trade names of their respective companies.
Members of the National Instruments Alliance Partner Program are business entities independent from National Instruments and have no
agency, partnership, or joint-venture relationship with National Instruments.
Patents
For patents covering National Instruments products, refer to the appropriate location: Help»Patents in your software, the patents.txt file
on your CD, or
ni.com/patents.
WARNING REGARDING USE OF NATIONAL INSTRUMENTS PRODUCTS
(1) NATIONAL INSTRUMENTS PRODUCTS ARE NOT DESIGNED WITH COMPONENTS AND TESTING FOR A LEVEL OF
RELIABILITY SUITABLE FOR USE IN OR IN CONNECTION WITH SURGICAL IMPLANTS OR AS CRITICAL COMPONENTS IN
ANY LIFE SUPPORT SYSTEMS WHOSE FAILURE TO PERFORM CAN REASONABLY BE EXPECTED TO CAUSE SIGNIFICANT
INJURY TO A HUMAN.
(2) IN ANY APPLICATION, INCLUDING THE ABOVE, RELIABILITY OF OPERATION OF THE SOFTWARE PRODUCTS CAN BE
IMPAIRED BY ADVERSE FACTORS, INCLUDING BUT NOT LIMITED TO FLUCTUATIONS IN ELECTRICAL POWER SUPPLY,
COMPUTER HARDWARE MALFUNCTIONS, COMPUTER OPERATING SYSTEM SOFTWARE FITNESS, FITNESS OF COMPILERS
AND DEVELOPMENT SOFTWARE USED TO DEVELOP AN APPLICATION, INSTALLATION ERRORS, SOFTWARE AND
HARDWARE COMPATIBILITY PROBLEMS, MALFUNCTIONS OR FAILURES OF ELECTRONIC MONITORING OR CONTROL
DEVICES, TRANSIENT FAILURES OF ELECTRONIC SYSTEMS (HARDWARE AND/OR SOFTWARE), UNANTICIPATED USES OR
MISUSES, OR ERRORS ON THE PART OF THE USER OR APPLICATIONS DESIGNER (ADVERSE FACTORS SUCH AS THESE ARE
HEREAFTER COLLECTIVELY TERMED “SYSTEM FAILURES”). ANY APPLICATION WHERE A SYSTEM FAILURE WOULD
CREATE A RISK OF HARM TO PROPERTY OR PERSONS (INCLUDING THE RISK OF BODILY INJURY AND DEATH) SHOULD
NOT BE RELIANT SOLELY UPON ONE FORM OF ELECTRONIC SYSTEM DUE TO THE RISK OF SYSTEM FAILURE. TO AVOID
DAMAGE, INJURY, OR DEATH, THE USER OR APPLICATION DESIGNER MUST TAKE REASONABLY PRUDENT STEPS TO
PROTECT AGAINST SYSTEM FAILURES, INCLUDING BUT NOT LIMITED TO BACK-UP OR SHUT DOWN MECHANISMS.
BECAUSE EACH END-USER SYSTEM IS CUSTOMIZED AND DIFFERS FROM NATIONAL INSTRUMENTS' TESTING
PLATFORMS AND BECAUSE A USER OR APPLICATION DESIGNER MAY USE NATIONAL INSTRUMENTS PRODUCTS IN
COMBINATION WITH OTHER PRODUCTS IN A MANNER NOT EVALUATED OR CONTEMPLATED BY NATIONAL
INSTRUMENTS, THE USER OR APPLICATION DESIGNER IS ULTIMATELY RESPONSIBLE FOR VERIFYING AND VALIDATING
THE SUITABILITY OF NATIONAL INSTRUMENTS PRODUCTS WHENEVER NATIONAL INSTRUMENTS PRODUCTS ARE
INCORPORATED IN A SYSTEM OR APPLICATION, INCLUDING, WITHOUT LIMITATION, THE APPROPRIATE DESIGN,
PROCESS AND SAFETY LEVEL OF SUCH SYSTEM OR APPLICATION.
Page 4

Compliance
Compliance with FCC/Canada Radio Frequency Interference
Regulations
Determining FCC Class
The Federal Communications Commission (FCC) has rules to protect wireless communications from interference. The FCC
places digital electronics into two classes. These classes are known as Class A (for use in industrial-commercial locations only)
or Class B (for use in residential or commercial locations). All National Instruments (NI) products are FCC Class A products.
Depending on where it is operated, this Class A product could be subject to restrictions in the FCC rules. (In Canada, the
Department of Communications (DOC), of Industry Canada, regulates wireless interference in much the same way.) Digital
electronics emit weak signals during normal operation that can affect radio, television, or other wireless products.
All Class A products display a simple warning statement of one paragraph in length regarding interference and undesired
operation. The FCC rules have restrictions regarding the locations where FCC Class A products can be operated.
Consult the FCC Web site at
FCC/DOC Warnings
This equipment generates and uses radio frequency energy and, if not installed and used in strict accordance with the instructions
in this manual and the CE marking Declaration of Conformity*, may cause interference to radio and television reception.
Classification requirements are the same for the Federal Communications Commission (FCC) and the Canadian Department
of Communications (DOC).
Changes or modifications not expressly approved by NI could void the user’s authority to operate the equipment under the
FCC Rules.
Class A
Federal Communications Commission
This equipment has been tested and found to comply with the limits for a Class A digital device, pursuant to part 15 of the FCC
Rules. These limits are designed to provide reasonable protection against harmful interference when the equipment is operated
in a commercial environment. This equipment generates, uses, and can radiate radio frequency energy and, if not installed and
used in accordance with the instruction manual, may cause harmful interference to radio communications. Operation of this
equipment in a residential area is likely to cause harmful interference in which case the user is required to correct the interference
at their own expense.
www.fcc.gov for more information.
Canadian Department of Communications
This Class A digital apparatus meets all requirements of the Canadian Interference-Causing Equipment Regulations.
Cet appareil numérique de la classe A respecte toutes les exigences du Règlement sur le matériel brouilleur du Canada.
Compliance with EU Directives
Users in the European Union (EU) should refer to the Declaration of Conformity (DoC) for information* pertaining to the
CE marking. Refer to the Declaration of Conformity (DoC) for this product for any additional regulatory compliance
information. To obtain the DoC for this product, visit
and click the appropriate link in the Certification column.
* The CE marking Declaration of Conformity contains important supplementary information and instructions for the user or
installer.
ni.com/certification, search by model number or product line,
Page 5

Conventions
This manual provides information on the installation and use of an
NI CardBus-8310-to-PXI Expansion system. The following conventions
are used in this manual:
» The » symbol leads you through nested menu items and dialog box options
to a final action. The sequence File»Page Setup»Options directs you to
pull down the File menu, select the Page Setup item, and select Options
from the last dialog box.
This icon denotes a note, which alerts you to important information.
This icon denotes a caution, which advises you of precautions to take to
avoid injury, data loss, or a system crash. When this symbol is marked on a
product, refer to Chapter 1, Introduction, for information about precautions
to take.
bold Bold text denotes items that you must select or click in the software, such
as menu items and dialog box options. Bold text also denotes parameter
names.
italic Italic text denotes variables, emphasis, a cross reference, or an introduction
to a key concept. Italic text also denotes text that is a placeholder for a word
or value that you must supply.
monospace Text in this font denotes text or characters that you should enter from the
keyboard, sections of code, programming examples, and syntax examples.
This font is also used for the proper names of disk drives, paths, directories,
programs, subprograms, subroutines, device names, functions, operations,
variables, filenames, and extensions.
Page 6

Contents
Chapter 1
Introduction
Functional Overview......................................................................................................1-1
Functional Unit Descriptions...........................................................................1-2
CardBus Connector...........................................................................1-2
StarFabric Bridge ..............................................................................1-2
RJ-45 Connector ...............................................................................1-3
NI CardBus-8310-to-PXI Cable Options ..........................................1-3
Before Installation..........................................................................................................1-3
Parts List..........................................................................................................1-4
Protecting Against Electrostatic Discharge .....................................................1-4
NI PXI-8310 Overview..................................................................................................1-5
Chapter 2
Hardware and Software Installation
Installation Instructions..................................................................................................2-1
Install the Software Driver ..............................................................................2-1
Windows 2000/XP (Without XP Service Pack 2) ............................2-2
Windows XP (With Service Pack 2).................................................2-2
Install the PXI Cards .......................................................................................2-4
Attach the PXI Expansion Cables ...................................................................2-4
Install the NI CardBus-8310............................................................................2-5
Powering Up....................................................................................................2-5
Verifying the Installation.................................................................................2-8
Powering Down...............................................................................................2-9
Running the System.........................................................................................2-10
Uninstalling the NI CardBus-8310 Driver ......................................................2-10
Additional Notes ............................................................................................................2-10
System Hierarchy ............................................................................................2-10
System Boot.....................................................................................................2-11
NI Measurement & Automation Explorer (MAX)..........................................2-11
Appendix A
PCIScope
Overview........................................................................................................................A-1
© National Instruments Corporation vii NI CardBus-8310-to-PXI Expansion User Manual
Page 7

Contents
Appendix B
Specifications
Power Requirements...................................................................................................... B-1
Physical.......................................................................................................................... B-1
Dimensions...................................................................................................... B-2
Operating Environment...................................................................................B-2
Storage Environment.......................................................................................B-2
Appendix C
Troubleshooting NI PXI-CardBus-8310 Cards
Contacting Technical Support ....................................................................................... C-1
Troubleshooting............................................................................................................. C-2
Error Code (Yellow Exclamation Mark) in Device Manager ....................................... C-8
Appendix D
Technical Support and Professional Services
Index
NI CardBus-8310-to-PXI Expansion User Manual viii ni.com
Page 8

Introduction
This chapter presents an overview of the hardware functionality of NI
CardBus-8310-to-PXI cards, and explains the operation of each functional
unit. It also contains recommended steps to be taken while preparing to
install the NI CardBus-8310 and NI PXI-8310 modules.
Functional Overview
The National Instruments CardBus-8310-to-PXI interface kit provides
laptop computers direct control of PXI systems. The CardBus-to-PXI link
is transparent to software applications and drivers, thereby providing you
the ability to use high-performance laptop computers to control PXI
systems. The NI CardBus-8310-to-PXI interface kit is ideal for use with
portable systems, and you can pair it with DC-powered chassis to provide
mobile solutions for applications such as in-vehicle testing.
The CardBus-to-PXI link consists of an NI CardBus-8310 card in the
laptop computer connected via cabling to an NI PXI-8310 module in slot 1
of a PXI chassis. For convenience, you can purchase either a complete
NI CardBus-8310-to-PXI interface kit with all necessary components or
purchase the NI CardBus-8310 card, NI PXI-8310 module, and cabling
separately.
1
The CardBus-8310-to-PXI interface kit, which uses a StarFabric serial
interface to implement a CardBus-to-PCI bridge, provides a transparent
link where all PXI modules appear as if they were PCI boards within the
laptop computer itself. However, you benefit from the increased number of
slots, power and cooling per slot, module selection, and synchronization
features provided by PXI.
The NI CardBus-8310-to-PXI product is based on Stargen’s StarFabric
technology. StarFabric is a 2.5 Gb/s serial technology that can extend the
capabilities of PCI based systems. It supports PCI-to-PCI bridging to
extend the PCI bus to multiple chassis.
© National Instruments Corporation 1-1 NI CardBus-8310-to-PXI Expansion User Manual
Page 9
Chapter 1 Introduction
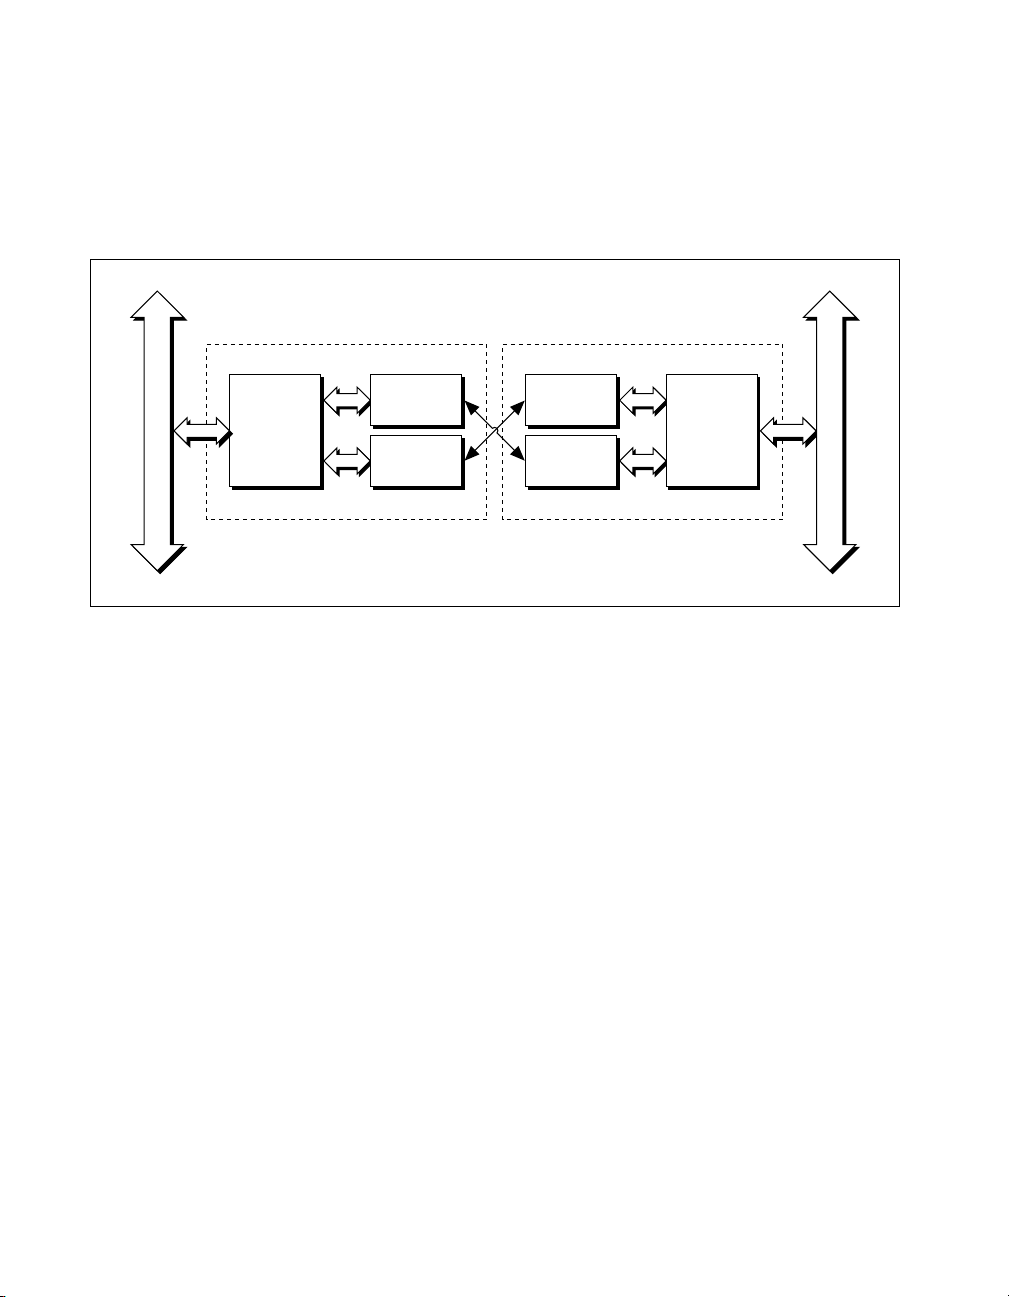
Figure 1-1 shows the basic architecture of an NI CardBus-8310-to-PXI
system. The NI CardBus-8310 consists of a CardBus connector, a
CardBus-to-PXI bridge, a StarFabric bridge and two RJ-45 connectors. The
NI PXI-8310 consists of two RJ-45 connectors, a StarFabric bridge, and a
PXI connector.
RJ-45
Starfabric
Cardbus
Bridge
Cardbus-8310 PXI-8310
Connector
RJ-45
Connector
Functional Unit Descriptions
This section describes the individual units that comprise an
NI CardBus-8310-to-PXI system.
CardBus Connector
The CardBus connector allows the NI CardBus-8310 to be used in a laptop
CardBus expansion slot. This connector is defined by the PCMCIA
Specification.
StarFabric Bridge
A PCI-to-StarFabric bridge provides an interface between PCI and
StarFabric by translating PCI traffic into serial frame format for
transmission across StarFabric. The PCI bus is a 32-bit parallel bus that
transfers data between a master and a slave at 33 MHz, while the StarFabric
link can simultaneously transmit and receive at 2.5 Gbps. A standard link
is made up of four aggregated 622 Mbps LVDS differential pairs in each
direction.
RJ-45
Connector
RJ-45
Connector
Figure 1-1. NI CardBus-8310-to-PXI Block Diagram
Starfabric
Bridge
PXI Bus
NI CardBus-8310-to-PXI Expansion User Manual 1-2 ni.com
Page 10

Chapter 1 Introduction
RJ-45 Connector
This connector is a standard connector commonly used for Ethernet. The
StarFabric bridges use the RJ-45 connector with CAT5 cables for a
board-to-board interconnect.
NI CardBus-8310-to-PXI Cable Options
A pair of CAT5-e cables are required to make a complete link: One cable
to transmit data and one cable to receive data. You must install these cables
in a pair. In addition, to meet the specified electromagnetic emissions
standards, you must install the supplied ferrites on both ends of each cable,
one ferrite per cable end.
The NI CardBus-8310-to-PXI is available with cables of various lengths.
Table 1-1 shows the cables that are available from National Instruments.
Table 1-1. National Instruments CardBus-8310-to-PXI Cables
Cable Length (meters) Description
3 m 3 m StarFabric Cable Set 763640-03,
779544-03, CBL3S-NI
10 m 10 m StarFabric Cable Set 763640-10,
779544-10, CBL10S-NI
14 m 14 m StarFabric Cable Set 763640-14,
779544-14, CBL14S-NI
Before Installation
Before installing the NI CardBus-8310-to-PXI expansion system you
should perform the following steps.
• Inventory the shipping carton contents for all of the required parts.
• Gather all of the necessary tools required for installation.
• Read the rest of this manual. The installation instructions must be
followed closely.
Follow these suggested guidelines and cautions while installing.
• Use only the cables provided by National Instruments.
• Use keyed connectors (to prevent connecting a cable backwards).
• Be careful when routing signal cables to your devices.
© National Instruments Corporation 1-3 NI CardBus-8310-to-PXI Expansion User Manual
Page 11
Chapter 1 Introduction
• Avoid sharp bends or folds in the cables.
• Provide enough slack to allow easy device placement.
• Avoid things that might cause scuffing and abrasion damage to the
cables.
• Secure the devices in their shelves using the appropriate hardware.
• Use the screws or brackets supplied with the device. Suitable mounting
brackets, adapters, and hardware are available from your local
computer dealer or retailer.
Parts List
Table 1-2 lists the components included with your kit.
Table 1-2. CardBus-8310 Kit Components
Quantity Item
1 NI CardBus-8310
2 3 meter CAT5-e cables with 4 ferrites (two ferrites for each cable). 10-meter
and 14-meter cables may be purchased separately.
1 NI PXI-8310
1 Software Installation CD (will contain the software driver, full user manual, and
Documents of Conformity)
1 Installation Guide
Caution In order to complete the installation of the CardBus-to-PXI expansion system you
will need perform the installation in a suitable electrostatic discharge (ESD) protective
environment.
Protecting Against Electrostatic Discharge
You can take the following steps to prevent damage from electrostatic
discharge (ESD):
• When unpacking a static-sensitive component from its shipping
carton, do not remove the anti-static packaging material until you are
ready to install the component in a computer. Just before unwrapping
the anti-static packaging, be sure you are at an ESD workstation, or
that you are electrically grounded.
• When transporting a sensitive component, first place it in an anti-static
container or package.
NI CardBus-8310-to-PXI Expansion User Manual 1-4 ni.com
Page 12

• Handle all sensitive components at an ESD workstation. If possible,
use anti-static floor pads and workbench pads.
• Handle components and boards with care. Don’t touch the components
or contacts on a board. Hold a board by its edges or by its metal
mounting bracket.
NI PXI-8310 Overview
The NI PXI-8310 expansion card is connected to the NI CardBus-8310
through the CAT5-e cables. You must install the PXI card in slot 1 (the
system controller slot) of the PXI chassis. The NI PXI-8310 card has two
ports for communication (L0 and L1), each utilizing four twisted pair
connections. Each twisted pair is represented on the PXI card front panel
by a separate LED. If a twisted pair connection is functioning, the
corresponding LED will be lit on the front panel.
Each port requires two CAT5-e cables. You must connect the RX jack of
the CardBus-8310 to the TX jack of the PXI-8310, and the TX jack of the
CardBus-8310 to the RX jack of the PXI-8310.
Note You must use the RX and TX connector for the same port to establish
communication. For instance, use the L1 RX and TX connectors to establish
communication on the L1 port. If you only use one port, it is recommended that you use
the L0 port, as the status LEDs will be easier to see.
Chapter 1 Introduction
The top 4 LEDs provide connection status of the top two RJ-45 jacks
(labeled L0) while the bottom 4 LEDs provide the status of the bottom two
jacks (L1). Each pair of RJ-45 jacks constitutes a link capable of
throughput of up to 2.5 Gbps at full duplex, one jack being used as
transmitter (TX) and the other as receiver (RX). The LED control register
within the StarGen chip can operate them in one of three modes.
• All LEDs off—No Link. The differential receiver and transmitter are
not synchronized, meaning that the RJ45 cables are either not
connected or they are crossed.
• All LEDs on—Link is active. The differential transmitter and receiver
are synchronized and data can flow across the link.
• All LEDs blinking—Communication has been lost. At some point the
transmitter and receiver were linked, however now they are longer
synchronized. The link needs to be re-established before data can be
transmitted again.
© National Instruments Corporation 1-5 NI CardBus-8310-to-PXI Expansion User Manual
Page 13

Chapter 1 Introduction
Note A faulty cable may link some differential pairs while disabling others and the LEDs
can be used to isolate the faulty cable. If replacing the cable does not resolve the issue, there
may be a problem with the StarGen bridge. In that case, contact National Instruments with
the information described in the Contacting Technical Support section of Appendix C,
Troubleshooting NI PXI-CardBus-8310 Cards.
If one or more LEDs for a given port (L0 or L1) are not lit, it indicates that
the twisted pair represented by that LED is not properly connected.
Table 1-3 describes the status indicated by each unlit LED. The same
descriptions apply for the L0 LEDs and the L1 LEDs.
Table 1-3. Unlit LED Status Descriptions
LED Description
0 The PXI card senses no link on its differential pair 0.
1 The PXI card senses no link on its differential pair 1.
2 The PXI card senses no link on its differential pair 2.
3 The PXI card senses no link on its differential pair 3.
Link problems may involve one or more LEDs turning off, depending on
the affected differential pair. It is recommended that you re-seat the cable
to see if that resolves the issue. It is also possible that one of the port cables
may need to be replaced.
NI CardBus-8310-to-PXI Expansion User Manual 1-6 ni.com
Page 14

Chapter 1 Introduction
NI PXI-8310
©
PXI StarFabric
Interface
1
2
4
3
1 L0 Link Status LEDs (0–3)
2 Receiver Ports (RX)
Figure 1-2. Front Panel of the NI PXI-8310 Expansion Card
3 L1 Link Status LEDs (0–3)
4 Transmitter Ports (TX)
© National Instruments Corporation 1-7 NI CardBus-8310-to-PXI Expansion User Manual
Page 15

Hardware and Software
Installation
The following steps will guide you in completing the installation of your
new NI CardBus-8310-to-PXI system.
Installation Instructions
It is highly recommended that Microsoft Windows users follow the
software driver installation instructions exactly, in the order in which the
instructions are presented in this chapter. If you do not follow the driver
installation instructions, you will greatly increase your chances of failure
while configuring your system.
Note The NI-CardBus-8310 driver is intended for use only with Windows 2000 and
Windows XP.
Install the Software Driver
2
Cautions You will be prompted to reboot after the software installation. Each shut down
and reboot is important and is required for correct installation. If you shut down and reboot
when requested, it may save you from having to make a call to NI technical support.
You must be logged in as a system administrator while installing the software. You must
remain logged in as system administrator until installation is complete.
Notes Under Windows XP, you must install the NI CardBus-8310 driver before
connecting or inserting the hardware into the CardBus slot.
If you are using Windows XP, the “Found New Hardware” dialog box will only appear if
you have Service Pack 2 installed. This dialog appears by default under Windows 2000.
© National Instruments Corporation 2-1 NI CardBus-8310-to-PXI Expansion User Manual
Page 16

Chapter 2 Hardware and Software Installation
Windows 2000/XP (Without XP Service Pack 2)
1. If you do not have your system configured to allow autorun CDs, you
must run
2. Follow the prompts to install the software.
3. When the software prompts you reboot, do so. When the system has
been rebooted, the installation process is complete.
Windows XP (With Service Pack 2)
1. If you do not have your system configured to allow autorun CDs, you
must run
After the software setup utility launches, the dialog box shown in
Figure 2-1 will appear.
SETUP.EXE to install the NI CardBus-8310 driver.
SETUP.EXE to install the NI CardBus-8310 driver.
Figure 2-1. Software Installation Dialog Box
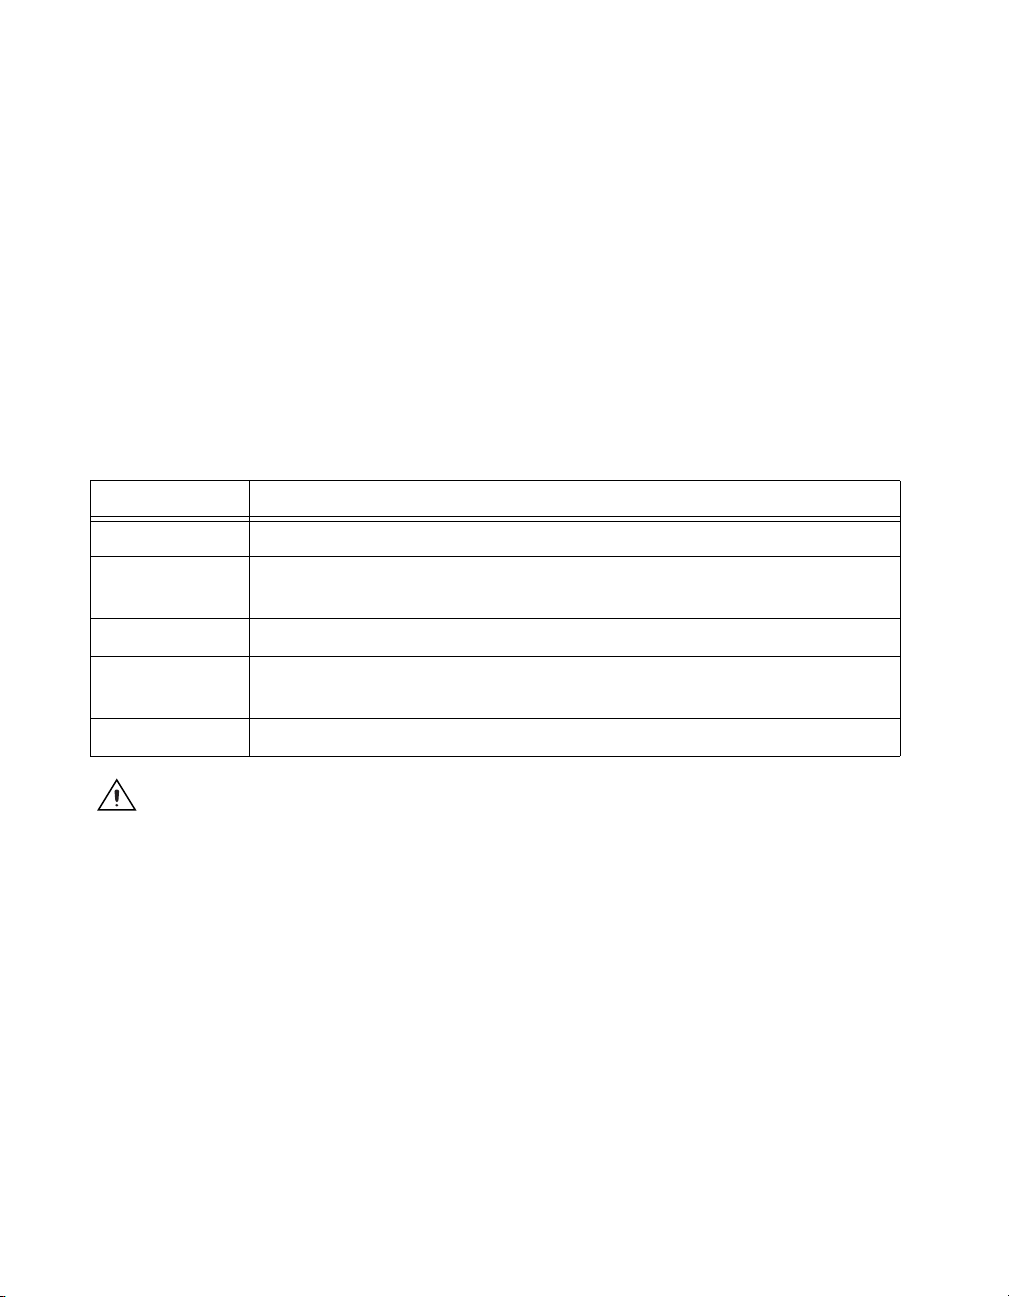
2. The driver will make a small change to boot.ini, and then prompt
you to reboot, as shown in Figure 2-2. You must do this before the
driver install can continue.
NI CardBus-8310-to-PXI Expansion User Manual 2-2 ni.com
Page 17
Chapter 2 Hardware and Software Installation
Figure 2-2. Reboot Dialog Box Under Windows XP Service Pack 2
After the reboot, the installation utility will re-launch automatically,
and you will see the dialog box shown in Figure. 2-1.
3. Click Next.
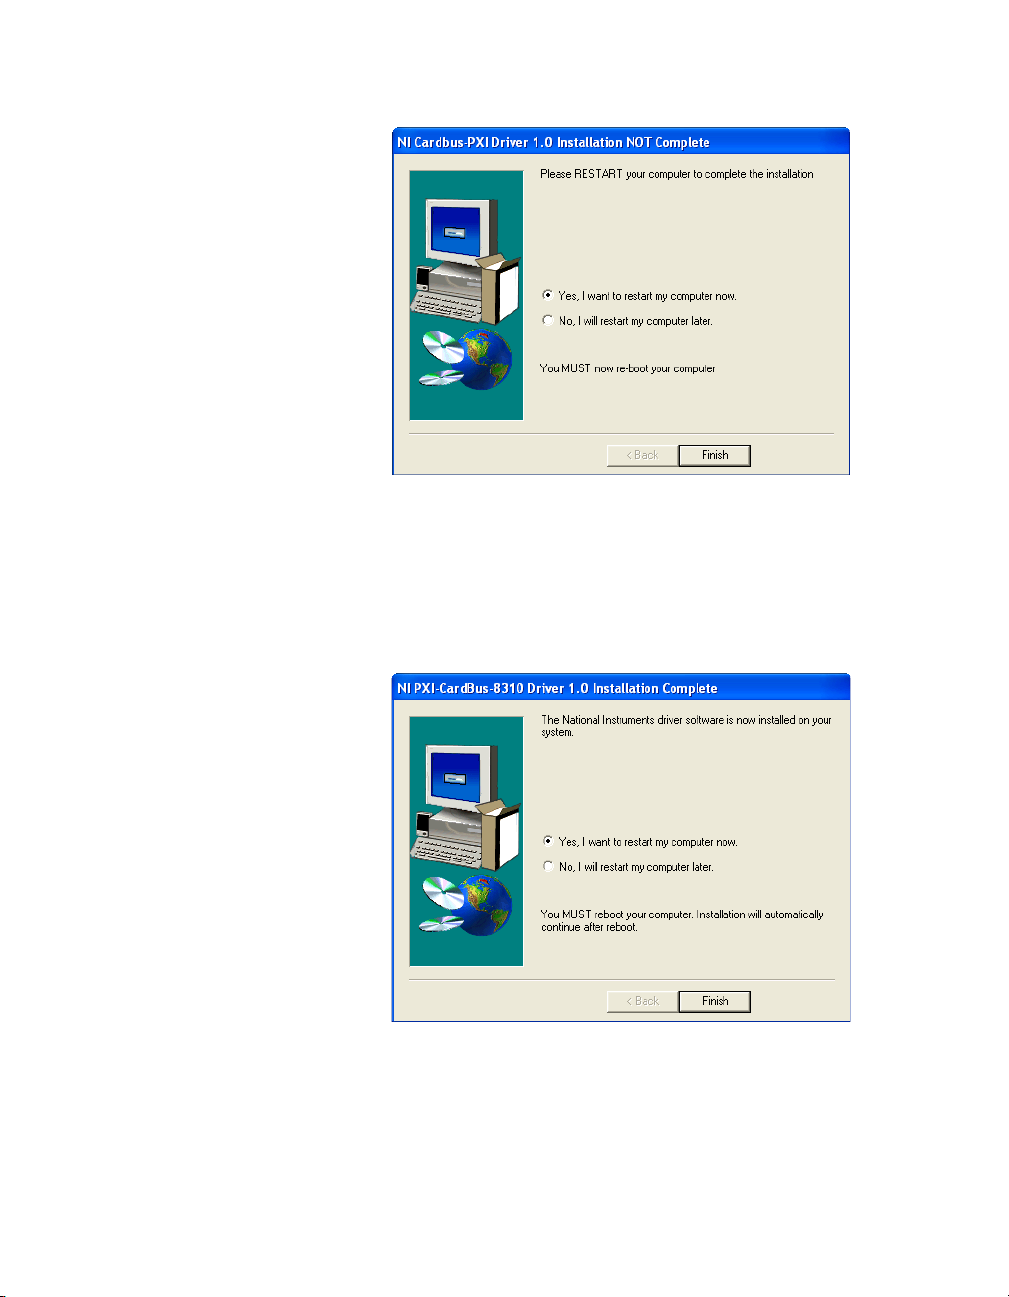
The dialog box shown in Figure 2-3 will appear.
Figure 2-3. Reboot Dialog Box
4. Choose No and click Finish.
5. Manually shut down your computer.
© National Instruments Corporation 2-3 NI CardBus-8310-to-PXI Expansion User Manual
Page 18

Chapter 2 Hardware and Software Installation
Note Before you shut down the system to proceed to the next step, you should also install
any drivers that may be required by the PXI cards. For instance, if you are using a
PXI-GPIB card in your expansion chassis, install the latest NI-GPIB driver, etc. Driver
CDs are shipped with each PXI card. It is recommended that you install the
NI CardBus-8310 driver first, then the PXI drivers.
Install the PXI Cards
Cautions High voltages are present inside the chassis when the power cord is plugged into
an electrical outlet. Disconnect the power cord from its source before removing the chassis
cover.
All PXI cards are susceptible to electrostatic discharge. When moving PXI cards, it is best
to carry the cards in anti-static packaging. If you need to set a card down, be sure to place
it inside or on top of an anti-static surface. For more information, refer to the Protecting
Against Electrostatic Discharge section of Chapter 1.
When installing PXI cards or hard drives, ensure that the input current rating specified on
the AC input label is not exceeded.
Generally, when installing PXI cards in the expansion system, it should
make no difference what slot order you place your cards in, unless specified
by the PXI card manufacturer.
Install the PXI cards following the PXI card manufacturer’s
recommendations. Be sure to seat the cards securely. Make sure that all
PXI cards are fully seated in their connectors. When correctly seated in its
connector, you will notice a firm resistance when you pull up gently on
the card.
Not all PXI cards are consistent in their behavior. Sometimes simply
moving a PXI card that is having a problem to a different slot, or reordering
your cards in their slots, may alleviate issues.
Attach the PXI Expansion Cables
1. Carefully position the PXI chassis so that the supplied cables will
conveniently reach from the connector of the NI CardBus-8310 card to
the connectors on the NI PXI-8310.
2. Install one of the provided ferrites on each end of each of your cables.
All four ferrites should be installed.
NI CardBus-8310-to-PXI Expansion User Manual 2-4 ni.com
Page 19

3. For each cable, Receive (RX) on one card attaches to Transmit (TX)
on the other card. Attach one CAT5-e cable to the Receive (RX) port
on the NI CardBus-8310 card. Attach the other end to the
Transmit (TX) terminal on the NI PXI-8310 card. Attach one CAT5-e
cable to the Transmit (TX) port on the NI CardBus-8310 card, then
attach the other end to the Receive (RX) port on the NI PXI-8310 card.
The LEDs on the NI PXI-8310 will light up if the cables are connected
properly.
If the LED lights flash continuously, reboot the laptop.
Install the NI CardBus-8310
This step can only be completed after the NI CardBus-8310 software has
been installed.
Note CardBus cards can only be used in systems that support CardBus. A special keying
mechanism prevents insertion into systems that do not support 32-bit CardBus cards.
1. Power down your laptop computer. Use the procedures for shutting
down your operating system and shutting off power to your system that
have been provided in your owner’s manual or host computer
documentation.
2. Insert the NI CardBus-8310 with the NI logo side up (gold strip up)
into the host computer CardBus slot. Gently push the card until it is
seated firmly.
3. For more information on using CardBus cards, refer to your host
computer’s user manual.
Chapter 2 Hardware and Software Installation
Powering Up
Apply power to the PXI chassis first, and then power up your host
computer. This will allow the higher-numbered buses in your hierarchy to
stabilize before the host computer issues its master power-on bus reset. In
systems that perform automatic bus configuration, this will allow the
configuration code to recognize the bus hierarchy and the attached devices.
Note The driver allows you to hot-plug your CardBus-8310 card into the CardBus slot on
your laptop, but you should never hot-plug a PXI card into a PXI chassis as it will cause
physical damage to the board, and possibly the backplane.
© National Instruments Corporation 2-5 NI CardBus-8310-to-PXI Expansion User Manual
Page 20

Chapter 2 Hardware and Software Installation
1. Make sure your CAT5-e cables are connected correctly, then turn on
the PXI chassis, and plug the NI CardBus-8310 card into the laptop.
Power up the host computer.
2. Both LEDs should be lit on the NI PXI-8310. Flashing LEDs indicate
that the wires are reversed. If the LEDs are flashing, switch the wires
and begin again at step 1.
3. The dialog box shown in Figure 2-4 will appear the first time you boot
your computer with the PXI chassis connected.
Figure 2-4. Found New Hardware Wizard Dialog Box (Windows 2000/XP SP2 Only)
4. Choose No and click Next.
NI CardBus-8310-to-PXI Expansion User Manual 2-6 ni.com
Page 21

Chapter 2 Hardware and Software Installation
Figure 2-5. Software Installation Options
5. Choose automatic installation and click Next.
Figure 2-6. Installation Wizard Completion Dialog Box
6. Once the StarGen PCI to PCI bridge installation is complete, click
Finish.
© National Instruments Corporation 2-7 NI CardBus-8310-to-PXI Expansion User Manual
Page 22

Chapter 2 Hardware and Software Installation
7. The Found New Hardware Wizard dialog box will appear again, and
will find another PCI to PCI bridge, because there are two bridge chips.
Follow the instructions outlined in steps 4 through 7 to successfully
install the second PCI to PCI bridge.
8. The Found New Hardware Wizard will now detect the PXI modules
that have been installed in the PXI chassis. Follow the same procedure
described in steps 4 through 7 to successfully install each module.
Note Remember that PXI devices in the chassis will not be recognized unless the
device-specific driver has been installed. The devices will show up as generic PCI devices
and will not operate properly.
Verifying the Installation
Go to Start»Control Panel»Printers and Other Hardware»System»
Hardware»Device Manager and make sure View device by connection
is selected. From there, go to ACPI»Microsoft ACPI-Compliant
System»PCI Bus. Open the device branches until you reach the CardBus
bridge. Under this entry you should see any hardware that is installed in the
PXI chassis. In Figure 2-7, a PXI-GPIB card has been installed in a
PXI chassis.
NI CardBus-8310-to-PXI Expansion User Manual 2-8 ni.com
Page 23

Chapter 2 Hardware and Software Installation
Figure 2-7. PXI Module Shown In Device Manager Tree
The NI CardBus-8310 CardBus Driver installation is now complete.
Powering Down
Caution The hardware will not support powering down the chassis before the host
computer. If you do so, the machine may hang, blue screen, or it may even appear to be
working. The condition of the system will be very unstable. If you must power down the
PXI chassis without shutting down the host computer, stop the NI CardBus-8310 device
first by using the undock manager in the system tray and requesting removal first.
It is recommended that you first shut down the host computer correctly, and
then power down the PXI chassis to avoid a computer lock-up.
© National Instruments Corporation 2-9 NI CardBus-8310-to-PXI Expansion User Manual
Page 24

Chapter 2 Hardware and Software Installation
Running the System
Cautions High voltages are present inside the chassis when the chassis power cord is
plugged into an electrical outlet. Disconnect the power cord from its source.
Before touching anything inside the chassis, move to an ESD station and follow proper
ESD procedure. Failure to do so may result in electrostatic discharge damaging the
computer or its components. For more information, refer to the Protecting Against
Electrostatic Discharge section of Chapter 1.
If there is a problem, be sure to turn off the power before making any
changes. If you are having trouble with the system, turn off the host
computer and the chassis, then check that all cards are seated properly and
all cables are connected.
If you are still having problems, check Appendix C, Troubleshooting NI
PXI-CardBus-8310 Cards, for more information.
Uninstalling the NI CardBus-8310 Driver
Go to Start»Settings»Control Panel»Add/Remove Programs. Select the
NI CardBus-8310 driver, and then select Add/Remove.
Additional Notes
The following notes are observations made during the testing of the
NI CardBus-8310 and the NI PXI-8310.
System Hierarchy
To connect additional PXI chassis through MXI-4, please connect them to
the first PXI bus segment in the first chassis as shown in Figure 2-8. The
preferred connection style is a Star configuration, rather than a daisy-chain,
which is shown in Figure 2-9. The system will support daisy-chaining, but
only to a certain depth of PCI bus segments. Systems connected in a Star
configuration will also exhibit lower latency.
NI CardBus-8310-to-PXI Expansion User Manual 2-10 ni.com
Page 25

Chapter 2 Hardware and Software Installation
Figure 2-8. Star Configuration (Preferred)
Figure 2-9. Daisy-Chain Configuration (Non-Preferred)
System Boot
In systems with a large number of modules and chassis, the host computer
may appear to hang, taking more than 20 seconds at the Windows XP
splash screen. This operation is expected, as the operating system is
enumerating all the devices in the PCI bus hierarchy, which can take time
in a complex configuration.
NI Measurement & Automation Explorer (MAX)
The initial launch of MAX may take a long time (several minutes) to
discover all the devices in a system with a large number of modules and
chassis.
© National Instruments Corporation 2-11 NI CardBus-8310-to-PXI Expansion User Manual
Page 26

PCIScope
Overview
A
PCIScope is a powerful monitoring tool designed by the German company
APSoft. This software utility is used to explore, examine and debug the PCI
subsystem of your computer. PCIScope has proven to be very useful when
verifying and debugging configurations involving an NI PXI expansion
system under a Windows platform. It can provide information such as PCI
bus numbering and resource allocation, as well as other information that
may prove useful when debugging expansion chassis or PCI card problems.
When the PCIScope utility is installed on your computer, a window similar
to the one shown in Figure A-1 will appear. (The example shown was taken
from a Compaq Armada 7400.)
Vis it
www.tssc.de for more information about the capabilities of
PCIScope and other utilities offered by APSoft.
An evaluation version of PCIScope can be downloaded from
www.tssc.de. (You can purchase a license from APSoft for use beyond
the evaluation period for $49.95.)
© National Instruments Corporation A-1 NI CardBus-8310-to-PXI Expansion User Manual
Page 27
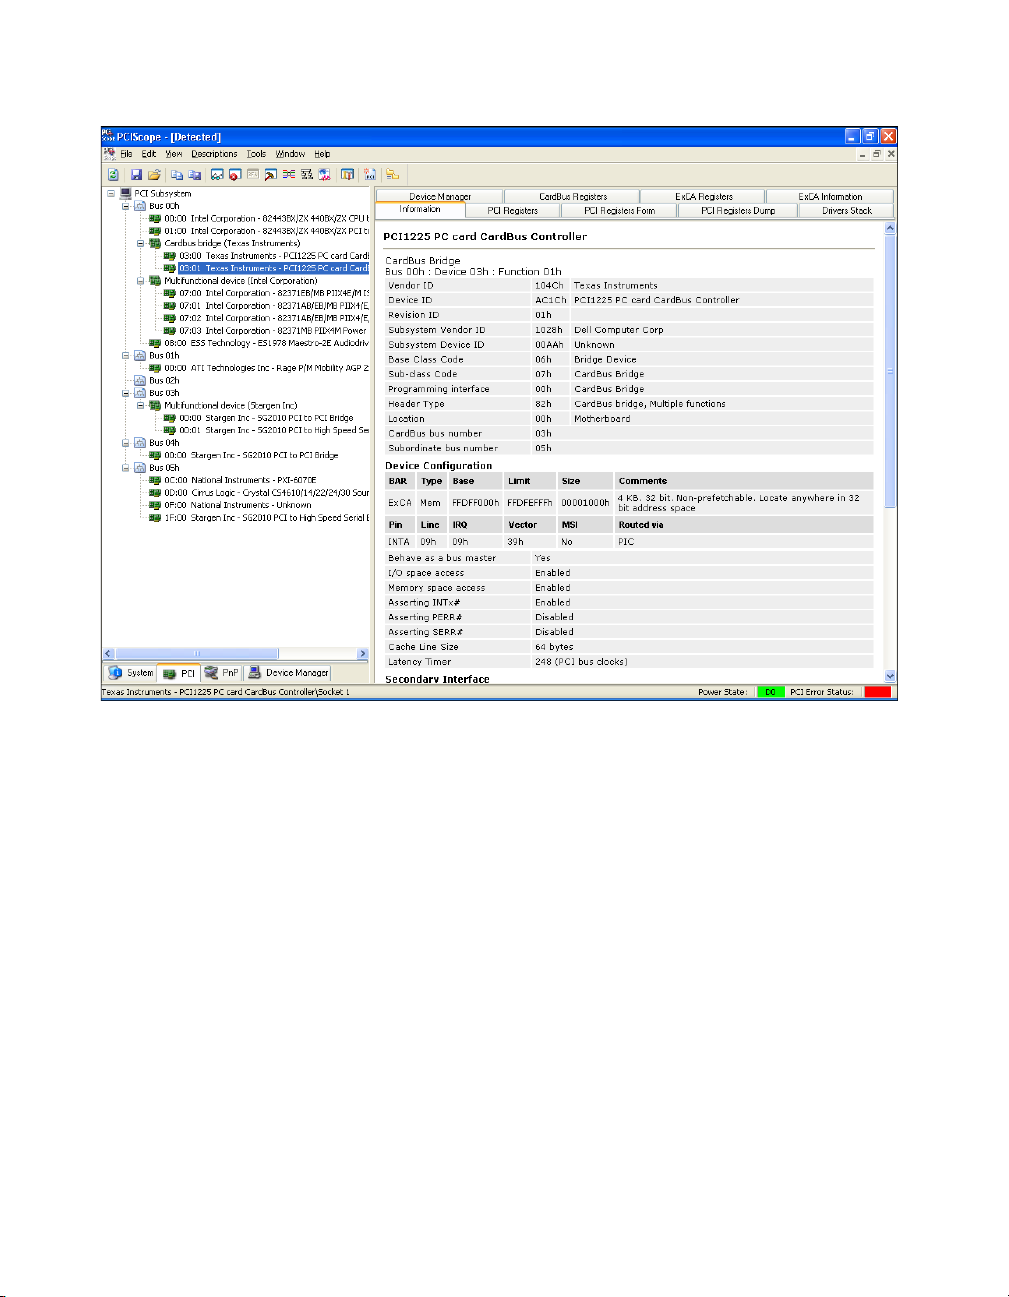
Appendix A PCIScope
Figure A-1. Example of PCIScope Interface
The data can be stored as a *.bpd file on your computer. You may be
requested to email this file to
support@ni.com if you are experiencing
configuration problems.
NI CardBus-8310-to-PXI Expansion User Manual A-2 ni.com
Page 28

Specifications
This appendix deals with safety and environmental specifications for the
NI CardBus-8310-to-PXI Expansion system.
Power Requirements
This section discusses the DC output for the NI CardBus-8310-to-PXI
system.
NI CardBus-8310
Typical
3.3 V ........................................ 0.25 A
5 V ........................................... 0 A
Maximum
3.3 V ........................................ 0.30 A
5 V ........................................... 0 A
NI PXI-8310
Typical
3.3 V ........................................ 0.15 A
5 V ........................................... 1.5 A
Maximum
3.3 V ........................................ 0.40 A
5 V ........................................... 1.7 A
B
Physical
Sustained Throughput
Input ................................................ Up to 50 MB/s
Output ............................................. Up to 10 MB/s
© National Instruments Corporation B-1 NI CardBus-8310-to-PXI Expansion User Manual
Page 29

Appendix B Specifications
Dimensions
NI CardBus-8310....................................Type II PC Card
NI PXI-8310 ...........................................1-slot 3U PXI module
Slot requirements....................................One 3U PXI system
Maximum cable length ...........................14 m
Compatibility ..........................................Fully compatible with the PXI
Operating Environment
Temperature
Relative humidity ...................................10 to 90%
controller slot
Hardware Specification 2.1
CardBus-8310..................................0 to 40 °C
PXI-8310 .........................................0 to 55 °C
Storage Environment
Temperature............................................–40 to 70 °C
Relative humidity ...................................5 to 95% noncondensing
Safety
The CardBus-8310-to-PXI Expansion system was designed to meet the
requirements of the following standards of safety for electrical equipment
for measurement, control, and laboratory use:
• EN 61010-1 A2:1995
Note For UL and other safety certifications, refer to the product label, or refer to the
Document of Conformity, which has been included as a digital document on your
driver CD.
NI CardBus-8310-to-PXI Expansion User Manual B-2 ni.com
Page 30

Electromagnetic Compatibility
Emissions ............................................... EN 55011 Class A @ 10 meters
Immunity................................................ Evaluated to EN 61326:1998,
EMC/EMI............................................... CE, C-Tick, and FCC Part 15
CE Compliance
Note Refer to the Declaration of Conformity (DoC) for this product for any additional
regulatory compliance information. The DoC for this product has been included as a digital
document on your driver CD.
Appendix B Specifications
FCC Part 15A above 1 GHz
Table 1
(Class A) Compliant
© National Instruments Corporation B-3 NI CardBus-8310-to-PXI Expansion User Manual
Page 31

Troubleshooting NI
PXI-CardBus-8310 Cards
This appendix deals with troubleshooting methods for an
NI CardBus-8310-to-PXI system.
Caution To avoid potential issues with this configuration, please install the
NI CardBus-8310 driver before inserting the CardBus card.
Contacting Technical Support
While this appendix contains a number of troubleshooting tips for resolving
issues that may be experienced with NI CardBus-8310 cards, extreme cases
may require you to contact National Instruments Technical Support. You
can find that contact information in the Technical Support and Professional
Services appendix of this manual.
You must be ready to give the following information prior to
troubleshooting the system.
• Name and model of laptop (exact model)
• Name of CardBus card controller
• Number of PCMCIA sockets (1 or 2 sockets)
• Which socket is being used
• Operating system version
• Third party cards: name, model and manufacturer—If there are
multiple cards, you will need all of the information provided
• Type of card
• Whether the card has a hardware bridge
• Application name and version
C
© National Instruments Corporation C-1 NI CardBus-8310-to-PXI Expansion User Manual
Page 32

Appendix C Troubleshooting NI PXI-CardBus-8310 Cards
Troubleshooting
The following list relates problems that have been observed during
initialization. Below the list, elaboration upon each issue is provided, along
with steps to correct it.
1. No LEDs are lit on the NI PXI-8310 card.
2. The LEDs are flashing on the NI PXI-8310 card.
3. One or more LEDs are not lit on the NI PXI-8310 card.
4. An error is returned after inserting the CardBus card before installing
the CardBus card driver.
5. The host computer is unable to detect the PXI chassis.
6. The host computer is unable to detect the third party PXI card in
Windows Device Manager.
7. The application or program is unable to detect the third party PXI card.
8. The host computer won't boot when the PXI chassis is connected.
9. The host computer is blue-screening/frozen while installing the
NI CardBus-8310 driver.
10. The system froze after installing the NI CardBus-8310 driver.
11. The host computer is blue-screening/frozen during reboot after
installing the NI CardBus-8310 driver.
12. The application or program failed to communicate with the PXI device
card during an operation.
13. An error (yellow exclamation mark) shows up next to the card in
Device Manager.
Issue: No LEDs are lit on the NI PXI-8310 card.
• Eject and re-insert the NI CardBus-8310 card.
• Re-seat both cable connections.
• Swap the cables. Ensure that one end of the cable goes into the
Transmitter (TX) port on the NI CardBus-8310 card, and the other end
goes into the Receiver (RX) port of the NI PXI-8310 card.
• Try or use another cable of the same length.
• If using a long cable, try using a shorter one.
Issue: The LEDs are flashing on the NI PXI-8310 card.
• Reverse the TX and RX cables, and power up again.
NI CardBus-8310-to-PXI Expansion User Manual C-2 ni.com
Page 33

Appendix C Troubleshooting NI PXI-CardBus-8310 Cards
• Try ejecting and re-inserting the CardBus card.
• Power down the laptop and the chassis system. Power up the chassis
first and then power up the computer.
Issue: One or more LEDs are not lit on the NI PXI-8310 card.
This may be a defective hardware. Please call customer service for support.
Note The hardware may still appear to function, but at a reduced bandwidth.
Issue: An error is returned after inserting the CardBus card before
installing the CardBus card driver.
1. Go to Windows Device Manager»View»Devices by connection, as
shown in Figure C-1.
Figure C-1. Devices by Connection Menu in Device Manager
2. Remove the CardBus card from the PCMCIA slot. Install the NI
CardBus Driver 1.0 from the provided driver CD.
After installing the NI CardBus-8310 Driver, the CardBus device will be
visible in Device Manager.
© National Instruments Corporation C-3 NI CardBus-8310-to-PXI Expansion User Manual
Page 34

Appendix C Troubleshooting NI PXI-CardBus-8310 Cards
Issue: The host computer is unable to detect the PXI chassis.
• If the LEDs are flashing on the NI PXI-8310 card:
– Try ejecting and reinserting the CardBus card.
– Power down the laptop and the chassis system. Power up the
chassis first and then the computer.
• If there are no LEDs lit on the NI PXI-8310 card:
– Verify that the CardBus card is inserted properly.
– Try ejecting and re-inserting the CardBus card.
– Re-seat both cable connections.
– Swap the cables. Make sure the one end of the cable goes into the
Transmitter (TX) port on the NI CardBus-8310 card, the other end
goes into the Receiver (RX) port on the NI PXI-8310 card.
– Test with another cable of the same length.
– If using a long cable, try using a shorter one.
• One or more LED lights are not lit.
This may be defective hardware. Please call customer service for
support.
Issue: The host computer is unable to detect the third party PXI card
in Windows Device Manager.
• If you see a yellow exclamation mark (error) next to the generic entries
“Other PCI Bridge Device” and “PCI standard PCI-to-PCI bridge” in
Windows Device Manager»View»Devices by connection:
– Please eject the CardBus card, and install the NI CardBus-8310
driver before inserting the NI CardBus-8310 card.
• If you see an entry called “StarGen Other Bridge” in Device Manager
but do not see any bridge devices:
– Turn off the system completely. Power up the PXI chassis first,
and then power up the laptop. Ensure that the PXI chassis is
powered up properly before the laptop is turned on.
– Swap the cables. Make sure that one end of the cable goes into the
Transmitter (TX) port on the NI CardBus-8310 card, the other end
goes into the Receiver (RX) port on the NI PXI-8310 card.
– Eject and re-insert the NI CardBus-8310 card.
NI CardBus-8310-to-PXI Expansion User Manual C-4 ni.com
Page 35

Appendix C Troubleshooting NI PXI-CardBus-8310 Cards
Issue: The application or program is unable to detect the third party
PXI card.
Go to Windows Device Manager»View»Devices by connection, expand
the device branches to see if there is a yellow exclamation mark (error) in
front of the affected PXI card.
• If there is a yellow exclamation mark in front of the PXI card:
– Double-click on the PXI device to find out the Error Code number.
Refer to the Error Code (Yellow Exclamation Mark) in Device
Manager section at the end of this appendix for more information
on the yellow exclamation mark.
– Re-install the driver for the third party PXI card using the
manufacturer’s installation instructions.
Note You may want to check the manufacturer’s web site to see if there are any
installation/driver updates for the device.
• If there is no yellow exclamation mark in front of the PXI card:
– Re-install the driver for the third party PXI card using the
manufacturer’s installation instructions.
– If another PXI card that has worked in the past is available, try
installing it in the same slot.
– Plug the PXI card into a different slot in the chassis, to make sure
that the chassis is functional.
Issue: The host computer won't boot when the PXI chassis is
connected.
Has any other hardware or software been added to the host computer
recently? If not, please call customer support for service. Otherwise:
• Remove the recently installed program or hardware, and re-test the
system.
• Reboot the computer and see if that fixes the problem.
• Make sure that recently added hardware or software is
fully-compatible with the operating system.
• Remove all the cards in the PXI chassis, then reboot the system with
the empty chassis connected. In Windows Device Manager»View»
Devices by connection, there should be no errors. At this point, power
down and begin adding PXI cards one by one, powering up to check
that there are no errors in Device Manager after installing each card.
This can isolate problematic hardware/software.
© National Instruments Corporation C-5 NI CardBus-8310-to-PXI Expansion User Manual
Page 36

Appendix C Troubleshooting NI PXI-CardBus-8310 Cards
Issue: The host computer is blue-screening/frozen while installing the
NI CardBus-8310 driver.
Re-install the NI CardBus-8310 driver again from the driver CD provided
in your kit. If the problem occurs consistently, please contact National
Instruments for technical support.
Issue: The system froze after installing the NI CardBus-8310 driver.
• If any other hardware or software has been added recently:
– Remove the recently installed program or hardware, and re-test
the system.
– Reboot the computer and see if that fixes the problem.
– Ensure that the recently added hardware or software is
fully-compatible with the operating system.
– Consult the manufacturer’s web site to see if there is a driver
update.
• If no other hardware or software has been added recently:
– Verify that the NI CardBus-8310 driver has loaded. If not,
re-install the NI CardBus-8310 driver.
– Verify that the NI CardBus-8310 card is inserted properly.
– Test the PCMCIA socket by using a different CardBus card, such
as a wireless CardBus card or modem, etc.
– Verify that you are using the correct expansion interface cards.
You should be using an NI CardBus-8310 card in your host
computer, and an NI PXI-8310 card in your PXI chassis.
– Re-seat both cable connections.
– Clean the cable with solvent alcohol using a soft bristle brush.
– Swap cables or reverse both end connections.
– Use another cable of the same length.
– If you are using a long cable, try using a shorter one.
Issue: The host computer is blue-screening/frozen during reboot after
installing the NI CardBus-8310 driver.
1. Reboot the system and press <F8> to go into Windows Safe Mode.
2. Go to
C:\Windows\System32\drivers, and delete Mobridg.sys.
3. Reboot the system.
4. Re-install the NI CardBus-8310 driver again from the driver CD
provided.
NI CardBus-8310-to-PXI Expansion User Manual C-6 ni.com
Page 37

Appendix C Troubleshooting NI PXI-CardBus-8310 Cards
If the problem occurs consistently, please contact National Instruments for
technical support.
Issue: The application or program failed to communicate with the PXI
device card during an operation.
• Make sure the PXI chassis is properly powered.
• Check the LED lights on the NI PXI-8310 card.
– No LEDs lit on the NI PXI-8310 card.
• Re-insert the NI CardBus-8310 card.
• Re-seat both cable connections.
• Swap cables or reverse both end connections.
• Use another cable of the same length.
• If you are using a long cable, try using a shorter one.
– LEDs flashing on the NI PXI-8310 card.
• Eject the NI CardBus-8310 card and re-insert it.
• Power down the laptop and the chassis system. Power up the
chassis and then the laptop.
– Only part of the LEDs are lit.
This may be defective hardware. Please call customer service for
support.
• Go to Windows Device Manager»View»Devices by connection,
expand the device branches to see if there is yellow exclamation mark
(error) in front of the card.
– If there is yellow exclamation mark (error) in front of the card:
• Double-click on the device to find out the Error Code number.
(Refer to the Error Code (Yellow Exclamation Mark) in
Device Manager section at the end of this appendix for more
information.)
– If there is no yellow exclamation mark (error) in front of the card:
• Re-install the driver for the third party card using the
manufacturers installation instructions.
Note You may want to check the manufacturer’s web site to see if there are any
installation/driver updates for the device.
© National Instruments Corporation C-7 NI CardBus-8310-to-PXI Expansion User Manual
Page 38

Appendix C Troubleshooting NI PXI-CardBus-8310 Cards
• If another card that has worked in the past is available, try it
in the same slot.
• Plug the card into a different slot in the chassis, to ensure that
the chassis is functional.
Error Code (Yellow Exclamation Mark) in Device
Manager
The following section interprets the error codes corresponding to the
yellow exclamation point used in Windows Device Manager to denote
hardware errors.
Error Code 1 on a third party card in the PXI chassis
This means that there is no driver installed for this device. Re-install the
driver for the third party card using the manufacturer’s installation
instructions.
Note You may want to check the manufacturer’s web site to see if there are any
installation/driver updates for the device.
Error Code 10 on a third party card in the PXI chassis
The device failed to start. This usually means that the driver is not properly
installed or the driver is not compatible with the Windows Driver Model
(WDM). Re-install the driver for the third party card using the
manufacturer’s installation instructions.
Note You may want to check the manufacturer’s web site to see if there are any
installation/driver updates for the device.
Error Code 12 on the first standard PCI-to-PCI Bridge
This usually means the NI CardBus-8310 driver is not installed, so the
resources are not allocated correctly. To resolve this issue, install the
NI CardBus-8310 driver before inserting the NI CardBus-8310 card into
the CardBus slot on the host computer.
Error Code 12 on a third party card in the PXI chassis
This usually means the memory, I/O, or Prefetch required by the card is
more than what has been allocated by the NI driver. Right-click on the
NI CardBus-8310-to-PXI Expansion User Manual C-8 ni.com
Page 39

Appendix C Troubleshooting NI PXI-CardBus-8310 Cards
NI icon in the system tray of your desktop, click Reset Bridges Settings
and restart your computer.
Error Code 28 on the Other PCI Bridge Device
This code means the device was not installed completely. Re-install the
NI CardBus-8310 driver from the driver CD provided before inserting the
NI CardBus-8310 card into the CardBus slot of the host computer.
Error Code 28 on a third party card in the PXI chassis
This code means the device was not installed completely. To resolve this
issue, remove the device from Device Manager (by right-clicking the
device entry and selecting Uninstall) and use the Add New Hardware
Wizard to re-detect it. If that is unsuccessful, re-install the driver from the
installation CD provided, or get the latest driver from the manufacturer’s
web site.
Error Code 31 on a third party card in the PXI chassis
This error means that the device is not working properly. This code usually
appears when a device is dependent on another device to function properly.
Remove the device from Device Manager (by right-clicking the device
entry and selecting Uninstall) and use the Add New Hardware Wizard to
re-detect it. If that is unsuccessful, use the other CardBus socket in your
host computer. If you don’t have another CardBus socket, please contact
technical support.
For more information on the Windows Device Manager Error Codes please
visit the Microsoft page:
http://www.microsoft.com/resources/documentation/
Windows/XP/all/reskit/en-us/Default.asp?url=/resources/
documentation/Windows/XP/all/reskit/en-us/
prjk_dec_lgsc.asp
© National Instruments Corporation C-9 NI CardBus-8310-to-PXI Expansion User Manual
Page 40

Technical Support and
Professional Services
Visit the following sections of the National Instruments Web site at
ni.com for technical support and professional services:
• Support—Online technical support resources at
include the following:
– Self-Help Resources—For answers and solutions, visit the
award-winning National Instruments Web site for software drivers
and updates, a searchable KnowledgeBase, product manuals,
step-by-step troubleshooting wizards, thousands of example
programs, tutorials, application notes, instrument drivers, and
so on.
– Free Technical Support—All registered users receive free Basic
Service, which includes access to hundreds of Application
Engineers worldwide in the NI Developer Exchange at
ni.com/exchange. National Instruments Application Engineers
make sure every question receives an answer.
For information about other technical support options in your
area, visit
ni.com/contact.
• Training and Certification—Visit
self-paced training, eLearning virtual classrooms, interactive CDs,
and Certification program information. You also can register for
instructor-led, hands-on courses at locations around the world.
• System Integration—If you have time constraints, limited in-house
technical resources, or other project challenges, National Instruments
Alliance Partner members can help. To learn more, call your local
NI office or visit
ni.com/services or contact your local office at
ni.com/alliance.
D
ni.com/support
ni.com/training for
© National Instruments Corporation D-1 NI CardBus-8310-to-PXI Expansion User Manual
Page 41

Appendix D Technical Support and Professional Services
• Declaration of Conformity (DoC)—A DoC is our claim of
compliance with the Council of the European Communities using
the manufacturer’s declaration of conformity. This system affords
the user protection for electronic compatibility (EMC) and product
safety. You can obtain the DoC for your product by visiting
ni.com/certification. A PDF copy of the DOC is available on
the NI-PXI-CardBus-8310 driver CD.
If you searched
ni.com and could not find the answers you need, contact
your local office or NI corporate headquarters. Phone numbers for our
worldwide offices are listed at the front of this manual. You also can visit
the Worldwide Offices section of
ni.com/niglobal to access the branch
office Web sites, which provide up-to-date contact information, support
phone numbers, email addresses, and current events.
NI CardBus-8310-to-PXI Expansion User Manual D-2 ni.com
Page 42

Index
C
cable installation, 2-4
cable options, 1-3
CardBus-8310 installation, 2-5
contacting technical support, C-1
conventions used in the manual, v
D
Declaration of Conformity (NI resources), D-2
diagnostic tools (NI resources), D-1
documentation
conventions used in the manual, v
NI resources, D-1
drivers (NI resources), D-1
E
electromagnetic compatibility, B-3
ESD protection, 1-4
examples (NI resources), D-1
F
functional overview, 1-1
functional unit descriptions, 1-2
I
installation
cabling, 2-4
CardBus-8310, 2-5
ESD protection, 1-4
parts list, 1-4
powering up, 2-5
preparation, 1-3
PXI cards, 2-4
software driver, 2-1
supported operating systems, 2-1
troubleshooting, C-1
uninstalling the CardBus driver, 2-10
verification, 2-8
instrument drivers (NI resources), D-1
K
kit components, 1-4
KnowledgeBase, D-1
L
latencies
Measurement and Automation Explorer
(MAX), 2-11
system boot, 2-11
H
help, technical support, D-1
© National Instruments Corporation I-1 NI CardBus-8310-to-PXI Expansion User Manual
M
Measurement and Automation Explorer
(MAX), 2-11
Page 43

Index
N
National Instruments support and
services, D-1
NI CardBus-8310, 1-2
NI PXI-8310, 1-5
front view (figure), 1-7
NI support and services, D-1
O
OS support, 2-1
overview
cabling, 1-3
functional, 1-1
NI CardBus-8310, 1-2
NI PXI-8310, 1-5
RJ-45 connector, 1-3
StarFabric bridge, 1-2
P
parts list, 1-4
PCIScope utility, A-1
powering down the system, 2-9
powering up the system, 2-5
preparing to install, 1-3
programming examples (NI resources), D-1
PXI card installation, 2-4
specifications
electromagnetic compatibility, B-3
safety, B-2
StarFabric bridge, 1-2
supported operating systems, 2-1
system boot latencies, 2-11
system hierarchy, 2-10
system operation, 2-10
T
technical support, D-1
training and certification (NI resources), D-1
troubleshooting (NI resources), D-1
troubleshooting your system, C-1
U
uninstallation, 2-10
using the system, 2-10
V
verifying the hardware installation, 2-8
W
Web resources, D-1
R
RJ-45 connector, 1-3
S
safety specifications (table), B-2
software (NI resources), D-1
software driver installation, 2-1
NI CardBus-8310-to-PXI Expansion User Manual I-2 ni.com
 Loading...