

Page 1

GETTING STARTED GUIDE
NI RF Signal Generators
This guide explains how to install, configure, test, and begin
using NI RF signal generators. For more information, such as
NI RF signal generator features and programming, refer to the
NI RF Signal Generators Help, accessible at Start»All Programs»
National Instruments»NI-RFSG»Documentation.
Refer to the specifications document that ships with your device for
detailed specifications.
Contents
For the most current versions of documentation, visit
For the most current example programs, visit
For the latest version of NI-RFSG, visit
Conventions ............................................................................................ 2
1. Verifying System Requirements ......................................................... 4
2. Unpacking ........................................................................................... 4
3. Verifying Kit Contents........................................................................5
4. Installing the Software ........................................................................ 7
Installing Application Development Software ................................ 7
Installing the NI-RFSG Instrument Driver ......................................7
Installing Toolkits or Add-On Software ..........................................7
5. Installing the Hardware....................................................................... 8
PXI Modules .................................................................................... 8
NI 5670/5671 ............................................................................ 8
Installing PXI Modules............................................................. 8
PXI Express Modules ...................................................................... 10
NI 5672 ..................................................................................... 11
Cooling............................................................................................. 13
6. Interconnecting the NI 5670/5671/5672 Modules .............................. 14
7. Configuring NI RF Signal Generators in MAX.................................. 16
Configuring the NI 5670/5671/5672 in MAX .................................16
Rename Both Modules .............................................................17
Associate the Upconverter with the AWG Module.................. 18
ni.com/instruments.
ni.com/rf.
ni.com/manuals.
Page 2
Generate a Signal Using the NI 5670/5671/5672 RF Signal
Generator Test Panel ..............................................................18
Configuring the NI 5650/5651/5652 in MAX..................................19
Rename the NI 5650/5651/5652 ...............................................20
Generate a Signal Using the NI 5650/5651/5652 RF Signal
Generator Test Panel ..............................................................20
8. Setting up Synchronization for NI-DAQmx Devices in MAX ...........21
9. Programming the RF Signal Generator ...............................................21
NI-RFSG Instrument Driver.............................................................22
NI-RFSG Examples..........................................................................22
Appendix A: Hardware Front Panel Connectors and Indicators .............23
NI 5610 RF Upconverter Module.....................................................23
NI 5421/5441 AWG Module............................................................25
NI 5442 AWG Module.....................................................................27
NI 5650/5651/5652 RF Signal Generator Module ...........................29
Appendix B: Building a Basic NI-RFSG Application.............................30
Appendix C: Troubleshooting .................................................................35
Module Front Panel ACCESS LED is Off When
PXI Chassis is On.............................................................................35
Hardware Module Does Not Appear in MAX .................................36
Module Fails the Self-Test ...............................................................37
Thermal Shutdown Error..................................................................37
Performance Issues Using A MXI Connection ................................37
Where to Go for Support .........................................................................38
Conventions
The following conventions are used in this manual:
» The » symbol leads you through nested menus to a final action. The
sequence File»Page Setup»Options directs you to pull down the File
menu, select the Page Setup item, and select Options from the last dialog
box.
♦ The ♦ symbol indicates that the following text applies only to a specific
product, a specific operating system, or a specific software version.
This icon denotes a tip, which alerts you to advisory information.
This icon denotes a note, which alerts you to important information.
This icon denotes a caution, which advises you of precautions to take to
avoid injury, data loss, or a system crash.
If the NI RF signal generator has been in use, it may exceed safe handling
temperatures and cause burns. Allow the NI RF signal generator to cool
before removing it from the chassis.
NI RF Signal Generators Getting Started Guide 2 ni.com
Page 3

AWG Arbitrary Waveform Generator—refers to the NI-RFSG-supported
arbitrary waveform generator hardware module used in the
NI 5670/5671/5672 devices.
bold Bold text denotes items that you must select or click in the software, such
as menu items and dialog box options. Bold text also denotes parameter
names.
italic Italic text denotes variables, emphasis, a cross-reference, or an introduction
to a key concept. Italic text also denotes text that is a placeholder for a word
or value that you must supply.
module Refers to the NI 5650/5651/5652 hardware or to one of the two hardware
components of the NI 5670/5671/5672 RF signal generator: the AWG
PXI/PXIe module or the upconverter module.
monospace Text in this font denotes text or characters that you enter from the keyboard.
This font is also used for the proper names of paths, directories, programs,
functions, operations, variables, and filenames.
MXI Multisystem Xtension Interface—a high-speed serial interface bus
designed to connect computers to PXI or to connect multiple PXI chassis.
In this document, MXI refers to MXI-3, MXI-4, or MXI-Express systems.
NI 5421/5441/5442 NI 5421/5441/5442 refers to the PXI/PXIe AWG module included with
the NI 5610 upconverter module to make up the NI 5670/5671/5672.
Supported AWG modules include the NI PXI-5421, NI PXI-5441, and
NI PXIe-5442.
NI 5650/5651/5652 NI 5650/5651/5652 refers to the NI PXI-5650, NI PXI-5651, or
NI PXI-5652 RF signal generators. These devices consist of a single PXI
hardware module.
NI 5670/5671/5672 NI 5670/5671/5672 refers to the NI PXI-5670, NI PXI-5671, or
NI PXIe-5672 RF signal generators. The NI 5670/5671/5672 instruments
are comprised of an upconverter hardware module, a PXI/PXIe AWG
hardware module, and the NI-RFSG instrument driver. There is no single
physical device labeled “NI PXI-5670,” “NI PXI-5671,” or
“NI PXIe-5672.”
Platform Text in this font denotes a specific platform and indicates that the text
following it applies only to that platform.
PLL Phase-Locked Loop—an electronic circuit that controls an oscillator so that
the circuit maintains a constant phase angle relative to a reference signal.
© National Instruments Corporation 3 NI RF Signal Generators Getting Started Guide
Page 4

PXI/PXIe Refers to a PXI or PXI Express module.
PXI Express
compatible module A PXI module compatible with existing PXI slots and PXI hybrid slots.
PXI Express compatible modules maintain hardware and software
compatibility, with the exception of local bus functionality.
RF Radio Frequency—refers to the signal output from the RF OUTPUT
connector on the NI RF signal generator device front panels.
upconverter A device that frequency-translates IF signals to center around a specified
RF frequency—refers to an NI 5610, 2-slot RF upconverter hardware
module.
1. Verifying System Requirements
Your system must meet certain requirements to use NI RF vector signal
generators. For more information about minimum system, recommended
system, and supported application development environments (ADEs),
refer to the NI-RFSG Instrument Driver Readme, which is available on the
NI-RFSG CD.
After you install NI-RFSG, you can access the NI-RFSG Instrument Driver
Readme at Start»All Programs»National Instruments»NI-RFSG»
Documentation.
2. Unpacking
NI RF signal generator hardware modules ship in antistatic packages to
prevent damage from electrostatic discharge (ESD). Because ESD can
damage several components of the NI RF signal generator, store all NI RF
signal generator hardware modules in the antistatic envelopes when not
in use.
Caution Never touch exposed connector pins.
To avoid damage when handling NI RF signal generator hardware modules,
take the following precautions:
• Ground yourself using a grounding strap or by touching a grounded
object.
• Touch the antistatic package to a metal part of the computer chassis
before removing the hardware module from the package.
Remove each hardware module from its package and inspect it for loose
components or any signs of damage. Notify NI if either hardware module
NI RF Signal Generators Getting Started Guide 4 ni.com
Page 5
appears damaged in any way. Do not install a damaged module into
the system.
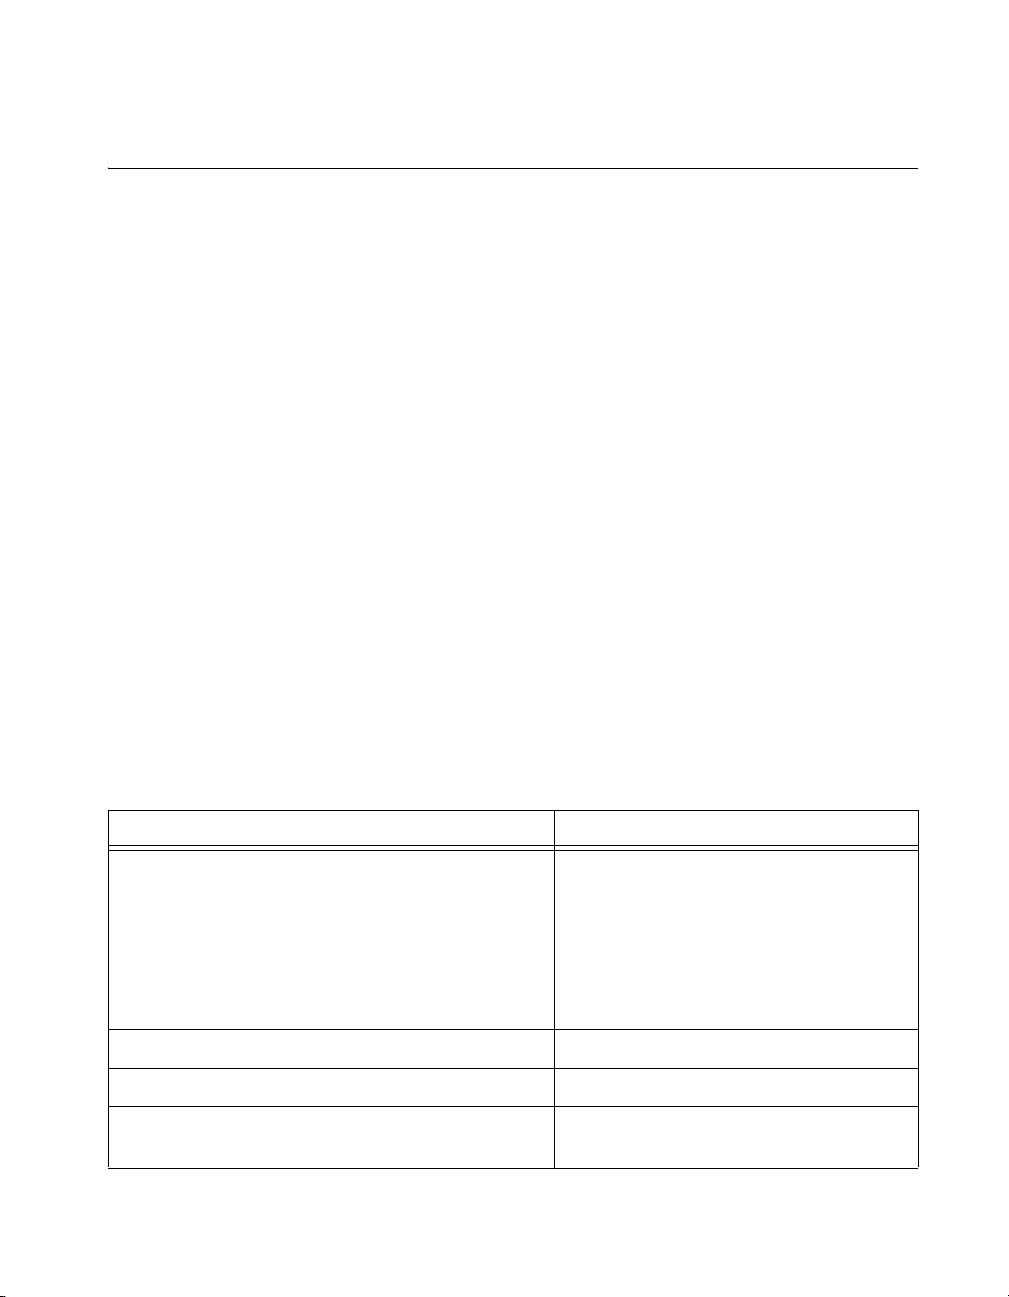
3. Verifying Kit Contents
Verify that the kit contains the following items required to set up and use
the NI RF signal generator:
❑ CDs, which install the following software components:
–NI-RFSG instrument driver, including NI-RFSG examples
– Hardware and software electronic documentation:
• NI RF Signal Generators Help (online help)
• NI RF Signal Generators Getting Started Guide (PDF)
• Specifications documents for your device (PDF)
• Hardware user manual for your device (PDF)
❑ Printed documents:
– The specifications document for your NI RF signal generator
– NI RF Signal Generators Getting Started Guide (this document)
– Read Me First: Safety and Radio-Frequency Interference
– Maintain Forced-Air Cooling Note to Users
❑ Either an NI 5670/5671/5672 or NI 5650/5651/5652 device. The
components required for installing each device are described in
Tables 1 and 2, respectively. All the components listed should be
included in the kit unless otherwise noted.
Table 1. NI 5670/5671/5672 Required Parts Inventory and Replacement Part Numbers
Hardware Component Replacement Part Number
Two hardware modules:
• NI 5610 wideband RF upconverter module
• NI 5421, NI 5441, or NI 5442 AWG module
Two semi-flexible SMA-to-SMB coaxial cables 190846A-01
1/8-in. combination Phillips/flathead screwdriver 772006-01
Plastic collars (cable wrenches) for gripping the
coaxial cable hex connectors
© National Instruments Corporation 5 NI RF Signal Generators Getting Started Guide
778737-01
778697-0X
779058-0X
779990-0X
746016-01
1
(NI PXI-5421);
1
(NI PXI-5441);
1
(NI PXIe-5442)
Page 6
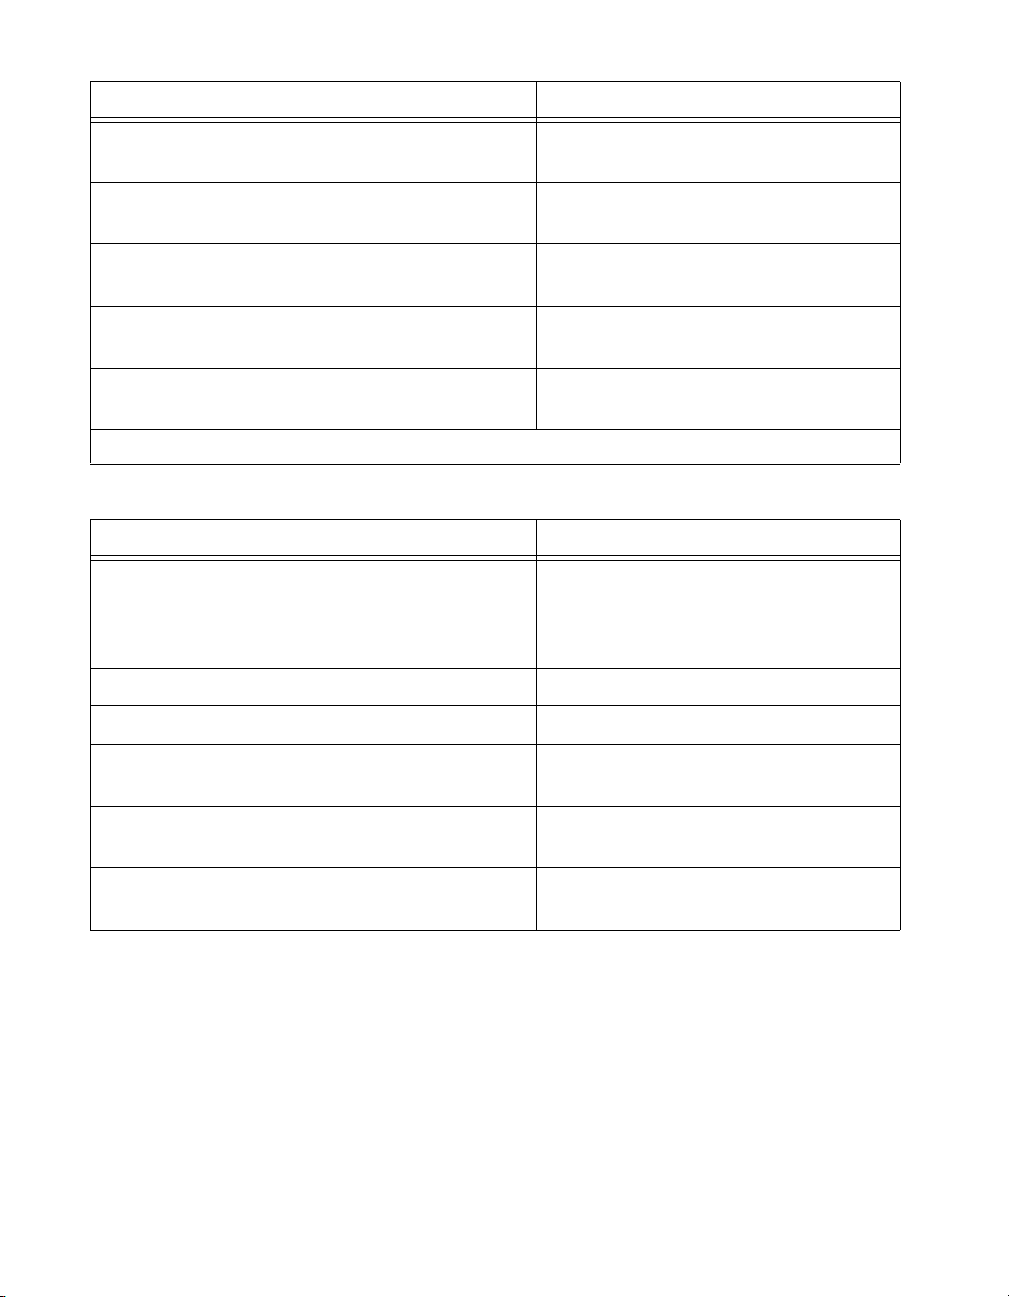
Table 1. NI 5670/5671/5672 Required Parts Inventory and Replacement Part Numbers (Continued)
Hardware Component Replacement Part Number
NI PXI-1042 chassis with controller
778636-01
(for NI 5670/5671 only, not included)
NI PXIe-1062Q chassis with controller
779633-01
(for NI 5672 only, not included)
PXI/PXIe Chassis Slot Blockers
778678-01
(optional, not included)
PXI/PXIe Chassis Filler Panels
778679-01
(optional, not included)
100 N-cm SMA torque wrench
N/A
(not included)
1
Part numbers on the NI PXI/PXIe-5421/5441/5442 modules vary according to memory size.
Table 2. NI 5650/5651/5652 Required Parts Inventory and Replacement Part Numbers
Hardware Component Replacement Part Number
NI PXI-5650
NI PXI-5651
NI PXI-5652
779670-00
779670-01
779670-02
1/8-in. combination Phillips/flathead screwdriver 772006-01
NI PXI-1042 chassis with controller (not included) 778636-01
PXI/PXIe Chassis Slot Blockers
778678-01
(optional, not included)
PXI/PXIe Chassis Filler Panels
778679-01
(optional, not included)
100 N-cm SMA torque wrench
N/A
(not included)
NI RF Signal Generators Getting Started Guide 6 ni.com
Page 7
4. Installing the Software
This section describes the software installation process for NI RF signal
generators.
Installing Application Development Software
You can create applications for NI RF signal generators using
application development environments (ADE) such as LabVIEW,
LabWindows
Any ADE you intend to use must be installed before you install your driver
software.
Installing the NI-RFSG Instrument Driver
Complete the following steps to install the contents of the NI-RFSG CDs:
1. Insert the NI-RFSG Disk 1 into the CD drive. The NI-RFSG installer
should open automatically.
Note If the installation window does not appear, navigate to the CD drive, double-click
the drive, and double click
2. Follow the instructions in the installation prompts to complete the
NI-RFSG installation. For troubleshooting information, contact NI
technical support or visit
(Windows Vista) Users may see access and security messages during
installation. Accept the prompts to complete the installation.
3. When the installer completes, a dialog box appears that asks if you
want to restart, shut down, or restart later. Select Restart.
™
/CVI™, or other development environments.
setup.exe.
ni.com/support.
Installing Toolkits or Add-On Software
Optional add-on software, such as the Modulation Toolkit, extends the
generation capability of NI RF signal generators for modulation-domain
and frequency-domain applications. Install any toolkits or add-on software
you intend to use with the NI RF signal generator after installing the
NI-RFSG instrument driver.
Note You must install the NI-RFSG instrument driver before installing the Modulation
Toolkit add-on software in order to properly install the Modulation Toolkit examples for
NI-RFSG. If the Modulation Toolkit is already installed, repeat or repair the Modulation
Toolkit installation after installing NI-RFSG.
© National Instruments Corporation 7 NI RF Signal Generators Getting Started Guide
Page 8
5. Installing the Hardware
This section describes how to install hardware for PXI platforms.
PXI Modules
NI PXI modules are sensitive instruments that should be handled carefully.
Do not expose the module to temperatures or humidity beyond the rated
maximums. Keep the module free of dust by cleaning with compressed air
only. Do not clean the module with any solvents or liquids. Refer to the
Cooling section for more information about module cooling.
You can install PXI modules in any PXI slot marked with a peripheral slot
3
compatibility glyph (a circle containing the slot number).
H
7
You also can install PXI modules in any PXI hybrid slot marked with
a peripheral slot compatibility glyph (the letter “H” and a solid circle
containing the slot number).
NI 5670/5671
Installation of the NI 5670/5671 hardware requires three vacant PXI
slots—two slots for the NI 5610 upconverter module and one slot for
the NI 5421/5441 AWG module. The NI 5421/5441 AWG module must be
installed in the slot immediately to the right of the NI 5610 upconverter
module to allow use of the included SMA-to-SMB coaxial cables.
Caution SMA connectors must be connected and tightened before the SMB or AWG
connectors are mated to preserve cable life and reduce stress on the SMB connectors.
Note PXI Chassis only—the NI 5610 upconverter module onboard frequency reference
can drive the PXI backplane clock only if the upconverter module is installed in PXI Slot 2.
When the NI 5610 is installed in PXI Slot 2, you can configure it to lock the PXI backplane
to the NI 5610 onboard oven-controlled crystal oscillator (OCXO) or to an external
frequency source (connected to the REF IN connector on the NI 5610 module front panel).
Installing PXI Modules
To install a PXI module, complete the following steps:
1. Power off and unplug the PXI chassis.
2. Make sure that the fans are set to HIGH if the PXI chassis has multiple
fan speed settings.
3. Position the PXI chassis so that inlet and outlet vents are not
obstructed. For more information, refer to the chassis documentation.
NI RF Signal Generators Getting Started Guide 8 ni.com
Page 9
4. Remove the black plastic connectors from all the captive screws in the
module front panel.
5. Make sure that the ejector handle is in the unlatched (downward)
position.
6. Hold the module by the ejector handle and slide it into an empty slot.
Make sure that the base engages with the guides in the chassis.
7. Slide the module completely into the chassis and latch it by pulling up
on the ejector handle.
8. Tighten the captive screws at the top and bottom of the module front
panel. Performance may suffer if both screws are not tightened
properly.
9. Verify that the PXI chassis fans are operable and free of dust and other
contaminants that may restrict airflow.
10. Cover all empty PXI slots using PXI filler panels or slot blockers
before operating the module.
11. Plug in and power on the PXI chassis.
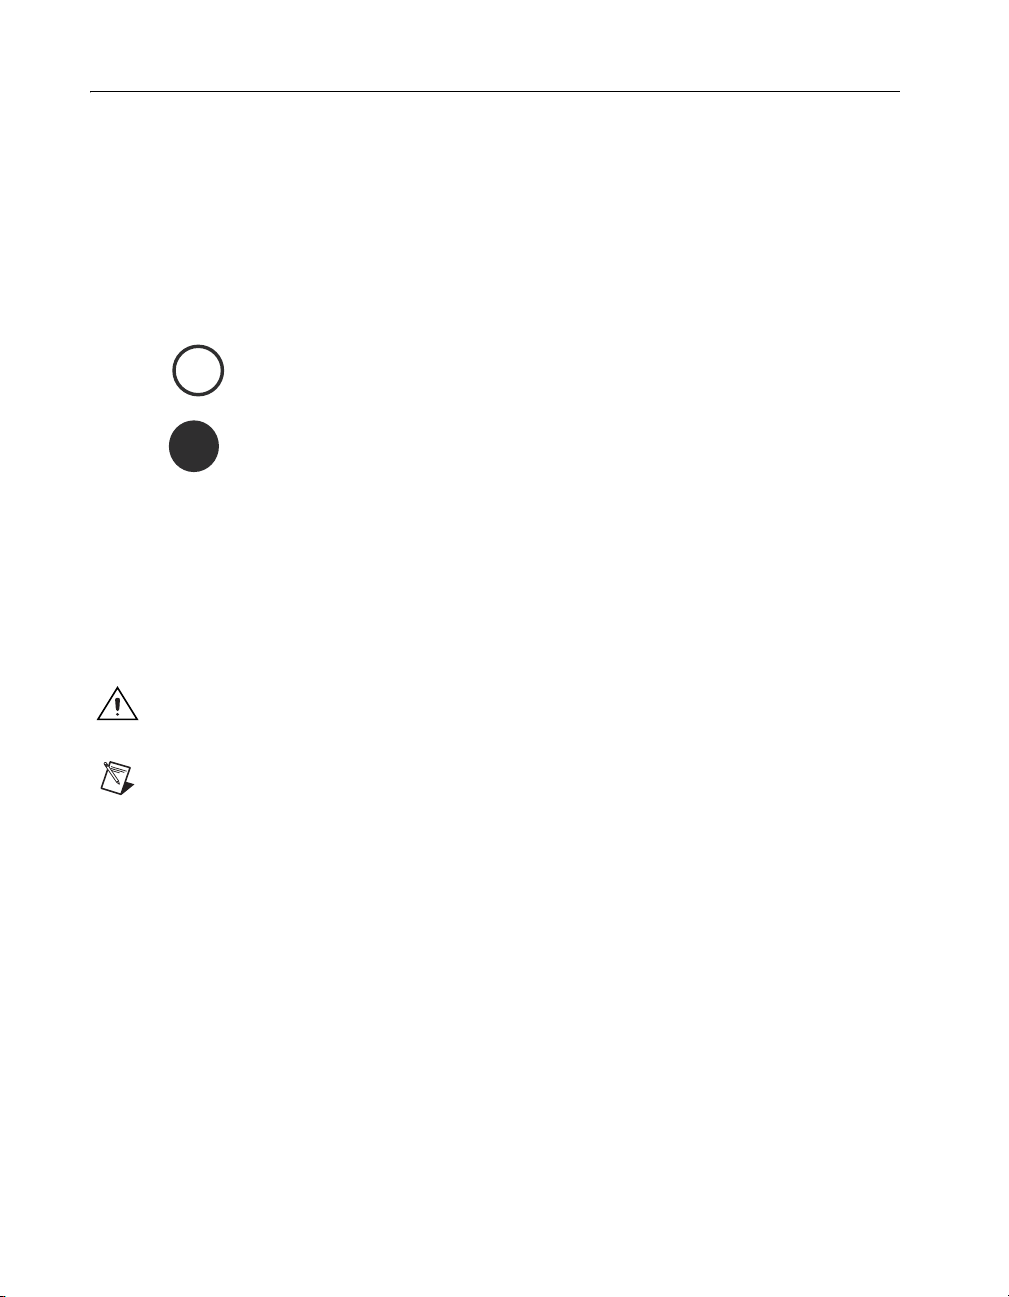
Figure 1 shows the correct installation of a PXI module into a compatible
chassis slot.
1
2
3
1 PXI Chassis
2 NI PXI Module
Figure 1. PXI Module Installation
© National Instruments Corporation 9 NI RF Signal Generators Getting Started Guide
3 Ejector Handle in Down Position
Page 10

Installing the NI 5610 Upconverter Module
Install the NI 5610 RF upconverter module by completing
steps 1 through 11 under the Installing PXI Modules section.
After completing all the steps, continue with the procedure
in the Installing the NI 5421/5441 AWG Module section.
Installing the NI 5421/5441 AWG Module
Install the NI 5421/5441 AWG module by completing steps 1 though 11
in the Installing PXI Modules section.
After completing all the steps, continue with the procedure in section 6.
Interconnecting the NI 5670/5671/5672 Modules.
Installing the NI 5650/5651/5652
Install the NI 5650/5651/5652 by completing steps 1 though 11
in the Installing PXI Modules section.
After completing all the steps, continue with the procedure in the
Configuring the NI 5650/5651/5652 in MAX section.
PXI Express Modules
NI PXI Express (PXIe) modules are sensitive instruments that should be
handled carefully. Do not expose the module to temperatures or humidity
beyond the rated maximums. Keep the module free of dust by cleaning with
compressed air only. Do not clean the module with any solvents or liquids.
Refer to the Cooling section for more information about module cooling.
H
7
8
NI RF Signal Generators Getting Started Guide 10 ni.com
You can install PXI Express modules in any PXI hybrid slot marked with a
peripheral slot compatibility glyph (the letter “H” and a solid circle
containing the slot number).
You can also install PXIe modules in any PXIe slot marked with a with a
peripheral slot compatibility glyph (a solid circle containing the slot
number).
Follow the installation instructions in the Installing PXI Modules section to
install the PXI Express module in a PXI Express-compatible slot of the
chassis. Refer to the chassis documentation for more information about
which slots are designated for PXI Express modules.
Page 11
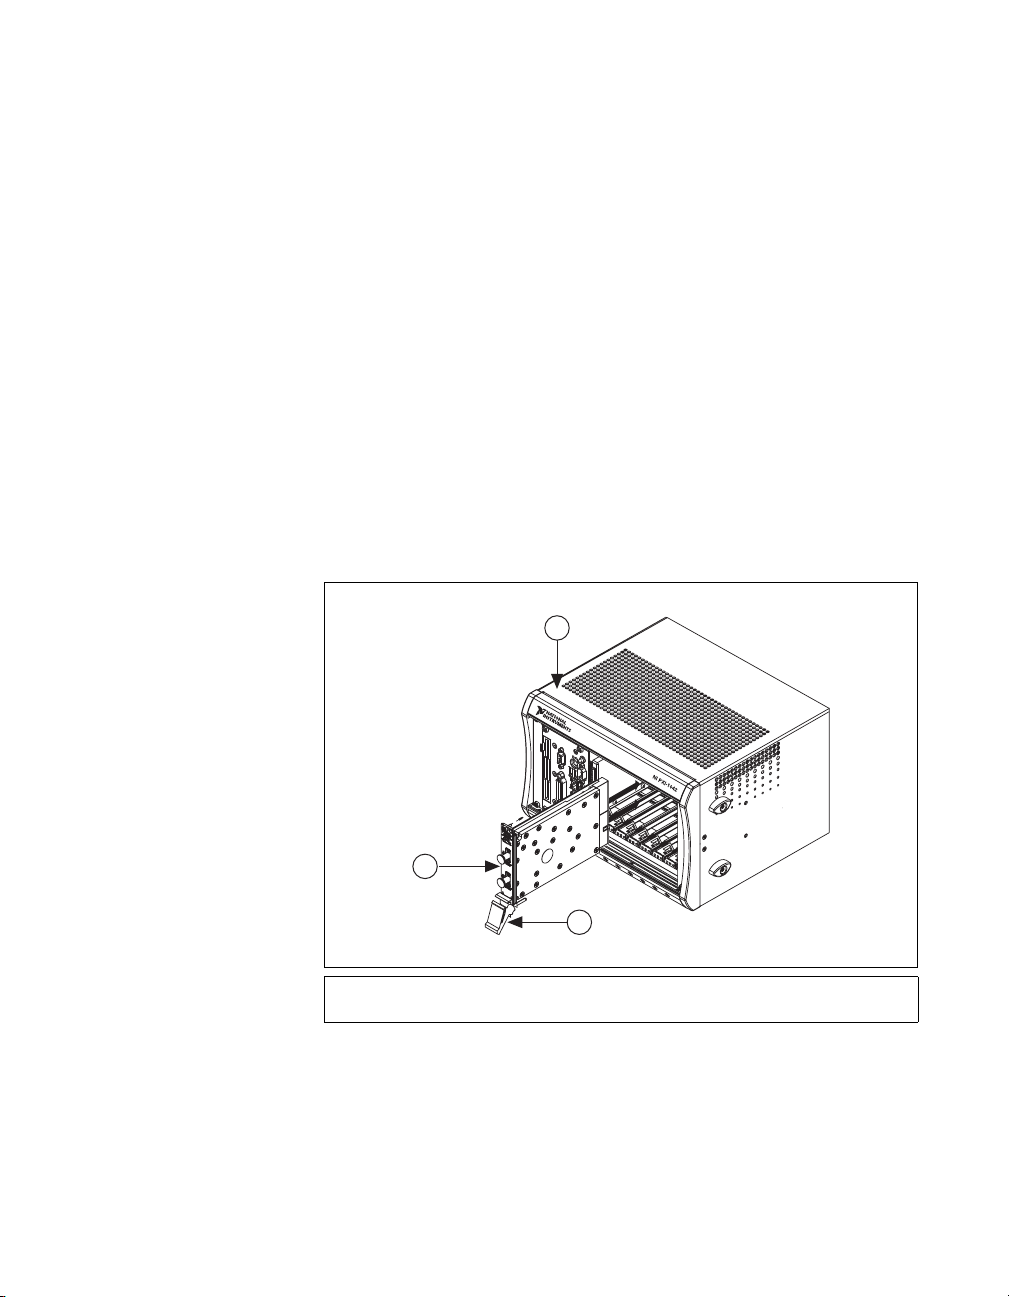
Figure 2 shows the correct installation of a PXI Express module into a
compatible chassis slot.
1
3
2
1 PXI Express Chassis
2 Ejector Handle in Down Position
Figure 2. PXI Express Module Installation
3 NI PXI Express Module
NI 5672
Installation of the NI 5672 hardware requires three vacant slots—two PXI
slots for the NI 5610 upconverter module and one PXIe compatible slot for
the NI 5442 AWG module. The NI 5442 AWG module must be installed
in the slot immediately to the right of the NI 5610 upconverter module to
allow use of the included SMA-to-SMB coaxial cables.
Caution SMA connectors must be connected and tightened before the SMB or AWG
connectors are mated in order to preserve cable life and reduce stress on the SMB
connectors.
© National Instruments Corporation 11 NI RF Signal Generators Getting Started Guide
Page 12
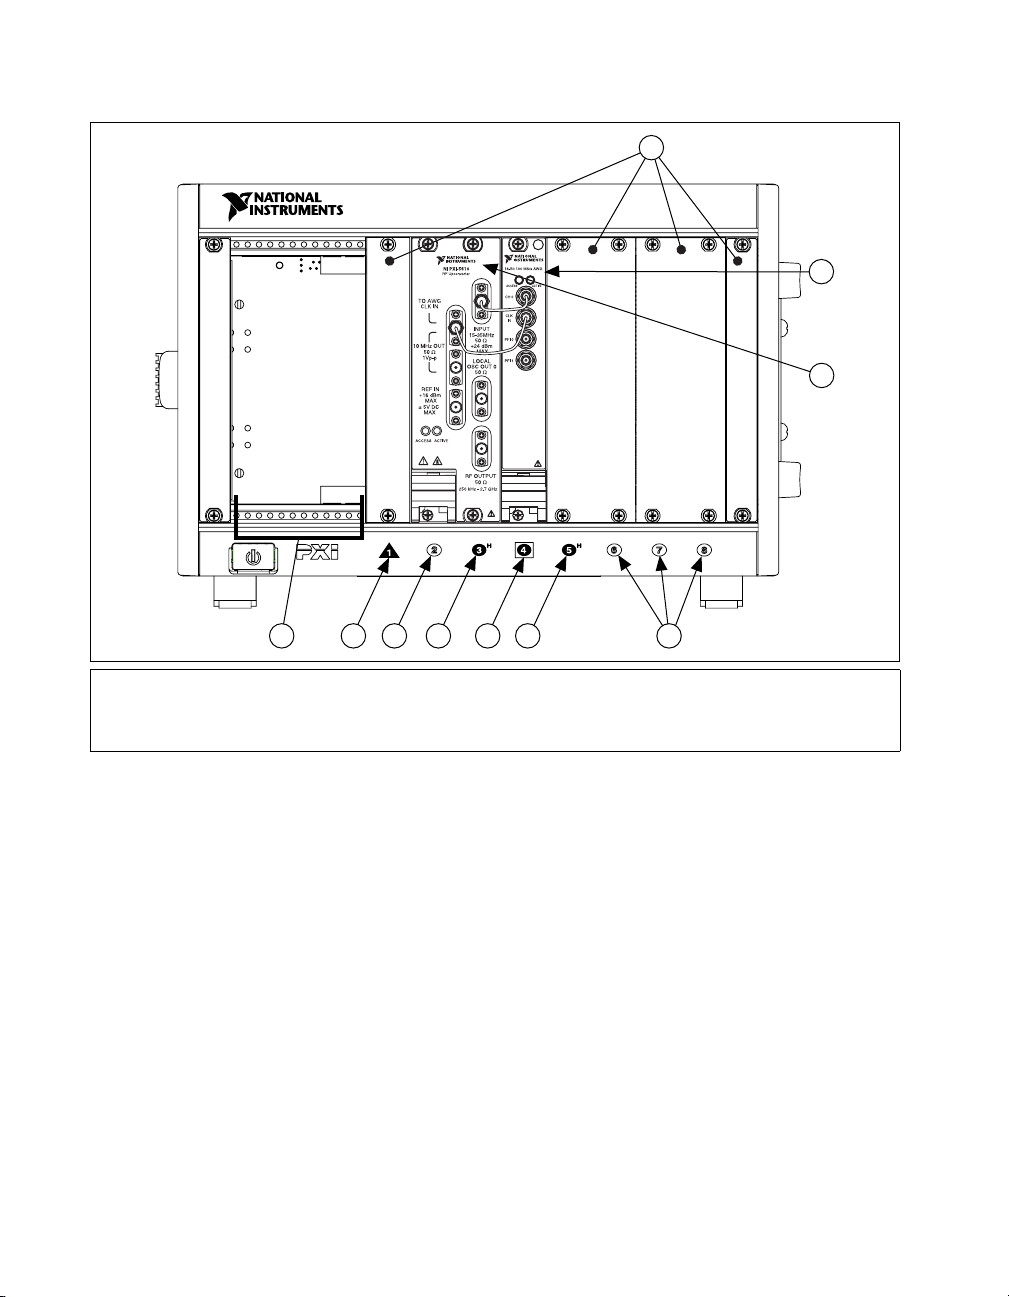
Figure 3 and Figure 4 show the two possible slot configurations for
the NI 5672 module in an 8-slot PXI Express chassis.
8
NI PXIe-1062Q
2
1
3 4 5
4
3
7
6
1 System Controller Expansion Slots
2 PXI Express System Controller Slot
3 PXI Peripheral Slots
4 PXI Express Hybrid Peripheral Slots
5 PXI Express System Timing Slot
6 NI PXI-5610 Module
7 NI PXIe-5442 Module
8 PXI Filler Panels
Figure 3. NI 5672 Module in Slots 2, 3, and 4
NI RF Signal Generators Getting Started Guide 12 ni.com
Page 13

8
NI PXIe-1062Q
7
6
2
1
3 4 5
4
3
1 System Controller Expansion Slots
2 PXI Express System Controller Slot
3 PXI Peripheral Slots
4 PXI Express Hybrid Peripheral Slots
Note
The NI PXI-5610 module blocks the PXI Express System Timing Slot in the
configuration shown in Figure 4.
Installing the NI 5442 AWG Module
Install the NI 5442 AWG module by completing steps 1 though 11 in the
Installing PXI Modules section.
After completing all the steps, continue with the procedure in section 6.
Interconnecting the NI 5670/5671/5672 Modules.
Cooling
When installing the hardware, refer to the guidelines in the Maintain
Forced-Air Cooling Note to Users included with the NI RF signal generator
to ensure that the device can cool itself effectively.
5 PXI Express System Timing Slot
6 NI PXI-5610 Module
7 NI PXIe-5442 Module
8 PXI Filler Panels
Figure 4. NI 5672 Module in Slots 3, 4, and 5
© National Instruments Corporation 13 NI RF Signal Generators Getting Started Guide
Page 14

Caution Inadequate air circulation could cause the temperature inside the chassis to rise
above the optimal operating temperature for the NI RF signal generator, potentially causing
thermal shutdown, shorter lifespans, or improper performance.
♦ NI 5670/5671/5672
Under conditions of proper air flow and 25 °C (63 °F) ambient
temperatures, the NI 5610 upconverter module operates at internal
temperatures of approximately 45 °C (113 °F), the NI 5421 module
at approximately 51 °C (124 °F), and the NI 5441/5442 module at
approximately 58 °C (136 °F).
♦ NI 5650/5651/5652
Under conditions of proper air flow and 25 °C (63 °F) ambient
temperatures, the NI 5650/5651/5652 operates at internal temperatures
of approximately 38 °C (100 °F).
Hot Surface If the NI RF signal generator has been in use, it may exceed safe handling
temperatures and cause burns. Allow the NI RF signal generator to cool before removing
it from the PXI chassis.
Tip NI recommends that you install PXI slot blockers between the NI RF signal generator
and adjacent hardware modules to maximize cooling air flow.
6. Interconnecting the NI 5670/5671/5672 Modules
The NI 5670/5671/5672 hardware modules interconnect through
the front panels. Complete the following steps to interconnect the
NI 5670/5671/5672 hardware module front panel connectors as shown
in Figure 5.
1. Connect the INPUT connector on the NI 5610 upconverter module to
the CH 0 connector on the NI 5421/5441/5442 AWG module.
2. Connect the TO AWG CLK IN connector on the NI 5610 upconverter
module to the CLK IN connector on the NI 5421/5441/5442 AWG
module.
Note Published NI 5670/5671/5672 RF signal generator specifications assume use of the
included cables. Substituting different cables may affect performance.
NI RF Signal Generators Getting Started Guide 14 ni.com
Page 15

Figure 5. Proper NI 5670/5671/5672 Front Panel Interconnection
3. Carefully tighten all SMA connectors to 100 N-cm using an SMA
torque wrench (not included), as shown in Figure 6. Tighten only until
the wrench clicks.
Note Incorrect torque at SMA connections can degrade signal fidelity, PLL performance,
and insertion loss. Use an SMA torque wrench to ensure all SMA connections are properly
torqued to 100 N-cm.
© National Instruments Corporation 15 NI RF Signal Generators Getting Started Guide
Page 16

1
2
1 100 N-cm SMA Torque Wrench 2 Apply Force Here Until Wrench Clicks
Figure 6. Torque All SMA Connectors to 100 N-cm
4. Power up the PXI chassis and controller system.
5. Verify that the ACCESS LEDs on both modules are illuminated. If the
LEDs are not illuminated, refer to Appendix C: Troubleshooting.
7. Configuring NI RF Signal Generators in MAX
Use Measurement & Automation Explorer (MAX) to configure your
National Instruments hardware. MAX informs other programs about which
devices reside in the system and how they are configured. MAX is
automatically installed with NI-RFSG.
Configuring the NI 5670/5671/5672 in MAX
Note MAX treats the NI 5610 upconverter module and the NI 5421/5441/5442 AWG
module as separate but associated devices. The MAX association is necessary for
NI RF Signal Generators Getting Started Guide 16 ni.com
Page 17

transparent operation of both modules as a single instrument (the NI 5670/5671/5672)
using NI-RFSG.
To use MAX to configure, self-test, associate, and generate signals with the
NI 5670/5671/5672, complete the following steps:
1. Launch MAX by navigating to Start»All Programs»National
Instruments»Measurement & Automation or by clicking the MAX
desktop icon.
2. In the Configuration pane, double-click Devices and Interfaces to see
the list of installed devices.
3. Expand the NI-DAQmx Devices folder. You will see a list of installed
devices that includes the NI PXI-5610 upconverter module and
an AWG module.
Note Refer to Appendix C: Troubleshooting if you do not see both the
NI PXI-5421/5441/5442 AWG module and the NI PXI-5610 upconverter module listed.
Note If you are using a MXI interface to control a PXI chassis and encounter performance
or initialization issues, refer to your MXI documentation to ensure that the MXI interface
is properly set up. Software optimization might be necessary. For MXI-3 optimization,
select Start»All Programs»National Instruments MXI-3»MXI-3 Optimization.
MXI-4 optimization is performed automatically by the MXI-4 hardware.
Rename Both Modules
MAX allows you to rename both NI 5670/5671/5672 hardware modules.
The MAX name is used in software to operate the NI 5670/5671/5672
hardware resources. You do not have to change the module names from the
default but doing so can make programming easier.
To rename both NI 5670/5671/5672 hardware modules, complete steps 4
through 10. If you do not wish to rename the modules, proceed to step 11.
4. Right-click the NI 5610 upconverter module and select Rename from
the shortcut menu.
5. Enter the new name for the NI 5610 upconverter module.
Note The device name must consist only of alphanumeric and underscore characters.
6. Click OK.
7. Right-click the AWG module and select Rename from the shortcut
menu.
8. Enter the new name for the AWG module.
© National Instruments Corporation 17 NI RF Signal Generators Getting Started Guide
Page 18

9. Click OK.
10. Verify that the new names for both modules are displayed.
Associate the Upconverter with the AWG Module
You must create a MAX association between the NI 5610 upconverter
module and the NI 5421/5441/5442 AWG module to control both
hardware modules as a single NI RF signal generator. Complete steps 11
through 13 to make this association.
11. Right-click NI PXI-5610 and select Properties.
12. In the NI 5610 Device Properties dialog box, use the drop-down
listbox to specify the NI 5421/5441/5442 AWG module that is
connected to the NI 5610 by front panel coaxial cables. Refer to
section 6. Interconnecting the NI 5670/5671/5672 Modules for more
information about cable connections.
Note If you rename the NI 5421/5441/5442 AWG module after association, you must
repeat the association. Association between NI 5670/5671/5672 hardware modules is lost
when a previously associated AWG module is renamed.
13. Click OK to close the dialog box.
Generate a Signal Using the NI 5670/5671/5672 RF Signal Generator Test Panel
To verify your device configuration, use the NI-RFSG test panel in MAX
to generate a simple signal using the NI RF signal generator hardware. The
NI-RFSG test panel tests both NI 5670/5671/5672 hardware modules as a
single instrument. Complete the following steps to use the NI RF signal
generator test panel.
Note This test requires front panel interconnection, as shown in Figure 5, and the
association of an NI 5421/5441/5442 AWG module with the NI 5610 upconverter module
as described in the Associate the Upconverter with the AWG Module section.
1. Right-click the NI PXI-5610 upconverter module, and select
Test Panels.
2. In the NI PXI-5670/5671/5672 tab of the Test Panels dialog box,
specify a frequency and a power level for signal generation.
Caution Running the test panel generates a signal from the RF OUTPUT front panel
connector. Disconnect any equipment that can be damaged by the test signal prior to
running the test panel.
NI RF Signal Generators Getting Started Guide 18 ni.com
Page 19

3. The test panel allows you to verify that the device is operating
properly. Click Start to begin signal generation. During signal
generation the ACTIVE LEDs on both NI 5670/5671/5672 hardware
modules are activated.
Note Refer to Appendix C: Troubleshooting if either ACTIVE LED does not illuminate
or if the NI RF signal generator test panel generates an error.
4. Click Stop to stop waveform generation.
5. Click Close to return to MAX.
6. Exit MAX.
You have completed setup, configuration, and testing of the
NI 5670/5671/5672 RF signal generator.
Configuring the NI 5650/5651/5652 in MAX
To use MAX to configure, self-test, associate, and generate signals with the
NI 5650/5651/5652, complete the following steps:
1. Launch MAX by navigating to Start»All Programs»National
Instruments»Measurement & Automation or by clicking the MAX
desktop icon.
2. In the Configuration pane, double-click Devices and Interfaces to see
the list of installed devices.
3. Expand the NI-DAQmx Devices folder. You will see a list of installed
devices that includes the NI PXI-5650/5651/5652 RF signal generator
module.
Note Refer to Appendix C: Troubleshooting if you do not see the
NI PXI-5650/5651/5652 module listed.
Note If you are using a MXI interface to control a PXI chassis and encounter performance
or initialization issues, refer to your MXI documentation to ensure that the MXI interface
is properly set up. Software optimization might be necessary. For MXI-3 optimization,
select Start»All Programs»National Instruments MXI-3»MXI-3 Optimization.
MXI-4 optimization is performed automatically by the MXI-4 hardware.
4. Perform a device self-test to verify installation by right-clicking the
NI 5650/5651/5652 device and selecting Self-Test. A dialog box
appears and indicates whether the device passed the test. When the
self-test finishes, a message indicates either successful verification
or an error. Refer to the Hardware Installation/Configuration
Troubleshooter at
© National Instruments Corporation 19 NI RF Signal Generators Getting Started Guide
ni.com/support/install if an error occurs.
Page 20

Rename the NI 5650/5651/5652
MAX allows you to rename the NI 5650/5651/5652 hardware module.
The MAX name is used in software to operate the NI 5650/5651/5652
hardware resources. You do not have to change the module name from the
default but doing so can make programming easier.
To rename the NI 5650/5651/5652 hardware modules, complete
steps 1 through 4. If you do not wish to rename the modules, proceed to the
Generate a Signal Using the NI 5650/5651/5652 RF Signal Generator Test
Panel section.
1. Right-click the NI 5650/5651/5652 module and select Rename from
the shortcut menu.
2. Enter the new name for the NI 5650/5651/5652 module.
Note The device name must consist only of alphanumeric and underscore characters.
3. Click OK.
4. Verify that the new name for the module is displayed.
Generate a Signal Using the NI 5650/5651/5652 RF Signal Generator Test Panel
To verify your device configuration, use the NI-RFSG test panel in MAX
to generate a simple signal using the NI 5650/5651/5652 RF signal
generator hardware. Complete steps 1 through 6 to use the NI RF signal
generator test panel.
1. Right-click the NI PXI-5650/5651/5652 RF signal generator module
and select Test Panels.
2. In the Test Panels dialog box, specify a frequency and a power level for
signal generation.
Caution Running the test panel generates a signal from the RF OUTPUT front panel
connector. Disconnect any equipment that can be damaged by the test signal prior to
running the test panel.
3. The test panel allows you to verify that the NI 5650/5651/5652 device
is operating properly. Click Start to begin signal generation. During
signal generation the ACTIVE LED on the NI 5650/5651/5652
hardware module is illuminated.
Note If the LED does not illuminate or if the NI RF signal generator test panel generates
an error, refer to Appendix C: Troubleshooting.
NI RF Signal Generators Getting Started Guide 20 ni.com
Page 21

4. Click Stop to stop waveform generation.
5. Click Close to return to MAX.
6. Exit MAX.
You have completed setup, configuration, and testing of the
NI 5650/5651/5652 RF Signal Generator.
8. Setting up Synchronization for NI-DAQmx Devices in MAX
If you plan to share triggers or clocks to synchronize NI-DAQmx devices,
you must identify or configure certain components in MAX.
Note The following steps are required for any type of synchronization involving an
NI-DAQmx device.
♦ PXI devices—identify the PXI system controller by completing the
following steps:
1. In the MAX configuration tree under Devices and Interfaces,
right-click PXI System
the list. For example, select External PC if you are using a MXI-3 or
MXI-4 controller in an external PC.
2. Expand the PXI System tree and select the chassis name to identify the
chassis you are using.
»Identify As and select your controller from
♦ PXI Express devices controlled via MXI-Express—in the MAX
configuration tree under Devices and Interfaces, right-click PXI
System»Identify As and select External PC. Your chassis will be
automatically identified.
♦ PXI Express controller—a PXI Express controller installed in a PXI
Express chassis is automatically identified in MAX.
9. Programming the RF Signal Generator
You can generate signals with the NI RF signal generator using the
NI-RFSG instrument driver. You also can run the NI-RFSG examples
to demonstrate the functionality of the NI RF signal generator.
© National Instruments Corporation 21 NI RF Signal Generators Getting Started Guide
Page 22

NI-RFSG Instrument Driver
The NI-RFSG driver configures and operates the NI RF signal generator
hardware, performs waveform programming and generation, and performs
basic modulation tasks using LabVIEW VIs or LabWindows/CVI
functions. In the case of NI 5670/5671/5672 RF signal generators, the
NI-RFSG instrument driver operates the NI 5610 upconverter module
and the NI 5421/5441/5442 AWG module as a single instrument.
Optional add-on software available from NI, including the
Modulation Toolkit and the Spectral Measurements Toolkit, extends
the capability of NI RF signal generators to include additional
modulation-domain and frequency-domain tasks. The NI RF signal
generator hardware-software architecture is shown in Figure 7.
Note
Refer to the NI RF Signal Generators Help for more information about NI RF signal
generator hardware/software architecture. More information about the NI RF Signal
Generators Help can be found in the NI-RFSG Instrument Driver Readme.
NI-RFSG Examples
LabVIEW
Application Development Environment
NI-RFSG Instrument Driver
NI 5670/5671/5672 NI 5650/5651/5652
RF Signal Generator Hardware
Figure 7. RF Signal Generator Hardware-Software Architecture
and/or
LabWindows/CVI
NI-RFSG includes several example applications for both LabVIEW
and LabWindows/CVI. These examples serve as interactive tools,
programming models, and building blocks in your own applications.
For more information about NI-RFSG examples and locations,
refer to the NI-RFSG Instrument Driver Readme, which is
available on the NI-RFSG CD.
Example applications are also available with add-on software such
as the Modulation Toolkit. Examples for generating modulated signals
with the NI 5670/5671/5672 are included with the Modulation Toolkit.
NI RF Signal Generators Getting Started Guide 22 ni.com
Page 23

Refer to the Installing Toolkits or Add-On Software section and
the NI-RFSG Instrument Driver Readme for more information
about installing the Modulation Toolkit and included examples.
Appendix A: Hardware Front Panel Connectors and Indicators
This appendix describes the connectors and LED indicators on the front
panels of both NI RF signal generator hardware modules. All input
connectors and output connectors are AC-coupled.
NI 5610 RF Upconverter Module
The NI 5610 RF upconverter module front panel contains six connectors
and two multicolor LEDs, as shown in Figure 8.
Figure 8. NI 5610 Upconverter Module Front Panel
© National Instruments Corporation 23 NI RF Signal Generators Getting Started Guide
Page 24

Table 3. NI 5610 RF Upconverter Module Front Panel Connectors
Connector Purpose
TO AWG CLK IN Output terminals for replications of the upconverter 10 MHz frequency
10 MHz OUT
reference signal, which is useful for driving other devices. Each
replication is 180° out-of-phase with the other. The output signal at these
connectors is always on and cannot be disabled.
Connect the TO AWG CLK IN connector to the CLK IN connector on
the NI 5421/5441/5442 module front panel.
REF IN Routes an external frequency reference signal that can be propagated to
the PXI backplane. The NI 5610 can lock to this signal.
IF INPUT Routes the IF signal from the NI 5421/5441/5442 AWG module for
frequency translation.
Connect to the CH 0 output on the NI 5421/5441/5442 front panel.
LOCAL OSC OUT 0 Output terminal for the auxiliary local oscillator signal.
RF OUTPUT Output terminal for the upconverted signal at the requested RF
frequency.
Table 4. NI 5610 RF Upconverter Module Front Panel LEDs
LED Indications
ACCESS Indicates the basic hardware status of the NI 5610 module. This LED functions
identically to the ACCESS LED on the AWG module front panel.
OFF—The module is not yet functional or has detected a problem with a PXI
power rail.
AMBER—The module is being accessed.
GREEN—The module is ready to be programmed.
ACTIVE Indicates the status of the NI 5610 PLLs.
OFF—The module is in an uninitialized state; there is no error.
AMBER—The module PLLs are attempting to lock.
GREEN—The module is in a ready state; applicable PLLs are locked and the
reverse power protection circuit is closed.
RED—The module has detected an error state; this state may indicate an
overload (reverse power protection circuit is open), lock failure in an applicable
PLL, a self-test or calibration failure, or a thermal shutdown condition.
NI RF Signal Generators Getting Started Guide 24 ni.com
Page 25

NI 5421/5441 AWG Module
The front panel of the NI 5421/5441AWG module contains five connectors
and two multicolor LEDs, as shown in Figure 9.
NI PXI-54XX
ACCESS ACTIVE
CH 0
CLK
IN
PFI 0
PFI 1
DIGITAL DATA & CONTROL
Figure 9. NI 5421/5441 AWG Module Front Panel
Table 5. NI 5421/5441 AWG Module Front Panel Connectors
Connector Purpose
CH 0 Output terminal for an IF waveform for upconversion to the desired RF
frequency.
Connect to the IF INPUT connector on the NI 5610 front panel.
CLK IN Output terminal for the AWG module reference clock signal.
Connect to the REF OUT connector on the NI 5610 module front panel.
© National Instruments Corporation 25 NI RF Signal Generators Getting Started Guide
Page 26

Table 5. NI 5421/5441 AWG Module Front Panel Connectors (Continued)
Connector Purpose
PFI 0 Bidirectional SMB connectors. As an input, the PFI terminals can accept
PFI 1
a trigger from an external source to start or step through signal generation.
DIGITAL DATA &
CONTROL
Routes the 16-bit digital pattern outputs, digital pattern clock output,
trigger outputs, trigger inputs, and a clock input.
Table 6. NI 5421/5441 AWG Module Front Panel LEDs
LED Indications
ACCESS Indicates the basic hardware status of the NI 5421/5441 AWG module.
This LED functions identically to the ACCESS LED on the
NI 5610 upconverter module front panel.
OFF—The module is not yet functional or has detected a problem with a power
rail.
AMBER—The module is being accessed.
GREEN—The module is ready to be programmed.
ACTIVE Indicates the state of the NI 5421/5441 AWG module.
OFF—The module is not armed or triggered.
AMBER—The module is armed and waiting for a Start trigger.
GREEN—The module has received a Start trigger and is generating a waveform.
RED—The module has detected an error state; this may indicate PLL unlocking,
self-test failure, or calibration failure.
NI RF Signal Generators Getting Started Guide 26 ni.com
Page 27

NI 5442 AWG Module
The front panel of the NI 5442 AWG module contains four connectors and
two multicolor LEDs, as shown in Figure 10.
Figure 10. NI 5442 AWG Module Front Panel
Table 7. NI 5442 AWG Module Front Panel Connectors
Connector Purpose
CH 0 Output terminal for an IF waveform for upconversion to the desired RF
frequency.
Connect to the IF INPUT connector on the NI 5610 front panel.
CLK IN Output terminal for the AWG module reference clock signal.
Connect to the REF OUT connector on the NI 5610 module front panel.
PFI 0 Bidirectional SMB connectors. As an input, the PFI terminals can accept
PFI 1
© National Instruments Corporation 27 NI RF Signal Generators Getting Started Guide
a trigger from an external source to start or step through signal generation.
Page 28

Table 8. NI 5442 AWG Module Front Panel LEDs
LED Indications
ACCESS Indicates the basic hardware status of the NI 5442 AWG module. This LED
functions identically to the ACCESS LED on the NI 5610 upconverter module
front panel.
OFF—The module is not yet functional or has detected a problem with a power
rail.
AMBER—The module is being accessed.
GREEN—The module is ready to be programmed.
ACTIVE Indicates the state of the NI 5442 AWG module.
OFF—The module is not armed or triggered.
AMBER—The module is armed and waiting for a Start trigger.
GREEN—The module has received a Start trigger and is generating a waveform.
RED—The module has detected an error state; this may indicate PLL unlocking,
self-test failure, or calibration failure.
NI RF Signal Generators Getting Started Guide 28 ni.com
Page 29

NI 5650/5651/5652 RF Signal Generator Module
The NI 5650/5651/5652 RF signal generator module front panel contains
two connectors and two multicolor LEDs, as shown in Figure 11.
NI PXI-5652
RF Signal Generator
ACCESS
ACTIVE
500 kHz-6.6 GHz
RF OUT
Reverse Power
2 W MAX
REF
IN/OUT
IN 5 Vp-p MAX
OUT 1 Vp-p
Figure 11. NI 5650/5651/5652 RF Signal Generator Module Front Panel
Table 9. NI 5650/5651/5652 RF Signal Generator Module Front Panel Connectors
Connector Purpose
RF OUT Output terminal for the RF signal at the requested frequency and power
level.
REF IN/OUT Routes a frequency reference signal to or from the NI 5650/5651/5652.
This connector can be configured as an external frequency reference
input or as an output for the onboard 10 MHz reference clock.
© National Instruments Corporation 29 NI RF Signal Generators Getting Started Guide
Page 30

Table 10. NI 5650/5651/5652 RF Signal Generator Module Front Panel LEDs
LED Indications
ACCESS Indicates the basic hardware status of the NI 5650/5651/5652 module.
OFF—The module is not yet functional or has detected a problem with a PXI
power rail.
AMBER—The module is being accessed.
GREEN—The module is ready to be programmed.
ACTIVE Indicates the status of the NI 5650/5651/5652.
OFF—The module is in an uninitialized state; there is no error.
AMBER—The module PLLs are attempting to lock.
GREEN—The module is generating a signal; applicable PLLs are locked.
RED—The module has detected an error state; this may indicate lock failure in
an applicable PLL, a self-test or calibration failure, or a thermal shutdown
condition.
Appendix B: Building a Basic NI-RFSG Application
NI-RFSG includes several example applications for both LabVIEW and
LabWindows/CVI. These examples are intended to serve as interactive
tools, programming models, and as building blocks in your own
applications.
LabVIEW and LabWindows/CVI users can access all installed NI-RFSG
examples at Start»All Programs»National Instruments»
NI-RFSG»Examples. LabVIEW users can access NI-RFSG examples by
running LabVIEW and selecting Help»Find Examples to launch the
LabVIEW Example Finder.
You can complete the following steps in LabVIEW to build a basic
NI-RFSG application for generating continuous sine wave signals:
1. Select Start»All Programs»National Instruments»<LabVIEW>»
LabVIEW to launch LabVIEW. The LabVIEW screen appears.
2. Click New, choose Blank VI, and click OK to create a blank VI.
3. Display the block diagram by clicking it or by selecting Window»
Show Block Diagram.
4. Activate the LabVIEW context help by pressing <Ctrl-H>.
5. Click the LabVIEW block diagram to launch the Functions palette.
NI RF Signal Generators Getting Started Guide 30 ni.com
Page 31

6. Navigate to the NI-RFSG VIs on the Functions»Measurement I/O»
NI-RFSG palette.
7. Create the block diagram shown in Figure 12 by wiring the five VIs on
the block diagram in the order in which they appear in the top row of
the NI-RFSG palette.
Figure 12. Basic NI-RFSG Block Diagram
8. Hover the cursor over the resource name terminal on the niRFSG
Initialize VI and right-click. Select Create»Control to create a front
panel control where you specify the NI RF signal generator device
name. The resource name terminal is shown in Figure 13.
Figure 13. Resource Name Terminal on niRFSG Initialize VI
9. Hover the mouse tool over the frequency (Hz) and
power level (dBm) terminals of the niRFSG Configure RF VI.
These terminals are shown in Figure 14.
Figure 14. Frequency and Power Level Terminals on the niRFSG Configure RF VI
10. Right-click each terminal and select Create»Control from the
shortcut menu to create frequency and power controls as shown
in Figure 15.
© National Instruments Corporation 31 NI RF Signal Generators Getting Started Guide
Page 32

Figure 15. Frequency and Power Level Controls on the Block Diagram
11. Display the VI front panel by clicking it or by selecting Window»
Show Front Panel. Controls are displayed in which you can specify
a frequency and power level.
12. In the VI front panel power level (dBm) control, enter
frequency (Hz) control, enter
100M (100 MHz).
0. In the
13. In the VI front panel resource name control, enter the NI 5610
upconverter device name or the NI 5650/5651/5652 device name that
you specified in MAX (the NI 5610 upconverter module must be
associated with an AWG module. Refer to the Configuring the
NI 5670/5671/5672 in MAX section for more information about
associating a module.)
You can control continuous waveform generation using a Stop button.
A Stop button is typically used within a While Loop. This example places
a While Loop around the niRFSG Check Generation Status VI so that
signal generation continues and waveform status is continuously checked
until you click STOP.
Build a STOP button by completing steps 14 through 18.
14. Display the block diagram by clicking it or selecting Window»
Show Block Diagram.
15. Select the While Loop on the Functions»Programming»Structures
palette.
16. Enclose the niRFSG Check Generation Status VI in the While Loop,
as shown in Figure 16.
NI RF Signal Generators Getting Started Guide 32 ni.com
Page 33

Figure 16. Enclose niRFSG Check Generation Status VI in the While Loop
17. Right-click the While Loop tunnels and select Replace with Shift
Register.
18. Select the Unbundle by Name primitive on the Functions»
Programming»Cluster & Variant palette. Place the primitive inside
the While Loop.
19. Wire the error out terminal of the niRFSG Check Generation Status
VI to the Unbundle by Name primitive.
20. Wire the output terminal of the status element to the Loop Condition
terminal of the While Loop using a logical Or gate.
21. Right-click the unused input terminal of the Or gate and select
Create»Control to create a STOP button on the VI front panel.
The portion of the block diagram resulting from steps 18 through 21
is shown in Figure 17.
Figure 17. While Loop with STOP Button
Complete steps 22 and 23 to add an error indicator to the VI front panel.
© National Instruments Corporation 33 NI RF Signal Generators Getting Started Guide
Page 34

22. Create an error indicator by right-clicking the error out terminal of the
niRFSG Close VI and selecting Create»Indicator. The error out
terminal is highlighted in Figure 18.
Figure 18. Error Out Terminal on niRFSG Close VI
23. Verify that the VI block diagram now looks like the example in
Figure 19.
Figure 19. Basic Sine Wave Generation VI Block Diagram
NI RF Signal Generators Getting Started Guide 34 ni.com
Page 35

24. Verify that the VI front panel looks like the example in Figure 20.
Figure 20. Basic Sine Wave Generation VI Front Panel Using NI 5670/5671/5672
Note
Populate the resource name control with the NI 5610 upconverter module name
(refer to the Rename Both Modules section for more information) or the
NI 5650/5651/5652 name specified in MAX.
25. Click the Run icon on the VI taskbar to initiate sine wave generation.
26. Click the VI front panel STOP button to stop sine wave generation.
You have successfully generated a continuous sine wave signal using the
NI-RFSG driver software and the NI RF signal generator hardware.
Appendix C: Troubleshooting
Module Front Panel ACCESS LED is Off When PXI Chassis is On
If the ACCESS LED fails to illuminate after you power on the PXI chassis,
a problem may exist with the PXI power rails, a hardware module, or
the LED.
© National Instruments Corporation 35 NI RF Signal Generators Getting Started Guide
Page 36

Note The LEDs may not light until the device has been configured in MAX. Before
proceeding, verify that the NI RF signal generator module(s) appear in MAX.
Troubleshoot this issue by completing the following steps:
1. Power off the PXI chassis.
2. Disconnect any signals from the PXI module front panels.
3. Remove any module front panel connections from the NI RF signal
generator hardware module(s).
4. Remove the NI RF signal generator hardware and inspect for damage.
Do not reinstall a damaged device.
5. Reinstall the NI RF signal generator in different PXI slot(s). Use the
procedure detailed in section 5. Installing the Hardware for more
installation information.
6. Power on the PXI chassis.
7. Verify that the NI RF signal generator module(s) appear in MAX.
8. Reset the NI RF signal generator module(s) in MAX and perform a
self-test. Refer to section 7. Configuring NI RF Signal Generators in
MAX or Configuring the NI 5650/5651/5652 in MAX for information
on performing device resets and self-tests in MAX.
9. If either ACCESS LED still fails to illuminate, and failures continue,
contact NI technical support or visit
ni.com/support.
Hardware Module Does Not Appear in MAX
Use the following procedure if an NI RF signal generator hardware module
does not appear in MAX:
1. In the MAX Configuration pane, click Devices and Interfaces to
expand the category.
2. Click NI-DAQmx Devices folder and press <F5> to refresh the list of
installed devices.
3. If an NI RF signal generator module is still not listed, power off the
system, ensure that all NI RF signal generator hardware is correctly
installed, and restart the system.
4. Open the Windows Control Panel and select System»Hardware»
Device Manager. Complete the appropriate step for the setup:
• If using a PXI controller, verify that a National Instruments
entry appears in the system device list. Reinstall NI-RFSG and
the NI RF signal generator hardware modules if error conditions
are present in the list.
NI RF Signal Generators Getting Started Guide 36 ni.com
Page 37

• If using a MXI controller, right-click PCI-to-PCI Bridge and
5. If either module still fails to appear in the MAX NI-DAQmx Devices
folder, contact NI technical support or visit
Module Fails the Self-Test
The MAX self-test performs a brief test of device resources. If an NI RF
signal generator hardware module does not pass the self-test, complete the
following steps:
1. Reboot the system.
2. Launch MAX and perform the self-test again.
3. If either module still fails the self-test, contact NI technical support or
visit
Thermal Shutdown Error
The thermal shutdown error appears when device temperatures exceed safe
limits. The NI RF signal generator shuts down until temperatures fall to
acceptable levels and you reset the device in MAX.
To re-enable the NI RF signal generator after thermal shutdown, complete
the following steps:
1. Power down the chassis that contains the device.
2. Review the procedure in the Cooling section and make any necessary
adjustments to ensure that the device is effectively cooled.
3. Call the niRFSG Reset Device VI or the
function to perform a device reset in MAX. The thermal shutdown
error continues to be reported until the device has been successfully
reset.
select Properties from the shortcut menu to verify that the bridge
is enabled.
ni.com/support.
ni.com/support.
niRFSG_ResetDevice
Note Refer to the Configuring the NI 5670/5671/5672 in MAX or Configuring the
NI 5650/5651/5652 in MAX section for information on performing device resets in MAX.
Performance Issues Using A MXI Connection
When using a MXI-3 connection to control the PXI chassis, you must run
the MXI Optimization Application prior to using the NI RF signal
generator. By default, this application runs automatically when Windows
starts. Using a MXI connection without running this application may result
in a
time exceeded or internal software error, or an initialization,
timeout, or performance issue when using an NI RF signal generator.
© National Instruments Corporation 37 NI RF Signal Generators Getting Started Guide
Page 38

For MXI-3 optimization, select Start»All Programs»National
Instruments MXI-3»MXI-3 Optimization. MXI-4 optimization
is performed automatically by the MXI-4 hardware.
If the MXI software is not installed, refer to the setup instructions included
with the MXI kit to install the software from the MXI software CD or
National Instruments Driver CD. After installation, you may be required
to reboot the computer before using the MXI application.
If you continue to have initialization or performance issues, refer to the
MXI documentation included in your MXI kit, or visit NI Technical
Support at
ni.com/support.
Where to Go for Support
The National Instruments Web site is your complete resource for technical
support. At
troubleshooting and application development self-help resources to email
and phone assistance from NI Application Engineers.
A Declaration of Conformity (DoC) is our claim of compliance with the
Council of the European Communities using the manufacturer’s
declaration of conformity. This system affords the user protection for
electronic compatibility (EMC) and product safety. You can obtain the DoC
for your product by visiting
supports calibration, you can obtain the calibration certificate for your
product at
ni.com/support you have access to everything from
ni.com/calibration.
ni.com/certification. If your product
National Instruments corporate headquarters is located at
11500 North Mopac Expressway, Austin, Texas, 78759-3504.
National Instruments also has offices located around the world to help
address your support needs. For telephone support in the United States,
create your service request at
instructions or dial 512 795 8248. For telephone support outside the United
States, contact your local branch office:
Australia 1800 300 800, Austria 43 662 457990-0,
Belgium 32 (0) 2 757 0020, Brazil 55 11 3262 3599,
Canada 800 433 3488, China 86 21 5050 9800,
Czech Republic 420 224 235 774, Denmark 45 45 76 26 00,
Finland 358 (0) 9 725 72511, France 01 57 66 24 24,
Germany 49 89 7413130, India 91 80 41190000, Israel 972 3 6393737,
Italy 39 02 413091, Japan 81 3 5472 2970, Korea 82 02 3451 3400,
Lebanon 961 (0) 1 33 28 28, Malaysia 1800 887710,
Mexico 01 800 010 0793, Netherlands 31 (0) 348 433 466,
New Zealand 0800 553 322, Norway 47 (0) 66 90 76 60,
Poland 48 22 3390150, Portugal 351 210 311 210, Russia 7 495 783 6851,
NI RF Signal Generators Getting Started Guide 38 ni.com
ni.com/support and follow the calling
Page 39

Singapore 1800 226 5886, Slovenia 386 3 425 42 00,
South Africa 27 0 11 805 8197, Spain 34 91 640 0085,
Sweden 46 (0) 8 587 895 00, Switzerland 41 56 2005151,
Taiwan 886 02 2377 2222, Thailand 662 278 6777,
Turkey 90 212 279 3031, United Kingdom 44 (0) 1635 523545
© National Instruments Corporation 39 NI RF Signal Generators Getting Started Guide
Page 40

National Instruments, NI, ni.com, and LabVIEW are trademarks of National Instruments Corporation.
Refer to the Terms of Use section on ni.com/legal for more information about National
Instruments trademarks. Other product and company names mentioned herein are trademarks or trad e
names of their respective companies. For patents covering National Instruments products, refer to the
appropriate location: Help»Patents in your software, the patents.txt file on your CD, or
ni.com/patents.
© 2004–2007 National Instruments Corporation. All rights reserved.
371356E-01 Sep07
 Loading...