

Page 1

TM
IMAQ
IMAQ Vision
TM
for LabWindows
User Manual
IMAQ Vision for LabWindows/CVI User Manual
/CVITM
August 2004 Edition
Part Number 371266A-01
Page 2

Support
Worldwide Technical Support and Product Information
ni.com
National Instruments Corporate Headquarters
11500 North Mopac Expressway Austin, Texas 78759-3504 USA Tel: 512 683 0100
Worldwide Offices
Australia 1800 300 800, Austria 43 0 662 45 79 90 0, Belgium 32 0 2 757 00 20, Brazil 55 11 3262 3599,
Canada (Calgary) 403 274 9391, Canada (Ottawa) 613 233 5949, Canada (Québec) 450 510 3055,
Canada (Toronto) 905 785 0085, Canada (Vancouver) 604 685 7530, China 86 21 6555 7838,
Czech Republic 420 224 235 774, Denmark 45 45 76 26 00, Finland 385 0 9 725 725 11,
France 33 0 1 48 14 24 24, Germany 49 0 89 741 31 30, India 91 80 51190000, Israel 972 0 3 6393737,
Italy 39 02 413091, Japan 81 3 5472 2970, Korea 82 02 3451 3400, Malaysia 603 9131 0918,
Mexico 01 800 010 0793, Netherlands 31 0 348 433 466, New Zealand 0800 553 322, Norway 47 0 66 90 76 60,
Poland 48 22 3390150, Portugal 351 210 311 210, Russia 7 095 783 68 51, Singapore 65 6226 5886,
Slovenia 386 3 425 4200, South Africa 27 0 11 805 8197, Spain 34 91 640 0085, Sweden 46 0 8 587 895 00,
Switzerland 41 56 200 51 51, Taiwan 886 2 2528 7227, Thailand 662 992 7519,
United Kingdom 44 0 1635 523545
For further support information, refer to the Technical Support and Professional Services appendix. To comment
on National Instruments documentation, refer to the National Instruments Web site at ni.com/info and enter
the info code feedback.
© 2001–2004 National Instruments Corporation. All rights reserved.
Page 3

Important Information
Warranty
The media on which you receive National Instruments software are warranted not to fail to execute programming instructions, due to defects
in materials and workmanship, for a period of 90 days from date of shipment, as evidenced by receipts or other documentation. National
Instruments will, at its option, repair or replace software media that do not execute programming instructions if National Instruments receives
notice of such defects during the warranty period. National Instruments does not warrant that the operation of the software shall be
uninterrupted or error free.
A Return Material Authorization (RMA) number must be obtained from the factory and clearly marked on the outside of the package before
any equipment will be accepted for warranty work. National Instruments will pay the shipping costs of returning to the owner parts which are
covered by warranty.
National Instruments believes that the information in this document is accurate. The document has been carefully reviewed for technical
accuracy. In the event that technical or typographical errors exist, National Instruments reserves the right to make changes to subsequent
editions of this document without prior notice to holders of this edition. The reader should consult National Instruments if errors are suspected.
In no event shall National Instruments be liable for any damages arising out of or related to this document or the information contained in it.
E
XCEPT AS SPECIFIED HEREIN, NATIONAL INSTRUMENTS MAKES NO WARRANTIES, EXPRESS OR IMPLIED, AND SPECIFICALLY DISCLAIMS ANY WAR RANTY OF
MERCHANTABILITY OR FITNESS FOR A PARTICULAR PURPOSE . CUSTOMER’S RIGHT TO RECOVER DAMAGES CAUSED BY FAULT OR NEGLIGENCE ON THE PART OF
N
ATIONAL INSTRUMENTS SHALL BE LIMITED TO THE AMOUNT THERETOFORE PAID BY THE CUSTOMER. NATIONAL INSTRUMENTS WILL NOT BE LIABLE FOR
DAMAGES RESULTING FROM LOSS OF DATA, PROFITS, USE OF PRODUCTS, OR INCIDENTAL OR CONSEQUENTIAL DAMAGES, EVEN IF ADVISED OF THE POSS IBILITY
THEREOF. This limitation of the liability of National Instruments will apply regardless of the form of action, whether in contract or tort, including
negligence. Any action against National Instruments must be brought within one year after the cause of action accrues. National Instruments
shall not be liable for any delay in performance due to causes beyond its reasonable control. The warranty provided herein does not cover
damages, defects, malfunctions, or service failures caused by owner’s failure to follow the National Instruments installation, operation, or
maintenance instructions; owner’s modification of the product; owner’s abuse, misuse, or negligent acts; and power failure or surges, fire,
flood, accident, actions of third parties, or other events outside reasonable control.
Copyright
Under the copyright laws, this publication may not be reproduced or transmitted in any form, electronic or mechanical, including photocopying,
recording, storing in an information retrieval system, or translating, in whole or in part, without the prior written consent of National
Instruments Corporation.
Trademarks
CVI™, IMAQ™, LabVIEW™, National Instruments™, National Instruments Alliance Partner™, NI™, ni.com™, NI Developer Zone™,
and NI-IMAQ
Product and company names mentioned herein are trademarks or trade names of their respective companies.
Members of the National Instruments Alliance Partner Program are business entities independent from National Instruments and have no
agency, partnership, or joint-venture relationship with National Instruments.
™
are trademarks of National Instruments Corporation.
Patents
For patents covering National Instruments products, refer to the appropriate location: Help»Patents in your software, the patents.txt file
on your CD, or
ni.com/patents.
WARNING REGARDING USE OF NATIONAL INSTRUMENTS PRODUCTS
(1) NATIONAL INSTRUMENTS PRODUCTS ARE NOT DESIGNED WITH COMPONENTS AND TESTING FOR A LEVEL OF
RELIABILITY SUITABLE FOR USE IN OR IN CONNECTION WITH SURGICAL IMPLANTS OR AS CRITICAL COMPONENTS IN
ANY LIFE SUPPORT SYSTEMS WHOSE FAILURE TO PERFORM CAN REASONABLY BE EXPECTED TO CAUSE SIGNIFICANT
INJURY TO A HUMAN.
(2) IN ANY APPLICATION, INCLUDING THE ABOVE, RELIABILITY OF OPERATION OF THE SOFTWARE PRODUCTS CAN BE
IMPAIRED BY ADVERSE FACTORS, INCLUDING BUT NOT LIMITED TO FLUCTUATIONS IN ELECTRICAL POWER SUPPLY,
COMPUTER HARDWARE MALFUNCTIONS, COMPUTER OPERATING SYSTEM SOFTWARE FITNESS, FITNESS OF COMPILERS
AND DEVELOPMENT SOFTWARE USED TO DEVELOP AN APPLICATION, INSTALLATION ERRORS, SOFTWARE AND
HARDWARE COMPATIBILITY PROBLEMS, MALFUNCTIONS OR FAILURES OF ELECTRONIC MONITORING OR CONTROL
DEVICES, TRANSIENT FAILURES OF ELECTRONIC SYSTEMS (HARDWARE AND/OR SOFTWARE), UNANTICIPATED USES OR
MISUSES, OR ERRORS ON THE PART OF THE USER OR APPLICATIONS DESIGNER (ADVERSE FACTORS SUCH AS THESE ARE
HEREAFTER COLLECTIVELY TERMED “SYSTEM FAILURES”). ANY APPLICATION WHERE A SYSTEM FAILURE WOULD
CREATE A RISK OF HARM TO PROPERTY OR PERSONS (INCLUDING THE RISK OF BODILY INJURY AND DEATH) SHOULD
NOT BE RELIANT SOLELY UPON ONE FORM OF ELECTRONIC SYSTEM DUE TO THE RISK OF SYSTEM FAILURE. TO AVOID
DAMAGE, INJURY, OR DEATH, THE USER OR APPLICATION DESIGNER MUST TAKE REASONABLY PRUDENT STEPS TO
PROTECT AGAINST SYSTEM FAILURES, INCLUDING BUT NOT LIMITED TO BACK-UP OR SHUT DOWN MECHANISMS.
BECAUSE EACH END-USER SYSTEM IS CUSTOMIZED AND DIFFERS FROM NATIONAL INSTRUMENTS' TESTING
PLATFORMS AND BECAUSE A USER OR APPLICATION DESIGNER MAY USE NATIONAL INSTRUMENTS PRODUCTS IN
COMBINATION WITH OTHER PRODUCTS IN A MANNER NOT EVALUATED OR CONTEMPLATED BY NATIONAL
INSTRUMENTS, THE USER OR APPLICATION DESIGNER IS ULTIMATELY RESPONSIBLE FOR VERIFYING AND VALIDATING
THE SUITABILITY OF NATIONAL INSTRUMENTS PRODUCTS WHENEVER NATIONAL INSTRUMENTS PRODUCTS ARE
INCORPORATED IN A SYSTEM OR APPLICATION, INCLUDING, WITHOUT LIMITATION, THE APPROPRIATE DESIGN,
PROCESS AND SAFETY LEVEL OF SUCH SYSTEM OR APPLICATION.
Page 4

Contents
About This Manual
Conventions ...................................................................................................................ix
Related Documentation..................................................................................................x
IMAQ Vision...................................................................................................x
NI Vision Assistant..........................................................................................x
NI Vision Builder for Automated Inspection ..................................................x
Other Documentation ......................................................................................xi
Chapter 1
Introduction to IMAQ Vision
About IMAQ Vision ......................................................................................................1-1
Application Development Environments.......................................................................1-1
IMAQ Vision Function Tree..........................................................................................1-2
IMAQ Machine Vision Function Tree...........................................................................1-3
Creating IMAQ Vision Applications.............................................................................1-4
Chapter 2
Getting Measurement-Ready Images
Set Up Your Imaging System ........................................................................................2-1
Calibrate Your Imaging System ....................................................................................2-2
Create an Image .............................................................................................................2-2
Source and Destination Images .......................................................................2-4
Acquire or Read an Image .............................................................................................2-5
Acquiring an Image .........................................................................................2-6
Reading a File..................................................................................................2-6
Converting an Array to an Image ....................................................................2-7
Display an Image ...........................................................................................................2-7
Attach Calibration Information......................................................................................2-8
Analyze an Image ..........................................................................................................2-8
Improve an Image ..........................................................................................................2-9
Lookup Tables .................................................................................................2-10
Filters...............................................................................................................2-10
Convolution Filter .............................................................................2-11
Nth Order Filter.................................................................................2-11
Grayscale Morphology ....................................................................................2-11
FFT ..................................................................................................................2-12
Complex Image Operations ..............................................................2-13
© National Instruments Corporation v IMAQ Vision for LabWindows/CVI User Manual
Page 5

Contents
Chapter 3
Making Grayscale and Color Measurements
Define Regions of Interest............................................................................................. 3-1
Defining Regions Interactively ....................................................................... 3-1
Tools Palette Transformation ........................................................... 3-5
Defining Regions Programmatically............................................................... 3-6
Defining Regions with Masks......................................................................... 3-6
Measure Grayscale Statistics......................................................................................... 3-7
Measure Color Statistics................................................................................................ 3-7
Comparing Colors ........................................................................................... 3-9
Learning Color Information ............................................................................ 3-9
Specifying the Color Information to Learn ...................................... 3-9
Choosing a Color Representation Sensitivity ................................... 3-12
Ignoring Learned Colors................................................................... 3-13
Chapter 4
Performing Particle Analysis
Create a Binary Image ................................................................................................... 4-1
Improve the Binary Image............................................................................................. 4-2
Removing Unwanted Particles........................................................................ 4-3
Separating Touching Particles ........................................................................ 4-3
Improving Particle Shapes .............................................................................. 4-3
Make Particle Measurements ........................................................................................ 4-4
Chapter 5
Performing Machine Vision Tasks
Locate Objects to Inspect .............................................................................................. 5-2
Using Edge Detection to Build a Coordinate Transform ................................ 5-4
Using Pattern Matching to Build a Coordinate Transform .............................5-6
Choosing a Method to Build the Coordinate Transform................................. 5-7
Set Search Areas............................................................................................................ 5-8
Defining Regions Interactively ....................................................................... 5-8
Defining Regions Programmatically............................................................... 5-9
Find Measurement Points .............................................................................................. 5-9
Finding Features Using Edge Detection ......................................................... 5-9
Finding Lines or Circles ................................................................... 5-10
Finding Edge Points Along One Search Contour ............................. 5-11
Finding Edge Points Along Multiple Search Contours ....................5-12
Finding Points Using Pattern Matching.......................................................... 5-13
Defining and Creating Good Template Images ................................ 5-13
Training the Pattern Matching Algorithm ........................................ 5-15
IMAQ Vision for LabWindows/CVI User Manual vi ni.com
Page 6

Contents
Defining a Search Area .....................................................................5-16
Setting Matching Parameters and Tolerances...................................5-17
Testing the Search Algorithm on Test Images..................................5-18
Using a Ranking Method to Verify Results ......................................5-19
Finding Points Using Color Pattern Matching ................................................5-19
Defining and Creating Good Color Template Images ......................5-20
Training the Color Pattern Matching Algorithm...............................5-21
Defining a Search Area .....................................................................5-22
Setting Matching Parameters and Tolerances...................................5-23
Testing the Search Algorithm on Test Images..................................5-25
Finding Points Using Color Location..............................................................5-25
Convert Pixel Coordinates to Real-World Coordinates.................................................5-26
Make Measurements ......................................................................................................5-26
Distance Measurements...................................................................................5-26
Analytic Geometry Measurements ..................................................................5-27
Instrument Reader Measurements ...................................................................5-27
Identify Parts Under Inspection .....................................................................................5-28
Classifying Samples ........................................................................................5-28
Reading Characters..........................................................................................5-29
Reading Barcodes............................................................................................5-30
Reading 1D Barcodes........................................................................5-30
Reading Data Matrix Barcodes .........................................................5-30
Reading PDF417 Barcodes ...............................................................5-31
Display Results ..............................................................................................................5-31
Chapter 6
Calibrating Images
Perspective and Nonlinear Distortion Calibration .........................................................6-1
Defining a Calibration Template.....................................................................6-2
Defining a Reference Coordinate System .......................................................6-3
Learning Calibration Information....................................................................6-5
Specifying Scaling Factors................................................................6-6
Choosing a Region of Interest...........................................................6-6
Choosing a Learning Algorithm .......................................................6-6
Using the Learning Score..................................................................6-7
Learning the Error Map.....................................................................6-8
Learning the Correction Table ..........................................................6-8
Setting the Scaling Method ...............................................................6-8
Calibration Invalidation ....................................................................6-8
Simple Calibration .........................................................................................................6-9
Save Calibration Information.........................................................................................6-10
Attach Calibration Information......................................................................................6-10
© National Instruments Corporation vii IMAQ Vision for LabWindows/CVI User Manual
Page 7

Contents
Appendix A
Technical Support and Professional Services
Glossary
Index
IMAQ Vision for LabWindows/CVI User Manual viii ni.com
Page 8

About This Manual
The IMAQ Vision for LabWindows/CVI User Manual is intended for
engineers and scientists who have knowledge of the LabWindows
programming environment and need to create machine vision and image
processing applications using C functions. The manual guides you through
tasks beginning with setting up your imaging system to taking
measurements.
™
/CVI™
Conventions
The following conventions are used in this manual:
» The » symbol leads you through nested menu items and dialog box options
to a final action. The sequence File»Page Setup»Options directs you to
pull down the File menu, select the Page Setup item, and select Options
from the last dialog box.
This icon denotes a tip, which alerts you to advisory information.
This icon denotes a note, which alerts you to important information.
bold Bold text denotes items that you must select or click in the software, such
as menu items and dialog box options. Bold text also denotes parameter
names.
italic Italic text denotes variables, emphasis, a cross reference, or an introduction
to a key concept. This font also denotes text that is a placeholder for a word
or value that you must supply.
monospace Text in this font denotes text or characters that you should enter from the
keyboard, sections of code, programming examples, and syntax examples.
This font is also used for the proper names of disk drives, paths, directories,
programs, subprograms, subroutines, device names, functions, operations,
variables, filenames, and extensions.
© National Instruments Corporation ix IMAQ Vision for LabWindows/CVI User Manual
Page 9

About This Manual
Related Documentation
In addition to this manual, the following documentation resources are
available to help you create your vision application.
IMAQ Vision
• IMAQ Vision Concepts Manual—If you are new to machine vision
and imaging, read this manual to understand the concepts behind
IMAQ Vision.
• IMAQ Vision for LabWindows/CVI Function Reference—If you need
information about IMAQ Vision functions while creating your
application, refer to this help file.
NI Vision Assistant
• NI Vision Assistant Tutorial—If you need to install NI Vision
Assistant and learn the fundamental features of the software, follow
the instructions in this tutorial.
• NI Vision Assistant Help—If you need descriptions or step-by-step
guidance about how to use any of the functions or features of NI Vision
Assistant, refer to this help file.
NI Vision Builder for Automated Inspection
• NI Vision Builder for Automated Inspection Tutorial—If you have
little experience with machine vision, and you need information about
how to solve common inspection tasks with NI Vision Builder AI,
follow the instructions in this tutorial.
• NI Vision Builder for Automated Inspection: Configuration
Help—If you need descriptions or step-by-step guidance about how to
use any of the NI Vision Builder AI functions to create an automated
vision inspection system, refer to this help file.
• NI Vision Builder for Automated Inspection: Inspection Help—If you
need information about how to run an automated vision inspection
system using NI Vision Builder AI, refer to this help file.
IMAQ Vision for LabWindows/CVI User Manual x ni.com
Page 10

Other Documentation
• Your National Instruments image acquisition (IMAQ) device user
• Getting Started With Your IMAQ System—If you need instructions
• NI-IMAQ User Manual—If you need information about how to use
• NI-IMAQ VI or function reference guides—If you need information
• IMAQ Vision Deployment Engine Note to Users—If you need
• Example programs—If you want examples of how to create specific
• Application Notes—If you want to know more about advanced
• NI Developer Zone (NIDZ)—If you want even more information
About This Manual
manual—If you need installation instructions and device-specific
information, refer to your device user manual.
for installing the NI-IMAQ software and your IMAQ hardware,
connecting your camera, running Measurement & Automation
Explorer (MAX) and the NI-IMAQ Diagnostics, selecting a camera
file, and acquiring an image, refer to this getting started document.
NI-IMAQ and IMAQ image acquisition devices to capture images for
processing, refer to this manual.
about the features, functions, and operation of the NI-IMAQ image
acquisition VIs or functions, refer to these help files.
information about how to deploy your custom IMAQ Vision
applications on target computers, read this CD insert.
applications, go to
<CVI>\samples\vision.
IMAQ Vision concepts and applications, refer to the Application
Notes located on the National Instruments Web site at
appnotes.nsf
.
ni.com/
about developing your vision application, visit the NI Developer Zone
at
ni.com/zone. The NI Developer Zone contains example
programs, tutorials, technical presentations, the Instrument Driver
Network, a measurement glossary, an online magazine, a product
advisor, and a community area where you can share ideas, questions,
and source code with vision developers around the world.
© National Instruments Corporation xi IMAQ Vision for LabWindows/CVI User Manual
Page 11

Introduction to IMAQ Vision
This chapter describes the IMAQ Vision for LabWindows/CVI software,
outlines the IMAQ Vision function organization, and lists the steps for
making a machine vision application.
Note Refer to the Vision Development Module Release Notes that came with your
software for information about the system requirements and installation procedure for
IMAQ Vision for LabWindows/CVI.
About IMAQ Vision
IMAQ Vision for LabWindows/CVI—a part of the Vision Development
Module—is a library of C functions that you can use to develop machine
vision and scientific imaging applications. The Vision Development
Module also includes the same imaging functions for LabVIEW,
and ActiveX controls for Microsoft Visual Basic. Vision Assistant, another
Vision Development Module software product, enables you to prototype
your application strategy quickly without having to do any programming.
Additionally, NI offers Vision Builder for Automated Inspection:
configurable machine vision software that you can use to prototype,
benchmark, and deploy applications.
1
Application Development Environments
This release of IMAQ Vision for LabWindows/CVI supports the
following Application Development Environments (ADEs) for
Windows 2000/NT/XP.
• LabWindows/CVI version 6.0 and later
• Microsoft Visual C/C++ version 6.0 and later
Note IMAQ Vision has been tested and found to work with these ADEs, although other
ADEs may also work.
© National Instruments Corporation 1-1 IMAQ Vision for LabWindows/CVI User Manual
Page 12

Chapter 1 Introduction to IMAQ Vision
IMAQ Vision Function Tree
The IMAQ Vision function tree (NIVision.lfp) contains separate
classes corresponding to groups or types of functions. Table 1-1 lists the
IMAQ Vision function types and gives a description of each type.
Table 1-1. IMAQ Vision Function Types
Function Type Description
Image
Management
Memory
Management
Error
Management
Acquisition Functions that acquire images through an IMAQ hardware device.
Display Functions that cover all aspects of image visualization and image window
Overlay Functions that create and manipulate overlays.
Regions of
Interest
File I/O Functions that read and write images from and to files.
Calibration Functions that learn calibration information and correct distorted images.
Image
Analysis
Grayscale
Processing
Functions that create space in memory for images and perform basic image
manipulation.
Function that returns, to the operating system, previously used memory that is
no longer needed.
Functions that set the current error, return the name of the function in which the
last error occurred, return the error code of the last error, and clear any pending
errors.
management.
Functions that create and manipulate regions of interest.
Functions that compute the centroid of an image, profile of a line of pixels,
and the mean line profile. This type also includes functions that calculate the
pixel distribution and statistical parameters of an image.
Functions for grayscale image processing and analysis.
Binary
Processing
Color
Processing
Pattern
Matching
IMAQ Vision for LabWindows/CVI User Manual 1-2 ni.com
Functions for binary image processing and analysis.
Functions for color image processing and analysis.
Functions that learn patterns and search for patterns in images.
Page 13

Chapter 1 Introduction to IMAQ Vision
Table 1-1. IMAQ Vision Function Types (Continued)
Function Type Description
Caliper Functions designed for gauging, measurement, and inspection applications.
Operators Functions that perform arithmetic, logic, and comparison operations with
two images or with an image and a constant value.
Analytic
Geometry
Frequency
Domain
Analysis
Barcode I/O Functions that find and read barcodes.
LCD Functions that find and read seven-segment LCD characters.
Meter Functions that return the arc information of a meter and read the meter.
Utilities Functions that return structures, and a function that returns a pointer to
OCR Functions that perform optical character recognition on an image.
Classification Functions that classify an image or feature vector.
Obsolete Functions that are no longer necessary but may exist in older applications.
Functions that perform basic geometric calculations on an image.
Functions for the extraction and manipulation of complex planes. Functions
of this type perform Fast Fourier Transform (FFT), inverse FFT, truncation,
attenuation, addition, subtraction, multiplication, and division of complex
images.
predefined convolution matrices.
IMAQ Machine Vision Function Tree
The IMAQ Machine Vision function tree (NIMachineVision.fp)
contains separate classes corresponding to groups or types of functions.
Table 1-2 lists the IMAQ Machine Vision function types and gives a
description of each type.
Table 1-2. IMAQ Machine Vision Function Types
Function Type Description
Coordinate Transform Functions that find coordinate transforms based on image contents.
Count and Measure Objects Function that counts and measures objects in an image.
Find Patterns Function that finds patterns in an image.
Locate Edges Functions that locate different types of edges in an image.
© National Instruments Corporation 1-3 IMAQ Vision for LabWindows/CVI User Manual
Page 14

Chapter 1 Introduction to IMAQ Vision
Table 1-2. IMAQ Machine Vision Function Types (Continued)
Function Type Description
Measure Distances Functions that measure distances between objects in an image.
Measure Intensities Functions that measure light intensities in various shaped regions
within an image.
Select Region of Interest Functions that allow a user to select a specific region of interest in
an image.
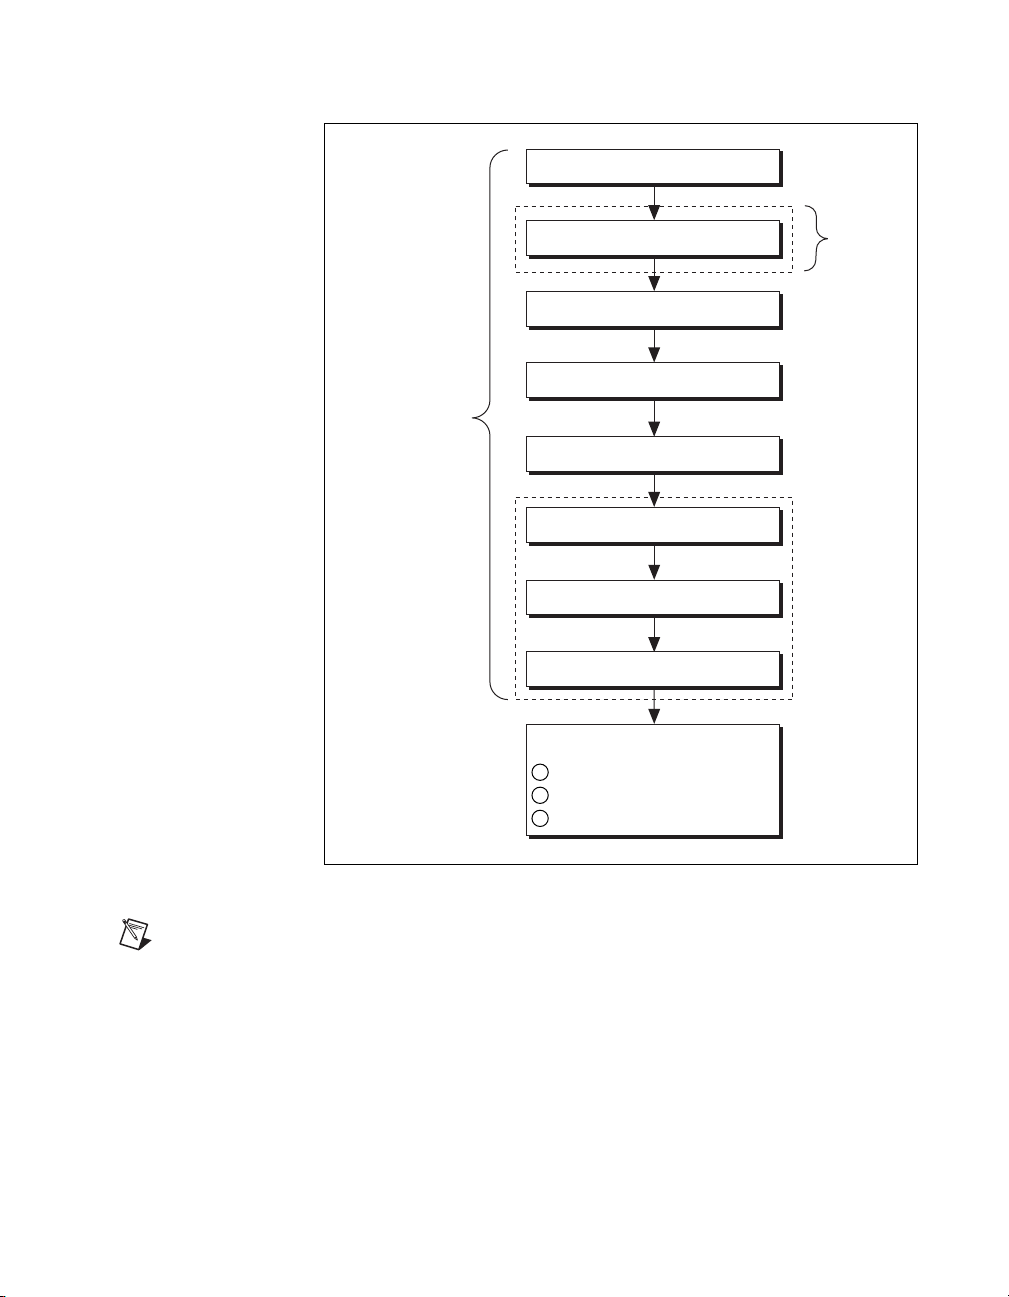
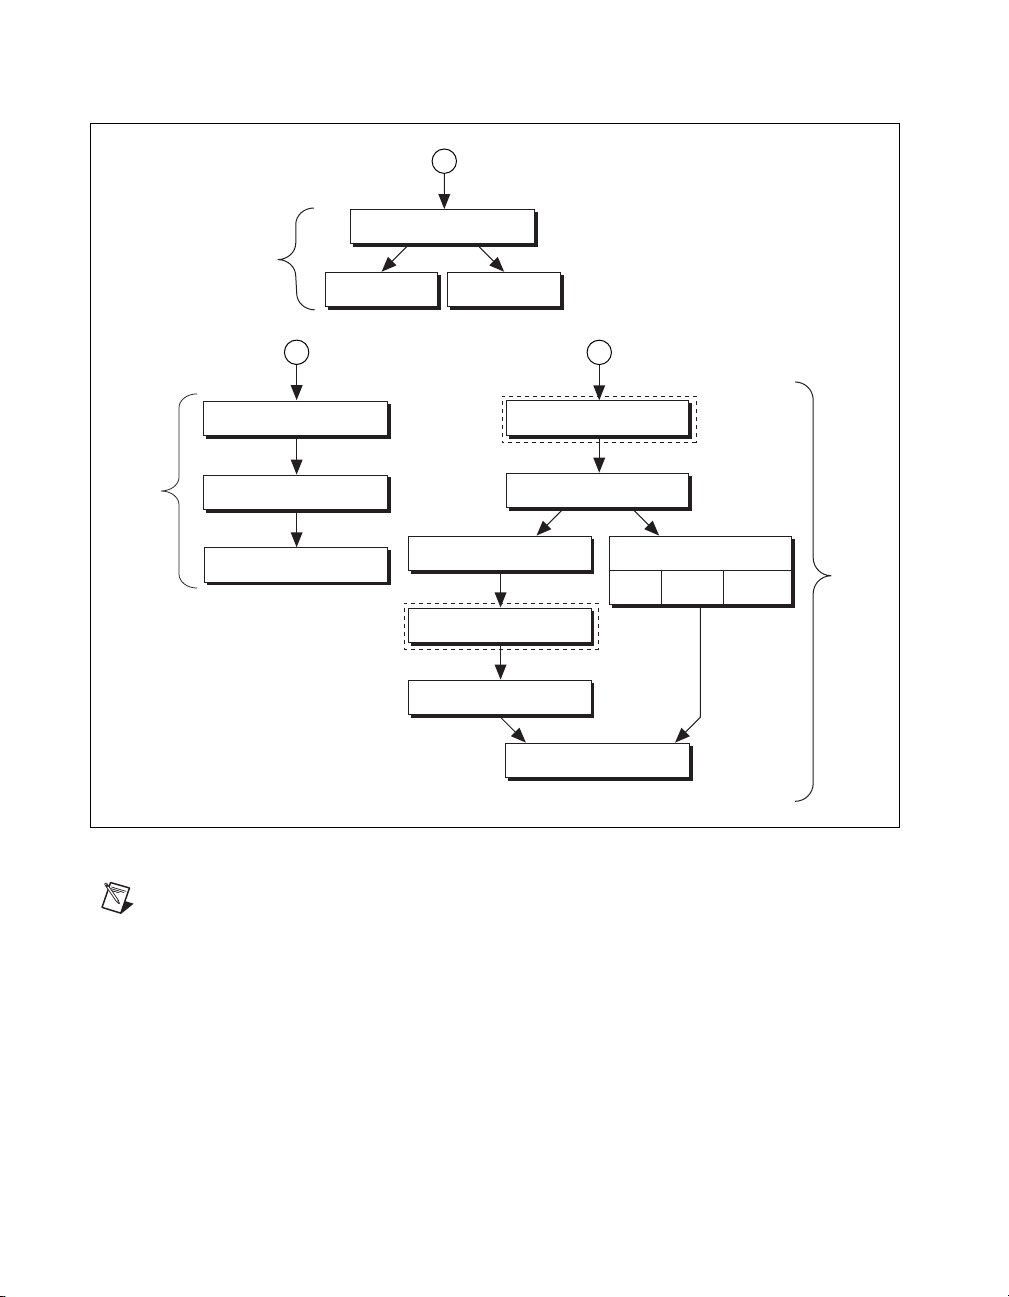
Creating IMAQ Vision Applications
Figures 1-1 and 1-2 illustrate the steps for creating an application with
IMAQ Vision. Figure 1-1 describes the general steps to designing a Vision
application. The last step in Figure 1-1 is expanded upon in Figure 1-2.
You can use a combination of the items in the last step to create your IMAQ
Vision application. Refer to the corresponding chapter listed to the side of
the item for more information about items in either diagram.
IMAQ Vision for LabWindows/CVI User Manual 1-4 ni.com
Page 15
Chapter 1 Introduction to IMAQ Vision
Set Up Your Imaging System
Chapter 2:
Measurement-Ready
Getting
Images
Calibrate Your Imaging System
Create an Image
Acquire or Read an Image
Display an Image
Attach Calibration Information
Analyze an Image
Improve an Image
Improve an Image
Make Measurements or Identify Objects
1
2
3
in an Image Using
Grayscale or Color Measurements, and/or
Particle Analysis, and/or
Machine Vision
Chapter 6:
Calibration
Figure 1-1. General Steps for Designing a Vision Application
Note
Diagram items enclosed with dashed lines are optional steps.
© National Instruments Corporation 1-5 IMAQ Vision for LabWindows/CVI User Manual
Page 16
Chapter 1 Introduction to IMAQ Vision
2
Chapter 5:
Particle
Analysis
Chapter 4:
Grayscale and Color
Measurements
Create a Binary Image
Improve a Binary Image
Make Particle Measurements
Grayscale Statistics
3
Define Regions of Interest
Measure
Find Measurement Points
Convert Pixel Coordinates to
Real-World Coordinates
Make Measurements
Measure
Color Statistics
4
Locate Objects to Inspect
Set Search Areas
Identify Parts Under Inspection
Classify
Objects
Display Results
Read
Characters
Read
Symbologies
Chapter 6:
Machine
Vision
Figure 1-2. Inspection Steps for Building a Vision Application
Note
Diagram items enclosed with dashed lines are optional steps.
IMAQ Vision for LabWindows/CVI User Manual 1-6 ni.com
Page 17

Getting Measurement-Ready
Images
This chapter describes how to set up your imaging system, acquire and
display an image, analyze the image, and prepare the image for additional
processing.
Set Up Your Imaging System
Before you acquire, analyze, and process images, you must set up your
imaging system. How you set up your system depends on your imaging
environment and the type of analysis and processing you need to do. Your
imaging system should produce images with high enough quality so that
you can extract the information you need from the images.
Complete the following steps to set up your imaging system.
1. Determine the type of equipment you need given your space
constraints and the size of the object you need to inspect. Refer to
Chapter 3, System Setup and Calibration, of the IMAQ Vision
Concepts Manual for more information.
a. Make sure your camera sensor is large enough to satisfy your
minimum resolution requirement.
b. Make sure your lens has a depth of field high enough to keep all
of your objects in focus regardless of their distance from the lens.
Also, make sure your lens has a focal length that meets your
needs.
c. Make sure your lighting provides enough contrast between the
object under inspection and the background for you to extract the
information you need from the image.
2. Position your camera so that it is perpendicular to the object under
inspection. If your camera acquires images of the object from an angle,
perspective errors occur. Even though you can compensate for these
errors with software, NI recommends that you use a perpendicular
inspection angle to obtain the most accurate results.
2
© National Instruments Corporation 2-1 IMAQ Vision for LabWindows/CVI User Manual
Page 18

Chapter 2 Getting Measurement-Ready Images
3. Select an IMAQ device that meets your needs. National Instruments
offers several IMAQ devices, including analog color and monochrome
devices as well as digital devices. Visit
information about IMAQ devices.
4. Configure the driver software for your image acquisition device. If
you have a National Instruments image acquisition device, configure
the NI-IMAQ driver software through MAX. Open MAX by
double-clicking the Measurement & Automation Explorer icon on
your desktop. Refer to the NI-IMAQ User Manual and the
Measurement and Automation Explorer Help for IMAQ for more
information.
Calibrate Your Imaging System
After you set up your imaging system, you may want to calibrate your
system to assign real-world coordinates to pixel coordinates. This allows
you to compensate for perspective and nonlinear errors inherent in your
imaging system.
Perspective errors occur when your camera axis is not perpendicular to the
object under inspection. Nonlinear distortion may occur from aberrations
in the camera lens. Perspective errors and lens aberrations cause images to
appear distorted. This distortion misplaces information in an image, but it
does not necessarily destroy the information in the image.
ni.com/imaq for more
Use simple calibration if you only want to assign real-world coordinates to
pixel coordinates. Use perspective and nonlinear distortion calibration if
you need to compensate for perspective errors and nonlinear lens distortion.
For detailed information about calibration, refer to Chapter 5, Performing
Machine Vision Tasks.
Create an Image
To create an image in IMAQ Vision for LabWindows/CVI, call
imaqCreateImage(). This function returns an image reference you can
use when calling other IMAQ Vision functions. The only limitation to the
size and number of images you can acquire and process is the amount of
memory on your computer. When you create an image, specify the type of
the image. Table 2-1 lists the valid image types.
IMAQ Vision for LabWindows/CVI User Manual 2-2 ni.com
Page 19

Chapter 2 Getting Measurement-Ready Images
Table 2-1. IMAQ Vision for LabWindows/CVI Image Types
Val ue Description
IMAQ_IMAGE_U8
IMAQ_IMAGE_I16
IMAQ_IMAGE_SGL
IMAQ_IMAGE_COMPLEX 2 × 32 bits per pixel—floating point, native format after a Fast
8 bits per pixel—unsigned, standard monochrome
16 bits per pixel—signed, monochrome
32 bits per pixel—floating point, monochrome
Fourier Transform (FFT)
IMAQ_IMAGE_RGB
IMAQ_IMAGE_HSL
IMAQ_IMAGE_RGB_U64
32 bits per pixel—standard color
32 bits per pixel—color
64 bits per pixel—standard color
You can create multiple images by executing imaqCreateImage() as
many times as you want. Determine the number of required images through
an analysis of your intended application. The decision is based on different
processing phases and your need to keep the original image after each
processing step. The decision to keep an image occurs before each
processing step.
When you create an image, IMAQ Vision creates an internal image
structure to hold properties of the image, such as its name and border size.
However, no memory is allocated to store the image pixels at this time.
IMAQ Vision functions automatically allocate the appropriate amount of
memory when the image size is modified. For example, functions that
acquire or resample an image alter the image size, so they allocate the
appropriate memory space for the image pixels. The return value of
imaqCreateImage() is a pointer to the image structure. Supply this
pointer as an input to all subsequent IMAQ Vision functions.
Most functions in the IMAQ Vision library require one or more image
pointers. The number of image pointers a function takes depends on the
image processing function and the type of image you want to use. Some
IMAQ Vision functions act directly on the image and require only one
image pointer. Other functions that process the contents of images require
pointers to the source image(s) and to a destination image.
At the end of your application, dispose of each image that you created using
imaqDispose().
© National Instruments Corporation 2-3 IMAQ Vision for LabWindows/CVI User Manual
Page 20

Chapter 2 Getting Measurement-Ready Images
Source and Destination Images
Some IMAQ Vision functions that modify the contents of an image have
source image and destination image input parameters. The source image
receives the image to process. The destination image receives the
processing results. The destination image can receive either another image
or the original, depending on your goals. If you do not want the contents of
the original image to change, use separate source and destination images.
If you want to replace the original image with the processed image, pass the
same image as both the source and destination.
Depending on the function, the image type of the destination image can be
the same or different than the image type of the source image. The function
descriptions in the IMAQ Vision for LabWindows/CVI Function Reference
include the type of images you can use as image inputs and outputs. IMAQ
Vision resizes the destination image to hold the result if the destination is
not the appropriate size.
The following examples illustrate source and destination images with
imaqTranspose():
•
imaqTranspose(myImage, myImage);
This function creates a transposed image using the same image for the
source and destination. The contents of
•
imaqTranspose(myTransposedImage, myImage);
This function creates a transposed image and stores it in a destination
different from the source. The
and
myTransposedImage contains the result.
myImage change.
myImage image remains unchanged,
Functions that perform arithmetic or logical operations between two
images have two source images and a destination image. You can perform
an operation between two images and then either store the result in a
separate destination image or in one of the two source images. In the
latter case, make sure you no longer need the original data in the source
image before storing the result over the data.
The following examples show the possible combinations using
imaqAdd():
•
imaqAdd(myResultImage, myImageA, myImageB);
This function adds two source images (myImageA and myImageB) and
stores the result in a third image (
myResultImage). Both source
images remain intact after processing.
IMAQ Vision for LabWindows/CVI User Manual 2-4 ni.com
Page 21

• imaqAdd(myImageA, myImageA, myImageB);
This function adds two source images and stores the result in the first
source image.
•
imaqAdd(myImageB, myImageA, myImageB);
This function adds two source images and stores the result in the
second source image.
Most operations between two images require that the images have the
same type and size. However, some arithmetic operations can work
between two different types of images, such as 8-bit and 16-bit images.
Some functions perform operations that populate an image. Examples of
this type of operation include reading a file, acquiring an image from an
IMAQ device, or transforming a 2D array into an image. This type of
function can modify the size of an image.
Some functions take an additional mask parameter. The presence of this
parameter indicates that the processing or analysis is dependent on the
contents of another image, the image mask.
Note The image mask must be an 8-bit image.
Chapter 2 Getting Measurement-Ready Images
If you want to apply a processing or analysis function to the entire image,
pass NULL for the image mask. Passing the same image to both the source
image and image mask also gives the same effect as passing NULL for the
image mask, except in this case the source image must be an 8-bit image.
Acquire or Read an Image
After you create an image reference, you can acquire an image into your
imaging system in three ways. You can acquire an image with a camera
through your IMAQ device, load an image from a file stored on your
computer, or convert data stored in a 2D array to an image. Functions that
acquire images, load images from file, or convert data from a 2D array to
an image automatically allocate the memory space required to
accommodate the image data.
© National Instruments Corporation 2-5 IMAQ Vision for LabWindows/CVI User Manual
Page 22

Chapter 2 Getting Measurement-Ready Images
Acquiring an Image
Use one of the following methods to acquire images with a National
Instruments IMAQ device.
• Acquire a single image using
this function, it initializes the IMAQ device and acquires the next
incoming video frame. Use this function for low-speed single capture
applications where ease of programming is essential.
• Acquire a single image using
function, it acquires the next incoming video frame on an IMAQ
device you have already initialized using
i
mgSessionOpen(). Use this function for high-speed single capture
applications.
• Acquire images continually through a grab acquisition. Grab functions
perform high-speed acquisitions that loop continually on one buffer.
Use
imaqSetupGrab() to start the acquisition. Use imaqGrab()
to return a copy of the current image. Use
to stop the acquisition.
• Acquire a fixed number of images using a sequence acquisition.
Set up the acquisition using
imaqStartAcquisition() to acquire the number of images you
requested during setup. If you want to acquire only certain images,
supply
of frames to skip after each acquired frame.
• Acquire images continually through a ringed buffer acquisition.
Set up the acquisition using
imaqStartAcquisition() to start acquiring images into the
acquired ring buffer. To get an image from the ring, call
imaqExtractFromRing() or imaqCopyRing(). Use
imaqStopAcquisition() to stop the acquisition.
imaqEasyAcquire(). When you call
imaqSnap(). When you call this
imgInterfaceOpen() and
imaqStopAcquisition()
imaqSetupSequence(). Use
imaqSetupSequence() with a table describing the number
imaqSetupRing(). Use
Note You must use imgClose() to release resources associated with the image
acquisition device.
Reading a File
Use imaqReadFile() to open and read data from a file stored on your
computer into the image reference. You can read from image files stored
in several standard formats: BMP, TIFF, JPEG, PNG, and AIPD. The
software automatically converts the pixels it reads into the type of image
you pass in.
IMAQ Vision for LabWindows/CVI User Manual 2-6 ni.com
Page 23

Chapter 2 Getting Measurement-Ready Images
Use imaqReadVisionFile() to open an image file containing additional
information, such as calibration information, template information for
pattern matching, or overlay information. For more information about
pattern matching templates and overlays, refer to Chapter 5, Performing
Machine Vision Tasks.
You can also use
properties—such as image size, recommended image type, and
calibration units—without actually reading all the image data.
Converting an Array to an Image
Use imaqArrayToImage() to convert a 2D array to an image. You can
also use
imaqImageToArray() to convert an image to a 2D array.
Display an Image
Display an image in an external window using imaqDisplayImage().
You can display images in 16 different external windows. Use the other
display functions to configure the appearance of each external window.
Properties you can set include whether the window has scroll bars, a title
bar, and whether it is resizable. You can also use
position the external image window at a particular location on you monitor.
Refer to the IMAQ Vision for LabWindows/CVI Function Reference for a
complete list of Display functions.
Note Image windows are not LabWindows/CVI panels. They are managed directly by
IMAQ Vision .
You can use a color palette to display grayscale images by applying a color
palette to the window. Use
color palettes. For example, if you need to display a binary image—an
image containing particle regions with pixel values of 1 and a background
region with pixel values of 0—apply the predefined binary palette. For
more information about color palettes, refer to Chapter 2, Display, of the
IMAQ Vision Concepts Manual.
imaqGetFileInfo() to retrieve image
imaqMoveWindow() to
imaqSetWindowPalette() to set predefined
Note At the end of your application, close all open external windows using
imaqCloseWindow().
© National Instruments Corporation 2-7 IMAQ Vision for LabWindows/CVI User Manual
Page 24

Chapter 2 Getting Measurement-Ready Images
Attach Calibration Information
If you want to attach the calibration information of the current setup to
each image you acquire, use
function takes in a source image containing the calibration information and
a destination image that you want to calibrate. The output image is your
inspection image with the calibration information attached to it. For
detailed information about calibration, refer to Chapter 6, Calibrating
Images.
Note Because calibration information is part of the image, it is propagated throughout
the processing and analysis of the image. Functions that modify the image size, such as
geometrical transforms, void the calibration information. Use
to save the image and all of the attached calibration information to a file.
Analyze an Image
After you acquire and display an image, you may want to analyze the
contents of the image for the following reasons:
• To determine whether the image quality is high enough for your
inspection task.
• To obtain the values of parameters that you want to use in processing
functions during the inspection process.
imaqCopyCalibrationInfo(). This
imaqWriteVisionFile()
The histogram and line profile tools can help you analyze the quality of
your images.
Use
imaqHistogram() to analyze the overall grayscale distribution in the
image. Use the histogram of the image to analyze two important criteria
that define the quality of an image—saturation and contrast. If your image
is underexposed, or does not have enough light, the majority of your pixels
will have low intensity values, which appear as a concentration of peaks on
the left side of your histogram. If your image is overexposed, or has too
much light, the majority of your pixels will have high intensity values,
which appear as a concentration of peaks on the right side of your
histogram. If your image has an appropriate amount of contrast, your
histogram will have distinct regions of pixel concentrations. Use the
histogram information to decide if the image quality is high enough to
separate objects of interest from the background.
IMAQ Vision for LabWindows/CVI User Manual 2-8 ni.com
Page 25

Chapter 2 Getting Measurement-Ready Images
If the image quality meets your needs, use the histogram to determine the
range of pixel values that correspond to objects in the image. You can use
this range in processing functions, such as determining a threshold range
during particle analysis.
If the image quality does not meet your needs, try to improve the imaging
conditions to get the necessary image quality. You may need to re-evaluate
and modify each component of your imaging setup, including lighting
equipment and setup, lens tuning, camera operation mode, and acquisition
device parameters. If you reach the best possible conditions with your setup
but the image quality still does not meet your needs, try to improve the
image quality using the image processing techniques described in the
Improve an Image section of this chapter.
Use
imaqLineProfile() to get the pixel distribution along a line in the
image, or use
one-dimensional path in the image. By looking at the pixel distribution, you
can determine if the image quality is high enough to provide you with sharp
edges at object boundaries. Also, you can determine if the image is noisy
and identify the characteristics of the noise.
If the image quality meets your needs, use the pixel distribution
information to determine some parameters of the inspection functions you
want to use. For example, use the information from the line profile to
determine the strength of the edge at the boundary of an object. You can
input this information into
along the line.
imaqROIProfile() to get the pixel distribution along a
imaqEdgeTool2() to find the edges of objects
Improve an Image
Using the information you gathered from analyzing your image, you may
want to improve the quality of your image for inspection. You can improve
your image with lookup tables, filters, grayscale morphology, and FFTs.
© National Instruments Corporation 2-9 IMAQ Vision for LabWindows/CVI User Manual
Page 26

Chapter 2 Getting Measurement-Ready Images
Lookup Tables
Apply lookup table (LUT) transformations to highlight image details in
areas containing significant information at the expense of other areas.
A LUT transformation converts input grayscale values in the source image
into other grayscale values in the transformed image. IMAQ Vision
provides four functions that directly or indirectly apply lookup tables to
images.
•
imaqMathTransform()—Converts the pixel values of an image
by eplacing them with values from a predefined lookup table.
IMAQ Vision has seven predefined lookup tables based on
mathematical transformations. For more information about these
lookup tables, refer to Chapter 5, Image Processing, of the IMAQ
Vision Concepts Manual.
•
imaqLookup()—Converts the pixel values of an image by replacing
them with values from a user-defined lookup table.
•
imaqEqualize()—Distributes the grayscale values evenly within a
given grayscale range. Use
in images containing few grayscale values.
•
imaqInverse()—Inverts the pixel intensities of an image to
compute the negative of the image. For example, use
before applying an automatic threshold to your image if the
background pixels are brighter than the object pixels.
imaqEqualize() to increase the contrast
imaqInverse()
Filters
Filter your image when you need to improve the sharpness of transitions in
the image or increase the overall signal-to-noise ratio of the image. You can
choose either a lowpass or highpass filter depending on your needs.
Lowpass filters remove insignificant details by smoothing the image,
removing sharp details, and smoothing the edges between the objects
and the background. You can use
lowpass filter with
imaqConvolve() or imaqNthOrderFilter().
Highpass filters emphasize details, such as edges, object boundaries,
or cracks. These details represent sharp transitions in intensity value.
You can define your own highpass filter with
imaqNthOrderFilter(), or you can use a predefined highpass filter
with
imaqEdgeFilter() or imaqCannyEdgeFilter(). The
imaqEdgeFilter() function allows you to find edges in an image using
predefined edge detection kernels, such as the Sobel, Prewitt, and Roberts
kernels.
IMAQ Vision for LabWindows/CVI User Manual 2-10 ni.com
imaqLowPass() or define your own
imaqConvolve() or
Page 27

Convolution Filter
The imaqConvolve() function allows you to use a predefined set of
lowpass and highpass filters. Each filter is defined by a kernel of
coefficients. Use
predefined kernels do not meet your needs, define your own custom filter
using a 2D array of floating point numbers.
Nth Order Filter
The imaqNthOrderFilter() function allows you to define a lowpass or
highpass filter depending on the value of N that you choose. One specific
Nth order filter, the median filter, removes speckle noise, which appears as
small black and white dots. Use
filter. For more information about Nth order filters, refer to Chapter 5,
Image Processing, of the IMAQ Vision Concepts Manual.
Grayscale Morphology
Perform grayscale morphology when you want to filter grayscale
features of an image. Grayscale morphology helps you remove or
enhance isolated features, such as bright pixels on a dark background.
Use these transformations on a grayscale image to enhance non-distinct
features before thresholding the image in preparation for particle analysis.
Chapter 2 Getting Measurement-Ready Images
imaqGetKernel() to retrieve predefined kernels. If the
imaqMedianFilter() to apply a median
Grayscale morphological transformations compare a pixel to those pixels
surrounding it. The transformation keeps the smallest pixel values when
performing an erosion or keeps the largest pixel values when performing
a dilation.
Refer to Chapter 5, Image Processing, of the IMAQ Vision Concepts
Manual for more information about grayscale morphology
transformations.
Use
imaqGrayMorphology() to perform one of the following seven
transformations:
• Erosion—Reduces the brightness of pixels that are surrounded by
neighbors with a lower intensity.
• Dilation—Increases the brightness of pixels surrounded by neighbors
with a higher intensity. A dilation produces the opposite effect of an
erosion.
• Opening—Removes bright pixels isolated in dark regions and smooths
boundaries.
© National Instruments Corporation 2-11 IMAQ Vision for LabWindows/CVI User Manual
Page 28

Chapter 2 Getting Measurement-Ready Images
• Closing—Removes dark pixels isolated in bright regions and smooths
boundaries.
• Proper-opening—Removes bright pixels isolated in dark regions and
smooths the inner contours of particles.
• Proper-closing—Removes dark pixels isolated in bright regions and
smooths the inner contours of particles.
• Auto-median—Generates simpler particles that have fewer details.
FFT
Use the Fast Fourier Transform (FFT) to convert an image into its
frequency domain. In an image, details and sharp edges are associated
with mid to high spatial frequencies because they introduce significant
gray-level variations over short distances. Gradually varying patterns are
associated with low spatial frequencies.
An image can have extraneous noise, such as periodic stripes, introduced
during the digitization process. In the frequency domain, the periodic
pattern is reduced to a limited set of high spatial frequencies. Also, the
imaging setup may produce non-uniform lighting of the field of view,
which produces an image with a light drift superimposed on the
information you want to analyze. In the frequency domain, the light drift
appears as a limited set of low frequencies around the average intensity of
the image, the DC component.
You can use algorithms working in the frequency domain to isolate and
remove these unwanted frequencies from your image. Complete the
following steps to obtain an image in which the unwanted pattern has
disappeared but the overall features remain.
1. Use
imaqFFT() to convert an image from the spatial domain to the
frequency domain. This function computes the FFT of the image and
results in a complex image representing the frequency information of
your image.
2. Improve your image in the frequency domain with a lowpass or
highpass frequency filter. Specify which type of filter to use with
imaqAttenuate() or imaqTruncate(). Lowpass filters smooth
noise, details, textures, and sharp edges in an image. Highpass filters
emphasize details, textures, and sharp edges in images, but they also
emphasize noise.
• Lowpass attenuation—The amount of attenuation is directly
proportional to the frequency information. At low frequencies,
there is little attenuation. As the frequencies increase, the
IMAQ Vision for LabWindows/CVI User Manual 2-12 ni.com
Page 29

Chapter 2 Getting Measurement-Ready Images
attenuation increases. This operation preserves all of the zero
frequency information. Zero frequency information corresponds
to the DC component of the image or the average intensity of
the image in the spatial domain.
• Highpass attenuation—The amount of attenuation is inversely
proportional to the frequency information. At high frequencies,
there is little attenuation. As the frequencies decrease, the
attenuation increases. The zero frequency component is removed
entirely.
• Lowpass truncation—Frequency components above the ideal
cutoff frequency are removed, and the frequencies below it remain
unaltered.
• Highpass truncation—Frequency components above the ideal
cutoff frequency remain unaltered, and the frequencies below it
are removed.
3. To transform your image back to the spatial domain, use
imaqInverseFFT().
Complex Image Operations
The imaqExtractComplexPlane() and
imaqReplaceComplexPlane() functions allow you to access, process,
and update independently the real and imaginary planes of a complex
image. You can also convert planes of a complex image to an array
and back with
imaqArrayToComplexPlane().
imaqComplexPlaneToArray() and
© National Instruments Corporation 2-13 IMAQ Vision for LabWindows/CVI User Manual
Page 30
Making Grayscale and Color
Measurements
This chapter describes how to take measurements from grayscale and color
images. You can make inspection decisions based on image statistics, such
as the mean intensity level in a region. Based on the image statistics, you
can perform many machine vision inspection tasks on grayscale or color
images, such as detecting the presence or absence of components, detecting
flaws in parts, and comparing a color component with a reference.
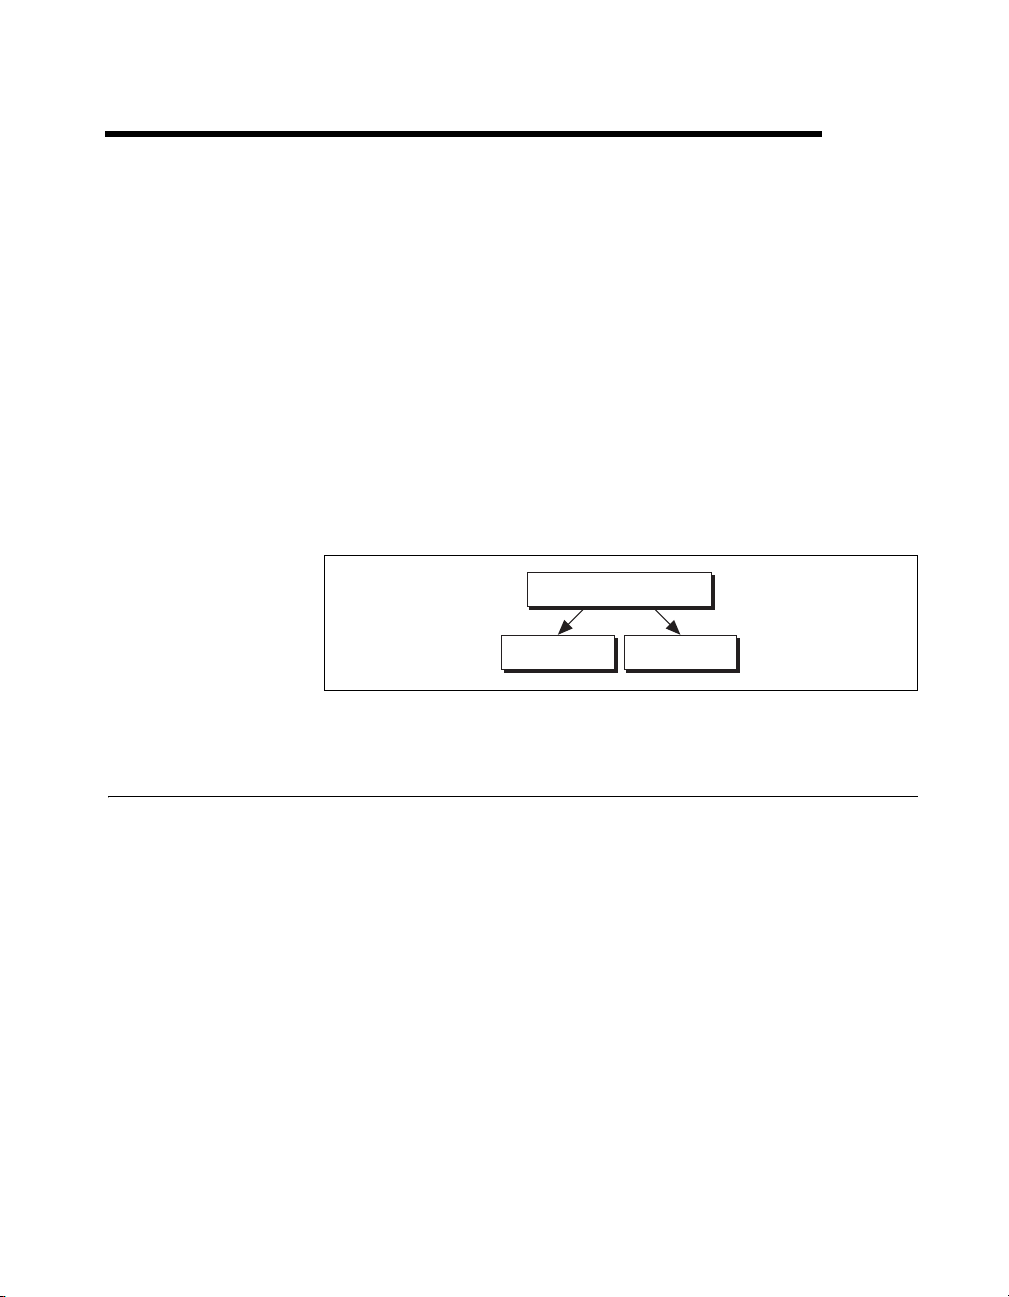
Figure 3-1 illustrates the basic steps involved in making grayscale and
color measurements.
Define Regions of Interest
3
Figure 3-1. Steps to Taking Grayscale and Color Measurements
Define Regions of Interest
A region of interest (ROI) is an area of an image in which you want
to focus your image analysis. You can define an ROI interactively,
programmatically, or with an image mask.
Defining Regions Interactively
You can interactively define an ROI in a window that displays an image.
Use the tools from the IMAQ Vision tools palette to interactively define and
manipulate an ROI.
Measure
Grayscale Statistics
Measure
Color Statistics
© National Instruments Corporation 3-1 IMAQ Vision for LabWindows/CVI User Manual
Page 31

Chapter 3 Making Grayscale and Color Measurements
Table 3-1 describes each of the tools and the manner in which you use
them.
Table 3-1. Tools Palette Functions
Icon Tool Name Function
Selection Tool Select an ROI in the image and adjust the position of its control
points and contours.
Action: Click the desired ROI or control points.
Point Select a pixel in the image.
Action: Click the desired position.
Line Draw a line in the image.
Action: Click the initial position, move the cursor to the final
position, and click again.
Rectangle Draw a rectangle or square in the image.
Action: Click one corner and drag to the opposite corner.
Rotated Rectangle Draw a rotated rectangle in the image.
Action: Click one corner and drag to the opposite corner to create
the rectangle. Then, click the lines inside the rectangle and drag
to adjust the rotation angle.
Oval Draw an oval or circle in the image.
Action: Click the center position and drag to the desired size.
Annulus Draw an annulus in the image.
Action: Click the center position and drag to the desired size.
Adjust the inner and outer radii, and adjust the start and end
angles.
Broken Line Draw a broken line in the image.
Action: Click to place a new vertex and double-click to complete
the ROI element.
Polygon Draw a polygon in the image.
Action: Click to place a new vertex and double-click to complete
the ROI element.
IMAQ Vision for LabWindows/CVI User Manual 3-2 ni.com
Page 32

Chapter 3 Making Grayscale and Color Measurements
Table 3-1. Tools Palette Functions (Continued)
Icon Tool Name Function
Freehand Line Draw a freehand line in the image.
Action: Click the initial position, drag to the desired shape,
and release the mouse button to complete the shape.
Freehand Region Draw a freehand region in the image.
Action: Click the initial position, drag to the desired shape,
and release the mouse button to complete the shape.
Zoom Zoom-in or zoom-out in an image.
Action: Click the image to zoom in. Hold down the <Shift> key
and click to zoom out.
Pan Pan around an image.
Action: Click an initial position, drag to the desired position,
and release the mouse button to complete the pan.
Hold down the <Shift> key while drawing an ROI to constrain the ROI to
the horizontal, vertical, or diagonal axes. Use the Selection Tool to position
an ROI by its control points or vertices. ROIs are context sensitive, meaning
that the cursor actions differ depending on the ROI with which you interact.
For example, if you move your cursor over the side of a rectangle, the
cursor changes to indicate that you can click and drag the side to resize the
rectangle. If you want to draw more than one ROI in a window, hold down
the <Ctrl> key while drawing additional ROIs.
© National Instruments Corporation 3-3 IMAQ Vision for LabWindows/CVI User Manual
Page 33

Chapter 3 Making Grayscale and Color Measurements
You can display the IMAQ Vision tools palette as part of an ROI
constructor window or in a separate, floating window. Follow these steps
to invoke an ROI constructor and define an ROI from within the ROI
constructor window:
1. Use
imaqConstructROI2() to display an image and the tools palette
in an ROI constructor window, as shown in Figure 3-2.
Figure 3-2. ROI Constructor
2. Select an ROI tool from the tools palette.
3. Draw an ROI on your image. Resize and reposition the ROI until it
designates the area you want to inspect.
4. Click OK to output a descriptor of the region you selected. You can
input this ROI descriptor into many analysis and processing functions.
You can also convert the ROI descriptor into an image mask, which
you can use to process selected regions in the image. Use
imaqROIToMask() to convert the ROI descriptor into an image mask.
You can also use
imaqSelectRect(), and imaqSelectAnnulus() to define regions
imaqSelectPoint(), imaqSelectLine(),
of interest. Complete the following steps to use these functions.
1. Call the function to display an image in an ROI Constructor window.
Only the tools specific to that function are available for you to use.
2. Draw an ROI on your image. Resize or reposition the ROI until it
covers the area you want to process.
IMAQ Vision for LabWindows/CVI User Manual 3-4 ni.com
Page 34

Chapter 3 Making Grayscale and Color Measurements
3. Click OK to populate a structure representing the ROI. You can use
this structure as an input to a variety of functions, such as the following
functions that measure grayscale intensity.
•
imaqLightMeterPoint()—Uses the output of
imaqSelectPoint()
• imaqLightMeterLine()—Uses the output of
imaqSelectLine()
• imaqLightMeterRect()—Uses the output of
imaqSelectRect()
Tools Palette Transformation
The tools palette, shown in Figure 3-3, automatically transforms from the
palette on the left to the palette on the right when you manipulate an ROI
tool in an image window. The palette on the right displays the
characteristics of the ROI you are drawing.
Pixel Intensity
Image-type indicator (8-bit, 16-bit, Float, RGB, HSL, Complex)
Coordinates of the mouse
on the active image window
Anchoring coordinates of a Region of Interest
Size of an active Region of Interest
Length and horizontal angle
of a line region
Figure 3-3. Tools Palette Tools and Information
© National Instruments Corporation 3-5 IMAQ Vision for LabWindows/CVI User Manual
Page 35

Chapter 3 Making Grayscale and Color Measurements
The following list describes how you can display the tools palette in a
separate window and manipulate the palette.
•Use
imaqShowToolWindow() to display the tools palette in a floating
window.
•Use
imaqSetupToolWindow() to configure the appearance of the
tools palette.
•Use
•Use
imaqMoveToolWindow() to move the tools palette.
imaqCloseToolWindow() to close the tools palette.
If you want to draw an ROI without using an ROI constructor or displaying
the tools palette in a separate window, use
This function allows you to select a contour from the tools palette without
opening the palette.
Defining Regions Programmatically
When you have an automated application, you may need to define regions
of interest programmatically. To programmatically define an ROI, create
the ROI using
A contour is a shape that defines an ROI. You can create contours from
points, lines, rectangles, ovals, polygons, and annuli. For example, to add a
rectangular contour to an ROI, use
imaqCreateROI(), and then add the individual contours.
imaqSetCurrentTool().
imaqAddRectContour().
Specify regions by providing basic parameters that describe the region you
want to define. For example, define a point by providing the x-coordinate
and y-coordinate. Define a line by specifying the start and end coordinates.
Define a rectangle by specifying the coordinates of the top, left point; the
width and height; and in the case of a rotated rectangle, the rotation angle.
Defining Regions with Masks
You can define regions to process with image masks. An image mask is
an 8-bit image of the same size as or smaller than the image you want to
process. Pixels in the mask image determine whether the corresponding
pixel in the source image needs to be processed. If a pixel in the image
mask has a value different than 0, the corresponding pixel in the source
image is processed. If a pixel in the image mask has a value of 0, the
corresponding pixel in the source image is left unchanged.
When you need to make intensity measurements on particles in an image,
you can use a mask to define the particles. First, threshold your image to
make a new binary image. For more information about binary images, refer
to Chapter 4, Performing Particle Analysis. You can input the binary image
IMAQ Vision for LabWindows/CVI User Manual 3-6 ni.com
Page 36

or a labeled version of the binary image as a mask image to the intensity
measurement function. If you want to make color comparisons, convert the
binary image into an ROI descriptor using
Measure Grayscale Statistics
You can measure grayscale statistics in images using light meters or
quantitative analysis functions. You can obtain the center of energy for
an image with the centroid function.
Use
imaqLightMeterPoint() to measure the light intensity at a
point in the image. Use
statistics along a line in the image, such as mean intensity,
standard deviation, minimum intensity, and maximum intensity.
Use
imaqLightMeterRect() to get the pixel value statistics within
a rectangular region in an image.
Use
imaqQuantify() to obtain the following statistics about the entire
image or individual regions in the image: mean intensity, standard
deviation, minimum intensity, maximum intensity, area, and the percentage
of the image that you analyzed. You can specify regions in the image with
a labeled image mask. A labeled image mask is a binary image that has
been processed so that each region in the image mask has a unique intensity
value. Use
imaqLabel2() to label your image mask.
imaqLightMeterLine() to get pixel value
Chapter 3 Making Grayscale and Color Measurements
imaqMaskToROI().
Use
imaqCentroid() to compute the energy center of the image, or of a
region within an image.
Measure Color Statistics
Most image processing and analysis functions apply to 8-bit images.
However, you can analyze and process individual components of a color
image.
Using
imaqExtractColorPlanes(), you can break down a color image
into various sets of primary components, such as RGB (Red, Green, and
Blue), HSI (Hue, Saturation, and Intensity), HSL (Hue, Saturation, and
Luminance), or HSV (Hue, Saturation, and Value). Each component
becomes an 8-bit or 16-bit image that you can process like any other
grayscale image. Using
reassemble a color image from a set of three 8-bit or 16-bit images, where
each image becomes one of the three primary components. Figures 3-4
and 3-5 illustrate how a color image breaks down into its three primary
components.
© National Instruments Corporation 3-7 IMAQ Vision for LabWindows/CVI User Manual
imaqReplaceColorPlanes(), you can
Page 37

Chapter 3 Making Grayscale and Color Measurements
Color
Image
32
Red
Green
Blue
Hue
or
Saturation
Intensity
Hue
Saturation
or
Luminance
Hue
or
Saturation
Value
8
8
8
8
8
8
8
8
8
8
8
8
8-bit Image Processing
8
8
8
8
8
8
8
8
8
8
8
8
Red
Green
Blue
Hue
Saturation
Intensity
Hue
Saturation
Luminance
Hue
Saturation
Value
or
Color
Image
32
or
or
Figure 3-4. Primary Components of a 32-Bit Color Image
16
Color
Image
1664
Red
Green
Blue
161616
16
16
16-bit
Image
Processing
16161616
16
16
Red
Green
Blue
1664
Color
Image
Figure 3-5. Primary Components of a 64-Bit Color Image
Use imaqExtractColorPlanes() to extract the red, green, blue, hue
saturation, intensity, luminance, or value plane of a color image into an
8-bit image.
Note You can also use imaqExtractColorPlanes() to process the red, green, and blue
components of a 64-bit image.
IMAQ Vision for LabWindows/CVI User Manual 3-8 ni.com
Page 38

Comparing Colors
Chapter 3 Making Grayscale and Color Measurements
You can use the color matching capability of IMAQ Vision to compare or
evaluate the color content of an image or regions in an image.
Complete the following steps to compare colors using color matching:
1. Select an image containing the color information that you want to use
as a reference. The color information can consist of a single color or
multiple dissimilar colors, such as red and blue.
2. Use the entire image or regions in the image to learn the color
information using
spectrum that contains a compact description of the color information
in an image or ROI. Use the color spectrum to represent the learned
color information for all subsequent matching operations.
Refer to Chapter 14, Color Inspection, of the IMAQ Vision Concepts
Manual for more information about color learning.
3. Define an entire image, a region, or multiple regions in an image as the
inspection or comparison area.
4. Use
5. Use the color matching score as a measure of similarity between the
imaqMatchColor() to compare the learned color information to
the color information in the inspection regions. This function returns
an array of scores that indicates how close the matches are to the
learned color information.
reference color information and the color information in the image
regions being compared.
imaqLearnColor(), which outputs a color
Learning Color Information
Choose the color information carefully when learning color information.
• Specify an image or regions in an image that contain the color or color
information that you want to learn.
• Select the level of detail you want the for the learned color information.
• Choose colors that you want to ignore during matching.
Specifying the Color Information to Learn
Because color matching only uses color information to measure similarity,
the image or regions in the image representing the object must contain only
the significant colors that represent the object, as shown in Figure 3-6a.
Figure 3-6b illustrates an unacceptable region containing background
colors.
© National Instruments Corporation 3-9 IMAQ Vision for LabWindows/CVI User Manual
Page 39

Chapter 3 Making Grayscale and Color Measurements
Figure 3-6. Template Color Information
a. b.
The following sections explain when to learn the color information
associated with an entire image, a region in an image, or multiple regions
in an image.
Using the Entire Image
You can use an entire image to learn the color spectrum that represents the
entire color distribution of the image. In a fabric identification application,
for example, an entire image can specify the color information associated
with a certain fabric type, as shown in Figure 3-7.
Figure 3-7. Using the Entire Image to Learn Color Distribution
Using a Region in the Image
You can select a region in the image to provide the color information for
comparison. A region is helpful for pulling out the useful color information
in an image. Figure 3-8 shows an example of using a region that contains
the color information that is important for the application.
IMAQ Vision for LabWindows/CVI User Manual 3-10 ni.com
Page 40

Chapter 3 Making Grayscale and Color Measurements
Figure 3-8. Using a Single Region to Learn Color Distribution
Using Multiple Regions in the Image
The interaction of light with the object surface creates the observed color of
that object. The color of a surface depends on the directions of illumination
and the direction from which the surface is observed. Two identical objects
may have different appearances because of a difference in positioning or a
change in the lighting conditions.
Figure 3-9 shows how light reflects differently off of the 3D surfaces of the
fuses, resulting in slightly different colors for identical fuses. Compare the
3-amp fuse in the upper row with the 3-amp fuse in the lower row. The
difference in light reflection results in different color spectrums for
identical fuses.
If you learn the color spectrum by drawing a region of interest around the
3-amp fuse in the upper row, and then do a color matching for the 3-amp
fuse in the upper row, you get a very high match score—close to 1000. But
the match score for the 3-amp fuse in the lower row is quite low—around
500. This problem could cause a mismatch for the color matching in a fuse
box inspection process.
The color learning algorithm of IMAQ Vision uses a clustering process to
find the representative colors from the color information specified by one
or multiple regions in the image. To create a representative color spectrum
for all 3-amp fuses in the learning phase, draw an ROI around the 3-amp
fuse in the upper row, hold down the <Shift> key, and draw another ROI
around the 3-amp fuse in the lower row. The new color spectrum represents
3-amp fuses better and results in high match scores (around 800) for both
3-amp fuses. Use as many samples as you want in an image to learn the
representative color spectrum for a specified template.
© National Instruments Corporation 3-11 IMAQ Vision for LabWindows/CVI User Manual
Page 41

Chapter 3 Making Grayscale and Color Measurements
1
1 Regions Used to Learn Color Information
Figure 3-9. Using Multiple Regions to Learn Color Distribution
Choosing a Color Representation Sensitivity
When you learn a color, you need to specify the sensitivity required to
specify the color information. An image containing a few, well-separated
colors in the color space requires a lower sensitivity to describe the color
than an image that contains colors that are close to one another in the color
space. Use the sensitivity parameter of
granularity you want to use to represent the colors. Refer to the Color
Sensitivity section of Chapter 5, Performing Machine Vision Tasks, for
more information about color sensitivity.
IMAQ Vision for LabWindows/CVI User Manual 3-12 ni.com
imaqLearnColor() to specify the
Page 42

Chapter 3 Making Grayscale and Color Measurements
Ignoring Learned Colors
Ignore certain color components in color matching by replacing the
corresponding component in the input color spectrum array to –1. For
example, by replacing the last component in the color spectrum with –1,
the white color is ignored during the color matching process. By replacing
the second to last component in the color spectrum, the black color is
ignored during the color matching process.
To ignore other color components in color matching, determine the index
to the color spectrum by locating the corresponding bins in the color wheel,
where each bin corresponds to a component in the color spectrum array.
Ignoring certain colors such as the background color results in a more
accurate color matching score. Ignoring the background color also provides
more flexibility when defining the regions of interest in the color matching
process. Ignoring other, non-background colors, such as the white color
created by glare on a metallic surface, also improves the accuracy of the
color matching. Experiment learning the color information about different
parts of the images to determine which colors to ignore. Refer to
Chapter 14, Color Inspection, of the IMAQ Vision Concepts Manual
for more information about the color wheel and color bins.
© National Instruments Corporation 3-13 IMAQ Vision for LabWindows/CVI User Manual
Page 43

Performing Particle Analysis
This chapter describes how to perform particle analysis on your images.
Use particle analysis to find statistical information about particles—such as
the area, location, and presence of particles. With this information, you can
perform many machine vision inspection tasks, such as detecting flaws
on silicon wafers or detecting soldering defects on electronic boards.
Examples of how particle analysis can help you perform inspection tasks
include locating structural defects on wood planks or detecting cracks on
plastic sheets.
Figure 4-1 illustrates the steps involved in performing particle analysis.
Create a Binary Image
Improve a Binary Image
Make Particle Measurements
in Pixels or Real-World Units
4
Figure 4-1. Steps to Performing Particle Analysis
Create a Binary Image
Threshold your grayscale or color image to create a binary image. Creating
a binary image separates the objects that you want to inspect from the
background. The threshold operation sets the background pixels to 0 in the
binary image while setting the object pixels to a non-zero value. Object
pixels have a value of 1 by default, but you can set the object pixels to any
value you choose.
You can use different techniques to threshold your image. If all the
objects of interest in your grayscale image fall within a continuous range
of intensities and you can specify this threshold range manually, use
imaqThreshold() to threshold your image.
© National Instruments Corporation 4-1 IMAQ Vision for LabWindows/CVI User Manual
Page 44

Chapter 4 Performing Particle Analysis
If all the objects in your grayscale image are either brighter or darker than
your background, you can use
determine the optimal threshold range and threshold your image.
Automatic thresholding techniques offer more flexibility than simple
thresholds based on fixed ranges. Because automatic thresholding
techniques determine the threshold level according to the image histogram,
the operation is more independent of changes in the overall brightness and
contrast of the image than a fixed threshold. These techniques are more
resistant to changes in lighting, which makes them well suited for
automated inspection tasks.
If your grayscale image contains objects that have multiple discontinuous
grayscale values, use
threshold ranges.
imaqAutoThreshold() to automatically
imaqMultithreshold() to specify multiple
If you need to threshold a color image, use
You must specify threshold ranges for each of the color planes using either
the RGB or HSL color model. The binary image resulting from a color
threshold is an 8-bit binary image.
Improve the Binary Image
After you threshold your image, you may want to improve the resulting
binary image with binary morphology. You can use primary binary
morphology or advanced binary morphology to remove unwanted
particles, separate connected particles, or improve the shape of particles.
Primary morphology functions work on the image as a whole by processing
pixels individually. Advanced morphology operations are built upon the
primary morphological operators and work on particles as opposed to
pixels. Refer to Chapter 9, Binary Morphology, of the IMAQ Vision
Concepts Manual for lists of which morphology functions are primary
and which are advanced.
The advanced morphology functions require that you specify the type of
connectivity to use. Use connectivity-4 when you want IMAQ Vision to
consider pixels to be part of the same particle only when the pixels touch
along an adjacent edge. Use connectivity-8 when you want IMAQ Vision
to consider pixels to be part of the same particle even if the pixels touch
only at a corner. Refer to Chapter 9, Binary Morphology, of the
IMAQ Vision Concepts Manual for more information about connectivity.
imaqColorThreshold().
Note Use the same type of connectivity throughout your application.
IMAQ Vision for LabWindows/CVI User Manual 4-2 ni.com
Page 45

Removing Unwanted Particles
Use imaqRejectBorder() to remove particles that touch the border of
the image. Reject particles on the border of the image when you suspect
that the information about those particles is incomplete.
Use
imaqSizeFilter() to remove large or small particles that do
not interest you. You can also use the
IMAQ_POPEN methods in imaqMorphology() to remove small particles.
Unlike
imaqSizeFilter(), these three operations alter the size and
shape of the remaining particles.
Chapter 4 Performing Particle Analysis
IMAQ_ERODE, IMAQ_OPEN, and
Use the
IMAQ_HITMISS method of imaqMorphology() to locate
particular configurations of pixels, which you define with a structuring
element. Depending on the configuration of the structuring element, the
IMAQ_HITMISS method can locate single isolated pixels, cross-shape or
longitudinal patterns, right angles along the edges of particles, and other
user-specified shapes. Refer to Chapter 9, Binary Morphology, of the
IMAQ Vision Concepts Manual for more information about structuring
elements.
If you know enough about the shape features of the particles you want to
keep, use
imaqParticleFilter2() to filter out particles that do not
interest you.
Separating Touching Particles
Use imaqSeparation() or apply an erosion or an open operation
with
imaqMorphology() to separate touching objects. The
imaqSeparation() function is an advanced function that separates
particles without modifying their shapes. However, erosion and open
operations alter the shape of all the particles.
Note A separation is a time-intensive operation compared to an erosion or open operation.
Consider using an erosion or open operation if speed is an issue with your application.
Improving Particle Shapes
Use imaqFillHoles() to fill holes in the particles. Use
imaqMorphology() to perform a variety of operations on the particles.
You can use the
and
IMAQ_POPEN methods to smooth the boundaries of the particles. Open
and proper-open smooth the boundaries of the particle by removing small
IMAQ_AUTOM, IMAQ_CLOSE, IMAQ_PCLOSE, IMAQ_OPEN,
© National Instruments Corporation 4-3 IMAQ Vision for LabWindows/CVI User Manual
Page 46

Chapter 4 Performing Particle Analysis
isthmuses while close widens the isthmuses. Close and proper-close fill
small holes in the particle. Auto-median removes isthmuses and fills holes.
Refer to Chapter 9, Binary Morphology, of the IMAQ Vision Concepts
Manual for more information about these methods.
Make Particle Measurements
After you create a binary image and improve it, you can make particle
measurements. IMAQ Vision can return the measurements in uncalibrated
pixels or calibrated real-world units. With these measurements you can
determine the location of particles and their shape features. Use the
following functions to perform particle measurements:
•
imaqCountParticles()—This function returns the number of
particles in an image and calculates various measurements for each
particle.
•
imaqMeasureParticle()—This function uses the calculations
from
imaqCountParticles() to return specific measurements of
a particle.
Table 4-1 lists all of the measurements that
returns.
Table 4-1. Particle Measurements
Measurement Description
IMAQ_MT_AREA
IMAQ_MT_AREA_BY_IMAGE_AREA
IMAQ_MT_AREA_BY_PARTICLE_AND_HOLES_AREA
IMAQ_MT_AVERAGE_HORIZ_SEGMENT_LENGTH
IMAQ_MT_AVERAGE_VERT_SEGMENT_LENGTH
IMAQ_MT_BOUNDING_RECT_BOTTOM
IMAQ_MT_BOUNDING_RECT_TOP
imaqMeasureParticle()
Area of the particle
Percentage of the particle area
covering the image area
Percentage of the particle area in
relation to the area of its particle and
holes
Average length of a horizontal
segment in the particle
Average length of a vertical segment
in the particle
Y-coordinate of the lowest particle
point
Y-coordinate of the highest particle
point
IMAQ Vision for LabWindows/CVI User Manual 4-4 ni.com
Page 47

Chapter 4 Performing Particle Analysis
Table 4-1. Particle Measurements (Continued)
Measurement Description
IMAQ_MT_BOUNDING_RECT_LEFT
IMAQ_MT_BOUNDING_RECT_RIGHT
IMAQ_MT_BOUNDING_RECT_HEIGHT
IMAQ_MT_BOUNDING_RECT_WIDTH
IMAQ_MT_BOUNDING_RECT_DIAGONAL
IMAQ_MT_CENTER_OF_MASS_X
IMAQ_MT_CENTER_OF_MASS_Y
X-coordinate of the leftmost particle
point
X-coordinate of the rightmost
particle point
Distance between the y-coordinate
of highest particle point and the
y-coordinate of the lowest particle
point
Distance between the x-coordinate
of the leftmost particle point and the
x-coordinate of the rightmost particle
point
Distance between opposite corners of
the bounding rectangle
X-coordinate of the point
representing the average position
of the total particle mass assuming
every point in the particle has a
constant density
Y-coordinate of the point
representing the average position
of the total particle mass assuming
every point in the particle has a
constant density
IMAQ_MT_COMPACTNESS_FACTOR
Area divided by the product of
bounding rectangle width and
bounding rectangle height
IMAQ_MT_CONVEX_HULL_AREA
Area of the smallest convex polygon
containing all points in the particle
IMAQ_MT_CONVEX_HULL_PERIMETER
Perimeter of the smallest convex
polygon containing all points in
the particle
© National Instruments Corporation 4-5 IMAQ Vision for LabWindows/CVI User Manual
Page 48

Chapter 4 Performing Particle Analysis
Table 4-1. Particle Measurements (Continued)
Measurement Description
IMAQ_MT_EQUIVALENT_ELLIPSE_MAJOR_AXIS
IMAQ_MT_EQUIVALENT_ELLIPSE_MINOR_AXIS
IMAQ_MT_EQUIVALENT_ELLIPSE_MINOR_AXIS_FERET
IMAQ_MT_EQUIVALENT_RECT_DIAGONAL
IMAQ_MT_EQUIVALENT_RECT_LONG_SIDE
IMAQ_MT_EQUIVALENT_RECT_SHORT_SIDE
IMAQ_MT_EQUIVALENT_RECT_SHORT_SIDE_FERET
Length of the major axis of the ellipse
with the same perimeter and area as
the particle
Length of the minor axis of the
ellipse with the same perimeter
and area as the particle
Length of the minor axis of the
ellipse with the same area as the
particle, and major axis equal in
length to the max feret diameter
Distance between opposite corners of
the rectangle with the same perimeter
and area as the particle
Longest side of the rectangle with
the same perimeter and area as the
particle
Shortest side of the rectangle with
the same perimeter and area as the
particle
Shortest side of the rectangle with the
same area as the particle, and longest
side equal in length to the max feret
diameter
IMAQ_MT_ELONGATION_FACTOR
Max feret diameter divided by
equivalent rectangle short side (feret)
IMAQ_MT_FIRST_PIXEL_X
X-coordinate of the highest, leftmost
particle pixel
IMAQ_MT_FIRST_PIXEL_Y
Y-coordinate of the highest, leftmost
particle pixel
IMAQ_MT_HU_MOMENT_1
IMAQ_MT_HU_MOMENT_2
IMAQ_MT_HU_MOMENT_3
IMAQ_MT_HU_MOMENT_4
IMAQ Vision for LabWindows/CVI User Manual 4-6 ni.com
First Hu moment
Second Hu moment
Third Hu moment
Fourth Hu moment
Page 49

Chapter 4 Performing Particle Analysis
Table 4-1. Particle Measurements (Continued)
Measurement Description
IMAQ_MT_HU_MOMENT_5
IMAQ_MT_HU_MOMENT_6
IMAQ_MT_HU_MOMENT_7
IMAQ_MT_HEYWOOD_CIRCULARITY_FACTOR
IMAQ_MT_HOLES_PERIMETER
IMAQ_MT_HYDRAULIC_RADIUS
IMAQ_MT_HOLES_AREA
IMAQ_MT_IMAGE_AREA
IMAQ_MT_MAX_FERET_DIAMETER
IMAQ_MT_MAX_FERET_DIAMETER_END_X
Fifth Hu moment
Sixth Hu moment
Seventh Hu moment
Perimeter divided by the
circumference of a circle
with the same area
Sum of the perimeters of each hole in
the particle
Particle area divided by the particle
perimeter
Sum of the areas of each hole in the
particle
Area of the image
Distance between the start and end of
the line segment connecting the two
perimeter points that are the furthest
apart
X-coordinate of the end of the
line segment connecting the two
perimeter points that are the furthest
apart
IMAQ_MT_MAX_FERET_DIAMETER_END_Y
Y-coordinate of the end of the
line segment connecting the two
perimeter points that are the furthest
apart
IMAQ_MT_MAX_FERET_DIAMETER_ORIENTATION
Angle of the line segment connecting
the two perimeter points that are the
furthest apart
IMAQ_MT_MAX_FERET_DIAMETER_START_X
X-coordinate of the start of the
line segment connecting the two
perimeter points that are the furthest
apart
© National Instruments Corporation 4-7 IMAQ Vision for LabWindows/CVI User Manual
Page 50

Chapter 4 Performing Particle Analysis
Table 4-1. Particle Measurements (Continued)
Measurement Description
IMAQ_MT_MAX_FERET_DIAMETER_START_Y
IMAQ_MT_MAX_HORIZ_SEGMENT_LENGTH_LEFT
IMAQ_MT_MAX_HORIZ_SEGMENT_LENGTH_RIGHT
IMAQ_MT_MAX_HORIZ_SEGMENT_LENGTH_ROW
IMAQ_MT_MOMENT_OF_INERTIA_XX
IMAQ_MT_MOMENT_OF_INERTIA_XY
IMAQ_MT_MOMENT_OF_INERTIA_YY
IMAQ_MT_MOMENT_OF_INERTIA_XXX
Y-coordinate of the start of the
line segment connecting the two
perimeter points that are the furthest
apart
X-coordinate of the leftmost pixel in
the longest row of contiguous pixels
in the particle
X-coordinate of the rightmost pixel
in the longest row of contiguous
pixels in the particle
Y-coordinate of all of the pixels in the
longest row of contiguous pixels in
the particle
Moment of inertia in the x direction
twice
Moment of inertia in the x and y
directions
Moment of inertia in the y direction
twice
Moment of inertia in the x direction
three times
IMAQ_MT_MOMENT_OF_INERTIA_XXY
Moment of inertia in the x direction
twice and the y direction once
IMAQ_MT_MOMENT_OF_INERTIA_XYY
Moment of inertia in the x direction
once and the y direction twice
IMAQ_MT_MOMENT_OF_INERTIA_YYY
Moment of inertia in the y direction
three times
IMAQ_MT_NORM_MOMENT_OF_INERTIA_XX
Normalized moment of inertia in the
x direction twice
IMAQ_MT_NORM_MOMENT_OF_INERTIA_XY
Normalized moment of inertia in the
x and y directions
IMAQ_MT_NORM_MOMENT_OF_INERTIA_YY
Normalized moment of inertia in the
y direction twice
IMAQ Vision for LabWindows/CVI User Manual 4-8 ni.com
Page 51

Chapter 4 Performing Particle Analysis
Table 4-1. Particle Measurements (Continued)
Measurement Description
IMAQ_MT_NORM_MOMENT_OF_INERTIA_XXX
IMAQ_MT_NORM_MOMENT_OF_INERTIA_XXY
IMAQ_MT_NORM_MOMENT_OF_INERTIA_XYY
IMAQ_MT_NORM_MOMENT_OF_INERTIA_YYY
IMAQ_MT_NUMBER_OF_HOLES
IMAQ_MT_NUMBER_OF_HORIZ_SEGMENTS
IMAQ_MT_NUMBER_OF_VERT_SEGMENTS
IMAQ_MT_ORIENTATION
IMAQ_MT_PERIMETER
Normalized moment of inertia in the
x direction three times
Normalized moment of inertia in the
x direction twice and the y direction
once
Normalized moment of inertia in the
x direction once and the y direction
twice
Normalized moment of inertia in the
y direction three times
Number of holes in the particle
Number of horizontal segments in the
particle
Number of vertical segments in the
particle
Angle of the line that passes through
the particle center of mass about
which the particle has the lowest
moment of inertia
Length of the outer boundary of the
particle
IMAQ_MT_PARTICLE_AND_HOLES_AREA
Area of a particle that completely
covers the image
IMAQ_MT_RATIO_OF_EQUIVALENT_ELLIPSE_AXES
Equivalent ellipse major axis divided
by equivalent ellipse minor axis
IMAQ_MT_RATIO_OF_EQUIVALENT_RECT_SIDES
Equivalent rectangle long side
divided by equivalent rectangle
short side
IMAQ_MT_SUM_X
Sum of all x-coordinates in the
particle
IMAQ_MT_SUM_Y
Sum of all y-coordinates in the
particle
© National Instruments Corporation 4-9 IMAQ Vision for LabWindows/CVI User Manual
Page 52

Chapter 4 Performing Particle Analysis
Table 4-1. Particle Measurements (Continued)
Measurement Description
IMAQ_MT_SUM_XX
IMAQ_MT_SUM_XY
IMAQ_MT_SUM_YY
IMAQ_MT_SUM_XXX
IMAQ_MT_SUM_XXY
IMAQ_MT_SUM_XYY
IMAQ_MT_SUM_YYY
IMAQ_MT_TYPE_FACTOR
IMAQ_MT_WADDEL_DISK_DIAMETER
Sum of all x-coordinates squared in
the particle
Sum of all x-coordinates multiplied
by y-coordinates in the particle
Sum of all y-coordinates squared in
the particle
Sum of all x-coordinates cubed in the
particle
Sum of all x-coordinates squared
multiplied by y-coordinates in the
particle
Sum of all x-coordinates multiplied
by y-coordinates squared in the
particle
Sum of all y-coordinates cubed in the
particle
Factor relating area to moment of
inertia
Diameter of a disk with the same area
as the particle
IMAQ Vision for LabWindows/CVI User Manual 4-10 ni.com
Page 53

Performing Machine Vision
Tasks
This chapter describes how to perform many common machine vision
inspection tasks. The most common inspection tasks are detecting the
presence or absence of parts in an image and measuring the dimensions
of parts to see if they meet specifications.
Measurements are based on characteristic features of the object represented
in the image. Image processing algorithms traditionally classify the type
of information contained in an image as edges, surfaces and textures, or
patterns. Different types of machine vision algorithms leverage and extract
one or more types of information.
Edge detectors and derivative techniques—such as rakes, concentric rakes,
and spokes—use edges represented in the image. They locate, with high
accuracy, the position of the edge of an object in the image. For example,
a technique called clamping uses edge locations to measure the width of a
part. You can combine multiple edge locations to compute intersection
points, projections, circles, or ellipse fits.
5
Pattern matching algorithms use edges and patterns. Pattern matching can
locate, with very high accuracy, the position of fiducials or characteristic
features of the part under inspection. Those locations can then be combined
to compute lengths, angles, and other object measurements.
The robustness of your measurement relies on the stability of your image
acquisition conditions. Sensor resolution, lighting, optics, vibration
control, part fixture, and general environment are key components of the
imaging setup. All the elements of the image acquisition chain directly
affect the accuracy of the measurements.
© National Instruments Corporation 5-1 IMAQ Vision for LabWindows/CVI User Manual
Page 54

Chapter 5 Performing Machine Vision Tasks
Figure 5-1 illustrates the basic steps involved in performing machine vision
inspection tasks.
Locate Objects to Inspect
Set Search Areas
Find Measurement Points
Convert Pixel Coordinates to
Real-World Coordinates
Figure 5-1. Steps to Performing Machine Vision
Note
Diagram items enclosed with dashed lines are optional steps.
Locate Objects to Inspect
In a typical machine vision application, you extract measurements from
ROIs rather than the entire image. To use this technique, the parts of the
object you are interested in must always appear inside the ROI you define.
If the object under inspection is always at the same location and orientation
in the images you need to process, defining an ROI is simple. Refer to
the Set Search Areas section of this chapter for information about selecting
an ROI.
Make Measurements
Identify Parts Under Inspection
Classify
Objects
Display Results
Read
Characters
Read
Symbologies
Often, the object under inspection appears rotated or shifted relative to the
reference image in which you located the object. When this occurs, the
ROIs need to shift and rotate with the parts of the object in which you are
interested. To move the ROIs with the object, you must define a reference
coordinate system relative to the object in the reference image. During the
measurement process, the coordinate system moves with the object when
IMAQ Vision for LabWindows/CVI User Manual 5-2 ni.com
Page 55

Chapter 5 Performing Machine Vision Tasks
it appears shifted and rotated in the image you need to process. This
coordinate system is referred to as the measurement coordinate system.
The measurement methods automatically move the ROIs to the correct
position using the position of the measurement coordinate system with
respect to the reference coordinate system. Refer to Chapter 13,
Dimensional Measurements, of the IMAQ Vision Concepts Manual
for information about coordinate systems.
You can build a coordinate transform using edge detection or pattern
matching. The output of the edge detection and pattern matching functions
that build a coordinate system are the origin, angle, and axes direction of
the coordinate system. Some machine vision functions take this output and
adjust the regions of inspection automatically. You can also use these
outputs to programmatically move the regions of inspection relative to the
object.
© National Instruments Corporation 5-3 IMAQ Vision for LabWindows/CVI User Manual
Page 56

Chapter 5 Performing Machine Vision Tasks
Using Edge Detection to Build a Coordinate Transform
You can build a coordinate transform using two edge detection techniques.
Use
imaqFindTransformRect() to define a coordinate system using
one rectangular region. Use
coordinate system using two independent rectangular regions. Follow these
steps to build a coordinate transform using edge detection.
Note To use this technique, the object cannot rotate more than ±65° in the image.
1. Specify one or two rectangular ROIs.
a. If you use
imaqFindTransformRect(), specify one rectangular
ROI that includes part of two straight, nonparallel boundaries of
the object, as shown in Figure 5-2. This rectangular region must
be large enough to include these boundaries in all the images you
want to inspect.
imaqFindTransformRects() to define a
2
3
1 Search Area for the Coordinate System
2 Object Edges
a. b.
Figure 5-2. Coordinate Systems of a Reference Image and Inspection Image
1
4
2
3
3 Origin of the Coordinate System
4 Measurement Area
1
4
IMAQ Vision for LabWindows/CVI User Manual 5-4 ni.com
Page 57

Chapter 5 Performing Machine Vision Tasks
b. If you use imaqFindTransformRects(), specify two
rectangular objects, each containing one separate, straight
boundary of the object, as shown in Figure 5-3. The boundaries
cannot be parallel. The regions must be large enough to include
the boundaries in all the images you want to inspect.
4
2
2
3
1 Primary Search Area
2 Secondary Search Area
4
3
1
3 Origin of the Coordinate System
4 Measurement Area
1
b.a.
Figure 5-3. Locating Coordinate System Axes with Two Search Areas
2. Use the options parameter to choose the options you need to locate the
edges on the object, the coordinate system axis direction, and the
results that you want to overlay onto the image. Set the options
parameter to
NULL to use the default options.
3. Choose the mode for the function. To build a coordinate transform for
the first time, set the mode parameter to
IMAQ_FIND_REFERENCE.
To update the coordinate transform in subsequent images, set this
mode to
IMAQ_UPDATE_TRANSFORM.
© National Instruments Corporation 5-5 IMAQ Vision for LabWindows/CVI User Manual
Page 58

Chapter 5 Performing Machine Vision Tasks
Using Pattern Matching to Build a Coordinate Transform
You can build a coordinate transform using pattern matching. Use
imaqFindTransformPattern() to define a coordinate system based on
the location of a reference feature. Use this technique when the object under
inspection does not have straight, distinct edges. Complete the following
steps to build a coordinate reference system using pattern matching.
Note The object may rotate 360° in the image using this technique if you use
rotation-invariant pattern matching.
1. Define a template that represents the part of the object that you want
to use as a reference feature. Refer to the Find Measurement Points
section of this chapter for more information about defining a template.
2. Define a rectangular ROI in which you expect to find the template.
3. Use the options parameter to select your options for finding the pattern
and the results that you want to overlay onto the image. When setting
the
Mode element, select IMAQ_MATCH_ROTATION_INVARIANT when
you expect your template to appear rotated in the inspection images.
Otherwise, select
parameter to
4. Choose the mode for the function. To build a coordinate transform for
the first time, set the mode parameter to
To update the coordinate system in subsequent images, set the mode
parameter to
IMAQ_MATCH_SHIFT_INVARIANT. Set the options
NULL to use the default options.
IMAQ_FIND_REFERENCE.
IMAQ_UPDATE_TRANSFORM.
IMAQ Vision for LabWindows/CVI User Manual 5-6 ni.com
Page 59

Chapter 5 Performing Machine Vision Tasks
Choosing a Method to Build the Coordinate Transform
Figure 5-4 guides you through choosing the best method for building a
coordinate transform for your application.
Start
Object positioning
accuracy better
than ±65 degrees.
Ye s
The object under
inspection has a straight,
distinct edge (main axis).
Ye s
The object contains a
second distinct edge not parallel
to the main axis in the same
search area.
Ye s
Build a
coordinate transformation
based on edge detection
using a single search area.
No
No
No
The object contains
a second distinct edge not
parallel to the main axis in a
separate search area.
Ye s
Build a coordinate
transformation based on
edge detection using two
distinct search areas.
No
Object positioning
accuracy better
than ±5 degrees.
Ye s
Build a coordinate
transformation based on
pattern matching
shift invariant strategy.
No
Build a coordinate
transformation based on
pattern matching
rotation invariant strategy.
End
Figure 5-4. Building a Coordinate Transform
© National Instruments Corporation 5-7 IMAQ Vision for LabWindows/CVI User Manual
Page 60

Chapter 5 Performing Machine Vision Tasks
Set Search Areas
You use ROIs to define search areas in your images and limit the areas in
which you perform your processing and inspection. You can define ROIs
interactively or programmatically.
Defining Regions Interactively
Complete the following steps to interactively define an ROI:
1. Use
2. Select an ROI tool from the tools palette.
3. Draw an ROI on your image. Resize and reposition the ROI until it
4. Click OK to output a descriptor of the region you selected. You can
imaqConstructROI2() to display an image and the tools palette
in a window.
specifies the area you want to process.
input the ROI descriptor into many analysis and processing functions.
You can also use
define ROIs. Complete the following steps to use these functions:
1. Call the function to display an image in a window. Only the tools
specific to that function are available for you to use.
2. Select an ROI tool from the tools palette.
3. Draw an ROI on your image. Resize or reposition the ROI until it
specifies the area you want to process.
Click OK to output a description of the ROI. You can use this description
as an input for the following functions.
ROI Selection Function Measurement Function
imaqSelectRect() imaqFindPattern()
imaqSelectAnnulus() imaqFindCircularEdge()
imaqSelectRect() and imaqSelectAnnulus() to
imaqClampMax()
imaqClampMin()
imaqFindEdge()
imaqFindConcentricEdge()
IMAQ Vision for LabWindows/CVI User Manual 5-8 ni.com
Page 61

Defining Regions Programmatically
When you have an automated application, you need to define ROIs
programmatically. You can programmatically define regions in two ways:
• Specify the contours of the ROI.
• Specify individual structures by providing basic parameters that
describe the region you want to define. You can specify a rotated
rectangle by providing the coordinates of the center, the width, the
height, and the rotation angle. You can specify an annulus by providing
the coordinates of the center, inner radius, outer radius, start angle, and
end angle. You can specify a point by setting its x-coordinates and
y-coordinates. You can specify a line by setting the coordinates of the
start and end points.
Refer to Chapter 3, Making Grayscale and Color Measurements, for more
information about defining ROIs.
Find Measurement Points
After you set regions of inspection, locate points within those regions on
which you can base measurements. You can locate measurement points
using edge detection, pattern matching, color pattern matching, and color
location.
Chapter 5 Performing Machine Vision Tasks
Finding Features Using Edge Detection
Use the edge detection tools to identify and locate sharp discontinuities
in an image. Discontinuities typically represent abrupt changes in pixel
intensity values, which characterize the boundaries of objects.
© National Instruments Corporation 5-9 IMAQ Vision for LabWindows/CVI User Manual
Page 62

Chapter 5 Performing Machine Vision Tasks
Finding Lines or Circles
If you want to find points along the edge of an object and find
a line describing the edge, use
imaqFindConcentricEdges(). The imaqFindEdge() function finds
edges based on rectangular search areas, as shown in Figure 5-5. The
imaqFindConcentricEdge() function finds edges based on annular
search areas.
4
3
imaqFindEdge() and
1
2
1 Search Region
2 Search Lines
3 Detected Edge Points
4 Line Fit to Edge Points
Figure 5-5. Finding a Straight Feature
IMAQ Vision for LabWindows/CVI User Manual 5-10 ni.com
Page 63

Chapter 5 Performing Machine Vision Tasks
If you want to find points along a circular edge and find the circle that best
fits the edge, as shown in Figure 5-6, use
imaqFindCircularEdge().
1
4
3
1 Annular Search Region
2 Search Lines
Figure 5-6. Finding a Circular Feature
2
3 Detected Edge Points
4 Circle Fit To Edge Points
Use imaqFindEdge() and imaqFindConcentricEdge() to locate the
intersection points between a set of search lines within the search region
and the edge of an object. You can specify the search region using
imaqSelectRect() or imaqSelectAnnulus(). Specify the separation
between the lines that the functions use to detect edges. The functions
determine the intersection points based on their contrast, width, and
steepness. The software calculates a best-fit line with outliers rejected
or a best-fit circle through the points it found. The functions return the
coordinates of the edges found.
Finding Edge Points Along One Search Contour
Use imaqSimpleEdge() or imaqEdgeTool2() to find edge points along
a contour. Using
edge, or all edges along the contour. Use
image contains little noise and the object and background are clearly
differentiated. Otherwise, use
imaqSimpleEdge(), you can find the first edge, last
imaqSimpleEdge() when your
imaqEdgeTool2().
© National Instruments Corporation 5-11 IMAQ Vision for LabWindows/CVI User Manual
Page 64

Chapter 5 Performing Machine Vision Tasks
These functions require you to input the coordinates of the points along the
search contour. Use
the edge of each contour in an ROI. If you have a straight line, use
imaqGetPointsOnLine() to obtain the points along the line instead of
using an ROI.
These functions determine the edge points based on their contrast and
slope. You can specify whether you want to find the edge points using
subpixel accuracy.
Finding Edge Points Along Multiple Search Contours
Use imaqRake(), imaqSpoke(), and imaqConcentricRake() to find
edge points along multiple search contours. These functions behave similar
to
imaqEdgeTool2(), but they find edges on multiple contours. Pass in an
ROI to define the search region for these functions.
The
imaqRake() function works on a rectangular search region. The
search lines are drawn parallel to the orientation of the rectangle. Control
the number of search lines in the region by specifying the distance, in
pixels, between each line. Specify the search direction as left to right or
right to left for a horizontally oriented rectangle. Specify the search
direction as top to bottom or bottom to top for a vertically oriented
rectangle.
imaqROIProfile() to obtain the coordinates along
The
imaqSpoke() function works on an annular search region, scanning
the search lines that are drawn from the center of the region to the outer
boundary and that fall within the search area. Control the number of lines
in the region by specifying the angle, in degrees, between each line. Specify
the search direction as either going from the center outward or from the
outer boundary to the center.
The
imaqConcentricRake() function works on an annular search
region. The concentric rake is an adaptation of the Rake to an annular
region. IMAQ Vision does edge detection along search lines that occur
in the search region and that are concentric to the outer circular boundary.
Control the number of concentric search lines that are used for the edge
detection by specifying the radial distance between the concentric lines
in pixels. Specify the direction of the search as either clockwise or
counterclockwise.
IMAQ Vision for LabWindows/CVI User Manual 5-12 ni.com
Page 65

Finding Points Using Pattern Matching
The pattern matching algorithms in IMAQ Vision measure the similarity
between an idealized representation of a feature, called a template, and the
feature that may be present in an image. A feature is defined as a specific
pattern of pixels in an image. Pattern matching returns the location of the
center of the template and the template orientation. Complete the following
generalized steps to find features in an image using pattern matching.
1. Define a template image in the form of a reference or fiducial pattern.
2. Use the reference pattern to train the pattern matching algorithm with
imaqLearnPattern2().
3. Define an image or an area of an image as the search area. A small
search area reduces the time to find the features.
4. Set the tolerances and parameters to specify how the algorithm
operates at run time using the options parameter of
imaqMatchPattern2().
5. Test the search algorithm on test images using
imaqMatchPattern2().
6. Verify the results using a ranking method.
Chapter 5 Performing Machine Vision Tasks
Defining and Creating Good Template Images
The selection of a good template image plays a critical part in obtaining
good results. Because the template image represents the pattern that you
want to find, make sure that all the important and unique characteristics of
the pattern are well defined in the image.
These factors are critical in creating a template image: symmetry, feature
detail, positional information, and background information.
© National Instruments Corporation 5-13 IMAQ Vision for LabWindows/CVI User Manual
Page 66

Chapter 5 Performing Machine Vision Tasks
Symmetry
A rotationally symmetric template, shown in Figure 5-7a, is less sensitive
to changes in rotation than one that is rotationally asymmetric, shown in
Figure 5-7b. A rotationally symmetric template provides good positioning
information but no orientation information.
Feature Detail
A template with relatively coarse features, shown in Figure 5-8a, is less
sensitive to variations in size and rotation than a model with fine features,
Figure 5-8b. However, the model must contain enough detail to identify the
feature.
a. b.
Figure 5-7. Symmetry
a. b.
Figure 5-8. Feature Detail
IMAQ Vision for LabWindows/CVI User Manual 5-14 ni.com
Page 67

Chapter 5 Performing Machine Vision Tasks
Positional Information
A template with strong edges in both the x and y directions is easier to
locate. Figure 5-9a shows good positional information in both the x and
y directions, while Figure 5-9b shows insufficient positional information in
the y direction.
a. b.
Figure 5-9. Positional Information
Background Information
Unique background information in a template improves search
performance and accuracy. Figure 5-10a shows a pattern with insufficient
background information. Figure 5-10b illustrates a pattern with sufficient
background information.
a. b.
Figure 5-10. Background Information
Training the Pattern Matching Algorithm
After you create a good template image, the pattern matching
algorithm has to learn the important features of the template. Use
imaqLearnPattern2() to learn the template. The learning process
depends on the type of matching that you expect to perform. If you do not
expect the instance of the template in the image to rotate or change its size,
then the pattern matching algorithm has to learn only those features from
© National Instruments Corporation 5-15 IMAQ Vision for LabWindows/CVI User Manual
Page 68

Chapter 5 Performing Machine Vision Tasks
the template that are necessary for shift-invariant matching. However, if
you want to match the template at any orientation, use rotation-invariant
matching. Use the learningMode parameter of
to specify which type of learning mode to use.
The learning process is usually time intensive because the algorithm
attempts to find the optimum features of the template for the particular
matching process. The learning mode you choose also affects the speed of
the learning process. Learning the template for shift-invariant matching is
faster than learning for rotation-invariant matching. You can also save time
by training the pattern matching algorithm offline, and then saving the
template image with
Defining a Search Area
Two equally important factors define the success of a pattern matching
algorithm: accuracy and speed. You can define a search area to reduce
ambiguity in the search process. For example, if your image has multiple
instances of a pattern and only one of them is required for the inspection
task, the presence of additional instances of the pattern can produce
incorrect results. To avoid this, reduce the search area so that only the
desired pattern lies within the search area.
imaqLearnPattern2()
imaqWriteVisionFile().
The time required to locate a pattern in an image depends on both the
template size and the search area. By reducing the search area or increasing
the template size, you can reduce the required search time. Increasing the
template size can improve the search time, but doing so reduces match
accuracy if the larger template includes an excess of background
information.
In many inspection applications, you have general information about the
location of the fiducial. Use this information to define a search area. For
example, in a typical component placement application, each printed
circuit board (PCB) being tested may not be placed in the same location
with the same orientation. The location of the PCB in various images can
move and rotate within a known range of values, as illustrated in
Figure 5-11. Figure 5-11a shows the template used to locate the PCB in the
image. Figure 5-11b shows an image containing a PCB with a fiducial you
want to locate. Notice the search area around the fiducial. If you know
before the matching process begins that the PCB can shift or rotate in the
image within a fixed range, then you can limit the search for the fiducial to
a small region of the image. Figure 5-11c and Figure 5-11d show examples
of a shifted fiducial and a rotated fiducial respectively.
IMAQ Vision for LabWindows/CVI User Manual 5-16 ni.com
Page 69

Chapter 5 Performing Machine Vision Tasks
a.
c.
Figure 5-11. Selecting a Search Area for Grayscale Pattern Matching
b.
d.
Setting Matching Parameters and Tolerances
Every pattern matching algorithm makes assumptions about the images
and pattern matching parameters used in machine vision applications.
These assumptions work for a high percentage of the applications.
However, there may be applications in which the assumptions used in the
algorithm are not optimal. Knowing your particular application and the
images you want to process is useful in selecting the pattern matching
parameters. Use the
elements that influence the IMAQ Vision pattern matching algorithm:
match mode, minimum contrast, and rotation angle ranges.
Match Mode
You can set the match mode to control how the pattern matching algorithm
handles the template at different orientations. If you expect the orientation
of valid matches to vary less than ±5° from the template, set the
element of the options parameter to
Otherwise, set the mode element to
IMAQ_MATCH_ROTATION_INVARIANT.
imaqMatchPattern2() function to set the following
mode
IMAQ_MATCH_SHIFT_INVARIANT.
Note Shift-invariant matching is faster than rotation-invariant matching.
© National Instruments Corporation 5-17 IMAQ Vision for LabWindows/CVI User Manual
Page 70

Chapter 5 Performing Machine Vision Tasks
Minimum Contrast
The pattern matching algorithm ignores all image regions in which contrast
values fall below a set minimum contrast value. Contrast is the difference
between the smallest and largest pixel values in a region. Set the
minContrast element of the imaqMatchPattern2() options parameter
control to slightly below the contrast value of the search area with the
lowest contrast.
You can set the minimum contrast to potentially increase the speed of the
pattern matching algorithm. If the search image has high contrast overall
but contains some low contrast regions, set a high minimum contrast value
to exclude all areas of the image with low contrast. Excluding these areas
significantly reduces the area in which the pattern matching algorithm must
search. However, if the search image has low contrast throughout, set a low
minimum contrast to ensure that the pattern matching algorithm looks for
the template in all regions of the image.
Rotation Angle Ranges
If you know that the pattern rotation is restricted to a certain range, such as
between –15° to 15°, provide this restriction information to the pattern
matching algorithm in the
imaqMatchPattern2() options parameter. This information improves
your search time because the pattern matching algorithm looks for the
pattern at fewer angles. Refer to Chapter 12, Pattern Matching, of the
IMAQ Vision Concepts Manual for information about pattern matching.
angleRanges element of the
Testing the Search Algorithm on Test Images
To determine if your selected template or reference pattern is appropriate
for your machine vision application, test the template on a few test images
by using
images generated by your machine vision application during true operating
conditions. If the pattern matching algorithm locates the reference pattern
in all cases, you have selected a good template. Otherwise, refine the
current template, or select a better template until both training and testing
are successful.
IMAQ Vision for LabWindows/CVI User Manual 5-18 ni.com
imaqMatchPattern2(). These test images should reflect the
Page 71

Using a Ranking Method to Verify Results
The manner in which you interpret the pattern matching algorithm depends
on your application. For typical alignment applications, such as finding a
fiducial on a wafer, the most important information is the position and
location of the best match. Use the
PatternMatch structure to get the position and the bounding rectangle of
a match.
In inspection applications, such as optical character verification, the score
of the best match is more useful. The score of a match returned by the
pattern matching algorithm is an indicator of the closeness between the
original pattern and the match found in the image. A high score indicates a
very close match, while a low score indicates a poor match. The score can
be used as a gauge to determine whether a printed character is acceptable.
Use the
score element of the PatternMatch structure to get the score
corresponding to a match.
Finding Points Using Color Pattern Matching
Color pattern matching algorithms provide a quick way to locate objects
when color is present. Use color pattern matching if your images have the
following qualities:
• The object you want to locate has color information that is very
different from the background, and you want to find a very precise
location of the object in the image.
• The object to locate has grayscale properties that are very difficult to
characterize or that are very similar to other objects in the search
image. In such cases, grayscale pattern matching can give inaccurate
results. If the object has color information that differentiates it from the
other objects in the scene, color provides the machine vision software
with the additional information to locate the object.
Chapter 5 Performing Machine Vision Tasks
position and corner elements of the
Color pattern matching returns the location of the center of the template and
the template orientation. Complete the following general steps to find
features in an image using color pattern matching:
1. Define a template image that contains a reference or fiducial pattern.
2. Use the reference pattern to train the color pattern matching algorithm
with
imaqLearnColorPattern().
3. Define an image or an area of an image as the search area. A small
search area reduces the time to find the features.
4. Set the
options parameter to
© National Instruments Corporation 5-19 IMAQ Vision for LabWindows/CVI User Manual
featureMode element of the imaqMatchColorPattern()
IMAQ_COLOR_AND_SHAPE_FEATURES.
Page 72

Chapter 5 Performing Machine Vision Tasks
5. Set the tolerances and parameters to specify how the algorithm
operates at run time using the options parameter of
imaqMatchColorPattern().
6. Test the search algorithm on test images using
imaqMatchColorPattern().
7. Verify the results using a ranking method.
Defining and Creating Good Color Template Images
The selection of a good template image plays a critical part in obtaining
accurate results with the color pattern matching algorithm. Because the
template image represents the color and the pattern that you want to find,
make sure that all the important and unique characteristics of the pattern are
well defined in the image.
Several factors are critical in creating a template image. These critical
factors include color information, symmetry, feature detail, positional
information, and background information. Refer to the Defining and
Creating Good Template Images section of this chapter for more
information about some of these factors.
Color Information
A template with colors that are unique to the pattern provides better results
than a template that contains many colors, especially colors found in the
background or other objects in the image.
Symmetry
A rotationally symmetric template in the luminance plane is less sensitive
to changes in rotation than a template that is rotationally asymmetric.
Feature Detail
A template with relatively coarse features is less sensitive to variations in
size and rotation than a template with fine features. However, the template
must contain enough detail to identify it.
Positional Information
A template with strong edges in both the x and y directions is easier to
locate.
IMAQ Vision for LabWindows/CVI User Manual 5-20 ni.com
Page 73

Chapter 5 Performing Machine Vision Tasks
Background Information
Unique background information in a template improves search
performance and accuracy during the grayscale pattern matching phase.
This requirement could conflict with the color information requirement
because background colors may not be desirable during the color location
phase. Avoid this problem by choosing a template with sufficient
background information for grayscale pattern matching while specifying
the exclusion of the background color during the color location phase.
Refer to the Training the Color Pattern Matching Algorithm section of this
chapter for more information about how to ignore colors.
Training the Color Pattern Matching Algorithm
After you have created a good template image, the color pattern
matching algorithm learns the important features of the template. Use
imaqLearnColorPattern() to learn the template. The learning process
depends on the type of matching that you expect to perform. By default,
the color pattern matching algorithm learns only those features from the
template that are necessary for shift-invariant matching. However, if you
want to match the template at any orientation, the learning process must
consider the possibility of arbitrary orientations. Use the
element of the
imaqLearnColorPattern() options parameter to
specify which type of learning mode to use.
learnMode
Exclude colors in the template that you are not interested in using during
the search phase. Typically, you should ignore colors that either belong to
the background of the object or are not unique to the template, to reduce the
potential for incorrect matches during the color location phase. You can
ignore certain predefined colors using the
ignoreMode element of the
options parameter. To ignore other colors, first learn the colors to ignore
using
imaqLearnColor(). Then set the colorsToIgnore element of the
options parameter to the resulting
imaqLearnColor().
ColorInformation structure from
The learning process is time-intensive because the algorithm attempts to
find unique features of the template that allow for fast, accurate matching.
However, you can train the pattern matching algorithm offline, and save the
template image using
© National Instruments Corporation 5-21 IMAQ Vision for LabWindows/CVI User Manual
imaqWriteVisionFile().
Page 74

Chapter 5 Performing Machine Vision Tasks
Defining a Search Area
Two equally important factors define the success of a color pattern
matching algorithm—accuracy and speed. You can define a search area to
reduce ambiguity in the search process. For example, if your image has
multiple instances of a pattern and only one instance is required for the
inspection task, the presence of additional instances of the pattern can
produce incorrect results. To avoid this, reduce the search area so that only
the desired pattern lies within the search area. For example, in the fuse box
inspection example, use the location of the fuses to be inspected to define
the search area. Because the inspected fuse box may not be in the exact
location or have the same orientation in the image as the previous one,
the search area you define must be large enough to accommodate these
variations in the position of the box. Figure 5-12 shows how you can select
search areas for different objects.
1 2
1 Search Area for 20 Amp Fuses 2 Search Area for 25 Amp Fuses
Figure 5-12. Selecting a Search Area for Color Pattern Matching
IMAQ Vision for LabWindows/CVI User Manual 5-22 ni.com
Page 75

Chapter 5 Performing Machine Vision Tasks
The time required to locate a pattern in an image depends on both the
template size and the search area. By reducing the search area or increasing
the template size, you can reduce the required search time. Increasing the
template size can improve the search time, but doing so reduces match
accuracy if the larger template includes an excess of background
information.
Setting Matching Parameters and Tolerances
Every color pattern matching algorithm makes assumptions about the
images and color pattern matching parameters used in machine vision
applications. These assumptions work for a high percentage of the
applications. However, there may be applications in which the assumptions
used in the algorithm are not optimal. In such cases, you must modify the
color pattern matching parameters. Knowing your particular application
and the images you want to process is useful in selecting the pattern
matching parameters. Use the options parameter of
imaqMatchColorPattern() to set these elements.
The following are elements of the IMAQ Vision pattern matching
algorithm that influence color pattern matching: color sensitivity, search
strategy, color score weight, ignore background colors, minimum contrast,
and rotation angle ranges. These elements are discussed in the following
sections.
Color Sensitivity
Use the sensitivity element to control the granularity of the color
information in the template image. If the background and objects in the
image contain colors that are very close to colors in the template image, use
a higher color sensitivity setting. Increase the color sensitivity settings as
the color differences decrease. Three color sensitivity settings are available
in IMAQ Vision:
and
IMAQ_SENSITIVITY_HIGH. Refer to Chapter 14, Color Inspection,
of the IMAQ Vision Concepts Manual for more information about color
sensitivity.
IMAQ_SENSITIVITY_LOW, IMAQ_SENSITIVITY_MED,
Search Strategy
Use the strategy element to optimize the speed of the color pattern
matching algorithm. The search strategy controls the step size,
sub-sampling factor, and percentage of color information used from
the template.
© National Instruments Corporation 5-23 IMAQ Vision for LabWindows/CVI User Manual
Page 76

Chapter 5 Performing Machine Vision Tasks
Choose from the following search strategies:
•
IMAQ_CONSERVATIVE—Uses a very small step size, the least amount
of subsampling, and all the color information present in the template.
The conservative strategy is the most reliable method to look for a
template in any image at potentially reduced speed.
Note Use the IMAQ_CONSERVATIVE strategy if you have multiple targets located very
close to each other in the image.
•
IMAQ_BALANCED—Uses values in between the IMAQ_AGGRESSIVE
and
IMAQ_CONSERVATIVE strategies.
•
IMAQ_AGGRESSIVE—Uses a large step size, a lot of sub-sampling,
and all of the color information from the template.
•
IMAQ_VERY_AGGRESSIVE—Uses the largest step size, the most
subsampling, and only the dominant color from the template to search
for the template. Use this strategy when the color in the template is
almost uniform, the template is well contrasted from the background,
and there is a good amount of separation between different occurrences
of the template in the image. This strategy is the fastest way to find
templates in an image.
Color Score Weight
When you search for a template using both color and shape information, the
color and shape scores generated during the match process are combined to
generate the final color pattern matching score. The color score weight
determines the contribution of the color score to the final color pattern
matching score. If the color information of the templates is superior to
its shape information, set the weight higher. For example, if you set
colorWeight to 1000, the algorithm finds each match by using both color
and shape information, and then ranks the matches based entirely on their
color scores. If you set
colorWeight to 0, the matches are still found using
color and shape information, but they are ranked based entirely on their
shape scores.
Minimum Contrast
Use the minContrast element to increase the speed of the color pattern
matching algorithm. The color pattern matching algorithm ignores all
image regions where grayscale contrast values fall beneath a set minimum
contrast value. Refer to the Setting Matching Parameters and Tolerances
section of this chapter for more information about minimum contrast.
IMAQ Vision for LabWindows/CVI User Manual 5-24 ni.com
Page 77

Rotation Angle Ranges
Refer to the Setting Matching Parameters and Tolerances section of this
chapter for information about rotation angle ranges.
Testing the Search Algorithm on Test Images
To determine if your selected template or reference pattern is appropriate
for your machine vision application, test the template on a few test images
by using
images generated by your machine vision application during true operating
conditions. If the pattern matching algorithm locates the reference pattern
in all cases, you have selected a good template. Otherwise, refine the
current template, or select a better template until both training and testing
are successful.
imaqMatchColorPattern(). These test images reflect the
Finding Points Using Color Location
Color location algorithms provide a quick way to locate regions in an image
with specific colors. Use color location when your application has the
following characteristics:
• Requires the location and the number of regions in an image with their
specific color information
• Relies on the cumulative color information in the region, instead of the
color arrangement in the region
• Does not require the orientation of the region
• Does not always require the location with sub-pixel accuracy
• Does not require shape information for the region
Chapter 5 Performing Machine Vision Tasks
Complete the following general steps to find features in an image using
color location.
1. Define a reference pattern in the form of a template image.
2. Use the reference pattern to train the color location algorithm with
imaqLearnColorPattern().
3. Define an image or an area of an image as the search area. A small
search area reduces the time to find the features.
4. Set the
options parameter to
5. Set the tolerances and parameters to specify how the algorithm
operates at run time using the options parameter of
imaqMatchColorPattern().
© National Instruments Corporation 5-25 IMAQ Vision for LabWindows/CVI User Manual
featureMode element of the imaqMatchColorPattern()
IMAQ_COLOR_FEATURES.
Page 78

Chapter 5 Performing Machine Vision Tasks
6. Test the color location algorithm on test images using
imaqMatchColorPattern().
7. Verify the results using a ranking method.
You can save the template image using
imaqWriteVisionFile().
Convert Pixel Coordinates to Real-World Coordinates
The measurement points you located with edge detection and pattern
matching are in pixel coordinates. If you need to make measurements using
real-world units, use
the pixel coordinates into real-world units.
imaqTransformPixelToRealWorld() to convert
Make Measurements
You can make different types of measurements either directly from the
image or from points that you detect in the image.
Distance Measurements
Use the following functions to make distance measurements for your
inspection application.
Clamp functions measure the separation between two edges in a
rectangular search region. First, clamp functions detect points along
the two edges using the Rake function. Then, they compute the distance
between the points detected on the edges along each search line of the
rake and return the largest or smallest distance. The
function generates a valid input search region for these functions. You also
need to specify the parameters for edge detection and the separation
between the search lines that you want to use within the search region
to find the edges. These functions work directly on the image under
inspection, and they output the coordinates of all the edge points that
they find. The following list describes the available clamp functions:
•
imaqClampMax()—Measures the largest separation between
two edges in a rectangular search region.
•
imaqClampMin()—Finds the smallest separation between two
edges.
imaqSelectRect()
Use
imaqGetDistance() to compute the distances between two points,
such as consecutive pairs of points in an array of points. You can obtain
these points from the image using any one of the feature detection methods
described in the Find Measurement Points section of this chapter.
IMAQ Vision for LabWindows/CVI User Manual 5-26 ni.com
Page 79

Analytic Geometry Measurements
Use the following functions to make geometrical measurements from the
points you detect in the image:
•
imaqFitLine()—Fits a line to a set of points and computes the
equation of the line.
•
imaqFitCircle2()—Fits a circle to a set of at least three points and
computes its area, perimeter, and radius.
•
imaqFitEllipse2()—Fits an ellipse to a set of at least six points
and computes its area, perimeter, and the lengths of its major and
minor axis.
•
imaqGetIntersection()—Finds the intersection point of two
lines specified by their start and end points.
•
imaqGetAngle()—Finds the smaller angle between two lines.
•
imaqGetPerpendicularLine()—Finds the perpendicular line
from a point to a line and computes the perpendicular distance between
the point and the line.
•
imaqGetBisectingLine()—Finds the line that bisects the angle
formed by two lines.
•
imaqGetMidLine()—Finds the line that is midway between a point
and a line and is parallel to the line.
•
imaqGetPolygonArea()—Calculates the area of a polygon
specified by its vertex points.
Chapter 5 Performing Machine Vision Tasks
Instrument Reader Measurements
You can make measurements based on the values obtained by meter and
LCD readers.
Use
imaqGetMeterArc() to calibrate a meter or gauge that you want to
read. The
two modes. The
the full-scale position of the needle. When using this mode, the function
calculates the position of the base of the needle and the arc traced by the tip
of the needle. The
using three points on the meter: the base of the needle, the tip of the needle
at its initial position, and the tip of the needle at its full-scale position.
When using this mode, the function calculates the position of the points
along the arc covered by the tip of the needle. Use
read the position of the needle using the base of the needle and the array of
points on the arc traced by the tip of the needle.
© National Instruments Corporation 5-27 IMAQ Vision for LabWindows/CVI User Manual
imaqGetMeterArc() function calibrates the meter using one of
IMAQ_METER_ARC_ROI mode uses the initial position and
IMAQ_METER_ARC_POINTS mode calibrates the meter
imaqReadMeter() to
Page 80

Chapter 5 Performing Machine Vision Tasks
Use imaqFindLCDSegments() to calculate the ROI around each digit
in an LCD or LED. To find the area of each digit, all the segments of the
indicator must be activated. Use
an LCD or LED.
Identify Parts Under Inspection
In addition to making measurements after you set regions of inspection,
you can also identify parts using classification, optical character
recognition (OCR), and barcode reading.
Classifying Samples
Use classification to identify an unknown object by comparing a set of its
significant features to a set of features that conceptually represent classes
of known objects. Typical applications involving classification include the
following:
• Sorting—Sorts objects of varied shapes. For example, sorting different
mechanical parts on a conveyor belt into different bins.
• Inspection—Inspects objects by assigning each object an identification
score and then rejecting objects that do not closely match members of
the training set.
imaqReadLCD() to read multiple digits of
Before you classify objects, you must train the classifier session with
samples of the objects using the NI Classification Training Interface.
Go to Start»Programs»National Instruments»Classification Training
to launch the NI Classification Training Interface.
After you have trained samples of the objects you want to classify, use the
following functions to classify the objects:
1. Use
2. Use
3. Use
IMAQ Vision for LabWindows/CVI User Manual 5-28 ni.com
imaqReadClassifierFile() to read in a classifier session that
you created using the NI Classification Training Interface.
imaqClassify() to classify the object inside the ROI of the
image under inspection into one of the classes you created using
the NI Classification Training Interface.
imaqDispose() to free the resources that the classifier
session used.
Page 81

Chapter 5 Performing Machine Vision Tasks
The following code sample provides an example of a typical classification
application.
ClassifierSession* session;
Image* image;
ROI* roi;
char* fileName; // The classifier file to use.
ClassifierReport* report;
session = imaqReadClassifierFile(NULL, fileName,
IMAQ_CLASSIFIER_READ_ALL, NULL, NULL, NULL);
while (stillClassifying)
{
// Acquire and process an image and store it in the
//image variable.
// Locate the object to classify, and store an ROI
//containing that object in the roi variable.
report = imaqClassify(image, session, roi, NULL, 0);
// Take action based on the report.
imaqDispose(report);
}
imaqDispose(session);
Reading Characters
Use OCR to read text and/or characters in an image. Typical uses for OCR
in an inspection application include identifying or classifying components.
Before you read text and/or characters in an image, you must train the
OCR Session with samples of the characters using the NI OCR Training
Interface. Go to Start»Programs»National Instruments»Vision»OCR
Training to launch the OCR Training Interface.
After you have trained samples of the characters you want to read, use the
following functions to read the characters:
1. Use
2. Use
3. Use
© National Instruments Corporation 5-29 IMAQ Vision for LabWindows/CVI User Manual
imaqReadOCRFile() to read in a session that you created using
the NI OCR Training Interface.
imaqReadText() to read the characters inside the ROI of the
image under inspection.
imaqDispose() to free the resources that the OCR Session used.
Page 82

Chapter 5 Performing Machine Vision Tasks
Reading Barcodes
Use barcode reading functions to read values encoded into 1D barcodes,
Data Matrix barcodes, and PDF417 barcodes.
Reading 1D Barcodes
To read a 1D barcode, locate the barcode in the image using one of the
techniques described in this chapter. Then pass the ROI Descriptor of the
location into
Use
imaqReadBarcode() to read values encoded in the 1D barcode.
Specify the type of 1D barcode in the application using the type parameter.
IMAQ Vision supports the following 1D barcode types: Codabar, Code 39,
Code 93, Code 128, EAN 8, EAN 13, Interleaved 2 of 5, MSI, and UPCA.
Reading Data Matrix Barcodes
Use imaqReadDataMatrixBarcode() to read values encoded in a
Data Matrix barcode. The function can determine automatically the
location of the barcode and appropriate search options for your application.
However, you can improve the performance of the application by
specifying control values specific to your application.
imaqReadBarcode().
imaqReadDataMatrixBarcode() can locate automatically one or
multiple Data Matrix barcodes in an image. However, you can improve
the inspection performance by locating the barcodes using one of the
techniques described in this chapter. Then pass the ROI indicating the
location into
Tip If you need to read only one barcode per image, set the searchMode element of the
options parameter to
imaqReadDataMatrixBarcode().
IMAQ_SEARCH_SINGLE_CONSERVATIVE to increase the speed of
your application. If the barcode occupies a large percentage of your search region, has
clearly defined cells, and exhibits little or no rotation, you can further increase the speed
of your application by setting the
IMAQ_SEARCH_SINGLE_AGGRESSIVE.
By default,
searchMode element of the options parameter to
imaqReadDataMatrixBarcode() detects whether the
barcode has black cells on a white background or white cells on a black
background. If the barcodes in your application have a consistent
cell-to-background contrast, you can improve the performance by setting
the
contrast element of the options parameter to
IMAQ_BLACK_ON_WHITE_BARCODE or
IMAQ_WHITE_ON_BLACK_BARCODE.
IMAQ Vision for LabWindows/CVI User Manual 5-30 ni.com
Page 83

Chapter 5 Performing Machine Vision Tasks
By default, imaqReadDataMatrixBarcode() assumes the barcode cells
are square. If the barcodes you need to read have round cells, set the
cellShape element of the options parameter to IMAQ_ROUND_CELLS.
Note Specify round cells only if the Data Matrix cells are round and have clearly defined
edges. If the cells in the matrix touch one another, you must set
IMAQ_SQUARE_CELLS.
cellShape to
By default,
imaqReadDataMatrixBarcode() assumes the shape of the
barcode is square. If the shape of your barcode is rectangular, set the
barcodeShape element of the options parameter to
IMAQ_RECTANGULAR_BARCODE_2D.
Note Setting the barcodeShape element to IMAQ_RECTANGULAR_BARCODE_2D when
the barcode you need to read is square reduces the reliability of your application.
By default,
imaqReadDataMatrixBarcode() automatically detects the
type of barcode to read. You can improve the performance of the your
function by specifying the type of barcode in your application. IMAQ
Vision supports Data Matrix types ECC 000 to ECC 140, and ECC 200.
Reading PDF417 Barcodes
Use imaqReadPDF417Barcode() to read values encoded in a PDF417
barcode.
imaqReadPDF417Barcode() can locate automatically one or multiple
PDF417 barcodes in an image. However, you can improve the inspection
performance by locating the barcodes using one of the techniques described
in this chapter. Then pass in the ROI location to
imaqReadPDF417Barcode().
Tip If you need to read only one barcode per image, set the searchMode parameter to
IMAQ_SEARCH_SINGLE_CONSERVATIVE to increase the speed of your application.
Display Results
You can overlay the results obtained at various stages of you inspection
process on the window that displays your inspection image. The software
attaches the information that you want to overlay to the image, but it does
not modify the image. The overlay appears every time you display the
image in an external window.
© National Instruments Corporation 5-31 IMAQ Vision for LabWindows/CVI User Manual
Page 84

Chapter 5 Performing Machine Vision Tasks
Use the following functions to overlay search regions, inspection results,
and other information, such as text and bitmaps.
•
imaqOverlayPoints()—Overlays points on an image. Specify a
point by its x-coordinate and y-coordinate.
•
imaqOverlayLine()—Overlays a line on an image. Specify a line
by its start and end points.
•
imaqOverlayRect()—Overlays a rectangle on an image.
•
imaqOverlayOval()—Overlays an oval or a circle on the image.
•
imaqOverlayArc()—Overlays an arc on the image.
•
imaqOverlayMetafile()—Overlays a metafile on the image.
•
imaqOverlayText()—Overlays text on an image.
•
imaqOverlayROI()—Overlays an ROI on an image.
•
imaqOverlayClosedContour()—Overlays a closed contour on an
image.
•
imaqOverlayOpenContour()—Overlays an open contour on an
image.
To use these functions, pass in the image on which you want to overlay
information and the information that you want to overlay.
Tip You can select the color of overlays with these functions.
You can configure the following processing functions to overlay different
types of information on the inspection image:
• imaqFindEdge()
• imaqFindCircularEdge()
• imaqFindConcentricEdge()
• imaqClampMax()
• imaqClampMin()
• imaqFindPattern()
• imaqCountObjects()
• imaqFindTransformRect()
• imaqFindTransformRects()
• imaqFindTransformPattern()
IMAQ Vision for LabWindows/CVI User Manual 5-32 ni.com
Page 85

Chapter 5 Performing Machine Vision Tasks
The following list contains the kinds of information you can overlay
with the previous functions except
imaqCountObjects(), and imaqFindTransformPattern().
imaqFindPattern(),
• The search area input into the function
• The search lines used for edge detection
• The edges detected along the search lines
• The result of the function
With
imaqFindPattern(), imaqCountObjects(), and
imaqFindTransformPattern()
, you can overlay the search area and
the result. Select the information you want to overlay by setting the element
that corresponds to the information type to
TRUE in the options input
parameter.
Use
imaqClearOverlay() to clear any previous overlay information
from the image. Use
imaqWriteVisionFile() to save an image with
its overlay information to a file. You can read the information from the
file into an image using
Note As with calibration information, overlay information is removed from an image
imaqReadVisionFile().
when the image size or orientation changes.
© National Instruments Corporation 5-33 IMAQ Vision for LabWindows/CVI User Manual
Page 86

Calibrating Images
This chapter describes how to calibrate your imaging system, save
calibration information, and attach calibration information to an image.
After you set up your imaging system, you may want to calibrate your
system. If your imaging setup is such that the camera axis is perpendicular
or nearly perpendicular to the object under inspection and your lens has no
distortion, use simple calibration. With simple calibration, you do not need
to learn a template. Instead, you define the distance between pixels in the
horizontal and vertical directions using real-world units.
If your camera axis is not perpendicular to the object under inspection, use
perspective calibration to calibrate your system. If your lens is distorted,
use nonlinear distortion calibration.
Perspective and Nonlinear Distortion Calibration
Perspective errors and lens aberrations cause images to appear distorted.
This distortion misplaces information in an image, but it does not
necessarily destroy the information in the image. Calibrate your imaging
system if you need to compensate for perspective errors or nonlinear lens
distortion.
6
Complete the following general steps to calibrate your imaging system:
1. Define a calibration template.
2. Define a reference coordinate system.
3. Learn the calibration information.
After you calibrate your imaging system, you can attach the calibration
information to an image. Refer to the Attach Calibration Information
section of this chapter for more information. Then, depending on your
needs, you can do one of the following:
• Use the calibration information to convert pixel coordinates to
real-world coordinates without correcting the image.
• Create a distortion-free image by correcting the image for perspective
errors and lens aberrations.
© National Instruments Corporation 6-1 IMAQ Vision for LabWindows/CVI User Manual
Page 87

Chapter 6 Calibrating Images
Refer to Chapter 5, Performing Machine Vision Tasks, for more
information about applying calibration information before making
measurements.
Defining a Calibration Template
You can define a calibration template by supplying an image of a grid or
providing a list of pixel coordinates and their corresponding real-world
coordinates. This section discusses the grid method in detail.
A calibration template is a user-defined grid of circular dots. As shown in
Figure 6-1, the grid has constant spacings in the x and y directions. You can
use any grid, but follow these guidelines for best results:
• The displacement in the x and y directions should be equal (dx = dy).
• The dots should cover the entire desired working area.
• The radius of the dots in the acquired image should be 6–10 pixels.
• The center-to-center distance between dots in the acquired image
should range from 18 to 32 pixels, as shown in Figure 6-1.
• The minimum distance between the edges of the dots in the acquired
image should be 6 pixels, as shown in Figure 6-1.
dx
dy
1 Center-to-Center Distance 2 Center of Grid Dots 3 Distance Between Dot Edges
Figure 6-1. Defining a Calibration Grid
Note
Click Start»Programs»National Instruments»Vision»Documentation»
1
2
3
Calibration Grid to use the calibration grid installed with IMAQ Vision. The dots have
radii of 2 mm and center-to-center distances of 1 cm. Depending on your printer, these
measurements may change by a fraction of a millimeter. You can purchase highly accurate
calibration grids from optics suppliers, such as Edmund Industrial Optics.
IMAQ Vision for LabWindows/CVI User Manual 6-2 ni.com
Page 88

Defining a Reference Coordinate System
To express measurements in real-world units, you need to define a
coordinate system in the image of the grid. Use the
structure to define a coordinate system by its origin, angle, and axis
direction.
The origin, expressed in pixels, defines the center of your coordinate
system. The angle specifies the orientation of your coordinate system
with respect to the angle of the topmost row of dots in the grid image.
The calibration procedure automatically determines the direction of the
horizontal axis in the real world. The vertical axis direction can either be
indirect, as shown in Figure 6-2a, or direct, as shown in Figure 6-2b.
Chapter 6 Calibrating Images
CoordinateSystem
X
Y
a. b.
Figure 6-2. Axis Direction in the Image Plane
Y
X
If you do not specify a coordinate system, the calibration process defines a
default coordinate system. If you specify a grid for the calibration process,
the software defines the following default coordinate system, as shown in
Figure 6-3:
1. The origin is placed at the center of the left, topmost dot in the
calibration grid.
2. The angle is set to 0°. This aligns the x-axis with the first row of dots
in the grid, as shown in Figure 6-3b.
3. The axis direction is set to indirect. This aligns the y-axis to the first
column of the dots in the grid, as shown in Figure 6-3b.
© National Instruments Corporation 6-3 IMAQ Vision for LabWindows/CVI User Manual
Page 89

Chapter 6 Calibrating Images
1
x
y
a.
1 Origin of a Calibration Grid in the Real World 2 Origin of the Same Calibration Grid in an Image
Figure 6-3. A Calibration Grid and an Image of the Grid
If you specify a list of points instead of a grid for the calibration process,
Note
2
y
b.
x
the software defines a default coordinate system, as follows:
1. The origin is placed at the point in the list with the lowest x-coordinate value and
then the lowest y-coordinate value.
2. The angle is set to 0°.
3. The axis direction is set to indirect.
If you define a coordinate system yourself, carefully consider the needs of
your application.
• Express the origin in pixels. Always choose an origin location that lies
within the calibration grid so that you can convert the location to
real-world units.
• Specify the angle as the angle between the x-axis of the new coordinate
system (x') and the top row of dots (x), as shown in Figure 6-4. If your
imaging system exhibits nonlinear distortion, you cannot visualize the
angle as you can in Figure 6-4 because the dots do not appear in
straight lines.
IMAQ Vision for LabWindows/CVI User Manual 6-4 ni.com
Page 90

Chapter 6 Calibrating Images
x
1
y'
x
1 Default Origin in a Calibration Grid Image 2 User-Defined Origin
Learning Calibration Information
After you define a calibration grid and reference axis, acquire an image of
the grid using the current imaging setup. For information about acquiring
images, refer to the Acquire or Read an Image section of Chapter 2, Getting
Measurement-Ready Images. The grid does not need to occupy the entire
image. You can choose a region within the image that contains the grid.
After you acquire an image of the grid, learn the calibration information by
inputting the image of the grid into
Note If you want to specify a list of points instead of a grid, use
imaqLearnCalibrationPoints() to learn the calibration information. Use the
CalibrationPoints structure to specify the pixel to real-world mapping.
2
y
y
Figure 6-4. Defining a Coordinate System
imaqLearnCalibrationGrid().
x'
© National Instruments Corporation 6-5 IMAQ Vision for LabWindows/CVI User Manual
Page 91

Chapter 6 Calibrating Images
Note The user-defined ROI represents the area in which you are interested. The learning
ROI is different from the calibration ROI generated by the calibration algorithm. Refer to
Figure 6-6 for an illustration of calibration ROIs.
Specifying Scaling Factors
Scaling factors are the real-world distances between the dots in the
calibration grid in the x and y directions and the units in which the distances
are measured. Use the
factors.
GridDescriptor structure to specify the scaling
Choosing a Region of Interest
Define a learning ROI during the learning process to define a region of the
calibration grid you want to learn. The software ignores dot centers outside
this region when it estimates the transformation. Depending on the other
calibration options selected, this is an effective way to increase correction
speeds. Set the user-defined ROI using the roi parameter of either
imaqLearnCalibrationGrid() or
imaqLearnCalibrationPoints().
Choosing a Learning Algorithm
Select a method in which to learn the calibration information: perspective
projection or nonlinear. Figure 6-5 illustrates the types of errors your image
can exhibit. Figure 6-5a shows an image of a calibration grid with no
errors. Figure 6-5b shows an image of a calibration grid with perspective
projection. Figure 6-5c shows an image of a calibration grid with nonlinear
distortion.
a. c.b.
Figure 6-5. Types of Image Distortion
IMAQ Vision for LabWindows/CVI User Manual 6-6 ni.com
Page 92

Chapter 6 Calibrating Images
Choose the perspective projection algorithm when your system exhibits
perspective errors only. A perspective projection calibration has an accurate
transformation even in areas not covered by the calibration grid, as shown
in Figure 6-6. Set the
IMAQ_PERSPECTIVE to choose the perspective calibration algorithm.
mode element of the options parameter to
Learning and applying perspective projection is less computationally
intensive than the nonlinear method. However, perspective projection
cannot handle nonlinear distortions.
If your imaging setup exhibits nonlinear distortion, use the nonlinear
method. The nonlinear method guarantees accurate results only in the area
that the calibration grid covers, as shown in Figure 6-6. If your system
exhibits both perspective and nonlinear distortion, use the nonlinear
method to correct for both. Set the
to
IMAQ_NONLINEAR to choose the nonlinear calibration algorithm.
mode element of the options parameter
2
1
1 Calibration ROI Using the Perspective Algorithm
2 Calibration ROI Using the Nonlinear Algorithm
Figure 6-6. Calibration ROIs
Using the Learning Score
The learning process returns a score that reflects how well the software
learned the input image. A learning score above 800 indicates that you
chose the appropriate learning algorithm, that the grid image complies with
the guideline, and that your vision system setup is adequate.
Note A high score does not reflect the accuracy of your system.
© National Instruments Corporation 6-7 IMAQ Vision for LabWindows/CVI User Manual
Page 93

Chapter 6 Calibrating Images
If the learning process returns a learning score below 600, try the following:
1. Make sure your grid complies with the guidelines listed in the
Defining a Calibration Template section of this chapter.
2. Check the lighting conditions. If you have too much or too little
lighting, the software may estimate the center of the dots incorrectly.
Also, adjust the range parameter to distinguish the dots from the
background.
3. Select another learning algorithm. When nonlinear lens distortion is
present, using perspective projection sometimes results in a low
learning score.
Learning the Error Map
An error map helps you gauge the quality of your complete system.
The error map returns an estimated error range to expect when a pixel
coordinate is transformed into a real-world coordinate. The transformation
accuracy may be higher than the value the error range indicates. Set the
learnMap element of the options parameter to TRUE to learn the error
map.
Learning the Correction Table
If the speed of image correction is a critical factor for your application, use
a correction table. The correction table is a lookup table stored in memory
that contains the real-world location information of all the pixels in the
image. The extra memory requirements for this option are based on the size
of the image. Use this option when you want to correct several images at a
time in your vision application. Set the
options parameter to
TRUE to learn the correction table.
learnTable element of the
Setting the Scaling Method
Use the method element of the options parameter to choose the appearance
of the corrected image. Select either
IMAQ_SCALE_TO_PRESERVE_AREA. Refer to Chapter 3, System Setup and
Calibration, of the IMAQ Vision Concepts Manual for more information
about the scaling methods.
IMAQ_SCALE_TO_FIT or
Calibration Invalidation
Any image processing operation that changes the image size or orientation
voids the calibration information in a calibrated image. Examples of
functions that void calibration information include
imaqScale(), imaqArrayToImage(), and imaqUnwrap().
IMAQ Vision for LabWindows/CVI User Manual 6-8 ni.com
imaqResample(),
Page 94

Simple Calibration
When the axis of your camera is perpendicular to the image plane and lens
distortion is negligible, use simple calibration. In simple calibration, a pixel
coordinate is transformed to a real-world coordinate through scaling in the
horizontal and vertical directions.
Use simple calibration to map pixel coordinates to real-world coordinates
directly without a calibration grid. The software rotates and scales a pixel
coordinate according to predefined coordinate reference and scaling
factors. You can assign the calibration to an arbitrary image using
imaqSetSimpleCalibration().
To perform a simple calibration, set a coordinate reference (angle, center,
and axis direction) and scaling factors on the defined axis, as shown in
Figure 6-7. Express the angle between the x-axis and the horizontal axis
of the image in degrees. Express the center as the position, in pixels, where
you want the coordinate reference origin. Set the axis direction to direct or
indirect. Simple calibration also offers a correction table option and a
scaling mode option.
Use the system parameter to define the coordinate system. Use the grid
parameter to specify the scaling factors. Use the method parameter to set
the scaling method. Set the learnTable parameter to
correction table.
Chapter 6 Calibrating Images
TRUE to learn the
Y
dy
1
dx
X
1Origin
Figure 6-7. Defining a Simple Calibration
© National Instruments Corporation 6-9 IMAQ Vision for LabWindows/CVI User Manual
Page 95

Chapter 6 Calibrating Images
Save Calibration Information
After you learn the calibration information, you can save it so that you
do not have to relearn the information for subsequent processing. Use
imaqWriteVisionFile() to save the image of the grid and its associated
calibration information to a file. To read the file containing the calibration
information use
Calibration Information section of this chapter for more information about
attaching the calibration information you read from another image.
imaqReadVisionFile(). Refer to the Attach
Attach Calibration Information
Now that you have calibrated your setup correctly, you can
apply the calibration settings to images that you acquire. Use
imaqCopyCalibrationInfo() to attach the calibration information of
the current setup to each image you acquire. This function takes in a source
image containing the calibration information and a destination image that
you want to calibrate. The destination image is your inspection image with
the calibration information attached to it.
Using the calibration information attached to the image, you can accurately
convert pixel coordinates to real-world coordinates to make any of the
analytic geometry measurements with
imaqTransformPixelToRealWorld(). If your application requires that
you make shape measurements, correct the image by removing distortion
with
imaqCorrectImage().
Note Correcting images is a time-intensive operation.
A calibrated image is not the same as a corrected image. Because
calibration information is part of the image, it is propagated throughout the
processing and analysis of the image. Functions that modify the image size,
such as an image rotation function, void the calibration information. Use
imaqWriteVisionFile() to save the image and all of the attached
calibration information to a file.
IMAQ Vision for LabWindows/CVI User Manual 6-10 ni.com
Page 96

Technical Support and
Professional Services
Visit the following sections of the National Instruments Web site at
ni.com for technical support and professional services:
• Support—Online technical support resources at
include the following:
– Self-Help Resources—For immediate answers and solutions,
visit the award-winning National Instruments Web site for
software drivers and updates, a searchable KnowledgeBase,
product manuals, step-by-step troubleshooting wizards, thousands
of example programs, tutorials, application notes, instrument
drivers, and so on.
– Free Technical Support—All registered users receive free Basic
Service, which includes access to hundreds of Application
Engineers worldwide in the NI Developer Exchange at
ni.com/exchange. National Instruments Application Engineers
make sure every question receives an answer.
• Training and Certification—Visit
self-paced training, eLearning virtual classrooms, interactive CDs,
and Certification program information. You also can register for
instructor-led, hands-on courses at locations around the world.
• System Integration—If you have time constraints, limited in-house
technical resources, or other project challenges, National Instruments
Alliance Partner members can help. To learn more, call your local
NI office or visit
ni.com/alliance.
A
ni.com/support
ni.com/training for
If you searched
your local office or NI corporate headquarters. Phone numbers for our
worldwide offices are listed at the front of this manual. You also can visit
the Worldwide Offices section of
office Web sites, which provide up-to-date contact information, support
phone numbers, email addresses, and current events.
© National Instruments Corporation A-1 IMAQ Vision for LabWindows/CVI User Manual
ni.com and could not find the answers you need, contact
ni.com/niglobal to access the branch
Page 97

Glossary
Numbers
1D One-dimensional.
2D Two-dimensional.
3D Three-dimensional.
A
AIPD The National Instruments internal image file format used for saving
complex images and calibration information associated with an image
(extension APD).
alignment The process by which a machine vision application determines the
location, orientation, and scale of a part being inspected.
alpha channel The channel used to code extra information, such as gamma correction,
about a color image. The alpha channel is stored as the first byte in the
four-byte representation of an RGB pixel.
area (1) A rectangular portion of an acquisition window or frame that is
controlled and defined by software.
(2) The size of an object in pixels or user-defined units.
arithmetic operators The image operations multiply, divide, add, subtract, and modulo.
array An ordered, indexed set of data elements of the same type.
auto-median function A function that uses dual combinations of opening and closing operations
to smooth the boundaries of objects.
B
b Bit. One binary digit, either 0 or 1.
B Byte. Eight related bits of data, an eight-bit binary number. Also denotes
the amount of memory required to store one byte of data.
© National Instruments Corporation G-1 IMAQ Vision for LabWindows/CVI User Manual
Page 98

Glossary
barycenter The grayscale value representing the centroid of the range of an image’s
grayscale values in the image histogram.
binary image An image in which the objects usually have a pixel intensity of 1 (or 255)
and the background has a pixel intensity of 0.
binary morphology Functions that perform morphological operations on a binary image.
binary threshold The separation of an image into objects of interest (assigned a pixel value
of 1) and background (assigned pixel values of 0) based on the intensities
of the image pixels.
bit depth The number of bits (n) used to encode the value of a pixel. For a given n,
a pixel can take 2
n
different values. For example, if n equals 8, a pixel can
take 256 different values ranging from 0 to 255. If n equals 16, a pixel can
take 65,536 different values ranging from 0 to 65,535 or –32,768 to 32,767.
blurring Reduces the amount of detail in an image. Blurring commonly occurs
because the camera is out of focus. You can blur an image intentionally
by applying a lowpass frequency filter.
BMP Bitmap. An image file format commonly used for 8-bit and color images.
BMP images have the file extension BMP.
border function Removes objects (or particles) in a binary image that touch the image
border.
brightness (1) A constant added to the red, green, and blue components of a color pixel
during the color decoding process.
(2) The perception by which white objects are distinguished from gray and
light objects from dark objects.
buffer Temporary storage for acquired data.
IMAQ Vision for LabWindows/CVI User Manual G-2 ni.com
Page 99

Glossary
C
caliper (1) A function in the NI Vision Assistant and in NI Vision Builder for
Automated Inspection that calculates distances, angles, circular fits, and
the center of mass based on positions given by edge detection, particle
analysis, centroid, and search functions.
(2) A measurement function that finds edge pairs along a specified path in
the image. This function performs an edge extraction and then finds edge
pairs based on specified criteria such as the distance between the leading
and trailing edges, edge contrasts, and so forth.
center of mass The point on an object where all the mass of the object could be
concentrated without changing the first moment of the object about
any axis.
chroma The color information in a video signal.
chromaticity The combination of hue and saturation. The relationship between
chromaticity and brightness characterizes a color.
closing A dilation followed by an erosion. A closing fills small holes in objects and
smooths the boundaries of objects.
clustering A technique where the image is sorted within a discrete number of classes
corresponding to the number of phases perceived in an image. The gray
values and a barycenter are determined for each class. This process is
repeated until a value is obtained that represents the center of mass for each
phase or class.
CLUT Color lookup table. A table for converting the value of a pixel in an image
into a red, green, and blue (RGB) intensity.
color image An image containing color information, usually encoded in the RGB form.
color space The mathematical representation for a color. For example, color can be
described in terms of red, green, and blue; hue, saturation, and luminance;
or hue, saturation, and intensity.
complex image Stores information obtained from the FFT of an image. The complex
numbers that compose the FFT plane are encoded in 64-bit floating-point
values: 32 bits for the real part and 32 bits for the imaginary part.
connectivity Defines which of the surrounding pixels of a given pixel constitute its
neighborhood.
© National Instruments Corporation G-3 IMAQ Vision for LabWindows/CVI User Manual
Page 100

Glossary
connectivity-4 Only pixels adjacent in the horizontal and vertical directions are considered
neighbors.
connectivity-8 All adjacent pixels are considered neighbors.
contrast A constant multiplication factor applied to the luma and chroma
components of a color pixel in the color decoding process.
convex hull The smallest convex polygon that can encapsulate a particle.
convex hull function Computes the convex hull of objects in a binary image.
convolution See linear filter.
convolution kernel 2D matrices, or templates, used to represent the filter in the filtering
process. The contents of these kernels are a discrete two-dimensional
representation of the impulse response of the filter that they represent.
D
Danielsson function Similar to the distance functions, but with more accurate results.
determinism
digital image An image f (x, y) that has been converted into a discrete number of pixels.
dilation Increases the size of an object along its boundary and removes tiny holes in
driver Software that controls a specific hardware device, such as an IMAQ or
A characteristic of a system that describes how consistently it can respond
to external events or perform operations within a given time limit.
Both spatial coordinates and brightness are specified.
the object.
DAQ device.
E
edge Defined by a sharp transition in the pixel intensities in an image or along
an array of pixels.
edge contrast The difference between the average pixel intensity before and the average
pixel intensity after the edge.
edge detection Any of several techniques to identify the edges of objects in an image.
IMAQ Vision for LabWindows/CVI User Manual G-4 ni.com
 Loading...