

Page 1

TM
IMAQ
NI-IMAQTM for IEEE 1394 Cameras User Manual
Image Acquisition Software
NI-IMAQ for IEEE 1394 Cameras User Manual
March 2005
370362C-01
Page 2

Support
Worldwide Technical Support and Product Information
ni.com
National Instruments Corporate Headquarters
11500 North Mopac Expressway Austin, Texas 78759-3504 USA Tel: 512 683 0100
Worldwide Offices
Australia 1800 300 800, Austria 43 0 662 45 79 90 0, Belgium 32 0 2 757 00 20, Brazil 55 11 3262 3599,
Canada 800 433 3488, China 86 21 6555 7838, Czech Republic 420 224 235 774, Denmark 45 45 76 26 00,
Finland 385 0 9 725 725 11, France 33 0 1 48 14 24 24, Germany 49 0 89 741 31 30, India 91 80 51190000,
Israel 972 0 3 6393737, Italy 39 02 413091, Japan 81 3 5472 2970, Korea 82 02 3451 3400,
Lebanon 961 0 1 33 28 28, Malaysia 1800 887710, Mexico 01 800 010 0793, Netherlands 31 0 348 433 466,
New Zealand 0800 553 322, Norway 47 0 66 90 76 60, Poland 48 22 3390150, Portugal 351 210 311 210,
Russia 7 095 783 68 51, Singapore 1800 226 5886, Slovenia 386 3 425 4200, South Africa 27 0 11 805 8197,
Spain 34 91 640 0085, Sweden 46 0 8 587 895 00, Switzerland 41 56 200 51 51, Taiwan 886 02 2377 2222,
Thailand 662 992 7519, United Kingdom 44 0 1635 523545
For further support information, refer to the Technical Support and Professional Services appendix. To comment
on National Instruments documentation, refer to the National Instruments Web site at ni.com/info and enter
the info code feedback.
© 2001–2005 National Instruments Corporation. All rights reserved.
Page 3

Important Information
Warranty
The media on which you receive National Instruments software are warranted not to fail to execute programming instructions, due to defects
in materials and workmanship, for a period of 90 days from date of shipment, as evidenced by receipts or other documentation. National
Instruments will, at its option, repair or replace software media that do not execute programming instructions if National Instruments receives
notice of such defects during the warranty period. National Instruments does not warrant that the operation of the software shall be
uninterrupted or error free.
A Return Material Authorization (RMA) number must be obtained from the factory and clearly marked on the outside of the package before
any equipment will be accepted for warranty work. National Instruments will pay the shipping costs of returning to the owner parts which are
covered by warranty.
National Instruments believes that the information in this document is accurate. The document has been carefully reviewed for technical
accuracy. In the event that technical or typographical errors exist, National Instruments reserves the right to make changes to subsequent
editions of this document without prior notice to holders of this edition. The reader should consult National Instruments if errors are suspected.
In no event shall National Instruments be liable for any damages arising out of or related to this document or the information contained in it.
E
XCEPT AS SPECIFIED HEREIN, NATIONAL INSTRUMENTS MAKES NO WARRANTIES, EXPRESS OR IMPLIED, AND SPECIFICALLY DISCLAIMS ANY WAR RANTY OF
MERCHANTABILITY OR FITNESS FOR A PARTICULAR PURPOSE . CUSTOMER’S RIGHT TO RECOVER DAMAGES CAUSED BY FAULT OR NEGLIGENCE ON THE PART OF
N
ATIONAL INSTRUMENTS SHALL BE LIMITED TO THE AMOUNT THERETOFORE PAID BY THE CUSTOMER. NATIONAL INSTRUMENTS WILL NOT BE LIABLE FOR
DAMAGES RESULTING FROM LOSS OF DATA, PROFITS, USE OF PRODUCTS, OR INCIDENTAL OR CONSEQUENTIAL DAMAGES, EVEN IF ADVISED OF THE POSS IBILITY
THEREOF. This limitation of the liability of National Instruments will apply regardless of the form of action, whether in contract or tort, including
negligence. Any action against National Instruments must be brought within one year after the cause of action accrues. National Instruments
shall not be liable for any delay in performance due to causes beyond its reasonable control. The warranty provided herein does not cover
damages, defects, malfunctions, or service failures caused by owner’s failure to follow the National Instruments installation, operation, or
maintenance instructions; owner’s modification of the product; owner’s abuse, misuse, or negligent acts; and power failure or surges, fire,
flood, accident, actions of third parties, or other events outside reasonable control.
Copyright
Under the copyright laws, this publication may not be reproduced or transmitted in any form, electronic or mechanical, including photocopying,
recording, storing in an information retrieval system, or translating, in whole or in part, without the prior written consent of National
Instruments Corporation.
Trademarks
National Instruments, NI, ni.com, and LabVIEW are trademarks of National Instruments Corporation. Refer to the Terms of Use section
on
ni.com/legal for more information about National Instruments trademarks.
Other product and company names mentioned herein are trademarks or trade names of their respective companies.
Members of the National Instruments Alliance Partner Program are business entities independent from National Instruments and have no
agency, partnership, or joint-venture relationship with National Instruments.
Patents
For patents covering National Instruments products, refer to the appropriate location: Help»Patents in your software, the patents.txt file
on your CD, or
ni.com/patents.
WARNING REGARDING USE OF NATIONAL INSTRUMENTS PRODUCTS
(1) NATIONAL INSTRUMENTS PRODUCTS ARE NOT DESIGNED WITH COMPONENTS AND TESTING FOR A LEVEL OF
RELIABILITY SUITABLE FOR USE IN OR IN CONNECTION WITH SURGICAL IMPLANTS OR AS CRITICAL COMPONENTS IN
ANY LIFE SUPPORT SYSTEMS WHOSE FAILURE TO PERFORM CAN REASONABLY BE EXPECTED TO CAUSE SIGNIFICANT
INJURY TO A HUMAN.
(2) IN ANY APPLICATION, INCLUDING THE ABOVE, RELIABILITY OF OPERATION OF THE SOFTWARE PRODUCTS CAN BE
IMPAIRED BY ADVERSE FACTORS, INCLUDING BUT NOT LIMITED TO FLUCTUATIONS IN ELECTRICAL POWER SUPPLY,
COMPUTER HARDWARE MALFUNCTIONS, COMPUTER OPERATING SYSTEM SOFTWARE FITNESS, FITNESS OF COMPILERS
AND DEVELOPMENT SOFTWARE USED TO DEVELOP AN APPLICATION, INSTALLATION ERRORS, SOFTWARE AND
HARDWARE COMPATIBILITY PROBLEMS, MALFUNCTIONS OR FAILURES OF ELECTRONIC MONITORING OR CONTROL
DEVICES, TRANSIENT FAILURES OF ELECTRONIC SYSTEMS (HARDWARE AND/OR SOFTWARE), UNANTICIPATED USES OR
MISUSES, OR ERRORS ON THE PART OF THE USER OR APPLICATIONS DESIGNER (ADVERSE FACTORS SUCH AS THESE ARE
HEREAFTER COLLECTIVELY TERMED “SYSTEM FAILURES”). ANY APPLICATION WHERE A SYSTEM FAILURE WOULD
CREATE A RISK OF HARM TO PROPERTY OR PERSONS (INCLUDING THE RISK OF BODILY INJURY AND DEATH) SHOULD
NOT BE RELIANT SOLELY UPON ONE FORM OF ELECTRONIC SYSTEM DUE TO THE RISK OF SYSTEM FAILURE. TO AVOID
DAMAGE, INJURY, OR DEATH, THE USER OR APPLICATION DESIGNER MUST TAKE REASONABLY PRUDENT STEPS TO
PROTECT AGAINST SYSTEM FAILURES, INCLUDING BUT NOT LIMITED TO BACK-UP OR SHUT DOWN MECHANISMS.
BECAUSE EACH END-USER SYSTEM IS CUSTOMIZED AND DIFFERS FROM NATIONAL INSTRUMENTS' TESTING
PLATFORMS AND BECAUSE A USER OR APPLICATION DESIGNER MAY USE NATIONAL INSTRUMENTS PRODUCTS IN
COMBINATION WITH OTHER PRODUCTS IN A MANNER NOT EVALUATED OR CONTEMPLATED BY NATIONAL
INSTRUMENTS, THE USER OR APPLICATION DESIGNER IS ULTIMATELY RESPONSIBLE FOR VERIFYING AND VALIDATING
THE SUITABILITY OF NATIONAL INSTRUMENTS PRODUCTS WHENEVER NATIONAL INSTRUMENTS PRODUCTS ARE
INCORPORATED IN A SYSTEM OR APPLICATION, INCLUDING, WITHOUT LIMITATION, THE APPROPRIATE DESIGN,
PROCESS AND SAFETY LEVEL OF SUCH SYSTEM OR APPLICATION.
Page 4

Conventions
The following conventions are used in this manual:
» The » symbol leads you through nested menu items and dialog box options
to a final action. The sequence File»Page Setup»Options directs you to
pull down the File menu, select the Page Setup item, and select Options
from the last dialog box.
This icon denotes a note, which alerts you to important information.
bold Bold text denotes items that you must select or click in the software, such
as menu items and dialog box options. Bold text also denotes parameter
names.
italic Italic text denotes variables, emphasis, a cross reference, or an introduction
to a key concept. This font also denotes text that is a placeholder for a word
or value that you must supply.
monospace Text in this font denotes text or characters that you should enter from the
keyboard, sections of code, programming examples, and syntax examples.
This font is also used for the proper names of disk drives, paths, directories,
programs, subprograms, subroutines, device names, functions, operations,
variables, filenames, and extensions.
monospace italic
Italic text in this font denotes text that is a placeholder for a word or value
that you must supply.
Page 5

Contents
Chapter 1
Introduction to NI-IMAQ for IEEE 1394 Cameras
About the NI-IMAQ Software.......................................................................................1-1
Application Development Environments ........................................................1-2
Configuring a IEEE 1394 Camera...................................................................1-2
Fundamentals of Building Applications with NI-IMAQ for IEEE 1394 Cameras........ 1-2
Architecture .....................................................................................................1-2
NI-IMAQ for IEEE 1394 Cameras Libraries ..................................................1-3
Example Programs...........................................................................................1-4
Chapter 2
Basic Acquisition with NI-IMAQ for IEEE 1394 Cameras
Introduction....................................................................................................................2-1
Acquisition Flow............................................................................................................ 2-2
Initialization.....................................................................................................2-2
Camera Name....................................................................................2-2
Camera Control Mode.......................................................................2-4
Configuration...................................................................................................2-4
One-Shot/Continuous Acquisition ....................................................2-4
Number of Buffers ............................................................................2-5
Region of Interest..............................................................................2-5
Acquisition ......................................................................................................2-6
User Buffer........................................................................................2-6
Buffer Number ..................................................................................2-6
Overwrite Mode ................................................................................2-7
Timeouts............................................................................................2-7
Decoding ........................................................................................... 2-7
Programming Examples.................................................................................................2-8
High-Level Function Examples.......................................................................2-8
Snap...................................................................................................2-9
Grab...................................................................................................2-10
Sequence ...........................................................................................2-11
Low-Level Function Examples ....................................................................... 2-11
Snap...................................................................................................2-12
Grab...................................................................................................2-13
Sequence ...........................................................................................2-14
© National Instruments Corporation v NI-IMAQ for IEEE 1394 Cameras User Manual
Page 6

Contents
Chapter 3
Advanced Programming with NI-IMAQ for IEEE 1394 Cameras
Camera Attributes.......................................................................................................... 3-1
Broadcasting ..................................................................................................................3-1
Implementation ............................................................................................... 3-2
Scalable Image Size....................................................................................................... 3-3
Trigger Modes ............................................................................................................... 3-4
Trigger Mode 0 ............................................................................................... 3-5
Trigger Mode 1 ............................................................................................... 3-5
Trigger Mode 2 ............................................................................................... 3-6
Trigger Mode 3 ............................................................................................... 3-6
Trigger Mode 4 ............................................................................................... 3-7
Trigger Mode 5 ............................................................................................... 3-7
Chapter 4
Using NI-IMAQ for IEEE 1394 Cameras in LabVIEW
Introduction ................................................................................................................... 4-1
Location of the NI-IMAQ for IEEE 1394 Cameras VIs ............................................... 4-2
Common VI Parameters ................................................................................................ 4-2
IMAQ1394 Session......................................................................................... 4-2
Image Buffer ................................................................................................... 4-3
Region of Interest............................................................................................ 4-3
Acquisition VIs..............................................................................................................4-3
High-Level ...................................................................................................... 4-3
Low-Level....................................................................................................... 4-3
Buffer Management....................................................................................................... 4-4
Acquisition Types.......................................................................................................... 4-5
Snap................................................................................................................. 4-5
Grab................................................................................................................. 4-5
Sequence ......................................................................................................... 4-6
Triggering ......................................................................................................................4-7
Image Display................................................................................................................ 4-7
Camera Attributes.......................................................................................................... 4-9
Error Handling............................................................................................................... 4-9
Chapter 5
Using NI-IMAQ for IEEE 1394 Cameras in C and .NET
Using NI-IMAQ for IEEE 1394 Cameras for C............................................................ 5-1
Using NI-IMAQ for IEEE 1394 Cameras for Microsoft Visual Studio .NET 2003 ..... 5-2
Creating a New .NET Application.................................................................. 5-2
NI-IMAQ for IEEE 1394 Cameras User Manual vi ni.com
Page 7

Appendix A
Register-Level Programming
Appendix B
Technical Support and Professional Services
Glossary
Index
Contents
© National Instruments Corporation vii NI-IMAQ for IEEE 1394 Cameras User Manual
Page 8

Introduction to NI-IMAQ for IEEE 1394 Cameras
This chapter describes the NI-IMAQ for IEEE 1394 Cameras software,
lists the supported application development environments (ADEs),
describes the fundamentals of creating applications using NI-IMAQ for
IEEE 1394 Cameras, describes the files used to build these applications,
and explains where to find sample programs.
About the NI-IMAQ Software
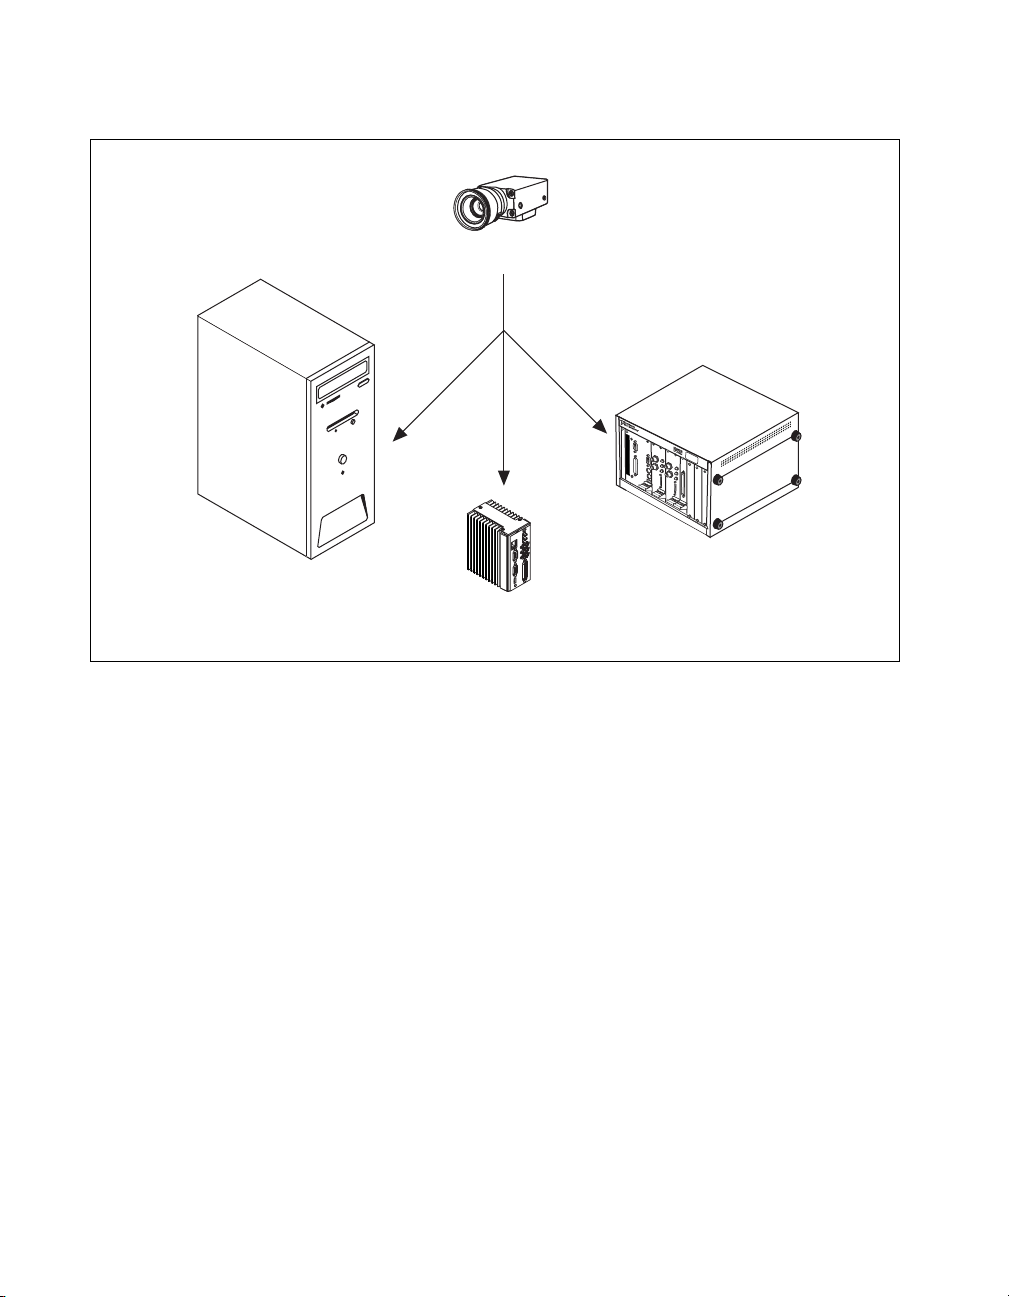
NI-IMAQ for IEEE 1394 Cameras gives you the ability to use IEEE 1394
industrial digital video cameras to acquire images. You can use cameras
with the following output formats:
• Monochrome (8 bits/pixel)
• Monochrome (16 bits/pixel)
• RGB (24 bits/pixel)
• RGB (48 bits/pixel)
• YUV 4:1:1 (12 bits/pixel)
• YUV 4:2:2 (16 bits/pixel)
• YUV 4:4:4 (24 bits/pixel)
• Bayer (8 bits/pixel)
• Bayer (16 bits/pixel)
1
The cameras may operate at various resolutions and frame rates, depending
on camera capabilities.
NI-IMAQ for IEEE 1394 Cameras complies with the 1394 Trade
Association’s Industrial and Instrumentation specification for Digital
Cameras (IIDC) and controls all available modes of the digital camera.
Note Refer to the NI-IMAQ for IEEE 1394 Cameras Release Notes for the specific version
of the IIDC specification to which this driver complies.
© National Instruments Corporation 1-1 NI-IMAQ for IEEE 1394 Cameras User Manual
Page 9

Chapter 1 Introduction to NI-IMAQ for IEEE 1394 Cameras
Application Development Environments
This release of NI-IMAQ for IEEE 1394 Cameras supports the following
ADEs for Windows 2000/XP:
• LabVIEW version 7.0 and later
• LabVIEW Real-Time Module version 7.0 and later
• LabWindows
• Microsoft Visual C/C++ version 6.0 and later
• Microsoft Visual Basic version 6.0 and later
• Microsoft Visual Studio .NET 2003 and later
Note Although the NI-IMAQ for IEEE 1394 Cameras software has been tested and found
to work with these ADEs, other ADEs may also work.
™
/CVI™ version 6.0 and later
Configuring a IEEE 1394 Camera
Use National Instruments Measurement & Automation Explorer (MAX) to
configure your IEEE 1394 camera. Refer to the NI-IMAQ for IEEE 1394
Cameras Help for information about configuring your IEEE 1394 camera.
You can access the NI-IMAQ for IEEE 1394 Cameras Help from within
MAX by going to Help»Help Topics»NI-IMAQ IEEE 1394.
The camera configuration is saved in a camera file, which the NI-IMAQ for
IEEE 1394 Cameras VIs and functions use to configure a camera and
supported attributes.
Fundamentals of Building Applications with NI-IMAQ for IEEE 1394 Cameras
Architecture
Figure 1-1 illustrates the NI-IMAQ for IEEE 1394 Cameras driver
architecture.
NI-IMAQ for IEEE 1394 Cameras User Manual 1-2 ni.com
Page 10
Chapter 1 Introduction to NI-IMAQ for IEEE 1394 Cameras
LabVIEW
IMAQ1394.DLL
Application Level
Kernel Level
IMAQ1394K.DLL
Windows Kernel
NIPALK.SYS
OCHI1394.SYS
1394BUS.SYS
Figure 1-1. NI-IMAQ for IEEE 1394 Cameras Architecture
LabWindows/CVI
Visual C++
LabVIEW RT Kernel
NIPALP.DLL
TNF.DLL
The architecture uses a hardware abstraction layer, which separates
software API capabilities, such as general acquisition and control
functions, from hardware-specific information. This layer lets you run your
application on different operating systems and use updated versions of the
driver without having to recompile your application.
NI-IMAQ for IEEE 1394 Cameras Libraries
The NI-IMAQ for IEEE 1394 Cameras function libraries are dynamic link
libraries (DLLs), which means that NI-IMAQ for IEEE 1394 Cameras
routines are not linked into the executable files of applications. Only the
information about the NI-IMAQ for IEEE 1394 Cameras routines in the
NI-IMAQ for IEEE 1394 Cameras import libraries is stored in the
executable files.
Import libraries contain information about their DLL-exported functions.
They indicate the presence and location of the DLL routines. Depending
on the development tools you use, you can give the DLL routines
© National Instruments Corporation 1-3 NI-IMAQ for IEEE 1394 Cameras User Manual
Page 11

Chapter 1 Introduction to NI-IMAQ for IEEE 1394 Cameras
information through import libraries or through function declarations.
Your NI-IMAQ for IEEE 1394 Cameras software contains function
prototypes for all routines.
Example Programs
You can find NI-IMAQ for IEEE 1394 Cameras code examples in the
following directories.
Note If you installed NI-IMAQ for IEEE 1394 Cameras in the default location, you can
find the following example directories within
National Instruments
.
C:\Program Files\
•LabVIEW—
LabVIEW\examples\imaq. For a brief description of
any example VI, open the VI, and select Windows»Show VI Info for
a text description of the example.
Tip You can access the NI-IMAQ for IEEE 1394 Cameras examples from the NI Example
Finder. From LabVIEW, go to Help»Find Examples to launch the NI Example Finder.
•CVI—
CVI\samples\imaq1394.
•C—NI-IMAQ for IEEE 1394\examples\MSVC.
• Visual Basic—NI-IMAQ for IEEE 1394\examples\VB.
• Microsoft Visual Studio .NET 2003—NI-IMAQ for IEEE
1394\examples\MSVB.NET
located in the
NI-IMAQ for IEEE 1394\examples\Images
. The images for the examples are
directory. The .NET examples are converted from the NI-IMAQ for
IEEE 1394 Cameras for Visual Basic examples. The .NET examples
are written in Visual Basic .NET and demonstrate use of the NI-IMAQ
for IEEE 1394 Cameras 2.0 Assemblies and the IMAQ Vision 7.1
Viewer control.
Refer to the
readme.rtf file located in your target installation directory
for the latest details about the example programs.
NI-IMAQ for IEEE 1394 Cameras User Manual 1-4 ni.com
Page 12

Basic Acquisition with
NI-IMAQ for IEEE 1394 Cameras
This chapter contains an overview of the NI-IMAQ for IEEE 1394
Cameras library, a description of the acquisition flow of NI-IMAQ for
IEEE 1394 Cameras, and generic programming examples. The chapter also
contains flowcharts of high-level and low-level snap, grab, and sequence
operations.
Introduction
The NI-IMAQ for IEEE 1394 Cameras application programming interface
(API) is divided two main function groups: high-level and low-level.
• High-level functions—Use to capture images quickly and easily. If
you need more advanced functionality, you can mix high-level
functions with low-level functions.
– Snap functions—Capture all or a portion of a single image to the
user buffer.
– Grab functions—Perform an acquisition that loops continually on
one or more internal buffers. You can copy the last acquired buffer
to a separate user buffer for processing or analysis.
– Sequence functions—Acquire a specified number of internal
buffers and then stops.
– Trigger functions—Control the trigger mode of the IEEE 1394
camera.
• Low-level functions—Use when you require more direct control of the
image acquisition.
– Acquisition functions—Configure, start, stop, and unconfigure an
image acquisition, or examine a user buffer during an acquisition.
– Attribute functions—Examine and change the acquisition or
camera attributes.
– Utility functions—Display an image in a window, save an image
to a file, or to get detailed error information.
2
© National Instruments Corporation 2-1 NI-IMAQ for IEEE 1394 Cameras User Manual
Page 13

Chapter 2 Basic Acquisition with NI-IMAQ for IEEE 1394 Cameras
Both high-level and low-level functions support snap, grab, sequence, and
triggered acquisitions. Using high-level functions, you can write programs
quickly without having to learn the details of the low-level API and driver.
The low-level functions give you finer granularity and control over the
image acquisition process, but you must understand the API and driver in
greater detail to use these functions.
Note The high-level functions call low-level functions and use certain attributes that are
listed in the high-level function description of the NI-IMAQ for IEEE 1394 Cameras
Function Reference Help. Changing the value of these attributes while using low-level
functions affects the operation of the high-level functions.
Acquisition Flow
This section describes the basic steps of performing an acquisition with the
NI-IMAQ for IEEE 1394 Cameras software. The basic steps are
initialization, configuration, and acquisition.
Initialization
To acquire images using the high-level or low-level functions, you first
must initialize a camera session. A camera session is a process-safe handle
to an IEEE 1394 camera. The driver uses a camera session to identify the
camera to which further NI-IMAQ for IEEE 1394 Cameras functions apply.
You can simultaneously open as many camera sessions as there are cameras
connected to you system.
When initializing the camera session, you need to specify two parameters:
camera name and camera control mode. Refer to the following sections for
detailed information about these parameters. When an application is
finished with the camera, call the Close function to close the camera
session.
Camera Name
NI-IMAQ for IEEE 1394 Cameras references all camera sessions by a
name. The driver creates default names for each camera in your system in
the order that the cameras are connected. The names observe the
convention shown in Table 2-1.
NI-IMAQ for IEEE 1394 Cameras User Manual 2-2 ni.com
Page 14
Chapter 2 Basic Acquisition with NI-IMAQ for IEEE 1394 Cameras
Table 2-1. Camera Naming Convention
Camera Name IEEE 1394 Camera Installed
cam0
cam1
Device 0
Device 1
... ...
cam
n
Device n
Every camera has an .iid interface file and an .icd camera file.
• Interface files—Store information about which physical camera is
associated with a camera name. Each interface file can be used by only
a single camera.
• Camera files—Store all the configurable attributes. Camera files can
be shared between identical cameras. Use MAX to configure the
default state of a particular camera.
Figure 2-1 shows the relationship between cameras, interface files, and
camera files.
MyCam.icdCam0.iid
or
Default.icdCam1.iid
Figure 2-1. Relationship Between Cameras, Interface Files, and Camera Files
Use the Enumerate function to query the number and names of available cameras.
Note
When you open a camera session with the Initialize function, the camera
with the unique serial number described by the interface file
opens, where
n
is the reference to the camera. If the camera is not present
camn.iid
and a camera of the same make and model is present, as described in the
interface file, the driver opens the available camera. The interface file
updates to use the new camera. The camera file described by the interface
© National Instruments Corporation 2-3 NI-IMAQ for IEEE 1394 Cameras User Manual
Page 15

Chapter 2 Basic Acquisition with NI-IMAQ for IEEE 1394 Cameras
file opens, and all the user attributes are set in the driver. If no camera of the
same make and model is present, the Initialize function returns an error.
Camera Control Mode
The camera control mode parameter has two options: controller and
listener. The default option—controller—controls the camera and receives
video data. The listener only receives video data. Use the listener option in
broadcasting applications. Refer to the Broadcasting section of Chapter 3,
Advanced Programming with NI-IMAQ for IEEE 1394 Cameras, for more
information about broadcasting.
Configuration
After initializing the interface, configure the interface for acquisition by
specifying the following parameters: whether the acquisition is one-shot or
continuous, the number of internal buffers to use, and the region of interest
for the acquisition.
During configuration, the driver validates all the user-configurable
attributes. If any attributes are invalid or out of range, the driver returns an
error and does not configure the acquisition.
If you want to reconfigure the acquisition, call the Clear Acquisition
function before calling the Configure function again.
Note National Instruments recommends that you do not configure an acquisition in a loop
because doing so is time-intensive.
One-Shot/Continuous Acquisition
Use a one-shot acquisition to start an acquisition, perform the acquisition,
and stop the acquisition using a single function. The number of images
acquired is equal to the number of images in the images collection.
With a one-shot acquisition, you specify a certain number of internal
buffers. The camera transfers each image up to and including the specified
number of buffers. The driver acquires every image during a one-shot
acquisition. National Instruments recommends one-shot acquisition for
applications that do not require real-time acquisition or processing.
Use a continuous acquisition to start an acquisition, continuously acquire
images into the internal buffers, and explicitly stop the acquisition. With
continuous acquisition, the driver acquires video data continuously from
NI-IMAQ for IEEE 1394 Cameras User Manual 2-4 ni.com
Page 16

Chapter 2 Basic Acquisition with NI-IMAQ for IEEE 1394 Cameras
the camera and enables you to examine the most current buffer. National
Instruments recommends continuous acquisition for real-time acquisition
and processing.
Note If CPU activity increases during a continuous acquisition, the driver might miss
subsequent images. Check the buffer number output to determine if you have missed any
images.
Number of Buffers
Another aspect of configuration is specifying the number of internal buffers
into which you want to acquire image data. During configuration, buffers
are allocated from system memory and page-locked. Once the acquisition
starts, the camera transfers video data over the IEEE 1394 bus to the
IEEE 1394 interface card FIFO. Then, video data is directly transferred to
the internal buffer. This transfer requires negligible CPU resources.
Each internal buffer you allocate is the exact size of the raw data being
transmitted by the camera. For continuous acquisitions, allocate three or
more buffers. Allocating a single buffer for a continuous acquisition may
result in a high number of lost images. For one-shot acquisitions, specify
the number of buffers that the application requires. For example, if the
application runs for two seconds, and the camera acquires at 30 frames per
second, allocate 60 buffers to capture each image.
Region of Interest
The region of interest (ROI) specifies a rectangular portion of the image to
be captured. In Partial Image Size Format (Format 7) video modes, the ROI
defines the portion of the image to transfer from the camera to system
memory. In non-Format 7 video modes, the entire image is transferred from
the camera to system memory. In all video modes, the ROI specifies the
amount of data decoded by the driver while acquiring into a user buffer.
By default, the driver transfers the entire image. Specify a smaller ROI for
the following reasons:
• To acquire only the necessary subset of data
• To increase the acquisition speed by reducing the amount of data
transferred and/or decoded
• To allow for multiple simultaneous acquisitions by reducing
bandwidth usage
© National Instruments Corporation 2-5 NI-IMAQ for IEEE 1394 Cameras User Manual
Page 17

Chapter 2 Basic Acquisition with NI-IMAQ for IEEE 1394 Cameras
Note Although you can specify an ROI of any size, the NI-IMAQ for IEEE 1394 Cameras
software coerces the ROI into one that is more compatible for the given camera. Refer to
Chapter 3, Advanced Programming with NI-IMAQ for IEEE 1394 Cameras, for more
information about defining an ROI for Format 7 images.
Acquisition
After configuring and starting your acquisition, the camera sends data to
the internal buffers. To process the acquired image data, you must copy the
data from the internal buffer into your user buffer.
User Buffer
Before starting the acquisition, you must allocate a user buffer in addition
to configuring internal buffers. The driver copies or decodes image data
from the internal buffer into the user buffer during acquisition. Then,
process and analyze the image in the user buffer.
When acquiring data into an IMAQ Vision image, the driver resizes and
casts the image as needed. However, if you acquire data into a user buffer,
you must allocate enough space for one decoded image.
Note Unlike internal buffers, you are responsible for destroying user buffers.
Buffer Number
A buffer number is a zero-based index that represents the cumulated
transferred image count. For example, during a continuous acquisition with
three internal buffers, the buffer number is updated as follows: 0, 1, 2, 3, 4,
5, and so on. Buffer numbers 0 and 3 refer to the same internal buffer in the
buffer ring.
For a one-shot acquisition, you can request only one of the available buffer
numbers. For a continuous acquisition, you can request any present or
future buffer number. You can also request the next logical buffer or the
buffer containing the most recently acquired data. With high-level grab
acquisitions, the buffer number defaults to the next transferred buffer.
When you complete the buffer acquisition step, the driver returns the actual
buffer number with the image.
NI-IMAQ for IEEE 1394 Cameras User Manual 2-6 ni.com
Page 18

Chapter 2 Basic Acquisition with NI-IMAQ for IEEE 1394 Cameras
Overwrite Mode
Ideally, a continuous acquisition acquires and processes every image that
is transferred from the camera. However, because of processing time
fluctuations, some images from the camera may not be processed before the
camera transfers the next image. Using multiple internal buffers in a
continuous acquisition allows for a small amount of jitter. However, if a
delay becomes too long, the camera overwrites the requested buffer with
new image data.
NI-IMAQ for IEEE 1394 Cameras is able to detect overwritten internal
buffers. You can configure the driver to manage an overwritten buffer in one
of the following ways:
• Get newest valid buffer
• Get oldest valid buffer
• Fail and return an error
In all cases, the camera continues to transfer data when a buffer is
overwritten.
The default overwrite mode for all types of acquisition is to get the newest
valid buffer. This option, which National Instruments recommends for most
applications, enables you to process the most recent image. If you need to
get the image closest in time to a requested buffer, configure the driver to
get the oldest valid buffer. If your application requires that every image be
processed, configure the driver to fail when a buffer is overwritten so that
you are alerted.
Timeouts
A timeout is the length of time, in milliseconds, that the driver waits for an
image from the camera before returning an error. A timeout error usually
occurs if the camera has been removed from the system or when the camera
did not receive an external trigger signal.
Decoding
Except for 8-bit monochrome images, all video modes require decoding
before you can interpret the image data. For example, many color
IEEE 1394 cameras output images of type YUV 4:2:2. However, IMAQ
Vision does not natively support the YUV mode. To process and display
the image, the driver automatically decodes the YUV image into a 32-bit
RGB image.
© National Instruments Corporation 2-7 NI-IMAQ for IEEE 1394 Cameras User Manual
Page 19

Chapter 2 Basic Acquisition with NI-IMAQ for IEEE 1394 Cameras
Table 2-2 lists common video modes and their corresponding image types
after being decoded by NI-IMAQ for IEEE 1394 Cameras.
Table 2-2. Decoder Inputs and Corresponding Outputs
Raw Camera Output Decoded Destination Image
8-bit monochrome 8-bit monochrome
16-bit monochrome (big endian) 16-bit monochrome (little endian)
YUV 4:1:1 32-bit color
YUV 4:2:2 32-bit color
YUV 4:4:4 32-bit color
24-bit RGB 32-bit color
48-bit RGB 64-bit color
8-bit Bayer 32-bit color
16-bit Bayer 32-bit color
Decoding images requires CPU resources. However, many of the decoding
algorithms have been optimized in the driver. If you do not want decoded
image data, you can use NI-IMAQ for IEEE 1394 Cameras to get a copy of
the raw camera output.
Programming Examples
This section contains examples of high-level and low-level image
acquisitions. Refer to the Example Programs section of Chapter 1,
Introduction to NI-IMAQ for IEEE 1394 Cameras, for directory paths to
the code examples discussed in this section.
High-Level Function Examples
Use high-level functions to write programs quickly without having to learn
the details of the low-level API and driver.
NI-IMAQ for IEEE 1394 Cameras User Manual 2-8 ni.com
Page 20

Chapter 2 Basic Acquisition with NI-IMAQ for IEEE 1394 Cameras
Snap
A snap acquires a single image into a user buffer. Figure 2-2 illustrates the
typical programming order of a high-level snap acquisition.
Initialize
Snap
User-Specific Functions
Close
Figure 2-2. High-Level Snap Flowchart
Opens and Configures Camera
Acquires Image into Buffer
Executes User-Specific Image
Processing
Closes the Camera Session
Use a snap for low-speed or one-shot applications where ease of
programming is essential. When you invoke a snap, the driver opens a
session on a camera and initializes the IEEE 1394 camera. Opening a
session sets the ROI to the size of the video mode you selected in MAX.
Note If you do not have a valid session, a temporary session is created using cam0.
Then, the snap acquires the next incoming image into a user buffer. After
the image is acquired, the program calls image processing and analysis
functions. When the processing and analysis functions are finished, the
program calls the Close function using the camera handle. This function
instructs NI-IMAQ to free all of the resources associated with this camera,
which releases the session.
© National Instruments Corporation 2-9 NI-IMAQ for IEEE 1394 Cameras User Manual
Page 21

Chapter 2 Basic Acquisition with NI-IMAQ for IEEE 1394 Cameras
Grab
A grab initiates a continuous high-speed acquisition of images to one or
more internal buffers. Figure 2-3 illustrates the typical programming order
of a high-level grab acquisition.
Initialize
Grab Setup
Grab
User-Specific Functions
Close
Use a grab for high-speed applications during which you need to process
only one image at a time. You can copy the last acquired buffer to a separate
user buffer for processing or analysis. To use these functions, you must
have a valid session. If you do not have a valid session, the NI-IMAQ for
IEEE 1394 Cameras Grab Setup function creates a session using
Opens and Configures Camera
Configures Camera for
Continuous Acquisition
Copies Contents of Internal Buffer
to User Buffer; Can Call Grab Function
Multiple Times for High-Speed Acquisition
Executes User-Specific Image Processing
(Loop)
Closes the Camera Session
Figure 2-3. High-Level Grab Flowchart
cam0.
Calling the Grab Setup function initializes a session for a grab acquisition.
During acquisition, each successive grab copies the last acquired internal
buffer into a user buffer where you can process the image.
NI-IMAQ for IEEE 1394 Cameras User Manual 2-10 ni.com
Page 22

Chapter 2 Basic Acquisition with NI-IMAQ for IEEE 1394 Cameras
Sequence
A sequence acquires a specified number of internal buffers and then stops.
Figure 2-4 illustrates the typical programming order of a high-level
sequence acquisition.
Initialize
Sequence
User-Specific Functions
Close
Use a sequence in applications where you need to process a series of
consecutive images. Sequence acquisitions are synchronous. If you do not
specify a session, a temporary session is created using
Low-Level Function Examples
Use low-level functions for more advanced programming techniques. In
general, low-level functions have more parameters than high-level
functions.
Opens and Configures Camera
Acquires a Specified Number
of Buffers and Stops
Executes User-Specific Image Processing
(Loop)
Closes the Camera Session
Figure 2-4. High-Level Sequence Flowchart
cam0.
© National Instruments Corporation 2-11 NI-IMAQ for IEEE 1394 Cameras User Manual
Page 23

Chapter 2 Basic Acquisition with NI-IMAQ for IEEE 1394 Cameras
Snap
The low-level snap examples set up a one-shot, single-image acquisition
and start the acquisition. The program acquires an image and processes it.
Finally, the program stops the acquisition, unconfigures the acquisition,
and closes the session.
Figure 2-5 illustrates the programming order of a low-level snap
acquisition.
Initialize
Configure
Start
Acquire
User-Specific Functions
Stop
Clear
Close
Opens and Configures Camera
Configures a Single-Shot, SingleBuffer Acquisition
Starts Transferring Data from Camera
to Host Computer
Copies and Decodes Buffer
Number 0
Executes User-Specific Image
Processing
Stops Transferring Data from Camera
to Host Computer
Frees IEEE 1394 Bandwidth and Memory
Resources Used by the Acquisition
Closes the Camera Session
Figure 2-5. Low-Level Snap Flowchart
NI-IMAQ for IEEE 1394 Cameras User Manual 2-12 ni.com
Page 24

Chapter 2 Basic Acquisition with NI-IMAQ for IEEE 1394 Cameras
Grab
The low-level grab examples demonstrate how to perform a grab
acquisition using low-level function calls. The program sets up a
continuous acquisition into three internal buffers and starts the acquisition.
The main loop iterates continuously. In the main processing loop, the
program acquires an image and processes it. After the loop, the program
stops the acquisition, unconfigures the acquisition, and closes the session.
Figure 2-6 illustrates the programming order of a low-level grab
acquisition.
Initialize
Configure
Start
Acquire
User-Specific Functions
Stop
Clear
Close
Opens and Configures Camera
Configures a Continuous MultipleBuffer Acquisition
Starts Transferring Data from Camera
to Host Computer
Copies and Decodes Next Buffer
Number
Executes User-Specific Image
Processing
Loop until Stopped
Stops Transferring Data from Camera
to Host Computer
Frees IEEE 1394 Bandwidth and Memory
Resources Used by the Acquisition
Closes the Camera Session
(Loop)
Figure 2-6. Low-Level Grab Flowchart
© National Instruments Corporation 2-13 NI-IMAQ for IEEE 1394 Cameras User Manual
Page 25

Chapter 2 Basic Acquisition with NI-IMAQ for IEEE 1394 Cameras
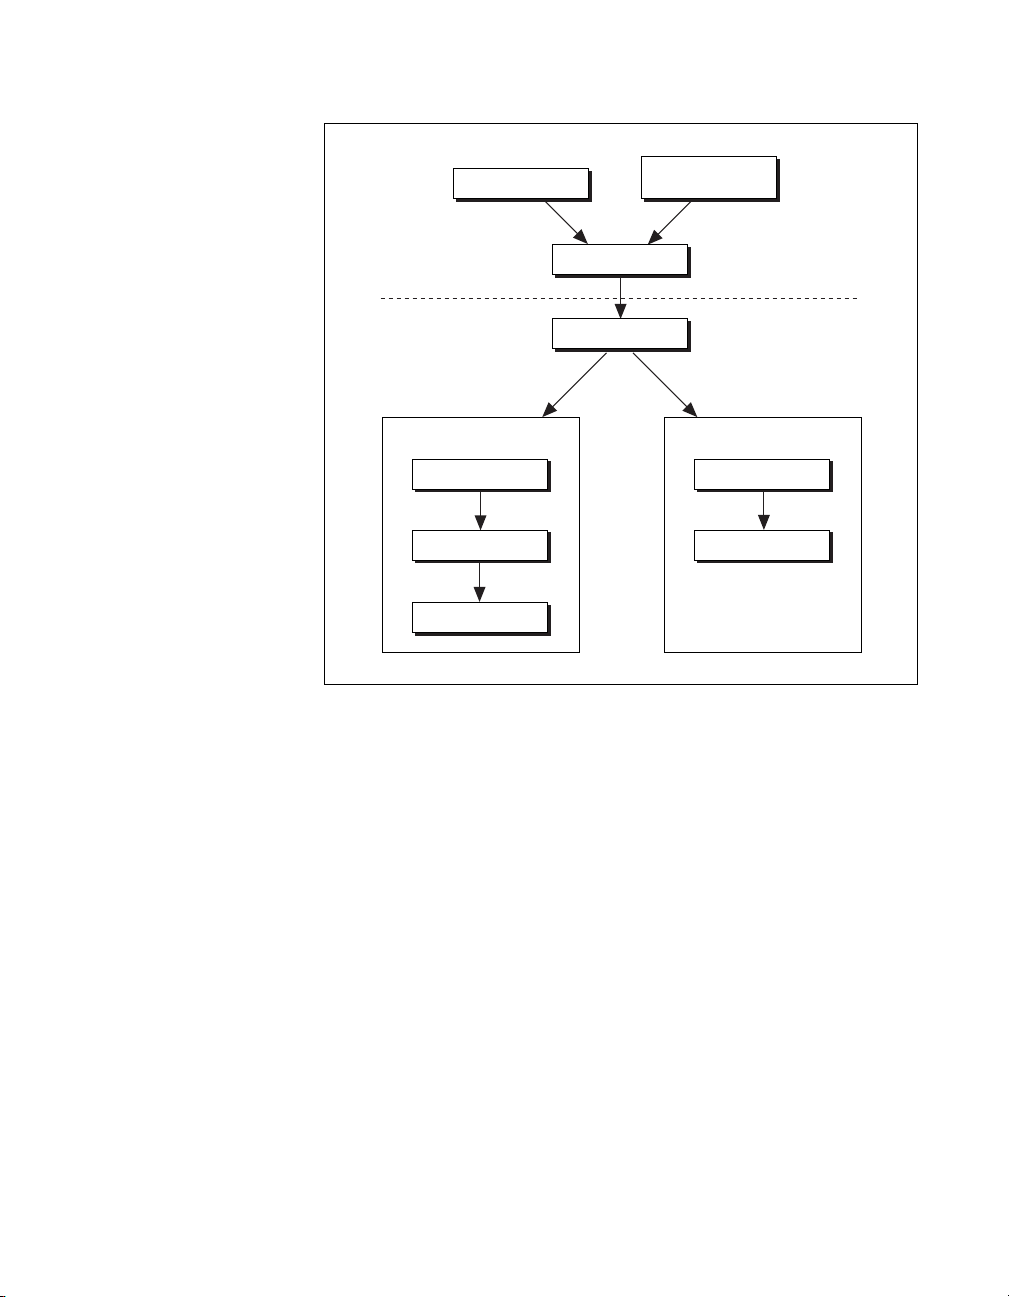
Sequence
The low-level sequence examples demonstrate how to perform a sequence
acquisition using low-level calls. The program sets up a one-shot,
multi-image acquisition and starts the acquisition. The main loop iterates
once for each internal buffer. In the main processing loop, the program
acquires an image and processes it. After the loop, the program stops the
acquisition, unconfigures the acquisition, and closes the session.
Figure 2-7 illustrates the programming order of a low-level sequence
acquisition.
Initialize
Configure
Start
Acquire
User-Specific Functions
Stop
Clear
Close
Opens and Configures Camera
Configures a Single-Shot MultipleBuffer Acquisition
Starts Transferring Data from Camera
to Host Computer
Copies and Decodes Buffer Number
i
, Where i is Between 0 and (n – 1)
Executes User-Specific Image
Processing
Loop n Times
Stops Transferring Data from Camera
to Host Computer
Frees IEEE 1394 Bandwidth and Memory
Resources Used by the Acquisition
Closes the Camera Session
(Loop)
Figure 2-7. Low-Level Sequence Flowchart
NI-IMAQ for IEEE 1394 Cameras User Manual 2-14 ni.com
Page 26

Advanced Programming with
NI-IMAQ for IEEE 1394 Cameras
This chapter contains information about setting camera attributes,
broadcasting acquired images to multiple machines, using Format 7 to
define the size of transferred images, and triggering.
Camera Attributes
Use camera attributes to control camera-specific features, such as
brightness and shutter speed. You can set camera attributes directly from
the NI-IMAQ for IEEE 1394 Cameras software or through the
Camera Attributes tab in MAX.
The following attributes are defined in the 1394 Based Digital Camera
Specification—brightness, auto exposure, sharpness, white balance, hue,
saturation, gamma, shutter, gain, iris, focus, temperature, zoom, pan, tilt,
optical filter, trigger delay, frame rate prioritize, and white shading.
3
The LabVIEW, C, Visual Basic, and .NET APIs all provide Get Attribute
and Set Attribute functions to modify camera attributes. However,
supported attributes are camera specific. Refer to your camera
documentation for information about the attributes your camera supports.
If your camera does not implement every attribute specified, the functions
return an error.
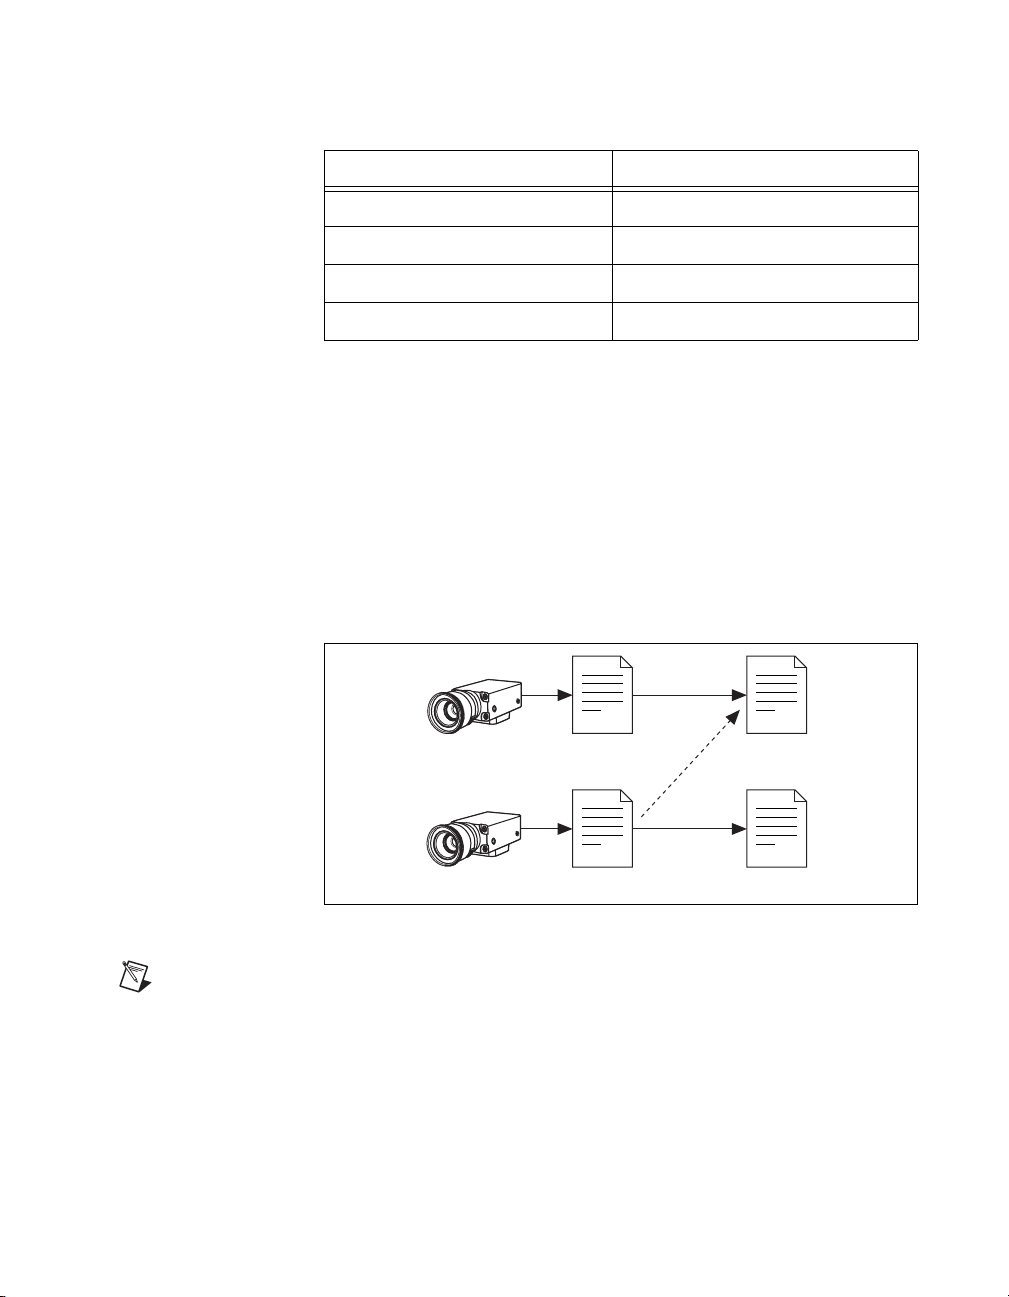
Broadcasting
Many machine vision applications involve a single host computer
acquiring data from a single industrial camera. Other machine vision
applications acquire data from multiple industrial cameras concurrently.
With the broadcasting feature, a machine vision application can run on
multiple host computers while acquiring data from a single camera, as
shown in Figure 3-1.
© National Instruments Corporation 3-1 NI-IMAQ for IEEE 1394 Cameras User Manual
Page 27
Chapter 3 Advanced Programming with NI-IMAQ for IEEE 1394 Cameras
IEEE 1394 Camera
Broadcast
Host Computer (Controller)
Host Computer (Listener)
P
X
I1
0
0
B
Host Computer (Listener)
Figure 3-1. One Camera Broadcasting to Multiple Host Computers
The IEEE 1394 camera broadcasts video data on the IEEE 1394 bus and all
the connected host computers receive the same image data. In this scenario,
one host computer is designated as the controller. The controller is
responsible for starting/stopping the camera feed. There can be only one
controller per camera. The listeners obtain image data from the IEEE 1394
bus. The listeners do not control the camera in any way. There may be one
or more listeners per camera.
Broadcasting has many uses. Computationaly intensive tasks can be spread
across different machines, thus effectively distributing computations.
Multiple host computers can also perform redundancy checks.
Additionally, listeners can monitor the current status of a headless system.
Implementation
Usage for the controller is unchanged from a stand-alone application. Open
your camera interface with the default interface name (for example,
configured in MAX. Configure and start your acquisition.
NI-IMAQ for IEEE 1394 Cameras User Manual 3-2 ni.com
cam0)
Page 28

Next, start the listener(s). On the listening computer, open your camera
interface with the 64-bit unique identifier of the target camera, which you
can find in the General tab in MAX. The controller can get a unique ID and
send it to the listener sessions. Additionally, you must set the listener
camera control mode parameter.
At this point, both the controller and listener systems are acquiring the
same live data from the same camera. When running as a listener, most
attributes—such as the camera features, video modes, or Format 7
acquisition parameters—are read-only. No camera feature or control is
accessible when running as a listener system. Attempts to set these
attributes result in the following error: Attribute not writable.
There is no synchronization between the controller and the listener host
computers provided by the low-level driver. The user must start the
controller before starting the listener. If the camera is not transmitting data
when the listener initializes, the session returns the following error: No
acquisition in progress. If the controller stops the video feed of the camera,
the listener times out.
Scalable Image Size
Chapter 3 Advanced Programming with NI-IMAQ for IEEE 1394 Cameras
IEEE 1394 digital cameras support a predefined set of image sizes, which
you can select through the Video attributes in MAX. Refer to your camera
documentation for a list of supported formats.
If you are using LabVIEW, the NI-IMAQ for IEEE 1394 Cameras software
recognizes the predefined formats and automatically allocates enough
memory to accommodate the image. If you use C or C++ with NI-IMAQ
for IEEE 1394 Cameras functions, you must know the size of the image for
the selected format and mode to allocate enough memory to contain the
image. Obtain the size of the image using the Image Width, Image
Height, and BytesPerPixel attributes.
Some IEEE 1394 cameras support Format 7, which allows you to define the
size of the acquired image. If you use this format, you must input the image
size using the Rectangle parameter in C and C++. The size and position of
the sub-image you are acquiring must be a multiple of the attributes Unit
Width and Unit Height, as shown in Figure 3-2, or the driver acquires the
smallest sub-image that contains the ROI you defined.
The Unit Width and Unit Height values are camera-specific. Refer to the
camera documentation or query the Unit Width and Unit Height attributes
to obtain the actual values.
© National Instruments Corporation 3-3 NI-IMAQ for IEEE 1394 Cameras User Manual
Page 29

Chapter 3 Advanced Programming with NI-IMAQ for IEEE 1394 Cameras
Full Image Size
Unit
Height
Unit Width
Figure 3-2. Partial Image Size Format (Format 7)
Trigger Modes
Acquired Sub-Image
User-Defined
Region
The IIDC 1.31 specification provides several external triggering modes for
IEEE 1394 cameras. A IEEE 1394 camera may support one or more of the
triggering modes. Refer to your camera documentation to find out which
standard modes are implemented.
All of the NI-IMAQ for IEEE 1394 Cameras ADEs have a Trigger
Configure function. The Trigger Configure function has the following input
parameters:
• Polarity—Specifies when the trigger input is active. A value of TRUE
indicates that the trigger is considered active when the value is high.
The default value depends on the vendor implementation of the
IEEE 1394 camera.
• Timeout—Maps to the acquisition timeout attribute. Use this
parameter to specify the amount of time to wait for a trigger before
issuing a timeout error. Specify a timeout duration that is at least as
long as the cycle time of the slowest expected frame rate.
• Mode—Specifies one of the trigger modes described in the following
sections.
• Optional—Certain trigger modes require an additional parameter.
Refer to the following sections to see if the optional parameter is
required.
NI-IMAQ for IEEE 1394 Cameras User Manual 3-4 ni.com
Page 30
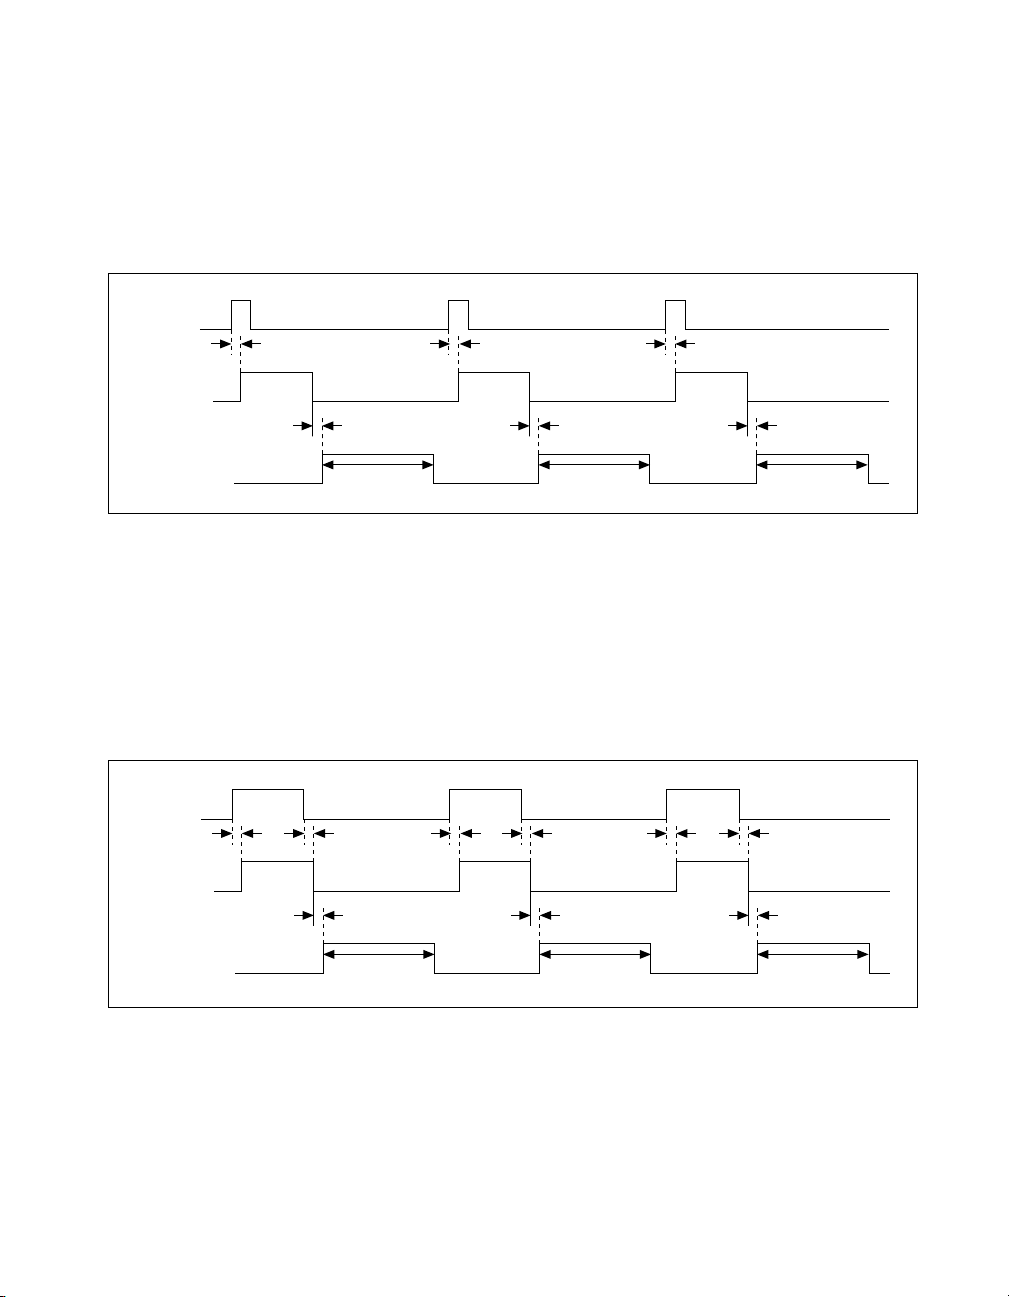
Trigger Mode 0
Trigger
Start Delay Start Delay Start Delay
Chapter 3 Advanced Programming with NI-IMAQ for IEEE 1394 Cameras
With trigger mode 0, the camera starts frame integration when the external
trigger input changes to an active value. The frame is exposed for a duration
specified by the shutter attribute before the camera transfers the image to
the host computer. No optional parameter is required.
Exposure
Transmission
Frame
Trigger Mode 1
Trigger
Exposure
Frame
Frame
N
Start Delay Start Delay Start Delay
Frame N Frame N + 1 Frame N + 2
N + 1
Frame
N + 2
Figure 3-3. Timing Diagram for Trigger Mode 0
With trigger mode 1, the camera starts frame integration when the external
trigger input changes to an active value. The frame is exposed while the
external trigger is active. When the trigger becomes inactive, the camera
stops frame integration and transfers the image to the host computer. No
optional parameter is required.
Start/Stop
Delay
N
Start Delay Start Delay Start Delay
Frame
N + 1
Start/Stop
Delay
Start/Stop
Delay
Frame
N + 2
Transmission
Frame N Frame N + 1 Frame N + 2
Figure 3-4. Timing Diagram for Trigger Mode 1
© National Instruments Corporation 3-5 NI-IMAQ for IEEE 1394 Cameras User Manual
Page 31

Chapter 3 Advanced Programming with NI-IMAQ for IEEE 1394 Cameras
Trigger Mode 2
With trigger mode 2, the camera starts frame integration when the external
trigger input changes to an active value. The same frame is exposed for
multiple triggers. The number of triggers is specified by the optional
parameter, which must have a value of 2 or more.
Trigger
Exposure
Transmission
Frame
Trigger Mode 3
Trigger
Start/Stop
Delay
Frame
N
Start Delay Start Delay Start Delay
Frame N Frame N + 1 Frame N + 2
N + 1
Start/Stop
Delay
Start/Stop
Delay
Frame
N + 2
Figure 3-5. Timing Diagram for Trigger Mode 2
With trigger mode 3, the camera triggers continuously internally. The
frame is exposed for a duration specified by the shutter attribute before the
camera transfers the image to the host computer. The next internal trigger
becomes active after a set cycle time. The cycle time is N times the cycle
time of the fastest frame rate. N is specified by the optional parameter,
which must have a value of 1 or more.
Internal Trigger Cycle Internal Trigger Cycle
Start Delay
Start Delay Start Delay
Internal Trigger Cycle
Exposure
Transmission
Frame
N
Frame
N + 1
Start Delay Start Delay Start Delay
Frame N Frame N + 1 Frame N + 2
Frame
N + 2
Figure 3-6. Timing Diagram for Trigger Mode 3
NI-IMAQ for IEEE 1394 Cameras User Manual 3-6 ni.com
Page 32

Trigger Mode 4
Chapter 3 Advanced Programming with NI-IMAQ for IEEE 1394 Cameras
With trigger mode 4, the camera starts frame integration when the external
trigger input changes to an active value. Multiple frames are exposed
before the camera transfers the image to the host computer. Each frame is
exposed for a duration specified by the shutter attribute. The number of
frames is specified by the optional parameter, which must have a value of
1 or more.
Trigger
Exposure
Transmission
Start Delay Start Delay Start Delay
Frame
N
Trigger Mode 5
Trigger
Exposure
Frame
Start Delay
Frame
N
Frame
N + 1
Start Delay Start Delay
Frame N
Frame
N + 1
Figure 3-7. Timing Diagram for Trigger Mode 4
With trigger mode 5, the camera starts frame integration when the external
trigger input changes to an active value. Multiple frames are exposed
before the camera transfers the image to the host computer. Each frame is
exposed while the external trigger is active. The number of frames is
specified by the optional parameter, which must have a value of 1 or more.
Start/Stop
Frame
N
N
Delay
Frame
N + 1
Start Delay Start Delay
Frame
N + 1
Frame N + 1
Start/Stop
Delay
Transmission
Frame N Frame N + 1
Figure 3-8. Timing Diagram for Trigger Mode 5
© National Instruments Corporation 3-7 NI-IMAQ for IEEE 1394 Cameras User Manual
Page 33

Using NI-IMAQ for IEEE 1394
Cameras in LabVIEW
This chapter describes how to use NI-IMAQ for IEEE 1394 Cameras VIs
in LabVIEW.
Introduction
The NI-IMAQ for IEEE 1394 Cameras VI library—part of the NI-IMAQ
for IEEE 1394 Cameras software—is a group of virtual instruments (VIs)
that enable you to use LabVIEW with an IEEE 1394 camera.
IMAQ Vision for LabVIEW is the National Instruments image processing
and analysis library, which consists of more than 400 VIs. Some of the
basic IMAQ Vision VIs are shared with NI-IMAQ for IEEE 1394 Cameras.
If you do not have IMAQ Vision, you can use the IMAQ Vision VIs
included with NI-IMAQ for IEEE 1394 Cameras to create an image
acquisition application. When you use these basic VIs, you can upgrade
your application later to use additional IMAQ Vision VIs without making
changes to your initial image acquisition application.
4
NI-IMAQ for IEEE 1394 Cameras adds a subpalette of VIs to the Vision
Functions palette and an Image Display control to the Controls palette.
Create NI-IMAQ for IEEE 1394 Cameras applications as you would any
other LabVIEW or LabVIEW Real-Time (RT) application. Drop icons
onto the block diagram to create the program, and use the front panel to
design the user interface. Click Run to compile and run the application.
Before you start building an image acquisition application, familiarize
yourself with the basic knowledge and concepts contained in the following
sections.
© National Instruments Corporation 4-1 NI-IMAQ for IEEE 1394 Cameras User Manual
Page 34

Chapter 4 Using NI-IMAQ for IEEE 1394 Cameras in LabVIEW
Location of the NI-IMAQ for IEEE 1394 Cameras VIs
You can find the NI-IMAQ for IEEE 1394 Cameras VIs in the LabVIEW
Functions palette. From the LabVIEW block diagram, select
NI Measurements»Vision»IMAQ IEEE-1394.
The most commonly used, high-level VIs are on the IMAQ for IEEE-1394
palette. You can find VIs for basic acquisition and changing attributes. The
Vision»IMAQ for IEEE-1394»IMAQ IEEE-1394 Low Level palette
contains VIs for more advanced applications.
Refer to the NI-IMAQ for IEEE 1394 Cameras VI Reference Help for more
information about using these VIs.
Common VI Parameters
The following sections describe commonly used VIs and important
parameters common to many VIs.
IMAQ1394 Session
IMAQ1394 Session is a unique identifier that specifies which interface file
to use for the acquisition. The IMAQ1394 Session is produced by the
IMAQ1394 Init VI and used as an input to all other NI-IMAQ for IEEE
1394 Cameras VIs. The NI-IMAQ for IEEE 1394 Cameras VIs use
IMAQ1394 Session Out, which is identical to IMAQ1394 Session, to
simplify dataflow programming. IMAQ1394 Session Out is similar to the
duplicate file sessions provided by the file I/O VIs. The high-level
acquisition VIs—IMAQ1394 Snap, IMAQ1394 Grab Setup, and
IMAQ1394 Sequence—require you to wire IMAQ1394 Session In only in
the following instances:
• If you are using an interface other than the default
• If you are using multiple cameras
• If you need to set IMAQ 1394 properties before the acquisition
cam0
To get and set properties of the acquisition and camera, wire the IMAQ1394
Session to the LabVIEW property node.
NI-IMAQ for IEEE 1394 Cameras User Manual 4-2 ni.com
Page 35

Image Buffer
Region of Interest
Acquisition VIs
Chapter 4 Using NI-IMAQ for IEEE 1394 Cameras in LabVIEW
Many acquisition VIs require an image buffer to receive the captured
image. You can create this image buffer with IMAQ Create. Refer to the
Buffer Management section of this chapter for more information about
using buffers. Image In receives the image buffer. Image Out returns the
captured image.
The acquisition VIs use the Region of Interest input to specify a
rectangular portion of an image frame to be captured. You can use Region
of Interest to reduce the size of the image you want to capture. Region of
Interest is an array of four elements whose elements are defined as Left,
Top, Right, and Bottom. If Region of Interest is not wired, the entire
image acquisition window is captured. Configure the default acquisition
window using MAX.
Two types of acquisition VIs are available in LabVIEW: high-level and
low-level.
High-Level
Use the high-level acquisition VIs for basic image acquisition applications.
VIs are included for snap, grab, and sequence, as described in the
Acquisition Types section of this chapter.
Low-Level
Use the low-level acquisition VIs for more advanced image acquisition
applications. The low-level VIs configure an acquisition, start an
acquisition, retrieve the acquired images, and stop an acquisition. You can
use these VIs to construct advanced IMAQ applications.
Complete the following general steps to perform a low-level acquisition.
1. Call IMAQ1394 Init to initialize the board and create an IMAQ1394
Session.
2. Call IMAQ1394 Configure Acquisition to allocate resources for the
acquisition.
3. Call IMAQ1394 Start Acquisition to start transferring data from the
camera.
© National Instruments Corporation 4-3 NI-IMAQ for IEEE 1394 Cameras User Manual
Page 36

Chapter 4 Using NI-IMAQ for IEEE 1394 Cameras in LabVIEW
4. Call IMAQ1394 Get Image to obtain a copy of the requested image
data.
5. After an acquisition, call IMAQ1394 Stop Acquisition to stop
transferring data from the camera.
6. Call IMAQ1394 Clear Acquisition to release the resources associated
with the acquisition.
7. Call IMAQ1394 Close to close the camera session.
Note If an acquisition is in progress and you call IMAQ1394 Close, the driver
automatically stops the acquisition and releases resources associated with the acquisition.
Buffer Management
The IMAQ Create VI and IMAQ Dispose VI manage image buffers in
LabVIEW.
IMAQ Create, shown in Figure 4-1, allocates an image buffer. Image
Name is a label for the buffer created. Each buffer must have a unique
name. Image Type specifies the type of image being created. Use
Grayscale (U8) for 8-bit monochrome images, Grayscale (U16) for 16-bit
monochrome images, and RGB (U32) for RGB color images.
Note If Image Type is set to a value incompatible with the current video mode, NI-IMAQ
for IEEE 1394 Cameras automatically changes the value to a compatible one when
acquiring images.
New Image contains pointer information to the buffer, which is initially
empty. When you wire New Image to the Image in input of an image
acquisition VI, the image acquisition VI allocates the correct amount of
memory for the acquisition. If you are going to process the image, you
might need to provide a value for Border Size. Border Size is the width,
in pixels, of a border created around an image. Some image processing
functions, such as labeling or morphology, require a border.
Figure 4-1. IMAQ Create
NI-IMAQ for IEEE 1394 Cameras User Manual 4-4 ni.com
Page 37

IMAQ Dispose, shown in Figure 4-2, frees the memory allocated for the
image buffer. Call this VI only after the image is no longer required for
processing.
Acquisition Types
The following sections describe snap, grab, and sequence acquisitions in
LabVIEW and give examples.
Snap
Use the IMAQ1394 Snap VI for snap applications. Figure 4-3 shows a
simplified block diagram for using IMAQ1394 Snap.
Chapter 4 Using NI-IMAQ for IEEE 1394 Cameras in LabVIEW
Figure 4-2. IMAQ Dispose
Figure 4-3. Acquiring an Image Using Snap
Grab
Use two VIs—IMAQ1394 Grab Setup and IMAQ1394 Grab Acquire—for
a grab acquisition in LabVIEW. Call IMAQ1394 Grab Setup once to
initialize the acquisition and start capturing the image to an internal
software buffer. You can call IMAQ1394 Grab Acquire multiple times to
copy the image currently stored in the internal buffer to a LabVIEW image
buffer. After the program finishes copying images, call IMAQ1394 Close
once to shut down the acquisition.
Figure 4-4 shows a simplified block diagram for using IMAQ1394 Grab
Setup and IMAQ1394 Grab Acquire.
© National Instruments Corporation 4-5 NI-IMAQ for IEEE 1394 Cameras User Manual
Page 38

Chapter 4 Using NI-IMAQ for IEEE 1394 Cameras in LabVIEW
Figure 4-4. Acquiring Images Using Grab
Sequence
Use the IMAQ1394 Sequence VI for sequence applications. IMAQ1394
Sequence starts, acquires, and releases a sequence acquisition. IMAQ1394
Sequence does not return until the entire sequence is acquired.
Figure 4-5 shows a simplified block diagram for using IMAQ1394
Sequence. Place the IMAQ Create VI inside a For Loop to create an array
of images for the Image In input to IMAQ1394 Sequence. The Number to
Decimal String VI and Concatenate String VI create a unique name for
each image in the array.
Figure 4-5. Acquiring Images Using Sequence
NI-IMAQ for IEEE 1394 Cameras User Manual 4-6 ni.com
Page 39

Triggering
Chapter 4 Using NI-IMAQ for IEEE 1394 Cameras in LabVIEW
Often, you may need to link or coordinate a vision action or function with
events external to the computer, such as receiving a strobe pulse for
lighting or a pulse from an infrared detector that indicates the position of
an item on an assembly line. In these cases, use a triggered image
acquisition.
Figure 4-6 illustrates using the IMAQ1394 Configure Trigger VI to
perform a grab acquisition based on a trigger. Timeout specifies the
amount of time, in milliseconds, to wait for the trigger.
Figure 4-6. IMAQ Triggering
Image Display
Many image acquisition applications require that one or more images
be displayed. You have several options for displaying images in LabVIEW.
You can display an image directly on the front panel using an Image
Display control, which is available on the Vision Controls palette. To
display an image on an Image Display control, place the control on the front
panel of your VI. On the block diagram, wire Image Out from an
acquisition VI to the Image Display control terminal.
Figure 4-7 illustrates using an image control to display an image using an
Image Display control. For more information about Image Display
controls, refer to the IMAQ Vision for LabVIEW VI Reference Help.
© National Instruments Corporation 4-7 NI-IMAQ for IEEE 1394 Cameras User Manual
Page 40

Chapter 4 Using NI-IMAQ for IEEE 1394 Cameras in LabVIEW
Figure 4-7. Displaying an Image Using an Image Control
If you have IMAQ Vision for LabVIEW, you can display an image in an
external window using IMAQ WindDraw, located at Vision»
Vision Utilities»External Display. Use IMAQ WindDraw when you need
more image size and location control.
Figure 4-8 illustrates using IMAQ WindDraw to display an image acquired
using IMAQ1394 Snap. You can display images in the same way using any
acquisition type. For more information about the display capabilities of
IMAQ Vision, refer to the IMAQ Vision for LabVIEW User Manual.
Figure 4-8. Displaying an Image Using IMAQ WindDraw
If you have LabVIEW RT, you can use IMAQ RT Video Out, located at
Vision»Vision Utilities»IMAQ RT, to display an image on the monitor
connected to your RT device. Use IMAQ Video Out Display Mode, located
at Vision»Vision Utilities»IMAQ RT, to configure the monitor for
display. Figure 4-9 illustrates configuring the monitor and displaying an
image acquired with IMAQ1394 Snap.
Figure 4-9. Displaying an Image Using RT Video Out
Note The IMAQ RT Video Out VI is available only on RT devices with Intel i815 or i845
video chipsets. These devices include NI CVS-1450 Series devices, PXI-817x controllers,
and PXI-818x controllers.
NI-IMAQ for IEEE 1394 Cameras User Manual 4-8 ni.com
Page 41

Camera Attributes
To modify camera attributes in LabVIEW, use the IMAQ1394 Property
Node. Every camera attribute has three parameters: Attribute Key,
Attribute Mode, and Attribute Value.
• Attribute Key—Select from a list of supported keys, including
• Attribute Mode—Select from a list of supported modes, including
• Attribute Value—Enter a numeric value for the attribute. This
Figure 4-10 shows a VI with the shutter camera attribute set to Absolute
mode with a value of 0.014s.
Chapter 4 Using NI-IMAQ for IEEE 1394 Cameras in LabVIEW
Brightness, Gain, Shutter Speed, and White Balance. Use
IMAQ1394 GetFeatures to return a list of supported camera attributes.
Absolute, Auto, Off, One Push, Relative, and Ignore. Use the
Inquiry property node to determine if a mode is supported by the
current camera. The Ignore mode is supported by all cameras
parameter applies only to camera attribute when using Absolute or
Relative camera mode. Use the Range property nodes to find the valid
range for the current camera.
Figure 4-10. Setting Camera Attributes with Property Nodes
Error Handling
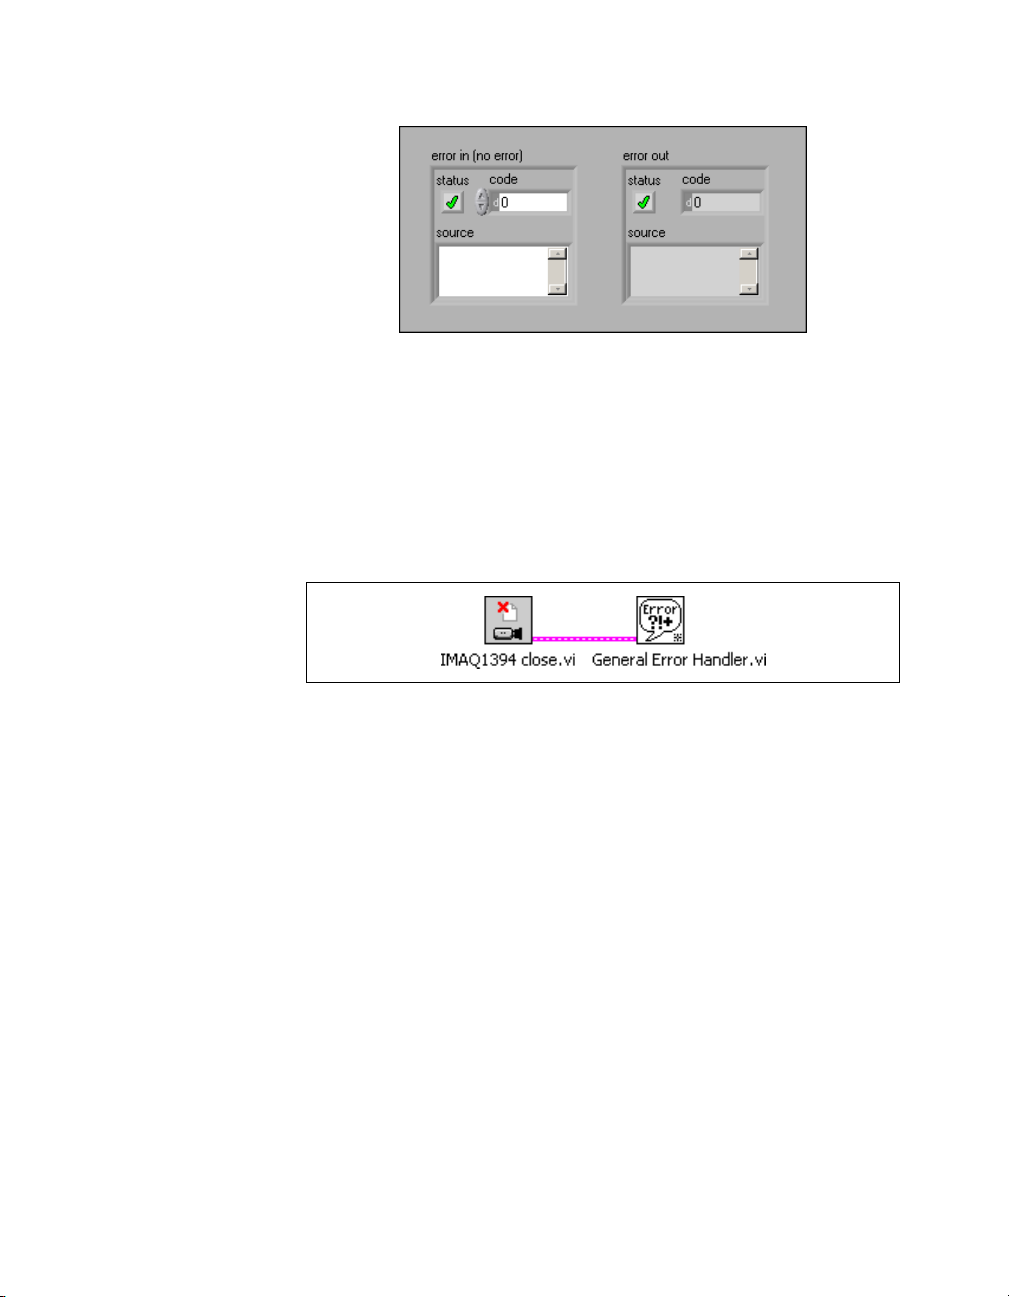
Every NI-IMAQ for IEEE 1394 Cameras VI contains an error in input
cluster and an error out output cluster. The clusters, shown in Figure 4-11,
contain a Boolean value that indicates whether an error occurred, the code
for the error, and the source or the name of the VI that returned the error. If
error in indicates an error, the VI passes the error information to error out
and does not execute any NI-IMAQ for IEEE 1394 Cameras function.
© National Instruments Corporation 4-9 NI-IMAQ for IEEE 1394 Cameras User Manual
Page 42
Chapter 4 Using NI-IMAQ for IEEE 1394 Cameras in LabVIEW
You can use the Simple Error Handler VI, located on the Functions»
Time&Dialog palette, to check for errors that occur while executing a VI.
If you wire an error cluster to the Simple Error Handle VI, the VI deciphers
the error information and displays a dialog box that describes the error. If
no error occurred, the Simple Error Handler VI does nothing. Figure 4-12
illustrates wiring an NI-IMAQ for 1394 Cameras VI to the Simple Error
Handler VI.
Figure 4-11. Error Clusters
Figure 4-12. Error Checking Using the Simple Error Handler VI
NI-IMAQ for IEEE 1394 Cameras User Manual 4-10 ni.com
Page 43

Using NI-IMAQ for IEEE 1394
Cameras in C and .NET
This chapter briefly describes how to use NI-IMAQ for IEEE 1394
Cameras function in Microsoft Visual C and Microsoft Visual
Studio .NET.
Using NI-IMAQ for IEEE 1394 Cameras for C
This section outlines the process for developing NI-IMAQ for IEEE 1394
Cameras applications using C for Windows 2000/XP. Detailed instructions
about creating project and source files are not included. For information
about creating and managing project files, refer to the documentation
included with your particular development environment.
Note The generic and high-level functions appear within each function class in the logical
order you might need to use them. The low-level functions appear within each function
class in alphabetical order.
5
When programming, use the following guidelines:
• Include the
NI-IMAQ functions. Add this file to the top of your source files.
•Add the
environments, you can add import libraries simply by inserting them
into your list of project files. In other environments, you can specify
import libraries under the linker settings portion of the project file.
• When compiling, indicate where the compiler can find the NI-IMAQ
header files and shared libraries. You can find most of the files you
need for development under the NI-IMAQ target installation directory.
If you choose the default directory during installation, the target
installation directory is
Instruments\NI-IMAQ for IEEE-1394
© National Instruments Corporation 5-1 NI-IMAQ for IEEE 1394 Cameras User Manual
niimaq1394.h header file in all C source files that use
niimaq1394.lib import library to your project. In some
C:\Program Files\National
. You can find the
Page 44

Chapter 5 Using NI-IMAQ for IEEE 1394 Cameras in C and .NET
include files under the include subdirectory. The import libraries for
Microsoft Visual C++ are located under the
If you have IMAQ Vision for LabWindows/CVI installed on your
computer, you can use the additional Image functions installed with
NI-IMAQ for IEEE 1394 Cameras. These functions use the IMAQ Vision
memory management feature, which automatically allocates the memory
for your image. To use these Image functions, first create an image using
imaqCreate, and then pass that image to an acquisition function.
If you are using LabWindows/CVI but do not have IMAQ Vision installed,
you must manually allocate the memory for your image. Use the
ImageWidth, ImageHeight, and BytesPerPixel attributes to determine
how much memory to allocate.
lib\msvc subdirectory.
Using NI-IMAQ for IEEE 1394 Cameras for Microsoft Visual Studio .NET 2003
NI-IMAQ for IEEE 1394 Cameras installs the following assemblies that
enable .NET languages to interact with the driver software:
•
NationalInstruments.CWIMAQ1394.Interop.dll
• NationalInstruments.AxCWIMAQControlsLib.Interop.dll—
Uses IMAQ Vision to display images with the included Viewer control
The
CWIMAQ1394 assembly is installed in the
<NI-IMAQ 1394>\dotNET\Assemblies\Current directory. The
AxCWIMAQControlsLib assembly is installed in the
<Vision>\dotNET\Assemblies\Current directory. Refer to the
NI-IMAQ for IEEE 1394 Cameras Function Reference Help for
information about the properties, methods, and events available with these
assemblies.
Creating a New .NET Application
You first must add a reference to the NI-IMAQ 1394 assembly in your
project when creating a new application. Complete the following steps to
add a reference to the
Studio .NET 2003:
1. Create a new application, or open an existing one.
2. Select Project»Add Reference.
3. Under the .NET Framework Components tab, select
NI-IMAQ 1394.
NI-IMAQ for IEEE 1394 Cameras User Manual 5-2 ni.com
NI-IMAQ 1394 assembly in Microsoft Visual
Page 45

Chapter 5 Using NI-IMAQ for IEEE 1394 Cameras in C and .NET
If you need to display acquired images, you also must add an IMAQ Vision
Viewer control to your toolbox and to your form. Complete the following
steps to add the IMAQ Vision Viewer control to the Microsoft Visual
Studio .NET 2003 toolbox.
1. With your project open, open a form in Design View.
2. Open the Toolbox (View»Toolbox).
3. Select the category in which you want the IMAQ Vision controls to
appear (General, Components, and so on).
4. Select Tools»Add/Remove Toolbox Items.
5. Under the .NET Framework Components tab, select the
CWIMAQViewer control.
When the Viewer control is in the toolbox, you can add it to your forms by
clicking on the tool and drawing an area on the form. References to the
IMAQ Vision Interop Assemblies are automatically added to your project.
© National Instruments Corporation 5-3 NI-IMAQ for IEEE 1394 Cameras User Manual
Page 46

Register-Level Programming
This appendix explains how to access and program register locations using
the NI-IMAQ for IEEE 1394 Cameras software, and discusses the caveats
involved in programming registers.
Introduction
All IEEE 1394 cameras communicate to the host computer through register
maps. The register map reflects the system memory located on the
IEEE 1394 camera. The register map allows the host computer to read and
write information with minimal overhead.
The host computer sends asynchronous messages over the IEEE 1394 bus
to the connected camera. When the data is written into memory on the
IEEE 1394 camera, the camera processes the incoming request. If possible,
the camera responds immediately. Otherwise, a pending transaction
message is returned. When the pending request is completed, the
IEEE 1394 camera returns the results of the request.
A
© National Instruments Corporation A-1 NI-IMAQ for IEEE 1394 Cameras User Manual
Page 47
Appendix A Register-Level Programming
Host Computer IEEE 1394 Camera
(1) Send Request
(2) Receive Request and
Send Pending Packet
(3) Receive Pending Packet.
Wait for complete
(4) Complete Request
and Send Result
(5) Receive Result
Figure A-1. Explanation of Split Transactions
NI-IMAQ for IEEE 1394 Cameras 2.0 supports the 1394 Trade Association
IIDC 1.31 register specification for industrial cameras. Most of the
intricacies of register-level programming are abstracted by the driver. The
driver is responsible for manipulating camera features and
activating/deactivating the video data stream.
Some cameras implement additional registers that are not contained in the
IIDC 1.31 specification. These advanced camera features are not natively
supported by the camera driver. To use these advanced features, you must
use the low-level, register-level access tools to communicate with the
camera.
The NI-IMAQ for IEEE 1394 Cameras software provides the following
register-level primitives:
• Read Quadlet—Reads a quadlet from a specified memory location
• Write Quadlet—Writes a quadlet to a specified memory location
NI-IMAQ for IEEE 1394 Cameras User Manual A-2 ni.com
Page 48

Note In LabVIEW, only the quadlet block variants are exposed.
Usage
Basic Example
Appendix A Register-Level Programming
• Read Quadlet Block—Reads an array of quadlets from a specified
memory location and range
• Write Quadlet Block—Writes an array of quadlets to a specified
memory location
To perform a register-level access, specify a memory location (or offset)
and data storage. IEEE 1394 memory locations are specified as 48-bit
values. The upper 20 bits are filled in by the driver. The low-level register
primitives accept the lower 28-bit offset. The memory storage contains the
result/desired data when transferring.
The isonchronous enable register indicates active video transmission. To
read the ISO_EN register (0x614), calculate the memory offset by adding
the specified offset to the base register. The base register is 0xF0F00000 for
most IEEE 1394 cameras.
0xF0F00000 + 0x614 = 0xF0F00614
The value is read, and the result is placed in the specified memory location.
read quadlet (0xF0F00614) = <iso_en>
where <iso_en> = (0x80000000 or 0x00000000).
If bit 0 has a value of 0x80000000, the bit is on, and the camera is
transmitting video data. If bit 0 has a value of 0x00000000, the camera is
not currently transmitting data.
Advanced Example
The advanced feature described in this example is specific to Basler
IEEE 1394 cameras. The advanced feature replaces the live video feed with
a static test pattern.
According to the user documentation for the Basler A601f camera, the
TEST_IMAGE register is located at advanced offset 0x0098. You can
enable a static test pattern by setting bit 17 of the TEST_IMAGE register.
To get the advanced base register, first read ADVANCED_FEATURE_INQ
© National Instruments Corporation A-3 NI-IMAQ for IEEE 1394 Cameras User Manual
Page 49

Appendix A Register-Level Programming
register (0x480). Add the specified offset to the base
register—0xF0F00000 for most IEEE 1394 cameras.
Read the value into storage.
where <advanced_feature_inq> = 0x800000.
Now, calculate the offset to the advanced feature offset. You need to
multiply the previous result by 4 to convert the quadlet offset value to byte
offset.
(0xF0F00000 + (<advanced feature offset> × 4) + 0x98) = newly
Now the camera is set to the test pattern.
0xF0F00000 + 0x480 = 0xF0F00480
read quadlet (0xF0F00480) = <advanced_feature_inq>
calculated offset
byte swap (1 << 17) = newly calculated register mask
write quadlet (0xF2F00098, 0x00002000)
Caveats
This section discusses caveats to consider when programming registers
using the NI-IMAQ for IEEE 1394 Cameras software.
Endianess
Data that spans multiple bytes, such as a quadlet, may be written
left-to-right or right-to-left. The method with which data is written is called
endianness. Two types of endianness exist: big endian and little endian.
The IEEE 1394 bus transports data using the big endian method. However,
Windows and LabVIEW RT host machines accept little endian data. To
correct for this discrepancy, NI-IMAQ for IEEE 1394 Cameras byte-swaps
every quadlet that is read or written with low-level register primitives.
NI-IMAQ for IEEE 1394 Cameras User Manual A-4 ni.com
Page 50

Appendix A Register-Level Programming
Quadlet Array
Many IEEE 1394 cameras allow register-level access to more than 32 bits
of data per communication request. In most cases, you can safely write and
read a large, contiguous block of data to and from the connected camera.
Some cameras fail when trying to access large payloads. If the camera does
not successfully transfer an array of quadlets, attempt to transfer the
quadlets one at a time.
Timing
Many IEEE 1394 cameras are responsive to successive register accesses. In
most cases, you can safely read and write registers as quickly as possible.
Some cameras lock up under stressed conditions. The camera driver inserts
an artificial delay between register accesses. You can change this artificial
delay in the registry under the following registry key:
HKEY_LOCAL_MACHINE\SYSTEM\CurrentControlSet\Services\
imaq1394k\Parameters\AsyncTransferDelay
The key specifies the millisecond value to delay before each transaction.
After changing the value, reboot the host computer to enable the changes.
Note Changing this delay affects the entire driver, not just register-level access.
.
Invalid Memory Location
The NI-IMAQ for IEEE 1394 Cameras software allows access to register
locations that do not exist. If an error occurs while accessing the register,
check the validity of the register location.
© National Instruments Corporation A-5 NI-IMAQ for IEEE 1394 Cameras User Manual
Page 51

Technical Support and
Professional Services
Visit the following sections of the National Instruments Web site at
ni.com for technical support and professional services:
• Support—Online technical support resources at
include the following:
– Self-Help Resources—For answers and solutions, visit the
award-winning National Instruments Web site for software drivers
and updates, a searchable KnowledgeBase, product manuals,
step-by-step troubleshooting wizards, thousands of example
programs, tutorials, application notes, instrument drivers, and
so on.
– Free Technical Support—All registered users receive free Basic
Service, which includes access to hundreds of Application
Engineers worldwide in the NI Developer Exchange at
ni.com/exchange. National Instruments Application Engineers
make sure every question receives an answer.
For information about other technical support options in your
area, visit
ni.com/contact.
• Training and Certification—Visit
self-paced training, eLearning virtual classrooms, interactive CDs,
and Certification program information. You also can register for
instructor-led, hands-on courses at locations around the world.
• System Integration—If you have time constraints, limited in-house
technical resources, or other project challenges, National Instruments
Alliance Partner members can help. To learn more, call your local
NI office or visit
ni.com/services or contact your local office at
ni.com/alliance.
B
ni.com/support
ni.com/training for
If you searched
your local office or NI corporate headquarters. Phone numbers for our
worldwide offices are listed at the front of this manual. You also can visit
the Worldwide Offices section of
office Web sites, which provide up-to-date contact information, support
phone numbers, email addresses, and current events.
© National Instruments Corporation B-1 NI-IMAQ for IEEE 1394 Cameras User Manual
ni.com and could not find the answers you need, contact
ni.com/niglobal to access the branch
Page 52

Glossary
A
acquisition window The image size specific to a video standard or camera resolution.
address Value that identifies a specific location (or series of locations) in memory.
API Application programming interface.
area A rectangular portion of an acquisition window or frame that is controlled
and defined by software.
array Ordered, indexed set of data elements of the same type.
aspect ratio The ratio of a picture or image’s width to its height.
asynchronous (1) Independent in time from any other event. (2) Communication
mechanism on the IEEE 1394 bus, which guarantees delivery of the
message but does not guarantee timing.
B
big endian Describes computers that store bytes of memory by placing the most
significant byte at the memory location with the lowest address, the next
significant byte at the next memory location, and so on.
buffer Temporary storage for acquired data.
C
camera session A process-safe handle to a IEEE 1394 camera.
chroma The color information in a video signal.
D
default setting A default parameter value recorded in the driver. In many cases, the default
input of a control is a certain value (often 0).
© National Instruments Corporation G-1 NI-IMAQ for IEEE 1394 Cameras User Manual
Page 53

Glossary
DLL Dynamic Link Library—A software module in Microsoft Windows
containing executable code and data that can be called or used by Windows
applications or other DLLs; functions and data in a DLL are loaded and
linked at run time when they are referenced by a Windows application or
other DLLs.
driver Software that controls a specific hardware device, such as an IEEE 1394
camera.
E
endianness The convention describing the ordering of bytes in memory or the sequence
in which bytes are transmitted.
external trigger A voltage pulse from an external source that triggers an event such as
A/D conversion.
F
FIFO First-In First-Out—The first data stored in the memory buffer is the first
data sent to the acceptor. FIFOs are used on IMAQ devices to temporarily
store incoming data until that data can be retrieved.
function A set of software instructions executed by a single line of code that may
have input and/or output parameters and returns a value when executed.
G
gamma The nonlinear change in the difference between the video signal’s
brightness level and the voltage level needed to produce that brightness.
grab Performs an acquisition that loops continually on one buffer. You obtain a
copy of the acquisition buffer by grabbing a copy to a separate buffer that
can be used for analysis.
H
hardware abstraction
layer
NI-IMAQ for IEEE 1394 Cameras User Manual G-2 ni.com
Separates software API capabilities, such as general acquisition and control
functions, from hardware-specific information.
Page 54

Glossary
hue Represents the dominant color of a pixel. The hue function is a continuous
function that covers all the possible colors generated using the R, G, and
B color spectrum. See also RGB.
I
I/O Input/Output—The transfer of data to/from a computer system involving
communications channels, operator interface devices, and/or data
acquisition and control interfaces.
IEEE Institute of Electrical and Electronics Engineers.
internal buffer A page-locked buffer. See also page-locked buffer.
L
library A file containing compiled object modules, each comprised of one of more
functions, that can be linked to other object modules that make use of these
functions.
little endian Describes computers that store bytes of memory by placing the least
significant byte at the memory location with the lowest address, the second
least significant byte at the next memory location, and so on.
luma The brightness information in the video picture. The luma signal amplitude
varies in proportion to the brightness of the video signal and corresponds
exactly to the monochrome picture.
M
MAX
Measurement & Automation Explorer—A controlled, centralized
configuration environment that allows you to configure all of your
NI devices.
N
NI-IMAQ Driver software for National Instruments IMAQ hardware.
© National Instruments Corporation G-3 NI-IMAQ for IEEE 1394 Cameras User Manual
Page 55

Glossary
P
page-locked buffer Memory page that is marked as non-pagable by the virtual file system.
Page-locked buffers remain in physical memory and do not cause page
faults
pixel Picture element. The smallest division that makes up the video scan line.
For display on a computer monitor, a pixel’s optimum dimension is square
(aspect ratio of 1:1, or the width equal to the height).
process-safe handle A handle that allows only one process to access a camera at any given time.
protocol The exact sequence of bits, characters, and control codes used to transfer
data between computers and peripherals through a communications
channel.
Q
quadlet A 32-bit (four-byte) word.
R
real time A property of an event or system in which data is processed as it is acquired
instead of being accumulated and processed at a later time.
resolution (1) The number of rows and columns of pixels. An image composed of
m rows and n columns has a resolution of n × m. This image has n pixels
along its horizontal axis and m pixels along its vertical axis; (2) The
smallest signal increment that can be detected by a measurement system.
Resolution can be expressed in bits, proportions, or a percentage of
full scale. For example, a system has 12-bit resolution, one part in
4,096 resolution, and 0.0244 percent of full scale.
RGB Color encoding scheme using red, green, and blue (RGB) color information
where each pixel in the color image is encoded using 32 bits: 8 bits for red,
8 bits for green, 8 bits for blue, and 8 bits for the alpha value (unused).
ROI Region of Interest—(1) An area of the image that is graphically selected
from a window displaying the image. This area can be used focus further
processing; (2) A hardware-programmable rectangular portion of the
acquisition window.
NI-IMAQ for IEEE 1394 Cameras User Manual G-4 ni.com
Page 56

Glossary
S
sequence Performs an acquisition that acquires a specified number of buffers, then
stops.
snap
syntax Set of rules to which statements must conform in a particular programming
Acquires a single image to a buffer.
language.
T
timeout Length of time, in milliseconds, that the driver waits for an image from the
camera before returning an error
transfer rate The rate, measured in bytes/s, at which data is moved from source to
destination after software initialization and set up operations. The
maximum rate at which the hardware can operate.
trigger Any event that causes or starts some form of data capture.
U
user buffer A memory buffer created by the user as a destination for the image. In
LabVIEW, this is created with the IMAQ Create VI.
UV plane See YUV.
V
VI Virtual Instrument. (1) A combination of hardware and/or software
elements, typically used with a PC, that has the functionality of a classic
stand-alone instrument; (2) A LabVIEW software module (VI), which
consists of a front panel user interface and a block diagram program.
© National Instruments Corporation G-5 NI-IMAQ for IEEE 1394 Cameras User Manual
Page 57

Glossary
Y
YUV A representation of a color image used for the coding of NTSC or PAL
video signals. The luma information is called Y, while the chroma
information is represented by two components, U and V representing the
coordinates in a color plane.
NI-IMAQ for IEEE 1394 Cameras User Manual G-6 ni.com
Page 58

Index
Symbols
.NET programming language, 1-4, 3-1, 5-1,
5-2, 5-3
A
advanced programming examples
grab using low-level functions, 2-13
sequence using low-level functions, 2-14
snap using low-level functions, 2-12
application development, 1-2
.NET, 4-1, 5-2
C, 5-1
environments, 1-2
LabVIEW, 4-1
LabVIEW Real-Time Module, 4-1
NI-IMAQ for IEEE 1394 libraries, 1-3
B
Bayer, 1-1, 2-8
block diagram, LabVIEW, 4-1, 4-2, 4-7
grab, 4-5
sequence, 4-6
snap, 4-5
broadcasting, 2-4, 3-1
figure, 3-2
buffers, 4-3, 4-5
internal, 2-1, 2-4 to 2-14, 4-5
management, 4-4
number, 2-5, 2-6
user, 2-1, 2-5, 2-6, 2-9, 2-10
C
C programming language, 1-2, 3-1, 3-3, 5-1
camera
attributes, 2-1, 2-3, 2-4, 3-1, 3-3
setting camera attributes in C, 3-1
setting camera attributes in
LabVIEW, 4-9
setting camera attributes in Visual Basic
and .NET, 3-1
configuration, 1-2
naming convention (table), 2-3
output formats, 1-1
camera control mode, 2-2, 2-4, 3-3
camera files, 1-2, 2-3
configuration
camera, 1-2
interface, 2-4
controller
broadcasting, 3-2, 3-3
camera control mode, 2-4
conventions used in the manual, iv
D
decoding video modes, 2-7
table, 2-8
diagnostic tools (NI resources), B-1
display. See image display
documentation
conventions used in the manual, iv
NI resources, B-1
drivers (NI resources), B-1
E
endianess, 2-8, A-4
enumerate function, 2-3
error handling, 4-9
© National Instruments Corporation I-1 NI-IMAQ for IEEE 1394 Cameras User Manual
Page 59

Index
examples
advanced programming examples, 2-11
introductory programming examples, 2-8
location of files, 1-4
examples (NI resources), B-1
F
features and overview, 1-1
Format 7 video mode, 2-5, 3-1, 3-3
figure, 3-4
front panel, LabVIEW, 4-1, 4-7
G
grab
high-level, 2-1, 2-6, 2-10, 4-5
flowchart, 2-10
in LabVIEW (figure), 4-6
low-level, 2-13
flowchart, 2-13
H
help, technical support, B-1
high-level functions, when to use, 2-1
initialization, interface, 2-2
instrument drivers (NI resources), B-1
interface file, 2-3, 4-2
internal buffers, 2-1, 2-4 to 2-14, 4-5
introductory programming examples, 2-8
high-level grab functions, 2-10
high-level sequence functions, 2-11
high-level snap functions, 2-9
K
KnowledgeBase, B-1
L
LabVIEW programming language, 1-2, 3-1,
3-3, 4-1
block diagram, 4-1, 4-2, 4-5 to 4-7
front panel, 4-1, 4-7
property nodes, 4-2, 4-9
LabVIEW Real-Time Module, 1-2, 4-1
LabWindows/CVI programming
language, 1-2
listener
broadcasting, 3-2, 3-3
camera control mode, 2-4
I
image buffer. See buffer
image display, 2-1, 2-7, 4-7
.NET, 5-2, 5-3
LabVIEW, 4-1, 4-7, 4-8
figure, 4-8
LabVIEW Real-Time Module, 4-8
figure, 4-8
IMAQ Create, 4-3, 4-4
IMAQ Dispose, 4-4, 4-5
IMAQ WindDraw, 4-8
IMAQ1394 Session, 4-2, 4-3
NI-IMAQ for IEEE 1394 Cameras User Manual I-2 ni.com
M
MAX, 1-2, 2-3, 2-9, 3-1 to 3-3, 4-3
Measurement & Automation Explorer.
See MAX
memory allocation, 2-5, 2-6, 3-3, 4-3, 4-4,
4-5, 5-2
memory offset, A-3, A-4
N
National Instruments support and
services, B-1
Page 60

Index
NI-IMAQ for IEEE 1394 Cameras
acquisition types
grab, 4-5
sequence, 4-6
snap, 4-5
acquisition VIs
high-level VIs, 4-3
low-level VIs, 4-3
architecture, 1-2
libraries, 1-3
O
overwrite mode, 2-7
P
Partial Image Size Format. See Format 7 video
mode
programming
guidelines for C, 5-1
high-level functions, 2-1
introduction to programming with
NI-IMAQ for 1394, 2-1
low-level functions, 2-1
register-level, A-1
programming environments supported by
NI-IMAQ for 1394 software, 1-2
programming examples (NI resources), B-1
programming with NI-IMAQ for
1394 VIs, 4-5
buffer management, 4-4
introduction, 4-1
location, 4-2
parameters, 4-2
property nodes, LabVIEW, 4-2, 4-9
R
region of interest. See ROI
register-level programming, A-1
caveats, A-4
RGB, 1-1, 2-7, 2-8, 4-4
ROI, 2-4 to 2-6, 2-9, 3-3
S
scalable image size, 3-3
sequence
high-level, 2-1, 4-6
flowchart, 2-11
in LabVIEW (figure), 4-6
low-level, 2-14
flowchart, 2-14
snap
high-level, 2-1, 4-5
flowchart, 2-9
in LabVIEW (figure), 4-5
low-level, 2-12
flowchart, 2-12
software (NI resources), B-1
static test pattern, A-3
support, technical, B-1
T
technical support, B-1
timeouts, 2-7, 3-4, 4-7
training and certification (NI resources), B-1
triggering
in LabVIEW, 4-7
modes, 2-1, 3-4 to 3-7
troubleshooting (NI resources), B-1
Q
quadlet arrays, A-3, A-5
© National Instruments Corporation I-3 NI-IMAQ for IEEE 1394 Cameras User Manual
U
user buffers, 2-1, 2-5, 2-6, 2-9 to 2-10
Page 61

Index
V
VI parameters, 4-2
video mode
decoding, 2-7
table, 2-8
ROI considerations, 2-5
Visual Basic programming language, 1-2, 3-1
Visual Studio .NET programming
language, 1-2
Visual Studio .NET. See .NET
W
Web resources, B-1
Y
YUV, 1-1, 2-7, 2-8
NI-IMAQ for IEEE 1394 Cameras User Manual I-4 ni.com
 Loading...