

Page 1

GPIB
Getting Started with Your GPIB-ENET/100 and NI-488.2™for Mac OS
GPIB-ENET/100 for Mac OS
November 2000 Edition
Part Number 322878A-01
Page 2

Support
Worldwide Technical Support and Product Information
ni.com
National Instruments Corporate Headquarters
11500 North Mopac Expressway Austin, Texas 78759-3504 USA Tel: 512 794 0100
Worldwide Offices
Australia 03 9879 5166, Austria 0662 45 79 90 0, Belgium 02 757 00 20, Brazil 011 284 5011,
Canada (Calgary) 403 274 9391, Canada (Ontario) 905 785 0085, Canada (Québec) 514 694 8521,
China 0755 3904939, Denmark 45 76 26 00, Finland 09 725 725 11, France 01 48 14 24 24,
Germany 089 741 31 30, Greece 30 1 42 96 427, Hong Kong 2645 3186, India 91805275406,
Israel 03 6120092, Italy 02 413091, Japan 03 5472 2970, Korea 02 596 7456, Mexico (D.F.) 5 280 7625,
Mexico (Monterrey) 8 357 7695, Netherlands 0348 433466, New Zealand 09 914 0488, Norway 32 27 73 00,
Poland 0 22 528 94 06, Portugal 351 1 726 9011, Singapore 2265886, Spain 91 640 0085,
Sweden 08 587 895 00, Switzerland 056 200 51 51, Taiwan 02 2528 7227, United Kingdom 01635 523545
For further support information, see the Technical Support Resources appendix. To comment on the
documentation, send e-mail to techpubs@ni.com
© Copyright 2000 National Instruments Corporation. All rights reserved.
Page 3

Important Information
Warranty
The GPIB hardware is warranted against defects in materials and workmanship fora period of two years from the date of shipment,
as evidenced by receipts or other documentation. National Instruments will, at its option, repair or replace equipment that proves
to be defective during the warranty period. This warranty includes parts and labor.
The media on which you receive National Instruments software are warranted not to fail to execute programming instructions,
due to defects in materials and workmanship, for a period of 90 days from date of shipment, as evidenced by receipts or other
documentation. National Instruments will, at its option, repair or replace software media that do not execute programming
instructions if National Instruments receives notice of such defects during the warranty period. National Instruments does not
warrant that the operation of the software shall be uninterrupted or error free.
A Return Material Authorization (RMA) number must be obtained from the factory and clearly marked on the outside of
the package before any equipment will be accepted for warranty work. National Instruments will pay the shipping costs of
returning to the owner parts which are covered by warranty.
National Instruments believes that the information in this document is accurate. The document has been carefully reviewed
for technical accuracy. In the event that technical or typographical errors exist, National Instruments reserves the right to
make changes to subsequent editions of this document without prior notice to holders of this edition. The reader should consult
National Instruments if errors are suspected. In no event shall National Instruments be liable for any damages arising out of
or related to this document or the information contained in it.
E
XCEPT AS SPECIFIED HEREIN,NATIONAL INSTRUMENTS MAKES NO WAR RANTIES, EXPRESS OR IMPLIED, AND SPECIFICALLY DISCLAIMS ANY
WARRANTY OF MERCHANTABILITY OR FITNESS FOR A PARTICULAR PURPOSE
NEGLIGENCE ON THE PART OF
INSTRUMENTS WILL NOT BE LIABLE FOR DAMAGES RESULTING F ROM LOSS OF DATA, PROFITS, USE OF PRODUCTS, OR INCIDENTAL OR
CONSEQUENTIAL DAMAGES
apply regardless of the form of action, whether in contract or tort, including negligence. Any action against National Instruments
must be brought within one year after the cause of action accrues. National Instruments shall not be liable for any delay in
performance due to causes beyond its reasonable control. The warranty provided herein does not cover damages, defects,
malfunctions, or service failures caused by owner’s failure to follow the National Instruments installation, operation, or
maintenance instructions; owner’s modification of the product; owner’s abuse, misuse, or negligent acts; and power failure or
surges, fire, flood, accident, actions of third parties, or other events outside reasonable control.
NATIONAL INSTRUMENTS SHALL BE LIMITED TO THE AMOUNT THERETOFORE PAID BY THE CUSTOMER.NATIONAL
, EVEN IF ADVISED OF THE POSSIBILITY THEREOF. This limitation of the liability of National Instruments will
.CUSTOMER’S RIGHT TO RECOVER DAMAGES CAUSED BY FAULT OR
Copyright
Under the copyright laws, this publication may not be reproduced or transmitted in any form, electronic or mechanical, including
photocopying, recording, storing in an information retrieval system, or translating, in whole or in part, without the prior written
consent of National Instruments Corporation.
Trademarks
LabVIEW™, National Instruments™, NI-488.2™, and ni.com™are trademarks of National Instruments Corporation.
Product and company names mentioned herein are trademarks or trade names of their respective companies.
WARNING REGARDING USE OF NATIONAL INSTRUMENTS PRODUCTS
(1) NATIONAL INSTRUMENTS PRODUCTS ARE NOT DESIGNED WITH COMPONENTS AND TESTING FOR A LEVEL
OF RELIABILITY SUITABLE FOR USE IN OR IN CONNECTION WITH SURGICAL IMPLANTS OR AS CRITICAL
COMPONENTS IN ANY LIFE SUPPORT SYSTEMS WHOSE FAILURE TO PERFORM CAN REASONABLY BE
EXPECTED TO CAUSE SIGNIFICANT INJURY TO A HUMAN.
(2) IN ANY APPLICATION, INCLUDING THE ABOVE, RELIABILITY OF OPERATION OF THE SOFTWARE PRODUCTS
CAN BE IMPAIRED BY ADVERSE FACTORS, INCLUDING BUT NOT LIMITED TO FLUCTUATIONS IN ELECTRICAL
POWER SUPPLY, COMPUTER HARDWARE MALFUNCTIONS, COMPUTER OPERATING SYSTEM SOFTWARE
FITNESS, FITNESS OF COMPILERS AND DEVELOPMENT SOFTWARE USED TO DEVELOP AN APPLICATION,
INSTALLATION ERRORS, SOFTWARE AND HARDWARE COMPATIBILITY PROBLEMS, MALFUNCTIONS OR
FAILURES OF ELECTRONIC MONITORING OR CONTROL DEVICES, TRANSIENT FAILURES OF ELECTRONIC
SYSTEMS (HARDWARE AND/OR SOFTWARE), UNANTICIPATED USES OR MISUSES, OR ERRORSON THE PART OF
THE USER OR APPLICATIONS DESIGNER (ADVERSE FACTORS SUCH AS THESE ARE HEREAFTER
COLLECTIVELY TERMED “SYSTEM FAILURES”). ANY APPLICATION WHERE A SYSTEM FAILURE WOULD
CREATE A RISK OF HARM TO PROPERTY OR PERSONS (INCLUDING THE RISK OF BODILY INJURY AND DEATH)
SHOULD NOT BE RELIANT SOLELY UPON ONE FORM OF ELECTRONIC SYSTEM DUE TO THE RISK OF SYSTEM
FAILURE. TO AVOID DAMAGE, INJURY, OR DEATH, THE USER OR APPLICATION DESIGNER MUST TAKE
REASONABLY PRUDENT STEPS TO PROTECT AGAINST SYSTEM FAILURES, INCLUDING BUT NOT LIMITED TO
BACK-UP OR SHUT DOWN MECHANISMS. BECAUSE EACH END-USER SYSTEM IS CUSTOMIZED AND DIFFERS
FROM NATIONAL INSTRUMENTS' TESTING PLATFORMS AND BECAUSE A USER OR APPLICATION DESIGNER
MAY USE NATIONAL INSTRUMENTS PRODUCTS IN COMBINATION WITH OTHER PRODUCTS IN A MANNER NOT
EVALUATED OR CONTEMPLATED BY NATIONAL INSTRUMENTS, THE USER OR APPLICATION DESIGNER IS
ULTIMATELY RESPONSIBLE FOR VERIFYING AND VALIDATING THE SUITABILITY OF NATIONAL
INSTRUMENTS PRODUCTS WHENEVER NATIONAL INSTRUMENTS PRODUCTS ARE INCORPORATED IN A
SYSTEM OR APPLICATION, INCLUDING, WITHOUT LIMITATION, THE APPROPRIATE DESIGN, PROCESS AND
SAFETY LEVEL OF SUCH SYSTEM OR APPLICATION.
Page 4

Compliance
FCC/Canada Radio Frequency Interference Compliance*
Determining FCC Class
The Federal Communications Commission (FCC) has rules to protect wireless communications from interference.
The FCC places digital electronics into two classes. These classes are known as Class A (for use in industrialcommercial locations only) or Class B (for use in residential or commercial locations). Depending on where it is
operated, this product could be subject to restrictions in the FCC rules. (In Canada, the Department of
Communications (DOC), of Industry Canada, regulates wireless interference in much the same way.)
Digital electronics emit weak signals during normal operation that can affect radio, television, or other wireless
products. By examining the product you purchased, you can determine the FCC Class and therefore which of the two
FCC/DOC Warnings apply in the following sections. (Some products may not be labeled at all for FCC; if so, the
reader should then assume these are Class A devices.)
FCC Class A products only display a simple warning statement of oneparagraph in length regarding interference and
undesired operation. Most of our products are FCC Class A. The FCC rules have restrictions regarding the locations
where FCC Class A products can be operated.
FCC Class B products display either a FCC ID code, starting with the letters EXN,
or the FCC Class B compliance mark that appears as shown here on the right.
Consult the FCC web site
http://www.fcc.gov
FCC/DOC Warnings
This equipment generates and uses radio frequency energy and, if not installed and used in strict accordance with the
instructions in this manual and the CE Mark Declaration of Conformity**, may cause interference to radio and
television reception. Classification requirements are the same for the Federal Communications Commission (FCC)
and the Canadian Department of Communications (DOC).
Changes or modifications not expressly approved by National Instruments could void the user’s authority to operate
the equipment under the FCC Rules.
Class A
Federal Communications Commission
This equipment has been tested and found to comply with the limits for a Class A digital device, pursuant to part 15
of the FCC Rules. These limits are designed to provide reasonable protection against harmful interference when the
equipment is operated in a commercial environment. This equipment generates, uses, and can radiate radio frequency
energy and, if not installed and used in accordance with the instruction manual, may cause harmful interference to
radio communications. Operation of this equipment in a residential area is likely to cause harmful interference in
which case the user will be required to correct the interference at his own expense.
for more information.
Canadian Department of Communications
This Class A digital apparatus meets all requirements of the Canadian Interference-Causing Equipment Regulations.
Cet appareil numérique de la classe A respecte toutes les exigences du Règlement sur le matériel brouilleur du
Canada.
Class B
Federal Communications Commission
This equipment has been tested and found to comply with the limits for a Class B digital device, pursuant to part 15
of the FCC Rules. These limits are designed to provide reasonable protection against harmful interference in a
residential installation. This equipment generates, uses and can radiate radio frequency energy and, if not installed
and used in accordance with the instructions, may cause harmful interference to radio communications. However,
there is no guarantee that interference will not occur in a particular installation. If this equipment does cause harmful
interference to radio or television reception, which can be determined by turning the equipment off and on, the user
is encouraged to try to correct the interference by one or more of the following measures:
• Reorient or relocate the receiving antenna.
• Increase the separation between the equipment and receiver.
Page 5

• Connect the equipment into an outlet on a circuit different from that to which the receiver is connected.
• Consult the dealer or an experienced radio/TV technician for help.
Canadian Department of Communications
This Class B digital apparatus meets all requirements of the Canadian Interference-Causing Equipment Regulations.
Cet appareil numérique de la classe B respecte toutes les exigences du Règlement sur le matériel brouilleur du
Canada.
European Union - Compliance to EEC Directives
Readers in the EU/EEC/EEA must refer to the Manufacturer's Declaration of Conformity (DoC) for information**
pertaining to the CE Mark compliance scheme. The Manufacturer includes a DoC for most every hardware product
except for those bought for OEMs, if also available from an original manufacturer that also markets in the EU, or
where compliance is not required as for electrically benign apparatus or cables.
* Certain exemptions may apply in the USA, see FCC Rules §15.103 Exempted devices,and§15.105(c).
Also available in sections of CFR 47.
** The CE Mark Declaration of Conformity will contain important supplementary information and instructions
for the user or installer.
Page 6

Contents
About This Manual
Conventions ...................................................................................................................xi
Related Documentation..................................................................................................xii
Chapter 1
Introduction
What You Need to Get Started ......................................................................................1-1
Optional Equipment....................................................................................................... 1-2
Optional Hardware ..........................................................................................1-2
Multiple-Computer Software License .............................................................1-2
GPIB-ENET/100 Hardware Overview ..........................................................................1-2
Feature Overview ............................................................................................1-3
LED Overview................................................................................................. 1-3
NI-488.2 Overview ........................................................................................................1-4
Time-Saving Development Tools..................................................................................1-5
Chapter 2
Installation
Installing NI-488.2.........................................................................................................2-1
Installing the GPIB-ENET/100 Hardware.....................................................................2-2
Step 1. Record the Serial Number, Ethernet Address, and
Default Hostname.........................................................................................2-2
Step 2. Connect the Cables..............................................................................2-3
Step 3. Switch on Your GPIB-ENET/100.......................................................2-4
Chapter 3
Ethernet Configuration
Entering Network Configuration Mode.........................................................................3-1
Using the NI Ethernet Device Configuration Utility .....................................................3-2
Changing the Network Settings....................................................................... 3-4
Static IP Parameters.........................................................................................3-6
Choosing a Static IP Address ..........................................................................3-6
For a Network Administered by a Network Administrator ..............3-6
For a Network without a Network Administrator............................. 3-7
Verifying the Hostname ..................................................................................3-8
© National Instruments Corporation vii GPIB-ENET/100 for Mac OS
Page 7

Contents
Chapter 4
GPIB Configuration
Configuring the NI-488.2 Software Characteristics...................................................... 4-1
Changing the Software Settings...................................................................... 4-1
Restart Your Computer ...................................................................................4-3
Chapter 5
Verify the Installation
Verifying the Software Installation ............................................................................... 5-1
Connecting the GPIB Cable .......................................................................................... 5-2
Chapter 6
Using Your GPIB-ENET/100 and NI-488.2
Using DHCP.................................................................................................................. 6-1
Using the CFG RESET Switch...................................................................................... 6-2
Using the CFG RESET Switch during Operation........................................... 6-3
Using the CFG RESET Switch at Power-On.................................................. 6-4
Updating the Firmware.................................................................................................. 6-4
Using the IBIC 488.2 Utility ......................................................................................... 6-6
Programming Considerations ........................................................................................ 6-6
Appendix A
PWR/RDY LED Signaling
Appendix B
Troubleshooting and Common Questions
Appendix C
Specifications
Appendix D
Technical Support Resources
Glossary
Index
GPIB-ENET/100 for Mac OS viii ni.com
Page 8

Figures
Tables
Contents
Figure 1-1. GPIB-ENET/100 Front Panel................................................................1-3
Figure 2-1. GPIB-ENET/100 Baseplate Identification Label..................................2-2
Figure 2-2. GPIB-ENET/100 Rear Panel................................................................. 2-3
Figure 2-3. Connecting Power to the GPIB-ENET/100........................................... 2-4
Figure 3-1. NI Ethernet Device Configuration Utility .............................................3-2
Figure 3-2. Properties Display for an Unconfigured GPIB-ENET/100...................3-4
Figure 3-3. Specifying IP Settings ...........................................................................3-5
Figure 3-4. Hostname Verification Error Detected..................................................3-8
Figure 4-1. Ethernet Settings in NI-488 Config.......................................................4-2
Figure 6-1. NI Ethernet Device Firmware Update Utility .......................................6-5
Table 1-1. LED Descriptions..................................................................................1-4
Table 3-1. Valid and Invalid IP Addresses for Subnet Mask 255.255.255.0 .........3-7
© National Instruments Corporation ix GPIB-ENET/100 for Mac OS
Page 9

About This Manual
This manual contains instructions to help you install and configure
the National Instruments GPIB-ENET/100 and NI-488.2 for Mac OS. The
NI-488.2 software included in this kit is intended for use with Mac OS 8.1
or higher with at least 32 MB memory.
This manual assumes that you are familiar with the Mac OS and with
Ethernet and Internet networks, and that your Macintosh is connected
to an Ethernet network. This manual also assumes you have Open
Transport and TCP/IP installed on your Macintosh, which is required
before you can use the driver software for the GPIB-ENET/100.
Conventions
The following conventions appear in this manual:
This icon denotes a note, which alerts you to important information.
This icon denotes a caution, which advises you of precautions to take to
avoid injury, data loss, or a system crash.
bold Bold text denotes items that you must select or click on in the software,
such as menu items and dialog box options. Bold text also denotes names
of utilities, control panels, software folders, parameters, icons, and LEDs.
italic Italic text denotes variables, emphasis, a cross reference, or an introduction
to a key concept. This font also denotes text that is a placeholder for a word
or value that you must supply.
monospace
monospace bold
© National Instruments Corporation xi GPIB-ENET/100 for Mac OS
Text in this font denotes text or characters that you should enter from the
keyboard, sections of code, programming examples, and syntax examples.
This font is also used for the proper names of disk drives, paths, device
names, functions, operations, variables, and code excerpts.
Bold text in this font denotes the messages and responses that the computer
automatically prints to the screen.
Page 10

About This Manual
Related Documentation
The following documents contain information that you might find helpful
as you read this manual:
• ANSI/IEEE Standard 488.1-1987, IEEE Standard Digital Interface
for Programmable Instrumentation
• ANSI/IEEE Standard 488.2-1992, IEEE Standard Codes, Formats,
Protocols, and Common Commands
• ANSI/IEEE Standard 802.3-1988, Information Processing Systems,
Local Area Networks,Part3
• Inside Macintosh: Networking with Open Transport, Apple Computer,
Inc.
GPIB-ENET/100 for Mac OS xii ni.com
Page 11

Introduction
This chapter lists what you need to get started and optional equipment
you can order, and briefly describes the GPIB-ENET/100 hardware and
NI-488.2 for Mac OS.
What You Need to Get Started
Before you install your GPIB-ENET/100 hardware and NI-488.2 for
Mac OS, make sure you have all of the following items:
❑
Mac OS 8.1 or higher with at least 32 MB memory
❑
TCP/IP protocol installed on your computer
❑
GPIB-ENET/100, which is included in your hardware kit
❑
GPIB-ENET/100 power supply, which is included in your hardware kit
❑
One of the following power cords, which is included in your
hardware kit:
– U.S. standard power cord
– Switzerland power cord
– Australian power cord
– Universal European power cord
– North American power cord
– U.K. power cord
1
❑
The NI-488.2 for Mac OS Version 7.6.7 CD, which is included in your
software kit
❑
One of the following Category 5 twisted-pair network cables,
which you can purchase from National Instruments:
– Straight-through cable for connecting the GPIB-ENET/100 to
a network hub
– Cross-over cable for connecting the GPIB-ENET/100 directly
to a computer’s network interface card (NIC)
© National Instruments Corporation 1-1 GPIB-ENET/100 for Mac OS
Page 12

Chapter 1 Introduction
❑
One of the following shielded GPIB cables, which you can purchase
from National Instruments:
– Type X1 single-shielded cables (1, 2, or 4 m)
– Type X2 double-shielded cables (1, 2, or 4 m)
Caution
(Type X1 or X2) GPIB cable. Operating this equipment with a non-shielded cable may
interfere with radio and television reception.
To meet FCC emission limits for this device, you must use a shielded
Optional Equipment
This section lists optional equipment that you can order from
National Instruments.
Optional Hardware
For information about ordering the following optional equipment,
contact National Instruments:
• Serial or parallel bus extender and cables
• Bus expander/isolator
• GPIB mechanical switch
Multiple-Computer Software License
A multiple-computer software license allows one or more hosts on a
single physical network to access one or more GPIB-ENET/100 boxes.
For information about ordering a software license, contact National
Instruments.
GPIB-ENET/100 Hardware Overview
The GPIB-ENET/100 high-speed interface controls GPIB instruments
across Ethernet networks. You can use the GPIB-ENET/100 to access
remote test equipment from anywhere in the world via TCP/IP protocols on
10Base-T and 100Base-TX networks. By incorporating a new architecture,
100Base-TX Ethernet, and HS488, the GPIB-ENET/100 delivers
performance comparable to that of plug-in boards.
The GPIB-ENET/100 automatically detects if the available network is
10Base-T (10 Mbits/s) or 100Base-TX (100 Mbits/s) and transmits at
the highest available speed.
GPIB-ENET/100 for Mac OS 1-2 ni.com
Page 13
Feature Overview
Chapter 1 Introduction
You can use either the Dynamic Host Configuration Protocol (DHCP) or
a simple Ethernet configuration utility to configure the GPIB-ENET/100
without the need for any dip switches or jumpers. Installation options
include rack mounting, DIN rail mounting, wall mounting, and stackable
stand-alone use. You can stack the unit with other GPIB-ENET/100 units
and additional National Instruments products including the ENET-232
Series and ENET-485 Series serial controllers.
For more information about hardware specifications, refer to Appendix C,
Specifications.
With the GPIB-ENET/100, you gain all the features inherent in a
networked device: fewer cabling distance restrictions, device sharing,
and communication with devices throughout the Internet.
In a GPIB application, you are restricted to the distance limitations of the
GPIB specification. However, you can overcome these restrictions because
the GPIB-ENET/100 uses Ethernet, and can add an unlimited distance to
your application simply by utilizing the distances available to you by using
a networked device. Because the GPIB-ENET/100 uses standard Internet
protocols, you can exploit the Internet to communicate with your GPIB
instruments throughout the world.
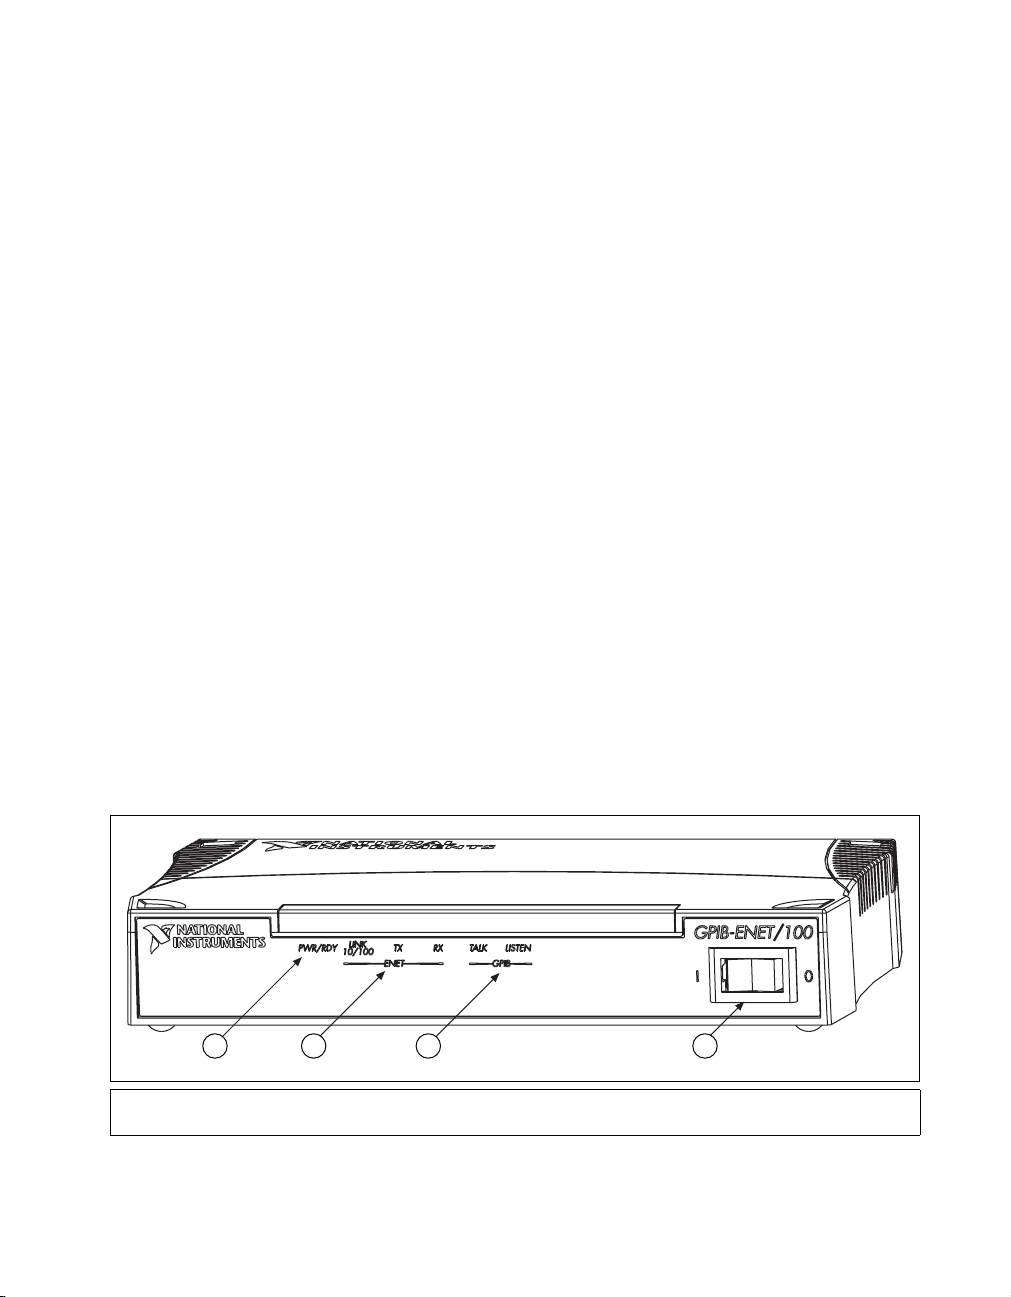
LED Overview
Figure 1-1 shows the six light-emitting diodes (LEDs) on the
GPIB-ENET/100. The LEDs are visible from the top and front of the unit.
1
1 Power/Ready LED
2 Ethernet LEDs
© National Instruments Corporation 1-3 GPIB-ENET/100 for Mac OS
2 3 4
3 GPIB Port LEDs
4PowerSwitch
Figure 1-1. GPIB-ENET/100 Front Panel
Page 14

Chapter 1 Introduction
The LEDs show the current status of the GPIB-ENET/100. Table 1-1
describes each LED.
Table 1-1. LED Descriptions
LED Description
PWR/RDY
LINK
10/100
TX
RX
TALK
LISTEN
NI-488.2 Overview
The NI-488.2 software for Mac OS is a comprehensive set of programs
and drivers. It simplifies the job of programming the GPIB-ENET/100 to
function as an IEEE 488.2 (GPIB) Controller with complete
communication and bus management capabilities.
Flashes rapidly at start-up while performing self
tests and when acquiring network parameters.
A steady yellow state indicates the box is ready
for operation. Slow flashing pattern indicates an
error occurred.
Indicates the GPIB-ENET/100 detected a twisted
pair (10Base-T or 100Base-TX) link. The color
indicates the connection speed. If yellow, the speed
is 10 Mbits/s. If green, the speed is 100 Mbits/s.
Indicates the GPIB-ENET/100 is transmitting to
the Ethernet network.
Indicates the GPIB-ENET/100 is receiving
Ethernet network traffic.
Indicates the GPIB-ENET/100 is configured as a
GPIB Talker.
Indicates the GPIB-ENET/100 is configured as
a GPIB Listener.
NI-488.2 also includes a GPIB interactive control utility; the Macintosh
Programmer’s Workshop (MPW) C, THINK C, and Metrowerks
CodeWarrior C language interfaces; and a shared library for
C programmers developing applications for the PowerPC platform.
GPIB-ENET/100 for Mac OS 1-4 ni.com
Page 15

Time-Saving Development Tools
Your kit includes the NI-488.2 software for Mac OS. In addition, you can
order LabVIEW from National Instruments. LabVIEW includes
instrument driver libraries that make it easier to communicate with your
GPIB instruments.
LabVIEW is a graphical programming environment you can use to acquire
data from thousands of different instruments, including IEEE 488.2
devices, VXI devices, serial devices, PLCs, and plug-in data acquisition
boards. After you acquire raw data, you can convert it into meaningful
results using the data analysis routines in LabVIEW. The LabVIEW
instrument drivers reduce software development time because you do
not have to program the low-level control of each instrument.
If you already have LabVIEW and want to use it with your
GPIB-ENET/100, refer to your product documentation for information
about GPIB I/O functions. For ordering information, contact National
Instruments.
Chapter 1 Introduction
© National Instruments Corporation 1-5 GPIB-ENET/100 for Mac OS
Page 16

Installation
This chapter describes how to install NI-488.2 for Mac OS and the
GPIB-ENET/100.
Installing NI-488.2
2
Caution
to the System Folder.Youmust disable or bypass any virus prevention software before
attempting the installation procedure.
Virus detection software might prevent the installer from copying important files
Complete the following steps to install NI-488.2 for Mac OS:
1. Insert the NI-488.2 for Mac OS CD and double-click the NI-488.2
Installer icon.
2. Follow the prompts as they guide you through the installation.
3. Restart your Macintosh to complete the installation.
The installation creates a NI-488.2 folder, which includes most of the
NI-488.2 components. The installer places the NI-488 Config file in the
Control Panels folder and the NI-488 INIT and NI-DMA/DSP files in the
Extensions folder.
After you install NI-488.2, you are ready to install the GPIB-ENET/100
hardware.
© National Instruments Corporation 2-1 GPIB-ENET/100 for Mac OS
Page 17

Chapter 2 Installation
Installing the GPIB-ENET/100 Hardware
Complete the following steps to install your GPIB-ENET/100.
Step 1. Record the Serial Number, Ethernet Address,
and Default Hostname
When you configure the GPIB-ENET/100 for use on your network, you
will need to differentiate it from other network devices. Every product has
a unique serial number, Ethernet address, and default hostname.
1. Locate the serial number, Ethernet address, and default hostname on
the GPIB-ENET/100 baseplate label, as shown in Figure 2-1.
2. Write down this information and keep it available so you can refer to
it later as you configure the GPIB-ENET/100.
Note
The Ethernet address is not the IP address. All devices on an Ethernet network
are assigned a unique physical address—the Ethernet address—so they can communicate
with each other.
1 Serial Number 2 Ethernet Address 3 Default Hostname
Figure 2-1. GPIB-ENET/100 Baseplate Identification Label
You can change the hostname after you finish the installation and
configuration steps in this chapter. Refer to the Changing the Network
Settings sectioninChapter3,Ethernet Configuration,formore
information.
GPIB-ENET/100 for Mac OS 2-2 ni.com
Page 18
Step 2. Connect the Cables
Note
If you do not have an Ethernet cable, as listed in the What You Need to Get Started
section of Chapter 1, Introduction, contact National Instruments for ordering information.
Figure 2-2 shows the locations of the power, Ethernet, and GPIB
connections on the rear panel of the GPIB-ENET/100.
Chapter 2 Installation
1
1 Configuration Reset Switch
2 Power Connection
32
3 Ethernet Connection
4 GPIB Connector
Figure 2-2.
4
GPIB-ENET/100 Rear Panel
To connect your cables, complete the following steps:
1. Connect one end of your Ethernet cable to your GPIB-ENET/100.
Connect the other end of the Ethernet cable to your Ethernet network.
Make sure you comply with all IEEE 802.3 cabling restrictions.
2. Because AC outlets vary throughout the world, your kit includes a
power cord that meets your local requirements in addition to a power
supply. Figure 2-3 shows how to hook up your power cord and
power supply.
a. Plug one end of the power cord you received in your kit into the
power supply.
b. Screw the power connector on the other end of the power supply
onto the power jack of the GPIB-ENET/100.
c. PlugtheotherendofthepowercordintoanACoutlet.
© National Instruments Corporation 2-3 GPIB-ENET/100 for Mac OS
Page 19

Chapter 2 Installation
4
1
1ToACOutlet
2PowerCord
Figure 2-3. Connecting Power to the GPIB-ENET/100
Note
Do not connect GPIB devices to your GPIB port until you use NI-488 Config to
configure NI-488.2 as described in Chapter 4, GPIB Configuration,andthenrunNI-488.2
Test to verify the software installation, as described in Chapter 5, Verify the Installation.
Running NI-488.2 Test requires that you leave the port unconnected.
Step 3. Switch on Your GPIB-ENET/100
Before you power-on your GPIB-ENET/100, contact your network
administrator to find out if the Dynamic Host Configuration Protocol
(DHCP) is available on your network to perform the configuration
automatically. By default, the GPIB-ENET/100 attempts its network
configuration through DHCP. If DHCP is not available, the unit enters
network configuration mode so you can configure your network settings
manually using the NI Ethernet Device Configuration utility. For more
information about DHCP, refer to the Using DHCP section in Chapter 6,
Using Your GPIB-ENET/100 and NI-488.2.
3
2
3 Power Supply
4 To GPIB-ENET/100 Power Jack
When you turn on the front-panel power switch, the PWR/RDY LED
alternates rapidly between red and yellow while the GPIB-ENET/100
completes its power-on self-tests and attempts to acquire its network
parameters. Each Ethernet and GPIB LED lights up as its functionality
is tested.
GPIB-ENET/100 for Mac OS 2-4 ni.com
Page 20

Chapter 2 Installation
The time required for assigning the IP address depends on your network
andtheconfigurationofyourGPIB-ENET/100.Allowupto90seconds
and observe the state of the PWR/RDY LED to determine the outcome of
the self tests. One of the following should occur:
• A steady yellow PWR/RDY LED indicates the GPIB-ENET/100
passed its self tests and acquired its IP address. The unit is now ready
to operate. When using DHCP, the GPIB-ENET/100 typically is
ready to operate about 15 seconds after you power it on. Run the
NI-488 Config configuration utility as described in Chapter 4, GPIB
Configuration,toaddtheunittoyourGPIBsystem.
• If the PWR/RDY LED continues to alternate rapidly between red and
yellow, the unit was unable to use DHCP to configure its network
parameters. If your network does not have DHCP, you must use the
NI Ethernet Device Configuration utility, as described in Chapter 3,
Ethernet Configuration, to give your unit its network configuration.
If this utility is successful, the PWR/RDY LED should become
steady yellow. Then you can run NI-488 Config as described in
Chapter 4, GPIB Configuration. Refer to Appendix B,
Troubleshooting and Common Questions, if the LED does not change
to steady yellow.
• If the PWR/RDY LED blinks a slow red/yellow pattern, the
GPIB-ENET/100 did not pass its self tests. Refer to Appendix A,
PWR/RDY LED Signaling, to interpret the flash pattern before calling
National Instruments Technical Support.
• If the PWR/RDY LED is steady red, the GPIB-ENET/100 has an
unrecoverable error. Contact National Instruments Technical Support.
You can skip Chapter 3, Ethernet Configuration, if your GPIB-ENET/100
can use DHCP, although you do need to use the NI Ethernet Device
Configuration utility if you want to change the hostname from the default
hostname listed on the baseplate label. You also can run this utility without
entering network configuration mode if you just want to view the network
settings.
Note
If at any time you want to return the GPIB-ENET/100 to its default configuration
state as given on the baseplate label, press and hold the CFG RESET switch for three
seconds while you switch the power on. This switch is located on the rear panel, as shown
in Figure 2-2. Refer to the Using the CFG RESET Switch section in Chapter 6, Using Your
GPIB-ENET/100 and NI-488.2, for more information.
© National Instruments Corporation 2-5 GPIB-ENET/100 for Mac OS
Page 21

Ethernet Configuration
This chapter describes how to use the NI Ethernet Device Configuration
utility to configure the network parameters of the GPIB-ENET/100. You
can use this utility for any of the following purposes:
• Manually configure the network parameters or enable DHCP
• Verify or change the hostname
• Add or change a comment to help identify the device
Your GPIB-ENET/100 must be in network configuration mode when you
make any changes to the network parameters.
Entering Network Configuration Mode
If DHCP is available on your network, it configures the network parameters
for your GPIB-ENET/100 at startup, as described in the Step 3. Switch on
Your GPIB-ENET/100 section of Chapter 2, Installation. In this case, using
the NI Ethernet Device Configuration utility is not necessary.
3
If the GPIB-ENET/100 is configured to use DHCP and DHCP is
unavailable, the unit automatically enters network configuration mode after
a 60 second timeout. The GPIB-ENET/100 must be in this mode before
you can make changes to the network parameters.
You also can enter network configuration mode during normal operation by
pressing and holding the CFG RESET switch for three seconds. Refer to
the Using the CFG RESET Switch section in Chapter 6, Using Your
GPIB-ENET/100 and NI-488.2 for more information on using this switch.
While in network configuration mode, the PWR/RDY LED alternates
rapidly between red and yellow, and normal operation is halted.
Note
If you only want to view the network configuration settings without making
changes, you do not need to place the unit into network configuration mode. While in
normal operation, you can run the utility as described in the following section, Using the
NI Ethernet Device Configuration Utility, and examine the properties for any National
Instruments Ethernet device on your subnet. However, any changes you attempt to make to
the network parameters while in normal mode will not take effect.
© National Instruments Corporation 3-1 GPIB-ENET/100 for Mac OS
Page 22

Chapter 3 Ethernet Configuration
Using the NI Ethernet Device Configuration Utility
If your network administrator tells you to assign the IP address manually,
run the NI Ethernet Device Configuration utility. To run the utility,
complete the following steps:
1. Open the Ethernet/100 folder in the NI-488.2 folder.
2. Double-click the EthernetConfig icon.
3. The NI Ethernet Device Configuration utility displays a list of
National Instruments Ethernet devices found on your subnet, sorted by
model. You can identify your device by the Ethernet address or the
serial number found on the GPIB-ENET/100 baseplate label.
Figure 3-1 shows an example of this display.
Figure 3-1. NI Ethernet Device Configuration Utility
The listed devices can be in one of four possible states, as indicated in
the IP address/hostname column:
• A hostname indicates the device has successfully been configured
by DHCP.
• A numerical IP address indicates the device has successfully been
configured with a static IP address.
GPIB-ENET/100 for Mac OS 3-2 ni.com
Page 23

Chapter 3 Ethernet Configuration
• *Unconfigured* indicates the device is configured to use DHCP,
butDHCPfailedtoattainnetworkparameters.
• *Busy* indicates the device is configured to use DHCP and
currently is attempting to acquire network parameters.
Click Properties... for any of the following reasons:
• You need to configure an unconfigured IP address.
• You need to change the current network parameters.
• You previously used DHCP, but it is no longer available.
• You are using DHCP and need to change the hostname of the
GPIB-ENET/100.
• The IP address/hostname column displays an exclamation
point (!) next to your GPIB-ENET/100, indicating a configuration
problem. Refer to the Verifying the Hostname section for help
resolving this problem.
• You want to add or change a comment to help identify the device.
Click Refresh if you do not see your GPIB-ENET/100 in the list of
Ethernet devices, or to discover a device that you recently added to the
subnet.
Click Exit if you are using DHCP and you do not need to change the
hostname of the GPIB-ENET/100, or if you are finished using the
NI Ethernet Device Configuration utility.
© National Instruments Corporation 3-3 GPIB-ENET/100 for Mac OS
Page 24

Chapter 3 Ethernet Configuration
Changing the Network Settings
Your GPIB-ENET/100 must be in network configuration mode if you want
to change its network settings. Any changes you make will not take effect
while in normal operating mode.
1. When you select Properties... from the NI Ethernet Device
Configuration utility, NI-488.2 displays the properties for your
GPIB-ENET/100. The example shown in Figure 3-2 shows the
properties display for an unconfigured device.
Figure 3-2. Properties Display for an Unconfigured GPIB-ENET/100
The current hostname is displayed. The hostname associates a name
with a numerical IP address. Hostname is a required field.
The GPIB-ENET/100 attempts to use the hostname when registering
with DHCP. Many DHCP servers have the ability to register the
hostname and the assigned IP address. You then can reliably use the
hostname to communicate with your GPIB-ENET/100 even if the
numerical IP address changes.
GPIB-ENET/100 for Mac OS 3-4 ni.com
Page 25

Chapter 3 Ethernet Configuration
However, some DHCP servers do not implement hostname
registration. The GPIB-ENET/100 requires Domain Name Server
(DNS) registration when using DHCP. If your DHCP server does not
support DNS registration, you must use static network parameters.
Consult your network administrator for more details.
2. In the Properties display, select either Obtain an IP address
automatically (DHCP) or Use the following IP settings.
3. If you select Obtain an IP address automatically (DHCP), you do
not need to enter any network parameters unless you want to change
the hostname of the Ethernet device. If you select Use the following
IP settings, enter the network parameters you have chosen for the host
IP address, subnet mask, gateway IP, and DNS server IP, as in the
example shown in Figure 3-3. Refer to the next section, Static IP
Parameters, for more information about these network parameters.
Figure 3-3. Specifying IP Settings
Note
The IP settings in Figure 3-3 are shown only as an example of the format.
© National Instruments Corporation 3-5 GPIB-ENET/100 for Mac OS
Page 26

Chapter 3 Ethernet Configuration
4. (Optional) You can enter a comment to help you identify the device.
5. Click OK to configure the device, or Cancel to exit without saving the
6. Click Exit to close the NI Ethernet Device Configuration utility.
The device automatically reboots with the new configuration in effect.
Static IP Parameters
If DHCP is not available, you must provide the GPIB-ENET/100 with
several important network parameters. These parameters are listed below.
• IP address—The unique, computer-readable address of a device on
• Subnet mask—A code that helps the network device determine
• Gateway IP—The IP address of a device that acts as a gateway, which
• DNS Server—The IP address of a network device that stores
configuration changes.
your network. An IP address typically is represented as four decimal
numbers separated by periods (for example,
Refer to the next section, Choosing a Static IP Address.
whether another device is on the same network or a different network.
is a connection between two networks. If your network does not have
a gateway, set this parameter to
hostnames and translates them into IP addresses. If your network does
not have a DNS server, set this parameter to
0.0.0.0
130.164.54.215)
.
0.0.0.0
.
.
Choosing a Static IP Address
For a Network Administered by a Network Administrator
IfyouareaddingtheGPIB-ENET/100toanexistingEthernetnetwork,you
must choose IP addresses carefully. Contact your network administrator to
obtain an appropriate static IP address for your GPIB-ENET/100. Also
have the network administrator assign the proper subnet mask, gateway,
and DNS server addresses.
GPIB-ENET/100 for Mac OS 3-6 ni.com
Page 27

Chapter 3 Ethernet Configuration
For a Network without a Network Administrator
If you are assembling your own small Ethernet network, you can choose
your own IP addresses. The format of the IP addresses is determined by
the subnet mask. You should use the same subnet mask as the computer
you are using with your GPIB-ENET/100. If your subnet mask is
255.255.255.0
network must be the same. If your subnet mask is
the first two numbers in the IP addresses on the network must match.
For either subnet mask, numbers between 1 and 254 are valid choices for
the last number of the IP address. Numbers between 0 and 255 are valid for
the third number of the IP address, but this number must be the same as
other devices on your network if your subnet mask is
Table 3-1 shows examples of valid and invalid IP addresses for a network
using subnet mask
same first three numbers. The IP addresses in this table are for example
purposes only.
Table 3-1. Valid and Invalid IP Addresses for Subnet Mask 255.255.255.0
IP Address Comment
, the first three numbers in every IP address on the
,only
255.255.255.0
255.255.0.0
255.255.255.0
. All valid IP addresses contain the
.
123.234.45.211
123.234.45.213
Valid.
Valid. The first three numbers match the previous
IP address. The fourth number must be a unique
number in the range of 1 to 254.
123.202.45.214
Invalid. Second number does not match the
previous IP addresses. The first three numbers
must match on all IP addresses with subnet mask
.
123.234.45.0
255.255.255.0
Invalid. The first three numbers are valid but the
fourth number cannot be 0.
123.234.45.255
Invalid. The first three numbers are valid but
the fourth number cannot be 255.
If you are setting up your own network, you probably do not have a gateway
or DNS server, so you should set these values to
© National Instruments Corporation 3-7 GPIB-ENET/100 for Mac OS
0.0.0.0
.
Page 28

Chapter 3 Ethernet Configuration
Verifying the Hostname
The NI Ethernet Device Configuration utility automatically verifies that
the hostname for each DHCP-enabled device matches the DNS entry for
the assigned IP address. This verification process automatically occurs
when you either run the utility or click Refresh. The utility alerts you as
shown in Figure 3-4 if it detects a problem with the network settings.
To correct the problem with the hostname, complete the following steps:
1. Locate the device that has a problem. This is indicated by an (!)onthe
2. Select Properties....
3. The utility gives you four options for resolving the verification error.
Figure 3-4. Hostname Verification Error Detected
device icon, as shown previously in Figure 3-1.
Select the one that best fits your situation and click OK.
• Change the device’s hostname to match the DNS entry. Use
this option if you want to accept the hostname assigned by the
DHCP server, or if you cannot contact the network administrator
to change the DNS entry.
• Use static network parameters instead of DHCP. Use this
option if you cannot use the hostname assigned by the DHCP
server. Contact your network administrator to obtain a valid IP
address, subnet, and gateway. This option disables DHCP on the
device.
• Edit the current hostname. Use this option to change the
hostname to a name other than either the configured hostname or
the name assigned by the DHCP server. Contact your network
administrator to obtain a valid name.
• Keep the existing hostname. Use this option if you wish to keep
the previously assigned hostname. If you select this option,
contact your network administrator to change the DNS entry.
GPIB-ENET/100 for Mac OS 3-8 ni.com
Page 29

Chapter 3 Ethernet Configuration
4. Review the network parameter settings in the Properties display.
5. Confirm that the device is in network configuration mode and click
OK. The device reboots with the new settings in effect.
6. After the device reboots, click Refresh to verify that the hostname is
now valid.
© National Instruments Corporation 3-9 GPIB-ENET/100 for Mac OS
Page 30

GPIB Configuration
This chapter describes how to configure your Mac OS computer to use the
GPIB-ENET/100.
Configuring the NI-488.2 Software Characteristics
The default settings for NI-488.2 work for most applications and devices.
However, you might want to change a device name or primary address.
Also, if more than one GPIB interface or external box is installed, you
might want to associate a device with a particular interface.
Changing the Software Settings
Use the GPIB Configuration utility, NI-488 Config, to examine and change
the NI-488.2 settings for your GPIB-ENET/100.
1. To activate the configuration utility, select Control Panels from the
Apple Icon menu and select NI-488 Config.
2. Click the Interface Type menu and select Ethernet box products as
showninFigure4-1.
4
© National Instruments Corporation 4-1 GPIB-ENET/100 for Mac OS
Page 31

Chapter 4 GPIB Configuration
Figure 4-1. Ethernet Settings in NI-488 Config
3. To choose a GPIB bus to use with your GPIB-ENET/100, check one of
the bus selection boxes at the top of the screen. There are no
restrictions on which box you should check. NI-488 Config displays
the number of the next available GPIB bus below the bus selection box
you selected. In Figure 4-1, NI-488 Config determined that GPIB
bus 0 is available for the GPIB-ENET/100.
4. Click the Bus/Device menu. From the listbox that appears, select the
bus NI-488 Config wants you to use to associate the GPIB bus with
your box. The configuration in Figure 4-1 shows
gpib0
.
5. Enter the hostname or IP address of your GPIB-ENET/100 in the
IP Address edit box that appears below the ENET Connections
linked to the
slider. The configuration in Figure 4-1 shows
gpib0
GPIB-ENET/100 at static IP address 128.164.28.39.
If DHCP configured the network parameters, enter the hostname
the GPIB-ENET/100 is using. Use the default hostname listed on
the baseplate label unless you changed the hostname using the
NI Ethernet Device Configuration utility.
If DHCP did not configure the network parameters, enter the static
IP address you configured for your GPIB-ENET/100 using the
NI Ethernet Device Configuration utility.
GPIB-ENET/100 for Mac OS 4-2 ni.com
Page 32

For more information about NI-488 Config, refer to Chapter 6, GPIB
Configuration Utility,intheNI-488.2 User Manual for MacOS.
Restart Your Computer
Exit NI-488 Config and restart your Macintosh so that the changes you
made in the configuration utility can take effect.
The NI-488.2 driver is installed every time you start or restart your
computer. The National Instruments icon appears momentarily in the
lower left corner of the screen to indicate that the driver is being installed.
If the National Instruments icon does not appear on your screen, repeat
the installation procedure before continuing to the next chapter to verify the
installation and troubleshoot any problems that may occur.
Chapter 4 GPIB Configuration
© National Instruments Corporation 4-3 GPIB-ENET/100 for Mac OS
Page 33

Verify the Installation
This chapter describes how to verify the software installation. If you
encounter hardware problems, please refer to the Troubleshooting
Hardware Problems section in Appendix B, Troubleshooting and
Common Questions.
Verifying the Software Installation
The software diagnostic test NI-488.2Test verifies that the NI-488.2 driver
is installed and functioning with the GPIB-ENET/100. If any one of the
software installation steps fails, you might have to change a hardware or
software setting. If this is the case, refer to Chapter 3, Ethernet
Configuration, or Chapter 4, GPIB Configuration.
Follow these steps to run the software verification test.
1. Ensure all GPIB cables are disconnected from the GPIB-ENET/100.
2. Double-click the NI-488.2 Test icon in the NI-488.2 folder.
If no error messages are displayed, the installation is complete and you
are ready to write your own application program. Refer to the NI-488.2
Function Reference Manual for MacOS for sample programs.
3. If error messages are displayed, restart your Macintosh and
double-click the NI-488.2 Test icon.
If the test fails again, reinstall the NI-488.2 software from the CD,
restart your Macintosh, and double-click the NI-488.2 Test icon.
Also refer to the Troubleshooting Software Problems section in
Appendix B, Troubleshooting and Common Questions for help
resolving your problem.
5
© National Instruments Corporation 5-1 GPIB-ENET/100 for Mac OS
Page 34

Chapter 5 Verify the Installation
Connecting the GPIB Cable
When you finish verifying the installation, you can connect the GPIB cable
to your GPIB-ENET/100.
Note
IfyoudonothaveaGPIBcable,aslistedintheWhat You Need to Get Started
section of Chapter 1, Introduction, contact National Instruments for ordering information.
Connect one end of your GPIB cable to your GPIB-ENET/100 and tighten
the thumb screws on the connector. Connect the other end of your GPIB
cable to your GPIB system. Make sure you comply with all IEEE 488.1
cabling restrictions and use only shielded GPIB cables.
GPIB-ENET/100 for Mac OS 5-2 ni.com
Page 35

Using Your GPIB-ENET/100
and NI-488.2
This chapter lists some general programming requirements and describes
how to use the following various options available with the
GPIB-ENET/100 and NI-488.2 for Mac OS:
• Dynamic Host Configuration Protocol (DHCP)
• Configuration Reset (CFG RESET) switch
• Firmware update utility
• Interactive Control utility
Using DHCP
The Dynamic Host Configuration Protocol (DHCP) is designed for large
networks in which networking devices are transient and network
parameters cannot be statically assigned and thus tied to specific devices.
DHCP eases the addition of networking devices onto a network by having
a server assign necessary network parameters, including the IP address, the
netmask, and router information, to a newly attached network device.
Optionally, if the device provides a hostname with the configuration
request, DHCP may attempt to configure your network to recognize
the device with the requested hostname.
6
DHCP requires a Domain Name Server (DNS) to associate the numerical
IP address assigned with the requested hostname. Within the past few years,
an Internet community standard has emerged to provide a standardized way
for these services to provide dynamic domain name services. Using this
standard, after DHCP assigns the numerical IP address, it can communicate
with DNS to register the newly assigned IP address with the requested
hostname. However, the complexity of DHCP and dynamic name
registration typically requires active management by a corporate MIS
department, or equivalent, because of several risks for failure.
One possible failure can occur if the pool of available addresses contains
no more unassigned IP addresses. This problem is evident if DHCP fails
to work and the PWR/RDY LED continues to flicker for longer than
© National Instruments Corporation 6-1 GPIB-ENET/100 for Mac OS
Page 36

Chapter 6 Using Your GPIB-ENET/100 and NI-488.2
90 seconds at power on. In this situation, you will need to obtain a static
IP address from your network administrator and configure the device
yourself using the NI Ethernet Device Configuration utility. Refer to the
Choosing a Static IP Address section in Chapter 3, Ethernet Configuration,
for more information. Notice that if DHCP fails to assign you an address,
the current subnet might not have an address available for you to use. In this
case, you may have to move your product to another subnet where there is
an available IP address.
Failure also happens if communication between DHCP and DNS does not
occur. In this situation, DHCP assigns an address to the device, but you
cannot communicate to it using the hostname you assigned. Your network
administrator may have to manually insert the hostname into the DNS table.
Alternatively, you can use the NI Ethernet Device Configuration utility
to determine the hostname associated with your assigned IP address, and
change the hostname to match the DNS entry. Refer to the Verifying the
Hostname section in Chapter 3, Ethernet Configuration,formore
information.
Because there are many other possible reasons for failure, contact your
network administrator if you are having problems getting DHCP to work.
When you can use DHCP and DNS successfully, you can use the hostname
form of the IP address to communicate with your product—even if the
numerical IP address changes with successive reboots.
If you are setting up a small network for your instrumentation system,
it is recommended to use static IP addresses, because they are easier to
implement and maintain. In this system, you can safely use the numerical
form of the IP address to communicate with your product because the
address is unlikely to change. Small networks are less likely to have domain
name services available that would resolve the hostname into a numerical
IP address.
Using the CFG RESET Switch
The Configuration Reset (CFG RESET) switch is a recessed switch located
beside the ENET connector on the rear panel. Refer to Figure 2-2,
GPIB-ENET/100 Rear Panel, for an illustration of its location.
This switch performs two functions, depending on whether you press it
while switching the power on or during operation.
GPIB-ENET/100 for Mac OS 6-2 ni.com
Page 37

Chapter 6 Using Your GPIB-ENET/100 and NI-488.2
Using the CFG RESET Switch during Operation
While the GPIB-ENET/100 is operational, as indicated by a steady yellow
PWR/RDY LED, you can use the CFG RESET switch to place the box into
network configuration mode. You then can use the NI Ethernet Device
Configuration utility as described in Chapter 3, Ethernet Configuration.
This special mode ensures that network parameters are not changed while
in use. Because you cannot change the network parameters unless you
deliberately place the GPIB-ENET/100 into network configuration mode,
the parameters are protected while in normal operation. Hosts cannot
connect to the GPIB-ENET/100 while it is in network configuration mode.
Note
Pressing the CFG RESET switch has no effect if hosts are currently connected.
Close all connections, then press and hold the CFG RESET switch for
three seconds. If you release the switch prior to three seconds, the
GPIB-ENET/100 continues to operate normally.
The PWR/RDY LED goes through the following changes during these
three seconds:
1. The LED begins slowly alternating between red and yellow.
2. The alternating pattern increases in tempo.
3. At three seconds, the PWR/RDY LED becomes steady red. This
indicates the GPIB-ENET/100 is ready to enter network configuration
mode.
4. Now release the CFG RESET switch. The PWR/RDY LED alternates
rapidly between red and yellow to indicate the GPIB-ENET/100 is
now in network configuration mode.
This mode remains in effect until you switch off the GPIB-ENET/100 or
you use the NI Ethernet Device Configuration utility to change its
network characteristics. The GPIB-ENET/100 automatically reboots when
you exit the utility.
© National Instruments Corporation 6-3 GPIB-ENET/100 for Mac OS
Page 38

Chapter 6 Using Your GPIB-ENET/100 and NI-488.2
Using the CFG RESET Switch at Power-On
If you want to reset the unit to its default network characteristics, you can
use the CFG RESET switch at power-on. By pressing and holding the
CFG RESET switch while you power on the GPIB-ENET/100, the network
parameters revert to the default settings as defined on the baseplate label.
You must press and hold the switch for three seconds. If you release
the switch prior to three seconds, no change occurs to the network
configuration, and the GPIB-ENET/100 continues to boot normally.
The PWR/RDY LED goes through the following changes during these
three seconds:
1. The LED begins slowly alternating between red and yellow.
2. The alternating pattern increases in tempo.
3. At three seconds, the PWR/RDY LED becomes steady red. This
indicates the network configuration will be set to the factory default
settings.
4. When you release the CFG RESET switch, the box continues to boot
as normal, and the PWR/RDY LED indicates the boot process as
described in Table 1-1, LED Descriptions.
Updating the Firmware
NI-488.2 for the GPIB-ENET/100 and Mac OS contains a firmware update
utility you can use to access new features that may be added to the
GPIB-ENET/100 in the future. It may be necessary to update the firmware
to take advantage of these new features.
You need to know either the IP address or hostname of your
GPIB-ENET/100 before you run the NI Ethernet Device Firmware
Update utility. If you do not remember this information, first run the
NI Ethernet Device Configuration utility by double-clicking the
EthernetConfig icon in the Ethernet/100 folder. Refer to Chapter 3,
Ethernet Configuration, for more information.
Caution
running the NI Ethernet Device Firmware Update utility. Doing so will damage the unit.
The GPIB-ENET/100 reboots automatically when the update completes.
GPIB-ENET/100 for Mac OS 6-4 ni.com
Do not power-off the GPIB-ENET/100 or disconnect the power supply while
Page 39

Chapter 6 Using Your GPIB-ENET/100 and NI-488.2
Note
The NI Ethernet Device Firmware Update utility cannot update the firmware
while any network connections are active. Close any open connections before you attempt
a firmware update. Hosts cannot connect to the GPIB-ENET/100 while it is updating the
firmware.
Complete the following steps to run the NI Ethernet Device Firmware
Update utility.
1. Double-click the FirmwareUpdate icon in the Ethernet/100 folder.
Figure 6-1. NI Ethernet Device Firmware Update Utility
2. Enter the IP address or the hostname of the GPIB-ENET/100 in the
IP address or hostname edit box. An example of an IP address is
137.65.220.40
. An example of a hostname is
nienetBB6004
.
3. Enter the full path of the binary file where the firmware is located in
the EEPROM binary image filename edit box. You also can click
Browse... to locate the file.
4. Click Update to update the firmware. The NI Ethernet Device
Firmware Update utility communicates with the specified
GPIB-ENET/100 to verify the box has no open network connections
and determine the current version of the firmware in the unit. A dialog
box reports that the update utility is searching for the Ethernet device.
© National Instruments Corporation 6-5 GPIB-ENET/100 for Mac OS
Page 40

Chapter 6 Using Your GPIB-ENET/100 and NI-488.2
5. The utility prompts you to confirm the change you are about to
perform. Click OK to continue. As the update utility transfers the
firmware image to your GPIB-ENET/100, the Update Progress status
bar fills, and the Current status box describes each step in the process.
The Current status box reports whether the firmware update
completed successfully or failed. The GPIB-ENET/100 automatically
reboots with the new firmware in effect.
6. Click Exit to close the NI Ethernet Device Firmware Update utility.
Using the IBIC 488.2 Utility
The NI-488.2 software includes the Interface Bus Interactive Control
utility, IBIC 488.2. You can use IBIC 488.2 to enter NI-488 functions and
IEEE 488.2-style-functions interactively and display the results of the
function calls automatically. Without writing an application, you can use
IBIC 488.2 to do the following:
• Verify GPIB communication with your device quickly and easily
• Become familiar with the commands of your device
• Receive data from your GPIB device
• Learn new functions and routines before integrating them into your
application
• Troubleshoot problems with your application
For more information about IBIC 488.2, refer to Chapter 4, Interface Bus
Interactive Control Utility,intheNI-488.2 User Manual for MacOS.
Programming Considerations
Depending on the programming language you use to develop your
application, you must include certain files, statements, or global variables
at the beginning of your application. For specific instructions, refer to
Chapter 2, Developing Your Application,intheNI-488.2 User Manual
for MacOS.
For information about choosing a programming method, developing your
application, or compiling and linking, refer to the NI-488.2 User Manual
for MacOS. For detailed information about each NI-488 function and
IEEE 488.2-style-function, refer to the NI-488.2 Function Reference
Manual for MacOS.
GPIB-ENET/100 for Mac OS 6-6 ni.com
Page 41

PWR/RDY LED Signaling
This appendix describes how to interpret the PWR/RDY LED error codes.
PWR/RDY LED Overview
The PWR/RDY LED has several purposes on the GPIB-ENET/100.
When you first power on the unit, the PWR/RDY LED alternates rapidly
between red and yellow while it completes its power-on self-tests and
acquires network parameters. When the tests complete successfully and
the IP address is assigned from either nonvolatile memory or the network,
the PWR/RDY LED remains steady yellow, indicating that the unit is
ready to operate.
The PWR/RDY LED also alternates rapidly between red and yellow
while the device is in network configuration mode. At other times, the
PWR/RDY LED blinks slowly in a recognizable pattern to alert you of
internal errors. Use this appendix to interpret and record the pattern that
the PWR/RDY LED flashes, and then contact National Instruments.
A
Note
By recording the PWR/RDY LED status messages before calling National
Instruments, you can save yourself time, and the Product Support Department can
answer your questions more accurately and efficiently. Do not switch off power to
your GPIB-ENET/100 before recording the flashing PWR/RDY LED pattern.
PWR/RDY LED signaling can report up to 81 different errors. The errors
are numbered from 11 to 99 and are reported through sequences of
PWR/RDY LED flashes.
Note
There is no zero in any error message. This means that error message numbers 0–10,
20, 30, 40, 50, 60, 70, 80, and 90 are not possible.
© National Instruments Corporation A-1 GPIB-ENET/100 for Mac OS
Page 42

Appendix A PWR/RDY LED Signaling
Step 1. Count the Long Flashes
A three-second interval, during which the PWR/RDY LED is yellow,
separates each repetition of the sequence. The sequence begins with a
series of long one-second flashes—that is, one second red, one second
yellow. These long flashes represent the digit in the tens column. There
can be one to nine long flashes, which represent digits 1 through 9. For
example, one long flash represents the digit 1 in the tens column, and nine
long flashes represent the digit 9 in the tens column.
Step 2. Count the Short Flashes
The long flashes are followed by shorter flashes; each short flash lasts
about one-fifth of a second—that is, one-fifth of a second red, one-fifth of
a second yellow. These short flashes represent the digit in the ones column.
Again, there can be one to nine flashes, which represent the digits 1 through
9. For example, one short flash represents the digit 1 in the ones column,
and nine short flashes represent the digit 9 in the ones column.
Using this method, the PWR/RDY LED flashes the following sequence to
represent status message 11:
<three seconds yellow> <one long red flash> <one short red flash>
<three seconds yellow>…
The PWR/RDY LED flashes the following sequence to represent status
message 31:
<three seconds yellow> <three long red flashes> <one short red flash>
<three seconds yellow>…
Step 3. Record Your Status Code Number
When you have computed your error message number, write it down and
also note the ON/OFF state of the LINK, TX,andRX LEDs. Have this
information available when calling National Instruments.
GPIB-ENET/100 for Mac OS A-2 ni.com
Page 43

Troubleshooting and
Common Questions
This appendix describes how to troubleshoot problems and answers some
common questions.
Troubleshooting Hardware Problems
Try one of the following solutions if you encounter hardware problems:
• Verify that all cables are securely connected to the GPIB-ENET/100.
• Verify that the unit is plugged in and powered on.
• Verify with the network administrator that your IP address is valid and
that the network is set up to recognize the IP address properly.
• If you configured the IP address manually using the NI Ethernet
Device Configuration utility, verify that you have correctly followed
the steps in Chapter 3, Ethernet Configuration.
• If the PWR/RDY LED continues to flash rapidly after 90 seconds, the
GPIB-ENET/100 is unable to obtain its IP address from the network.
Check with your network administrator to verify your IP address and
make sure that you recorded the Ethernet address correctly.
• If the PWR/RDY LED is blinking in a slower red/yellow pattern, the
GPIB-ENET/100 is reporting an internal error. Refer to Appendix A,
PWR/RDY LED Signaling, to interpret the error code and contact
National Instruments.
B
Troubleshooting Software Problems
The NI-488 Config control panel (GPIB Configuration utility) should
show the following software configuration:
• The Interface Type box should be set to Ethernet box products.
• A checkmark should appear in one of the bus selection boxes at the top
of the control panel.
© National Instruments Corporation B-1 GPIB-ENET/100 for Mac OS
Page 44

Appendix B Troubleshooting and Common Questions
• The entry in the Bus/Device menu should correspond to the bus
number displayed below the checked bus selection box.
• The IP address or hostname of the GPIB-ENET/100 should be visible
in the IP Address edit box. Verify that this address is correct.
Use NI-488 Config to examine and adjust the configuration of the
software. Refer to Chapter 6, GPIB Configuration Utility,intheNI-488.2
User Manual for MacOS for more information on running the utility and
for information about the configurable software parameters.
If the software verification test NI-488.2 Test fails, make sure that no GPIB
cables are connected to the GPIB-ENET/100.
Common Questions
Can I control the GPIB-ENET/100 and other GPIB interfaces from the
same computer?
Yes. The Mac OS driver supports a full range of GPIB interfaces
simultaneously.
How many GPIB interfaces can I configure for use with NI-488.2 for
Mac OS?
You can configure NI-488.2 for Mac OS to communicate with up to eight
GPIB interfaces.
How many devices can I configure for use with NI-488.2 for Mac OS?
NI-488.2 for Mac OS provides a total of 64 logical devices for applications
to use. The maximum number of physical devices you should connect to a
single GPIB interface is 14, or fewer, depending on your system
configuration.
I powered off my GPIB-ENET/100 before recording the flashing
PWR/RDY LED pattern. What should I do?
Try to duplicate the error before calling National Instruments for
assistance. Recording the PWR/RDY LED pattern is not critical to the
operation of your GPIB-ENET/100, but it saves you time and helps
National Instruments diagnose the problem quickly and accurately.
GPIB-ENET/100 for Mac OS B-2 ni.com
Page 45

Appendix B Troubleshooting and Common Questions
What do I do if I have installed NI-488.2 and now my Macintosh
crashes upon startup?
Try changing the name of the NI-488 INIT to ZNI-488 INIT. Because
INITs load in alphabetical order, the ZNI-488 INIT will load last,
preventing possible corruption from INITs that load after it. If changing
the name of the NI-488 INIT does not solve the problem, another INIT file
might have a conflict with the NI-488 INIT. Try removing some of your
other INIT files. You can store them in a temporary folder, in case you need
to reload them later. You can use the Extensions Manager utility to disable
certain extensions and control panels.
I have a GPIB-ENET. Can I use the GPIB-ENET and GPIB-ENET/100
in the same system?
Yes, this version of NI-488.2 supports systems containing both products as
well as systems containing only one of the two products.
How do I configure my existing GPIB-ENET with this software?
This version of NI-488.2 includes options for configuring both the
GPIB-ENET and the GPIB-ENET/100. Use the utilities in the Ethernet
folder with the GPIB-ENET, and the utilities in the Ethernet/100 folder
with the GPIB-ENET/100. For information on configuring the
GPIB-ENET hardware, refer to Getting Started with Your GPIB-ENET and
the NI-488.2 Software for MacOS.
I have an application using the GPIB-ENET. Can I replace the
GPIB-ENET with a GPIB-ENET/100?
Yes. You do not need to rewrite your application code to replace
a GPIB-ENET with a GPIB-ENET/100. However, you do need to
configure the GPIB-ENET/100 to have the same network identity as the
GPIB-ENET you are replacing. First, acquire network parameters for the
GPIB-ENET/100 using DHCP or the NI Ethernet Device Configuration
utility. Then use the NI-488 Config utility to remove the GPIB-ENET
information from the Bus/Device list and reassociate the same entry with
the IP address for the GPIB-ENET/100. For example, if your application
code refers to the GPIB-ENET as
gpib1
, reconfigure
gpib1
to refer to the
GPIB-ENET/100.
© National Instruments Corporation B-3 GPIB-ENET/100 for Mac OS
Page 46

Appendix B Troubleshooting and Common Questions
Why does the NI Ethernet Device Configuration utility list my box as
*BUSY*
when I know my network uses DHCP?
For up to one minute, the GPIB-ENET/100 attempts to retrieve network
parameters from a DHCP server. During this time,
utility display. If this status does not change, there are several reasons why
DHCP may fail to respond. One of the most likely reasons is that your
subnet has no more available addresses to assign using DHCP. Consult your
network administrator to determine the specific reason for the problem.
I just added a GPIB-ENET/100 to the network, but it does not show up
in the NI Ethernet Device Configuration utility. What is the problem?
Allow at least 15 seconds for the GPIB-ENET/100 to complete its
power-on self tests before launching the utility or clicking Refresh.
Communication between the NI Ethernet Device Configuration utility
and the GPIB-ENET/100 is not guaranteed. Though unlikely, it is possible
that the communication gets lost in the network. Click Refresh more than
once before concluding the device is not discovered.
Verify that the GPIB-ENET/100 shares the same subnet as the computer
running the NI Ethernet Device Configuration utility. The utility cannot
communicate with devices through gateways on the network and will not
discover devices on another subnet.
*BUSY*
appears in the
I have GPIB-ENET interfaces as well as GPIB-ENET/100 interfaces.
Why can’t I see the GPIB-ENET interfaces in the NI Ethernet Device
Configuration utility?
The GPIB-ENET/100 uses a configuration protocol that can communicate
with the NI Ethernet Device Configuration utility. Because GPIB-ENET
interfaces are not compatible with this configuration protocol, the utility
does not recognize them on the network.
What do I do if the software verification test fails with an error?
Refer to the Troubleshooting Software Problems section of this appendix
for information about what might cause this test to fail. If you already have
completed the troubleshooting steps, contact National Instruments.
My driver is not communicating with the GPIB-ENET/100. What
should I do?
Make sure that the GPIB-ENET/100 is configured properly. Refer to
Chapter 2, Installation, and Chapter 4, GPIB Configuration. Then run the
software verification utility again.
GPIB-ENET/100 for Mac OS B-4 ni.com
Page 47

Appendix B Troubleshooting and Common Questions
When should I use IBIC 488.2?
You can use IBIC 488.2 to practice communication with your instrument,
troubleshoot problems, and develop your application program. For more
information about IBIC 488.2, refer to Chapter 4, Interface Bus Interactive
Control Utility,intheNI-488.2 User Manual for MacOS.
How do I use an NI-488.2 language interface?
For information about using NI-488.2 language interfaces, refer to the
NI-488.2 User Manual for MacOS.
My I/O worked with a board interface, but it times out when I use the
GPIB-ENET/100 interface. What should I do?
Network communication is slower than straight cable communication.
You might need to raise the Timeout value using the NI-488 Config utility.
Refer to Chapter 4, GPIB Configuration, for more information.
How do I communicate with my instrument over the GPIB?
Refer to the documentation that came from the instrument manufacturer.
The command sequences you use are totally dependent on the specific
instrument. The documentation for each instrument should include the
GPIB commands you need to communicate with it. In most cases, NI-488
device-level calls are sufficient for communicating with instruments. Refer
to Chapter 2, Developing Your Application,intheNI-488.2 User Manual
for MacOS, for more information.
How should I check for errors in my GPIB application?
Examinethevalueof
fails, the ERR bit of
ibsta
after each NI-488 or NI-488.2 call. If a call
ibsta
is set and an error code is stored in
iberr
.
For more information about global status variables, refer to Chapter 2,
Developing Your Application,intheNI-488.2 User Manual for MacOS.
© National Instruments Corporation B-5 GPIB-ENET/100 for Mac OS
Page 48

Specifications
This appendix describes the characteristics of the GPIB-ENET/100 and the
transfer rates of the NI-488.2 software, along with the recommended
operating conditions.
Electrical Characteristics
Input power requirements ...................... 9–30 VDC
Current requirements
9–30 VDC ....................................... 425 mA maximum
@ 15 VDC ...................................... 250 mA typical
Environmental Characteristics
Operating environment
Temperature .................................... 0° to 40° C
Relative humidity............................ 10% to 90% noncondensing
C
conditions
Storage environment
Temperature .................................... –20° to 70° C
Relative humidity............................ 5% to 90% noncondensing
conditions
EMI ........................................................ FCC Class A Verified
Physical Characteristics
Overall case size (dimensions)............... 21.0 by 12.4 by 3.7 cm
(8.25by4.89by1.44in.)
Case material.......................................... Hard plastic with metal baseplate
Weight.................................................... 0.41 kg (0.9 lb)
© National Instruments Corporation C-1 GPIB-ENET/100 for Mac OS
Page 49

Appendix C Specifications
Software Characteristics
Maximum software transfer rate1...........800 kbytes/s
Electrostatic Discharge Protection
Non-isolated devices...............................1.5 kV
Connectors
Ethernet connector..................................RJ-45
GPIB connector ......................................IEEE 488 standard 24 pin
Network Specifications
Connection type......................................IEEE 802.3 compliant
Duplex mode...........................................Half duplex
100BaseTX (100 Mbits/s)
10BaseT (10 Mbits/s)
1
Actual speed may vary considerably from speed shown due to system, network, and instrumentation capabilities.
GPIB-ENET/100 for Mac OS C-2 ni.com
Page 50

Technical Support Resources
Web Support
National Instruments Web support is your first stop for help in solving
installation, configuration, and application problems and questions. Online
problem-solving and diagnostic resources include frequently asked
questions, knowledge bases, product-specific troubleshooting wizards,
manuals, drivers, software updates, and more. Web support is available
through the Technical Support section of
application engineers by visiting
request form.
NI Developer Zone
ni.com
ni.com/ask
D
. You also can contact our
and filling out an e-mail
The NI Developer Zone at
building measurement and automation systems. At the NI Developer Zone,
you can easily access the latest example programs, system configurators,
tutorials, technical news, as well as a community of developers ready to
share their own techniques.
Customer Education
National Instruments provides a number of alternatives to satisfy your
training needs, from self-paced tutorials, videos, and interactive CDs to
instructor-led hands-on courses at locations around the world. Visit the
Customer Education section of
syllabi, training centers, and class registration.
System Integration
If you have time constraints, limited in-house technical resources, or other
dilemmas, you may prefer to employ consulting or system integration
services. You can rely on the expertise available through our worldwide
network of Alliance Program members. To find out more about our
Alliance system integration solutions, visit the System Integration section
of
ni.com
ni.com/zone
ni.com
.
is the essential resource for
for online course schedules,
© National Instruments Corporation D-1 GPIB-ENET/100 for Mac OS
Page 51

Appendix D Technical Support Resources
Worldwide Support
National Instruments has offices located around the world to help address
your support needs. You can access our branch office Web sites from the
Worldwide Offices section of
up-to-date contact information, support phone numbers, e-mail addresses,
and current events.
If you have searched the technical support resources on our Web site and
still cannot find the answers you need, contact your local office or National
Instruments corporate. Phone numbers for our worldwide offices are listed
at the front of this manual.
ni.com
. Branch office web sites provide
GPIB-ENET/100 for Mac OS D-2 ni.com
Page 52

Glossary
Prefix Meaning Value
m- milli- 10
c- centi- 10
k- kilo- 10
M- mega- 10
Symbols
° degrees
% percent
A
A amperes
–3
–2
3
6
ANSI American National Standards Institute
API Application Programming Interface
B
bbits
Bbytes
C
CCelsius
© National Instruments Corporation G-1 GPIB-ENET/100 for Mac OS
Page 53

Glossary
D
DHCP Dynamic Host Configuration Protocol
DNS Domain Name Server
E
EMI electromagnetic interference
F
FCC Federal Communications Commission
G
ggrams
GPIB General Purpose Interface Bus
H
Hz hertz
I
I/O input/output
IEEE Institute of Electrical and Electronic Engineers
in. inches
IP Internet Protocol
L
lb. pounds
LED light-emitting diode
GPIB-ENET/100 for Mac OS G-2 ni.com
Page 54

M
m meters
MB megabytes of memory
N
NIC network interface card
S
s seconds
V
V volts
VAC volts alternating current
Glossary
© National Instruments Corporation G-3 GPIB-ENET/100 for Mac OS
Page 55

Index
A
adding a GPIB-ENET/100
to GPIB system, 4-1
to network, 2-4
C
cables
Ethernet connection, 2-3
GPIB cable types, 1-2
GPIB connection, 5-2
network cable types, 1-1
power connection, 2-3
CFG RESET switch
accessing Ethernet Device Configuration
utility, 6-3
if hosts are connected, 6-3
location, 2-3
resetting default network configuration, 2-5
using at power-on, 6-4
using during operation, 6-3
comment
(optional) to identify device on network, 3-6
common questions, B-2
communication problems
between driver and GPIB-ENET/100, B-5
with Ethernet Device Configuration
utility, B-4
Configuration Reset switch.
See CFG RESET switch
configuring
network parameters, 3-2
NI-488.2, 4-1
connecting
cables, 2-3
GPIB devices (caution), 2-4
connection speed, 1-4
connector types, C-2
conventions, xi
crashing at startup, B-3
Customer Education, D-1
D
default configuration
resetting, 2-5, 6-4
specifications, 2-2
default hostname
finding, 2-2
using with NI-488 Config, 4-2
DHCP
benefits and purpose, 6-1
communication failure with DNS, 6-2
configuring network settings
automatically, 2-5
configuring network settings without
DHCP, 2-5, 3-1, 3-5
confirming its availability, 2-4
failing to provide IP address, 6-2
registering hostname and IP address, 3-4
risks for failure, 6-1
time required to complete, 2-5
using with DNS, 3-5, 6-1
distance capabilities, 1-3
DNS
if not supported, 3-5
manually inserting hostname in DNS
table, 6-2
using with DHCP, 3-5, 6-1
DNS server, 3-6
Dynamic Host Configuration Protocol.
See DHCP
© National Instruments Corporation I-1 GPIB-ENET/100 for Mac OS
Page 56

Index
E
electrical characteristics, C-1
environmental characteristics, C-1
error checking, B-5
error code, A-1
Ethernet address, 2-2
Ethernet connection
location, 2-3
Ethernet Device Configuration utility
! shown on device listing, 3-8
accessing during normal operation, 6-3
busy device, 3-3, B-3, B-5
example (figure), 3-2
GPIB-ENET, B-4
if GPIB-ENET/100 is not listed, B-4
locating and starting, 3-2
network configuration mode, 3-1
Refresh option, 3-3, B-4
unconfigured device, 3-3
verifying hostname, 3-8
viewing settings in normal mode, 3-1
when to use, 2-5, 3-1
Ethernet Device Firmware Update utility
Bad checksum message, B-4
before using, 6-4
example (figure), 6-5
important warning, 6-4
location and starting, 6-5
using, 6-4
when to use, 6-4
Ethernet settings in NI-488 Config, 4-2
F
failed device
reported by PWR/RDY LED, 2-5, A-1
firmware
updating, 6-4
front panel (figure), 1-3
G
gateway IP, 3-6
getting started, 1-1
glossary, G-1
GPIB cable
connecting, 2-4, 5-2
when to install, 5-2
GPIB communication, B-5
GPIB Configuration utility.
See NI-488 Config
GPIB connection
location, 2-3
GPIB-ENET
configuring, B-3
replacing with GPIB-ENET/100, B-3
using with GPIB-ENET/100, B-3
GPIB-ENET/100
front panel (figure), 1-3
hardware overview, 1-2
installing, 2-2
network properties, 3-4
rear panel (figure), 2-3
H
hardware overview, 1-2
hostname
accepting DNS hostname, 3-8
changing DNS entry, 3-8
default hostname, 2-2
editing, 3-8
fixing verification error, 3-8
using to identify device, 6-2
using with NI-488 Config, 4-3
verifying, 3-8
viewing or changing, 3-4
GPIB-ENET/100 for Mac OS I-2 ni.com
Page 57

Index
I
IBIC 488.2
using, 6-6, B-5
information to record, 2-2
INIT files
managing and renaming, B-3
installation
disabling virus protection, 2-1
Ethernet cable, 2-3
getting started, 1-1
GPIB cable, 5-2
GPIB-ENET/100, 2-2
NI-488.2, 2-1
power cable, 2-3
verification, 5-1
IP address
acquiring automatically using DHCP, 2-5
choosing static IP address, 3-6
defined, 3-6
examples of valid and invalid IP
addresses (table), 3-7
format, 3-6
static IP address, 6-2
using with NI-488 Config, 4-3
IP parameters
DNS server, 3-6
gateway IP, 3-6
if assigned by network administrator, 3-6
if assigned by user, 3-7
IP address, 3-6
subnet mask, 3-6
K
kit contents, 1-1
L
label
example (figure), 2-2
information to record, 2-2
location, 2-2
LabVIEW, 1-5
LEDs
description of each (table), 1-4
overview, 1-3
license
multiple-computer software license, 1-2
N
National Instruments software
LabVIEW, 1-5
National Instruments Web support, D-1
network administrator
assigning IP parameters, 3-6
confirming DHCP availability, 2-4
if DHCP fails, 6-2
network configuration mode
accessing with CFG RESET switch, 6-3
entering automatically, 3-1
when not required, 3-1
when to use, 3-1
network settings
changing, 3-4
configuring with DHCP, 2-5
configuring without DHCP, 2-5, 3-1, 3-5
network specifications, C-2
NI Developer Zone, D-1
NI Ethernet Device Configuration utility.
See Ethernet Device Configuration utility
NI Ethernet Device Firmware utility.
See Ethernet Device Firmware utility
© National Instruments Corporation I-3 GPIB-ENET/100 for Mac OS
Page 58

Index
NI-488 Config
changing NI-488.2 settings, 4-1
example (figure), 4-2
locating and starting, 4-1
proper Ethernet settings, B-1
running before connecting GPIB
devices, 2-4
NI-488.2
components, 1-4
function information, 6-6
IBIC 488.2 utility, 6-6
installing, 2-1
interfaces supported by this version, B-2
language interfaces, B-5
overview, 1-4
programming considerations, 6-6
viewing or changing configuration, 4-1
NI-488.2 Test
accessing, 5-1
if error messages displayed, 5-1
if failure, B-2
running before connecting GPIB
devices, 2-4
verifying software installation, 5-1
O
optional equipment
hardware, 1-2
multiple-computer software license, 1-2
overview
features, 1-3
GPIB-ENET/100, 1-2
LEDs, 1-3
NI-488.2, 1-4
P
physical characteristics, C-1
power connection
installing (figure), 2-4
location, 2-3
power cord
installing, 2-3
types, 1-1
power requirements, C-1
powering on your GPIB-ENET/100, 2-4
programming considerations, 6-6
properties
configured device (figure), 3-5
configuring, 3-4
unconfigured device (figure), 3-4
PWR/RDY LED
description, 1-4
if blinking a pattern, 2-5, A-1
if flashing rapidly, 2-5, 3-1, A-1, B-1
if red, 2-5
if yellow, 2-5, A-1
interpreting status messages, A-1
observing during self tests, 2-5
overview, A-1
when using CFG RESET switch, 6-3, 6-4
R
rear panel (figure), 2-3
rebooting
after Ethernet configuration, 3-6
after firmware update, 6-4
Refresh
discovering new devices on subnet, 3-3
updating list of Ethernet devices, 3-3
verifying hostname, 3-9
related documentation, xii
requirements, 1-1
GPIB-ENET/100 for Mac OS I-4 ni.com
Page 59

Index
resetting default network characteristics, 6-4
restarting
after using NI-488 Config utility, 4-3
S
software
configuring NI-488.2, 4-1
installation, 2-1
overview, 1-4
transfer rate (maximum), C-2
verification test, 5-1
specifications
electrical characteristics, C-1
environmental characteristics, C-1
network specifications, C-2
physical characteristics, C-1
software characteristics, C-2
static IP parameters
assigning, 3-6
choosing static IP address, 3-6
using instead of DHCP, 3-8
when easier than using DNS, 6-2
status code number
recording, A-2
subnet mask
purpose, 3-6
selecting valid IP addresses for, 3-7
system integration, D-1
T
technical support resources, D-1
timeout problems
fixing, B-5
troubleshooting
hardware problems, B-1
software problems, B-1
U
universal power supply
connecting, 2-3
updating the firmware, 6-4
using
CFG RESET switch, 6-2
DHCP, 6-1
Ethernet Device Configuration utility, 3-2
Ethernet Device Firmware Update
utility, 6-4
IBIC 488.2 utility, 6-6
Internet, 1-3
NI-488 Config, 4-1
NI-488.2 Test, 5-1
V
verifying
hardware installation, B-1
hostname, 3-8
software installation, 5-1
virus protection software
disabling before installing software, 2-1
voltage rating, C-1
W
warning
using firmware update utility, 6-4
Web support, D-1
worldwide technical support, D-2
© National Instruments Corporation I-5 GPIB-ENET/100 for Mac OS
 Loading...