

Page 1

FP-1600 User Manual
FieldPoint FP-1600 User Manual
July 1999 Edition
Part Number 322394A-01
Page 2

Worldwide Technical Support and Product Information
www.natinst.com
National Instruments Corporate Headquarters
11500 North Mopac Expressway Austin, Texas 78759-3504 USA Tel: 512 794 0100
Worldwide Offices
Australia 03 9879 5166, Austria 0662 45 79 90 0, Belgium 02 757 00 20, Brazil 011 284 5011,
Canada (Ontario) 905 785 0085, Canada (Québec) 514 694 8521, China 0755 3904939, Denmark 45 76 26 00,
Finland 09 725 725 11, France 01 48 14 24 24, Germany 089 741 31 30, Hong Kong 2645 3186,
India 91805275406, Israel 03 6120092, Italy 02 413091, Japan 03 5472 2970, Korea 02 596 7456,
Mexico (D.F.) 5 280 7625, Mexico (Monterrey) 8 357 7695, Netherlands 0348 433466, Norway 32 27 73 00,
Singapore 2265886, Spain (Madrid) 91 640 0085, Spain (Barcelona) 93 582 0251, Sweden 08 587 895 00,
Switzerland 056 200 51 51, Taiwan 02 2377 1200, United Kingdom 01635 523545
For further support information, see the Technical Support Resources appendix. To comment on the
documentation, send e-mail to techpubs@natinst.com.
© Copyright 1999 National Instruments Corporation. All rights reserved.
Page 3

Important Information
Warranty
The FieldPoint FP-1600 network module is warranted ag ain st defect s in mat erials an d w orkm ans hip for a p erio d o f
one year from the date of shipment, as evidenced by receipts or other documentation. National Instruments will, at its
option, repair or replace equipment that proves to be defective during the warranty period. This warranty includes parts
and labor.
The media on which you receive National Instruments software are warranted not to fail to execute programming
instructions, due to defects in materials and work man ship, for a peri od of 90 d ays from da te o f sh ipm ent, as evi denced
by receipts or other documentation. National Instruments will, at its option, repair or replace software media that do not
execute programming instructions if National Instruments receives noti ce of su ch defect s d uring th e warranty perio d.
National Instruments does not warrant that the op eration of t he soft ware shall b e uni nterrup ted or erro r free.
A Return Material Authorization (RMA) number must b e ob tain ed fro m th e facto ry an d clearl y mark ed on t he outsi de
of the package before any equipment wil l be accepted for warranty work. National Instruments will pay the shippi ng costs
of returning to the owner parts which are covered by warran ty.
National Instruments believes that the information in this document is accurate. The document has been carefully
reviewed for technical accuracy. In the event that technical or typographical errors exist, National Instruments reserves
the right to make changes to subsequent editions of this document without prior notice to holders of this edition. The
reader should consult National Instruments if errors are suspected. In no event shall National Instruments be liable for
any damages arising out of or related to th is d ocum ent o r th e in form ation con tained in i t.
XCEPT AS SPECIFIED HEREIN
E
ANY WARRANTY OF MERCHANTABILITY OR FITNESS FOR A PARTICULAR PURPOSE
BY FAULT OR NEGLIGENCE ON THE PART OF NATIONAL INSTRUMENTS SHALL BE LIMITED TO THE AMOUNT THERETOFORE PAID BY THE
CUSTOMER
OR INCIDENTAL OR CONSEQUENTIAL DAMAGES, EVEN IF ADVISED OF THE POSSIBILITY THEREOF
National Instruments will apply regardless of the form of action, wh ether in con tract or tort , incl udin g n egli gen ce.
Any action against National Instruments must be brought within one year after the cause of action accrues. National
Instruments shall not be liable for any delay in performance due to causes beyond its reasonable control. The warranty
provided herein does not cover damages, defects, malfuncti ons, or s ervice failur es caused by own er’s fai lure to fol low
the National Instruments installation, operation, or maintenance instructions; owner’s modification of the product;
owner’s abuse, misuse, or negligent acts; and power failure or surges, fire, flood, accident, actions of third parties,
or other events outside reasonable control.
ATIONAL INSTRUMENTS WILL NOT BE LIABLE FOR DAMAGES RESULTING FROM LOSS OF DATA, PROFITS, USE OF PRODUCTS
. N
ATIONAL INSTRUMENTS MAKES NO WARRANTIES, EXPRESS OR IMPLIED, AND SPECIFICALLY DISCLAIMS
, N
USTOMER’S RIGHT TO RECOVER DAMAGES CAUSED
. C
. This limitation of the liability of
,
Copyright
Under the copyright laws, this publication may not be reproduced or transmitted in any form, electronic or mechanical,
including photocopying, recording, storing in an information retrieval system, or translating, in whole or in part, without
the prior written consent of National Instruments Corporation.
Trademarks
BridgeVIEW™, CVI™, FieldPoint™, LabVIEW™, Lookout™, natinst.com™, and National Instruments™ are
trademarks of National Instruments Corporation.
Product and company names mentioned herein are trademarks or trade names of their respective companies.
WARNING REGARDING MEDICAL AND CLINICAL USE OF NATIONAL INSTRUMENTS PRODUCTS
National Instruments products are not designed with com ponent s and tes ting for a level o f reli ability suit abl e for use in
or in connection with surgical implants o r as cri tical co m ponent s i n any li fe su pp ort sy stem s wh ose fail ure t o pe rform
can reasonably be expected to cause s ignifi cant in ju ry to a hu m an. A ppli cations of Nation al In st rument s prod ucts
involving medical or clinical treatment can create a pot enti al for d eath or bod ily i njury caused b y p rodu ct fail ure, o r by
errors on the part of the user or application designer. Because each end-user system is customized and differs from
National Instruments testing platforms and because a user or application designer may use National Instruments products
in combination with other products in a m ann er no t ev alu ated or co ntem p lated b y N ati onal Ins trum ents , the user or
application designer is ultimately responsible for verifying and validating the suitability of National Instruments products
whenever National Instruments products are incorporated in a system or application, including, without limitation,
the appropriate design , pr ocess and safet y level of such syst em or ap plicat io n.
Page 4

Contents
About This Manual
How to Use This Manual Set.........................................................................................ix
Conventions ...................................................................................................................x
Related Documentation........................................... .......................................................x
Chapter 1
Overview of FP-1600 Hardware and FieldPoint Software
FP-1600 Hardware Overview ........................................................................................1-1
FieldPoint Software Overview.......................................................................................1-2
FieldPoint Explorer Configuration Utility.......................................................1-3
BridgeVIEW Server ........................................................................................1-3
LabVIEW VIs..................................................................................................1-3
LabWindows/CVI Functions...........................................................................1-3
OPC Server...................................... ................................................................1-4
Chapter 2
Hardware and Software Installation
Mount the FP-1600 and Terminal Bases .......................................................................2-1
Mounting the FP-1600 on a DIN Rail.............................................................2-1
Connecting Terminal Bases with DIN Rail Mounting......................2-2
Removing the FP-1600 and Terminal Bases from the DIN Rail......2-3
Mounting the FP-1600 to a Panel....................................................................2-3
Connecting Terminal Bases with Panel Mounting ...........................2-4
Removing the FP-1600 and Terminal Bases from the Panel............2-5
Mount I/O Modules onto Terminal Bases .....................................................................2-5
Connect Your FP-1600 to the Network.........................................................................2-6
Cabling...........................................................................................................................2-7
Connect Power to the FP-1600......................................................................................2-8
Calculating Power for a FieldPoint Bank........................................................2-9
Power On the FP-1600...................................................................................................2-10
Install the FieldPoint Software ......................................................................................2-10
© National Instruments Corporation v FieldPoint FP-1600 User Manual
Page 5

Contents
Chapter 3
Hardware and Software Configuration
Getting Assistance While You Work............................................................................3-1
Configure Your Hardware with FieldPoint Explorer....................................................3-3
Ethernet Parameters ........................................................................................3-6
Choose an IP Address.......................................................................3-7
Set FP-1600 Properties....................................................................................3-9
Find and Configure Devices ...........................................................................3-10
Use the FP-1600 with Other Applications.....................................................................3-13
FieldPoint BridgeVIEW Server......................................................................3-13
Lookout........................................................................................................... 3-15
LabVIEW VIs.............................................. ...................................................3-16
LabWindows/CVI Functions ............................................................ ..............3-18
FieldPoint OPC Server....................................................................................3-19
Chapter 4
Feature Set Description
High-Speed Local Bus...................................................................................................4-1
Network Watchdog Timer.............................................................................................4-1
SnapShot Feature...........................................................................................................4-2
Programmable Power-Up State.....................................................................................4-3
HotPnP (Hot Plug and Play)..........................................................................................4-4
HotPnP During Power-Up ..............................................................................4-4
HotPnP During Operation...............................................................................4-4
Inserting New I/O Modules..............................................................4-5
Replacing I/O Modules.....................................................................4-5
Power-On Self Test (POST)..........................................................................................4-6
Appendix A
Resetting the FP-1600
Appendix B
Troubleshooting
Appendix C
Specifications
FieldPoint FP-1600 User Manual vi www.natinst.com
Page 6

Appendix D
Technical Support Resources
Glossary
Index
Figures
Figure 1-1. Typical Ethernet Network Setup...........................................................1-2
Figure 2-1. DIN Rail Clip ........................................................................................2-1
Figure 2-2. Mounting the FP-1600 onto a DIN Rail................................................2-2
Figure 2-3. Connecting Terminal Bases...................................................................2-3
Figure 2-4. Installing the Network Panel Mount Accessory....................................2-4
Figure 2-5. Mounting I/O Module to Terminal Base...............................................2-6
Figure 2-6. Power and Ethernet Connectors on the FP-1600...................................2-7
Figure 2-7. Ethernet Cable Pinouts..........................................................................2-8
Figure 2-8. FP-1600 Power Connector Pinout.........................................................2-9
Figure 3-1. ToolTips Showing the Name of an Item...............................................3-2
Figure 3-2. ScreenTips Showing a Description of an Item......................................3-3
Figure 3-3. FieldPoint Explorer Window.................................................................3-4
Figure 3-4. Comm Resource Configuration Dialog Box.........................................3-5
Figure 3-5. Network Devices Window ....................................................................3-6
Figure 3-6. Device Properties Window.................................................... ................3-9
Figure 3-7. Channel Configuration Dialog Box.......................................................3-11
Figure 3-8. Accessing Data in Lookout ...................................................................3-16
Figure 3-9. LabVIEW Diagram for LabVIEW Example Application.....................3-18
Contents
Figure A-1. FP-1600 Reset Switch...........................................................................A-2
Figure B-1. LEDs on the FP-1600............................................................................B-5
Tables
Table 2-1. Ethernet Cable Wiring Connections......................................................2-7
Table 4-1. Module Configuration Results After HotPnP Replacement..................4-5
Table B-1. STATUS LED Flashes and Corresponding Error Conditions...............B-6
© National Instruments Corporation vii FieldPoint FP-1600 User Manual
Page 7
About This Manual
This manual describes how to install and use the FieldPoint FP-1600
network module.
How to Use This Manual Set
Operating
Instructions
for Modules
and Bases
Installation
Specifications
FieldPoint
User Manual
© National Instruments Corporation ix FieldPoint FP-1600 User Manual
Network Connection,
Hardware
Configuration,
and Feature Set
Description
FieldPoint Server
Online Help
Page 8

About This Manual
Conventions
The following conventions appear in this manual:
» The » symbol leads you through nested menu items and dialog box options
to a final action. The sequence File»Page Setup»Options directs you to
pull down the File menu, select the Page Setup item, and select Options
from the last dialog box.
This icon denotes a tip, which alerts you to advisory information.
This icon denotes a note, which alerts you to important information.
This icon denotes a caution, which advises you of precautions to take to
avoid injury, data loss, or a system crash.
bold Bold text denotes items that you must select or click on in the software,
such as menu items and dialog box options. Bold text also denotes
parameter names.
italic Italic text denotes variables, emphasis, a cross reference, or an introduction
to a key concept. This font also denotes text that is a placeholder for a w ord
or value that you must supply.
monospace Text in this font denotes text or characters that you should enter from the
keyboard, sections of code, programming examples, and syntax examples.
This font is also used for the proper names of disk drives, paths, directories,
programs, subprograms, subroutines, device names, functions, operations,
variables, filenames and extensions, and code excerpts.
monospace italic
Italic text in this font denotes text that is a placeholder for a word or value
that you must supply.
Related Documentation
The following documents contain information that you might find helpful
as you read this manual:
• Operating Instructions (for network module, terminal bases, and
I/O modules)
• FieldPoint software online help
FieldPoint FP-1600 User Manual x www.natinst.com
Page 9

Overview of FP-1600 Hardware
and FieldPoint Software
This chapter provides an overview of the FieldPoint FP-1600 network
module and FieldPoint software.
FP-1600 Hardware Overview
A FieldPoint system consists of at least one network module, at least
one terminal base, and one or more I/O modules.
The FieldPoint FP-1600 network module connects a 10/100 Ethernet
network to FieldPoint I/O modules. Because the FP-1600 is an Ethernet
device, the maximum number of FP-1600 network modules that can be
installed on your Ethernet network is determined by your network
topology. Each FP-1600 can support up to nine I/O modules.
The FP-1600 network module connects directly to a 10 Mbps or 100 Mbps
Ethernet network. The FP-1600 autodetects the speed of the connection and
configures itself accordingly.
1
© National Instruments Corporation 1-1 FieldPoint FP-1600 User Manual
Page 10

Chapter 1 Overview of FP-1600 Hardware and FieldPoint Software
Figure 1-1 shows an FP-1600 connected to an Ethernet network.
1
5
1 FP-1600 Network
Module
2 Terminal Base
Figure 1-1. Typical Ethernet Network Setup
4
66 6
3 I/O Module
4 Ethernet Cable
5 Ethernet Hub
6 Ethernet Devices
2
3
In a distributed application, many FieldPoint banks are networked together .
With Ethernet, you can use an unlimited number of FieldPoint banks. Each
bank can be accessed by an unlimited number of host computers.
FieldPoint Software Overview
Your FieldPoint software includes a configuration utility as well as server
and driver software for easy integration into application software packages.
These software components manage the low-level communications and
hardware details, simplifying programmatic access to I/O channels.
Version 2.0 of the FieldPoint software runs on Windows 98, Windows 95,
and Windows NT 4.0 and later, and includes the following components.
• FieldPoint Explorer configuration utility
• BridgeVIEW Server
• LabVIEW VIs
FieldPoint FP-1600 User Manual 1-2 www.natinst.com
Page 11

Chapter 1 Overview of FP-1600 Hardware and FieldPoint Software
• LabWindows/CVI Functions
• OPC Server
The following sections describe each of these components in more detail.
Y ou can do wnload future versions of FieldPoint software from the National
Instruments FTP site at
fieldpoint/Server
ftp.natinst.com/support/
.
FieldPoint Explorer Configuration Utility
FieldPoint Explorer is the configuration utility for FieldPoint hardware
and software. The first step in using FieldPoint software is to run the
FieldPoint Explorer. You then use FieldPoint Explorer to configure the
programmable settings of the FieldPoint hardware, such as the input range
of an analog input module, watchdog timer settings, or the power-up values
of output modules. From FieldPoint Explorer you define I/O items (which
represent one or more physical I/O channels) that you want to write to or
read from. FieldPoint Explorer also provides a user interface from which
you can interactively read and write values of these I/O items to verify that
your FieldPoint system has been correctly installed and configured.
BridgeVIEW Server
The BridgeVIEW server for FieldPoint provides communication between
FieldPoint devices and applications you develop using the BridgeVIEW
graphical programming package for automation. This native BridgeVIEW
server allows access to I/O items defined in the FieldPoint Explorer. If you
prefer, you can also use the OPC server to access FieldPoint hardware from
BridgeVIEW.
LabVIEW VIs
A set of VIs (Virtual Instruments) provide communication between I/O
items configured in the FieldPoint Explorer and applications you develop
using the LabVIEW graphical programming environment. A set of
example applications using these VIs is also provided.
LabWindows/CVI Functions
Applications you develop using the LabWindows/CVI C programming
environment use a set of C function calls to communicate with I/O items
configured in the FieldPoint Explorer. An instrument driver with a set of
function panels and example programs is provided to accelerate your
development process.
© National Instruments Corporation 1-3 FieldPoint FP-1600 User Manual
Page 12

Chapter 1 Overview of FP-1600 Hardware and FieldPoint Software
OPC Server
OPC (Object Linking and Embedding for Process Control) is an industry
standard interface that uses Microsoft’s Component Object Model (COM).
The FieldPoint OPC server provides an interface to the I/O items
configured in the FieldPoint Explorer and software packages that are
capable of using OPC, including recent versions of Microsoft’s Visual
Basic and Visual C/C++ programming environments, and other third-party
software packages.
FieldPoint FP-1600 User Manual 1-4 www.natinst.com
Page 13

Hardware and Software
Installation
This chapter describes how to mount your FieldPoint FP-1600 network
module, connect the terminal bases, connect power to the FP-1600, connect
the FP-1600 to an Ethernet network, and install your FieldPoint software.
Mount the FP-1600 and Terminal Bases
You can mount your FieldPoint system either to a DIN rail or directly on
a panel. Panel mounting is generally the more secure option, but DIN rail
mounting might be more convenient for your application. The following
sections give instructions for both mounting methods.
Note
Write down the serial number from the back of your FP-1600 before you mount your
FP-1600. You will need this information when you configure the FP-1600.
Mounting the FP-1600 on a DIN Rail
The FP-1600 has a simple rail clip for reliable mounting onto a standard
35 mm DIN rail. Follow these steps to mount the FP-1600 on a DIN rail.
1. Use a flat-bladed screwdriv er to open the DIN rail clip to the unlocked
position, as shown in Figure 2-1.
2
Rail Clip Locked Rail Clip Unlocked
Figure 2-1.
© National Instruments Corporation 2-1 FieldPoint FP-1600 User Manual
DIN Rail Clip
Page 14
Chapter 2 Hardware and Software Installation
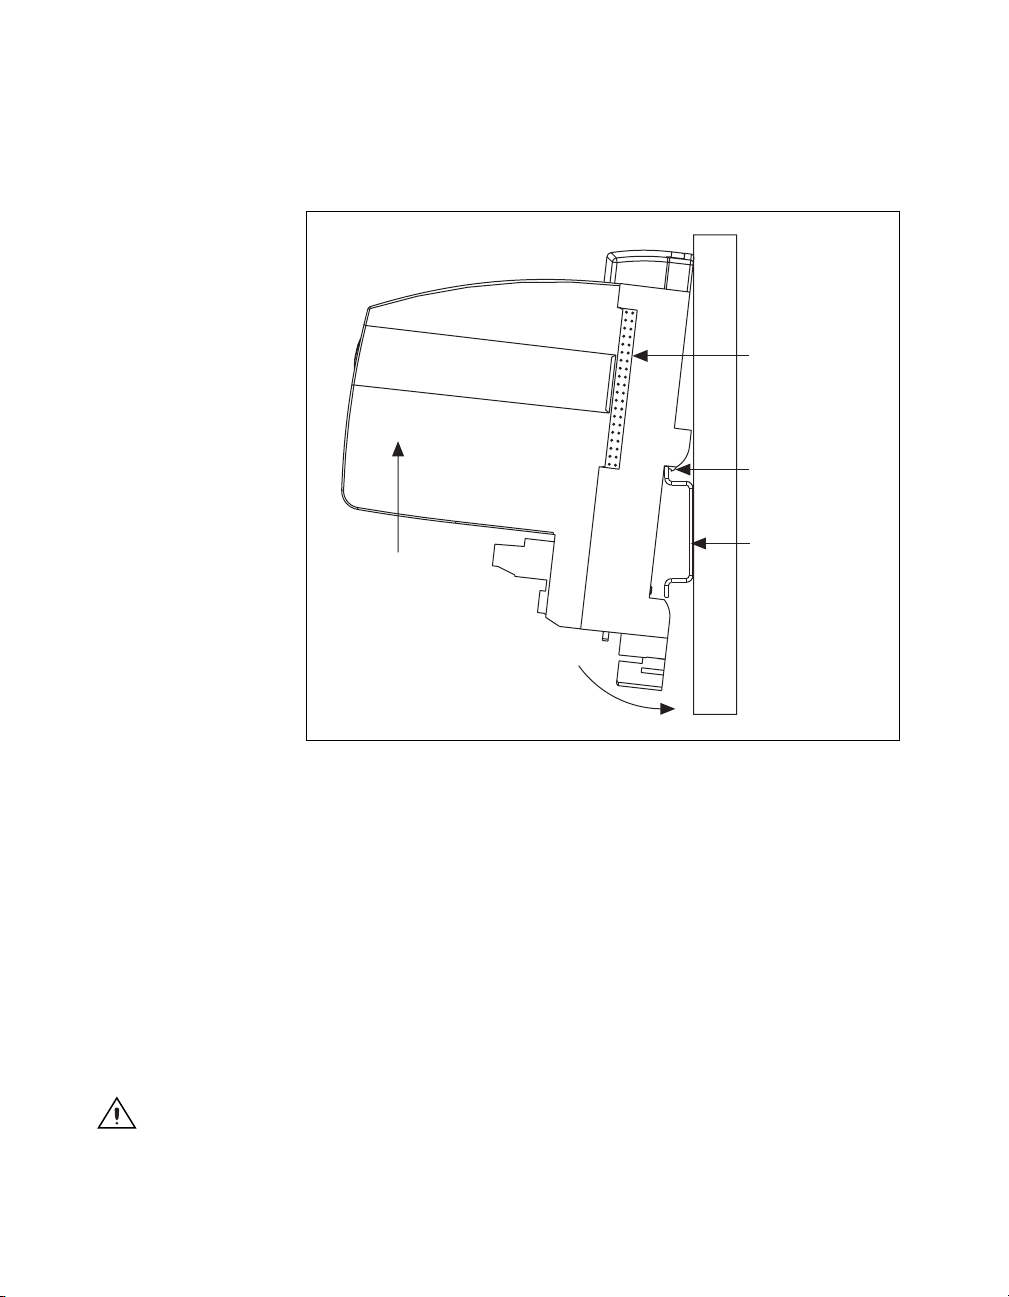
2. Hook the lip on the rear of the FP-1600 onto the top of a 35 mm
DIN rail and press the FP-1600 down onto the DIN rail, as shown
in Figure 2-2.
Cover
Local Bus
Connector
Lip
35 mm DIN Rail
Press
Figure 2-2. Mounting the FP-1600 onto a DIN Rail
3. Slide the FP-1600 to the desired position along the DIN rail. After the
FP-1600 is in position, lock it to the DIN rail by pushing the rail clip
to the locked position, as shown in Figure 2-1.
After the FP-1600 is mounted to the DIN rail, connect the terminal base to
the FP-1600 as explained in the next section, Connecting Terminal Bases
with DIN Rail Mounting.
Connecting Terminal Bases with DIN Rail Mounting
Follow these steps to connect a terminal base to an FP-1600 network
module using DIN rail mounting.
Caution To avoid damaging the FP-1600 and the terminal bases, make sure that power
is not applied to the FP-1600 while you install or remove terminal bases.
FieldPoint FP-1600 User Manual 2-2 www.natinst.com
Page 15
Chapter 2 Hardware and Software Installation
1. Mount the terminal base onto the DIN rail in the same way you
installed the FP-1600.
2. Attach the terminal base to the FP-1600 by firmly mating the local
bus connectors.
3. To add more terminal bases, install them on the rail and connect their
local bus connectors together . A single FP-1600 can support up to nine
terminal bases.
4. Place the protective cover onto the local bus connector of the last
terminal base on the bank, as shown in Figure 2-3.
Local Bus Connectors
Firmly Mated
Protective
Cover
Rail Clip
Locked
Figure 2-3. Connecting Terminal Bases
DIN
Rail
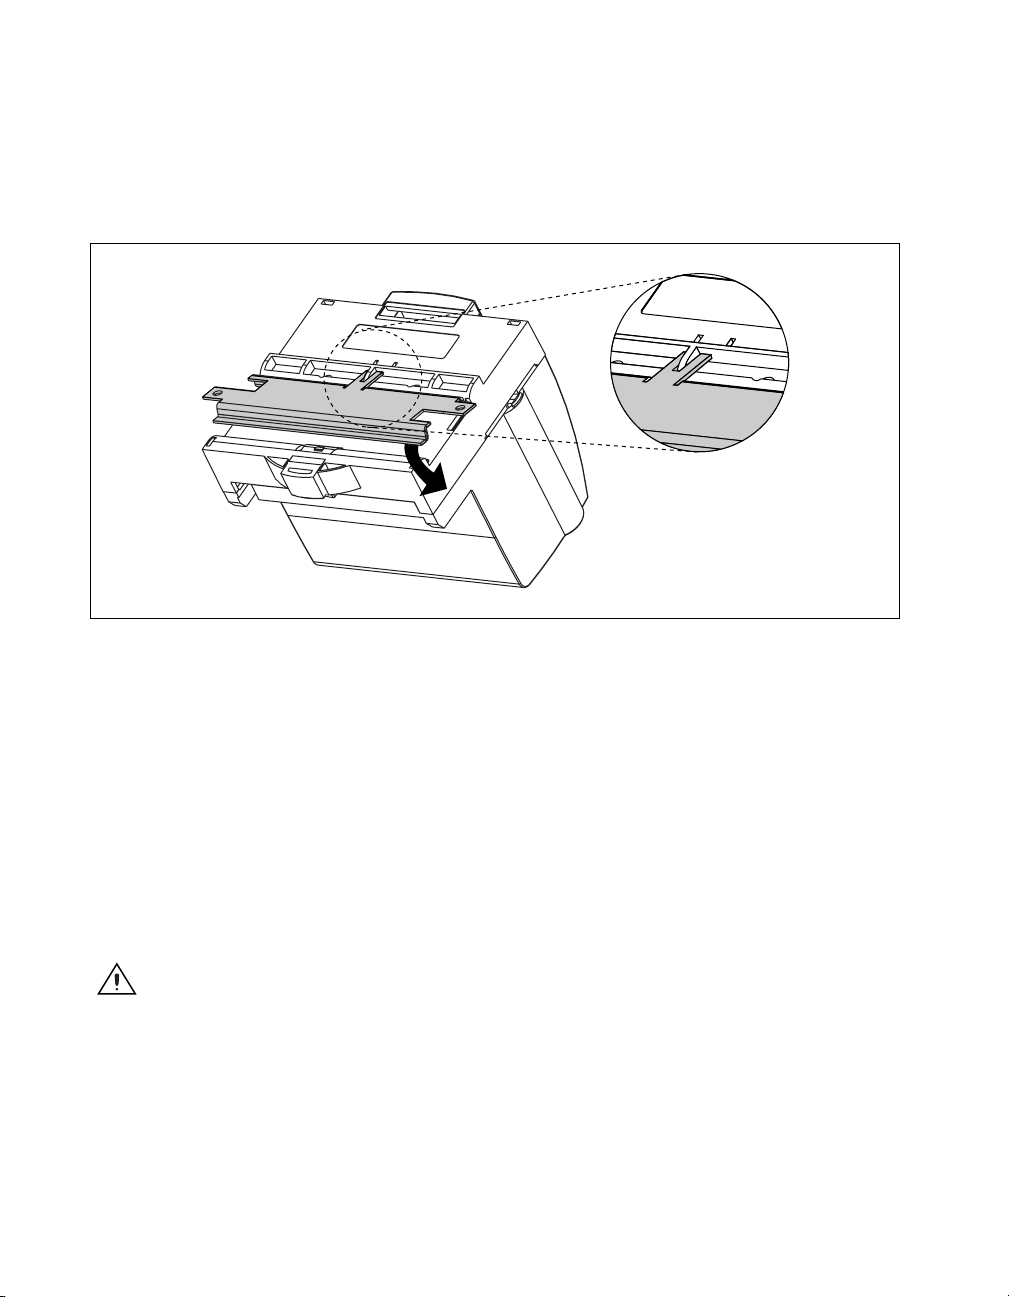
Removing the FP-1600 and Terminal Bases from the DIN Rail
To remove an FP-1600 network module or terminal base, unlock it from the
DIN rail by placing a screwdriver in the slot on the rail clip and opening it
to the unlocked position. Then, disconnect the FP-1600 from the local bus
connector of the terminal base and lift the network module or terminal base
off the rail.
Mounting the FP-1600 to a Panel
Follow these steps to install the optional FieldPoint network panel
mount accessory and mount the FP-1600 network module to a panel.
You can order the panel mount accessory, part number 777609-01, from
National Instruments.
© National Instruments Corporation 2-3 FieldPoint FP-1600 User Manual
Page 16
Chapter 2 Hardware and Software Installation
1. Use a flat-bladed screwdriver to open the rail clip to the unlocked
position, as shown in Figure 2-1.
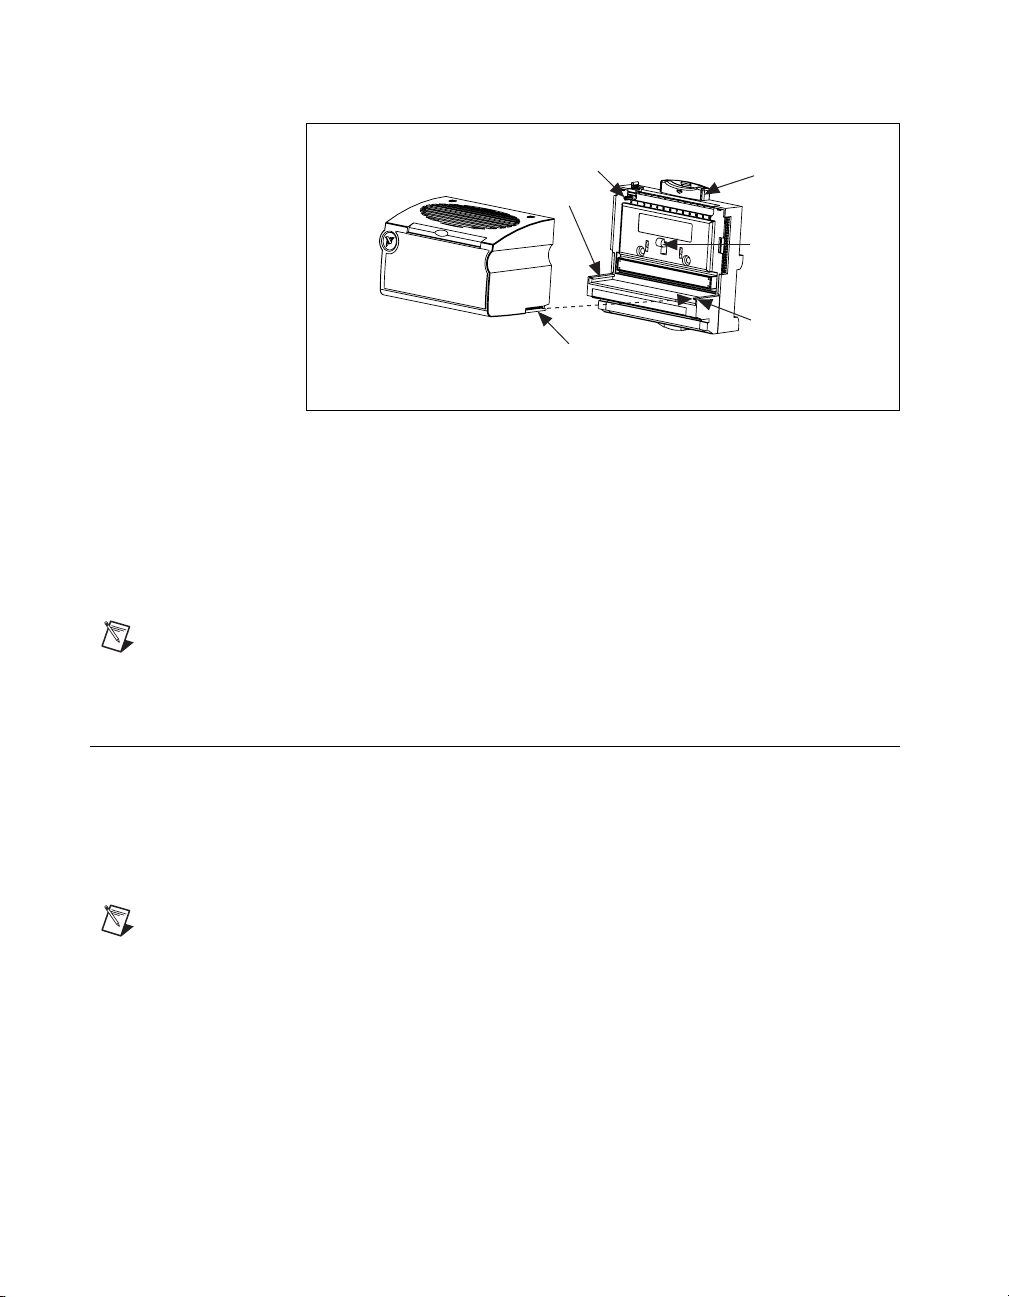
2. Snap the panel mount accessory onto the module, as shown in
Figure 2-4.
Press
Figure 2-4. Installing the Network Panel Mount Accessory
3. Lock the panel mount accessory into place by pushing the rail clip to
the locked position.
4. Mount the FP-1600 to your panel with the panel mount accessory. The
installation guide that came with the panel mount accessory includes a
guide that you can use to drill pilot holes for mounting the FP-1600.
Connecting Terminal Bases with Panel Mounting
You can install terminal bases directly, without using the panel mount
accessory needed to mount the FP-1600 network module. Follow these
steps to connect terminal bases to an FP-1600 using panel mounting.
Caution To avoid damaging the FP-1600 and the terminal bases, make sure that power
is not applied to the FP-1600 while you install or remove terminal bases.
1. Drill pilot holes in the panel to mount the terminal bases. A drilling
guide is provided with the network module panel mount accessory.
2. Attach the terminal base to the FP-1600 by firmly mating the local
bus connectors.
FieldPoint FP-1600 User Manual 2-4 www.natinst.com
Page 17

Chapter 2 Hardware and Software Installation
3. Bolt, screw, or otherwise fasten the terminal base to the panel. Make
sure that the local bus connectors remain firmly mated after the
terminal base is mounted.
4. T o add more terminal bases, repeat steps 1 through 3, mating the local
bus connectors of each new terminal base to the connector of the last
installed base. If all the pilot holes were correctly drilled, the local bus
connectors should remain firmly mated after all the bases are mounted
to the panel.
5. Place the protective cover onto the local bus connector of the last
terminal base on the bank.
Removing the FP-1600 and Terminal Bases from
the Panel
To remove an FP-1600 network module and terminal bases from the panel,
reverse the process described in the previous sections, Mounting the
FP-1600 to a Panel and Connecting Terminal Bases with Panel Mounting.
First remove the terminal bases, starting with the last one, then remove the
FP-1600 network module.
Mount I/O Modules onto Terminal Bases
Refer to Figure 2-5 and follow these steps to connect an I/O module to a
terminal base:
1. Make sure the ejector button on the terminal base is pressed down in
the unlocked position.
2. Position the first module with its alignment slots aligned with the guide
rails on the terminal base.
© National Instruments Corporation 2-5 FieldPoint FP-1600 User Manual
Page 18
Chapter 2 Hardware and Software Installation
Key
Guide Rail
Alignment Slot
Terminal BaseI/O Module
Figure 2-5. Mounting I/O Module to Terminal Base
3. Firmly press the module onto the terminal base. The terminal base
latch locks the I/O module into place when the ejector button pops up.
4. Repeat this procedure to install additional I/O modules onto terminal
bases.
5. To remove a module, press the ejector button and pull off the module.
Note Some older modules may be require more force to remove from the terminal base.
Make sure you firmly pull the module straight off the terminal base.
Connect Your FP-1600 to the Network
Ejector Button
Latch
Guide Rail
Connect the FP-1600 to an Ethernet network using the RJ-45 Ethernet port
on the FP-1600. Connect the RJ-45 Ethernet port of the FP-1600 to an
Ethernet hub using a standard Category 5 Ethernet cable. You can also
connect an FP-1600 directly to a computer using an Ethernet crossover
cable.
Note Do not use a cable longer than 100 m. If you are using a 100 Mbps Ethernet,
National Instruments recommends using a Category 5 shielded twisted-pair Ethernet
cable.
FieldPoint FP-1600 User Manual 2-6 www.natinst.com
Page 19
Cabling
Chapter 2 Hardware and Software Installation
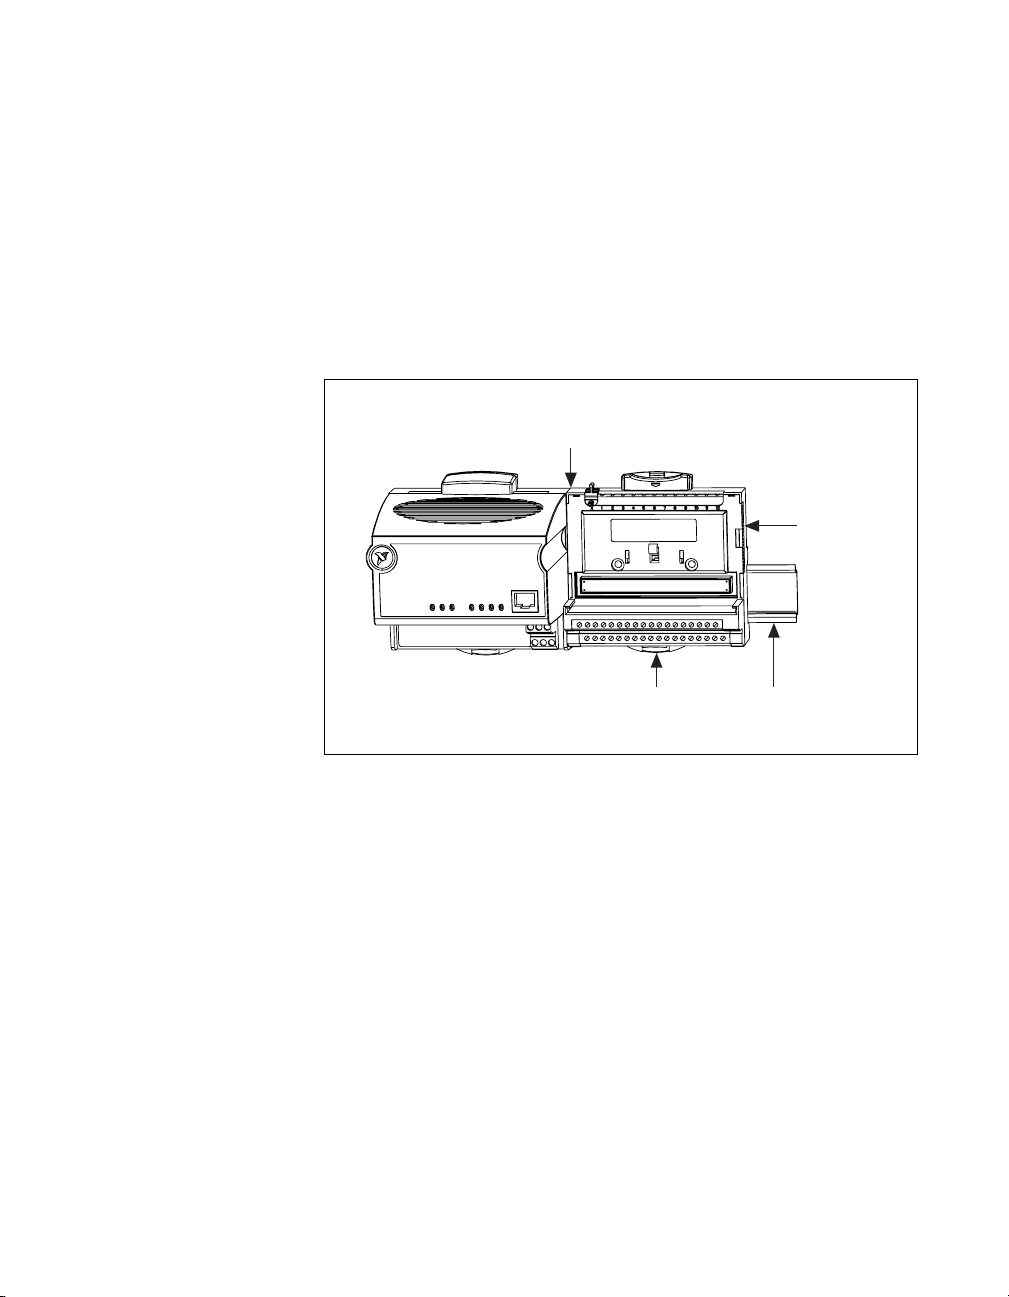
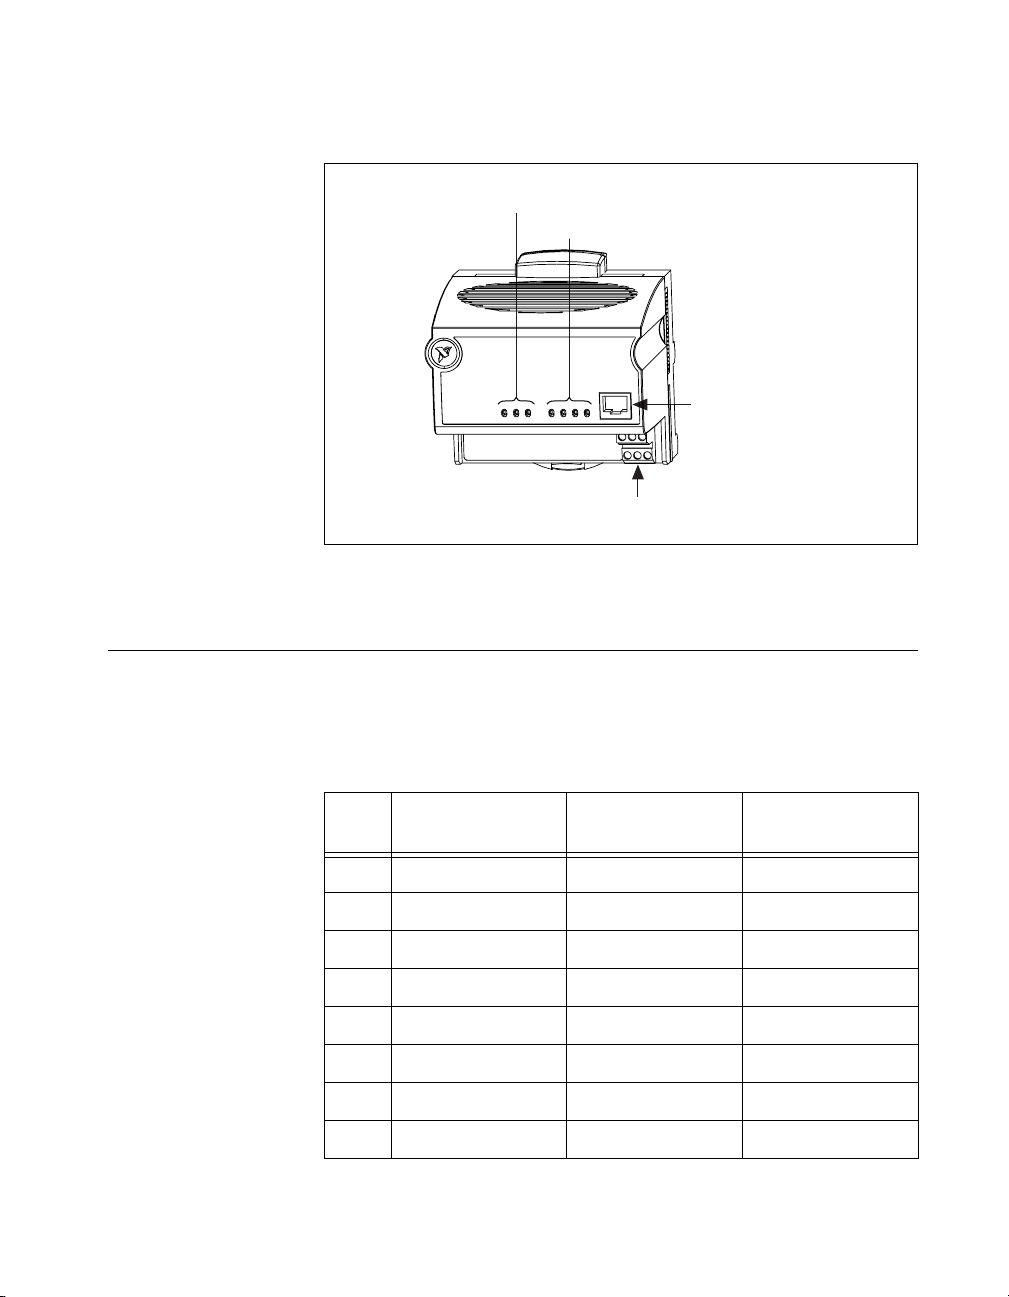
Figure 2-6 shows the power and Ethernet connectors on the FP-1600.
FieldPoint Bank Status Indicators
Ethernet Status Indicators
RJ-45 Ethernet Port
Power Connector
Figure 2-6. Power and Ethernet Connectors on the FP-1600
If you need to build your own cables, the following table shows the
standard Ethernet cable wiring connections for both normal and crossover
cables.
Table 2-1. Ethernet Cable Wiring Connections
Pin Connector 1
Connector 2
(Normal)
Connector 2
(Crossover)
1 white/orange white/orange white/green
2 orange orange green
3 white/green white/green white/orange
4 blue blue blue
5 white/blue white/blue white/blue
6 green green orange
7 white/brown white/brown white/brown
8 brown brown brown
© National Instruments Corporation 2-7 FieldPoint FP-1600 User Manual
Page 20
Chapter 2 Hardware and Software Installation
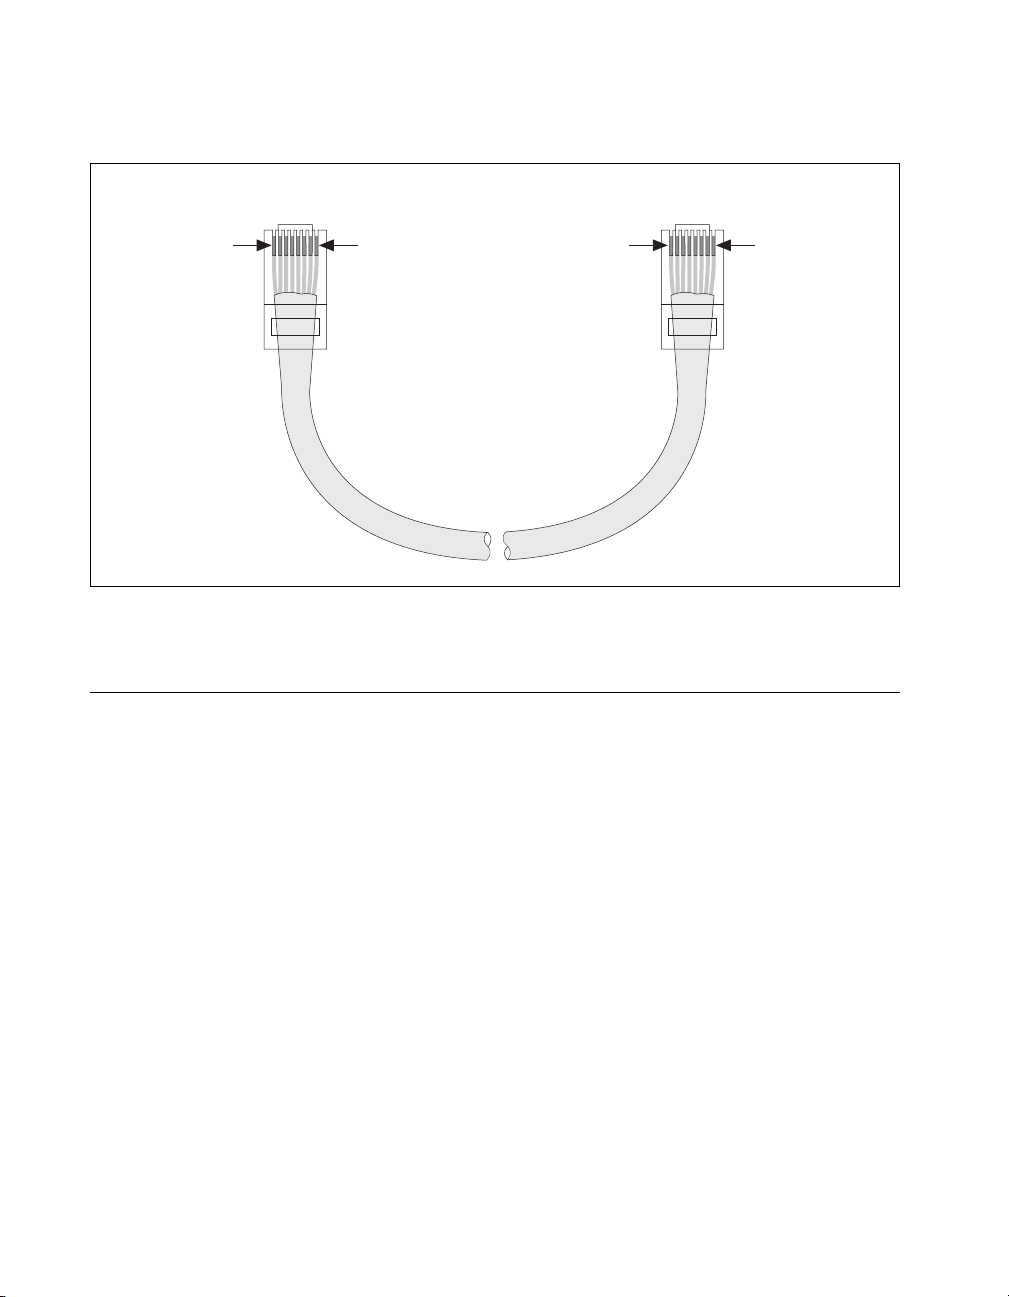
Figure 2-7 shows the connector pinouts for FieldPoint Ethernet cables.
Connector 1 Connector 2
pin 1
Figure 2-7. Ethernet Cable Pinouts
Connect Power to the FP-1600
Each FP-1600 on your network requires an 11–30 VDC power supply.
The FP-1600 filters and regulates this supplied power and provides power
for all the I/O modules in the bank. Therefore, you do not need to provide
power separately to each FieldPoint I/O module in the bank.
pin 1 pin 8pin 8
FieldPoint FP-1600 User Manual 2-8 www.natinst.com
Page 21
Chapter 2 Hardware and Software Installation
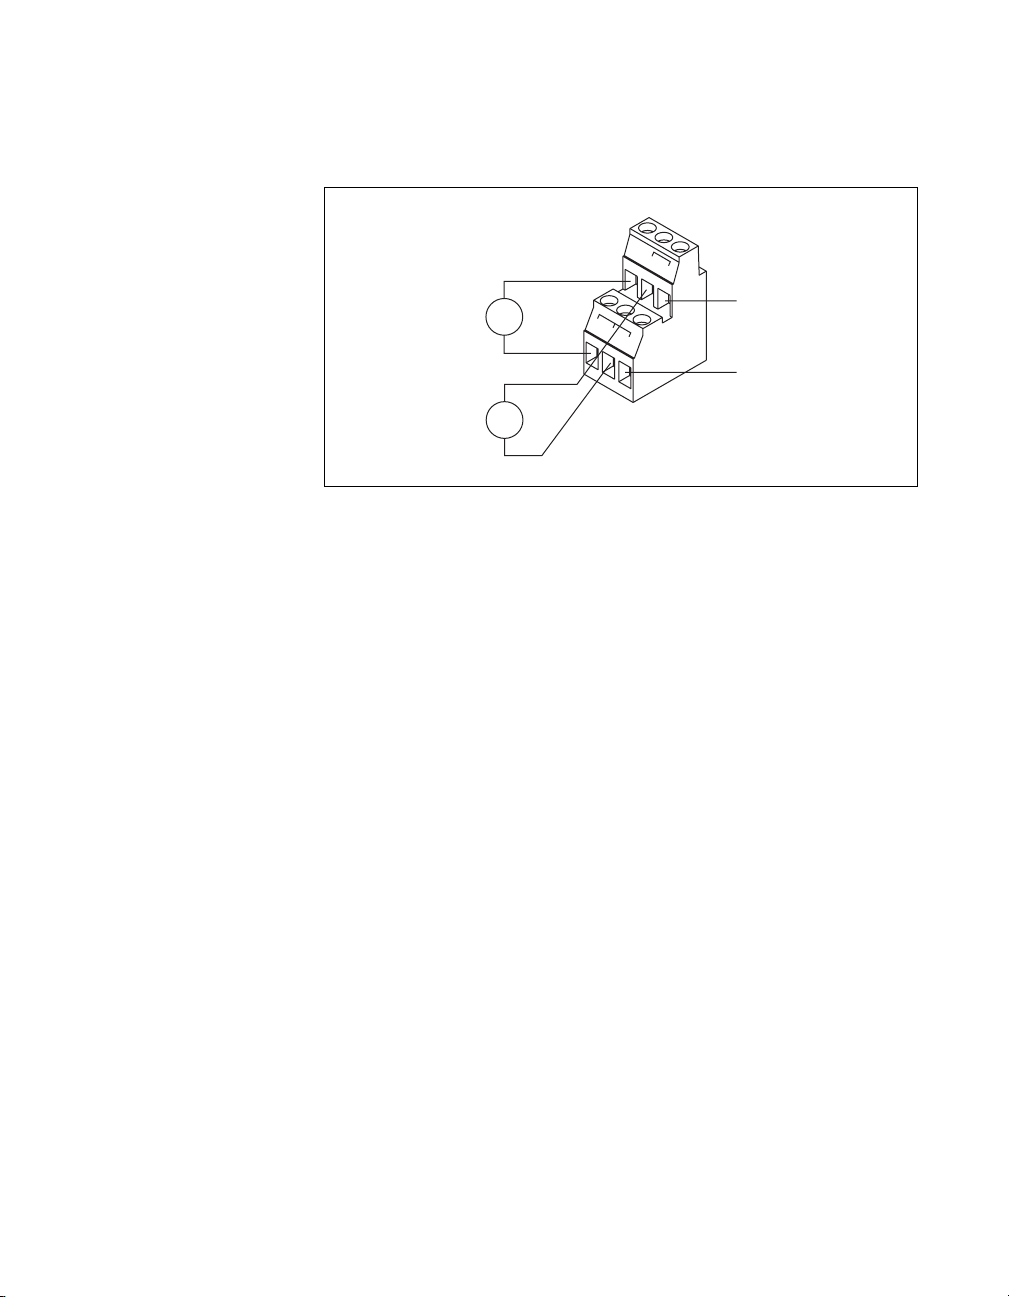
The power connector is a 6-pin screw terminal power connector whose
pinout is shown in Figure 2-8.
v
v
11-30 VDC
backup power
supply
(optional)
11-30 VDC
primary power
supply
Figure 2-8. FP-1600 Power Connector Pinout
+
–
+
–
c
v
V
c
c
To adjacent device
(optional connection)
C
Connect the primary power supply to the center V and C pair with the
positive and negative wires on your power cable in the V and C terminals,
respectively. You can connect an optional backup power supply to the left
V and C pair. The right V and C pair provides a convenient means of
connecting power to the V and C terminals of a terminal base.
If your field I/O devices need to be powered separately, you can use
the terminals provided on each terminal base for such power supply
connections. Refer to the documentation that came with your terminal base
and I/O module for more information on powering your field I/O devices.
Calculating Power for a FieldPoint Bank
The power requirements for a FieldPoint bank that uses an FP-1600
network module are calculated as follows:
Power = 7 Watts + 1.15 * ∑(I/O Module Consumption)
This is the amount of power the FP-1600 network module consumes from
the power supply to power itself and the I/O modules. It does not include
any power consumed by devices that you wire to the terminal bases.
The operating instructions for each FieldPoint I/O module contain power
consumption information.
© National Instruments Corporation 2-9 FieldPoint FP-1600 User Manual
Page 22

Chapter 2 Hardware and Software Installation
Power On the FP-1600
The FP-1600 turns on when you apply power to its power connector. At
power up, the FP-1600 runs a set of power-on self tests (POST) that take
several seconds. For more information about reading the status of the
POST, refer to the section LED Indicators in Appendix B,
Troubleshooting.
Install the FieldPoint Software
Follow these steps to install your FieldPoint software, version 2.0:
1. If you are using BridgeVIEW, LabVIEW, Lookout, or
LabWindows/CVI with FieldPoint, install the other application
programs before you install your FieldPoint software. The FieldPoint
software installation installs the BridgeVIEW server, LabVIEW VIs
and examples, Lookout driver class for use with serial FieldPoint
modules, and LabWindows/CVI instrument driver only if it finds the
corresponding application software installed.
2. Insert the FieldPoint Configuration and Server Software CD into the
CD-ROM drive on your computer.
3. Follow the onscreen instructions to complete the installation.
Note
If the setup does not launch automatically, select Start»Run from Windows, enter
d
:\setup, where
FieldPoint FP-1600 User Manual 2-10 www.natinst.com
d
is the letter of your CD-ROM drive, and select OK.
The hardware and software installation is now complete. Proceed to
Chapter 3, Hardware and Software Configuration.
Page 23

Hardware and Software
Configuration
This chapter describes how to configure your FieldPoint hardware and
software and how to use the Fieldpoint software with various servers and
software packages.
Getting Assistance While You Work
FieldPoint Explorer includes several features to help answer your questions
about using the software and to reduce the time you spend learning how to
use and get the most out of FieldPoint Explorer. These features include
ToolTips, ScreenTips, and online help.
ToolTips identify tool bar icons and most items on the screen. Rest your
pointer over the element you are interested in, and its name appears,
as shown in Figure 3-1.
3
© National Instruments Corporation 3-1 FieldPoint FP-1600 User Manual
Page 24

Chapter 3 Hardware and Software Configuration
Rest your pointer over an
element to display ToolTips.
Figure 3-1. ToolTips Showing the Name of an Item
ScreenTips provide descriptions of the items in a dialog box to help explain
what the item does or how you should use it. Display ScreenTips by
clicking on the question mark button in the title bar of the dialog box and
then clicking on the item you want to know more about. The ScreenTip
appears, as shown in Figure 3-2.
FieldPoint FP-1600 User Manual 3-2 www.natinst.com
Page 25

Chapter 3 Hardware and Software Configuration
1. Click on
this button
to display
ScreenTips.
2. Then, click on
the element you
want to learn
more about.
Figure 3-2. ScreenTips Showing a Description of an Item
The FieldPoint online help provides complete descriptions of the features
of FieldPoint Explorer and provides assistance in getting started with
configuring your FieldPoint hardware and software. Open the online help
by selecting the
Contents
option in the
Help
menu of FieldPoint Explorer.
Configure Your Hardware with FieldPoint Explorer
To get started with FieldPoint Explorer, follow these steps:
1. Install the FP-1600, I/O modules, and FieldPoint software as described
in Chapter 2,
FieldPoint system is powered on and the I/O modules have their
READY
2. From the Windows
Instruments FieldPoint»FieldPoint Explorer
Explorer appears. Figure 3-3 shows the parts of the FieldPoint
Explorer window.
© National Instruments Corporation 3-3 FieldPoint FP-1600 User Manual
Hardware and Software Installation
LEDs lit.
Start
menu, select
. Verify that the
Programs»National
. The FieldPoint
Page 26

Chapter 3 Hardware and Software Configuration
Menu and Tool Bars
Device Network Hierarchy (DNH) window
shows a tree view of your FieldPoint systems,
consisting of the Server, Communications
Resource Devices, and I/O Items.
Figure 3-3. FieldPoint Explorer Window
3. Add a communications resource to the Device Network Hierarchy
(DNH) in the FieldPoint Explorer. To add the resource, click on the
+ sign next to IA Server with OPC in the DNH frame to expand the
view. Then, right-click on FieldPoint and select Add a comm
resource to this server. The Comm Resource Configuration dialog
box appears, as shown in Figure 3-4.
List View window shows details
about the group of objects
selected in the DNH window.
FieldPoint FP-1600 User Manual 3-4 www.natinst.com
Page 27

Chapter 3 Hardware and Software Configuration
Figure 3-4. Comm Resource Configuration Dialog Box
4. To use the FP-1600, change the
Type
from
RS232/485
Ethernet
to
Each Ethernet comm resource represents a single bank of FieldPoint
modules on the network.
5. If you already know the device’s address, enter the address in the
Hostname or IP Address
Configure Devices
.
field, then proceed to the section
If you do not know the address, click on
Network Devices
The
window appears, as shown in Figure 3-5.
Browse
to locate the device.
Find and
.
© National Instruments Corporation 3-5 FieldPoint FP-1600 User Manual
Page 28

Chapter 3 Hardware and Software Configuration
Figure 3-5. Network Devices Window
6. The
7. Choose the Ethernet parameters that you will assign to the FP-1600.
Ethernet Parameters
You must provide the FP-1600 with several important network parameters.
These parameters are listed below.
•
•
Network Devices
window displays a list of devices, sorted by
serial number. If this is your first time to run the FieldPoint Explorer,
you should see an entry for your unconfigured FP-1600. Select it, then
click on
Device Properties
.
If you have already configured your device, click on the device
IPAddress, then click on
Refer to the next section,
OK.
Ethernet Parameters
, for more information
about each of the Ethernet parameters.
IP address
—The unique, computer-readable address of a device on
your network. An IP address is typically represented as four numbers
separated by periods (for example,
130.164.55.112)
. For more
information about choosing an IP address, refer to the next section,
Choose an IP Address
Subnet mask
—A code that helps the network device determine
.
whether another device is on the same network or a different network.
255.255.255.0
is the most common subnet mask.
FieldPoint FP-1600 User Manual 3-6 www.natinst.com
Page 29

Chapter 3 Hardware and Software Configuration
• Gateway IP—The IP address of a device that acts as a gatew ay server ,
which is a connection between two networks.
• Comment—A comment to help you identify the FP-1600.
• DNS Server IP—The IP address of a network device that stores
hostnames and translates them into IP addresses.
• Time Server IP—The IP address of a networked computer that runs
the National Instruments Time Service. This is usually the IP address
of one of the computers that you run FieldPoint software on.
IP address, Subnet mask, and Time Server IP are required parameters. If
your network does not have a gate way server or DNS server , you should set
these parameters to
0.0.0.0.
Choose an IP Address
For a Network Administered by a Network Administrator
If you are adding the FP-1600 to an existing Ethernet network, you must
choose IP addresses carefully. Consult with your network administrator to
obtain an appropriate IP address. Ask the administrator to assign static
IP addresses to your FP-1600 and the computer running the National
Instruments Time Service. Time Service is installed along with the
FieldPoint software and runs automatically. Also, ask the network
administrator to assign the proper subnet mask, gateway, IP address,
and DNS server addresses.
For a Network without a Network Administrator
If you are assembling your own small Ethernet network, you can choose
your own IP addresses. The format of the IP addresses is determined by the
subnet mask. You should use the same subnet mask as the computer you
are using to configure your FP-1600. If your subnet mask is 255.255.255.0,
the first three numbers in every IP address on the network must be the same.
If your subnet mask is 255.255.0.0, then only the first two numbers in the
IP addresses on the network must match.
For either subnet mask, numbers between 1 and 254 are valid choices for
the last number of the IP address. Numbers between 0 and 255 are valid for
the third number of the IP address, but this number must be the same as
other devices on your network if your subnet mask is 255.255.255.0.
© National Instruments Corporation 3-7 FieldPoint FP-1600 User Manual
Page 30

Chapter 3 Hardware and Software Configuration
The Time Server IP is the address of the computer where you ha ve installed
the National Instruments Time Service. Time Service is installed along with
the FieldPoint software and with Lookout 4.0 and will run automatically.
If you are setting up your own network, you probably do not have a gateway
or DNS server, so you should set these values to
0.0.0.0.
To find out the network settings for your computer, run
Windows 98/95 or
ipconfig on Windows NT. To run winipcfg, select
Run from the Windows 98/95 Start menu. Type
winipcfg on
winipcfg in the Open
field, and click on OK. The IP Configuration window appears, which
gives you information about the network setup for your computer. Make
sure that you have selected the correct Ethernet adapter from the pop-up
menu at the top of the window. Most computers have only one Ethernet
card, but many are also configured for some type of dial-up networking
such as PPP or SLIP. Make sure you are looking at the Ethernet adapter
settings.
To run
ipconfig under Windows NT, open a Windows NT Command
window, type
more information, you can run
ipconfig /all. This shows you all of the settings for the Windows NT
ipconfig at the prompt, and press <Enter>. If you need
ipconfig with the /all option by typing
machine. Make sure you use the settings for the correct Ethernet adapter to
configure your FP-1600.
FieldPoint FP-1600 User Manual 3-8 www.natinst.com
Page 31

Set FP-1600 Properties
1. After you have selected the Device Properties button from the
Chapter 3 Hardware and Software Configuration
Network Devices window, the FP-1600 Properties window appears,
as shown in Figure 3-6.
Figure 3-6.
Device Properties Window
2. In the FP-1600 Properties window, enter the Ethernet parameters
you have chosen for the IP address, subnet mask, gateway IP, DNS
server IP , and T ime Server IP. You can also click on Suggest Values to
let the software provide default parameters. If you have more than one
FP-1600, you can enter a comment to help you identify each device.
To configure the device, click on OK.
Note
Suggest Values might provide settings that do not work with your network.
3. When the FP-1600 reappears in the Network Devices window with its
own IP address, it is ready to use. Click on the IP Address, then click
on Select.
© National Instruments Corporation 3-9 FieldPoint FP-1600 User Manual
Page 32

Chapter 3 Hardware and Software Configuration
Find and Configure Devices
1. From the Comm Resource Configuration dialog box, click on Find
Devices to start searching for all of the FieldPoint devices on this
communications resource. If no devices are found, make sure that the
FieldPoint hardware is powered on and connected to the network.
2. After the FieldPoint modules are found, click on the + sign next to
FP Res in the DNH frame to expand the device hierarchy and display
the modules found on the network.
The hierarchy includes all of the modules connected to the FP-1600
(Figure 3-3 shows an example of an expanded device hierarchy). The
default name of each device found includes the model number of the
FieldPoint module, followed by the @ sign and the address of the
module (for example,
one I/O Item is created for each channel on the module, and if all the
channels are of the same type, one I/O Item is created to represent all
the channels on that module collectively.
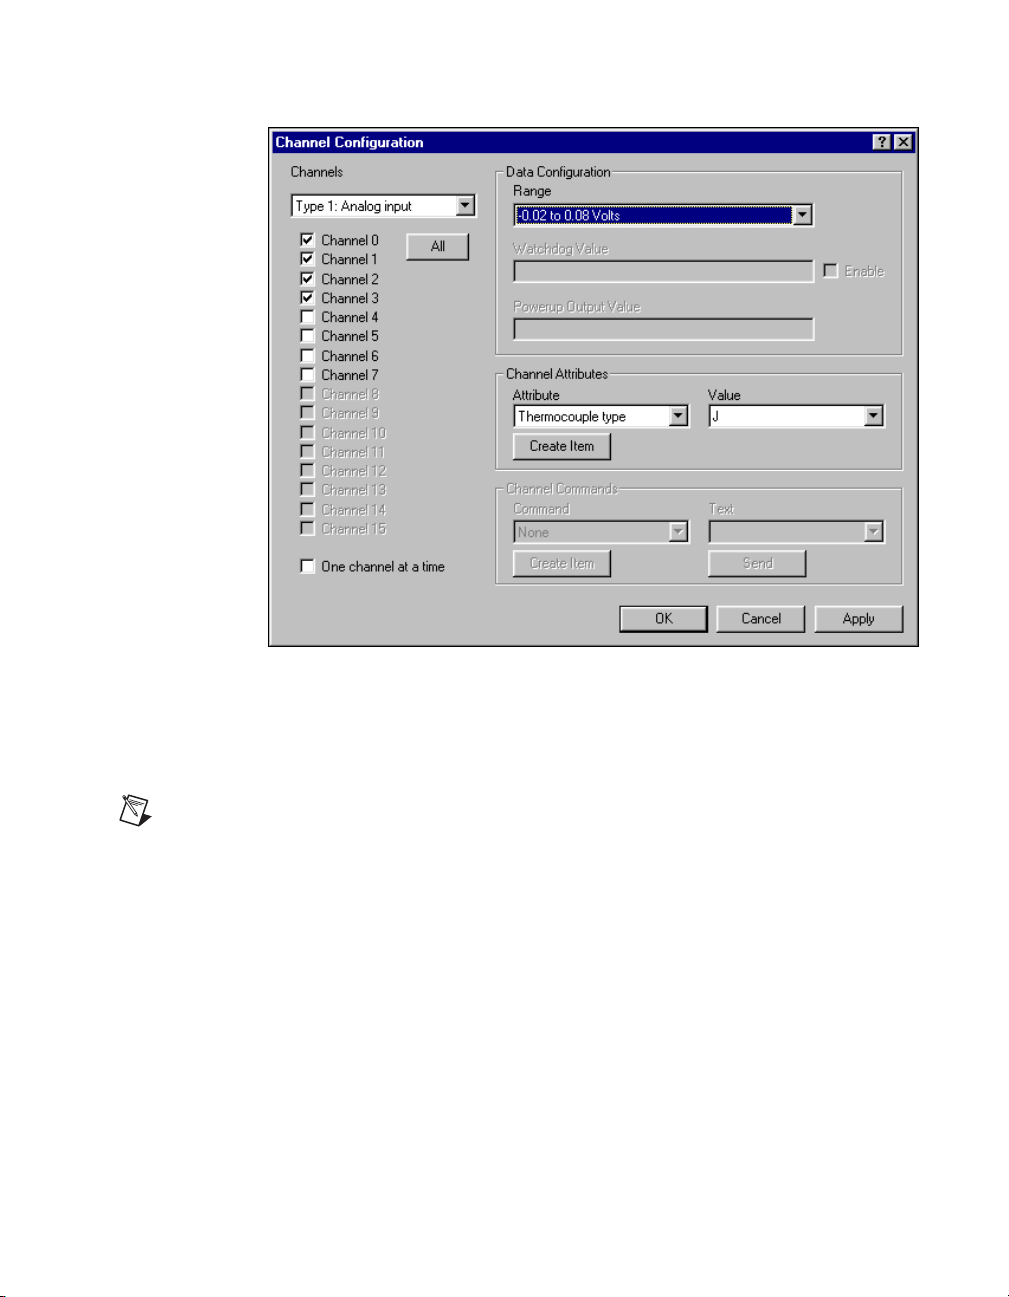
3. To configure the hardware settings of a particular I/O module, select
the device in the DNH frame.
a. Right-click on the device name, and select Edit this device from
the pop-up menu.
b. Click on the Channel Configuration button to bring up the
Channel Configuration dialog box, shown in Figure 3-7. In this
example, an FP-TC-120 thermocouple module is selected.
FP-1600 @0). For each I/O module found,
FieldPoint FP-1600 User Manual 3-10 www.natinst.com
Page 33
Chapter 3 Hardware and Software Configuration
Figure 3-7. Channel Configuration Dialog Box
c. Select the type of channel to show, then checkmark the channel(s)
that you want to change. T o select more than one channel, uncheck
One channel at a time
the
Note
Configuration options are module-dependent. The options listed here might not be
box.
available for your particular module.
d. Set the range and output values of the selected channel(s).
e. Set the attributes for the selected channel(s) by selecting the
attribute and entering the desired value.
f. Send commands to the selected channel(s) by choosing a
command and value and clicking on
Send
.
g. Repeat this procedure for each channel you want to configure.
h. Click on the OK button when you are finished, or click on the
Apply
button to save the changes and continue to configure
channels. When you click on OK or
Apply
, the changes are
immediately sent to the device.
© National Instruments Corporation 3-11 FieldPoint FP-1600 User Manual
Page 34

Chapter 3 Hardware and Software Configuration
Note When you configure the FP-1600, wait for the message The module’s
configuration was confirmed
might not be properly configured.
4. You can now try to read from the FieldPoint devices that you have
configured. Select one of the devices in the DNH frame, and then click
on the Start Monitoring button (green arrow icon) in the toolbar to
start monitoring the items of that device.
The tag symbols of the items in the List View frame turn blue to sho w
that they are being monitored. The Value column in the List View
frame shows the current value of the I/O channels defined by the
I/O Items, and the Status column shows any error conditions recei v ed
while communicating with the FieldPoint network.
5. Click on the Stop Monitoring button (red square icon) in the toolbar
to stop monitoring the items.
6. You can also write to output channels of I/O Items that you have
configured.
a. Select a device with output channels in the DNH frame.
b. Select the I/O Item in the List View frame corresponding to
the channel you want to write to.
c. Click on the Write Value button (pen and paper icon) in the
toolbar to write to the I/O channel(s) represented by the I/O Item.
d. Enter the value you want to write in the Value box and click on
the Write button to write the value out. The value must be in the
range of the channel that you configured in step 3. For example, if
the channel was configured for a range of 0.0035 A to 0.021 A,
and you want to write a value of 0.010 A (10 mA), enter 0.010 in
the Value box. For discrete I/O channels with a Boolean range,
enter a 1 or a 0 in the Value box.
7. When you are satisfied with the hardware configuration of your
FieldPoint system, you can save this configuration as the new
power-up state for the hardware.
a. To edit the device configuration of the FP-1600 network module,
right-click on the network module entry in the DNH frame, then
select Edit this device from the pop-up menu.
b. Make sure that the factory configuration checkbox is not
checked.
. If this message does not appear, the FP-1600
FieldPoint FP-1600 User Manual 3-12 www.natinst.com
Page 35

Chapter 3 Hardware and Software Configuration
c. If you only want the range and attribute settings you configured
in step 3 to be saved as power-up states, click on the OK button.
These settings get written to the non-volatile memory of the
network module when you write changes to the device in step 3.
d. If you also want to save all the current watchdog and power-up
output states of the output channels, click on the Snapshot button
to store all of the output values of that bank of FieldPoint modules
to the power-up memory of the network module, then click on the
OK button when you are finished.
8. When you are finished configuring the hardware settings and the
I/O Items, you must save your configuration file. Select File»Save
from the menu bar.
Use the FP-1600 with Other Applications
The following sections explain how to use the FP-1600 with other software
applications.
FieldPoint BridgeVIEW Server
The FieldPoint BridgeVIEW server is a device server based on the native
BridgeVIEW server architecture. The I/O Items you configured in the
FieldPoint Explorer become available to the BridgeVIEW server when
you export the configuration data from FieldPoint Explorer into the
BridgeVIEW common configuration database (CCDB). From within
BridgeVIEW, the Tag Configuration Wizard imports this configuration
information, creating a tag for every I/O Item you configured in the
FieldPoint Explorer. These tags are immediately accessible through the
BridgeVIEW real-time database.
To start using the FieldPoint server with BridgeVIEW, follow these steps:
1. Configure your FieldPoint server and FP-1600 from FieldPoint
Explorer, as described in the Configure Your Hardware with
FieldPoint Explorer section of this chapter, and save your
configuration file.
2. Select BridgeVIEW»Export to BridgeVIEW from the menu bar
of FieldPoint Explorer to export the current configuration file that you
saved to BridgeVIEW’s active CCDB. (If BridgeVIEW is not an
option on your FieldPoint Explorer’s menu bar, make sure that you
have installed the FieldPoint software after installing BridgeVIEW.)
© National Instruments Corporation 3-13 FieldPoint FP-1600 User Manual
Page 36

Chapter 3 Hardware and Software Configuration
Note If you edit, rename, or move your configuration file after you export it to the
BridgeVIEW Active CCDB, you must re-export the new configuration file. If you select
another CCDB file as the Active CCDB for BridgeVIEW, you must re-export your
FieldPoint configuration file to the newly selected Active CCDB file.
3. Exit FieldPoint Explorer.
Note You must exit FieldPoint Explorer before you can use the FieldPoint server from
BridgeVIEW.
4. Launch BridgeVIEW and load the Tag Configuration Editor by
selecting Project»Tag»Configuration from the menu bar of a
BridgeVIEW window, or click on the Configure Tags button of
BridgeVIEW’s initial tile screen.
5. Click on the Configuration Wizard button in the lower-right corner
of the Tag Configuration Editor window , and then select FieldP oint
from the list of servers that appears.
6. All of the FieldPoint I/O Items in your configuration file are
automatically imported as tags into BridgeVIEW and are now
accessible through the BridgeVIEW real-time database. Do not worry
if you get a message that no tags were created for the network modules
in your system, as they do not have any I/O Items.
7. You can edit the tags to change their names, scaling information,
and other parameters.
Refer to your BridgeVIEW documentation for more information about
tags and their configuration.
Tip The T ag Configuration Editor might be easier to read for FieldPoint tags if you change
the middle column heading from Tag Group to Item.
8. When you have finished editing the tags (or if you chose to keep the
default settings for the tags), exit the Tag Configuration Editor and
save the changes to the configuration file.
You can now access the FieldPoint I/O Items by reading or writing these
tags as you would any other tag in BridgeVIEW.
FieldPoint FP-1600 User Manual 3-14 www.natinst.com
Page 37

Lookout
Chapter 3 Hardware and Software Configuration
The FP-1600 was designed to integrate easily with National Instruments
Lookout 4.0. You can access the FP-1600 the same way you would access
another desktop computer running Lookout 4.0. You can access the
channel data, ranges, attributes, and commands from Lookout, as well as
several control variables, such as Reset and Snapshot.
T o access the FP-1600 with Lookout 3.8 or earlier, use the FieldPoint OPC
server. You cannot use the FieldPoint Lookout driver class with the
FP-1600.
To use the FP-1600 with Lookout 4.0, follow these steps:
1. Configure your FP-1600 from FieldPoint Explorer, as described in the
Configure Your Hardware with FieldPoint Explorer section of this
chapter.
2. Start Lookout, and create a new process or open an existing one.
3. Register the FP-1600 as a networked computer in Lookout. Select
Object»Object Explorer or Object»Connection Browser from the
menu bar and right-click on the Network icon. Choose Register
network computer from the pop-up menu. Type the hostname or
IPAddress of the FP-1600 in the Computer name field and click
on OK.
4. When you create a Lookout object or expression, you can connect it to
data on the FP-1600. In the Insert Expression dialog box, click on
Network to browse the registered computers and FP-1600s. Click on
the hostname or IP address of the FP-1600 and browse to the desired
data. Figure 3-8 shows how you would access the data on Channel 0
of an FP-DO-401 connected to an FP-1600 named
fp1600.natinst.com.
© National Instruments Corporation 3-15 FieldPoint FP-1600 User Manual
Page 38

Chapter 3 Hardware and Software Configuration
.
Figure 3-8. Accessing Data in Lookout
LabVIEW VIs
When you install the FieldPoint software, a library of FieldPoint VIs is
created if LabVIEW has already been installed on your computer. The
FieldPoint VIs (FP Open, FP Get Configuration Info, FP Create Tag,
FP Advise, FP Read, FP Write, and FP Close) directly access the I/O Items
you configured in the FieldPoint Explorer program. In addition, a set of
examples is placed in your
LabVIEW Examples
are the best way to get familiar with the LabVIEW VIs. The
LabVIEW Help
document is in the same program group on your Windows
taskbar as the FieldPoint Explorer program. This help document explains
how to use the FieldPoint VIs.
FieldPoint FP-1600 User Manual 3-16 www.natinst.com
directory. These examples
FieldPoint
Page 39

Chapter 3 Hardware and Software Configuration
A simple FieldPoint application to read an I/O Item might only need to use
four of the VIs. T o create an e xample of such an application, complete the
following steps and refer to Figure 3-9. This application reads the inputs
from the I/O Item named All, shown in Figure 3-3.
1. Use FP Open to open the server. By default, the server opens with the
configuration file you last saved with FieldPoint Explorer.
2. Use FP Create Tag to create a handle to an I/O Item that you defined
in FieldPoint Explorer. You provide three string names to this VI to
indicate which I/O Item you want access to. These three strings are
the names given to the communications resource, the device, and the
I/O Item. Figure 3-9 shows default names as they appear when you use
the Find Devices button in FieldPoint Explorer.
3. Use FP Advise to continuously monitor the I/O Item at the rate
specified in FieldPoint Explorer . (You can also set a new rate with this
VI.) In this example, the while loop executes at this advise rate. If you
used FP Read VI here instead of FP Advise, the loop would free-run at
the fastest rate it could sustain, reading the I/O Item over the serial port
each time the loop ran.
Note Do not put more than one FP Advise VI in a loop. All VIs in a loop execute only
once each time a loop runs, and FP Advise VIs only complete at their advise rate. If you
had more than one FP Advise VI in the loop, the loop (and therefore all of the FP Advise
VIs in the loop) would only execute at the slowest rate of the Advises. The loop might not
execute at all if any of the advises is set to complete “On Data Change”, and the data of the
corresponding I/O Item never changed.
4. Use FP Close to close the server. This action also stops all pending
advise operations.
Note This example reads the value of an I/O Item value from the FieldPoint device. To
write to an Output Item, use FP Write instead of FP Advise (or FP Read).
© National Instruments Corporation 3-17 FieldPoint FP-1600 User Manual
Page 40

Chapter 3 Hardware and Software Configuration
Figure 3-9. LabVIEW Diagram for LabVIEW Example Application
LabWindows/CVI Functions
When you install the FieldPoint software, a LabWindows/CVI instrument
driver for FieldPoint is created if LabWindows/CVI has already been
installed on your computer. This instrument driver includes function panels
to call C functions that directly access the I/O Items you configured in the
FieldPoint Explorer program. In addition, a set of sample projects is placed
in your
the best way to get familiar with these functions. The FieldPoint CVI Help
document is in the same program group on your Windows taskbar as the
FieldPoint Explorer program. This help document describes each function
in the instrument driver with a description of the C syntax, a description of
each parameter, and a list of possible error codes.
LabWindows/CVI Samples directory. Using these examples is
Note FieldPoint CVI Interface Compatibility Modes—The FieldPoint software ships
with object (
.obj) files to support the different compiler compatibility modes that
LabWindows/CVI supports (Microsoft Visual C/C++, Borland, Watcom, and Symantec).
When FieldPoint software is installed, the Microsoft compatibility mode is installed
by default. T o use an alternate compatibility, copy the supplied
folder (for instance,
would like compatibility to the
FieldPoint FP-1600 User Manual 3-18 www.natinst.com
/CVI/FieldPoint/borland/FieldPoint.obj) with which you
/FieldPoint subdirectory of the CVI directory.
.obj file from the compiler
Page 41

FieldPoint OPC Server
OPC (OLE for Process Control) is an industry standard device interface
specification that provides interoperability between field devices such as
FieldPoint and application software packages. The FieldPoint OPC server,
like the other FieldPoint interfaces, imports the I/O Items that you
configured in FieldPoint Explorer and makes them available as OPC Items
to an OPC client, a software program designed to communicate with OPC
servers. The FieldPoint OPC server allows any application written as an
OPC client to access the FieldPoint hardware over the serial port. Because
OPC is based in part on Microsoft’s DCOM (Distributed Component
Object Model), it is even possible for an OPC client on one computer to
access FieldPoint hardware connected to the serial port of another
computer if the two computers are networked together.
OPC clients might differ in the features they offer and their presentation
of the OPC interface for the FieldPoint OPC server. Refer to the
documentation on using the OPC client features of your application for
detailed instructions on how to access an OPC server. However, the basic
steps involved are similar for most OPC client applications.
Follow these steps to use the FieldPoint OPC server:
1. Open the FieldPoint OPC server,
2. Create a group.
3. Select the I/O Items, which you configured in FieldPoint Explorer, that
Chapter 3 Hardware and Software Configuration
National
Instruments.OPCFieldPoint
.
This server was registered with Windows when you installed the
FieldPoint software. OPC clients should be able to show you a list
of available registered servers, but you might have to type this name
in yourself. The OPC client might automatically connect to the server
when you select it, but if you are gi ven the option to explicitly connect
to the FieldPoint OPC server, you should do so.
Groups are a collection of I/O Items. Some OPC clients might not give
you the option of creating groups, or they might be created for you.
you want to read or write as a part of this group.
Many OPC clients can use the “Browse Address Space” feature of
the FieldPoint OPC server to show you a list of all of the I/O Items
you configured in FieldPoint Explorer. Ho wever , if the OPC client you
are using does not support this feature, you might need to type the Item
IDs of the I/O Items directly . The naming convention of the FieldPoint
Item IDs is
Comm resource name\Device Name\I/O Item name
where the Comm resource name, Device name, and I/O Item name are
© National Instruments Corporation 3-19 FieldPoint FP-1600 User Manual
Page 42

Chapter 3 Hardware and Software Configuration
the names given in FieldPoint Explorer. For example, an Item ID
associated with one of the I/O Items shown in Figure 3-3 would be
FP Res\FP-TC-120 @1\Channel 0.
In most cases, the preceding steps are all that is required to configure an
OPC client to read from I/O Items of the FieldPoint OPC server. In some
cases, the OPC client might require more information about the FieldPoint
OPC server. The following list contains additional information about the
FieldPoint OPC server, which you might find helpful.
• The FieldPoint OPC server does not require an access path. Some OPC
clients might expect the access path to be included in the Item ID name
or might request the access path when you select I/O Items. Y ou should
be able to leave the access path blank (empty string).
• The FieldPoint OPC custom interface is an out of process server.
• The FieldPoint OPC server supports both synchronous and
asynchronous reads and writes.
• The FieldPoint OPC server uses the “GetErrorString” method to return
error and diagnostic messages from the FieldPoint server and
hardware. OPC clients that do not support this method might give you
error messages like “Bad, non-specific” along with an error code.
Some OPC clients that do not support this “GetErrorString” method
might still provide a way for you to manually look up the FieldPoint
message corresponding to the error code using the method.
FieldPoint FP-1600 User Manual 3-20 www.natinst.com
Page 43

Feature Set Description
This chapter describes the feature set for the FP-1600 network module.
High-Speed Local Bus
The FP-1600 provides a high-speed local bus for communication to the
I/O modules in the bank. The high-speed local bus has low overhead
that enables fast response to commands from the host computer.
Network Watchdog Timer
The FP-1600 can detect unexpected periods of network inactivity and
respond to them in a user-defined way. The network watchdog timer
feature enables you to guard your system against failures in the network
connection, cables, or host computer, and to put the channel outputs in
a user-defined state (the watchdog state) if such failures do occur.
You can set the watchdog output values to be different from the power-up
output values. Some system applications do not differentiate between
power-up output values and watchdog output values, whereas other
applications treat the two conditions differently. The FP-1600 supports
both types of applications.
4
By default, the watchdog timer for the bank is disabled on power up. T o use
the watchdog timer, use the FieldPoint Explorer software to set up the
following parameters.
• Watchdog data value for each channel
• Watchdog data enable/disable status for each channel
• Watchdog enabled/disabled status for each I/O module
• Watchdog timeout value for the bank
Note
Each bank has only one watchdog timeout value that is common for all the modules
in that bank. In addition, the current watchdog timeout value is not stored when you store
the SnapShot.
© National Instruments Corporation 4-1 FieldPoint FP-1600 User Manual
Page 44

Chapter 4 Feature Set Description
SnapShot Feature
Many applications require that, on startup, the system’s I/O modules power
up with user-specified configuration and output levels rather than factory
default settings. The SnapShot feature provides you with a single-step
method to store the current state of your FieldPoint bank for use as the
power-up state of the bank.
If you subsequently enable the SnapShot feature, you can ensure that your
system powers up with the configuration and output levels that you
specified when storing the SnapShot.
Before you store the SnapShot, bring all the channels to the desired
power-up settings. You can use the FieldPoint Explorer software to change
the configuration of the FieldPoint bank, and then store the SnapShot. The
SnapShot stores all the following information in a single step:
• Attribute and range settings of each channel.
• Output values of each channel.
• Watchdog data values of each channel. See the Network Watchdog
• Watchdog data enabled (or disabled) status for each channel. See the
• Watchdog enabled (or disabled) status of each module. See the
Timer section in this chapter for more information.
Network Watchdog Timer section in this chapter for more information.
Network Watchdog Timer section in this chapter for more information.
After you store the SnapShot information, you can still choose whether the
FP-1600 uses that stored information during future power-ups. Enable the
SnapShot feature if you want the FieldPoint bank to power up with the
stored SnapShot information.
If you have enabled the SnapShot feature, the FP-1600 restores the stored
settings to all I/O modules and channels in the bank every time you power
up until you disable the SnapShot feature. If the SnapShot feature is
disabled, the FieldPoint bank powers up with factory-default settings.
At some time you might want to change the stored SnapShot information.
To make incremental changes in the stored SnapShot information, use the
features described in the next section, Programmable Power-Up State.
Note
The current watchdog timeout value for the FieldPoint bank is not saved when you
store the SnapShot.
FieldPoint FP-1600 User Manual 4-2 www.natinst.com
Page 45

Note The SnapShot feature inherently requires that the entire FieldPoint bank be at your
desired power-up state, since when you store the SnapShot information, the current settings
of the entire bank are stored for use at future power-ups.
Programmable Power-Up State
The SnapShot feature described in the SnapShot section provides you with
a single-step method to store the current state of the FieldPoint bank for use
as the power-up state. The FP-1600 provides an alternative method to
define power-up states that allows you to store the SnapShot information
with more flexibility.
The Programmable Power-Up State feature enables you to define the
power-up configuration on a module-b y-module basis. In addition, you do
not need to actually set any of the channels to the desired power-up state.
You can therefore define the power-up states regardless of the current
settings of any channel of a module.
Optionally, you can utilize the Programmable Power-Up State feature
to incrementally modify previously stored SnapShot information.
If you subsequently enable the SnapShot feature, you can ensure that
your system powers up with the configuration and output levels that you
specified when storing the Programmable Power-Up States.
Chapter 4 Feature Set Description
You can use the FieldPoint Explorer software to use the Programmable
Power-Up State feature to individually store the following information.
• Attribute and range settings of each channel.
• Output values of each channel.
• Watchdog data value of each channel. See the Network Watchdog
Timer section in this chapter for more information.
• Watchdog data enabled (or disabled) status for each channel. Refer
to the Network Watchdog Timer section in this chapter for more
information.
• Watchdog timer enabled (or disabled) status of each module. Refer
to the Network Watchdog Timer section in this chapter for more
information.
• Power-up watchdog timeout value for the FieldPoint bank.
• The turn-around delay for each module.
© National Instruments Corporation 4-3 FieldPoint FP-1600 User Manual
Page 46

Chapter 4 Feature Set Description
• The hot-swap reporting mode for the FieldPoint stack. Refer to the
next section, HotPnP (Hot Plug and Play), for more information on
the hot-swap reporting mode.
If you have enabled the SnapShot feature, the FP-1600 restores your
desired settings to all I/O modules and channels in the bank every time you
power up, until you disable the SnapShot feature.
HotPnP (Hot Plug and Play)
The HotPnP feature simplifies system installation, configuration, and
maintenance. With the HotPnP feature, you can remove or insert I/O
modules into the FieldPoint terminal bases while power is on, even if the
system is already engaged in network activity. You do not need to power
down the entire system or even a bank to insert, remove, or replace I/O
modules. In addition, you do not need to change the operation of the host
computer or software to use the HotPnP feature.
When you insert an I/O module with the power on, it is automatically
recognized, configured, and made available on the network. The follo wing
sections describe how the HotPnP feature works under different conditions.
Note
Do not add or remove terminal bases while power is applied to the bank. An I/O
module can be hot-inserted only if an empty terminal base is already av ailable in the bank.
HotPnP During Power-Up
On power-up, the FP-1600 automatically uploads an electronic data sheet
(EDS) from each I/O module in its bank. The FP-1600 then configures each
I/O module in the bank to factory default settings in the module’s EDS, or
in the stored SnapShot settings if the SnapShot feature is enabled.
HotPnP During Operation
You might need to insert or replace one or more I/O modules in a bank
while your system is operational (power is on and the network may or may
not be active).
While one or more new or replacement I/O modules in a bank are being
serviced by the HotPnP feature, the other I/O modules in the bank remain
fully operational and accessible on the network without any interruptions.
As soon as the FP-1600 configures the new or replacement I/O module
through the HotPnP service, that I/O module becomes automatically
accessible on the network.
FieldPoint FP-1600 User Manual 4-4 www.natinst.com
Page 47

Chapter 4 Feature Set Description
Inserting New I/O Modules
When a new I/O module is inserted, the FP-1600 automatically uploads
the EDS and configures the I/O module to factory default settings in the
module’s EDS, or to stored SnapShot settings if the SnapShot feature is
enabled. This configuration is accomplished without any intervention from
the host computer or software.
Replacing I/O Modules
When an I/O module is removed, the FP-1600 does not undertake any
special course of action for the bank. The host computer (or the software
executing on it) could be unaware that the I/O module is missing, and might
continue to send commands to the missing I/O module. Each command
returns an error response, but the FP-1600 remembers the commands sent
to the missing I/O module.
When a new I/O module is connected in place of the one that w as removed,
the FP-1600 first verifies that the replacement I/O module is compatible
with the one that was removed. If the I/O module is the same as, or is
compatible with, the one removed, the FP-1600 configures the replacement
I/O module with its predecessor’s configuration and output value settings.
It also applies the effects of any commands sent by the host computer while
the I/O module was missing.
If the replacement module is incompatible with the one that was removed,
the FP-1600 looks at the information stored in the SnapShot. If the
SnapShot is enabled and the replacement module is compatible with the
information in the SnapShot, the FP-1600 configures the replacement
module with the SnapShot configuration. Otherwise, the FP-1600
configures the replacement module to factory default settings.
Table 4-1 shows how modules are configured after HotPnP replacement.
Table 4-1.
SnapShot
Feature
Enabled/Disabled Compatible with the removed
Disabled Incompatible with the removed
© National Instruments Corporation 4-5 FieldPoint FP-1600 User Manual
Module Configuration Results After HotPnP Replacement
Replacement
Module
module
module
Configuration After HotPnP
Same as the configuration of the
removed module
Factory default configuration of
replacement module
Replacement Module
Page 48

Chapter 4 Feature Set Description
Table 4-1.
SnapShot
Feature
Enabled Incompatible with the removed
Enabled/Disabled Incompatible with the removed
Module Configuration Results After HotPnP Replacement (Continued)
Replacement
Module
module but compatible with the
SnapShot information
module and incompatible with the
stored SnapShot information
Power-On Self Test (POST)
The power-on self test (POST) is a test suite that the FP-1600 runs at power
up to verify its own operational status. The test takes several seconds. The
test is non-invasive and therefore does not affect the operation of the
network, nor does it affect any of your field wiring connected to the
terminal bases in the bank.
If the self-test suite fails, the FP-1600 does not participate in the network
communication traffic, eliminating potential conflicts with the other banks
in your network.
Replacement Module
Configuration After HotPnP
Same as the configuration stored in
the SnapShot
Factory default configuration of
replacement module
The FP-1600 indicates POST failure through the POWER and STATUS
LEDs. Refer to the section LED Indicators in Appendix B,
Troubleshooting, for more information.
FieldPoint FP-1600 User Manual 4-6 www.natinst.com
Page 49

Resetting the FP-1600
It is possible to configure the Ethernet settings of the FP-1600 so that the
device cannot communicate with the network. When you configure the
device, it attempts to confirm that the new settings are valid. However, if
the configuration process is interrupted or the FP-1600 is moved to a new
network with different settings, the device might not be able to
communicate with the network. If this occurs, you can manually reset the
unit to its factory settings.
When you reset the unit, the following actions occur:
• The IP address, subnet mask, DNS server IP, gateway IP, and time
server IP are set to
• The normal I/O services are suspended until the FP-1600 is
reconfigured.
• The device will appear as
Network Devices list.
• The device’s watchdog settings, powerup values, and channel
configurations will be lost.
0.0.0.0.
A
Unconfigured in FieldPoint Explorer’s
Follow these instructions to reset the unit:
1. Power down the FP-1600 and remove it from the bank.
2. Locate the slot on the bottom of the FP-1600 just above the label.
Inside the slot, find the red reset switch, shown in Figure A-1.
© National Instruments Corporation A-1 FieldPoint FP-1600 User Manual
Page 50

Appendix A Resetting the FP-1600
Reset Switch
Made in the USA
MODEL:
P/N:
S/N:
FP-1600
185690A-01
ABCD12
Normal Reset
Figure A-1. FP-1600 Reset Switch
3. Looking at the FP-1600 so that the label is upright, as shown in
Figure A-1, use a pen or a small screwdriver to move the reset switch
to the right.
4. Power up the FP-1600 and wait for the red STATUS LED to flash.
When the LED flashes, the FP-1600 is in reset mode.
5. Power down the FP-1600 and move the reset switch back to the left.
6. Reattach the FP-1600 to the rail or panel.
7. Power up the FP-1600.
The following tips should help you avoid having to manually reset the
module:
• When you configure the FP-1600, wait for the message
module’s configuration was confirmed
. If this message does
The
not appear, the FP-1600 might not be properly configured.
FieldPoint FP-1600 User Manual A-2 www.natinst.com
Page 51

Appendix A Resetting the FP-1600
• Do not power off the module while the green PROCESS LED is on.
This LED indicates that the FP-1600 is updating its configuration or
receiving a firmware upgrade. If power is lost while the PROCESS
LED is on, the configuration settings could be lost.
• Use FieldPoint Explorer to reset the FP-1600 before moving it to a new
network or subnet. If you do not reset the FP-1600, the device might
be unable to communicate with the new network. T o reset the FP-1600,
from the FP-1600 Properties window, click on Reset Module. This
resets the FP-1600 to the factory settings. When you click on this
button, the module returns to an unconfigured state. You must
reconfigure the module before you can use it again.
Note You should not need to select Reset Module unless you want to reset the device and
put it in storage.
© National Instruments Corporation A-3 FieldPoint FP-1600 User Manual
Page 52

Troubleshooting
Editing HOSTS Files
If you want to give the FP-1600 a hostname, and your network does not
have a DNS server, you need to set up the
computer. A
when no DNS server is available. Each computer on the network that needs
to access the FP-1600 should have a properly configured
Under Windows NT 4.0
1. Log on as an administrator to the local machine (not onto a domain).
2. Create a file called
system32\drivers\etc directory of the system root, for example:
c:\winnt\system32\drivers\etc\hosts
3. The file should include the following lines:
127.0.0.1 localhost
12.34.56.78 hostname
where
is the IP address of your FP-1600.
B
HOSTS files on each networked
HOSTS file allows a networked computer to use hostnames
HOSTS file.
hosts. This file has to be placed in the
hostname
is the hostname of your FP-1600 and
12.34.56.78
Under Windows 95/98
1. Create a file called hosts. This file has to be placed in the windows
directory, for example
2. The file should include the following lines:
127.0.0.1 localhost
12.34.56.78 fp
fp
where
IP address of the FP-1600.
© National Instruments Corporation B-1 FieldPoint FP-1600 User Manual
is the hostname of the FP-1600 and
c:\windows\hosts
12.34.56.78
is the
Page 53

Appendix B Troubleshooting
Configure the Device with the Network Device Configurator
Follow these steps to set up the FP-1600 with the Network Device
Configurator:
1. Install, connect, and power up the FP-1600, if you have not done so
already. Make sure you write down the serial number printed on the
back of the unit.
2. Connect a computer to the Ethernet. Y ou will use this computer to
configure the device. The computer must be running Windows 98,
Windo ws 95, or Windows NT. It must be attached to the same physical
network segment as the FP-1600 that you want to configure and
properly configured for Ethernet communication.
3. Run the Network Device Configurator,
networked computer . The Network Devices windo w appears. You can
also use the FieldPoint Explorer to configure the device. Refer to
Chapter 3, Hardware and Software Configuration, for more
information about how to configure your computer with the FieldPoint
Explorer.
FPCONFIG.EXE, on your
Viewing and Editing the FP-1600 TCP/IP settings
To view the TCP/IP settings for an FP-1600 from within FieldPoint
Explorer, right-click on the Comm Resource which contains the FP-1600.
Select Edit this comm resource from the pop-up menu. Click on the
Browse button in the Comm Resource dialog. From the Network Devices
dialog box, select the FP-1600 whose settings you would like to view, and
click on Device Properties. When you are done editing/viewing the
settings, click on OK. Click on Cancel to discard any changes you have
made.
FieldPoint FP-1600 User Manual B-2 www.natinst.com
Page 54

Appendix B Troubleshooting
Configuration Troubleshooting
Problem An error occurs when clicking the Browse button in the Comm Resource
Configuration dialog box.
Possible causes
and solutions
Problem The FP-1600 does not appear in the Network Devices dialog when browsing.
Possible causes
and solutions
• Your Ethernet adapter is not installed properly. To install your Ethernet
adapter, open the Network control panel by selecting Settings»Control
Panel from the Start menu and double-clicking on Network. Your
Ethernet adapter should appear in the list of installed components. If it does
not appear, reinstall the software that came with your Ethernet adapter. If
you do not have this software, contact the Ethernet adapter manufacturer.
• Y our Ethernet adapter is installed, but TCP/IP protocol is not. TCP/IP is the
network protocol used to communicate over Ethernet to the FP-1600. Open
the Network control panel by selecting Settings»Control Panel from the
Start menu and double-clicking on Network. TCP/IP should appear in the
list of installed network components. If it does not appear, select Protocol
from the Network Component Type dialog box and click on Add. In the
Select Network Protocol dialog box that appears, select Microsoft as the
manufacturer and TCP/IP from the Network protocol list. Click on OK.
You may need the Microsoft Windows NT/98/95 disks or CD-ROM that
came with your computer, and you may hav e to restart your computer after
closing the Network control panel.
• Confirm that there is power to the module, and that both the FP-1600 and
the computer are properly connected the Ethernet network. The FP-1600
Power and Link LED indicators should be lit. When you click on Browse,
the Tx and Rx LEDs on the FP-1600 should flash to indicate that
communications are taking place.
• Certain network devices, such as switches and routers, may filter out the
directed UDP broadcast packets which FieldPoint Explorer uses to
communicate with unconfigured FP-1600s, even if they are on the same
subnet as the computer running FieldPoint Explorer. You can test this by
connecting the computer running FieldPoint Explorer and the FP-1600
directly to a simple Ethernet hub. If the FP-1600 appears in the Network
Devices window using this configuration, but not when connected to the
larger network, it is likely that there is a problem of this type. Consult your
network administrator.
• The module may have been configured on another network and then moved
to the current network. Refer to Appendix A, Resetting the FP-1600, for
instructions on resetting the FP-1600.
© National Instruments Corporation B-3 FieldPoint FP-1600 User Manual
Page 55

Appendix B Troubleshooting
Problem An error occurs when configuring the module from the FP-1600 Properties
dialog box.
Possible causes
and solutions
Make sure you are entering valid values for all network parameters. If the
subnet mask or IP address is not compatible with the network settings, an error
is returned and the FP-1600 will not be configured.
Problem The FP-1600 returns invalid time-stamp values.
Possible causes
and solutions
• Make sure that the IP address for the computer running National
Instruments Time Service is correctly configured for the FP-1600.
• Make sure that National Instruments Time Service was installed on the
desired machine and is running. If Time Service is installed but is not
running, restart it.
– Under Windows 98/95—Open an MS-DOS pro mpt and enter
c:\windows\system\timeservice -start
– Under Windows NT—Open a Command Prompt and enter
c:\winnt\system32\timeservice -start
• If Time Service is not installed, refer to Chapter 2, Hardware and Software
Installation, for instructions on installing the FieldPoint software, which
includes Time Services.
FieldPoint FP-1600 User Manual B-4 www.natinst.com
Page 56

LED Indicators
Appendix B Troubleshooting
The FP-1600 has seven LED indicators: POWER, PROCESS, STATUS,
TX, RX, 100 Mbps, and LINK. Figure B-1 shows the LEDs on the
FP-1600.
Power
Process
Status
Tx
Rx
100 Mbps
Link
Power
Process
Status
Tx
Rx
100 Mbps
Link
Ethernet Status Indicators
FieldPoint Bank Status Indicators
Figure B-1.
LEDs on the FP-1600
The green POWER LED is lit while the FP-1600 is powered up. This LED
indicates that the power supply connected to the FP-1600 is acceptable, and
that the FP-1600 is supplying power to the I/O modules.
The red STATUS LED is lit when the FP-1600 detects an error. The
FP-1600 indicates specific error conditions by flashing STATUS a specif ic
number of times. Table B-1 describes the STATUS LED flashing
sequences and the corresponding error condition.
The green PROCESS LED lights when you update the non-volatile flash
memory of the FP-1600, either by changing its network settings, saving
channel settings or power-up values, or by upgrading its firmware.
Caution
Do not power down the FP-1600 while the PROCESS LED is lit.
The green TX LED is lit when the FP-1600 transmits data over the
Ethernet.
© National Instruments Corporation B-5 FieldPoint FP-1600 User Manual
Page 57

Appendix B Troubleshooting
The green RX LED is lit when the FP-1600 receives data from the Ethernet.
Because of unrelated network traffic, this LED blinks occasionally even
when the FP-1600 is inactive.
The yellow 100 Mbps LED is lit when the FP-1600 is communicating at
100 megabits per second. If the 100 Mbps LED does not light, all
communications with the FP-1600 will be at 10 megabits per second.
The green LINK LED is lit when the FP-1600 is connected to an active
Ethernet segment.
Table B-1. STATUS LED Flashes and Corresponding Error Conditions
Number
of Flashes
Error Condition
0 (stays lit) The FP-1600 has not been configured with a proper IP
address. Refer to Chapter 3, Hardware and Software
Configuration, for more information.
1 The FP-1600 is in Reset mode. Switch the FP-1600
back to Normal mode by powering do wn the device and
sliding the switch underneath the unit away from the
I/O modules. Restore power and configure the module.
Refer to Appendix A, Resetting the FP-1600, for more
information.
2 The FP-1600 has detected an error in its firmware. This
usually occurs when an attempt to upgrade the firmware
is interrupted. Repeat the firmware upgrade process.
3 The FP-1600 cannot communicate with the Time
Service. Be sure that the Time Service is running on the
computer that you specified when you configured the
FP-1600. Refer to the section Configure Your
Hardware with FieldPoint Explorer in Chapter 3,
Hardware and Software Configuration.
4 (or more) The FP-1600 has detected an unrecoverable error.
Contact National Instruments for more information of
finding the cause of this error.
FieldPoint FP-1600 User Manual B-6 www.natinst.com
Page 58

Specifications
This appendix describes the specifications of the FP-1600 network module.
All FieldPoint network modules undergo extensive testing for operating
under rugged environmental conditions that exist in industrial applications.
FieldPoint network modules are designed and tested for immunity and
susceptibility, as well as for emissions.
Network
Network interface...................................10BaseT and 100BaseTX
Compatibility .........................................IEEE802.3
Communication rates .............................10 Mbps, 100 Mbps,
Cabling distance.....................................100 m
C
Ethernet
autonegotiated
Power supply range................................11 to 30 VDC
Power consumption................................7 watts + 1.15 * ∑(I/O Module
Consumption)
Maximum terminal bases per bank........9
Maximum number of banks...................determined by network topology
Environment
Operating temperature............................–20 to +55 °C
Storage temperature ...............................–55 to +85 °C
Relative humidity...................................5% to 90% noncondensing
© National Instruments Corporation C-1 FieldPoint FP-1600 User Manual
Page 59

Appendix C Specifications
Compliance
Electrical safety ......................................designed to meet IEC 1010
EMI emissions/immunity .......................CISPR 11
FieldPoint FP-1600 User Manual C-2 www.natinst.com
Page 60

Technical Support Resources
This appendix describes the comprehensive resources available to you in
the Technical Support section of the National Instruments Web site and
provides technical support telephone numbers for you to use if you have
trouble connecting to our Web site or if you do not have internet access.
NI Web Support
To provide you with immediate answers and solutions 24 hours a day,
365 days a year, National Instruments maintains extensi ve online technical
support resources. They are available to you at no cost, are updated daily,
and can be found in the Technical Support section of our Web site at
www.natinst.com/support.
Online Problem-Solving and Diagnostic Resources
• KnowledgeBase—A searchable database containing thousands of
frequently asked questions (F A Qs) and their corresponding answers or
solutions, including special sections devoted to our newest products.
The database is updated daily in response to new customer experiences
and feedback.
• Troubleshooting Wizards—Step-by-step guides lead you through
common problems and answer questions about our entire product line.
Wizards include screen shots that illustrate the steps being described
and provide detailed information ranging from simple getting started
instructions to advanced topics.
• Product Manuals—A comprehensive, searchable library of the latest
editions of National Instruments hardware and software product
manuals.
• Hardware Reference Database—A searchable database containing
brief hardware descriptions, mechanical drawings, and helpful images
of jumper settings and connector pinouts.
• Application Notes—A library with more than 100 short papers
addressing specific topics such as creating and calling DLLs,
developing your own instrument driver software, and porting
applications between platforms and operating systems.
D
© National Instruments Corporation D-1 FieldPoint FP-1600 User Manual
Page 61

Appendix D Technical Support Resources
Software-Related Resources
• Instrument Driver Network—A library with hundreds of instrument
drivers for control of standalone instruments via GPIB, VXI, or serial
interfaces. You also can submit a request for a particular instrument
driver if it does not already appear in the library.
• Example Programs Database—A database with numerous,
non-shipping example programs for National Instruments
programming environments. You can use them to complement the
example programs that are already included with National Instruments
products.
• Software Library—A library with updates and patches to application
software, links to the latest versions of driver software for National
Instruments hardware products, and utility routines.
Worldwide Support
National Instruments has offices located around the globe. Many branch
offices maintain a Web site to provide information on local services. You
can access these Web sites from
www.natinst.com/worldwide.
If you have trouble connecting to our Web site, please contact your local
National Instruments office or the source from which you purchased your
National Instruments product(s) to obtain support.
For telephone support in the United States, dial 512 795 8248. For
telephone support outside the United States, contact your local branch
office:
Australia 03 9879 5166, Austria 0662 45 79 90 0, Belgium 02 757 00 20,
Brazil 011 284 5011, Canada (Ontario) 905 785 0085,
Canada (Québec) 514 694 8521, China 0755 3904939,
Denmark 45 76 26 00, Finland 09 725 7 25 11, France 01 48 14 24 24,
Germany 089 741 31 30, Hong Kong 2645 3186, India 91805275406,
Israel 03 6120092, Italy 02 413091, Japan 03 5472 2970,
Korea 02 596 7456, Mexico (D.F.) 5 280 7625,
Mexico (Monterrey) 8 357 7695, Netherlands 0348 433466,
Norway 32 27 73 00, Singapore 2265886, Spain (Madrid) 91 640 0085,
Spain (Barcelona) 93 582 0251, Sweden 08 587 895 00,
Switzerland 056 200 51 51, Taiwan 02 2377 1200,
United Kingdom 01635 523545
FieldPoint FP-1600 User Manual D-2 www.natinst.com
Page 62

Glossary
Prefix Meaning Value
m- milli- 10
k- kilo- 10
M- mega- 10
% percent
° degrees
0x precedes a hexadecimal number
Ω ohms
bbits
Bbytes
bank The combination of one FieldPoint network module and one or more
terminal bases and I/O modules
–3
3
6
bps bits per second
C celsius
CISPR International Special Committee On Radio Interference
DNS domain name system
EDS electronic data sheet
EMI electromagnetic interference
FTP file transfer protocol
HotPnP Hot Plug and Play
IEC International Electrotechnical Commission
I/O input/output
LED Light-emitting diode
m meter
OPC OLE for Process Control
© National Instruments Corporation G-1 FieldPoint FP-1600 User Manual
Page 63

Glossary
POST power-on self test
PPP point-to-point protocol
SLIP serial line internet protocol
VVolts
VDC Volts direct current
FieldPoint FP-1600 User Manual G-2 www.natinst.com
Page 64

Index
Numbers
100 Mbps LED, B-6
B
BridgeVIEW server
overview, 1-3
using with FP-1600, 3-13 to 3-14
C
cabling, 2-7 to 2-8
Ethernet cable pinouts (figure), 2-8
Ethernet connections (table), 2-7
calculating power for FieldPoint bank, 2-9
compliance specifications, C-2
configuration, 3-1 to 3-13. See also HotPnP
(Hot Plug and Play).
getting assistance, 3-1 to 3-13
ScreenTips, 3-2 to 3-3
ToolTips, 3-1 to 3-12
resetting FP-1600 to factory configuration,
A-1 to A-3
troubleshooting, B-3 to B-4
using FieldPoint Explorer, 3-3 to 3-13
Ethernet parameters, 3-6 to 3-8
finding and configuring devices,
3-10 to 3-13
getting started, 3-3 to 3-6
IP address, 3-7 to 3-8
setting properties, 3-9
using Network Device Configurator, B-2
connecting FP-1600 to network, 2-6 to 2-7
connecting terminal bases
DIN rail mount, 2-2 to 2-3
panel mount, 2-4 to 2-5
D
diagnostic resources, online, D-1
DIN rail mount. See mounting on DIN rail.
documentation
conventions used in manual, x
how to use manual set, ix
related documentation, x
E
editing HOSTS files, B-1
environment specifications, C-1
Ethernet network
cable length (note), 2-6
cable pinouts (figure), 2-8
cable wiring connections (table), 2-7
configuration parameters, 3-6 to 3-7
DNS Server IP, 3-7
Gateway IP, 3-7
IP address, 3-6, 3-7
Subnet mask, 3-6
Time Server IP, 3-7, 3-8
connecting FP-1600 to network, 2-6 to 2-7
finding network settings, 3-8
IP address selection
networks with network
administrator, 3-7
networks without network
administrator, 3-7
setup (figure), 1-2
F
FieldPoint Explorer Configuration Utility,
3-3to3-13
Channel Configuration dialog box
(figure), 3-11
© National Instruments Corporation I-1 FieldPoint FP-1600 User Manual
Page 65

Index
Comm Resource Configuration dialog
box (figure), 3-5
Device Properties window (figure), 3-9
Ethernet parameters, 3-6 to 3-8
finding and configuring devices,
3-10 to 3-13
getting started, 3-3 to 3-6
IP address, 3-7 to 3-8
Network Devices window (figure), 3-6
overview, 1-3
ScreenTips, 3-2 to 3-3
setting FP-1600 properties, 3-9
setting properties, 3-9
ToolTips, 3-1 to 3-12
window (figure), 3-4
FieldPoint software
BridgeVIEW server, 1-3, 3-13 to 3-14
installation, 2-10
LabVIEW VIs, 1-3, 3-16 to 3-18
LabWindows/CVI functions, 1-3, 3-18
Lookout software, 3-15 to 3-16
OPC server, 1-4, 3-19 to 3-20
overview, 1-2 to 1-4
finding and configuring devices, 3-10 to 3-13
FP-1600 hardware
configuration, 3-1 to 3-13
getting assistance, 3-1 to 3-13
resetting FP-1600 to factory
configuration, A-1 to A-3
troubleshooting, B-3 to B-4
using FieldPoint Explorer,
3-3to3-13
using Network Device
Configurator, B-2
Ethernet network setup (figure), 1-2
high-speed local bus, 4-1
HotPnP (Hot Plug and Play), 4-4 to 4-6
installation
cabling, 2-7 to 2-8
connecting FP-1600 to network,
2-6to2-7
mounting I/O modules onto terminal
bases, 2-5 to 2-6
mounting on DIN rail, 2-1 to 2-3
mounting to panel, 2-3 to 2-4
power connection, 2-8 to 2-9
powering on the FP-1600, 2-10
serial number information (note), 2-1
network watchdog timer, 4-1
overview, 1-1 to 1-2
power-on self test (POST), 2-10, 4-6
programmable power-up state, 4-3 to 4-4
resetting to factory configuration,
A-1toA-3
SnapShot feature, 4-2 to 4-3
troubleshooting
configuration troubleshooting,
B-3 to B-4
editing HOSTS files, B-1
LED indicators, B-5 to B-6
using Network Device
Configurator, B-2
viewing and editing FP-1600 TCP/IP
settings, B-2
using with other applications,
3-13 to 3-20
FieldPoint BridgeVIEW server,
3-13 to 3-14
FieldPoint OPC server, 3-19 to 3-20
LabVIEW VIs, 3-16 to 3-18
LabWindows/CVI functions, 3-18
Lookout, 3-15 to 3-16
H
hardware. See FP-1600 hardware.
high-speed local bus, 4-1
HOSTS files, editing, B-1
under Windows 95/98, B-1
under Windows NT 4.0, B-1
HotPnP (Hot Plug and Play), 4-4 to 4-6
inserting new I/O modules, 4-5
FieldPoint FP-1600 User Manual I-2 www.natinst.com
Page 66

Index
module configuration after HotPnP
replacement (table), 4-5 to 4-6
during operation, 4-4
during power-up, 4-4
replacing I/O modules, 4-5
I
installation, 2-1 to 2-10. See also HotPnP (Hot
Plug and Play).
cabling, 2-7 to 2-8
Ethernet cable pinouts (figure), 2-8
Ethernet connections (table), 2-7
connecting FP-1600 to network,
2-6to2-7
mounting I/O modules onto terminal
bases, 2-5 to 2-6
mounting on DIN rail, 2-1 to 2-3
connecting terminal bases, 2-2 to 2-3
procedure, 2-1 to 2-2
removing FP-1600 and terminal
bases, 2-3
mounting to panel, 2-3 to 2-4
connecting terminal bases, 2-4 to 2-5
procedure, 2-3 to 2-4
removing FP-1600 and terminal
bases, 2-5
power connection, 2-8 to 2-9
calculating power for FieldPoint
bank, 2-9
power connector pinout (figure), 2-9
powering on the FP-1600, 2-10
serial number information (note), 2-1
software installation, 2-10
I/O modules
inserting new, 4-5
mounting onto terminal bases, 2-5 to 2-6
replacing, 4-5
IP addresses. See Ethernet network.
ipcfg utility, 3-8
L
LabVIEW VIs
diagram for example application
(figure), 3-18
overview, 1-3
using with FP-1600, 3-16 to 3-18
LabWindows/CVI functions
overview, 1-3
using with FP-1600, 3-18
LED indicators
description, B-5 to B-6
location on FP-1600 (figure), B-5
STATUS LED flashes and corresponding
error conditions (table), B-6
LINK LED, B-6
local bus, high-speed, 4-1
Lookout software, 3-15 to 3-16
accessing data (figure), 3-16
using with FP-1600, 3-15
M
manual. See documentation.
100 Mbps LED, B-6
mounting I/O modules onto terminal bases,
2-5to2-6
mounting on DIN rail, 2-1 to 2-3
connecting terminal bases, 2-2 to 2-3
procedure, 2-1 to 2-2
removing FP-1600 and terminal
bases, 2-3
mounting to panel, 2-3 to 2-4
connecting terminal bases, 2-4 to 2-5
procedure, 2-3 to 2-4
removing FP-1600 and terminal
bases, 2-5
© National Instruments Corporation I-3 FieldPoint FP-1600 User Manual
Page 67

Index
N
National Instruments Web support, D-1 to D-2
Network Device Configurator, B-2
networks. See also Ethernet network.
specifications, C-1
watchdog timer, 4-1
O
Object Linking and Embedding for Process
Control (OPC) server. See OPC server.
online problem-solving and diagnostic
resources, D-1
OPC server
overview, 1-4
using with FP-1600, 3-19 to 3-20
P
panel mount. See mounting to panel.
Plug and Play. See HotPnP (Hot Plug and
Play).
power connection, 2-8 to 2-9
calculating power for FieldPoint
bank, 2-9
power connector pinout (figure), 2-9
POWER LED, B-5
powering on the FP-1600
HotPnP during, 4-4
procedure for, 2-10
power-on self test (POST), 2-10, 4-6
power-up state, programmable, 4-3 to 4-4
problem solving. See troubleshooting.
PROCESS LED, B-5
R
removing FP-1600 and terminal bases
DIN rail mount, 2-3
panel mount, 2-5
resetting FP-1600 to factory configuration,
A-1 to A-3
RX LED, B-6
S
ScreenTips, 3-2 to 3-3
serial number information (note), 2-1
SnapShot feature, 4-2 to 4-3
software. See FieldPoint software.
software-related resources, D-2
specifications
compliance, C-2
environment, C-1
network, C-1
STATUS LED
flashes and corresponding error
conditions (table), B-6
overview, B-5
T
TCP/IP settings, viewing and editing, B-2
technical support resources, D-1 to D-2
terminal base connections
DIN rail mount, 2-2 to 2-3
I/O module, 2-5 to 2-6
panel mount, 2-4 to 2-5
ToolTips, 3-1 to 3-12
troubleshooting
configuration troubleshooting, B-3 to B-4
editing HOSTS files, B-1
LED indicators, B-5 to B-6
problem-solving and diagnostic
resources, online, D-1
using Network Device Configurator, B-2
viewing and editing FP-1600 TCP/IP
settings, B-2
TX LED, B-5
FieldPoint FP-1600 User Manual I-4 www.natinst.com
Page 68

W
watchdog timer, 4-1
Web support from National Instruments,
D-1 to D-2
online problem-solving and diagnostic
resources, D-1
software-related resources, D-2
winipcfg utility, 3-8
Worldwide technical support, D-2
Index
© National Instruments Corporation I-5 FieldPoint FP-1600 User Manual
 Loading...