

Page 1

ER-8/16
User Manual
An 8-Channel or 16-Channel SPDT Relay Accessory
for Data Acquisition Boards
December 1996 Edition
Part Number 371197A-01
© Copyright 1995, 1996 National Instruments Corporation.
All Rights Reserved.
Page 2

National Instruments Corporate Headquarters
6504 Bridge Point Parkway
Austin, TX 78730-5039
(512) 794-0100
Technical support fax: (800) 328-2203
(512) 794-5678
Branch Offices:
Australia 03 9879 5166, Austria 0662 45 79 90 0, Belgium 02 757 00 20, Canada (Ontario) 905 785 0085,
Canada (Québec) 514 694 8521, Denmark 45 76 26 00, Finland 09 527 2321, France 01 48 14 24 24,
Germany 089 741 31 30, Hong Kong 2645 3186, Israel 03 5734815, Italy 02 413091, Japan 03 5472 2970,
Korea 02 596 7456, Mexico 5 520 2635, Netherlands 0348 433466, Norway 32 84 84 00, Singapore 2265886,
Spain 91 640 0085, Sweden 08 730 49 70, Switzerland 056 200 51 51, Taiwan 02 377 1200, U.K. 01635 523545
Page 3

Limited Warranty
The ER-8 or ER-16 is warranted against defects in materials and workmanship for a period of one year from the date
of shipment, as evidenced by receipts or other documentation. National Instruments will, at its option, repair or
replace equipment that proves to be defective during the warranty period. This warranty includes parts and labor.
The media on which you receive National Instruments software are warranted not to fail to execute programming
instructions, due to defects in materials and workmanship, for a period of 90 days from date of shipment, as
evidenced by receipts or other documentation. National Instruments will, at its option, repair or replace software
media that do not execute programming instructions if National Instruments receives notice of such defects during
the warranty period. National Instruments does not warrant that the operation of the software shall be uninterrupted
or error free.
A Return Material Authorization (RMA) number must be obtained from the factory and clearly marked on the
outside of the package before any equipment will be accepted for warranty work. National Instruments will pay the
shipping costs of returning to the owner parts which are covered by warranty.
National Instruments believes that the information in this manual is accurate. The document has been carefully
reviewed for technical accuracy. In the event that technical or typographical errors exist, National Instruments
reserves the right to make changes to subsequent editions of this document without prior notice to holders of this
edition. The reader should consult National Instruments if errors are suspected. In no event shall National
Instruments be liable for any damages arising out of or related to this document or the information contained in it.
EXCEPT AS SPECIFIED HEREIN, NATIONAL INSTRUMENTS MAKES NO WARRANTIES, EXPRESS OR IMPLIED,
AND SPECIFICALLY DISCLAIMS ANY WARRANTY OF MERCHANTABILITY OR FITNESS FOR A PARTICULAR
PURPOSE
OF
NATIONAL INSTRUMENTS WILL NOT BE LIABLE FOR DAMAGES RESULTING FROM LOSS OF DATA, PROFITS,
USE OF PRODUCTS, OR INCIDENTAL OR CONSEQUENTIAL DAMAGES, EVEN IF ADVISED OF THE POSSIBILITY
THEREOF
whether in contract or tort, including negligence. Any action against National Instruments must be brought within
one year after the cause of action accrues. National Instruments shall not be liable for any delay in performance due
to causes beyond its reasonable control. The warranty provided herein does not cover damages, defects,
malfunctions, or service failures caused by owner’s failure to follow the National Instruments installation, operation,
or maintenance instructions; owner’s modification of the product; owner’s abuse, misuse, or negligent acts; and
power failure or surges, fire, flood, accident, actions of third parties, or other events outside reasonable control.
. CUSTOMER’S RIGHT TO RECOVER DAMAGES CAUSED BY FAULT OR NEGLIGENCE ON THE PART
NATIONAL INSTRUMENTS SHALL BE LIMITED TO THE AMOUNT THERETOFORE PAID BY THE CUSTOMER.
. This limitation of the liability of National Instruments will apply regardless of the form of action,
Copyright
Under the copyright laws, this publication may not be reproduced or transmitted in any form, electronic or
mechanical, including photocopying, recording, storing in an information retrieval system, or translating, in whole or
in part, without the prior written consent of National Instruments Corporation.
Trademarks
LabVIEW
®
, NI-DAQ
Corporation.
Product and company names listed are trademarks or trade names of their respective companies.
®
, DAQCard
TM
DAQPad
,
TM
, and SCXI
TM
are trademarks of National Instruments
Page 4

WARNING REGARDING MEDICAL AND CLINICAL USE
OF NATIONAL INSTRUMENTS PRODUCTS
National Instruments products are not designed with components and testing intended to ensure a level of reliability
suitable for use in treatment and diagnosis of humans. Applications of National Instruments products involving
medical or clinical treatment can create a potential for accidental injury caused by product failure, or by errors on the
part of the user or application designer. Any use or application of National Instruments products for or involving
medical or clinical treatment must be performed by properly trained and qualified medical personnel, and all
traditional medical safeguards, equipment, and procedures that are appropriate in the particular situation to prevent
serious injury or death should always continue to be used when National Instruments products are being used.
National Instruments products are NOT intended to be a substitute for any form of established process, procedure, or
equipment used to monitor or safeguard human health and safety in medical or clinical treatment.
Page 5

Contents
About This Manual
Organization of This Manual.........................................................................................ix
Conventions Used in This Manual.................................................................................x
National Instruments Documentation ............................................................................xi
Customer Communication .............................................................................................xii
Chapter 1
Introduction
About the ER-8/16.........................................................................................................1-1
What You Need to Get Started ......................................................................................1-1
Optional Equipment.......................................................................................................1-2
Software .........................................................................................................................1-2
Unpacking......................................................................................................................1-2
..........................................................................................................................1-1
Chapter 2
Setup
........................................................................................................................................2-1
Safety Information .........................................................................................................2-4
Connecting the ER-8/16 to Your DAQ Device .............................................................2-5
Chapter 3
Signal Connections
Front Connectors............................................................................................................3-1
Using DIO-24 Devices.......................................................................................3-1
Using DIO-32 Boards ........................................................................................3-2
Power Supply.................................................................................................................3-2
Channel Connections .....................................................................................................3-3
Power-up Conditions..........................................................................................3-4
Wire Gauge ........................................................................................................3-4
Channel Isolation ...............................................................................................3-4
Contact Protection for Inductive Loads .............................................................3-4
Connecting Your Signal Lines.......................................................................................3-6
Internal Connectors........................................................................................................3-7
Daisy Chaining the ER-8/16..............................................................................3-8
Using the SC-205X Series with the ER-8......................................................................3-8
DAQ System Configurations with the ER-8/16.............................................................3-9
............................................................................................................ix
.............................................................................................................3-1
Chapter 4
Theory of Operation
Functional Overview......................................................................................................4-1
Digital Interface .............................................................................................................4-3
Relay Channels ..............................................................................................................4-3
© National Instruments Corporation v ER-8/16 User Manual
..........................................................................................................4-1
Page 6

Contents
Appendix A
Specifications
........................................................................................................................A-1
Appendix B
I/O Connectors
.....................................................................................................................B-1
Appendix C
Contact Protection
..............................................................................................................C-1
Appendix D
Takamisawa VE Series Relay Technical Data
.........................................................D-1
Appendix E
Customer Communication
...............................................................................................E-1
Glossary...................................................................................................................... Glossary-1
Index..................................................................................................................................Index-1
ER-8/16 User Manual vi © National Instruments Corporation
Page 7

Contents
Figures
Figure 2-1. ER-8/16 Parts Locator Diagram.........................................................................2-2
Figure 2-2. The ER-8/16 Front Connector............................................................................2-7
Figure 3-1. Contact Protection Using a Flyback Diode for DC Loads.................................3-5
Figure 3-2. Arc Suppressor Pad Locations for Channel 1....................................................3-6
Figure 3-3. ER-8/16 Configurations with DIO Devices.......................................................3-9
Figure 3-4. ER-8/16 Configurations with Multifunction DAQ Devices ..............................3-10
Figure 4-1. ER-8/16 Block Diagram.....................................................................................4-2
Figure 4-2. ER-8/16 Onboard Equivalent Circuit.................................................................4-3
Figure B-1. The DIO-24 Connector ......................................................................................B-1
Figure B-2. The DIO-32 Connector ......................................................................................B-3
Figure B-3. 26-Pin Internal Connectors ................................................................................B-5
Tables
Table 2-1. Parts Locator Diagram Descriptions..................................................................2-3
Table 3-1. Arc Suppressor Placement, COM to NO...........................................................3-5
Table 3-2. Arc Suppressor Placement, COM to NC ...........................................................3-6
Table B-1. DIO-24 Connector Pin Descriptions..................................................................B-2
Table B-2. DIO-32 Connector Pin Descriptions..................................................................B-4
Table B-3. 26-Pin IN Connector Pin Descriptions...............................................................B-5
Table B-4. 26-Pin OUT Connector Pin Descriptions...........................................................B-6
© National Instruments Corporation vii ER-8/16 User Manual
Page 8

About This Manual
This manual describes the electrical and mechanical aspects of the ER-8 and ER-16 and contains
information concerning their setup, operation, and safety. Both the ER-8 and ER-16 are singlepole double-throw (SPDT) relay accessories for use with other data acquisition (DAQ) products.
The ER-8 has eight channels; the ER-16 has 16 channels.
Throughout this manual, ER-8/16 refers to either the ER-8 or ER-16, unless otherwise noted.
The ER-8/16 interfaces to any National Instruments DAQ device with digital I/O capabilities for
the Macintosh and PC/XT/AT (AT Series, Lab) computers. More specifically, the National
Instruments product families that interface with the ER-8/16 are the DIO-24, DIO-32, Lab,
E Series, MIO, DAQCards, and 1200 Series devices.
This accessory is designed for low-cost control applications in laboratory testing, production
testing, and industrial process monitoring and control.
Organization of This Manual
The ER-8/16 User Manual is organized as follows:
• Chapter 1, Introduction, describes the ER-8/16; lists what you need to get started and
optional equipment; describes software support; and explains how to unpack the ER-8/16.
• Chapter 2, Setup, describes how to set up the ER-8/16.
• Chapter 3, Signal Connections, describes the signal connections, channel connections, and
digital interface to the ER-8/16.
• Chapter 4, Theory of Operation, contains a functional overview of the ER-8/16 and explains
the operation of each functional unit making up the ER-8/16.
• Appendix A, Specifications, lists the specifications of the ER-8/16.
• Appendix B, I/O Connectors, contains the connector pinouts and pin descriptions for the
ER-8/16.
• Appendix C, Contact Protection, contains technical data on contact protection when you are
switching inductive loads.
• Appendix D, Takamisawa VE Series Relay Technical Data, contains a manufacturer data
sheet for the relay used on the ER-8/16.
• Appendix E, Customer Communication, contains forms you can use to request help from
National Instruments or to comment on our products.
• The Glossary contains an alphabetical list and description of terms used in this manual,
including abbreviations, acronyms, metric prefixes, mnemonics, symbols, and terms.
© National Instruments Corporation ix ER-8/16 User Manual
Page 9

About This Manual
• The Index contains an alphabetical list of key terms and topics used in this manual, including
the page where each one can be found.
Conventions Used in This Manual
The following conventions are used in this manual:
bold Bold text denotes menu items, function panel items, and dialog box
buttons or options.
italic Italic text denotes emphasis, a cross reference, or an introduction to a
key concept.
bold italic Bold italic text denotes a note, caution, or warning.
< > Angle brackets containing numbers separated by an ellipsis represent a
range of values associated with a bit, signal name, or port (for example,
ACH<0..7> stands for ACH0 through ACH7).
device Device refers generically to National Instruments boards, cards, or
modules.
ER-8/16 ER-8/16 refers to the ER-8 or ER-16 unless otherwise noted.
DIO device DIO device refers to National Instruments digital I/O devices such as the
AT-DIO-32F, NB-DIO-24, NB-DIO-96, NB-DIO-32F, PC-DIO-24,
DAQCard-DIO-24, and PC-DIO-96, unless otherwise noted.
DIO-24 device DIO-24 device refers to the National Instruments NB-DIO-24,
DAQCard-DIO-24, and PC-DIO-24 digital I/O devices unless otherwise
noted.
DIO-32 board DIO-32 board refers to the National Instruments AT-DIO-32F and
NB-DIO-32F digital I/O boards unless otherwise noted.
DIO-type board DIO-type board refers to the National Instruments DIO boards with only
digital I/O capabilities. These boards include the DIO-24, DIO-32F, and
DIO-96 boards unless otherwise noted.
Lab board Lab board refers to the National Instruments Lab-LC, Lab-NB, Lab-PC,
and Lab-PC+ boards unless otherwise noted.
E Series device E Series device refers to National Instruments digital I/O devices such as
the AT-MIO-16E-2, AT-MIO-64E-3, AT-MIO-16E-10,
AT-MIO-16DE-10, AT-MIO-16XE-50, NEC-MIO-16E-4, and
NEC-AI-16XE-50, unless otherwise noted.
MIO board MIO board refers to National Instruments boards such as the
AT-MIO-16F-5, AT-MIO-16D, AT-MIO-64F-5, AT-MIO-16, and
AT-MIO-16X unless otherwise noted.
ER-8/16 User Manual x © National Instruments Corporation
Page 10

About this Manual
DAQCard DAQCard refers to National Instruments cards such as the
DAQCard-500 and DAQCard-700 unless otherwise noted.
1200 Series 1200 Series refers to the National Instruments DAQPad-1200 and
DAQCard-1200 unless otherwise noted.
NB NB refers to the NuBus Series computers.
NI-DAQ NI-DAQ is used in this manual to refer to the NI-DAQ software for
Macintosh and PC compatibles unless otherwise noted.
Macintosh Macintosh refers to all Macintosh II, Macintosh Quadra, and Macintosh
Centris computers except the Centris 610 unless otherwise noted.
PC PC refers to PC/XT/AT and IBM PS/2, models 25 and 30, computers.
Port A Port A is used in this manual to refer to port A or port 0 (as in your
NI-DAQ manuals).
Port B Port B is used in this manual to refer to port B or port 1 (as in your
NI-DAQ manuals).
Port C Port C is used in this manual to refer to port C or port 2 (as in your
NI-DAQ manuals).
Port D Port D is used in this manual to refer to port D or port 3 (as in your
NI-DAQ manuals).
Abbreviations, acronyms, metric prefixes, mnemonics, symbols, and terms are listed in the
Glossary.
National Instruments Documentation
The ER-8/16 User Manual is one piece of the documentation set for your DAQ system. You
could have any of several types of manuals, depending on the hardware and software in your
system. Use the different types of manuals you have as follows:
• Your DAQ hardware user manuals—These manuals have detailed information about the
DAQ hardware that plugs into or is connected to your computer. Use these manuals for
hardware installation and configuration instructions, specification information about your
DAQ hardware, and application hints.
• Software manuals—Examples of software manuals you may have are the LabVIEW and
LabWindows/CVI manual sets and the NI-DAQ manuals. After you set up your hardware
system, use either the application software (LabVIEW or LabWindows/CVI) manuals or the
NI-DAQ manuals to help you write your application. If you have a large and complicated
system, it is worthwhile to look through the software manuals before you configure your
hardware.
© National Instruments Corporation xi ER-8/16 User Manual
Page 11

About This Manual
• Accessory installation guides or manuals—If you are using accessory products, read the
terminal block and cable assembly installation guides or accessory device user manuals.
They explain how to physically connect the relevant pieces of the system. Consult these
guides when you are making your connections.
Customer Communication
National Instruments wants to receive your comments on our products and manuals. We are
interested in the applications you develop with our products, and we want to help if you have
problems with them. To make it easy for you to contact us, this manual contains comment and
configuration forms for you to complete. These forms are in Appendix E, Customer
Communication, at the end of this manual.
ER-8/16 User Manual xii © National Instruments Corporation
Page 12
Chapter 1 Introduction
This chapter describes the ER-8/16; lists what you need to get started and optional equipment;
describes software support; and explains how to unpack the ER-8/16.
About the ER-8/16
Thank you for buying the National Instruments ER-8/16. The ER-8 consists of eight isolated
single-pole double-throw (SPDT) or form C relay channels. The ER-16 consists of 16 isolated
SPDT or form C relay channels. The ER-8/16 can serve as a controller or switcher in laboratory
testing, production testing, and industrial-process monitoring and control applications. The
ER-8/16 operates with full functionality with most National Instruments digital I/O products. It
also interfaces with the Lab and MIO boards using the SC-205X Series cable adapters. The
ER-8/16 has onboard screw terminals for easy wire attachment. You can also build a 32-channel
ER system by daisy-chaining two ER-16s.
Detailed ER-8/16 specifications are in Appendix A, Specifications.
What You Need to Get Started
To set up and use your ER-8/16, you will need the following:
ER-8 or ER-16
ER-8/16 User Manual
Your DIO-24, DIO-32, Lab, E Series, MIO, DAQCard, or 1200 Series device and
documentation
SC-205X Series cable adapter if you are using a Lab or MIO board
Interface cable (different for DIO-24 and DIO-32 devices, DAQCards, and SC-205X Series
adapters)
Your computer
© National Instruments Corporation 1-1 ER-8/16 User Manual
Page 13

Introduction Chapter 1
Optional Equipment
You can use the following National Instruments products with your ER-8/16.
• Any National Instruments DAQ device with digital I/O capability
• SC-2050 cable adapter with NB1 cable
• SC-2051 cable adapter with NB1 cable
• SC-2052 cable adapter with NB1 cable
• SC-2053 cable adapter with NB1 cable
• SC-2054 48-channel kit with NB5 cable
• SC-2054 96-channel kit with NB5 cable
• SC-2055 cable adapter with NB1 cable
• NB7 cable assembly
• SH6850 shielded cable
• R6850 ribbon cable
• R1005050 ribbon cable
• Type NB5 cable
For more information about optional equipment available from National Instruments, refer to
your National Instruments catalog or call the office nearest you.
Refer to Chapter 3, Signal Connections, for additional information on cabling, connectors, and
adapters.
Software
The ER-8/16 requires no additional software beyond what you are using for your DAQ device.
Unpacking
Your ER-8/16 is shipped in an antistatic package to prevent electrostatic damage to the unit.
Electrostatic discharge can damage several components on the ER-8/16. To avoid such damage
in handling the unit, take the following precautions:
• Ground yourself via a grounding strap or by holding a grounded object.
• Touch the antistatic package to a metal part of your computer chassis before removing the
ER-8/16 from the package.
• Remove the unit from the package and inspect it for loose components or any other sign of
damage. Notify National Instruments if the ER-8/16 appears damaged in any way. Do not
install a damaged unit.
• Never touch the exposed pins of connectors.
ER-8/16 User Manual 1-2 © National Instruments Corporation
Page 14

Chapter 2 Setup
This chapter describes how to set up the ER-8/16.
The ER-8 has eight SPDT relays controlled by eight digital lines. Each of these relays has a
normally closed (NC) contact that connects to the common (COM) contact when the
corresponding digital output line is low, and a normally open (NO) contact that connects to the
COM contact when the digital line is high. The contacts are break-before-make so that all three
contacts are never shorted.
The ER-8/16 is an accessory to National Instruments DAQ devices with digital I/O. No
hardware or software configuration is necessary. To configure the DAQ device driving the
ER-8/16, refer to your DAQ hardware user manual.
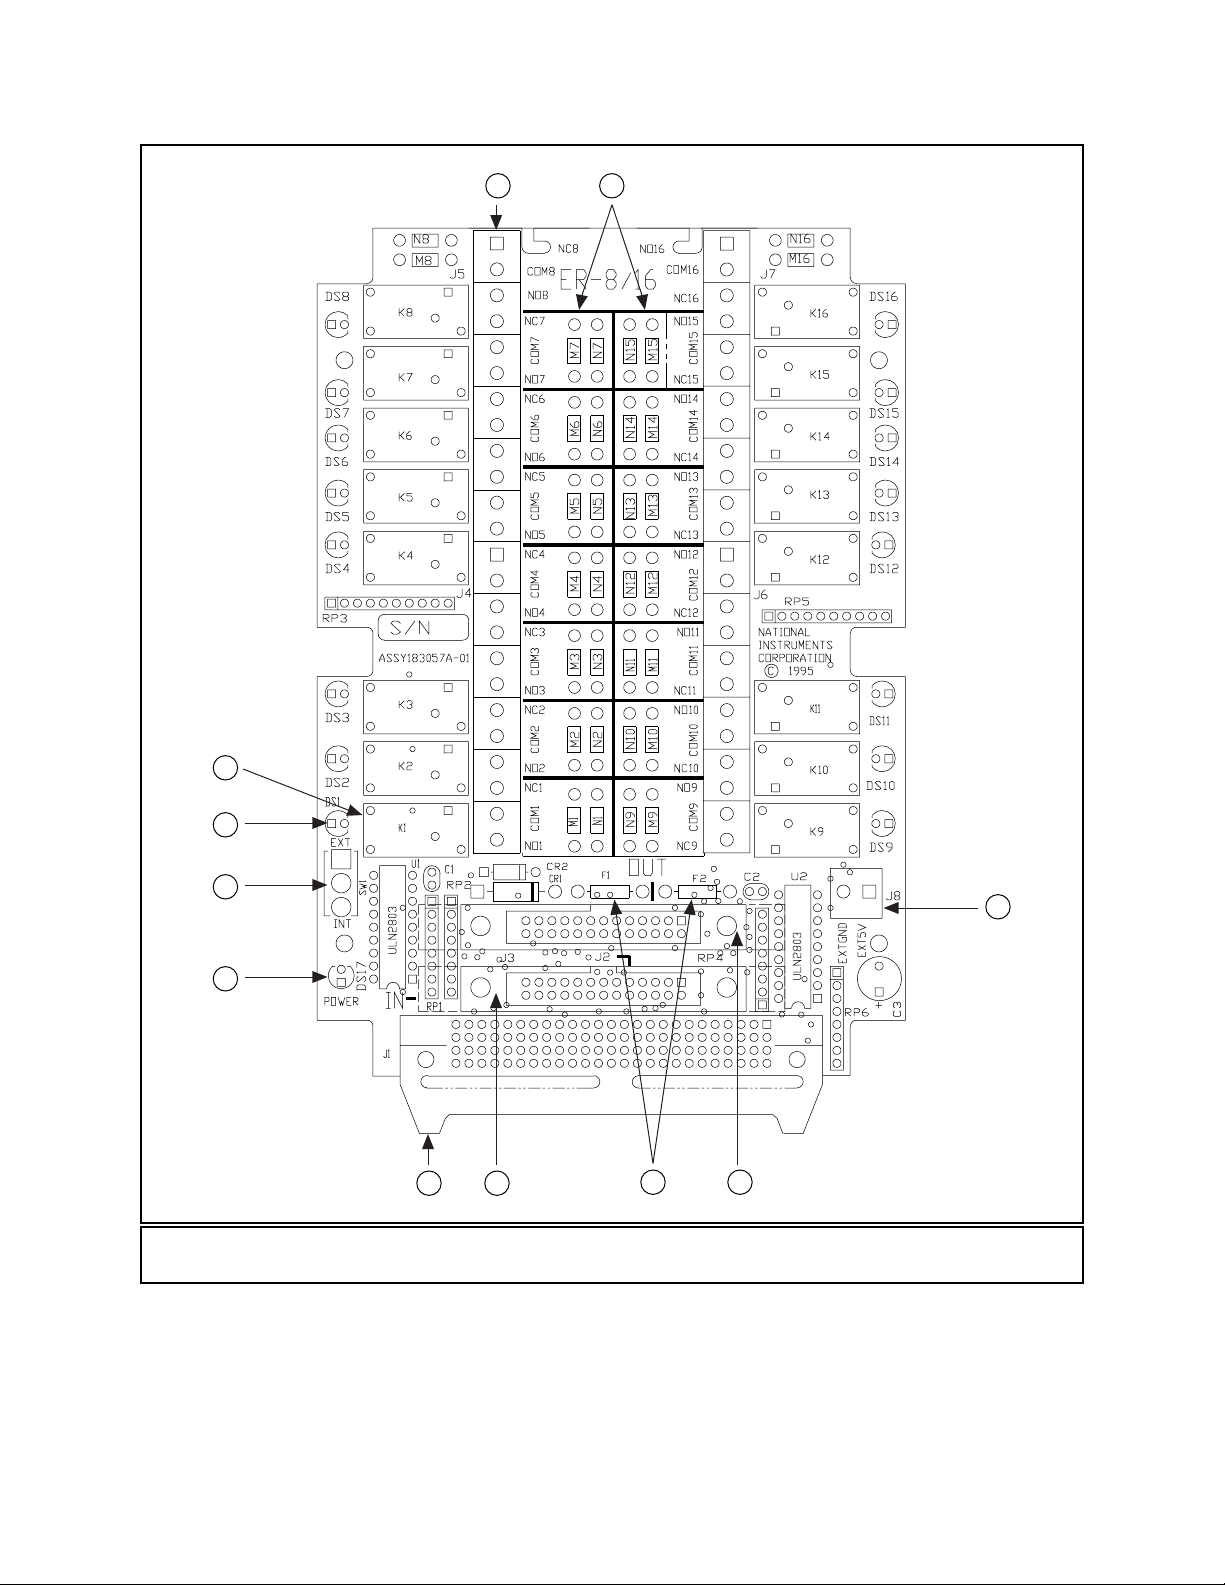
Figure 2-1 shows the parts locator diagram for the ER-8/16. See Table 2-1 for detailed
descriptions of the parts called out on the parts locator diagram.
© National Instruments Corporation 2-1 ER-8/16 User Manual
Page 15
Setup Chapter 2
5 6
4
3
2
7
1
11 10
1 Power LED 4 Channel 1 Relay 7 J8—EXT power supply conn. 10 J2—26-pin IN conn.
2 SW1—power supply switch 5 Screw Terminals 8 J3—26-pin OUT conn. 11 J1—DIO-24 and
3 Channel 1 LED 6 Surge Protector Pads 9 Fuses DIO-32 conn.
89
Figure 2-1. ER-8/16 Parts Locator Diagram
ER-8/16 User Manual 2-2 © National Instruments Corporation
Page 16

Chapter 2 Setup
Table 2-1. Parts Locator Diagram Descriptions
Callout Name Description
1 Power LED When illuminated red, this LED indicates that the ER-8/16
is receiving power.
2 SW1 This is the main +5 V power supply switch for selecting
external or internal supply. Move the switch to EXT if
using external supply and to INT if using internal (driving
device or ER-16) supply. By default, your ER-8/16 is
shipped with SW1 in the EXT position.
3 Channel 1 LED These DS<1..16> LEDs are illuminated green when the NO
contact is shorted to the COM contact for the respective
channel. Otherwise the LED is shut off.
4 Channel 1 Relay These K<1..16> relays are controlled digitally on the
ER-8/16.
5 Screw Terminals The NC<1..16> screw terminals are for the NC contact for
channels 1 through 16.
The NO<1..16> screw terminals are for the NO contact for
channels 1 through 16.
The COM<1..16> screw terminals are for the COM contact
for the channels 1 through 16.
6 Surge Protector Pads The M<1..16> pads across NC and COM contacts are for
protecting the relay contacts from inductive loads. A
resistor and capacitor combination can be placed across
these pads to suppress sparking on the relay contacts due to
inductive loads.
The N<1..16> pads across NO and COM contacts are for
protecting the relay contacts from inductive loads. A
resistor and capacitor combination can be placed across
these pads to suppress sparking on the relay contacts due to
inductive loads.
7 J8 This external power-supply connector, EXT +5 V, is for
external +5 V supply. EXT GND is the reference for the
external +5 V supply, and is connected to the ER-8/16
ground.
8 J3 This 26-pin OUT connector sends the 26-pin daisy-chain
cable to the ER-8 or the ER-16.
9 Fuses F1 and F2 are socketed power supply fuses. You may
replace these fuses if they are blown. The fuse is
LIT-PICOII, 2 A, 125 V, fast.
10 J2 This 26-pin IN connector receives the 26-pin daisy-chain
cable from the ER-16 or SC-205X cable adapter.
11 J1 This 50-pin dual connector has the top connector for DIO-32
boards, and the bottom connector for DIO-24 devices.
© National Instruments Corporation 2-3 ER-8/16 User Manual
Page 17

Setup Chapter 2
Safety Information
The following warnings contain important safety information concerning hazardous voltages.
!
Warning: Connections that exceed any of the maximum input signal ratings on the
ER-8/16 can create a shock or a fire hazard, or damage the ER-8/16, your
computer, and the DAQ device. Maximum input ratings for each signal are
given in Appendix A, Specifications. National Instruments is
any damages resulting from signal connections that exceed any of these
ratings.
Do not operate your ER-8/16 in an explosive atmosphere or where there may
be flammable gases or fumes.
K
EEP AWAY FROM LIVE CIRCUITS. DO NOT REMOVE THE TOP COVER of the
ER-8/16 when it is operating or is powered on. If signal wires are connected
to the unit, dangerous voltages may exist even when the equipment is turned
off. To avoid dangerous electrical shock, do not perform procedures
involving cover removal unless you are qualified to do so. Before removing
the cover make sure that the computer and the power supply are turned off
and that the signal wires connected to the screw terminals do not contain live
voltages.
NOT liable for
D
O NOT OPERATE DAMAGED EQUIPMENT. The safety protection features built
into your ER-8/16 can become impaired if it is damaged in any way. If
necessary, return the unit to National Instruments for service and repair to
ensure that safety is not compromised.
D
O NOT SUBSTITUTE PARTS OR MODIFY EQUIPMENT. To avoid introducing
additional hazards, do not install unauthorized parts or modify your ER-8/16.
If necessary, return the unit to National Instruments for service and repair to
ensure that safety is not compromised.
When using the unit with high common mode voltages, you must insulate
your signal wires appropriately. National Instruments is
NOT liable for any
damages or injuries resulting from inadequate signal wire insulation.
When connecting or disconnecting signal lines to the ER-8/16 screw terminal,
verify that the lines are powered off. Potential differences between the lines
and the ER-8/16 ground create a shock hazard while you connect the lines.
Connections, including power signals to ground and vice versa, that exceed
any of the maximum signal ratings on the ER-8/16 can create a shock or a
fire hazard, or can damage any or all of the devices connected to the ER-8/16,
the host computer, and the ER-8/16. National Instruments is
NOT liable for
any damages or injuries resulting from incorrect signal connections.
ER-8/16 User Manual 2-4 © National Instruments Corporation
Page 18

Chapter 2 Setup
Use and connect to only one of the following connectors when operating the
ER-8/16: the DIO-24, DIO-32, or IN connector. National Instruments is
NOT
liable for any damages resulting from incorrect connections.
Equipment described in this document must be used in an Installation
Category II environment per IEC 664. This category requires local level
supply mains-connected installation.
Do not operate this equipment in a manner that contradicts the information
specified in this document. Misuse of this equipment could result in a shock
hazard.
Terminals are for use only with equipment that has no accessible live parts.
Use only 26-16 AWG wire with a voltage rating of 300 V and 60° C for
controlling 250 V. Prepare your signal wire by stripping the insulation no
more than 7 mm.
Connect the signal wires to the screw terminals by inserting the stripped end
of the wire fully into the terminals. Tighten the terminals to a torque of 57 in.-lb.
Clean devices and terminal blocks by brushing off light dust with a soft,
nonmetallic brush. Remove other contaminants with deionized water and a
stiff nonmetallic brush. The unit must be completely dry and free from
contaminants before returning to service.
Connecting the ER-8/16 to Your DAQ Device
The following are general instructions for setting up your ER-8/16. Consult your computer user
manual or technical reference manual for specific instructions and warnings.
Warning: Connections that exceed any of the maximum rating of the input signals on the
ER-8/16 can damage the ER-8/16, your computer, and the DAQ device.
Maximum input ratings for each signal are given in Appendix A, Specifications.
National Instruments is
connections that exceed any of these ratings.
1. Turn off the host computer power before making any connections.
Warning: Keep away from live circuits.
ER-8/16 when it is operating or is powered on. If signal wires are
connected to the unit, dangerous voltages may exist even when the
equipment is turned off. To avoid dangerous electrical shock, do not
perform procedures involving cover removal unless you are qualified to do
so. Before removing the cover make sure that the computer and the power
supply are turned off and that the signal wires connected to the screw
terminals do not contain live voltages.
NOT liable for any damages resulting from signal
DO NOT REMOVE THE TOP COVER of the
© National Instruments Corporation 2-5 ER-8/16 User Manual
Page 19

Setup Chapter 2
2. Remove the top cover of your ER-8/16 by removing the four screws located on the bottom
of your unit.
3. Connect the 50-pin interfacing cable to the appropriate 50-pin connector located on the
front end of the ER-8/16 as shown in Figure 2-2.
• If you are connecting a DIO-24 device to the ER-8/16, use the DIO-24 50-pin
connector. This is the bottom connector.
• If you are connecting a DIO-32 board to the ER-8/16, use the DIO-32 50-pin connector.
This is the top connector.
Warning: Connecting the cable to the wrong connector can damage the ER-8/16 or
your DAQ device. National Instruments is
NOT liable for any damages
resulting from such connections.
Only one of the following connectors should be used and connected when
operating the ER-8/16: the DIO-24, DIO-32, or IN connector. National
Instruments is
NOT liable for any damages resulting from any other
connections.
• If you are daisy chaining the ER-8/16 or using the SC-205X Series cable adapter,
connect the 26-pin cable to the correct 26-pin connector, either IN or OUT. For
additional information on signal connections and cabling refer to Chapter 3, Signal
Connections.
4. Switch the +5 V power supply switch (SW1) to the correct position, either INT or EXT.
The switch position depends on the number of channels and the type of DAQ device you
are using with the ER-8/16. Set the switch to INT if you are using your DAQ device’s
internal +5 V supply. Set the switch to EXT if you are using an external +5 supply. For
additional information on power supply connections, refer to the Power Supply section in
Chapter 3, Signal Connections.
Note: By default, your ER-8/16 is shipped with SW1 set to the EXT position.
5. Verify the connections and setup.
6. Turn on the external power supply, if necessary, then turn on your computer. The red
Power LED should light up indicating that the ER-8/16 is receiving power. If the red
Power LED does not light up, verify that the power supply connections and electrical
power supply are switched ON. If the connections and external power supply are working,
check the electrical continuity on fuses F1 and F2. If the continuity test fails on these
fuses, a fuse is blown. You can either replace the fuse yourself or send it to National
Instruments for replacement.
Note: The fuses are socketed. If you choose to replace them yourself, the fuse
specification is LIT-PICOII, 2 A, 125 V, fast. The manufacturer is Littelfuse,
and the manufacturer part number is R251002T1.
ER-8/16 User Manual 2-6 © National Instruments Corporation
Page 20

Chapter 2 Setup
7. You can now test your ER-8/16 without making any connections to the screw terminals by
writing to port A (0). When you write a digital 1 to port A (0), the DS1 LED should turn
green, indicating it is ON. You may also hear a clicking sound. Port A (0) corresponds to
channel 1 on the ER-8/16. Use this procedure to test all the channels on your ER-8/16.
Note: LEDs are present only for verifying your digital cable connections.
Warning:
DO NOT connect any wires to the channel screw terminals when you are
conducting this test. National Instruments is
NOT liable for any damages
resulting from such connections.
If the ER-8/16 does not respond to the control signals, check your cable connections and
try again. If the test fails again, contact National Instruments.
8. Switch off your computer and the external power supply. Make wire connections to the
ER-8/16 channels by wiring to the proper screw terminals, marked NC, COM, and NO.
For additional information, refer to the Channel Connections section in Chapter 3, Signal
Connections.
9. When you have connected the wires, check the connections again.
10. Replace the top cover and screw it on tightly.
11. Turn on your computer and the external power supply.
Your ER-8/16 is now ready for operation.
TOP: DIO-32
BOTTOM: DIO-24
Figure 2-2. The ER-8/16 Front Connector
© National Instruments Corporation 2-7 ER-8/16 User Manual
Page 21

Chapter 3 Signal Connections
This chapter describes the signal connections, channel connections, and digital interface to the
ER-8/16.
Front Connectors
This section describes the signal connections to the ER-8/16 via the I/O connectors for the digital
interface.
Warning: Connections that exceed any of the maximum ratings of the input signals on the
ER-8/16 can damage the ER-8/16, your computer, and the DAQ device.
Maximum input ratings for each signal are given in Appendix A, Specifications.
National Instruments is
connections that exceed any of these ratings.
Turn off signal sources before connecting or disconnecting any additional signal.
NOT liable for any damages resulting from signal
DO NOT attempt to connect your ER-8/16 to any connector for which it is not
designed. Incorrect connection can damage your ER-8/16 or the host computer.
National Instruments is
connections.
The front end of the ER-8/16 has two 50-pin connectors. The top connector, DIO-32, is for
interfacing to DIO-32 boards, and the bottom connector, DIO-24, is for interfacing to DIO-24
devices.
Warning: Use only one connector, either the DIO-24 or the DIO-32 connector.
connect cables to both connectors.
Connecting the cable to the wrong connector can damage the ER-8/16 or your
DAQ device. National Instruments is NOT liable for any damages resulting from
such connections.
NOT liable for any damages resulting from incorrect
DO NOT
Using DIO-24 Devices
If you are using a National Instruments DIO-24 device to control the ER-8/16, connect the cable
to the DIO-24 connector.
© National Instruments Corporation 3-1 ER-8/16 User Manual
Page 22

Signal Connections Chapter 3
You can control a maximum of 24 channels using this connector, one ER-16, and one ER-8.
Daisy chain the ER-8 to the ER-16 using the NB7 cable.
The ER-8 uses port A<0..7> to control channels 1 through 8. Port C<0..7> wraps back to the
26-pin OUT connector.
The ER-16 uses port A<0..7> to control channels 1 through 8 and port B<0..7> to control
channels 9 through 16. Port C<0..7> wraps back to the 26-pin OUT connector. For additional
information on daisy chaining, refer to the Daisy Chaining the ER-8/16 section later in this
chapter.
Using DIO-32 Boards
If you are using a National Instruments DIO-32 board to control the ER-8/16, connect the cable
to the DIO-32 connector.
Note: You will need an external +5 V power supply if you use this connector.
Warning: Connecting the cable to the wrong connector can damage the ER-8/16 or your
DAQ device. National Instruments is NOT liable for any damages resulting from
such connections.
You can control a maximum of 32 channels using the DIO-32 connector and two ER-16s. Daisy
chain one ER-16 to the other ER-16 using the NB7 cable.
The ER-16 uses port A<0..7> to control channels 1 through 8 and port B<0..7> to control
channels 9 through 16. Port C<0..7> and port D<0..7> wrap back to the 26-pin OUT connector.
For additional information on daisy chaining refer to the Daisy Chaining the ER-8/16 section
later in this chapter.
Power Supply
You can use either your DAQ device’s internal +5 V supply or an external +5 V supply to power
up your ER-8/16. If you use an external +5 V supply, use the two screw terminals to connect
external +5 V and GND. Refer to Figure 2-1 in Chapter 2, Setup, for the location of this screw
terminal on the ER-8/16.
Warning: Connections that exceed any of the input signal maximum ratings on the ER-8/16
can damage the ER-8/16, your computer, and the DAQ device. Maximum input
ratings for each signal are given in Appendix A, Specifications. National
Instruments is
exceed any of these ratings.
NOT liable for any damages resulting from signal connections that
ER-8/16 User Manual 3-2 © National Instruments Corporation
Page 23

Chapter 3 Signal Connections
Current requirements for the ER-8/16 are as follows:
Channels Current (Amps)
8 0.5 A
16 1.0 A
24 1.5 A
32 2.0 A
If you use its internal +5 V supply setting, make sure your device can supply the required amount
of +5 V power to the ER-8/16.
Note: DIO-32F boards do not provide internal +5 V supply. You will need an external +5 V
supply for DIO-32F boards.
DAQCard-DIO-24 and other DAQCards can provide a maximum of 500 mA of
current. You can drive only one ER-8 with the internal supply. You will need an
external +5 V supply for driving more than eight channels.
In addition to the above note, refer to Figures 3-3 and 3-4 for information on configurations that
require an external +5 V supply.
When you connect more than one ER-8 with any of the SC-205X Series cable adapters, you will
need an external +5 V power supply.
Warning: Connecting the cable to the wrong connector can damage the ER-8/16 or your
DAQ device. National Instruments is
NOT liable for any damages resulting from
such connections.
Use and connect only one of the following connectors when operating the
ER-8/16: the DIO-24, DIO-32, or IN connector. National Instruments is
NOT
liable for any damages resulting from incorrect connections.
If you use your DAQ device’s internal +5 V supply, make sure that the power supply switch
(SW1) is set to the INT position. If you are using an external +5 V supply, make sure that SW1
is set to the EXT position. Refer to Figure 2-1 for the location of the SW1 switch.
Note: By default, your ER-8/16 is shipped with SW1 set to the EXT position.
Channel Connections
The ER-8/16 has 26 screw terminals. Twenty-four of these screw terminals are for connecting
the loads to the relay channels and two screw terminals are for providing the external +5 V
supply to the unit. Each channel consists of a COM position, an NC position, and an NO
position.
© National Instruments Corporation 3-3 ER-8/16 User Manual
Page 24

Signal Connections Chapter 3
Power-up Conditions
When the digital interface cable is not connected to either connector, the COM contact is
connected to the relay NC contact at power up.
When the digital interface cable is connected to any of the connectors, the power-up state
depends on the power-up state of the digital signals on the DAQ device. If the power-up state of
the digital lines driving the ER-8/16 is low, the COM contact is connected to the relay NC
contact. If the power-up state of the digital lines driving the ER-8/16 is high, the COM contact is
connected to the relay NO contact.
Wire Gauge
When using the ER-8, you can use up to 16 AWG gauge wire for all channels. If you are using
the ER-16 and all channels are in use, use 18 AWG gauge wire, maximum.
Warning: When using the ER-8/16 with high voltages, you must insulate your signal wires
appropriately. National Instruments is
resulting from inadequate signal wire insulation.
NOT liable for any damages or injuries
Make sure that your wires are properly insulated to avoid any short circuit to the
other channels, ground, or any other point on the printed wire board (PWB).
Channel Isolation
All contacts have a working voltage of 250 VAC or 30 VDC. This product complies with
IEC-1010 for Voltage Installation Category II Pollution Degree 2. Refer to the specifications
listed in Appendix A, Specifications, for further details before connecting the signals to the relay
contacts.
Contact Protection for Inductive Loads
When inductive loads are connected to the relays, a large counter-electromotive force can occur
at relay-switching time because of the energy stored in the inductive load. These flyback
voltages can severely damage the relay contacts and greatly reduce the relay life.
It is best to limit these flyback voltages at your inductive load by installing, across your
inductive load, a flyback diode for DC loads, as shown in Figure 3-1, or a metal oxide varistor
(MOV) for AC loads. Refer to the Diode Circuit and Varistor Circuit information in the table in
the Contact Protection Circuit section of Appendix C, Contact Protection, for more information.
If placing a diode or an MOV across the load is not possible, use arc suppressor pads on the
ER-8/16 to limit the voltage spike generated during the switching of the inductive loads. These
pads are between the COM position and the NO position, and between the COM position and the
ER-8/16 User Manual 3-4 © National Instruments Corporation
Page 25

Chapter 3 Signal Connections
NC position of the relays. Refer to the CR Circuit information in the table in the Contact
Protection Circuit section of Appendix C, Contact Protection, for more information.
To determine the placement of each arc suppressor, refer to Tables 3-1 and 3-2, which list the
channel and suppressor pad assignments.
+
Inductive
Load
Flyback Diode
NO
Relay
VDC
COM
V
-
NC
Figure 3-1. Contact Protection Using a Flyback Diode for DC Loads
Table 3-1. Arc Suppressor Placement, COM to NO
COM to NO
Channel Number
1N1
2N2
3N3
4N4
5N5
6N6
7N7
8N8
9N9
10 N10
11 N11
12 N12
13 N13
14 N14
15 N15
16 N16
Transient Voltage Suppressor
Reference Designator
© National Instruments Corporation 3-5 ER-8/16 User Manual
Page 26

Signal Connections Chapter 3
Table 3-2. Arc Suppressor Placement, COM to NC
COM to NC
Channel Number
Transient Voltage Suppressor
Reference Designator
1M1
2M2
3M3
4M4
5M5
6M6
7M7
8M8
9M9
10 M10
11 M11
12 M12
13 M13
14 M14
15 M15
16 M16
Figure 3-2 shows how to connect a transient voltage suppressor for AC and DC inductive loads.
NC1
Relay
r
c
r
c
M1
Arc Suppressor Pads
N1
Inductive
Load
COM1
NO1
Figure 3-2. Arc Suppressor Pad Locations for Channel 1
Connecting Your Signal Lines
To connect the signal wires to the screw terminals, perform the following steps:
1. Turn off your ER-8/16. Make sure the signal wires you are connecting to the screw terminals
are also turned off and do not contain any live voltages. Also make sure the host computer is
turned off.
ER-8/16 User Manual 3-6 © National Instruments Corporation
Page 27

Chapter 3 Signal Connections
Warning: KEEP AWAY FROM LIVE CIRCUITS. DO NOT REMOVE THE TOP COVER of the
ER-8/16 when it is operating or is powered on. If signal wires are connected to
the ER-8/16, dangerous voltages may exist even when the equipment is turned
off. To avoid dangerous electrical shock, do not perform procedures involving
cover removal unless you are qualified to do so. Before removing the cover make
sure that the computer and the power supply are turned off and that the signal
wires connected to the screw terminals do not contain live voltages.
2. Remove the ER-8/16 top cover by placing a screwdriver in the groove at the bottom of the
ER-8/16 and rotating the screwdriver.
3. Install the contact protection, preferably across the load, if your load is inductive. Refer to
the Contact Protection for Inductive Loads section earlier in this chapter. For additional
information refer to Appendix C, Contact Protection.
4. Connect the wires to the screw terminals.
5. Bundle the wires at the rear end of the ER-8/16 and use a tie-wrap to tie them together.
6. Replace the top cover so that the bundled wires fall within the smaller rectangular hole in the
top cover.
7. Tighten the top cover by fastening the screws to the bottom cover.
Internal Connectors
There are two 26-pin connectors marked IN and OUT on the ER-8/16 PWB. These connectors
are visible when you remove the top cover.
Warning: KEEP AWAY FROM LIVE CIRCUITS. DO NOT REMOVE THE TOP COVER of the
ER-8/16 when it is operating or is powered on. If signal wires are connected to
the ER-8/16, dangerous voltages may exist even when the equipment is turned
off. To avoid dangerous electrical shock, do not perform procedures involving
cover removal unless you are qualified to do so. Before removing the cover make
sure that the computer and the power supply are turned off and that the signal
wires connected to the screw terminals do not contain live voltages.
The internal connectors expand the switching system to 24 or 32 channels with the minimum
number of cables or accessories. Use the IN connector to interface the ER-8 with the SC-205X
Series cable adapters so you can interface your ER-8 to the Lab or MIO boards.
Warning: If you are using the IN internal connector,
front connectors.
DO NOT connect a cable to any of the
Connecting the cable to the wrong connector can damage the ER-8/16 or your
DAQ device. National Instruments is
NOT liable for any damages resulting from
such connections.
© National Instruments Corporation 3-7 ER-8/16 User Manual
Page 28

Signal Connections Chapter 3
Daisy Chaining the ER-8/16
To expand your system from 16 channels to 24 channels, connect a 26-pin NB7 ribbon cable
from the ER-16 OUT connector to the ER-8 IN connector.
Note: DO NOT connect an external supply to the ER-8 (the receiving unit). Verify that SW1 is
in the INT position on the receiving unit. Connect the external supply to the sending
unit.
The power supply will also be daisy-chained through the NB7 cable to the expanded system.
To expand your system from 16 channels to 32 channels, connect a 26-pin NB7 ribbon cable
from one ER-16 OUT connector to the other ER-16 IN connector.
Note: DO NOT connect an external supply to the ER-16 (the receiving unit). Verify that SW1
(see Figure 2-1) is in the INT position on the receiving unit. Connect the external
supply to the sending unit.
The power supply will also be daisy-chained through the NB7 cable to the expanded system.
Warning: Connecting the cable to the wrong connector can damage the ER-8/16 or your
DAQ device. National Instruments is
NOT liable for any damages resulting from
such connections.
Using the SC-205X Series with the ER-8
You can use your SC-205X Series cable adapter with the Lab or MIO boards to control the ER-8.
Connect the 26-pin cable to the ER-8 IN connector only. In this configuration, you can control
only channels 1 through 8. Digital lines—port A<0..7> as shown in
Figure 3-3a—control the relays. Port B<0..7> is not used.
Warning: When connecting more than one ER-8 with any of the SC-205X Series cable
adapters, verify that SW1 (see Figure 2-1) is at the EXT position and that you are
using an external power supply.
Connecting the cable to the wrong connector can damage the ER-8/16 or your
DAQ device. National Instruments is
incorrect connections.
DO NOT attempt to connect an ER-16 to any of the SC-205X Series cable adapters.
NOT liable for any damages resulting from
For additional information on the SC-205X Series cable adapters refer to the SC-205X Series
User Manual.
ER-8/16 User Manual 3-8 © National Instruments Corporation
Page 29

Chapter 3 Signal Connections
DAQ System Configurations with the ER-8/16
The following figures show the possible DAQ system configurations using the ER-8/16 for
multichannel control.
DIO-24 Boards
(or AT -MIO-16D,
AT -MIO-16DE-10)
Cable*1
Port A
ER-8
a. 8-Channel Relay Control
DIO-24 Boards
(or AT -MIO-16D,
AT -MIO-16DE-10)
Cable*1
NB7 Cable
Port A, Port B
ER-16
OUT
Port C
ER-8
IN
*2
c. 24-Channel Relay Control
Port AA, Port AB
ER-16
OUT
Port AC
ER-8
IN
Port BA, Port BB
ER-16
OUT
Port BC
ER-8
IN
*2
*2
DIO-96
Boards
SC-2054
(48-Channel)
NB1 Cable
NB7 Cable
NB1 Cable
NB7 Cable
e. 48-Channel Relay Control
*1 Cable Options: DAQCard-DIO-24: PSH27-50F-D1 cable
*2 External supply should be connected to the ER-16
*3 External supply needed for PCMCIA DAQCards
PC-DIO-24, NB-DIO-24: NB-1 cable
AT-MIO-16D: Type NB5 cable (pin # 51-100)
AT-MIO-16DE-10: R1005050 ribbon cable (pin # 51-100)
DIO-24 Boards
(or AT -MIO-16D,
AT -MIO-16DE-10)
DIO-96
Boards
(48-Channel)
(48-Channel)
Cable*1
Port A, Port B
ER-16
*3
b. 16-Channel Relay Control
DIO-32
Boards
NB1 Cable
NB7 Cable
Port A, Port B
ER-16
OUT
Port C, Port D
ER-16
IN
*2
d. 32-Channel Relay Control
NB1 Cable
NB7 Cable
SC-2054
NB1 Cable
SC-2054
NB7 Cable
NB1 Cable
NB7 Cable
NB1 Cable
NB7 Cable
Port AA, Port AB
ER-16
OUT
Port AC
ER-8
IN
Port BA, Port BB
ER-16
OUT
Port BC
ER-8
IN
Port CA, Port CB
ER-16
OUT
Port CC
ER-8
IN
Port DA, Port DB
ER-16
OUT
Port DC
ER-8
IN
*2
*2
*2
*2
f. 96-Channel Relay Control
Figure 3-3. ER-8/16 Configurations with DIO Devices
© National Instruments Corporation 3-9 ER-8/16 User Manual
Page 30

Signal Connections Chapter 3
Figure 3-4 shows the possible DAQ system configurations using National Instruments
multifunction DAQ devices and the ER-8/16.
E-Series/MIO
Boards *1
DAQCard-700/
PC-LPM-16
DAQCard-AO-2DC
DIO-24
Boards
*1 E-Series boards except AT-MIO-16DE-10
MIO boards except AT-MIO-16D
*2 Cable Options: AT-MIO-16E-2, AT-MIO-16E-10, AT-MIO-16XE-50:
*3 External supply should be connected to the ER-8/16
Cable *2
SC-2050
SC-2055
PSH27-50F-D1 Cable PSH27-50F-D1 Cable
SC-2051
AT-MIO-16F-5, AT-MIO-16, AT-MIO-16X: NB1 cable
AT-MIO-64E-3: R1005050 ribbon cable (pin # 1-50)
AT-MIO-64F-5: Type NB5 cable (pin # 1-50)
Digital I/O
NB7 Cable
NB7 Cable
NB7 Cable
NB7 Cable
NB7 Cable
SH6850 shielded cable or R6850 ribbon cable
Port A
ER-8
Port A
ER-8
Port A
ER-8
Port A
ER-8 or other 8-channel accessories
Port B
ER-8 or other 8-channel accessories
Port C
ER-8 or other 8-channel accessories
1200 Series/
Lab Boards
PC-AO-2DC
DAQCard-AO-2DC
SC-2053
SC-2053
*3
*3
NB7 Cable
NB7 Cable
NB7 Cable
NB7 Cable
NB7 Cable
Port A
ER-8
Port B
ER-8
*3
Port C
ER-8
*3
Port A
ER-8
Port B
ER-8
*3
Port A, Port B
ER-16
*3
Figure 3-4. ER-8/16 Configurations with Multifunction DAQ Devices
ER-8/16 User Manual 3-10 © National Instruments Corporation
Page 31

Chapter 4 Theory of Operation
This chapter contains a functional overview of the ER-8/16 and explains the operation of each
functional unit making up the ER-8/16.
Functional Overview
The ER-8 has eight SPDT relays controlled by eight digital lines connected to the ER-8. Each of
these relays has an NC contact that is connected to the COM contact when the corresponding
digital output line is low, and an NO contact that is connected to the COM contact when the
digital line is high. The contacts are break-before-make, so all three contacts are never shortcircuited. The block diagram in Figure 4-1 illustrates the key functional components of the
ER-8/16.
© National Instruments Corporation 4-1 ER-8/16 User Manual
Page 32

Theory of Operation Chapter 4
EXT +5 V
Port A
Port B
DIO-32
Port C
Port D
Port A
Port B
DIO-24
Port C
+5 V
Port C
OUT
Port D
Port A
IN
Port B
FUSE (F2)
EXT
INT
Switch
+5 V
+5 V
Port A
Relay
Driver
Included on the ER-16
Port B
Relay
Digital Input
Driver
8 Lines
Digital Input
8 Lines
CH1 RELAY
CH2 RELAY
CH3 RELAY
CH4 RELAY
CH5 RELAY
CH6 RELAY
CH7 RELAY
CH8 RELAY
CH9 RELAY
CH10 RELAY
CH11 RELAY
CH12 RELAY
CH13 RELAY
CH14 RELAY
CH15 RELAY
CH16 RELAY
24 Power
Lines
24 Power
Lines
NO 1
CH1 COM 1
NC 1
NO 2
CH2 COM 2
NC 2
NO 3
CH3 COM 3
NC 3
NO 4
CH4 COM 4
NC 4
NO 5
CH5 COM 5
NC 5
NO 6
CH6 COM 6
NC 6
NO 7
CH7 COM 7
NC 7
NO 8
CH8 COM 8
NC 8
Terminal Block
NO 9
CH9 COM 9
NC 9
NO 10
CH10 COM 10
NC 10
NO 11
CH11 COM 11
NC 11
NO 12
CH12 COM 12
NC 12
NO 13
CH13 COM 13
NC 13
NO 14
CH14 COM 14
NC 14
NO 15
CH15 COM 15
NC 15
NO 16
CH16 COM 16
NC 16
Terminal Block
Figure 4-1. ER-8/16 Block Diagram
ER-8/16 User Manual 4-2 © National Instruments Corporation
Page 33

Chapter 4 Theory of Operation
Digital Interface
There are four connectors with which to interface an ER-8/16 to digital devices or to daisy-chain
it to another ER-8/16. The two front connectors are marked DIO-24 and DIO-32; the two
internal connectors are marked IN and OUT. Use the internal connectors when daisy-chaining
the
ER-8/16 or when using SC-205X Series cable adapters.
Warning: Use only one of the connectors—DIO-24, DIO-32, or IN—at a time. Using more
than one of these connectors can damage your host computer, DAQ device, and
the ER-8/16. National Instruments is
NOT liable for any damages resulting from
incorrect connections.
For additional information on signal connections, refer to Chapter 3, Signal Connections.
Relay Channels
Figure 4-2 shows the onboard equivalent circuit for the ER-8/16. When the channel receives a
digital low signal, the relay for that channel remains unenergized, the NC contact shorts to the
COM contact, and the NO contact remains open. When a digital high signal is present on a
channel, the relay for that channel is energized, the NO contact shorts to the COM contact, and
the NC contact is open.
A green LED just above each relay illuminates when the relay is energized. To reduce the power
consumption and to help extend relay life, control the signals so that relays are energized for
only short periods of time and only a minimal number of relays are energized.
+5 V
NO
COM
Digital Line
ULN 2803
High-Current Driver
NC
Figure 4-2. ER-8/16 Onboard Equivalent Circuit
© National Instruments Corporation 4-3 ER-8/16 User Manual
Page 34

Appendix A Specifications
This appendix lists the specifications for the ER-8/16. These specifications are typical at 25° C and 50% humidity
unless otherwise noted.
Channel Rating
Number of channels ................................................................8 channels for ER-8
16 channels for ER-16
Relay type................................................................................SPDT (1 Form C), nonlatching
Max switching capacity (resistive load)
AC........................................................................................3 A at 250 VAC
DC........................................................................................3 A at 30 VDC
Max working voltage ..............................................................250 Vrms (channel to ground)
Switching current ....................................................................3 A max per channel
Channel on resistance..............................................................100 mΩ
Contact material ......................................................................Silver-nickel alloy
2
Life
Mechanical ..........................................................................10,000,000 operations min
Electrical .............................................................................100,000 at rated load
Isolation
Complies with IEC 1010 for Voltage Installation Category II Pollution Degree 2
Operate time............................................................................10 ms
Release time ............................................................................5 ms
1
250 Vrms (channel to channel, same phase)
40 A max for ER-16, all channels
24 A max for ER-8, all channels
Power Requirement
External Supply
Voltage....................................................................................+5 V (±5%)
Current ....................................................................................0.5 A for 8 channels
1.0 A for 16 channels
1.5 A for 24 channels
2.0 A for 32 channels
1
If you operate at high currents, later operation at low currents may not be possible.
2
Relays are subject to normal wear based on the number of operations.
© National Instruments Corporation A-1 ER-8/16 User Manual
Page 35

Specifications Appendix A
Physical
Dimensions..............................................................................17.5 by 5.2 by 12.25 cm (6.9 by 2.05 by 4.82 in.)
Connectors
External................................................................................DIO-24 and DIO-32 50-pin male, latching type, ribbon-
cable front connectors
Internal.................................................................................IN and OUT 26-pin male, latching type, ribbon-cable
internal connectors
Channel screw terminals .........................................................24 for ER-8, 16 AWG wire max,
48 for ER-16, 18 AWG wire max
Power supply screw terminals.................................................2
Environment
Operating temperature.............................................................0° to 50° C
Storage temperature ................................................................-55° to 150° C
Relative humidity....................................................................5% to 90% noncondensing
ER-8/16 User Manual A-2 © National Instruments Corporation
Page 36

Appendix B I/O Connectors
This appendix contains the connector pinouts and pin descriptions for the ER-8/16.
DIO-24 Connector
PC7 1 2 NC
PC6 3 4 NC
PC5 5 6 NC
PC4 7 8 NC
PC3 9 10 NC
PC2 11 12 NC
PC1 13 14 NC
PC0 15 16 NC
PB7 17 18 NC
PB6 19 20 NC
PB5 21 22 NC
PB4 23 24 NC
PB3 25 26 GND
PB2 27 28 GND
PB1 29 30 GND
PB0 31 32 GND
PA7 33 34 GND
PA6 35 36 NC
PA5 37 38 NC
PA4 39 40 NC
PA3 41 42 NC
PA2 43 44 NC
PA1 45 46 NC
PA0 47 48 NC
+5 V 49 50 NC
Figure B-1. The DIO-24 Connector
© National Instruments Corporation B-1 ER-8/16 User Manual
Page 37

I/O Connectors Appendix B
Table B-1. DIO-24 Connector Pin Descriptions
Pin Signal Name Description
1, 3, 5, 7, 9,
11, 13 15
17, 19, 21,
23, 25, 27,
29, 31
33, 35, 37,
39, 41, 43,
45, 47
2, 4, 6, 8, 10,
12, 14, 16, 18,
20, 22, 24, 36,
38, 40, 42, 44,
46, 48, 50
49 +5 V +5 V supply—This pin is connected to the internal +5 V
26, 28, 30, 32,
34
PC<7..0> Port C Channels 7 through 0—These signals are routed back
to the 26-pin OUT connector for daisy chaining to another
ER-8. Each of these pins controls the relay channel of the
daisy-chained ER-8. A digital high on these pins connects
the COM contact of a channel to the NO contact of that
channel. A digital low on these pins connects the COM
contact of a channel to the NC contact of that channel.
PB<7..0> Port B Channels 7 through 0—Each of these pins controls
the relay channel. A digital high on these pins connects the
COM contact of a channel to the NO contact of that channel.
A digital low on these pins connects the COM contact of a
channel to the NC contact of that channel.
PA<7..0> Port A Channels 7 through 0—Each of these pins controls
the relay channel. A digital high on these pins connects the
COM contact of a channel to the NO contact of that channel.
A digital low on these pins connects the COM contact of a
channel to the NC contact of that channel.
NC Not connected.
signal on the ER-8/16.
GND Ground—These pins are connected to the internal ground on
the ER-8/16.
ER-8/16 User Manual B-2 © National Instruments Corporation
Page 38

Appendix B I/O Connectors
DIO-32 Connector
PD1 1 2 PD4
PD3 3 4 PD0
PD6 5 6 PD7
PD2 7 8 PD5
PC5 9 10 PC7
PC3 11 12 PC1
PC2 13 14 PC0
PC6 15 16 PC4
NC 17 18 NC
NC 19 20 NC
NC 21 22 NC
NC 23 24 NC
NC 25 26 GND
NC 27 28 GND
NC 29 30 GND
NC 31 32 GND
NC 33 34 GND
PA4 35 36 PA6
PA0 37 38 PA2
PA1 39 40 PA3
PA7 41 42 PA5
PB5 43 44 PB2
PB7 45 46 PB6
PB0 47 48 PB3
PB4 49 50 PB1
Figure B-2. The DIO-32 Connector
© National Instruments Corporation B-3 ER-8/16 User Manual
Page 39

I/O Connectors Appendix B
Table B-2. DIO-32 Connector Pin Descriptions
Pin Signal Name Description
6, 5, 8, 2, 3, 7,
1, 4
10, 15, 9, 16,
11, 13, 12, 14
45, 46, 43, 49,
48, 44, 50, 47
41, 36, 42, 35,
40, 38, 39, 37
26, 28, 30, 32,
34
17–25, 27, 29,
31, 33
PD<7..0> Port D Channels 7 through 0—These signals are routed back
to the 26-pin OUT connector for daisy chaining to another
ER-8 or ER-16. Each of these pins controls the relay
channel of the daisy chained ER-8 or ER-16. A digital high
on these pins connects the COM contact of a channel to the
NO contact of that channel. A digital low on these pins
connects the COM contact of a channel to the NC contact of
that channel.
PC<7..0> Port C Channels 7 through 0—These signals are routed back
to the 26-pin OUT connector for daisy chaining to another
ER-8 or ER-16. Each of these pins controls the relay
channel of the daisy chained ER-8 or ER-16. A digital high
on these pins connects the COM contact of a channel to the
NO contact of that channel. A digital low on these pins
connects the COM contact of a channel to the NC contact of
that channel.
PB<7..0> Port B Channels 7 through 0—Each of these pins controls
the relay channel. A digital high on these pins connects the
COM contact of a channel to the NO contact of that channel.
A digital low on these pins connects the COM contact of a
channel to the NC contact of that channel.
PA<7..0> Port A Channels 7 through 0—Each of these pins controls
the relay channel. A digital high on these pins connects the
COM contact of a channel to the NO contact of that channel.
A digital low on these pins connects the COM contact of a
channel to the NC contact of that channel.
GND Ground—These pins are connected to the internal ground on
the ER-8/16.
NC Not connected.
ER-8/16 User Manual B-4 © National Instruments Corporation
Page 40

Appendix B I/O Connectors
26-Pin Internal Connectors
+5 V 1 2 GND
+5 V 3 4 GND
+5 V 5 6 GND
+5 V 7 8 GND
PA7 9 10 PB7
PA6 11 12 PB6
PA5 13 14 PB5
PA4 15 16 PB4
PA3 17 18 PB3
PA2 19 20 PB2
PA1 21 22 PB1
PA0 23 24 PB0
+5 V 25 26 GND
+5 V 1 2 GND
+5 V 3 4 GND
+5 V 5 6 GND
+5 V 7 8 GND
PC7 9 10 PD7
PC6 11 12 PD6
PC5 13 14 PD5
PC4 15 16 PD4
PC3 17 18 PD3
PC2 19 20 PD2
PC1 21 22 PD1
PC0 23 24 PD0
+5 V 25 26 GND
a. 26-Pin IN Connector b. 26-Pin OUT Connector
Figure B-3. 26-Pin Internal Connectors
Table B-3. 26-Pin IN Connector Pin Descriptions
Pin Signal Name Description
10, 12, 14,
16, 18, 20,
22, 24
PB<7..0> Port B Channels 7 through 0—Each of these pins controls
the relay channel. A digital high on these pins connects the
COM contact of a channel to the NO contact of that channel.
A digital low on these pins connects the COM contact of a
channel to the NC contact of that channel.
9, 11, 13,
15, 17, 19,
21, 23
PA<7..0> Port A Channels 7 through 0—Each of these pins controls
the relay channel. A digital high on these pins connects the
COM contact of a channel to the NO contact of that channel.
A digital low on these pins connects the COM contact of a
channel to the NC contact of that channel.
2, 4, 6, 8,
26
1, 3, 5, 7,
25
GND Ground—These pins are connected to the internal ground on
the ER-8/16.
+5 V +5 VDC supply—These pins are connected to the internal
(INT) +5 VDC supply on the ER-8/16.
© National Instruments Corporation B-5 ER-8/16 User Manual
Page 41

I/O Connectors Appendix B
Table B-4. 26-Pin OUT Connector Pin Descriptions
Pin Signal Name Description
10, 12, 14,
16, 18, 20,
22, 24
9, 11, 13,
15, 17, 19,
21, 23
2, 4, 6,
8, 26
1, 3, 5, 7,
25
PD<7..0> Port D Channels 7 through 0—These signals are for daisy
chaining to another ER-8 or ER-16. Each of these pins
controls the relay channel of the daisy chained ER-8 or
ER-16. A digital high on these pins connects the COM
contact of a channel to the NO contact of that channel. A
digital low on these pins connects the COM contact of a
channel to the NC contact of that channel.
PC<7..0> Port C Channels 7 through 0—These signals are for daisy
chaining to another ER-8 or ER-16. Each of these pins
controls the relay channel of the daisy chained ER-8 or
ER-16. A digital high on these pins connects the COM
contact of a channel to the NO contact of that channel. A
digital low on these pins connects the COM contact of a
channel to the NC contact of that channel.
GND Ground—These pins are connected to the ground on the
ER-8/16.
+5 V +5 VDC supply—These pins are connected to the +5 V
supply on the ER-8/16.
ER-8/16 User Manual B-6 © National Instruments Corporation
Page 42

Page 43

Page 44

Page 45

Page 46

Page 47

Page 48

Appendix D
Takamisawa VE Series Relay
Technical Data*
This appendix contains a manufacturer data sheet for the relays used on the ER-8/16.
* Copyright © Farnell Electronics, Inc. 1995. Reprinted with permission of copyright owner.
All rights reserved.
Farnell Electronics, Inc. Farnell Relay Products, Takamisawa Relay & SSR General Catalog ‘95–’96.
© National Instruments Corporation D-1 ER-8/16 User Manual
Page 49

Page 50

Page 51

Page 52

Page 53

Page 54

Appendix E Customer Communication
___________________________________________________
For your convenience, this appendix contains forms you can use to request help from National
Instruments or to comment on our products. Filling out a copy of the Technical Support Form
before contacting National Instruments helps us help you better and faster.
National Instruments provides comprehensive technical assistance around the world. In the U.S.
and Canada, applications engineers are available Monday through Friday from 8:00 a.m. to
6:00 p.m. (central time). In other countries, contact the nearest branch office. You may fax
questions to us at any time.
Corporate Headquarters
(512) 795-8248
Technical support fax: (800) 328-2203
(512) 794-5678
Branch Offices Phone Number Fax Number
Australia 03 9879 5166 03 9879 6277
Austria 0662 45 79 90 0 0662 45 79 90 19
Belgium 02 757 00 20 02 757 03 11
Canada (Ontario) 905 785 0085 905 785 0086
Canada (Quebec) 514 694 8521 514 694 4399
Denmark 45 76 26 00 45 76 26 02
Finland 09 527 2321 09 502 2930
France 01 48 14 24 24 01 48 14 24 14
Germany 089 741 31 30 089 714 60 35
Hong Kong 2645 3186 2686 8505
Israel 03 5734815 03 5734816
Italy 02 413091 02 41309215
Japan 03 5472 2970 03 5472 2977
Korea 02 596 7456 02 596 7455
Mexico 5 520 2635 5 520 3282
Netherlands 0348 433466 0348 430673
Norway 32 84 84 00 32 84 86 00
Singapore 2265886 2265887
Spain 91 640 0085 91 640 0533
Sweden 08 730 49 70 08 730 43 70
Switzerland 056 200 51 51 056 200 51 55
Taiwan 02 377 1200 02 737 4644
U.K. 01635 523545 01635 523154
© National Instruments Corporation E-1 ER-8/16 User Manual
Page 55

Technical Support Form
___________________________________________________
Photocopy this form and update it each time you make changes to your software or hardware, and use the completed
copy of this form as a reference for your current configuration. Completing this form accurately before contacting
National Instruments for technical support helps our applications engineers answer your questions more efficiently.
If you are using any National Instruments hardware or software products related to this problem, include the
configuration forms from their user manuals. Include additional pages if necessary.
Name
Company
Address
Fax ( ) Phone ( )
Computer brand Model Processor
Operating system
Speed MHz RAM MB Display adapter
Mouse yes no Other adapters installed
Hard disk capacity MB Brand
Instruments used
National Instruments hardware product model Revision
Configuration
National Instruments software product Version
Configuration
The problem is
List any error messages
The following steps will reproduce the problem
Page 56

ER-8/16 Hardware Configuration Form
Record the settings and revisions of your hardware on the line to the right of each item. Complete a new copy of
this form each time you revise your software or hardware configuration, and use this form as a reference for your
current configuration. Completing this form accurately before contacting National Instruments for technical support
helps our applications engineers answer your questions more efficiently.
National Instruments Products
• SW1 Switch Position (INT or EXT) _________________________________________________________
• Power (INT or EXT) _________________________________________________________
• Connector _________________________________________________________
(DIO-24, DIO-32, or IN)
• Daisy-Chained (Yes or No) _________________________________________________________
• SC-205X Series Cable Adapter _________________________________________________________
(Yes or No)
• PC-Plug-in Card or DAQCard _________________________________________________________
Other Products
• Computer Make and Model _________________________________________________________
• Amount of Memory _________________________________________________________
• Type of Video Board Installed _________________________________________________________
• System and Finder Versions _________________________________________________________
• Programming Language _________________________________________________________
• Programming Language Version _________________________________________________________
• Other Boards in System _________________________________________________________
• Slots (base I/O addresses) of Other
Boards _________________________________________________________
Page 57

Documentation Comment Form
National Instruments encourages you to comment on the documentation supplied with our products. This
information helps us provide quality products to meet your needs.
Title: ER-8/16 User Manual
Edition Date: December 1996
Part Number:371197A-01
Please comment on the completeness, clarity, and organization of the manual.
If you find errors in the manual, please record the page numbers and describe the errors.
Thank you for your help.
Name
Title
Company
Address
Phone ( )
Mail to: Technical Publications Fax to: Technical Publications
National Instruments Corporation National Instruments Corporation
6504 Bridge Point Parkway (512) 794-5678
Austin, TX 78730-5039
Page 58

Glossary
Prefix Meaning Value
p- picon- nano-
µ- micro-
m- millik- kiloM- mega-
° degrees
Ω ohms
% percent
A amperes
AC alternating current
AWG American Wire Gauge
C Celsius
cm centimeters
COM common
DAQ data acquisition
DC direct current
EXT external
GND ground
Hz hertz
in. inches
INT internal
I/O input/output
LED light-emitting diode
MB megabytes of memory
MOV metal oxide varistor
NB NuBus Series computers
NC normally closed
NO normally open
PA port A pin
PB port B pin
PC port C pin
PCMCIA personal computer memory card association
10
10
10
10
10
10
-12
-9
-6
-3
3
6
© National Instruments Corporation Glossary-1 ER-8/16 User Manual
Page 59

Glossary
PD port D pin
PWB printed wire board
RAM random-access memory
s seconds
SPDT single-pole double-throw
V volts
VAC volts alternating current
VDC volts direct current
Vrms volts, root-mean-square
ER-8/16 User Manual Glossary-2 © National Instruments Corporation
Page 60

Index
Numbers
front connectors
+5 V signal
26-pin internal connector (table),
B-5, B-6
DIO-24 connector (table), B-2
26-pin internal connectors
pin assignments (figure), B-5
pin descriptions (table), B-5 to B-6
C
channel 1 LED
description (table), 2-3
parts locator diagram, 2-2
channel 1 relay
description (table), 2-3
parts locator diagram, 2-2
channel connections, 3-3 to 3-6
channel isolation, 3-4
contact protection for inductive loads,
3-4 to 3-6
arc suppressor pad locations for
channel 1 (figure), 3-6
arc suppressor placement
COM to NC (figure), 3-6
COM to NO (figure), 3-5
using flyback diode for DC loads
(figure), 3-5
power-up conditions, 3-4
wire gauge, 3-4
channel isolation, 3-4
channel rating specifications, A-1
configuration. See data acquisition system
configuration; setup.
connecting ER-8/16 to DAQ devices
ER-8/16 front connector (figure), 2-7
procedural steps, 2-5 to 2-6
connectors
ER-8/16 front connector (figure), 2-7
contact protection for inductive loads, 3-4
customer communication, xii, E-1
D
daisy chaining the ER-8/16, 3-8
data acquisition devices, connecting to
exceeding maximum ratings
(warning), 3-1
for DIO-24 devices, 3-1 to 3-2
for DIO-32 boards, 3-2
internal connectors, 3-7 to 3-8
daisy chaining the ER-8/16, 3-8
I/O connectors
26-pin internal connectors, B-5
to B-6
DIO-24 connector, B-1 to B-2
DIO-32 connector, B-3 to B-4
J1 connector
description (table), 2-3
parts locator diagram, 2-2
J2 connector
description (table), 2-3
parts locator diagram, 2-2
J3 connector
description (table), 2-3
parts locator diagram, 2-2
J8 connector
description (table), 2-3
parts locator diagram, 2-2
to 3-6
arc suppressor pad locations for
channel 1 (figure), 3-6
arc suppressor placement
COM to NC (figure), 3-6
COM to NO (figure), 3-5
technical information, C-1
using flyback diode for DC loads
(figure), 3-5
ER-8/16, 2-5 to 2-6
© National Instruments Corporation Index-1 ER-8/16 User Manual
Page 61

Index
data acquisition system configuration
ER-8/16 configuration with DIO devices
(figure), 3-9
ER-8/16 configuration with
multifunction DAQ boards
(figure), 3-10
digital interface, 4-3
DIO-24 connector
pin assignments (figure), B-1
pin descriptions (table), B-2
DIO-24 devices
connecting to ER-8/16, 3-1 to 3-2
power supply (note), 3-3
DIO-32 boards
connecting to ER-8/16, 3-2
external power supply required
(note), 3-3
DIO-32 connector
pin assignments (figure), B-3
pin descriptions (table), B-4
documentation
conventions used in manual, x-xi
National Instruments
documentation, xi-xii
organization of manual, ix
E
environment specifications, A-2
equipment, optional, 1-2
ER-8/16
block diagram, 4-2
features, 1-1
getting started, 1-1
optional equipment, 1-2
software, 1-2
unpacking, 1-2
fuses
description (table), 2-3
parts locator diagram, 2-2
replacing, 2-6
G
GND signal
26-pin internal connector
(table), B-5, B-6
DIO-24 connector (table), B-2
DIO-32 connector (table), B-4
I
inductive load, protection against.
See contact protection for inductive loads.
internal connectors, 3-7 to 3-8
26-pin internal connectors
pin assignments (figure), B-5
pin descriptions (table), B-5 to B-6
daisy chaining the ER-8/16, 3-8
I/O connectors. See also connectors.
26-pin internal connectors
pin assignments (figure), B-5
pin descriptions (table), B-5 to B-6
DIO-24 connector
pin assignments (figure), B-1
pin descriptions (table), B-2
DIO-32 connector
pin assignments (figure), B-3
pin descriptions (table), B-4
M
manual. See documentation.
F
fax technical support, E-1
front connectors
exceeding maximum ratings
(warning), 3-1
for DIO-24 devices, 3-1 to 3-2
for DIO-32 boards, 3-2
ER-8/16 User Manual Index-2 © National Instruments Corporation
O
operation of ER-8/16. See theory
of operation.
optional equipment, 1-2
Page 62

Index
P
PA<7..0> signal
26-pin internal connector (table), B-5
DIO-24 connector (table), B-2
DIO-32 connector (table), B-4
PB<7..0> signal
26-pin internal connector (table), B-5
DIO-24 connector (table), B-2
DIO-32 connector (table), B-4
PC<7..0> signal
26-pin internal connector (table), B-6
DIO-24 connector (table), B-2
DIO-32 connector (table), B-4
PD<7..0> signal
26-pin internal connector (table), B-6
DIO-32 connector (table), B-4
physical specifications, A-2
power LED
description (table), 2-3
parts locator diagram, 2-2
power supply, 3-2 to 3-3
exceeding maximum ratings
(warning), 3-2
requirements for ER-8/16, 3-3
setting up, 3-2 to 3-3
specifications, A-1
power supply switch (SW1)
description (table), 2-3
parts locator diagram, 2-2
power-up conditions, 3-4
R
relay channels
channel 1 relay
description (table), 2-3
parts locator diagram, 2-2
ER-8/16 onboard equivalent circuit
(figure), 4-3
Takamisawa VE series relay technical
data, D-1
theory of operation, 4-3
S
safety information for ER-8/16, 2-4
SC-205X series, using with ER-8/16, 3-8
screw terminals
description (table), 2-3
parts locator diagram, 2-2
setup, 2-1 to 2-7
connecting ER-8/16 to DAQ device, 2-5
to 2-6
ER-8/16 front connector (figure), 2-7
overview, 2-1
parts locator diagram, 2-2
description (table), 2-3
safety information, 2-4
signal connections
channel connections, 3-3 to 3-6
channel isolation, 3-4
contact protection for inductive
loads, 3-4 to 3-6
power-up conditions, 3-4
wire gauge, 3-4
connecting signal lines, 3-6 to 3-7
DAQ system configuration with
ER-8/16, 3-9 to 3-10
front connectors, 3-1 to 3-2
exceeding maximum ratings
(warning), 3-1
for DIO-24 devices, 3-1 to 3-2
for DIO-32 boards, 3-2
internal connectors, 3-7 to 3-8
26-pin internal connectors, B-5
to B-6
daisy chaining the ER-8/16, 3-8
warnings, 3-7
I/O connectors
26-pin internal connectors, B-5
to B-6
DIO-24 connector, B-1 to B-2
DIO-32 connector, B-3 to B-4
power supply, 3-2 to 3-3
using SC-205X series with ER-8/16, 3-8
specifications
channel ratings, A-1
environment, A-2
physical, A-2
power requirements, A-1
© National Instruments Corporation Index-3 ER-8/16 User Manual
Page 63

Index
surge protector pads
description (table), 2-3
parts locator diagram, 2-2
SW1 (power supply switch)
description (table), 2-3
parts locator diagram, 2-2
T
Takamisawa VE series relay technical
data, D-1
technical support, E-1
theory of operation
block diagram, 4-2
digital interface, 4-3
functional overview, 4-1
relay channels, 4-3
U
unpacking the ER-8/16, 1-2
V
voltage, hazardous, 2-4
W
wire gauge, channel connections, 3-4
ER-8/16 User Manual Index-4 © National Instruments Corporation
 Loading...