

Page 1
DIO 6533
User Manual
High-Speed Digital I/O Boards for
PCI, PXI, CompactPCI, AT, EISA, or
PCMCIA Bus Systems
July 1997 Edition
Part Number 321464B-01
© Copyright 1997 National Instruments Corporation. All rights reserved.
Page 2
Internet Support
support@natinst.com
E-mail: info@natinst.com
FTP Site: ftp.natinst.com
Web Address: http://www.natinst.com
Bulletin Board Support
BBS United States: (512) 794 -5422
BBS United Kingdom: 01635 551422
BBS France: 01 48 65 15 5 9
Fax-on-Demand Support
(512) 418-1111
Telephone Support (U.S.)
Tel: (512) 795-8248
Fax: (512) 794-5678
International Offices
Australia 03 9879 5166, Austria 0662 45 79 90 0, Belgium 02 757 00 20,
Canada (Ontario) 905 785 0085, Canada (Québec ) 514 694 8521, Denmark 45 76 26 00,
Finland 09 725 725 11, France 01 48 14 24 24, Germany 089 741 31 30,
Hong Kong 2645 3186, Israel 03 5734815, Ital y 02 413091, Jap an 03 5472 2970,
Korea 02 596 7456, Mexico 5 520 2635, Nethe rlands 034 8 433466, Nor way 32 84 84 00,
Singapore 2265886, Spain 91 640 0085, Swede n 08 730 49 70, Switzerland 056 200 51 51,
Taiwan 02 377 1200, United Kingdom 01635 523545
National Instruments Corporate Headquarters
6504 Bridge Point Parkw ay Austin, TX 78730-503 9 Tel: (512) 794-0100
Page 3

Important Information
Warranty
The PCI-DIO-32HS, PXI-6533, AT-DIO-32HS, and DAQCard-6533 devices are warranted against defects in materials
and workmanship for a period of one year from the date of shipment, as evidenced by receipts or other documentation.
National Instruments will, at its option, repair or replace equipment that proves to be defective during the warranty
period. This warranty includes parts and l abor.
The media on which you receive National Instru ments software ar e warranted not to fail to execute pro grammi ng
instructions, due to defects in materials and workmanship, for a period of 90 days from date of shipment, as evidenced
by receipts or other documentation. National Instruments will, at its option, repair or replace soft ware media that do
not execute programming instructions if National Instruments receives notice of such defects during the warranty
period. National Instrument s does not war rant that the oper ation of the softwar e shall be un interr upted or error free.
A Return Material Authorization (RMA) number must be obtained from the factory and clearly marked on the outside
of the package before any equipment will be accepted for warranty work. National Instruments will pay the shipping
costs of returning to the owner par ts whi ch are cov ered by w arranty .
National Instruments believes that the information in this manual is accurate. The document has been carefully
reviewed for technical accuracy. In the event that technical or typographical errors exist, National Instruments reserves
the right to make ch anges to subsequent edition s of this document withou t prior notice to hol ders of this edition. The
reader should consult National Instruments if errors are suspected. In no event shall National Instruments be liable for
any damages arising out of or related to this docum ent or the in format ion contai ned in it.
E
XCEPT AS SPECIFIED HEREIN
SPECIFICALLY DISCLAIMS ANY WARRANTY OF MERCHANTABILITY OR FITNESS FOR A PARTICULAR PURPOSE
C
USTOMER’S RIGHT TO RECOVER DAMAGES CAUSED BY FAULT OR NEGLIGENCE ON THE PART OF NATIONAL
I
NSTRUMENTS SHALL BE LIMITED TO THE AMOUNT THERETOFORE PAID BY THE CUSTOMER
WILL NOT BE LIABLE FOR DAMAGES RESULTING FROM LOSS OF DATA, PROFITS, USE OF PRODUCTS, OR INCIDENTAL OR
CONSEQUENTIAL DAMAGES, EVEN IF ADVISED OF THE POSSIBILITY THEREOF
Instruments will apply regardles s of the fo rm of acti on, whether i n contract or tort, incl uding neg lig ence. Any acti on
against National Instruments must be brought wit hin one year after the cause of action accrues. Nation al Instrument s
shall not be liable for any delay in performan ce due to causes beyo nd it s reasonable cont rol. The warranty pr ovided
herein does not cover damages, defects, malf unctio ns, or s ervice fai lures caused by owne r’s fail ure to fol low the
National Instruments in sta llat ion, o perat ion, or ma inte na nce instr uct ions; owner ’s modif icat ion of the p roduct;
owner’s abuse, misuse, or negligent acts; and power failure or surges, fire, flood, accident, actions of third parties, or
other events outside reasonable control.
, N
ATIONAL INSTRUMENTS MAKES NO WARRANTIES, EXPRESS OR IMPLIED, AND
.
. N
ATIONAL INSTRUMENTS
. This limitation of the liability of National
Copyright
Under the copyright laws, this publication may not be reproduced or transmitted in any form, electronic or mechanical,
including photocopying, reco rding, storin g in an in format ion retr iev al system , or tra nslati ng, in wh ole or in par t,
without the prior written consent of Nation al Inst rument s Corpo ration .
Trademarks
LabVIEW®, NI-DAQ®, RTSI®, ComponentWorks™, CVI™, DAQCard™, MITE™, SCXI™, and VirtualBench™
are trademarks of National Instruments Corpor ation.
Product and company names listed are trademarks or trade names of their respective companies.
WARNING REGARDING MEDICAL AND CLINICAL USE OF NATIONAL INSTRUMENTS PRODUCTS
National Instruments products are not design ed with comp onents and testing in tend ed to ensure a level o f reliabi lity
suitable for use in treatment and diag nosi s of humans . Appli cations of Nation al Instru men ts product s invol vin g
medical or clinical treatment can create a potential for accidental injury caused by product failure, or by err ors on the
part of the user or application designer . Any us e or applicat ion of Nat ional Ins trum ent s products for or involvi ng
medical or clinical treatment must be performed by properly trained and qualified medical personnel, and all traditional
medical safeguards, equipment, and procedures that are appropriate in the particular situation to prevent serious injury
or death should always continue to be used when National Instruments prod ucts ar e being used. National Instruments
products are NOT intended to be a substitute f or any for m of establ ished pr ocess, proce dure, or equi pmen t used to
monitor or safegua rd huma n he alth and sa fety in med ical or clin ical t reat ment .
Page 4

About This Manual
Organization of This Manual................................................ ...... ..... .............................xi
Conventions Used in This Manual................................................................................ xii
National Instruments Documentation.............................. ..... ........................................xii
Related Documentation.................................................................................................xiii
Customer Communication............................................................................................xiv
Chapter 1
Introduction
About the DIO 6533 Devices........................................................................................1-1
Using PXI with CompactPCI........................................................................................1-2
What You Need to Get Started.....................................................................................1-3
Software Programming Choices...................................................................................1-4
National Instruments Application Software...................................................1-4
NI-DAQ Driver Software...............................................................................1-5
Register-Level Programming.........................................................................1-6
Optional Equipment......................................................................................................1-7
Unpacking.....................................................................................................................1-8
Table of
Contents
Chapter 2
Installation and Configuration
Software Installation.....................................................................................................2-1
Hardware Installation....................................................................................................2-1
Installing the PCI-DIO-32HS.........................................................................2-1
Installing the PXI-6533..................................................................................2-2
Installing the AT-DIO-32HS..........................................................................2-3
Installing the DAQCard-6533........................................................................ 2-3
PCI, PXI, and DAQCard Device Configuration...........................................................2-4
©
National Instruments Corporation v DIO 6533 User Manual
Page 5

Table of Contents
AT Device Configuration.............................................................................................2-5
Bus Interface..................................................................................................2-5
Chapter 3
Hardware Overview
Unstrobed I/O...............................................................................................................3-4
Strobed I/O—Pattern Generation and Handshaking.................................................... 3-5
Pattern and Change Detection........................................................................ 3-6
Handshaking Protocols .................................................................................. 3-8
Comparing Protocols............................ ..... ..................................................... 3-10
Starting a Handshaking Transfer.................................................................... 3-12
Transfer Rates............................................................................................................... 3-13
Plug and Play Mode.........................................................................2-5
Switchless Data Acquisition............................................................ 2-5
Base I/O Address Selection...............................................2-6
DMA Channel Selection ...................................................2-6
Interrupt Channel Selection............................................... 2-6
Pattern-Detection Triggers ..............................................................3-6
Change Detection ............................................................................3-7
Message Generation ........................................................................ 3-8
8255 Emulation................................................................................ 3-9
Level ACK....................................................................................... 3-9
Leading-Edge Pulse........................................... ..............................3-9
Long Pulse....................................................................................... 3-9
Trailing-Edge Pulse......................................................................... 3-9
Burst Mode...................................................................................... 3-10
Controlling the Startup Sequence.................................................... 3-12
Controlling Line Polarities .............................................................. 3-13
Chapter 4
Signal Connections
I/O Connector............................................................................................................... 4-1
Signal Descriptions............................................... ......................................... 4-3
Signal Characteristics................................................... ...... ............. 4-6
Control Signal Summary.................................................................4-7
RTSI Bus Interface.........................................................................................4-7
Board and RTSI Clocks................................................................... 4-8
RTSI Triggers..................................................................................4-8
Data Signal Connections.............................................................................................. 4-9
Unstrobed I/O.................................................................................................4-10
Strobed I/O.....................................................................................................4-12
DIO 6533 User Manual vi
©
National Instruments Corporation
Page 6

Timing Connections......................................................................................................4-13
Pull-Up and Pull-Down Connections ...........................................................................4-13
Power Connections .............................................. ...... ...... .............................................4-14
Field Wiring and Termination ......................................................................................4-14
Chapter 5
Signal Timing
Pattern-Generation Timing...........................................................................................5-1
Handshake Timing........................................................................................................5-4
Table of Contents
Request Timing ..............................................................................................5-2
Internal Requests..............................................................................5-2
External Requests.............................................................................5-2
Trigger Timing...............................................................................................5-3
8255 Emulation ..............................................................................................5-4
Input.................................................................................................5-5
Output...............................................................................................5-6
8255 Emulation Mode Timing Specifications.................................5-8
Other Asynchronous Modes...........................................................................5-9
Level-ACK Mode ............................................................................5-9
Input...................................................................................5-9
Output................................................................................5-10
Level-ACK Mode Timing Specifications..........................5-11
Leading-Edge Mode....................................... ..... ...... .......................5-14
Input............................................................ ...... .................5-14
Output................................... ..... ........................................5-14
Leading-Edge Mode Timing Specifications......................5-16
Long-Pulse Mode.............................................................................5-19
Long-Pulse Mode Timing Specifications..........................5-20
Trailing-Edge Mode .........................................................................5-23
Input...................................................................................5-23
Output................................................................................5-23
Trailing-Edge Mode Timing Specifications......................5-25
Burst Mode.....................................................................................................5-27
Burst Mode Timing Specifications..................................................5-28
©
National Instruments Corporation vii DIO 6533 User Manual
Page 7

Table of Contents
Appendix A
Specifications
Appendix B
Optional Adapter Description
Appendix C
Customer Communication
Glossary
Index
Figures
Figure 1-1. The Relationship Between the Programming Environment, NI-DAQ,
and Your Hardware ............................................................................... 1-6
Figure 2-1. DAQCard-6533 Completed Installation................................................ 2-4
Figure 3-1. PCI-DIO-32HS/PXI-6533 Block Diagram ........................................... 3-2
Figure 3-2. AT-DIO-32HS Block Diagram.............................................................3-3
Figure 3-3. DAQCard-6533 Block Diagram............................................................3-4
Figure 3-4. Pattern Detection Example....................................................................3-7
Figure 4-1. 6533 Device I/O Connector Pin Assignments....................................... 4-2
Figure 4-2. RTSI Bus Signal Connection ................................................................ 4-9
Figure 4-3. Example of Data Signal Connections.................................................... 4-11
Figure 4-4. Transmission Line Terminations........................................................... 4-16
Figure 5-1. Pattern-Generation Timing.................................................................... 5-1
Figure 5-2. Internal Request Timing........................................................................ 5-2
Figure 5-3. External Request Timing....................................................................... 5-3
Figure 5-4. Trigger Input Signal Timing.................................................................. 5-4
Figure 5-5. 8255 Emulation Mode Input.................................................................. 5-6
Figure 5-6. 8255 Emulation Mode Output............................................................... 5-7
Figure 5-7. 8255 Emulation Timing......................................................................... 5-8
Figure 5-8. Level-ACK Mode Input ........................................................................5-10
Figure 5-9. Level-ACK Mode Output......................................................................5-11
Figure 5-10. Level-ACK Mode Input Timing............................................................ 5-12
DIO 6533 User Manual viii
©
National Instruments Corporation
Page 8

Table of Contents
Figure 5-11. Level-ACK Mode Output Timing.........................................................5-13
Figure 5-12. Leading-Edge Mode Input.....................................................................5-15
Figure 5-13. Leading-Edge Mode Output.................................................................. 5-16
Figure 5-14. Leading-Edge Mode Input Timing........................................................5-17
Figure 5-15. Leading-Edge Mode Output Timing......................................................5-18
Figure 5-16. Long-Pulse Mode Input.........................................................................5-19
Figure 5-17. Long-Pulse Mode Output.......................................................................5-20
Figure 5-18. Long-Pulse Mode Input Timing ............................................................5-21
Figure 5-19. Long-Pulse Mode Output Timing..........................................................5-22
Figure 5-20. Trailing-Edge Mode Input.....................................................................5-24
Figure 5-21. Trailing-Edge Mode Output...................................................................5-25
Figure 5-22. Trailing-Edge Mode Input Timing........................................................5-26
Figure 5-23. Trailing-Edge Mode Output Timing......................................................5-27
Figure 5-24. Input Burst Mode Transfer Example.....................................................5-28
Figure 5-25. Output Burst Mode Transfer Example...................................................5-29
Figure 5-26. Burst Mode Output Timing (Default)....................................................5-30
Figure 5-27. Burst Mode Input Timing (Default).......................................................5-31
Figure 5-28. Burst Mode Output Timing (PCLK Reversed)......................................5-32
Figure 5-29. Burst Mode Input Timing (PCLK Reversed)........................................5-33
Figure B-1. 68-to-50-Pin Adapter Pin Assignments.................................................B-2
Table
Table 1-1. Pins Used by the PXI-6533 Device.......................................................1-3
Table 2-1. PC AT I/O Address Map .......................................................................2-6
Table 2-2. PC AT Interrupt Assignment Map.........................................................2-8
Table 2-3. PC AT 16-Bit DMA Channel Assignment Map....................................2-9
Table 3-1. 6533 Handshaking Protocols.................................................................3-11
Table 4-1. Signal Descriptions................................................................................4-3
Table 4-2. Control Signal Summary .......................................................................4-7
©
National Instruments Corporation ix DIO 6533 User Manual
Page 9

This manual describes the elect rical and mechanical aspects of the
DIO6533 (formerly called DIO-32HS) family of devices, and contains
information concerning their ope ration and programming. U nless
otherwise noted, text applies to all devices in the DIO6533 family. The
devices named DIO-32HS and 6533 are the same in functionality; their
primary difference is the bus interface.
The DIO6533 family includes the following devices:
• PCI-DIO-32HS
• PXI-6533
• AT-DIO-32HS
• DAQCard-6533
Organization of This Manual
About
This
Manual
The DIO 6533 User Manual is orga nized as follows:
• Chapter1, Introduction, describes the DIO 6533 (DIO -32HS)
devices, lists what you need to get started, descr ibes optional
equipment, and explains how to unpack your de vice.
• Chapter2, Installation and Configuration, explains how to install
and configure your DIO 6533 device.
• Chapter3, Hardware Overview, provides an overview of the
hardware functions of your DIO 6533 devic e.
• Chapter4,
output signal connections to your DIO 6533 device via the device
I/O connector and RTSI connector.
• Chapter5, Signal Timing, provides detailed timing specifications
for DIO 6533 pattern generation and for the various full, two- way
handshaking modes.
• AppendixA, Specifications, lists the specifications for the DIO
6533 devices.
©
National Instruments Corporation xi DIO 6533 User Manual
Signal Connections, describes how to ma ke input a nd
Page 10

About This Manual
• AppendixB, Optional Adapter Description, describes the optional
68-to-50-pin DIO 6533 device adapter.
• AppendixC, Customer Communication, contains forms you can
use to request help from National Instruments or to comment on our
products.
•The Glossary contains an alphabetical list and descriptions of terms
used in this manual, including acronyms, abbreviations,
definitions, metric prefixes, mnemonics, and symbols.
•The Index alphabetically lists topics covered in this manual,
including the page where you can f ind the topic.
Conventions Used in This Manual
The following conventions are used in this manual:
<> Angle brackets containing numbers separated by an ellipsis represent a
range of values associate d with a bit or signal name (for example,
DIOB<3..0>).
♦ The ♦ symbol indicates that the text following it applies only to a
specific DIO6533 device.
bold italic Bold italic text denotes a note, caution, or warning.
6533 device 6533 device refers to the PCI-D IO- 32HS, PXI- 6533, A T-DI O-32HS,
and DAQCard-6533 devices, unless otherwise noted.
italic Italic text denotes emphasis, a cross reference, or an introduction to a
key concept.
SCXI SCXI stands for Signal Conditioning eXtensions for Instrumentation
and is a National Instruments product line designed to perform
front-end signal conditioning for National Instruments plug-in DAQ
boards.
The Glossary lists abbreviations, acronyms, def initions, metric prefixes,
mnemonics, symbols, and ter ms.
National Instruments Documentation
The DIO 6533 User Manual is one piece of the doc umentation set for
your DAQ system. You could have any of seve ral types of documents,
depending on the hardwa re a nd sof twa re in your syste m. U se the
documentation you have as follows:
©
DIO 6533 User Manual xii
National Instruments Corporation
Page 11

About This Manual
• Getting Started with SCXI—If you are using SCXI, this is the first
manual you should re ad. I t giv es an o ve rview of the SC XI sy stem
and contains the most commonly needed information for the
modules, chassis, and software.
• Your SCXI hardware user manuals—If you are using SCXI, read
these manuals next for detailed information about signal
connections and module configuration. They also explain in greater
detail how the module works and contain application hints.
• Your DAQ hardware documentation— This docum entation ha s
detailed information about the DAQ ha rdware that plu gs into or is
connected to your computer. Use this documentation for hardware
installation and configuration instructions, specification
information about your DAQ hardw are, an d applicatio n hints.
• Software documentation—You may have both application software
and NI-DAQ software docum entation. National Instrum ents
®
application software incl udes LabV IE W, L abW indow s
/CVI,
ComponentWorks, and Vir tualBe nch. Afte r you se t up y our
hardware system, use either your applic ation softw are
documentation or the N I-D AQ docu me ntation to he lp y ou write
your application. If y ou have a la rge, comp lica ted system, it is
worthwhile to look through the software documentation before you
configure your har dwar e.
• Accessory installation guides or manuals—If you are using
accessory products, read the terminal block and cable assembly
installation guides. They explain how to physically connect the
relevant pieces of the system. Consult these guides when you are
making your connec tions.
• SCXI Chassis Manual—If you are using SCXI, read this manual for
maintenance information on the chassis and installation
instructions.
Related Documentation
The following documents contain information that you may find helpful
as you read this manual:
• Your computer’s technical reference manual
• National Instruments PXI Specification, rev. 1.0
• PICMG CompactPCI 2 .0 R2 .1
©
National Instruments Corporation xiii DIO 6533 User Manual
Page 12

About This Manual
Customer Communication
National Instruments wants to receive your comments on our products
and manuals. We are interested in the applications you develop with our
products, and we want to help if you have problems with them. To make
it easy for you to contact us, this manual contains comment and
configuration forms for you to complete. These for ms are in
AppendixC, Customer Communication, at the end of this manual.
DIO 6533 User Manual xiv
©
National Instruments Corporation
Page 13

Chapter
Introduction
This chapter describes the DIO6533 (DIO-32HS) devices, lists what
you need to get started, describes optional equipment, and explains how
to unpack your device.
About the DIO 6533 Devices
Thank you for buying a National Instruments DIO6533 device . The
6533devices are 32-bit, parallel digital I/O interfaces for
PC-compatible computers, or PXI or CompactPCI chassis. The 6533
devices offer digital data acquisition, digital waveform generation, and
high-speed, flexible handshaking.
The PCI-DIO-32HS and PXI-6533 are com pletely switchless,
jumperless DAQ devices for PCI buses and PXI or CompactPCI
chassis, respectively. Both contain the National Instruments MITE PCI
interface. The MITE offers bus-master operation, PCI burst transfers,
and high-speed DMA controllers for continuous, scatter-gather DMA
without requiring DMA resources from your computer. See the Using
PXI with CompactPCI section in this chapter for more informatio n on
your PXI-6533 device.
1
The AT-DIO-32HS is a completely switchless, jumperless DAQ device
for AT (16-bit ISA) buses. The AT-DIO-32HS implements the Plug and
Play ISA Specification so that your operating system can configur e all
DMA channels, interrupts, and base I/O addresses. You ca n easily
change device configurations without removing the devic e from your
computer. The AT-DIO-32HS offers dual DMA with channel switching
for uninterrupted, high-speed data transfer.
The DAQCard-6533 is a general-purpose d igital I/O card for com puters
equipped with Type II PCMCIA slots. The small size and weight of the
DAQCard-6533, coupled with low power consumption, make this card
ideal for use in portable computers, making remote digital data
acquisition practical. The card requires very little operating power and
has a standby mode that uses even less power, thus extending the life of
your computer batteries.
© National Instruments Corporation 1-1 DIO 6533 User Manual
Page 14

Chapter 1 Introduction
Each 6533 device contains the National Instruments DAQ-DIO chip,
providing two independent channels of digital input and output, pattern
generation, and handshaking. Each channel offers the following
functions:
• Selectable data path width (8, 16, or 32 bits)
• 16-sample-deep FIFO buffer
• 16-bit and 32-bit counters for timeba se a nd inter val genera tion,
with a maximum timing resolution of 50 ns
• A handshaking controller implementing six flexible timing
protocols
• Start and stop trigger detection and digital pattern detection
• 24mA outputs
• Hysteresis and diode-based line termination on all inputs
With 6533 devices, you can use your c omputer or c hassis a s a digital
I/O tester, logic analyzer, or system controller for laboratory testing,
production testing, and industrial process monitoring and contr ol.
For detailed 6533 device speci fications, see AppendixA,
Specifications.
Using PXI with CompactPCI
Using PXI-compatible products with standard CompactPCI products is
an important feature provided by the PXI Specification, rev.1.0. If you
use a PXI compatible plug-in device in a standard Comp actPCI chassis,
you will be unable to use PXI-specific functions, but you can still use
the basic plug-in device functions. For example, the RTSI bus on your
PXI-6533 device is available in a PXI chassis, but n ot in a CompactPCI
chassis.
The CompactPCI specification permits vendors to develop sub-buses
that coexist with the basic PCI interface on the CompactPCI bus.
Compatible operation is not guaranteed between Compa ctPCI device s
with different sub-buses nor between CompactPCI devices with
sub-buses and PXI. The standard implementation for CompactPCI does
not include these sub-buses. Your PXI-6533 device wi ll work in any
standard CompactPCI chassis adhering to the PICMG
CompactPCI2.0R2.1 document.
DIO 6533 User Manual 1-2 © National Instruments Corporation
Page 15

Chapter 1 Introduction
PXI specific features are impleme nted on the J2 connec tor of the
CompactPCI bus. Table 1-1 lists the J2 pins used by yo ur PXI-6 533
device. Your PXI device is compatible with any CompactPCI chassis
with a sub-bus that does not drive these lines. Even if the sub-bus is
capable of driving these lines, the PXI device is still compatible as long
as those pins on the sub-bus are disabled by default and not ever
enabled. Damage m a y resu lt if these lines ar e dr iven b y the sub- bus.
Table 1-1.
PXI-6533
Signal
RTSI
Trigger
(0..6)
Reserved PXI Star D17
RTSI Clock PXI Trigger (7) E16
Reserved LBR (7, 8, 10, 11,
PXI Pin Name PXI J2 Pin Number
PXI Trigger (0..6) B16, A16, A17, A18, B18,
12)
What You Need to Get Started
To set up and use your DIO 6533 device, you will need the following:
❑ One of the following devices:
PCI-DIO-32HS
PXI-6533
AT-DIO-32HS
DAQCard-6533
Pins Used by the PXI-6533 Device
C18, E18
A3, C3, E3, A2, B2
❑ D IO 6 533 Us er Man ual
© National Instruments Corporation 1-3 DIO 6533 User Manual
Page 16

Chapter 1 Introduction
❑ One of the following software packages and documentation:
NI-DAQ for PC compatibles
LabVIEW for Windows
LabWindows/CVI
ComponentWorks
VirtualBen ch
❑ Appropriate cable:
PSHR68-68M (DAQCard-6 533 only)
Shielded or ribbon c able (f or all de vices)
❑ Your computer, PXI, or CompactPCI chassis and controller
Software Programming Choices
There are several op tions to choo se from whe n programm ing your
National Instruments DAQ hardware. You can use LabVIEW,
LabWindows/CVI, Comp one ntWorks, V irtu alBench, or NI -DA Q.
National Instruments Application Software
LabVIEW features interactive graphics, a state-of-the art user interface,
and a powerful gr aphic al progra mm ing lan gua ge. Th e LabV IEW D ata
Acquisition VI Library, a series of VIs for using LabVIE W with
National Instruments DAQ hardware, is included with LabVIEW. The
LabVIEW Data Acquisition VI Library is f unctionally equivalent to the
NI-DAQ software.
LabWindows/CVI features interactive graphics and a state-of-the-art
user interface, and uses the ANSI sta ndard C pro gram ming langua ge.
The LabWindows/CVI Data A cquisition Lib rary, a serie s of fun ction s
for using National Instruments DAQ hardware, is included with
LabWindows/CVI. The LabWindows/CVI Data Acquisition Library is
functionally equivalent to the NI-DAQ software.
ComponentWorks con tains tools for data acq uisition and instr ument
control built on NI-DAQ driver softw are. Component Works provide s a
higher-level programming interface for building virtual instruments
through standard OLE controls and DLLs. With ComponentWorks, you
can use all of the configuration tools, resource management utilities,
and interactive control utilities included with NI-DAQ.
DIO 6533 User Manual 1-4 © National Instruments Corporation
Page 17

VirtualBench features virtual instruments that combine DAQ products,
software, and your co mputer to create a stand- alone instrumen t with the
added benefit of the processing, display, and storage capabilities of
your computer. VirtualBench instruments load and save waveform data
to disk in the same forms that can be used i n popular s preads heet
programs and word proce ssors.
Using LabVIEW, LabWindows/CVI, ComponentWorks, or
VirtualBench software will greatly reduce the development time for
your data acquisition and control application.
NI-DAQ Driver Software
The NI-DAQ driver software is included at no ch ar ge with all Natio n al
Instruments DAQ hardware. NI-DAQ is not packaged with SCXI or
accessory products, except for the SCXI-1200. NI-DAQ has an
extensive library of functions that you can c all from your application
programming enviro nment. These fu nctions includ e routines for analo g
input (A/D conversion), buffered data acquisition (high-speed A/D
conversion), analog output (D/A conversion), wavefor m generation
(timed D/A conversion), digital I/O, counter/timer operations, SCXI,
RTSI, calibration, messaging, and acquiring da ta to extended memory.
Chapter 1 Introduction
NI-DAQ has both high-level DAQ I/O functions for maximum ease of
use and low-level DAQ I/O functions for maximum flexibility and
performance. Examples for high-l evel funct ions a re strea ming dat a t o
disk or acquiring a certain number of da ta points. An example of a
low-level function is writing directly to registers on the DAQ device.
NI-DAQ does not sacrifice performance of National Instruments DAQ
devices because it lets multiple devices operate at their peak
performance, even simul taneous ly.
NI-DAQ also internally addresses many of the com plex issues between
the computer and the DAQ hardware such as programming interrupts
and DMA controllers. NI-DAQ maintains a consistent software
interface so that you can change platforms with minimal modifications
to your code. Whether you are using c onventional program ming
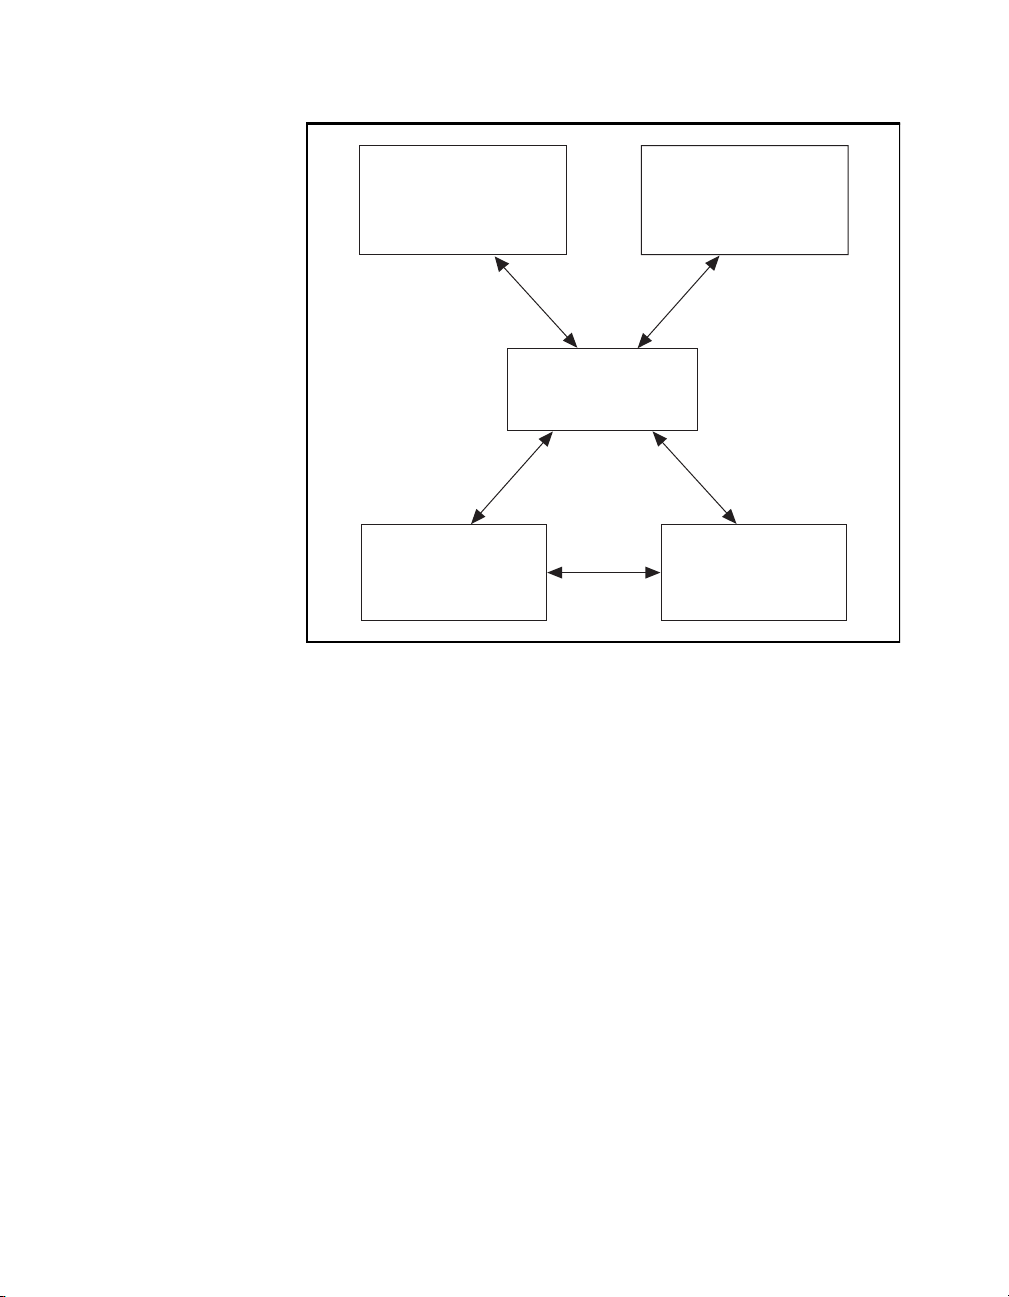
languages or NI-DAQ software, your application uses the NI-DAQ
driver software, as illustrated in Figure1-1.
© National Instruments Corporation 1-5 DIO 6533 User Manual
Page 18
Chapter 1 Introduction
Conventional
Programming
Environment
NI-DAQ
Driver Software
DAQ or
SCXI Hardware
Figure 1-1. The Relationship Between the Programming Environment, NI-DAQ,
and Your Hardware
ComponentWorks,
LabVIEW,
LabWindows/CVI,
or VirtualBench
Personal
Computer or
Workstation
You can use your 6533 device, together wi th other AT (16-b it ISA),
PCI, PC, EISA, DAQCard, and DAQPad Series DAQ hardware, with
NI-DAQ software for PC compatibles. The PCI-DIO-32HS or
AT-DIO-32HS requires version 5 .0 or late r. T he PXI -65 33 or
DAQCard-6533 requires ve rsion 5.1 or later.
Register-Level Programming
The final option for programming any National Instruments DAQ
hardware is t o wr it e r eg iste r- lev el softw are . Writ ing re gist er-l ev el
programming software can be very time-consuming and inefficient and
is not recommended for most u ser s.
Even if you are an experienced register-level programmer, consider
using NI-DAQ or National I nstruments applicatio n software to prog ram
your National Instruments DAQ hardware. Using National Instruments
application softw are is as easy and as flex ible as regis ter-lev el
programming and can save weeks of develop ment time.
DIO 6533 User Manual 1-6 © National Instruments Corporation
Page 19

Optional Equipment
National Instruments offers a variety of pr oducts to use with your
6533device, including cables, connector blocks, and other accessories,
as follows:
• Cables and cable assemblies, shielded and ribbon
• Connector blocks, shielded and unshielded 50 a nd 68- pin scr ew
terminals
• Real Time System Integration (RTSI) bus cables
• SCXI modules and accessories for isolating digital signals,
controlling relays, and creating isolated analog outputs
• Low channel-count signal conditioning modules, devices, and
accessories, including relays and optical isolation
Some cables and accessories require use of the 68 to 50-pin DIO 6533
device adaptor, detailed in Appe ndixB, Optional Adapter D escription.
For more specific information about these products, refer to your
National Instruments catalogue or web site, or c all the office near est
you.
Chapter 1 Introduction
© National Instruments Corporation 1-7 DIO 6533 User Manual
Page 20

Chapter 1 Introduction
Unpacking
Your 6533 device is ship ped in an a ntistatic p ackage to pr ev ent
electrostatic damage to the device. El ectrostatic disc harge can da mage
several components on the device. To avoid such damage in handling
the device, take the following precautions:
• Ground yourself via a grounding strap or by hold ing a ground ed
object.
• Touch the antistatic package to a metal part of your computer
chassis before rem oving the d evic e f rom the pack age .
• Remove the device from the package and inspect the device for
loose components or a ny sign of d amag e. N otify N atio na l
Instruments if the device appear s damaged in any way. Do not
install a damaged dev ice into yo ur comp uter .
• Never touch the exposed pins of connectors.
• Store your 6533 device in the antistatic envelope when not in use.
DIO 6533 User Manual 1-8 © National Instruments Corporation
Page 21

Installation and
Chapter
Configuration
This chapter expla ins how to insta ll and co nfig ure y our DIO 653 3
device.
Software Installation
Install your software before you install your 6533 devi ce. Refe r to the
appropriate release notes indicated be low for specific instruc tions on
the software ins tall ation sequ ence .
If you are using NI-DAQ, refer to your NI-D AQ release notes. Find
the insta llation section fo r your o perating sy stem and fo llow the
instructions given there.
If you are using LabV IEW, L a bWindow s/CVI, or o ther N ationa l
Instruments applica tion sof tware packag es, refe r to th e appro priat e
release notes. After you have installed yo ur application software, refer
to your NI-DAQ relea se no tes an d follow th e instruc tions give n there
for your operating sy stem a nd ap plica tion softwa re p acka ge.
2
Hardware Installation
Following are general installation instructions for each device. Consult
your computer or chassis user manual or technical reference manual for
specific instructions about installing new devices in your com puter or
chassis.
Installing the PCI-DIO-32HS
You can install a PCI-DIO-32HS in any ava ilable 5 V PCI expansion
slot in your computer.
1. Turn off and unplug your comp uter .
2. Remove the top cover or access port to the e xpan sion slots.
3. Remove the expansion slot cover on the back panel of the
computer.
© National Instruments Corporation 2-1 DIO 6533 User Manual
Page 22

Chapter 2 Installation and Configuration
4. Touch the metal part inside your computer to discharge any static
electricity that might be on your clothes or body.
5. Insert the PCI-DIO-32HS into a 5 V PCI slot. It may be a tight fit, but
do not force the device into place.
6. Screw the mounting bracket of the PCI-DIO-32HS to the back panel
rail of the computer.
7. Visually verify the installation.
8. Replace the top cover of your com puter.
9. Plug in and turn on your compute r.
Installing the PXI-6533
You can install a PXI-6533 in any available 5V periphera l slot in your
PXI or CompactPCI chassis.
Note: The PXI-6533 has connections to several reserved lines on the
CompactPCI J2 connector. Before installing a PXI-6533 in a CompactPCI
system that uses J2 connector lines for purposes other than PXI, see Using
PXI with CompactPCI in Chapter1, Introduction, of this manual.
1. Turn off and unplug your PXI or CompactPCI c hassis.
2. Choose an unused PXI or CompactPCI 5V peri phera l slot. For
maximum performance, install the PXI-6533 in a slot that supports
bus arbitration, or bus-master cards. T he PX I-6533 c ontains
onboard bus-master DMA logic that can operate only in such a slot.
If you choose a slot that does not support bus masters, you will have
to disable the onboard DMA controller using your software. PXIcompliant chassis must have bus arbitration for all slots.
3. Remove the filler panel for the peripheral slot you have chosen.
4. Touch a metal part on your cha ssis to discha rge a ny sta tic
electricity that might be on your clothes or body.
5. Insert the PXI-6533 in the selected 5V slo t. Use the injector/ejector
handle to fully inject the device into place.
6. Screw the front panel of the PXI-6533 to the front panel mounting
rails of the PXI or CompactPCI chassis.
DIO 6533 User Manual 2-2 © National Instruments Corporation
Page 23

7. Visually verify the installation.
8. Plug in and turn on the PXI or CompactPCI chassis.
Installing the AT-DIO-32HS
You can install an AT-DIO-32HS in any available AT (16-bit ISA) or
EISA expansion slot in your com puter.
1. Turn off and unplug your computer.
2. Remove the top cover or access port to the expansion slots.
3. Remove the expansion slot cover on the back panel of the
computer.
4. Touch the metal part inside your computer to discharge any static
electricity that might be on your clothes or body.
5. Insert the AT-DIO-32HS into an AT (16-bit ISA) or EISA slot. It
may be a tight fit, but do not force the device into place.
6. Screw the mounting bracket of the AT-DIO-32HS to the back panel
rail of the computer.
7. Visually verify the installation.
8. Replace the top cover of the computer.
9. Plug in and turn on your compute r.
Chapter 2 Installation and Configuration
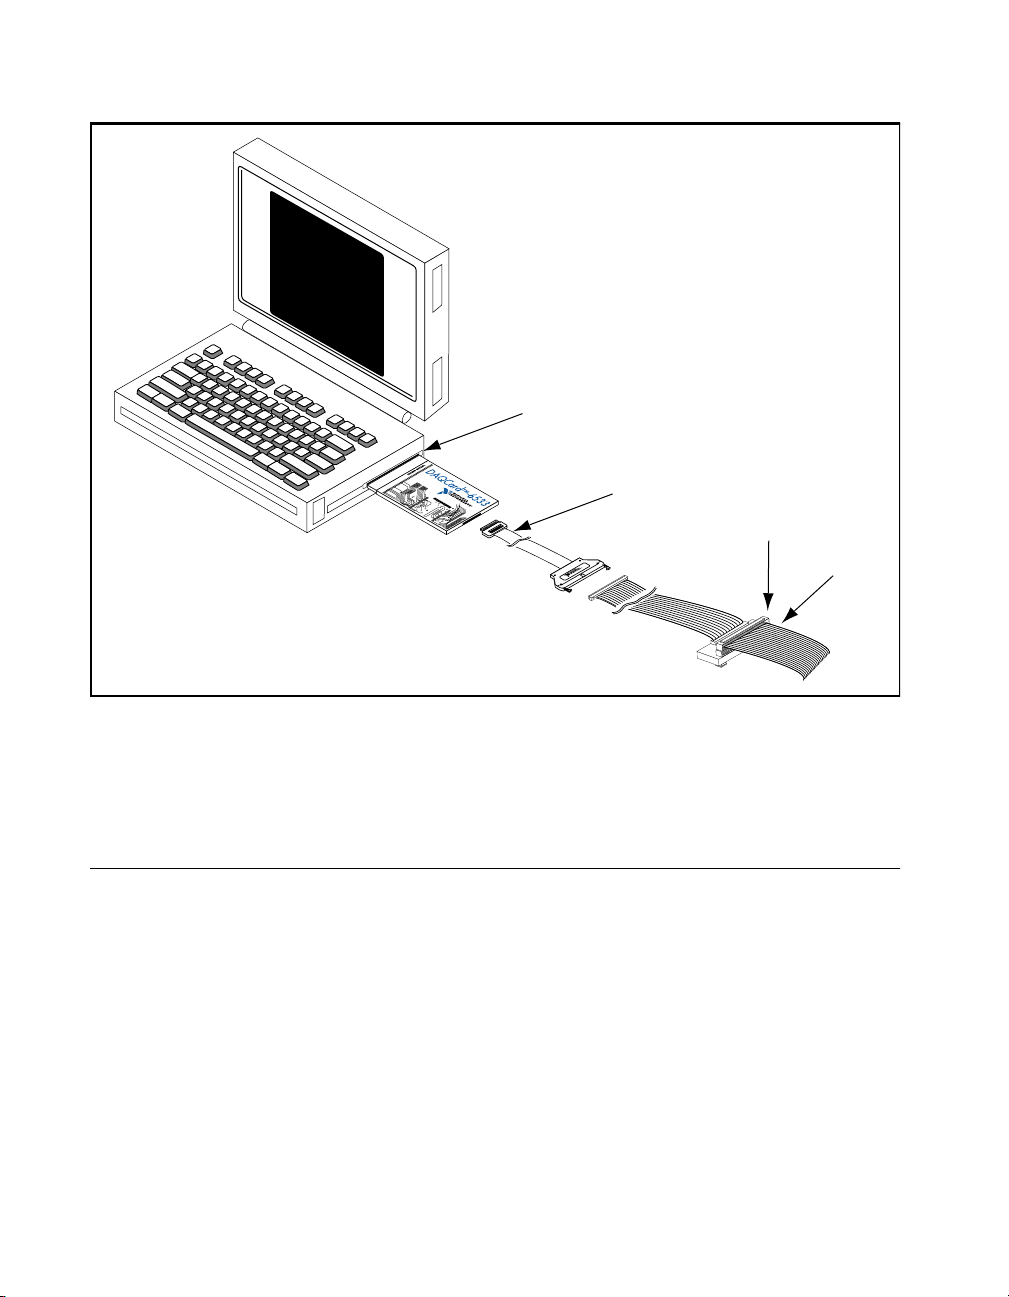
Installing the DAQCard-6533
You can install your DAQCard-6533 in any available Type II PCMCIA
slot in your computer. See Figure2-1 for the completed installation.
1. Turn off your computer. If your compute r supports hot insertion,
you may insert or remove the DAQCard-6533 at any time, whether
the computer is powered on or off.
2. Remove the PCMCIA slot cover on your computer, if any.
3. Insert the PCMCIA bus connector of the DAQCard-6533 into the
PCMCIA slot. The card is keye d so tha t you ca n insert it only one
way.
4. Attach the I/O cable. Be very careful not to put strain on the I/O
cable when inserting it into and removing it from the
DAQCard-6533. When plugging and unplugging the cable, always
grasp the cable by the connector. Never pull directly on the I/O
cable to unplug it from the DAQCard-6533.
© National Instruments Corporation 2-3 DIO 6533 User Manual
Page 24
Chapter 2 Installation and Configuration
Portable
Computer
PCMCIA Socket
I/O Cable
CB-68
I/O Signals
Figure 2-1. DAQCard-6533 Completed Installation
Your 6533 device is insta lled. T he d evice is now r eady f or softwa re
configuration.
PCI, PXI, and DAQCard Device Configuration
The PCI-DIO-32HS , PXI -65 33, a nd DAQC ard-6 533 a re c omple tely
software configurable. The system software automatically allocates all
device resources, incl uding b ase m emor y add ress a nd inte rrupt level.
These devices do not require DMA controller resources from your
computer.
DIO 6533 User Manual 2-4 © National Instruments Corporation
Page 25

AT Device Configuration
The plug and play feature of the AT-DIO -32HS mak es it completely
software configurable. You can use software to configure the base I/O
address, DMA cha nnels, an d in terr upt lev els.
Bus Interface
The AT-DIO-32HS works in either a Plug and Play mo de or a
switchless mode. These modes dictate how system resources are
determined and assigned to the devic e.
Plug and Play Mode
The AT-DIO-32HS is fully compatible with the industry-standard
Intel/Microsoft Plug and Play Specification version 1.0a. A Plug and
Play system arbitrates and assigns system resources through software,
freeing you from man ually se tting switc hes and jump ers. Th ese
resources include the device base I/O address, DMA channels, and
interrupt channels. Th e A T-DI O-32 HS is c onf igured a t the f act ory to
request these resources from the Plug and Play Configuration Manager.
Chapter 2 Installation and Configuration
The Configuration Manager receives all of the resource requests at
startup, compares the available resources to those requested, and
assigns the available resou rces as efficie ntly as possible to the Plug and
Play devices. Applicatio n softwa re c an qu er y th e Configu ratio n
Manager to determine the resources assigned to each device without
your involvement. The Plug and Play so ftware is instal led a s a d ev ice
driver or as an integra l com pon en t of the c om puter BIOS .
Switchless Data Acquisition
You can use your AT-DIO-32HS device in a non-Plug and Play system
as a switchless DAQ device. A non-Plug and Play system is a system in
which the Configuration Manager has not been installed and which does
not contain any non-National Instruments Plug and Play products. Use
a configuration utility, such as the NI-PnP or Intel configuration
utilities, to enter the base address, DMA, and interrupt selections, and
the application software assigns them to the device.
Note: Avoid resource conflicts with non-National Instruments d evices. For
example, do not configure two devices to have the same base address.
© National Instruments Corporation 2-5 DIO 6533 User Manual
Page 26
Chapter 2 Installation and Configuration
Base I/O Address Selection
The AT-DIO-32HS device can be configured to use a base address in
the range of 100 to 3E 0 hex. T he A T-D IO-32 H S occ upies 1 6 b ytes of
address space and must be located on a 16-byte boun dary. Therefore ,
valid addresses include 100, 110, 120, ..., 3D0, 3E0 hex. This selection
is software configured and does not require you to manually change any
settings on the device.
DMA Channel Selection
The AT-DIO-32HS can a chieve h igh tra nsfe r ra tes by usin g u p to two
16-bit DMA channels. The AT-DI O-32HS can use only 16-bit DMA
channels, w h ich co rr esp ond t o ch an ne ls 5, 6 , a nd 7 i n an AT (1 6-b i t
ISA) computer and channels 0, 1, 2, 3, 5, 6, and 7 in an EISA computer.
These selections are all software configured and do not require you to
manually change any settings on the device.
Interrupt Channel Selection
The AT-DIO-32HS increases bus efficiency by using an interrupt
channel for event notification. Th e AT-DI O-32HS can use interrupt
channel 3, 4, 5, 6, 7, 9, 10, 11, 12, 14, or 15. This selection is softwareconfigured and does not require you to manually change any settings on
the device.
Tables 2-1, 2-2, and 2-3 provide information concerning possible
conflicts in base address, DMA cha nnel, and interr upt chan nel
assignment when configuring you r AT-DIO -32HS de vice.
Table 2-1.
I/O Address Range (Hex) Device
100 to 1EF —
1F0 to 1F8 IBM PC AT Fixed Disk
200 to 20F PC and PC AT Game Controller, reserve d
210 to 213 PC-DIO-24 – default
218 to 21F —
220 to 23F Previous generation of AT-MIO boards – default
DIO 6533 User Manual 2-6 © National Instruments Corporation
PC AT I/O Address Map
Page 27

Chapter 2 Installation and Configuration
Table 2-1. PC AT I/O Address Map (Continued)
I/O Address Range (Hex) Device
240 to 25F AT-DIO-32F – default
260 to 27F Lab-PC/PC+ – default
278 to 28F AT Parallel Printer Port 2 (LPT 2)
279 Reserved for Plug and Play operation
280 to 29F WD EtherCard+ – default
2A0 to 2BF —
2E2 to 2F7 —
2F8 to 2FF PC, AT Serial Port 2 (COM2)
300 to 30F 3Com EtherLink – defa ul t
310 to 31F —
320 to 32F IBM PC/XT Fixed Disk Controll er
330 to 35F —
360 to 363 PC Network (low address)
364 to 367 Reserved
368 to 36B PC Network (high address)
36C to 36F Reserved
370 to 366 PC, AT Parallel Printer Port 1 (LPT1)
380 to 38C SDLC Communications
380 to 389 Bisynchronous (BSC) Communications (alternate )
390 to 393 Cluster Ada pter 0
394 to 39F —
3A0 to 3A9 BSC Communications (primary)
3AA to 3AF —
3B0 to 3BF Monochrome Display/Parallel Printer Adapter 0
© National Instruments Corporation 2-7 DIO 6533 User Manual
Page 28
Chapter 2 Installation and Configuration
I/O Address Range (Hex) Device
Table 2-2 shows the PC AT interrupt assignments.
Table 2-1. PC AT I/O Address Map (Continued)
3C0 to 3CF Enhanced Graphics Adapter, VGA
3D0 to 3DF Color/Graphics Monitor Adapter, VGA
3E0 to 3EF —
3F0 to 3F7 Diskette Controller
3F8 to 3FF Serial Port 1 (COM1)
A79 Reserved for Plug and Play operation
Table 2-2. PC AT Interrupt Assignment Map
IRQ Device
15 Available
14 Fixed Disk Controller
13 Coprocessor
12 AT-DIO-32F – default
11 AT-DIO-32F – default
10 AT-MIO-16 – default
9 PC Network – default
8 Real-Time Clock
7 Parallel Port 1 (LPT1)
6 Diskette Drive Control ler
5 Parallel Port 2 (LPT2)
4 Serial Port 1 (COM1)
PC Network Alternate – defa ult
Fixed Disk and Diskette Drive Controller
PC-DIO-24 – default
Lab-PC/PC+ – default
BSC, BSC Alternate
DIO 6533 User Manual 2-8 © National Instruments Corporation
Page 29
Chapter 2 Installation and Configuration
Table 2-2. PC AT Interrupt Assignment Map (Continued)
IRQ Device
3 Serial Port 2 (COM2)
2 IRQ 8-15 Chain (from in terrupt controller 2)
1 Keyboard Controller Output Buffer Full
0 Timer Channel 0 Output
BSC, BSC Alternate
Cluster (primary)
PC Network, PC Network Alte rna te
WD EtherCard+ – default
3Com EtherLink – default
Table 2 -3 shows the PC AT 16- bit DMA chan nel assignmen ts.
Table 2-3. PC AT 16-Bit DMA Channel Assignment Map
Channel Device
7 AT-MIO-16 Series – default
6 AT-MIO-16 Series – default
5 AT-DIO-32F – default
4 Cascade for DMA Controll er #1 (ch ann els<0..3>)
AT-DIO-32F – default
Note: EISA computers also have channels<0..3> available as 16-bit DMA
channels.
© National Instruments Corporation 2-9 DIO 6533 User Manual
Page 30

Chapter
Hardware Overview
This chapter provides an overview of the ha rdwa re f unc tions of your
DIO6533 device.
Each 6533 device contains the National Instruments DAQ-DIO chip, a
32-bit general-purpose digital I/O interface. The DAQ-DIO chip
enables the 6533 device to perform single-line and single-point input
and output, digital data acquisition, digital waveform generation, a nd
high-speed data transfer using a wide range of ha ndshaking protoc ols.
Figures3-1,3-2, and3-3 show the block diagrams for the 6533devices.
3
© National Instruments Corporation 3-1 DIO 6533 User Manual
Page 31

Chapter 3 Hardware Overview
PCI I/O Channel
Data Lines
(32)
MITE PCI
Interface
EEPROM
Data Lines
Bus
Interface
DMA/
Interrupt
Requests
Counters
and
Timers
20 MHz RTSI
Oscillator Interface
Internal
FIFOs
DAQ-DIO
Clock
Selection
RTSI/PXI Trigger Bus
Data Latches
and
Drivers
Handshaking
and
Control
Request
Processing
Control
Lines (8)
Figure 3-1. PCI-DIO-32HS/PXI-6533 Block Diagram
(32)
Connector
I/O
DIO 6533 User Manual 3-2 © National Instruments Corporation
Page 32

Chapter 3 Hardware Overview
AT I/O Channel
Data Lines
(16)
AT Plug and Play
Interface
EEPROM
Bus
Interface
DMA/
Interrupt
Requests
Counters
and
Timers
20 MHz RTSI
Oscillator Interface
Internal
FIFOs
DAQ-DIO
Clock
Selection
Data Latches
and
Drivers
Handshaking
and
Control
Request
Processing
RTSI Bus
Figure 3-2. AT-DIO-32HS Block Diagram
Data Lines
(32)
Control
Lines (8)
Connector
I/O
© National Instruments Corporation 3-3 DIO 6533 User Manual
Page 33

Chapter 3 Hardware Overview
Data Lines
(16)
PCMCIA
Interface
PCMCIA I/O Channel
Bus
Interface
DMA/
Interrupt
Requests
Counters
and
Timers
20 MHz
Oscillator
Internal
FIFOs
DAQ-DIO
Clock
Selection
Data Latches
and
Drivers
Handshaking
and
Control
Request
Processing
Figure 3-3. DAQCard-6533 Block Diagram
Data Lines
(32)
Control
Lines (8)
Connector
I/O
Unstrobed I/O
The 6533 devices can perform unstrobed I/O, which is basic digital I/O
that employs no handshaking or har dwa re-contro lled timing. You ca n
write or read data directly to or from the four digital I/O ports of the
6533 devices. The I/O ports contain eight lines each and are labeled A,
B, C, and D. You can conf igure ea ch line individua lly for e ither input
or output.
When you perform only unstrobed I/O, the 6533 device does not require
its handshaking control and status signals to carry timing information .
Therefore, you can use the REQ and STOPTRIG lines as extra data
inputs, and the ACK an d PCLK lines as ex tra da ta ou tputs.
DIO 6533 User Manual 3-4 © National Instruments Corporation
Page 34

Chapter 3 Hardware Overview
Strobed I/O—Pattern Generation and Handshaking
The 6533 devices can also perf orm strobed I/O. Strobe d I/O is data
transfer in which the 6533 hardware regulates tim ing or perform s
handshaking functions. The 6533 devices have two handsha king
controllers and can perfo rm up to two strobed ope rations
simultaneously. The operations can be input transfers, output transfers,
or one of each.
You select the width of each transfer by allocating the digital I/O ports
into two groups for the two c ontr ollers. For example , by a llocating
ports A a nd B to g roup 1, you c an p erfo rm a 16 -bit str obed transfe r
using the group 1 controller. Any por t that you do not allocate to a
group, you can use for unstrobed I/O.
LabVIEW users should note that the LabVIEW documentation uses the
term group in another context. LabVIE W grou ps do not corresp ond
directly to hardware g rou ps.
Each hardware group ha s its ow n, ind epen dent set o f tim ing con trol
lines—ACK (STARTTRIG), REQ, PCLK, and STOPTRIG—to carry
control, status, clock ing, and trigg er inf orm ation.
Any external device that the 6533 de vices control, monitor, test, or
communicate with is referred to as a peripheral device.
Strobed operations fall into two categories—pattern generation and
full, or two-way, handshaking transfer.
In pattern generation, data acquisition applications typically requ ire
sampling input data at a predetermined frequenc y. Similarly,
waveform-generation applications re quire driving outpu t data to
specific output patterns at a predetermined frequency. You can regulate
the frequency by supplying a timing signal to the REQ line; this signal
is an external request. The 6533 de vices can also gene rate their own
REQ pulses, or internal r eque sts. Eac h grou p h as a 32-bit co unter to
regulate the period between transfers.
In pattern generation, you can also supply start and stop triggers to
begin and end an opera tion. You can selec t e ither a rising ed ge or a
falling edge as a trigger signal. You can also trigger when the
6533 device detects a specified digital pattern on its data lines.
© National Instruments Corporation 3-5 DIO 6533 User Manual
Page 35

Chapter 3 Hardware Overview
A variant of pattern generation is change detection. In change detection,
the 6533 device generates an interna l re quest only w hen the input data
changes. This feature allows you to monitor activity on the input lines
efficiently, without capturing multiple copies of the same input pattern.
See the Pattern and Change Detection section for more information.
In full, or two-way, handshaking transfer, control information passes
both to and from the peripheral device . The 6533 device a nd the
peripheral device each provides the other wi th strobe signals a s data
becomes available or is acquired. By withholding strobe signals, either
the 6533 device or the peripheral device can slow down the transfer, if
necessary. Because of this capability, and because fixed rates are not
critical, you can run full-hand shaking operations at th e highest p ossible
speeds.
Pattern and Change Detection
You can configure the 6533 device to do several types of pattern and
change detection. These modes add additional monitoring capabilities
to strobed input operation.
Pattern-Detection Triggers
You can configure the 6533 device to search f or a partic ular pa ttern in
the input data. When the pattern occurs, the 6533 device ca n:
• Generate a start trigger to begin a digital data acquisition operation
• Generate a stop trigger to end a digital data acquisition operation
To use a start or stop trigger, you must configure the 6533 devic e for
pattern-generation mode. See Chapter5, Signal Timing, for more
information on start and stop triggers.
You can specify the following three parameters to the pattern-detection
circuit:
• A mask, declaring which data bits you wish to examine
• The pattern value you wish to search for
• Polarity (whether to search for data that matches or that mismatches
the specified pattern)
DIO 6533 User Manual 3-6 © National Instruments Corporation
Page 36

Figure3-4 shows a patt ern-de t ect ion example.
Chapter 3 Hardware Overview
Value to Detect
Pattern
Mask
Polarity
Figure 3-4. Pattern Detection Example
XXXXXX10
00000010
00000011
Postive: Search for Match
The 6533 device provides the following two types of pattern detection
timing:
• Compare all data to the input pattern immediately, without waiting
for a request pulse (typica lly us ed for start trig gers).
• Compare acquired data to the pa ttern, after a re quest pulse str obes
the data in (typically used for stop triggers).
In immediate, unstrobed pattern-detection, the 6533 device detects any
occurrence of the pattern, with or w ithout a request strobe. Howeve r,
the 6533 device filters out very short patte rn ma tches, to ensure that a
transient data value that occurs during line switching does not falsely
cause a match. A glitch must be present for no more than 20ns to
guarantee rejection. A valid pattern must be present for at least 60ns to
guarantee detection.
In strobed, request-based pattern detection, data is checked as it is
strobed in by request pulses. Strobed pattern detection is typically used
to generate triggers. You can use strobed pa ttern detection to ge nera te
start triggers too, but only when using an external request source. See
the Request Timing section in Chapter5, Signal Timing, for the timing
of the request pulses that strobe in data.
Change Detection
You can configure the 6533 device to search for transitions on one or
more input lines. Whenever a change occurs, the 6533 device generates
an internal request, capturing the new input pattern.
© National Instruments Corporation 3-7 DIO 6533 User Manual
Page 37

Chapter 3 Hardware Overview
The pattern mask, which selects the bits that are significant for pattern
detection, also applies to change detec tion. The 6533 device monitors
only the significant bits for changes. After detecting a change, however,
the 6533 device captures the values of all bits.
Change detection can increase CPU and bus efficiency for control
applications. You can monitor activity on input lines without
continuously polling, and without transferring unnecessary data during
periods of inactivity.
After a change occurs, the 6533 device takes from 50to 150ns to clock
in the new data. Therefore, the resolution of change detection is 150ns.
Repeatedly changing data is also subject to the usual pattern generation
rate limits; see the Transfer Rates section in this chapter for more
information.
You can use change detection in conjunction with pattern detection.
Within a single group, the change and pattern detect ion masks are the
same; input lines that are significant for pattern detection are also
significant for change detection.
Message Generation
Some software environments, such a s La bVIE W and
LabWindows/CVI, support message generation. Messages allow you to
run a user-specified routine when a particular data acquisition event
occurs. For example:
• Generate a message upon acquisition of a specified input pattern
• Generate a message every time the 6533devi ce transfers a data
point. You can apply this option to change-de tection mode to
generate a message every time the input data changes.
These message-generation options can extend your pattern and
change-detection capabilities. Some message-generation options
require that you select interrupt-driven rather than DMA transfers. See
your software documentation for further information about messa ges.
Handshaking Protocols
When you perform full, two-way handshaking operations, you can
select among several timing protocols offered by the 6533 devices. The
protocol you select determines the timing of the ACK signals that the
6533 device sends to the peripheral device and of the REQ signals
DIO 6533 User Manual 3-8 © National Instruments Corporation
Page 38

Chapter 3 Hardware Overview
expected from the peripheral device. One protocol, burst mode, a lso
uses PCLK signals.
The following sections describe the handshaking prot ocols offe red by
the 6533 devices. Refer to Table3-1 for further information on thes e
protocols. For timing details, see Chapter5, Signal Timing.
8255 Emulation
The 8255 emulation protocol emulates the strobed protocols obeyed by
the 8255 and 82C55 PPI chips—chips that are used, for example, on the
National Instruments PC-DIO-24 and PC-DIO -96/PnP. Be cause of
faster response times, a wide r da ta path, and FIFO buff er ing, 8255
emulation mode offers much higher data transfer ra tes than an actual
8255 chip. The 8255 emulation protocol offers the highest peak transfer
rate of any protocol except burst mode.
Level ACK
After each transfer, the 6533 device asserts the ACK signal to the
peripheral device. Holding the ACK line at the asserted level, the
6533device does not begin a new transfer until a false-to-true tra nsition
on the REQ line from the peripheral device occurs.
Leading-Edge Pulse
After each transfer, the 6533 device sends a pulse on the ACK line to
the peripheral device. The 6533 devic e then waits for a false-to-true
transition on the REQ line, the start of a REQ pulse, before starting a
new transfer. You can specify an AC K pulse delay.
Long Pulse
Long-pulse mode is the same as le ading-edge pulse mode , exce pt that
you can specify a minimum pulse width, instead of an ACK pulse delay.
Trailing-Edge Pulse
After each transfer, the 6533 device sends a pulse on the ACK line to
the peripheral device. The 6533 device waits for a true-to-false
transition on the REQ line, the end of a REQ pulse, before starting a
new transfer.
© National Instruments Corporation 3-9 DIO 6533 User Manual
Page 39

Chapter 3 Hardware Overview
Burst Mode
The 6533 device sends or receives a c loc k signal to or fr om the
peripheral device over the PCLK line. Every cycle, the 6533 device
asserts an ACK signal if ready for a transfer, and th e perip h er al device,
likewise, asserts a REQ signal if ready for a transfer. Each cycle during
which both the 6533 device and the peripheral device indicate that they
are ready for a transfer, one data point is latched. Burst mode c an
transfer data at high rates, particularly over short ca bles.
Comparing Protocols
Table3-1 shows similarities and diffe renc es a mong the 6533 devi ce
handshaking modes. Asynchronous protocols use only the ACK and
REQ signals. Burst mode, a synchronous protocol, uses the ACK, REQ,
and PCLK signals. The PCLK line shares a clock signal between the
6533 device and the peripheral de vice .
Table3-1 shows peak handshaking rates f or typical ca ble len gths. The
peak rates give an upper limit, deriving from the pulse widths and other
timing specifications of the handshaking protocol. Your actual
maximum rate depends on many factors; see the Transfer Rates section
in this chapter.
Table3-1 also shows whether the ACK a nd RE Q signa ls are active
high, active low, or programma ble polar ity. The table shows w het her
the leading or trailing edge of a REQ pulse initiates a data transfer. The
table also describes the ef fect on eac h protocol of se tting a
programmable delay. See Chapter5, Signal Timing, for timing details.
The table also shows complementary protocols with which the protocol
can communicate, assuming that you choose complementary settings
for any options the two protocols offer . For example, a 6533 device in
8255 emulation mode can communicate wi th a 6533 de vice in long
pulse mode, if you select A CK and REQ to be active low.
DIO 6533 User Manual 3-10 © National Instruments Corporation
Page 40

Chapter 3 Hardware Overview
Table 3-1.
Protocol Peak Rates (MS/s)
at Various Cable
Lengths
1 m 2 or 5 m
Asynchronous Protocols
8255
Emulation
Level
ACK
LeadingEdge Pulse
Long Pulse 3.33 2.5 Programmable Leading For pulse width
TrailingEdge Pulse
5 2.67 Active-low Trailing Between
3.33 2.5 Programmable Leading Before ACK
3.33 2.5 Programmable Leading Before ACK
1.8 1.5 Prog rammable Trailing For pulse width
653 3 Handshaking Protocols
REQ and ACK
Polarity
That Requests
REQ Edge
Transfer
Programmable
Delay Location
transfers
and between
transfers
and between
transfers
and between
transfers
and between
transfers
Complementary
Protocols
Leading-Edge
Pulse
Level ACK
Leading-Edge
Pulse
Long Pulse,
8255
Emula-tion,
PC-DIO-24,
PC-DIO-96/PnP,
8255, 82C55
Trailing-Edge
Pulse
Synchronous Protocol
Burst 20 10* Programmable Neither
(level REQ)
* Although asynchronous modes can adjust automatically to cable length, for synchronous modes, you must
select an appropriate speed for your cable at configuration time. Select a delay of at least the following: 0 for
a typical cable up to 1 m, 1 (100 ns) for a typical cable up to 5 m, and 2 (200 ns) for a typical cable up to 15 m
long.
For clock speed Burst
© National Instruments Corporation 3-11 DIO 6533 User Manual
Page 41

Chapter 3 Hardware Overview
Starting a Handshaking Transfer
Starting a handshaking transfer correctly protects against incorrect or
missed data when the ACK and REQ lines are ch anging po larity to
active-high or active-low. This is particularly important in burst mode
because of the potential to miss a lot of data. You ca n us e ei ther of the
following two startup methods:
• Control the configuration an d startup se quen ce .
• Select compatible line polarities and default line levels.
Controlling the Startup Sequence
One startup method is to follow a prescribed initialization order in
which you can ma ke su re the 6 533 devic e is c on figure d and is d riving
a valid ACK value before you enable the transfer on the perip heral
device. Similarly, you can make sure the peripheral device is configured
and is driving a valid REQ value before you enable the transfer on the
6533 device.
To use a prescribed initialization order, perform the following steps:
1. Configure the 6533 devic e for a protoco l compatible with your
peripheral device.
2. Configure and reset the perip heral device, if appropriate.
3. Enable the inpu t device (6533 de vice or peripher al device) and
begin a transfer.
4. Enable th e outp ut de vice (6 533 de vic e or p eriphe ral devic e) a nd
begin a transfer.
To control the startup order, you must be able to enable and disable the
peripheral device , a nd you m ust c ontrol the ord er in which the 6533
device and the pe riphera l dev ice are ena bled. T he 65 33 devic e ex tra
input and output lines can be helpful for these purposes.
Controlling the startup sequence does not ap ply to buffer ed (bloc k)
operations. In a buffered operation, the NI-DAQ sof tware con figures
and enables the 6533 device at the same time, whe n you star t the actu al
data transfer. For buffered operations, therefore, use the second startup
method, controlling the line polarities.
DIO 6533 User Manual 3-12 © National Instruments Corporation
Page 42

Transfer Rates
Chapter 3 Hardware Overview
Controlling Line Polarities
If you cannot control the initialization order of the 6533 device and
peripheral device, you can still start a transfer reliably if you select the
polarities of the ACK and REQ lines so that the power-up, undriven
states of the control lines are the inactive states.
By default, the power-up, undrive n stat e of the REQ and ACK lines is
low, due to the onboard 2.2kΩ pull-down re sistors. There fore, you
should either select a protocol w ith ac tive-high REQ and A CK signals
or use the CPULL bias-selection line or your own pull-up re sistors to
change the power-up, undriven control-line state to high. See Chapter4,
Signal Connections, for information on using the CPULL line to control
the 6533device pull-up and pull-down resistor s.
The maximum average transfer rate that the 6533 d evice can achieve for
two-way handshaking applications is the lower of the following two
rates:
• The peak handshaking rate from Table3-1, which c an be lowe red
by the handshaking speed of your peripheral device
•The average available bus bandwidth, ba sed on your computer
system, the number of other devices generating bus cycles, and
your application software
The maximum sustainable transfer rate the 6533device can achieve for
pattern generation application is the minimum available bus bandwidth,
based on your computer system, the number of other devices generating
bus cycles, and your application software (this rate is always lower than
the peak pattern gene ration ra te).
To achieve the highest possible rates, consider the follow ing
information:
• Full, two-way handshaking is faster than pattern generation,
because two-way handsha king uses the average rathe r than the
minimum bus bandwidth.
• Burst mode is the fastest handshaking protocol, especially for short
cables.
• Your system bus should be as free a s possible fr om unrelate d
activity. Minimize the number of other I/O cards active in the
system.
© National Instruments Corporation 3-13 DIO 6533 User Manual
Page 43

Chapter 3 Hardware Overview
• Direct-memory access (DMA) transfers are faster than
interrupt-driven transfers, especially for pattern generation. By
default, the software uses DMA if available.
♦ The PCI-DIO-32HS always supports DMA transfers.
♦ The PXI-6533 supports DMA if inserted into a p eripheral slot t hat
allows bus arbitration (bus mastering). When using a slot that does
not allow bus arbitration, use software to select interrupt-driven
transfers.
♦ The AT-DIO-32HS supports DMA, if system DMA resources are
available. If a second DMA channel is available, you can
minimize channel reprogramming time by allocating two DMA
channels to a single transfer. By allocating two channels, you
allow the AT-DIO-32HS software to reprogram one channel
while continuing transfers on the other channel. This is
particularly important for pattern generation.
♦ The DAQCard-6533 cannot be programmed for DMA.
• The average bus bandwid th is higher for the PCI- DIO-32 HS or
PXI-6533 than for the AT -DIO -32H S, a nd high er fo r the
AT-DIO-32HS than for the DAQCard-6533.
DIO 6533 User Manual 3-14 © National Instruments Corporation
Page 44

Chapter
Signal Connections
This chapter describes how to make input and output signal connections
to your DIO6533 device via the device I/O connector a nd RT SI
connector.
The I/O connector for the 6533 device has 68 pins. You can connect the
6533device to 68-pin accessories through an SH68-68-D1 shielde d
cable or an R6868 ribbon cable. Using an optional 68-to-50 pin
6533device adapter, you can also connect your 6533device to 50-pin
accessories through an NB1ribbon cable.
I/O Connector
Figure4-1 shows the pin assignments for the 68-pin 6533 device I/O
connector. Refer to Appendi xB, Optional Adapter Description, for the
pin assignments for the 68-to-50 pin adapter.
Caution:
!
Connections that exceed any of the maximum input or output ratings
onthe 6533 may damage your device and your computer. See AppendixA ,
Specifications
any power signals to ground and vice versa. National Instruments is
liable for any damages resulting from any such signalconnections.
, for maximum ratings. This warning includes connecting
4
NOT
© National Instruments Corporation 4-1 DIO 6533 User Manual
Page 45

Chapter 4 Signal Connections
DIOD7
GND
DIOD4
DIOD3
GND
DIOD0
DIOC7
GND
DIOC4
DIOC3
GND
DIOC0
DIOB7
DIOB6
GND
RGND
GND
DIOB1
DIOB0
DIOA7
GND
DIOA4
DIOA3
GND
DIOA0
REQ2*
ACK2 (STARTTRIG2)*
STOPTRIG2
PCLK2
PCLK1
STOPTRIG1
ACK1 (STARTTRIG1)*
REQ1*
+5 V
34 68
33 67
32 66
31 65
30 64
29 63
28 62
27 61
26 60
25 59
24 58
23 57
22 56
21 55
20 54
19 53
18 52
17 51
16 50
15 49
14 48
13 47
12 46
11 45
10 44
943
842
741
640
539
438
337
236
135
GND
DIOD6
DIOD5
GND
DIOD2
DIOD1
GND
DIOC6
DIOC5
GND
DIOC2
DIOC1
RGND
GND
DIOB5
DIOB4
DIOB3
DIOB2
GND
GND
DIOA6
DIOA5
GND
DIOA2
DIOA1
RGND
GND
GND
CPULL
GND
DPULL
GND
GND
RGND
Figure 4-1. 6533 Device I/O Connector Pin Assignments
Note: In Figure 4-1, the * indicates that you can reverse the pin assignments of
the ACK1 (STARTTIG1) and REQ1 pins, or the ACK2 (STARTTIG2) and
REQ2 pins, with software. This can be useful when performing two-way
ACK/REQ handshaking between two 6533 devices over an SH68-68-D1 or
similar cable, because it allows you to connect one device’s ACK pin to the
DIO 6533 User Manual 4-2 © National Instruments Corporation
Page 46

other device’s REQ pin. W he n you ex chan ge two signals on the I/O
connector, you also exchange them for RTSI purposes.
Signal Descriptions
Chapter 4 Signal Connections
Table 4-1 provides signal descriptions. Each signal on the 65 33 device
is referenced to the GND lines.
Table 4-1.
Signal Descriptions
Pins Signal N ame Signal Type Description
2, 9 REQ<1..2> Control Group 1 and group 2 request lines—In
handshaking mode, a group’s REQ line car ries
handshaking status information from the
peripheral.
In pattern generation mode, R EQ carries tim ing
pulses either to or from the peripheral to strobe
data into or out of the 6533 device . These strob e
signals are comparable to the CONVERT* or
UPDATE* signals of an analog DAQ device.
When not configuring the 6533 device for group
operations, you can use the REQ<1..2> lines as
extra, general-purpose input lines (IN<3..4>).
3, 8 ACK<1..2> C ontrol Group 1 and group 2 acknowledge lines—In
handshaking mode, a group’s ACK line carries
handshaking control information to the peripheral.
In pattern generation mode, the ACK lines can
function as STARTTRIG<1..2> lines. You can use
rising or falling edges on these lines to start pattern
generation operations.
When not configuring the 6533 device for group
operations, you can use the ACK<1..2> lines as
extra, general-purpose output lines (OUT<3..4>).
© National Instruments Corporation 4-3 DIO 6533 User Manual
Page 47

Chapter 4 Signal Connections
Table 4-1.
Signal Descriptions (Continued)
Pins Signal N ame Signal Type Description
4, 7 STOPTRIG
<1..2>
Control Group 1 and group 2 stop triggers—You can use
rising or falling edges on these lines to end pattern
generation operations.
When not configuring the 6533 device for group
operations, you can use the STOPTRIG<1..2>
lines as extra, general-purpose input lin es
(IN<1..2>).
5–6 PCLK<1.. 2> Control Group 1 and group 2 peripheral clock lines—In
handshaking mode, if you select the bur st protocol ,
these lines carry clock signals to the peripheral
(during output operations) or from the peripheral
device (during input operations).
When not configuring the 6533 device for group
operations, you can use the PCLK<1..2> lines as
extra, general-purpose output lines (OUT<1..2>).
10, 12–13,
15, 44–45,
47–48
DIOA<0..7> Data Port A bidirectional data lines—Port A is po rt
number 0. DIOA7 is the MSB; DIOA0 is the
LSB. When combined in a group with other ports,
port A is the least significant port.
16–17, 21–
22, 51–54
23, 25–26,
28, 57–58,
DIOB<0..7> Data Port B bid irectional data lines—Port B is port
number 1. DIOB7 is th e MSB; DIOB0 is the LSB.
DIOC<0..7> Data Port C bid irectional data lines—Port C is port
number 2. DIOC7 is th e MSB; DIOC0 is the LSB.
60–61
29, 31–32,
34, 63–64,
66–67
DIOD<0..7> Data Port D bidirectional data lines—Port D is po rt
number 3. DIOD7 is the MSB; DIOD0 is the
LSB. When combined in a group with other ports,
port D is the most significant port.
DIO 6533 User Manual 4-4 © National Instruments Corporation
Page 48

Chapter 4 Signal Connections
Table 4-1.
Signal Descriptions (Continued)
Pins Signal N ame Signal Type Description
40 CPULL Bias
Selection
Control pull-up/pull-down selection—This input
signal selects whether the 653 3 device pulls the
timing and handshaking control lines (REQ,
ACK, PCLK, and STOPTRIG) up or down when
undriven. If you connect CPULL to +5 V, the
6533 device pulls the control line s u p. If y ou
connect CPULL to GND or leave CPULL
unconnected, the 6533 de vice pulls the control
lines down.
38 DPULL Bias
Selection
Data pull-up/pull-down selection—This input
signal selects whether the 653 3 device pulls the
data lines (DIOA, DIOB, DIOC, and DIOD) up
or down when u ndrive n. If yo u con nect DPUL L
to +5 V , the 6533 d ev ice pu lls the d ata line s u p.
If you connect DPULL to GND or leave DPULL
unconnected, the 6533 device pulls the data lines
down.
1 +5 V Power 5 Volts, output—This line provides a maximum
of 1 A of po wer, regulated by an onbo ard fuse
that can automatically reset itself after current
returns to normal.
11, 14, 18,
20, 24, 27,
GND Power Ground—These line s are the groun d refere nce
for all other signals.
30, 33, 36–
37, 41–42,
46, 49–50,
55, 59, 62,
65, 68
19, 35, 43, 56RGND Power Reserved ground—These lines of fer additio nal
ground pins that vary in connection from cable to
cable. With an R6868 ribbon cable , you can use
these lines as additional ground references. With
an SH68-68-D1, howeve r, these signals ar e not
connected.
© National Instruments Corporation 4-5 DIO 6533 User Manual
Page 49

Chapter 4 Signal Connections
Signal Characteristics
Following is a list of signal characteristics. Characteristics are for all
signals, unless otherwise noted. For signal characte ristics not given in
this section, see AppendixA, Spec ifications.
• Drive current—After bein g enabled, all lines that can be configured
for output sink at least 24mA at 0.4V, and source at least 24mA
at 2.4V.
♦ DAQCard-6533—Your PCMCIA socket may not provide
sufficient power to drive all outputs at 24mA.
• Ground reference—All signals are referenced to the GND lines.
• Initial state—At power up, all control and data lines begin at high
impedance. With no load attached, the voltage levels of the lines
are controlled by the pull-up or pull-down resistors.
• Pull-up/pull-down
• Control lines—All timing control lines have 2.2kΩ pull-up or
pull-down resistors, controlled by the CPULL line.
• Data lines—All timing data lines have 100kΩ pull-up or
pull-down resistors, controlled by the DPULL line.
• Bias-selection lines—The CPULL and DPULL lines, which
select the bias of the control and data lines, are themselves
biased low with 20kΩ pull-down resistors. The default bias of
all lines, therefore, is pulled down.
• Polarity
• Data signals—Active high. A 1 corresponds to a high voltage,
and a 0 corresponds to a low voltage.
• Control signals—Depending on the operating mode and
handshaking protocol you select, control signals can be active
high or active low.
DIO 6533 User Manual 4-6 © National Instruments Corporation
Page 50

Chapter 4 Signal Connections
Control Signal Summary
The direction and function of each group’s signal timing and
handshaking lines vary, depending on the mode of operation you select
for the group. Table4-2 shows the dire ction and function of e ach
control signal in each mode.
Table 4-2.
Signal Name Direction in
Handshaking
Mode
REQ<1..2> input request input or
ACK<1..2> output acknowledge input start trigger
STOPTRIG<1..2> — — input stop trigger extra inputs
PCLK<1..2> input or output peripheral
Control Signal Summary
Function in
Handshaking
Mode
clock
Direction in
Pattern
Generation
output
— — extra outputs
Function in
Pattern
Generation
request extra inputs
(START–
TRIG<1..2>)
Function in
Unstrobed
(IN<3..4>)
extra outputs
(OUT<3..4>)
(IN<1..2>)
(OUT<1..2>)
Mode
RTSI Bus Interface
The PCI-DIO-32HS, PXI-6533, and AT-D IO-32H S eac h conta ins a
RTSI bus interface.
The PCI-DIO-32HS and AT-DI O-32HS ea ch contains a RTSI
connector and an interface to the National Instrume nts RTSI bus. The
RTSI bus provides seven trigger lines and a system clock line. All
National Instruments AT and PCI boards that have RTSI bus connectors
can be cabled together inside a computer to share these signals.
The PXI-6533 uses pins on the PXI J2 connector to connec t the RTSI
bus to the PXI trigger bus as defined in the PXI Specification, rev. 1.0.
All National Instruments PXI boards that provide a connection to these
pins can be connected together by softwar e. T his fe ature is availa ble
only when the PXI-6533 is used in a PXI-compatible chassis. It is not
supported in CompactPCI chassis.
© National Instruments Corporation 4-7 DIO 6533 User Manual
Page 51

Chapter 4 Signal Connections
♦ PXI-6533—The PXI-6533 uses PXI trigger line7 as its RTSI clock line.
Board and RTSI Clocks
The 6533 device requires a frequency timebase to run the handshaking
logic and to generate intervals for pattern generation. The freque ncy
timebase must be 20MHz.
Either the 6533 device can use its internal 20MHz clock source as the
timebase, or you can provide a timebase from anothe r 20MHz device
over the RTSI bus. When using its internal 20MHz timebase, the
6533device can also drive its internal timebase onto the bus and to
another device that uses a 20MHz c lock.
The 20MHz timebase, whether local or impor ted from the RT SI bus,
serves as the primary frequency source for the 6533 device. Y ou can
select a clocking configuration through software. By default, the
6533device uses its own internal timebase, without driving the RTSI
bus clock line.
RTSI Triggers
The seven trigger lines on the RTSI bus provide a very flexible
interconnection scheme for any device sharing the RTSI or trigger bus.
Any 6533 device control signal can connect to a RTSI or trigger bus
line. You can drive output control signals onto the bus and receive input
control signals from the bus. Figure4-2 shows the signal connection
scheme.
DIO 6533 User Manual 4-8 © National Instruments Corporation
Page 52

Trigger
Chapter 4 Signal Connections
DAQ-DIO
REQ<1..2>
2
ACK<1..2>
(STARTTRIG<1..2>)
2
RTSI Bus or PXI Connector
♦ PXI-6533—RTSI trigger lines 0 through 6 correspond to PXI trigger bus
lines 0 through 6.
Data Signal Connections
The digital data signals are DIOA<0..7>, DIOB<0..7>, DIOC<0..7>,
and DIOD<0..7>. The se data signa ls are refere nced to the GND pins.
Ports D IOA , DIO B, DIO C, a nd D IOD are p ort num bers 0, 1, 2, a nd 3,
respectively.
7
20 MHz Timebase
Crossbar Switch
2
2
STOPTRIG<1..2>
PCLK<1..2>
Switch
Figure 4-2. RTSI Bus Signal Connection
© National Instruments Corporation 4-9 DIO 6533 User Manual
Page 53

Chapter 4 Signal Connections
Unstrobed I/O
For low-speed, unstrobed operation, you can configure each individual
pin for input, standard output, or wired-OR output. Figure4-3 shows
DIOA<0..3> configured for input, DIOA<4..7> configured for standard
output, and DIOB<0..3> configured for wired-OR output. Unstrobed
input applications include sensing external device sta tes, such a s the
state of the switch shown in the figure, and r ecei ving low -speed TT L
signals. Unstrobed output applications include driving external controls
and indicators such as the LE D shown in Figur e4-3, and sending
low-speed TTL signa ls.
DIO 6533 User Manual 4-10 © National Instruments Corporation
Page 54

LED
Chapter 4 Signal Connections
+5 V
DIOA<4..7>
+5 V
Open-Collector
TTL
+5 V
Switch
Switch
TTL Signal
I/O Connector
DIOA<0..3>
GND
+5 V
DPULL
DIOB<0..3>
GND
6533 Device
Figure 4-3. Example of Data Signal Connections
© National Instruments Corporation 4-11 DIO 6533 User Manual
Page 55

Chapter 4 Signal Connections
For unstrobed operations, you have a choice of two types of outp ut
drivers: standard and wired-OR. A standard driver drives its output pin
to approximately 0 V for logic lo w, or +5 V fo r log ic high. A standa rd
driver has several adva ntag es:
• It does not rely on pull-up resistors.
• It is independent of the state of the DPULL line.
• It has high current drive for both its logic high and logic low states.
• It can drive high-speed transitions in both the high-to-low and
low-to-high directions.
A wired-OR output driver drives its output pin to 0 V for logic low, but
floats (tri-states) the pin for logic hig h. T herefor e, a wire d-O R o utput
driver requires a pull-up resistor to pull the pin to +5 V for logic high.
To provide a pull-up resistor, you can co nnect the DPULL pin on the
I/O connector to the +5 V pin, making the 6533 devi ce 100 kΩ
pull-down resistors into 100 kΩ pull-up resistor s. A wired-O R driver
has the following advantages over a standard driver:
• You can connect two or more wired-OR outputs together without
damaging the drivers.
• You can connect wired-OR outputs to open-c ollector driv ers, to
GND signals, or to switches connecting to GND signals, without
damaging the drivers.
• You can use wired-OR outputs bidirectionally. For ex ample, after
connecting wired- OR output s together, yo u can read b ack the value
of one of the pins to determine whether any of the c onnected
outputs is logic low.
Note: As of NI-DAQ 5 .1, Lab VIEW does not suppo rt wired-OR outputs.
Strobed I/O
Strobed operations, such as pattern generation and handshaking, use the
same data signal connections as unstrobed operations, with the
following exceptions:
• You can configure data signals only on a port-by-port basis, rather
than on a pin-by-pin basis. To configure data ports, you must assign
them to handshaking group s.
• Strobed output operations use only standard, rather than wired-OR,
output drivers.
DIO 6533 User Manual 4-12 © National Instruments Corporation
Page 56

Strobed applications include digital data acquisition, digital waveform
generation, and data transmission to or fr om an exte rnal device.
Timing Connections
Timing connections include the REQ, ACK (STARTTRIG), and
STOPTRIG pins for pattern generation, and the REQ, ACK, and PCLK
pins for two-way handshaking operation.
The 6533 device provides two handshaking groups, each with its own
timing connections. To perform pattern generation or handshaking, you
must first associate a set of data pins with a group. Do this by assigning
data ports to handshaking groups.
Chapter5, Signal Timing, details the connection and timing of each
pattern generation and handshaking control signal .
Pull-Up and Pull-Down Connections
The CPULL and DPULL lines enable you to select the biasing of the
control and data signals.
Chapter 4 Signal Connections
If you drive the CPULL pin low, connect the CPULL pin to a GND pin,
or leave the CPULL line disco nnected, the 6533 dev ice pulls a ll its
control lines down to 0V with 2.2kΩ resistors. If you drive the CPULL
pin high or connect the CPULL pin to the +5V pin, the 6533device
pulls all its control lines to +5V with the same 2.2kΩ resistors.
Similarly, if you drive the DPULL pin low, connect the DPULL pin to
a GND pin, or leave the DPULL line disconnected, the 6533 device
pulls all its data lines down to 0V with 100kΩ resistors. If you drive
the DPULL pin high or connect the DPULL pin to the +5V pin, the
6533 device pulls all its control lines to +5V with the same 100kΩ
resistors.
Do not connect CPULL, DPULL, or any other line directly to an
external power supply while the 6533 device is powere d off.
The 6533 device drivers power up and reset to high-impeda nce state s.
Therefore, the CPULL and D PULL lines control w hether you ge t high
or low control and data lines, respectively, when you power up the 6533
device or reset its drivers.
© National Instruments Corporation 4-13 DIO 6533 User Manual
Page 57

Chapter 4 Signal Connections
You should connect DPULL to +5V when using any wired-OR output
drivers. In other cases, you can use the CPUL L and DPULL lines to
select a power-up state that is inactive in y our application. For example,
if you are using active-low handshaking signals, you c an c onnect the
CPULL line to +5V to place the handshaking lines in the high, inactive
state at power up.
Power Connections
The +5V pin on the I/O connector supplies power from the c omputer
power supply through a self-resetting fuse. The fuse resets
automatically within a few se conds a fte r removal of an overcurrent
condition. The power pin is referenced to the GND pins and can supply
power to external, digital circuitry.
♦ PCI-DIO-32HS, PXI-6533, and AT-DIO-32HS:
• Power rating: +4.65 to +5.25VDC at 1A
♦ DAQCard-6533:
• Power rating: +4.65 to 5.25VDC a t 25 0mA
You can connect the +5V pin to the CPULL and DPULL pins to control
the bias of the 6533 device control and data pins , as de sc ribed in the
Pull-Up and Pull-Down Connections section in this chapter.
Caution: Do not connect the +5V power pin directly to the GND, RGND, or any
!
output pin of the 6533 device or any voltage source or output pin on
another device. Doing so can damage the device and the computer.
NOT
National Instruments is
connection.
liable for damages resulting from such a
Field Wiring and Termination
Transmission line effects and e nvironm ental noise, par ticularly on
clock and control lines, can lead to incorrect data transfers if you do not
take proper care when running signal wir es to and from the device.
Note: Make sure your 6533 device and your peripheral device share a com mon
ground reference. Connect one or more 6533 device GND lines to the
ground reference of your peripheral devic e.
DIO 6533 User Manual 4-14 © National Instruments Corporation
Page 58

Chapter 4 Signal Connections
Take the following precautions to ensure a uniform transmission line
and minimize noise pickup:
• Use twisted-pair wires to connect digital I/O signals to the device.
Twist each digital I/O signal with a GND line.
• Place a shield around the wires connecting digital I/O signals to the
device.
• Route signals to the device carefully. Keep cabling a way from
noise sources. The most common noise source in a PC- based
system is the video monitor. As much as possible, separate the
monitor from any unshielded signal w iring.
For 6533 device output signals, it is important to term inate your ca ble
properly to reduce or eliminate signal reflections in the cable. You can
use many different methods for termina ting transmission lines.
A good method for the 6533 device is to connect one fa st Schottky
diode from +5V to each signal line, and another from the signal line to
ground. The +5V and ground connections should be low- impe danc e
connections. For example, if you make your +5V connection through a
long wire, back to the +5V pin of the 6533 devic e, add a c apacitor to
your termination circuit to stabilize the +5V connection near the
Schottky diodes.
One suitable Shottky diode is the 1N5711, available f rom se vera l
manufacturers. For more specialized use, you may be able to find diodes
packaged in higher densities appropriate to your application. For
example, the Central Semiconductor CMPSH-35 contains two diodes,
suitable for terminating one line. The California Micro Devices
PDN001 contains 32 diodes, suitable for terminating 16 lines.
You do not need to terminate the 6533 devic e input signals. The 6533
device contains onboard Schottky diode termination. Figure4-4 shows
the recommended transmission line terminations.
© National Instruments Corporation 4-15 DIO 6533 User Manual
Page 59

Chapter 4 Signal Connections
6533 Device Peripheral Device
+5 V
+5 V
+5 V
Figure 4-4. Transmission Line Terminations
The following additional recommendations apply for all signal
connections to your 6533 de vice:
• Separate 6533 device signal lines from high-current or high-voltage
lines. These lines are capable of inducing currents in or voltages on
the 6533 device signal lines if they run in parallel paths at a close
distance. To reduce the magnetic coupling between lines, separate
them by a reasonab le distance if they run in parallel, or run the lines
at right angles to each other.
• Do not run signal lines through condu its that also c ontain pow er
lines.
• Protect signal lines from magnetic fiel ds caused by e lectric motors,
welding equipment, br eake rs, o r tr ansfor me rs by ru nning them
through special metal conduits.
DIO 6533 User Manual 4-16 © National Instruments Corporation
Page 60

Chapter
Signal Timing
This chapter provides detailed timing specifications for DIO 6533
pattern generation and for the various fu ll, two-wa y handshak ing
modes.
Pattern-Generation Timing
Pattern-generation timing is similar for digital data acquisition (input)
and digital wavefo rm ge nera tion (ou tput). Da ta tra nsfers a re time d by
request pulses, carried on the REQ pin. The 6533 device s can generate
request pulses internally, or you can provide external pulses. Each
request pulse strobes a data point into or out of the 6533 device.
You can use up to two additional timing signals, if you select triggered
pattern generation: a start trigger and a stop trigger. A start trigger, if
used, begins the pattern-generation operation. A stop trigger ends the
operation. However, you can specify a number of data points to transfer
after the stop trigger.
You can substitute a digital pattern for either the start or stop trigger. In
this case, the operat ion begins or en ds wh en the 6533 de vice detec ts a
particular digital pattern on the data lines belonging to the group.
5
Figure 5-1 shows a pattern-generation operation using request pulses, a
start trigger, and a stop trigger.
ACK (STARTTRIG)
STOPTRIG
REQ
Pretrigger Data Posttrigger Data
Figure 5-1.
© National Instruments Corporation 5-1 DIO 6533 User Manual
Pattern-Generation Timing
Page 61

Chapter 5 Signal Timing
Request Timing
Data (Output Mode)
Internal Requests
Figure5-2 shows internal request tim ing. You can select a timebase and
an interval. The request pulses low on ce per d ata tran sfer. The duratio n
of the low pulse is equal to one timebase. The period of the request
pulse is equal to the interval multiplied by the timebase (in LabVIEW,
you specify an overall per i od, and the software selects the interval and
timebase).
t
Programmable = Interval x Timebase
REQ
c
t
Programmable = One Timebase
t
p
30 ns
Max
lw
Data (Input Mode)
t
su
30 ns
Min
t
h
0 ns
Min
Parameter Description
t
c
t
lw
t
p
t
su
t
h
Cycle time
Width of low pulse
Propagation time to valid output data
Setup time
Hold time
Figure 5-2.
Internal Request Timing
External Requests
Figure5-3 shows external request timing. The request signal must pulse
low and return high. The request pulse low and high dura tions must be
at least 20ns each. The minimum period is 50ns.
DIO 6533 User Manual 5-2 © National Instruments Corporation
Page 62

t
c
50 ns Min
20 ns Min
REQ
Data (Output Mode)
Data (Input Mode)
t
hw
20 ns Min
t
su
10 ns
Min
30 ns
Max
t
h
20 ns
Min
t
p
Parameter Description
t
c
t
lw
t
hw
t
p
t
su
t
h
Cycle time
Width of low pulse
Width of high pulse
Propagation time to valid output data
Setup time
Hold time
Chapter 5 Signal Timing
t
lw
Figure 5-3. External Request Timing
Trigger Timing
Using pattern-generation mod e, you can co nfigure the 6533 device to
accept both start and stop triggers.
The stop trigger is the prim ar y trig ger. The 65 33 de vic e ca n tra nsfer
specified numbers of data both before and after a stop trigger. If you do
not enable a stop trigger, the 6533 device stops automatically after
transferring a number of data poin ts equal to the size of your buffer.
The start trigger is a second trigger that begins a pa ttern-gener ation
operation. If you do no t ena ble a start tr igge r, the o peration sta rts
immediately when you issue a software command to perform a transfer.
Triggers are available for both waveform generation (output mode) and
data acquisition (input mode). Acquiring data that occurs before or after
a trigger is known as pretrigger or posttrigge r data acquisition,
© National Instruments Corporation 5-3 DIO 6533 User Manual
Page 63

Chapter 5 Signal Timing
Rising-Edge
Polarity
Falling-Edge
Polarity
respectively. Using only a start trigge r, you can do posttr igger data
acquisition. A stop trigger enables you to do pretrigger data acquisition,
or combined pretrigger and posttrigger data acquisition. After detecting
the stop trigger, the 6533 device begins counting the post-stop-trigger
portion of the data acquisition. Figure5-4 shows trigger pulse timing,
where t
is pulse width.
w
Figure 5-4. Trigger Input Signal Timing
t
t
= 10 ns minimum
w
w
Instead of a pulse on the I/O connector, you can also use digital pattern
detection as a trigger to start or stop an input operation. See Chapter3,
Hardware Overview, for more information about pattern detection.
Handshake Timing
This section describes the 6533 device two- way handshaking modes
and the timing specifications of each mode.
In handshaking, the ACK signal alw ays conveys inf orma tion about
when the 6533 device is ready for a tra nsfer. The RE Q signal conveys
information about when the periphera l device is ready for a tra nsf er.
Note: Depending on the protocol and the direction of the transfer, either an ACK
or a REQ signal can occur first in the handshaking sequence.
8255 Emulation
The 8255 emulation mode handshakes in a ma nner compatible with an
8255 or 82C55 Programmable Peripheral Interface (PPI). The 8255 and
82C55 PPIs are digital I/O chips used on many digital DAQ devices,
such as the National Instruments PC-DIO-24 and PC-DIO- 96/PnP.
DIO 6533 User Manual 5-4 © National Instruments Corporation
Page 64

Chapter 5 Signal Timing
6533 device emulation mo de is a superset of th e 8255 an d 82C55
protocols. The PCI- DIO -32H S c an ha ndsha ke w ith p eriphe ra l devic es
that use 8255 or 82C55 h andshaking spe cifica tions.
The 6533 device can perform back-to-back transfers much faster than a
true 8255-based device. If your periph eral device re quires more time
between transfers, yo u can co nfigu re the 653 3 d ev ice to ad d a
data-settling delay between transfers.
You can use a 6533 device in emulation mode with 8, 16, or 32-bit data
paths.
Input
Note: 6533 devi ce termino logy d iffers from 8 255 term inology. In input mo de ,
the 653 3 devi ce REQ line carrie s the 82 55 STB input sign al, and the
6533 d evice ACK line carries the 8255 IBF output signal. Both lines are
active low.
© National Instruments Corporation 5-5 DIO 6533 User Manual
Page 65

Chapter 5 Signal Timing
When REQ Unasserted,
Wait
For
REQ
In input mode, the 6533 device asserts the ACK signal low when ready
to accept data. Th e peripheral d ev ice can then strobe d ata in to th e 6 53 3
device by pulsing the REQ line low. The falling REQ signal edge causes
the ACK signal to dea ssert, and the rising REQ sign al ed ge cau ses the
6533 device to latch input data. Afterward, the 6533 device reasserts the
ACK signal low whe n re ady for a nother inpu t. Figu re 5-5 sho ws an
input transfer in 8255 emulation mode.
Latch Input Data
Programmable
Delay
Wait
For
Space
When 6533 Device
Has Space For Data
Clear
ACK
When REQ
Asserted
Initial State
Wait
For
REQ
ACK Set
Send
ACK
Figure 5-5. 8255 Emulation Mode Input
Output
Note: 6533 devi ce termino logy d iffers from 8 255 term inology. In output mode ,
the 6533 device REQ line carries the 82 55 ACK input signal, and the
6533 d evice ACK line carries the 8255 OBF output signal. Both lines are
active low.
DIO 6533 User Manual 5-6 © National Instruments Corporation
Page 66

Wait
For
REQ
Chapter 5 Signal Timing
In output mode, the 6 533 de vice asser ts the ACK signa l low wh en
output data is available. The perip her al de vice can rec eive th e data on
the falling or rising edge of the ACK signal, or any time in between. The
peripheral device must respon d with an active-low RE Q pulse to
request additional data. The falling REQ signa l edge causes the ACK
signal to return to the inactive state, and the rising REQ signal edge
enables a new tr ansfer t o occu r. Th erefore, the pe ripher al dev ice shoul d
wait until it has received data before raising the REQ signal. The
peripheral device ca n also w ait for the A CK sig nal to de assert be fore
raising the REQ signal. Figur e 5-6 show s an outp ut transfe r in 82 55
emulation mode.
Initial State
ACK Cleared
When REQ
Unasserted
Programmable
Delay
Wait
For
Data
When 6533 Device
Has Data to Output
Output Data,
Then Send ACK
When REQ
Asserted
Wait
For
REQ
Figure 5-6. 8255 Emulation Mode Output
© National Instruments Corporation 5-7 DIO 6533 User Manual
Page 67

Chapter 5 Signal Timing
8255 Emulation Mode Timing Specifications
Figure 5-7 sh ows the timin g diag ra m for 8 255 e mulation mod e.
REQ
ACK
Data In
Data Out
t
doa*
t
r*r
t
a*r
t
r*a
t
aa*
t
dir
t
rdi
t
rdo
t
rr*
Parameter Description Minimum Maximum
Input Parameters
t
r*r
t
rr*
t
a*r
t
dir
t
rdi
REQ low duration
REQ high duration
ACK falling edge to REQ rising edge
Input data valid to REQ rising edge
REQ rising edge to input data invalid
75 —
75 —
0—
0—
10 —
Output Parameters
t
t
t
t
aa*
r*a
doa*
rdo
ACK high duration
REQ falling edge to ACK rising edge
Output data valid to ACK falling edge
REQ rising edge to output data invalid
100 —
— 150
25 —
100 —
All timing values are in nanoseconds.
Figure 5-7.
DIO 6533 User Manual 5-8 © National Instruments Corporation
8255 Emulation Timing
Page 68

Other Asynchronous Modes
Besides 8255-compatible mode, the 6533 device supports several other
asynchronous handshaking protoc ols: leve l-ACK mode , le adin g-edg e
mode, long-pulse mode, and trailing-e dge mode. The se hands haking
modes are compatible with the handshaking modes of the National
Instruments AT-DIO-32F device.
Each of these modes offers the following options:
• Polarity of the ACK and REQ signals. The diagrams show
active-high signals.
• A programmable delay, fr om 0 to 700 ns, prog ra mmab le in
increments of 100 ns. You can use the programmable delay to
reduce handshaking spee d for slow periphe ral d ev ices. A de lay
increases the duration of each transfer. The location of the delay in
the handshaking sequence differs fro m protoco l to protocol. In
addition, a delay increases the minimum spacing between
consecutive transfers.
• Request-edge latching. With request-edge latc hing enabled, in
input mode, the 6533 device latches data in from the I/O connector
on the REQ edge before reading the data. In outpu t mode, af ter
writing the data, the 6533 device latches data out of the I/O
connector on the REQ edge. Which edge of REQ is used (rising or
falling) depends on the hand shaking mode and the REQ polar ity.
Chapter 5 Signal Timing
Level-ACK Mode
In level-ACK mode, the 6533 device asserts the ACK signal when ready
for a transfer an d hol ds the AC K sign al le vel u ntil a n act ive-go ing ed ge
occurs on the REQ line. After the REQ edge oc curs, the 6533 dev ice
deasserts the ACK signal until ready for another transfe r.
Input
In input mode, the 6533 device asserts the ACK signal when ready to
accept data. The peripheral device can then strobe da ta into the 6533
device by asserting the REQ signal. The active-going REQ signal edge
deasserts the ACK signal and causes the 6533 device to latch input data.
Afterward, the 6533 device rea sserts the ACK signal whe n ready for
another input.
To slow down the handshake, you can specify a data-settling delay to
occur before the ACK signal.
© National Instruments Corporation 5-9 DIO 6533 User Manual
Page 69

Chapter 5 Signal Timing
g
Initial State
ACK Cleared
Wait
For
REQ
When REQ
Unasserted
Output
In output mode, the 6 533 de vice raises the ACK sig nal a fter d riving
output data to indicate new, valid output data. The peripheral device can
latch the data on the falling or rising edge of the ACK signal, or at any
time before returning a REQ pulse. The peripheral device must respond
with an active-going REQ signal edge to deassert the ACK s ignal and
request additional da ta.
To slow down the handshake, you can specify a data-settling delay to
occur before the ACK signa l. T his delay inc rea ses the se tup time fro m
valid output data to the ACK signal.
Figure 5-8 shows an input transfer in level-A CK mode.
When REQ
Asserted
Clear ACK
Programmable
Delay
Wait
For
REQ
Programmable
Send
ACK
Wait
For
Space
When 6533 Device
Has Space For Data,
Input Data*
Delay
* With REQ-edge latching enabled, the data read
is from the last active-
DIO 6533 User Manual 5-10 © National Instruments Corporation
oing REQ edge.
Figure 5-8.
Level-ACK Mode Input
Page 70

Figure5-9 shows an output transfer in level-ACK mode.
When REQ
Wait
For
REQ
Asserted
Clear ACK
When REQ
Unasserted
* With REQ-edge latching enabled, the data written is
delayed until the next inactive-going REQ edge.
Programmable
Delay
Wait
For
REQ
Send
ACK
Chapter 5 Signal Timing
Initial State
ACK Cleared
Wait
For
Data
When 6533 Device
Has Data to Output,
Output Data*
Programmable
Delay
Figure 5-9. Level-ACK Mode Output
Level-ACK Mode Timing Specifications
Figures5-10 and5-11 show the timing diagrams for le vel-A CK mode .
© National Instruments Corporation 5-11 DIO 6533 User Manual
Page 71

Chapter 5 Signal Timing
t
ar
REQ
ACK
Input Data
(REQ-edge latching)
Input Data
(REQ-edge
latching disabled)
t
r*r
t
aa*
t
ra*
t
dir(1)
t
dir(2)
t
rr*
t
rdi
Parameter Description Minimum Maximum
Input Parameters
t
rr*
t
r*r
t
ar
t
dir(1)
REQ pulse width
REQ inactive duration
ACK to next REQ
Input data setup to REQ active
75 —
75 —
0—
0—
(with REQ-edge latching)
t
rdi
Input data hold from REQ active
10 —
(with REQ-edge latching)
t
dir(2)
Input data setup to REQ
0—
(with REQ-edge latching disabled)
t
adi
Input data hold from ACK
0—
(with REQ-edge latching disabled)
Output Parameters
t
aa*
t
ra*
ACK pulse width
REQ to ACK inactive
225 —
100 200
All timing values are in nanoseconds.
t
adi
Figure 5-10. Level-ACK Mode Input Timing
DIO 6533 User Manual 5-12 © National Instruments Corporation
Page 72

REQ
ACK
Chapter 5 Signal Timing
t
ar
t
r*r
t
aa*
t
rr*
Output Data
(REQ-edge latching)
Output Data
(REQ-edge
latching disabled)
t
doa
t
ra*
t
rdo
t
r*do
Parameter Description Minimum Maximum
Input Parameters
t
rr*
t
r*r
t
ar
REQ pulse width
REQ inactive duration
ACK to next REQ
75 —
75 —
0—
Output Parameters
t
t
t
r*do
aa*
ra*
ACK pulse width
REQ to ACK inactive
REQ inactive to new output data
225 —
100 200
050
(with REQ-edge latching)
t
rdo
REQ to new output data
0—
(with REQ-edge latching disabled)
t
doa
Output data valid to ACK
25
1
(with REQ-edge latching disabled)
1
t
(min) = 25 + programmable delay All timing values are in nanoseconds.
doa
Figure 5-11. Level-ACK Mode Output Timing
—
© National Instruments Corporation 5-13 DIO 6533 User Manual
Page 73

Chapter 5 Signal Timing
Leading-Edge Mode
In leading-edge mode, the 6533 device and the perip heral device send
each other pulse s on the AC K an d REQ lin es. T he lead ing ed ge of the
ACK or REQ pulse indicates tha t the 6533 de vice or periphe ral de vice
is ready for a transfer.
Input
In input mode, the 6533 device sends an A CK pulse when rea dy to
receive data . Th e AC K pu lse width is fixe d, as sum in g th e pe riph er al
device has deasserted the REQ signal. Otherwise, the ACK signal
remains asserted until the REQ signal deasserts. After receiving at le ast
the leading edge of the ACK pulse, the peripheral device can strobe data
into the 6533 device b y asse rting the R EQ sig nal. T he 6 533 devic e
sends another ACK pulse wh en ready fo r anot her input.
To slow down the handshake, you can specify a data-settling delay to
occur before the ACK signal.
Output
In output mode, the 6 533 de vice sends an ACK pulse afte r drivin g
output data to indicate new, valid output data. The ACK pulse width is
fixed, assuming the periph er al device ha s dea sse rted the R EQ signa l.
Otherwise, the ACK signal re mains until the peripheral device deasserts
the REQ signal. The peripheral device can latch the data on the falling
or rising edge of the ACK signal, or at any time before returning a REQ
pulse. The peripheral device must re spond with an active-going REQ
signal edge to deassert the AC K signal a nd r equest ad ditional da ta.
To slow down the handshake, you can specify a data-settling delay to
occur before the ACK signa l. T his delay inc rea ses the se tup time fro m
valid output data to the ACK signal.
DIO 6533 User Manual 5-14 © National Instruments Corporation
Page 74

Initial State
ACK Cleared
When REQ
Wait
For
REQ
When REQ
Unasserted
* With REQ-edge latching enabled, the data read
Figure 5-1 2 shows an input transf er in leading-edge mod e.
Asserted
is from the last active-going REQ edge.
Clear
ACK
Pulse
Programmable
Delay
Wait
For
REQ
Send
ACK
Pulse
Programmable
Wait
For
Space
When 6533 Device
Has Space For Data,
Input Data*
Delay
Chapter 5 Signal Timing
Figure 5-12. Leading-Edge Mode Input
© National Instruments Corporation 5-15 DIO 6533 User Manual
Page 75

Chapter 5 Signal Timing
Wait
For
REQ
When REQ
Unasserted
* With REQ-edge latching enabled, the data written is
Figure5-13 shows an output transfer in leading-edge mode.
Initial State
ACK Cleared
When REQ
Asserted
Clear
ACK
Pulse
delayed until the next inactive-going REQ edge.
Programmable
Delay
Wait
For
REQ
Programmable
Send
ACK
Pulse
Wait
For
Data
When 6533 Device
Has Data to Output,
Output Data*
Delay
Figure 5-13. Leading-Edge Mode Output
Leading-Edge Mode Timing Specifications
Figures5-14 and5-15 show the timing diagrams for le ading-edge
mode.
DIO 6533 User Manual 5-16 © National Instruments Corporation
Page 76

Chapter 5 Signal Timing
t
r*a*
REQ
ACK
Input Data
(REQ-edge latching)
Input Data
(REQ-edge
latching disabled)
t
ar
t
r*r
t
aa*
t
dir(1)
t
dir(2)
t
rr*
t
rdi
Parameter Description Minimum Maximum
Input Parameters
t
rr*
t
r*r
t
ar
t
dir(1)
REQ pulse width
REQ inactive duration
ACK to next REQ
Input data setup to REQ active
75 —
75 —
0—
0—
(with REQ-edge latching)
t
rdi
Input data hold from REQ active
10 —
(with REQ-edge latching)
t
dir(2)
Input data setup to REQ
0—
(with REQ-edge latching disabled)
t
adi
Input data hold from ACK
0—
(with REQ-edge latching disabled)
Output Parameters
t
t
r*a*
aa*
ACK pulse width
REQ inactive to ACK inactive
125 —
150 —
All timing values are in nanoseconds.
t
adi
Figure 5-14. Leading-Edge Mode Input Timing
© National Instruments Corporation 5-17 DIO 6533 User Manual
Page 77

Chapter 5 Signal Timing
t
REQ
ACK
Output Data
(REQ-edge latching)
Output Data
(REQ-edge
latching disabled)
r*a*
t
doa
t
ar
t
r*r
t
aa*
t
rr*
t
r*do
t
rdo
Parameter Description Minimum Maximum
Input Parameters
t
rr*
t
r*r
t
ar
REQ pulse width
REQ inactive duration
ACK to next REQ
75 —
75 —
0—
Output Parameters
t
t
r*a*
t
r*do
aa*
ACK pulse width
REQ inactive to ACK inactive
REQ inactive to new output data
125 —
150 —
050
(with REQ-edge latching)
t
rdo
REQ to new output data
0—
(with REQ-edge latching disabled)
t
doa
Output data valid to ACK
25
1
(with REQ-edge latching disabled)
1
t
(min) = 25 + programmable delay All timing values are in nanoseconds.
doa
Figure 5-15. Leading-Edge Mode Output Timing
—
DIO 6533 User Manual 5-18 © National Instruments Corporation
Page 78

Initial State
ACK Cleared
When REQ
Wait
For
REQ
Chapter 5 Signal Timing
Long-Pulse Mode
Long-pulse mode is a variant of leading-edge mode . T he only
difference is the effect of a data-settling delay, if used. In long-pulse
mode, a programmable delay, rather than delaying the ACK pulse,
increases the minimum width of the pulse.
Long-pulse mode enables you to handshake with a pe ripher al de vice
that requires a large minimum pulse width.
Long-pulse mode also enables you to handshake with 8255 emula tion
mode, if you set the ACK and REQ signals to active low. If you want to
use long-pulse mode to handshake with an actua l 8255 or 82C55 PPI,
make sure you select an adequate minimum pulse w idth for your 8255
or 82C55. A data-settling delay of 500ns is sufficient for any current
8255 or 82C55 PPI. Figures5-16 and 5-17 show long-pulse mode input
and output diagrams, respectively.
Asserted
Clear
ACK
Pulse
Programmable
Delay
ACK Pulse
Programmable
Send
Wait
For
Space
When 6533 Device
Has Space For Data,
Input Data*
Delay
When REQ
Unasserted
* With REQ-edge latching enabled, the data read
is from the last active-
© National Instruments Corporation 5-19 DIO 6533 User Manual
Wait
For
REQ
going REQ edge.
Figure 5-16.
Long-Pulse Mode Input
Page 79

Chapter 5 Signal Timing
Wait
For
REQ
When REQ
Asserted
Clear
ACK
Pulse
Programmable
Delay
Initial State
ACK Cleared
Wait
Data
Send
ACK Pulse
Programmable
Delay
For
When 6533 Device
Has Data to Output,
Output Data*
When REQ
Unasserted
* With REQ-edge latching enabled, the data written is
delayed until the next inactive-going REQ edge.
Wait
For
REQ
Figure 5-17. Long-Pulse Mode Output
Long-Pulse Mode Timing Specifications
Figures5-18 and5-19 show the timing diagrams for long-pulse mode .
DIO 6533 User Manual 5-20 © National Instruments Corporation
Page 80

REQ
ACK
Chapter 5 Signal Timing
t
r*a*
t
ar
t
r*r
t
aa*
t
rr*
(REQ-edge latching)
Input Data
Input Data
(REQ-edge
latching disabled)
t
dir(1)
t
dir(2)
t
rdi
Parameter Description Minimum Maximum
Input Parameters
t
rr*
t
r*r
t
ar
t
dir(1)
REQ pulse width
REQ inactive duration
ACK to next REQ
Input data setup to REQ active
75 —
75 —
0—
0—
(with REQ-edge latching)
t
rdi
Input data hold from REQ active
10 —
(with REQ-edge latching)
t
dir(2)
Input data setup to REQ
0—
(with REQ-edge latching disabled)
t
adi
Input data hold from ACK
0—
(with REQ-edge latching disabled)
Output Parameters
t
aa*
t
r*a*
1
t
(min) = 125 + programmable delay All timing values are in nanoseconds.
aa*
ACK pulse width
REQ inactive to ACK inactive
Figure 5-18. Long-Pulse Mode Input Timing
1
125
150 —
—
t
adi
© National Instruments Corporation 5-21 DIO 6533 User Manual
Page 81

Chapter 5 Signal Timing
t
ar
REQ
ACK
Output Data
(REQ-edge latching)
Output Data
(REQ-edge
latching disabled)
t
doa
t
r*r
t
aa*
t
rr*
t
r*do
t
rdo
Parameter Description Minimum Maximum
Input Parameters
t
rr*
t
r*r
t
ar
REQ pulse width
REQ inactive duration
ACK to next REQ
75 —
75 —
0—
Output Parameters
t
t
r*do
aa*
ACK pulse width
REQ inactive to new output data
1
125
050
(with REQ-edge latching)
t
rdo
REQ to new output data
0—
(with REQ-edge latching disabled)
t
doa
Output data valid to ACK
25 —
(with REQ-edge latching disabled)
1
t
(min) = 125 + programmable delay All timing values are in nanoseconds.
aa*
Figure 5-19. Long-Pulse Mode Output Timing
—
DIO 6533 User Manual 5-22 © National Instruments Corporation
Page 82

Chapter 5 Signal Timing
Trailing-Edge Mode
In trailing-edge mode, the 6533 device and the peripheral device send
each other pulses on the AC K an d REQ lin es. T he tr ailing edge of the
ACK or REQ pulse indicates tha t the 65 33 devic e or pe riphera l device
is ready for a transfer.
Input
In input mode, the 6533 device sends an A CK pulse of progr ammable
width when ready to receive data. After receiving the trailing edge of
the ACK pulse, the periph er al dev ice c an s tr obe data into the 6 533
device by deasserting the REQ signal. The 6533 devic e sends another
ACK pulse wh en r eady fo r an othe r in put.
To slow down the handshake, you can specify a data-settling delay to
increase th e ACK pu lse wid th.
Output
In output mode, the 6533 device sends an ACK pulse of programmable
width after driving outpu t data to in dicate ne w, valid outp ut data. Th e
peripheral device can latc h the d ata on the falling or rising ed ge of the
ACK signal, or at any time before ending the REQ pulse. The peripheral
device must respond with a REQ pulse, the trailing edge of which
deasserts the ACK signal and requests additional da ta.
To slow down the handshake, you can specify a data-settling delay to
increase the ACK pulse width and, therefore, the setup time from valid
output data to the trailing edge of the ACK signal.
© National Instruments Corporation 5-23 DIO 6533 User Manual
Page 83

Chapter 5 Signal Timing
Wait
For
REQ
When REQ
Asserted
Figure 5-20 shows an inpu t transf er in tra ilin g-edge mod e.
When REQ
Unasserted
Initial State
ACK Cleared
* With REQ-edge latching enabled, the data read
is from the last inactive-going REQ edge.
Programmable
Delay
Programmable
Clear
ACK
Wait
For
REQ
Figure 5-20. Trailing-Edge Mode Input
Send
ACK
Delay
Wait
For
Space
When 6533 Device
Has Space For Data,
Input Data*
DIO 6533 User Manual 5-24 © National Instruments Corporation
Page 84

Figure5-21 shows a write transfer in trailing edge mode .
When REQ
Wait
REQ
Unasserted
For
When REQ
Asserted
* With REQ-edge latching enabled, the data written is
yed until the next inactive-going REQ edge.
dela
Programmable
Delay
Wait
For
REQ
Clear
ACK
Initial State
ACK Cleared
Wait
For
Data
Send
ACK
Programmable
Delay
Chapter 5 Signal Timing
When 6533 Device
Has Data to Output,
Output Data*
Figure 5-21. Trailing-Edge Mode Output
Trailing-Edge Mode Timing Specifications
Figures5-22 and5-23 show the timing diagrams for tra iling-edge
mode.
© National Instruments Corporation 5-25 DIO 6533 User Manual
Page 85

Chapter 5 Signal Timing
REQ
ACK
Input Data
(REQ-edge latching)
Input Data
(REQ-edge
latching disabled)
t
r*r
t
aa*
t
r*di
t
dir*
t
adi
t
dir
t
rr*
t
a*r*
Parameter Description Minimum Maximum
Input Parameters
t
t
t
rr*
r*r
dir*
REQ pulse width
REQ inactive duration
Input data setup to REQ inactive
75 —
75 —
0—
(with REQ-edge latching)
t
r*di
Input data hold from REQ inactive
10 —
(with REQ-edge latching)
t
dir
Input data setup to REQ
0—
(with REQ-edge latching disabled)
t
adi
Input data hold from ACK
0—
(with REQ-edge latching disabled)
Output Parameters
t
aa*
t
a*r*
1
t
(min) = 225 + programmable delay All timing values are in nanoseconds.
aa*
2
t
(max) = 275 + programmable delay
aa*
ACK pulse width
ACK inactive to next REQ inactive
Figure 5-22. Trailing-Edge Mode Input Timing
1
225
0—
275
t
adi
2
DIO 6533 User Manual 5-26 © National Instruments Corporation
Page 86

Chapter 5 Signal Timing
REQ
ACK
Output Data
(REQ-edge latching)
Output Data
(REQ-edge
latching disabled)
t
doa
t
r*r
t
aa*
t
rr*
t
a*r*
t
r*do(1)
t
r*do(2)
Parameter Description Minimum Maximum
Input Parameters
t
t
t
a*r*
rr*
r*r
REQ pulse width
REQ inactive duration
ACK inactive to next REQ inactive
75 —
75 —
0—
Output Parameters
t
aa*
t
r*do(1)
ACK pulse width
REQ inactive to new output data
225
1
275
050
(with REQ-edge latching)
t
r*do(2)
REQ inactive to new output data
0—
(with REQ-edge latching disabled)
t
doa
Output data valid to ACK
25 —
(with REQ-edge latching disabled)
1
t
aa*
2
t
aa*
= 225 + programmable delay All timing values are in nanoseconds.
(min)
(max) = 275 + programmable delay
Figure 5-23. Trailing-Edge Mode Output Timing
2
Burst Mode
Burst mode is a synchronous, or clocked, protocol. The data transmitter
and receiver share a clock signal over the PCLK line.
In every clock cycle, the 6533 device asserts the ACK signal if it is
ready to perform a transfer. If the peripheral device also asserts the REQ
signal, a transfer occurs on the rising clock edge. Either the 6533 device
or the peripheral device can insert wait states into the protocol by
© National Instruments Corporation 5-27 DIO 6533 User Manual
Page 87

Chapter 5 Signal Timing
PCLK
deasserting the ACK or REQ signal, respectively. Every clock cycle in
which both the ACK and REQ signals are high transfers one data point.
The 6533device can either drive an output clock signal onto the PCLK
line or receive an input clock signal from the PCLK line. By default, the
PCLK line is an input during output transfers, and an output during
input transfers. In the default configuration, because the clock direction
is the opposite of the data direction, any delay associated with the cable
between the 6533device and the peripheral device increases the data
hold time available, although decreasing the data setup time . If
necessary, for long cables, you can compensate for the decrease in data
setup time by slowing down the PCLK clock.
Burst Mode Timing Specifications
Figure5-24 shows a burst mode transfer data input e xample, a nd
Figure5-25 shows a burst mode transfer data output example, where D1
is data point number one, D2 is data point number2, and so on.
Figures5-26 through5-29 show the burst mode timing diagrams.
ACK
REQ
Data In
DIO 6533 User Manual 5-28 © National Instruments Corporation
D1
D2 D3 D4
Figure 5-24.
Input Burst Mode Transfer Example
D5
Page 88

PCLK
ACK
REQ
Chapter 5 Signal Timing
Data Out
D1
D2
D3 D4 D5
Figure 5-25. Output Burst Mode Transfer Example
© National Instruments Corporation 5-29 DIO 6533 User Manual
Page 89

Chapter 5 Signal Timing
PCLK
t
pc
t
pw
t
pl
t
t
ah
doh
t
rh
ACK
REQ
Data Out
t
t
pa
pdo
t
rs
Parameter Description Minimum Maximum
Input Parameters
t
pc
t
pw
t
pl
t
rs
PCLK cycle time
PCLK high pulse duration
PCLK low pulse duration
Setup time from REQ valid to PCLK falling
50 —
20 —
20 —
1—
edge
t
rh
Hold time from PCLK to REQ invalid
0—
Output Parameters
t
pa
t
ah
t
pdo
t
doh
PCLK to ACK valid
Hold time from PCLK to ACK invalid
PCLK to output data valid
Hold time from PCLK to output data invalid
—22
3—
—28
5—
All timing values are in nanoseconds.
Figure 5-26. Burst Mode Output Timing (Default)
DIO 6533 User Manual 5-30 © National Instruments Corporation
Page 90

PCLK
Chapter 5 Signal Timing
t
pc
t
pw
t
ah
t
rh
t
dih
ACK
REQ
Data In
t
pa
t
rs
t
dis
Parameter Description Minimum Maximum
Input Parameters
t
rs
t
rh
t
dis
t
dih
Setup time from REQ valid to PCLK
Hold time from PCLK to REQ invalid
Setup time from input data valid to PCLK
Hold time from PCLK to input data invalid
12 —
0—
4—
6—
Output Parameters
t
pc
t
pw
t
pa
t
ah
1
tpc = programmable delay from 100 to 700 ns, or 50 ns if programmable delay is 0. Timebase
PCLK cycle time
PCLK high pulse duration
PCLK to ACK valid
Hold time from PCLK to ACK invalid
50
/2 – 5 tpc/2 + 5
t
pc
700
—18
3—
stability for the onboard 20 MHz clock source is 50 ppm.
All timing values are in nanoseconds.
1
Figure 5-27. Burst Mode Input Timing (Default)
© National Instruments Corporation 5-31 DIO 6533 User Manual
Page 91

Chapter 5 Signal Timing
PCLK
t
pc
t
pw
t
t
ah
doh
t
rh
ACK
REQ
Data Out
t
t
pa
pdo
t
rs
Parameter Description Minimum Maximum
Input Parameters
t
rs
t
rh
Setup time from REQ valid to PCLK
Hold time from PCLK to REQ invalid
12 —
0—
Output Parameters
t
pc
t
pw
t
pa
t
ah
t
pdo
t
doh
1
t
= programmable delay from 100 to 700 ns, or 50 ns if programmable delay is 0. Timebase
pc
PCLK cycle time
PCLK high pulse duration
PCLK to ACK valid
Hold time from PCLK to ACK invalid
PCLK to output data valid
Hold time from PCLK to output data invalid
50 700
/2 - 5 tpc/2 + 5
t
pc
—18
3—
—28
4—
stability for the board 20 MHz clock source is 50 ppm.
All timing values are in nanoseconds.
1
Figure 5-28. Burst Mode Output Timing (PCLK Reversed)
DIO 6533 User Manual 5-32 © National Instruments Corporation
Page 92

PCLK
Chapter 5 Signal Timing
t
pc
t
pw
t
pl
t
ah
t
rh
t
dih
ACK
REQ
Data In
t
pa
t
rs
t
dis
Parameter Description Minimum Maximum
Input Parameters
t
pc
t
pw
t
pl
t
rs
PCLK cycle time
PCLK high pulse duration
PCLK low pulse duration
Setup time from REQ valid to PCLK falling
50
—
20 —
20 —
1—
edge
t
rh
Hold time from PCLK to REQ invalid
0—
Output Parameters
t
pa
t
ah
PCLK to ACK valid
Hold time from PCLK to ACK invalid
—22
3—
All timing values are in nanoseconds.
Figure 5-29. Burst Mode Input Timing (PCLK Reversed)
© National Instruments Corporation 5-33 DIO 6533 User Manual
Page 93

Appendix
Specifications
This appendix lists the sp ec ification s fo r the D IO 653 3 devic es. T hes e
specifications are typical at 25°C unless othe rwise no ted.
PCI-DIO-32HS, PXI-6533, AT-DIO-32HS, and DAQCard-6533 Devices
Digital I/O
Number of ch an n els ........... .. .. .. .... .. .. .. . 3 2 inpu t/o u tput ;
4 dedicated output and control;
4 dedicated input and status
Compatibility......................................TTL/CMOS (standard or
wired-OR
Hysteresis...........................................500 mV
1
)
A
1. As of NI-DAQ 5.1, LabVIEW does not support wired-OR outputs.
© National Instruments Corporation A-1 DIO 6533 User Manual
Page 94

Appendix A Specifications
Digital logic levels
Level Min Max
Input low voltage 0 V 0.8 V
Input high voltage 2 V 5 V
Input low current for
data lines
= 0.4 V)
(V
in
DPULL high
DPULL low
—
—
Input high current for
data lines
= 2.4 V)
(V
in
DPULL high
DPULL low
—
—
Input low current for
control lines
= 0.4 V)
(V
in
CPULL high
CPULL low
—
—
–70 µA
–10 µA
10 µA
40 µA
–2.5 mA
–200 µA
Input high current for
control lines
= 2.4 V)
(V
in
CPULL high
CPULL low
—
—
200 µA
1.4 mA
Input low current for
CPULL/DPULL
= 0.4 V) — 4 µA
(V
in
Input high current for
CPULL/DPULL
= 2.4 V) — 140 µA
(V
in
DIO 6533 User Manual A-2 © National Instruments Corporation
Page 95

Strobed I/O
Appendix A Specifications
Level Min Max
Output low voltage
= 24 mA) — 0.4 V
(I
OL
Output high voltage*
= 24 mA) 2.4 V —
(I
OH
* When configured as standard outputs. Drivers configured as wired-OR
outputs are tri-stated when logically high.
Abso l u t e max inpu t volt a g e r a n g e ....... –0 . 3 to 5 V
Power-on stat e fo r o utpu ts ........... .. .... .Tri-stated, p ull ed up or d ow n
(selectable)
Data transf er s.. .. .... .. .. .. .... ... .. .. .... .. .. .. ...Programm ed I/O , DM A
Pattern Generation
Direction... .. .. .... .. .. .... .. .. ..... .. .... .. .. .... .. . Inp ut o r outpu t
Modes....... .... .. .. .. .... .. .. .. ..... .. .. .. .... .. .. .. . Int e rn all y or ext er na lly t ime d
© National Instruments Corporation A-3 DIO 6533 User Manual
Page 96

Appendix A Specifications
Sample rate (max sustainable)............ System dependent
1
Mode Triton I Chip Set Triton II Chip Set Natoma Chi p Set
PCI-DIO-32HS Rates in MS/s (MB/s) on Sample Systems
32-bit input 2.8 (11.2) 4 (16) 4 (16)
16-bit input 4 (8) 5 (10) 6.67 (13.33)
8-bit input 6.67 (6.67) 10 (10) 10 (10)
32-bit output 1 (4) 2 (8) 3.33 (13.33)
16-bit output 1 (2) 2.5 (5) 3.33 (6.67)
8-bit output 2 (2) 5 (5) 6.67 (6.67)
PXI-6533 Rates in MS/s (MB/s) on Sample Systems
32-bit input 4 (16) — —
16-bit input 5 (10) — —
8-bit input 6.67 (6.67) — —
32-bit output 2.22 (8.88) — —
16-bit output 2.5 (5) — —
8-bit output 5 (5) — —
DIO 6533 User Manual A-4 © National Instruments Corporation
Page 97

Appendix A Specifications
Mode Triton I Chip Set Triton II Chip Set Natoma Chi p Set
AT-DIO-32HS Rates in kS/s (kbytes/s) on Sample Systems
32-bit 350 (1400) — —
16-bit 700 (1400) — —
8-bit 1400 (1400) — —
DAQCard-6533 Rates in kS/s (kbytes/s) on Sample Systems
32-bit 30 (120) 70 (280) 140 (560)
16-bit 35 (70) 75 (150) 165 (330)
8-bit 35 (35) 75 (75) 165 (165)
Sample rate (peak internally
timed, for small transfers) ..................10 MS/s
Sample rate (peak externally
timed, for small transfers) ..................20 MS/s
Sample rate (min internally timed)......1 S/10 min.
Sample rate (min externally timed).....No limit
1. Pattern generation rates depend on your computer, software, and other bus activity. The rates shown were
measured for 100 kS transfers on sample Intel Pentium-based computers, using NI-DAQ software, with no other
DAQ operations in progress. The PCI-DIO-32HS Triton I rates were measured on a 100 MHz Pentium computer with
the Triton I (430FX) chip set. The PCI-DIO-32HS Triton II rates were measured on a 166 MHz Pentium computer
with the Triton II HX (4 30HX) chip set. The PCI-DIO-32HS Natoma rates were measured on a 180 MHz Pentium
Pro system with the Natoma (4 40FX ) chip s et. The PXI- 6533 r ates wer e measu red us ing a 13 3MH z Pentium
CompactPCI controller with the Triton I chip set. The AT-DIO-32HS rates were measured using the dual-DMA
transfer method on a 100 MHz Pentium computer with the Triton I (430FX) chip set. The DAQCard-6533 Triton I
rates were measured using a 75 MHz Pentium computer with the Triton I (430FX) chip set. The DAQCard-6533
Triton II rates were measured using a 133 MHz Pentium computer with the Natoma (430HX) chip set. The
DAQCard-6533 266 MHz Pentium II rates were measured using a 266 MHz Pentium II computer with the Natoma
(440FX) chip set.
© National Instruments Corporation A-5 DIO 6533 User Manual
Page 98

Appendix A Specifications
Handshaking
Direction............................................Input or output
Modes ................................................ 6 (burst, level-ACK,
leading-edge pulse,
trailing-edge pulse, long pulse,
and 8255 emulation)
1
Transfer rate
PCI-DIO-32H S ...... .... ..... .... ...... ... up to 76 MB /s
PXI-6533 .....................................up to 64 MB/s
AT-DIO-32HS....... ...... ..... ...... .... . up to 1.8 MB/s
(max)
(19 MS/s) at 32 bits;
up to 38 MB /s
(19 MS/s) at 16 bits;
up to 19 MB /s
(19MS/s) at 8bits
(16 MS/s) at 32 bits;
up to 34 MB /s
(17 MS/s) at 16 bits;
up to 19 MB /s
(19MS/s) at 8bits
(450 kS/s) at 32 bits;
up to 1.8 M B/s
(900 kS/s) at 16 bits;
up to 1.8 M B/s
(1.8 MS/s) at 8 bits
1. Handshaking rates depend on your computer, software, other bus activity, and handshaking protocol. The rates
shown were measured using NI-DAQ software and the burst-mode handshaking protocol, performing continuous
waveform generation using 100,000-point or larger buffers, with no other DAQ operations in progress. The PCIDIO-32HS, PXI-6533, and AT-DIO-32HS handshak i ng rates are DMA-based and do not nece ss arily increase as the
speed of the computer increases. The PCI-DIO-32HS and AT-DIO-32HS rates shown were measured on a sample
100 MHz Intel Pentium-based computer with an Intel 430FX (Triton I) chip set. The PXI-6533 rates were measured
using a 133 MHz Pentium CompactPCI controller with a Triton I chip set. The DAQCard-6533 rates do tend to
increase as the speed of the computer increases. The DAQCard-6533 75 MHz Pentium rates were measured using a
75 MHz Pentium computer with the Triton I (430FX) chip set. The DAQCard-6533 133 MH z Pentium rates were
measured using a 133 MHz Pentium computer with the Natoma (430HX) chip set. The DAQCard-6533 266 MHz
Pentium II rates were measured using a 266 MHz Pentium II computer with the Natoma (440FX) chip set.
DIO 6533 User Manual A-6 © National Instruments Corporation
Page 99

DAQCard-6533
Appendix A Specifications
Rates in KB/s (kS/s) on Sample Systems
32-bit 80 (20) 420 (105) 740 (185)
16-bit 44 (22) 250 (125) 470 (235)
8-bit 22 (22) 125 (125) 235 (235)
Pattern and Change Detection
Pattern-detec tio n tri gge rs ... .. .... .. .... .. .. . S tar t or st op on p atter n
Pattern-detec tion re soluti on . .... ...... .... . 60 ns or one REQ period ,
Change-detectio n f unc ti on ..... .... .. .. .... .Sample on c ha nge
Change-detectio n r es ol uti on......... .... .. . 150 n s
Triggers
75 MHz
Pentium
133 MHz
Pentium
depending on mode
266 MHz
Pentium II
Start and Stop Triggers
Compatibility......................................TTL/CMOS
Trigger types.......................................Rising or falling edge, or digital
pattern
Pulse width for edge triggers (min).....10 ns
Pattern triggers detection
capabilities..........................................Detect pattern match or
mismatch on user-selected bits
RTSI Triggers (PCI, PXI, AT)
Trigger lines ... .... ...... .... ..... .... ...... .... ... 7
© National Instruments Corporation A-7 DIO 6533 User Manual
Page 100

Appendix A Specifications
Bus Interfaces
Power Requirement
Physical
PCI-DIO-32HS /PX I-65 33 ty pe.... .... .. . PCI ma st er a nd t arge t w i th
onboard linking (scatter-gather)
DMA
AT-DIO-32HS type...... .... .. ... .... .. .. .... . AT slave wit h dual D MA
DAQCard-6533 type ........ ..... ...... .... ... PCMCIA slave
+5 VDC (±5%)
(with light ou tp ut loa d) ............... .. .... . 500 mA
Power available at I/O connector
PCI-DIO-32HS, PXI-6533,
and AT-DIO- 32HS ........... .. .. .. .... . +4.6 5 to + 5.2 5 VDC at 1 A
DAQCard-6533 ......... ..... .. .... .. .. ... +4.6 5 t o +5 .2 5 VDC at 250 mA
Dimensions, not including
connectors ..........................................17.5 by 10.7 cm (6.9 by 4.2 in.)
I/O connector
PCI-DIO-32HS, PXI-6533,
and AT-DIO-32H S ............. .. .... .. . 68-pin ma le SC SI- II typ e
DAQCard-6533 ......... ....... .... ...... . 68-pin fema le PCM CIA
connector
DIO 6533 User Manual A-8 © National Instruments Corporation
 Loading...