

National 446TBL, 447TBL, 448TBL User Manual
National Optical & Scientific Instruments Inc.
Phone (210) 590-9010 Fax (210) 590-1104
MODELS #446TBL, #447TBL AND #448TBL
STEREOSCOPIC MICROSCOPES
6508 Tri-County Parkway
Schertz, Texas 78154
INSTRUCTIONS FOR
Copyright © 1/2/01
National Optical & Sc i ent i fic Instrument I nc.
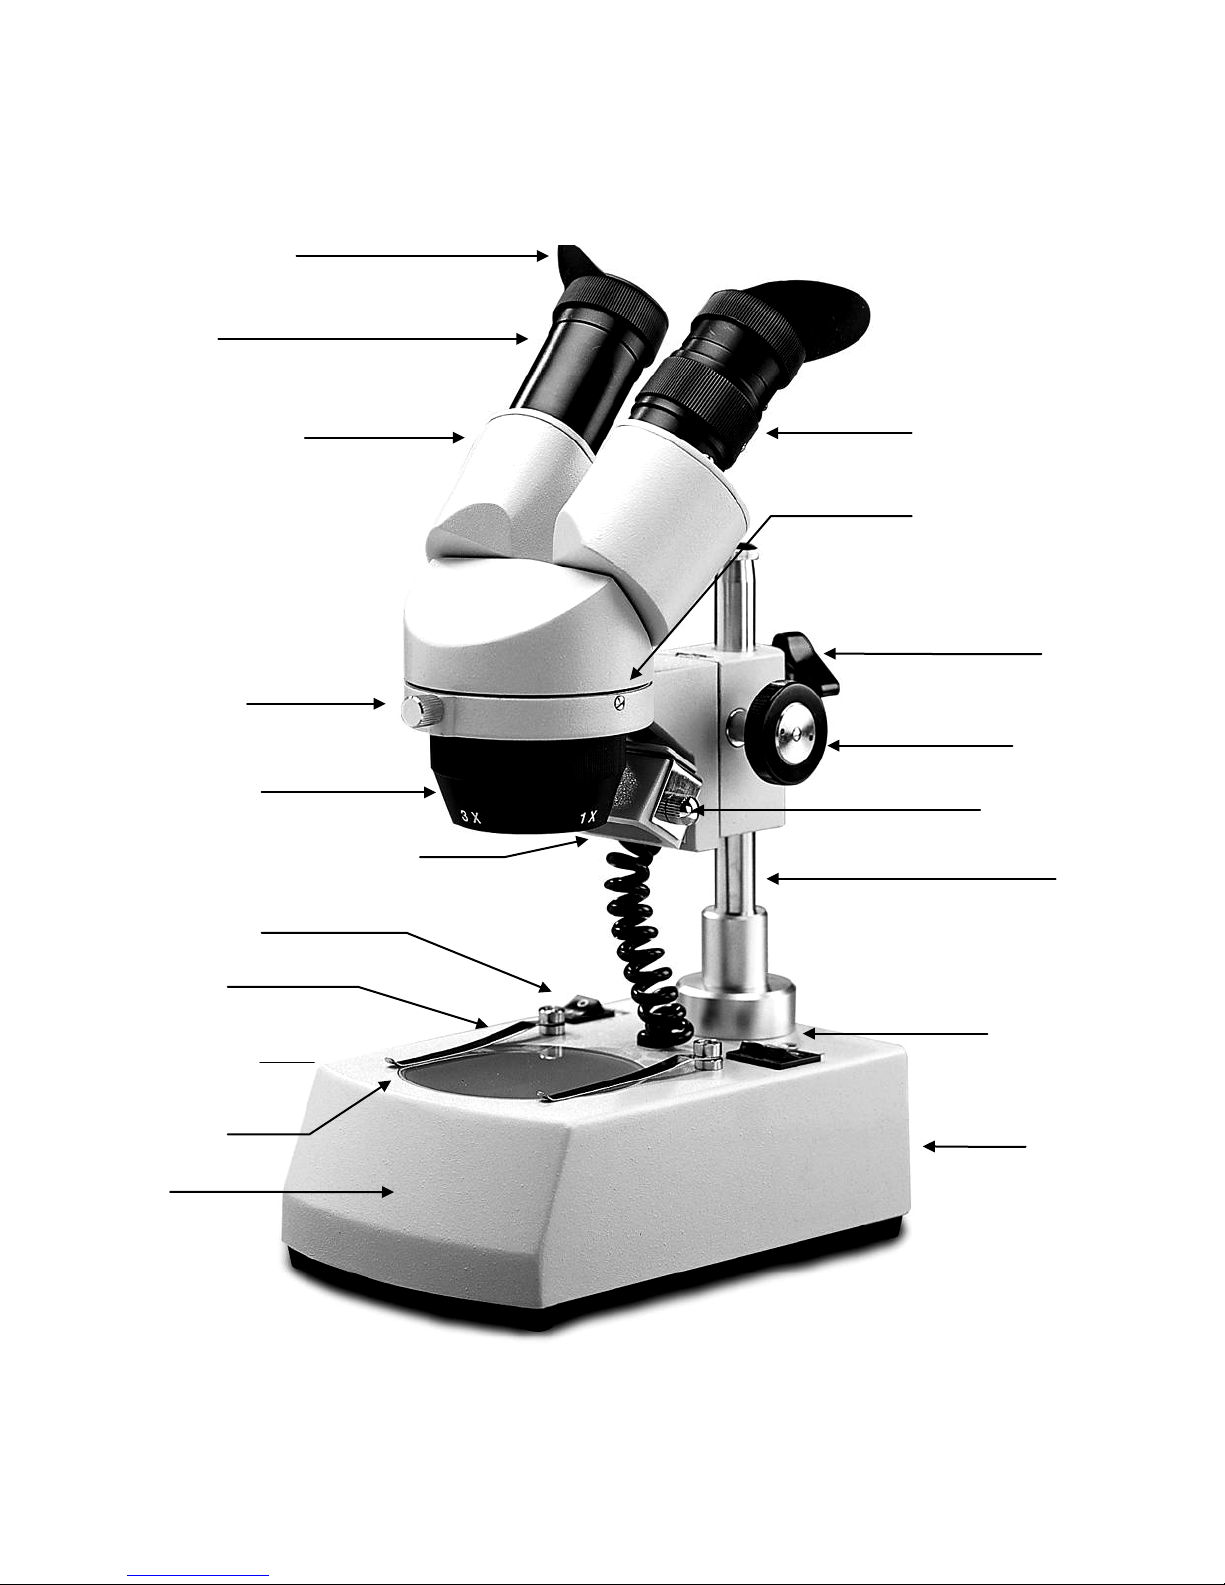
Head of microscope
Knurled diopter collar
Post
Objective turret
Focusing
Base
Stage Plate
Stage Clips
Top light housing
Head retaining screw
Light control
Power switch
Fuse
Rubber eyeshields
Eyepieces
Head position
locking screw
(one on each side)
Post
locking
knob
knob
Light housing
locking knob
Locking set screw
(located on side)
switches

Page 3
Stereoscopic microscopes are used for viewing 3-dimensional objects , inspection or assembly of small
parts, and for dissection of biological specimen. They provide an upright, unreversed image which
permits easy manipulation of the object being viewed while looking through the microscope. They are
designed for viewing solid objects at low magnification, but they will also permit viewing of some
transparent specimen slides.
For optimum viewing satisfaction, follow these simple procedures. Nomenclature used to describe
components and controls can be identified by referring to the diagram at left.
UNPACKING
Do not touch any of the lens surfaces while handling the microscope. Dust, dirt, fingerprints can dam age
the delicate lens surfaces or adversely affect image quality.
Remove micr oscope stand and head assembly from car ton. Remove rubber eyeshields and dustcover.
Remove “pin spanner wrench” (used to adj ust focusing tension), “L hex wrench” (used to r emove lock ing
set screw on stage plates), and plastic black /white contrast plate (80mm diam eter). Your microscope is
also supplied with a frosted glass stage plate (80mm diameter), which is already mounted in the
microscope base.
Examine packing material before you discard it. Retain the styrofoam container in case you need to
transport, store, or return the m icroscope f or service. If it becom es necessar y to ship the microscope for
any reason, pack it in the styrofoam container, and then pack the styrofoam in another corrugated
shipping container for optimum protection. Use of the styrofoam alone will not provide adequate
protection in transit, and will void your warranty.
ASSEMBLY & OPERATION
1. Install rubber eyepiece shields over top of eyepieces, with the flared portion of the shields positioned
at the outside edge of eyepieces. These help block out undesired light r eflections, and to position
your eyes at the proper point above the eyepieces.
2. Please observe that the head rotates 360 degrees. T o position the binocular head in stand, loosen
knurled head lock ing screw. Rotate head to face either forward or back ward, whichever suits your
preference or needs. Then, tighten knurled head locking screw.
3. This model is furnis hed with s tage plates. The f rosted glass plate is used when viewing transparent
specimen slides or for viewing some specimen thin enough through which light can pass (insect
wings, etc.). The black/white contrast plate can be used when viewing opaque objects or for
dissecting. Choose side of plate providing best contrast with specimen.
FROSTED GLASS PLATE MUST BE USED IF USING BOTTOM ILLUMINATION. HEAT
GENERATED IN BASE FROM BOTTOM LIGHT WILL WARP OR DAMAGE THE PLASTIC
BLACK/WHITE PLATE. SUCH DAMAGE WILL NOT BE COVERED BY WARRANTY. It is
acceptable to leave the glass plate in place for most viewing purposes.
To switch plates or to reverse sides of contrast plate, use the “L hex wrench” to loosen set s crew at
side of base, only enough to permit removal of plate. Replace plate and tighten set screw.
4. Plug cord into a standard 120 volt AC three-wire grounded outlet.
 Loading...