

Page 1
GB
INSTALLATION INSTRUCTIONS AND
INSTRUCTIONS FOR USE
NARVI STONY SAUNA STOVES
SAFETY DISTANCES
Before installing the sauna stove ensure the required safety distances to inflammable
material are met. The safety distances of the sauna stove are 400 mm to the sides,
250 mm to the rear and 1200 mm upwards. At the base, a concrete board of at least
70 mm must be used. The Narvi Stony sauna stove must not be installed on top
of an underfloor heating. If you are unsure please contact your local fire authority
for guidance.
Inflammable construction parts, such as wooden
walls, sauna seats etc.
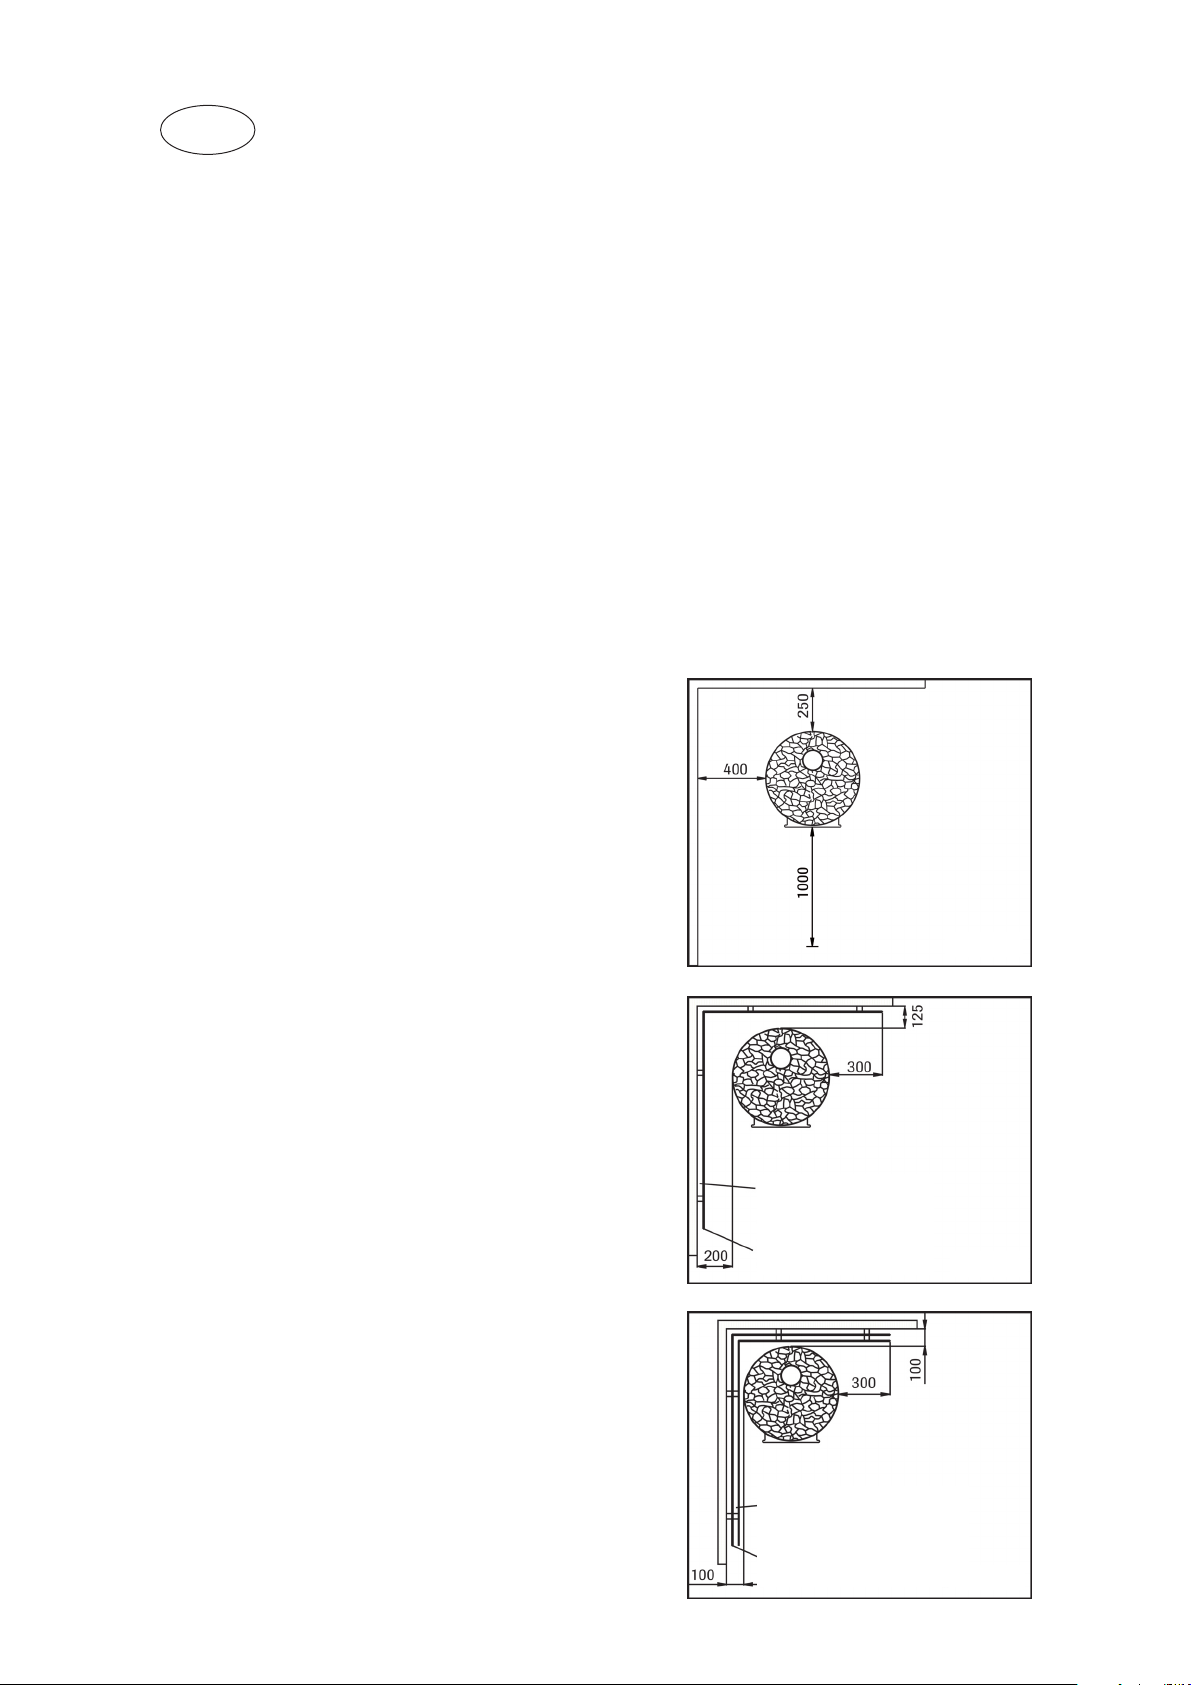
1. Distance from the vertical surfaces of the sauna
stove to unprotected wooden parts 400 mm to the
sides, 250 mm to the rear and 1000 mm in front.
(Fig. 1)
The protection must also be clear of the floor
and the ceiling.
2. The safety distance mentioned in paragraph
1 can, however, be reduced by half when “lightsingle” protection is used. Single-light protection
of this type can be made of a non-combustible,
fibre-reinforced cement board of at least 7 mm
dick or of a metal plate of at least 1 mm which
has been fastened securely enough to the wall.
A ventilation gap of at least 30 mm must be left
between the wooden surface to be protected and
the safety plate by using piping collars. (Fig. 2)
3. The safety distance in paragraph 2 can
be further reduced to 100 mm when double
protection is used.
Double protection can be made of two plates as
described in paragraph 2 and, then a ventilation
gap of at least 30 mm must be left between the
wall and the plates. (Fig. 3)
30 mm ventilation gap
1 mm metal plate or
7 mm non-combustible,
fibre-reinforced,
cement board
30 mm ventilation gap
1 mm metal plate or
7 mm non-combustible,
fibre-reinforced
concrete board
Fig. 1
Fig. 2
Fig. 3
Page 2
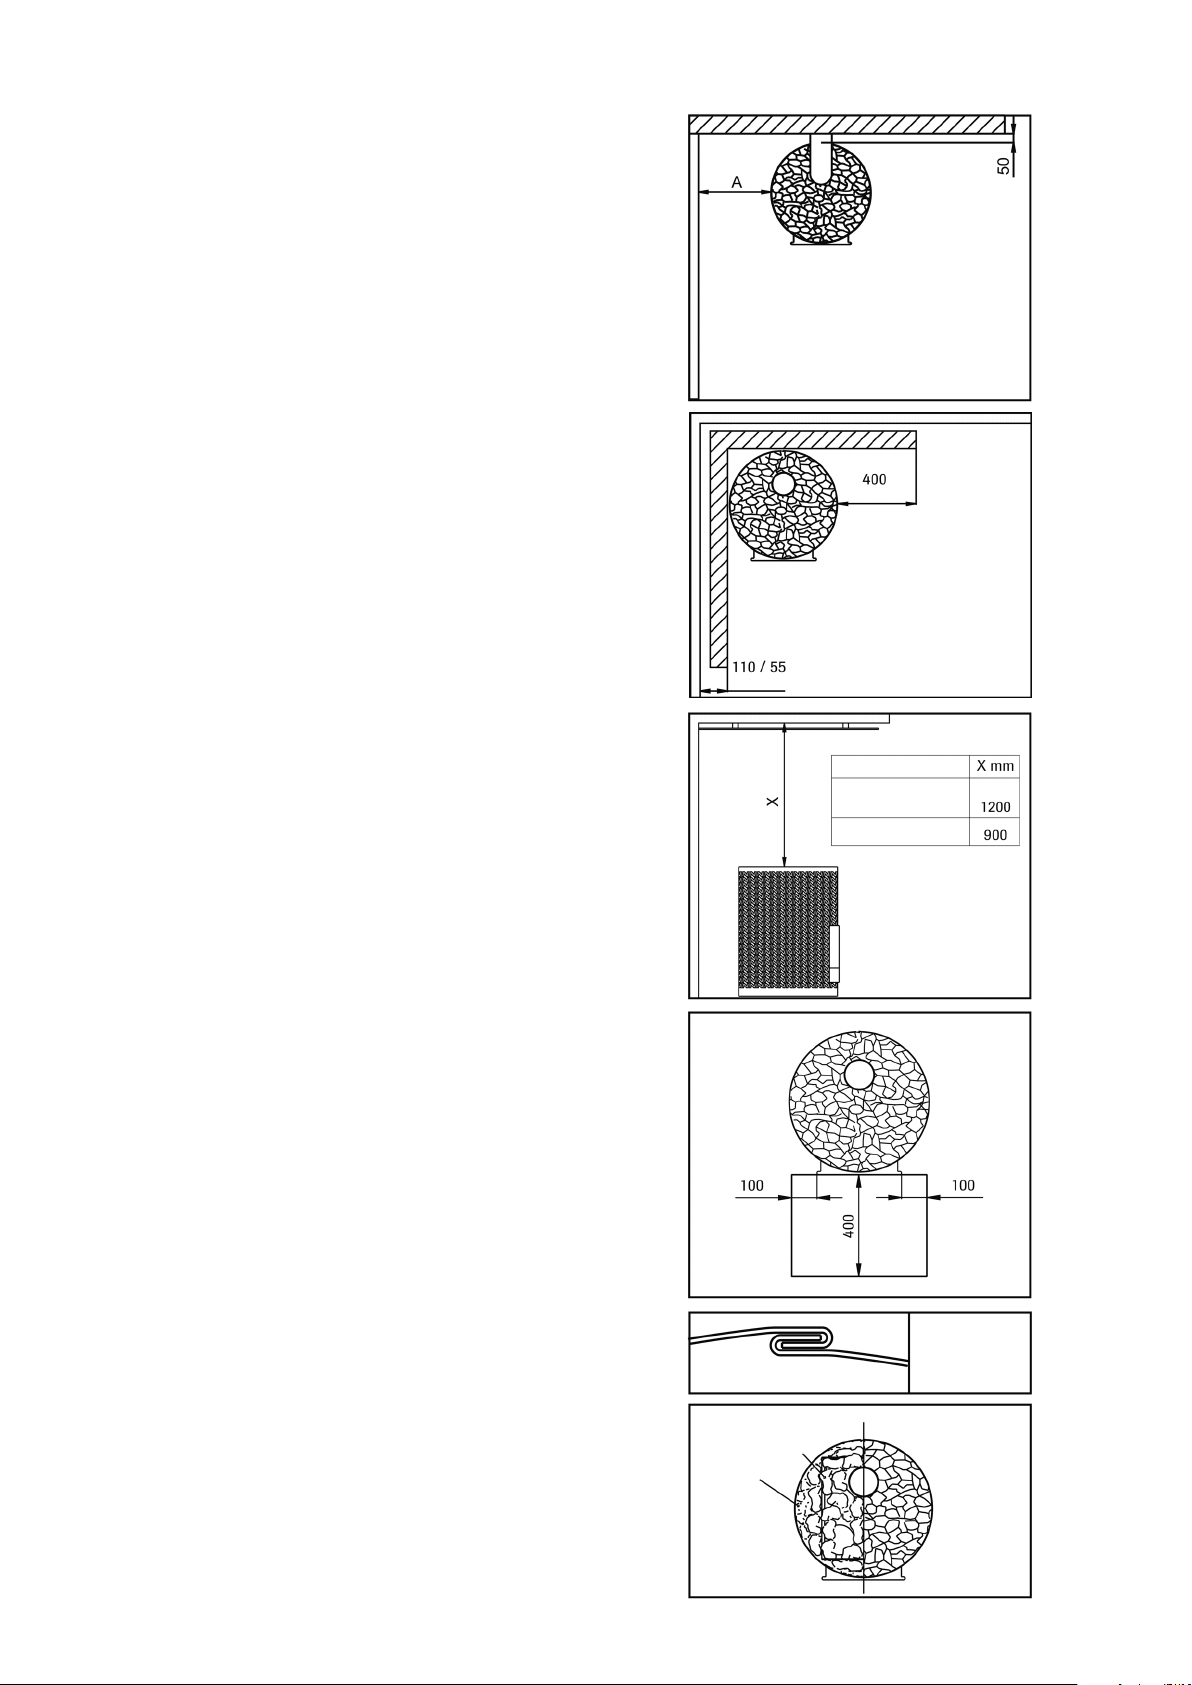
4. For brick walls, a ventilation gap of 50 mm
between the vertical surfaces of the sauna stove
and the wall is sufficient. (Fig. 4)
The dimension A is determined based on the
safety method used for wooden surfaces:
- without protection 400 mm
- single-light protection 200 mm
- double-light protection 100 mm
5. Brickwork of 55 mm that is open at the
edges and at least 30 mm clear of the surface
to be protected corresponds to a single-light
protection. Brickwork of 110 mm and at least
30 mm clear of the surface to be protected
corresponds to double-light protection. (Fig. 5)
Fig. 4
Fig. 5
Protection of the ceiling:
When the distance from the upper surface of the
sauna stove to the ceiling is at least 1200 mm
no special protection of the ceiling is necessary.
If the distance is less than 1200 mm the
protection method for the ceiling is selected from
paragraphs 1-3. (Fig. 6)
Protection of the floor in front of the sauna stove:
Floors made of inflammable material must be
protected with a metal plate which reaches at
least 100 mm to both sides of the sauna stove
and 400 mm in front. (Fig. 7)
INSTALLATION
Install the sauna stove on a concrete plate. Place
the sauna stove directly on the base with the aid of
the adjustable feet. Place the net jacket round the
firebox and thread it into the locking system. (Fig.8)
Install the trap-door according to separate
instructions. Arrange the stones as tightly as
possible placing big stones against the sauna
stove and smaller stones against the net casing.
Also place small stones towards the top of the
sauna stove as steam stones. (Fig. 9)
Large stones
near the firebox
Small stones
near the
outer jacket
The ceiling without
protection
Single-light protection
Fig. 6
Fig. 7
Fig. 8
Fig. 9
Page 3
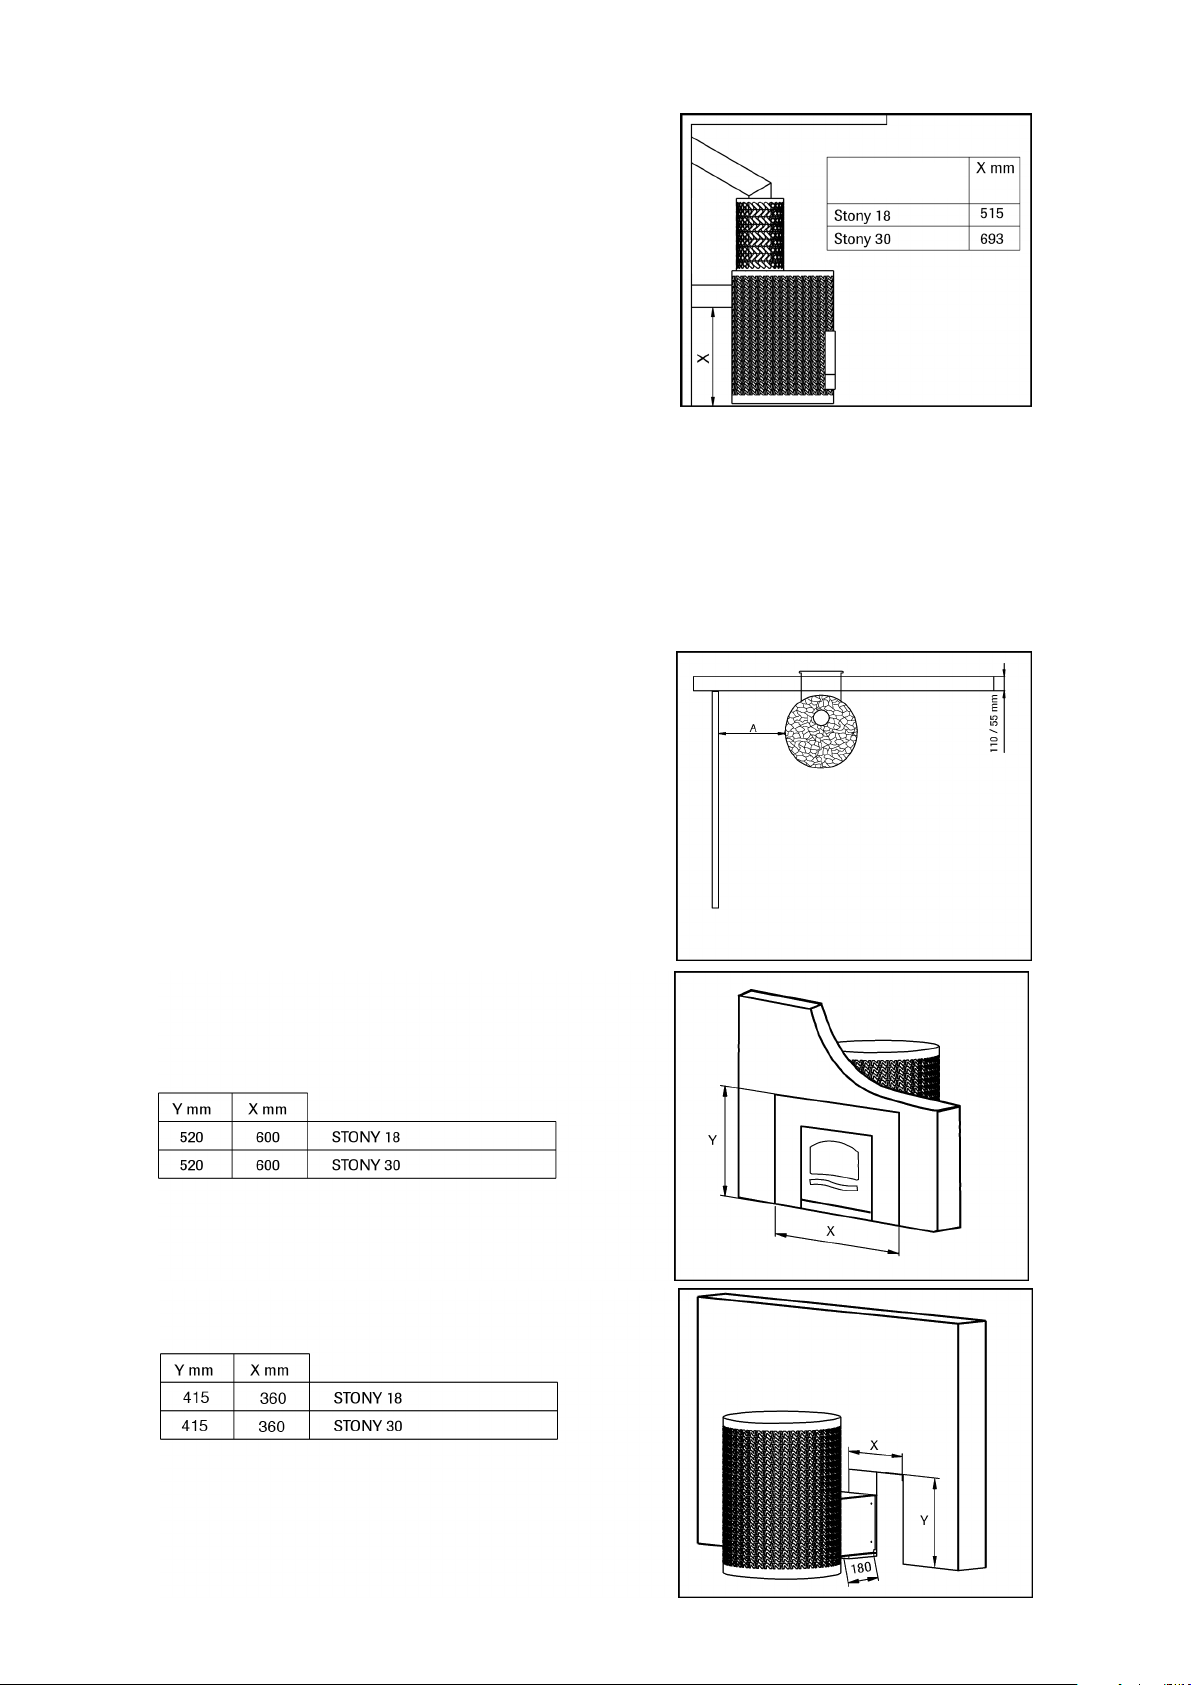
There are two opening for connecting the firebox
with the smoke flue, which are located on top and
rear of the firebox.
Block the unused opening
with the cover plate included in the delivery.
Distance to the bottom
edge of the flue behind
the firebox.
Also included in the delivery is a 200 mm flue
pipe connector for connection of the sauna
woodburning stove to a rear flue pipe. When
connecting the sauna woodburning stove to the
flue from the top of the woodburning stove, always
use NARVI chimney pipes or NARVI chimney flues.
Fig. 10
In order to connect the flue to the rear opening, the round detail must first be
removed from the rear of the firebox casing, by using a hacksaw, for example, to saw
through the part that attaches it to the casing.
Do not install the flue adapter pipe too deeply into the chimney flue, as this will reduce
the flue draw. The gap between the flue adapter pipe and the chimney flue must be
insulated e.g. with mineral wool. The sauna woodburning stove comes fitted with
adjustable feet to assist accurate installation.
In connection with the sauna woodburning stove
installation, ensure that the woodburning stove
stands firmly on its base and that all of the safety
distances mentioned in these instructions have
been observed correctly.
To install a sauna stove:
The wall between the heating room and sauna
stove must be of non-combustible material, for
Dimension A is determined based on
the protection method
used for wooden surfaces
- Without protection 400 mm
- Single-light protection
- Double- light protection
Fig. 11
example bricks.
Outer dimensions of the decorative frame:
Size of the tunnel opening:
We recommend a mineral wool mat for compaction
of the brick wall and tunnel part to allow room for
thermal expansion. The tunnel model is attached to
the flue from the top of the sauna stove.
Fig. 12
Fig. 13
Page 4

Always use NARVI chimneys or NARVI chimney flues. When installing the stove
ensure that it stands firmly on its base and installed so that the safety distances are
correct according to the instructions.
Floor protection in front of the sauna stove: Floors made of inflammable material must
be protected with a metal plate extending at least 100 mm on either sides of the sauna
stove trap-door and 400 mm in front of it.
CHIMNEY
- Each heater includes reducer 122/115 mm
- Chimneys: additional equipment if necessary
PREHEATING
Before use and arranging the stones, the sauna stove must be heated to remove
the protective agents. 1-2 fireboxes of wood are sufficient for preheating. During
preheating, ensure that there is plenty of ventilation in the sauna to allow the
combustion gases from protective agents to escape. Preheating can also be done
outdoors.
SAUNA STOVE STONES
We recommend that you use NARVI olive dolerite stones. Do not heap stones too
tightly because air must circulate between the stones. NARVI sauna stove stones
have been prewashed and can be placed directly on the sauna stove. Fresh water
must be used as steam water. Seawater considerably shortens the service life of your
sauna stove.
FIREWOOD
Both hardwood and softwood can be used in the NARVI sauna stove. Fell and cut
trees into firewood outside of the growing season. Dry the firewood outdoors in
summer and move it to a dry store before autumn rain. Store one or two years supply
of firewood in surroundings where the moisture is < 20 %.
HEATING
Before heating the sauna stove, the grate must always be cleaned and the ash pan
must be emptied. Start by lightning a small quantity of wood on the upper surface of
the wood. When the wood is burning properly add more wood to 2/3 of the height of
the firebox. To burn properly wood needs air. Use the draught regulator to adjust the
amount of air. Avoid heating the sauna stove so that the channels of the stone basket
glow red for a long time because this will overload the firebox and the service life of
the sauna stove will be reduced! After your sauna leave a little fire in the sauna stove
to dry the sauna..
MAINTENANCE OF THE SAUNA STOVE
Sweep the sauna stove through the soot hatches at least once a year to maintain a
proper draught. At the same time, check the condition of the sauna stove stones and
replace any warm-out stones.
 Loading...