

Page 1

Household Refrigerator / Freezer
Operation Manual
Réfrigérateur / congélateur ménager
Mode d’emploi
Kühlschrank/Gefrierschrank für den
Frigorifero/congelatore per usi domestici
Manuale per l'uso
Frigorífico/Congelador doméstico
Combinado doméstico
Haushaltsgebrauch
HB21TSSAA
Page 2

Home Refrigerator
Table of Contents
Before Use
Features ................................................................. 1
Name of Part s ........................................................... 2-3
Saf ety P reca utions ................................................... 4-6
Location................................................................7
Removing & Replacing Door....................................8-10
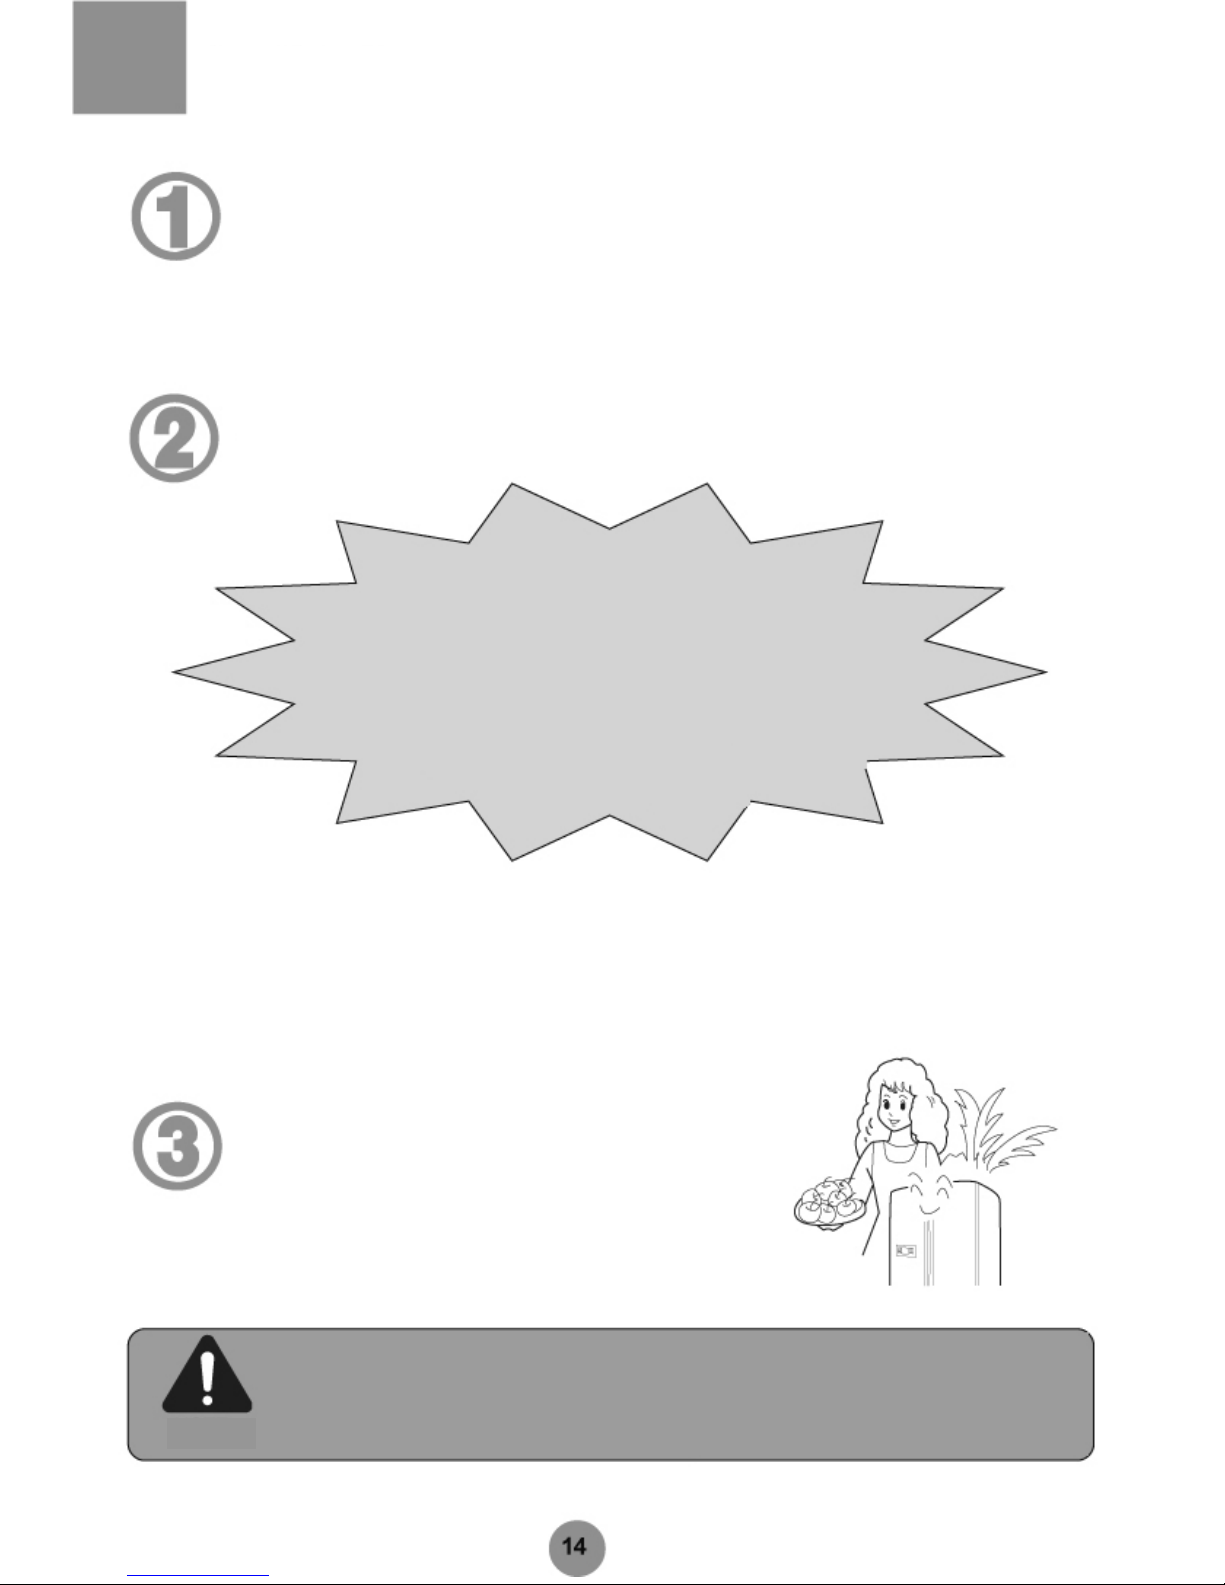
Pre par at io n ................................................................ 11-13
Initial Use.................................................................... 14
Func tion s ................................................................... 1 5-18
Instructions for the Refrigerator Compartment
Abo ut th e Ref rigerat or Compa rtment ......................19-20
Storing Food in the Ref rigerator Compartment ......21
Use fuI Tips .................................................................22
Instructions for the Freezer Compartment
Abo ut th e Freezer Compar tment .............................22-23
Storing Food in the Fre ezer Compar tment.............24
Defrosting • Cleaning • Vacation
Defros t i n g • Cleani n g.............................................. 25
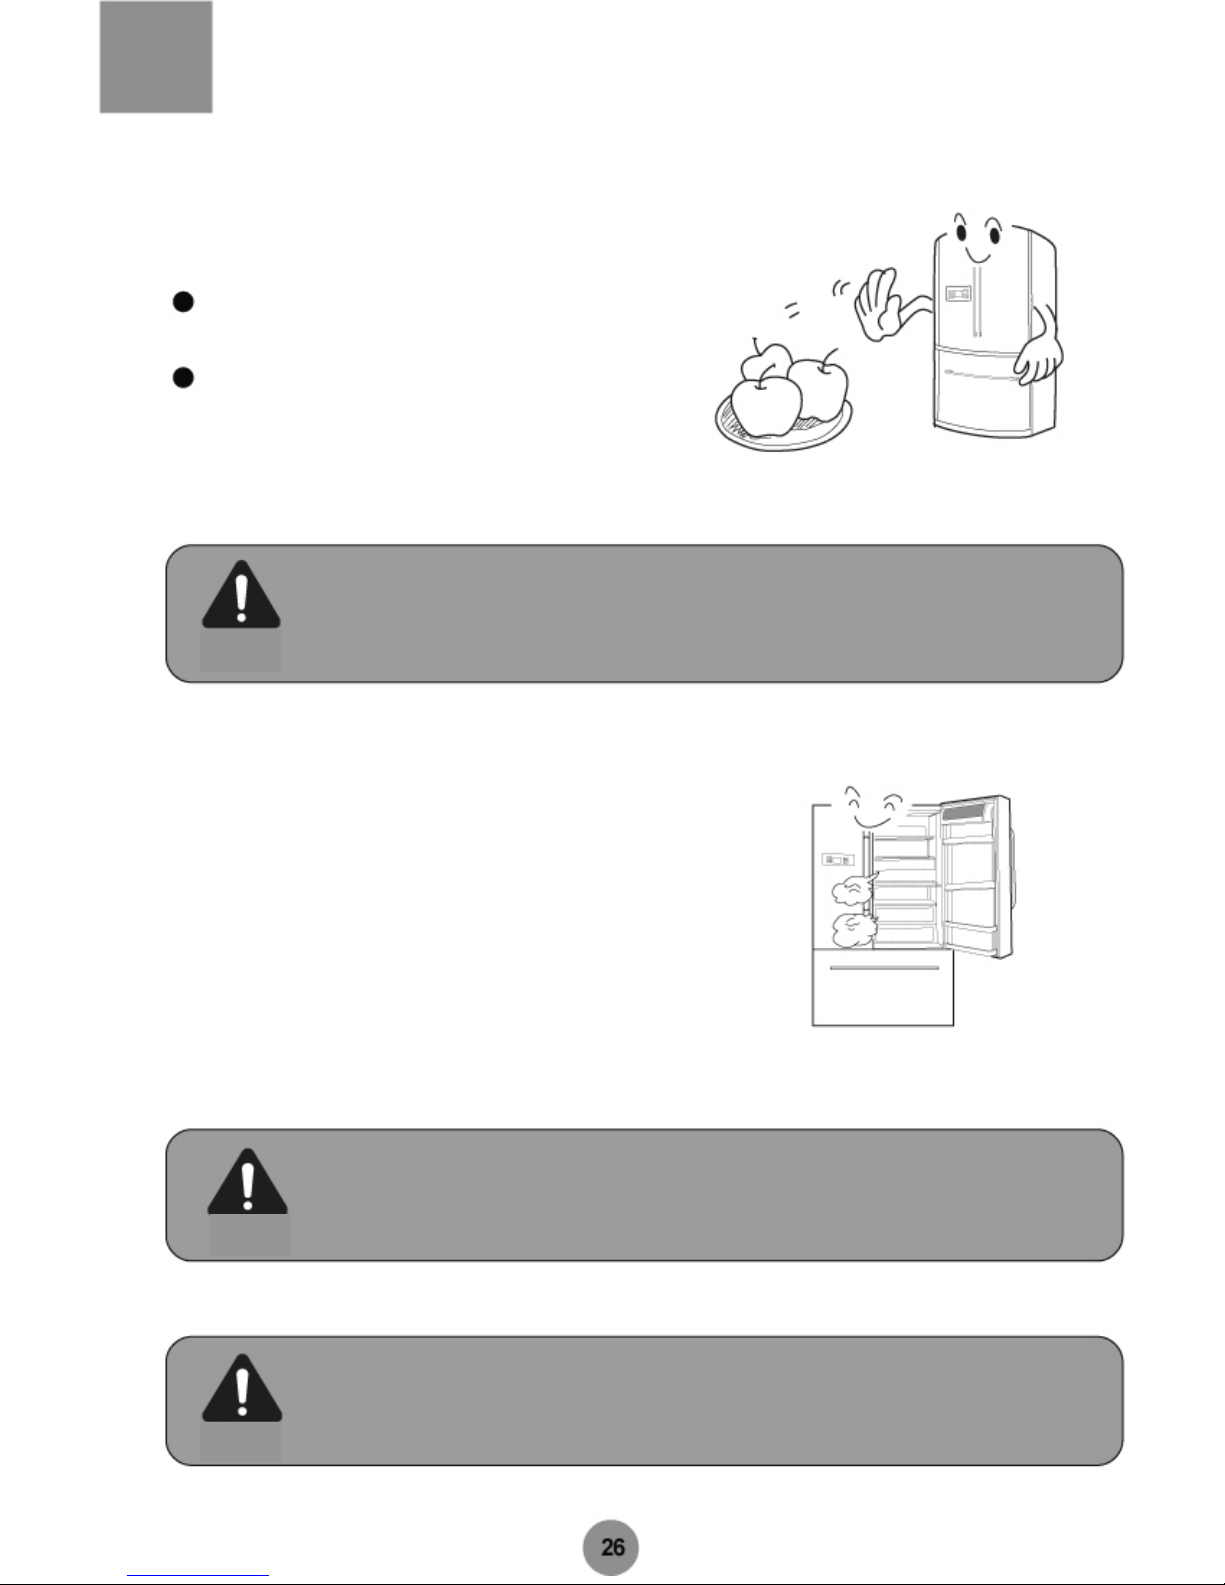
Vac at io n .....................................................................2 6- 2 7
Troubleshooting • After-sale Services
Troubleshooting ...................................................... 28-29
After-sale Ser v i c e s.................................................. 30-31
Technical Data .Circuit Diagram • Packaging List
Technical Data Circuit Diagram • Packing List -..........32-38
.
• Please read this User Manual carefully before use.
• Please keep this User Manual in a safe place.
• The appearance and color of your refrigerator may vary slightly from that
illustrated herein.
Page 3

Features
Ice making
A built-in semi-automatic icemaker will produce ready-to-use ice cubes based on your
preference.
Chill compartment
The chill compartment at the bottom of the refrigerator compartment is intended for storage
of delicatessen within the temperature range from -2°C to +3°C.
Slide-out shelf for easy food access
The refrigerator compartment is equipped with slide-o ut shelves for easy loading and
unloading. These shelves can be removed when the door is at a ri ght-angle.
Artificial Intelligent (AI) design
Optimum refrigeration performance is secured based on the inner and ambient temperature,
without the need for manual intervention.
Super slim, super large and super luxurious
Compact dimensions, large capacity, spacious refrigerator compartm ent and freezer
compartment, supreme internal and external design
CFC-free and frost-free deep freezing enabled by an effi cient air coolin g system
Air Curtain technology
The air curtain located at the front end of the refrige rator compartme nt is intended to aid food
storage by preventing invasion of warm air and faci litating equal distribution of cool air.
Cooling before defrosting to prevent thawing
A pre-cooling process will be activated based on the measured inner temperature, to avoid
the adverse impact of temperature rises on food stored in the refrigerator.
Optimized refrigeration performance and long service life of the compressor enabled by an
efficient condenser unit and fan motor
Door-open alarm, touch button and large-screen LCD display
Vitamin C technology for fresh food storage
The Vitamin C technology effectively keeps the food fresh for a longer peri od of time while
eliminating unpleasant odors.
Smooth and effortless drawer slide
Page 4
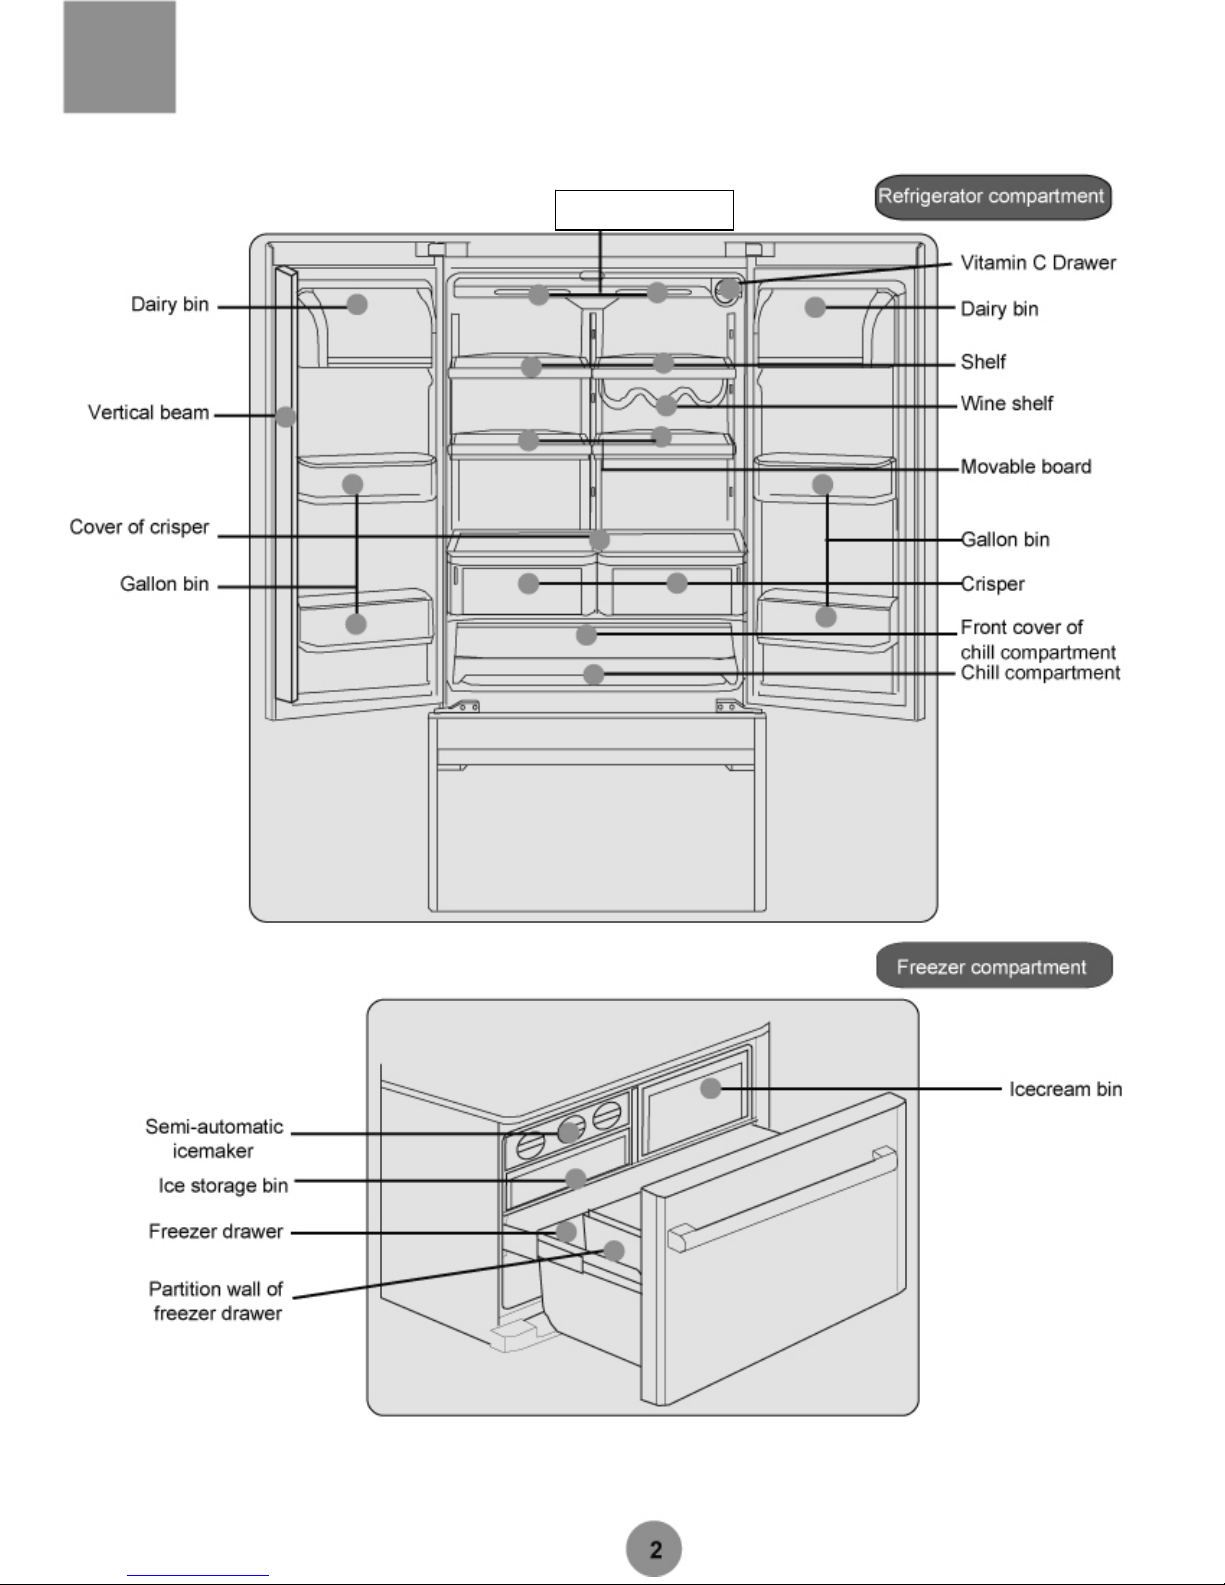
Names of
p
arts
Refrigerator light
Page 5

Names of
p
arts
Dear Customer
Thank you for purchasing a NARDI product.
NARDI products are of supreme quality and superior performance. Please read
these instructions and follow the procedures describe d herein.
You are enjoying a NARDI International Star Service. For any question you
may have, please contact our service centers at the telephone numbers or
addresses specified in the Letter of Warranty.
NARDI – Now, and always!
NOTE: Product specifications may change without notice due to product
improvements.
Page 6
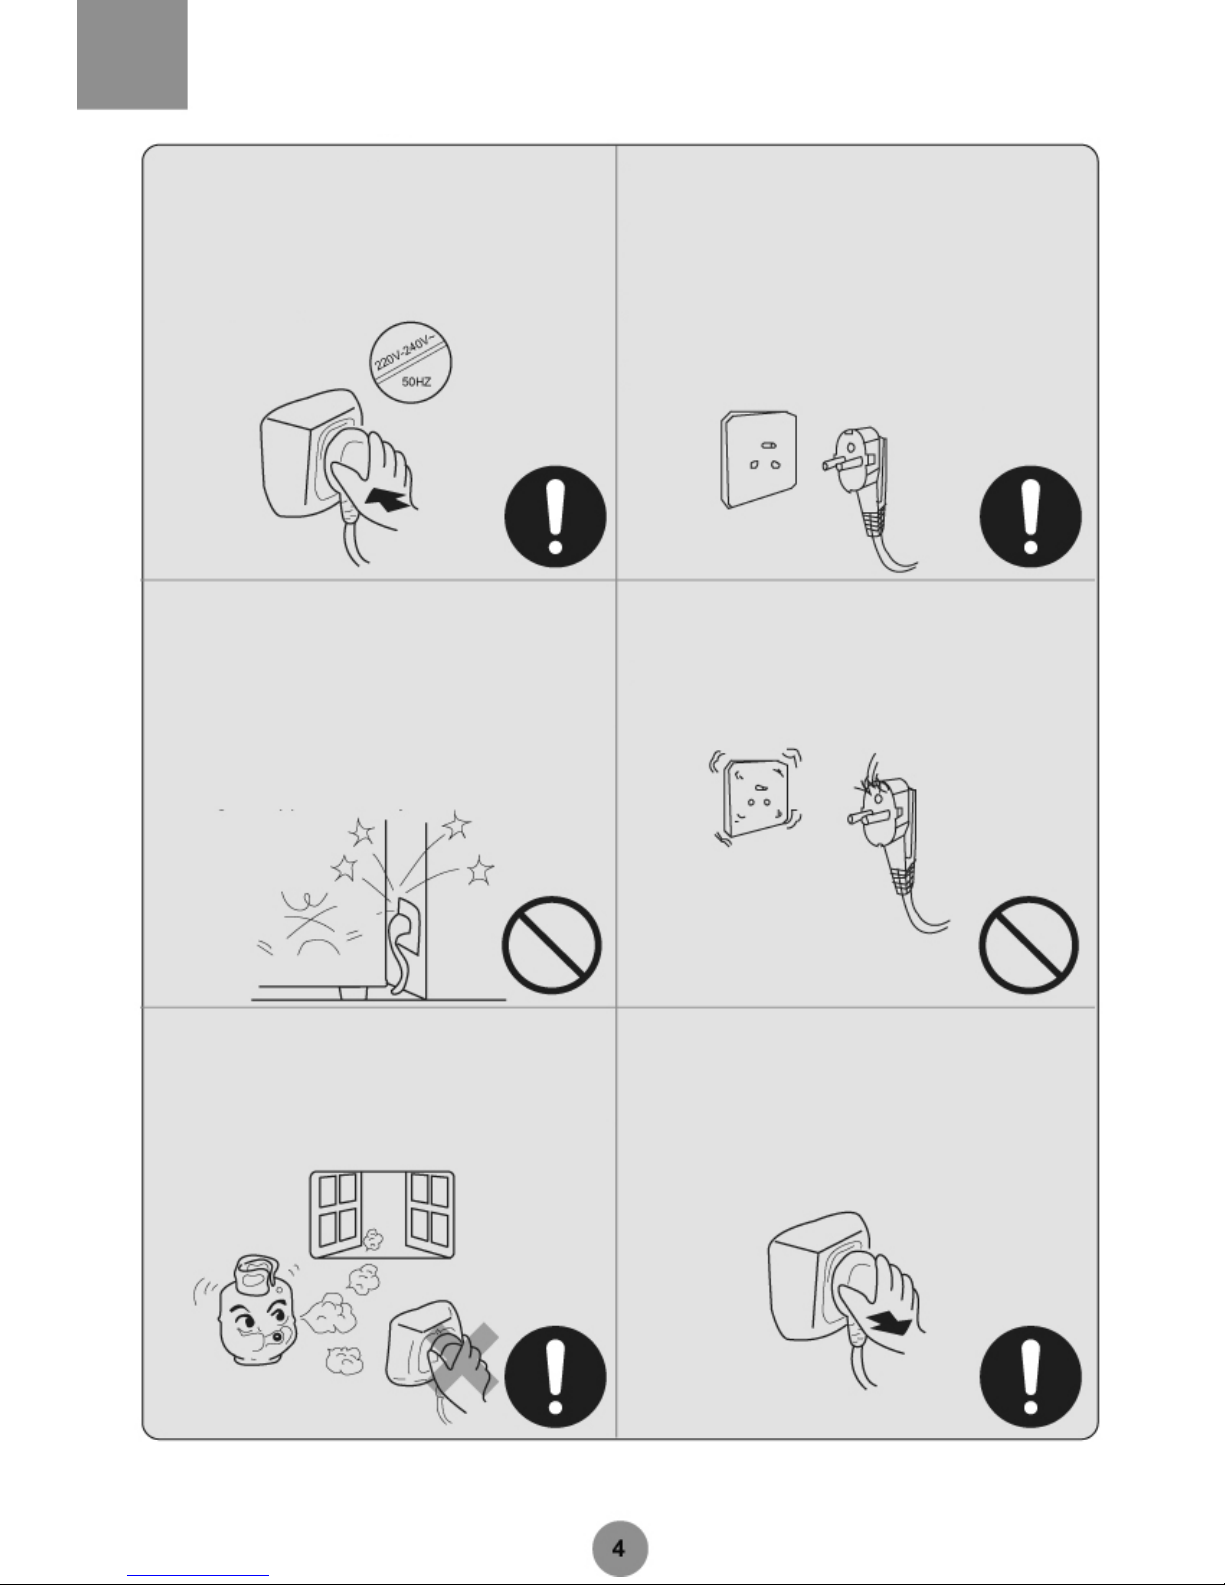
Safety Precautions
Power supply: AC 220V-240V/5OHZ
If the voltage fluctuates violently (beyond 187242V), it is necessary to use a voltage stabilizer of
750W or above to prevent startup failure, damage
to the control board or compressor, or unusual
noises.
The appliance must be plugged into a dedicated
outlet that is securely grounded. The power cord
of this appliance is fitted with a three-prong plug
(grounded) that complies with the standard threeprong outlet (grounded). Never cut off or remove
the third prong. The refrigerator should be located
so that the plug is accessible. VVARNING! The
plug should be securely connected to the socket
to prevent fire hazards.
Be careful not to damage the power cord. Hold the
plug, not the electric cable, when disconnecting
the appliance from the outlet. Place the power
cord in such a way as to eliminate the risk of
damage caused by the refrigerator’s weight.
Be careful not to damage the power cord when
moving the appliance.
When the power cord is damaged
The use of a damaged cord or plug is strictly
prohibited. If the power cord is damaged, it should
be replaced at an authorized service center.
When there is a gas leak
Turn off the gas valve.
Open the doors and windows for ventilation.
Do not plug or unplug the refrigerator or other
electric appliances.
Always remember to unplug the appliance in the
following cases:
Unplug the appliance before cleaning and
reparation.
Unplug the appliance before replacing the old light
bulb to prevent electric shock.
Page 7
Safety Precautions
Never store inflammable or explosive items and
strong corrosive acids or alkalis in the appliance.
Mousse / Spraying agent / Gas/ Acid / Alkali
This appliance is a household refrigerator, which is
produced in accordance with the specifications of
national standards. It is intended for food storage
only, not for storage of blood, medicine and
biological products.
To prevent the risk of fire, keep the appliance
away from gasoline or any other inflammables.
To prevent the risk of electromagnetic interference
or other accidents, do not place patch panels,
voltage stabilizers or microwave ovens on top of
the refrigerator or use any electric appliance
(unless recommended by the manufacturer) inside
the refrigerator.
Children must not play with the door or bottle
racks as serious injury may occur. Do not swing
on the door or cabinet when loading and
unloading the refrigerator.
The internal surface of the freezer compartment is
very cold when the appliance is running. Do not
touch the surface, especially with wet hands.
Page 8
Safety Precautions
Hold the door handle when opening and closing
the door. The gap between the doors and the
cabinet are very small. Ensure no children are
standing within the range of the door movement
when opening or closing the appliance doors.
Do not spray or splash the refrigerator, or place same in
a damp area
to avoid adverse effects on electric
insulation performance.
Disassembly or maintenance must be authorized.
Damage to the refrigeration system is strictly
prohibited. Repairs must be carried out by
authorized personnel.
Bottled beer or beverages must not be stored in
the freezer compartment to avoid the risk of
explosion.
Unplug the appliance in the event of a power
interruption or when cleaning. Allow at least a 5
minute lapse before restarting the refrigerator, to
prevent damage to the compressor caused by
frequent startups.
Please remove the door, door seal and shelves
before disposing of the old appliance and put them
in a safe place to prevent children from being
trapped inside.
Page 9
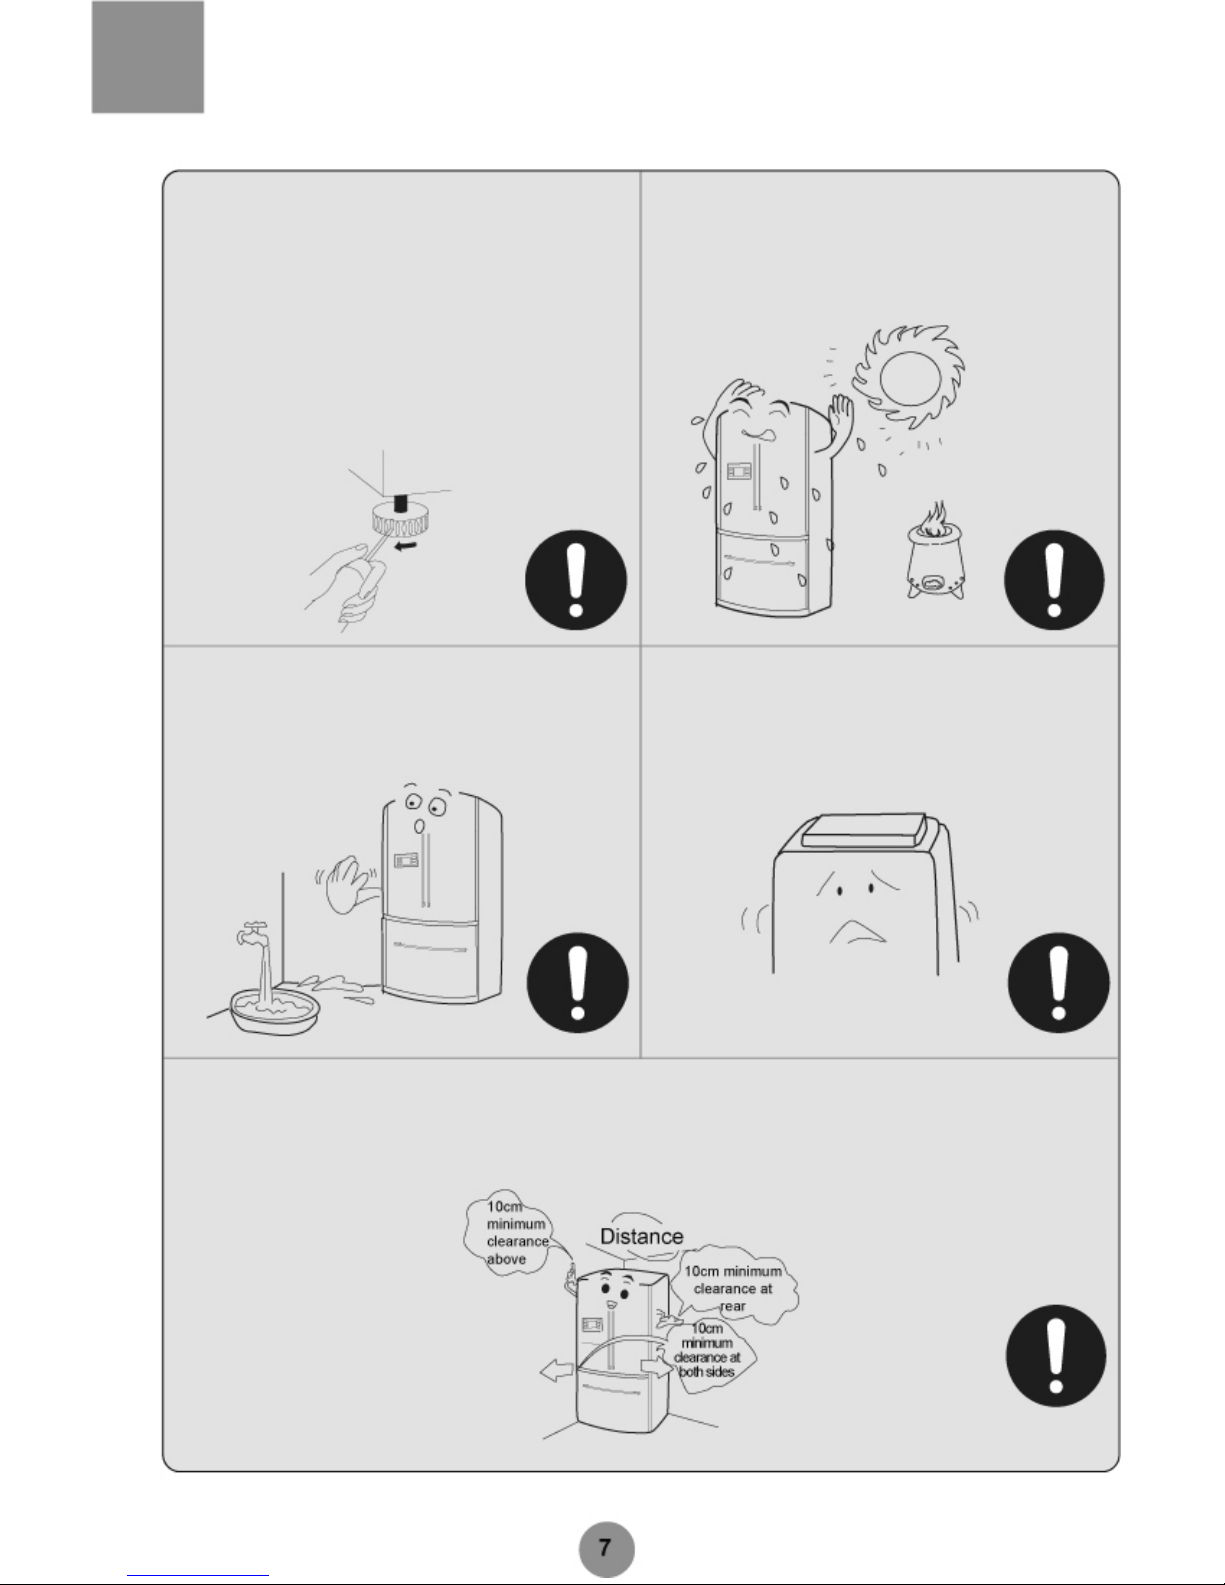
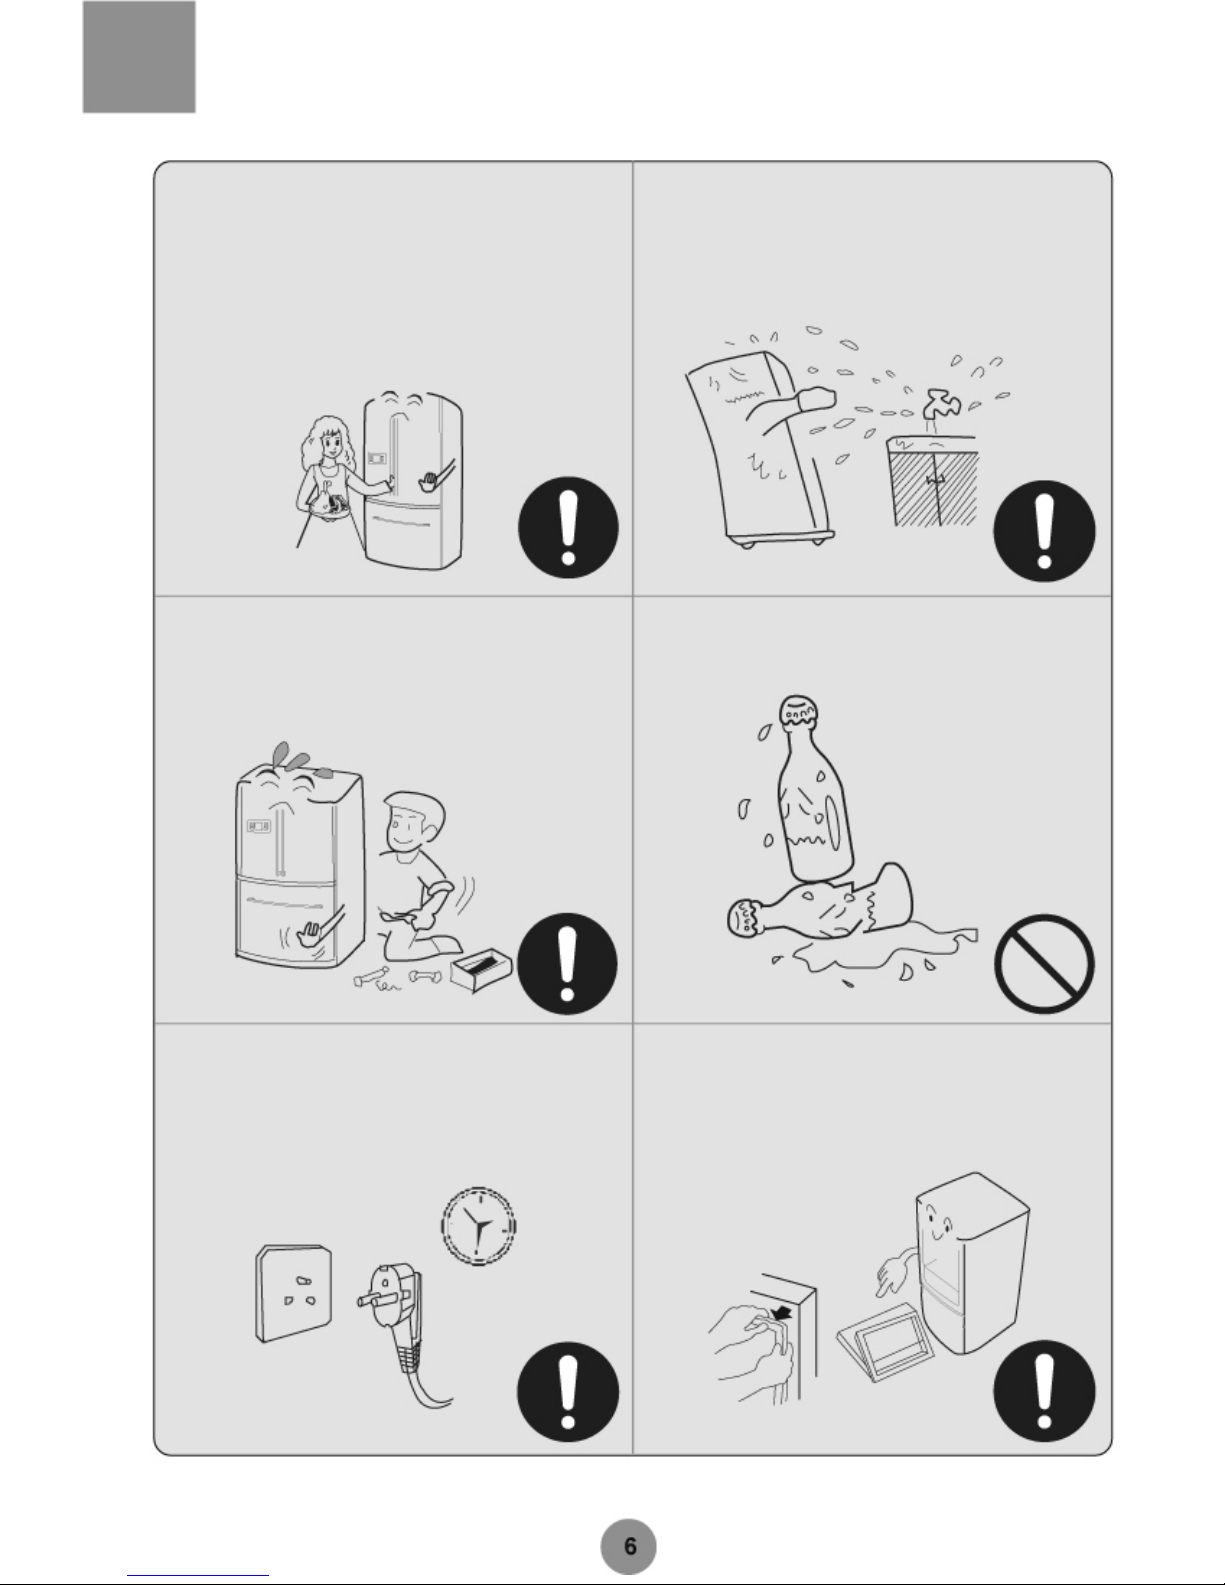
Location
Leveling Do not expose the appliance to direct sunlight or
sources of heat.
The appliance should stand firmly on a solid floor.
To support it, use firm and solid, non-flammable
pads. Never use the packaging materials for
support. Level the appliance using the adjustable
legs whenever necessary. Turn clockwise to raise
the refrigerator, and anticlockwise to lower it.
Do not expose the appliance to rain and moisture.
Keep the appliance dry and clean.
To prevent the risk of injury and accidents, do not
place heavy loads and water containers on top of
the refrigerator.
The appliance should be placed in a well ventilated room. A minimum clearance of 10cm at both sides and
at the rear is required. If a built-in installation is needed, allow 25cm or more above the top surface of the
a
pp
liance and 5cm or more away from the walls, to enableproper air circulation.
Page 10
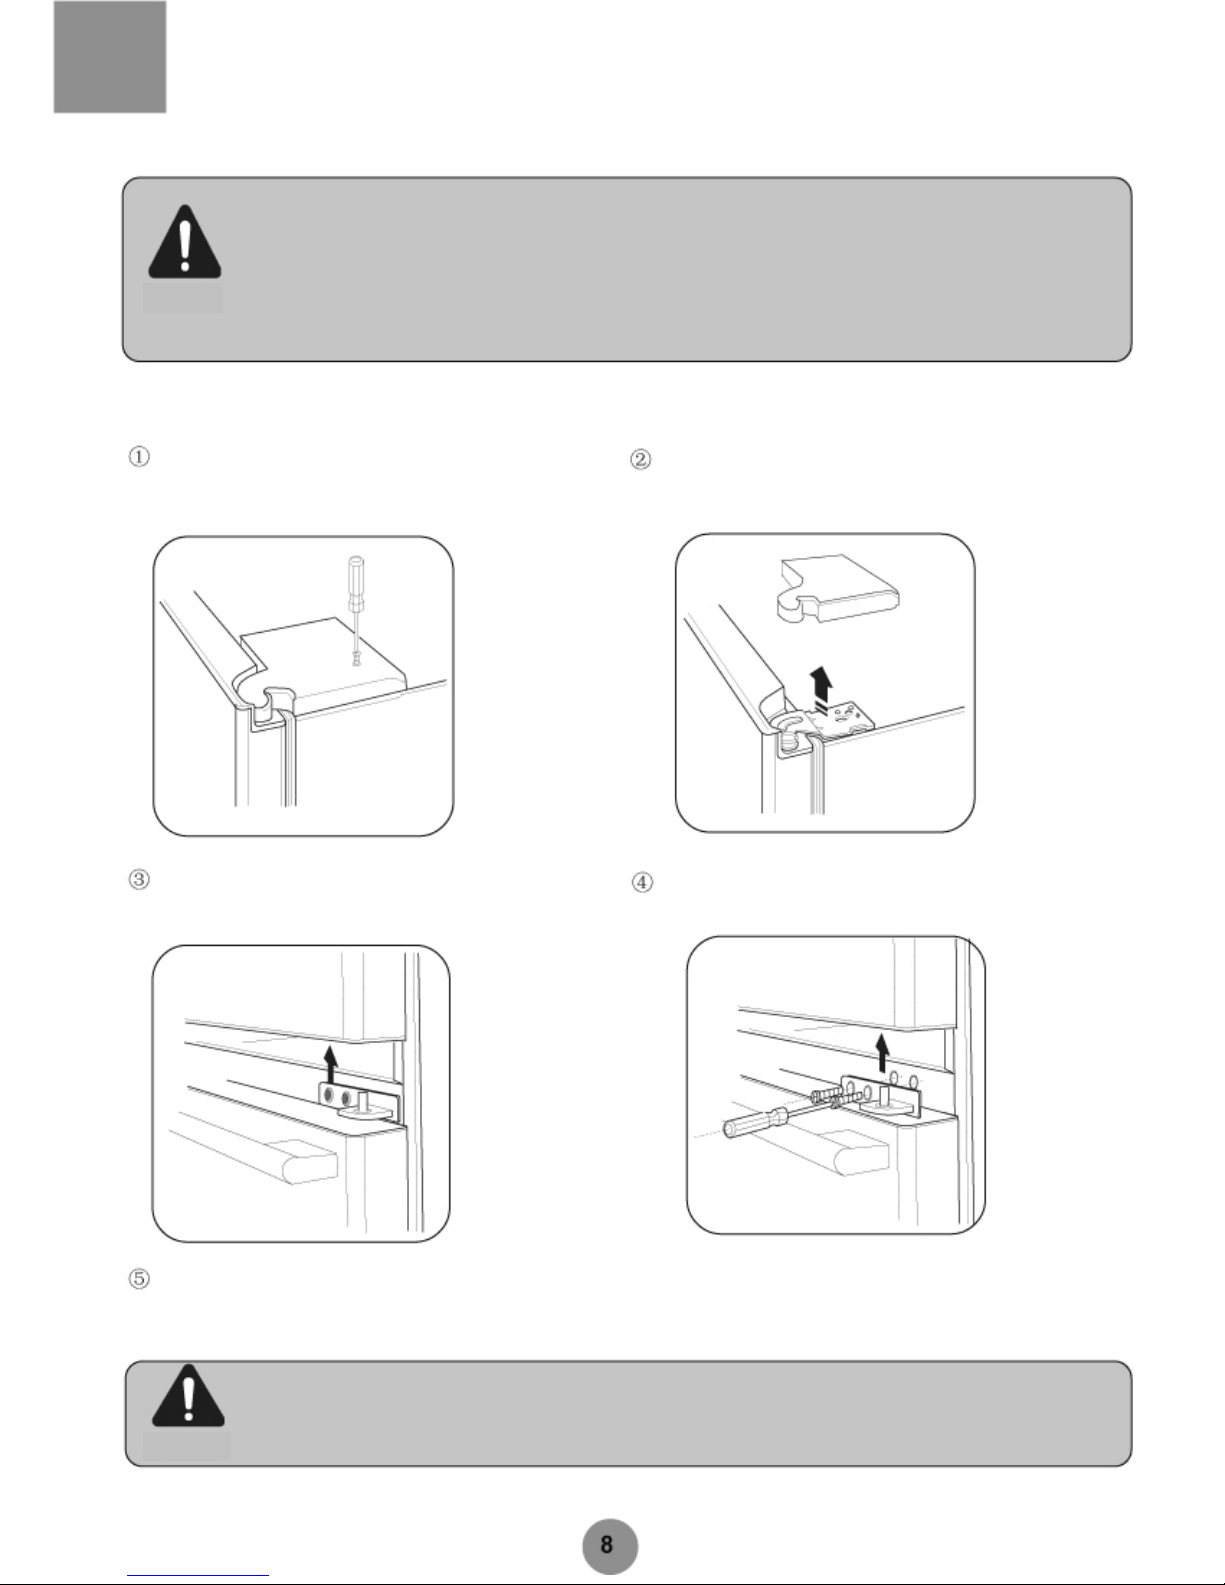
Removing & Replacing Doors
To avoid injury, property loss or damage to the refrigerator, make sure you remove all food from the door racks, remove the bottle bin(s),
unplug the refrigerator and shut off the water supply before removing and replacing a door.
To avoid injury or property loss, remove or replace the door with the help of 2 persons or more. The following instructions should be
observed.
NOTE
Removing and replacing the right hand door of the refrigerator
Unscrew the upper right hand hinge cover and remove. Unscrew the upper right hand hinge and remove.
Remove the door and place it in a suitable position. Remove the middle hinge if necessary.
Replace the door in the reverse sequence.
Take care to prevent the door from falling onto you when lifting the door off the hinge.
NOTE
Page 11

Removing & Replacing Doors
Removing and replacing the left hand door of the refrigerator
Unscrew the upper left hand hinge cover and remove. Unscrew the upper left hand hinge by means of hexagonal
screwdriver and remove.
Remove the door and place it in a suitable position. Remove the middle hinge if necessary.
Replace the door in the reverse sequence.
Take care to prevent the door from falling onto you when lifting the door off the hinge.
NOTE
Removing & Replacing the Freezer Drawer
Pull out the freezer drawer entirely and remove it from the
refrigerator.
Replace the freezer drawer in the reverse sequence.
Page 12

To prevent the risk of suffocation, keep children and pets away
from the drawers, in case they get trapped within.
WARNING
Pre
p
aration
Remove all packaging materials.
Foam support and adhesive tapes should be removed.
Check the accessories and literature.
Check the accessories in accordance with the packing list. For
any doubt, contact the dealer.
Locate the appliance in a proper position. See
"Location".
Please write down the model number and serial number in the Letter of
Warranty for later reference.
Page 13
Pre
p
aration
It is recommended to clean the appliance
before operation.
See Cleaning.
Standstill
To ensure optimal operation, allow the appliance to stand still for
6 hours or longer after installation and cleaning.
Installing Bottom Trim
Open the door of the refrigerator compartment and take out the
bottom trim. Fasten it to the bottom of the refrigerator with screws,
as illustrated.
Wear a pair of gloves to protect your hands when
dismantling the bottom trim and adjustable legs
of the refrigerator.
WARNING
Page 14

Pre
paration
ill u s tr a tio n 1 ill u s tr a tio n 2
Page 15
Pre
p
aration
Installing the wine shelf
Open the door of the refrigerator compartment. Take out the food shelf in the upper left
corner. Place the glass shelf downwards on a table. Then take out the wine shelf from the
delicatessen drawer at the bottom. Hold the wine shelf on both ends, attach it to the food
shelf (as shown below in Fig 1) and then push it in place (as shown below in Fig 3).
Installing the front cover of the chill compartment
Open the door of the refrigerator compartment. Remove the front cover of the chili
compartment from the crisper cover. Then place the rotary shaft at the two ends of the
chili compartment into the supporting slot of the stele guide, and turn the front cover of
chili compartment downwards.
Page 16
Initial Use
Connect the appliance to the power supply.
The actual refrigerator and the freezer temperatures are shown.
The appliance has a backup memory, storing the settings prior to a power
interruption. (See Backup Memory section on Page 17 for details)
Operation Modes
Recommendation!
Once the AI mode is selected there is no need to
make any adjustment within a prescribed temperature
range, regardless of changes in
ambient temperature.
You can select one of the following operation modes.
(1) AI: Unless otherwise required, it is recommended that the AI mode is used. Tap the AI button
and the indicator will illuminate. The appliance will start an automatic operation. (See the AI
Mode section on Page 14)
(2)Manual: Alternatively, you can adjust the inner temperature by means of the temperature
control button. (See the Temperature Setting & Regulation section on Page 16)
Loading the refrigerator
The inner compartment will be cold enough and ready for food storage after a
couple of hours of non-load operation.
When the temperature setting is adjusted, it takes some time for
the desired inner temperature to be reached. The period will be
longer or shorter depending on the ambient temperature, the
amount of food in storage and how often the door is opened.
NOTE
Page 17
Initial Use
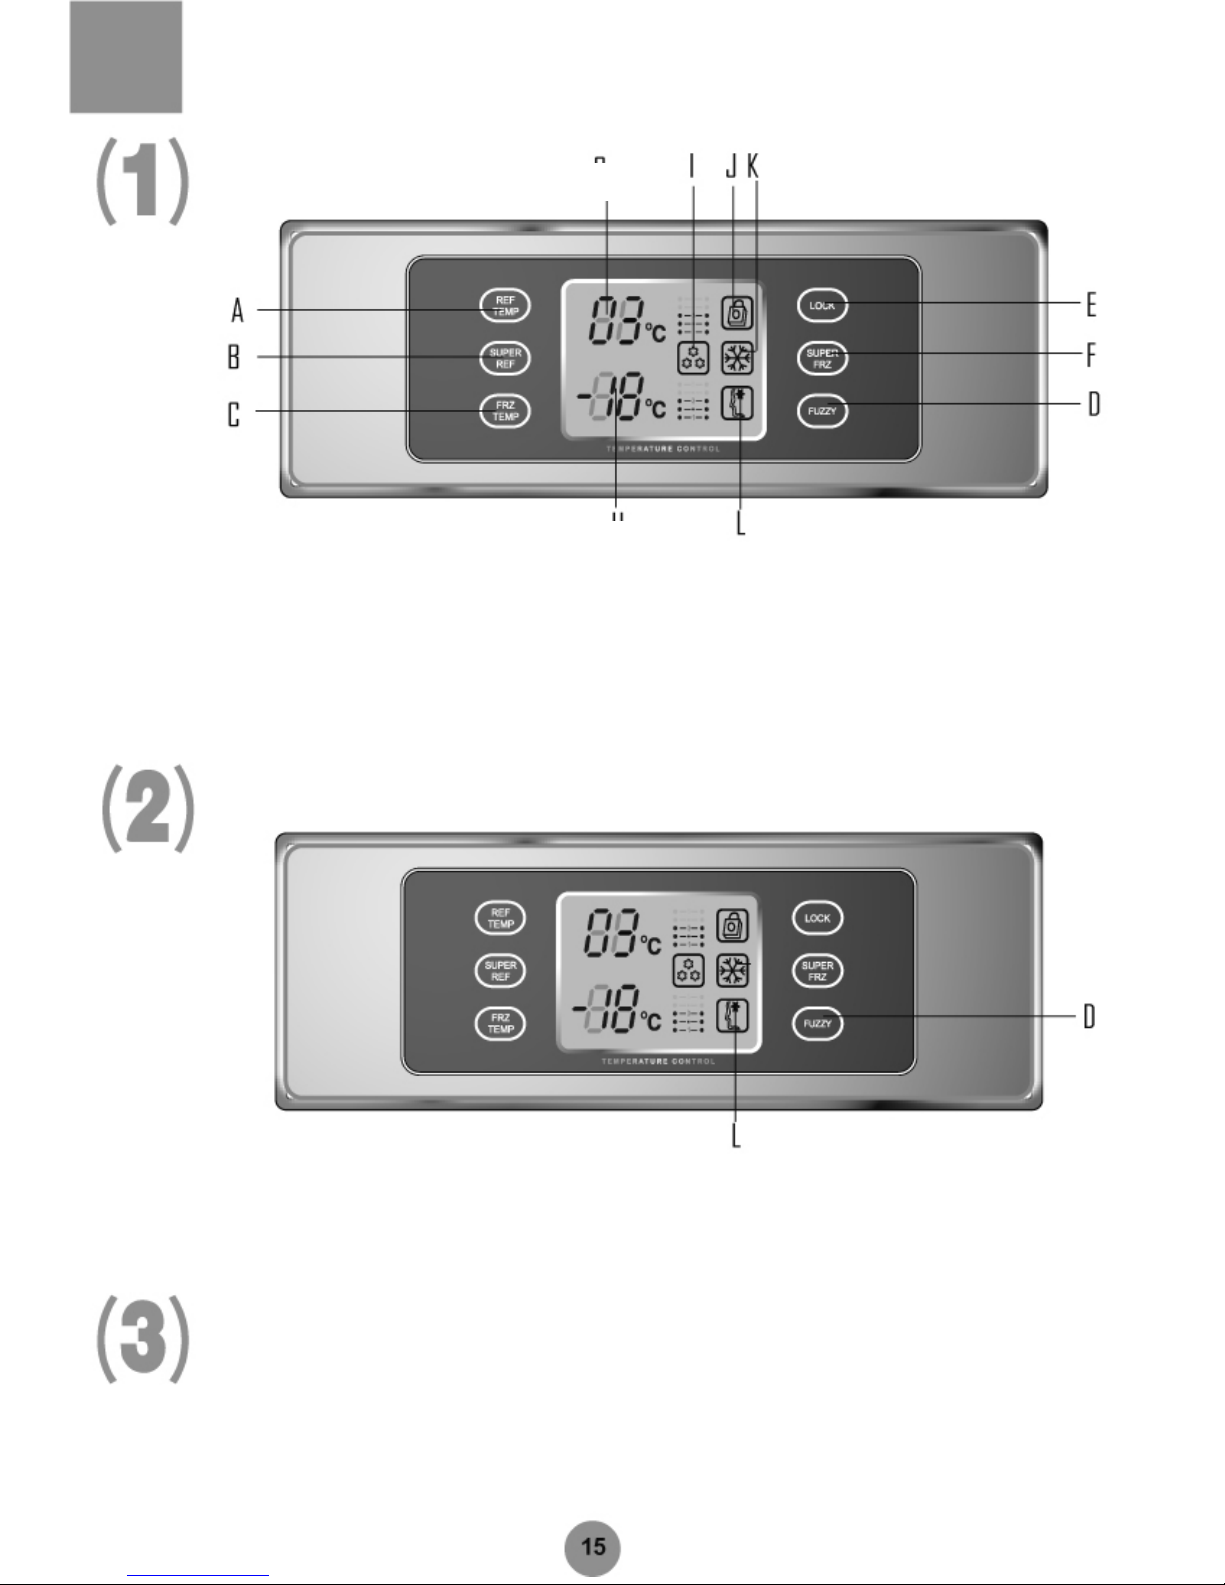
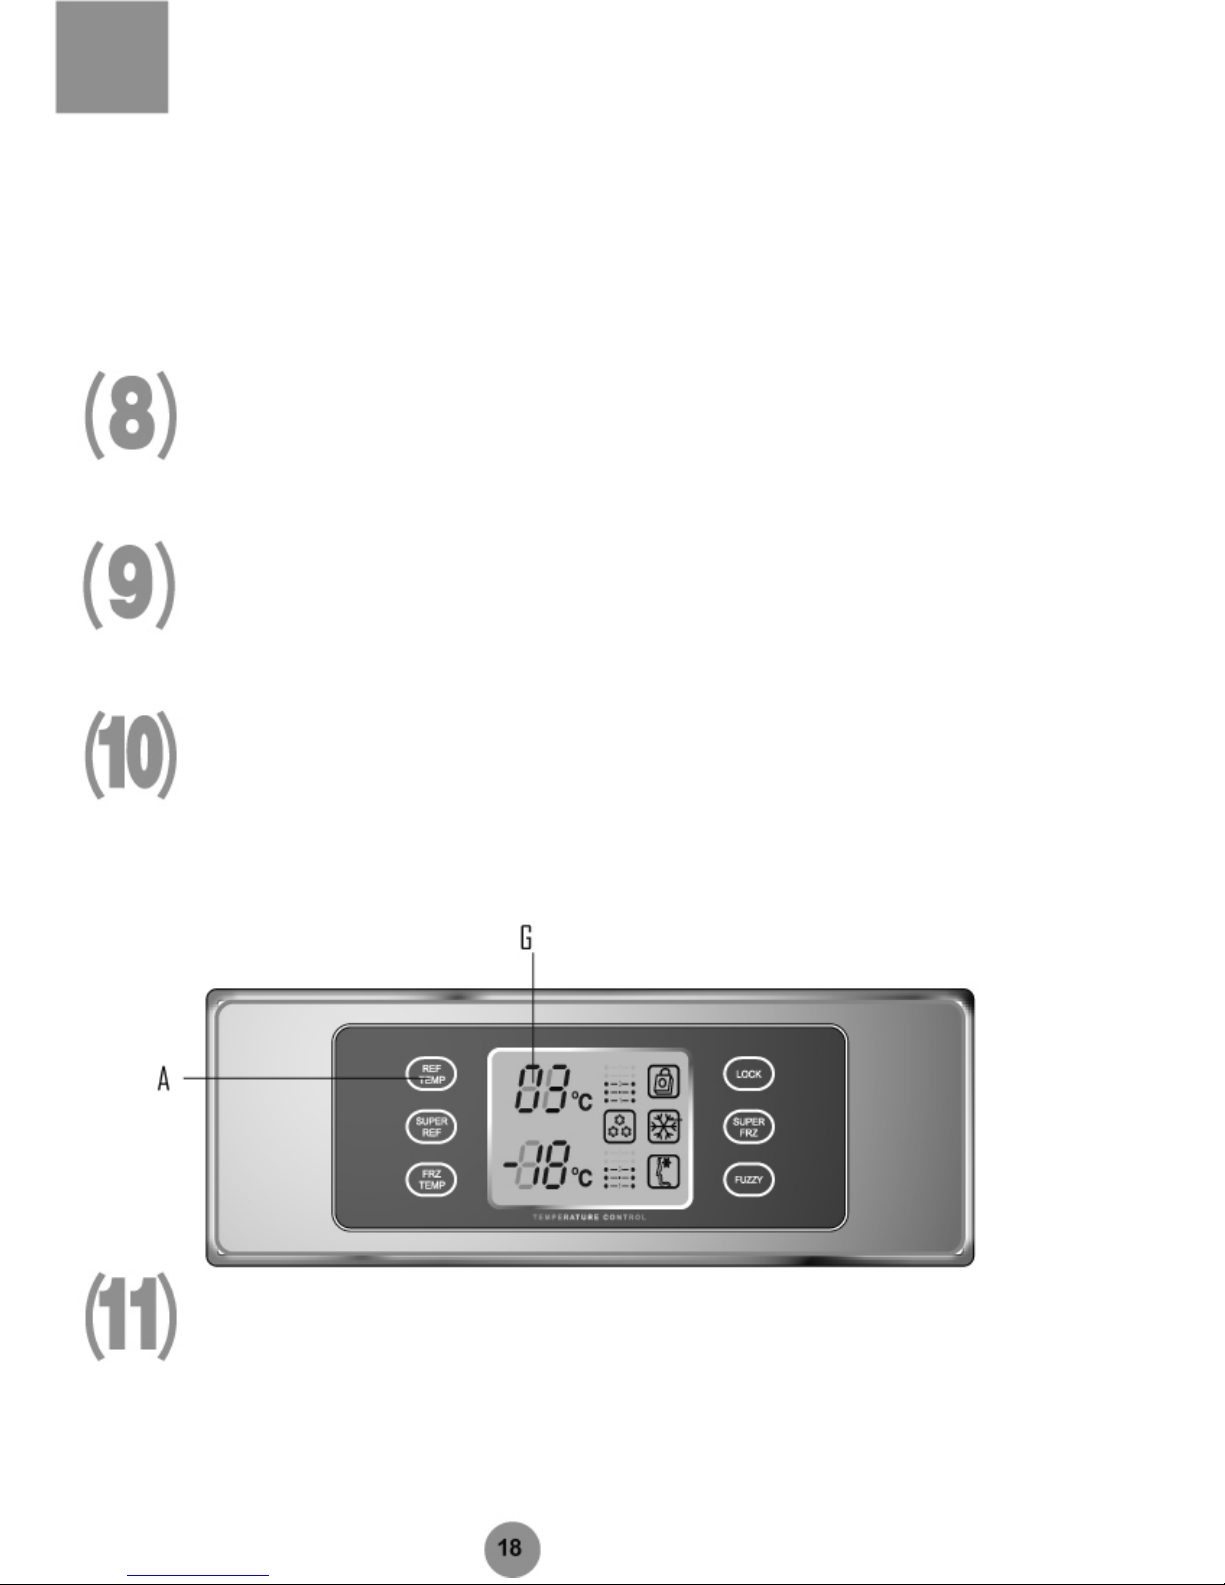
Control panel
Loading the refrigerator
The inner compartment will be cold enough and ready for food storage after a
cou
p
le of hours of non-load operation.
A Refrigerator temperature control button G Refrigerator temperature display
B Fast chill button H Freezer temperature display
C Freezer temperature control button I Fast chili icon
D AI button J Lock icon
E Fast freeze button K Fast freeze icon
F Lock / unlock button L AI icon
AI Mode
The AI mode means there is no need for manual intervention and the temperature setting will change
automatically along with the ambient temperature and the inner temperature. In Unlock mode, the AI button
(D) may be tapped to display the AI icon (L) and activate the AI mode. To quit the AI mode, tap the AI
button (D) again. The AI icon (L) will disappear.
When a control or function fault is detected, the refrigerator temperature and the freezer temperature will
disappear and the fault codes will be displayed, i.e. EO, E1, E2, F 1 , F2, F3, F5, etc.
Fault Display
Page 18
Functions
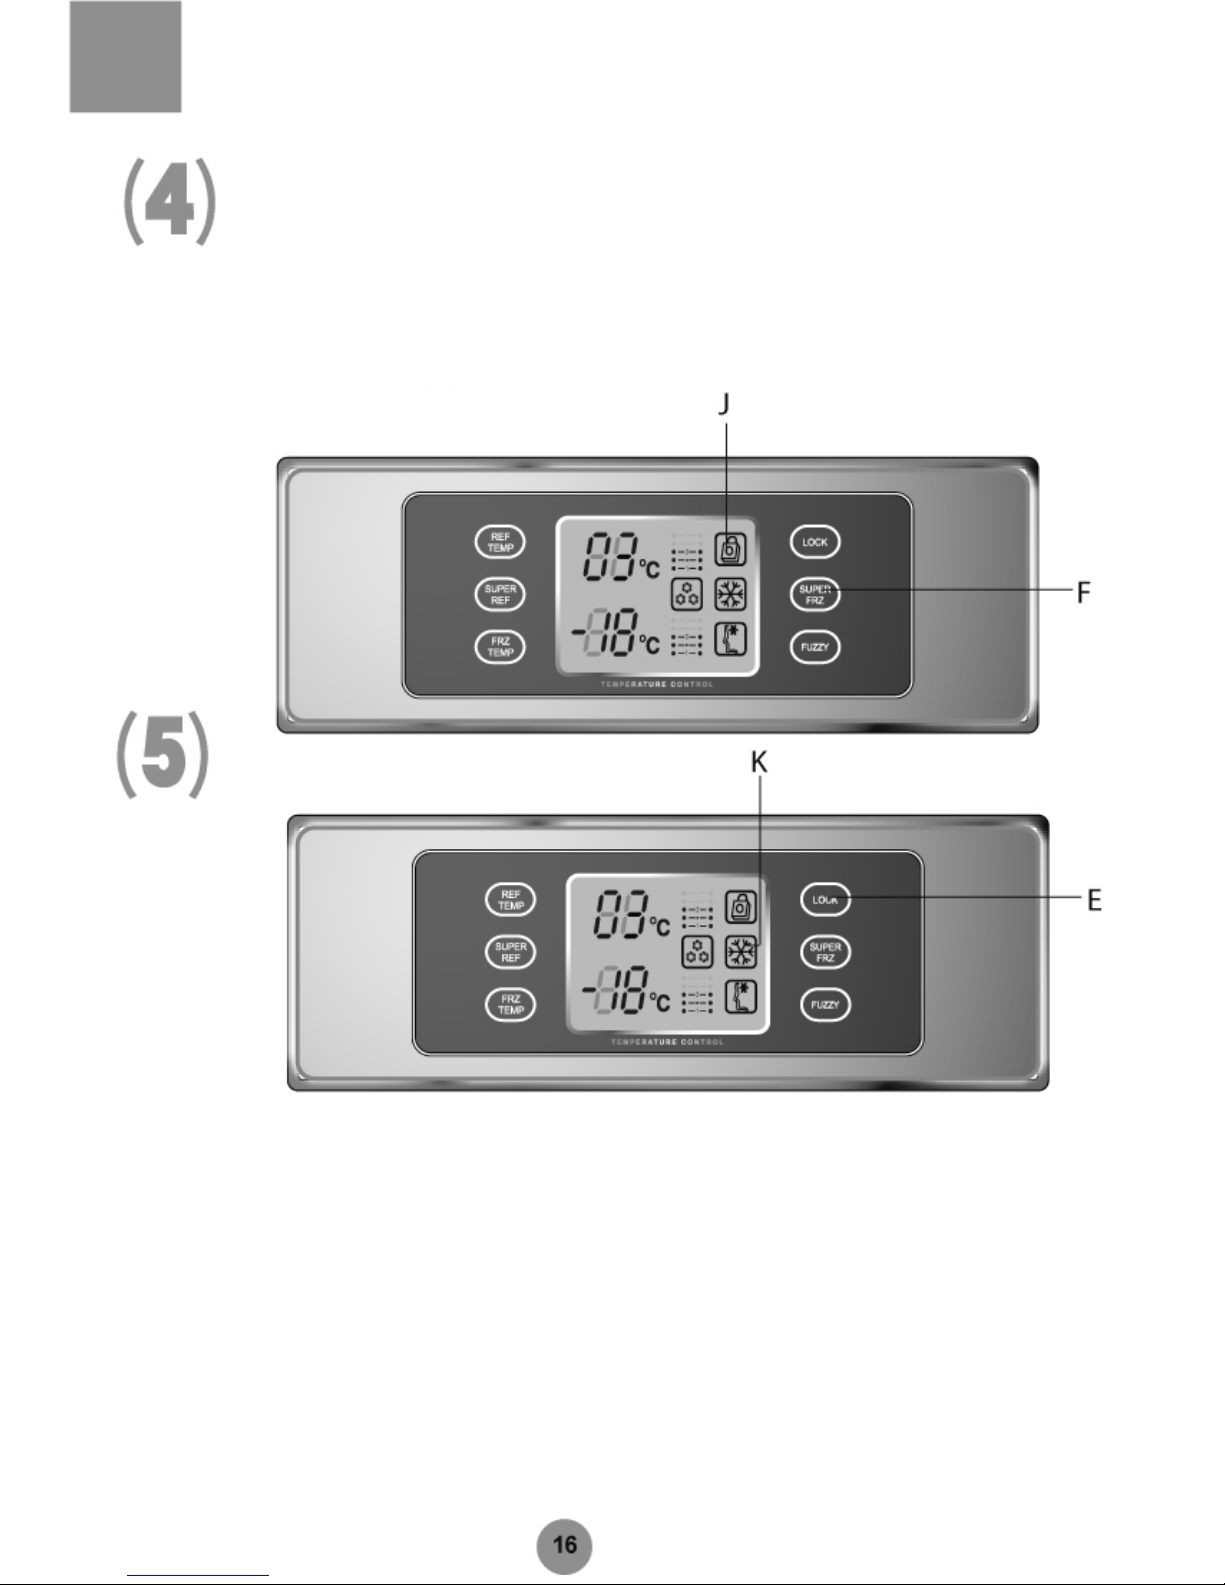
Lock & Unlock
In Unlock mode, the Lock / Unlock button (F) may be tapped to display the Lock icon (J) and enter into the Lock mode.
To quit the Lock mode, tap the Lock / Unlock button (F) again. The Lock icon (J) will disappear.
NOTE: Controls for selecting temperatures in the refrigerator and freezer compartments and functions such as fast
freeze, fast chill and AI (artificial intelligence) cannot be operated in Lock mode.
Fast Freeze
This function is designed to preserve the nutrients contained in foo d stored in the freezer, by freezing the food fully
within a short period of time.
In Unlock mode, the Fast Freeze button (E) may be tapped to display the Fast Free icon (K) and activate the Fast
Freeze mode. The Fast Freeze mode is activated and will be stopped automatically after 3 hours. To quit the Fast
Freeze mode, tap the Fast Freeze button (E) again. The Fast Freeze icon (K) will disappear.
NOTE: The Fast Freeze mode is not available in AI mode.
NOTE: When making ice, you may select Fast Freeze to speed up the ice-making process and quit Fast Freeze after
the ice-making process is completed.
Page 19
Functions
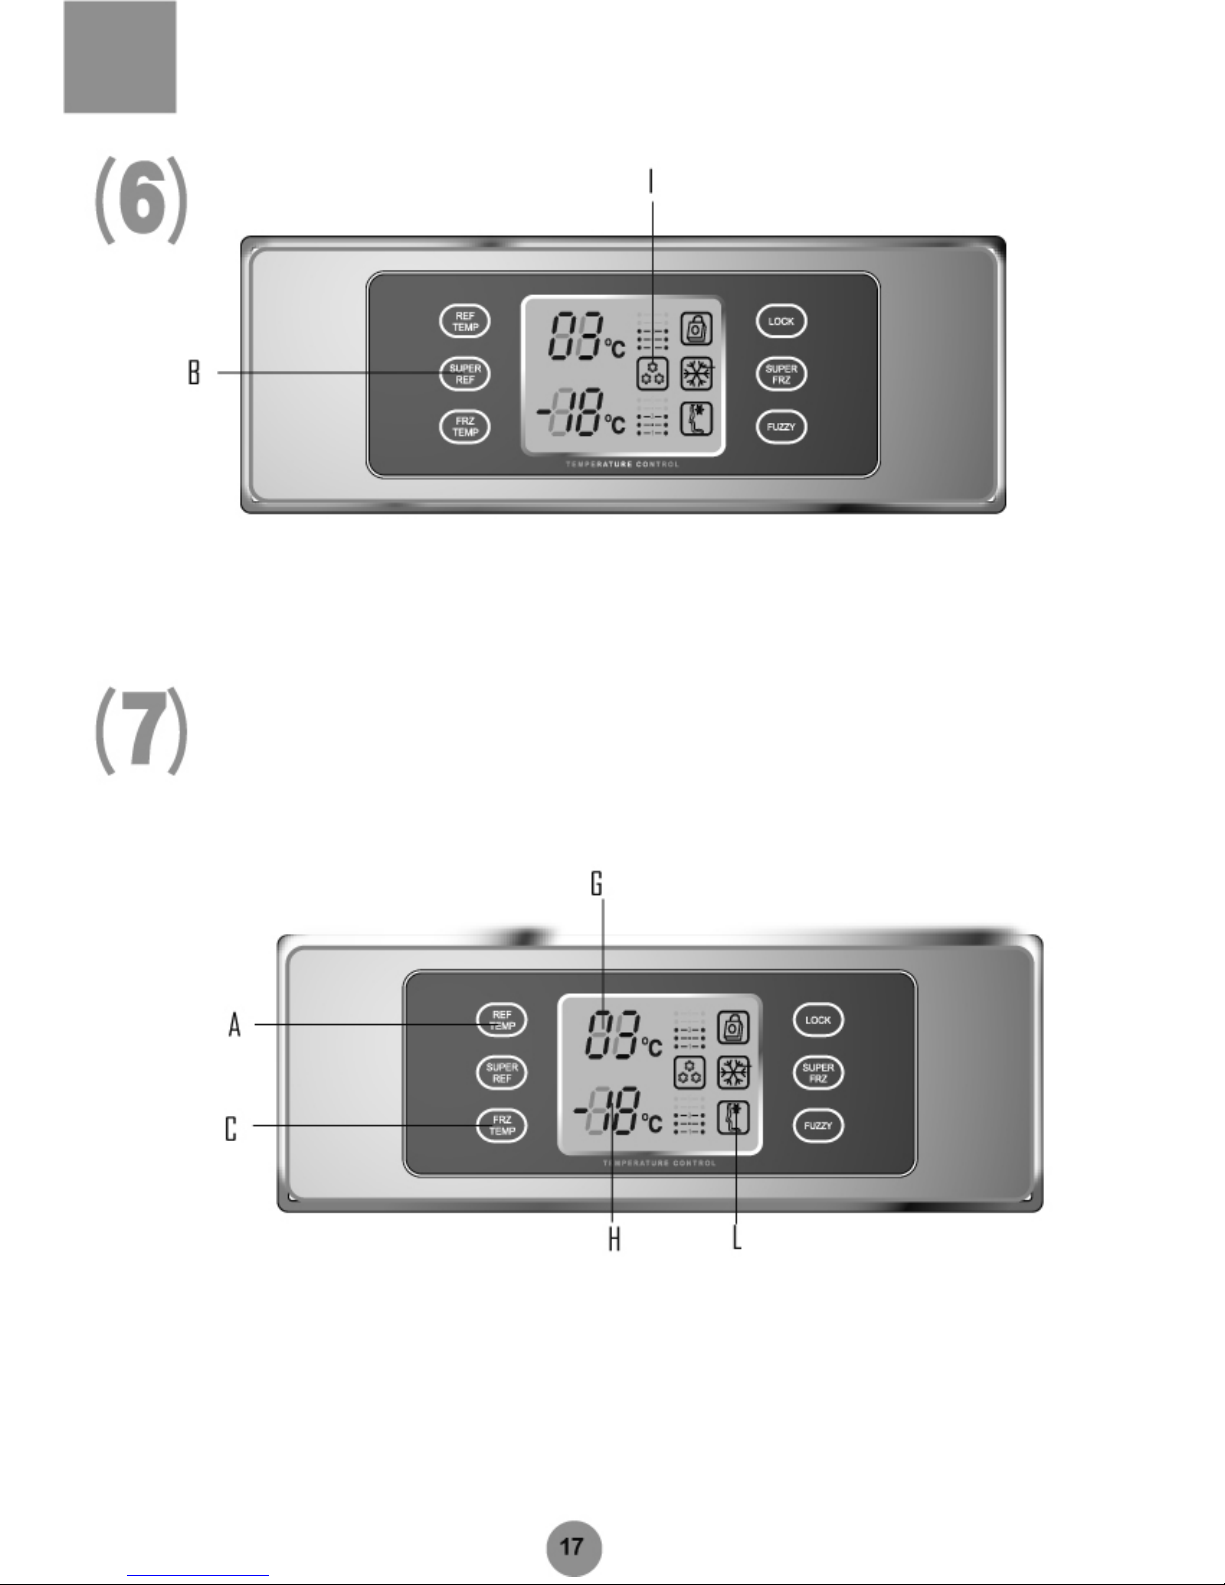
Fast Chill
This function is designed to preserve the nutrients contained in food stored in the refrigerator, by chilling the food to the
desired temperature within a short period of time.
In Unlock mode, the Fast Chill button (B) may be tapped to display the Fast Chill icon (I) and activate the Fast Chill
mode. The Fast Chill mode will be stopped automatically after 3 hours.
To quit the Fast Chill mode, tap the Fast Chill button (B) again. The Fast Chill icon (I) will disappear.
Temperature Setting & Regulation
Temperature setting & regulation: This function is available only when the Al mode is deactivated. The following
instructions should be observed.
To set the refrigerator temperature: In Unlock mode (the display screen is on), the refrigerator temperature control
button (A) may be tapped. The refrigerator temperature display (G) will illuminate. Each time the refrigerator
temperature control button (A) is tapped, the display sequence is as follows:
7°C – 5°C – 3°C – 2°C – 1°C – 7°C
Page 20
Functions
To set the freezer temperature: In Unlock mode (the display screen is on), the freezer temperature control button (C)
may be tapped. The freezer temperature display (H) will illuminate. Each time the freezer temperature control button
(C) is tapped, the display sequence is as follows:
-16°C – -17°C – -18°C – -20°C – -22°C – -16°C
Door-open Alarm
When the door is kept open or not properly closed, an audible alarm will be given until the door is closed.
Economic Display Control
The display screen will go dark 30 seconds after the operation of the control panel is finished. The display is restored
when any control button is tapped or any door is opened. This button operation will not change the present
refrigerator setting.
Refrigerator On / Off Control
In Lock mode, hold the refrigerator temperature control button (A) 3 seconds to turn off the refrigerator. The
refrigerator temperature display (G) will disappear while the refrigerator light will remain functional. Press the
refrigerator temperature control button (A) for 3 seconds to turn on the refrigerator. The refrigerator temperature
display (G) will illuminate and the normal operation of the refrigerator compartment will be resumed.
Backup Memory
The temperature settings will be memorized and, in the event of a power interruption, these will be restored once
power is restored.
Page 21
Refrigerator storage compartment
The refrigerator can be used for short-term food storage.
The average temperature of the compartment is generally maintained within 0-10'C (-2-3°C
for the chill compartment). Therefore it is only used for short-term food storage and is not
suitable for storing fresh food for long periods of time.
Lift
and remove
Height-adjustable shelf
The height of the shelf can be adjusted to meet your storage needs.
To adjust the shelf height, remove the shelf first. The steps are as follows: tilt the shelf
upwards at the front, and lift it up and out of the tracks. To replace the shelf, with the shelf
front raised slightly, engage the lugs in the tracks. Then lower the shelf front until it locks into
position.
Tilt up
To remove
Engage the lugs
Make sure the shelf is installed securely and
level, to prevent the shelf from falling or food
from spilling.
To replace
NOTE
Up
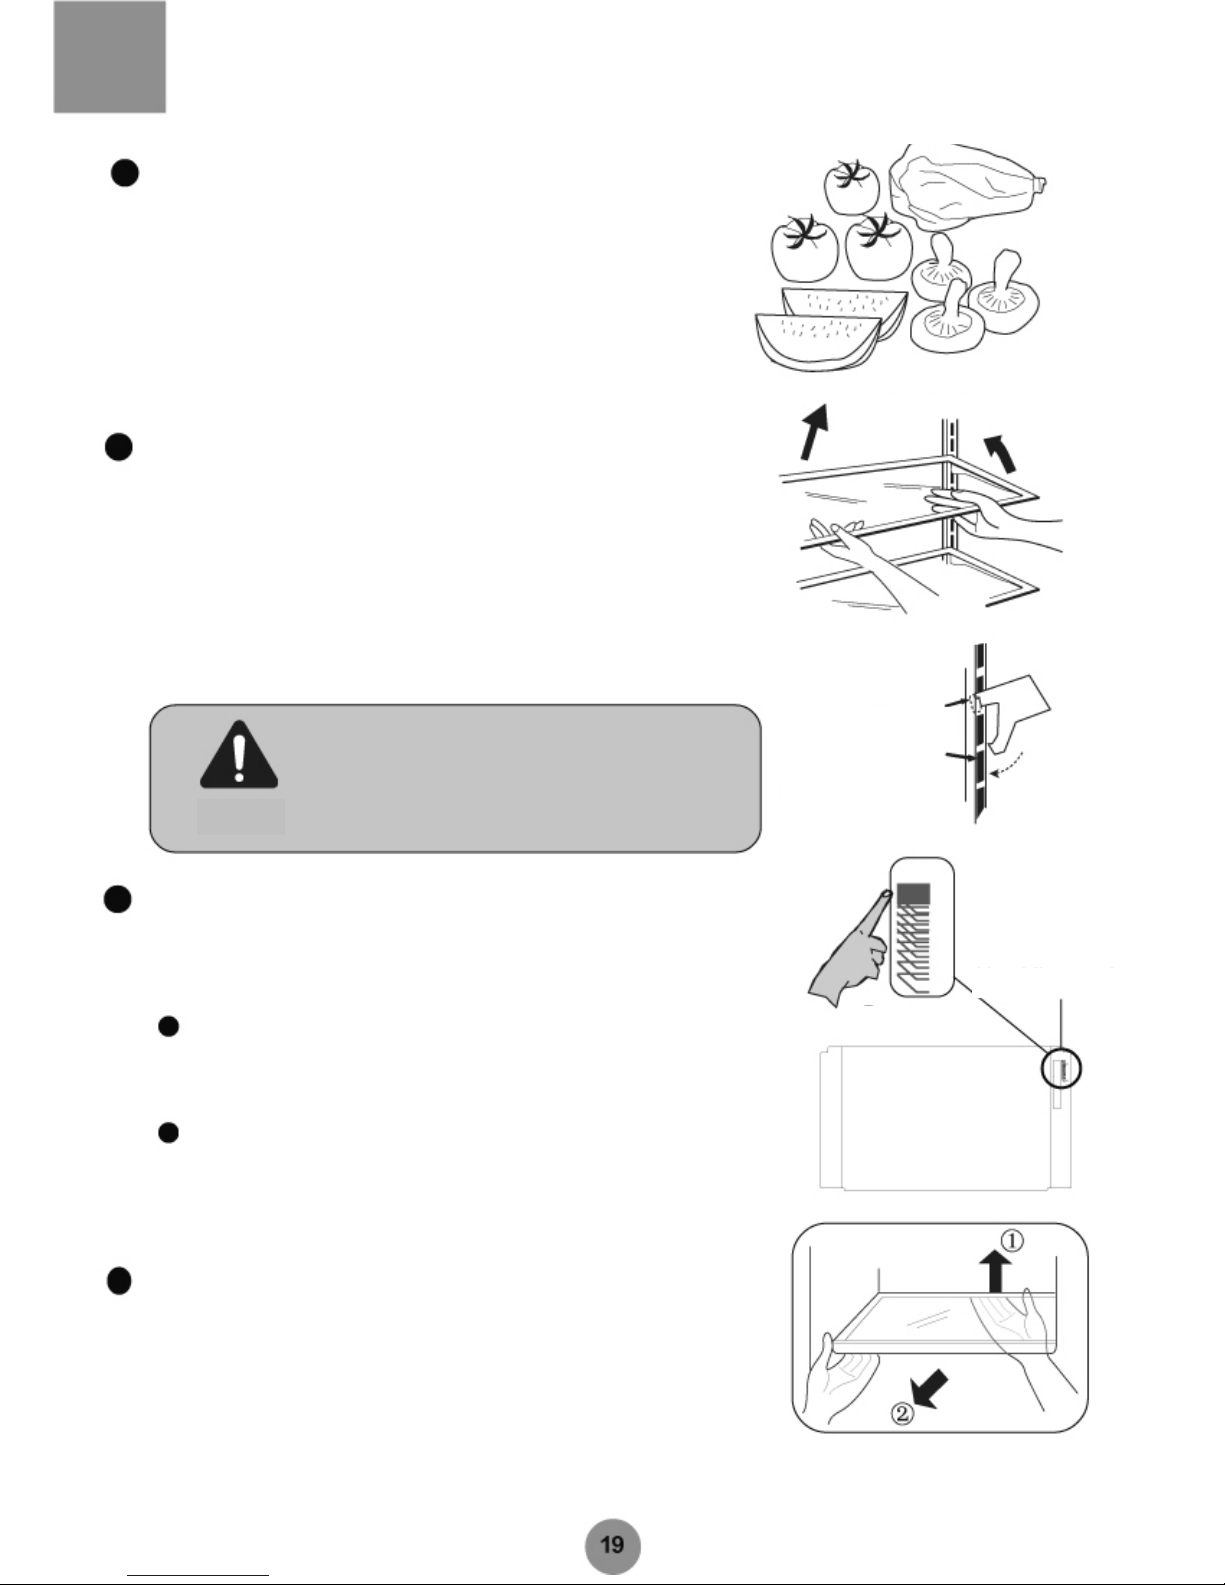
How to User the Crisper
The appliance is equipped with a crisper for vegetable and fruit storage. You can set the
humidity to meet your storage needs.
Humidity regulator
Down
Turn up the humidity regulator (located in the upper right hand corner of the crisper)
to increase the humidity, suitable for the storage of cucumbers, grapes, kiwis,
persimmons, etc.
Turn down the humidity regulator (located in the upper right hand corner of the
crisper) to reduce the humidity, suitable for the storage of strawberries, oranges,
beans, garlic, watermelons, plums, tomatoes, etc.
Removing the Crisper Cover
Take the crisper out. Lift up the cover end (1) and remove it (2).
Page 22
Refrigerator storage compartment
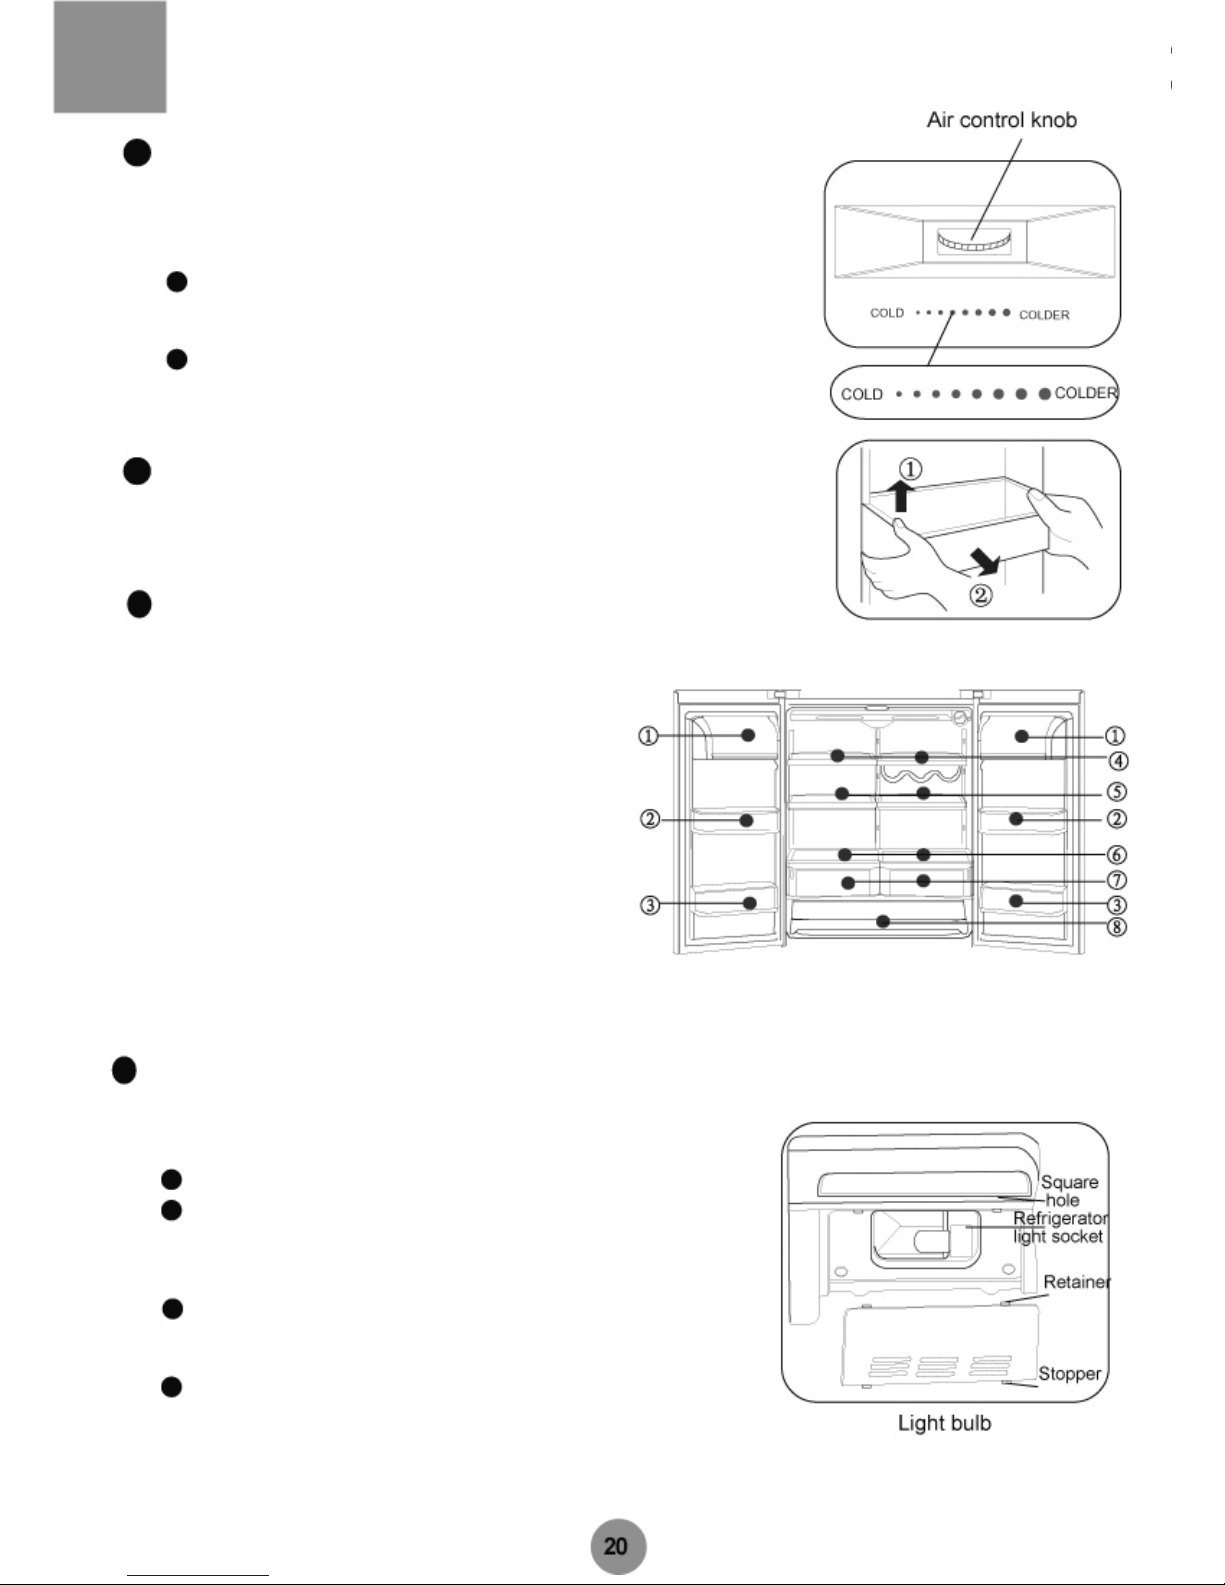
How to Use the Chill compartment.
The appliance is equipped with a delicatessen drawer with a temperature range from 2°C~+3°C. The temperature can be adjusted by the air control knob to meet your storage
needs.
Turn the air control knob leftwards (weak) to reduce the cool air moving in the chill
compartment and maintain a higher temperature.
Turn the air control knob rightwards (strong) to increase the cool air moving in the
chill compartment and maintain a lower temperature.
Cleaning the door bin
Lift the bin up (1) and pull it towards you (2). Replace the bin in the reverse sequence
alter cleaning.
① Egg, butter, cheese, etc.
② Pop cans, canned food, condiments, etc.
③ Beverages, bottled food, etc.
④ Pickles, canned food, etc.
⑤ Sausages, snacks, etc.
⑥ Pastries, canned food, milk, tofu, etc.
⑦ Fruit, vegetable, salad, etc.
⑧ Delis, sausages, etc.
Food Arrangement
As a result of air circulation in the refrigeration compartment, some areas
are warmer and the others colder. Foods should be organized accordingly.
Replacing the Light Bulb
Bulb specifications: 220V-. 25W
Socket: E14 (DO NOT use a bulb over 25W)
Unplug the appliance.
① To remove the lampshade, press the stopper at
the rear through the square hole,
② Pull the lampshade backwards until the retainer is
separated from the square hole.
Turn the bulb anticlockwise and pull outwards.
Replace a bulb of the same specifications in the
reverse sequence.
To replace the lampshade: engage the retainer
in the square hole and press the back of the
lampshade forwards until the stopper is locked in the
square hole.
Page 23
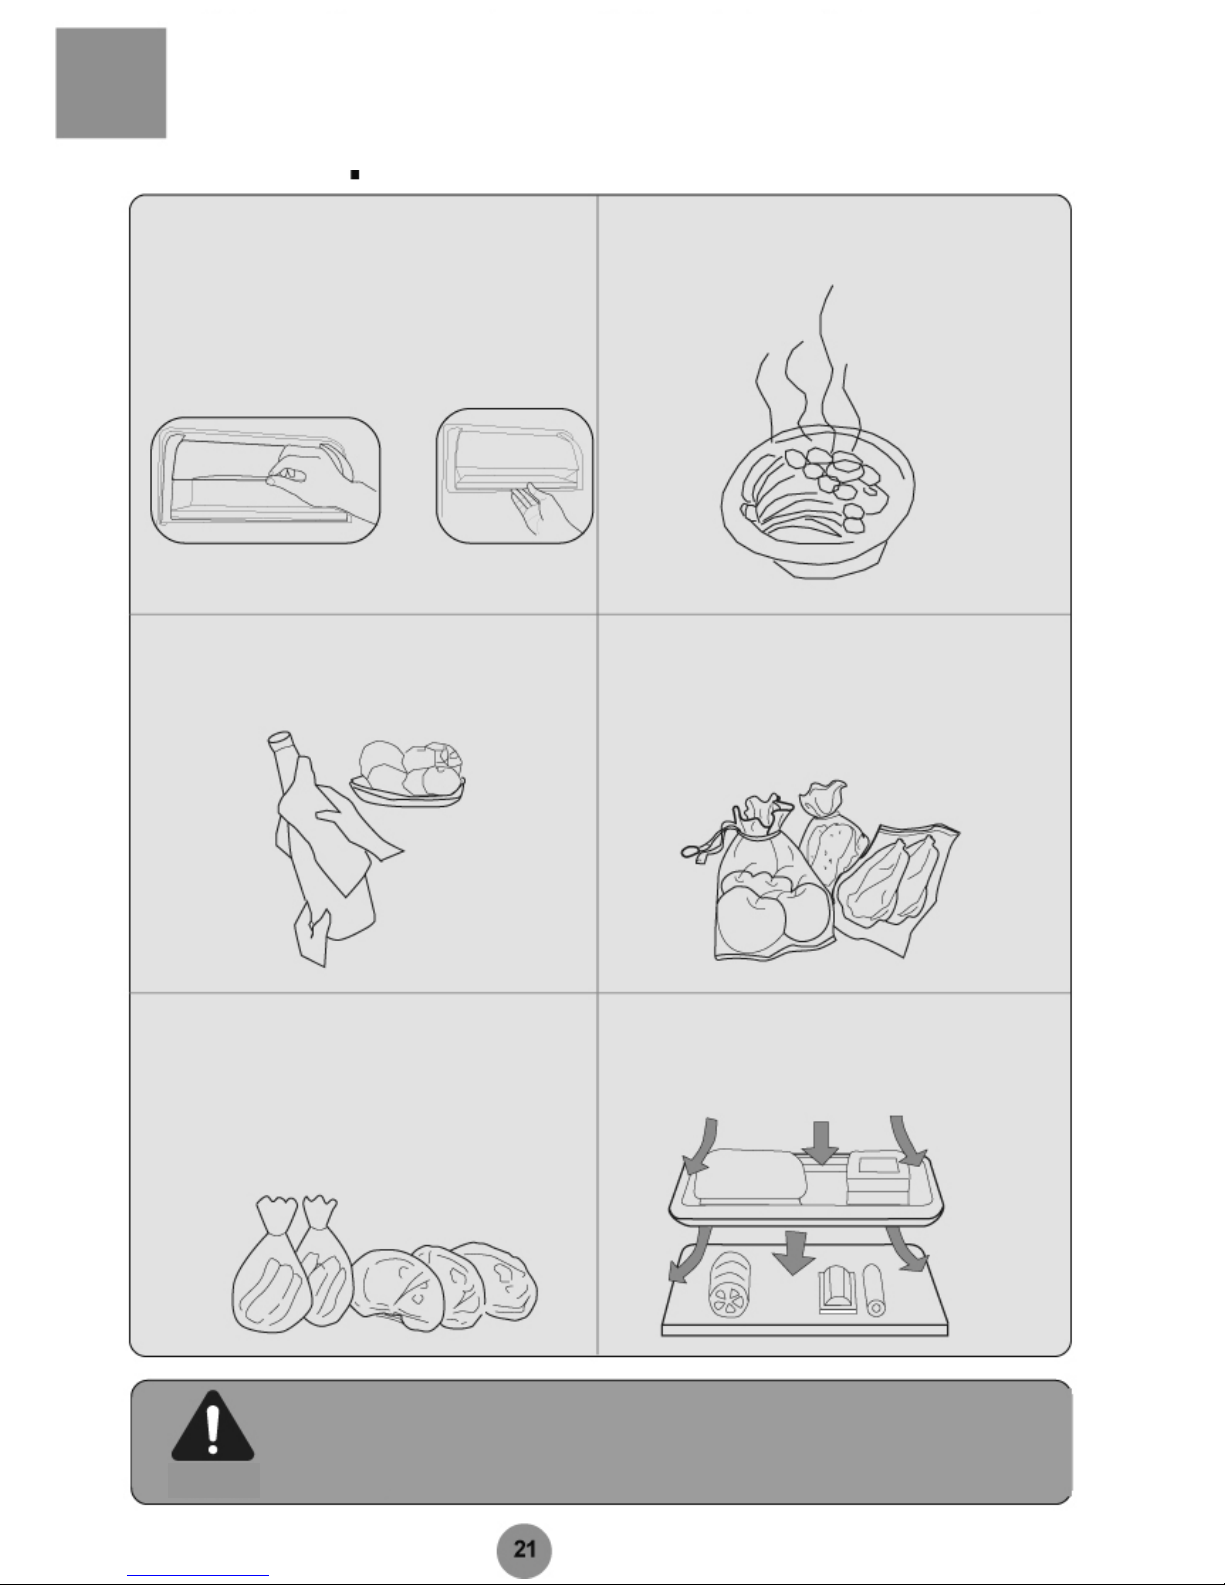
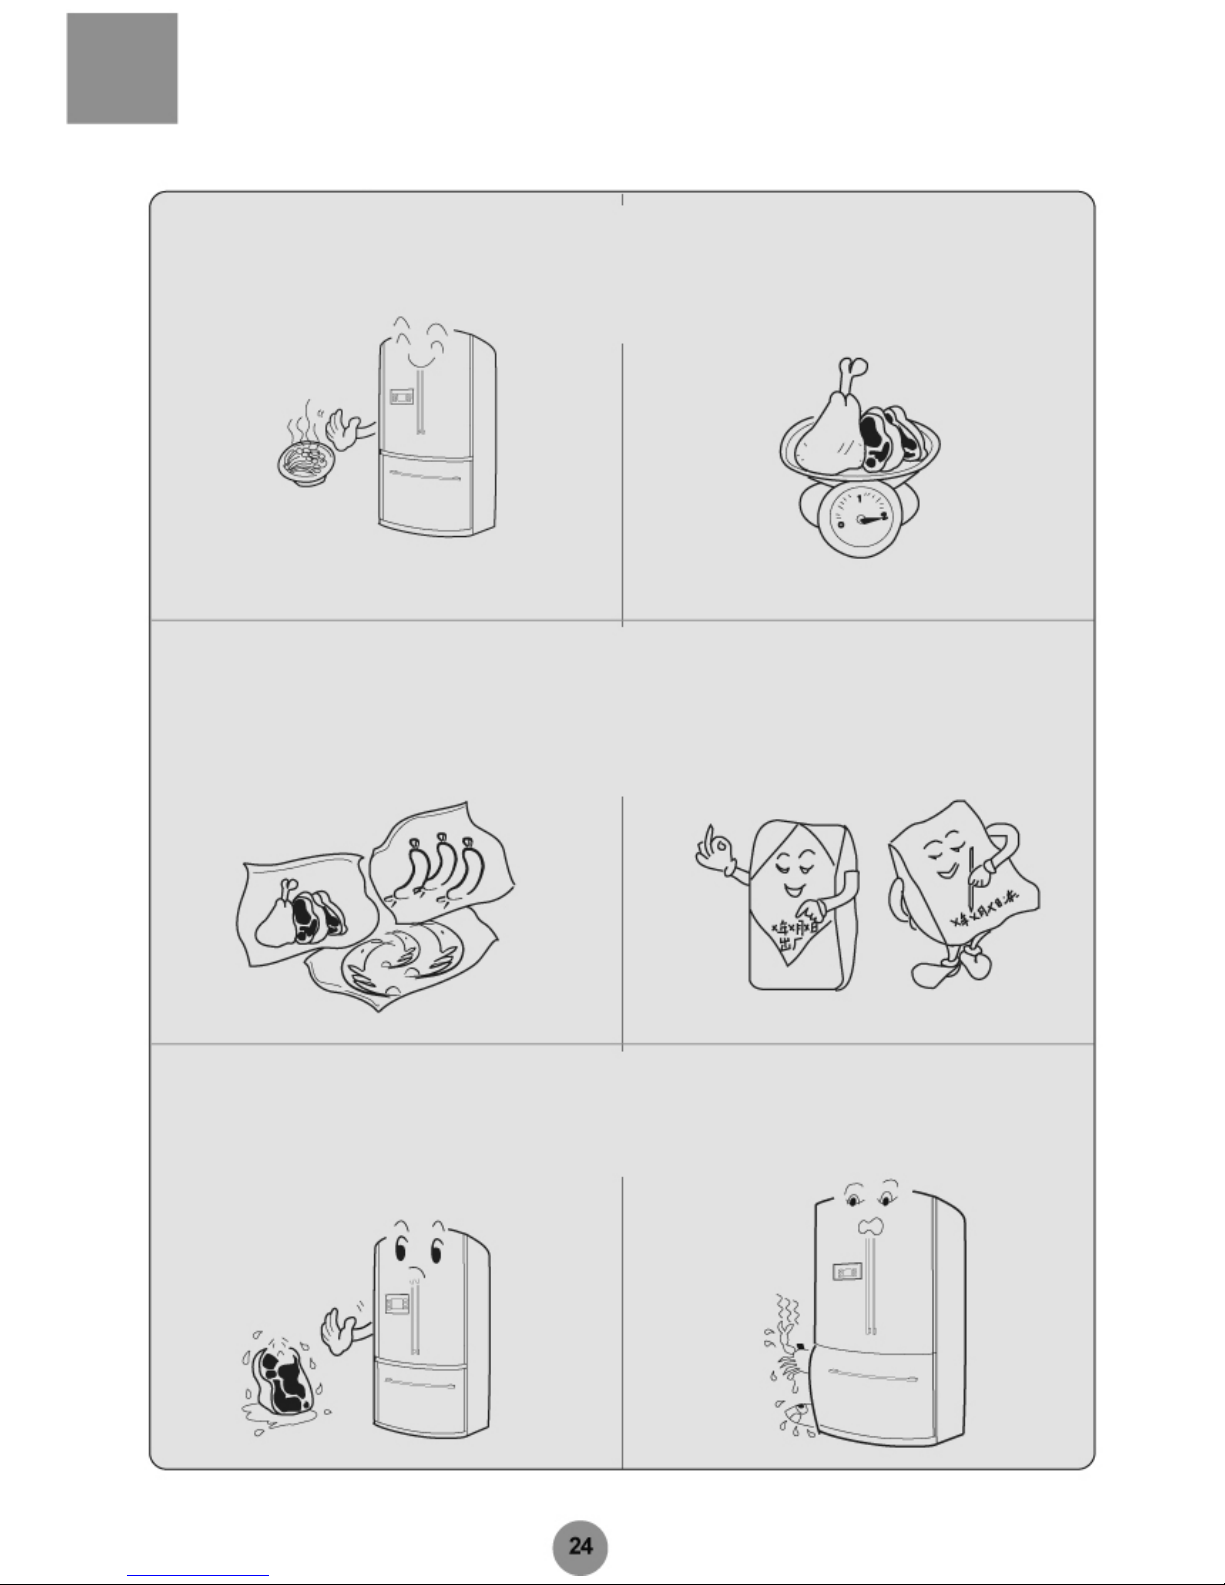
Refrigerating storage precautions
When loading or unloading the dairy bin, open
and close same as illustrated below.
Allow warm foods to cool down before putting
them into the refrigerator.
Make sure food is clean and any drips of water
are wiped away before storing.
Wrap or cover food before storing.
This will help prevent the loss of water contents,
keep fruit and vegetables fresh, and avoid any
unpleasant odors.
Do not overfill your refrigerator.
Leave enough space between foods stored in
the refrigerator to keep good air-circulation for
better refrigeration.
Sorting before storage
Sort the foods by category. Place foods to be
used up soon at the front of the shelf so as to
avoid food deterioration as a result of frequent
and
p
rolonged door openings.
Greasy foods may gradually cause corrosion of lining materials. Keep them away from
the walls of the inner compartment. Keep the inner compartment clean and free of oil
stains.
Page 24
Useful Tips
Thaw frozen food in the refrigerator
compartment; this will help the cooling
performance of the refrigerator compartment and
save energy.
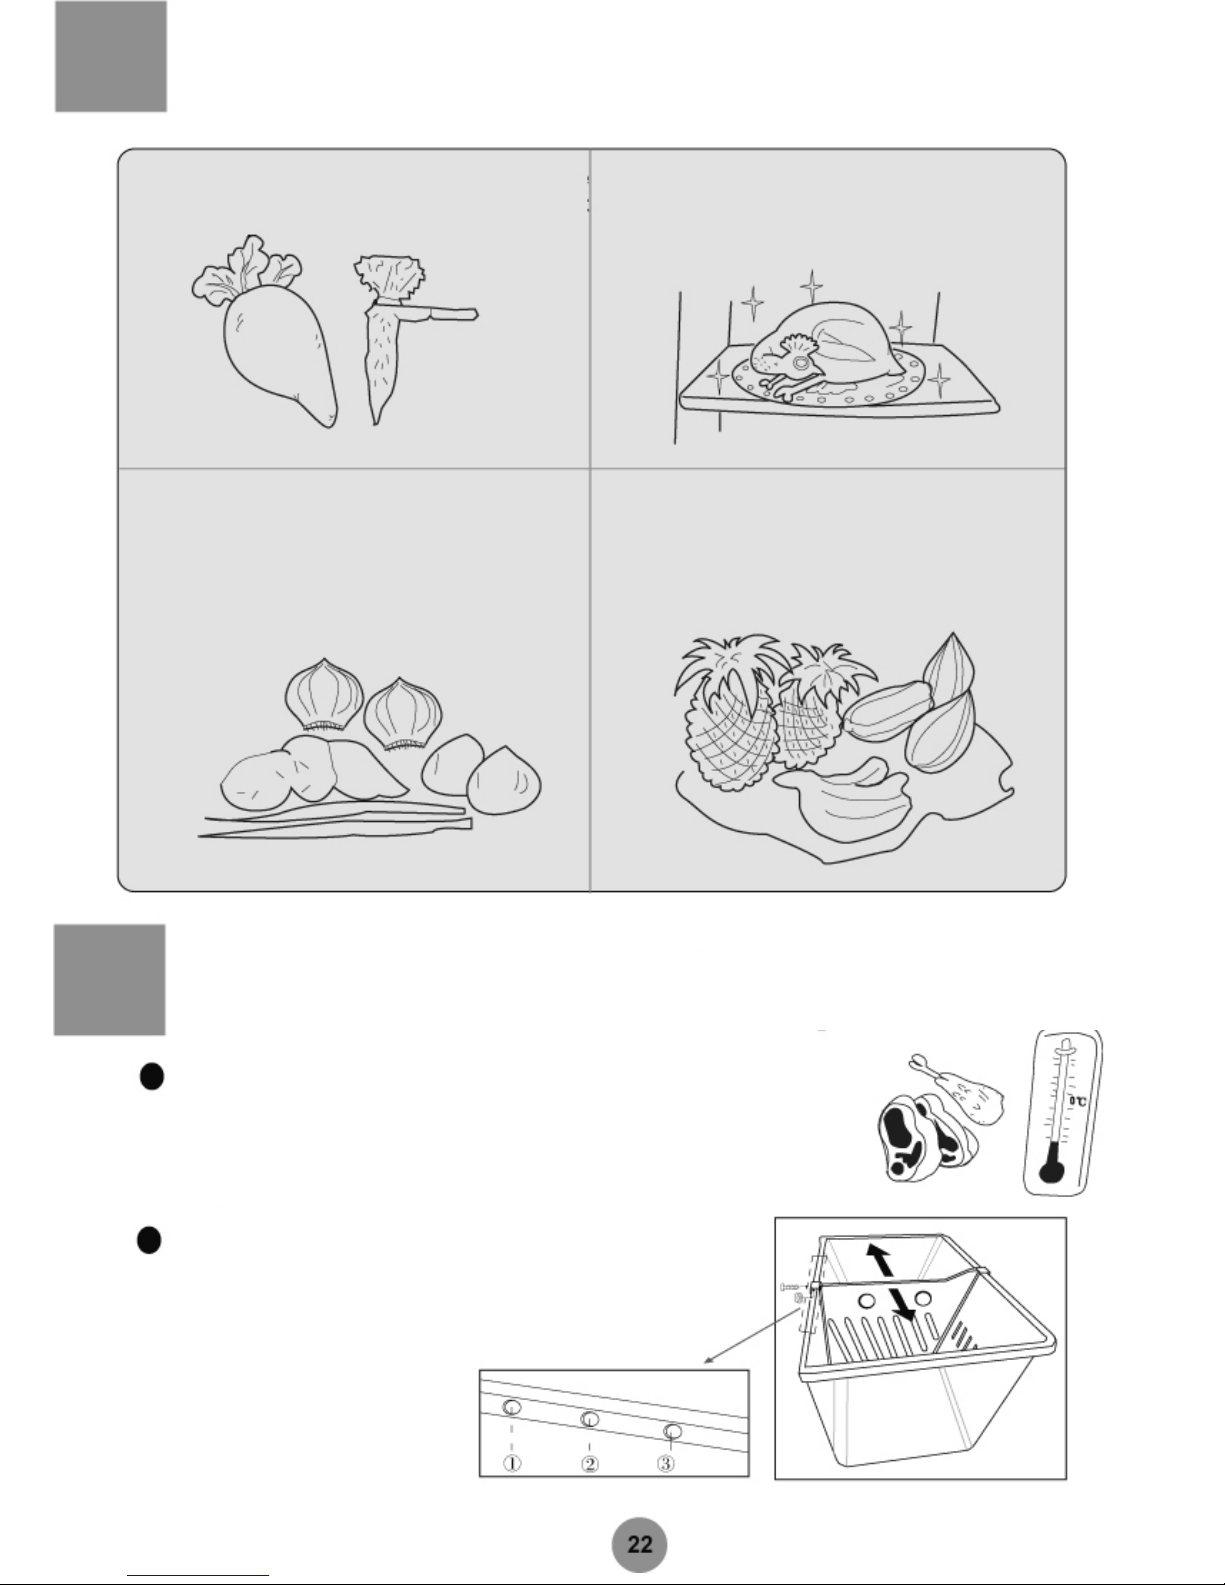
Remove leaves of carrots and radishes before
adding them to the refrigerator, to prevent loss
of nutrients.
Fruits such as rice melon, Chinese quince, sweet
melon, banana and pineapple ripen faster at
lower temperatures, as as a result are not
suitable for refrigerated storage unless you need
them to ri
p
en sooner.
Foods which preserve their freshness at room
temperature, such as onions, garlic and other
roots, need not be stored in the refrigerator.
Freezer Storage Compartment
The Freezer is intended for long-term food storage.
The temperature in the freezer is very low, making it ideal for the storage
of frozen food. Freeze food that you expect to keep stored in the freezer
for a longer period of time; however, but the expiry date indicated on the
packing should be observed.
Adjustable partition of the freezer drawer
A movable partition wall is provided in the freezer drawer to split the
drawer into two parts. You may move the partition wall towards the right or
left to meet your storage needs.
Page 25
Freezer Storage Compartment
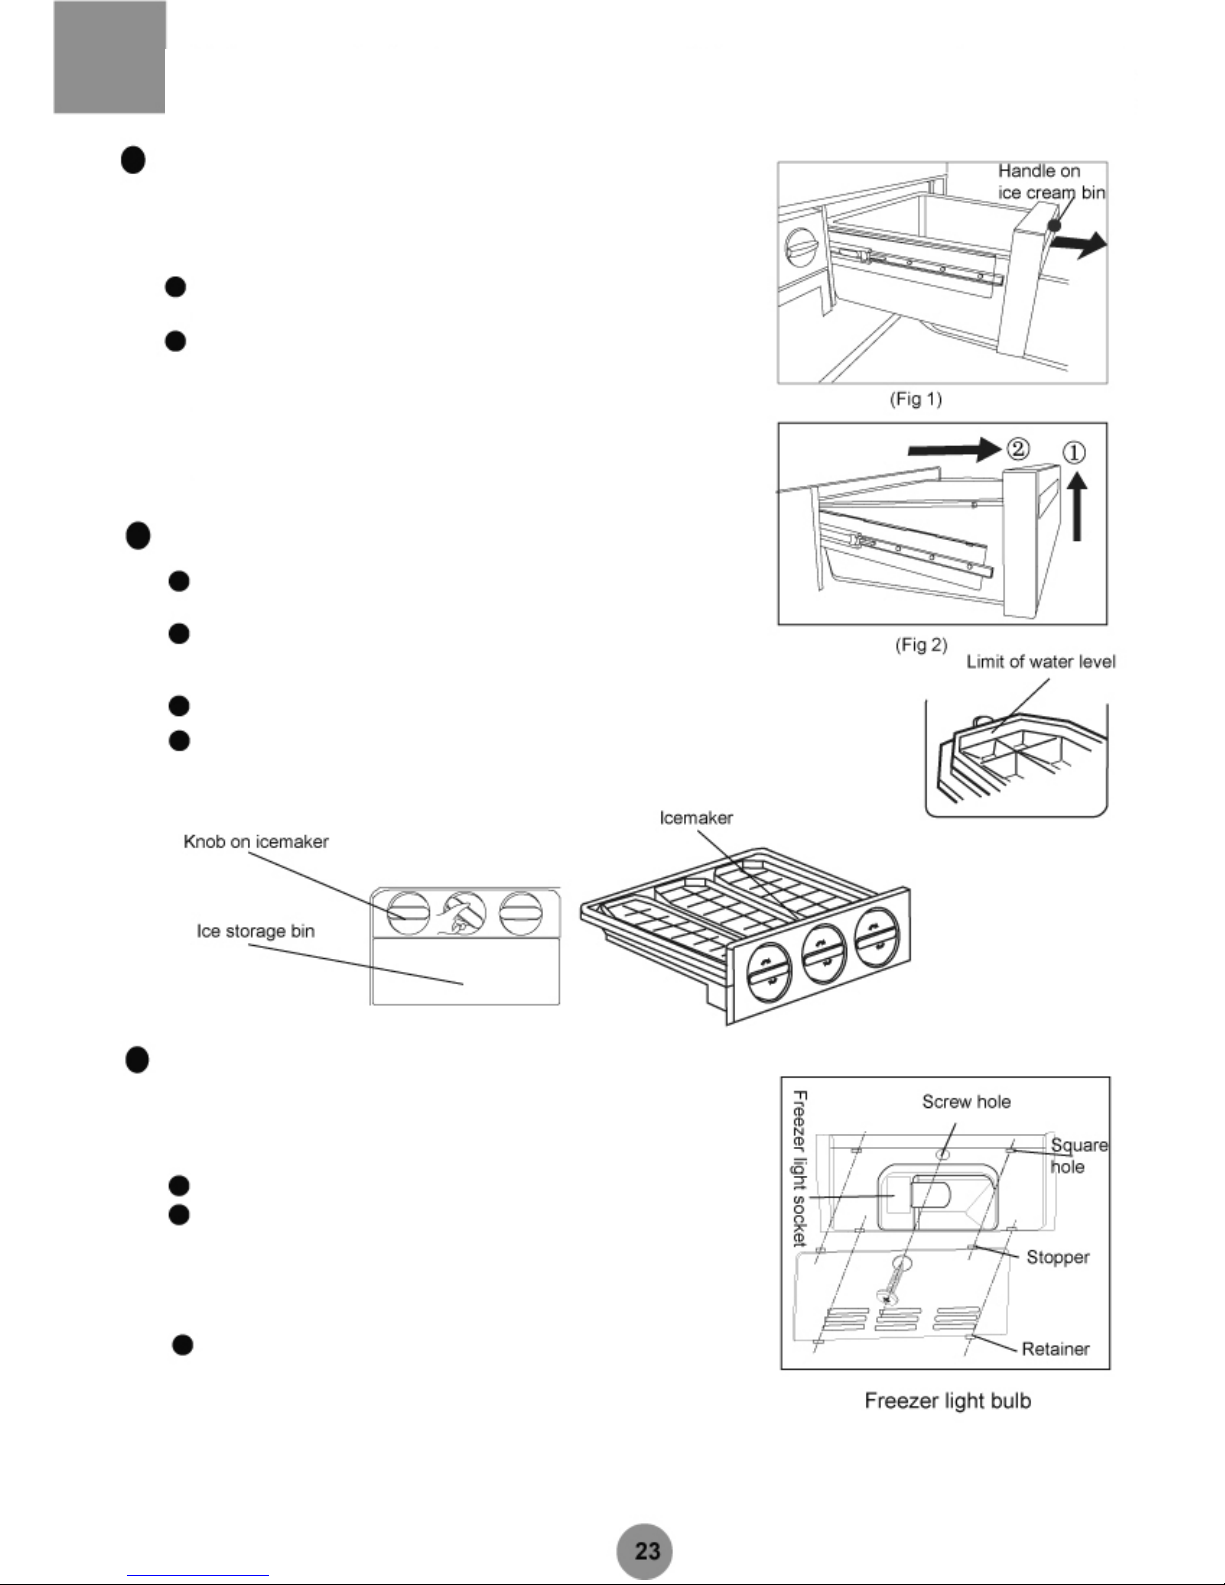
Ice Cream Bin
An ice cream bin is provided to hold ice cream or
similar items to be stored at low temperatures.
How to use the ice cream bin
To take out the ice cream bin, take the handle
and pull it towards you.
To clean the ice cream bin, follow these
instructions:
① Pull the ice cream bin out to the stop position.
② Lift the ice cream bin up (in the direction indicated by
Arrow 1) and remove it from the refrigerator (in the
direction indicated by Arrow 2).
③ Replace the ice cream bin alter cleaning in the reverse
sequence.
Ice-making
Pour water into the icemaker to 3/4 of its
capacity and then place it in the freezer.
To obtain ice cubes, turn the knobs on the
icemaker and the ice cubes will be collected in
the ice storage bin.
The ice cubes in the ice storage bin are ready
for use.
Whenever necessary, the semi-automatic
icemaker can be taken out and the ice storage
bin can be used to store more food.
Replacing the Light Bulb
Bulb specifications: 220V–, 25W
Socket: E14 (DO NOT use a bulb over 25W)
To re
p
lace the light bulb:
Unplug the appliance.
① Remove the front screw using a screwdriver.
② To remove the lampshade, press the stopper at the
front through the square hole.
③ Pull the lampshade forwards until the retainer is
separated from the square hole.
Turn the bulb anticlockwise and outwards. Replace a
bulb of the same specifications in the reverse
sequence.
To replace the lampshade: engage the retainer in the
square hole and press the lampshade front backwards
until the stopper is locked in the square hole. Replace
and tighten the screw.
Page 26
Freezer Storage Precautions
Allow warm foods to cool down before putting
them into the freezer.
Store food in small packages. This will make it
easier to freeze the food fully and provide better
quality when the food is thawed. Each package
should not exceed 2.5k
g
.
Wrap food before storing. Make sure the
wrappings are dry to prevent them from sticking to
each other. The wrapping materials used should
be odorless, airtight, leak-proof, nontoxic and
environmentally-friendly, to prevent unpleasant
odors or food deterioration.
The food packages should indicate information
such as the food type contained, the date of
storage and the expiry date.
Once thawed, food cannot be returned to the
freezer unless it has been cooked. Thaw out
frozen food according to actual needs.
Do not put too much fresh food in your freezer.
The freezing capacity indicated in the Technical
Data sheet must be observed.
Page 27
Defrosting • Cleaning
Defrosting the Freezer Compartment
The defrost cycle of the freezer compartment is automatic and no
manual operation is needed.
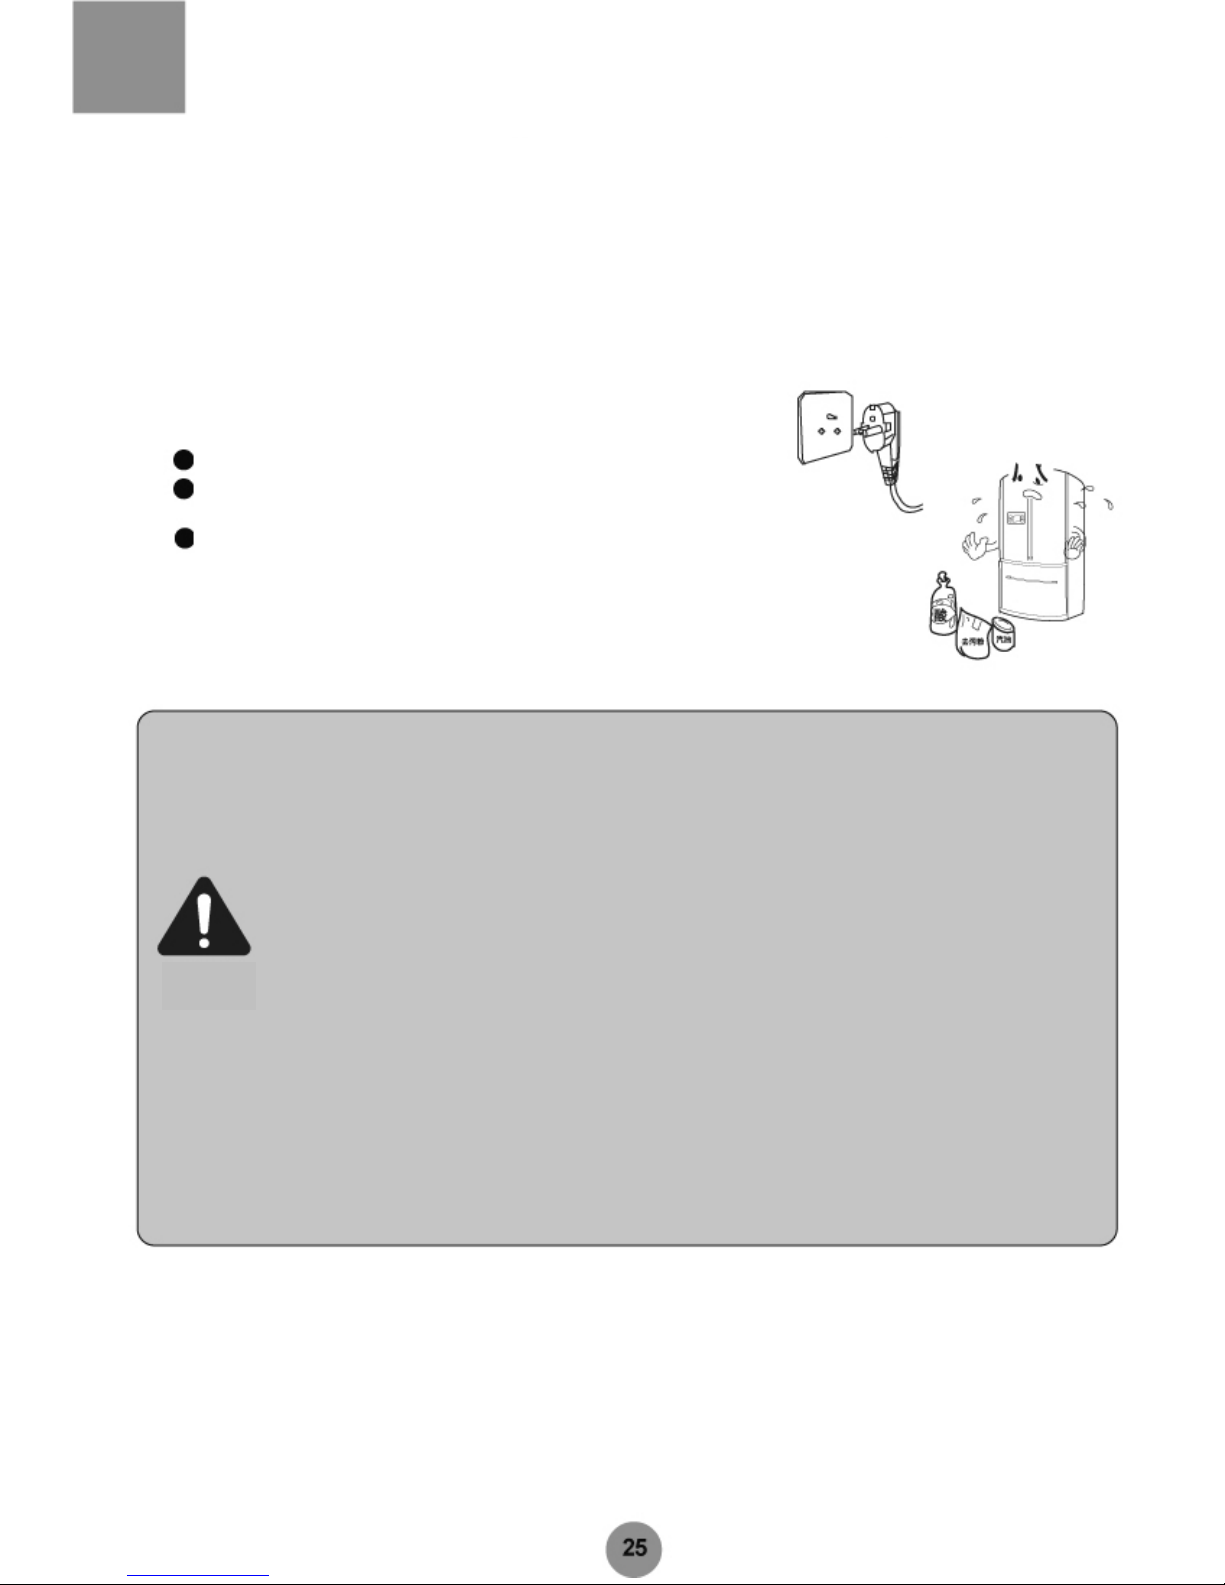
Cleaning
Clean the inner compartments to get rid of food residues and
eliminate unpleasant odors.
Unplug the appliance before cleaning.
Use a cloth or sponge to wash the inner compartments with
lukewarm water and a mild detergent.
Dry the external surface with a dry cloth.
① The appliance is heavy. Protect flooring when the appliance has to be moved for
cleaning and servicing.
② Do not splash water on the appliance to protect the electric insulation.
③ To clean electric components such as switches and illuminators, make sure the
appliance is not connected before cleaning with a dry cloth.
④ When cleaning, do not use a sharp or pointed brush, hard cleansers, organic
solvents (e.g. gasoline, amyl acetate or acetone), boiled water, acid or alkali.
⑤ Do not touch the cold metal surface with wet hands.
⑥ When cleaning, do not use hot water to clean the glass shelves as these may brake
from thermal shock and risk causing injury and property loss.
⑦ Clean the door seal from time to time.
⑧ Never use amyl acetate to remove unpleasant odors as this would be a fire hazard.
⑨ Only detergents intended for refrigerators should be used in cleaning.
NOTE
Page 28
Vacation
Power failure
Food can be stored for several hours in the event of
power failure, even in summer.
Do not add foods in the appliance and keep the
doors closed as far as possible when there is a
power failure.
If a power failure is announced beforehand, make
some extra ice cubes and hold them in a le ak-pr oof
container. Place the container on the top shelf in the
refrigerator compartment.
A temperature rise in the freezer due to power interruption or other faults may shorten the
shelf fife of products stored within and have an adverse effect on food quality.
NOTE
Ceased operation
Please unplug the appliance and clean it as described
above if the appliance is not to be used for a long period
of time.
Keep the door open to prevent unpleasant odors caused
by food residues.
To ensure a long service life, do not stop the appliance frequently.
NOTE
After unplugging the appliance, wait at least 5 minutes before re-connecting it to the power
supply.
NOTE
Page 29

Vacation
When leaving on vacation
If you are leaving for a long vacation , it's
necessary to shut off the power, take out all of
the food, and defrost and clean the appliance.
Dry the appliance and leave the door open to
prevent odors
Discarded appliances must be disposed of professionally to avoid undesired impacts on the
environment or other hazards.
When moving your refrigerator
Unplug the appliance before transportation.
Take out foods from the appliance.
Fix the refrigerator shelves, the crisper and
the freezer shelves in position w ith adhesive
tapes.
Keep the door closed during transportation
with adhesive tapes.
When moving the refrigerator, do not tilt it by
more than 45 degrees to prevent the
malfunction of the refrigeration system.
Never place the refrigerator horizontally.
Page 30
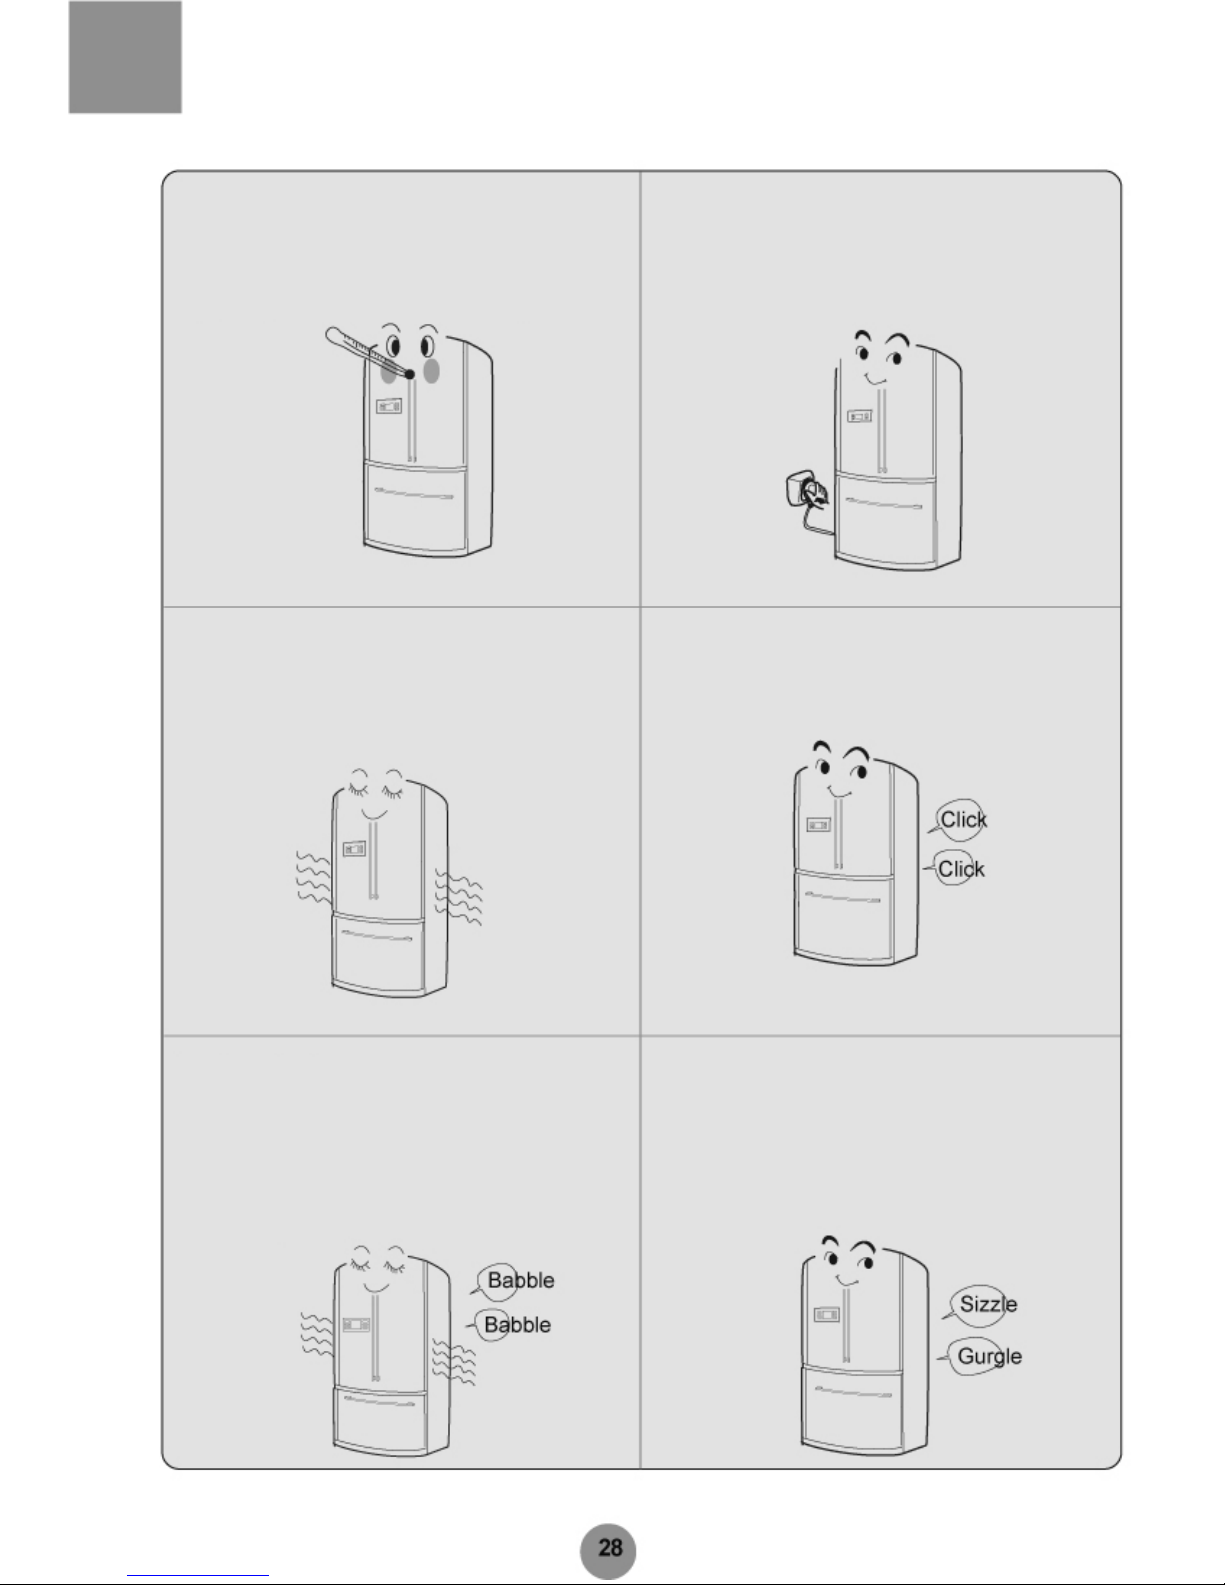
Troubleshooting Tips
When the refrigerator is first plugged in, the
compressor operates for long periods or
switches on and off frequently. In this case, it
will take a longer time for the inner temperature
to reach the desired value.
The refrigerator makes a humming noise when
first plugged in or started up . This sound will
fade away when the refr igerator is in stable
operation.
The external surface of the refrigerator will be
warm, especially when first plugged in, as a
result of its anti-sweat design.
The compressor may produce a humming
sound during operation and a c licking sound
upon starting and stoppin g.
The flow of the refrigerant through the
refrigeration coils may make a babb ling noise.
This noise is usually produced by the
evaporator and compressor. When the
compressor comes to a stop, the refrigerant
backflow of will make a noise like running
water, either from time to time or continuously.
Water dropping onto the defrost h eater can
cause a sizzling or buzzing sound during a
defrost cycle. At the end of a defrost cycle, a
slight popping sound may be heard, and the
evaporator may make a gurgling noise like that
of boiling water.
Page 31

Troubleshooting Tips
The fan makes a spinning noise during
operation.
Expansion and contraction of the evaporator
and refrigerating coils due to temperature
changes can cause a cracking or popping
sound.
Moisture may form on the outside of the
refrigerator and between the doors dur ing
periods of high humidity.
The rated power consumption s pecified in the
Technical Data sheet is measured during a
period of 24 hours under stable operation at an
ambient temperature of 25°C, with the
refrigerator and freezer main tained at 5°C and 18°C respectively. The actual power
consumption depends on the amount o f fresh
food stored in the refrigerator.
Page 32

After-Sale Service
When calling for service, provide the model name, the list o f accessories and the series
number (stated on the product nameplate).
Before calling for services, check the following points to see if you
can solve the problems yourself.
The refrigerator does not work.
The refrigerator is not connected to the
power supply (plug, outlet and fuse) or
Voltage is too low.
The interior light does not
Unusual noise
The refrigerator is
not connected to
The light bulb has
fused.
The refrigerator is
not level.
The refrigerator
rubs against the
The compartments are warmer than expected.
The temperature is set
to a warmer setting.
(See the Functions
section from Page 14
to Page 17.)
The appliance is
exposed to direct
sunshine or placed
near a stove or
radiator.
Poor ventilation.
Check if the heat
radiation unit on
the rear is blocked.
The door is not
closed properly,
opened frequently or
kept open too long.
Page 33

After-Sale Service
Before calling for services, check the following points to see if you can solve the
problems yourself.
The compressor operates for lo ng periods or switches on and
off fre
q
uently.
This is normal when refrig erators are firs t plugged in.
A large amount of food is placed in the refrigerator for
storage or freezing.
The door has been left open or is held open by food.
The door is opened frequ ently.
It is hot weather.
The temperature is s et to a w armer set ting. See the In itial Use
section.
Poor ventilation
Frost or ice crystals form on food. Unpleasant odor
Food with strong odors should be tightly
wrapped.
Food has deteriorated.
The compartments need clea ning.
Frost within packages is normal.
The door has been left op en or is held
open by food.
The door is opened frequ ently or kept
open too long.
Food is placed near the vent.
Page 34

Technical Data •Circuit
Diagram • Packing List
Technical Data
Total input power
Model
Star mark Defrost input power
Climate type Rated power consumption
Protection class Refrigerant
Total storage volume
Freezing capacity
Freezer storage
volume
Weight
Overall dimensions (DxWxH)
Rated voltage
Rated frequency
Type of cord connecti on
NOTE: According to GB standa rds, the ra nge of amb ient temperature should be from
10°C to 38°C for the climate type SN/N/ST.
A. Power plug B. Freezer fan C. Refrigerator damper
D. Display screen E1. Refrigerator door control 1
E2. Refrigerator door control 2 E3. Refrigerator door cont rol 3
F. Control board G. Chilling fan H1. Defrost sensor
H2. Freezer sensor H3. Refrigerator sensor H4 . Ambience sensor
I1. Freezer light I2. Refrigerator light 1 13. Refrigerator light 2
J. vertical beam heater K. Defrost heater L. Fuse
M. Overload protector N. Compressor O. PTC
Page 35

Technical Data •Circuit
Diagram • Packing List
Packing List
Name Quantity
Model
Page 36

Réfrigérateur domestique
Table des matières
Avant l’utilisation
Caracté ristiques ............................................................................ 1
Nom des parties ................................................................................ 2-3
Précaution s en matière de sécurité ................................................ 4- 6
Emplacement.............................................................................. 7
Enl èvement et remplacement de la porte ....................................... 8-10
Pré par at io n ........................................................................................ 11- 13
Pre mièr e utilis ation............................................................................ 14
Fonc tion s ...........................................................................................1 5-18
Instructions pour le compartiment réfrigérateur
Compartime nt réfri gérateur ............................................................. 19-20
Conservation des aliments dans le compartiment réfrigérateur...21
Con seil s utiles.................................................................................... 2 2
Compartiment congélateur
Compartiment congélateur................................................................ 22-23
Con serv ation de s ali ments da ns le compartime nt congé late ur.... 24
Dégivrage • Nettoyage • Vacances
Dégivrage • Nettoyage .................................................................. 25
Vac ance s ........................................................................................... 26 -27
Dépannage • Service après-vente
Dépanna ge .................................................................................... 28-29
Service après- v e nte....................................................................... 30-31
Données techniques
.
Schéma du circuit • Liste d’emballage
Données techniques Schéma du circuit • Liste d’emballage -............32-38
• Veuillez lire attentivement ce mode d’emploi avant toute utilisation.
• Veuillez conserver ce mode d’emploi dans un lieu sûr.
• Votre réfrigérateur pourrait être légèrement différent de l’illustration ici présente
en ce qui concerne l’aspect, la couleur et la peinture.
Page 37

Caractéristi
q
ues
Machine à glaçons
Une machine à glaçons semi-autom atique et intégrée pro duira des gl açons prêt s à l’emploi
selon vos préférences.
Compartiment fraîcheur
Le compartiment fraîcheur en bas du compartiment réfrigérateur est conçu pour la
conservation de la charcuterie à une température comprise entre -2 °C et +3 °C.
Clayette coulissante pour un accès facile aux aliments
Le compartiment réfrigérateur est équipé de clay ettes coulissante s pour placer et enlever
facilement les aliments. Les clayettes p euvent être enl evées quand l a porte est ouverte à 90 °.
Conception Intelligence Artificielle (AI – Artificial Intelligent)
Les performances optimales de réfrigération se basent sur la température interne et la
température ambiante sans intervention manuelle.
Super élancé, super large et super luxueux
Des dimensions compactes, une grande capacité, un compa rtiment réfrigérateur et un
compartiment congélateur spacieux, un d esign interne et externe parf ait
Congélation profonde sans CFC et sans givre grâce à un système de refroidissement à air
efficace
Technologie rideau d’air
Le rideau d’air situé à l’extrémité avant du compartiment réfrigérateur est conçu pour éviter
l’entrée d’air chaud et faciliter la distri bution équilib rée de l’air refroidi.
Refroidissement avant le dégivrage pour prévenir la décongélation
Un processus de pré-refroidissement sera activé en fonction de la température interne
mesurée pour éviter l’impact néfaste de l’augmentation de température sur les aliments
présents dans le réfrigérateur.
Des performances de réfrigération optimisées et une longue durée de vie du compresseur
grâce à une unité de condensation efficace et à un moteur de ventilation
Alarme porte ouverte, boutons tactiles et écran large LCD
Technologie vitamine C pour la conservation des aliments frais
La t echnologie vitamine C con s e r v e e f fec t i v e m e n t l e s a l imen t s f r a i s pe nda nt un e périod e
plus longue tout en éliminant les odeurs désagréables.
Coulissement des tiroirs simple et sans effort
Page 38

Nom des
p
arties
Tiroir vitamine C
Compartiment réfrigérateur
Compartiment produits
Clayette
Casier à vin
Paroi amovible
Porte-bouteilles
Bac à légumes
Couvercle avant du
compartiment fraîcheur
Compartiment fraîcheur
Porte-bouteilles
Faisceau vertical
Compartiment
produits laitiers
Lumière réfrigérateur
Compartiment congélateur
Bac à glace
Paroi de division du tiroir
congélateu
r
Bac à glaçons
Machine à glaçons semi-
automatique
Couvercle du
Tiroir congélateu
r
Page 39

Nom des
p
arties
Cher client,
Merci d’avoir acheté un produit NARDI.
Tout produit NARDI est de très grande qualité et offre des performances haut
de gamme. Veuillez lire ces instructions et respectez les procédures décrites
dans la présente.
Vous bénéficiez d’un Service Étoile International de NARDI. Si vous avez des
questions, veuillez contacter nos centres d’assistance aux numéros de
téléphone ou aux adresses indiqués dans la Lettre de Garantie.
NARDI - Bien sincèrement !
REMARQUE : les caractéristiques du produit peuvent changer sans préavis au
cours du temps en raison des améliorations apportées au produit.
Page 40

Précautions en matière de sécurité
Alimentation : CA 220 V-240 V/5O Hz
Si la tension varie violemment (au-delà de 187242 V), il est nécessaire d’utiliser un stabilisateur
de tension de 750 W ou plus pour éviter les
pannes de démarrage, l’endommagement des
tableaux de commande ou des compresseurs ou
les bruits inhabituels.
L’appareil doit être branché à une prise dédiée qui
est mise à la terre de façon sûre. Le cordon de cet
appareil est équipé d’une fiche à trois broches
(mise à la terre) conforme à la prise standard à
trois broches (mise à la terre). Ne coupez jamais
et n’enlevez pas la troisième broche. Le
réfrigérateur devrait être placé de manière à avoir
accès à la fiche. AVERTISSEMENT ! La fiche doit
être reliée de manière sûre à la prise, dans le cas
contraire il existe un ris
q
ue d’incendie.
Veillez à ne pas abîmer le cordon d’alimentation.
Tirez toujours la fiche plutôt que le cordon pour
débrancher l’appareil. Placez le cordon de
manière à éviter tout risque d’endommagement
par le poids du réfrigérateur.
Veillez à ne pas abîmer le cordon quand vous
déplacez l’appareil.
Quand le cordon est endommagé
Il est formellement interdit d’utiliser un cordon
endommagé ou une fiche usée. Si le cordon est
abîmé, il doit être remplacé dans un centre de
service agréé.
En cas de fuite de gaz :
Coupez la soupape.
Ouvrez les portes et les fenêtres pour aérer.
Ne branchez pas et ne débranchez pas le
réfrigérateur ou d’autres appareils électriques.
Veillez à débrancher l’appareil dans les cas
suivants :
Débranchez l’appareil avant le nettoyage ou la
réparation.
Débranchez l’appareil avant de remplacer
l’ampoule pour éviter les décharges électriques.
Page 41

Précautions en matière de sécurité
Ne conservez jamais de matériaux inflammables
ou explosifs ou d’acides corrosifs forts ou d’alcalis
dans l’appareil. Mousse / Spray / Gaz/ Acide /
Alcali
Cet appareil est un réfrigérateur ménager qui est
fabriqué conformément aux caractéristiques de la
réglementation nationale. Il est conçu uniquement
pour la conservation des aliments, et non pour la
conservation de sang, de médicaments et de
p
roduits biologiques.
Vaccin / Bactérine / Produits chimiques
Pour prévenir les risques d’incendie, installez les
appareils loin de l’essence ou d’autres produits
inflammables.
Pour prévenir tout risque d’interférence
électromagnétique ou d’autres accident, ne placez
aucun panneau de revêtement, stabilisateur de
tension ou four à micro-ondes sur le dessus du
réfrigérateur. En outre n’utilisez aucun appareil
électrique (sauf ceux autorisés par le fabricant) à
l’intérieur du réfrigérateur.
Les enfants ne sont pas autorisés à jouer avec la
porte ou les porte-bouteilles car cela pourrait
porter à de graves blessures. Ne marchez pas sur
la porte ou sur l’armoire lors du chargement et du
déchargement du réfrigérateur.
La surface interne du compartiment congélateur
est extrêmement froide quand l’appareil
fonctionne. Ne touchez pas la surface en
particulier avec les mains mouillées.
Page 42

Précautions en matière de sécurité
Tenez la poignée de la porte lorsque vous ouvrez
et vous fermez la porte. L’espace entre les portes
et celui entre les portes et l’armoire sont très
petits. Veillez à ne pas vous coincer les doigts.
Tenez les enfants éloignés lorsque vous ouvrez ou
vous fermez l’une des portes.
N’éclaboussez pas le réfrigérateur avec de l’eau.
Ne le placez pas dans des lieux très humides car
cela pourrait avoir un effet néfaste sur les
performances d’isolation électrique.
Il est interdit de démonter des parties ou
d’effectuer des modifications sans autorisation. Il
est strictement interdit d’abîmer le système de
réfrigération. Toute réparation doit être effectuée
par un personnel autorisé.
Ne conservez jamais de bouteilles de bière ou de
boissons dans le compartiment congélateur car
elles pourraient exploser.
Débranchez l’appareil en cas de coupure de
courant ou de nettoyage. Attendez au moins 5
minutes avant de le rebranchez pour éviter
d’endommager le compresseur en raison de
redémarrages fréquents.
Veuillez enlever la porte, le joint de la porte et les
clayettes avant de mettre au rebut l’ancien
appareil et placez-les dans un lieu sûr pour éviter
que les enfants ne restent bloqués à l’intérieur
accidentellement.
Page 43

Em
p
lacement
Mise à niveau
L’appareil doit être placé sur un sol résistant.
Pour le soutenir, utilisez des coussinets robustes
et rigides qui soient inflammables. N’utilisez
jamais les matériaux d’emballage pour le
soutenir. Mettez l’appareil à niveau avec les
pieds réglables le cas échéant. Tournez dans le
sens des aiguilles d’une montre pour soulever le
réfrigérateur, et dans le sens contraire des
aiguilles d’une montre pour le baisser.
N’exposez pas l’appareil à la lumière directe du
jour ou à une source de chaleur
N’exposez pas l’appareil à la pluie et à l’humidité.
Maintenez l’appareil sec et propre.
Pour prévenir tout risque de blessure ou
d’accident, ne placez pas de lourde charge ou de
récipient d’eau sur le dessus du réfrigérateur.
L’appareil doit être placé dans une pièce bien aérée. Un espace libre de 10 cm minimum des deux côtés et
à l’arrière est nécessaire. Si une installation intégrée est nécessaire, laissez au moins 25 cm au-dessus de
la surface su
p
érieure de l’appareil et 5 cm ou plus par rapport au mur pour une circulation d’air correcte.
Page 44

Pour éviter les blessures, la perte de biens ou les dommages au réfrigérateur, assurez-vous d’avoir enlevé tous les aliments des
compartiments de la porte puis enlevez le(s) porte-bouteilles, débranchez le réfrigérateur et coupez l’alimentation en eau avant d’enlever et
de remplacer une porte.
Pour éviter les blessures ou la perte de biens, enlevez et remplacez la porte avec l’aide de 2 personnes ou plus. Veuillez respecter les
instructions suivantes.
REMARQUE
Enlèvement et remplacement de la porte de droite du compartiment réfrigérateur
Dévissez le couvercle de la charnière en haut à droite avec un tournevis
puis enlevez le couvercle de la charnière.
Dévissez la charnière en haut à droite avec un tournevis cruciforme puis
enlevez la charnière.
Enlevez la porte et placez-la dans une position correcte. Enlevez la charnière du milieu si nécessaire.
Remettez la porte en place selon la séquence inverse de l’enlèvement.
Faites attention à éviter que la porte ne vous tombe dessus lorsque vous soulevez la porte de la charnière.
REMARQUE
Enlèvement et remplacement de la porte
Page 45

Enlèvement et remplacement de la porte
Dévissez le couvercle de la charnière en haut à gauche avec un
tournevis puis enlevez le couvercle de la charnière.
Enlèvement et remplacement de la porte de gauche du compartiment réfrigérateur
Dévissez la charnière en haut à gauche avec un tournevis
cruciforme puis enlevez la charnière.
Enlevez la porte et placez-la dans une position correcte.. Enlevez la charnière du milieu si nécessaire.
Remettez la porte en place selon la séquence inverse de
l’enlèvement
REMARQUE
Faites attention à éviter que la porte ne vous tombe dessus lorsque vous soulevez la porte de la charnière.
Tirez entièrement le tiroir congélateur et sortez-le du réfrigérateur. Remettez le tiroir congélateur en place selon la séquence inverse
de l’enlèvement.
Enlèvement et remplacement du tiroir congélateur
Page 46

AVERTISSEMENT
Afin d’éviter tout risque d’étouffement, tenez les enfants et les animaux domestiques à distance des
tiroirs pour qu’ils ne restent pas bloqué dedans.
Pré
p
aration
Enlevez tous les matériaux d’emballage.
Le support en mousse et les rubans adhésifs doivent être
enlevés.
Contrôlez les accessoires et les documents.
Contrôlez que les accessoires correspondent à la liste
d’emballage. En cas de doute, contactez le revendeur.
Placez l’appareil dans une position appropriée. Voir la
section "Emplacement".
Veuillez écrire le nom du modèle et le numéro de série sur la garantie pour
pouvoir vous y référer ensuite.
Page 47

Pré
p
aration
Il est recommandé de nettoyer l’appareil avant
de le mettre en marche.
Voir la section “Nettoyage”.
Repos
Pour garantir un fonctionnement correct, laissez l’appareil au
repos pendant 6 heures ou plus après l’installation et le
nettoyage.
Installation du revêtement inférieur
Ouvrez la porte du compartiment réfrigérateur et sortez le
revêtement inférieur. Fixez-le en bas du réfrigérateur avec les vis
comme cela est illustré.
AVERTISSEMENT
Afin d’éviter tout risque d’étouffement, tenez les enfants et les
animaux domestiques à distance des tiroirs pour qu’ils ne
restent pas bloqué dedans.
Page 48

Pré
p
aration
Enlèvement et remplacement de la poignée de la porte
Sortez les poignées de porte du compartiment réfrigérateur (2 poignées longues à
monter sur le réfrigérateur et une poignée courte à monter sur le congélateur). Veuillez
respecter les instructions suivantes.
Enlèvement et remplacement de la poignée de porte du
réfrigérateur
Prenez 2 chevilles expansives dans le sachet des accessoires et placez-les dans les
trous prévus dans la porte gauche. Installez une poignée en fixant la plaque de renfort
aux chevilles expansives puis en poussant la poignée vers le bas pour la fixer à son
emplacement. Installez la poignée droite de la même manière. Pour enlever la poignée,
poussez-la vers le haut.
Enlèvement et remplacement de la poignée de porte du
congélateur
Prenez 2 chevilles expansives dans le sachet des accessoires et placez-les dans les
trous prévus dans la porte du congélateur. Montez une poignée en fixant la plaque de
renfort aux chevilles expansives puis en poussant la poignée vers la gauche pour la fixer
à son emplacement. Pour enlever la poignée, poussez-la vers la droite.
Cheville expansive
Plaque de renfort
Page 49

Pré
p
aration
Installation du casier à vin
Ouvrez la porte du compartiment réfrigérateur. Sortez la clayette par le coin en haut à
gauche. Placez la clayette en verre à l’envers sur une table puis sortez le casier à vin du
tiroir traiteur en bas. Tenez le casier à vin aux deux extrémités, fixez-le à la clayette
(comme indiqué en Fig 1) puis remettez-la en place (comme indiqué ci-dessous en Fig 3).
Installation du couvercle avant du compartiment fraîcheur
Ouvrez la porte du compartiment réfrigérateur. Sortez le couvercle avant du compartiment
fraîcheur du couvercle du bac à légumes. Puis placez la tige tournante aux deux
extrémités du compartiment fraîcheur dans l’emplacement de support de la glissière et
tournez le couvercle avant du compartiment fraîcheur vers le bas.
Page 50

Première utilisation
Branchez l’appareil à l’alimentation.
Les températures effectives dans le réfrigérateur et le congélateur s’affichent.
L’appareil possède une mémoire de sauvegarde et les paramètres présents
avant une coupure de courant seront stockés. (Voir la section Mémoire de
sauvegarde à la page 17 pour plus de détails)
Modes de fonctionnement
Recommandation !
Une fois que le mode AI est sélectionné, il n’est pas nécessaire
d’effectuer de réglage dans une plage prescrite de température,
malgré les changements de la température ambiante.
Remplissage du réfrigérateur
Le compartiment interne sera suffisamment froid et prêt pour la conservation
des aliments après environ deux heures de fonctionnement à vide.
Vous pouvez sélectionner l’un des modes de fonctionnement suivants.
(1) AI : il est recommandé d’utiliser le mode AI. Appuyez sur le bouton AI et l’indicateur s’allumera.
L’appareil démarrera en fonctionnement automatique (Voir la section Mode Al à la page 14)
(2) Manuel : en alternative, vous pouvez régler la température interne au moyen du bouton de
commande de la température. (Voir la section Configuration et réglage de la température à la page 16)
REMARQUE
Quand la température est réglée, il faut un certain temps pour atteindre la
température interne souhaitée. Ce laps de temps sera plus ou moins long en
fonction de la température ambiante, de la quantité d’aliments et de la fréquence
d’ouverture de la porte.
Page 51

Première utilisation
Tableau de commande
Mode AI
Affichage des pannes
A Bouton de commande de la température
du réfrigérateur
G Affichage de la température du
réfrigérateur
B Bouton refroidissement rapide H Affichage de la température du
congélateur
C Bouton de commande de la température
du congélateur
I Icône Refroidissement rapide
D Bouton AI J Icône Verrouillage
E Bouton congélation rapide K Icône Congélation rapide
F Bouton verrouillage/déverrouillage L Icône AI
Le mode AI veut dire qu’il n’y a pas besoin d’intervention manuelle et que la configuration de la température
changera automatiquement avec la température ambiante et la température interne. Avec le mode
Déverrouillage, le bouton Al (D) peut être appuyé pour afficher l’icône Al (L) et activer le mode Al . Pour
quitter le mode Al, appuyez à nouveau sur le bouton Al (D). L’icône Al (L) disparaît.
Quand une panne liée à une commande ou à une fonction est détectée, l’affichage de la température du
réfrigérateur et l’affichage de la température du congélateur disparaissent et les codes de panne s’affichent,
comme par exemple EO, E1, E2, F 1 , F2, F3 et F5, etc.
Page 52

Fonctions
Verrouillage et déverrouillage
Dans le mode Déverrouillage, le bouton Verrouillage / Déverrouillage (F) peut être appuyé pour afficher l’icône
Verrouillage (J) et entrer dans le mode Verrouillage. Pour quitter le mode Verrouillage, appuyez sur le bouton
Verrouillage / Déverrouillage (F) à nouveau. L’icône Verrouillage (J) disparaît.
NOTE : les commandes pour sélectionner les températures dans les compartiments réfrigérateur et congélateur et les
fonctions telles que congélation rapide, refroidissement rapide et Al (artificial intelligence – intelligence artificielle) ne
peuvent pas être utilisées en mode Verrouillage.
Congélation rapide
Cette fonction est conçue pour préserver les substances nutritives contenues dans les aliments conservés dans le
congélateur en les congelant en un laps de temps très court .
En mode Déverrouillage, le bouton Congélation rapide (E) peut être appuyé pour afficher l’icône Congélation rapide (K)
et activer le mode Congélation rapide. Le mode Congélation rapide est activé et il s’arrêtera automatiquement au bout de
3 heures. Pour quitter le mode Congélation rapide, appuyez à nouveau sur le bouton Congélation rapide (E). L’icône
Congélation rapide (K) disparaît.
NOTE : le mode Congélation rapide n’est pas disponible en mode AI.
NOTE : quand vous fabriquez des glaçons, vous pouvez sélectionner Congélation rapide pour accélérer le processus de
fabrication des glaçons et quitter Congélation rapide dès que le processus de fabrication des glaçons est terminé.
Page 53

Fonctions
Refroidissement rapide
Cette fonction est conçue pour préserver les substances nutritives contenues dans les aliments conservés dans le
réfrigérateur en refroidissant les aliments à la température désirée dans un laps de temps très court.
Dans le mode Déverrouillage, le bouton Refroidissement rapide (B) peut être appuyé pour afficher l’icône
Refroidissement rapide (I) et activer le mode Refroidissement rapide. Le mode Refroidissement rapide s’arrêtera
automatiquement au bout de 3 heures. Pour quitter le mode Refroidissement rapide, appuyez à nouveau sur le bouton
Refroidissement rapide (B). L’icône Refroidissement rapide (I) disparaît.
Configuration et réglage de la température
Configuration et réglage de la température : cette fonction n’est disponible que quand le mode AI est désactivé. Veuillez
respecter les instructions suivantes.
Pour configurer la température du réfrigérateur : dans le mode Déverrouillage (l’écran d’affichage est allumé), appuyez
sur le bouton de commande de la température du réfrigérateur (A). L’affichage de la température du réfrigérateur (G)
s’éclaire. Chaque fois que vous appuyez sur le bouton de commande de la température du réfrigérateur la séquence
d’affichage est la suivante :
7 °C - 5 °C – 3 °C – 2 °C - 1°C - 7°C
Page 54

Fonctions
Pour configurer la température du congélateur : dans le mode Déverrouillage (l’écran d’affichage est allumé), vous
pouvez appuyer sur le bouton de commande de la température du congélateur ©. L’affichage de la température du
congélateur (H) s’éclaire. Chaque fois que vous appuyez sur le bouton de commande de la température du
congélateur la séquence d’affichage est la suivante:
-16 °C – -17 °C – -18 °C – -20 °C – -22 °C – -16 °C
Alarme porte ouverte
Si la porte reste ouverte ou qu’elle n’est pas fermée correctement, une alarme sonnera à intervalle jusqu’à ce que la
porte soit fermée.
Commande affichage économique
L’écran d’affichage devient sombre 30 secondes après la fin de l’opération sur le tableau de commande. L’affichage
se rallume quand tout bouton de commande est appuyé ou qu’une porte est ouverte. Mais ce fonctionnement du
bouton ne changera pas le réglage actuel du réfrigérateur.
Commande On / Off du réfrigérateur
Dans le mode Déverrouillage, maintenez appuyé le bouton de commande de la température du réfrigérateur (A)
pendant 3 secondes pour éteindre le réfrigérateur. L’affichage de la température du réfrigérateur (G) disparaît tandis
que la lumière du réfrigérateur reste en marche. Maintenez appuyé le bouton de commande de la température du
réfrigérateur (A) pendant 3 secondes pour allumer le réfrigérateur. L’affichage de la température du réfrigérateur (G)
s’éclaire et le fonctionnement normal du compartiment du réfrigérateur reprend.
Mémoire de sauvegarde
Les paramètres de la température seront mémorisés et, en cas de coupure de courant, ils seront récupérés quand
la coupure de courant sera terminée.
Page 55

Compartiment réfrigérateur
Le réfrigérateur peut être utilisé pour la conservation de courte
durée des aliments.
La température moyenne du compartiment est généralement maintenue entre 0 et -10°C (2-3°C pour le compartiment fraîcheur). Par conséquent il est uniquement utilisé pour la
conservation de courte durée des aliments et il n’est pas adapté pour conserver pendant de
longues périodes des aliments frais.
Clayette réglable en hauteur
La hauteur de la clayette peut être réglée en fonction de vos besoins.
Pour régler la hauteur de la clayette, enlevez d’abord la clayette. Les étapes sont les
suivantes : faites basculer la clayette vers le haut et soulevez-la pour la sortir des rails. Pour
remettre en place la clayette, en soulevant légèrement le devant de la clayette, insérez les
saillies dans les rails. Puis baissez le devant de la clayette pour la bloquer à son
emplacement.
Basculez
vers le
haut
Soul
evez et enlevez
Pour l’enleve
r
Insérez les saillies
Pour la
rem
p
lace
r
Haut
Bas
Régulateur d’humidité
Vérifiez que la clayette est installée de façon
sûre et au même niveau pour éviter que la
clayette ne tombe ou que des aliments ne se
renversent.
REMARQUE
Comment utiliser le bac à légumes
L’appareil est équipé d’un bac à légumes pour la conservation des fruits et légumes. Vous
pouvez régler l’humidité selon vos besoins.
Tournez le régulateur d’humidité (situé en haut à droite du bac à légumes) vers le
haut pour obtenir une humidité supérieure adaptée à la conservation des
concombres, du raisin, des kiwis et des plaque-mines, etc.
Tournez le régulateur d’humidité (situé en haut à droite du bac à légumes) vers le bas
pour obtenir une humidité inférieure adaptée à la conservation des fraises, oranges,
haricots, ail, pastèques, prunes et tomates, etc.
Enlèvement du couvercle du bac à légumes
Enlevez le bac à légumes et mettez-le de côté. Soulevez l’extrémité du couvercle (1) et
enlevez-le (2).
Page 56

Compartiment réfrigérateur
Comment utiliser le compartiment fraîcheur.
L’appareil est équipé d’un tiroir traiteur avec une température comprise entre -2 °C et
+3 °C. La température peut être réglée avec le bouton de réglage de l’air selon vos
besoins.
Tournez le bouton de réglage de l’air vers la gauche (faible) pour réduire l’air froid
diffusé dans le compartiment fraîcheur et maintenir une température plus élevée.
Tournez le bouton de réglage de l’air vers la droite (fort) pour augmenter l’air froid
diffusé dans le compartiment fraîcheur et maintenir une température plus basse.
Nettoyage du bac de la porte
Soulevez le bac (1) et tirez-le vers vous (2). Replacez le bac dans la séquence inverse
après le nettoyage.
Disposition des aliments
En raison de la circulation d’air dans le compartiment de réfrigération,
certaines zones sont plus chaudes et d’autres plus froides. Les aliments
devraient être rangés en fonction de cela.
① Oeufs, beurre et fromage etc.
② Canettes, conserves, condiments etc.
③ Boissons et aliments en bouteilles, etc.
④ Conserves etc.
⑤ Saucisses et en-cas etc.
⑥ Pâtisseries, conserves, lait et tofu, etc.
⑦ Fruits, légumes et salade, etc.
⑧ Charcuterie et saucisses, etc.
Remplacement de l’ampoule
Caractéristiques de l’ampoule : 220 V~. 25 W
Douille : E14 (N’UTILISEZ PAS d’ampoule de plus de 25 W)
Débranchez l’appareil.
① Pour enlever le pare-lumière, appuyez sur le
butoir à l’arrière dans le trou carré,
② Tirez le pare-lumière vers l’arrière jusqu’à ce que
le dispositif de retenue sorte du trou carré.
Tournez l’ampoule dans le sens contraire des
aiguilles d’une montre pour l’enlever. Remplacez-la
par une ampoule possédant les mêmes
caractéristiques, et faites-le selon la séquence
inverse de l’enlèvement.
Pour replacer le pare-lumière : insérez le dispositif
de retenue dans le trou carré puis appuyez sur
l’arrière du pare-lumière vers l’avant jusqu’à ce que
le butoir se bloque dans le trou carré.
Bouton de réglage de l’air
Trou
carré
Douille de l’ampoule
du réfrigérateur
Dispositif de
retenue
Butoir
Ampoule
Page 57

Conservation des aliments dans le compartiment
réfrigérateur
Pour placer ou enlever des aliments du
compartiment produits laitiers, il est bon de
l’ouvrir et de le fermer de la façon illustrée cidessous.
Laissez refroidir les aliments chauds avant de
les placer dans le réfrigérateur.
Vérifiez que les aliments sont propres et que
l’eau en excès est essuyée avant de les placer
à l’intérieur du réfrigérateur.
Emballez ou couvrez les aliments avant de les
conserver. Ceci aidera à prévenir la perte du
contenu en eau, maintiendra la fraîcheur des
fruits et des légumes et évitera toute odeur
déplaisante.
Tri avant la conservation
Triez les aliments par catégorie. Ceux qui
seront bientôt utilisés devront être placés sur
le devant de la clayette afin d’éviter les
ouvertures fréquentes et prolongées de la
porte et la détérioration des aliments.
Ne remplissez pas trop votre réfrigérateur.
Laissez suffisamment de place entre les
aliments conservés dans le réfrigérateur afin de
permettre une bonne circulation de l’air pour
une meilleure réfrigération.
Les aliments gras peuvent provoquer la corrosion progressive des matériaux de
revêtement. Tenez-les à l’écart des parois du compartiment interne. Maintenez le
com
p
artiment interne propre et sans taches d’huile.
REMARQUE
Page 58

Conseils utiles
Enlevez les feuilles des carottes et des radis
avant de les placer dans le réfrigérateur de
manière à éviter la perte des valeurs nutritives.
Décongelez les aliments congelés dans le
compartiment réfrigérateur, ceci aidera à refroidir
le compartiment réfrigérateur et à économiser de
l’énergie.
Il n’est pas nécessaire de placer dans le
réfrigérateur les aliments pouvant conserver
leur fraîcheur à température ambiante comme
les oignons, l’ail et autres.
Les fruits tels que le melon, le choux de Chine, les
bananes et les ananas peuvent mûrir plus
rapidement aux basses températures. Ces fruits ne
sont pas adaptés à la conservation dans le
réfrigérateur à moins de vouloir les faire mûrir plus
tôt.
Compartiment congélateur
Le congélateur est conçu pour la conservation à
long terme des aliments.
La température dans le congélateur est très basse ce qui est idéal pour la
conservation des aliments congelés. Placez des aliments prévus pour être
stockés pendant une période plus longue dans le congélateur mais
respectez la date d’expiration indiquée sur l’emballage.
Paroi de division réglable dans le tiroir congélateur
Une paroi de division amovible est fournie avec le tiroir congélateur afin de
diviser le tiroir en deux parties. Vous pouvez déplacer la paroi de division
vers la droite ou la gauche en fonction de vos besoins.
Page 59

Compartiment congélateur
Bac à glace
Un bac à glace est fourni pour conserver toutes les
glaces ou autres produits semblables à de faibles
tem
p
ératures.
Pour sortir le bac à glace, saisissez la poignée
et tirez-le vers vous.
Pour nettoyer le bac à glace, suivez ces
instructions :
① Tirez le tiroir à glace jusqu’à la position d’arrêt.
② Soulevez le tiroir à glace (dans le sens de la flèche 1) et
sortez-le du réfrigérateur (dans le sens de la flèche 2).
③ Remettez en place le tiroir à glace après le nettoyage
selon la séquence inverse de l’enlèvement.
Fabrication de glaçons
Versez de l’eau dans la machine à glaçons aux 3/4
de sa capacité et placez-la dans le congélateur.
Pour obtenir des glaçons, tournez les boutons sur la
machine à glaçons respectivement et les glaçons
seront recueillis dans le bac à glaçons.
Les glaçons qui se trouvent dans le bac à glaçons
sont prêts à l’emploi. Quand cela s’avère nécessaire
vous pouvez sortir la machine semi-automatique à
glaçons et le bac à glaçons pour placer plus
d’aliments.
Remplacement de l’ampoule
Caractéristiques : 220 V~, 25 W
Douille : E14 (N’UTILISEZ PAS d’ampoule de plus de 25 W)
Pour remplacer l’ampoule :
Débranchez l’appareil.
① Enlevez la vis avant avec un tournevis.
② Pour enlever le pare-lumière, appuyez sur le butoir devant
pour le sortir du trou carré.
③ Tirez le pare-lumière vers l’avant jusqu’à ce que le
dispositif de retenue se détache du trou carré.
Tournez l’ampoule dans le sens contraire des aiguilles d’une
montre et enlevez-la. Remplacez-la par une ampoule
possédant les mêmes caractéristiques selon la séquence
inverse de l’enlèvement.
Pour remplacer le pare-lumière : insérez le dispositif de
retenue dans le trou carré puis appuyez sur le devant du parelumière vers l’arrière jusqu’à ce que le butoir s’enclenche d ans
le trou carré. Remettez la vis et serrez-la.
Poignée sur le bac
à glace
Limite du niveau d’eau
Bouton sur la machine à glaçons
Machine à glaçons
Bac à glaçons
Douille de l’ampoule du congélateur
ampoule du congélateur
trou
carré
trou de la vis
butoir
retenue
Page 60

Conservation des aliments dans le
compartiment congélateur
Laissez refroidir les aliments chauds avant de les
placer dans le congélateur.
Conservez les aliments en petites portions. Elles
seront plus facile à congeler entièrement et elles
offriront une meilleure qualité lors de la
décongélation. Le poids conseillé pour chaque
portion ne doit pas dépasser 2,5 kg.
Enveloppez les aliments avant de les conserver.
Assurez-vous que les emballages sont secs pour
éviter qu’ils ne collent l’un à l’autre. Les matériaux
d’emballage doivent être sans odeur, étanches,
non toxiques et respectueux de l’environnement
pour éviter les odeurs désagréables et la
détérioration des aliments.
L’emballage des aliments devrait indiquer les
informations utiles telles que le nom de l’aliment,
la date de conservation et la date d’expiration.
Une fois décongelés, les aliments ne peuvent pas
être remis dans le congélateur à moins d’avoir été
cuits. Sortez uniquement la quantité d’aliments
nécessaire du congélateur.
Ne mettez pas trop d’aliments frais dans votre
congélateur. La capacité de congélation (comme
indiquée dans la fiche technique) doit être
res
p
ectée.
Page 61

Dégivrage • Nettoyage
Dégivrage du compartiment congélateur
Le cycle de dégivrage du compartiment congélateur est
automatique et aucune opération manuelle n’est requise.
Nettoyage
Nettoyez les compartiments internes pour ôter les résidus
d’aliments et éliminer les odeurs désagréables.
Débranchez l’appareil avant le nettoyage.
Utilisez un chiffon ou une éponge pour laver les compartiments
internes avec de l’eau tiède et un détergent doux.
Essuyez la surface externe avec un chiffon sec.
① L’appareil est lourd. Protégez le revêtement du sol si l’appareil doit être déplacé
durant le nettoyage ou l’entretien.
② Pour le bien de l’isolation électrique, n’éclaboussez pas l’appareil avec de l’eau.
③ Pour nettoyer les composants électriques tels que les interrupteurs et les ampoules,
vérifiez que l’appareil est débranché avant de les nettoyer avec un chiffon sec.
④ Lors du nettoyage, n’utilisez pas de brosse pointue ou aiguë, de produits de
nettoyage puissants, d’essence, d’acétate d’amyle, d’acétone ou d’autres solvants
organiques, d’eau bouillie, d’acide ou d’alcali.
⑤ Ne touchez pas les surfaces métalliques froides avec des mains mouillée.
⑥ Lors du nettoyage, n’utilisez pas d’eau chaude pour nettoyer les clayettes en verre.
Le verre pourrait se briser à cause du choc thermique et provoquer des blessures ou
des dommages aux biens.
⑦ Nettoyez régulièrement le joint de la porte.
⑧ N’utilisez jamais d’acétate d’amyle pour vous débarrasser des odeurs désagréables.
Cela pourrait provoquer un incendie.
⑨ Seuls les détergents conçus pour les réfrigérateurs peuvent être utilisés pour le
nettoyage.
REMARQUE
Page 62

Vacances
Ne rajoutez pas d’aliments dans le réfrigérateur
pendant une coupure de courant et essayez
d’ouvrir la porte le moins possible.
Si vous avez été averti à l’avance de la coupure de
courant, préparez plus de glaçons et conservez-les
dans un récipient étanche. Placez le récipient sur la
clayette du haut dans le comp artiment réfrigérateur.
Coupure de courant
Même pendant l’été, les aliments peuvent être bien
conservés dans le réfrigérateur en cas de coupure de
courant.
L’augmentation de la température dans le congélateur à cause de la coupure de courant ou
d’autres pannes peut raccourcir la durée de conservation des aliments et avoir u n effet
néfaste sur leur qualité.
REMARQUE
Arrêt du fonctionnement
Veuillez débrancher l’appareil et le nettoyer comme décrit
ci-dessus si l’appareil ne sera pas utilisé pendant une
longue période.
Laissez la porte ouverte pour éviter les odeurs
désagréables provoquées par les résidus d’aliments.
Pour garantir une longue durée de vie, n’arrêtez pas l’appareil fréquemment.
REMARQUE
Après avoir débranché l’appareil, attendez au moins 5 minutes avant de le rebrancher.
REMARQUE
Page 63

Vacances
Quand vous partez en vacances
Si vous partez pour de longues vacances, il
est nécessaire de couper l’alimentation,
d’enlever tous les aliments, de dégivrer et de
nettoyer l’appareil. Essuyez l’appareil et
laissez la porte ouverte pour prévenir la
formation d’odeurs désagréables
Un appareil mis au rebut doit être éliminé par des professionnels, dans le cas contraire il
pourrait avoir un impact néfaste sur l’environnement ou provoquer d’autres risques.
AVERTISSEMENT
Lors du déplacement du réfrigérateur
Débranchez l’appareil avant le transport.
Sortez les aliments de l’appareil.
Fixez les clayettes dans le ré frigérateur, le
bac à légumes et les clayettes dans le
congélateur avec du ruban adhés if.
Maintenez la porte fermée avec du ruban
adhésif durant le transport.
Ne basculez pas le réfrigérateur de plus de
45° durant le transport (l’angle avec la
verticale). Cela pourrait provoquer un risque
de dysfonctionnement du système de
réfrigération.
Ne placez jamais le réfrigérateur à l’horizontale.
REMARQUE
Page 64

Conseils de dépannage
C’est normal, quand le réfrigérateur es t branché
pour la première fois, que le compresseur
fonctionne fréquemment pendant des p ériodes
ou des cycles plus longs d’allumage et de
coupure. Cela prend plus de temps pour
atteindre la température désirée à l’intérieur.
C’est normal que le réfrigérateur fasse un léger
bruit lorsqu’il est branché ou démarré la
première fois. Le bruit dispara îtra quand le
réfrigérateur sera en régime.
C’est normal que la surface externe du
réfrigérateur se réchauffe, en particulier
lorsqu’il est branché la première fois. C’es t une
conséquence de la conception anticondensation.
Le compresseur peut produire un léger bruit
durant le fonctionnement et un c liquetis lors du
démarrage ou de l’arrêt.
L’écoulement du réfrigéran t dans les bob ines
de réfrigération peut faire un léger murmure.
Ce bruit se présente habituellement au niveau
de l’évaporateur et du compresseur. Quan d le
compresseur s’arrête, le retour du réfrigérant
produira un bruit d’eau courant de temps en
temps ou en continu.
L’eau s’égouttant sur le dispositif de chauffage
de dégivrage peut provoquer un bruit de
grésillement ou de bourdonnement duran t le
cycle de dégivrage. À la fin du cycle de
dégivrage, un léger bruit d’éclatement peut se
produire et l’évaporateur peut gargou iller.
Page 65

Conseils de dépannage
C’est normal d’entendre le bruit du ventilateur
durant le fonctionnement.
L’expansion et la contraction des bobines de
l’évaporateur et de la réfrigération à cause des
changements de température peuvent produire
des bruits de craquement ou d’éclatemen t.
De l’humidité peut se former à l’extérieur du
réfrigérateur et entre les portes durant les
périodes d’humidité élevée.
La consommation de courant nomina l indiquée
dans la fiche technique est mesurée durant une
période de 24 heures en fo nctionnement
régulier à une température ambiante de 25 °C
avec le réfrigérateur et le congélateur
maintenus respectivement à 5 °C et -18 °C. La
consommation effective de cou rant dépend de
la quantité d’aliments frais placés dans le
réfri
g
érateur
,
Page 66

Service après-vente
Lorsque vous appelez l’assistance , communiquez le n om du modèle, la lis te des
accessoires et le numéro de série indiqué sur la plaque signalétique de l’appareil.
Avant d’appeler l’assistance, vérifiez les poin ts suivants pour voir si
vous pouvez résoudre vous-même les problè mes.
Le réfrigérateur ne fonctionne pas.
Le réfrigérateur n’est pas branché à
l’alimentation (fiche, prise et fusible) ou la
commande d’alimentation est réglée sur OFF.
La tension est trop basse.
La lumière interne ne fonctionne pas.
Le réfrigérateur
n’est pas branché à
’
L’ampoule est
grillée.
Bruit inhabituel
Le réfrigérateur est au
contact du mur ou
d’autres meubles.
Le réfrigérateur
n’est pas à
Les compartiments sont plus chauds que prévus.
La porte n’est pas
fermée correctement,
est ouverte souvent ou
laissée ouverte trop
longtemps.
La température est
réglée trop haut. (Voir
la section Fonctions
de la page 14 à la
page 17.)
L’appareil est exposé
à la lumière directe du
jour ou placé près d’un
four ou d’un radiateur.
Mauvaise ventilation.
Vérifiez si l’unité de
radiation de chaleur à
l’arrière est bloquée.
Page 67

Service après-vente
Avant d’appeler l’assistance, contrôlez les points suivants pour voir si vous pouvez
résoudre vous-même les problèmes.
Le compresseur fonctionne fréquemment pendan t de longues
p
ériodes ou des cycles d’allumage et de coupure.
C’est normal quand le réfrigérateur est branché la première fois.
Une grande quantité d’aliments est placée dans le réfrigérateur
pour la conservation ou la congélation.
La porte reste ouverte ou ne peut se fermer à cause d’un paquet.
La porte est ouverte fréquemment.
Il fait chaud.
La température est réglée trop haut. Voir la section Première
utilisation.
Mauvaise ventilation
Formation de givre ou de cristaux sur les
aliments.
Le givre dans les emballages est normal.
La porte reste ouverte ou ne peut se
fermer à cause d’un paquet.
La porte est ouverte fréquemment ou
laissée ouverte trop longtemps.
Les aliments sont placés près de
l’aération.
Odeur désagréable
Les aliments ayant des odeurs fortes doivent
être bien emballés.
Les aliments se décomposent.
Les compartiments ont besoin d’être nettoyés.
Page 68

Données techniques •Schéma
du circuit • Liste d’emballage
Données techniques
REMARQUE : conformément à la réglementation britannique, la température ambiante
doit être comprise entre 10 °C et 38°C pour le type de climat SN/N/ST.
Modèle
Etoiles
Type de climat
Classe de protection
Volume total
Volume congélateur
Tension nominale
Fréquence nominale
Courant de dégivrage
Consommation courant nominal
Réfrigérant
Capacité de congélation
Poids
Dimensions (Lxlxh)
Type de connexion
Courant d’entrée
total
A. Fiche B. Ventilateur congélateur C. Am ortisseur réfri gérateur
D. Écran E1. Commande porte réfrigérateur 1
E2. Commande porte réfrigérateur 2 E3. Commande porte réfri gérateur 3
F. Tableau de commande G. Ventilateur refroidissement H1. Capteur
dégivrage
H2. Capteur congélateur H3. Capteur réfrigérateur H4. Capteur ambiant
I1. Lumière congélateur I2. Lumière réfrigérateur 1 13. Lumière réfrigérateur 2
J. App. de chauffage faisceau vertical K. App. de chauffage dégivrage
L. Fusible
M. Protection surcharge N. Compresseur O. PTC
Page 69

Données techniques •Schéma
du circuit • Liste d’emballage
Liste d’emballage
Quantité Nom
Modèle
Couvercle avant du
compartiment fraîcheur
Fixation poignée
Porte-bouteilles
Compartiment produits
Bac à légumes
Couvercle bac à légumes
compartiment fraîcheur
Clayette réfrigérateur
Clayette amovible
Casier à vin
Machine à glaçons semi-automatique
Bac à glaçons
Tiroir congélateur
Paroi de division congélateur
Bac à glace
Poignée
Revêtement inférieur
Pied
Manuale per l'utente
Page 70

Haushaltskühlschrank
Inhaltsverzeichnis
Vor dem Gebrauch
Hauptme rkmal e ...................................................... 1
Übe rsic ht über d ie Ba uteile .....................................2-3
Hinweise zur Sicherheit ...........................................4-6
Aufstellung............................................................ 7
Aus- und Ein bau der T ür........................................... 8-1 0
Vor b e reitung .............................................................. 11- 13
Betrieb.........................................................................14
Funktio n e n .................................................................15 - 1 8
Anleitung für das Kühlfach
Kühlfach......................................................................19-20
Lebensmitt elaufbewahrung im K ühlf ach................. 21
Nützliche Tipps ..........................................................22
Anleitung für das Gefrierfach
Gefrierfach.................................................................. 22-23
Lebensmitt elaufbewahrung im Gefrierf ach.............2 4
Abtauen • Reinigen • Ferien
Abtaue n • R e i nigen................................................. 25
Längere Abw esen heit ..............................................26-27
Fehlersuche • Kundendienst
Fehlersuche ............................................................ 28-29
Kundendienst ......................................................... 30-31
Technische Daten
.
Schaltplan • Packliste
Technische Daten
.
Schaltplan • Packliste -.................32-38
• Lesen Sie diese Gebrauchsanweisung vor dem Betrieb des Gerätes bitte
aufmerksam durch.
• Bewahren Sie diese Gebrauchsanweisung an einem sicheren Ort auf, damit
sie Ihnen zum späteren Nachschlagen zur Verfügung steht.
• Aussehen, Farbe und Anstrich Ihres Kühlschrankes können geringfügig von
den Abbildungen in dieser Gebrauchsanweisung abweichen.
Page 71

Hau
p
tmerkmale
Eiserzeugung
Ein eingebauter halbautomatischer Eiserzeuger bereitet gebrauchsfertige Eiswürfel
entsprechend Ihren Vorlieben.
Delikatessenfach
Das Delikatessenfach im unteren Teil des Kühlfachs ist für die Aufbewahrung von
Delikatessen bei Temperaturen von -2°C bis +3°C bestimmt.
Lebensmittelschubfächer für einen problemlosen Zugang
Im Kühlfach befinden sich ausziehbare Schubfächer, mit deren Hilfe die Lebensmittel
problemlos eingefüllt und entnommen werden können. Die Schubfächer können
herausgenommen werden, wenn die Tür mind estens um 90 ° geöffnet ist.
Artificial Intelligent (AI) Design
Die optimale Kühlleistung wird stets anhand der Innentemperatur und der
Umgebungstemperatur automatisch reguliert, ohne dass Einstellungen von Hand
vorgenommen werden müssen.
Superschlank, supergeräumig und superluxuriös
Kompakte Abmessungen, gro ß e K a p azität , gerä um ige s K ühl- und G e f rierfac h, erstklassige
Innen- und Außengestaltung
FCKW-freie Tiefkühlung ohne Eis- und Rei fbildung (F rost-Free-Sy stem) dank eine m
effizienten Luftkühlsystem
Luftschleier-Technologie (Air Curtain)
Der Luftschleier an der Vorderseite des Kühlfachs verhindert das Eindringen von warmer
Luft, erleichtert die gleichmäßige Kühlluftverteilung und sorgt damit für die optimale
Lebensmittelaufbewahrung.
Vorkühlfunktion vor dem Auftauen zur Vermeidung von Taubildung
Um die im Kühlschrank gelagerten Lebensmittel vor den nachteiligen Auswirkungen eines
Temperaturanstieges zu schützen, wird anhand der gemessenen Innentemperatur die
Vorkühlungsfunktion aktiviert.
Effizientes Kühlaggregat und effizienter Lüftermotor sorgen für eine optimierte Kühlleistung
und eine lange Lebensdauer des Kältemittelverdichters
Tür-offen-Warnung, Drucktaste und großes LCD-Anzeigefeld
Vitamin-C-Technologie für die Aufbewahrung von Frischlebensmitteln
Die Vitamin-C-Technologie hält die Lebensmittel länger frisch und verhindert unan genehme
Geruchsbildung.
Sanft und mühelos bewegliche Schubfächer
Page 72

Übersicht über die Bauteile
Vitamin-C-Schubfach
Kühlfach
Butterfach
A
blageboden
Flaschenablage
Beweglicher
Flaschenhalter
Gemüsefach
Delikatessenfachabdec
kung
Delikatessenfach
Flaschenhalter
Vertikalträger
Kühlfachlampe
Gefrierfach
Cassetto per gelato
Trennwand im
Gefrierschubfach
Gefrierschubfach
Halbautomatischer
Eiserzeuge
r
Butterfach
Gemüsefachabdeck
un
g
Eiswürfelentnahmefach
Speiseeisfach
Page 73

Übersicht über die
Bauteile
Sehr geehrte Kundin, sehr geehrter Kunde!
Wir danken Ihnen, dass Sie sich für ein Produkt von NARDI entschieden
haben. NARDI-Produkte zeichnen sich durch erstklassige Qualität und
Leistung aus. Bitte lesen Sie diese Gebrauchsanweisung durch und befolgen
Sie die darin gegebenen Hinweise.
Für Ihre Anliegen steht Ihnen der International Star Service von NARDI zur
Verfügung. Sollten Sie also irgendeine Frage haben, wenden Sie sich bitte mit
Ihrer Serviceanfrage an eines unserer Service-Center, die Sie telefonisch unter
den auf dem Garantieschein angegebenen Telefonnummern oder per Post
unter der dort angegebenen Anschrift erreichen.
NARDI – jederzeit zuverlässig!”
HINWEIS: Änderungen der Produktspezifikationen aufgrund von
Produktverbesserungen ohne Vorankündigung vorbehalten.
Page 74

Hinweise zur Sicherheit
Stromversorgung: AC 220V-240V/5OHZ
Bei starken Spannungsschwankungen (über den
Bereich von 187 bis 242V hinaus) ist ein
Spannungsregler mit einer Kapazität von 750W
oder mehr zu verwenden, damit es nicht zu
Anlaufschwierigkeiten, Beschädigungen des
Bedienfeldes oder des Kompressors oder
übermäßi
g
er Geräuschentwicklung kommt.
Das Gerät muss an eine vorschriftsmäßig
geerdete Netzsteckdose angeschlossen werden.
Das Netzkabel des Gerätes ist mit einem
Standardnetzstecker mit drei Kontakten versehen,
von denen der für die Erdung bestimmte Kontakt
niemals entfernt werden darf. Die Netzsteckdose
des aufgestellten Kühlschrankes muss immer
zugänglich sein. VVARNUNG! Zur Vermeidung
von Brandgefahren muss der Stecker sicher an
die Steckdose angeschlossen sein.
Achten Sie sorgfältig darauf, dass das Netzkabel
nicht beschädigt wird.
Ziehen Sie stets am Netzstecker und nie am
Netzkabel. Stellen Sie sicher, dass das Netzkabel
nicht unter dem Kühlschrank eingequetscht wird,
und treten Sie nie auf das Kabel.
Bei Beschädigungen des Netzkabels
Beschädigte oder abgenutzte Stecker dürfen auf
keinen Fall verwendet werden. Wenn das
Netzkabel beschädigt ist, wenden Sie sich zwecks
Ersetzung an ein autorisiertes Service-Center.
Bei Gasundichtigkeiten
Schließen Sie den Gashahn.
Öffnen Sie Türen und Fenster zum Lüften.
Ziehen Sie auf keinen Fall den Netzstecker des
Kühlschrankes oder anderer Elektrogeräte aus der
Steckdose und stecken Sie ihn auch nicht in die
Steckdose.
Ziehen Sie den Netzstecker des Kühlschrankes
für die folgenden Arbeiten aus der Steckdose:
Vor Reinigungs- und Reparaturarbeiten.
Vor dem Ersetzen der Lampe
(Stromschlagvermeidung).
Page 75

Hinweise zur Sicherheit
Lagern Sie nie entzündliche oder explosive Stoffe
und stark ätzende Säuren und Laugen im
Kühlschrank. Schaumfestiger / Sprays / Gas /
Säure / Lauge
Bei diesem Gerät handelt es sich um einen
Haushaltskühlschrank, der den nationalen
Richtlinien entsprechend hergestellt wurde. Er ist
nur für die Lagerung von Lebensmitteln, nicht
jedoch für die Aufbewahrung von Blut,
Medikamenten oder biologischen Produkten
bestimmt.
Impfstoffe / Druck / Chemikalien
Stellen Sie den Kühlschrank zur Vermeidung von
Brandrisiken nicht in der Nähe von Benzin oder
anderen entzündlichen Substanzen auf.
Stellen Sie, um elektromagnetische Störungen
oder andere Störungen zu vermeiden, keine
Steckdosenleisten und Mikrowellenöfen auf den
Kühlschrank. Benutzen Sie im Inneren des
Kühlschranks keine Elektrogeräte (mit Ausnahme
der vom Hersteller
g
estatteten Geräte).
Kinder dürfen nicht mit der Tür oder den
Flaschenhaltern spielen. Andernfalls kann es zu
schweren Verletzungen kommen. Stoßen Sie nicht
vor die Tür oder das Gehäuse, wenn Sie den
Kühlschrank beladen oder etwas aus dem
Kühlschrank nehmen.
Vermeiden Sie – insbesondere mit nassen Händen
– den Kontakt mit den Innenflächen des
Gefrierfaches, wenn der Kühlschrank in Betrieb ist.
Page 76

Hinweise zur Sicherheit
Halten Sie beim Öffnen und Schließen der Tür den
Türgriff fest. Der Zwischenraum zwischen den
Türen und der Zwischenraum zwischen Türen und
Gehäuse sind sehr klein. Achten Sie darauf, dass
keine Finger eingequetscht werden. Öffnen oder
schließen Sie den Kühlschrank nur, wenn sich
keine Kinder in Reichweite der Tür befinden.
Besprühen Sie den Kühlschrank nicht mit Wasser.
Stellen Sie ihn nicht in einer feuchten Umgebung
auf, da dies die elektrische Isolierleistung
beeinträchtigen könnte.
Der Kühlschrank darf nicht ohne Autorisierung
zerlegt oder modifiziert werden. Beschädigungen
des Kühlsystems sind streng untersagt.
Reparaturen müssen von autorisiertem Personal
durchgeführt werden.
Lagern Sie Bier oder andere Getränke in Flaschen
niemals im Gefrierfach - Explosionsgefahr.
Ziehen Sie bei einer Unterbrechung der
Stromversorgung oder beim Reinigen den
Netzstecker des Kühlschrankes aus der
Steckdose. Lassen Sie mindestens 5 Minuten
verstreichen, bevor Sie den Netzstecker wieder
einstecken, um Schäden am Kompressor durch zu
häufiges Einschalten zu vermeiden.
Entfernen Sie, bevor Sie den Kühlschrank
entsorgen, die Tür, die Türdichtung und die
Ablageböden und lagern Sie sie an einem
sicheren Ort, damit Kinder nicht versehentlich im
Kühlschrank eingesperrt werden.
Page 77

Aufstellun
g
Nivellieren
Der Kühlschrank sollte auf einem ebenen und
festen Untergrund aufgestellt werden. Verwenden
Sie zur Abstützung belastbare und nicht
entflammbare Unterlagen und niemals die
Verpackungsmaterialien. Falls der Kühlschrank
nivelliert werden muss, verwenden Sie hierfür die
verstellbaren Füße. Durch Drehen im
Uhrzeigersinn wird der Kühlschrank angehoben;
durch Drehen gegen den Uhrzeigersinn wird er
abgesenkt.
Setzen Sie das Gerät niemals direkter
Sonneneinstrahlung aus und stellen Sie es nicht in
der Nähe von Wärmequellen auf.
Setzen Sie das Gerät weder Regen noch
Feuchtigkeit aus. Halten Sie das Gerät trocken
und sauber.
Um Verletzungen und Unfälle zu vermeiden,
stellen Sie keine schweren Gegenstände oder
Wasserbehälter auf den Kühlschrank.
Das Gerät sollte in einem gut durchlüfteten Raum aufgestellt werden. Um den Kühlschrank herum sollte zu
beiden Seiten und an der Rückseite mindestens 10 cm Abstand eingehalten werden. Im Falle eines Einbau
muss über dem Kühlschrank mindestens 25 cm Abstand und zur Wand hin mindestens 5 cm Abstand
gelassen werden, damit die Luft zirkulieren kann.
Page 78

Um Personen- und Sachschäden sowie Beschädigungen des Kühlschranks zu vermeiden, entfernen Sie auf jeden Fall sämtliche
Lebensmittel aus den Türfächern und dann die Flaschenhalterung(-en), ziehen Sie den Netzstecker aus der Steckdose und sperren Sie die
Wasserzufuhr, bevor Sie eine Tür aus- und wieder einbauen.
Um Personen- und Sachschäden zu vermeiden, lassen Sie sich beim Aus- und Einbau der Tür von mindestens zwei Personen helfen. Bitte
beachten Sie unbedingt die folgenden Anweisungen.
ACHTUNG
Aus- und Einbau der rechten Kühlschranktür
Lösen Sie mit einem Schraubenzieher die Schraube der rechten oberen
Scharnierabdeckung und nehmen Sie dann die Scharnierabdeckung ab.
Schrauben Sie mit einem Sechskantschraubenzieher das obere rechte
Scharnier los und nehmen Sie das Scharnier ab.
Nehmen Sie die Tür ab und bringen Sie sie in die richtige Position. Entfernen Sie, falls nötig, auch das mittlere Scharnier.
Gehen Sie zum Wiedereinbau der Tür in umgekehrter Reihenfolge wie
beim Ausbau vor.
Achten Sie darauf, dass die Tür nicht auf Sie fällt, wenn Sie die Tür aus dem Scharnier heben.
ACHTUNG
Aus- und Einbau der Tür
Page 79

Aus- und Einbau der Tür
Lösen Sie mit einem Schraubenzieher die Schraube der linken
oberen Scharnierabdeckung und nehmen Sie dann die
Scharnierabdeckun
g
ab.
Aus- und Einbau der linken Kühlschranktür
Schrauben Sie mit einem Sechskantschraubenzieher das obere
linke Scharnier los und nehmen Sie das Scharnier ab.
Nehmen Sie die Tür ab und bringen Sie sie in die richtige Position. Entfernen Sie, falls nötig, auch das mittlere Scharnier.
Gehen Sie zum Wiedereinbau der Tür in umgekehrter Reihenfolge
wie beim Ausbau vor.
ACHTUNG
Achten Sie darauf, dass die Tür nicht auf Sie fällt, wenn Sie die Tür aus dem Scharnier heben.
Ziehen Sie das Gefrierschubfach ganz heraus und nehmen Sie es
aus dem Kühlschrank.
Gehen Sie zum Wiedereinbau des Gefrierschubfachs in
umgekehrter Reihenfolge wie beim Ausbau vor
Aus- und Einbau des Gefrierschubfachs
Page 80

WARNUNG
Halten Sie Kinder und Haustiere von den Schubfächern fern, damit sie nicht versehentlich in den
Schubfächern eingesperrt werden. Erstickungsgefahr!
V
orbereitun
g
Entfernen Sie das gesamte Verpackungsmaterial.
Bitte Schaumstofffüllmaterial und Klebebänder entfernen.
Überprüfen Sie Zubehörteile und Anleitungen.
Vergewissern Sie sich, ob alle Zubehörteile den Angaben auf der
Packliste entsprechen. Bitte wenden Sie sich an Ihren Händler
vor Ort, falls Sie irgendwelche Fragen haben sollten.
Stellen Sie das Gerät ordnungsgemäß auf. Siehe
Abschnitt “Aufstellung”.
Bitte notieren Sie sich die Modellnummer und die Seriennummer des
Gerätes, die beide im Garantieschein angegeben sind, damit Sie diese
An
g
aben später zur Hand haben.
Page 81

V
orbereitun
g
Es wird empfohlen, das Gerät vor der
Inbetriebnahme zu säubern.
Siehe Abschnitt „Reinigen“.
Ruhezeit
Um einen einwandfreien Betrieb sicherzustellen, lassen Sie das
Gerät nach der Installation oder nach dem Reinigen mindestens 6
Stunden ruhen.
Befestigen der Dekorationsleiste
Öffnen Sie die Kühlschranktür, nehmen Sie die Dekorationsleiste
aus dem Kühlschrank und schrauben Sie sie, wie in der
Abbildung gezeigt, an den Sockel des Gerätes.
WARNUNG
Halten Sie Kinder und Haustiere von den Schubfächern fern,
damit sie nicht versehentlich in den Schubfächern eingesperrt
werden. Erstickungsgefahr!
Page 82

V
orbereitun
g
Abnehmen & Befestigen der Türgriffe
Nehmen Sie die Türgriffe aus dem Kühlfach (2 längere Griffe müssen am Kühlschrank
und 1 kürzerer Griff am Gefrierfach angebracht werden). Bitte beachten Sie die folgenden
Anweisungen.
Abnehmen & Befestigen der Kühlschranktürgriffe
Nehmen Sie 2 Befestigungselemente aus dem Zubehörbeutel und stecken Sie sie in die
beiden dafür vorgesehenen Löcher in der linken Tür. Bringen Sie den ersten der beiden
Griffe an, indem Sie die Verstärkungsplatte an dem Befestigungselement anbringen und
den Griff dann nach unten drücken, bis er einrastet. Bringen Sie auf die gleiche Weise
auch den rechten Griff an. Um den Griff abzunehmen, muss er nach oben gedrückt
werden.
Abnehmen & Anbringen des Gefrierfachgriffs
Nehmen Sie 2 Befestigungselemente aus dem Zubehörbeutel und stecken Sie sie in die
beiden dafür vorgesehenen Löcher in der Gefrierfachtür. Bringen Sie einen der Griffe an,
indem Sie die Verstärkungsplatte an dem Befestigungselement anbringen und den Griff
dann nach links drücken, bis er einrastet. Um den Griff abzunehmen, muss er nach rechts
gedrückt werden
Befestigungselement
Verstärkungsplatte
Befestigungselement
Verstärkungsplatte
Page 83

V
orbereitun
g
Installieren der Flaschenablage
Öffnen Sie die Kühlschranktür. Nehmen Sie den Ablageboden oben links heraus. Legen
Sie den Glasablageboden auf einem Tisch ab. Nehmen Sie dann die Flaschenablage aus
dem Delikatessenschubfach unten. Halten Sie die Flaschenablage an beiden Enden,
befestigen Sie es am Ablageboden (wie unten in Abbildung 1 gezeigt) und drücken Sie es
fest (wie unten in Abbildung 3 gezeigt Fig 3).
Anbringen der Abdeckung für das Delikatessenfach
Öffnen Sie die Kühlschranktür. Nehmen Sie die Frontabdeckung des Delikatessenfaches
aus dem Gemüsefach. Lassen Sie dann die Drehachse an beiden Enden des
Delikatessenfachs in den Halterungsschlitz der Gleitführung einrasten und klappen Sie
die Abdeckung des Delikatessenfaches nach unten.
Page 84

Betrieb
Anschließen der Stromversorgung.
Die tatsächlichen Kühl- und Gefriertemperaturen werden angezeigt.
Das Gerät ist mit einem Speichersystem ausgestattet, das dafür sorgt, dass
vor einer Unterbrechung der Stromzufuhr die Einstellungen gespeichert
werden. (Näheres hierzu finden Sie in Abschnitt “Speichersystem” auf Seite
17)
Betriebsarten
Empfehlung!
Wenn Sie den AI-Modus wählen, sind innerhalb eines
festgelegten Temperaturbereiches keine weiteren Einstellungen
mehr notwendig, auch wenn sich die Umgebungstemperatur
ändert.
Beladen des Kühlschranks
Nach ein paar Betriebsstunden im Leerzustand haben die Kühlfächer die
erforderliche Kälte erreicht, so dass Sie den Kühlschrank nun mit
Lebensmitteln beladen können.
Sie können eine der folgenden Betriebsarten wählen.
(1) AI: Sofern nicht anders gewünscht, wird die Verwendung der Betriebsart AI empfohlen.
Sobald Sie die AI-Taste antippen, wird die Anzeigebeleuchtung aktiviert. Das Gerät startet den
Automatikbetrieb. (Siehe Abschnitt „AI-Modus“ auf Seite 14)
(2) Manuell: Alternativ können Sie die Innentemperatur auch mit der Temperaturregelungstaste
einstellen. (Siehe Abschnitt "Temperatureinstellung und -anpassung” auf Seite 16)
ACHTUNG
Beim Einstellen der Temperatur dauert es manchmal eine
Weile, bis die gewünschte Innentemperatur erreicht ist. Wie
lange dies dauert, hängt von der Umgebungstemperatur, der
Lebensmittelmenge und davon ab, wie oft die Tür geöffnet wird.
Page 85

Betrieb
Bedienfeld
AI-Modus
Störungsanzeige
Beladen des Kühlschrankes
Nach ein paar Betriebsstunden im Leerzustand haben die Kühlfächer die erforderliche
Kälte erreicht
,
so dass Sie den Kühlschrank nun mit Lebensmitteln beladen können.
A Temperaturwahltaste für Kühlschrank G Kühlschranktemperaturanzeige
B Schnellkühltaste H Gefrierschranktemperaturanzeige
C Temperaturwahltaste für Gefrierschrank I Schnellkühl-Symbol
D AI-Taste J Gesperrt-Symbol
E Fast-Freeze-Taste K Fast-Freeze-Symbol
F Sperren/Entsperren-Taste L AI-Symbol
Im AI-Modus brauchen Sie keine weiteren manuellen Einstellungen vornehmen, da die
Temperatureinstellung in Abhängigkeit von der Umgebungstemperatur und der Innentemperatur
nachgeregelt wird. Im Entsperrt-Modus wird durch Antippen der AI-Taste (D) das AI-Symbol (L) angezeigt
und der AI-Modus aktiviert. Wenn Sie den AI-Modus wieder beenden möchten, drücken Sie erneut die AITaste (D). Das AI-Symbol (L) verschwindet.
Bei einer Fehlfunktion im Steuerungs- und Funktionssystem wird anstelle der Gefrierfach- bzw.
Kühlfachtemperatur der jeweilige Störungscode angezeigt, z. B. EO, E1, E2, F 1, F2, F3 und F5, etc.
Page 86

Funktionen
Sperren & Entsperren
Im Entsperrt-Modus wird durch Drücken der Sperren/Entsperren-Taste (F) das Gesperrt-Symbol (J) angezeigt und der
Gesperrt-Modus aktiviert. Wenn Sie den Gesperrt-Modus beenden möchten, drücken Sie erneut die
Sperren/Entsperren-Taste (F). Das Gesperrt-Symbol (J) verschwindet.
ACHTUNG: Im Gesperrt-Modus können die Bedienungselemente für die Temperatureinstellung in den Kühl- und
Gefrierfächern und Funktionen wie Fast Freeze, Schnellkühlung und AI (Artificial Intelligence) nicht betätigt werden.
Fast Freeze
Diese Funktion dient dazu, den Nährwert der im Gefrierfach aufbewahrten Lebensmittel zu erhalten, da die
Lebensmittel bei Aktivierung dieser Funktion innerhalb der kürzestmöglichen Zeit vollständig eingefroren werden.
Im Entsperrt-Modus wird durch Drücken der Fast-Freeze-Taste (E) das Fast-Freeze-Symbol (K) angezeigt und der
Fast-Freeze-Modus aktiviert. Nach 3 Stunden wird der Fast-Freeze-Modus automatisch beendet. Wenn Sie den FastFreeze-Modus beenden möchten, drücken Sie erneut die Fast-Freeze-Taste (E). Das Fast-Freeze-Symbol (K)
v
ersc
hwin
det
.
Page 87

Funktionen
Schnellkühlung
Diese Funktion dient dazu, den Nährwert der im Kühlfach aufbewahrten Lebensmittel zu erhalten, da die Lebensmittel
bei Aktivierung dieser Funktion innerhalb der kürzestmöglichen Zeit vollständig eingefroren werden.
Im Entsperrt-Modus wird durch Drücken der Schnellkühltaste (B) das Schnellkühl-Symbol (I) angezeigt und der
Schnellkühlmodus aktiviert. Nach 3 Stunden wird der Schnellkühlmodus automatisch beendet. Wenn Sie den
Schnellkühlmodus beenden möchten, drücken Sie erneut die Schnellkühltaste (B. Das Schnellkühl-Symbol (I)
verschwindet.
Temperatureinstellung und - anpassung
Einstellen und Regulieren der Temperatur. Diese Funktion ist nur verfügbar, wenn die AI-Modus deaktiviert ist. Bitte
beachten Sie die folgenden Anweisungen.
Einstellen der Kühlschranktemperatur: Im Entsperrt-Modus (das Anzeigefeld ist eingeschaltet) kann die
Temperaturwahltaste für die Kühlschranktemperatur (A) betätigt werden. Die Kühlschranktemperaturanzeige (G)
leuchtet auf. Mit jedem Antippen der Temperaturwahltaste für die Kühlschranktemperatur (A) wird die folgende Sequenz
angezeigt: 7°C 5°C 3°C 2°C 1°C 7°C
Page 88

Funktionen
Einstellen der Gefrierschranktemperatur: Im Entsperrt-Modus (das Anzeigefeld ist eingeschaltet) kann die
Temperaturwahltaste für die Gefrierschranktemperatur (C) betätigt werden. Die Gefrierschranktemperaturanzeige
(G) leuchtet auf. Mit jedem Antippen der Temperaturwahltaste für die Gefrierschranktemperatur (C) wird die
folgende Sequenz angezeigt:-16°C – -17°C – -18°C – -20°C – -22°C – -16°C
Tür-offen-Warnung
Wenn die Tür über einen längeren Zeitraum geöffnet bleibt oder nicht richtig geschlossen ist, ertönt in regelmäßigem
Abstand ein vernehmliches Alarmsignal, bis die Tür geschlossen wird.
Energiesparfunktion für das Anzeigefeld
30 Sekunden nach dem letzten Betätigungsvorgang am Bedienfeld erlischt das Anzeigefeld. Sobald irgendeine
Einstelltaste angetippt oder eine Tür geöffnet wird, wird das Anzeigefeld wieder aufgerufen. Durch dieses Betätigen
einer oder mehrerer Tasten wird die aktuelle Einstellung des Kühlschrankes jedoch nicht verändert.
Kühlschrank EIN-/AUS-Funktion
Um den Kühlschrank auszuschalten, halten Sie die Temperaturwahltaste für die Kühlschranktemperatur (A) im
Gesperrt-Modus 3 Sekunden lang gedrückt. Die Kühlschranktemperaturanzeige (G) verschwindet, während die
Kühlschrankbeleuchtung in Funktion bleibt. Um den Kühlschrank einzuschal ten, halten Sie die Temperaturwahltaste
für die Kühlschranktemperatur (A) 3 Sekunden lang gedrückt. Die Kühlschranktemperaturanzeige (G) leuchtet auf,
und das Kühlfach nimmt seinen Normalbetrieb wieder auf.
Speicher
Die Temperatureinstellungen werden gespeichert und bei einer Unterbrechung der Stromversorgung
wiederhergestellt, sobald die Stromunterbrechung vorüber ist.
Page 89

Kühlfach
Der Kühlschrank dient zur kurzfristigen Lagerung von
Lebensmitteln.
Die Durchschnittstemperatur des Kühlfaches liegt im Allgemeinen zwischen 0 und 10°C (im
Delikatessenfach -2 bis 3°C). Darum wird es nur zur kurzfristigen Lagerung von
Lebensmitteln verwendet und ist nicht dafür geeignet, Nahrungsmittel über einen längeren
Zeitraum frisch zu halten.
Höheneinstellung der Ablageböden
Die Lebensmittelfächer können je nach Größe und Höhe der Lebensmittel, die Sie im
Kühlschrank lagern möchten, angepasst werden.
Um die Höhe eines Ablagebodens zu verändern, nehmen Sie den Ablageboden zunächst
heraus. Gehen Sie hierfür folgendermaßen vor: Kippen Sie den Ablageboden an der
Vorderseite nach oben und ziehen Sie ihn nach oben aus den Führungen heraus. Um den
Ablageboden wieder einzubauen, halten Sie den Ablageboden leicht nach oben geneigt und
stecken Sie die Halteausleger in die dafür vorgesehenen Halteöffnungen. Senken Sie den
Ablageboden dann ab, bis er einrastet.
Hochklappen
Anheb
en und
herausnehmen
Herausnehmen
Halteausleger in die
Öffnungen
Wieder einsetzen
Hoch
Herunter
Feuchtigkeitsregler
Vergewissern Sie sich, dass der Ablageboden
wirklich sicher und eben eingebaut ist, damit
der Ablageboden nicht herunterfällt und keine
Lebensmittel verschüttet werden.
ACHTUNG
Benutzung des Gemüsefachs
Das Gerät ist mit einem Gemüsefach für die Lagerung von Obst und Gemüse ausgestattet,
dessen Luftfeuchtigkeit Sie entsprechend Ihren Bedürfnissen einstellen können.
Regeln Sie den Feuchtigkeitsregler (an der rechten oberen Ecke des Gemüsefachs)
hoch, wenn Sie eine höhere Luftfeuchtigkeit wünschen, weil Sie z. B. Gurken,
Trauben, Kiwi, Persimonen etc. lagern möchten.
Regeln Sie den Feuchtigkeitsregler (an der rechten oberen Ecke des Gemüsefachs)
herunter, wenn Sie eine geringere Luftfeuchtigkeit wünschen, weil Sie z. B.
Erdbeeren. Orangen, Bohnen, Knoblauch, Wassermelonen, Pflaumen und Tomaten
etc. lagern möchten.
Abnehmen der Gemüsefachabdeckung
Nehmen Sie das Gemüsefach heraus und legen Sie es beiseite. Heben Sie die Abdeckung
am Ende an (1) und nehmen and sie ab (2).
Page 90

Kühlfach
Benutzung des Delikatessenfachs.
Das Gerät ist mit einem Delikatessenschubfach mit einem Temperaturbereich von -2°C
bis +3°C ausgestattet. Mit Hilfe des Luftreglers lässt sich die Temperatur so einstellen,
wie Sie es zur Lagerung Ihrer Lebensmittel brauchen.
Drehen Sie den Luftregler nach links (schwach), um die Kühlluftzirkulation im
Delikatessenfach zu reduzieren und eine höhere Temperatur zu erreichen:
Drehen Sie den Luftregler nach rechts (stark), um die Kühlluftzirkulation im
Delikatessenfach zu erhöhen und eine niedrigere Temperatur zu ereichen.
Reinigen des Flaschenhalters
Heben Sie den Flaschenhalter an (1) und ziehen Sie ihn zu sich hin (2). Zum
Wiedereinbau des Flaschenhalters gehen Sie in umgekehrter Reihenfolge vor wie beim
Herausnehmen.
Lagerbereiche
Aufgrund der Luftzirkulation im Kühlfach gibt es im Kühlschrank wärmere
und kältere Bereiche. Dementsprechend sollten auch die Lebensmittel auf
verschiedene Bereiche verteilt werden.
① Eier, Butter, Käse etc.
② Getränkedosen, Konserven, Gewürze
etc.
③ Getränke und Lebensmittel in Flaschen
etc.
④ Eingelegte Lebensmittel und
Lebensmittel in Dosen etc.
⑤ Wurst und Snacks etc.
⑥ Backwaren, Lebensmittel in Dosen,
Milch und Tofu etc.
⑦ Obst, Gemüse, Salat etc.
Ersetzen der Lampe
Lampe: 220V- 25W
Lampenhalter: E14 (Es dürfen KEINE Lampen über 25W verwendet
werden)
Ziehen Sie den Netzstecker des Kühlschrankes heraus.
① Nehmen Sie die Lampenabdeckung ab, indem Sie den
Stopper hinten aus der rechteckigen Öffnung drücken,
② Ziehen Sie die Abdeckung nach hinten, bis die
Halterung sich aus der rechteckigen Öffnung löst.
Drehen Sie die Lampe gegen den Uhrzeigersinn heraus.
Setzen Sie eine Lampe mit den gleichen Eigenschaften
ein und gehen Sie dabei in umgekehrter Reihenfolge vor
wie beim Ausbau.
Einsetzen der Lampenabdeckung: Lassen Sie die
Halterung in der rechteckigen Öffnung einrasten und
drücken Sie die Abdeckung dann von hinten nach vorn, bis
der Stopper in der rechteckigen Öffnung einrastet.
Rechteckige
Öffnung
Kühlschrankla
mpenhalter
Halterun
g
Sobenpe
r
Lampe
Page 91

Lebensmittelaufbewahrung im
Kühlfach
Wenn Sie Lebensmittel in das Butterfach legen
oder Lebensmittel aus dem Butterfach
entnehmen, öffnen und schließen Sie das
Butterfach so wie in der Abbildung gezeigt.
Lassen Sie warme Speisen erst abkühlen,
bevor Sie sie in den Kühlschrank stellen.
Stellen Sie sicher, dass die Lebensmittel sauber
sind, und trocknen Sie alle Wassertropfen von
den Lebensmitteln ab, bevor Sie sie im
Kühlschrank lagern.
Verpacken Sie die Lebensmittel ein oder decken
Sie sie ab, bevor Sie sie im Kühlschrank lagern.
Dadurch wird vermieden, dass die in den
Lebensmitteln enthaltene Feuchtigkeit verdunstet
und unangenehme Gerüche entstehen, und Obst
und Gemüse bleiben frisch.
Geordnete Lagerung der Lebensmittel
Sortieren Sie die Lebensmittel nach Kategorien.
Lagern Sie die zum baldigen Gebrauch
bestimmten Lebensmittel im vorderen Teil des
Ablagebodens, damit die Tür nur für möglichst
kurze Zeit geöffnet werden muss.
Überfüllen Sie Ihren Kühlschrank nicht.
Lassen Sie genügend Abstand zwischen den im
Kühlschrank gelagerten Lebensmitteln, um eine
gute Luftzirkulation zu ermöglichen und die
besten Kühlresultate zu erzielen.
Durch fettige Lebensmittel kann der Inneneinsatzverkleidung nach und nach
erodieren. Vermeiden Sie daher den direkten Kontakt solcher Lebensmittel mit dem
Inneneinsatz. Wischen Sie Ölreste re
g
elmäßig vom Inneneinsatz ab.
Page 92

Nützliche Tipps
Entfernen Sie vor der Lagerung Blätter von
Karotten und Rüben, um einen Nährstoffverlust
zu vermeiden.
Tauen Sie eingefrorene Lebensmittel im Kühlfach
auf. Dies trägt zur Kühlung im Kühlfach und spart
Energie.
Zwiebeln, Knoblauch und sonstiges
Wurzelgemüse, die bei Raumtemperatur frisch
bleiben, brauchen nicht im Kühlschrank gelagert
werden.
Früchte wie Melonen, Quitten, Honigmelonen,
Bananen und Ananas sollten nicht im
Kühlschrank gelagert werden, da der
Reifungsprozess durch Kühlung beschleunigt
wird – es sei denn, Sie möchten den
Reifungsprozess bewusst beschleunigen.
Gefrierfach
Der Gefrierschrank dient zur langfristigen Lagerung
von Lebensmitteln
Da die Temperatur im Gefrierfach sehr niedrig ist, ist es ideal für die
Lagerung eingefrorener Lebensmittel geeignet. Lagern Sie Lebensmittel,
die für eine längere Zeit aufbewahrt werden sollen, im Gefrierfach. Dabei
sollte iedoch das auf der Packung angegebene Haltbarkeitsdatum
beachtet werden.
Verstellbare Trennwand im Gefrierschubfach
Das Gefrierschubfach ist durch eine bewegliche Trennwand in zwei Teile
geteilt. Diese Trennwand können Sie entsprechend Ihren Bedürfnissen
nach links oder rechts verschieben.
Page 93

Gefrierfach
Speiseeisfach
Zur Lagerung von Speiseeis und ähnlichen Lebensmitteln
steht ein Speiseeisfach zur Verfügung.
So verwenden Sie das S
p
eiseeisfach:
Zum Herausnehmen des Speiseeisfachs
ziehen Sie es am Griff zu sich hin.
Gehen Sie zum Reinigen des Speiseeisfachs
wie fol
g
t vor:
① Ziehen Sie das Speiseeisfach bis zum Anschlag heraus.
② Heben Sie das Speiseeisfach an (in Pfeilrichtung 1) und
nehmen Sie es aus dem Kühlschrank heraus (in
Pfeilrichtung 2).
③ Gehen Sie zum Wiedereinsetzen des Speiseeisfachs in
um
g
ekehrter Reihenfolge vor wie beim Herausnehmen.
Eiserzeugung
Füllen Sie den Eiserzeuger zu 3/4 mit Wasser und stellen
Sie ihn in den Gefrierschrank.
Wenn Sie Eiswürfel entnehmen möchten, drehen Sie
entsprechend an den Drehknöpfen des Eiserzeugers. Die
Eiswürfel werden im Eiswürfelentnahmefach aufgefangen.
Die Eiswürfel im Entnahmefach sind gebrauchsfertig.
Bei Bedarf kann der halbautomatische Eiserzeuger
herausgenommen und das Entnahmefach dazu genutzt
werden, weitere Lebensmittel zu lagern.
Ersetzen der Lampe
Lampe: 220V–, 25W
Lampenhalter: E14 (Es dürfen KEINE Lampen über
25W verwendet werden).
Gehen Sie zum Ersetzen der Lampe wie folgt vor:
Ziehen Sie den Netzstecker des Kühlschranks heraus.
① Schrauben Sie mit einem Schraubenzieher die Frontseite ab.
② Um die Lampenabdeckung abzunehmen, drücken Sie den
Stopper vorn aus der rechteckigen Öffnung heraus.
③ Ziehen Sie die Abdeckung nach vorn, bis die Halterung sich
aus der rechteckigen Öffnung löst.
Drehen Sie die Lampe gegen den Uhrzeiger heraus. Setzen Sie
eine Lampe mit den gleichen Eigenschaften ein und gehen Sie
dabei in umgekehrter Reihenfolge vor wie beim Ausbau.
Einsetzen der Lampenabdeckung: Lassen Sie die Halterung in
der rechteckigen Öffnung einrasten und drücken Sie die
Abdeckung dann von hinten nach vorn, bis der Stopper in der
rechteckigen Öffnung einrastet. Setzen Sie die Schraube wieder
ein und ziehen Sie sie fest.
Griff des
Speiseeisfaches
Wasserstandobergrenze
Eiserzeuger
Drehknopf am Eiserzeuger
Eisentnahmefach
Gefrierfachlampenhalter
Rechteckige
Öffnun
g
Halterung
Halt Gefrierfachlampe erung
Page 94

Lebensmittelaufbewahrung im
Gefrierfach
Lassen Sie warme Speisen zunächst abkühlen,
bevor Sie sie in den Gefrierschrank stellen.
Lagern Sie Ihre Lebensmittel in kleineren
Portionsmengen. Dadurch wird das vollständige
Gefrieren erleichtert, und nach dem Auftauen
bleiben die Lebensmittel in einer besseren Qualität
erhalten. Die einzelnen Portionen sollten nicht
schwerer als 2,5 kg sein.
Verpacken Sie Ihre Lebensmittel vor dem Lagern
im Kühlschrank. Achten Sie darauf, dass die
Verpackungen nicht aneinander kleben. Alle
verwendeten Verpackungsmaterialien sollten
geruchsfrei, luftdicht, auslaufsicher, ungiftig und
unmweltfreundlich sein, so dass unangenehme
Geruchsentwicklung oder ein Verderben der
Lebensmittel aus
g
eschlossen sind.
Die verpackten Portionen sollten mit Angaben wie
der Bezeichnung des Lebensmittels, dem
Einlagerungsdatum und dem Haltbarkeitsdatum
versehen sein.
Einmal aufgetaute Lebensmittel dürfen nicht
wieder im Gefrierfach gelagert werden, es sei
denn, sie wurden nach dem Auftauen gekocht. Es
sollte stets nur die benötigte Menge an gefrorenen
Lebensmitteln aus dem Gefrierschrank
entnommen und aufgetaut werden.
Lagern Sie nicht zu viel frische Lebensmittel in
Ihrer Gefrierschrank. Die Menge der eingelagerten
Lebensmittel muss der im Technischen Datenblatt
an
geg
eben Kühlleistung entsprechen.
Page 95

Abtauen • Reinigen
Abtauen des Gefrierfaches
Das Abtauen des Gefrierfaches erfolgt automatisch und erfordert
kein manuelles Eingreifen.
Reinigen
Die Kühlfächer sollten von Lebensmittelrückständen gereinigt
werden, auch um die Bildung unangenehmer Gerüche zu
vermeiden.
Ziehen Sie den Netzstecker des Gerätes aus der Steckdose.
Reinigen Sie die Kühlschrankfächer mit einem Schwamm,
lauwarmem Wasser und einem milden Reinigungsmittel.
Trocknen Sie die Außenflächen des Gerätes mit einem trockenen
Tuch ab.
① Das Gerät ist schwer. Schützen Sie den Bodenbelag, falls das Gerät zum Reinigen
und für Wartungs- und Reparaturarbeiten bewegt werden muss.
② Vermeiden Sie im Interesse der elektrischen Isolierung, dass das Gerät mit Wasser
besprüht oder bespritzt wird.
③ Vergewissern Sie sich vor dem Reinigen stromführender Bauteile wie Schaltern und
Beleuchtungselementen, dass das Gerät nicht an die Stromversorgung
angeschlossen ist. Erst dann können Sie diese Bauteile mit einem trockenen Tuch
reinigen.
④ Verwenden Sie zum Reinigen keine harte oder spitze Bürste, scharfe
Reinigungsmittel, Benzin, Amylazetat, Azeton oder andere organische
Lösungsmittel, heißes Wasser, Säure oder Lauge.
⑤ Berühren Sie die kalten Metallflächen nicht mit feuchten oder nassen Händen.
⑥ Reinigen Sie die Glasablageböden nicht mit heißem Wasser. Andernfalls ka nn der
plötzliche Temperaturwechsel zum Zerbrechen des Glases und zu Sachschäden
oder Verletzungen führen.
⑦ Reinigen Sie in regelmäßigen Abständen die Türdichtung.
⑧ Gehen Sie nie mit Amylazetat gegen unangenehme Geruchsbildung vor.
Feuergefahr!
⑨ Verwenden Sie zum Reinigen nur für Kühlschränke bestimmte Reinigungsmittel.
ACHTUNG
Page 96

Längere Abwesenheit
Füllen Sie keine Lebensmittel in den Kühlschrank
ein, während die Stromversorgung unterbrochen
ist, und öffnen Sie die Tür so wenig wie möglich.
Wenn eine Unterbrechung der Stromversorgung vorher
angekündigt wird, erzeugen Sie etwas mehr Eiswürfel
als sonst und bewahren Sie sie in einem
auslaufsicheren Behälter. Stellen Sie diesen Behälter
auf den obersten Ablageboden im Kühlfach.
Unterbrechung der Stromversorgung
Auch im Sommer können Lebensmittel problemlos
einige Stunden gelagert werden.
Wenn es durch die Unterbrechung der Stromversorgung oder durch irgendeine andere
Störung zu einem Temperaturanstieg im Gefrierschrank kommt, kann sich dadurch die
Haltbarkeitszeit verkürzen und die Qualität der Lebensmittel leiden.
ACHTUNG
Stilllegung
Ziehen Sie den Netzstecker des Gerätes aus der
Steckdose und reinigen Sie es wie oben beschrieben, falls
das Gerät über für einen längeren Zeitraum nicht benutzt
wird.
Lassen Sie die Tür offen stehen, um unangenehme
Geruchsbildung durch Lebensmittelrückstände zu
vermeiden.
Schalten Sie das Gerät im Interesse einer langen Lebensdauer nicht häufig ab.
ACHTUNG
Lassen Sie nach dem Abschalten des Gerätes mindestens 5 Minuten vergehen, bevor Sie
das Gerät wieder an die Stromversorgung anschließen.
ACHTUNG
Page 97

Längere Abwesenheit
Wenn Sie in den Urlaub fahren
Wenn Sie für längere Zeit verreisen, müssen
Sie die Stromversorgung abschalten, alle
Lebensmittel entnehmen und das Gerät
abtauen und reinigen. Trocken Sie das Geräte
und lassen Sie die Tür offen, um
Geruchsbildung zu vermeiden.
Die Entsorgung ausrangierter Geräte muss durch professionelles Personal erfolgen, da sonst
unerwünschte Umweltschäden oder anderen Gefahren entstehen können.
Transport Ihres Kühlschrankes
Ziehen Sie vor dem Transport den
Netzstecker des Gerätes aus der Steckdose.
Entnehmen Sie alle Lebensmittel.
Sichern Sie die Ablagen des Kühlfaches, das
Gemüsefach und die Gefrierfachablag en mit
Klebeband.
Sichern Sie die geschlossene Tür beim
Transport mit Klebeband.
Kippen Sie das Gerät beim Transport um n icht
mehr als 45 Grad (Winkel zur Vertikalen).
Andernfalls besteht die Gefahr, dass es zu
Störungen des Kühlsystems kommt.
Halten Sie den Kühlschrank aufrecht und niemals waagerecht.
Page 98

Fehlersuche
Dass bei der ersten Inbetriebnahme der
Kompressor länger läuft oder häufig an- und
ausgeht, ist normal. Andernfalls würde es
länger dauern, bis die gewünschte
Innentem
p
eratur erreicht ist.
Dass der Kühlschrank bei der ersten
Inbetriebnahme oder beim ersten Einschalten
ein summendes Geräusch macht, ist normal.
Es wird allmählich immer leiser, sobald der
Kühlschrank einen stabilen Betriebszustand
erreicht hat.
Die Außenseiten des Kühlschrank es können -
insbesondere bei der ersten Inbetriebnah me –
warm werden. Dadurch soll eine
Kondensierung vermieden werden.
Wenn der Kompressor läuft, kann ein leises
Geräusch zu hören sein, und wenn er seinen
Betrieb startet bzw. unterbricht, kann ein
klickendes Geräusch zu hören sein.
Die durch die Kühlleitungen fließende
Kühlflüssigkeit kann ein plätscherndes
Geräusch erzeugen. Dieses Geräusch ents teht
in der Regel am Verdampfer und am
Kompressor. Wenn der Kompressor
ausgeschaltet wird, kann die zurückfließende
Kühlflüssigkeit zeitweise oder durchgehend ein
Geräusch wie von laufendem Wasser
erzeu
g
en.
Beim Abtauen kann durch abtauendes Wasser,
das auf die Abtauheizung tropft, ein zischendes
oder brummendes Geräusch entstehen . Am
Ende des Abtauvorgangs ist un ter Umständen
ein leises Knallgeräusch zu hören, und d er
Verdampfer kann ein gluckerndes Geräusch
wie von kochendem Wasser erzeugen.
Page 99

Fehlersuche
Dass bei laufendem Betrieb der sich drehende
Lüfter durch Geräusche bemerkbar macht, ist
normal.
Dadurch, dass sich der Verdampfer und die
Kühlleitungen durch Temperaturverän derungen
ausdehnen und zusammenziehen, können
knackende oder knallende Geräusche
entstehen.
An den Außenseiten des Kühlschrankes und
zwischen den Türen können sich aufgrund
hoher Raumfeuchtigkeit Wassertropfen bilden.
Der im Technischen Datenblatt angegebe ne
Nennstromverbrauch wird in einem
Messzeitraum von 24 Sunden bei stabilem
Betrieb und einer Außentemperatur von 25°C
gemessen, wobei die Temperatur im
Kühlschrank bei 5°C und im Gefrierschrank bei
-18°C gehalten wird. Der tatsächlic he
Stromverbrauch hängt von der Me nge der im
Kühlschrank
g
elagerten frischen Lebensmittel
Page 100

Kundendienst
Wenn Sie sich an den Kundendienst wende n, geben Sie bitte die Modellbezeichnung ,
die Zubehörliste und die (auf d em Produktschild a ngegebene) Ser iennummer bereit.
Bevor Sie den Kundendienst anrufen, überprü fen Sie anhand der
folgenden Punkte, ob Sie die das Problem nicht selbs t lösen können.
Der Kühlschrank arbeitet nicht.
Kühlschrank ist nicht an die Stromversorgung
angeschlossen (Stecker, Steckdose und Sicherung),
-
-
Die Spannung ist zu niedrig.
Die Innenbeleuchtung funktioniert nicht.
Der Kühlschrank ist nicht
an die Stromversorgung
angeschlossen.
Die Glühbirne ist
durchgebrannt.
Übermäßige Geräuschentwicklung
Kontakt zwischen
Kühlschrank und
Wand oder Möbeln.
Unebene
Aufstellung.
Die Kühlfächer sind warmer als gewünscht.
Tür ist nicht richtig
geschlossen, wird zu
häufig geöffnet oder
stand zu lange offen.
Eingestellte Temperatur
ist zu hoch (Siehe
Abschnitt “Funktionen”,
Seiten 14 bis 17.)
Das Gerät ist direkter
Sonneneinstrahlung
ausgesetzt oder steht in
der Nähe eines Ofens
oder Heizkörpers.
Unzureichende
Belüftung. Prüfen Sie,
ob an der Rückseite
die Wärmeabstrahler
blockiert sind.
 Loading...