


NARDA
Safety
Test
Solutions
S.r.l. Socio Unico
Sales & Support:
Via Leonardo da Vinci, 21/23
20090 Segrate (MI) -
ITALY
Tel.: +39 02 2699871
Fax: +39 02 26998700
Manufacturing Plant:
Via Benessea, 29/B
17035 Cisano sul Neva (SV)
Tel.: +39 0182 58641
Fax: +39 0182 586400
http://www.narda-sts.it
SERIAL NUMBER OF THE INSTRUMENT
You can find the Serial Number on the rear panel of the instrument.
Serial Number is in the form: 0000X00000.
The first four digits and the letter are the Serial Number prefix, the last five digits are the
Serial Number suffix. The prefix is the same for identical instruments, it changes only
when a configuration change is made to the instrument.
The suffix is different for each instrument.
Document 7010EN-81007-1.09 – Copyright © NARDA 2018
User’s Manual
PMM 7010
EMI CISPR RECEIVER
- PMM 7010/00 EMI CISPR Receiver
150 kHz ÷ 1000 MHz Pre compliance
- PMM 7010/01 EMI CISPR Receiver
9 kHz ÷ 1000 MHz Pre compliance
- PMM 7010/02 EMI CISPR Receiver
9 kHz ÷ 30 MHz Pre compliance
- PMM 7010/03 EMI CISPR Receiver
9 kHz ÷ 3000 MHz Pre compliance

II Note and symbols
NOTE:
® Names and Logo are registered trademarks of Narda Safety Test Solutions GmbH and L3 Communications
Holdings, Inc. – Trade names are trademarks of the owners.
If the instrument is used in any other way than as described in this User’s Manual, it
may become unsafe.
Before using this product, the related documentation must be read with great care and fully understood to familiarize
with all the safety prescriptions.
To ensure the correct use and the maximum safety level, the User shall know all the instructions and
recommendations contained in this document.
This product is a Safety Class I instrument according to IEC classification and has
been designed to meet the requirements of EN61010-1 (Safety Requirements for
Electrical Equipment for Measurement, Control and Laboratory Use).
In accordance with the IEC classification, the power supply of this product meets requirements Safety Class II and
Installation Category II (having double insulation and able to carry out mono-phase power supply operations).
It complies with the requirements of Pollution Class II (usually only non-conductive pollution). However,
occasionally it may become temporarily conductive due to condense on it.
The information contained in this document is subject to change without notice.
EXPLANATION OF ELECTRICAL AND SAFETY SYMBOLS :
You now own a high-quality instrument that will give you many years of reliable service.
Nevertheless, even this product will eventually become obsolete. When that time comes, please
remember that electronic equipment must be disposed of in accordance with local regulations.
This product conforms to the WEEE Directive of the European Union (2002/96/EC) and belongs to
Category 9 (Monitoring and Control Instruments). You can return the instrument to us free of
charge for proper environment friendly disposal. You can obtain further information from your
local Narda Sales Partner or by visiting our website at www.narda-sts.it .
Warning, danger of electric shock
Earth
Read carefully the Operating Manual and its
instructions, pay attention to the safety symbols
Unit Earth Connection
Earth Protection
Equipotential
KEY TO THE SYMBOLS USED IN THIS DOCUMENT:
The DANGER sign draws attention to a serious risk to a person’s safety,
which, if not avoided, will result in death or serious injury. All the
precautions must be fully understood and applied before proceeding.
The WARNING sign indicates a hazardous situation, which, if not avoided,
could result in death or serious injury. All the precautions must be fully
understood and applied before proceeding.
The CAUTION sign indicates a hazardous situation, which, if not avoided,
could result in minor or moderate injury.
The NOTICE sign draws attention to a potential risk of damage to the
apparatus or loss of data.
The NOTE sign draws attention to important information.

Contents III
Contents
Explanation of electrical and safety symbols……....…………………………
General safety considerations and instructions.………....………………….
EC Declaration of Conformity .....................................………………………...
1. General Information
1.1 Documentation…………………………………………………………………..
1.2 Operating Manual changes…………………………………………………….
1.3 Introduction to PMM 7010………………………………………………………
1.4 Instrument Items………….……………………………………………………..
1.5 Optional accessories……………….…………………………………………...
1.6 Other accessories……………………………………………………………….
1.7 Main Specifications……………………………………………………………..
1.8 Front Panel………………………...…………………………………………….
1.9 Rear Panel……………………………………………………………………….
1.10 Functional Description………………………………………………………..
1.11 Fast and precise measurement……………………………………..
1.12 Emission measurement……………..………………………………………..
Page
II
VI
VII
Page
1-1
1-1
1-1
1-2
1-2
1-2
1-3
1-5
1-6
1-7
1-7
1-8
2 Installation
2.1 Introduction………………………………………………………………………
2.2 Initial Inspection……………………………….……………….………………..
2.3 Packing and Unpacking……………………………………….……………….
2.4 Preparation for Use……………………………………………………………..
2.5 Power supply……………………………………………………….……………
2.5.1
To replace the mains connector of the universal adapter…………
2.5.2 Indication of the Power status with LINE led……..………………………..
2.6 Environment……………………………………………………………………..
2.7 Return for Service……………………………………………………………….
2.8 Equipment Cleaning…………………………………………………………….
2.9 Equipment ventilation…………………………………………………………...
2.10 Hardware Installation………………………………………………………….
2.11 Using an Artificial Mains Network (AMN or LISN)………………………….
2.12 Using Pulse Limiter……………………………………………………………
2.13 Using Current and Voltage Probes………………………………………….
2.14 Using Antennas and other Transducers……………………………………
2.15 The User Port…………………………………………………………………..
2.16 HXYZ 9170 Triple Loop Antenna remote cable Configuration for 7010…
2.17 PMM LISNs Three phase Remote cable configuration for PMM 7010 (L3-
25 excluded)………………………………………………………………………......
2.18 PMM L3-25 remote cable Configuration for PMM 7010…………………..
Page
2-1
2-1
2-1
2-1
2-1
2-1
2-2
2-2
2-2
2-2
2-2
2-3
2-4
2-4
2-4
2-4
2-5
2-6
2-7
2-8
3 Setup and Panel Instructions
3.1 Introduction………………………………………………………………………
3.2 Operating mode…………………………………………………………………
3.2.1 SWEEP MODE………………………………………………………………..
3.2.2 ANALYZER MODE…..………………………………………………………..
3.2.3 MANUAL MODE……………………………………………………………….
3.3 Detectors…………………………………………………………………………
3.3.1 RSM-AVG Definition………………………………………………………….
3.3.2 RSM-AVG Activation Procedure (option)…………………………………..
3.3.3 C-AVG Definition……………………..………………………………………
3.3.4 Smart detector…………………………………………………………………
3.4 RBW Filters………………………………………………………………………
3.4.1 MIL Filter……………………………………………………………………….
3.5 Hold time…………………………………………………………………………
Page
3-1
3-1
3-1
3-2
3-2
3-3
3-3
3-3
3-4
3-4
3-5
3-5
3-6

IV Contents
4. Applications
4.1 Measuring the EMI Voltage…………………………………………………….
4.1.1 Measuring Principle with a LISN………………………………………….....
4.1.2 Coupling Networks……………………………………………………………
4.1.2.1 AMN…………………………………………………………………………..
4.1.2.2 Current probe……………………………………………………………….
4.1.2.3 Voltage probe……………………………………………………………….
4.1.3 Test setup……………………………………………………………………..
4.1.4 Guidance on a preliminary Measuring Procedure………………………..
4.1.5 Remarks and hints for Measuring…………………………………………..
Page
4-1
4-1
4-1
4-2
4-3
4-3
4-4
4-4
4-5
5. Updating firmware and Activation code Utility
5.1 Introduction………………………………………………………………………
5.2 System requirements ……………………………….………………………….
5.3 Preparing the Hardware…………………………….………………………….
5.4 Software installation…………………………………………………................
5.5 To transfer data……………….……………………………………..………….
5.6 7010 WrDongle utility ...……….……………………………………..………….
Page
5-1
5-1
5-1
5-1
5-3
5-5
6 PMM 9010-RMA Rack Mount Adapter for Rack 19”
6.1 Introduction……….………………………………………………...…………
6.2 Instruments Items………………………………………………..……………
6.3 Optional accessories………………………………………..…..……………
6.4 PMM 9010-RMA Main Specifications………………………………………
6.5 PMM 9010-RMA Front view………………………………...……………….
6.6 PMM 9010-RMA Inside view…………………………..…...…………….….
6.7 Rack requirements……………..……….…………………...……………….
6.8 Required equipment…………………..………………..…...…….………….
6.9 Moving chassis……………….……………..…………………………………
6.10 Installation guidelines ………………………………………………………
6.11 Installing the PMM 9010-RMA……………………………………………..
6.12 Use of the PMM 9010-RMA with PMM 9010……………………………..
Page
6-1
6-1
6-1
6-2
6-2
6-3
6-4
6-4
6-4
6-5
6-6
6-7
7 Remote control
7.1 Introduction ……….……………………………………………………………
7.2 Communication …………….………………..………………………………..
7.3 Protocol …………………………… ………………………………………......
7.4 Format ….……………..……………………………………………………......
7.5 List of commands………………………………………………………………
7.6 PMM 7010 COMMANDs .………………………………………………….....
7.6.1 QUERY Commands .……………………………………………………….
7.6.2 SETTING Commands ..…………………………………………………….
7.6.3 Analyzer Reply ……………………………………………………………...
7.6.3.1 Reply example ……………………………………………………………
7.6.4 Sweep Structure …………………………………………………………….
7.6.5 Procedure to read a measure stored by the PMM 9010 .………………
7.7 Sweep Mode commands sequence example………………………………
Page
7-1
7-1
7-1
7-1
7-2
7-4
7-4
7-8
7-18
7-18
7-20
7-23
7-24

Contents V
Figures
Figure
1-1
1-2
2-1
2-2
2-3
2-4
4-1
4-2
6-1
6-2
6-3
Front Panel 7010………………………………………………….…………..
Rear Panel 7010…………………………………………………..................
PMM Emission Suite and 7010 initial screen showing the last sweep….
HXYZ 9170 remote cable configuration for 7010…………………………
PMM LISN three phase remote cable configuration for 7010……………
PMM L3-25 remote cable configuration for PMM 7010………................
AMN Principle: a) Δ-type or T-type LISN ; b) V-type LISN……………….
Example of test Setup for RFI Voltage Measurements…………………..
Front view 9010-RMA………………………………………………………..
Inside view 9010-RMA……………………………………………...............
PMM 9010-RMA with 9010 Instrument…………………………………….
Page
1-5
1-6
2-3
2-6
2-7
2-8
4-2
4-3
6-2
6-3
6-7
Tables
Table
1-1
6-1
Main Specifications 7010….………………………………………………..
Main Specifications 9010-RMA…………………………………………….
Page
1-3
6-2

VI Contents
SAFETY RECOMMENDATIONS AND INSTRUCTIONS
This unit has been designed and tested in Italy, according to IEC 348 standard and has left the
manufacturer’s premises in a state fully complying with the safety standards ; in order to maintain the
unit in a safe state and to ensure safe operation, the following instructions must be reviewed and fully
understood before operation.
• When the unit is to be permanently cabled, first connect an uninterruptible protective earth ground
conductor before making any other connections.
• If the unit is to be connected to other equipment or accessories, prior to energizing either unit verify
that a common ground exists between them.
• For permanently cabled unit without built-in fuses, automatic circuit breakers or similar protective
facilities, the power supply line shall be provided with fuses or protections rated to the unit.
• Verify that the unit is set to match the available mains voltage and correct fuse rating is installed
before applying power.
• The Safety Class I units provided with disconnectible AC supply cable and plug may only be
operated from a power socket with protective earth ground connection.
• Any interruption or loosening of the protective earth ground conductor, either inside or outside the
unit or in an extension cable will cause a potential shock hazard that could result in personal injury.
• The protective earth ground conductor shall not be interrupted intentionally.
• To avoid electrical shock do not remove protections or covers of the unit , refer to qualified NARDA
Servicing Center for maintenance of the unit.
• To maintain adequate protection against fire hazard, replace fuses only with others of the same type
and rating;
• Observe safety regulations and rules and also the additional safety instructions specified in this
manual for prevention of accidents.

Contents VII
Dichiarazione di Conformità
EU Declaration of Conformity
In accordo alla Decisione 768/2008/EC, conforme alle direttive EMC 2014/30/UE, Bassa Tensione 2014/35/UE e
RoHS 2011/65/UE, ed anche alle norme ISO/IEC 17050-1 e 17050-2.
In accordance with the Decision 768/2008/EC, compliant to the Directives EMC 2014/30/EU, Low Voltage 2014/35/EU and
RoHS 2011/65/EU, also compliant to the ISO/IEC standard 17050-1 and 17050-2
Il costruttore
The manufacturer
narda Safety Test Solutions S.r.l. Socio Unico
Indirizzo
Address
Via Benessea, 29 / B
I-17035 Cisano sul Neva (SV) - Italy
sulla base delle seguenti norme europee armonizzate, applicate con esito positivo:
based on the following harmonized European Standards, successfully applied:
EMC - Emissioni:
EMC - Emission:
EN 61326-1 (2013)
EMC - Immunità:
EMC - Immunity:
EN 61326-1 (2013)
Sicurezza:
Safety:
EN 61010-1 (2010)
dichiara, sotto la propria responsabilità, che il prodotto:
declares, under its sole responsibility, that the product:
Descrizione
Description
RICEVITORE EMI PRECOMPLIANCE
EMI PRECOMPLIANCE RECEIVER
Modello
Model
7010 /00 /01 /02 /03
è conforme ai requisiti essenziali delle seguenti Direttive:
conforms with the essential requirements of the following Directives:
Bassa Tensione
Low Voltage
2014/35/EU
Compatibiltà Elettromagnetica
EMC
2014/30/EU
RoHS
RoHS
2011/65/EU
Cisano sul Neva, 22 June 2017
Egon Stocca
General Manager

VIII Contents
This page has been left blank intentionally

General Information 1-1
1 – General Information
1.1 Documentation
Enclosed with this manual are:
• a service questionnaire to send back to NARDA in case an equipment
service is needed
• an accessories checklist to verify all accessories enclosed in the
packaging.
1.2 Operating
Manual Changes
Instruments manufactured after the printing of this manual may have a
serial number prefix not listed on the title page; this indicates that
instruments with different Serial Number prefix may be different from those
documented in this manual.
1.3 Introduction
to PMM 7010
PMM 7010 is a EMI receiver, a precompliance system to measure
conducted and radiated interferences from: 150 kHz up to 1000 MHz
(Option 7010/00), 9 kHz up to 1000 MHz (Option 7010/01), 9 kHz up to 30
MHz (Option 7010/02) and 9 kHz up to 3000 MHz (Option 7010/03).
All measurements performed by the PMM 7010 are according to the most
accepted standards like: IEC, CISPR, EN (EuroNorm), FCC, VDE,..
Thanks to its built-in Line Impedance Stabilization Network (LISN), PMM
7010 is able to autonomously measure and characterize DUTs for the
conducted emissions.
The PMM 7010 has been designed adopting an innovative philosophy
made possible only in the recent years by the availability of superior
technology components. This equipment is fully digital but the input first RF
conversions and therefore combines into a pure EMI Receiver and Signal
Analyzer the precision and accuracy of a numeric approach, with flexibility
and user friendly approach typical of a modern instrument.
Document 7010EN-81007-1.09 - © NARDA 2018

1-2 General Information
1.4 Instrument Items
PMM 7010 includes the following items:
• EMI Receiver
• External power supply/battery charger;
• Flexible black cover/accessories holding;
• RS232 cable, 2m;
• USB cable, 2m;
• Operating manual;
• PMM 7010 Utility Software on Software Media;
• Certificate of Compliance;
• Return for Repair Form.
1.5 Optional
accessories
PMM 7010 can be used with several optional accessories, the most common
being the following:
• PMM 9010-RMA Rack Mount Adapter for Rack 19”
• L2-16B: single phase AMN, 16A;
• L3-32: four lines, 3-phase, 32A LISN, (50Ω//5 Ω+50μH);
• L3-64: four lines, 3-phase, 63A LISN, (50Ω//5 Ω+50μH);
• L3-64/690: four lines, 3-phase, 63A LISN, (50Ω//5 Ω+50μH);
• L3-100: four lines, 3-phase, 100A LISN, (50Ω//5 Ω+50μH);
• L1-150M: single line LISN, 150A (50Ω//1 Ω+5μH);
• L1-150M1: single line LISN, 150A (50Ω//1 Ω+5μH);
• L1-500: single phase, 500A LISN, (50Ω//5 Ω+50μH);
• L3-500: four lines, 3-phase, 500A LISN, (50Ω//5 Ω+50μH);
• L2-D: Delta LISN for telecom, 2A, 150Ω
• SBRF4 RF Switching Box (Switching Box for LISNs and Loop Antennas)
• LISN Service Kit (AC-BNC adapter for LISNs verification and calibration)
• SHC-1/1000: 35 dB CISPR Voltage probe, 1500Ω;
• SHC-2/1000: 30 dB CISPR Voltage probe, 1500Ω;
• RA-01: Rod Antenna 9 kHz to 30 MHz
• RA-01-HV: Rod Antenna 150 kHz to 30 MHz
• RA-01-MIL: Rod Antenna 9 kHz to 30 MHz
• BC-01: Biconical Antenna (30 – 200 MHz)
• BL-01: Biconical Log Periodic Antenna 30 MHz to 6 GHz
• DR-01: Double-ridged Horn Antenna 6 to 18 GHz
• LP-02: Log Periodic Antenna 200 MHz to 3 GHz
•
LP-03: Log Periodic Antenna 800 MHz to 6 GHz
• LP-04: Log Periodic Antenna 200 MHz to 6 GHz
• VDH-01: Van der Hoofden Test Head 20 kHz to 10 MHz
• TR-01: Antenna Tripod
• Antenna Set AS-02 (BC01+LP02+TR01)
• Antenna Set AS-03 (BC01+LP02+LP03+TR01)
• Antenna Set AS-04 (BC01+LP04+TR01)
• Antenna Set AS-05 (BC01+LP04+DR01+TR01)
• Antenna Set AS-06 (BC01+LP02+LP03+DR01+TR01)
• Antenna Set AS-07 (BL01+TR01)
• Antenna Set AS-08 (BL01+DR01+TR01)
1.6 Other accessories
Of course, the PMM 7010 can be used with other accessories available on the
market, like:
• LISNs, any type;
• Antennas and Loops;
• Near Field Probes;
• Various TEM/GTEM Cells;
• HXYZ 9170 Triple Loop Antenna .

General Information 1-3
1.7 Main Specifications
Table 1-1 lists the PMM 7010 performance specifications.
The following conditions apply to all specifications:
• The ambient temperature shall be -5°C to 45°C
TABLE 1-1 Main Specifications
Electrical Characteristics Performance Limits
Frequency range
Resolution
Frequency accuracy
150 kHz to 1 GHz (Option 00)
9 kHz to 1 GHz (Option 01)
9 kHz to 30 MHz (Option 02)
9 kHz to 3 GHz (Option 03)
10 Hz
< 3 ppm
RF input
VSWR 10 dB RF att.
0 dB RF att.
Attenuator
Pulse Limiter
Zin 50 Ω, N fem.
< 1,2; < 2 over 1 GHz
< 1,2; <1,4 over 30 MHz; < 2 over 1 GHz
0 dB to 35 dB (5dB steps)
0 dB to 50 dB (2dB steps) over 30 MHz
Built in up to 30 MHz
Max input level
Sinewave AC voltage
Pulse spectral density
(without equipment damage)
140 dBµV (2 W)
100 dBµV/MHz
Preselector (Permanent built-in)
9 kHz to 30 MHz
30 MHz to 1 GHz
1 GHz to 3 GHz
IF bandwidth
6dB bandwidth
CISPR 16-1-1
1 (Opt. 01, 02, 03), 3, 10, 30, 100, 300 kHz, 1 MHz (Opt. 03)
200 Hz (Opt. 01, 02, 03), 9 kHz and 120 kHz
Noise level
(Att. 0 dB, 50 term., Hold Time 1 s)
0,009 to 0,15 MHz < 0 dBuV (QP) (-130 dBm/Hz)
(200 Hz RBW)
< -3 dBuV (AV) (-133 dBm/Hz)
0,15 to 30 MHz < 14 dBuV (QP) (-128 dBm/Hz)
(9 kHz RBW)
< 7 dBuV (AV) (-135 dBm/Hz)
30 to 1000 MHz < 14 dBuV (QP) (-144
dBm/Hz)
(120 kHz RBW)
< 7 dBuV (AV) (-151 dBm/Hz)

1-4 General Information
1000 to 2700 MHz < 16 dBuV (AV) (-151 dBm/Hz)
(1 MHz RBW)
2700 to 3000 MHz < 19 dBuV (AV) (-148 dBm/Hz)
(1 MHz RBW)
Spurious response
(Att 0dB, 50 term, det. PK, Hold time 10 ms)
< 20 dBµV; < 23 dBµV over 2700 MHz
Detectors
Peak, Quasi-peak, Average, RMS, RMS-Average (optional),
C-Average, Smart Detector function
Level measuring time (hold time)
0,2 ms to 120 s (CISPR 16-1-1 as default)
Display units
With PMM Emission Suite SW
(80 to 200 dB selectable dynamic)
dBm, dBµV, dBµA, dBpW, dBµV/m, dBµA/m, dBpT,
Measurement accuracy
S/N > 20 dB
9 kHz to 1 GHz ± 1,0 dB
1 GHz to 3 GHz ± 1,5 dB
CISPR 16-1-1 conformity
Standard compliant QP detector down to 20 Hz PRF
Demodulation
AM – FM Internal loudspeaker
I/O Interface
USB 2.0; RS-232; User Port (drives PMM LISNs and
accessories)
Operating temperature
-5 °C to 45 °C
Power supply
12 Vdc, 0,8A (AC universal adapter)
Built-in LISN
Frequency range
Continuous rated output current
Max permissible operating voltage
EUT supply frequency range
CISPR equivalent circuit
EUT Power connector
Artificial Hand
9 kHz to 30 MHz
16 A
250 Vac – 350 Vdc
DC to 60 Hz
50 // (5 + 50 H)
Schuko 2P+E
4 mm socket
Dimensions (W x H x D)
235 x 105 x 335 mm
Weight
5,0 kg
General Information 1-5
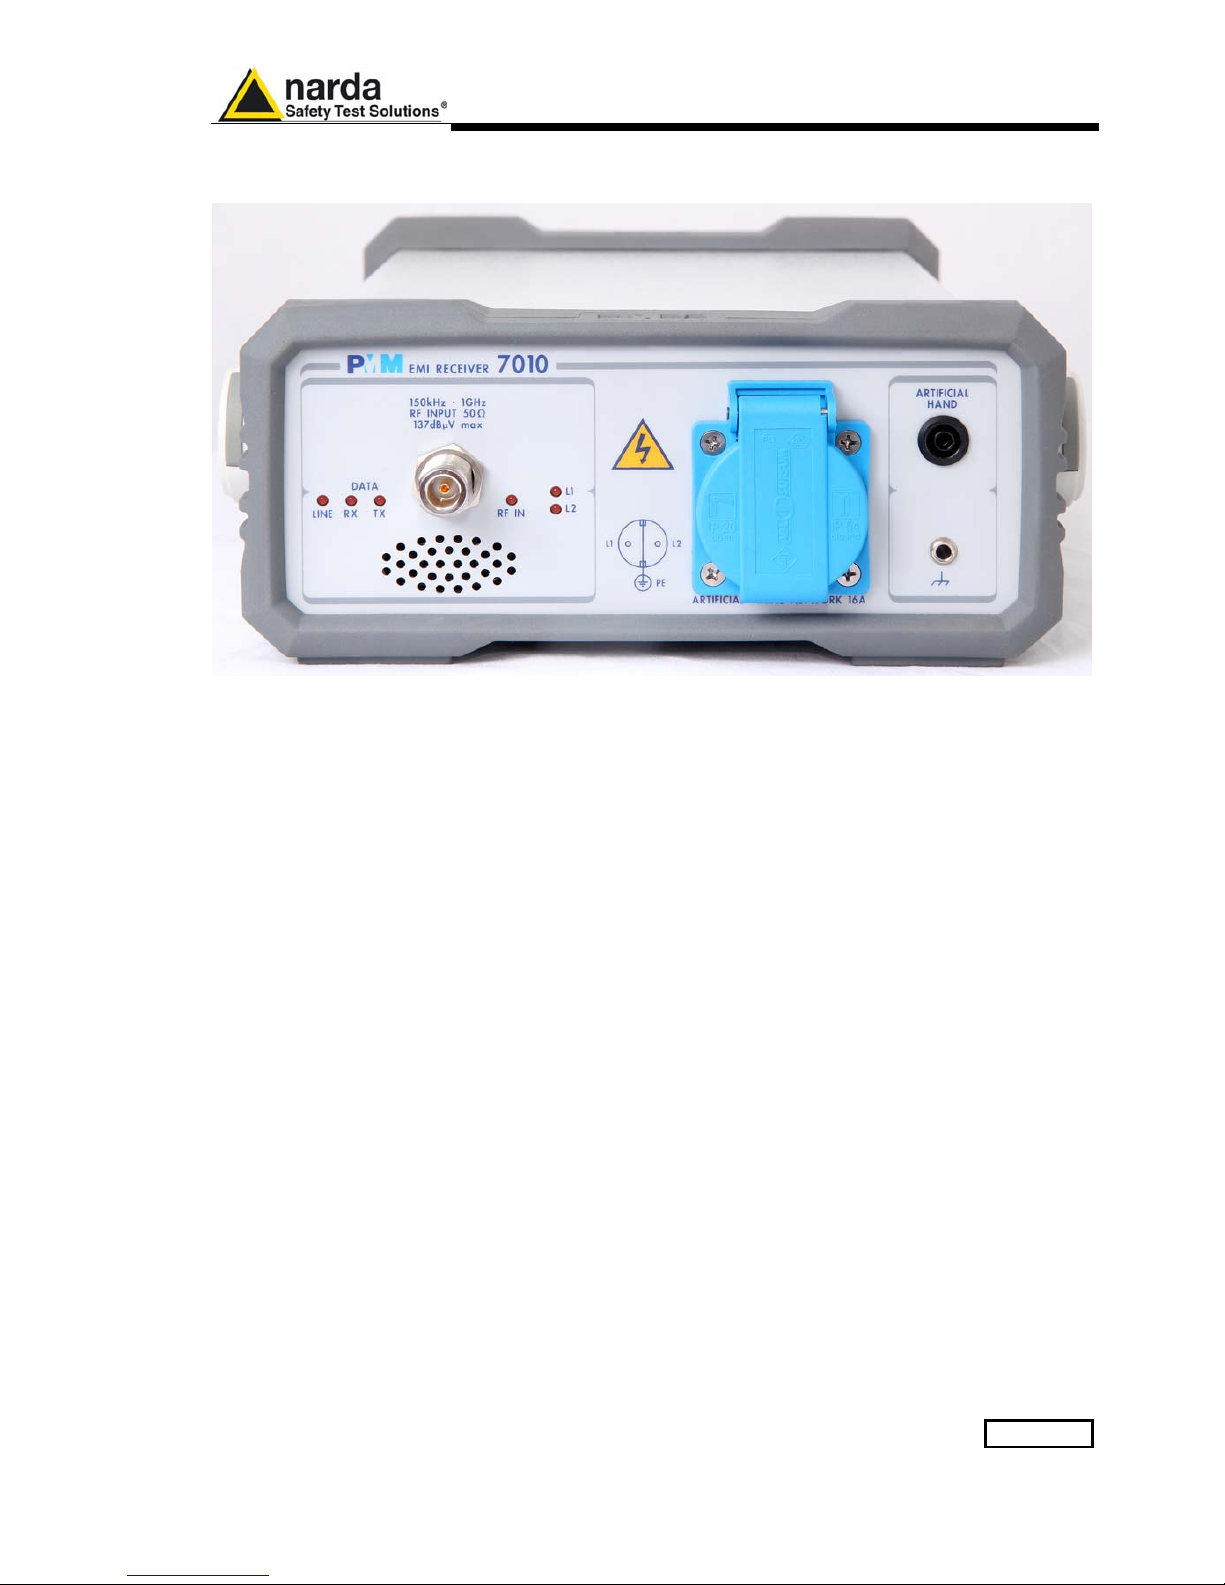
1.8 Front Panel
Fig. 1-1 7010 Option 00 Front Panel
Legend from left to right:
- Line Power led
- DATA RX-TX Leds which show the serial communication status
- RF INPUT N female RF Input connector
- RF IN This led indicates if the signal source is from the internal LISN or from the N connector
- L1 – L2 These two leds indicate the line of the internal LISN under investigation.
- Artificial Mains Network 16A It is the mains socket where the supply of the EUT must be connected
to measure its conducted emissions.
The line comes through the internal LISN and is capable of handling
16A of max current.
- Artificial Hand standard 4 mm socket
- Earth ground connector

1-6 General Information
1.9 Rear Panel
Fig. 1-2 7010 Option 00
Rear Panel
Legend from left to right:
- Product Label and Serial Number
- Mains socket to connect the EUT to the mains through the internal LISN.
- Earth ground connector
- USER PORT User I/O Port
- Fan Cooling Fan controlled by firmware
- RS232 9 pin, DB9 connector
- On-Off switch Power switch
- USB Fully functional USB 2.0 Port
- Power Supply Power Supply Input to power the apparatus.

General Information 1-7
1.10 Functional
Description
The PMM 7010 features a completely new receiver architecture based on
the most recent DSP and FPGA technology.
1.11 Fast and precise
measurement
This measurement system has been designed for use on any PC with the
Windows™ operating system.
The PMM 7010 pre-compliance measurement system allows the designer
to measure the conducted and radiated interferences of a prototype under
test as part of the daily routine.
In the CISPR bands A (9 kHz ÷ 150 kHz), B (150 kHz ÷ 30 MHz), C (30 ÷
300 MHz) and D (300 ÷ 1000 MHz) the standards requires the use of
specially shaped 200 Hz, 9 kHz, and 120 kHz filters.
Thanks to its architecture and to the large internal computation capability,
the PMM 7010 can perform the entire band test in a short time.
This feature is not only useful to greatly increase the productivity of the test
lab, but also to make better and more comprehensive analysis in case the
disturbance to be evaluated is somehow intermittent and with an irregular
repetition rate.
PMM 7010 makes use of internal numerically modelled filters in
compliance with the norms, using FFT and FIR techniques.

1-8 General Information
1.12 Emission
measurements
All electric and electronic devices are potential generators of ElectroMagnetic Interference (EMI).
The term EMI thus refers to the electromagnetic energy emitted by a
device which propagates itself along cables or through the air and couples
with other devices that are present in the surroundings.
These electromagnetic fields (conducted or radiated interferences) may
generate interfering currents and voltages into nearby equipment and
therefore can cause possible malfunctions.
In order to prevent and control such interferences there are nowadays a
number of national and international standards, like IEC and CISPR, which
specifies limits and methods of tests. Moreover, within the European Union
the application of several European Norms on Electromagnetic
Compatibility is enforced by law and therefore the commercialization and
use of all the electric and electronic equipment is subject to the
measurement of the EMC characteristics, which must be within well
defined limits.
The design approach adopted for the PMM 7010 is that the instrument
shall be innovative, full compliant with all the relevant standards and at the
same time simple and reliable to use, to be the base building block for any
possible emission system to measure and evaluate any electric or
electronic device from the very first design stages to the final certification.
The need to precisely measure the conducted and radiated EMI noises
forces the equipment manufactures to use reliable equipment to verify the
limits imposed by the relevant standards and/or enforced by local rules.
In this view the PMM 7010 receiver is the ideal solution from prototype
debugging to final certification, as it fully meets all the performance criteria
dictated by these standards, although it remains small, lightweight and very
easy to use.
The PMM 7010 Utility control software permits an immediate use of the
instrument without any training or special difficulties: the operator can
concentrate just on analyzing the measurement results.
Moreover, the PMM 7010 software has also been designed for a fast and
easy installation on any PC with the Windows™ operating system and with
at least one free USB or Serial Port.
The device under test (DUT) must be installed according to the procedures
indicated in the constructor’s manual and normal operating conditions
respected.
Be sure not to overload PMM 7010: the input signal should not
exceed the maximum level indicated in the main specifications in
chapter 1.
Also do not apply any signal to RF generator output connector.

Installation 2-1
2 - Installation
2.1 Introduction
This section provides the information needed to install your PMM 7010.
It includes the information pertinent to initial inspection and power
requirements, connections, operating environment, instrument mounting,
cleaning, storage and shipment.
2.2 Initial Inspection
2.3 Packing and
Unpacking
When receiving the equipment, first inspect the shipping cardbox for any
damages.
If the shipping box is damaged, it should be kept until the contents of the
shipment have been checked for completeness and the instrument has
been checked mechanically and electrically.
Verify the availability of all the shipped items with reference to the shipping
check list enclosed with the Operating Manual.
Notify any damage to the forwarder personnel as well as to your NARDA
Representative.
To avoid further damage, do not turn on the instrument when there
are signs of shipping damage to any portion of it.
2.4 Preparation for Use
This is a Safety Class I apparatus, and it is also equipped with
protective/functional earth terminals on the rear and front panels. A
good safety/functional ground connection should be provided before
to operate the system.
2.5 Power Supply
The universal adapter supplied with the receiver can work at either 50 Hz
or 60 Hz with a supply voltage rated between 100 and 240 Volt.
It is supplied with different connectors to fit all the possible outlets in
accordance with the various National standards.
+
-
Power supply: DC, 12 V, ~ 800 mA
=> DC Connector
2.5.1 To replace the
mains connector of
the universal
adapter
To replace the mains connector, simply remove the one installed on the
battery charger sliding it off, and insert the one that fits the outlets in use.
Document 7010EN-81007-1.09 - © NARDA 2018

2-2 Installation
2.5.2 Indication of the
Power status
with LINE led
When the wall universal adapter is connected to the PMM 7010 and the
power is switched ON the LINE led lights up.
After just a short time since the power has been switched on, the PMM 7010
is ready for use.
2.6 Environment
The operating environment of the receiver is specified to be within the
following limits:
• Temperature
• Humidity
• Altitude
-5 °C to +45 °C
< 90% relative
4000 meters
The instrument should be stored and shipped in a clean, dry environment
which is specified to be within the following limitations:
• Temperature
• Humidity
• Altitude
-40 °C to + 50 °C
< 95% relative
15.000 meters
2.7 Return for Service
If the instrument should be returned to NARDA for service, please complete
the service questionnaire enclosed with the Operating Manual and attach it
to the instrument.
To minimize the repair time, be as specific as possible when describing the
failure. If the failure only occurs under certain conditions, explain how to
duplicate the failure.
If possible, reusing of the original packaging to ship the equipment is
preferable.
In case other package should be used, ensure to wrap the instrument in
heavy paper or plastic.
Use a strong shipping box and use enough shock absorbing material all
around the equipment to provide a firm cushion and prevent movement in
the shipping box; in particular protect the front panel.
Seal the shipping box securely.
Mark the shipping box FRAGILE to encourage careful handling.
2.8 Equipment Cleaning
Use a clean, dry, non abrasive cloth for external cleaning of the equipment.
To clean the equipment do not use any solvent, thinner, turpentine,
acid, acetone or similar matter to avoid damage to external plastic or
display surfaces.
2.9 Equipment
ventilation
To allow correct equipment ventilation ensure that the vent grids on
the rear panel and on the bottom of the receiver are free by any
obstructing object.
In order to avoid the unwanted tripping of the protection devices, an
insulation transformer shall always be used between the mains supply
and the built-in LISN.

Installation 2-3
2.10 Hardware
Installation
PMM 7010 is delivered from factory ready to use. Remove the receiver from
its cardboard shipping box, connect properly the universal power supply and
switch ON the Power button.
In this way the LINE Led lights up to indicate the receiver is correctly
powered.
To avoid unwanted starts and stops, the Power button is placed in an
adequate recess.
After having been switched ON, the PMM 7010 boots with its internal BIOS
and runs the firmware which manages the receiver.
At the beginning the instrument performs a diagnostic test to check if
everything is working properly.
The boot sequence is very fast and the receiver is ready to use in a few
seconds after having switched the ON button.
When the initial sequence is completed the receiver is ready to be controlled
by the PC, running the PMM Emission Suite software.
The main screen shows the last sweep.
Connect the output of any LISN, or antenna, or absorbing clamp or any other
transducers to the RF input, ore use the internal LISN for conducted
emissions test.
When using a PMM LISN, it is possible to control from the receiver the lines
of the LISN and automatically switch between them connecting a special
cable between the User Port of the receiver and the LISN remote control
input.
Press the button to the “0” position to switch the apparatus OFF.
Fig. 2-1 PMM Emission Suite and 7010 initial screen showing the last
sweep.

2-4 Installation
2.11 Using an Artificial
Mains Network
(AMN or LISN)
When the PMM 7010 receiver is connected to a LISN to perform conducted
interference measurements of the EUT, the RF output of the LISN shall be
connected to the RF input of the receiver. In order to switch automatically
between the lines of the LISN, it shall be connected to the User Port of the
receiver thanks to the dedicated cable supplied with the LISN .
If the built-in LISN is to be used, all the connections and commutations are
already done internally and automatically.
Using PMM Emission Suite software it is possible to carry out an automatic
measurement on all mains lines and get the worst case.
In order to avoid the unwanted tripping of the protection devices, an
insulation transformer shall always be used between the mains supply
and a LISN.
2.12 Using the Pulse
Limiter
The built in pulse limiter is a useful device to protect the input of the receiver
from transient over voltages. Sometime the conducted disturbances entering
the receiver through the LISN are too high - even if they cannot be seen on
the PMM 7010 because they are out of measurement bandwidth - and the
associate energy is high enough to damage the input circuit.
The pulse limiter has been integrated in the system as a protection of the
input from unexpected pulses.
When using an external Artificial Mains Network, to reduce the
probability of damages caused by transient voltage pulses always
disconnect the PMM 7010 RF input before switching Equipment Under
Test supply ON or OFF.
2.13 Using Current and
Voltage Probes
When a LISN cannot be used – e.g. when measurements have to be made
on terminals other than the mains ones, such as load or command terminals,
sensitive to inserted capacities for example, or when LISNs of adequate
current capabilities aren’t available, or when the line voltage is too high – a
current or voltage probe can be used.
The characteristics of these probes, and some advises on their uses, are
given in §5 of CISPR 16-1-2.
The CISPR voltage probe contains a resistor with a minimum resistance of
1500 ohm, in series with a capacitor of negligible reactance vs. the resistance
(in the 150 kHz to 30 MHz range), and it is insulated at least up to 1500V.
All these probes have an insertion loss and a frequency response that can be
stored in the PMM Emission Suite, so that the actual readings of the receiver
can be automatically corrected by these characteristics values.
2.14 Using Antennas
and other
Transducers
In the frequency range from 9 kHz to 1000 MHz any other transducer can be
used to pick-up and measure RF conducted and radiated emissions, like
active and passive loop antennas, rod, dipole, biconical and log periodic
antennas, near field probes etc.
The characteristics of these transducers are usually specified in the relevant
standards (e.g. Military or Automotive Standards).
Their use with PMM 7010 is very easy, as it’s enough to enter their response
with the frequency into the memory of the PMM Emission Suite to have the
readings automatically corrected. When the cable is not calibrated together
with the transducer, even the cable loss can be entered.
Up to four factors can be used together at the same time.

Installation 2-5
2.15 The User Port
The PMM 7010 features on the rear panel a programmable User Port that
can be used to drive external devices or, more generally, to output signals
and data.
The User Port can easily be programmed and managed; the connector has
the following hardware connection:
PIN # Signal
1 nc
2 nc
3 + 12 VDC (max 50 mA)
4 OUT 0
5 OUT 2
6 nc
7 nc
8 and 9 nc
10 IN 0
11 GND
12 OUT 1
13 nc
14 nc
15 nc
Data output (OUT 0 to OUT 2) and input (IN 0) are opto-coupled TTL level
with max. 1 mA draining.
Every other detail about User Port functionality is described in a separate
and more specific manual, available upon request.

2-6 Installation
2.16 Schwarzbeck Model
HXYZ 9170 Triple
Loop Antenna
Remote Cable
configuration for
PMM 7010
The following figure shows the HXYZ 9170 Triple Loop Antenna remote
cable pin configuration. This cable can be requested to N
arda or arranged
locally.
Fig. 2-2 HXYZ 9170 remote cable configuration for PMM 7010

Installation 2-7
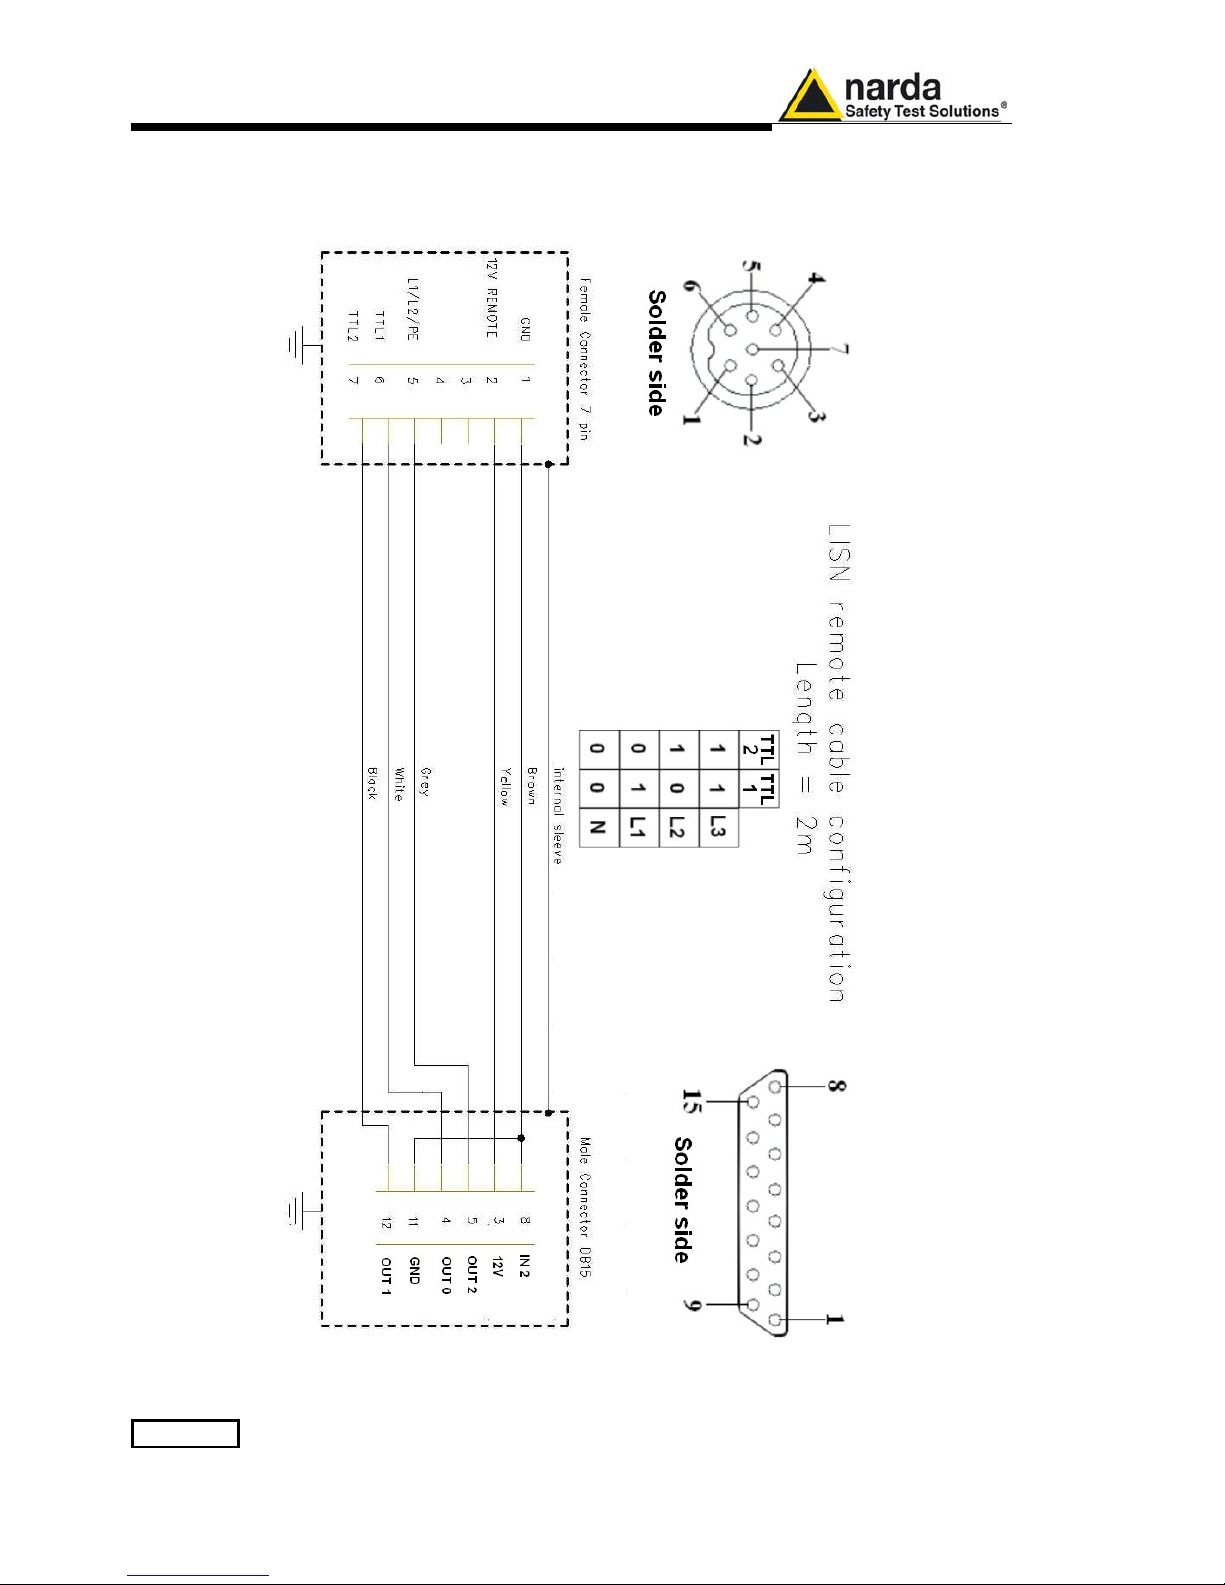
2.17 PMM LISNs
Three Phase
Remote Cable
configuration
for PMM 7010
(L3-25 excluded)
The following figure shows the LISN remote cable pin configuration. The
cable can be requested to N
arda or arranged locally.
Fig. 2-3 PMM LISN three phase remote cable configuration for PMM 7010
2-8 Installation
2.18 PMM L3-25
Remote Cable
configuration
for PMM 7010
The following figure shows the LISN remote cable pin configuration. The
cable can be requested to N
arda or arranged locally.
Fig. 2-4 PMM L3-25 remote cable configuration for PMM 7010

Sweep Mode Operating Instructions 3-1
3 – Operating Instructions
3.1 Introduction
The PMM 7010 EMI Receiver needs to be driven by a PC through an USB or
RS232 serial connection.
The system is provided with a specifically developed software called PMM
Emission Suite, which installer utility is stored on the Software Media shipped
together with the instrument.
Please refer to the PMM Emission Suite Manual for any information and
instruction concerning the operation of the software.
The Sweep mode is used to operate the PMM 7010 as a powerful scanning
EMI receiver. To enter in this mode it’s enough to depress the Sweep soft key
on the main screen, and immediately the scan setup window pops up and
allows the operator to set the parameters for the scan. All the automatic
settings (RBW, frequency step, etc.) refer to the CISPR standard.
Operating Manual Changes
Instruments manufactured after the printing of the User’s manual may
have a serial number prefix not listed on the title page; this indicates
that instruments with different Serial Number prefix may be different
from those documented in the manual itself.
3.2 Operating Modes
Under the control of the PMM Emission Suite PC Software it is possible to use
the receiver in different modes of operation.
3.2.1 SWEEP MODE The Sweep Mode is the most common way to perform measurements in the
EMI environment.
The Sweep mode is used to operate the PMM 7010 as a powerful scanning
EMI receiver. To enter in this mode it’s enough to depress the Sweep soft key
on the main screen, and immediately the scan setup window pops up and
allows the operator to set the parameters for the scan. All the automatic
settings (RBW, frequency step, etc.) refer to the CISPR standard.
In Sweep mode the Peak, QPeak, C-Rms, RMS, C-Avg, Avg detectors are
available.
All the relevant information are reported on the screen.
In this way the User can see which detector is in use and the relevant hold
time; if the function “Smart Detector” is activated and which one; if the input
attenuation is Automatic or Manual and the set attenuation and the Minimum
attenuation.
On the right it is possible to choose the Reference level. During the scan, in
the center above the graph the actual frequency measured is displayed and
continuously updated.
Below the graph the start and the stop frequency, and loaded limits, if any.
When the sweep has been executed, on the bottom of the screen the most
important sweep parameters are repeated.
Document 7010EN-81007-1.09 - © NARDA 2018

3-2 Sweep Mode Operating Instructions
3.2.2 ANALYZER
MODE
To enter the ANALYZER Mode it’s enough to depress the Analyzer soft key
on the main screen.
In this mode the receiver works as a powerful Spectrum Analyzer and the
display shows the "spectrum analysis" in the frequency domain.
The analysis is done at the selected span frequency.
Using the marker facility the User can accomplish a very accurate
measurement of the signals either in frequency as well as in level.
On the screen of the Analyzer Mode all the relevant information are reported.
So that the User can see which detector is in use and the relevant hold time; if
the input attenuation is Automatic or Manual and the set attenuation and the
Minimum attenuation.
Near the the graph there is the Reference level, the Resolution bandwidth and
the span value.
Below the graph the start, center and stop frequency.
A proper box is dedicated to the marker indication, with actual frequency and
level of the marker.
3.2.3 MANUAL MODE The MANUAL mode is a very useful feature to manually control the receiver
and to deeply investigate electrical signals modifying the parameters of
receiver exactly as per the needs of the Test Engineer.
It is possible, for example, to observe the signals exceeding the limits
frequency by frequency; evaluating their levels measured simultaneously with
4 different detectors (Peak, QuasiPeak, Average and RMS); listening to them
after a demodulation, etc.
To enter in .Manual Mode press the key in the main menu, and immediately
the first Manual window opens.
In manual mode the levels corresponding to the detectors in use are displayed
both in analogue and in digital format, and exactly as for the other operating
modes, all the relevant information are reported on the screen.
The User can see the resolution bandwidth, the longest hold time associated
to the detectors in use; if the input attenuation is Automatic or Manual and the
set attenuation and the Minimum attenuation.
Also the Demodulator can be switched on and set to AM or FM, and the audio
volume regulated as wished and represented by a simple bar.
Then there are three or fours vertical bars representing the detectors and
indicating in analogue and digital (the figures below each bar) the level
measured; on top of the bars the relevant detector, the unit in use and the
tuned frequency. The analogue scale of the analogue bars is set automatically
by the software in accordance with the Reference Level set.
In case an OVERLOAD indication occurs it is necessary to add an external
attenuator to carry on the measurement without overpassing the declared limit
for continuous power or spectral density.
Using 0 dB attenuation PMM 7010 has no input protection.
This is a potentially dangerous condition for the input stage of the receiver.
Use 0 dB attenuation only if you are very sure that your input signal is less
than 0,5 Vpp (or 106 dBμV).
Before to apply an unknown signal to PMM 7010 receiver, use an oscilloscope
or a wide band RF voltmeter to measure it. In any case set Min. ATT at 10 dB
and select the maximum available attenuation.
If needed, add an external coaxial attenuator on the input signal line.

Sweep Mode Operating Instructions 3-3
3.3 Detectors
PMM 7010 has been designed to allow the use of many kinds of detectors.
CISPR Standard has introduced the application of two detectors that are
derived from the Root Mean Squared and from the Average ones.
3.3.1 RMS-AVG
Definition
The RMS-Average detector is a payment special function implemented in
the PMM 7010 receiver.
RMS-Average detector is manufactured under license of Rohde & Schwarz
GmbH & Co. KG.
The RMS-Average detector, according to the CISPR 16-1-1 standard,
supplies a reading of the input signal that is weighted, for repeated pulses,
such that for a constant indication, the relationship between amplitude and
repetition frequency is in accordance with the following rule:
The Amplitude is proportional to (repetition frequency)-1/2
The value is the maximum level during the measurement time (Hold Time)
and the averaging is carried out with a lowpass filter of the 2
nd
order to
simulate a mechanical instrument.
The calibration is in reference to the RMS value of an unmodulated sine wave
signal.
3.3.2 RMS-AVG
Activation
Procedure
(option)
To enable the RMS-AVG Detector use the 7010 Set code Utility.
For further information on software installation refer to the “Updating
firmware and Activation code Utility” chapter.
When the 40 Digit Serial Code is sent to the instrument by the Dongle Code
Window, selecting the Write RMS-AVG Dongle button.
Then press OK to confirm.
The software will inform that the Dongle Code has been successfully stored.
Press Ok to close the program.
If the Dongle code is not valid an error message appears.

3-4 Sweep Mode Operating Instructions
3.3.3 C-AVG
Definition
CISPR 16-1-1 defines the Average detector as designed to indicate the
weighted average value of the maximum value of the envelope of the signal
passed through the pre-detector stages:
up to 1000 MHz, is defined as the response of the measuring receiver to
pulses of repetition rate n Hz and impulse area of 1,4/n mVs emf at
50Ω source impedance that shall be equal to the response to an unmodulated
sine-wave signal at the tuned frequency having an emf with rms value of 66
dBµV.
The value of n shall be 500 for Band B, and 5000 for Bands C and D.
The average detector is useful to measure narrowband signals to overcome
problems associated with either modulation content or the presence of
broadband noise.
When the Average is measured according to CISPR 16-1-1, the maximum
value of the linear mean envelope during the measurement interval is
showwn.
The detector is used, for example, to measure pulsed sinusoidal signals with a
low pulse repetition rate. It is calibrated with the rms value of an unmodulated
sine wave signal. Averaging is carried out with lowpass filters of the 2nd order
(simulating a mechanical instrument).
3.3.4 Smart
Detector
The Smart Detector is an innovative special function implemented in the
PMM 7010 receiver with the purpose of reducing the test time and increasing
the productivity of the lab.
This function works only when at least one limit is loaded, therefore
remember to enable a limit to run the Smart detector function.
Selecting one out of the five Smart detectors the receiver will execute the
scan using at first the Peak detector and, if a peak value is found over the
selected limit minus a Margin set with the specific button, the reading is remeasured and displayed with the chosen (C-Avg, AVG, C-Rms, RMS or
QPeak) detector.
Obviously this way of operation results in a much faster scan sweep and
moreover it immediately draws the attention of the test Engineer to the most
critical points. The limit associated to the Margin is displayed as a bold
colored line and is automatically selected by the receiver depending which
Smart detector is chosen; for example, if a Smart QP is selected, the
associated QP limit line will be displayed as a bold colored line.
It is immediately clear that this function is very useful to dramatically reduce
test time and increase the productivity of the test lab.
To deselect the Smart Detector function simply select a single detector.
The weighting time must be properly set in the Hold Time window to
allow the Smart detectors functions to operate as intended.
The Hold Time is the measurement time the receiver takes to value the input
signal and form result weighted by the selected detector.
When using the C-Avg (CISPR-Average) or the C-RMS (CISPR-RMS)
detector, since for definition they are characterized by a long time constant,
the minimum measurement time should be set long enough to allow a correct
measurement.
For this reason, when unknown signal are to be measured, the Hold Time
should be at least 1000ms to correctly weight signals pulsed at a rate of 5
Hz or faster.

Sweep Mode Operating Instructions 3-5
With the Peak, RMS and AVG detectors the smallest settable
measurement time depends on the RBW.
If several detectors are used contemporarily the Hold Time should be set
to meet the requirement of the slowest one, so that the results of the
measurement are correct for all them.
When a frequency change or an attenuation variation occurs, PMM 7010
waits automatically the time needed to the internal circuits to overcome the
transient before the measurement time starts again.
3.4 RBW Filters
The Resolution Bandwidth box is used to select the bandwidth of the
measuring filter.
The drop-down menu allows the User to select from the list, the filter desired.
These filters are mathematically modeled using digital techniques and,
concerning the 9 and 120 kHz, they are compliant to the CISPR 16-1-1
standard.
Other additional -6dB bandwidth filters are also available: please refer to the
instrument specifications paragraph for the complete list.
3.4.1 MIL Filters
The 10 kHz and 100 kHz provided filters are MIL-STD-461E (they are not
optional but always available).
When a non-CISPR filter is selected, the Quasi Peak, C-RMS and C-AVG
detectors are disabled.

3-6 Sweep Mode Operating Instructions
3.5 Hold Time
The Hold Time (expressed in milliseconds) represents the time the receiver
uses to “take a snapshot” of the incoming signal and to measure it with the
chosen detector. When selecting a detector, the default hold time value is
automatically loaded, but in some cases this time is not appropriate, e.g. when
the interference signals have a low repetition rate or when the standard
impose a proper measurement time.
In this case it could happen that the PMM 7010 sees a high input signal and
therefore tries to set the proper attenuation automatically increasing the value
or the input attenuators. However, when the input attenuation is set the signal
is gone, so the receiver lowers the attenuation, but then a new peak arrives,
and so on and so forth…
On the other hand, if the Hold Time is too high the PMM 7010 cannot properly
follow the signals.
In this situation the Hold Time value should be manually set to find a correct
compromise.
To set the Hold Time to the lowest possible value (this value dynamically
depends from the measurement conditions), enter the figure 0; if a value lower
than the allowed is entered, the lowest possible value is automatically
selected.
The max. Hold Time that can be set is 30 sec (30.000 ms).
Be sure not to overload PMM 7010: the input signal should not exceed
the maximum level indicated in the main specifications in chapter 1.
Also do not apply any signal to RF generator output connector.
The weighting time must be properly set in the Hold Time window to
allow the desired detectors to operate as intended.

Applications 4-1
4 – Applications
4.1 Measuring the
EMI Voltage
ElectroMagnetic Interference (EMI) voltage measurements on power
supply lines or on signal lines are carried out by means of "Coupling
Networks" (e.g. LISNs) or other transducers (e.g. antennas, voltage
probes). The frequency range is dictated by the applicable standard,
however it is generally limited from 9 kHz to 30 MHz in commercial
applications, while for measurements on other equipment/accessories e.g. military, automotive, information technology and communication
equipment (ITE), ISDN devices, etc. - the frequency range extends down
to 20 Hz and up to 200 MHz, depending the relevant standards.
Nevertheless, the most common tests in the frequency range covered by
PMM 7010 are certainly the conducted measurements, done with the help
of a LISN, and the ratiated ones, for which various types of antennas can
be used.
4.1.1 Measuring Principle
with a LISN
In the case of a system with two floating conductors, the EMI voltages of
the two conductors relative to each other and with reference to the ground
form a vector system where three kind of RFI voltages are present
(sometime EMI is also referred as RFI: Radio Frequency Interference).
They are:
• Symmetrical (or differential mode) voltages. These RFI components are
measured between the two conductors. They behave like the wanted
signal on the forward and return lines.
• Asymmetrical (or common mode) voltages. These EMI components are
measured between the electrical midpoint of the two conductor voltages
and reference ground. Usually these are the components most likely to
cause interference effects.
• Unsymmetrical voltages. These RFI components are measured from
each line conductor and the reference ground. They consist of
symmetrical and asymmetrical components. The measurement of these
RFI voltages is the easiest to do and the most commonly performed.
Indeed, for practical reasons, Standards mostly specify the measurements
of unsymmetrical voltages instead of the theoretically more meaningful
common mode EMI, but the standard doesn’t necessarily reflect the real
life exactly as it is: it shall be a common practice reference aiming to create
a database of fully comparable results.
See figure 7-1 for a graphic explanations of these differences between the
EMI voltages.
Some Regulations require both measurement of symmetrical and
asymmetrical RFI voltages, also defining separate and different limits for
them.
4.1.2 Coupling Networks
Coupling Networks are electrical interfaces which allow to “transfer” the
quantity to be measured (e.g. EMI voltages or currents) from the lines
under test to the receiver.
Some types of Coupling Networks are: AMN (Artificial Mains Network),
also known as "LISN" (Line Impedance Stabilization Network), Current
Probe and Voltage Probe. Again, Fig. 7-1 also shows the AMN principle.
The PMM 7010 is already equipped with a built-in LISN.
Document 7010EN-81007-1.09 - © NARDA 2018
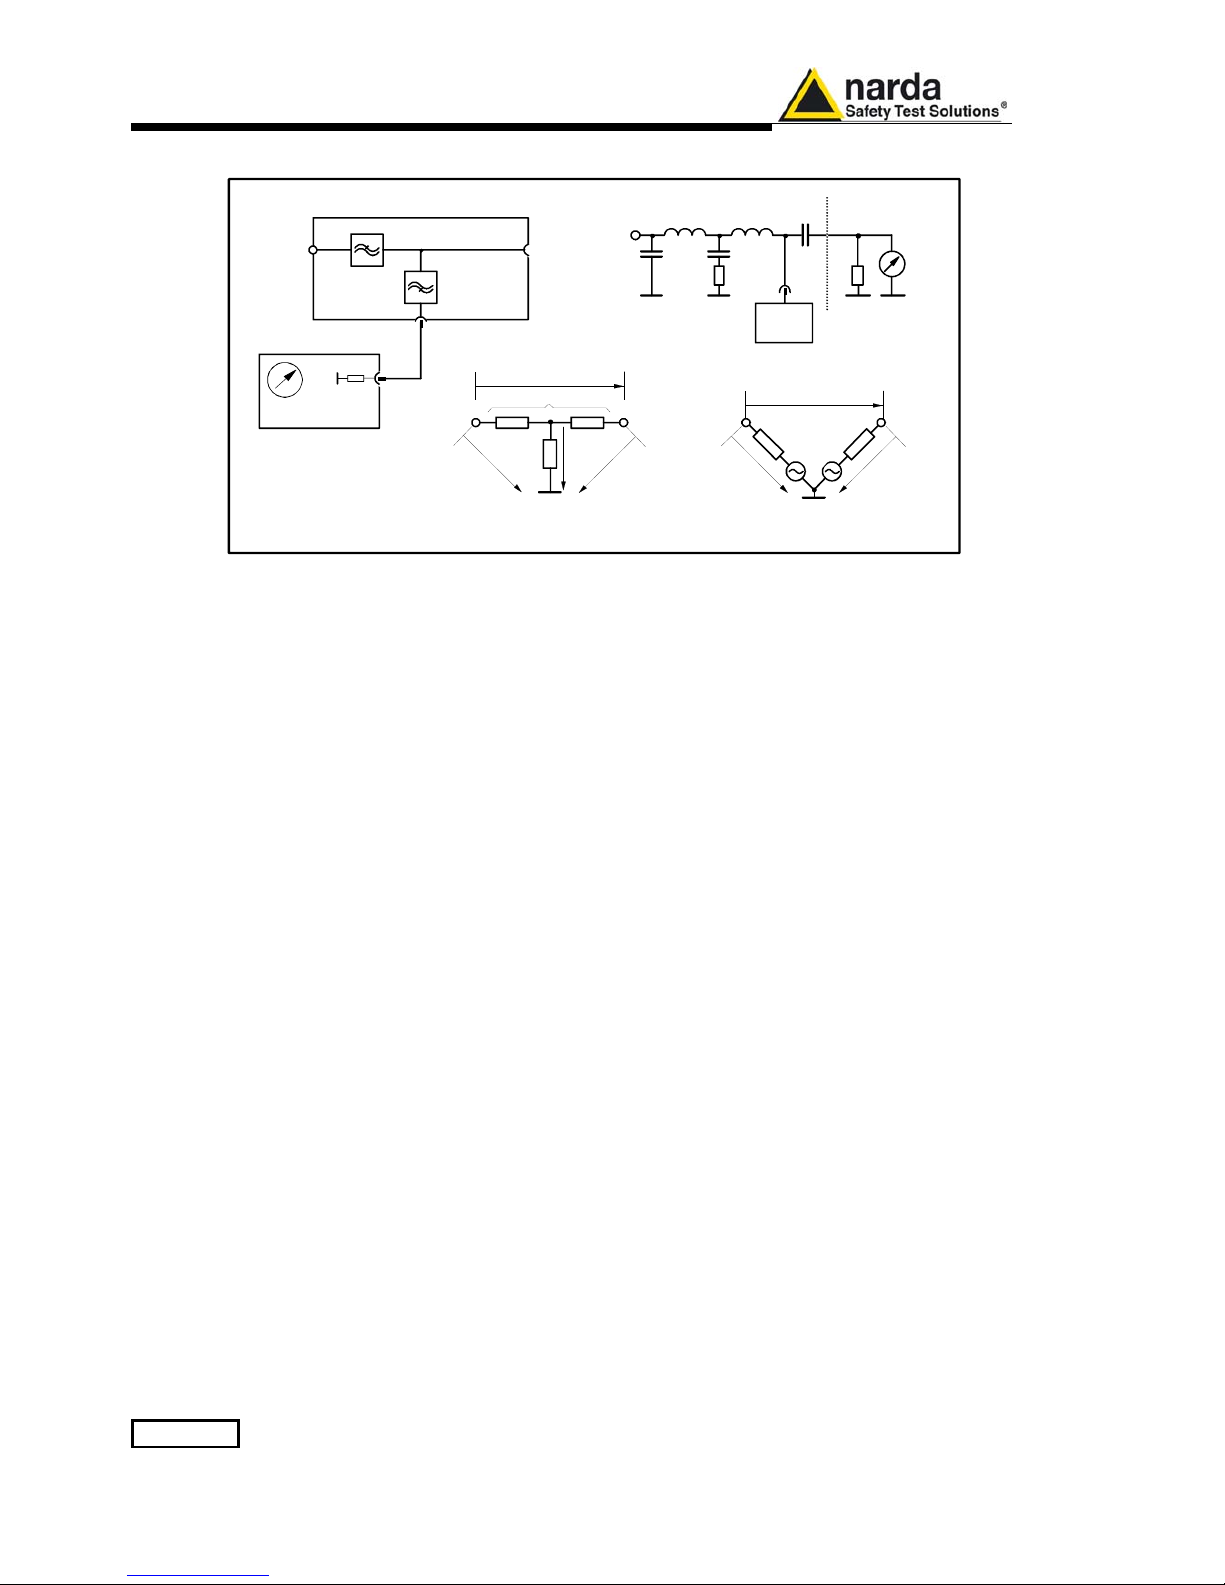
4-2 Applications
Fig. 4-1 AMN Principle: a) Δ-type or T-type LISN ; b) V-type LISN
4.1.2.1 AMN
AMNs are usually classified depending their configuration: V-type
Networks, Δ-type Networks, T-type Networks.
• The V-type Network is used for measuring the unsymmetrical RFI
voltage on AC and DC supply line. Standard impedances specified by
CISPR and other international standards are 50Ω // 50 μH+5Ω and 50Ω
// 5 μH+1Ω.
• The Δ-type Network is used for measuring the symmetrical RFI voltage
on balanced telecommunication lines. It is generally designed to permit
switchover between symmetrical and asymmetrical RFI measurements.
Its use is limited; Standards usually specify the T-type Network instead.
The most common impedance for Δ-type Network is 150Ω.
• The T-type Network is used for measuring the asymmetrical RFI
voltage on balanced (electrically symmetrical) audio frequency, control
and data lines. Standard impedance is 150Ω as well.
An Artificial Mains Network shall be designed in order to:
1. terminate each line (power, signal, etc.) of the EUT (Equipment Under
Test) with a standardized impedance;
2. permit the feeding of the EUT with the proper supply voltage and
current or with the signal and data required for operations;
3. isolate the side of the test circuit where EMI voltages are measured
against interference coming from mains network or from the auxiliary
equipment supplying the EUT with the required data;
4. provide a suitable test point – to be connected to the test receiver - to
pick up the RFI voltages from the conductor under test;
5. ensure that the impedance of the source (power, signal) is not varied in
a significant way, otherwise EUT response to the interference may
change.
lowpass
filter
highpass
filter
mains
DUT
test
receiver
RF load to
inter fer ence
DUT
50
Ω
8μF
5
Ω
50μH0.25μF
test
receiver
mains
V-LISN
V
sym
V
asym
Z
asym
Z
sym
V
unsym
V
unsym
2μF
250
μ
H
V
unsym
V
unsym
V
sym
L
1
L
2
L
1
L
2
L
1
a) b)
V-LISN
(only one
line is shown)
Applications 4-3
4.1.2.2 Current Probe
Current Probes may be Clamp-on Probes or Fixed-ring Probes.
Current Probes are used to measure differential or common mode RFI
currents. In some cases it may be important to make a distinction between
the two kinds of current flowing in a system.
RFI current measurements with Current Probes may be required, for
example, when measuring EMI from shielded lines or from complex wiring
systems, when finding interference sources among other sources in a
system, when performing compliance to some Standards, etc.
4.1.2.3 Voltage Probe
Voltage Probes include Active Probes and Passive Probes.
Active Probe has a very high input impedance Zin > 100 KΩ // < 10 pF.
Passive Probe has a standard impedance Zin = 1,5 KΩ // < 10 pF.
Voltage Probe is used for measuring the unsymmetrical RFI voltage when
it is not possible to carry out measurement by interconnecting an Artificial
V-type Network. Such situation may occur, for example, when measuring
on lines on which only small loads are permissible (control and signal
lines), when measuring on a EUT (Equipment Under Test) which would
not operate correctly using V-type LISN or a DUT (Device Under Test)
requiring very high power supply current for which no V-type LISN is
available.
For diagnostic or design purposes on high impedance circuits, Voltage
Probe may be used to determine, for example, noisy components or
conductors that cause interference on CMOS PC boards.
Some Regulations give statements when Voltage Probe are to be used
and specify relevant setup and RFI voltage limits.
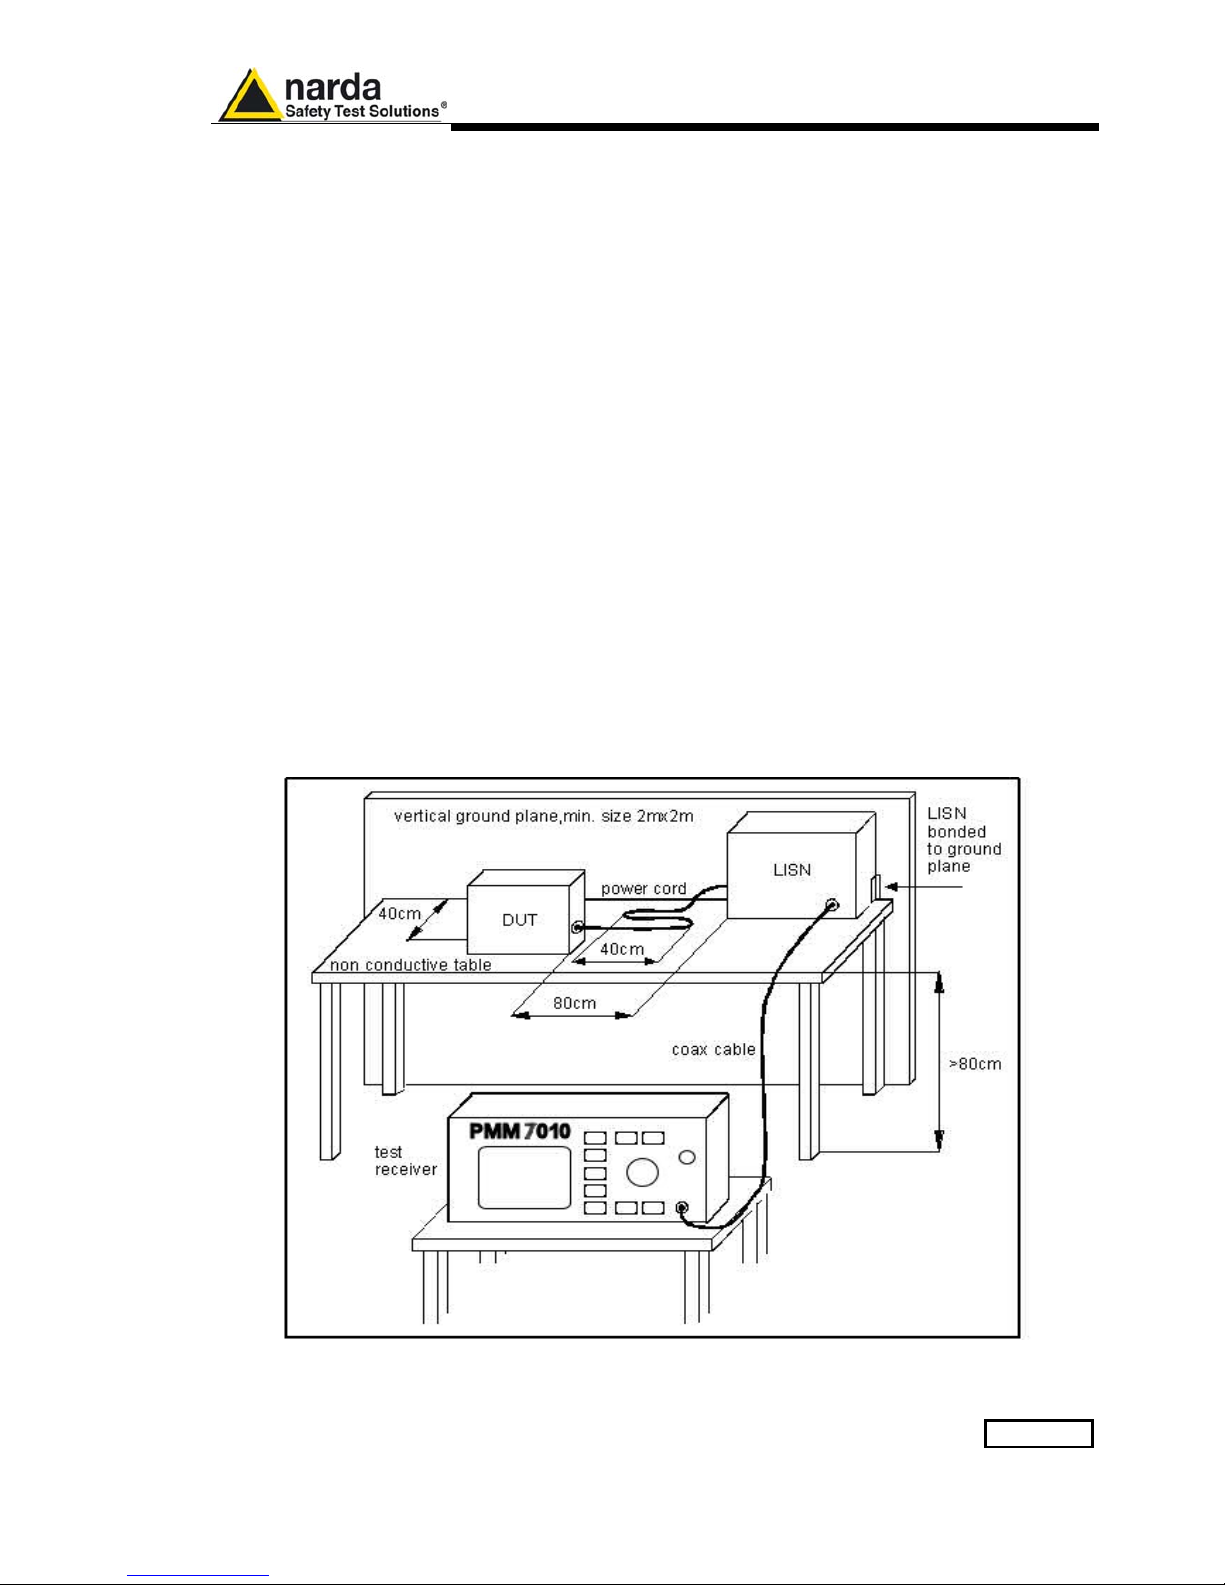
Fig. 4-2 Example of Test Setup for RFI Voltage Measurement

4-4 Applications
4.1.3 Test Setup
Fig. 7-2. shows an example of test setup for RFI voltage measurement.
The DUT is placed 0,4 m from an horizontal or vertical earthed conducting
surface of at least 2 m x 2 m in size.
A table top DUT is placed 0,8 m from the LISN and at least 0,8 m from any
other earthed conducting surface. If the measurements are made in a
shielded room, the DUT shall be placed 0,4 m from one of the walls of the
room.
The LISN shall be bonded to the reference conducting surface.
A Floor standing DUT is placed 0,1 m above an horizontal earthed
conducting surface of at least 2 m x 2 m in size. This size shall be
exceeding by at least 0,5 m the projection of the DUT on the conducting
surface. The power cable should be 1m long; longer cable should be
centrally bundled for at least 40 cm.
DUTs without a PE (Protective Earth) conductor and manually operated
DUTs shall be measured in conjunction with an auxiliary screen or an
“Artificial Hand”, as duly specified in the relevant standards.
All the details and information on the test setup are written on the latest
version of the applicable Standard.
4.1.4 Guidance on a
preliminary
Measuring
Procedure
A step-by-step example of a conducted test manually performed is the
following:
1. Switch ON the PMM 7010 and enter in Sweep Mode pressing the
relevant button;
2. Select Display and then 120dB; Reference Level should be between
110 and 135 dBμV; press Esc;
3. Touch the Measure key, then Freq B Band;
4. Then Level, Input and set the Minimum Attenuation to 10 dB and the
Attenuation is automatic; press Esc;
5. The Pulse Limiter is always enabled to protect the input from voltage
spikes;
6. Enter in the Detector menu and select Peak; press Esc two times;
7. Connect the internal LISN or any other suitable transducer to the RF
input, selecting the proper phase/line whenever applicable;
8. With the EUT switched OFF touch Exec Sweep and wait until the first
scan has been finished;
9. Carry out an overview of the whole spectrum and check the by
executing a pre-measurement with peak detector that the ambient RF
disturbances are at least 20 dB below the desired emission levels;
10. If the ambient noises are low enough continue to the next step,
otherwise take all the necessary steps to reduce the ambient
disturbances (e.g. go to a shielded room, etc.);
11. Switch ON the EUT and then Measure, Exec Sweep again and wait
until the scan has been finished;
12. Enter in the Display menu and adjust the Dynamic Range and the
Reference Level to the most convenient visualization;
13. If the results are satisfactory select Marker, Peak and then either
Analyzer or Tune to enter respectively in Spectrum Mode or in Manual
Mode and deeply investigate the highest signals;
14. If the results of the scan need to be refined, select a Limit, if
appropriate, and then Measure, Level and Smart Detector (if a limit
has been loaded);
15. In the Smart Detector menu check the best combination among those
listed; enter a Margin, if needed; press Esc;
16. Exec Sweep again and repeat from step #12.

Applications 4-5
4.1.5 Remarks and Hints
for Measuring
To avoid errors caused by ambient interference, measurements should be
carried out inside a properly shielded room. Different sites, like basements
or other rooms with low ambient interferences, are often sufficient for a
preliminary evaluation.
Conducted measurements do not strictly require any anechoic
environment, while radiated tests may need it if so specified by the relevant
standard.
Using the PMM Emission Suite SW running on an external PC it is possible
to make automatic measurements and to automatically select LISNs lines
(with the built-in LISN or any external PMM LISN), etc.

4-6 Applications
This page has been left blank intentionally
Updating Firmware 5-1
5 – Updating firmware and
Activation code Utility
5.1 Introduction
The PMM 7010 features a simple and user-friendly method for updating its
internal firmware through a Personal Computer (PC).
The “WrDongle” embedded in the FW Upgrade Tool is used for the
Options activation procedure.
This section provides all the information required for easy updating.
5.2 System requirements
The minimum requirements to allow the software to operate properly are
the following:
• 486 Processor or Pentium
• 16 Mb of RAM
• at least 10 Mb of free space on hard disk
• 1 free Serial Port (RS-232), or, alternatively, a USB/RS-232 Adapter
with related driver
• Windows Operating System™ 98/2000/XP/Vista/Win7
5.3 Preparing the
Hardware
Turn off the PMM 7010 and connect the RS-232 cable supplied with the
apparatus directly or through a USB/RS-232 Adapter separately purchased
(once related driver has been properly installed), to the 9 pin socket
situated on the back panel of PMM 7010 on one side and to a free RS232
port (or USB in case of Adapter’s use) on the PC side.
The first free RS-232 port will be automatically detected by the Firmware
Update Program during installation. In case of troubles please check port
assignments on the PC through the Control Panel utility.
5.4 Software
Installation
The Update Firmware and 7010 WrDongle executable programs are
provided together with the 7010 Software Utility stored on Software Media
and included in PMM 7010 Receiver package; anyway it’s always possible
to check for newer releases and download them from official NARDA Italy
Web Site Support page.
The User must have administrator privileges to install the
7010SeriesUp software in Windows 7; right click on the program .exe
file and click on “Run as administrator” to temporarily run the
program or application as an administrator until close it (Windows 7
also allows to mark an application so that it always runs with
administrator rights).
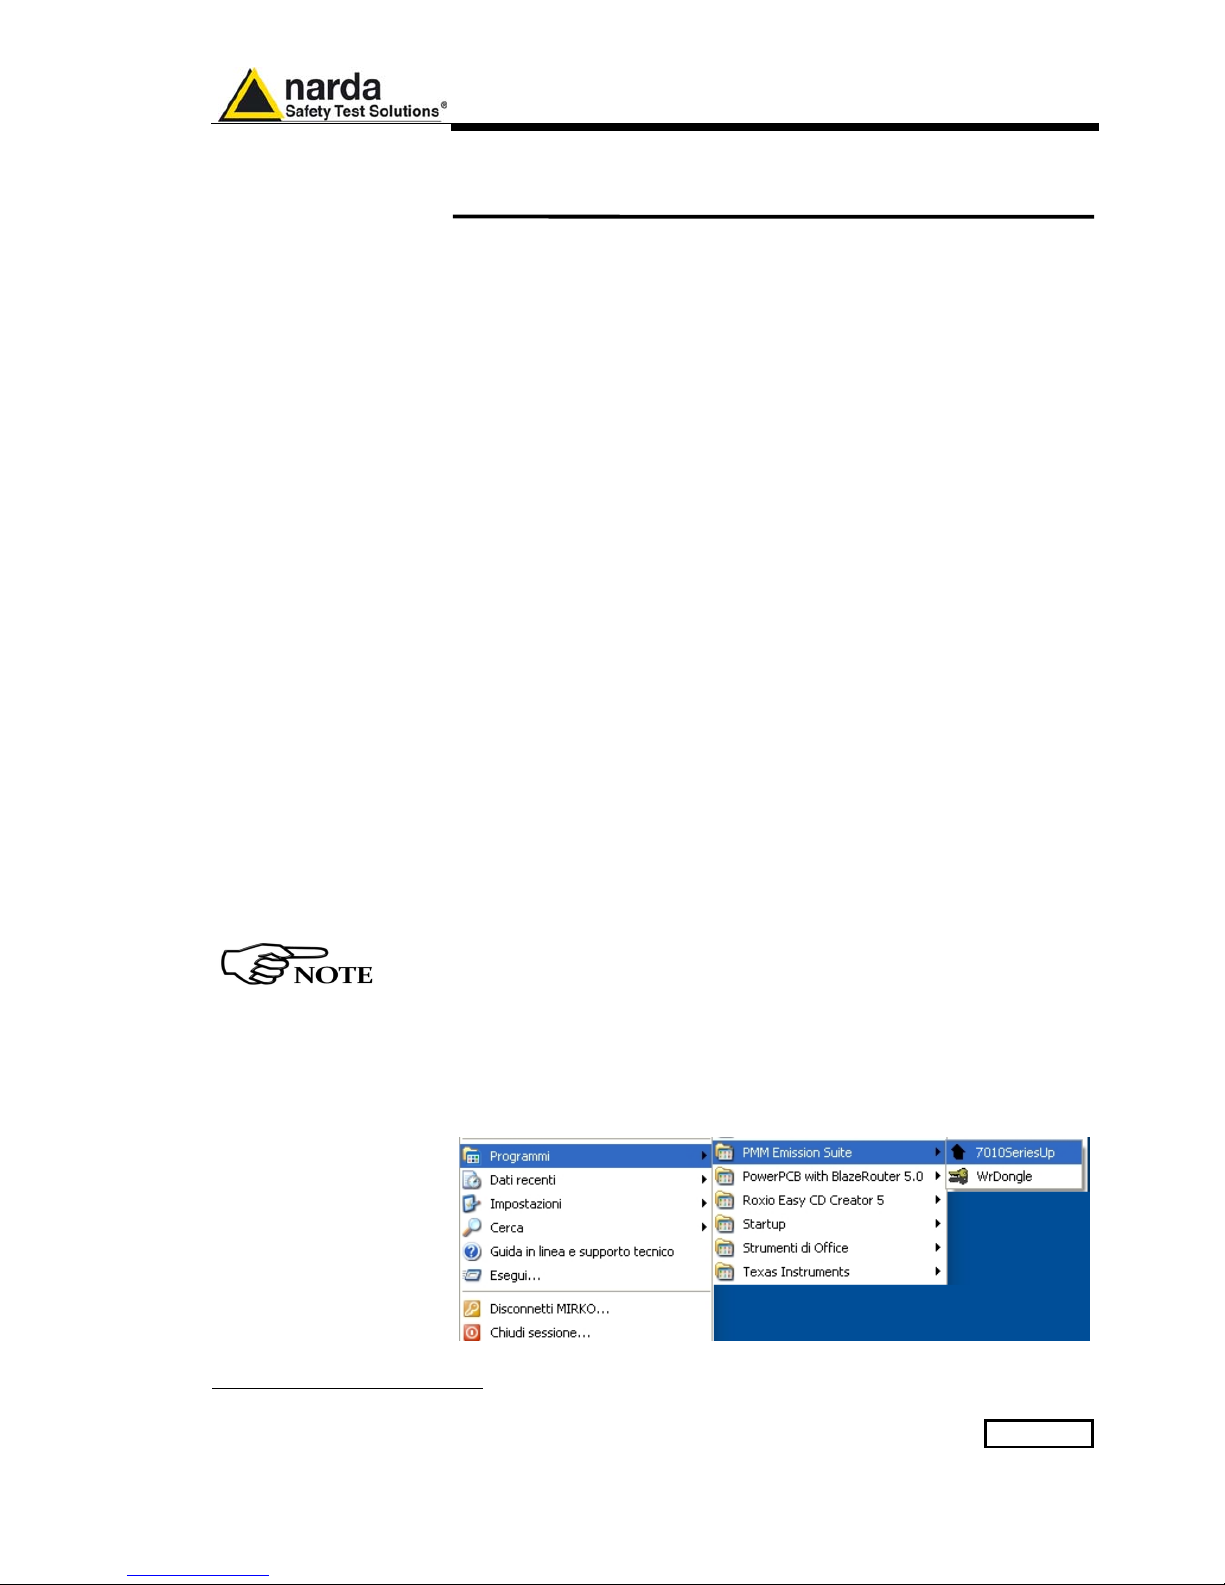
Once the 7010SeriesUp Setup has been installed in the PC, another item
is created in the Programs list at Start Menu, which is “PMM Emission
Suite”, from where the “7010SeriesUp” and “WrDongle” programs must
be run from.
Document 7010EN-81007-1.09 - © NARDA 2018
5-2 Updating Firmware
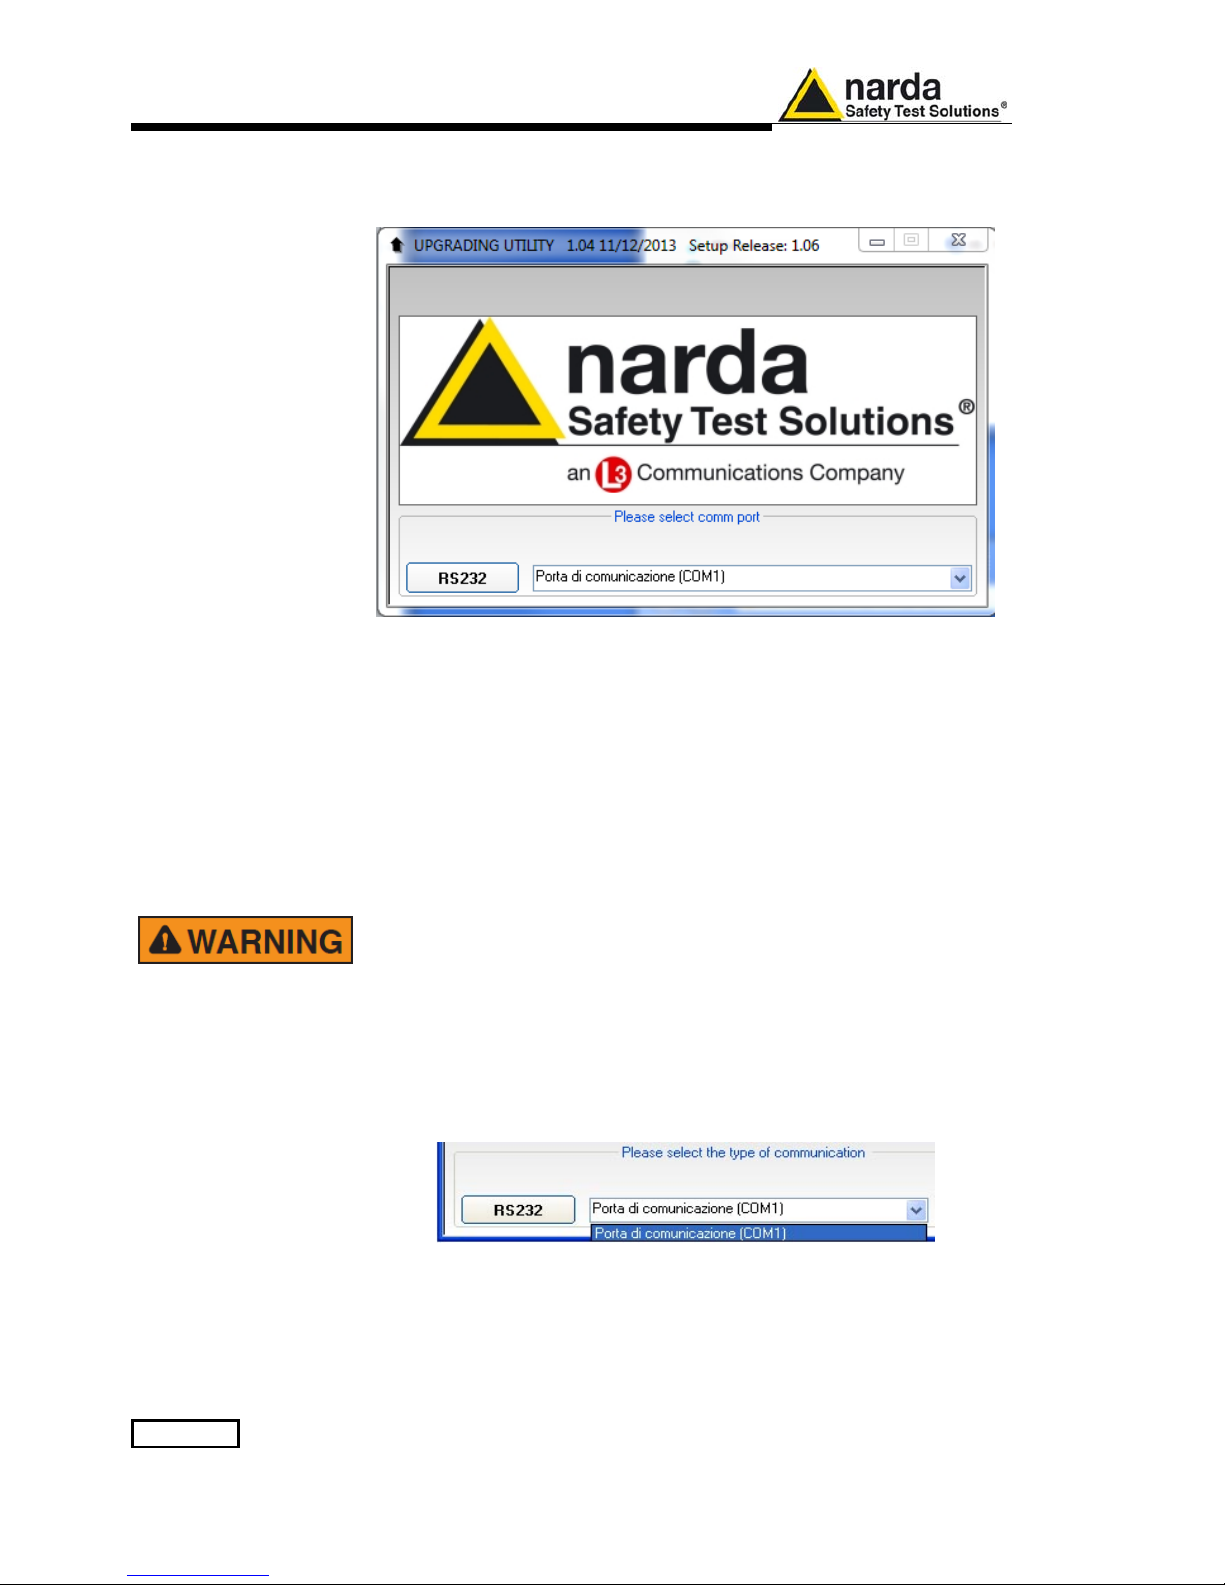
Click on “7010SeriesUp” (7010SeriesUp.exe) once for running the update
program, so getting the following window:
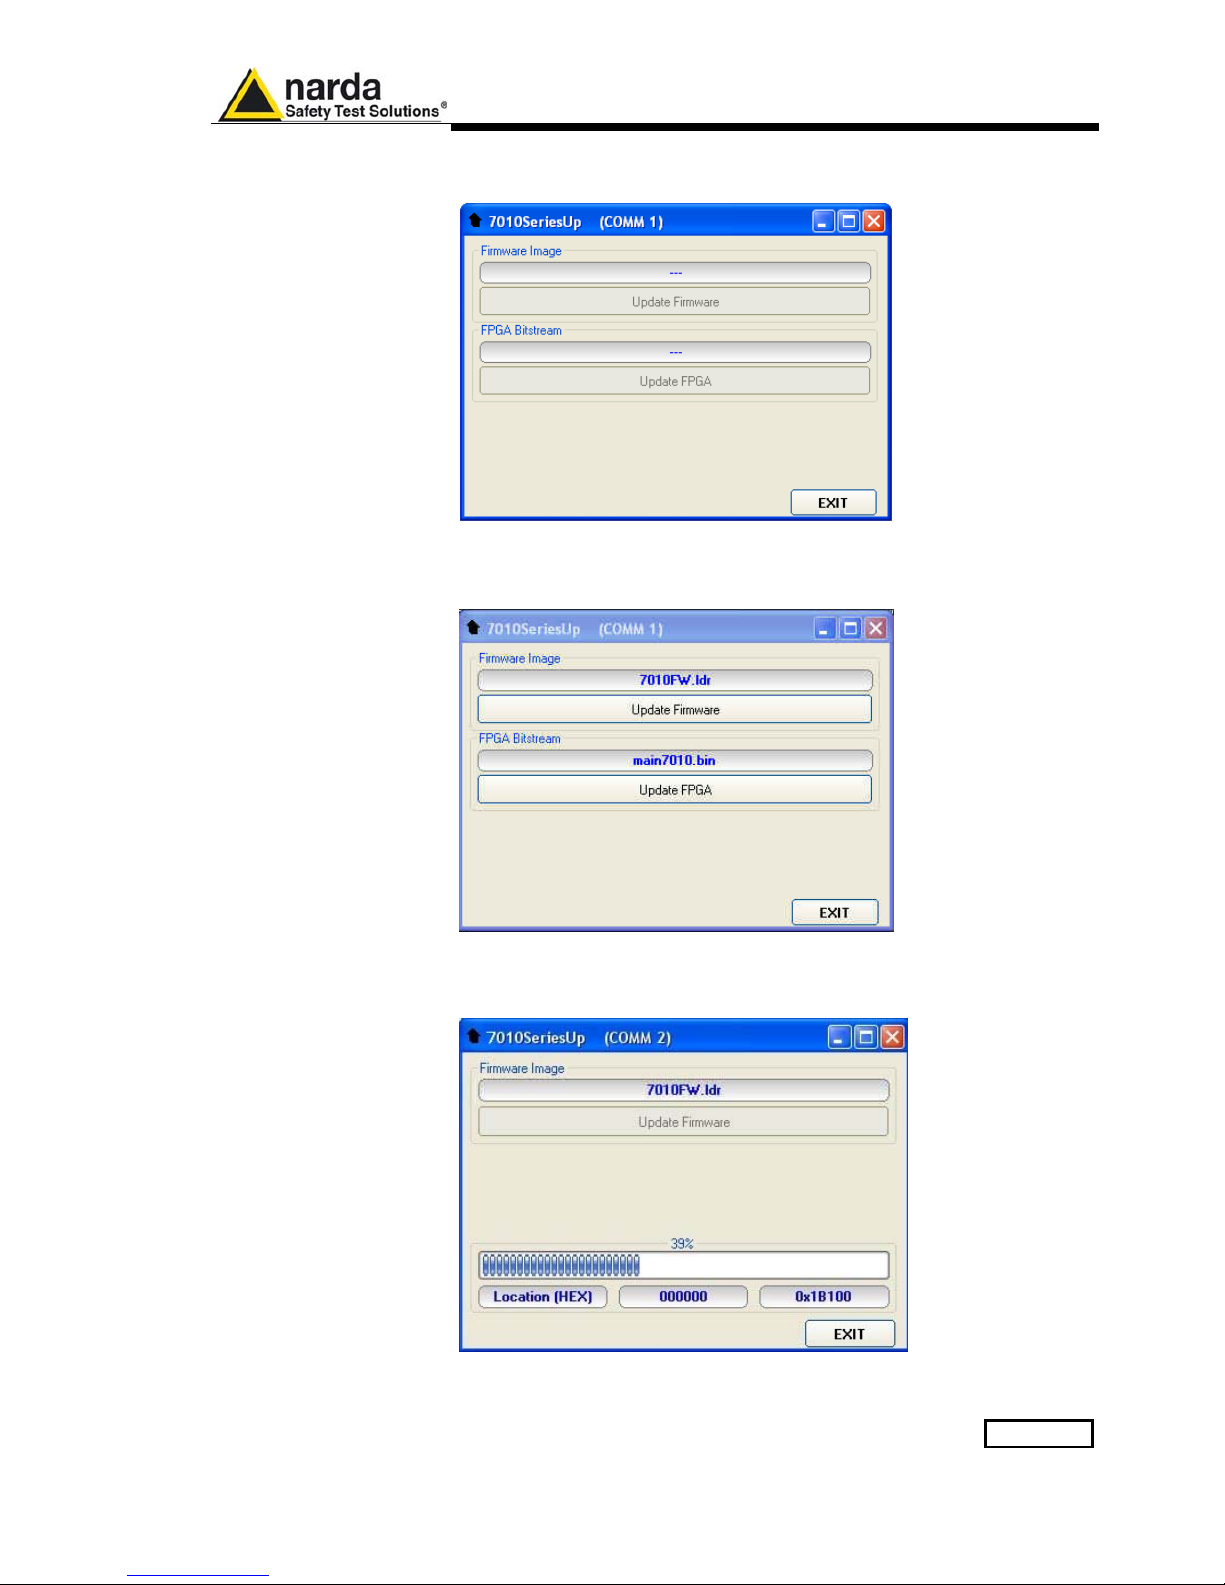
Two firmware components can be updated by this application: Firmware,
which is the receiver internal program, and FPGA, to update the internal
programmable logic.
The 7010FW.ldr file required for Firmware updating and the main7010.bin
file for FPGA are automatically stored in the same directory of the
7010SeriesUp.exe, otherwise just copy them there before performing the
upgrade.
Be sure the power to the PMM 7010 is stable and reliable before
performing the FW Upgrade, otherwise the upgrade progress could not
terminate properly.
Anyway, even in case of failure, the internal BIOS will never be
corrupted and you’ll just need to repeat the procedure once more (this
is a unique feature!).
Should FW Upgrade procedure stop before reaching the 100%
completion that will have not to be considered a trouble but simply an
intermediate step: in this case please switch OFF and ON the receiver
and repeat the FW Upgrade procedure once more until the end.
Always cycle power OFF and ON again after every FW Upgrade.
Choose the COM port from the pulldown menu.
Press RS232 button or Enter key to set the com port.
Updating Firmware 5-3
The program will display the following window:
5.5 To transfer data
To start the process simply switch PMM 7010 on, select Update Firmware
or Update FPGA button, and wait until the automatic transfer is completed.
During the firmware storing procedure, a blue bar will progress from left to
right in the window of the PC, showing percentage of downloading time by
time until 100%.
5-4 Updating Firmware
In the meanwhile on the 7010 front panel the DATA RX and TX led will
blink to indicate a serial communication is going on.
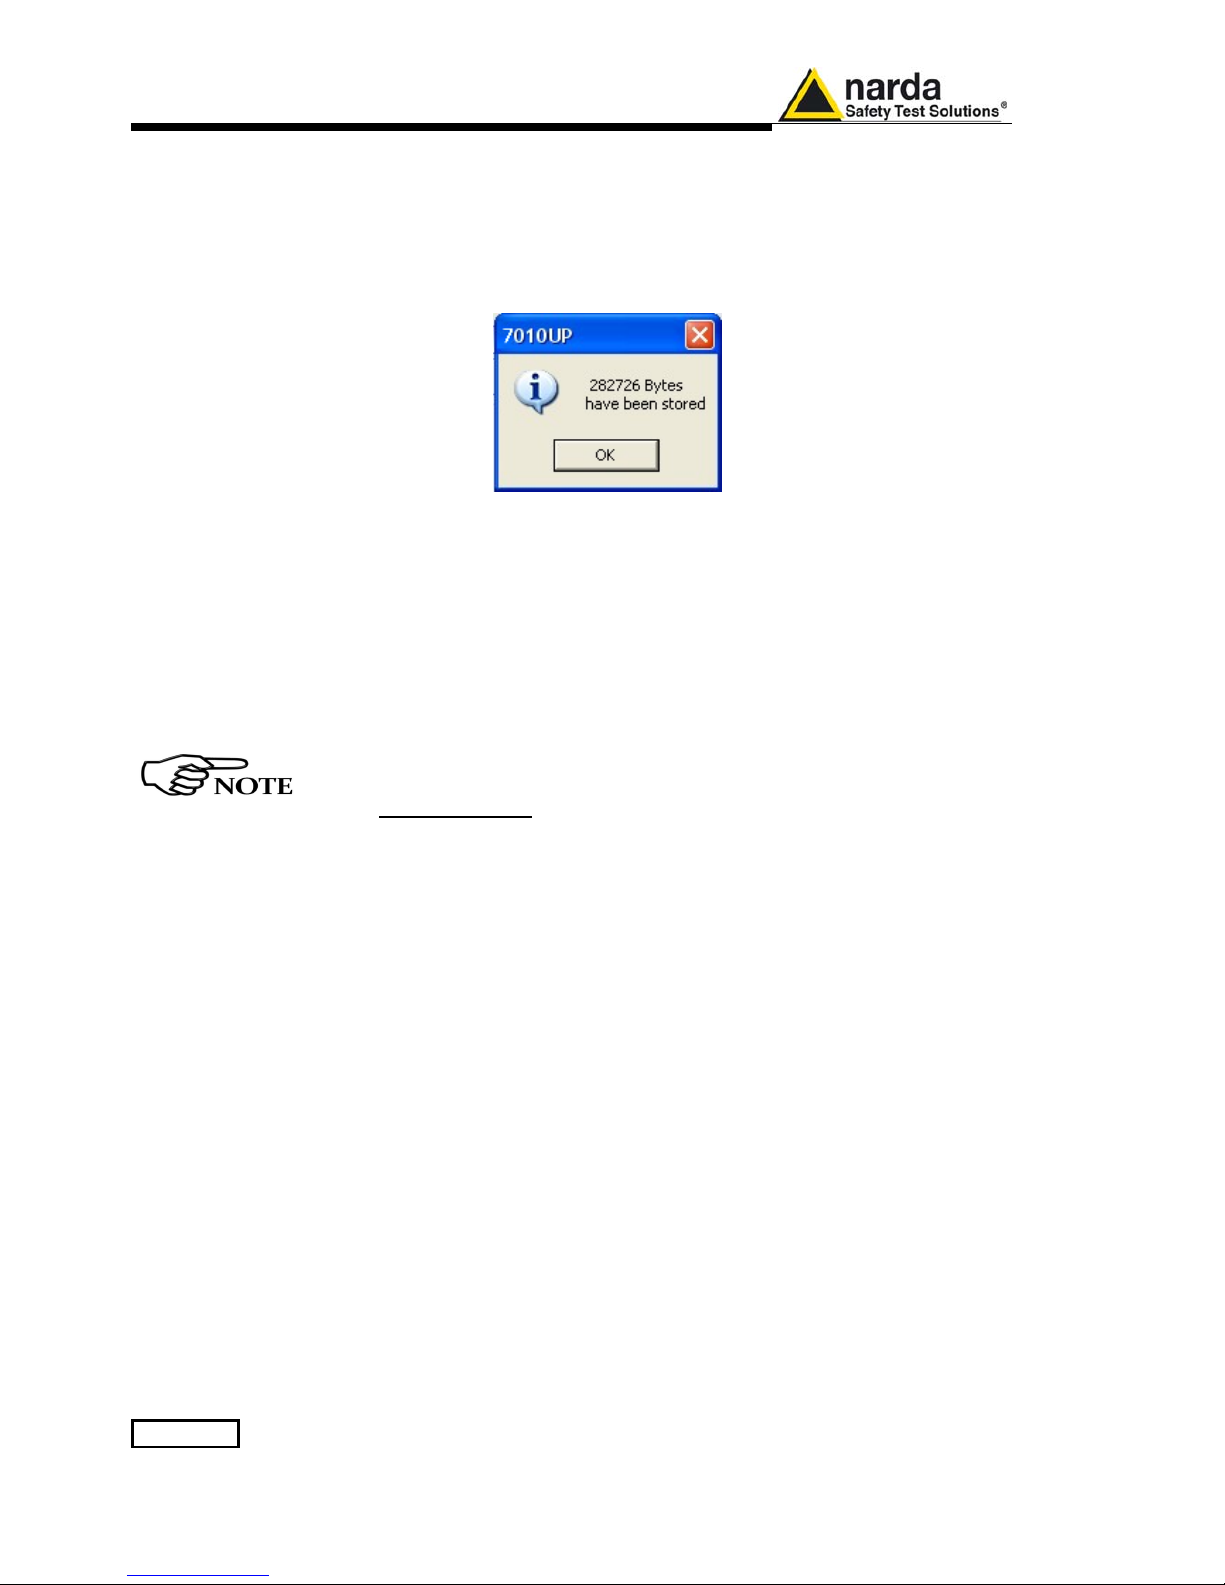
When FW download finishes, following message appears to show that
everything was properly completed:
The length of the file can change with the version.
In case of failure, an error message is showed instead.
After Firmware Update is successfully completed, switch OFF and then ON
again the PMM 7010, looking at screen, and then perform Auto-calibration.
It is now possible to disconnect the cable connected to the PC, with the
PMM 7010 receiver either switched On or Off.
To obtain up-to-date Firmware or PC Utility for PMM 7010, the user
can contact his NARDA distributor or download it directly from
Support area of EMC Product Range on the following Web Site:
www.narda-sts.it.

Updating Firmware 5-5
5.6 7010 WrDongle
utility
The WrDongle utility allows to enable the function ordered such Options
using the 40 Digit Activation Code received from NARDA Italy.
Turn on the PMM 7010 and connect it to a free USB or RS232 port of the
PC.
Browse for All Programs from the Start Menu and reach the “WrDongle”
executable link:
Main window displayed after the program WrDongle has been run:
Select USB or RS232 communication port.
In case of RS232 communication, choose the COM port from the pulldown
menu.
Press RS232 button or Enter key to set the com port.

5-6 Updating Firmware
The program will display the following window:
Copy and paste the 40 Digit Activation Code to the “Dongle Code” input
field and press the button below related to the specific Option:
In case of failure, an error message is showed instead.
Always cycle OFF and ON the receiver to properly initialize the function.
With the PMM 7010 the only option available is the RMS-AVG standard
CISPR detector.
For further information on activation procedure refer to the “RMS-AVG
detector”.

PMM 9010-RMA Rack Mount Adapter 6-1
6 – PMM 9010-RMA
Rack Mount Adapter for Rack 19”
(Option)
6.1 Introduction A 19-inch rack is a standardized frame or enclosure for mounting multiple
equipment modules. Equipment designed to be placed in a rack is typically
described as rack-mount or simply chassis; the height of the electronic
modules is standardized as multiples of 1.75 inches (44.5 mm) or one rack
unit or "U". Each module has a front panel that is 19 inches (482.6 mm)
wide, including edges that protrude on each side which allow the module to
be fastened to the rack frame with screws.
6.2 Instrument Items
PMM 9010-RMA Rack Mount Adapter includes the following items:
• Rack Mount kit (screws, plastic
round washers and cage nuts).
• Return for Repair Form.
6.3 Optional
accessories
PMM 9010-RMA Rack Mount Adapter can be used with several optional
accessories, the most common being the following:
• PMM 9010 EMI Receiver 10 Hz ÷ 30 MHz;
• PMM 9010/03P EMI Receiver 10 Hz ÷ 300 MHz;
• PMM 9010/30P EMI Receiver 10 Hz ÷ 3 GHz;
• PMM 9010/60P EMI Receiver 10 Hz ÷ 6 GHz;
• PMM 7010 EMI Receiver 9 kHz ÷ 3 GHz
Document 7010EN-81007-1.09 - © NARDA 2018

6-2 PMM 9010-RMA Rack Mount Adapter
6.4 PMM 9010-RMA
Main Specifications
Table 6-1 lists the PMM 9010-RMA specifications.
TABLE 6-1 Technical Specifications
Environment temperature
0° to 40°C
Rack unit
3U
Dimensions
483 x 410 x 132,5 mm (WxDxH)
Weight
5,5 Kg (without instruments)
6.5 PMM 9010-RMA Front view
Fig. 6-1 Front view
Legend::
- 1 – Holes Flanges used to fix the Rack Mount to the Rack
- 2 – Handles used to carry the Rack Mount
- 3 – PMM 9010, 9010/03P/30P/60P or 7010 window
- 4 – Milled knob used to fix the frontal panel to the Rack
- 5 – Cover for future implementation

PMM 9010-RMA Rack Mount Adapter 6-3
6.6 PMM 9010-RMA Inside view
Fig. 6-2 Inside view
Legend::
- 1 – Round holes of service
- 2 – Rectangular holes used to put 9010, 9010/03P/30P/60P or 7010 Instrument;
- 3 – 9010, 9010/03P/30P/60P or 7010 straps;
- 4 – Rectangular holes for future implementation;
- 5 – Straps for future implementation.

6-4 PMM 9010-RMA Rack Mount Adapter
6.7 Rack Requirements
The rack must be of the following type:
- Standard 19 inch (483 mm) with mounting rails that conform to English
universal hole spacing per section 1 of ANSI/EIA-310-D-1992.
- The minimum vertical rack space per chassis must be 3U (rack units),
equal to 3 inches (132,5 cm).
6.8 Required Equipment
Before you begin the installation, ensure that you have the following items:
- Crosshead screwdriver (not provided)
- Flat-blade screwdriver or rack-insertion tool (not provided)
- Tape measure and level (not provided)
- Rack Mount kit (provided)
6.9 Moving chassis
When lifting the chassis, be aware of its weight, and follow these
guidelines:
- Disconnect all power and external cables before lifting the chassis.
- Remove all instruments from the chassis before lifting.
- Make sure that the milled knob well locking.
- Using the two handles, lift the PMM 9010-RMA slowly keeping your back
straight. Lift with your legs, not with your back. Bend at the knees, not at
the waist.

PMM 9010-RMA Rack Mount Adapter 6-5
6.10 Installation
guidelines
When installing the chassis, follow these guidelines:
- Plan your site configuration and prepare the site before installing the
chassis.
- Ensure that there is adequate space around the rack to allow for servicing
the chassis and for airflow.
- If the rack has wheels, ensure that the brakes are engaged or that the rack is
otherwise stabilized
- For a round hole (tapped) rack, use
clip nuts with M6 x 16 screw
(not provided).
- For a square hole (untapped) rack (shown below), use M6 x 16
screws, plastic
round washers head screws and M6 cage nut
(provided).
6-6 PMM 9010-RMA Rack Mount Adapter
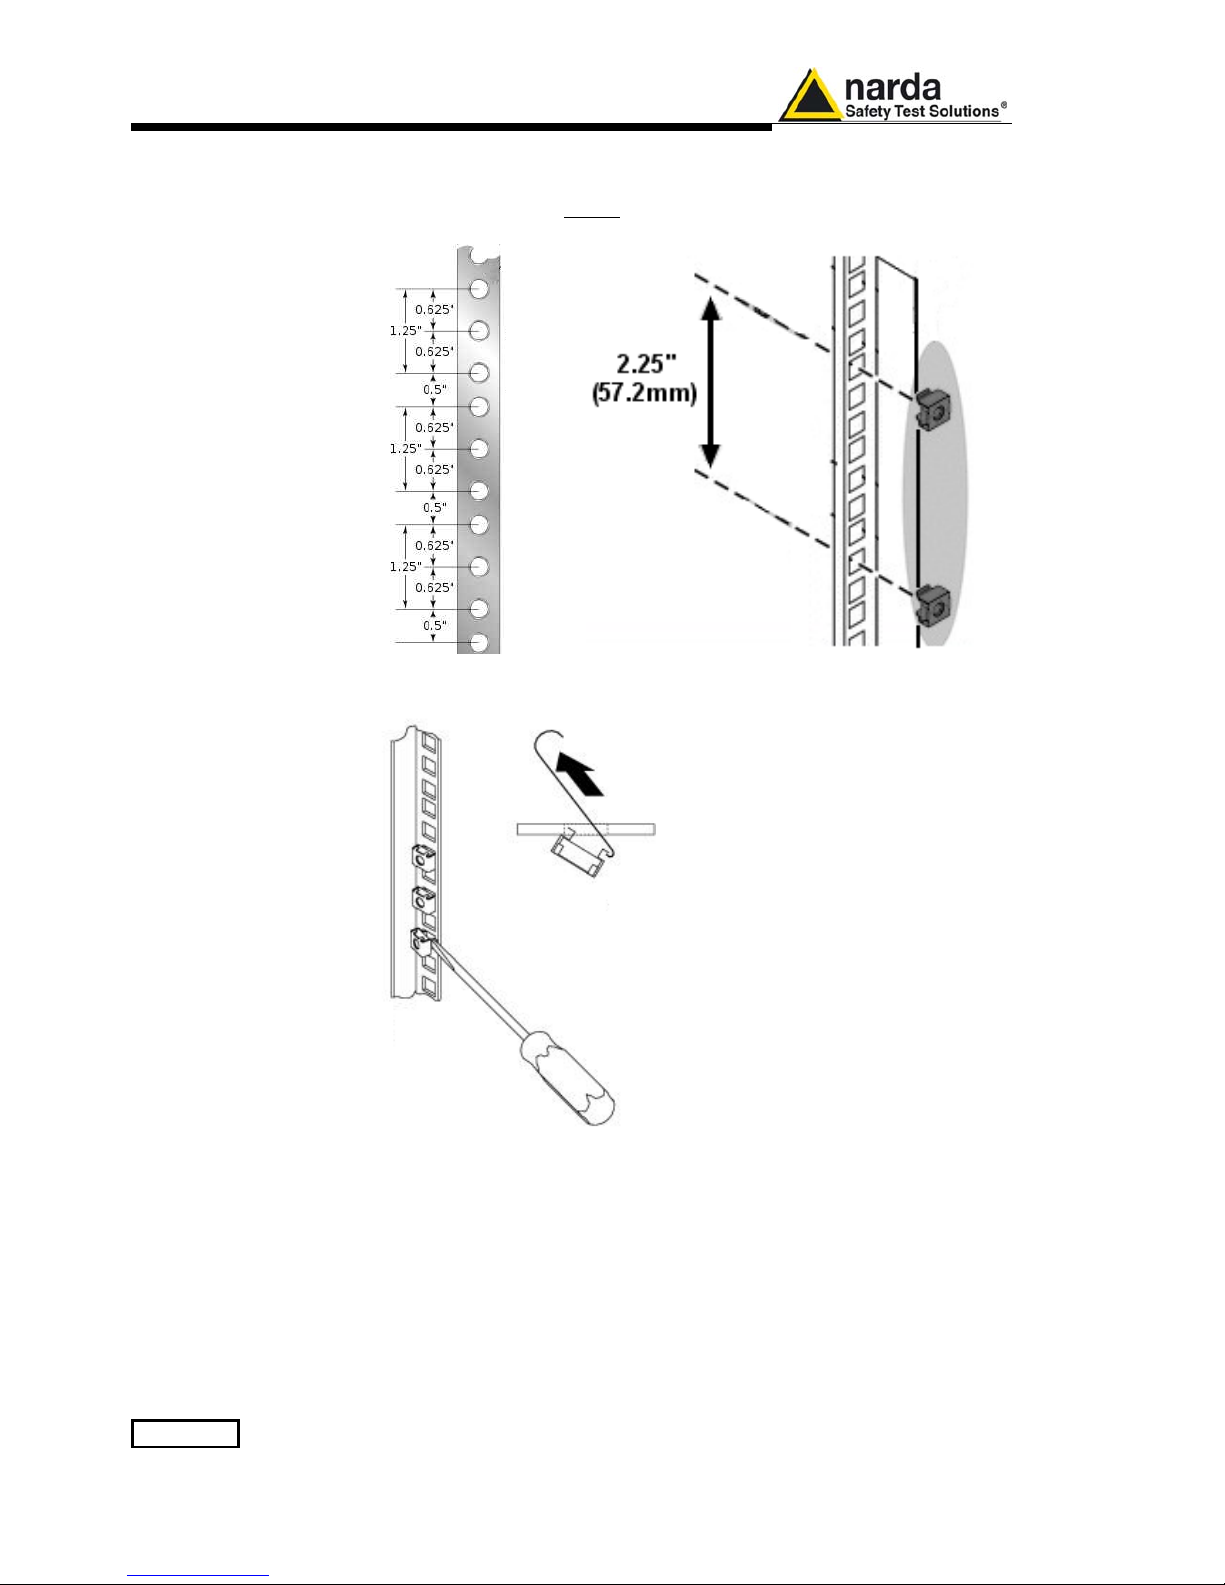
6.11 Installing the
PMM 9010-RMA
This section describes how to install the PMM 9010-RMA Rack Mount Adapter:
- Insert the cage nuts behind the vertical rails with respect to the Rack Unit
Boundary and the distance show below:
- Y
ou can use a rack-insertion tool or a flat-blade screwdriver to install the cage
nuts.
- Insert the chassis into the rack.
- Slide the chassis into the rack until the front flange is flat against the cage
nuts.
- Using the four screws and black plastic washers, fix the chassis by its
flanges to the rack.
PMM 9010-RMA Rack Mount Adapter 6-7
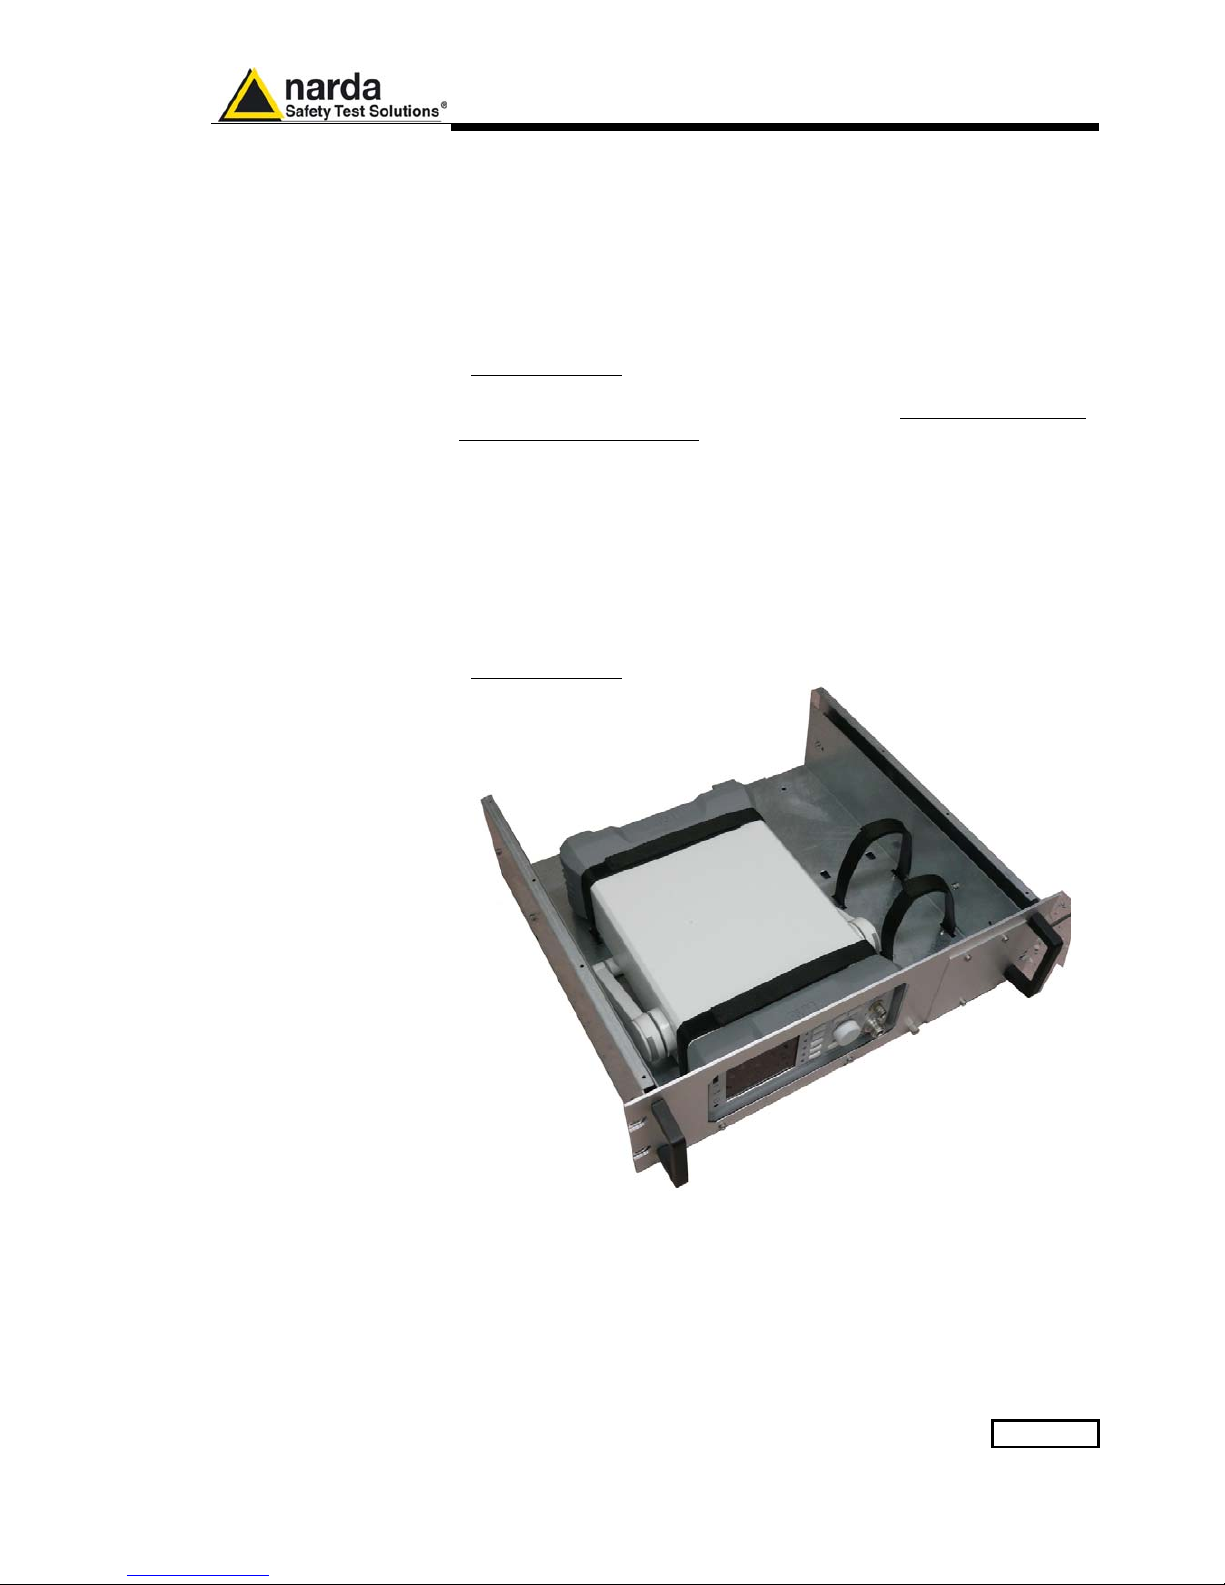
6.12 Use of the
PMM 9010-RMA
with PMM 9010
The following procedure is indifferently referred to the 9010,
9010/03P/30P/60P or 7010.
This section provides the information needed to install your 9010 or 7010
Instrument on the PMM 9010-RMA Rack Mount Adapter.
- Remove the frontal panel from the Rack unscrewing the milled knob
without loosing it completely.
- Using the handles, open the PMM 9010-RMA slowly.
- Place the instrument by the rectangular holes and drag the instrument in
contact with the frontal panel.
- To ensure the necessary stability, the instrument must be fastened to the
unit using the straps.
- Connect the cables on the rear panel (see “Installation” chapter for further
information)
- To fix the rear cables to the Rack Mount insert plastic straps by of the
round holes.
- Using the handles, close the PMM 9010-RMA slowly.
Fig. 6-3 PMM 9010-RMA with 9010 Instrument

6-8 PMM 9010-RMA Rack Mount Adapter
This page has been left blank intentionally

Remote control 7-1
7 – Remote control
7.1 Introduction
PMM 7010 has been designed to allow remote control operations through
its either RS232 or USB (Rear) ports.
When using RS232 you can use only one instrument connected to PC
serial port. If using USB you can connect other instruments to the free
RS232 port and the PMM 7010 Receiver to the USB 2.0.
PMM 7010 uses the same commands protocol for both communications.
7.2 Communication
Half duplex communication is implemented. The RS232 port has a DB-9
female connector and the USB 2.0 has a USB-B connector.
A built-in automatic tool identify the type of communication used.
The communication is at 115200 bit/sec with 8 bit words, one start bit, one
stop bit and no parity
(115200 N 8 1).
7.3 Protocol
Be aware that only the PC can send the commands. PMM 7010 will
answer when is inquired only.
The communication uses strings with variable byte width. The characters
used inside the strings are in ASCII format (00 - 127) at 7 bits. The most
significant bits are ignored in reception and set to 0 during transmission.
Every string starts with the special character “#” and stops with “*”.
7.4 Format
Commands are made of ASCII string delimited character “#” (0x23) and
the character “*”(0x2A)
Replies are terminated with <CR><LF> (\r\n)
All the following examples are indifferently referred to the PMM 7010.
Document 7010EN-81007-1.09 - © NARDA 2018

7-2 Remote control
7.5 List of
commands
Query COMMANDs
Syntax Function
?3PR*
Tells whether the apparatus is a PMM 7010 and in which mode
?AAT*
Requests the Attenuator status for Analyzer mode.
?ACE*
Requests the Center frequency for analyzer mode
?ADT*
Requests the detector used for Analyzer mode
?AHT*
Requests the Hold Time for Analyzer mode.
?AOP*
Requests the Stop frequency for analyzer mode
?ART*
Requests the Start frequency for analyzer mode
?ASP*
Requests the Span frequency for analyzer mode
?CFA*
Sends back the ID of the conversion factor
?CRA*
Tells whether RMS-AVG detector is available
?DET*
Reports the five detector for manual mode
?DMD*
Requests the status of demodulator.
?DMV*
Requests the volume of demodulator.
?FPGA
Sends back a string containing information about version of FPGA.
?IDN*
Requests model, release and date of firmware
?LSN
Sends back a string showing which Band B input is selected
?MAF*
Requests the tuning frequency for manual mode
?MAT*
Requests the Attenuator status for Manual mode
?MHT*
Requests the Hold Time for manual mode
?RBW
Sends back a string expressing the selected RBW
?S/N*
Requests Serial Number internally stored by manufacturer
?TAT*
Requests the MinAtt value
?TMP
Sends back a string showing the temperature expressed in Celsius (°C)
?UHT*
Requests the actual Hold Time currently or lastly used
?UPP*
Requests the status of input PINs of the User Port

Remote control 7-3
Setting COMMANDs
Syntax Function
ASBK
Aborts a sweep currently in progress
ASPA
Suspends a sweep currently in progress
ASRE
Resumes a sweep previously paused
S3PRC
Sets the PMM 7010 to conducted mode
S3PRR
Sets the PMM 7010 to radiated mode
SAAT a
Sets Attenuator for Analyzer Mode
SADT b
Sets the Detector for Analyzer Mode.
SAFF start,stop
Sets both Start and Stop frequency for Analyzer mode.
SAGO
Sets the 7010 in Analyzer mode
SAHT h
Sets Hold Time for Analyzer mode.
SAOP f
Sets the Stop frequency for Analyzer mode
SART f
Sets the Start frequency for Analyzer mode
SCFA n
Activates the conversion factor stored in the 7010
SCFE n, name Saves the conversion factor (made by SCFW).
SCFW n, freq; lev
Creates a conversion factor frequency by frequency.
SDMD a Switches the Demodulator On or OFF
SDMV v
Sets the volume of Demodulator
SLDW n, freq; levq, leva
Sets the custom double value limit frequency by frequency
SLIE name
Name the custom limit and making it active or deactivating it.
SLIM n
Sets the Margin to be used with Smart Detector function
SLIW n, freq; lev
Sets the custom limit frequency by frequency
SLSN n
Sets the input for Band B
SMAF f
Sets the tuning frequency for manual mode
SMAN
Sets the 7010 in manual mode
SMANP
Sets the 7010 in manual mode and sets the default value
SMAT a
Sets Attenuator for Manual Mode.
SMHT h
Sets Hold Time for manual mode
SRBW b
Sets RBW
SSFD
Sets parameters and triggers a sweep
SSFW n, freq
Creates a Frequency-Scan-Tab frequency by frequency
SSTP
Stops abruptly a running sweep in Analyzer mode
STAT b
Sets MinAtt
SUPP n
Outputs on the User Port bit by bit the argument n

7-4 Remote control
7.6 PMM 7010
COMMANDs
Following are Commands to control and set various operating modes of PMM
7010, that can be distinguished in two main groups:
• Query Commands
• Setting Commands
7.6.1
Query
COMMANDs
Description
?3PR This query command #?3PR * sends back a string expressing whether the
apparatus is a PMM 7010 and in which mode. The reply is either:
• 3PR =CON (The PMM 7010 is ready for conducted frequency range )
• 3PR =RAD (The PMM 7010 is ready for radiated frequency range )
• 3PR=NUL (The PMM 7010 is not ready)
?AAT This query command #?AAT * sends back a string expressing the Attenuator
status for Analyzer mode. The reply is made of 2 fields:
• AAT =AUTO (7010 automatically selects the most suitable attenuator to
get best dynamic range) or AAT =MAN ( operator selects manually the
attenuator)
• Value (in dB) of current attenuator
Example of reply: AAT =AUTO; 20 which means that the Attenuator is now
switched to 20dB automatically by 7010
?ACE This query command #?ACE* sends back a string expressing the Center
frequency, in exponential notation, for analyzer mode. Unit is fixed MHz.
Example of reply: ACE = 1.500000e+07 which means that the Center frequency in
Analyzer mode is 15MHz
?ADT This query command #?ADT * sends back a string expressing the detector used
for Analyzer mode. The reply cab be:
• ADT =Peak
• ADT =Avg
• ADT =Rms
?AHT This query command #?AHT* sends back a string expressing the HOLD TIME for
Analyzer mode. Unit is fixed ms.
Example of reply: AHT= 1000 ms which means that the hold time in Analyzer
mode is 1000ms (or 1s)
?AOP This query command #?AOP* sends back a string expressing the Stop frequency,
in exponential notation, for analyzer mode. Unit is fixed MHz.
Example of reply: AOP = 3.000000e+07 which means that the Stop frequency in
Analyzer mode is 30MHz
?ART This query command #?ART* sends back a string expressing the Start frequency,
in exponential notation, for analyzer mode. Unit is fixed MHz.
Example of reply: ART = 1.500000e+07 which means that the start frequency in
Analyzer mode is 15MHz
?ASP This query command #?ASP* sends back a string expressing the Spanfrequency,
in exponential notation, for analyzer mode. Unit is fixed MHz.
Example of reply: ASP = 3.000000e+07 which means that the Span frequency in
Analyzer mode is 30MHz

Remote control 7-5
?CFA This query command #?CFA* sends back a string in the format CFA=n,(LABEL)
where n is the ID of the conversion factor as shown in 7010 menu and LABEL is
its temporary name as it was last labelled. If No conversion factor is active the reply
is:
CFA= NONE
Example of reply: CFA=1,(PROBE) means that conversion factor 1 is active and it
was last named as PROBE
?CRA This query command #?CRA* sends back a string telling whether RMS-AVG
detector is available.
Reply is:
• CRA=N/A if RMS-AVG detector is NOT available
• CRA=OK if RMS-AVG detector is available
?DET This query command #?DET* sends back a string reporting the six detector for
manual mode. Unit is fixed dBµV. Each value is separated by a semicolon. The
order is Peak; Qpeak; RMS;AVG;C-RMS:C-AVG
In case Qpeak is not available (RBW other than 9kHz [only for Band B] ,120kHz)
Qpeak field is replaced by the string “----“.
In case C-RMS or C-AVG is not available (RBW other than 9kHz,120kHz)
respective field is replaced by the string “----“.
An additional string “OVER;” is appended at the end whenever an over range
condition occurred
Example of reply: DET=23.22;17.09;16.23;11.36,16.01,15.50;
(which means Peak=23.22; Qpeak=17.09; RMS=16.23;AVG=11.36;C-
RMS=16.01;C-Avg=15.50
Example of reply (No Cispr filter selected, over range shown):
DET=17.20;-----;11.98;9.57;-----;-----;OVER;
?DMD This query command #?DMD * sends back a string expressing the status of
demodulator. The reply is either:
• DMD=Off (The Demodulator is OFF)
• DMD =AM (The Demodulator is On and demodulating AM )
• DMD =FM (The Demodulator is On and demodulating FM )
?DMV This query command #?DMV * sends back a string expressing the volume of
demodulator. The reply is made of the string “DMV=” followed by the magnitude of
volume ranging from 0 to 100
• DMV=50 (The Demodulator Volume is 50)
?FPGA This query command #?FPGA* sends back a string containing information about
version of FPGA.
Note that two <LF> are appended to the string before the terminator
Example of reply: FPGA=0x14<LF><LF>
?IDN This query command #?IDN* sends back a string containing information about
model, release and date of firmware.
Note that two <LF> are appended to the string before the terminator
Example of reply: IDN=7010/03-FW - 1.09 11/06/14<LF><LF>

7-6 Remote control
?LSN This query command #?LSN* sends back a string showing which Band B input is
selected in the format: LSN=n
Where n can be:
• 0 Input on N connector
• 1 Input on 7010 internal LISN L1
• 2 Input on 7010 internal LISN L2
Example of reply: LSN=0
?MAF This query command #?MAF* sends back a string expressing the tuning
frequency, in exponential notation, for manual mode. Unit is fixed MHz.
Example of reply: MAF= 1.500000e+07 which means that the tuned frequency in
manual mode is 15MHz
?MAT This query command #?MAT * sends back a string expressing the Attenuator
status for Manual mode. The reply is made of 2 fields:
• MAT=AUTO (7010 automatically selects the most suitable attenuator to
get best dynamic range) or MAT=MAN ( the operator selects manually the
attenuator)
• Value (in dB) of current attenuator
Example of reply: MAT=AUTO; 20 which means that the Attenuator is now
switched to 20dB automatically by 7010
?MHT This query command #?MHT* sends back a string expressing the HOLD TIME for
manual mode. Unit is fixed ms.
Example of reply: MHT= 1000 ms which means that the hold time in manual mode
is 1000ms (or 1s)
?RBW
This query command #?RBW * sends back a string expressing the selected RBW.
The reply is made of 3 fields:
1. RBW=AUTO (7010 automatically selects the suitable RBW according the
tuned frequency) or RBW=MAN ( Operator selects manually the RBW)
2. Id identify the RBW as follows:
o 1 300kHz
o 2 100kHz
o 3 30kHz
o 4 10kHz
o 5 3kHz
o 6 9kHz (Cispr 16-1)
o 7 200Hz (Cispr 16-1) (Option)
o 8 1kHz (Option)
o Only for Radiated
10 120kHz (Cispr 16-1)
9 1MHz (Option)
3. RBW NickName (a mnemonic name)
Example of reply: RBW=AUTO 6 (9k_CISPR) which means that selection is
automatically made by 7010, the RBW id is 6 (9kHz (Cispr 16-1). (9k_CISPR) is
the nickname to quickly identify it
?S/N
This query command #?S/N* sends back a string containing serial number
internally stored by manufacturer.
Example of reply: S/N=000WE50327

Remote control 7-7
?TAT This query command #?TAT * sends back a string expressing MinAtt value. The
reply is a string representing the minimum reachable value of attenuator in dB
Example of reply: TAT=10 which means that MinAtt is 10dB
?TMP This query command #?TMP* sends back a string showing the temperature
expressed in Celsius (°C) .
Example of reply: TMP= 40.50
?UHT This query command #?UHT* sends back a string expressing the actual hold time
currently or lastly used
Example of reply: UHT=1.9ms
?UPP This query command #?UPP* sends back a string expressing the status of input
PIN of the User Port.
Example of reply: UPP= 1 means that user port pin is high level

7-8 Remote control
7.6.2 SETTING
Commands
Behaviour
ASBK
This command aborts a sweep currently in progress previously started by command
SSFD. The reply is either:
• SBK=OK which means the sweep has been stopped and all setting
commands are available again.
• SBK=SERR which informs that the sweep was not in need to be stopped
ASPA
This command suspends a sweep currently in progress previously started by
command SSFD. There is no reply unless a sweep is not in progress in which case
the reply is:
• SPA=SERR which informs that the sweep was not in need to be paused
ASRE This command resumes a sweep previously paused by command ASPA. There is
no reply unless a sweep is not in progress in which case the reply is:
• SRE=SERR which informs that the sweep was not in need to be resumed
S3PRC This setting command #S3PRC * sets the PMM 7010 to conducted mode (BAND B).
The reply is:
• 3PR=OK (The PMM 7010 has been set for conducted mode )
• 3PR =BERR (The command has been ignored for the following:
• The instrument is not idling and therefore cannot switch to a different
mode. In such an event, stop the current process (Manual, Analyzer or
Sweep) and put it back to Idle.
• 3PR =SERR (The command contains a syntax error )
S3PRR This setting command #S3PRR * sets the PMM 7010 to radiated mode (BANDS C,
D and E). The reply is:
• 3PR=OK (The PMM 7010 has been set for radiated mode )
• 3PR =BERR (The command has been ignored for the following:
• The instrument is not idling and therefore cannot switch to a different
mode. In such an event, stop the current process (Manual, Analyzer or
Sweep) and put it back to Idle.
• 3PR =SERR (The command contains a syntax error )
SAAT a
This setting command sets Attenuator, for Analyzer Mode, to the value indicated by
(a) which can be 0 to 35 (55). Automatic Attenuator feature is disabled. If (a) is a
negative figure then the Automatic Attenuator feature is turned on. The reply is
AAT=OK which acknowledges the command has been granted or AAT =SERR if
the command has been ignored.
Example: # AAT 15* (set attenuator to 15dB and disable Automatic Attenuator
feature)
Example: # AAT -1* (Enable Automatic Attenuator feature)

Remote control 7-9
SADT b
This setting command sets the detector for Analyzer Mode. The argument (b) should
be a index representing the detetector as follows:
o 1 Peak
o 2 Avg
o 3 Rms
The reply is SADT =OK which acknowledges the command has been granted or
SADT =SERR if the command has been ignored.
Example: # SADT 1* sets the detector to Peak for Analyzer Mode
SAFF start,stop
This setting command sets both Start and Stop frequency for Analyzer mode. The
strings (Start and Stop) can be in exponential form and should be expressed in Hz.
The reply is AFF=OK which acknowledges the command has been granted or AFF
=SERR if the command has been ignored.
Example: #SAFF 150e3,30e6* Sets the Start frequency to 150kHz and Stop
frequency to 30MHz for Analyzer mode
SAGO
This setting command puts the 7010 in Analyzer mode. The reply is always
SAGO=OK, which acknowledges the command has been granted, followed by an
array, variable in size, representing the reply. Please refer to “Analyzer Reply”
section for details of the response.
The 7010 goes to Analyzer mode.
The 7010 goes to Analyzer mode.
Example: #SAGO*
SAHT h
This setting command sets hold time for Analyzer mode. The string (h) should be
expressed in ms. The reply is AHT=OK which acknowledges the command has
been granted or AHT =SERR if the command has been ignored.
Example: #S AHT 1500* Sets the hold time, for Analyzer mode, to 1500 ms (or
1.5s)
SAOP f
This setting command sets the Stop frequency for Analyzer mode. The string (f) can
be in exponential form and should be expressed in Hz. The reply is AOP=OK which
acknowledges the command has been granted or AOP =SERR if the command has
been ignored.
Example: #SAOP 10e6* Sets the Stop frequency, for Analyzer mode, to 10MHz
SART f
This setting command sets the Start frequency for Analyzer mode. The string (f) can
be in exponential form and should be expressed in Hz. The reply is ART=OK which
acknowledges the command has been granted or ART =SERR if the command has
been ignored.
Example: #SART 150e3* Sets the Start frequency, for Analyzer mode, to 150kHz
SCFA This setting command deactivates the conversion factor (if any).
The reply is:
CFA=OK (OFF)

7-10 Remote control
SCFE n, name This setting command is used for saving the conversion factor (made by SCFW).
The command is made of the string:
• FCE (the command itself),
• n is the index and should be 0 (other index are ignored)
• name which is a string representing the name of it
This command is intended for creating a conversion factor into PMM7010. For
further information see command SCFW.
When the command is received the conversion factor is checked and, if data
(frequency and level) are coherent, the command is granted by replying SCFW =OK
otherwise the replay is SCFW =SERR
Example: #SCFE 0,Probe* checks the data previously loaded by SCFW commands,
names it as “Probe” and activates it.
SCFW n,freq;lev
This setting command is used for creating a conversion factor frequency by
frequency. It consists of three fields as follows:
• n Is the index of frequency being written and it should range from 0 to 499
• freq Is the frequency, expressed in Hz (exponential notation allowed), being
written
• lev Is the level of the limit and is expressed in dB
The procedure to creating a conversion factor on PMM7010 is the following:
• Send as many commands as the frequency points of limit are in
upwards order.
• Terminate (and make it active) by sending the command SFCE
Here is an example how to make a custom limit on PMM7010:
• #SCFW 0, 150e3; -1 * Send the first line 150kHz -1 dB
• # SCFW 1, 500e3; 0 * Send the second line 500kHz 0 dB
• # SCFW 2, 5e6; 1.2 * Send the third line 5MHz +2 dB
• # SCFW 3, 50e6; 1.1 * Send the fourth line 50MHz +1.1 dB
• # SCFW 4, 300e6; 1 * Send the fifth line 300MHz +1 dB
• #SCFE 2,Probe* Save it permanently as #2 into 7010 and name
it as “PROBE”
Note that all the higher indexes in the conversion factor are cleared. Therefore, a
conversion factor must be made upwards otherwise all points, having a higher index
previously written, are cleared.
It is responsibility of the user to make sure the data sent are correct and
coherent.
The reply is SCFW =OK which acknowledges the command has been granted or
LCFW =SERR if the command has been ignored.
SDMD
This setting command switches the Demodulator; according the parameter (a) which
can be AM, FM or OFF.
The reply is DMD =OK which acknowledges the command has been granted or
DMD =SERR if the command has been ignored.
Example: # DMD FM*
Example: # DMD OFF*

Remote control 7-11
SDMV v
This setting command sets the volume of demodulator. The string (v) should be in
the range of 0 to 100.
The reply is DMV =OK which acknowledges the command has been granted or
DMV =SERR if the command has been ignored.
Example: #SDMV 50* Sets the volume of demodulator to half of the audio power.
SLDW n,freq;
levq,leva
This setting command is used for setting the custom double value limit frequency by
frequency. It consists of four fields as follows:
• n Is the index of frequency being written and it should range from 0 to 15
• freq Is the frequency, expressed in Hz (exponential notation allowed), being
written
• levq Is the level of the limit which refers to QPeak and is expressed in dBµV
• leva Is the level of the limit which refers to the alternate detector and is
expressed in dBµV
The purpose of this command is to have a double value limit that can be used along
with smart detector function when sweeping by the command SSFD:
The procedure to set a custom double value limit on PMM7010 is the following:
• Send as many commands as the frequency points of limit are in
upwards order.
• Terminate (and make it active) by sending the command SLIE
Here is an example how to make a custom limit on PMM7010:
• #SLDW 0, 150e3; 66,56 * Send the first line 150kHz 66 dBµV
• #SLDW 1, 500e3; 56,46 * Send the second line 500kHz 56 dBµV
• #SLDW 2, 5e6; 56,46 * Send the third line 5MHz 56 dBµV
• #SLDW 3, 5e6; 60,50 * Send the fourth line 5MHz 60 dBµV
• #SLDW 4, 30e6; 60,50 * Send the fifth line 30MHz 60 dBµV
• #SLIE Custom Double * Send the name and make the limit active
Note that all the higher indexes in the limit are cleared. Therefore, a limit must be
made in upwards order otherwise all points, having a higher index previously written,
are cleared.
It is responsibility of the user to make sure the data sent are correct and
coherent.
The reply is SLDW =OK which acknowledges the command has been granted or
LDW =SERR if the command has been ignored.
SLIE name
This setting command is used for naming the custom limit and making it active or
deactivating it. The command is made of the string LIE (the command itself) and a
string which represents the name of the limit it will be shown. Sending a LIE with no
argument (Limit name) deactivates all limit active, if any. This command is intended
for making a custom limit into PMM7010. For further information see command
SLIW.
When the command is received the limit is checked and, if data (frequency and
level) are coherent, the command is granted by replying SLIW =OK otherwise the
replay is SLIW =SERR
Example: # SLIE Custom Limit* checks the data previously loaded by SLIW
commands, names the limit as “Custom Limit” and activates it
Example: # SLIE * deactivates any limits

7-12 Remote control
SLIM n
This setting command sets the Margin to be used with Smart Detector function. The
argument (n) in the range of -20 to 20.
The reply is LIM =OK which acknowledges the command has been granted or LIM
=SERR if the command has been ignored.
Example: #SLIM 2* Sets the threshold of smart detector to 2 dB below the limit.
SLIW n,freq;lev
This setting command is used for setting the custom limit frequency by frequency. It
consists of three fields as follows:
• n Is the index of frequency being written and it should range from 0 to 15
• freq Is the frequency, expressed in Hz (exponential notation allowed), being
written
• lev Is the level of the limit and is expressed in dBµV
The procedure to set a custom limit on PMM7010 is the following:
• Send as many commands as the frequency points of limit are in
upwards order.
• Terminate (and make it active) by sending the command SLIE
Here is an example how to make a custom limit on PMM7010:
• #SLIW 0, 150e3; 66 * Send the first line 150kHz 66 dBµV
• #SLIW 1, 500e3; 56 * Send the second line 500kHz 56 dBµV
• #SLIW 2, 5e6; 56 * Send the third line 5MHz 56 dBµV
• #SLIW 3, 5e6; 60 * Send the fourth line 5MHz 60 dBµV
• #SLIW 4, 30e6; 60 * Send the fifth line 30MHz 60 dBµV
• #SLIE Custom CISPR 14-1 * Send the name and make the limit
active
Note that all the higher indexes in the limit are cleared. Therefore, a limit must be
made in upwards order otherwise all points, having a higher index previously written,
are cleared.
It is responsibility of the user to make sure the data sent are correct and
coherent.
The reply is SLIW =OK which acknowledges the command has been granted or LIW
=SERR if the command has been ignored.
SLSN n This setting command #SLSN n* sets the input for Band B according to the
argument ‘n’ as follows:
• 0 Input on N connector
• 1 Input on 7010 internal LISN L1
• 2 Input on 7010 internal LISN L2
‘n’ higher than ‘2’ is ignored and SERR message sent back
The reply is LSN =OK which acknowledges the command has been granted or LSN
=SERR if the command has been ignored.
Example: #SLSN 0* switches the input for radiated to ‘N’ connector
Example: #SLSN 2* switches the input for radiated to the 7010 built-in LISN Line-2
SMAF f
This setting command sets the tuning frequency for manual mode. The string (f) can
be in exponential form and should be expressed in Hz. The reply is MAF=OK which
acknowledges the command has been granted or MAF=SERR if the command has
been ignored.
When the command is granted the 7010 goes to manual mode automatically
Example: #SMAF150e3* Sets the manual frequency to 150kHz

Remote control 7-13
SMAN This setting command puts the 7010 in manual mode. The reply is always MAN=OK
which acknowledges the command has been granted.
The 7010 goes to manual mode.
Example: #SMAN *
SMANP
This setting command puts the 7010 in manual mode and sets the default value to
the following settings:
• RBW Automatic
• Attenuator Automatic
• MinAtt=10 dB
• Preselector On
• Preamplifier OFF
• Hold Time =1000ms
• Pulse Limiter = OFF
• TG=OFF
The reply is always MANP=OK which acknowledges the command has been
granted.
The 7010 goes to manual mode.
Example: #SMANP*
SMAT a
This setting command sets Attenuator, for Manual Mode, to the value indicated by
(a) which can be 0 to 35 (55). Automatic Attenuator feature is disabled. If (a) is a
negative figure then the Automatic Attenuator feature is turned on. The reply is
MAT=OK which acknowledges the command has been granted or MAT =SERR if
the command has been ignored.
When the command is granted the 7010 goes to manual mode automatically.
Example: #SMAT 15* (set attenuator to 15dB and disable Automatic Attenuator
feature)
Example: #SMAT -1* (Enable Automatic Attenuator feature)
SMHT h
This setting command sets hold time for manual mode. The string (h) should be
expressed in ms. The reply is MHT=OK which acknowledges the command has
been granted or MHT =SERR if the command has been ignored.
When the command is granted the 7010 goes to manual mode automatically.
Example: #SMHT 1500* Sets the hold time, for manual mode, to 1500 ms (or 1.5s)
SRBW b
This setting command sets RBW. The argument (b) should be a string representing
the RBW as follows:
o 0 RBW is Automatic so that the 7010 automatically selects the
suitable RBW according to the tuned frequency
o 1 300kHz
o 2 100kHz
o 3 30kHz
o 4 10kHz
o 5 3kHz
o 6 9kHz (Cispr 16-1)
o 7 200Hz (Cispr 16-1) (Option)
o 8 1kHz (Option)
o Only for Radiated
10 120kHz (Cispr 16-1)
9 1MHz (Option)
The reply is RBW =OK which acknowledges the command has been granted or
RBW =SERR if the command has been ignored.
Example: #S RBW 3* sets the RBW to 30kHz and disables Auto RBW mode
Example: #S RBW 0* turn the RBW mode in Automatic

7-14 Remote control
SSFD
FreqStart;
FreqStop;
FreqStep;
Detector;
HoldTime; Rbw;
MinAtt; Preamp;
Preselector;
ScanHoldT
Arguments are as follows:
• FreqStart = Sweep Start Frequency expressed in Hz
• FreqStop = Sweep Stop Frequency expressed in Hz
• FreqStep = Sweep Step Frequency expressed in Hz
o If FreqStep > 0 then a standard sweep, tuned step by step, is
made
o If FreqStep < 0 (typical = -1) then the step will be set to AUTO
o If FreqStep = 0 then the sweep will be made by tuning all the
frequencies which are listed in Frequency-Scan-Tab (which it must
have been written previously by command SSFW.
• Detector. In non –smart mode, any combination of the following detectors
can be used and combined. All the detectors set will be measured and sent
out. However, in Smart Mode only one detector at time, in addition to PEAK
which is always present, can be set.
o Non Smart Mode (All detectors can be indicated at once). Order is
not important.
P Peak
Q Peak
N C-Rms
A Avg
R Rms
C C-Avg
o Smart Mode (No more than 2 detectors can be indicated at once)
S Smart Mode (this must be the first in the string)
Q Peak
N C-Rms
A Avg
R Rms
C C-Avg
• HoldTime = Hold Time for each step and it is expressed in ms. Note that in
case of Smart Mode HoldTime is used only when the disturbance is
measured again by the alternative detector as minimum time, depending on
the Rbw set, is used for the fast scan.
• Rbw. This is the index of Rbw to be used for the scan. Neither automatic
selection, nor automatic switch is performed. The user must issue a suitable
Rbw index. Index are as follows:
o 1 300kHz
o 2 100kHz
o 3 30kHz
o 4 10kHz
o 5 3kHz
o 6 9kHz (Cispr 16-1)
o 7 200Hz (Cispr 16-1) (Option)
o 8 1kHz (Option)
o Only for Radiated
10 120kHz (Cispr 16-1)
91MHz (Option)
• MinAtt = Minimum attenuation allowed during sweeping. This parameter
ranges from 0 (no limitation) to the maximum the 7010 can set. This
parameter is normally used to avoid switching up the sensitivity in order to
either protect the input from high spikes or to prevent switching down the
attenuation when, for instance, the limit is so high that it would be only
waste of time.
Note: In Sweep mode the Attenuator is always forced to AUTO

Remote control 7-15
(Continued)
SSFD FreqStart;
FreqStop;
FreqStep;
Detector;
HoldTime; Rbw;
MinAtt; Preamp;
Preselector;
ScanHoldT
• Preamp. This Parameter switches the Preamplifier On or Off according to
its content as follows.
o On. It turns ON the preamplifiaer.
o Off. It turns Off the preamplifiaer.
• Preselector. This Parameter switches the Preselector On or Off according
to its content as follows.
o On. It turns ON the Preselector.
o Off. It turns Off the Preselector.
• ScanHoldT = Hold Time used in Smart Mode when tuning for Peak for each
step and it is expressed in ms. Note that this is used only in case of Smart
Mode and not in standard sweep. This parameters is not compulsory and
can be omitted if not required. I case it is not present, minimum time is
taken.
This command triggers a free sweep (no automatic items are selected) based on the
provided parameters. After this command has been received, all parameters issued
in the command itself are checked out and, if coherent, a sweep starts otherwise the
related error is notified and the sweep is not triggered.
Moreover, using the Frequency-Scan-Tab, the user has the capability of tuning only
those frequencies which are suspected skipping thus the remainder. Hence, saving
a lot of time.
After the command has been received, the 7010 replies by sending a string which
reflects the status of parameter check as follows:
• SFD=OK<RC><LF> No error in parameters and sweep started.
• SFD=ERR 1<RC><LF> An Error was found in start or stop frequencies.
Errors can be one of the following:
o Start Frequency lower than minimum allowed frequency
o Stop Frequency higher than maximun allowed frequency
o Start Frequency higher than Stop Frequency
• SFD=ERR 2<RC><LF> An Error was found in step frequency. Step is either
o Too small.
o Is equal to zero (use of Frequency-Scan-Tab) but there are less than two
frequencies in the table
• SFD=ERR 3<RC><LF> An Error was found in detector. Errors can be one of
the following:
o Invalid Detector or no detector found. Detectors must be indicated by
‘P’,’Q’,’R’,’A’,’N’ and ‘S’ only
o Smart Mode selected but no active limit
o Smart Mode selected but no alternative detector
o Smart Mode selected but more than two alternative detector indicated
• SFD=ERR 4<RC><LF> An Error was found in HoldTime value. HoldTime is
either too big (>10s) or negative.
• SFD=ERR 5<RC><LF> An Error was found in RBW. Errors can be one of the
following:
o Unsuitable RBW for the active unit (for instance 200HZ Rbw while
Downconverter is active)
o Unsuitable RBW for the detector previously selected (for instance 100kHZ
Rbw and QuasiPeak selected).
• SFD=ERR 6<RC><LF> An Error was found in MinAtt value. Errors can be one
of the following:
o MinAtt value is negative
o MinAtt value is higher than maximum available attenuation
o MinAtt value is not in step of 5
• SFD=ERR 7<RC><LF> An Error was found in Preamp string. Preamp string
can be either ON or OFF only. String is not case sensitive.
• SFD=ERR 8<RC><LF> An Error was found in Preselector string. Preselector
string can be either ON or OFF only. String is not case sensitive.

7-16 Remote control
(Continued)
SSFD FreqStart;
FreqStop;
FreqStep;
Detector;
HoldTime; Rbw;
MinAtt; Preamp;
Preselector;
ScanHoldT
Once the sweep is started, the 7010 sends the value of each detector chosen in the
command. Each detector is made of a Little Endian 16 bit integer which represents
the value of that particularly tuned frequency. The value is expressed in hundredth
of dBm. Therefore, for each step, there will be a packet of n detectors (n *2 bytes).
The order of detectors is fixed and is not related to the order issued in the command.
For instance, PAQ is equivalent to QAP as well as RA is same as AR. The order of
detector is as follows (from the first to the last):
1. Peak (which is always present)
2. QPeak (QuasiPeak)
3. RMS
4. AVG (Average)
5. C-RMS
6. C-AVG
Special meaning has the value NOLEVEL, -32700 (Hex 8044), which informs that
the detector has not been measured. This happens, for example, in Smart mode
where the alternative detector is taken only for those frequencies the Peak was
above the limit.
After having terminated all steps and sent all data, the string SFD_END<RC><LF> is
then sent informing the user there are no more data left.
Any started sweep can be stopped by sending the command ASBK which abruptly
terminates it.
In case the sweep was prematurely terminated by the command ASBK, the end of
sweep (which will not contain all expected data) is SBK=OK<RC><LF>
Here is an example of the command:
#SSFD 1e6;10e6;10e3;PAR;0;6;10;OFF;ON*
Which triggers a sweep from 1 MHz to 10 MHz using a step of 5 kHz. Detectors are
Peak, AVG and RMS. The hold time will be the minimum suitable (automatically
adjusted by the unit). RBW is 9kHz. MinAtt is 10 dB which means that the attenuator
will not switch below 10 dB attenuation. Preamplifier is OFF while the Preselector is
turned on.
Here, for each step there will be a packet of 3 detectors per step (Peak, AVG and
RMS in this order) counting thus 6 bytes (3 * 2) per step.
Here is another example:
#SSFD 9e3;150e3;50;SPQ;1000;7;10;OFF;ON;100*
Which triggers a sweep from 9kHz to 150kHz using a step of 50 Hz. Detector is
Smart QuasiPeak using a hold time of 1s in re-measuring those frequencies which
value was over the limit scanned using 100ms holdtime . RBW is 200Hz. MinAtt is 10
dB which means that the attenuator will not switch below 10 dB attenuation.
Preamplifier is OFF while the Preselector is turned on.
In this case, as all the needed conditions are matched , FFT is used to perform the
Peak scan.
Here, for each step there will be a packet of 2 detectors per step (Peak and
QuasiPeak in this order) counting thus 4 bytes (2 * 2) per step. Of course, most of
QuasiPeak value will be populated by NOLEVEL as QuasiPeak will be measured
only for few frequencies (the ones which value is above the limit).

Remote control 7-17
SSFW n,freq
This setting command is used for creating a Frequency-Scan-Tab frequency by
frequency. It is made of two fields as follows:
• n Is the index of frequency being written and it should range from 0 to 99
• freq Is the frequency, expressed in Hz (exponential notation allowed), being
written
The procedure to make and use a Frequency-Scan-Tab on PMM7010 is the
following:
• Send as many commands SSFW as frequency points of table are in
upwards order.
• Send the command SSFD with step size set to zero
Here is an example how to make a Frequency-Scan-Tab on PMM7010:
• #SSFW 0, 150e3 * Set the first freq to 150kHz
• # SSFW 1, 500e3 * Set the second freq to 500kHz
• # SSFW 2, 5e6* Set the third freq to 5MHz
• # SSFW 3, 6e6* Set the fourth freq to 6MHz
• # SSFW 4, 30e6 * Set the fifth freq to 30MHz
Note that all the higher indexes in the Frequency-Scan-Tab are cleared. Therefore, a
Frequency-Scan-Table must be made in upwards order. All points, having a higher
index previously written, are cleared.
Note that only the present frequencies will be tuned and measured as all remaining
will be completely neglected. Hence, it is responsibility of the user to make sure
the data sent are correct and coherent.
The reply is SSFW =OK which acknowledges the command has been granted or
SSFW =SERR if the command has been ignored.
SSTP
This setting command stops abruptly a running sweep in Analyzer mode. The reply
is always STP=OK, which acknowledges the command has been granted
STAT b
This setting command sets MinAtt to the value indicated by (b) which range from
0dB to the maximum the 7010 can set and must be in step of 5dB. The reply is
TAT=OK which acknowledges the command has been granted or TAT =SERR if the
command has been ignored.
Example: #STAT 10*
Note: In Sweep mode the Attenuator is always forced to AUTO
SUPP n This setting command #SUPP n* outputs on the User Port bit by bit the argument n .
Each Pin has its own contribution according to its index as follows:
OUT0= 2^0
OUT1= 2^1
OUT2= 2^2
Thus, the argument sent is the sum of each weighted contribution
The reply is UPP=OK which acknowledges the command has been granted or
UPP=SERR if the command has been ignored (IE argument >31).
Example: SUPP 5 will set:
• user port pins OUT0 and OUT2 to high level
• user port pins OUT1 to low level

7-18 Remote control
7.6.3 Analyzer
Reply
The PMM 7010 replies to the command “SAGO” sending back an array of bytes
which contains all the information needed to draw a sweep.
Typically, the user should first send the PMM 7010 all the setting commands to
insure the receiver is correctly set on the wanted parameters and then read the
reply.
Just as an example, the user could send the following commands:
7.6.3.1 Reply
example
#SAAT -1* Set Attenuator Automatic mode
#SAPA Off* Switch Preamplifier OFF
#SPLM a* Switch Pulse Limiter OFF
#SAFF
150e3,30e6*
Sets the Start frequency to 150kHz
and Stop frequency to 30MHz
#SAHT 2* Sets the hold time to 2 ms
#SADT 2* Sets the detector to AVG
............. More Command
............. More Command
#SAGO *
Start Sweep in Analyzer Mode
The PMM7010 replies by sending a 48 bytes header followed by a variable
size array of integer (the size depends on frequency settings) as follows:
HEADER
ID Byte Value Meaning
1 A The first 8 Bytes are just a fixed header and acknowledge the command
2 G
3 O
4 =
5 O
6 K
7 0x13 (CR)
8 0x10 (LF)
9 Start
Frequency
Little Endian 32 bit Float figure representing the start frequency of sweep
10
11
12
13 Stop
Frequency
Little Endian 32 bit Float figure representing the Stop frequency of sweep
14
15
16
17 Step
Frequency
Little Endian 32 bit Float figure representing the step frequency of sweep
18
19
20
21
…
26
Reserved
…
…
27 Attenuator Little Endian 16 bit integer representing the attenuator used
28
29
…
48
Reserved
….
…

Remote control 7-19
********** End of Header ********** (continued)
From here all figures represent the level referred to the tuned frequency
And are expressed in hundredth of dBm
49 Level Fstart Little Endian 16 bit integer representing the level referred to start
frequency.
50
51 Level Fstart
+Fstep
Little Endian 16 bit integer representing the level referred to start frequency
plus step frequency
52
51 Level Fstart
+2*Fstep
Little Endian 16 bit integer representing the level referred to start frequency
plus 2 * step frequency
52
.... ....... ..........
.... ....... ..........
nn Level Fstop Little Endian 16 bit integer representing the level referred to Stop
frequency
nn+1
The number of levels replied is calculated by the formula 1+(FstopFstart)/Fstep. However, because of the different approximation in managing
floating point figures, please note that the number of received levels may
slightly differ specially with big difference in (Fstop-Fstart).
It is always possible to terminate a sweep before its natural end by sending
the command SSTP.

7-20 Remote control
7.6.4 Sweep
Structure
The PMM 7010, in order to optimize memory, stores measures (sweeps) in dynamic
mode. This means that a single sweep does not have a fixed size but it varies
depending on the sweep itself. Moreover, in order to have a sweep made of
different steps (as for example band A and band B), often sweeps are split into two
single sweeps. Basically, the higher the span, the wider the size of sweeps. Here
below there is a comprehensive description of the structure in which a sweep is
stored by the PMM 7010.
The full structure is obtained by the reply to the command “?FSF n”.
The PMM7010 replies by first sending a Little Endian 32 bit long representing the
size of the array, then a 512 bytes main header plus an additional 512 bytes
sweeps header followed by a variable size array of integer (the size depends on
frequency settings) as follows:
ID Byte Mnemonic Meaning
1 Size of data Little Endian 32 bit long representing the size in byte of full sweep
2
3
4
Main Header
ID Byte Mnemonic Meaning
1 Start
Frequency
Little Endian 32 bit Float figure representing the start frequency of full
sweep
2
3
4
5 Stop
Frequency
Little Endian 32 bit Float figure representing the Stop frequency of full
sweep
6
7
8
9 NumSweep Little Endian 16 bit integer representing the number of single sub-sweeps
forming the full sweep
10
11 Detector Little Endian 16 bit integer representing the detector used
12
13
…
498
Reserved
….
…
499
…
512
Conversion
Fatctor
Null terminated string containing the name of the conversion factor used
********** End of Main Header **********

Remote control 7-21
Sweeps header
Sweep #n
ID Byte Mnemonic Meaning
513+(n-1)*32 Start
Frequency
Sub1
Little Endian 32 bit Float figure representing the start frequency of subsweep #1
514+(n-1)*32
515+(n-1)*32
516+(n-1)*32
517+(n-1)*32 Stop
Frequency
Sub1
Little Endian 32 bit Float figure representing the Stop frequency of subsweep #1
518+(n-1)*32
519+(n-1)*32
520+(n-1)*32
521+(n-1)*32 Step
Frequency
Sub1
Little Endian 32 bit Float figure representing the Step frequency of subsweep #1
522+(n-1)*32
523+(n-1)*32
524+(n-1)*32
525+(n-1)*32 OffRec1 Little Endian 32 bit long representing the address of the array level of sub-
sweep #1
This figure must be multiplied by 2
526+(n-1)*32
527+(n-1)*32
528+(n-1)*32
529+(n-1)*32 LenRec1 Little Endian 32 bit long representing the size (in 16 bit words) of current
sub-sweep #1
This figure must be multiplied by 2
530+(n-1)*32
531+(n-1)*32
532+(n-1)*32
533+(n-1)*32 Detector
Sub1
Little Endian 16 bit integer representing the detector used #1
The meaning of each individual bit is :
o 0x0001 --> Peak
o 0x0002 --> Avg
o 0x0004 --> RMS
o 0x0008 --> QPeak
o 0x0010 --> C-Rms
o 0x0020 --> C-Avg
o 0x0200 --> Smart Avg
o 0x0400 --> Smart RMS
o 0x0800 --> Smart QPeak
o 0x1000 --> Smart C-Rms
o 0x2000 --> Smart C-Avg
534+(n-1)*32
535+(n-1)*32
…
544+(n-1)*32
Reserved
….
…

7-22 Remote control
Then, the arrays containing the level related to the tuned frequencies can be
interpreted using the data OffRec and LenRec (respectively OffRec1, LenRec1
for sweep 1 and OffRec2, LenRec2 for sweep 2) as follows:
Level Array
From here all figures represent the level referred to the tuned frequency
And are expressed in hundredth of dBm
OffRecn+1
Level Fstart
Peak
Little Endian 16 bit integer representing the level referred to start frequency
of sub sweep n.
OffRecn +2
OffRecn +3
Level Fstart
Alternate
Detector
Little Endian 16 bit integer representing the level of the alternate detector
referred to start frequency of sub sweep n.
OffRecn +4
OffRecn +5
Level Fstart
+Fstep
Little Endian 16 bit integer representing the level referred to start frequency
of sub sweep n plus step frequency of sub sweep n.
OffRecn +6
OffRecn +7
Level Fstart
+Fstep
Alternate
Detector
Little Endian 16 bit integer representing the level of the alternate detector
referred to start frequency of sub sweep n plus step frequency of sub
sweep n.
OffRecn +8
OffRecn +9
Level Fstart
+2*Fstep
Little Endian 16 bit integer representing the level referred to start frequency
of sub sweep n plus 2* step frequency of sub sweep n.
OffRecn +10
OffRecn +11
Level Fstart
+2*Fstep
Alternate
Detector
Little Endian 16 bit integer representing the level of the alternate detector
referred to start frequency of sub sweep n plus 2* step frequency of sub
sweep n.
OffRecn +12
.... ....... ..........
.... ....... ..........
OffRecn +
(2*LenRecn) +1
Level Fstop Little Endian 16 bit integer representing the level referred to Stop
frequency of sub sweep n.
OffRecn +
(2*LenRecn) +2
OffRecn +
(2*LenRecn) +3
Level Fstop
Alternate
Detector
Little Endian 16 bit integer representing the level of the alternate detector
referred to Stop frequency of sub sweep n.
OffRecn +
(2*LenRecn) +4

Remote control 7-23
7.6.5 Procedure
to read a
measure
stored by
PMM 7010
1. Send the command #?FSF n * .
2. Wait for the size of array
3. Wait for the first 1024 bytes in order to get both main and sweeps header
4. Read the relevant data concerning Start, Stop of full sweep as well as single
sub-sweeps if they are more than one.
5. Go to the offset OffRec1 (OffRec1 *2) in the received buffer and read all the
LenRec1 levels.
6. If the number of Sub-Sweeps is 2, go to the offset OffRec2 in the received
buffer and read all the LenRec2 levels.
7. Next Address is (OffRec2+ LenRec1)*2

7-24 Remote control
7.7 Sweep Mode
commands
sequence
example
This is the sequence used by the PMM Emission Suite when a scantable is run, in
the “conducted” range (Band B from 0.15 to 30 MHz).
Example
Command sent Reply received Description
#?IDN*
Queries information about model, release and date of the firmware
IDN=7010/03-FW - 1.09 11/06/14
It is a 7010/03 with its FW
It is used to check congruencies, frequency limits, and all the related
characteristics
#?S/N*
Queries the serial number
S/N=000WE20304
Serial number
#?CRA*
Queries if RMS-AVG optional detector is active
CRA=OK
RMS-AVG active
#SCFA -1*
Correction factors, if present, deactivated
CFA=OK (OFF)
Important. Could be previously stored and activated.
#S3PRC*
Sets the unit in the bands A and B for conducted
3PR=OK
ack
#SSFD
150000;30000000;5000;P;2;6;10;OFF;OFF;0*
Sweep
Binary data reply
Measurements data
#?UHT*
Queries the hold time
UHT=2.5ms
Applied hold time

NARDA
Safety
Test
Solutions
S.r.l. Socio Unico
Sales & Support:
Via Leonardo da Vinci, 21/23
20090 Segrate (MI) -
ITALY
Tel.: +39 02 2699871
Fax: +39 02 26998700
Manufacturing Plant:
Via Benessea, 29/B
17035 Cisano sul Neva (SV)
Tel.: +39 0182 58641
Fax: +39 0182 586400
http://www.narda-sts.it
Mod. 18-1
Caro cliente
grazie per aver acquistato un prodotto NARDA! Sei in possesso di uno strumento che per molti anni ti garantirà un’alta qualità di servizio. NARDA riconosce
l'importanza del Cliente come ragione di esistenza; ciascun commento e suggerimento, sottoposto all'attenzione della nostra organizzazione, è tenuto in grande
considerazione. La nostra qualità è alla ricerca del miglioramento continuo. Se uno dei Suoi strumenti NARDA necessita di riparazione o calibrazione, può aiutarci
a servirla più efficacemente compilando questa scheda e accludendola all’apparecchio.
Tuttavia, anche questo prodotto diventerà obsoleto. In questo caso, ti ricordiamo che lo smaltimento dell'apparecchiatura deve essere fatto in conformità con i
regolamenti locali. Questo prodotto è conforme alle direttive WEEE dell’Unione Europea (2002/96/EC) ed appartiene alla categoria 9 (strumenti di controllo). Lo
smaltimento, in un ambiente adeguato, può avvenire anche attraverso la restituzione del prodotto alla NARDA senza sostenere alcuna spesa. Può ottenere ulteriori
informazioni contattando i venditori NARDA o visitando il nostro sito Web www.narda-sts.it.
Dear Customer
thank you for purchasing a NARDA product! You now own a high-quality instrument that will give you many years of reliable service. NARDA recognizes the
importance of the Customer as reason of existence; in this view, any comment and suggestion you would like to submit to the attention of our service organization
is kept in great consideration. Moreover, we are continuously improving our quality, but we know this is a never ending process. We would be glad if our present
efforts are pleasing you. Should one of your pieces of NARDA equipment need servicing you can help us serve you more effectively filling out this card and
enclosing it with the product.
Nevertheless, even this product will become obsolete. When that time comes, please remember that electronic equipment must be disposed of in accordance with
local regulations. This product conforms to the WEEE Directive of the European Union
(2002/96/EC) and belongs to Category 9 (Monitoring and Control Instruments). You can return the instrument to us free of charge for proper environment friendly
disposal. You can obtain further information from your local NARDA Sales Partner or by visiting our website at www.narda-sts.it.
Servizio richiesto: Service needed:
Solo taratura Riparazione Riparazione & Taratura Taratura SIT Altro:
Calibration only Repair Repair & Calibration Certified Calibration Other:
Ditta:
Company:
Indirizzo:
Address:
Persona da contattare: Telefono:
Technical contact person: Phone n.
Modello: Numero di serie:
Equipment model: Serial n.
Accessori ritornati con l’apparecchiatura: Nessuno Cavo(i) Cavo di alimentazione Altro:
Accessories returned with unit: None Cable(s) Power cable Other:
Sintomi o problemi osservati: Observed symptoms / problems:
Guasto: Fisso Intermittente Sensibile a : Freddo Caldo Vibrazioni Altro
Failure: Continuous Intermittent Sensitive to: Cold Heat Vibration Other
Descrizione del guasto/condizioni di funzionamento:
Failure symptoms/special control settings description:
Se l’unità è parte di un sistema descriverne la configurazione:
If unit is part of system please list other interconnected equipment and system set up:

Suggerimenti / Commenti / Note:
Suggestions / Comments / Note:
 Loading...