

Page 1
GOURMET GRILLS
LE GRILS DU GOURMET
MANUFACTUREDBY/ MANUFACTUREPAR: NAPOLEONAPPLIANCE CORP.,
214 BAYVIEW DR., BARRIE, ONTARIO,CANADA L4N 4Y8
CUSTOMER SERVICE PHONE: (866) 820-8686 FAX: (705)727-4282
EMAIL: ask@nac.on.ca WEBB SITE: www.napoleongrills.com
PTSS215 ACCESSORY MOUNTING INSTRUCTIONS
Please use this manual in conjuction with your main manual to properly assemble your gas grill. Refer to
the main manual for operating, cleaning, and maintenance instructions.
WARNING:
-This grill is not to be used while the vessel is in motion.
- When operating the grill on a vessel, only 8 oz cylinders that are DOT approved (2P/2Q) can be used in the United States. In
Canadaa 16 oz. cylinder may be used. These cylinders are available atyourlocal marina or hardware store.
-This grill is not to be mounted on a railing while the boat is in motion. It is highly recommended that the grill head is removed and
storedaway before casting off.
Propaneandbutanecan be more dangerous than gasoline. These gases are heavier than air. Ifthey escape, they collect in the lower
partsofthevesselandareverydifficulttoremove. Make sure all propane appliances and cylinders are properlysecured,protected
andventilated, so that escaping gas can not reach bilges or otherenclosedspaces. The equipment installationshould meet Federal
Governmentstandards.
Makesure that all valves are working properly,andthatallconnectionsare tight.
Whenused on a small vessel, this unit must be installed according tothemanufacturer’s instructions.
Thisapplianceis not to be installedon any small commercial vessel that is carrying passengers.
Do not install or store this appliancein a manner that permits or islikely to permit ingress or trapping of the gas below deck.
This grill is not to be operated within a cabin or any other enclosed area. Thisgrill is to be used outdoors only.
N415-0117 / APR 09/04
Page 2
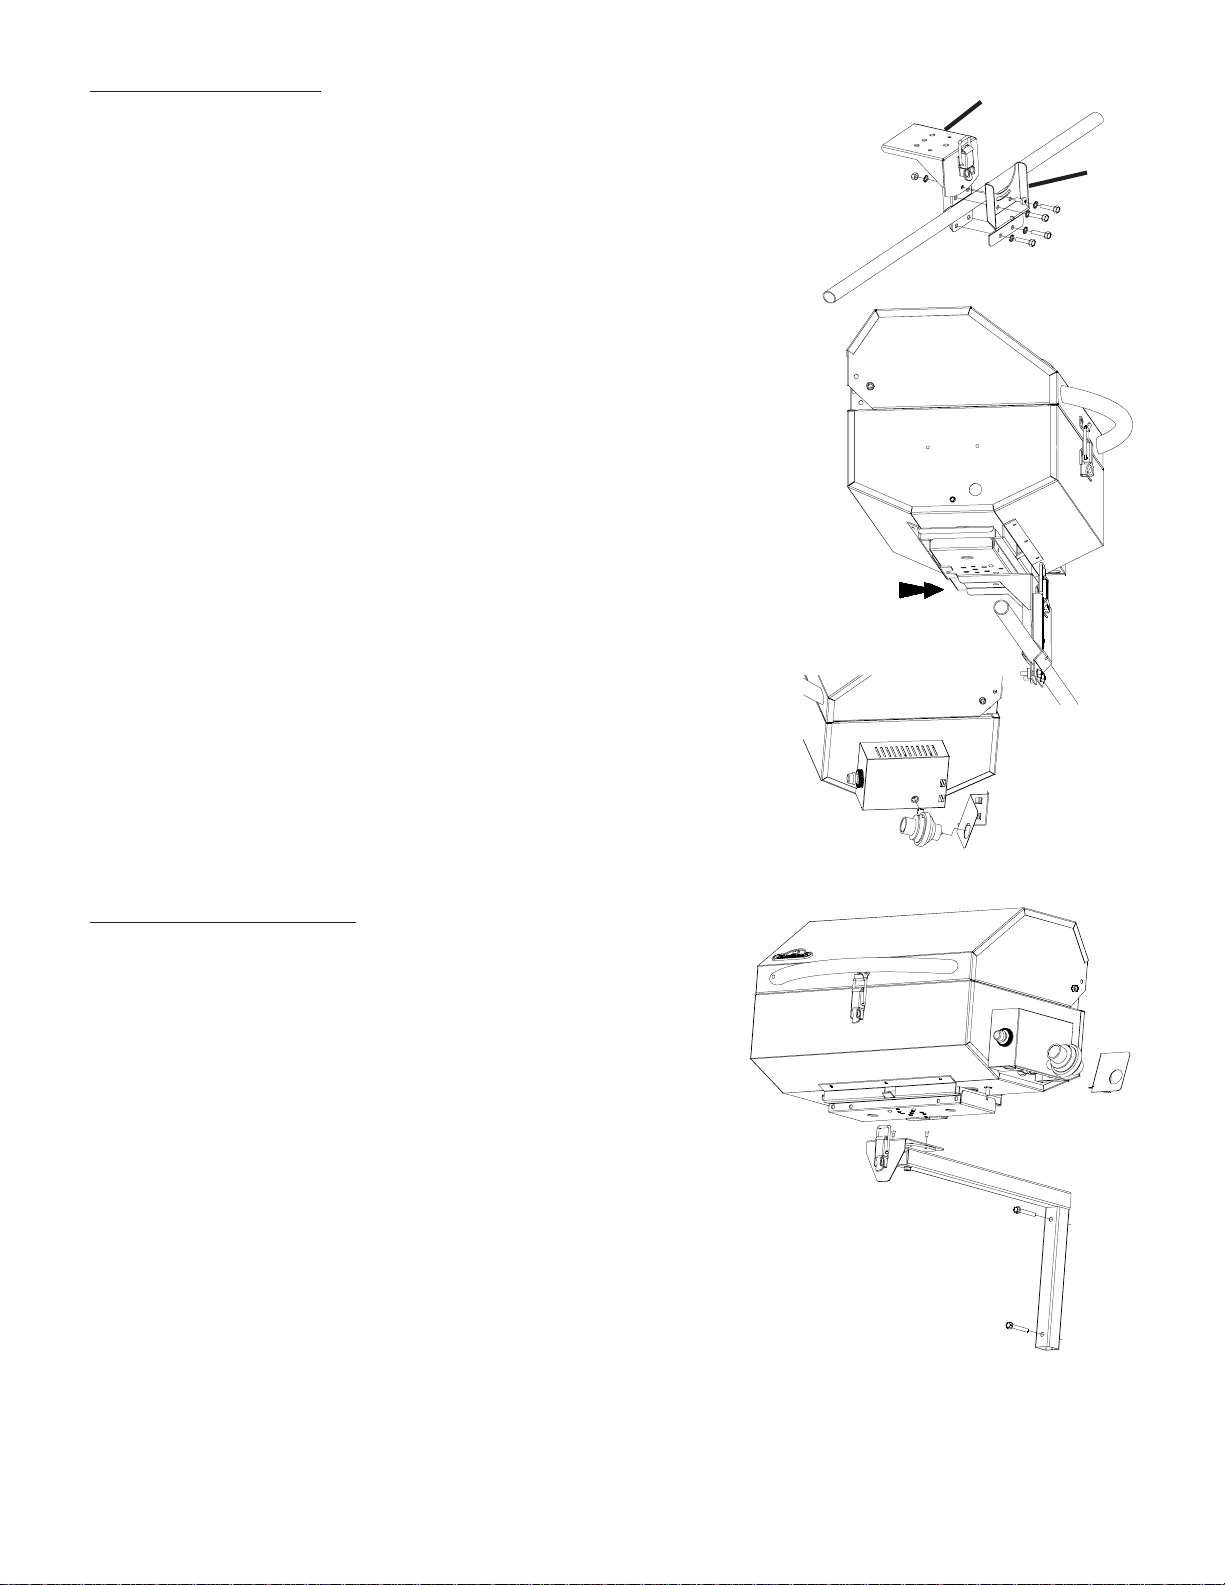
Rail Mount Instructions:
1. Place mount “A” on the outsideof the railing, with the mounting platform facing up.
A
2.Attach mount “B” to mount “A” using the four 1/4-20 x 1” bolts.
3. Level the platform and tighten the top two bolts first. Be sure the platform is pinched tight before
tightening the bottom two bolts.
4.The platform can also be adjusted left to right by loosening the top two bolts and centre
pivotscrew. Once theplatformisadjusted,tighten all three fasteners.
5. Once the platform is level in both directions, the grill can bemounted:
a. Lock the lid of the grill closed with the latch.
b. Hold the grill by the handle with one hand, place the other hand under the grill in the centre of
thefront taperedsurface.
c. Place the grill bottom on the platform and slide it forward to engage the tab protruding from
the bottom of the grill. Ensure that the tab is properly engaged.
d. When the dimples on the bottom of the unit line up with the holes on the platform,the latch is
readyto be fastened.
6. Under extreme conditions, thebracket may pivot around the railing. A centre hole has been
provided to allow a bolt tobe fastened through the railto prevent the grill from pivoting on the rail.
7. Once the grill has been attached, thread the regulator (clockwise) into the regulator mount. On
tube burner version, lift the burner slightly to align it withthe orifice. Tightenby hand.
8.To fasten the regulator locking bracket, locate it at the bottom back corner of the
regulator mount and turn the regulator until the gas inlet is aligned with the hole in the
regulator locking bracket. Slidethe lockingbracket forward until the two tabs engage
into the slots on the regulator mount. Tapin firmly.
B
9.Attach the cylinder to the regulator by turning clockwise. (Be sure not to cross thread
thecylinder.)
Wall Mounting Instructions:
1. Using the two holes provided in the vertical tube, mount the bracket to the wall.
2.Ensure minimum clearance to combustibles are maintained, 4” (100mm) to sides,
and 6”(150mm) from the rear.
3. Do not locate the grill under unprotected combustible construction.
4.Theplatformmaybe swivelled by removing the two #8 x 3/8” flathead phillips screws
and turning the platform to the desired angle. Replacethe two screws and tighten.
5. Once the platform is located in the desired position, the grill can be mounted:
a. Lock the lid of the grill closed with the latch.
b. Hold the grill by the handle with one hand, place the other hand under the grill in the centre of the
fronttaperedsurface.
c. Place the grill bottom on the platform and slide it forward to engage the tab protruding from the bottom of the grill.
Ensurethat the tab is properly engaged.
d. When the dimples on the bottom of the unit line up with the holes on the platform, the latch is ready to be fastened.
6. Once the grill has been attached, thread the regulator (clockwise) into the regulator mount. Ontube burner
version, lift the burner slightly to align it with the orifice. Tightenby hand.
7.To fasten the regulator locking bracket, locate it at the bottom back corner of the regulator mount and turn the regulator until the
gas inlet is aligned with the hole in the regulator locking bracket. Slidethe locking bracket forward until the two tabs engage into the
slotson the regulator mount. Tapin firmly.
8.Attach the cylinder to the regulator by turning clockwise. (Be sure not to cross thread the cylinder.)
2
Page 3

Trailer Ball Mounting Instructions:
1. Place the ball mount over the ball on your drawbar or bumper.
2.Tightenthe two wing screws until the mount is firmly held in place.
3. Once the mounting arm is tight, the grill can be mounted:
a. Lock the lid of the grill closed with the latch.
b. Hold the grill by the handle with one hand, place the other hand
under the grill in the centre of the front taperedsurface.
c. Place the grill bottom on the platform and slide it forward to
engage the tab protruding from the bottom of the grill. Ensurethat the
tabis properly engaged.
d. When the dimples on the bottom of the unit line up with the holes on the
platform,thelatchis ready to be fastened.
4.Once the grill has been attached, thread the regulator (clockwise) into theregulator
mount. On tube burner version, lift the burner slightly to align it with the orifice. Tighten
byhand.
5.To fasten the regulator locking bracket, locate it at the bottom back corner of the
regulator mount and turn the regulator until the gas inlet is aligned with the hole in the
regulator locking bracket. Slidethe locking bracket forward until the two tabs engage into
the slots on the regulator mount. Tap in firmly.
6.Attach the cylinder to the regulator by turning clockwise. (Besure not to cross thread
thecylinder.)
Post Mounting Instructions:
1. Remove all the parts from the packaging.
2.Attach the post to the casting using four 1/4-20 x 1” hex head bolts. Ensure that
the holes on the back side of the post face the same direction as the groove on the
bottom back of the foot casting.
3. Place the spacers provided on the three nutserts that are closest to the front of the
post.
4. Place the platformwith the latch to the front onto the three spacers. Attachwith the three
1/4-20x13/4”flathead bolts. Tighten firmly in place.
5.Attach the back post cover with the two #8 screws provided.
6.Once the post is completely assembled, the grillcanbe mounted:
a. Lock the lid of the grill closed with the latch.
b. Hold the grill by the handle with one hand, place the other hand under the grill in the centre of the
fronttaperedsurface.
c. Place the grill bottom on the platform and slide it forward to engage the tab protruding from the
bottom of the grill. Ensurethat the tab is properly engaged.
d. When the dimples on the bottom of the unit line up with the holes on the platform,the latch is
readyto be fastened.
7. Once the grill has been attached, thread the regulator (clockwise) into the regulator mount. On
tube burner version, lift the burner slightly to align it withthe orifice. Tightenby hand.
8.To fasten the regulator locking bracket, locate it at the bottom back corner of the regulator mount
and turn the regulator until the gas inlet is aligned with the hole in the regulator locking bracket.
Slide the locking bracket forward until the two tabs engage into the slots on the regulator
mount. Tap in firmly.
9.Attach the cylinder to the regulator by turning clockwise. (Be sure not to cross
threadthecylinder.)
3
Page 4

INSTRUCTIONS POUR LES ENSEMBLES DE SUPPORT
AVERTISSEMENT :
- Ce gril ne doit pasêtre utilisé lorsque le bateau esten mouvement.
- Lorsque vous utilisez le grilsur un bateau, seules des bonbonnes de 8 oz certifiées DOT(2P/2Q) peuventêtre utilisées aux ÉtatsUnis.Au Canada, des bonbonnes de 16 oz peuvent être utilisées. Ces bonbonnes sont disponibles à votre marina locale ou dans
unequincaillerie.
- Ce gril ne doit pasêtre installé sur un rail lorsque lebateau est en mouvement. Il est fortement recommandé de retirer le gril et de
le ranger avant de larguer les amarres.
Le propane et le butane peuvent être plus dangereux que l’essence. Comme ils sont plus lourds que l’air,lorsqu’ils s’échappent, ils
s’accumulentdans les fonds du navire et ilest très difficile de les évacuer.Assurez-vous que tous les appareilset toutesles bouteilles
depropane sont bien saisis sur lepont, bien protégés et ventilés, desorte que le gaz qui s’en échapperait ne puisse pas atteindre les
fondsni d’autres espaces clos. L’installationde l’équipement devraitsatisfaire aux normes fédérales.
Assurez-vous que toutes les soupapes fonctionnent bien et que tous les raccords sont bien serrés.
Lorsque cet appareil est utilisé sur unpetit bateau, il doit être installéconformément auxinstructions du fabricant.
Cet appareilne doit pas être installé sur des petits bateauxcommerciaux qui transportent des passagers à sonbord.
N’installezpas ou ne rangez pas cet appareil de façon à permettre aux fuites de gaz de s’accumuler dans la cale dubateau.
Ne faites pas fonctionner ce gril dans une cabine ou tout autre endroit fermé. Ce gril doit êtreutilisé à l’extérieur seulement.
Instructions pour le support pour rail de bateau :
1. Placez le support “A” du côté extérieur du rail, avec laplateforme faisant face vers le haut.
2. Fixez le support “B” au support “A” à l’aide des quatre boulons 1/4-20 x 1”.
3. Mettez la plateforme de niveau et serrez d’abord les deux boulons supérieurs.Assurez-vous que la
plateformeest solidement fixée avant de serrer les deuxboulons inférieurs.
4. Vouspouvez aussi ajuster la plateforme de gauche à droite en desserrant les deux
boulons supérieurs et la vis pivot centrale. Lorsque la plateforme est ajustée, serrez la vis
pivot et les boulons.
5. Une fois que la plateforme est de niveau sur ses deux axes, vous pouvez installer le gril :
a.Verrouillezle couvercle du gril avec le loquet de sécurité.
b. Placez une main sur la poignée du gril et l’autre main sous le gril, au centre de la surface
en angle.
c. Placez le gril sur la plateformeet glissez-le vers l’avant pour engager lapattesituée sous
le gril dans la plateforme. Assurez-vous que la patte est bien engagée.
d. Lorsque les bosselures sous le gril sont alignées avec les trous sur la plateforme, vous
pouvezfixer le loquet de fixation.
6. Dans des conditions extrêmes, le support peut pivoter sur le rail du bateau. Un trou central
est fourni pour permettre d’y insérerun boulon à travers le rail pour empêcher le gril de pivoter.
7. Une fois que le gril est fixé, vissez le régulateur (vers la droite) dans le boîtier du régulateur.Pour les
appareilsavec un brûleur en tube, soulevez légèrement lebrûleur pour l’aligner avec l’orifice. Serrez àla
main.
A
B
8. Pour fixer le support de fixation du régulateur,placez-le dans le coin inférieur arrière duboîtier
du régulateur et tournez le régulateur jusqu’à ce que l’extrémité de l’entréedu gaz soit alignée
avec le trou du support defixation. Glissez le support vers l’avant jusqu’à ce que les deux pattes
s’engagent dans les fentes sur le boîtier du régulateur. Donnez un coup sec pour bien engager
lespattes.
9. Fixez la bonbonne au régulateur en vissant vers la droite. (Assurez-vous de ne pas fausser le
filetage de la bonbonne.)
4
Page 5

Instructions pour le support mural :
1.En vous servant des deux trous qui setrouvent sur le tube vertical,
fixezle support mural au mur.
2.Assurez-vous que les dégagements minimums aux matériaux
combustibles sont maintenus, 4” (100 mm) des côtés et 6” (150 mm)
àl’arrière.
3. Ne placez pas le gril sous une construction combustible non
protégée.
4.Laplateformepeut pivoter en retirant les deux vis phillips à tête plate #8
x3/8” et en tournant la plateforme à l’angle désiré. Remettez les deux viset
serrez.
5.Unefois que la plateforme est installée dans la position désirée, vous pouvez installer
legril:
a.Verrouillezle couvercle du gril avec le loquet de sécurité.
b.Placez une main sur la poignée du gril et l’autre main sous le gril, au centre de la surface en angle.
c.Placezle gril sur la plateforme et glissez-le vers l’avant pour engager la patte située sous le gril dans la
plateforme.Assurez-vous que la patte est bien engagée.
d.Lorsqueles bosselures sous le gril sont alignées avec les trous sur la plateforme,vouspouvezfixer le
loquetdefixation.
6.Une fois que le gril est fixé, vissez le régulateur (vers la droite)dansleboîtier du régulateur.Pour les
modèlesavecun brûleur en tube, soulevez légèrement le brûleur pour l’aligner avec l’orifice. Serrez à la
main.
7.Pour fixer le support de fixation du régulateur,placez-ledans le coin inférieur arrière du boîtier du régulateur et tournezlerégulateur
jusqu’àce que l’extrémité de l’entrée du gaz soit alignée avec letroudu support de fixation. Glissez le support vers l’avant jusqu’à ce
queles deux pattes s’engagent dans les fentes sur le boîtier du régulateur. Donnez un coup sec pourbien engager les pattes.
8.Fixez la bonbonne au régulateur en vissant vers la droite. (Assurez-vous denepasfausserlefiletagede la bonbonne.)
Instructions pour le support d’attache de remorque :
1.Placezle support d’attache par-dessuslabouled’attelage située sur
la barre de traction ou le pare-chocs.
2.Serrez les deux vis à oreilles jusqu’à ce que lesupportd’attache
tiennesolidementenplace.
3.Une fois que le support d’attache est solidement fixé, vous pouvez
installerle gril :
a.Verrouillezle couvercle du gril avec le loquet de sécurité.
b.Placez une main sur la poignée du gril et l’autre main sous le gril, au
centre de la surface en angle.
c.Placezle gril sur la plateforme et glissez-le vers l’avant pour engager la patte
situéesous le gril dans la plateforme.Assurez-vous que la patte est bien engagée.
d.Lorsqueles bosselures sous le gril sont alignées avec les trous sur la plateforme,
vouspouvezfixerle loquet de fixation.
4.Une fois que le gril est fixé, visser le régulateur (vers la droite)dansle boîtier du
régulateur.Pour les modèles avec un brûleur en tube, soulevezlégèrementlebrûleur
pourl’aligneravecl’orifice. Serrez à la main.
5.Pourfixer le support de fixation du régulateur,placez-ledansle coin inférieur arrière
duboîtier du régulateur et tournez le régulateur jusqu’à ce que l’extrémitédel’entrée du
gazsoitalignée avec le trou du support de fixation. Glissez le support vers l’avant
jusqu’àce que les deux pattes s’engagent dans les fentes sur le boîtier durégulateur.
Donnez un coup sec pour bien engager les pattes.
6.Fixez la bonbonne au régulateur en vissant vers la droite. (Assurez-vous de nepasfausser le
filetagedelabonbonne.)
5
Page 6

Instructions pour le support sur poteau :
1. Sortez toutes les pièces de l’emballage.
2. Fixez le poteau à la base en fonte à l’aide de quatre boulons à tête hexagonale 1/
4-20 x 1”.Assurez-vous queles trous à l’arrière du poteau soient orientés dans la
même direction que les trous àl’arrière de la base en fonte.
3. Placez les espaceurs fournis sur lestrois filets rapportés les plus rapprochés de
l’avant du poteau.
4.Placez la plateforme avec le loquet situéà l’avant, par-dessus les trois espaceurs. Fixez
la plateforme à l’aide des troisboulons à tête plate 1/4-20 x 1 3/4”. Serrez solidement.
5. Fixez le couvercle arrière du poteau à l’aide des deux vis#8 fournies.
6. Une fois que le poteau estentièrement assemblé, vous pouvez installer le gril :
a.Verrouillezle couvercle du gril avec le loquet de sécurité.
b. Placez une main sur la poignée du gril et l’autre main sous le gril, au centre de la surface en
angle.
c. Placez le gril sur la plateformeet glissez-le vers l’avant pour engager lapattesituée sous le gril
dans la plateforme.Assurez-vous que la patte est bien engagée.
d. Lorsque les bosselures sous le gril sont alignées avec les trous surla plateforme, vous pouvez
fixerle loquet de fixation.
7. Une fois que le gril est fixé, visser le régulateur (vers la droite) dans le boîtier du régulateur.Pour
les modèles avec un brûleur en tube, soulevez légèrement le brûleur pour l’aligner avecl’orifice.
Serrez à la main.
8. Pour fixer le support de fixation du régulateur,placez-le dans le coin inférieur arrière du
boîtier du régulateur et tournez le régulateur jusqu’à ce que l’extrémité del’entrée du gaz
soit alignée avec le trou du supportde fixation. Glissez le support versl’avant jusqu’à
ce que les deux pattes s’engagent dans les fentes sur le boîtier durégulateur.
Donnez un coup sec pour bien engager les pattes.
9. Fixez la bonbonne au régulateur en vissant vers la droite. (Assurez-vous de ne
pasfausser le filetage de la bonbonne.)
6
 Loading...