

Page 1

APPLY SERIAL NUMBER LABEL FROM CARTON
SERIAL NO. XXXXXX000000
MODEL NO.
DECORA TIVE INDOOR WA TERF ALLS
THA T PURIFY AND HUMIDIFY THE AIR
WF 6/9/18
WF9ST
MANUFACTURED BY / MANUFACTURE PAR : NAPOLEON APPLIANCE CORP.,
214 BA YVIEW DR., BARRIE, ONTARIO, CANADA L4N 4Y8 PHONE: (705)726-4278
FAX: (705)725-2564 EMAIL: wecare@napoleonproducts.com
WEB SITE: www.napoleongrills.com
RET AIN THIS MANUAL FOR FUTURE REFERENCE
GARDER CE LIVRE POUR RÉFÉRENCES FUTURES
N415-0128 / MAR 17/10
Page 2
NAPOLEON waterfalls are manufactured under the strict Standard of the world recognized
ISO 9001-2008 Quality Assurance Certificate.
NAPOLEON products are designed with superior components and materials, and are assembled by
trained craftsmen who take great pride in their work. Every component is thoroughly inspected by
a qualified technician before packaging and shipping to ensure that you, the customer, receive the
quality product you expect from NAPOLEON.
NAPOLEON WATERFALL PRESIDENT'S WARRANTY
NAPOLEON warrants the materials and workmanship in your new NAPOLEON Waterfall
against defects for a period of one year. This excludes filters, light bulbs, and UV light bulbs.
NAPOLEON shall not be liable for any transportation charges, labour costs, installation or
removal costs, water damage or export duties.
CONDITIONS AND LIMITA TIONS
"NAPOLEON warrants its products against manufacturing defects to the original purchaser only, provided that the purchase was
made through an authorized NAPOLEON dealer and is subject to the following conditions and limitations:"
This factory warranty is non-transferable and may not be extended what-so-ever by any of our representatives.
The waterfall must be installed by a licenced, authorized service technician or contractor. Installation must be done in accordance
with the installation instructions included with the product and all local and national building codes.
This limited warranty does not cover damages caused by misuse, lack of maintenance, hostile environments, accident, alterations,
abuse or neglect and parts installed from other manufacturers will nullify this warranty.
This limited warranty further does not cover any scratches, dents, rust, painted finishes, abrasive and chemical cleaners, nor
chipping on porcelain enamel parts, nor any components used in the installation of the waterfall.
Should deterioration of parts occur to the degree of non-performance within the duration of the warranted coverage, a replacement
part will be provided.
In the first year only, this warranty extends to the replacement of warranted parts which are defective in material or workmanship
provided that the product has been operated in accordance with the operation instructions and under normal conditions.
NAPOLEON will not be responsible for the installation, labour or any other costs or expenses related to the re-
installation of a warranted part, and such expenses are not covered by this warranty.
Notwithstanding any provision contained in this President's Warranty NAPOLEON's responsiblity under this warranty is defined as
above and it shall not in any event extend to any incidental, consequential, or indirect damages.
This warranty defines the obligation and liability of NAPOLEON with respect to the NAPOLEON waterfall and any other warranties
expressed or implied with respect to this product, its components or accessories are excluded.
NAPOLEON neither assumes, nor authorizes any third party to assume, on its behalf, any other liabilities with respect to the sale of
this product.
Any damages to the waterfall due to weather damage, hail, rough handling, damaging chemicals or cleaners will not be the responsi-
bility of NAPOLEON.
The bill of sale or copy will be required together with a serial number and a model number when making any warranty claims from
NAPOLEON.
NAPOLEON reserves the right to have its representative inspect any product or part prior to honouring any warranty claim.
NAPOLEON shall not be liable for any transportation charges, labour costs, installation or removal cost, water damage or export
duties.
2
Page 3

indoor air quality
Your new NAPOLEON waterfall will dramatically improve the indoor air quality in your home. The waterfall is a natural
humidifier which helps alleviate dry skin and allergies. This is extremely beneficial in dry climates and also cold climates
where forced air furnaces dry the air. The waterfall also cleans the air by attracting contaminants. Moving water attracts
airborne particles, such as dust, pet dander, pollen and other pollutants. The waterfall draws these particles into the water,
which is then filtered through a 5 micron filter before being recirculated. The result is cleaner, fresher, humidified air.
Waterfalls also generate negative ions. These odourless tasteless invisible molecules are created in nature as air
molecules break apart due to sunlight, radiation, and moving air and water. Researchers now believe that negative ions aid
in alleviating depression, reducing stress and boosting energy.
installation Tools and materials required
Before you begin hooking up the fountain ensure that you have access to the following materials and tools.
Tools:
- utility knife
- adjustable wrench
- 3/8” nut driver
- pliers
- flat screw driver
Materials:
- saddle valve and 1/4” tubing (ice maker plumbing kit) (required if unit is being connected to house water supply)
- teflon tape
- possible additional 1/2” i.d. tubing and 3/4” i.d. tubing depending on location of unit.
- liquid TSP (Trisodium Phosphate) or TSP Substitute cleaner
appropriate location
There are several things to consider when choosing the appropriate location to install your waterfall.
The waterfall is designed to be installed into a 2” x 4” interior wall. The waterfall should not be installed in a load bearing wall, unless it
can be framed in with proper supports and headers as required by your local building codes. Check with your local building authority for
specifications. Installing the waterfall in an exterior wall is not recommended, as it cannot be properly insulated. If there are no suitable
alternative locations, then the waterfall can be installed in a 2” x 6” wall using rigid foam insulation between the exterior of the house and the
back of the fountain. The waterfall cannot be installed in a 2” x 4” exterior wall.
The see-thru waterfall only has water running down one side of the glass, so thought should be given as to which direction the unit is
mounted. The side with the manifold is the side with the water flow. The see-thru waterfall is not designed to be air tight like a window and
cannot be placed on an exterior wall. If being placed between rooms where privacy may be a concern, a clouded or patterned glass can be
used. Some noise will also travel between the two rooms that share the waterfall.
The lights, pump and optional UV-light require power. Make sure you choose a location that has the available power within reach of the
supplied electrical cords. The receptacle must be GFI (ground fault interrupt) protected. Electrical work must be done by a qualified electrician.
Check with your local building authority for specifications for your area. Do not run extension cords behind walls.
An area to locate the pump module is also required. It should be located as close to the fountain as possible and in a location
that is easily accessible for servicing and maintaining the module. Although we recommended that the pump module and the
waterfall be located as close as possible to each other we have specified some maximum heights which you must follow. Maximum height
from floor on which pump module is sitting to top edge of waterfall frame is 12 feet. The maximum horizontal distance from drain outlet on
waterfall to drain inlet on pump module is 15 feet. For every 1 foot that the pump module is located away from the fountain unit, 1 inch of
drop is required from the fountain basin drain outlet to the pump module drain inlet. With longer lines there are a few other things to
consider, the drain needs to have a constant slope from the waterfall outlet to the pump module inlet, if there are dips or rises the drain will
gurgle. A lot more water is held in the lines, this means that there is a large difference in the level of water in the reservoir from when the
unit is off, to when the unit is operating. To eliminate any potential problems such as unit overflowing or running dry, the unit must be
hooked up to both a water supply and a drain.
The waterfall is designed to be connected to a water source, to automatically refill the basin as water evaporates, and to a drain, in case
of accidental overflow. The unit can be operated without the water source connection, but is not recommended. The water will evaporate
naturally and will require additional water to ensure proper flow and pump operation. Damage to the pump incurred by running dry is not
covered by warranty. The waterfall must be hooked-up to a drain which will allow the tank to be purged for routine cleaning, and will
prevent the unit from overflowing if the float valve malfunctions.
Water damage to surrounding objects in your home is not covered in your NAPOLEON warranty. The waterfall is designed to not splash,
however if it is not properly installed or maintained, some splashing may occur. Protect delicate nearby surfaces that could be damaged by
splashing. Do not trim with materials that can be damaged by moisture such as particle board or MDF. It is best to install the unit in stone,
marble, glass, tile etc.
Although your NAPOLEON Waterfall will be beneficial to the air quality of your home, excess moisture can lead to the formation of mold and
mildew. It is recommended that all homes have some form of humidity control and air exchange system to prevent such an occurence.
3
Page 4

water
Water is perhaps the most critical component in the waterfall. Dirty or contaminated water will quickly cause operational
problems with your waterfall. House water must be softened and filtered if the unit is to be connected to the water supply. RO
(Reverse Osmosis) water will give the best results, and require the least amount of maintenance. If the unit is not being
connected to the house supply, distilled bottled water is recommended. The provided filter and optional UV-light cannot
prevent hard water deposits from forming on the surfaces of your waterfall. Hard water will also cause plugged passages
and manifold ports, reducing the flow effect on the waterfall surface. The life-span of the pump will also be adversely affected
due to the use of hard water. Use of RO or distilled water is by far the best way of ensuring years of carefree enjoyment from
your waterfall.
The provided sediment filter will help prevent clogging of the manifold ports that disperse the water down the face of the
waterfall. The water that flows down the face will attract dust, debris particles and mould spores that are floating in the air in
your home. This will help to naturally filter the air you breathe and keep your home cleaner. However the filter will become
contaminated and the water flow will be reduced over time. We recommend that the filter be replaced whenever the waterfall
is cleaned, every 3-4 months or sooner as deemed necessary by poor water flow. The filters can be purchased through your
authorized NAPOLEON dealer.
An additive such as “Fountec” manufactured by McGrayel will prevent algae from growing in the reservoir or on any other
waterfall surfaces. To use Fountec start with a completely clean system and add three to four drops to the water reservoir
every week.
The optional ultraviolet-light will also help destroy any green algae, bacteria, mould or mildew found in the water. Flowing
water is fairly resistant to this kind of growth, but in time the water will become contaminated and the system will have to be
flushed and thoroughly cleaned. Not only unsightly but mould and bacteria growth will plug the manifold ports, reducing the
flow of water and can damage the water pump over time. The optional UV-light will help to keep your waterfall relatively
maintenance free by keeping the water cleaner for a longer period of time. The UV-bulb must be replaced every year to
ensure proper operation. The UV-bulbs are available from your authorized NAPOLEON dealer.
The waterfall is designed to be connected directly to a water source. Waterfalls are natural humidifiers for the environment.
The amount of water the waterfall consumes daily is dependant upon how dry the air is, and how large the waterfall surface
is. There is a float valve that will open as the water level drops, allowing water to enter the system. This will ensure that the
water level is kept at the height required for proper operation of the water pump. The pump should never be allowed to run dry
and damage resulting from that will not be covered by warranty. If there is not a suitable water source to be had nearby, the
waterfall can be installed as a stand-alone system, but the water level will have to be monitored frequently and supplemented
as needed.
WATER PUMPS
The water pump supplied with your waterfall has been selected for its high flow volume, efficiency, quiet operation and
reliability. The pump is suitable for pushing water to a height of 12 feet, however the flow is reduced greatly at that height.
This must be kept in mind when finding a location for the pump and water basin, so the pump module must be located on the
same floor as the fountain. The minimum space required for the pump module for the waterfall is 18” x 18” x 18” high. The
system has a flow control valve after the filter that can be adjusted to provide the desired flow rate on the waterfall surface.
The pump must be kept submersed in water at all times while in operation. The water acts as a cooling agent for the
pump, preventing the pump from overheating. Low water levels, frequently turning the pump on and off and impurities in the
water from poor waterfall maintenance will shorten the life of the pump. If maintained properly, the pump will provide years of
reliable service.
If you hear excessive noise coming from your pump, check first to see that you have enough water in the basin to keep the
pump fully submerged below 1-2” of water. The pump should not be vibrating against the tub, but if it is, it can be isolated by
placing a small piece of sponge between the pump and the basin. Be sure to not block or restrict in any way the pump’s
water inlet.
ELECTRICAL REQUIREMENTS
The waterfall will require 2 separate 110 volt electrical receptacles, one for the lights and one for the water pump. GFI
receptacles must be used, because of the use of water and possibility of contact.
It is not required that the receptacles be wired on their own circuit, as the pump, lights and optional UV-light draw very little
current. If there is already a heavy load elsewhere on that circuit or you have trouble with breakers tripping, a separate circuit
will need to be installed. Any circuit wiring or GFI installation must be done by a qualified electrician. If you would like to be
able to turn the fountain on and off, the receptacles should be wired to a wall switch. Two wall switched receptacles are
recommended, one for the pump and UV-light (optional) and one for the lights. This will allow you to turn the lights on and off
endently of the fountain.
4
Page 5
INSTALLATION
The framing dimensions are included in the framing specifications drawing. The unit is designed to be installed after
drywalling. For added protection water resistant drywall (green board) or cement board are recommended in the vicinity of the
fountain. The fountain is designed to be attached to the studs over the drywall along both vertical sides of the fountain using
drywall screws. This will leave a basically flush surface to trim over. Leak test the waterfall before fully enclosing. All trim
used on the fountain should be made of real wood (not MDF), or any other material that is not damaged by moisture, with
several coats of a water proof coating (paint or urethane) depending on the desired look. The bottom piece of trim can only be
nailed at the ends, because it is mounted in front of the stainless basin. It should be siliconed to the stainless basin for
additional support.
After installing the fountain, connect the piping as shown in the piping diagrams. The tubing to connect the unit overflow to
the house drain is not supplied. If the unit is being connected to the water supply, use an ice maker plumbing kit (not
supplied) to connect the water supply to the float valve. When the unit is operational, adjust the float valve so that it turns the
water off when the top of the pump is submerged below 1-2” of water. Ensure that the wing nut on the side of the float valve is
properly tightened. Connect the light wire to the terminals on the transformer.
WATERFALL SURFACE MATERIALS
The waterfall models WF6, WF9, and WF18 are supplied with a stainless steel panel for the water to flow over. The surface
of the stainless steel must be cleaned to remove any grease or oily materials left behind from the manufacturing process.
The protective coating will also leave a residue behind. Any residue left on the surface, or oily residue from your hands, will
repel the water and prevent a sheet of water from forming over the panel. This will give you thin streams of water with large
dry spots in between. Cleaning the panel with liquid TSP (or TSP Substitute) will remove any residue or film that is impeding
the progress of the water. Clean the panel thoroughly two or three times before the first use.
The See-Thru waterfall model is not supplied with any surface panel. The glass panel can be ordered from any glass and
window dealer in your local area. There is no specific type of recommended glass, but the glass should be minimum 1/4”
(6mm) thick. Clear glass displays the water flow pattern the best, but if privacy between the adjoining rooms is desired some
type of smoked or opaqued glass will work as well.
Before starting the waterfall, the entire panel surface should be wet down, either by spray bottle, or wet cloth. This will help
the water to spread evenly across the panel. The wave effect of water flowing down the panel, will be attained after the panel
is covered in water. The wave pattern can be adjusted by increasing or restricting the flow of water with the valve at the side of
the filter. Adjust the valve to achieve the effect that is most pleasing to your eye. It is important to remember that too little water
flow can cause dry spots to reappear on the surface of the waterfall. You can increase the flow of water slightly until they
disappear. Lightly rubbing a wet cloth or Scotchbrite pad (careful not to scratch the stainless steel surface), across the panel
may be enough to remove any dry spots.
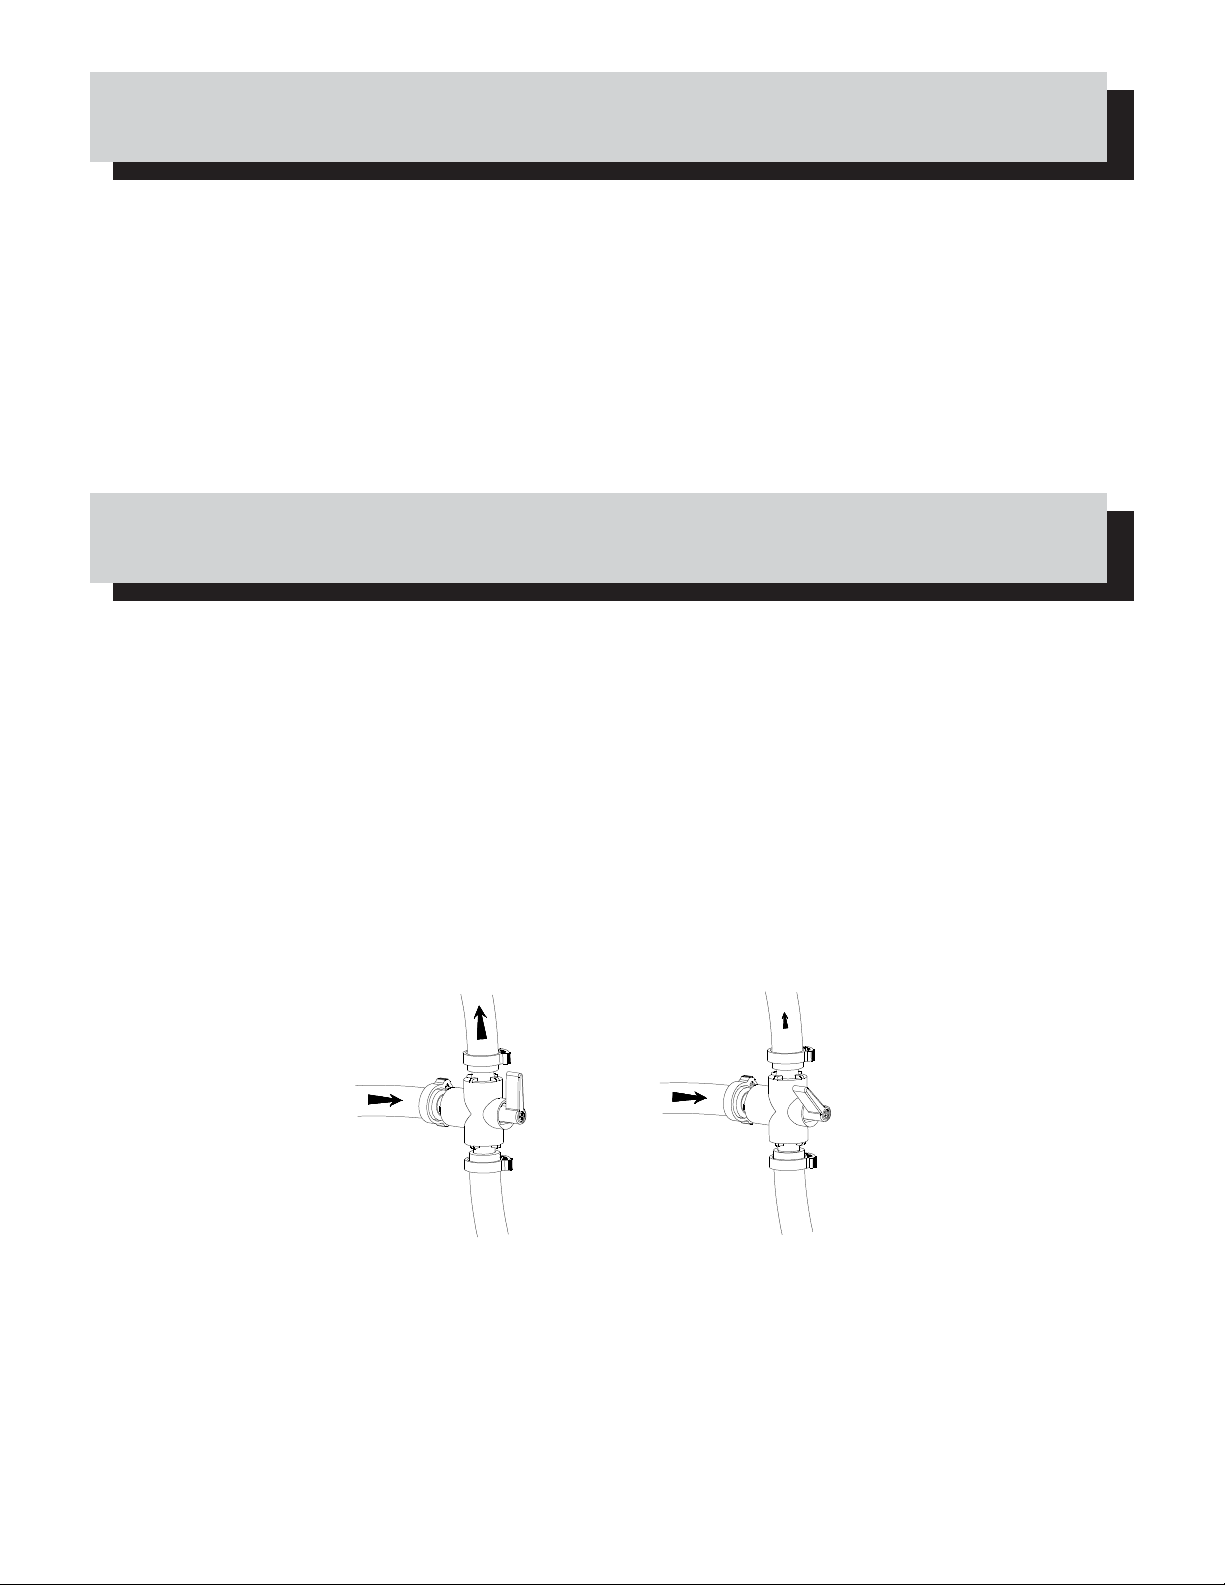
TO FOUNT AIN
TO FOUNT AIN
FROM BASIN
TO DRAIN TO DRAIN
VALVE
FULL OPEN
GROOVED LUXIDIO PANEL: An optional grooved LUXIDIO panel which enhances the ripple effect can be purchased at your
authorized NAPOLEON dealer. This panel must be cleaned with liquid TSP (or TSP Substitute) before being placed in the
unit, to prevent dust and debris from the manufacturing process from entering the water. Use caution when cleaning the
grooves on the panel as the machined edges can be very sharp. The stainless steel panel must be removed before
installing the LUXIDIO panel. Turn off the water before switching the panels. To remove the stainless steel panel, slide it
upwards slightly, then swing the bottom of the panel towards you, clearing the panel retaining brackets. Slide the panel
downwards and out of the fountain. Install the LUXIDIO panel in the reverse order. The LUXIDIO panel will require more water
to achieve the same wave effect as the stainless panel, as the grooves will fill and retain water. Again any dry spots can be
removed by rubbing horizontally with a Scotchbrite pad.
FROM BASIN
VALVE
PA RTIAL OPEN
5
Page 6

BACKBOARD
WF6
BACKBOARD
WF9 WF18
BACKBOARD
MORT AR
TILES
23.500”
CUSTOM SURFACE PANEL: Panels can also be made using materials such as mirror, glass, slate, marble or ceramic tile
for display in your waterfall. If tiling, use waterproof cement board as a backer, available at any building centre. Cut the
cement board to the size of your existing stainless steel panel. Ensure that the tiles can be used in a wet environment.
Porcelain tiles are recommended. Tile the surface, using thinset mortar, as you would a ceramic tile floor or bathroom wall. It
is not necessary to leave a gap or grout line in your tile. Ensure that the bottom edge of the tiles are flush with the bottom
edge of the cement board. You can choose any colour or pattern that you like, to match the room or surroundings. The water
will flow over the tiles, just as it does on the stainless steel panel, but be sure to keep the edges of the tiles fairly flush to each
other to prevent the water from splashing off. The stainless panel must be removed before installing any decorative panel.
Do not use glue to attach the tiles to the back panel, as some types of glue or epoxy will leach out into the water, causing the
filter and manifold to plug.
SEE-THRU WA TERFALL (WF9ST)
35.250”
MORT AR
TILES
35.375”
35.250”
MORT AR
TILES
35.375”
The waterfall is not supplied with glass. This needs to be purchased separately by the customer . The size is as shown.
Before installing, clean the entire glass surface and stainless diffuser edge with the supplied TSP. Do not use glass
cleaner such as Windex on the side that has the water running on it. This will cause the water to break into streams
rather than running down the surface as a sheet.
ROUNDED EDGES
ALL SIDES
1/4” THICK
36.250”
T ALL
35.375”
WIDE
CAUTION
During unpacking and assembly it is recommended that you wear work gloves and safety glasses for your protection.
Although we make every effort to make the assembly process as problem free and safe as possible, it is characteristic
of fabricated steel parts that the edges and corners may be sharp and can cause cuts if handled incorrectly .
6
Page 7

CLEANING AND MAINTENANCE
The waterfall should be drained and cleaned every 3-4 months, possibly more depending on the quality of the water. The
waterfall surface can be cleaned using a warm soap and water mixture. Do not use harsh abrasive cleaners on the surface
of the stainless steel panel or it will permanently scratch the surface. Any wiping motion should be done in the direction of the
grain. If small scratches do occur, they can be blended out by gentle rubbing in the direction of the grain with a Scotchbrite pad.
The water should be completely flushed and drained from the system - switch the valve
to the purge setting, and run the pump to pump the water out. Refill the tank, run the water
through the fountain for 3 minutes and purge again. If calcium or hard water deposits are
forming on the panel or anywhere else in the system, cycle CLR solution through the
system until the deposits are removed then purge the system a few times with water.
TO FOUNT AIN
FROM BASIN
If there are spots on the panel that dry out, check that there are no blocked ports in the manifold
tube. Remove the three nuts that secure the tube cover, and remove the cover. Remove the tube by
flexing it out in the centre. This will allow the ends to pull out. Poke the holes out with an opened
paper clip, and then flush the tube with water. Clean the angled surface that the manifold sprays
onto with liquid TSP (or TSP substitute). It is critical that this surface is extremely clean. Install the
tube back into the unit, with the ports aiming straight down and refill with water. Install the tube
cover and test the unit.
MANIFOLD TUBE
TUBE COVER
The sediment filter should be replaced every 3-4 months. To replace, unplug the pump. Lay a towel under the filter housing, as water will drain out of the housing when opening. Unscrew the housing, and remove the filter. Replace with a new
filter (part #N252-0001) available through your authorized NAPOLEON dealer. Push the new sediment filter firmly onto the
collar in the bottom of the housing. Screw the housing back onto the unit. This must be screwed on very tightly, or it will leak.
For cases where the unit is not hooked up to the water supply (for automatic refilling), it is still highly recommended that the
reservoir overflow be connected to a floor drain. This will prevent reservoir overflows, which can cause water damage to
surrounding materials. If the overflow is not connected to a floor drain, only refill or add water to the reservoir when the unit is
off. This will prevent the unit from over flowing.
VALVE
PURGE POSITION
TO DRAIN
7
Page 8

TROUBLESHOOTING
Problem Possible Causes Solution
Water not flowing. Pump not plugged in.
Insufficient water level. Add water to recommended level. Pump must be submerged by 1-2” at
Water flow control valve
turned off.
Sediment filter plugged.
Pump is “vapour-locked”. The pump may have an air bubble in it, preventing it from pushing water
Pump burned out. Replace pump.
Dry spots on waterfall surface.
Lights not working. Lights not plugged in. Plug lights into nearest electrical receptacle.
(optional)
Improper start-up procedure.
Insufficient flow. Increase flow by opening water flow valve.
Surface not cleaned
properly.
Plugged ports in manifold. Turn off water and remove manifold tube. Inspect and clean. See
Burrs on edges of LUXIDIO
panel.
Bulb(s) are broken. Replace light bulb(s).
UV-light not plugged in. Plug UV-light into nearest electrical receptacle.UV-light not working.
Bulb no longer good. Replace UV-light bulb.
Plug pump into nearest GFI protected receptacle.
all times.
Turn valve to on position.
Replace filter.
through. Unplug the pump, and plug it back in several times, or momentarily turn the valve to the purge setting.
Ensure surface of waterfall is wet before starting by spraying with water
or washing with wet cloth.
Clean with liquid TSP (or TSP Substitute) to remove oily residue.
cleaning instructions.
Turn off the water. Remove the burr on the edge of the groove with a
utility knife.
Water leaking on
floor.
Drain is gurgling. Insufficient drop from
Water dripping from
lip of top retainer.
Waterfall appears to
be rusting.
Leaking connection. Check all connections and ensure they are tight. If leaking, re-tighten.
Water level too high. Check that the basin drain is hooked-up properly and not blocked,
Weld leaking in waterfall
housing.
Water leaking out sides of
waterfall.
fountain reservoir to basin.
P-trap created in drain line. Ensure that there is a consistent slope from the fountain outlet to basin
Certain drain configurations
may have a tendency to
gurgle.
Decorative panel is not
touching front lip of retainer.
High concentration of iron in
water.
8
preventing water from escaping. Ensure that there is adequate drop
from the fountain to the basin. Also check that the float valve is working
properly and not overfilling the basin.
Inspect waterfall thoughly and ascertain exactly where the leak is
coming from. Drain all water, and dry thoroughly. Apply a bead of clear
silicone to the inside surface of the weld. Let stand 24 hours before refilling with water.
Wipe the sides of the waterfall frame with an oiled(WD40) rag to repel
water.
Ensure there is at least 1” per foot drop from the fountain outlet to the
basin inlet.
inlet without a dip that would trap water.
Reduce the flow through the flow control valve, or loosen the fitting in the
left hand drain (loosen a couple of turns at a time, and then test).
Remove the panel and flex out the panel tension springs. Ensure
positive tension on panel. Replace the decorative panel.
The waterfall and components are made entirely of stainless steel and
cannot rust. Use CLR remover to clean the iron deposits off the affected
areas and refill the waterfall with the recommended distilled water.
Page 9

Problem Possible Causes Solution
An odour emitting
from the waterfall.
Dirty or contaminated water.
Bacterial build up
in stagnant water.
See Water section in manual.
Keep the waterfall running at all times, to keep the water moving.
Ensure the ultraviolet-light (optional) is working. See Water section
in manual.
An addivitve such as “Fountec” manufactured by McGrayel, or
hyrdrogen peroxide may be added to the water. See Water section in
manual for complete details.
ORDERING REPLACEMENT PARTS
Before contacting the customer care department, check the NAC web site for more extensive cleaning, maintenance,
troubleshooting and part replacement instructions at www.napoleongrills.com. Contact the factory directly for replacement
parts and warranty claims. The customer service department is available between 9 AM and 5 PM (Eastern Standard Time) at
1-866-820-8686 or fax at 1-705-727-4282. In order to process a claim, we must be provided with the following information:
1. Model and serial number of the unit.
2. Part number and description.
3. A concise description of the problem ('broken' is not sufficient).
4. Proof of purchase (photocopy of the invoice).
In some cases the customer care representative may request to have the parts returned to the factory for inspection, before
providing replacement parts. The parts must be shipped prepaid to the attention of the customer care department with the
above information.
Before contacting customer care, please note that the following items are not covered by the warranty:
-costs for transportation, brokerage or export duties
-labour costs for removal and reinstallation
-costs for service calls to diagnose problems
-discoloration of stainless steel parts
-part failure due to lack of cleaning and maintenance, or use of improper cleaners.
9
Page 10

FRAMING SPECIFICATIONS
2x6 HEADER P ANEL RECOMMENDED
CHECK WITH LOCAL CODES
HEIGHT
Ø1.50”
24”
RECOMMENDED*
CHECK WITH YOUR LOCAL BUILDING AUTHORITY FOR COMPLETE FRAMING GUIDELINES. THE CHART
BELOW WILL GIVE YOU THE OPENING SIZE REQUIRED FOR EACH MODEL. EACH WATERFALL IS IN-
TENDED TO BE MOUNTED ON TOP OF THE DRYWALL (NOT SHOWN). THE DRYWALL BELOW THE UNIT
SHOULD CONTINUE UP TO THE BOTTOM OF THE WATERFALL BASIN.
WF6
WF9 / WF9ST
4.00” CENTERS
WIDTH
49.00”
49.00”
CONTINUE DRYWALL
UP TO THIS EDGE
WIDTHHEIGHTMODEL
26.750”
38.625”
10
WF18
*Additional height may be required to ensure adequate drop to the pump module.
The minimum space required for the pump module for the waterfall is 18” x 18” x 18” high.
84.25”
38.625”
Page 11

PUMP MODULE LOCATION
FROM BASIN TO W A TERFALL DRAIN
MAXIMUM HORIZONT AL DIST ANCE 15’
MAXIMUM
HEIGHT
12’
MINIMUM
SLOPE IN
DRAIN LINE
1” PER FOOT
11
Page 12

PIPING DIAGRAM WITHOUT UV LIGHT
6 X
N570-0043 (8-32 X 3/4")
1
TO
ELECTRICAL
OUTLET
2
FROM THREE
WAY VALVE TO
WATERFALL
A
FROM BASIN TO
WATERF ALL DRAIN
INSTALL THE SUPPLIED
HOSE CLAMPS ON EITHER
SIDE OF THE BASIN
CUT THE SHORT
PIECE OF BLACK
TUBING TO 14”
OVERFLOW
PROTECTION
FROM WA TERF ALL
DRAIN TO BASIN
B
B
A
SEDIMENT
FILTER
FROM THREE WA Y
VALVE TO WATERFALL
FROM WATER
SOURCE TO
FLOAT V AL VE
SADDLE V AL VE
(NOT INCLUDED)
FLOW CONTROL
VALVE / PURGE
VALVE
TO DRAIN
PURGE LINE
Remove components from basin and assemble as shown. The fittings required are already attached to the filter and basin. Measure
and cut the lines to the length necessary, push onto the barbed fittings and secure with the supplied hose clamp s. Leak test the waterfall
before fully enclosing.
12
Page 13

PIPING DIAGRAM WITH UV-LIGHT
9 X
N570-0043 (8-32 X 3/4")
TO
ELECTRICAL
OUTLET
1
3
2
4
FROM THREE
WAY VALVE TO
WATERFALL
A
FROM BASIN TO
WATERF ALL DRAIN
INSTALL THE SUPPLIED
HOSE CLAMPS ON EITHER
SIDE OF THE BASIN
OVERFLOW
PROTECTION
TO DRAIN
FROM WA TERF ALL
DRAIN TO BASIN
B
B
PURGE LINE
UV
LIGHT
A
SEDIMENT
FILTER
FROM THREE WA Y
V ALVE TO WATERFALL
FROM WATER
SOURCE TO
FLOAT V AL VE
SADDLE VALVE
FLOW CONTROL
VALVE / PURGE
VALVE
Remove components from basin and assemble as shown. The fittings required are already attached to the filter and basin.
When using the optional UV light, the barbed elbow fitting on the “IN” side of the filter will need to be removed and threaded into the
elbow at the bottom of the UV light. Then connect the UV light directly to the sediment filter. Use teflon t ape to seal these connections. Ensure that the supplied ground wire is connected from the grounding terminal on the UV light to either grounded copper
plumbing, or the ground in your electrical system. Use the supplied short piece of black tubing to run from the pump to the UV light.
Measure and cut the lines to the length necessary, push onto the barbed fittings and secure with the supplied hose clamp s. Leak
test the waterfall before fully enclosing.
13
Page 14
WATERFALL SURFACE INSTALLATION
The stainless steel panel provided with WF6, WF9, and WF18 is installed simply by sliding the top of the panel under the
retaining bracket at the top of the waterfall, and pushing it high enough to slip over the bottom support brackets. The welded
brackets that protrude at an angle from the waterfall housing, merely provide pressure to the panel to prevent it from bowing.
The optional acrylic panel can be placed in front of the stainless steel panel in the same manner. If building your own ceramic
tile or slate background, you must remove the stainless steel panel, because of the thickness of the tile and cement board
backing.
The glass panel for WF9ST is installed from the manifold side by sliding the top of the glass into the gap between the
retaining bracket and the rear panel support, and pushing it high enough to slip over the lip on the bottom support brackets. The
glass should fit tight at the top and not rattle. If so it can be removed and the front retaining bracket can be pushed in, closing up
the gap so the glass fits tight.
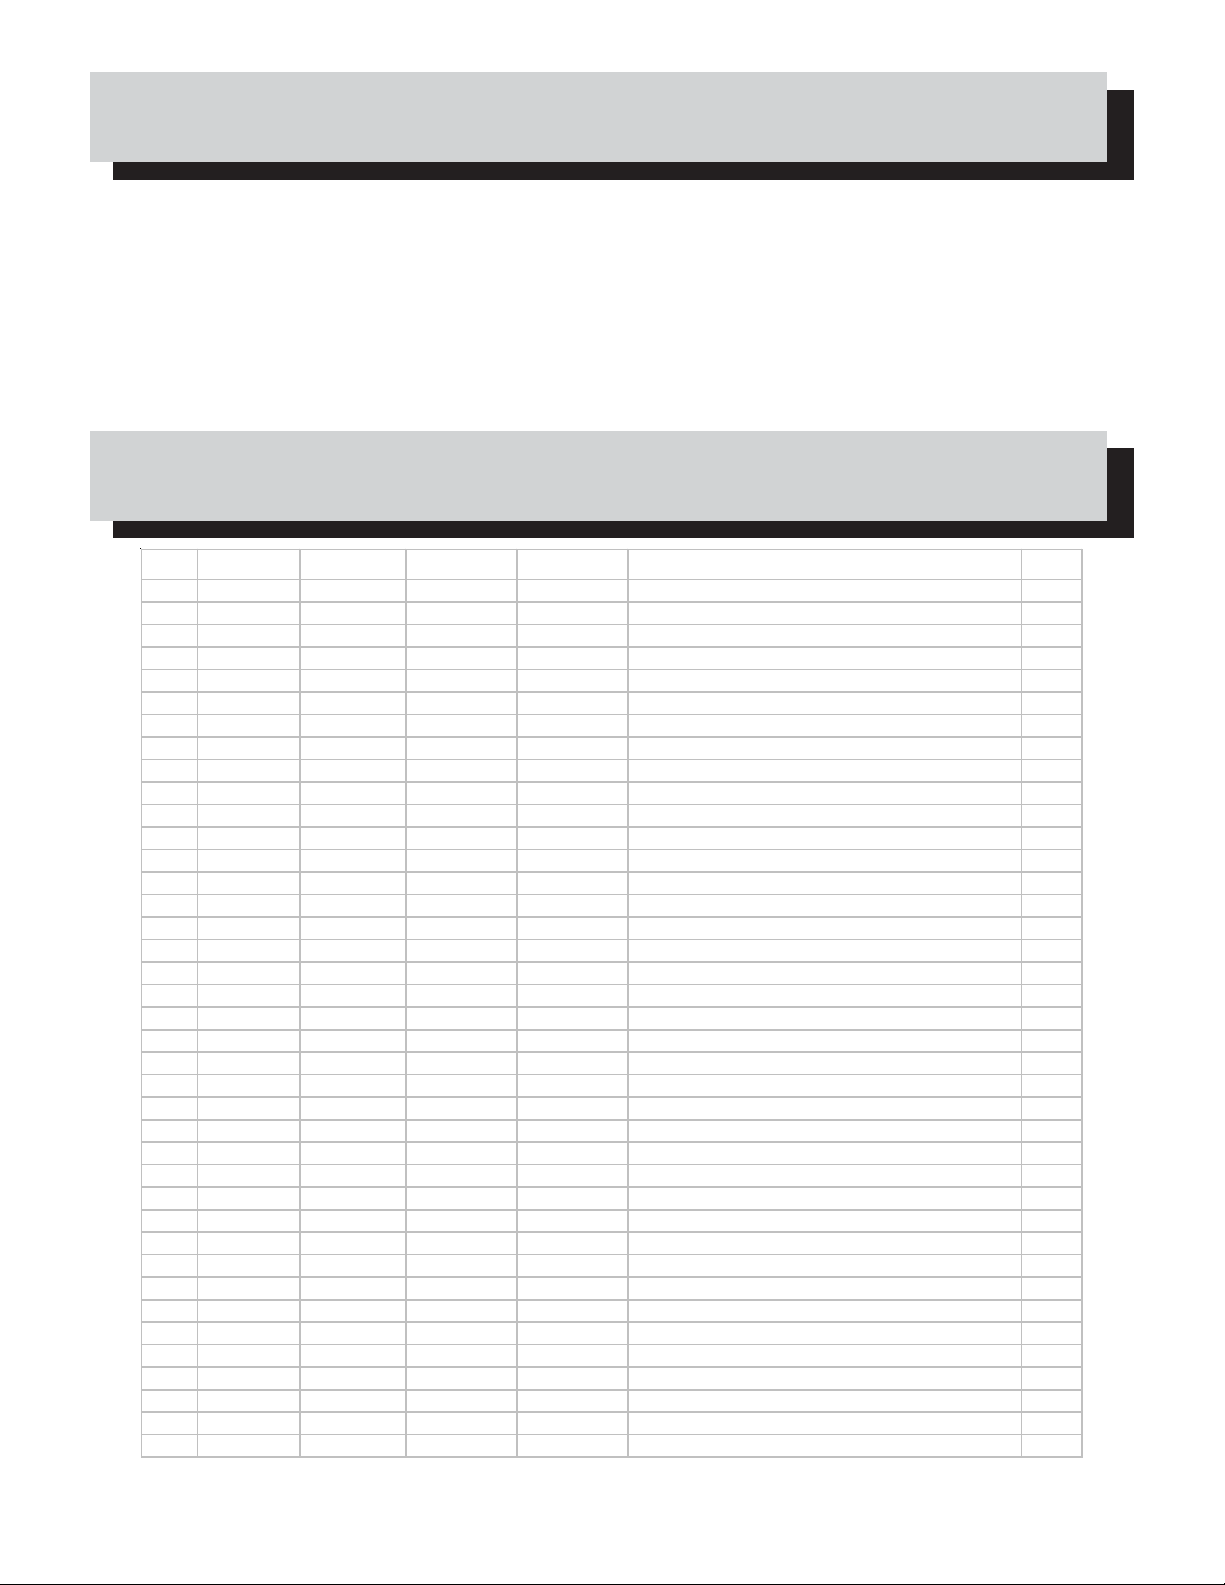
PARTS LIST
ITEM# WF6 PART# WF9 PART# WF9ST PART# WF18 P ART# PARTS DESCRIPTION
1 n010-0446 n010-0447 n010-0490 n010-0448 main housing x
2 n010-0449 n010-0450 n010-0450 n010-0451 water supply line assembly x
3 n432-0014 n432-0015 n432-0015 n432-0015 m anifold x
4 n105-0008 n105-0008 n105-0008 n105-0008 rubber grommet x
5 n080-0169 n080-0170 n080-0170 n080-0170 water pinch bracket x
6 n450-0009 n450-0009 n450-0009 n450-0009 10-24 nut x
7 n402-0009 n402-0010 n402-0010 n402-0010 lighting track WF6 - 20" long WF9/18 - 32" long x
8 n402-0004 n402-0004 n402-0004 n402-0004 lighting track end cap x
9 n402-0005 n402-0005 n402-0005 n402-0005 lighting track power connection x
10 n402-0007 n402-0007 n402-0007 n402-0007 light socket x
11 n402-0003 n402-0003 n402-0003 n402-0003 light bulb x
12 n200-0071 n200-0072 n200-0072 n200-0072 light cover x
n707-0002 n707-0002 n707-0002 n707-0002 12 volt transformer x
13 n255-0033 n255-0033 n255-0033 n255-0033 1/2" female pipe to 1/2" barb adapter fitting x
14 n160-0012 n160-0012 n160-0012 n160-0012 5/8" hose clamp x
15 n160-0013 n160-0013 n160-0013 n160-0013 1" hose clamp x
n255-0036 n255-0036 n255-0036 n255-0036 3/4" "T" barb fitting drain x
16 n255-0034 n255-0034 n255-0034 n255-0034 3/4" bulkhead fitting x
17 n255-0037 n255-0037 n255-0037 n255-0037 3/4" male pipe to 3/4" barb elbow fitting x
18 n475-0149 n475-0150 - n475-0151 waterfall panel - stainless steel x
n475-0152 n475-0153 - n475-0154 waterfall panel - black grooved LUXIDIO ac
19 n335-0037 n335-0037 n335-0037 n335-0037 water basin li d x
20 n185-0002c n185-0002c n185-0002c n185-0002c water basin x
21 n255-0035 n255-0035 n255-0035 n255-0035 1/4" female pipe to 1/2" barb adapter fitting x
22 n517-0002 n517-0002 n517-0002 n517-0002 water pump x
23 n725-0023 n725-0023 n725-0023 n725-0023 float valve x
24 n010-0443 n010-0443 n010-0443 n010-0443 water basin housing x
25 n725-0022 n725-0022 n725-0022 n725-0022 3-way valve x
26 n255-0041 n255-0041 n255-0041 n255-0041 3/4" male pipe to 1/2" barb adapter fitting x
27 n350-0052 n350-0052 n350-0052 n350-0052 sediment filter housing x
28 n252-0001 n252-0001 n252-0001 n252-0001 replacement sediment filter (5 micron) ac
29 n080-0177 n080-0177 n080-0177 n080-0177 filter mounting bracket x
30 n570-0043 n570-0043 n570-0043 n570-0043 8-32 x 3/4" stainless steel screw x
31 n402-0002 n402-0002 n402-0002 n402-0002 ultra violet light ac
32 n402-0008 n402-0008 n402-0008 n402-0008 ultra violet replacement bulb ac
33 n080-0171 n080-0171 n080-0171 n080-0171 ultra violet light mounting bracket ac
34 n255-0042 n255-0042 n255-0042 n255-0042 fitting, plastic 1/2" male pipe - 1/2" barb el bow x
35 n255-0039 n255-0039 n255-0039 n255-0039 fitting, plastic 1/2" femal e pi pe - 1/2" female pipe elbow ac
36 n255-0040 n255-0040 n255-0040 n255-0040 3/4" male pipe x 1/2" fem al e pi pe bushing x
14
x - standard x - compris
ac - accessory ac - accessoires
Page 15

PARTS DIAGRAM
36
15
Page 16

NOTES
16
 Loading...