

Napoleon W415-0118 Service Manual

Wolf Steel’s Service Manual Index
Part 1: Troubleshooting: Direct Vents
Pilot Not Lighting Flowchart ..............................................................................................................4
Pilot Not Holding Flowchart .............................................................................................................5
Pilot Failure Flowchart....................................................................................................................6
Main Burner Not Lighting Flowchart............................................................................................7
Main Burner Delayed Ignition Flowchart.........................................................................................8
Main Burner Low Flame Flowchart...................................................................................................9
Main Burner Failure Flowchart........................................................................................................... 10
Complete Unit Shutdown.................................................................................................................. 11
Odour Flowchart.............................................................................................................................. 12
Part 2: Troubleshooting: Natural Vents
Pilot Not Lighting Flowchart...........................................................................................................14
Pilot Not Holding Flowchart............................................................................................................15
Pilot Failure Flowchart......................................................................................................................16
Main Burner Not Lighting Flowchart............................................................................................17
Main Burner Delayed Ignition Flowchart............................................................................................18
Main Burner Low Flame Flowchart..................................................................................................19
Main Burner Failure Flowchart........................................................................................................20
Complete Unit Shutdown.................................................................................................................21
Odour Flowchart..............................................................................................................................22
Part 3: Troubleshooting: Vent Free
Pilot Not Lighting Flowchart.............................................................................................................24
Pilot Not Holding Flowchart..............................................................................................................25
Pilot Failure Flowchart......................................................................................................................26
Main Burner Not Lighting Flowchart.................................................................................................27
Main Burner Delayed Ignition Flowchart...........................................................................................28
Main Burner Low Flame Flowchart...................................................................................................29
Complete Unit Shutdown.................................................................................................................30
Odour Flowchart..............................................................................................................................31
Part 4: Troubleshooting: Other Issues
Carboning Flowchart.......................................................................................................................33
Oil-Canning Flowchart.....................................................................................................................34
Blower Flowchart.............................................................................................................................35
Remote Control Guide.....................................................................................................................36
Part 5: Testing & Adjustments
Testing: Pressures...........................................................................................................................38
Testing: Gasket................................................................................................................................39
T esting: Switches - Spill Switch.........................................................................................................39
Testing: Switches - T .stat/Toggle.......................................................................................................39
Testing: Millivolts - Thermocouple - Robertshaw Valve...................................................................40
Testing: Millivolts - Thermocouple - SIT 820 Nova Valve................................................................41
Testing: Millivolts - Thermopile........................................................................................................42
Testing: Function - Magnet Coil - Robertshaw Valve......................................................................43
Testing: Function - Operator Coil - Robertshaw Valve....................................................................44
Testing: Function - Magnet Coil - SIT 820 Nova Valve....................................................................45
Testing: Function - Operator Coil - SIT 820 Nova Valve.................................................................46
Testing: Pilot Flame.........................................................................................................................47
Adjustments: Pilot Flame..................................................................................................................48
Adjustments: Spill Switch - Robertshaw Valve....................................................................................49
Adjustments: Spill Switch - SIT 820 Nova Valve..................................................................................50
Adjustments: Venturi/Air Shutter.....................................................................................................51
ALL RIGHTS RESERVED, NO PART OF THIS BOOK MAY BE REPRODUCED OR TRANSMITTED IN ANY FORM OR BY ANY MEANS - GRAPHIC, ELECTRONIC OR MECHANICAL WITHOUT THE
ISO-176 W415-0118 / B / 10.25.06
PRIOR WRITTEN PERMISSION FROM WOLF STEEL LTD., BARRIE, ONTARIO, CANADA
© WOLF STEEL LTD.

PART 1: TROUBLESHOOTING: DIRECT VENTS
Pilot Not Lighting Flowchart..........................................................................................................4
Pilot Not Holding Flowchart..........................................................................................................5
Pilot Failure Flowchart..................................................................................................................6
Main Burner Not Lighting Flowchart.............................................................................................7
Main Burner Delayed Ignition Flowchart......................................................................................8
Main Burner Low Flame Flowchart...............................................................................................9
Main Burner Failure Flowchart....................................................................................................10
Complete Unit Shutdown...........................................................................................................11
Odour Flowchart.........................................................................................................................12
ALL RIGHTS RESERVED, NO PART OF THIS BOOK MAY BE REPRODUCED OR TRANSMITTED IN ANY FORM OR BY ANY MEANS - GRAPHIC, ELECTRONIC OR MECHANICAL WITHOUT THE
ISO-176 W415-0118 / B / 10.25.06
PRIOR WRITTEN PERMISSION FROM WOLF STEEL LTD., BARRIE, ONTARIO, CANADA
© 2005 WOLF STEEL LTD.
4
Troubleshooting: Direct Vents
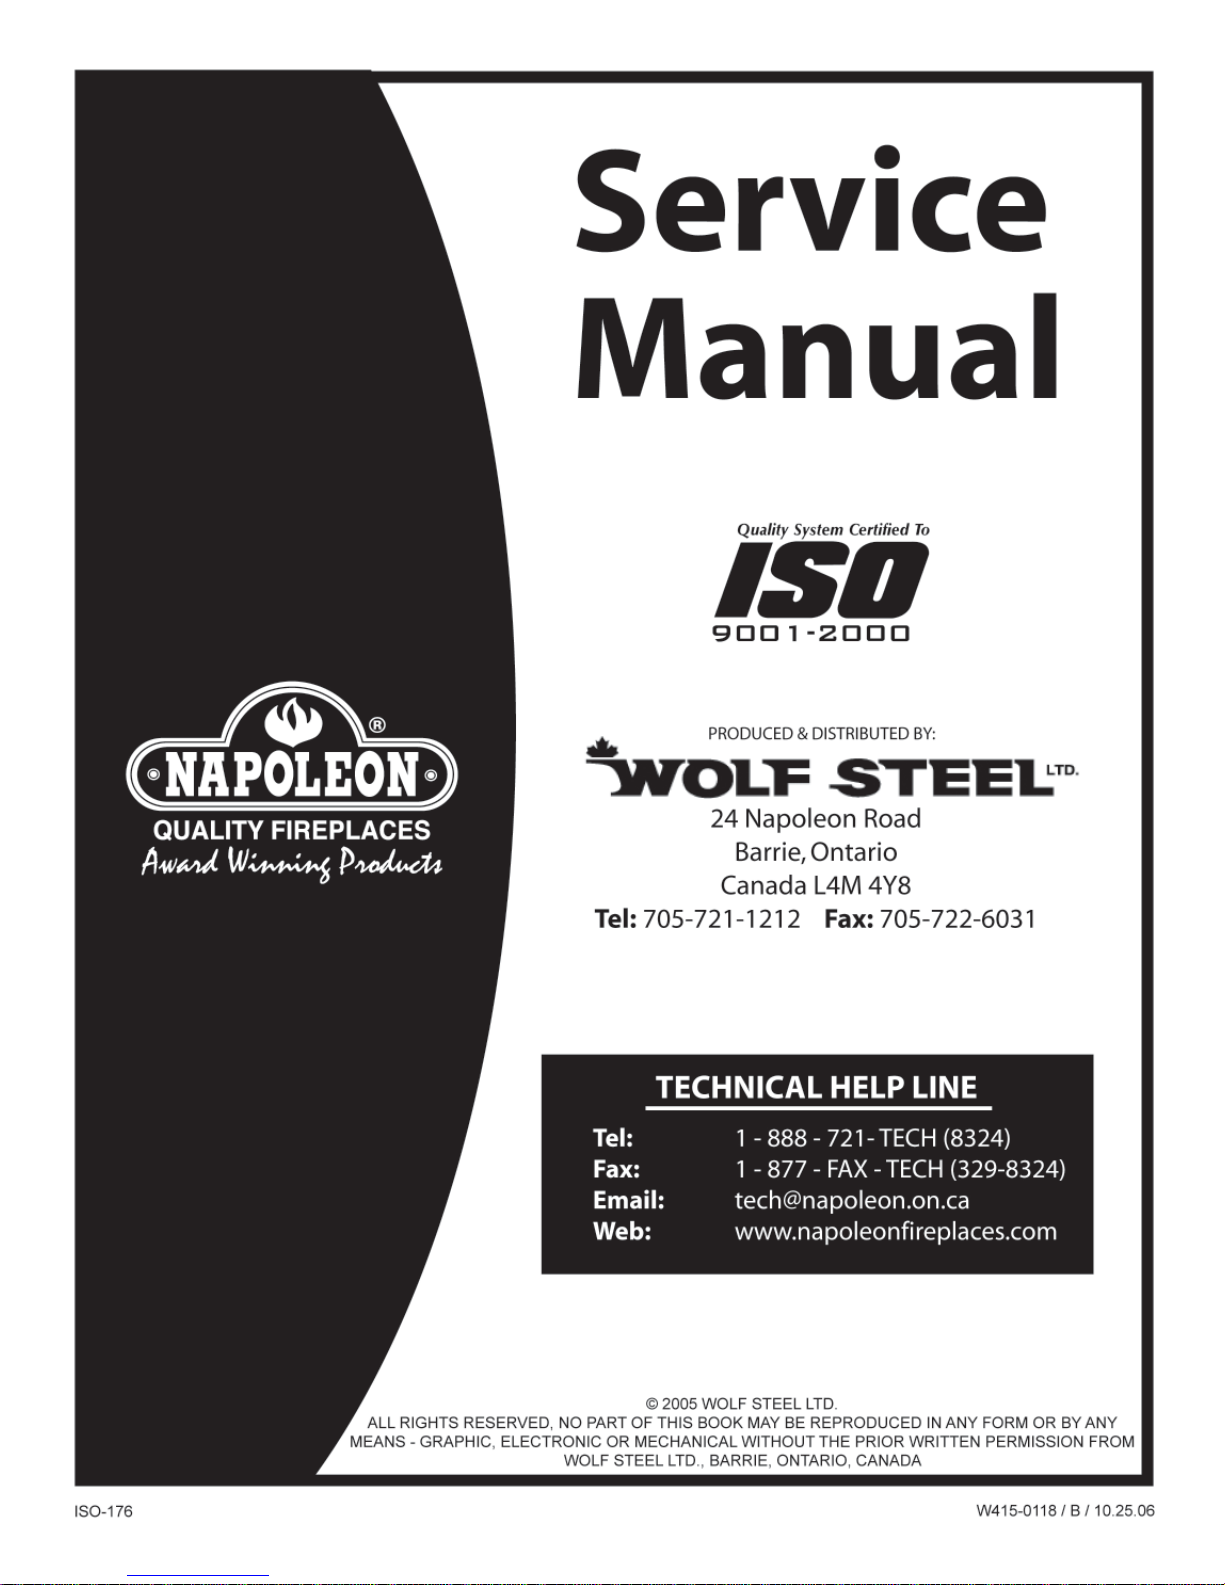
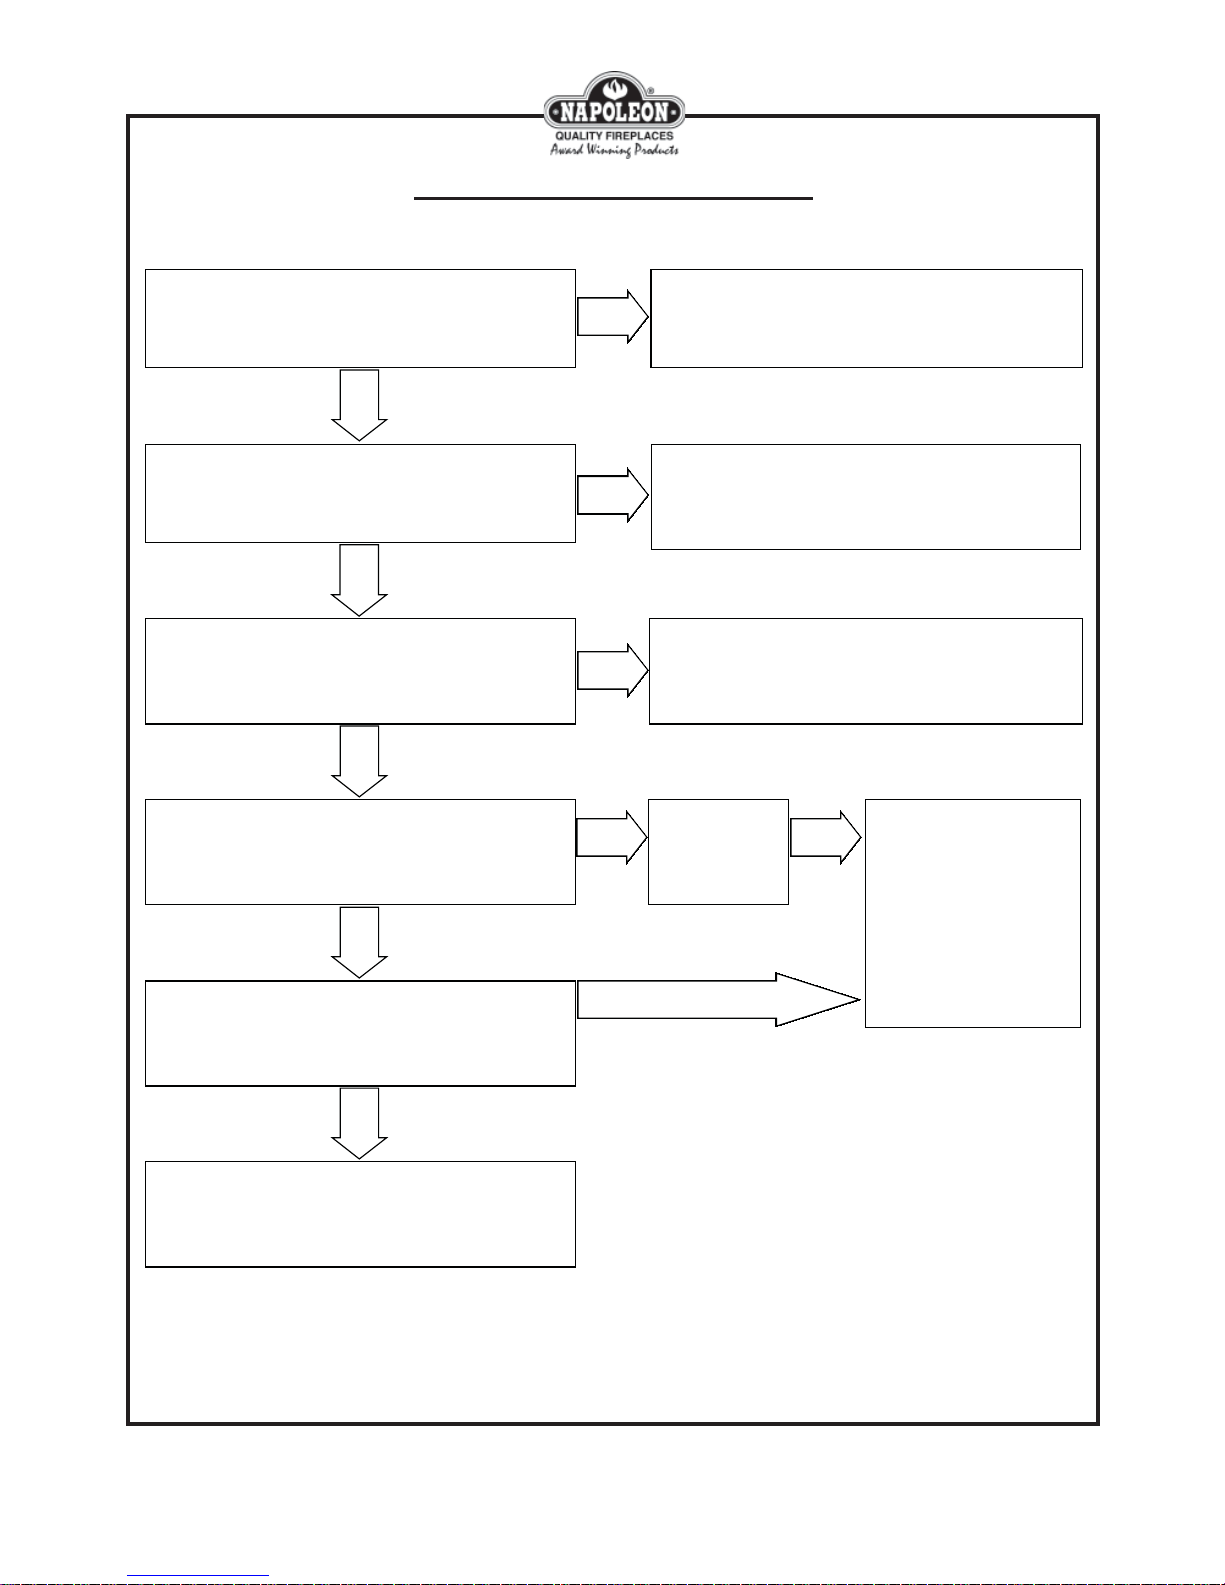
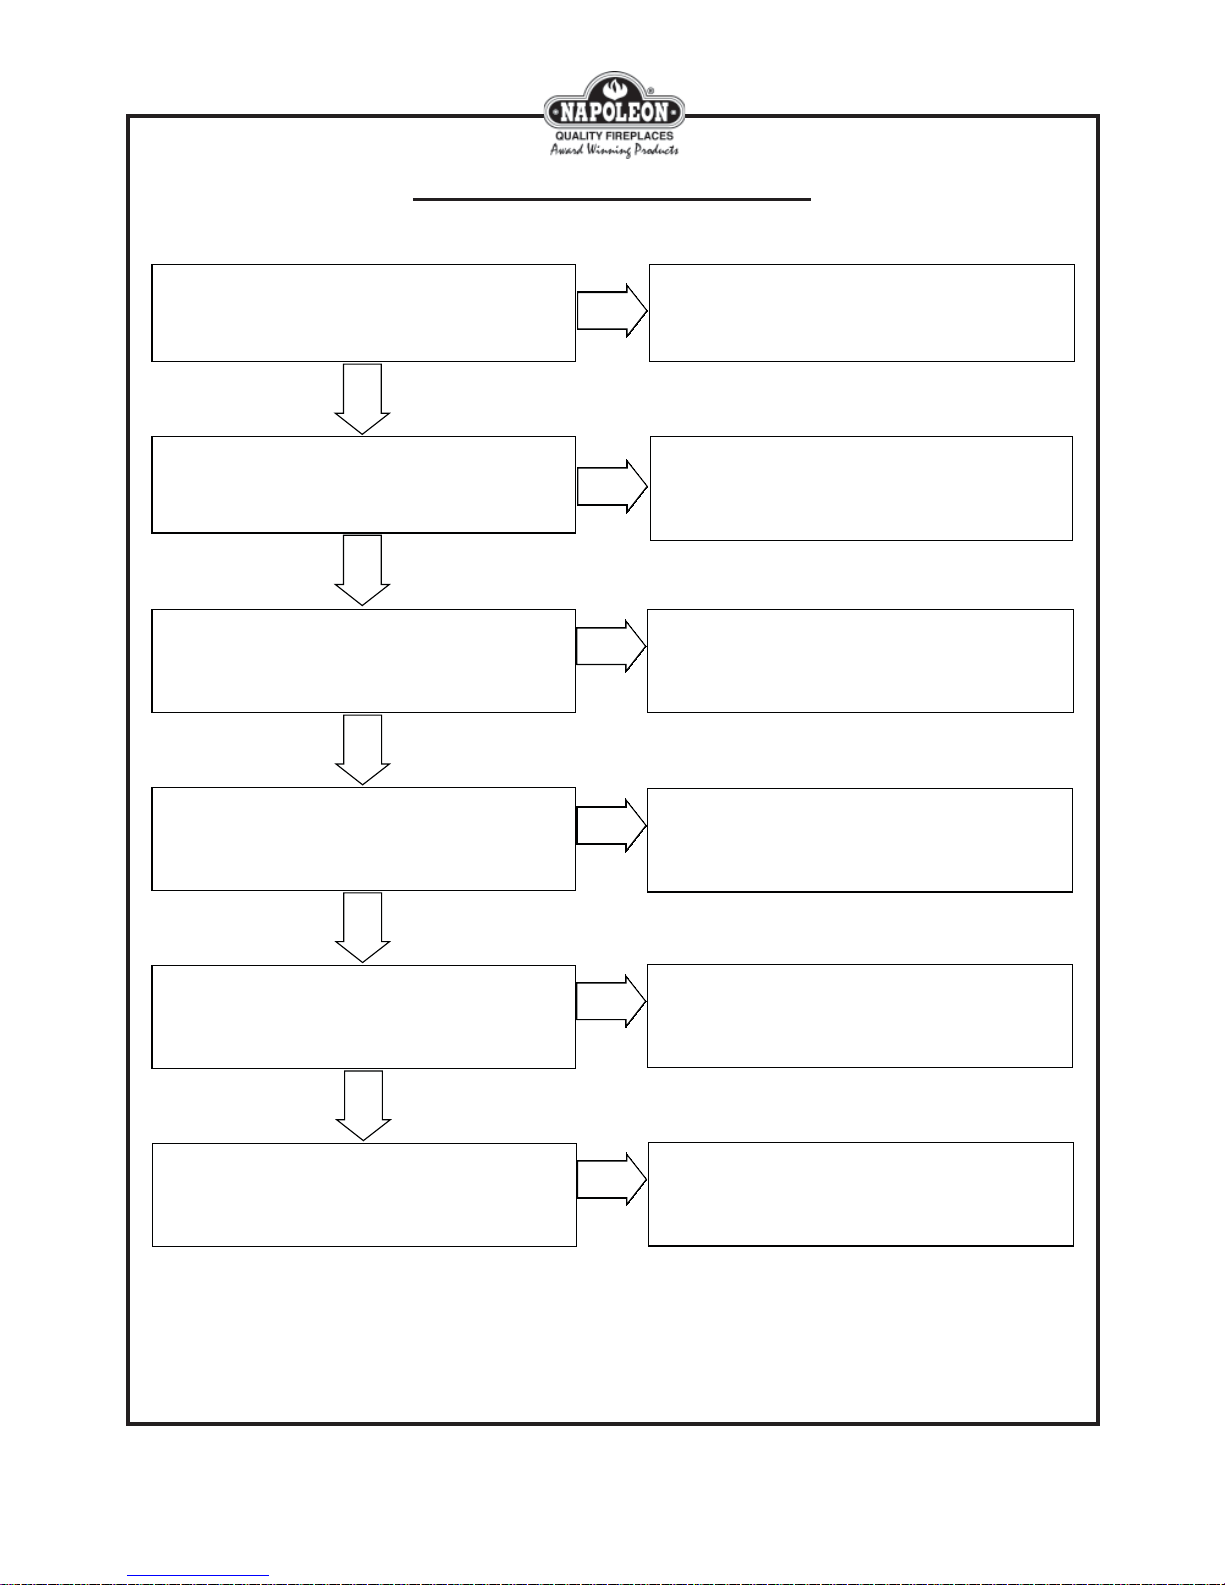
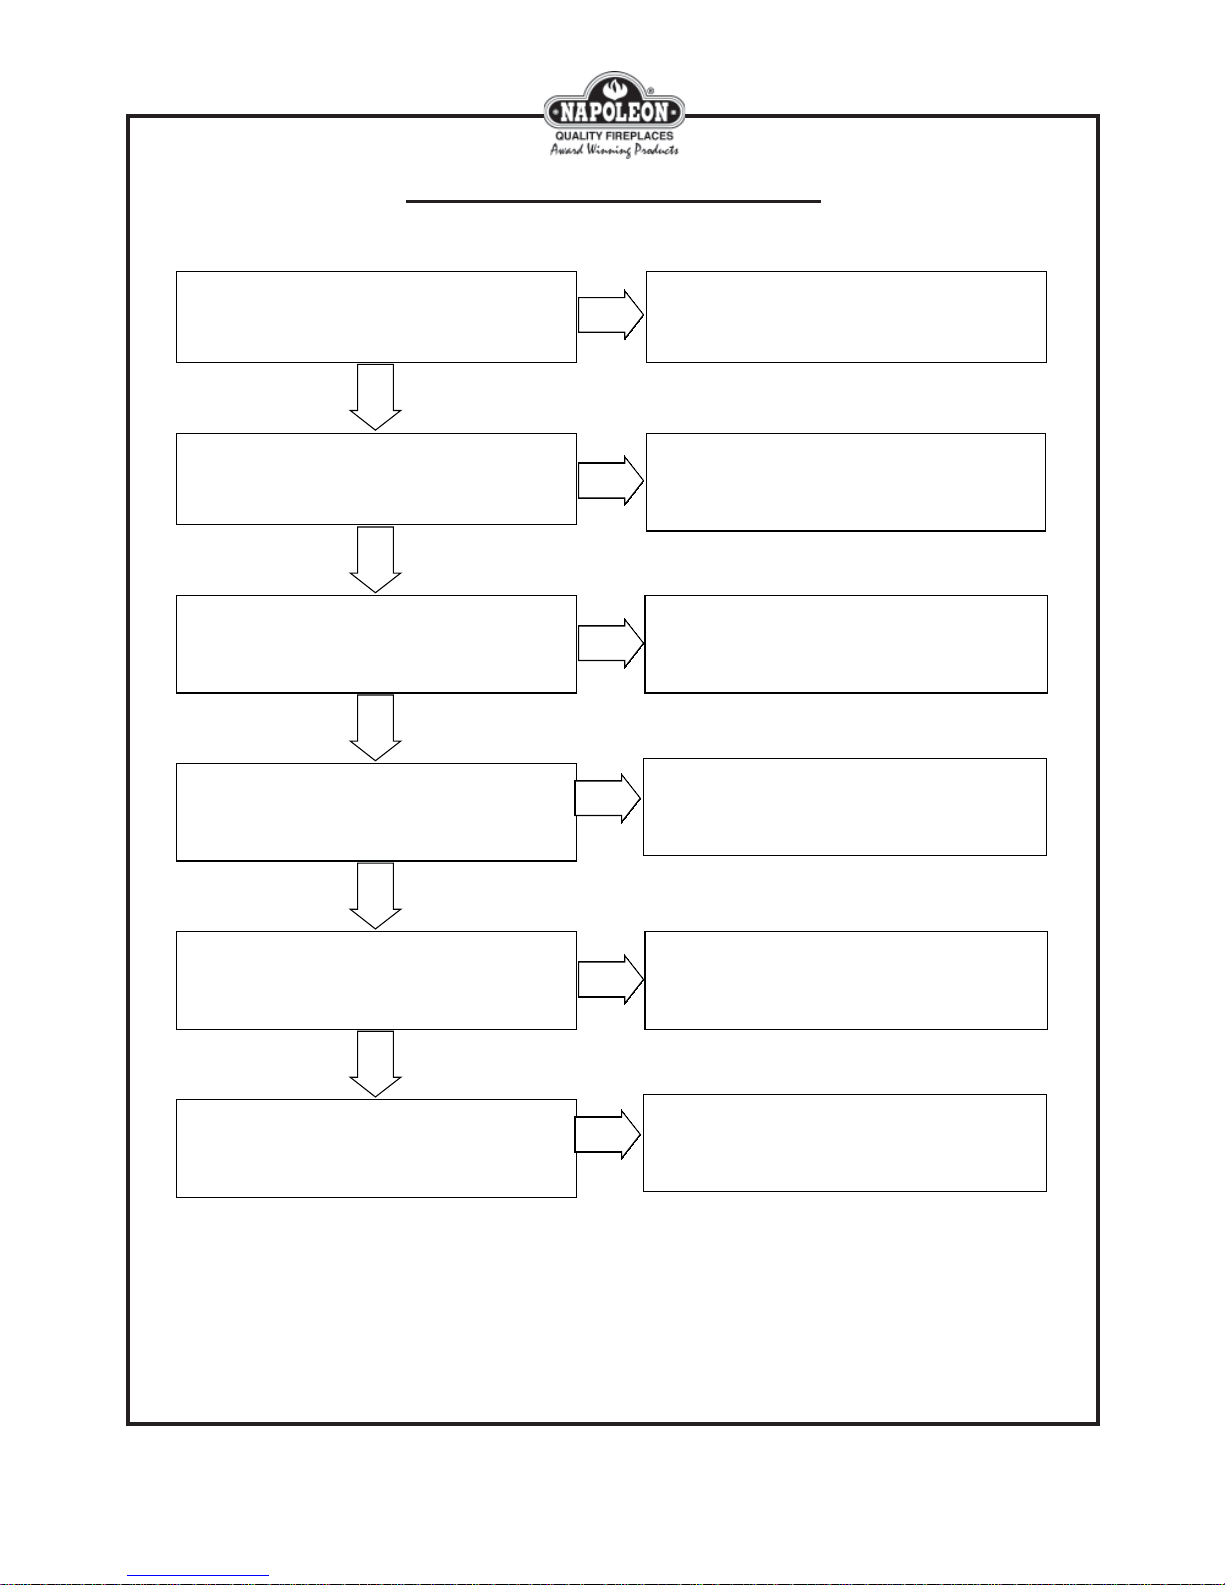
Pilot Not Lighting Flowchart
Is there a s park at the electrode when the pus h button igniter is pres s ed?
Check to ensure proper supply
pressures are available for ignition.
(See "Testing: Procedures")
Ensure the adjustment screw has not
been tightened closed. Adjust as
necessary. (See "Adjustments: Pilot
Flame")
Remove the tube and orifice and clean,
make sure no debris has compacted the
inside, inhibiting the flow of gas .
T ig hte n / sec u re to prev e nt le a k s .
NO
Has the inline gas
pressure been
NO
adjustment screw
been checked?
NO
Ha ve th e pilo t tub e
& pilo t orific e been
NO
Ar e the fittings on
the pilot tu be
te s ted ?
Has the pilot
checked for
blocka ges?
secure?
YES
YES
YES
YES
NO
Is the electrode
wire c onnection
secure?
YES
Is there a 1/8" gap
between the
electrode and the
pilot hood?
YES
Has the electrode
been examined for
damage? (i.e.
chipped/broke n)
NO
NO
NO
Secure / Replace
as necessary.
Adjust position so
the r e is no
grea ter than a
1/8" gap.
Replace if
damaged or
broke n.
Un-kink the tube to prevent blockage, or
ALL RIGHTS RESERVED, NO PART OF THIS BOOK MAY BE REPRODUCED OR TRANSMITTED IN ANY FORM OR BY ANY MEANS - GRAPHIC, ELECTRONIC OR MECHANICAL WITHOUT THE
replace leaking tube.
E nsure the opening is not blocked or
plugged. C lea r if necess ary.
PRIOR WRITTEN PERMISSION FROM WOLF STEEL LTD., BARRIE, ONTARIO, CANADA
ISO-176 W415-0118 / B / 10.25.06
NO
Ha s the pilo t tube
been checked for
NO
Has the primar y
air opening on the
been checked for
YES
kinks / leaks?
YES
pilot assembly
blocka ges?
© 2005 WOLF STEEL LTD.
Troubleshooting: Direct Vents
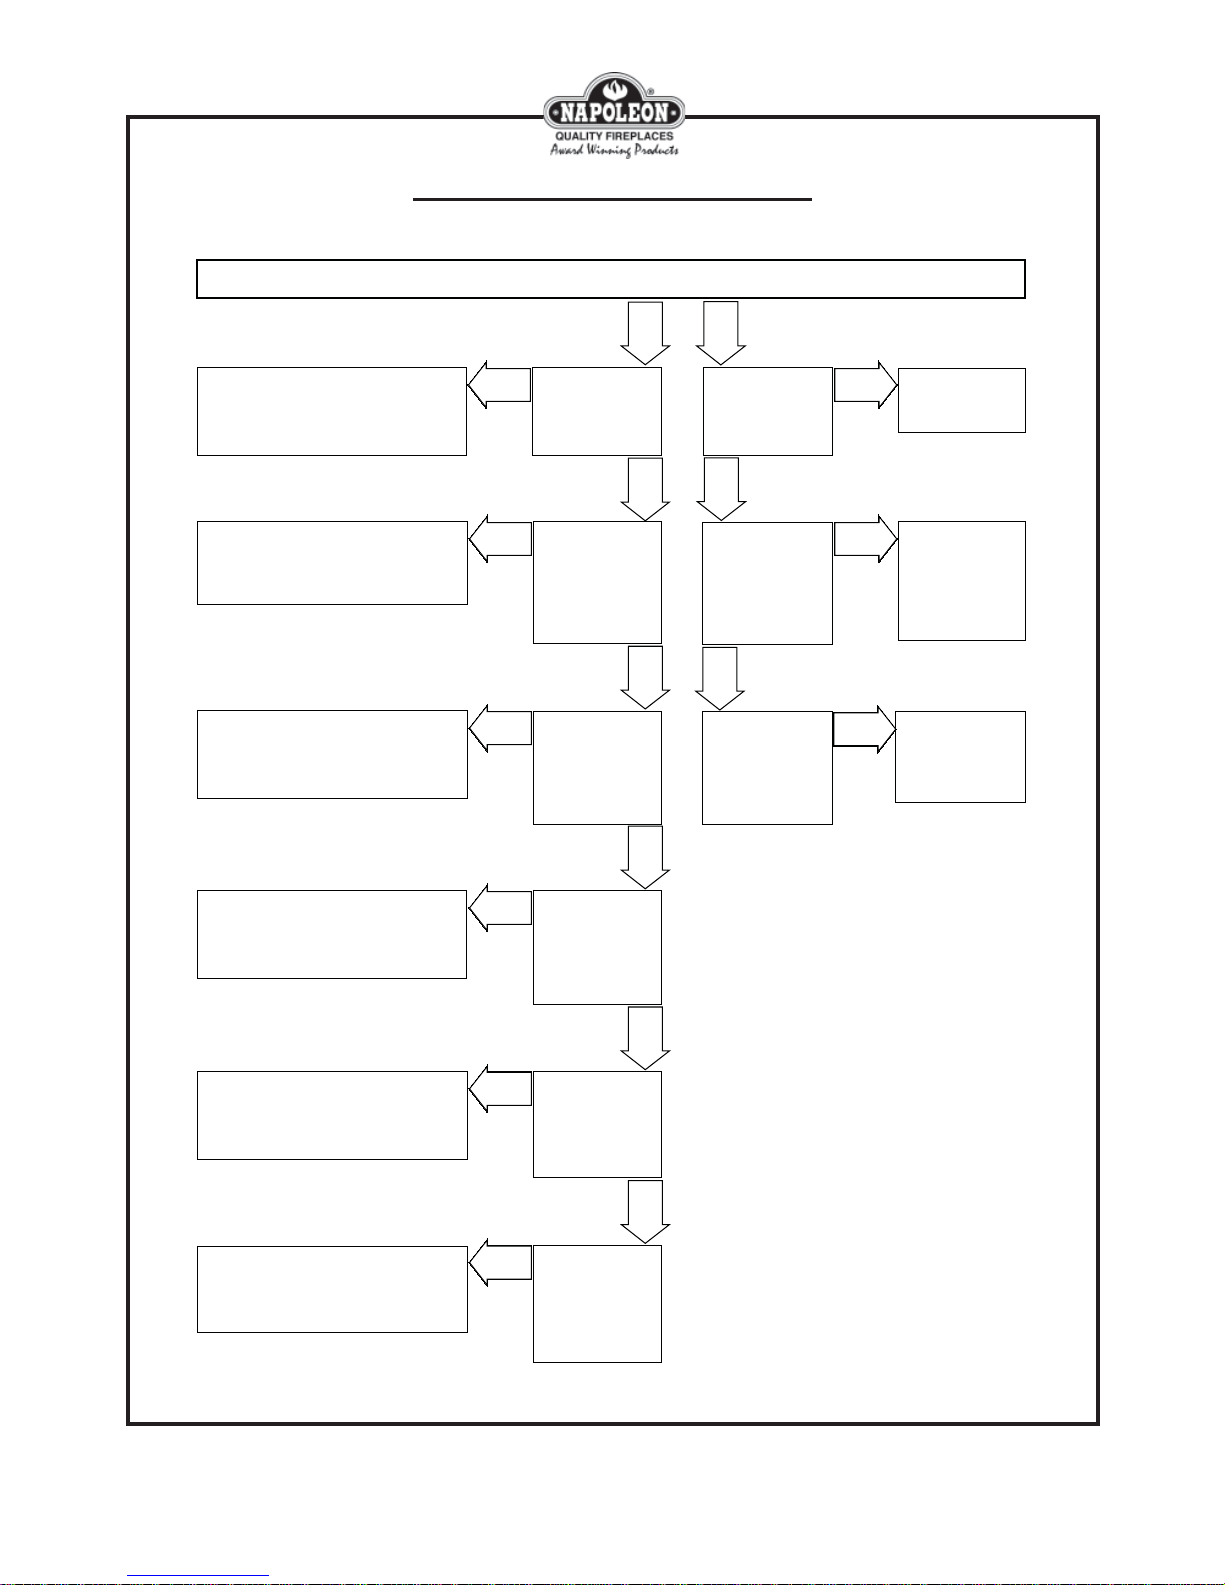
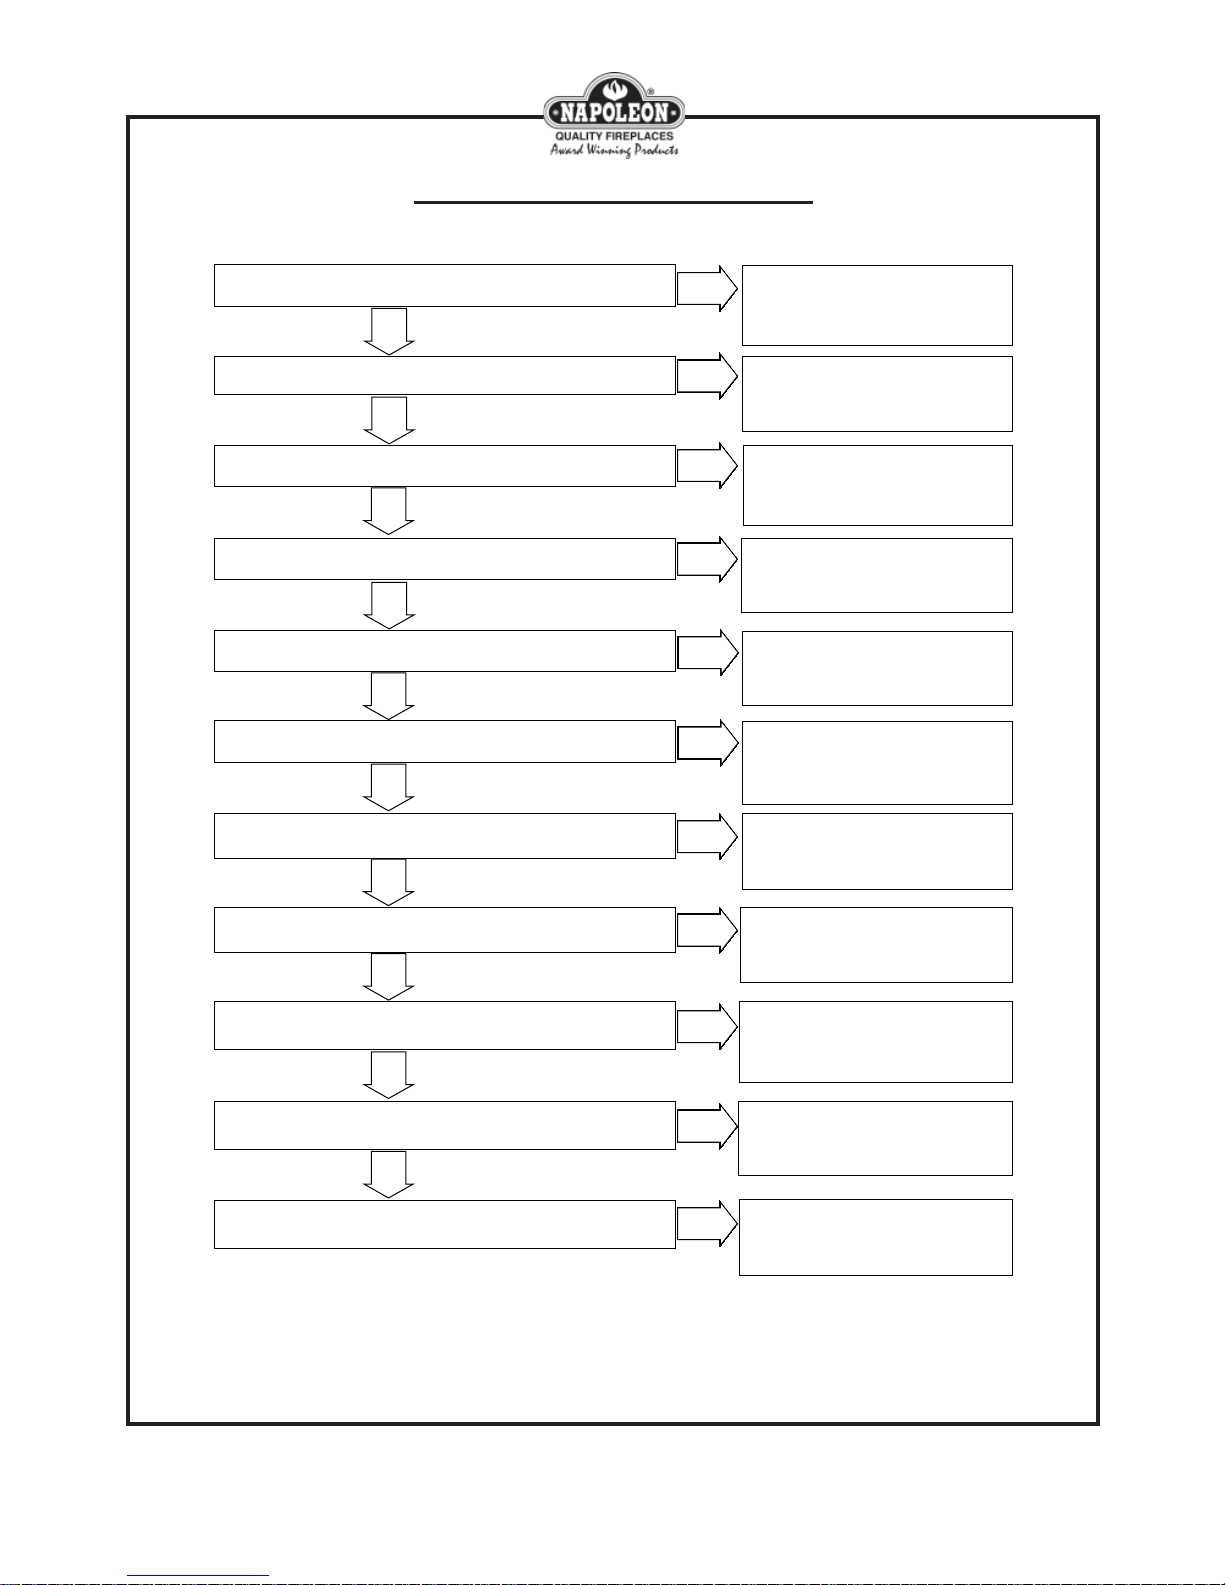
Pilot Not Holding Flowchart
5
Has the thermocouple connection been checked?
Is the tip of the thermocouple clean?
YES YES
Has the thermocouple been tested for millivolt
generation?
YES
Has the magnet coil of the valve been checked for
function?
NO
NO
NO
NO
Tighte n therm oc ou ple t o e nsure prop e r m illivolt
delivery.
Clean any buildup off of the tip of the
therm ocouple to m aximize it's exposure to the
flame.
Test the therm ocouple to ensure it is within
specifications. (See "Testing: Millivolts -
Thermocoup le")
Te st the m agne t c oil to ensure it is w ithin
specification. (See "Testing: Function - Magnet
Coil")
YES
Is the supply line size ade quate for the
ALL RIGHTS RESERVED, NO PART OF THIS BOOK MAY BE REPRODUCED OR TRANSMITTED IN ANY FORM OR BY ANY MEANS - GRAPHIC, ELECTRONIC OR MECHANICAL WITHOUT THE
ISO-176 W415-0118 / B / 10.25.06
installatio n?
PRIOR WRITTEN PERMISSION FROM WOLF STEEL LTD., BARRIE, ONTARIO, CANADA
NO
© 2005 WOLF STEEL LTD.
Check the local code requirements and replace as
ne ce ssar y.
6
Troubleshooting: Direct Vents
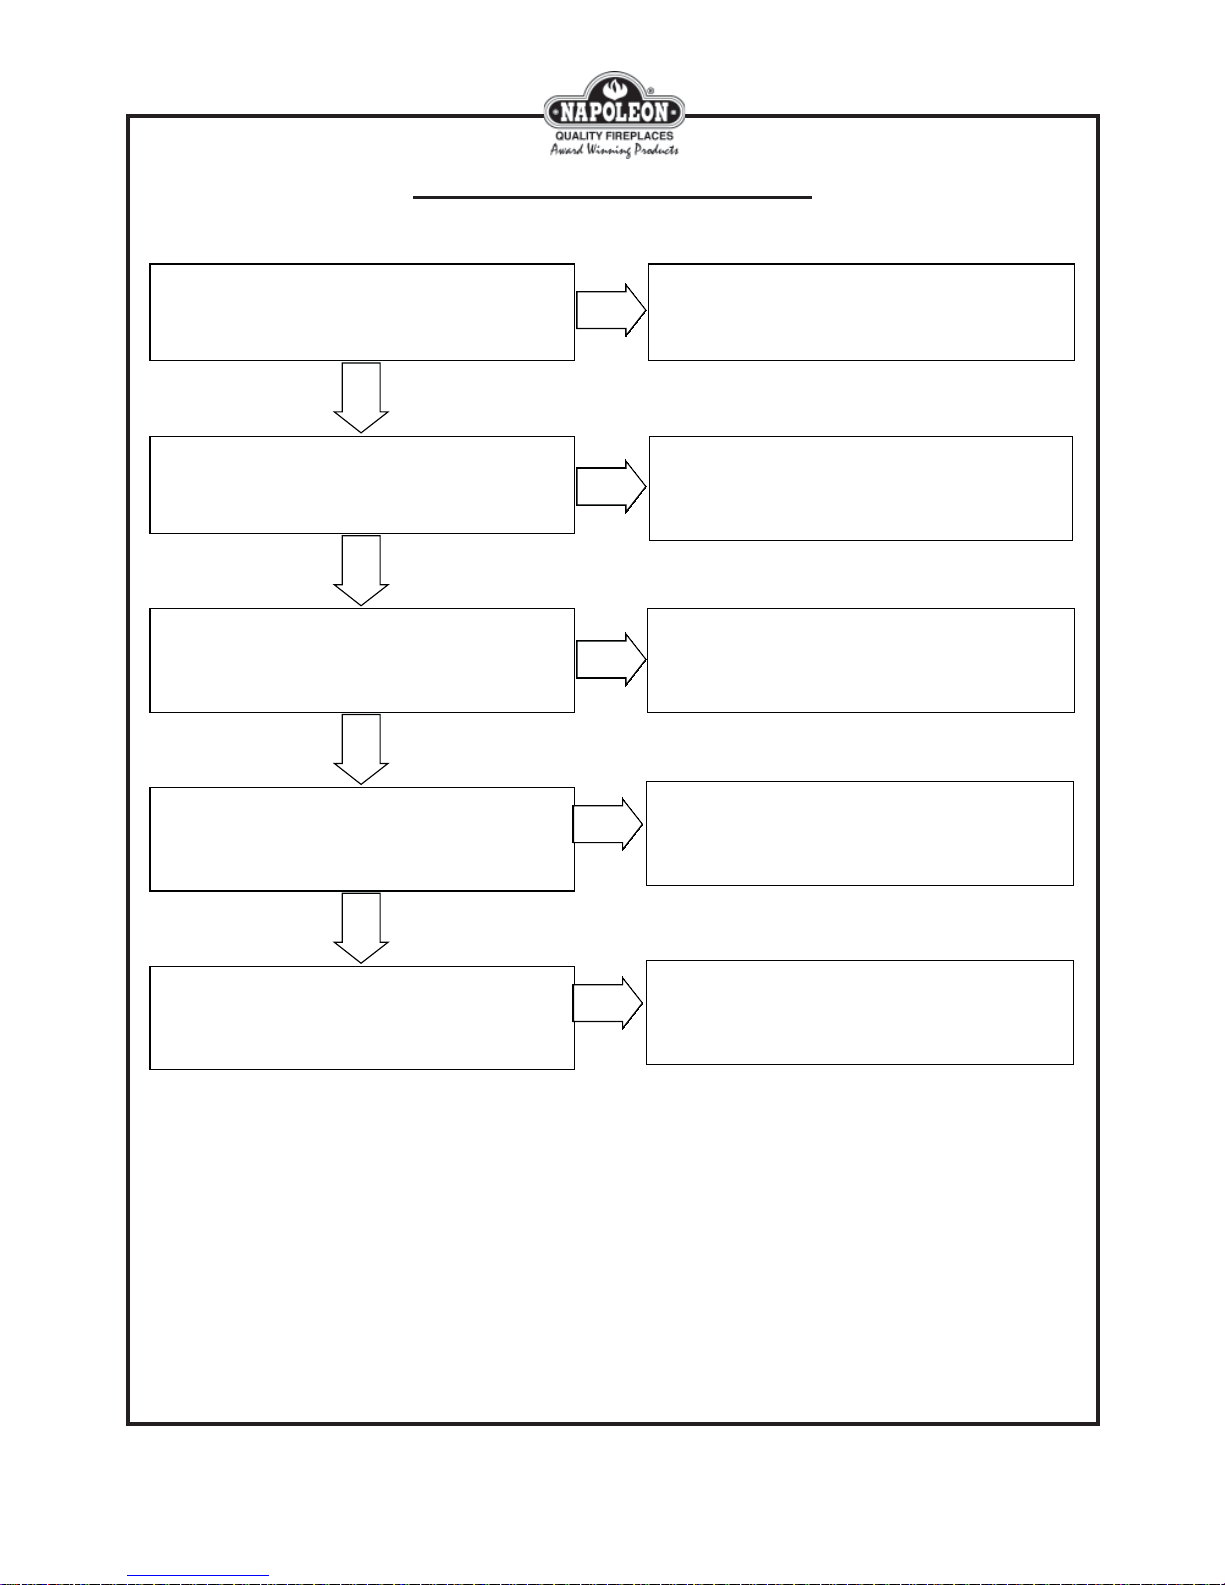
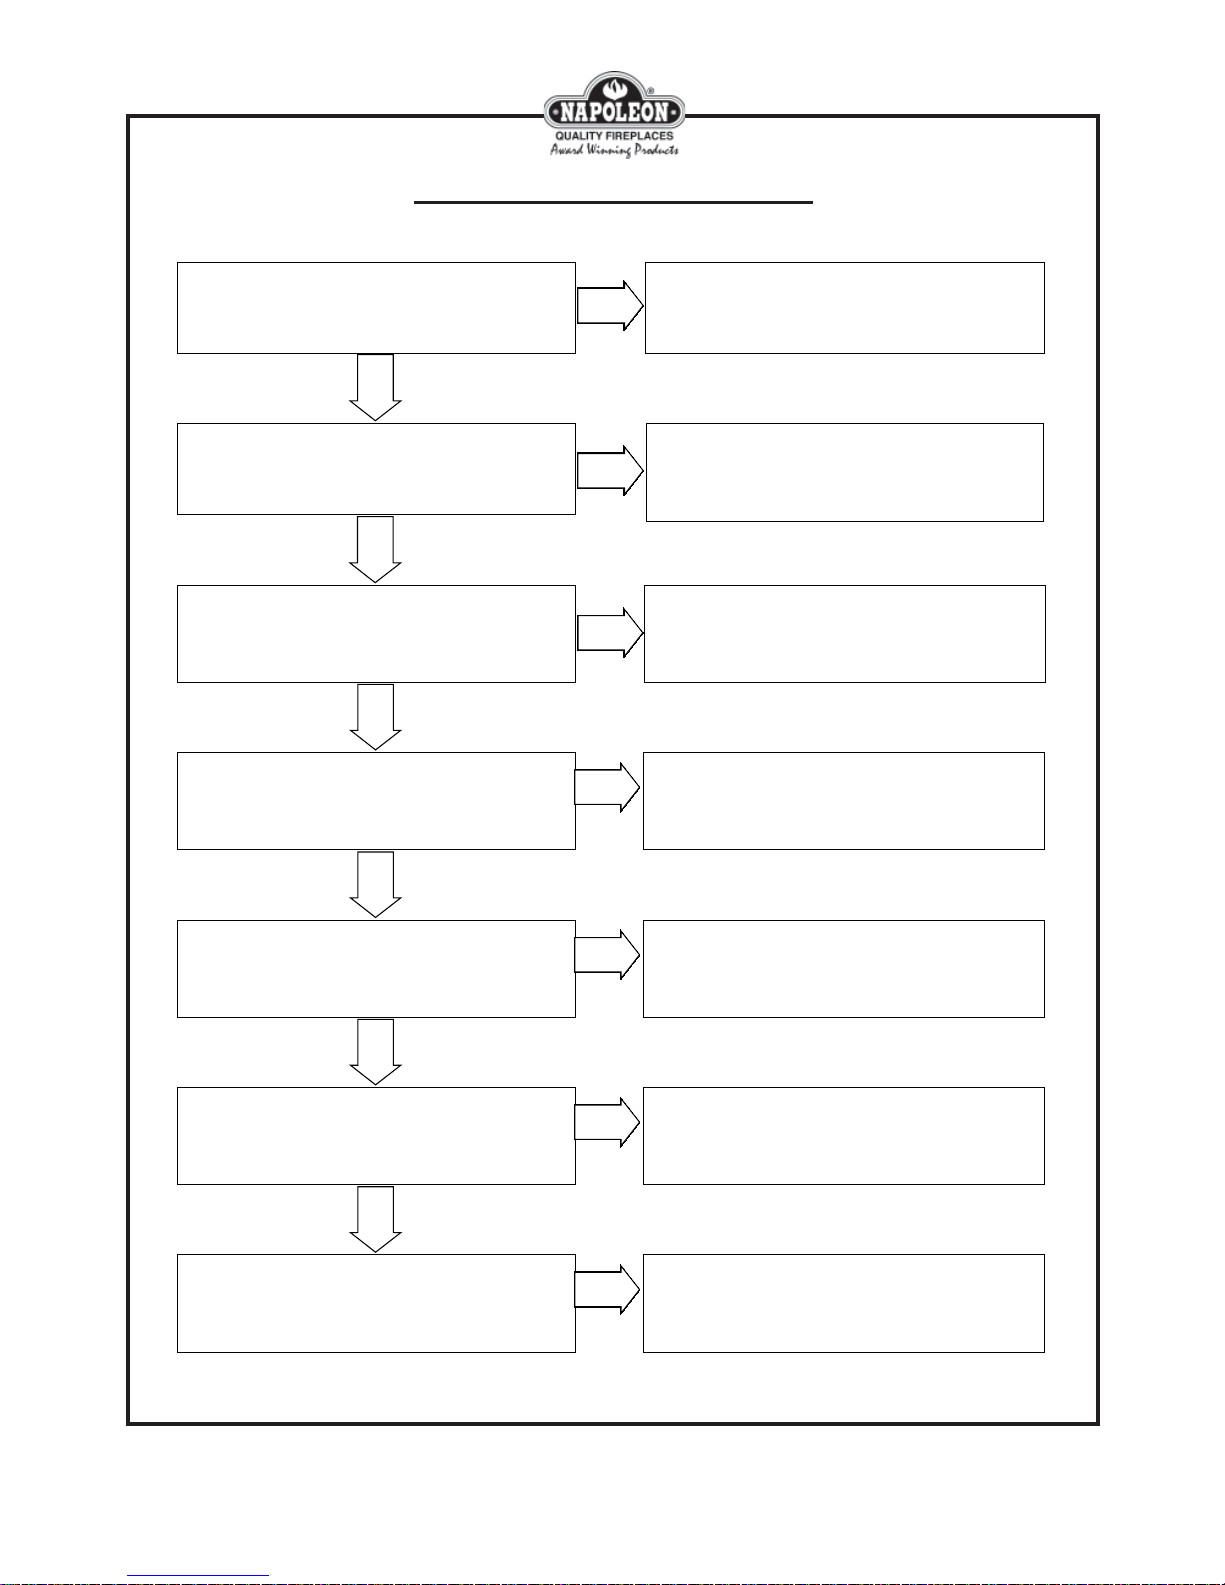
Pilot Failure Flowchart
Is the pilot flame p attern, position and size
correct?
YES
Is the pilot flame shrinking when the burner is
turned on?
NO
Has the thermocouple been tested for millivolt
generation?
YES
Has the function of the magnet coil been
checked?
NO
YES
NO
NO
Check to m ake sure the p ilot is large enough and in
the proper p osition, to properly heat the
thermocouple. (See "Testing: Pilot Flame")
Check to m ake sure the pressure is not dropping
off on activation. (See "Testing: Pressures")
Test the therm ocouple to ensure it is within
spe c ific ations. (See "Testing: Millivolts -
Thermocoup le")
Te st the m agne t c oil to e nsure it is w ithin
specification. (See "Testing: Function - Magnet
Coil" )
YES
Has the vent system been examined for problems?
NO
(See "Complete Unit Shutdown" Flowchart)
YES
Are the logs properly positioned?
ALL RIGHTS RESERVED, NO PART OF THIS BOOK MAY BE REPRODUCED OR TRANSMITTED IN ANY FORM OR BY ANY MEANS - GRAPHIC, ELECTRONIC OR MECHANICAL WITHOUT THE
ISO-176 W415-0118 / B / 10.25.06
PRIOR WRITTEN PERMISSION FROM WOLF STEEL LTD., BARRIE, ONTARIO, CANADA
NO
© 2005 WOLF STEEL LTD.
Out of place logs can alter the flow of air within
the combustion chamber, causing an erratic pilot.
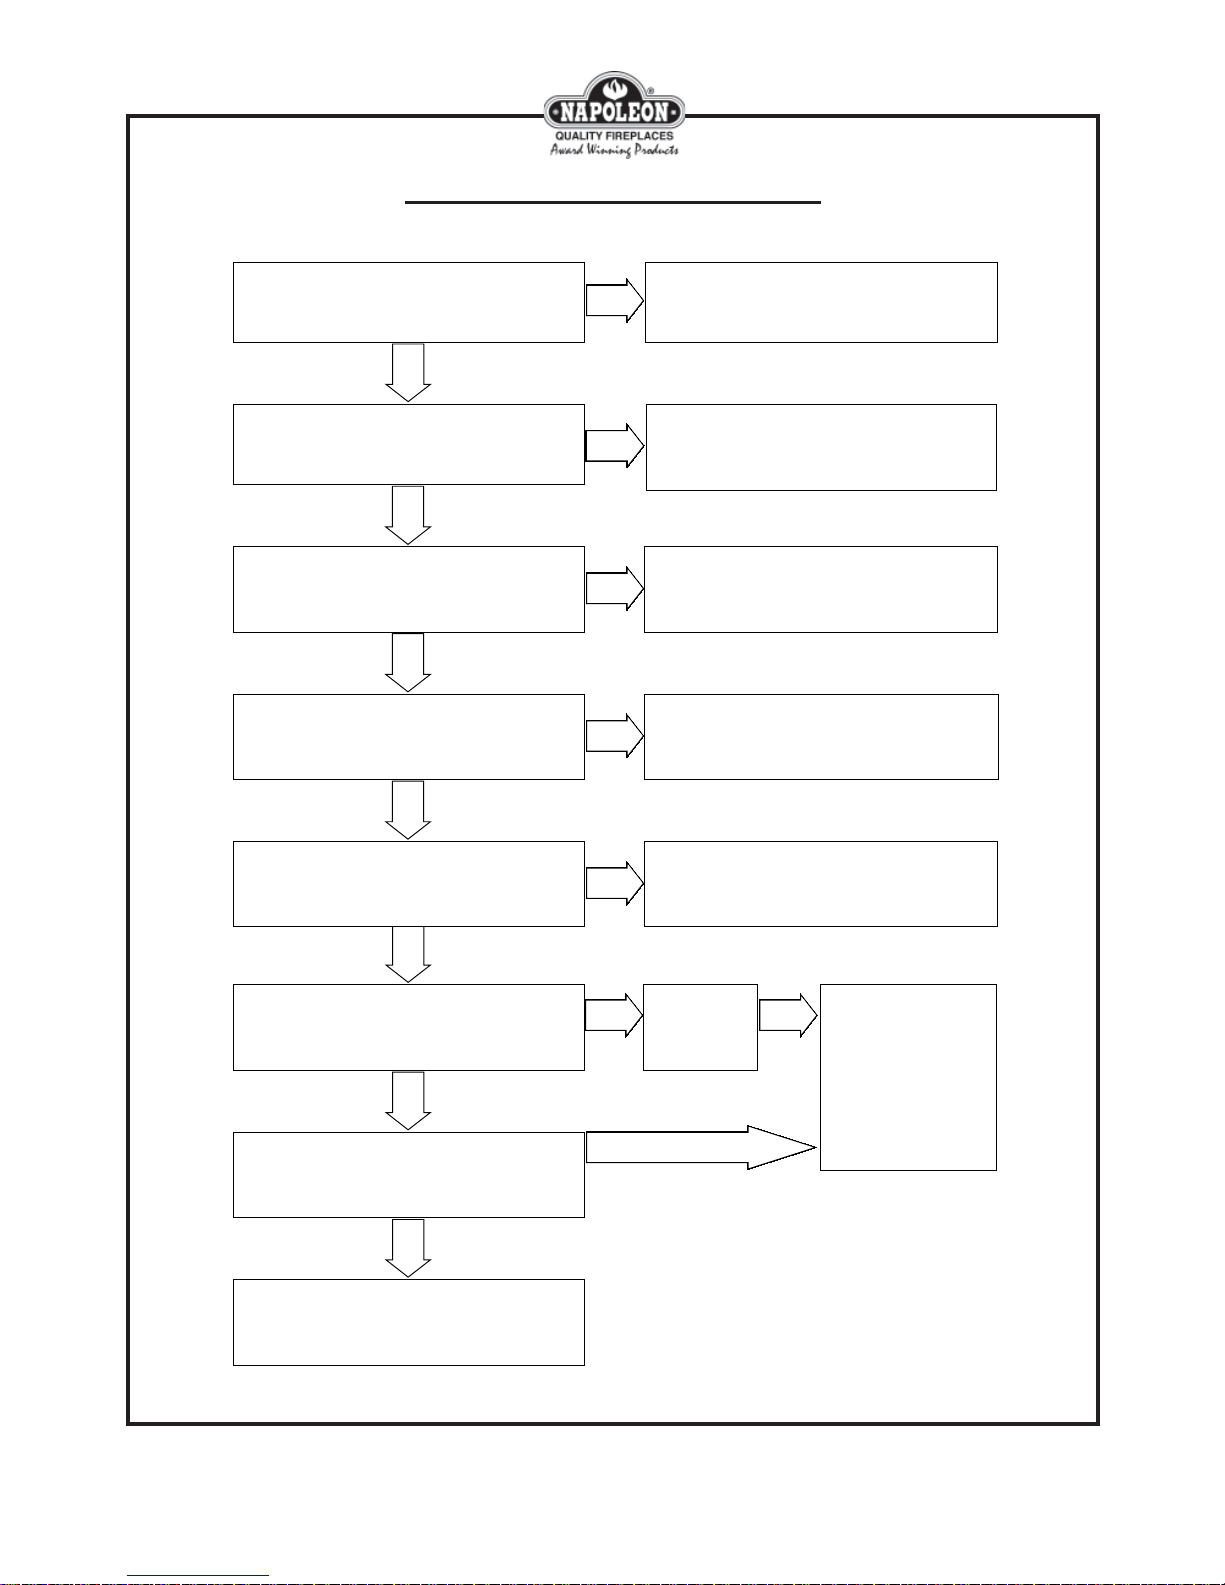
Troubleshooting: Direct Vents
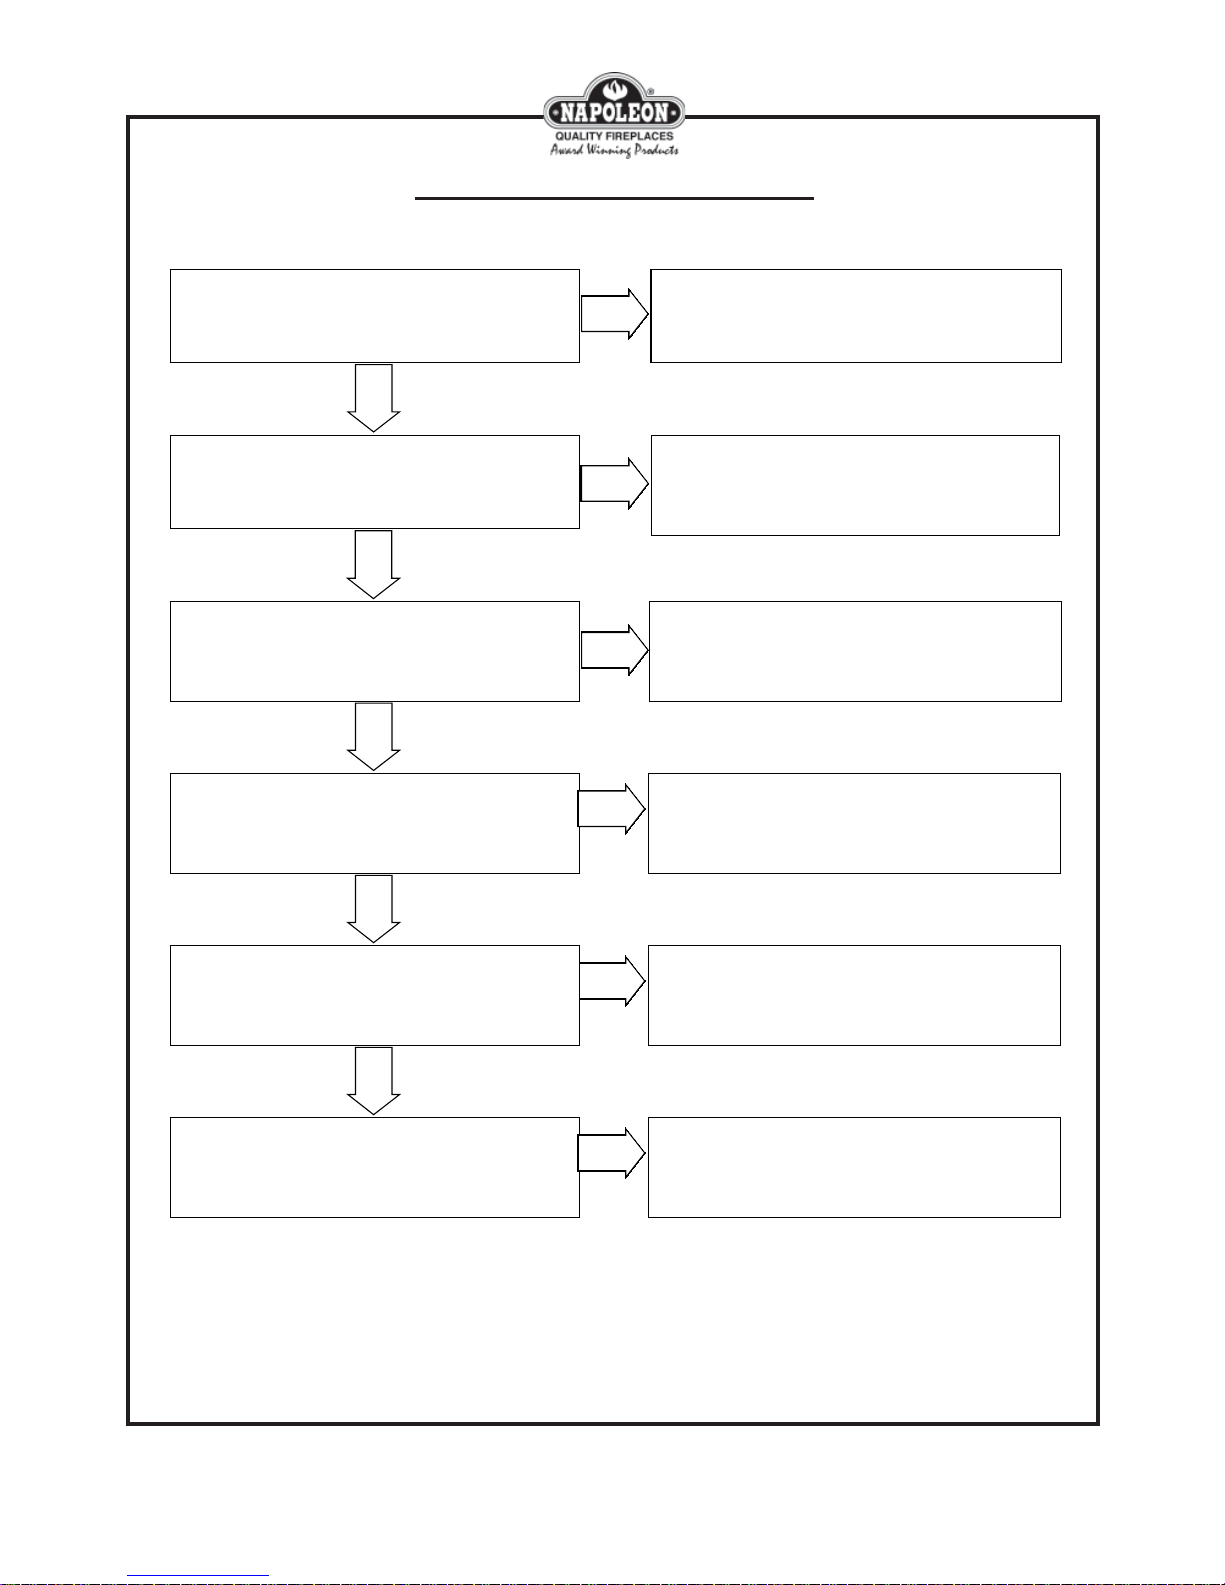
Main Burner Not Lighting Flowchart
7
Have the thermopile leads been connected to the
1st & 2nd term inals on the valve (THTP & TP)?
YES
Has the thermopile been tested for millivolt
generation?
YES
Has the burner & orifice been checked for
blockages?
YES
Is there a sw itch or remote connected on
te rm inals 1 & 3?
YES
NO
NO
NO
NO
Connect the thermopile leads to the 1st & 2nd
term inals on the valve (THTP & TP).
Test the thermopile to ensure it is within
spe c ifications. (See "Testing: Millivolt s -
Check and clean as required.
Conn e c t a
sw it ch or
rem ote to
te rm inals 1 & 3.
Thermopile").
NO
Test the operator coil of
the valve for resistance.
Replace the valve if out
of spec ification. (See
"Testing: Function -
Op era to r Coil")
Disc on ne c t sw itch or re m o te a t v alv e and re p lace
with a jumper wire. Did the burner activate?
YES
See "Testing: Switches - T.Stat/Toggle"
ALL RIGHTS RESERVED, NO PART OF THIS BOOK MAY BE REPRODUCED OR TRANSMITTED IN ANY FORM OR BY ANY MEANS - GRAPHIC, ELECTRONIC OR MECHANICAL WITHOUT THE
ISO-176 W415-0118 / B / 10.25.06
PRIOR WRITTEN PERMISSION FROM WOLF STEEL LTD., BARRIE, ONTARIO, CANADA
NO
© 2005 WOLF STEEL LTD.
8
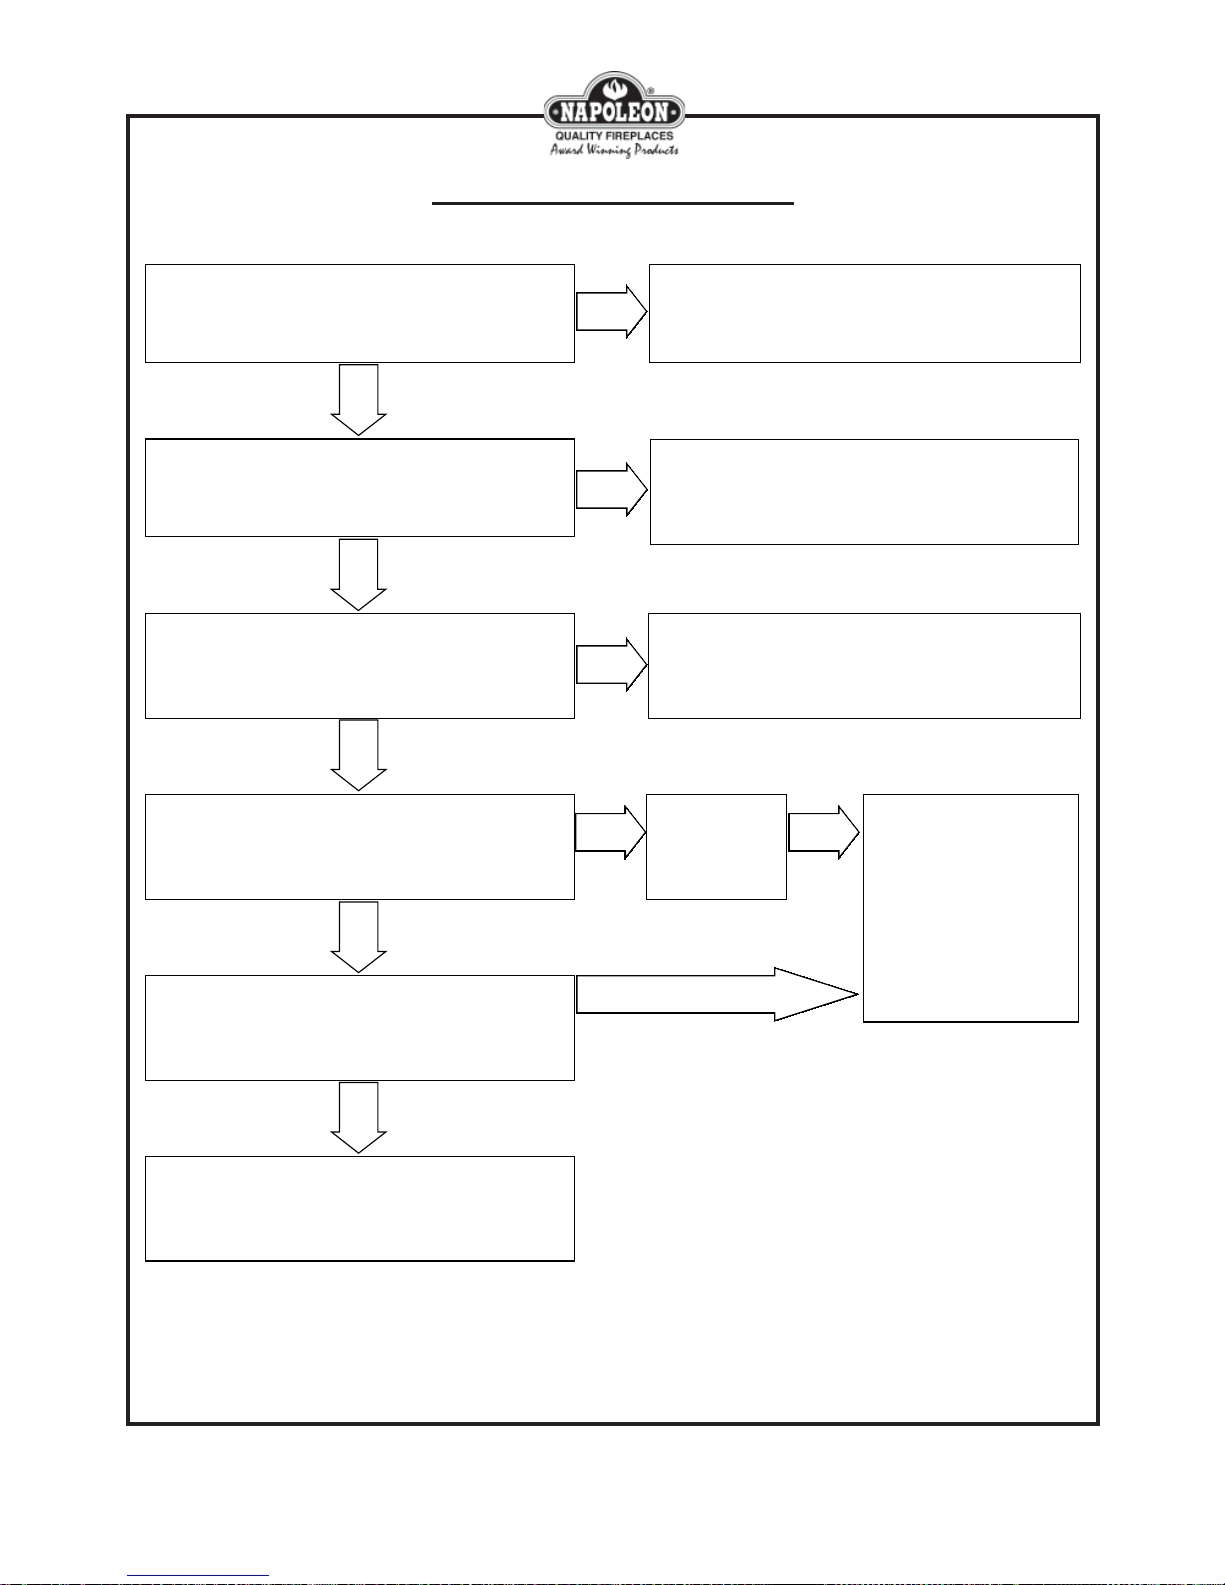
Troubleshooting: Direct Vents
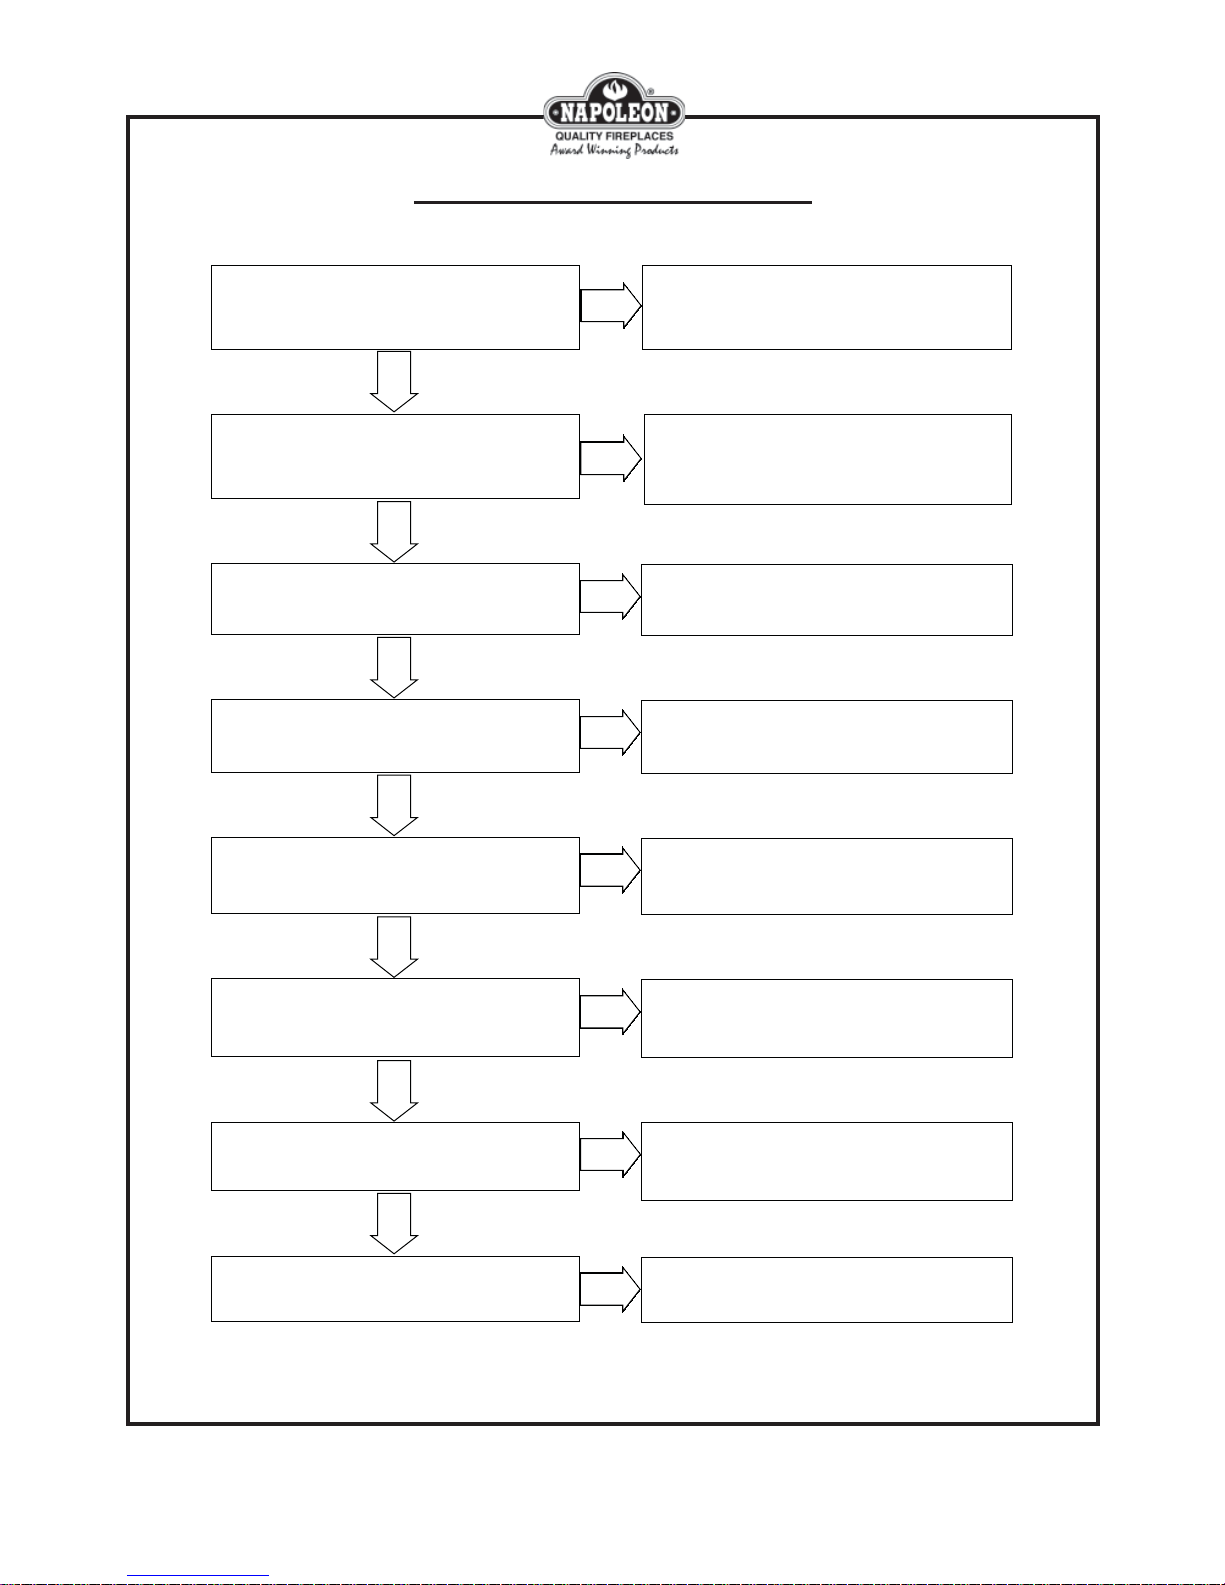
Main Burner Delayed Ignition Flowchart
Has the pilot flame position and size been examined?
YES
Has t he inline ga s pre ssur e b ee n t est e d?
YES
Has the main burner & orifice been checked for blockages?
YES
Has th e m ain bu rne r o rif ice bee n e xam ined to see if it is the
right size?
YES
Has the venturi (air shutter) been checked & adjusted?
YESYESYES
Has the venturi access door been checked?
YES
Has the burner been checked to ensure it is level?
NO
NO
NO
NO
NO
NO
NO
Check to m ake sure the pilot is large
enough and in the proper position,
to reach the ignition ports. (See
"Testing: Pilot Flame")
Check to ensure the proper supply
pre ssures are available for ignition.
(See "Testing: Pressures")
Chec k to m ake sure nothin g is
blocking the flow of gas through the
burne r a nd orif ice, c ont rib utin g to
the de lay. Clean as nec essary.
Check the size of the orifice and
ensure it meets manufacturers
spe cific atio n.
Check the venturi setting and adjust
as necessary to improve the ignition
time. (See "Ad justing: Venturi")
Check to e nsure the door is tightly
sealed and not allowing any air into
the air-shutter cham be r, and that the
gasket is intac t.
Examine and level as nece ssary.
Has the positioning of the logs been checked?
Have the c harcoal / glowing em bers (w here app licable) been
checked?
NO
NO
Out of place logs can alter the flow
of air within the com bustion
chamber, causing an erratic pilot.
Check to make sure no e mb er
material is clogging the ports, and
contributing to the delay.
YES
Has the venting been examined?
NO
Ensure the ve nting is sealed and
there are no leaks.
YES
Has the main door seal been checked?
ALL RIGHTS RESERVED, NO PART OF THIS BOOK MAY BE REPRODUCED OR TRANSMITTED IN ANY FORM OR BY ANY MEANS - GRAPHIC, ELECTRONIC OR MECHANICAL WITHOUT THE
PRIOR WRITTEN PERMISSION FROM WOLF STEEL LTD., BARRIE, ONTARIO, CANADA
© 2005 WOLF STEEL LTD.
NO
Check to m ake sure no air is leaking
in around the seal, which can affe ct
the flow of air in the combustion
chamber.
ISO-176 W415-0118 / B / 10.25.06
Troubleshooting: Direct Vents
Main Burner Low Flame Flowchart
9
Does the fireplace have a modulating remote?
NO
Is the h i- lo knob s et to a high s e tting ?
YES
Have the inlet + outlet gas pressures been tested?
YES
Ha s the main burn er orifice be en examine d to see if it is
the r igh t s ize?
YES
NO
NO
NO
Check to see if the remote has power. When power is
un a va ilable , the r e mote def a ults to a low-fla me mo de until
it's re s tored.
T u rn the k no b to its higher s e ttin g.
Check to ensure the proper supply and flow condition
pressures for optimal burn. (See "Testing: Pressures")
Check the size of the orifice and ensure it meets
manufacturers specification.
YES
Has the main burner and orifice been checked for
blocka ges?
NO
Check to make sure nothing is blocking the flow of gas
through the burner and orifice, which could res ult in low
flame. Clean as necessary.
YES
Has the venturi (air shutter) been checked + adjusted?
NO
C heck the v e ntu ri s etting a nd a dju s t a s nec e s s ar y to
improve the flame appearance. (See "Adjustments:
Venturi")
YES
Has the manifold tube been checked for blockages?
ALL RIGHTS RESERVED, NO PART OF THIS BOOK MAY BE REPRODUCED OR TRANSMITTED IN ANY FORM OR BY ANY MEANS - GRAPHIC, ELECTRONIC OR MECHANICAL WITHOUT THE
ISO-176 W415-0118 / B / 10.25.06
PRIOR WRITTEN PERMISSION FROM WOLF STEEL LTD., BARRIE, ONTARIO, CANADA
NO
© 2005 WOLF STEEL LTD.
R emo ve the tu be to ma ke s ure no deb ris ha s comp a cted
inside, inhibiting the flow of gas . C lea n as nec es sa ry.
10
Troubleshooting: Direct Vents
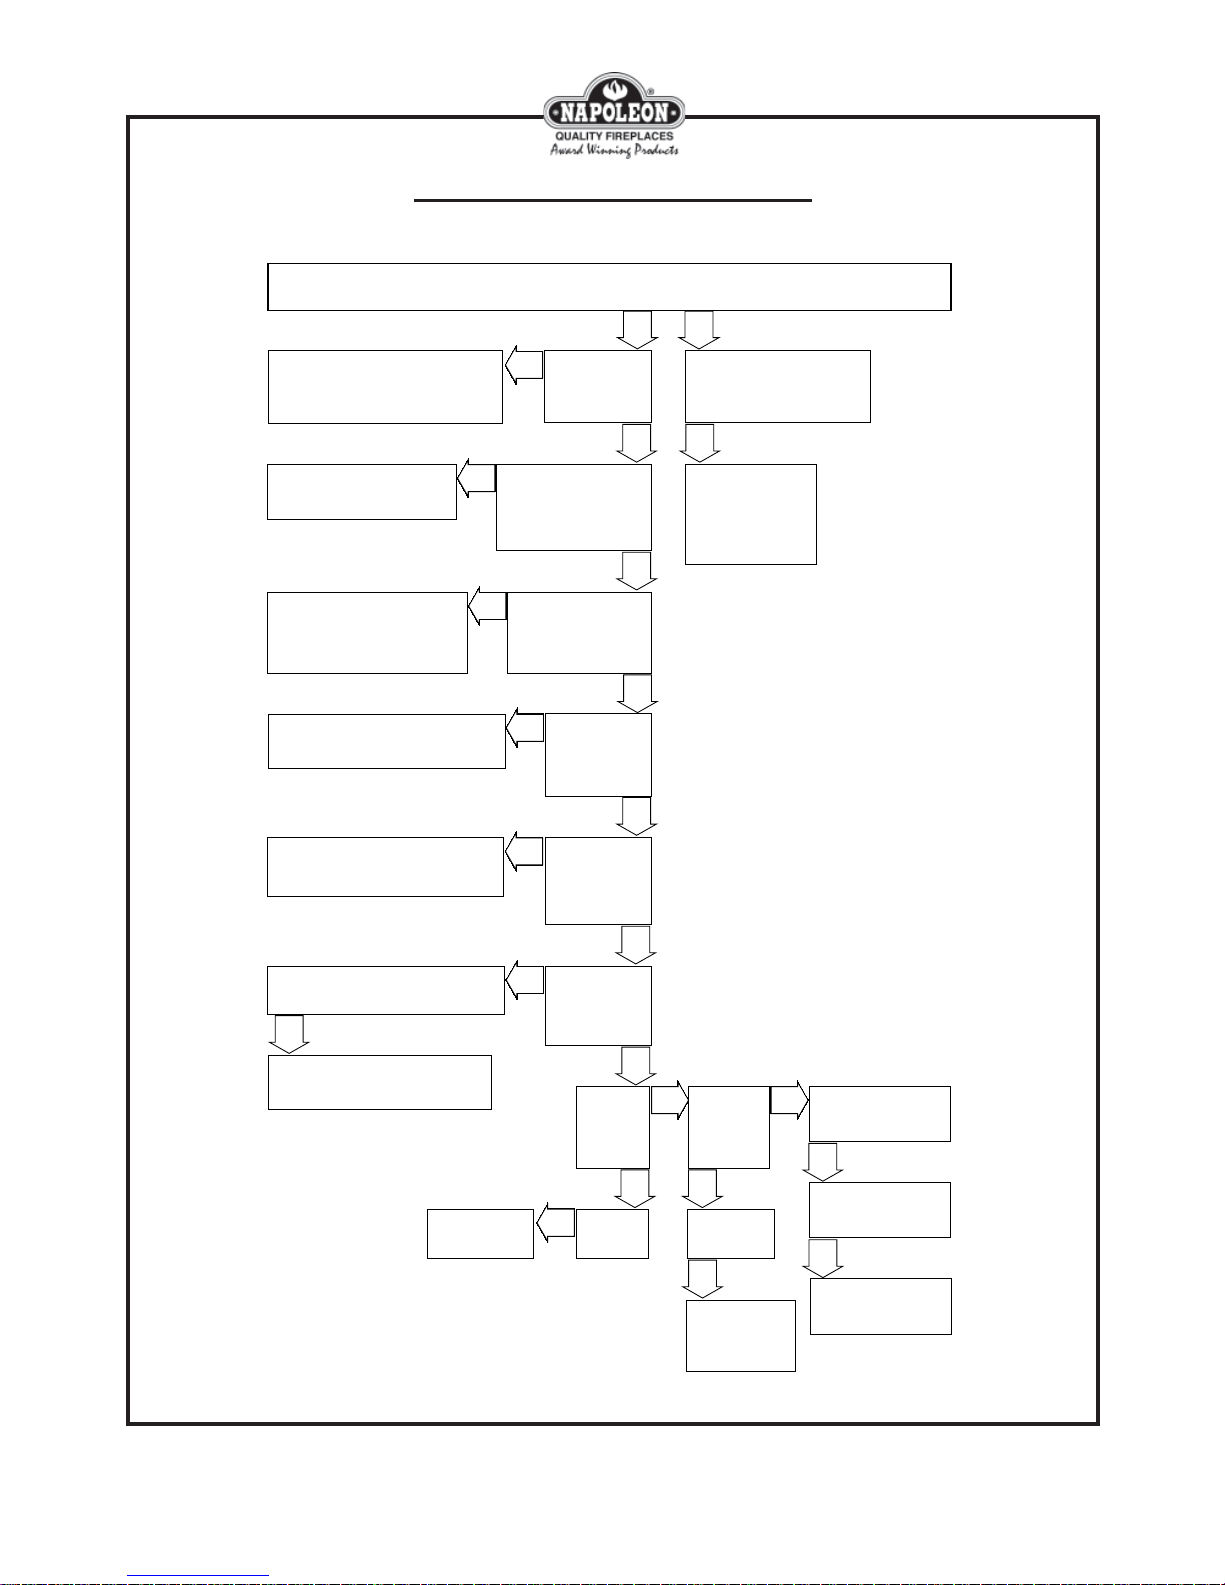
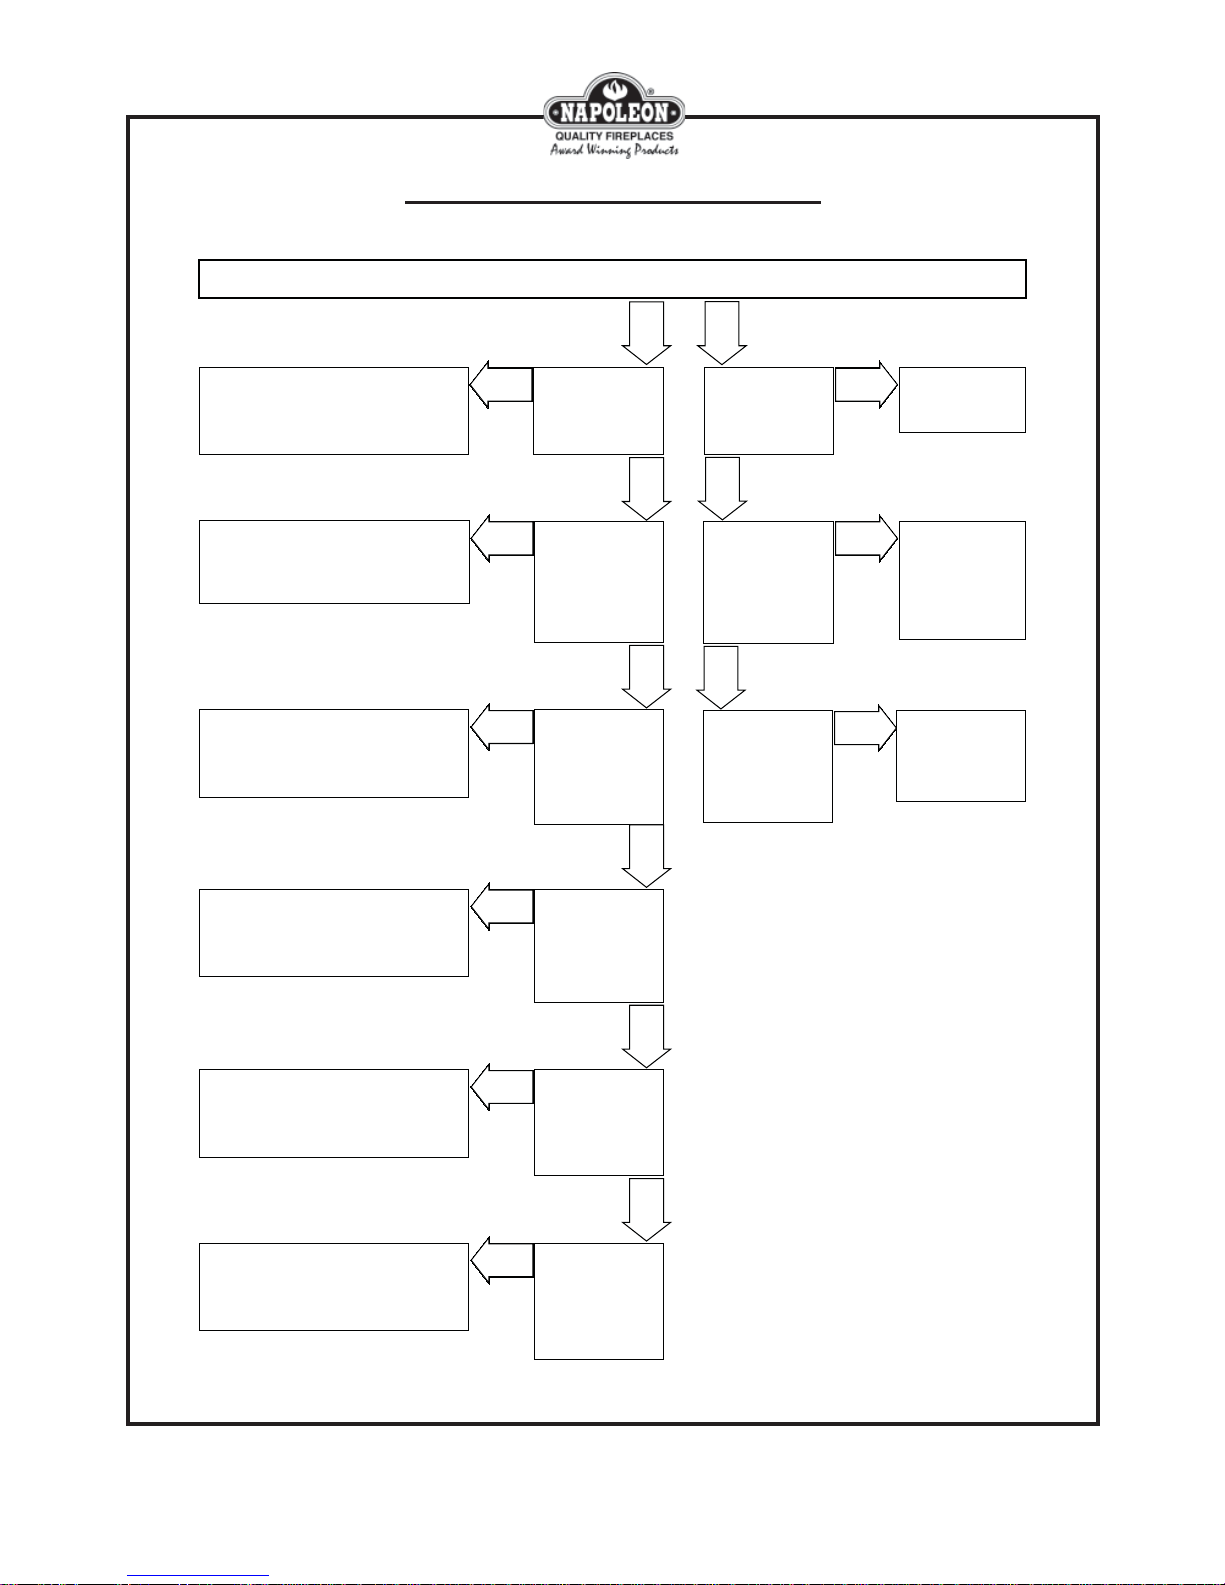
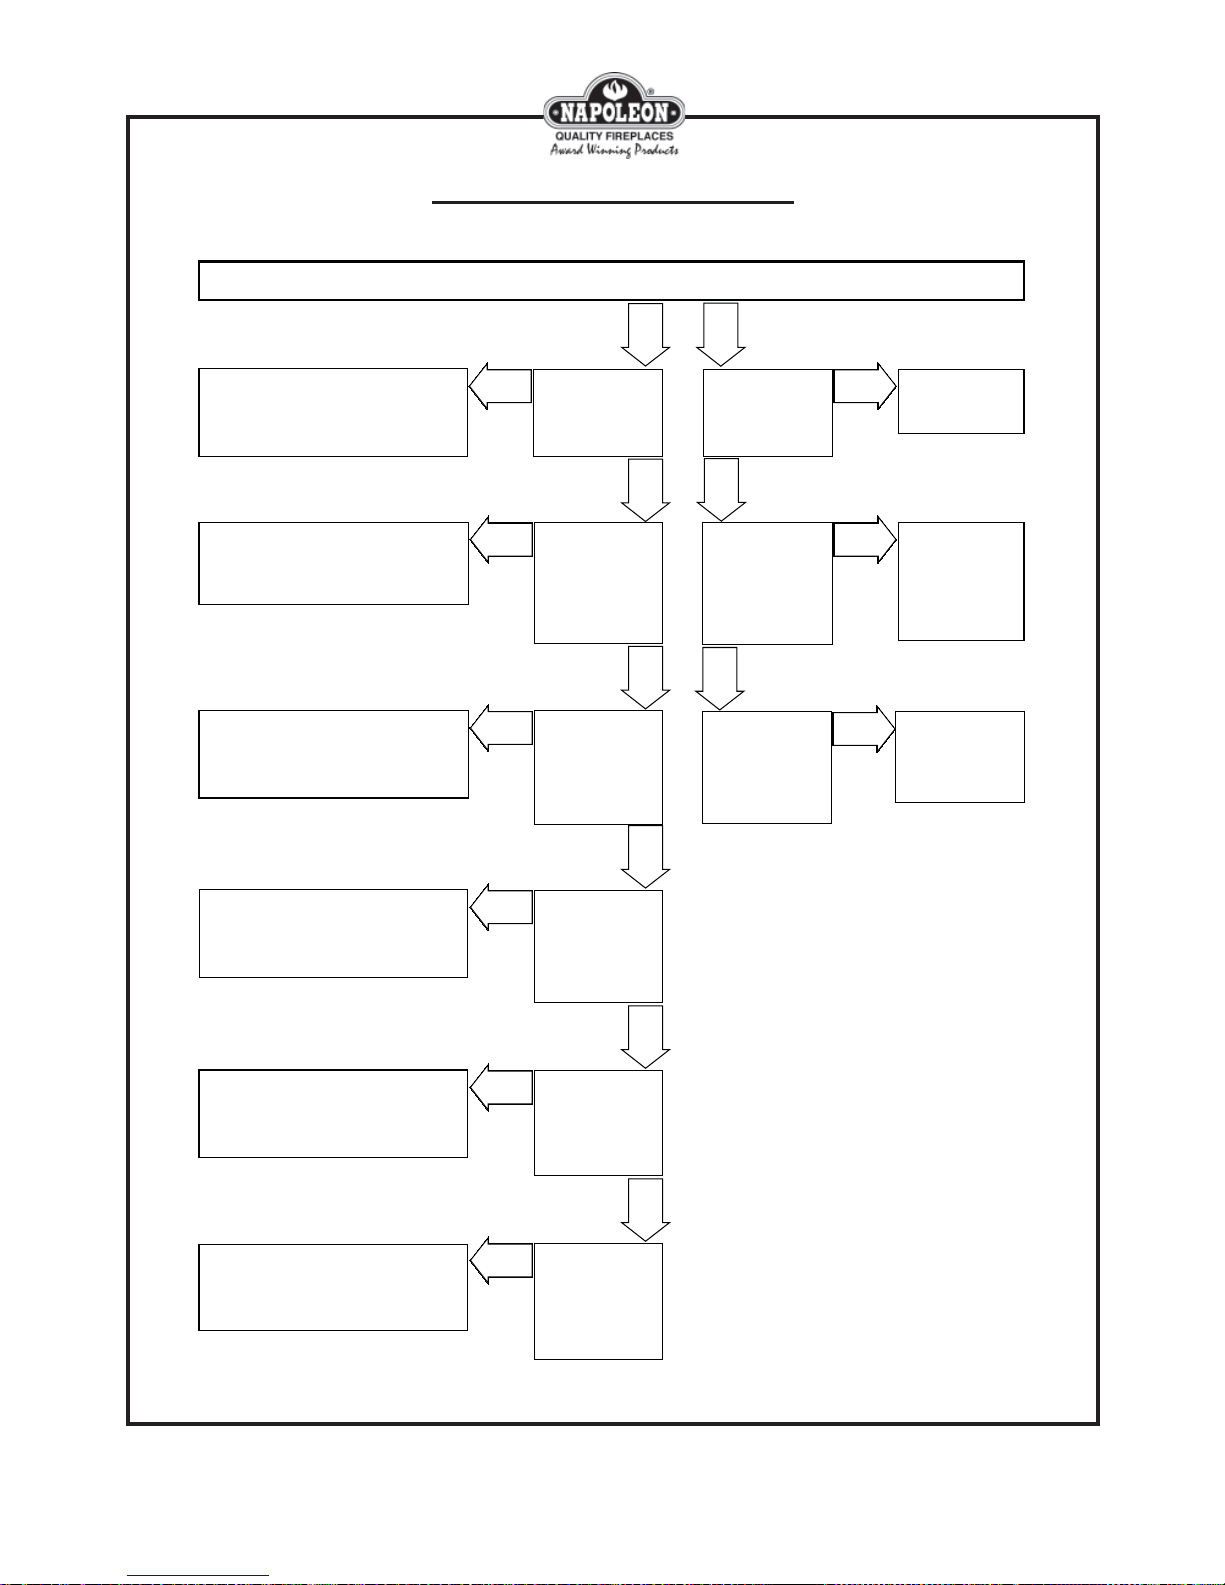
Main Burner Failure Flowchart
Is the burner flame spontaneously going out without any change in flame
appearance?
NO
Is the burner flame going
ghostly and blue before
extinguishing?
YES
(See "Complete Unit
Shu td ow n"
Flowchart)
Check to m ake sure the pilot flame is
adeq uately covering the therm opile
+ thermocouple. (See "Testing: Pilot
Clean, tighten, or re place as
Flame)
NO
ne ce ssary .
Has the pilot
NO
flame position
and size been
examined?
Are the electrical
connections
(the rm opile, sw itch,
rem ote, thermostat),
clean/secure /unb roken?
YES
YES
YES
Check to ensure that the length
and gauge of the w ire have not
exceeded their listed
maximums, and that the wire is
not coiled at any p oint.
Has the w iring for the
NO
therm ostat/switch (if
applicable) been
checked for proper
len gth/size?
YES
Test the thermop ile to ensure it is
w ithin sp ecif icat ions. (See "Te sting:
Millivolts - Ther mo pile" )
NO
therm opile
been tested for
gener ation?
Has the
m illivolt
YES
Has the
Test the operator coil to ensure it is
w ithin sp ecif icat ion. (See "Testin g:
Function - Operator Coil")
NO
operator c oil of
the valve been
checked for
re sistan ce ?
YES
Is the m ain
Does the main burner flame shrink
shortly after activation?
YES
Che ck to m ake sure the pre ssure is
not dropp ing off on activation.
(See "Testing: Pressures")
Remove and
replace w ith a
m illivolt sw itch.
ALL RIGHTS RESERVED, NO PART OF THIS BOOK MAY BE REPRODUCED OR TRANSMITTED IN ANY FORM OR BY ANY MEANS - GRAPHIC, ELECTRONIC OR MECHANICAL WITHOUT THE
PRIOR WRITTEN PERMISSION FROM WOLF STEEL LTD., BARRIE, ONTARIO, CANADA
NO
burner flame
sta ying the
sam e size wh en
turned on?
Doe s the
unit have a
connected
NO
m illivolt
sw itch ?
© 2005 WOLF STEEL LTD.
sw itch
to it?
Is it a
YES
Doe s the
NO NO
unit have a
therm ostat
connected
to it?
YES
YES
Is it a
m illivolt w all
therm ostat?
NO
Remove and
replace w ith a
m illivolt w all
therm ostat.
Does the unit have a
remote connected to
it?
YES
Is it a Wolf Steel
approved remote?
(Advantage/Skytech)
NO
Rem ove and re place
with a Wolf Steel
approved remote.
ISO-176 W415-0118 / B / 10.25.06
Troubleshooting: Direct Vents
Complete Unit Shutdown
11
Is the burner flame going blue and see-through before
extinguishing?
Have the seals on the venting, main door, relief doors,
around the burner and the pilot assembly been checked
for le aks ?
YES YES
Has the termination been checked for blockages and
obstructions?
YES
Is the ve nting within the s pe c ifications of the installa tion
manual and local code requirements?
NO
NO
NO
NO
(S ee: "Pilot F a ilure " F lowchart)
Check and seal/replace as necessary. (See "Testing:
Gasket")
E nsure tha t nothing is obs tructing the flow of air &
exhaust from the terminal. C lear as necessary.
Check the venting requirements and return to
s pec ifica tion.
YES
Has the venting been sealed on the inner and outer vent
pipe connections?
NO
S ea l all inner a nd outer vent pipe connections.
YES
Does the venting meet the fireplace parameters
ALL RIGHTS RESERVED, NO PART OF THIS BOOK MAY BE REPRODUCED OR TRANSMITTED IN ANY FORM OR BY ANY MEANS - GRAPHIC, ELECTRONIC OR MECHANICAL WITHOUT THE
ISO-176 W415-0118 / B / 10.25.06
regarding length and rise?
PRIOR WRITTEN PERMISSION FROM WOLF STEEL LTD., BARRIE, ONTARIO, CANADA
NO
© 2005 WOLF STEEL LTD.
E nsure tha t the ve nting is within s pec ified pa ra me ters .
12
Troubleshooting: Direct Vents
Odour Flowchart
Has th e u nit had its re qu ire d 'Burn-in' p eriod ?
YES
Has the unit been checked for leaks around the
d oor se al, re lie f-doo r se als, ve nt c olla r (if possib le ),
and firebox?
YES
Is the unit be ing used f requently?
Run the unit on its highest setting for 8-10 hours
NO
NO
NO
w ith the blow er shut off. (Note: Som e low e r BTU
units may req uire more than 1 burn-in period.)
Remember to ventilate the area.
Check for leaks and seal as necessary. (See
"Testing: Gasket")
Chec k to see if the unit is du sty and is bur ning off
accumulated dust from prolonged inactivity.
YES
Is the front of the fireplace clear of the presence
of any combustible materials?
YES
If the unit has a mantle - have the m antle
clearances been referenced for accuracy?
YES
Has th e u nit b e en installe d in a f inishe d w all?
YES
Have the required clearances to combustibles
been maintained?
YES
Ensure that com bustible mate rials are kept at least
NO
NO
NO
NO
four feet away from the front of the fireplace.
Check the mantle clearances listed in the manual
against th e spe cif ics o f the installation. Ad just or
rem ove the mantle as necessary.
Check for the presence of vapor barrier, insulation,
or other m aterial / construction-d ebris in contact
with the outer shell of the firebox.
Referenc e installation manual and restore to
manufacturers specifications as necessary.
Is the unit an inser t?
ALL RIGHTS RESERVED, NO PART OF THIS BOOK MAY BE REPRODUCED OR TRANSMITTED IN ANY FORM OR BY ANY MEANS - GRAPHIC, ELECTRONIC OR MECHANICAL WITHOUT THE
PRIOR WRITTEN PERMISSION FROM WOLF STEEL LTD., BARRIE, ONTARIO, CANADA
ISO-176 W415-0118 / B / 10.25.06
NO
© 2005 WOLF STEEL LTD.
Check the existing chimney for the presence of
creosote, w hich can, w hen heated, p roduce an
odour.
PART 2: TROUBLESHOOTING: NATURAL VENTS
Pilot Not Lighting Flowchart............................................................................................................14
Pilot Not Holding Flowchart............................................................................................................15
Pilot Failure Flowchart....................................................................................................................16
Main Burner Not Lighting Flowchart...............................................................................................17
Main Burner Delayed Ignition Flowchart........................................................................................18
Main Burner Low Flame Flowchart................................................................................................19
Main Burner Failure Flowchart......................................................................................................20
Complete Unit Shutdown................................................................................................................21
Odour Flowchart............................................................................................................................22
ALL RIGHTS RESERVED, NO PART OF THIS BOOK MAY BE REPRODUCED OR TRANSMITTED IN ANY FORM OR BY ANY MEANS - GRAPHIC, ELECTRONIC OR MECHANICAL WITHOUT THE
ISO-176 W415-0118 / B / 10.25.06
PRIOR WRITTEN PERMISSION FROM WOLF STEEL LTD., BARRIE, ONTARIO, CANADA
© 2005 WOLF STEEL LTD.
14
Troubleshooting: Natural Vents
Pilot Not Lighting Flowchart
Is ther e a s park at the electrode when the push button igniter is pres s ed?
Check to ensure proper supply
pressures are available for ignition.
(See "Testing: Procedures")
Ensure the adjustment screw has not
been tightened closed. Adjust as
necessary. (See "Adjustments: Pilot
Flame")
R emove the tube and or ifice a nd c lean ,
make sure no debris has compacted the
ins ide , inh ibiting the flo w of g a s .
T ig hte n / sec u re to pre vent le a ks .
NO
Has the inline gas
pressure been
NO
adjustment screw
been checked?
NO
Ha ve th e pilo t tub e
& pilo t orific e been
NO
Ar e the fittings on
te s ted ?
Has the pilot
checked for
blocka ges?
the pilot tu be
secure?
YES
YES
YES
YES
NO
Is the electrode
wire c onnection
secure?
YES
Is there a 1/8" ga p
between the
electrode and the
pilot hood?
YES
Has the electrode
been examined for
damage? (i.e.
chipped/broke n)
NO
NO
NO
Secure / Replace
as necessary
Adjust position so
the r e is no
gr eater than a
1/8" gap.
Replace if
damaged or
broke n.
Un-kink the tube to prevent blockage, or
ALL RIGHTS RESERVED, NO PART OF THIS BOOK MAY BE REPRODUCED OR TRANSMITTED IN ANY FORM OR BY ANY MEANS - GRAPHIC, ELECTRONIC OR MECHANICAL WITHOUT THE
replace leaking tube.
Ensure the opening is not blocked or
plugged. C lea r if necess ary.
PRIOR WRITTEN PERMISSION FROM WOLF STEEL LTD., BARRIE, ONTARIO, CANADA
ISO-176 W415-0118 / B / 10.25.06
NO
Ha s the pilo t tube
been checked for
NO
Has the primar y
air opening on the
pilot assembly
been checked for
© 2005 WOLF STEEL LTD.
YES
kinks / leaks?
YES
blocka ges?
Troubleshooting: Natural Vents
Pilot Not Holding Flowchart
15
Has the thermocouple/thermopile connection
been checked?
Has the thermocouple/thermopile been tested for
millivolt generation?
YES YES
Have the pilot tube/pilot orifice been checked for
blockages?
YES
Is th e sup p ly line size a dequ at e fo r t he
installatio n?
NO
NO
NO
NO
Check and tighten thermocouple/thermop ile to
ensure p rope r millivolt de live ry.
Test the thermocouple/thermopile to ensure they
are within specifications. (See "Testing: Millivolts -
The rm ocouple", and "Testing: Millivolt s -
Thermopile")
Remove the tube & orifice and clean, to make sure
no de bris has com pacted inside, inhibiting the
flow of gas.
Check the local code requirements and replace as
ne ce ssar y.
YES
Has the spill switch connection been checked?
NO
Verify that the spill switch is connected and that
the re is c ont inuit y on the sw itc h..
YES
Has the magnet coil of the valve been checked for
ALL RIGHTS RESERVED, NO PART OF THIS BOOK MAY BE REPRODUCED OR TRANSMITTED IN ANY FORM OR BY ANY MEANS - GRAPHIC, ELECTRONIC OR MECHANICAL WITHOUT THE
ISO-176 W415-0118 / B / 10.25.06
function?
PRIOR WRITTEN PERMISSION FROM WOLF STEEL LTD., BARRIE, ONTARIO, CANADA
NO
© 2005 WOLF STEEL LTD.
Test the magnet coil to ensure it is within
specification. (See "Testing: Function - Magnet
Coil" )

16
Troubleshooting: Natural Vents
Pilot Failure Flowchart
Is the pilot fl ame patte rn, pos ition a nd s ize c orr ec t?
YES
C hec k to ma ke s ure the p ilot i s l ar ge en ough an d in the
proper position, to properly heat the thermocouple. (S ee
NO
"Testing: Pilot F lame")
Is the pilot flame s hrinking when the burner is turned on?
NO
Has the thermocouple been tested for millivolt
gener ation?
YES
Has the thermopile (on single-generator systems) been
tes ted for millivolt ge ner atio n?
YES
Are the connections on the thermopile, spill s witch, and
switches secure?
YES
Has the function of the spill switch been checked?
YES
Has the function of the magnet coil been checked?
Check to ma ke sure the pressure is not dropping off on
YES
NO
NO
NO
NO
NO
activation. (See "Testing: Pressures")
T es t the ther mocou ple to ens ure it is within s pecifica tions .
(See "Tes ting: Millivolts - Thermocouple")
Test the thermopile to ensure it is within specifications.
(See "Tes ting: Millivolts - Thermocouple")
Tighten / secure the connections.
Check the function of the spill switch. (See "Tes ting:
T es t the magn et c oil to en su re it is within s pecifica tion.
Switches - Spill Switch")
(See "Tes ting: Function - Magnet Coil")
Are the units venting parame ter s within s pec ifica tion?
Has the unit been checked for spilling?
Has the positioning of the logs been checked?
ALL RIGHTS RESERVED, NO PART OF THIS BOOK MAY BE REPRODUCED OR TRANSMITTED IN ANY FORM OR BY ANY MEANS - GRAPHIC, ELECTRONIC OR MECHANICAL WITHOUT THE
PRIOR WRITTEN PERMISSION FROM WOLF STEEL LTD., BARRIE, ONTARIO, CANADA
ISO-176 W415-0118 / B / 10.25.06
YES
YES
YES
NO
NO
NO
© 2005 WOLF STEEL LTD.
Che ck local code requirements for natural-vent
appliances and adjust as necessary.
C hec k the s pill- tube for dra ft (a s d eta ile d in th e
ins tallation manual) and open a window to alleviate
negative pressure in the area.
O ut of pla ce logs ca n a lter the flow of a ir within the
combustion chamber, causing an erratic pilot.
Troubleshooting: Natural Vents
Main Burner Not Lighting Flowchart
Has the pilot flame position and size been examined?
YES
Check to make sure the pilot is large enough and in the
NO
pr ope r po s ition to r e ach the ign itio n po rts . ( S ee
"A dju s tmen ts : P ilot F la me ")
17
Has the thermopile been tested for millivolt generation?
YES
Has the inline gas pressure been tested?
YES
Have the spill & vent safety switches been checked for
proper function?
YES
Has the burner & orifice been checked for blockages?
YES
NO
NO
NO
NO
T est the the rmopile to e ns ure it is within spec ifica tions,
and that it is connected. (See "Testing: Millivolts -
Check to ensure the proper supply pressures are
available for ignition. (See "Testing: Pressures")
Test s witches to ensure function and verify connection.
(See "Tes ting: Switches - Spill Switch")
Thermopile")
Check & clean as required.
Is there a switch or remote connected on terminals 1 & 3?
Disconnect at valve and replace with a jumper wire. Did
See "Tes ting: Switches - T.S tat/Toggle"
ALL RIGHTS RESERVED, NO PART OF THIS BOOK MAY BE REPRODUCED OR TRANSMITTED IN ANY FORM OR BY ANY MEANS - GRAPHIC, ELECTRONIC OR MECHANICAL WITHOUT THE
(T HTP & T H)
the bu rn er a c tiva te?
PRIOR WRITTEN PERMISSION FROM WOLF STEEL LTD., BARRIE, ONTARIO, CANADA
ISO-176 W415-0118 / B / 10.25.06
YES
YES
Connect a switch
NO
terminals 1 & 3.
© 2005 WOLF STEEL LTD.
or re mote to
NO
NO
T est the operator coil of the
valve for resistance.
Replace the valve if out of
s pec ification . ( S ee
"T es ting: F unction -
Operator Coil")

18
Troubleshooting: Natural Vents
Main Burner Delayed Ignition Flowchart
Has the pilot flame position and size been examined?
YES
Has the inline gas pressure been tested?
YES
Has the main burner & orifice been examined to see if it is the right size?
YESYES
Has the main burner and orifice been checked for blockages?
YES
Ha s th e ve ntu ri (air s hutte r ) be en c he c ke d & a djus ted?
Ha s th e pos ition ing of the lo gs bee n ch e cke d?
YES
NO
NO
NO
NO
NO
NO
C hec k to ma ke s ur e the pilot is lar ge
e no ugh a nd in the pr op er pos ition, to
reach the ignition ports. (See
"A dju s tme nts : P ilot F lame")
C heck to e ns ur e the pr op er s upply
pressures are available for ignition. (See
"Testing: Pressures")
Check the size of the orifice to ensure it
meets manufacturers specification.
Check to make sure nothing is blocking
the flow of ga s thro ugh the b ur ne r a nd
orifice, contributing to the delay. Clean
as necessary.
C heck the v enturi s ettin g a n d a djus t a s
ne ce s s a ry to improve the ign ition time.
(S ee "Adjusting: Venturi")
O ut o f pla ce logs ca n alter the f low of a ir
within the c omb us tion c hambe r, c a us ing
an erratic pilot.
Have the charcoal / glowing embers (where applicable) been checked?
ALL RIGHTS RESERVED, NO PART OF THIS BOOK MAY BE REPRODUCED OR TRANSMITTED IN ANY FORM OR BY ANY MEANS - GRAPHIC, ELECTRONIC OR MECHANICAL WITHOUT THE
PRIOR WRITTEN PERMISSION FROM WOLF STEEL LTD., BARRIE, ONTARIO, CANADA
© 2005 WOLF STEEL LTD.
NO
Check to make sure no ember material is
cloggin g th e por ts , a nd contrib utin g to the
delay.
ISO-176 W415-0118 / B / 10.25.06

Troubleshooting: Natural Vents
Main Burner Low Flame Flowchart
19
Does the fireplace have a modulating remote?
NO
Is the hi-lo knob set to a high setting?
YES
Have the inlet + outlet gas pressures have been
tested?
YES
Has the main burner orifice been examined to see
if it is the righ t size ?
YES
YES
NO
NO
NO
Check to see if the remote has power. When
pow er is unavailable, the remote defaults to a
low -f lam e m od e u ntil it's re stor ed .
Turn the knob to its higher setting.
Check to ensure the proper supply and flow
condition pressures for optimal burn. (Se e
"Test ing: Pr essure s")
Check the size of the orifice and ensure it meets
manufacturers specification.
Check to make sure nothing is blocking the flow of
Has the main burner and orifice been checked for
blockages?
NO
gas through the burner and orifice, which could
re sult in low fla me. Cle an as nec essary.
YES
Has the venturi (air shutter) bee n checke d +
adjusted?
NO
Check the venturi setting and adjust as necessary
to improve the flame appearance. (See
"Adjustments: Venturi")
YES
Has the manifold tube been checked for
ALL RIGHTS RESERVED, NO PART OF THIS BOOK MAY BE REPRODUCED OR TRANSMITTED IN ANY FORM OR BY ANY MEANS - GRAPHIC, ELECTRONIC OR MECHANICAL WITHOUT THE
blockages?
PRIOR WRITTEN PERMISSION FROM WOLF STEEL LTD., BARRIE, ONTARIO, CANADA
NO
© 2005 WOLF STEEL LTD.
Remove the tube to m ake sure no de bris has
com pacte d inside, inhibiting the flow of gas. Clean
as nec e ssary.
ISO-176 W415-0118 / B / 10.25.06

20
Troubleshooting: Natural Vents
Main Burner Failure Flowchart
Is the burner flame spontaneously going out without any change in flame appearance?
Check to make sure the p ilot flame is
adeq uately covering the therm opile
+ thermocouple.
Clean, tighten, or re place as
ne ce ssary .
Check to ensure that the length
and gauge of the w ire have not
exceeded their listed
maximums, and that the wire is
not coiled at any p oint.
Test the thermopile to ensure it is
w ithin sp ecif icat ions. (See "Te sting:
Millivolt s - Therm opile ")
Test the operator coil to ensure it is
w ithin sp ecif icat ion. (See "Testin g:
Function - Operato r Coil")
NO
Has the pilot
NO
flame position
and size been
examined?
Are the electrical
connec tions
(the rm opile , swit ch,
remote, thermostat),
clean/secure/unbroken?
Has the w iring for the
NO
therm ostat/switch (if
applicable) been
checked for proper
len gth/size?
Has the
NO
therm opile
been tested for
millivolt
gener ation?
Has the
NO
operator c oil of
the valve been
checked for
resistance?
YES
YES
NO
Is the burner flame going
ghostly and blue b efore
YES
(See "Complete Unit
Shu td ow n"
Flowchar t)
YES
YES
YES
extinguishing?
YES
NO
Check the function of the spill switch.
(See "Testing: Switches - Spill Switch")
Has the function
of the spill
sw itc h b ee n
checked?
YES
Check to ensure the unit is not spilling
and it is estab lishing a goo d d raf t.
NO
been checked
Has the unit
for proper
draft?
YES
Doe s the
unit have a
sw itch
connec ted
to it?
YES
Remove and
replace w ith a
m illivolt sw itch.
ALL RIGHTS RESERVED, NO PART OF THIS BOOK MAY BE REPRODUCED OR TRANSMITTED IN ANY FORM OR BY ANY MEANS - GRAPHIC, ELECTRONIC OR MECHANICAL WITHOUT THE
PRIOR WRITTEN PERMISSION FROM WOLF STEEL LTD., BARRIE, ONTARIO, CANADA
© 2005 WOLF STEEL LTD.
NO
Is it a
millivolt
sw itch ?
Doe s the
NO NO
unit have a
therm ostat
connected
to it?
YES
Is it a
millivolt wall
therm ostat?
NO
Remove and
replace w ith a
millivolt wall
therm ostat.
Does the unit have a
rem ote connected to
it?
YES
Is it a Wolf Steel
approved remote?
(Advantage/Skytech)
NO
Rem ove and re place
with a Wolf Steel
approved remote.
ISO-176 W415-0118 / B / 10.25.06

Troubleshooting: Natural Vents
Complete Unit Shutdown
21
Is the burner flame going blue and see-through
before extinguishing?
YES
Is the venting within the specifications of the
installation m anual and loc al c od e re q uir ements?
NO
NO
(See: "Pilot Failure" Flowchart)
Check the venting requirements and return to
spe c ificat ion.
ALL RIGHTS RESERVED, NO PART OF THIS BOOK MAY BE REPRODUCED OR TRANSMITTED IN ANY FORM OR BY ANY MEANS - GRAPHIC, ELECTRONIC OR MECHANICAL WITHOUT THE
ISO-176 W415-0118 / B / 10.25.06
PRIOR WRITTEN PERMISSION FROM WOLF STEEL LTD., BARRIE, ONTARIO, CANADA
© 2005 WOLF STEEL LTD.

22
Troubleshooting: Natural Vents
Odour Flowchart
Has th e unit ha d it s req uired 'Burn-in' perio d?
YES
Run the unit on its highest setting for 8-10 hours
w ith the blow er shut off . (Note: Some low er BTU
NO
units may req uire more than 1 burn-in period.)
Remember to ventilate the area.
Has the area been checked for the presence of
contaminants in the air? (i.e. pet hair, excess of
d ust, ex cess o f sm oke , e tc .)
YES
Is the unit being used frequently?
YES
Is the front of the fireplace clear of the presence
of any combustible materials?
YES
If the unit has a mantle - have the m antle
clearances been referenced for accuracy?
YES
Has th e unit b ee n installe d in a finishe d w all?
NO
NO
NO
NO
NO
The presence of air pollutants can give off an
odour when combusted by the fireplace.
Chec k to see if t he unit is d usty and is b urning of f
accumulated dust from prolonged inactivity.
Ensure that com bustible mate rials are kep t at least
four feet away from the front of the fireplace.
Check the mantle clearances listed in the manual
against the specifics of the installation. Adjust or
remove the mantle as necessary.
Check for the presence of vapor barrier, insulation,
or other m aterial / construction-deb ris in contact
with the oute r shell of the fireb ox.
Have the required clearances to combustibles
ALL RIGHTS RESERVED, NO PART OF THIS BOOK MAY BE REPRODUCED OR TRANSMITTED IN ANY FORM OR BY ANY MEANS - GRAPHIC, ELECTRONIC OR MECHANICAL WITHOUT THE
been maintained?
Is the unit an insert ?
Is the unit bu rning cle an?
PRIOR WRITTEN PERMISSION FROM WOLF STEEL LTD., BARRIE, ONTARIO, CANADA
ISO-176 W415-0118 / B / 10.25.06
YES
YES
YES
NO
NO
NO
© 2005 WOLF STEEL LTD.
Reference installation manual and restore to
manuf acturers specifications as necessary.
Check the existing chimney for the presence of
creosote, which can, w hen heated, p roduce an
A un it th at is sooting, or ha s its air shutte r
im p rop erly ad juste d , c an r esult in inc omp let e
combustion and produce a de finite odour.
odour.

PART 3: TROUBLE SHOOTING: VENT FREE
Pilot Not Lighting Flowchart..............................................................................................24
Pilot Not Holding Flowchart..............................................................................................25
Pilot Failure Flowchart......................................................................................................26
Main Burner Not Lighting Flowchart...................................................................................27
Main Burner Delayed Ignition Flowchart............................................................................28
Main Burner Low Flame Flowchart...................................................................................29
Complete Unit Shutdown.................................................................................................30
Odour Flowchart...............................................................................................................31
ALL RIGHTS RESERVED, NO PART OF THIS BOOK MAY BE REPRODUCED OR TRANSMITTED IN ANY FORM OR BY ANY MEANS - GRAPHIC, ELECTRONIC OR MECHANICAL WITHOUT THE
ISO-176 W415-0118 / B / 10.25.06
PRIOR WRITTEN PERMISSION FROM WOLF STEEL LTD., BARRIE, ONTARIO, CANADA
© 2005 WOLF STEEL LTD.
24
Troubleshooting: Vent Free
Pilot Not Lighting Flowchart
Is there a s park at the electrode when the pus h button igniter is pres s ed?
Check to ensure proper supply
pressures are available for ignition.
(See "Testing: Procedures")
Ensure the adjustment screw has not
be e n tighte ned clos ed. A djus t a s
necessary. (See "Adjustments: Pilot
Flame")
R emove the tube and or ifice a nd c lean ,
make sure no debris has compacted the
inside, inhibiting the flow of gas.
Tighten / secure to prevent leaks.
NO
Has the inline gas
pressure been
NO
Has the pilot
adjustment screw
been checked?
NO
Ha ve th e pilo t tub e
& pilot orifice been
NO
Ar e the fittings on
the pilot tu be
te s ted ?
checked for
blocka ges?
secure?
YES
YES
YES
YES
NO
Is the electrode
wire c onnection
secure?
YES
Is there a 1/8" gap
between the
electrode and the
pilot hood?
YES
Has the electrode
been examined for
damage? (i.e.
chipped/broke n)
NO
NO
NO
Secure / Replace
as necessary
Adjust position so
the r e is no
grea ter than a
1/8" gap.
Replace if
damaged or
broke n.
Un-kink the tube to prevent blockage, or
ALL RIGHTS RESERVED, NO PART OF THIS BOOK MAY BE REPRODUCED OR TRANSMITTED IN ANY FORM OR BY ANY MEANS - GRAPHIC, ELECTRONIC OR MECHANICAL WITHOUT THE
replace leaking tube.
Ensure the opening is not blocked or
plugged. C lea r if necess ary.
PRIOR WRITTEN PERMISSION FROM WOLF STEEL LTD., BARRIE, ONTARIO, CANADA
ISO-176 W415-0118 / B / 10.25.06
NO
Ha s the p ilo t tube
been checked for
NO
Has the primar y
air opening on the
pilot assembly
been checked for
© 2005 WOLF STEEL LTD.
YES
kinks/leaks?
YES
blocka ges?

Troubleshooting: Vent Free
Pilot Not Holding Flowchart
25
Has the thermocouple/thermopile connection been
Has the thermocouple/thermopile been tes ted for millivolt
checked?
generation?
YES YES
Has the magnet coil of the valve been checked for
func tion?
YES
Have the pilot tube/pilot orifice been checked for
blocka ges?
YES
Is the supply line size adequate for the installation?
NO
NO
NO
NO
NO
C he ck an d tig hte n th ermoco uple to ens ur e prope r
C he ck an d tig hte n th e the rmo co up le/the rmo pile to
T est the magne t coil to e nsure it is within s pe cific ation.
(S ee "T es ting: F unction - Magnet C oil")
Remove the tube & orifice and clean to make sure no
debris has compa cted inside , inhibiting the flow of gas.
Check local code requirements and replace as
millivolt de live ry .
en sure pro per millivolt de live ry .
necessary.
YES
Is the unit sustaining pressure when the burner is
a ctiv a ted ?
Check to make sure the pressure is not dropping off on
NO
activation. (See "Testing: Pressures")
YES
Is the primary air opening for the ODS system clean?
NO
Clean the air opening to prevent the pilot flame from
ca ndling a nd lifting off o f the ther moco uple .
YES
E ns ur e th a t the logs ha ve be en po s itione d a c co rd ing to
Has the positioning of the logs been checked?
NO
the spec ifica tions in the ma nua l.
YES
T oo much pre ssure ca n pus h the pilot out past the
thermopile re s ulting in lower millivolts . T oo low pre s s ure
Has the inline gas pressure been tested?
ALL RIGHTS RESERVED, NO PART OF THIS BOOK MAY BE REPRODUCED OR TRANSMITTED IN ANY FORM OR BY ANY MEANS - GRAPHIC, ELECTRONIC OR MECHANICAL WITHOUT THE
PRIOR WRITTEN PERMISSION FROM WOLF STEEL LTD., BARRIE, ONTARIO, CANADA
NO
© 2005 WOLF STEEL LTD.
can prevent the pilot from lighting. (See "Testing:
pressures")
ISO-176 W415-0118 / B / 10.25.06

26
Troubleshooting: Vent Free
Pilot Failure Flowchart
Is the pilot flame p attern, position and size
correct?
YES
Is the pilot flame shrinking when the burner is
turned on?
NO
Has the thermocouple been tested for millivolt
generation?
YES
Has the function of the magnet coil been
checked?
YES
Has the inline gas pressure been tested?
YES
Check to make sure the pilot is large enough and in
NO
YES
NO
NO
NO
the proper position, to properly heat the
therm ocouple. (See "Testing: Pilot Flame ")
Check to make sure the pressure is not dropping
off on activation. (See "Testing: Pressure s")
Test the therm ocouple to ensure it is within
spe cific atio ns. (See "Te sting: Millivo lts -
Thermoc ouple")
Te st the m agnet coil to ensu re it is w ithin
specification. (See "Testing: Function - Magnet
Coil" )
Too much pressure can push the pilot out past the
the rmo pile result ing in low e r m illivo lts. To o low
pressure can prevent the pilot from lighting. (See:
"Test ing : Pre ssur e s)
Has the ODS been examined for dirt/debris in it's
prim ary air o penin g?
YES
Has th e u nit b e en installed in a room w hich me e ts
its minimum unconfined space requirement.
YES
Are the logs properly positioned?
ALL RIGHTS RESERVED, NO PART OF THIS BOOK MAY BE REPRODUCED OR TRANSMITTED IN ANY FORM OR BY ANY MEANS - GRAPHIC, ELECTRONIC OR MECHANICAL WITHOUT THE
PRIOR WRITTEN PERMISSION FROM WOLF STEEL LTD., BARRIE, ONTARIO, CANADA
ISO-176 W415-0118 / B / 10.25.06
NO
NO
NO
© 2005 WOLF STEEL LTD.
the combustion chamber, causing an erratic pilot.
Check the ODS and clean as required.
Check the requirem ents for the unit as per the
manual, and the n provide make-up air as
ne ce ssary.
Out of place logs can alter the flow of air within
Troubleshooting: Vent Free
Main Burner Not Lighting Flowchart
27
Ha v e the thermo pile lea ds been c on ne c te d to the 1 s t &
2nd termin a ls on th e va lve ( T HT P & T P )?
YES
Has the thermopile been tested for millivolt generation?
YES
Has the burner & orifice been checked for blockages?
YES
Is there a switch or remote connected on terminals 1 & 3?
(T HTP & T H)
YES
NO
NO
NO
NO
C o nn e ct the thermo pile lea ds to the 1s t & 2nd termina ls
Test the thermopile to ensure it is within specifications.
C onnect a s witch
or remote to
terminals 1 & 3.
on the valve (THTP & TP).
(See "Testing: Millivolts - Thermopile").
Check & clean as required.
NO
T es t the operator coil of the
valve for resistance.
Replace the valve if out of
s pe cifica tion. ( S ee
"T es ting: F unction -
Operator Coil")
Disconnect at valve and replace with a jumper wire. Did
the burner activate?
YES
See "Testing: S witches - T.S tat/T oggle"
ALL RIGHTS RESERVED, NO PART OF THIS BOOK MAY BE REPRODUCED OR TRANSMITTED IN ANY FORM OR BY ANY MEANS - GRAPHIC, ELECTRONIC OR MECHANICAL WITHOUT THE
ISO-176 W415-0118 / B / 10.25.06
PRIOR WRITTEN PERMISSION FROM WOLF STEEL LTD., BARRIE, ONTARIO, CANADA
NO
© 2005 WOLF STEEL LTD.

28
Troubleshooting: Vent Free
Main Burner Delayed Ignition Flowchart
Has the pilot flame position and size been examined?
YES
Has the inline gas pressure been tested?
YES
Has the main burner & orifice been checked for blockages?
YES
Has the main burner orifice been examined to see if it is the
right size?
YES
Has the venturi (air shutter) been checked & adjusted?
YESYES
Has the burner been checked to ensure it is level?
NO
NO
NO
NO
NO
NO
Check to m ake sure the pilot is large
enough and in the proper position,
to reach the ignition ports. (See
"Testing: Pilot Flame")
Check to ensure the proper supply
pre ssures are available for ignition.
(See "Te sting: Pr e ssur e s")
Check to make sure nothing is
blocking the flow of gas through the
burner and orif ice , c ontrib uting to
the de lay. Clean as ne ce ssary.
Check the size of the orifice and
ensure it meets manufacturers
spe c ificat ion.
Check the venturi setting and adjust
as necessary to improve the ignition
time. (See "Ad justing: Venturi")
Examine and level as necessary.
Has the positioning of the logs been checked?
NO
Out of place logs can alter the flow
of air within the combustion
chamber, causing an erratic pilot.
YES
Have the charcoal/glowing embers (where applicable) been
ALL RIGHTS RESERVED, NO PART OF THIS BOOK MAY BE REPRODUCED OR TRANSMITTED IN ANY FORM OR BY ANY MEANS - GRAPHIC, ELECTRONIC OR MECHANICAL WITHOUT THE
ISO-176 W415-0118 / B / 10.25.06
checked?
© 2005 WOLF STEEL LTD.
PRIOR WRITTEN PERMISSION FROM WOLF STEEL LTD., BARRIE, ONTARIO, CANADA
NO
Check to make sure no ember
material is clogging the ports, and
contributing to the de lay.

Troubleshooting: Vent Free
Main Burner Low Flame Flowchart
29
Does the fireplace have a modulating remote?
NO
Is the hi-lo knob set to a high setting?
YES
Have the inlet & outlet gas pressures have been
tested?
YES
Has the main burner orifice been examined to see
if it is the right size ?
YES
NO
NO
NO
Check to see if the remote has p ow er. Whe n
pow er is unavailable, the remote de faults to a
low -fla me m ode until it' s re stored .
Turn the knob to its higher setting.
Check to ensure the proper supply and flow
condition pressures for optimal burn. (See
"Test ing : P re ssure s")
Check the size of the orifice and ensure it meets
m an uf ac ture rs spec if ic ation.
YES
Check to make sure nothing is blocking the flow of
Has the main burner and orifice been checked for
blockages?
NO
gas through the burne r and orifice, w hich could
result in low flame. Clean as necessary.
YES
Has the venturi (air shutter) been checked &
adjusted?
NO
Check the venturi setting and adjust as necessary
to improve the flame appearance. (See
"Adjustments: Venturi")
YES
Has the manifold tube been checked for
ALL RIGHTS RESERVED, NO PART OF THIS BOOK MAY BE REPRODUCED OR TRANSMITTED IN ANY FORM OR BY ANY MEANS - GRAPHIC, ELECTRONIC OR MECHANICAL WITHOUT THE
blockages?
PRIOR WRITTEN PERMISSION FROM WOLF STEEL LTD., BARRIE, ONTARIO, CANADA
NO
© 2005 WOLF STEEL LTD.
ISO-176 W415-0118 / B / 10.25.06
Remove the tub e to make sure no d ebris has
compacted inside, inhibiting the flow of gas. Clean
as nece ssar y.

30
Troubleshooting: Vent Free
Complete Unit Shutdown Flowchart
Is the burner flam e going ghostly and blue before extinguishing?
Clean, tighten, or replace as
ne ce ssar y.
Test the operator coil to ensure it is
w ithin spec ificat ion. (See "Testing:
Function - Operator Coil")
Does the main burner flame shrink
shortly after activation?
NO
YES
Check to make sure the pressure is
not dropping off on activation. (See
"Test ing: P re ssu re s")
Increase available room air or
relocate as necessary to meet
requirements
Are the electrical
connections
(the r m op ile , sw itc h,
rem ote, therm ostat),
clean/secure/unbroken?
NO
NO
NO
Has the
operator coil
been checked
for re sistance ?
Does t h e m ain
burner flame
remain a
consistent size
when activated?
Have t h e
com bustion and
ventilation air
pr ovisio n
guidelines been
checked to see if
the room is of
sufficient volume
to sustain th e
unit ?
NO
YES
YES
YES
YES
Does the unit have a catalytic
door?
YES
Ensure that the air
intakes for the
catalytic door are
not plugged or
covered.
ALL RIGHTS RESERVED, NO PART OF THIS BOOK MAY BE REPRODUCED OR TRANSMITTED IN ANY FORM OR BY ANY MEANS - GRAPHIC, ELECTRONIC OR MECHANICAL WITHOUT THE
PRIOR WRITTEN PERMISSION FROM WOLF STEEL LTD., BARRIE, ONTARIO, CANADA
ISO-176 W415-0118 / B / 10.25.06
© 2005 WOLF STEEL LTD.
 Loading...