

Napoleon Ultra Chef US405RSB-INFRARED, Ultra Chef UD405RSB-TUBE BURNER, Ultra Chef 405 User Manual
Page 1

APPLY SERIAL NUMBER LABEL FROM CARTON
APPOSEZ LÉTIQUETTE DU NUMERO DE SERIE DU CARTON
Serial No. / NO de série XXXXXX000000
MODEL NO. / N
O
DE MODÈLE
UD405RSB-TUBE BURNER
MANUFACTURED BY / MANUFACTURE PAR: NAPOLEON APPLIANCE CORP.,
214 BAYVIEW DR., BARRIE, ONTARIO, CANADA L4N 4Y8 PHONE: (705)726-4278
FAX: (705)725-2564 EMAIL: care@nac.on.ca WEB SITE: www.napoleongrills.com
RETAIN THIS MANUAL FOR FUTURE REFERENCE.
GARDER CE LIVRE POUR RÉFÉRENCES FUTURES
US405RSB-INFRARED
N415-0172 / JAN 08/08
Page 2

Do not try to light this appliance without reading "LIGHTING"
instructions section of this manual.
WARNING
Do not store or use gasoline or other flammable liquids or vapors in the vicinity of
this or any other appliance. An L.P. cylinder not connected for use must not be
stored in the vicinity of this or any other appliance. If the information in these
instructions is not followed exactly, a fire or explosion may result, causing
property damage, personal injury or death.
DANGER
IF YOU SMELL GAS:
• Shut off gas to the appliance.
• Extinguish any open flame.
• Open lid.
• If odor continues, keep away from the appliance and immediately call your gas
supplier or your fire department.
CAUTION
During unpacking and assembly it is recommended that you wear work gloves and safety glasses for your
protection. Although we make every effort to make the assembly process as problem free and safe as pos-
sible, it is characteristic of fabricated steel parts that the edges and corners may be sharp and can cause cuts
if handled incorrectly.
SAFE OPERATING PRACTICES
• This gas grill must not be installed in or on recreational
vehicles and/or boats.
• This gas grill must only be used outdoors in a well-ventilated space and must not be used inside a building, garage
or any other enclosed area.
• Keep any electrical supply cord and fuel supply hose away
from any heated surfaces.
• Inspect the fuel supply hose before each use. If there is
evidence of excessive abrasion or wear or the hose is cut, it
must be replaced, prior to using the gas grill, with a replacement hose assembly specified by the manufacturer.
• When the propane cylinder is not disconnected from the appliance, the gas grill and cylinder must be stored outdoors
in a well ventilated space.
• Do not locate in windy settings. High winds adversely affect
the cooking performance of the gas grill.
• Adults and especially children should be alerted to the hazards of high surface temperatures. Young children should be
supervised near the gas grill.
• Under no circumstances should this gas grill be modified.
• Gas must be turned off at the propane cylinder or at the natural gas supply valve when the gas grill is not in use.
• When the gas grill is to be stored indoors, the connection
between the propane cylinder and the gas grill must be disconnected and the cylinder removed and stored outdoors in
a well ventilated space out of reach of children. Disconnected
cylinders must not be stored in a building, garage or any
other enclosed area. Natural gas units must be disconnected
from the supply when being stored indoors.
• The top lid is to be closed during the gas grill preheat period.
• Do not use the condiment tray to store lighters, matches or
other flammable materials.
• This gas grill is designed for outdoor use only.
2
Page 3

NAPOLEON gas grills are manufactured under the strict Standard of the world recognized
ISO 9001-2000 Quality Assurance Certificate.
NAPOLEON products are designed with superior components and materials, and are assembled by trained
craftsmen who take great pride in their work. The burner and valve assembly are leak tested and test-fired at a
quality test station, and thoroughly inspected by a qualified technician before packaging and shipping to ensure
that you, the customer, receive the quality product you expect from NAPOLEON.
NAPOLEON GAS GRILL ULTRACHEF LIMITED LIFETIME WARRANTY
NAPOLEON warrants the following materials and workmanship in your new NAPOLEON gas grill against
defects for as long as you own the gas grill. This covers: aluminum castings (excluding paint), stainless steel
side shelves, wheels, knobs, stainless steel burners, stainless steel lid inserts, and lid handles. Subject to the
following conditions. During the first five years NAPOLEON will provide replacement parts at our option free of
charge. From the sixth year to lifetime NAPOLEON will provide replacement parts at 50% of the current retail
price.
Components such as stainless steel sear plates,ceramic infra red burner (excluding screens), cooking grids,
igniters (excluding batteries), temperature gauges and brass valves are covered and NAPOLEON will provide
parts free of charge during the first two years of the limited warranty.
Components such as regulators, casters, warming racks, hoses and connectors, fasteners and accessories
are covered and NAPOLEON will provide parts free of charge during the first year of the limited warranty.
NAPOLEON shall not be liable for any transportation charges, labour costs or export duties.
"NAPOLEON warrants its products against manufacturing defects to the original purchaser only, provided that the purchase was made through an authorized
NAPOLEON dealer and is subject to the following conditions and limitations:"
This factory warranty is non-transferable and may not be extended what-so-ever by any of our representatives.
The gas grill must be installed by a licenced, authorized service technician or contractor. Installation must be done in accordance with the installation instructions
included with the product and all local and national building and fire codes.
This limited warranty does not cover damages caused by misuse, lack of maintenance, grease fires, hostile environments, accident, alterations, abuse or neglect
and parts installed from other manufacturers will nullify this warranty.
This limited warranty further does not cover any scratches, dents, painted finishes, corrosion or discolouring by heat, abrasive and chemical cleaners, nor chipping
on porcelain enamel parts, nor any components used in the installation of the gas grill.
Should deterioration of parts occur to the degree of non-performance within the duration of the warranted coverage, a replacement part will be provided.
In the first year only, this warranty extends to the replacement of warranted parts which are defective in material or workmanship provided that the product has been
operated in accordance with the operation instructions and under normal conditions.
After the first year, with respect to this President's Limited Lifetime Warranty NAPOLEON may, at its discretion, fully discharge all obligations with respect to this
warranty by refunding to the original warranted purchaser the wholesale price of any warranted but defective part(s).
NAPOLEON will not be responsible for the installation, labour or any other costs or expenses related to the re-installation of a warranted part, and such
expenses are not covered by this warranty.
Notwithstanding any provision contained in this President's Limited Lifetime Warranty NAPOLEON's responsiblity under this warranty is defined as above and it
shall not in any event extend to any incidental, consequential, or indirect damages.
This warranty defines the obligation and liability of NAPOLEON with respect to the NAPOLEON gas grill and any other warranties expressed or implied with respect
to this product, its components or accessories are excluded.
NAPOLEON neither assumes, nor authorizes any third party to assume, on its behalf, any other liabilities with respect to the sale of this product. NAPOLEON will
not be responsible for: over firing, blow outs caused by environmental conditions such as strong winds, or inadequate ventilation.
Any damages to the gas grill due to weather damage, hail, rough handling, damaging chemicals or cleaners will not be the responsibility of NAPOLEON.
The bill of sale or copy will be required together with a serial number and a model number when making any warranty claims from NAPOLEON.
NAPOLEON reserves the right to have its representative inspect any product or part prior to honouring any warranty claim.
NAPOLEON shall not be liable for any transportation charges, labour costs, or export duties.
CONDITIONS AND LIMITATIONS
3
Page 4

GENERAL INFORMATION
This gas barbecue is certified under Canadian and American national standards, CAN/CGA-1.6b-2002 and ANSI Z21.58b - 2002
respectively for outdoor gas grills and should be installed to conform with local codes. In absence of local codes, install to the current
National Fuel Gas Code CAN/CGA-B149.1 or ANSI Z223.1/NFPA 54, natural gas and propane installation code. When installed, the
unit must be electrically grounded in accordance with local codes or, in absence of local codes, with the current CSA C22.1 Canadian
electrical code in Canada or the National Electrical Code, ANSI/NFPA 70 in the United States.
Use only the pressure regulator and hose assembly provided with this barbecue. Replacement pressure regulators and
hose assemblies must be specified by the manufacturer. Do not store propane cylinder or spare cylinder on the shelf
beneath the barbecue. Never fill the cylinder beyond 80 percent full. If the preceding information is not followed exactly, a fire
causing death or serious injury may occur.
The regulator supplies a pressure of 11 inches water column to the gas grill and has a QCC1 type fitting. Cylinders to be used
with this unit must be supplied with a QCC1 cylinder valve. A QCC1 cylinder has a positive seating connection, which will not
allow gas flow until a positive seal has been achieved. It is also equipped with an excess flow device. In order to attain full
flow to the barbecue, the gas grill valves must be in the off position when the cylinder valve is turned on.
PROPANE CYLINDER SPECIFICATIONS: A dented or rusty cylinder may be hazardous and should be checked by your propane
supplier. Never use a cylinder with a damaged valve. Use only a propane supply cylinder constructed and marked in accordance with
the specifications for LP-gas cylinders of the Canadian Transport Commission (CTC) or the US Department of Transportation (DOT).
This appliance has been designed for use with a 20lb. (9.1 kg) size propane cylinder only (not supplied). The propane cylinder must
be provided with a shut-off valve terminating in a propane cylinder valve type QCC1, and a safety relief device having direct communication with the vapour space of the cylinder. The cylinder supply system must be arranged for vapour withdrawal and the cylinder
shall include a collar to protect the cylinder valve. The cylinder shall incorporate a listed OPD (overfill protection device).
CALIFORNIA PROPOSITION 65: The burning of gas fuel creates by - products, some of which are on the list as substances
known by the State of California to cause cancer or reproductive harm. When cooking with gas, always ensure adequate
ventilation to the unit, to minimize exposure to such substances.
IMPORTANT DO'S AND DON'TS
DO'S DON'TS
Do not attempt to use a tank which is not equipped with a
QCC-1 type connection.
Do not use condiment tray to store lighters, matches or
any other combustibles.
Do not locate unit under unprotected combustible
construction.
Do not operate rear burner with main burners operating.
Do not leave grill unattended when operating.
Do not light burners with lid closed.
Do not move grill when hot or operating.
Do not use a pressure washer to clean any part of the unit.
Do not allow cold water (rain, sprinkler, hose, etc.) to
come in contact with hot ceramic burners. A large
temperature differential can cause cracking in the
ceramic tile.
Do not operate the grill in a screened in porch, gazebo
or any other enclosed area.
4
Read the entire instruction manual before operating the
gas grill.
Maintain proper clearance to combustibles (20" to rear
of unit, 6" to sides). Additional clearance is recommended (24") near vinyl siding or large panes of
glass.
Leak test the unit before initial use, annually and
whenever any gas components are replaced.
Follow lighting instructions carefully when operating
grill. Burner controls must be off when turning supply
cylinder valve on.
Ensure sear plates are positioned properly according to
sear plate installation instructions.
Clean grease tray and sear plates regularly to avoid
build-up which may lead to grease fires.
Remove warming rack before lighting rear burner. (The
extreme heat will damage the warming rack.)
Inspect infrared burner venturi tube for spider webs
and other obstructions periodically. Clean the tubes
completely if you find any such obstructions.
Page 5
GAS HOOK-UP INSTRUCTIONS
CYLINDER CONNECTION: Ensure that the gas regulator hose is kink free. Remove the cap or plug from the cylinder fuel
valve. Insert the black QCC1 regulator nipple onto the QCC1 fuel valve. Hand tighten clockwise. Do not use tools. Leak test all joints
prior to using the barbecue. A leak test must be performed annually, and each time a cylinder is hooked up, or if a part of the gas
system is replaced.
PROPANE CYLINDER INSTALLATION: Set cylinder into the hole in the bottom shelf.
PROPANE GAS HOOK-UP: Press the nylon grommet into the side panel, and pass the hose from the side burner through
the grommet. Insert the quick connect hose end into the regulator outlet.
NATURAL GAS HOOK-UP: This natural gas grill is supplied with a 10ft supply hose (complete with a quick disconnect)
designed for natural gas and certified for outdoor use. The gas grill is designed to operate at an inlet pressure of 7 inches water
column. A regulator must be installed if the house pressure is greater than 7 inches water column. Piping and valves upstream
of the quick disconnect are not supplied. The quick disconnect must not be installed in an upward direction and a readily
accessible manual shut-off valve must be installed upstream of, and as close to, the quick disconnect as is feasible. The flared
end of the hose must be connected to the unit as illustrated in the Natural Gas Hose Attachment diagram. These connections must
be made by a licensed gas installer. Leak test all joints prior to using the gas grill.
Connect the 20" hose from the manifold, to the side burner as illustrated in the Natural Gas Hose Attachment diagram. Connect the
supply hose to the flare connection which faces down from the side burner. Tighten all connections using two wrenches. (Do not
use thread sealer/pipe dope.)
WARNING
• The installation must be performed by a licensed gas fitter, and all connections must be leak tested before operating the grill.
• Do not route hose underneath drip pan.
• Do not route hose between space in bottom shelf and back panel.
• Do not route hose over top of rear panel.
• Ensure all hose connections are tightened using two wrenches. Do not use teflon tape or pipe dope on any hose connection.
• Ensure the hose does not contact any high temperature surfaces, or it may melt and leak causing a fire.
• Leak test all the connections using a soap and water solution, as per the leak testing instructions found in this manual.
LEAK TESTING INSTRUCTIONS
DANGER
Do not use an open flame to check for gas leaks. Be sure there are no sparks or open flames in the area while you check
for leaks. Sparks or open flames will result in a fire or explosion, damage to property, serious bodily injury or death.
LEAK TESTING: This must be done before initial use, annually and whenever any gas components are replaced or serviced. Do
not smoke while performing this test, and remove all sources of ignition. See Leak Testing Diagram for areas to check.
1. Turn all burner controls to off. Turn supply valve on.
2. Brush a half and half solution of liquid soap and water onto all joints and connections of the regulator, hose, manifolds and
valves.
3. Bubbles will indicate a gas leak. Either tighten the loose joint or have the part replaced with one recommended by the customer
care department.
4. If the leak cannot be stopped, shut off the gas supply, disconnect it and have the barbecue inspected by your gas supplier or
dealer. Do not use the appliance until the leak has been corrected.
5. Turn off gas supply.
5
Page 6
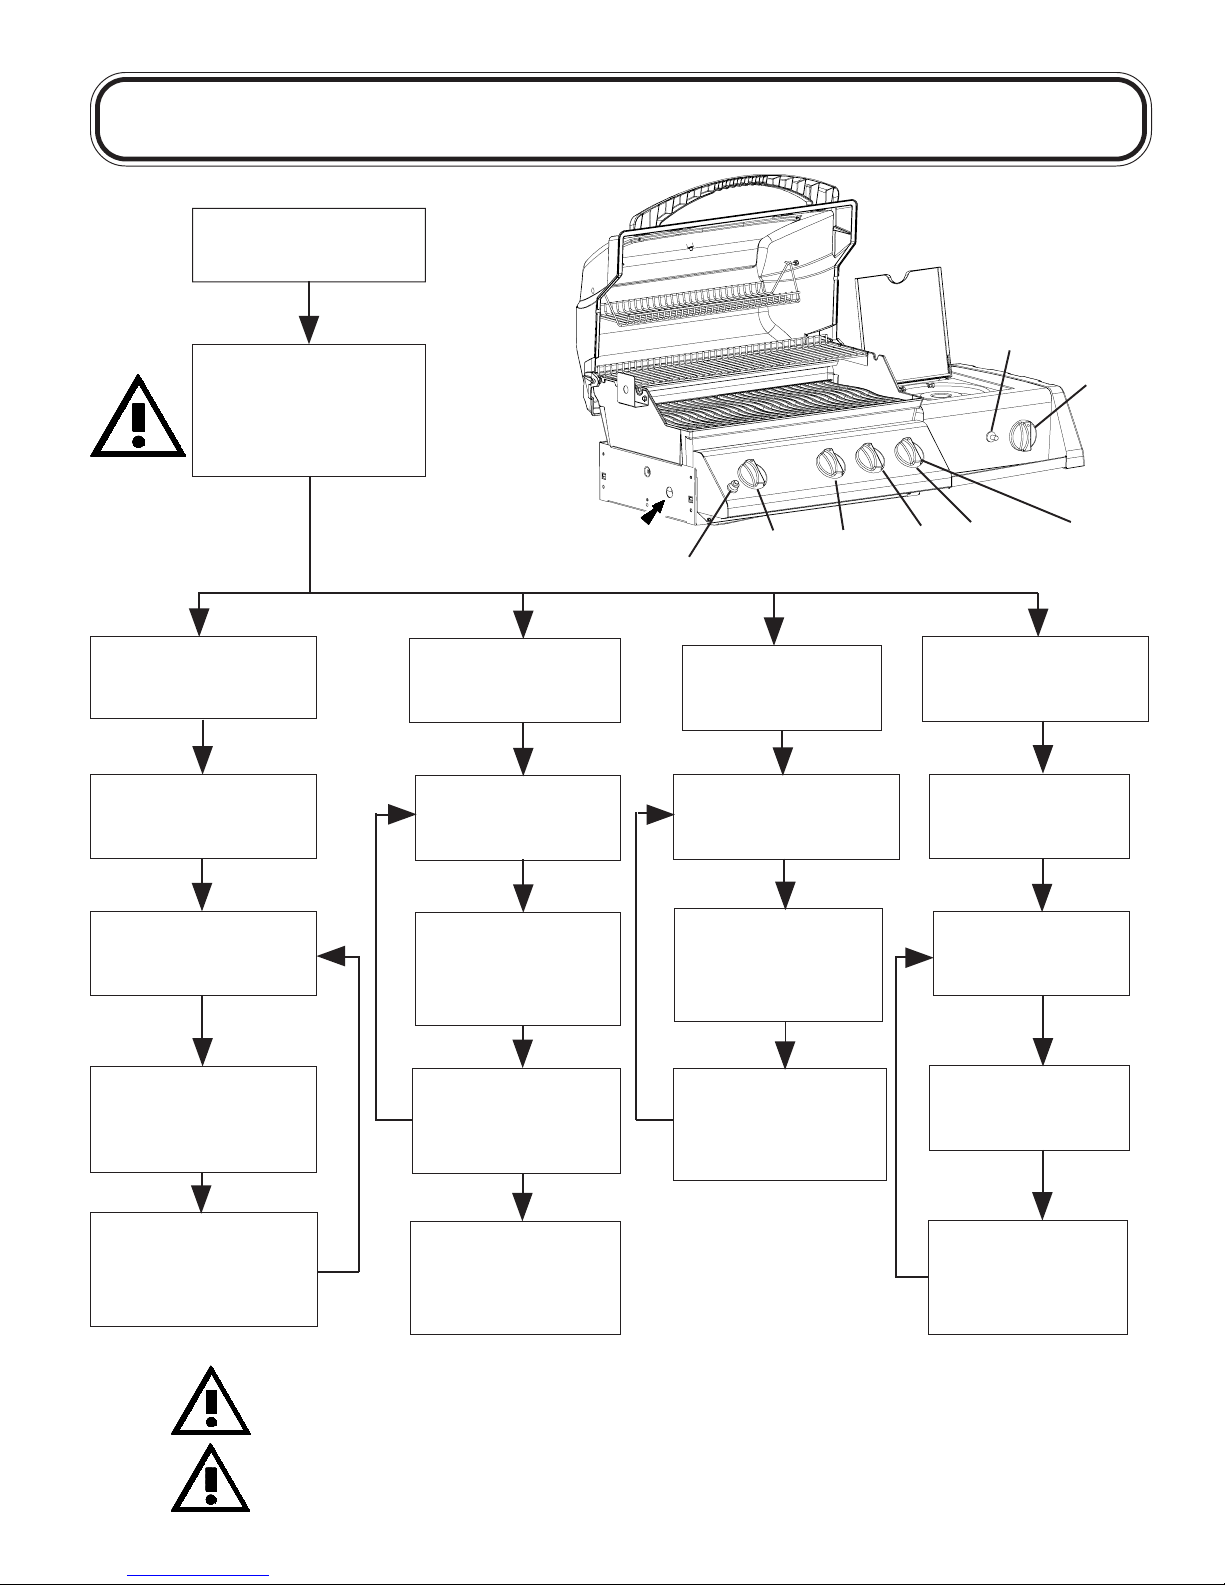
405 LIGHTING INSTRUCTIONS
Open lid.
Ensuring burner
controls are in the off
postion, turn on the
gas supply valve.
SIDE
BURNER
IGNITER
SIDE
BURNER
Rear Burner Lighting
Remove warming
rack and hanging
basket.
Light match and hold
to ports on left side of
rear burner.
Turn rear burner
control to high posi-
tion.
LIGHTING HOLE
Tube Burner Lighting
Turn left burner
control to high posi-
tion.
Press and hold
igniter button until lit,
or light by match.
If ignition is not
immediate, turn
burner control off.
Wait 5 minutes.
LEFT
IGNITER
BURNER
Main Infared Burner
Lighting
Turn infrared burner
control to high
position.
Press and hold
igniter button until lit,
or light by match.
If ignition is not
immediate, turn
burner control off.
Wait 5 minutes.
CENTER
BURNER
INFRARED
REAR
BURNER
BURNER
(US405)
Side Burner Lighting
Open burner cover.
Turn side burner
control to high
position.
Push igniter several
times or light by
match.
RIGHT
BURNER
(UD405)
If ignition is not
immediate, turn
burner control off.
Wait 5 minutes.
The propane cylinder is equipped with an excess flow device. Unless all
burners are turned off prior to turning the cylinder on, only small flames will
be achievable.
Do not use rear burner while operating main burner.
6
With left burner
operating on high, turn
center or right tube
burner to high
If ignition is not
immediate, turn
burner control off.
Wait 5 minutes.
Page 7

INFRARED HEAT
Most people don’t realize that the heat source that we are most familiar with, namely the sun warms the earth using mainly infrared energy.
Infrared energy is a form of electro-magnetic energy that has a wavelength just greater than the red end of the visible light spectrum, but less
than that of radio waves. This energy was discovered in 1800 by Sir William Herschel who, dispersed sunlight into its component colours
using a prism. He showed that most of the heat in the beam fell into the spectral region just beyond the red end of the spectrum, where no
visible light existed. This is infrared energy. Most materials readily absorb infrared radiation in a wide range of wavelengths, causing an
increase in temperatures of the materials. This is the same phenomenon that causes us to feel warmth when we are exposed to sunlight.
The infrared rays from the sun travel through the vacuum of space, through the atmosphere and penetrate our skin. This causes increased
molecular activity in the skin, which creates internal friction and generates heat, allowing us to feel warmth.
Foods cooked over infrared heat sources are heated by the same principle. Charcoal is the traditional way of infrared cooking that we are
all familiar with. The glowing briquettes emit infrared energy to the food being cooked, with very little drying effect. Any juices or oils that
escape from the food drip down onto the charcoal and vaporize into smoke giving the food its delicious grilled taste. The Napoleon infrared
burner cooks in the same way. In each burner, 10000 ports each with its own tiny flame cause the surface of the ceramic to glow red. This
glow emits the same type of infrared heat to the food, without the hassle or mess of charcoal. It also provides a more consistent heated area
that is far easier to regulate than a charcoal fire. For instantaneous searing the burners can be set to high, yet they can also be turned down
for slower cooking. We all know how difficult that is on a charcoal fire. Traditional gas burners heat the food in a different way. The air
surrounding the burner is heated by the combustion process and then rises up to the food being cooked. This generates lower grill
temperatures that are ideal for more delicate cuisine such as seafood or vegetables. The bottom line is that Napoleon’s infrared burners
produce searing heat for juicier, tastier steaks, hamburgers and other meats. For cooking times and tips refer to the Infrared Grilling Chart.
COOKING INSTRUCTIONS
When lit for the first time, the gas grill will emit a slight odour. This is a normal temporary condition caused by the "burn-in" of internal
paints and lubricants used in the manufacturing process and will not occur again. Simply run the main burners on high for
approximately ½ hour.
INFRARED MAIN BURNER USE:
1. Follow the infrared burner ignition procedures and operate on high for 5 minutes with the lid closed or until the ceramic burners glow red.
2. Place food on grills and cook according to times listed in the Infrared Grilling Chart.
3. Depending upon your taste, continue cooking over infrared burners on high, medium or low, turning food frequently, or place food away from
infrared burners, close lid, and allow oven temperature to slowly finish cooking your food.
Caution: Due to the intense heat the infrared burners provide, food left unattended over burners will burn quickly. Keep the lid open when
cooking with the infrared burners on high. The intense heat ensures adequate searing temperatures even with the lid open. This also allows
observation of the food, so as to prevent burning.
MAIN BURNER USE: When searing foods, preheating is recommended by operating all main burners in the high position with the
lid closed for approximately 10 minutes. Food cooked for a short period of time (fish, vegetables) may be grilled with the lid open.
Cooking with the lid closed will ensure higher, more even temperatures that will reduce cooking time and cook meat more evenly.
Food that has a cooking time longer than 30 minutes, such as roasts, may be cooked indirectly (with the burner lit opposite to the
food placement). When cooking very lean meats, such as chicken breasts, or lean pork, the grids can be oiled before pre-heating
to reduce sticking. Cooking meat with a high degree of fat content, may create flare-ups. Either trim some fat or reduce temperatures to prevent this. Should a flare-up occur, move food away from flames, reduce heat. Leave the lid open.
REAR BURNER USE: Remove the warming rack prior to use. Cooking grids should also be removed if they interfere with the
rotisserie. This gas grill is equipped with a 14,000 BTU rear burner. The rear burner is designed to be used in conjunction with the
included rotisserie kit. See the rotisserie kit assembly instructions. To use the counterbalance, remove the rotisserie motor from the
gas grill. Place the spit with meat being cooked across the hangers inside the grill. The meat will naturally hang with the heavy side
down. Tighten the counterbalance arm and weight, so that the arm is facing up. Slide the counterweight in or out to balance the load,
and tighten in place. Re-install the motor and begin cooking. Place a dish underneath to collect drippings for basting and naturally
delicious gravy. Basting liquid may be added as required. To seal in juices, first operate rear burner on high until brown, then reduce
the heat to thoroughly cook foods. Keep the lid closed for best results. Your roasts and fowl will brown perfectly on the outside and
stay moist and tender on the inside. For example, a 3 pound chicken on the rotisserie will be done in approximately 1½ hours on
medium to high.
SIDE BURNER USE: The side burner can be used like any range top burner, for gravies, soups etc. The gas grill should be located
so that the side burner is protected from the wind, because the wind will adversely affect it's performance.
7
Page 8

INFRARED GRILLING CHART
FOOD
Steak
1” Thick
Hamburger
1/2” Thick
Chicken
Pieces
Pork Chops
Spare Ribs
CONTROL SETTING COOKING TIME HELPFUL SUGGESTIONS
High setting 2 min. each side 4 min. - Rare
High setting 2 min. each side
then medium setting
High setting 2 min. each side
then medium setting
High setting 2 min. each side 4 min. - Rare
High setting 2 1/2 min. each
side
High setting 3 min. each side
High setting 2 min. each side
medium-low to low setting
Medium 6 min. per side
High setting for 5 minutes
low to finish
6 min. - Medium
8 min. - Well Done
5 min. - Medium
6 min. - Well Done
20-25 min.
20 min. per side
turn often
When selecting meat for grilling, ask for meat
with a marbled fat distribution. The fat acts as a
natural tenderizer while cooking and will keep
the meat moist and juicy.
Preparing hamburgers to order is made easier
by varying the thickness of your patties. To add
an exotic taste to your meat, try adding hickoryflavored woodchips into Napoleon’s woodchip
smoker.
The joint connecting the thigh and the leg from
the skinless side, should be sliced 3/4 of the
way though in order for the meat to lay flatter on
the grill. This will help it to cook faster and more
evenly. To add a trademark taste to your cooking,
try adding mesquite-flavoured woodchips in your
Napoleon woodchip smoker.
Trim off the excess fat before grilling. Choose
thicker chops to get more tender meat.
Choose ribs that are lean and meaty. Grill until
meat easily pulls away from the bone.
Lamb Chops
Hot Dogs
High setting for 5 minutes
medium to finish
Medium - Low 4-6 min.
15 min. per side
Trim off the excess fat before grilling. Choose
extra thick chops to get more tender meat.
Select the larger size wieners. Slit the skin
lengthwise before grilling.
CLEANING INSTRUCTIONS
Ensure that the burners are turned off prior to cleaning. Avoid unprotected contact with hot surfaces. Clean grill in an area
where cleaning solutions will not harm decks, lawns or patios. Do not use oven cleaner to clean any part of this gas grill. Do
not use a self cleaning oven to clean cooking grids or any other parts of the gas grill. Barbecue sauce and salt can be
corrosive and will cause rapid deterioration of the gas grill components unless cleaned regularly.
Note: Stainless steel tends to oxidize or stain in the presence of chlorides and sulfides, particularly in coastal areas and other
harsh environments, such as the warm, high humidity atmosphere around pools and hot tubs. These stains may be perceived
as rust, but can be easily removed and prevented. To ensure stain prevention, wash all stainless steel surfaces every 3-4
weeks with fresh water and stainless steel cleaner or as often as required.
GRIDS AND WARMING RACK - The grids and warming rack are best cleaned during the pre-heat period with a soft brass wire
brush. Steel wool can be used for stubborn stains. Stainless grids will discolour permanently from normal usage, due to the high
temperature of the cooking surface.
CLEANING INSIDE THE GAS GRILL - Remove cooking grids. Use a soft brass wire brush to clean loose debris from casting sides
and insides of the lid. Scrape sear plates with a putty knife or scraper, and use a wire brush to remove ash. Remove sear plates
and brush debris off of burners with a brass wire brush. Brush all debris from inside the gas grill into the drip pan. The pan
should be scraped out with a putty knife or scraper, and all the debris should be scraped into the disposable grease tray. This tray
should be replaced every two to four weeks, depending on gas grill usage. For supplies, see your NAPOLEON Gas Grill dealer.
Ensure that the sear plates are placed properly when they are reinstalled (Check assembly instructions for proper orientation).
CLEANING THE OUTSIDE OF THE GAS GRILL - Do not use abrasive cleaners to clean any painted, or stainless steel parts. Exterior
grill surfaces should be cleaned while warm to the touch, with warm soapy water. To clean stainless surfaces, use a stainless
steel cleaner or a non-abrasive cleaner. Always wipe in the direction of the grain. Do not use steel wool, as it will scratch the
finish. Stainless steel parts will discolour when heated, usually to a golden or brown colour. This discolouration is normal and
will not affect the performance of the grill.
INFRARED BURNERS - Because of the high intensity of the infrared burner, most drippings and food particles that fall onto the
burner surface are immediately incinerated. However, some debris and residue may remain. To remove this residue after
cooking, turn the grill on high with lid closed for 5-10 minutes. Do not clean the ceramic tile with a wire brush. If debris is
collecting on your burner, simply light the burner and operate on high for 5 minutes with the lid open, allowing debris to burn off.
8
Page 9
MAINTENANCE INSTRUCTIONS
It is recommended that this gas grill be thoroughly inspected and serviced annually by a qualified service person.
Turn off the gas at the source and disconnect unit before servicing. Maintenance should only be done when the grill is
cool, to avoid the possibility of burns. A leak test must be performed annually, and whenever any component of the gas
train is replaced.
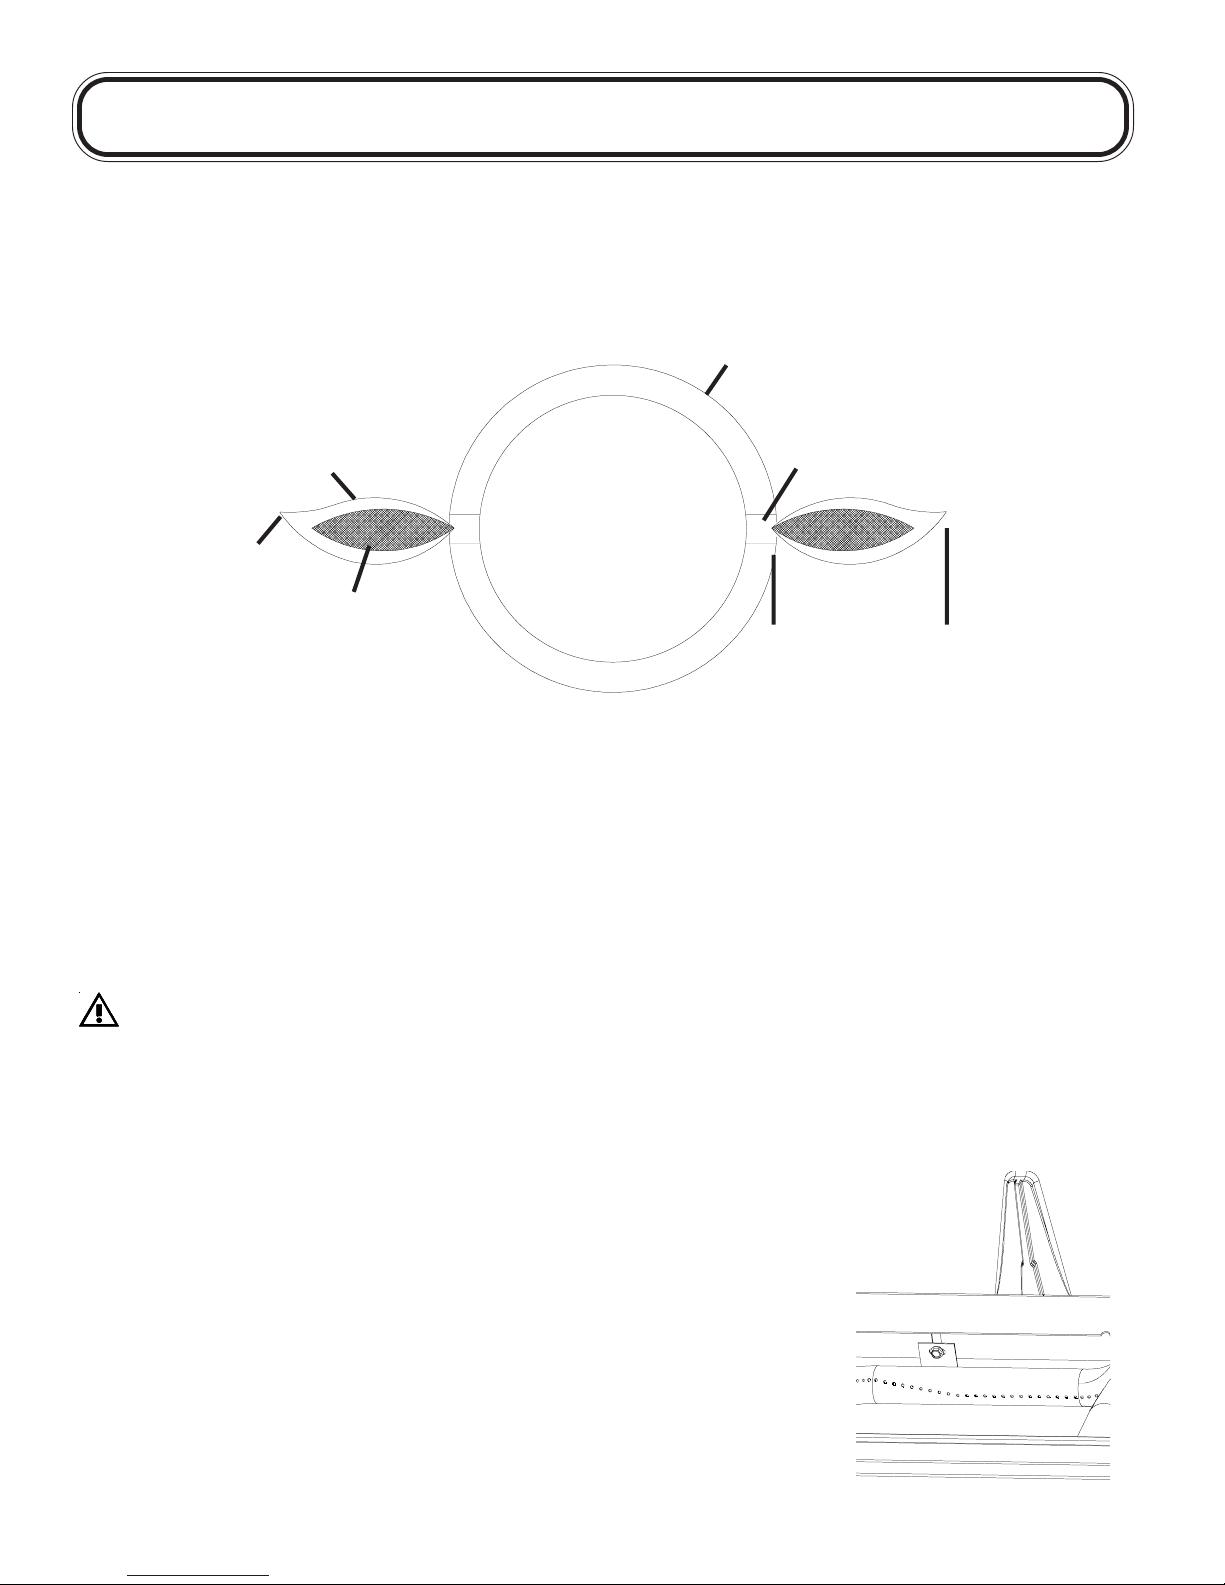
COMBUSTION AIR ADJUSTMENT - (This must be done by a qualified gas installer.) The air shutter is factory set and should not
have to be adjusted under normal conditions. However, some extreme field conditions may exist that require adjustment. When
the air shutter is adjusted correctly, the flames will be dark blue with light blue tips, and occasional yellow tips.
BURNER
LIGHT BLUE
YELLOW TIPPING
DARK BLUE
If the burner is getting too little air, the flames will be lazy yellow, and possibly produce soot. If the burner is getting too much air,
the flames will be lifting erratically from the burner and may cause difficulties when lighting.
1. To adjust the air shutter, remove cooking grids and sear plates and leave lid open. The back cover must be removed for back
burner air shutter adjustment.
2. Loosen air-shutter lock screw and open or close air shutter as required. The normal settings are:
Main Burner Propane 3/16" Back Burner Propane 3/8"
Natural 1/8" Natural 1/8"
3. Light burners and set to high. Visually inspect burner flames. When shutters are set, turn burners off, tighten locking screw,
and replace removed parts.
BURNER PORT
APPROXIMATELY
1/2"
WARNING
HOSE - Check for abrasion, melting, cuts and cracks. If any of these conditions exist, do not use gas grill. Have part replaced by
your gas grill dealer, or qualified gas installer.
BURNER - The burner is made from heavy wall 304 stainless steel, but due to the extreme
heat and corrosive environment, surface corrosion will occur. Use a brass wire brush to
remove surface corrosion. Clean any blocked ports using an opened paper clip. Do not
enlarge the burner ports. Spiders and insects are attracted to the smell of propane and
natural gas. The burner is equipped with an insect screen on the air shutter, which will reduce
the likelihood of insects building nests inside the burner, but does not entirely eliminate the
problem. The nest or web will cause the burner to burn with a soft yellow or orange flame or
cause a fire (flashback) at the air shutter underneath the control panel. To clean the inside of
the burner, it must be removed from the gas grill. Remove the 2 screws located above the
burner to the left and right of the centre of the burner. Lift back of burner upwards to remove.
Use a flexible venturi tube cleaning brush to clean out the inside of the burner. Shake any
loose debris out of the burner, through the gas inlet. Ensure that the insect screen is clean,
tight, and free of any lint or other debris. Check also that the valve orifices are clean. Do not
enlarge the orifices. Re-install the burner. Check that the valve enters the burner when
installing. Replace burner cover and mounting screws to complete installation.
WARNGUN
9
Page 10
ALUMINUM CASTINGS - Clean castings periodically with warm soapy water. Aluminum will not rust, but due to high temperatures
and weathering, oxidation can occur on aluminum surfaces. This will appear as white spots on the castings. To refinish the
castings, clean them and sand lightly with fine sandpaper. Wipe surface to remove any residue, and paint with high temperature
barbecue paint. Protect surrounding areas from over-spray. Follow curing directions found on the can.
PROTECTION OF INFRARED BURNERS - The infrared burners of your grill are designed to provide a long service life. However,
there are steps you must take to prevent cracking of their ceramic surfaces, which will cause the burners to malfunction.
Following are the common causes of cracks and the steps you must take to avoid them. Damage caused by failure to follow
these steps is not covered by your grill warranty.
Impact with Hard Objects - Never allow hard objects to strike the ceramic. Take care when inserting or removing cooking
1.
grates and accessories into or from the grill. If these objects were to fall on the ceramic, it is likely to crack.
2.
Water or Other Liquids - Cold liquid contacting a hot surface in substantial amounts can cause the surface to break. Do
not throw water into the grill to douse a flame. Also if the ceramic or interior of a burner becomes wet while not in use, later
operation of the burner can create steam, which may produce enough pressure to crack the ceramic. In addition, repeated
soaking of the ceramic will cause it to swell and expand. This expansion will cause undue pressure on the ceramic and
therefore it may crack and crumble.
i) Never throw water into the grill to control flare-ups
ii) Do not attempt to operate the infrared burners in open air while raining.
iii) If you find standing water in your grill (because of exposure to rainfall, sprinklers etc.), inspect ceramic for
evidence of possible watersoaking. If ceramic appears to be wet, remove the burner from the grill. Turn upside
down to drain the excess water. Bring indoors and allow to dry thoroughly.
3. Impaired Ventilation of Hot Air From the Grill - In order for the burners to function properly, hot air must have a way to escape
the grill. If the hot air is not allowed to escape, the burners may become deprived of oxygen, causing them to back flash. If this
occurs repeatedly, the ceramic may crack. Do not cover more than 75% of the cooking surface with solid metal (ie. griddle or
large pan).
TROUBLESHOOTING
Problem Possible Causes Solution
Low heat / Low flame when
valve turned to high.
Excessive flare-ups/uneven
heat.
Burners burn with yellow
flame, accompanied by the
smell of gas.
For propane - improper lighting
procedure.
For natural gas - undersized
supply line.
For both gases - improper
preheating.
Sear plates installed incorrectly. Ensure sear plates are installed correctly. The archs
Improper pre-heating.
Excessive grease and ash build
up on sear plates and in drip pan.
Possible spider web or other
debris, or improper air shutter
adjustment.
Ensure lighting procedure is followed carefully. All gas grill
valves must be in the off position when the tank valve is
turned on. Turn tank on slowly to allow pressure to equalize.
See lighting instructions.
Pipe must be sized according to installation code.
Pre-heat grill with main burners on high for 10 to 15 minutes.
without slots should be located directly above the left and
right burners. When the sear plates are installed correctly,
six of the eight slots should be in valleys.
Pre-heat grill with main burners on high for 10 to 15
minutes.
Clean sear plates and drip pan regularly. Do not line base
with aluminum foil. Refer to cleaning instructions.
Thoroughly clean burner by removing. See general maintenance instructions. Open air shutter slightly according to
combustion air adjustment instructions.
(This must be done by a qualified gas installer.)
10
Page 11

Problem Possible Causes Solution
Flames lift away from
burner, accompanied by the
smell of gas, and possibly
difficulties in lighting.
Burner will not light with the
igniter, but will light with a
match.
Humming regulator.
Burners will not crosslight
each other.
"Paint" appears to be
peeling inside lid or hood.
Improper air shutter adjustment.
Dead battery / or installed
incorrectly.
Loose electrode wire.
Wrong replacement igniter. One spark systems must use a one spark igniter.
Improper gap at electrode tip. Ensure that the collector box is tight, and the gap between the
Lifting flames on burner. Close air shutter slightly - see previous problem
Normal occurance on hot days. This is not a defect. It is caused by internal vibrations in the
Plugged ports along back of
burner.
Grease build up on inside
surfaces.
Close air shutter slightly according to combustion air
adjustment instructions.
(This must be done by a qualified gas installer.)
Replace with heavy duty 'AAA' battery. Install with positive
terminal up.
Check that electrode wire is firmly pushed onto the terminal
on the back of the igniter.
electrode end and the collector box is between 1/8 - 3/16".
The gap can be adjusted by bending the box in or out.
regulator, and does not affect the performance or safety of the
gas grill.
Clean burner ports. See burner maintenance instructions.
This is not a defect. The peeling is caused by hardened
grease, which dries into paint-like shards, that will flake off.
Regular cleaning will prevent this. See cleaning instructions.
Burner output on “high”
setting is too low. (Rumbling noise and fluttering
blue flame at burner
surface.)
Infrared burner flashes
back (during operation the
burner abruptly makes a
loud “whoosh” sound,
followed by a continuous
blow-torch type sound and
grows dim.)
Lack of gas.
Supply hose is pinched.
Dirty or clogged orifice.
Spider webs in venturi tube, or
other foreign matter.
Cracked ceramic tile.
Propane regulator in “low flow”
state.
Ceramic tiles overloaded with
grease drippings and build-up,
ports are clogged.
Burner overheated due to
inadequate ventilation (too much
grill surface covered by griddle or
pan.)
Cracked ceramic tile.
Leaking gasket surrounding the
ceramic tile, or a weld failure in
the burner housing.
Check gas level in propane cylinder.
Reposition supply hose as necessary.
Clean burner orifice.
Clean out venturi tube.
Order replacement burner from your Authorized Napoleon
dealer.
Ensure lighting procedure is followed carefully. All gas
grill valves must be in the off position when the tank valve
is turned on. Turn tank on slowly to allow pressure to
equalize. See lighting instructions.
Turn burner off and allow to cool for at least two minutes.
Relight burner and burn on high for at least five minutes or
until the ceramic tiles are evenly glowing red.
Ensure that no more than 75% of the grill surface is
covered by objects or accessories. Turn burner off and
allow to cool for at least two minutes, then relight.
Allow burner to cool and inspect very closely for cracks. If
any cracks are found, contact your authorized Napoleon
dealer for ordering a replacement burner assembly.
Contact your authorized Napoleon dealer for instructions
on ordering a replacement burner assembly.
11
Page 12

ORDERING REPLACEMENT P ARTS / RETURNS
Before contacting the customer care department, check the NAC web site for more extensive cleaning, maintenance, troubleshooting and part
replacement instructions at www.napoleongrills.com. Contact the factory directly for replacement parts and warranty claims. The customer care
department is available between 9 AM and 5 PM (Eastern standard time) at 1-866-820-8686 or fax at 1-705-727-4282. In order to process a claim, we
must be provided with the following information:
1. Model and serial number of the unit.
2. Part number and description.
3. A concise description of the problem ('broken' is not sufficient).
4. Proof of purchase (photocopy of the invoice).
In some cases the customer care representative may request to have the parts returned to the factory for inspection, before providing replacement
parts. The parts must be shipped prepaid to the attention of the customer service department with the following information:
1. Model and serial number of the unit.
2. A concise description of the problem ('broken' is not sufficient).
3. Proof of purchase (photocopy of the invoice).
4. SPC number - provided by the customer service representative.
Before contacting customer care, please note that the following items are not covered by the warranty:
-costs for transportation, brokerage or export duties
-labor costs for removal and re-installation
-costs for service calls to diagnose problems
-discoloration of stainless steel parts
-part failure due to lack of cleaning and maintenance, or use of improper cleaners (ovencleaner).
12
Page 13

Ne tentez pas d’allumer cet appareil avant d’avoir lu la section
“INSTRUCTIONS D’ALLUMAGE” de ce manuel.
AVERTISSEMENT
Pour votre sécurité n'entreposez pas et n'utilisez pas d'essence ou autres liquides et vapeurs
inflammables à proximité de cet ou tout autre appareil. Une bonbonne de propane de
propane non branchée ne devrait pas être entreposée à proximité de cet ou de tout autre
appareil. Si ces instructions ne sont pas suivies à la lettre, un feu ou une explosion
pourraient s'ensuivre, causant des dommages à la propriété, des blessures corporelles ou
des pertes de vie.
DANGER
QUE FAIRE SI VOUS DÉTECTEZ UNE ODEUR DE GAZ:
• Fermez l’alimentation principale en gaz.
• Éteignez toute flamme nue.
• Ouvrez le couvercle.
• Si l’odeur persiste, appelez immédiatement votre fournisseur de gaz ou le service des
incendies.
ATTENTION
Lors du déballage et de l’assemblage, nous vous conseillons de porter des gants de travail et des lunettes de sécurité pour votre protection. Malgré tous nos efforts pour assurer que l’assemblage soit
aussi sécuritaire et sans problème que possible, il se peut que les bords et les coins des pièces usinées
en acier soient coupants et qu’ils causent des coupures si les pièces ne sont pas manipulées
correctement.
CONSIGNES DE SÉCURITÉ
* Ce gril à gaz n’est pas conçu pour être installé dans ou sur
des véhicules récréatifs et/ou des bateaux.
* Ce gril doit être utilisé uniquement à l’extérieur, dans un
endroit bien aéré et ne doit jamais être utilisé à l’intérieur d’un
bâtiment, d’un garage ou de tout autre endroit fermé.
* Gardez les fils électriques et les tuyaux d’alimentation en gaz
éloignés des surfaces chauffantes.
* Inspectez le tuyau d’alimentation en gaz avant chaque
utilisation. S’il montre des signes de fendillement excessif,
d’usure ou s’il est coupé, il doit être remplacé par un ensemble
de rechange spécifié par le fabricant avant d’utiliser le gril.
* Lorsque la bonbonne de propane n’est pas débranchée du
gril, la bonbonne et le gril doivent être entreposés à l’extérieur,
dans un endroit bien aéré.
* N’installez pas le gril dans un endroit venteux. Les vents forts
nuiront à la performance de cuisson de votre gril.
* Lorsque le gril n’est pas utilisé, l’alimentation en gaz doit être
fermée à la bonbonne de propane ou à la soupape
d’alimentation du gaz naturel.
* Les adultes et particulièrement les enfants doivent être
sensibilisés aux risques que représentent les surfaces
exposées à des températures élevées. Surveillez les jeunes
enfants lorsqu’ils sont près du gril.
* Ce gril ne devra être modifié en aucun cas.
* Lorsque le gril doit être entreposé à l’intérieur, la bonbonne
de propane doit être débranchée du gril et entreposée à
l’extérieur dans un endroit bien aéré, hors de la portée des
enfants. Les bonbonnes de propane ne doivent en aucun
temps être entreposées à l’intérieur d’un bâtiment, d’un
garage ou de tout autre endroit fermé. Les appareils au gaz
naturel doivent être débranchés de leur source
d’alimentation en gaz lorsqu’ils sont entreposés à l’intérieur.
* Le couvercle doit être fermé lors de la période de
préchauffage du gril.
* N’utilisez pas le plateau à condiments pour entreposer des
briquets, des allumettes ou autres matériaux inflammables.
* Ce gril à gaz est conçu pour un usage extérieur seulement.
13
Page 14

Les grils à gaz NAPOLÉON sont fabriqués conformément aux normes strictes du
Certificat d’assurance de qualité mondialement reconnues ISO 9001-2000.
Les produits NAPOLÉON sont conçus avec des composantes et des matériaux de qualité supérieure,
assemblés par des artisans qualifiés qui sont fiers de leur travail. Le brûleur et le montage de la soupape
subissent un test de détection de fuites et d’allumage à une station de test de qualité et sont soigneusement
inspectés par un technicien qualifié avant d’être emballés et expediés pour garantir que vous, le client, recevez
le produit de qualité dont vous vous attendez de NAPOLÉON.
GARANTIE À VIE LIMITÉE DES GRILS À GAZ ULTRA CHEF DE NAPOLÉON
NAPOLÉON garantit votre nouveau gril à gaz contre tous défauts concernant les matériaux et le procédé
de fabrication tant et aussi longtemps que vous êtes propriétaire du gril. Cette garantie couvre : la fonte
d’aluminium (excluant les finis peints), les tablettes latérales en acier inoxydable, les roues, les boutons de
contrôle, les brûleurs en acier inoxydable, les poignées de couvercle, et l’appliqué pour couvercle en acier
inoxydable sous réserve des conditions suivantes. Pendant les cinq premières années, NAPOLÉON fournira
gratuitement les pièces de rechange selon son choix. De la sixième année à vie, NAPOLÉON fournira les
pièces de rechange à 50 % du prix de détail courant.
Les composants tels que les plaques de brûleur en acier inoxydable,les brûleurs infrarouges en
céramique (à l'exclusion des écrans), les grilles de cuisson en acier inoxydable, l’allumeur (excluant les
piles), la jauge de température et les soupapes en laiton sont couverts et NAPOLÉON fournira les pièces
gratuitement durant les deux premières années de la garantie limitée.
Les composants tels que les régulateurs, les roulettes, les grilles, les tuyaux et les raccords, les pièces
d’assemblage et les accessoires sont couverts et NAPOLÉON fournira les pièces gratuitement durant la
première année de la garantie limitée.
NAPOLÉON n’assumera aucuns frais d’expédition, de main-d’oeuvre ou de taxes d’exportation.
“NAPOLÉON garantit ses produits contre tous défauts de fabrication à l’acheteur d’origine seulement, à condition que l’achat ait été fait par l’entremise d’un représentant
autorisé NAPOLÉON et sous réserve des conditions et limitations suivantes.”
Cette garantie d’usine n’est pas transférable et ne peut être prolongée par aucun de nos représentants qu’elle qu’en soit la raison.
Le gril à gaz doit être installé par un installateur ou entrepreneur qualifié. L’installation doit être faite conformément aux instructions d’installation incluses avec le produit et à tous
les codes d’incendie et de construction locaux et nationaux.
Cette garantie limitée ne couvre pas les dommages causés par un usage impropre, un manque d’entretien, feux de graisse, un environnement inadéquat, un accident, des
modifications, de l’abus ou de la négligence. L’installation de pièces d’autres fabricants annulera cette garantie.
Cette garantie limitée ne couvre pas non plus les éraflures, les bosselures, la corrosion ou la décoloration causés par la chaleur ou les produits d’entretien chimiques et abrasifs ni
l’écaillage des pièces de porcelaine émaillée ni les composantes utilisées dans l’installation du gril à gaz.
Dans le cas d’une détérioration des composantes causant un mauvais fonctionnement pendant la période couverte par la garantie, un remplacement part des composantes sera
effectué.
Au cours de la première année seulement, cette garantie s’applique à la réparation ou au remplacement des pièces garanties dont les matériaux ou la fabrication sont défectueux
à la condition que le produit ait été utilisé conformément aux instructions d’opération et dans des conditions normales.
Après la première année, selon cette Garantie à vie limitée du Président NAPOLÉON peut, à sa discrétion, se libérer complètement de toutes ses obligations en ce qui concerne
cette garantie en remboursant à l’acheteur d’origine le prix de gros de toutes pièces garanties qui sont défectueuses.
NAPOLÉON ne sera pas responsable de l’installation, main-d’oeuvre ou autres coûts ou dépenses relatives à la réinstallation d’une pièce garantie car de telles
dépenses ne sont pas couvertes par cette garantie.
Nonobstant toutes les dispositions contenues dans cette Garantie à vie limitée du Président, la responsabilité de NAPOLÉON sous cette garantie est définie comme ci-dessus et
elle ne s’appliquera à aucun dommage accidentel, consécutif ou indirect.
Cette garantie définit les obligations et responsabilités de NAPOLÉON en ce qui concerne le gril à gaz NAPOLÉON. Tout autre garantie énoncée ou implicite en ce qui concerne
ce produit, ses composantes ou accessoires est exclue.
NAPOLÉON n’endosse ni n’autorise aucun tiers à assumer en son nom, tout autre responsabilité concernant la vente de ce produit. NAPOLÉON ne se tiendra pas responsable
d’une surchauffe ou d’explosions causées par des conditions environnementales tel que des vents forts ou une ventilation inappropriée.
Tous dommages causés au gril par la température, un usage abusif ou l’utilisation de produits d’entretien chimiques ou abrasifs ne seront pas la responsabilité de NAPOLÉON.
La facture ou une copie sera requise ainsi que le numéro de série et de modèle du gril lors d’une réclamation auprès de NAPOLÉON.
NAPOLÉON se réserve le droit de demander à son représentant d’inspecter tous produits ou pièces avant d’approuver les réclamations.
NAPOLÉON n’assumera aucun frais de transport, de main-d’oeuvre ou taxes d’exportation.
14
CONDITIONS ET LIMITATIONS
Page 15

INFORMATION GÉNÉRALE
CE GRIL À GAZ EST CERTIFIÉ SELON LES NORMES NATIONALES CANADIENNES ET AMÉRICAINES, CAN/CGA-1.6b-2002 ET
ANSI Z21.58b-2002 RESPECTIVEMENT POUR DES GRILS À GAZ POUR L’EXTÉRIEUR ET SON INSTALLATION DEVRAIT ÊTRE
CONFORME AUX CODES LOCAUX. En l’absence de codes locaux, installez selon les normes courantes CAN1-B149.2 du code
d’installation de Propane au Canada ou selon les normes ANSI Z223.1 du “National Fuel Gas” aux États-Unis.
Si un moteur de rôtissoire est utilisé, il doit être électriquement mis à la terre conformément aux codes locaux ou, en l’absence de tels
codes, conformément à la version courante du code CSA C22.1 Code électrique canadien ou au code ANSI/NFPA 70 aux États-Unis.
N’UTILISEZ QUE L’ENSEMBLE DE RÉGULATEUR DE PRESSION ET DE TUYAU FOURNI AVEC CE GRIL. LES ENSEMBLES DE
RÉGULATEUR DE PRESSION ET TUYAUX DE RECHANGE DOIVENT ÊTRE RECOMMANDÉS PAR LE FABRICANT.
N’ENTREPOSEZ PAS DE BONBONNE DE PROPANE OU DE BONBONNE DE RECHANGE SUR L’ÉTAGÈRE SOUS LE GRIL.
Le régulateur fourni une pression de 11 pouces de colonne d’eau au gril. Le gril possède un raccord de type QCC1. Les bonbonnes
utilisées avec ce gril doivent être munies d’une soupape QCC1. Une soupape QCC1 possède un raccord qui empêche l’écoulement
du gaz jusqu’à ce qu’un joint étanche soit obtenu. Elle est aussi équipée d’un dispositif de contrôle d’écoulement du gaz. Afin
d’obtenir un débit maximal de gaz, les soupapes du gril doivent être fermées lorsque vous ouvrez la soupape de la bonbonne.
SPÉCIFICATIONS POUR LA BONBONNE DE PROPANE: Une bonbonne bosselée ou rouillée peut être dangereuse et devrait être
vérifiée par votre fournisseur de propane. N’utilisez jamais une bonbonne avec une soupape endommagée. Utilisez uniquement une
bonbonne de propane fabriquée et étiquetée selon les normes pour les bonbonnes de propane de la Commission canadienne des
Transports ou le “US Department of Transportation (DOT)”. Cet appareil a été conçu pour être utilisé avec une bonbonne de propane de
20 livres (9.1kg) uniquement (non fournie).
La bonbonne de propane doit être équipée d’une soupape d’arrêt se raccordant à une soupape de type QCC1. Une valve de sécurité
doit être branchée directement sur la bonbonne. Le système d’alimentation de la bonbonne doit être installé de manière à permettre
l’évacuation des vapeurs et doit avoir un collet pour protéger la soupape de la bonbonne. La bonbonne doit être munie d’un dispositif de
détection de trop-plein.
PROPOSITION 65 DE LA CALIFORNIE : La combustion de gaz crée des sous-produits, parmi lesquels certains se retrouvent sur la
liste de substances connues par l’état de Californie comme causant le cancer ou autres dangers pour la reproduction. Lorsque vous
cuisinez avec le gaz, assurez-vous de toujours avoir une ventilation adéquate afin de minimiser l’exposition à ces substances.
QUOI FAIRE ET NE PAS FAIRE
À FAIRE
Lire le manuel d’instructions au complet avant d’utiliser le
gril.
Respecter les dégagements recommandés des matériaux
inflammables (20" à l’arrière du gril et 6" sur les côtés).
Une distance plus grande est recommandée (24") à
proximité d’un recouvrement de vinyle ou d’une grande
surface vitrée.
Faire un test de fuites avant la première utilisation,
annuellement et à chaque fois qu’une composante de gaz
est changée.
Suivre les instructions d’allumage à la lettre lorsque vous
utilisez votre gril. Les soupapes des brûleurs doivent être
fermées lorsque vous ouvrez la soupape d’alimentation en
gaz.
S’assurer que les plaques du brûleur sont bien en place
selon le livre d’instructions.
Nettoyer le tiroir d’égouttement et les plaques du brûleur
régulièrement pour éviter les feux de graisse.
Enlever la grille-réchaud avant d’allumer le brûleur arrière.
(La chaleur intense pourrait l’endommager).
Inspecter les tubes de venturi des brûleurs infrarouges
pour de toiles d’araignées ou toutes autres obstructions
régulièrement.
Nettoyer les tubes si vous découvrez des obstructions.
À NE PAS FAIRE
Ne pas tenter d’utiliser une bonbonne qui n’est pas équipée
d’un raccord de type QCC1.
Ne pas utiliser le plateau à condiments pour entreposer des
briquets, des allumettes ou tout autre matériau inflammable.
Ne pas placer le gril sous une construction inflammable nonprotégée.
Ne pas utiliser le brûleur arrière en même temps que le
brûleur principal.
Ne pas laisser le gril sans surveillance lorsqu’il est allumé.
Ne pas allumer le gril avec le couvercle fermé.
Ne pas déplacer le gril pendant qu’il fonctionne ou qu’il est
chaud.
N’utilisez pas un pulvérisateur pour nettoyer l’appareil.
Ne pas permettre à l’eau froide (pluie, arrosoir, boyeau
d’arrosage etc) de venir en contacte avec les brûleurs en
céramique. Une grande différence de température pourrait
causer la céramique à fissurer.
Ne faites pas fonctionner le gril dans une véranda avec
paramoustique, un gazebo ou tout autre endroit fermé.
15
Page 16

INSTRUCTIONS DE BRANCHEMENT DU GAZ
RACCORD DE LA BONBONNE: Assurez-vous que le tuyau du régulateur de gaz est sans anomalie. Enlevez les bouchons sur la
soupape de gaz à la bonbonne. Connectez le régulateur QCC1 sur la soupape de gaz QCC1. Serrez à la main dans le sens
des aiguilles d’une montre. N’utilisez pas d’outil. Faites un test de fuites sur tous les raccords avant d’utiliser le gril. Un test de
fuites doit être fait annuellement et à chaque fois qu’une bonbonne est remplacée ou qu’une pièce du système de gaz est
remplacée.
INSTALLATION DE LA BONBONNE DE PROPANE: Placer la bonbonne dans le support inférieur de la bonbonne.
BRANCHEMENT AU GAZ NATUREL: Ce gril à gaz naturel est équipé d’un tuyau d’alimentation de 10 pieds (complet avec un
système de débranchement rapide) conçu pour un branchement au gaz naturel et certifié pour une utilisation extérieure. Ce gril
à gaz est conçu pour fonctionner à une pression d’alimentation de 7 pouces de colonne d’eau. Un régulateur de pression doit
être installé si la pression de la source d’alimentation en gaz est plus grande que 7 pouces de colonne d’eau. La tuyauterie et
les soupapes en amont du système de débranchement rapide ne sont pas fournies.
Le système de débranchement rapide ne doit pas être installé verticalement et une soupape d’arrêt manuelle facilement
accessible doit être installée en amont, et aussi près que possible du système de débranchement rapide. Le bout évasé du
tuyau doit être raccordé à l’unité comme montré. Ces raccords doivent être faits par un installateur de gaz qualifié.
APPAREILS AVEC BRÛLEUR LATÉRAL: Raccordez le tuyau de 20" à partir du collecteur, à travers la bague de fixation au-dessous
de la base, au côté du brûleur comme montré. Installez le coude de 90o faisant face à l’arrière de l’unité. Raccordez le tuyau
d’alimentation à ce coude et le bout évasé du tuyau d’alimentation au brûleur latéral. Resserrez avec une clé tous les raccords.
(N’utilisez pas de scellant/enduit à tuyaux).
AVERTISSEMENT
• L’installation doit être effectuée par un installateur certifié pour le gaz et tous les raccordements doivent être testés pour des
fuites avant de faire fonctionner le gril.
• Ne pas passer le tuyau d’alimentation sous le tiroir d’égouttement.
• Ne passez pas le boyau entre l’espace dans la tablette inférieure et le panneau arrière.
• N’acheminez pas le boyau par-dessus le panneau arrière.
• Assurez-vous que tous les raccordements de boyaux sont serrés à l’aide de deux clés. N’utilisez pas de ruban de Téflon ou
de composé pour raccord de tuyau sur les raccordements.
• Vérifiez pour des fuites de gaz en appliquant une solution d’eau savonneuse selon les instructions de détection de fuites
dans de manuel.
• Assurez-vous que le boyau ne touche à aucune surface à haute température sinon il risque de fondre, de provoquer une
fuite et causer un feu.
TEST DE DÉTECTION DE FUITES
DANGER
N’utilisez pas une flamme nue pour vérifier pour des fuites de gaz. Assurez-vous qu’il n’y ait aucune étincelle ni flamme nue à
proximité de l’endroit à vérifier. Les étincelles ou les flammes nues provoqueront un feu ou une explosion, causant des
dommages matériels, des blessures graves ou des pertes de vie.
TEST DE FUITES: Il doit être fait avant la première utilisation, annuellement et à chaque fois qu’une pièce du système de gaz
est remplacée ou réparée. Ne fumez pas et enlevez toutes sources d’allumage lorsque vous faites ce test. Consultez le
schéma de test de fuites pour voir les endroits à tester.
1 - Fermez tous les boutons des brûleurs. Ouvrez la soupape de la bonbonne.
2 - Appliquez une solution de deux parts égales de savon liquide et d’eau sur tous les joints du régulateur, le tuyau et ses
raccords.
3 - Des bulles indiqueront une fuite de gaz. Resserrez le joint ou remplacez la pièce avec une autre recommandée par le
détaillant.
4 - Si la fuite ne peut être réparée, fermez l’alimentation de gaz à la bonbonne, enlevez-la et faites inspecter votre gril par votre
fournisseur de gaz ou détaillant. N’utilisez pas l’appareil jusqu’à ce que la fuite soit réparée.
5 - Fermez la soupape de la bonbonne.
16
Page 17

INSTRUCTIONS D’ALLUMAGE 405
Ouvrir le couvercle.
S’assurer que les
commandes des brûleurs
sont en position d’arrêt, et
ouvrir le robinet d’alimentation
en gaz.
ALLUMEUR
DE
BRÛLEUR
LATÉRAL
BRÛLEUR
LATÉRAL
Allumage du brûleur
arrière
Retirez la grille de
réchaud et la grille de
réchaud pivotante.
Allumer l’allumette et la
tenir aux ports du côté
gauche du brûleur
arrière.
Tourner la commande
du brûleur arrière à
HIGH.
TROU D’ALLUMAGE
Allumage du tube
brûleur principal
Tourner la commande
du brûleur de gauche à
HIGH.
Poussez et tenir la
bouton d'allumeur ou
allumez avec une
allumette.
Si l’allumage n’est pas
instantané, tourner la
commande du brûleur à
la position d’arrêt et
attendre cinq minutes.
BRÛLEUR DE
ALLUMEUR
GAUCHE
Allumage du
brûleur infrarouge.
Tournez le bouton
du brûleur infrarouge
sur “high”.
Poussez et tenir
d'allumeur ou
allumez avec une
allumette.
Si l’allumage ne se
immédiatement,
fermez le bouton de
contrôle du brûleur et
attendez 5 minutes.
la bouton
fait pas
BRÛLEUR
CENTRAL
BRÛLEUR
ARRIÈRE
BRÛLEUR
INFRAROUGE
(US405)
BRÛLEUR DE
Allumage de brûleur
latéral
Ouvrir le couvercle
du brûleur.
Tourner la commande du
brûleur latéral à HIGH.
Appuyer sur l’allumeur
à plusieurs reprises ou
allumer à l’aide d’une
allumette.
DROITE
(UD405)
Si l’allumage n’est pas
instantané, tourner la
commande du brûleur à
la position d’arrêt et
attendre cinq minutes.
du tube brûleur central
La bonbonne de propane est munie d’un dispositif de régulation pour prévenir les débits excessifs. À
moins de fermer tous les brûleurs avant d’ouvrir le robinet de la bonbonne, seules de petites
flammes seront possibles.
Ne pas utiliser le brûleur arrière pendant que le brûleur principal est en marche.
Avec le brûleur de
gauche réglé à HIGH,
tourner la commande
ou de droite à HIGH.
Si l’allumage n’est pas
instantané, tourner la
commande du brûleur à
la position d’arrêt et
attendre cinq minutes.
17
Page 18

CHALEUR INFRAROUGE
La plupart des gens ne réalisent pas que la source de chaleur qui nous est la plus familière et que le soleil émet pour réchauffer la planète est
l’énergie infrarouge. L’énergie infrarouge est une forme d’énergie électromagnétique dont la longueur d’onde est tout juste plus grande que la
lumière rouge visible du spectre lumineux mais plus petite que les ondes radios. Cette forme d’énergie fut découverte en 1800 par Sir William
Herschel qui fit passer la lumière du soleil à travers un prisme qui divisa la lumière en ses composants du spectre lumineux. Il démontra que la
plus forte concentration de chaleur qui émanait des rayons provenait de la région du spectre lumineux juste au-dessus du rouge, où aucune
lumière n’était visible. C’est cela l’énergie infrarouge. La plupart des matériaux absorbent facilement l’énergie infrarouge sous un large spectre de
longueur d’onde, causant une augmentation de température des matériaux. C’est le même phénomène qui se produit lorsque nous ressentons de
la chaleur durant une exposition au soleil. Les rayons infrarouges du soleil voyagent dans l’espace, pénètrent l’atmosphère et notre peau. Ceci
provoque une augmentation de l’activité moléculaire de la peau, créant des frictions internes et générant de la chaleur, nous permettant de
ressentir de la chaleur.
Les aliments cuits au-dessus des sources de chaleur infrarouges sont réchauffés selon le même principe. Le charbon de bois est la méthode
traditionnelle de cuisson à l’infrarouge dont nous sommes les plus familiers. Les briquettes incandescentes émettent de l’énergie infrarouge à
l’aliment qui se fait cuire et ce, avec très peu d’assèchement. Les jus de cuisson ou les graisses qui s’échappent des aliments dégouttent sur le
charbon de bois et se vaporisent en fumée, donnant ainsi aux aliments leur goût savoureux. Les brûleurs infrarouges de Napoléon fonctionnent
de la même façon. Dans chaque brûleur, 10 000 orifices possédant chacun leur flamme rendent la surface de la céramique incandescente. Cette
incandescence émet le même type de chaleur infrarouge sans le souci du charbon de bois qui est souvent malpropre. Il procure aussi une
chaleur plus uniforme qui est plus facile à contrôler que celle du charbon de bois. Pour saisir les aliments, les brûleurs peuvent être réglés à
“high” et être ensuite réglés plus bas pour une cuisson plus lente. Nous savons combien cela est difficile avec le charbon de bois. Les brûleurs
traditionnels au gaz réchauffent les aliments d’une façon différente. L’air entourant le brûleur est réchauffé par le processus de combustion et
s’élève ensuite vers les aliments à cuire. Cette méthode génère des températures plus basses qui sont idéales pour les aliments plus fragiles tels
que les fruits de mer et les légumes. En conclusion, les brûleurs infrarouges de Napoléon produisent un rayonnement intense qui vous donnera
des steaks, des hambourgeois et des viandes qui seront plus juteux et plus savoureux. Pour connaître les temps de cuisson et certains conseils,
consultez le tableau de cuisson à l’infrarouge.
INSTRUCTIONS D’OPÉRATION
Lorsqu’il est allumé pour la première fois, le gril dégagera une légère odeur. Ceci est un phénomène normal et temporaire causé par l’évaporation des
peintures et lubrifiants internes utilisés dans le processus de fabrication et ne se reproduira pas. Allumez simplement votre gril sur “high” pendant une
demi-heure.
UTILISATION DU BRÛLEUR INFRAROUGE DE CUVE
1. Suivez la procédure d’allumage du brûleur infrarouge de cuve et faites fonctionner à “high” pendant 5 minutes avec le couvercle fermé ou
jusqu’à ce que les brûleurs en céramique deviennent incandescents.
2. Placez les aliments sur les grilles de cuisson et faites cuire selon les temps spécifiés dans le ”Tableau de cuisson à l’infrarouge”.
3. Au choix, continuez de cuire par-dessus le brûleur infrarouge à “high”, “medium” ou “low”, en tournant souvent les aliments, ou placez les
aliments éloignés du brûleur infrarouge, fermez le couvercle et laissez la température de convection terminer la cuisson de vos aliments plus
lentement.
Avertissement : Dû à la chaleur intense produite pour le brûleur infrarouge, les aliments qui sont laissés sur les brûleurs sans surveillance
brûleront rapidement. Gardez le couvercle ouvert lorsque vous faites fonctionner le brûleur infrarouge à “high”. La chaleur intense vous assure
des températures adéquates de rayonnement même lorsque le couvercle est ouvert. Ceci vous permettra de surveiller les aliments afin de
prévenir qu’ils brûlent.
UTILISATION DU BRÛLEUR PRINCIPAL: Avant de cuire les aliments il est recommandé de préchauffer le gril à “high” avec le couvercle fermé
pendant environ 10 minutes. Les aliments à cuisson courte (poisson, légumes) peuvent être grillés avec le couvercle ouvert. Une cuisson avec
le couvercle fermé procurera des températures plus élevées et plus constantes qui réduiront la période de cuisson et cuiront la viande de façon
plus égale. Les aliments qui requièrent un temps de cuisson de plus de 30 minutes, tels que les rôtis, peuvent être cuits en utilisant la méthode
indirecte (avec le brûleur allumé du côté opposé à l’emplacement de la viande). Lorsque vous faites cuire des viandes très maigres, comme une
poitrine de poulet ou du porc maigre, il est à conseiller de huiler les grilles de cuisson avant le préchauffage ce qui aura pour effet d’empêcher la
viande de trop coller aux grilles. Le fait de cuire de la viande avec beaucoup de gras, peut causer des flambées soudaines. Il suffit alors
d’enlever le gras avant la cuisson ou de réduire la température pour remédier à ce problème. En cas de flambées, éloignez les aliments de la
flamme et réduisez la température. Gardez le couvercle ouvert..
UTILISATION DU BRÛLEUR ARRIÈRE: Enlevez la grille-réchaud avant de l’allumer. Les grilles de cuisson doivent également être enlevées si
elles interfèrent avec l’utilisation de la rôtissoire. Ce gril est équipé d’un brûleur arrière de 14,000 BTU. Le brûleur arrière est conçu pour être
utilisé avec l'ensemble de rôtissoire. Consultez les instructions de montage de l’ensemble rôtissoire pour plus de détails. Pour placer le contrepoids au bon endroit enlevez le moteur de la rôtissoire de son support. Placez la broche qui supporte la viande sur les deux supports à l’intérieur
du gril. Le morceau de viande se placera naturellement avec son côté le plus pesant vers le bas. Fixez le contre-poids en place en plaçant le
bras vers le haut. Vous devez ensuite glisser le poids vers le haut ou vers le bas afin de contrebalancer le poids de la viande puis serrez- le en
place. Replacez le moteur et commencez la cuisson. Placez la lèchefrite sous la viande pour récupérer le jus de cuisson qui servira pour arroser
la viande et créer ainsi une délicieuse sauce naturelle. On peut également ajouter un peu d’eau si nécessaire pour favoriser l’arrosage. Afin de
capturer le jus à l’intérieur de la viande, réglez le brûleur arrière à “high” jusqu’au brunissement puis, réduisez ensuite la chaleur pour une
cuisson complète. Gardez le couvercle fermé pour obtenir de meilleurs résultats. Vos rôtis et volailles seront parfaitement dorés à l’extérieur tout
en restant tendres et juteux à l’intérieur. Par exemple, un poulet de 3 livres sur la rôtissoire sera cuit dans approximativement 1h30 à une
température entre moyenne et haute.
UTILISATION DU BRÛLEUR LATÉRAL: Votre brûleur latéral peut être utilisé comme un rond de cuisinière normal pour chauffer les sauces,
les soupes etc. Le gril doit être placé de manière à ce que le vent n’affecte pas l’opération du brûleur latéral car il en réduirait la performance.
18
Page 19

TABLEAU DE CUISSON À L’INFRAROUGE
ALIMENT RÉGLAGE DES CONTRÔLES TEMPS DE CUISSON CONSEILS PRATIQUES
Steak
1” d’épaisseur
Hambourgeois
1/2”
d’épaisseur
Morceaux de
poulet
Côtelettes de
porc
Côtes Réglage à “high” pendant 5 minutes
Côtelettes
d’agneau
Saucisses
Réglage à “high” 2 min chaque côté
Réglage à “high” 2 min chaque côté
ensuite réglage à “medium”
Réglage à “high” 2 min chaque côté
ensuite réglage à “medium”
Réglage à “high” 2 min chaque côté
Réglage à “high” 2 1/2 min chaque côté
Réglage à “high” 3 min chaque côté
Réglage à “high” 2 min chaque côté
ensuite réglage de “medium-low” à
“low”
“Medium”
ensuite réglage à “low” pour terminer
la cuisson
Réglage à “high” pendant 5 minutes
ensuite réglage à “medium” pour
terminer la cuisson
“Medium” - “low”
4 min - Saignant
6 min - À point
8 min - Bien cuit
4 min - Saignant
5 min - À point
6 min - Bien cuit
20-25 min
6 min chaque côté Coupez l’excès de gras avant de faire cuire.
20 min chaque côté
tournez souvent
15 min chaque côté
4-6 min
Lorsque vous choisissez votre viande, demandez une
viande qui est marbrée. Le gras de la viande agira
comme un élément attendrissant durant la cuisson et
gardera la viande plus juteuse.
Pour terminer la cuisson de vos hambourgeois tous en
même temps, nous vous conseillons de varier
l’épaisseur de vos boulettes. Pour ajouter une saveur
exotique à votre viande, ajoutez des copeaux de bois
à saveur de hickory dans une pipe à boucane de
Napoléon.
L’articulation qui retient le pilon à la cuisse doit être
coupée au 3/4 à partir du côté sans peau afin de
permettre à la viande d’être plus à plat sur la grille de
cuisson. Ceci permettra à la viande de cuire de façon
plus uniforme et plus rapidement. Pour ajouter une
touche personnelle à votre poulet, ajoutez des
copeaux de bois à saveur de mesquite dans une pipe
à boucane de Napoléon.
Choisissez des côtelettes de porc plus épaisses pour
obtenir une viande plus tendre.
Choisissez des côtes bien charnues et maigres.
Grillez jusqu’à ce que la viande se détache facilement
des os.
Coupez l’excès de gras avant de faire cuire.
Choisissez des côtelettes très épaisses pour obtenir
une viande plus tendre.
Choisissez des saucisses plus grosses. Faites une
entaille dans la peau, sur la longueur de la saucisse
avant de faire griller.
NETTOY AGE
Assurez-vous que les brûleurs sont éteints avant de nettoyer. Éviter tout contact avec les surfaces chaudes. Nettoyez votre
gril dans un endroit où les produits de nettoyage n’endommageront pas votre patio, terrain ou terrasse. N’utilisez pas de
produit de nettoyage à fourneau pour nettoyer votre gril. La sauce BBQ et le sel sont très corrosifs et causeront une
détérioration très rapide de votre gril à moins que vous ne fassiez un nettoyage régulier.
Note : L’acier inoxydable a tendance à s’oxyder ou à tacher en présence de chlorures et de sulfures que l’on retrouve particulièrement dans les zones
côtières ainsi que dans les environnements chauds et humides tels que les piscines et les spas. Ces taches peuvent être prises pour de la rouille mais
il peuvent être facilement enlevées et même évitées. Afin de prévenir les taches, nettoyez toutes les surfaces en acier inoxydable à toutes les trois à
quatre semaines ou au besoin avec de l’eau douce et un nettoyant à acier inoxydable.
LES GRILLES DE CUISSON ET LA GRILLE-RÉCHAUD: Les grilles de cuisson et la grille-réchaud sont plus faciles à nettoyer durant la période de
préchauffage en utilisant une brosse en laiton. Une laine d’acier peut être utilisée pour les taches les plus rebelles. Les grilles en acier inoxydable
vont changer de couleur en permanence dû à la chaleur excessive de la surface de cuisson.
NETTOYAGE DE L’INTÉRIEUR DU GRIL: Enlevez les grilles de cuisson. Utilisez une brosse en laiton pour enlever les débris non-incrustés sur les
côtés de la cuve et à l’intérieur du couvercle. Grattez les plaques de brûleur avec un couteau à mastic ou un grattoir puis utilisez une brosse en
laiton pour enlever la suie. Enlevez les plaques de brûleur et nettoyez les débris sur le brûleur à l’aide de la brosse. Nettoyez tous les débris qui se
trouvent à l’intérieur du gril en les faisant tomber dans le tiroir d’égouttement. Le tiroir d’égouttement devrait être gratté à l’aide d’un couteau à
mastic ou d’un grattoir en jetant les débris dans le récipient à graisse jetable. Le récipient jetable devrait être remplacé entre deux et quatre
semaines selon la fréquence d’utilisation du gril. Pour vous procurer des récipients de rechange informez-vous à votre représentant NAPOLEON.
Assurez-vous de replacer les plaques de brûleur dans la bonne position. (Consultez les instructions de montage si nécessaire pour un
positionnement correct).
NETTOYAGE DE L’EXTÉRIEUR DU GRIL: N’utilisez pas de produits abrasifs pour nettoyer les pièces peintes, ou en acier inoxydable. Utilisez une
solution d’eau savonneuse chaude pour nettoyer l’extérieur du gril pendant qu’il est encore tiède au toucher. Pour nettoyer les surfaces en acier
inoxydable utilisez un produit de nettoyage à acier inoxydable ou un produit de nettoyage tout usage sans abrasif. Frottez toujours dans le sens du
grain. N’utilisez pas de laine d’acier car elle égratignerait le fini. Les pièces en acier inoxydable vont décolorer sous l’effet de la chaleur pour
habituellement prendre une couleur dorée ou brune. Cette décoloration est normale et n’affectera pas la performance du gril.
NETTOYAGE DES BRÛLEURS INFRAROUGES : Vu la chaleur très intense des brûleurs infrarouges, la plupart des jus de cuisson et des
particules de nourriture qui tombent sur la surface de ces brûleurs seront incinérés immédiatement. Cependant, certains résidus peuvent
demeurer. Pour enlever ces résidus après la cuisson, réglez le gril à “high” avec le couvercle fermé pendant 5-10 minutes.
Ne nettoyez pas la tuile de céramique avec une brosse métallique. Si des débris s’accumulent sur le brûleur, allumez simplement le brûleur et
faites fonctionner à “HIGH” pendant cinq minutes avec le couvercle ouvert, permettant aux débris de se consumer.
19
Page 20

INSTRUCTIONS D’ENTRETIEN
Nous vous conseillons de faire inspecter ce gril à gaz annuellement par un technicien de service qualifié.
Fermez le gaz à la source et débranchez l’appareil avant l’entretien. L’entretien devrait être effectué seulement lorsque le gril
est froid pour éviter toutes possibilités de brûlure. Un test de détection de fuites devrait être effectué annuellement ou à
chaque fois qu’une composante de gaz est remplacée.
AJUSTEMENT DE L’AIR DE COMBUSTION (ceci doit être effectué par un installateur qualifié): Le volet d’air est réglé à l’usine et ne
devrait pas avoir besoin normalement d’être ajusté. Cependant dans des conditions exceptionnelles un ajustement peut être
requis. Lorsque le volet d’air est bien ajusté, les flammes seront bleues foncées avec des pointes bleues pâles ou quelques fois
jaunes.
BRÛLEUR
BLEUE PÂLE
POINTE JAUNE
BLEUE FONCÉE
Si le brûleur ne reçoit pas assez d’air, les flammes seront jaunes pâles et produiront possiblement de la suie. Si le brûleur reçoit
trop d’air, les flammes scintilleront de façon erratique et causeront possiblement des problèmes d’allumage.
1. Pour ajuster le volet d’air, enlevez les grilles de cuisson, les plaques de brûleur et laissez le couvercle ouvert. Pour ajuster le
volet d’air du brûleur arrière, vous devez enlevez le couvercle arrière.
2. Desserrez la vis de verroullage du volet d’air et ouvrez ou fermez le volet d’air selon le cas. Les ajustements normaux sont:
Brûleur principal Propane 3/16" Brûleur arrière Propane 3/8"
Naturel 1/8" Naturel 1/8"
3. Allumez les brûleurs et positionnez-les à “high”. Inspectez visuellement les flammes. Lorsque les volets sont ajustés, éteignez
les brûleurs, serrez la vis de verrouillage et replacez les pièces qui avaient été enlevées.
ORIFICE DU BRÛLEUR
1/2"
AVERTISSEMENT
BOYAU - Vérifiez l’usure, coupures, craquelures ou s’il est fondu. Si vous découvrez une
de ces défectuosités, n’utilisez pas votre gril. Faites remplacer la pièce par votre
détaillant ULTRACHEF ou par un installateur qualifié.
BRÛLEUR - Le brûleur est fait d’acier inoxydable 304, mais en raison de la chaleur
extrême et d’un environnement corrosif, il se produira une corrosion de surface.
Enlevez cette corrosion à l’aide d’une brosse en laiton. Nettoyez les orifices bouchées à
l’aide d’un trombonne déplié. N’agrandissez surtout pas les orifices du brûleur. Les
araignées et les insectes sont attirés par l’odeur du propane et du gaz naturel. Le
brûleur est muni d’un grillage contre les insectes qui protège le volet d’air réduisant
ainsi la possibilité que les insectes se construisent des nids dans le brûleur mais ceci
n’est pas efficace à 100 %. Le nid ou la toile d’araignée fera que le brûleur produira une
flamme jaune pâle ou orangée ou causera des “ratés” de feu au niveau des volets d’air
sous le panneau de contrôle. Pour nettoyer l’intérieur du brûleur vous devez le détacher
du gril. Retirez les vis qui se trouvent au-dessus de l'arrière du brûleur, de chaque côté
du centre. Soulevez l’arrière du brûleur vers le haut pour le retirer. Utilisez une brosse flexible de tube de venturi pour nettoyer
l’intérieur du brûleur. Faites sortir tous les débris qui se trouvent à l’intérieur du brûleur en le brossant. Assurez-vous que le grillage
est propre, serré et libre de tous débris ou déchets. Vérifiez également que les orifices de la soupape sont propres. N’agrandissez
surtout pas les orifices. Réinstallez le brûleur. Assurez-vous que la soupape pénètre le brûleur lors de la réinstallation. Replacez le
couvre-brûleur et la vis centrale afin de terminer l’installation.
20
Page 21

MOULAGES EN ALUMINIUM - Nettoyez les moulages périodiquement à l’aide d’une solution d’eau savonneuse chaude. L’aluminium
ne rouillera pas mais dû aux chaleurs élevées et aux effets climatiques, une oxydation se produira sur les surfaces d’aluminium.
Ceci apparaîtera comme des taches blanches sur les moulages. Pour réparer le fini des moulages, sablez-les à l’aide d’un papier
émeri fin. Essuyez la surface et peinturez avec de la peinture à gril haute température. Protégez les alentours des vapeurs de
peinture. Suivez les directives de séchage inscrites sur la bonbonne de peinture.
PROTECTION DES BRÛLEURS INFRAROUGES - Les brûleurs infrarouges de votre gril sont conçus pour vous offrir une longue
durée de vie. Cependant, certaines précautions doivent être prises afin d’éviter que les surfaces en céramiques ne fissurent,
causant ainsi un mauvais fonctionnement des brûleurs. Vous trouverez ci-dessous les causes de fissuration les plus courantes
ainsi que les moyens à prendre pour les éviter. Tout dommage résultant d’une négligence de votre part à observer les consignes
ci-dessous ne sera pas couvert par la garantie.
Impact avec des objets durs - Ne laissez jamais d’objets durs cogner la céramique. Faites très attention lorsque vous retirez ou
1.
installez les grilles de cuisson et autres accessoires dans votre gril. Si ces objets devaient tomber sur la céramique, elle risque
très probablement de fissurer.
L’eau et les autres liquides - Des liquides froids qui entrent en contact avec des surfaces chaudes en quantité considérable
2.
risquent de fissurer la surface de la céramique. Ne jetez jamais d’eau dans le gril pour éteindre des poussées de flamme. De
plus, si la céramique ou l’intérieur d’un brûleur deviennent mouillés alors qu’ils ne sont pas en fonction, le brûleur risque de
produire de la vapeur d’eau au prochain usage, ce qui peut produire suffisamment de pression pour faire fissurer la céramique.
Le trempage répété de la céramique la fera dilater et prendre de l’expansion. Cette expansion causera des pressions anormales
sur la céramique et risque de la faire fissurer et s’effriter.
contact avec la céramique. Si la céramique semble mouillée, retirez le brûleur du gril. Tournez-le à l’envers pour égoutter le
surplus d’eau. Apportez le brûleur à l’intérieur et laissez-le sécher complètement.
Mauvaise évacuation de l’air chaud sortant du gril - Pour que les brûleurs fonctionnent adéquatement, l’air chaud doit pouvoir
3.
s’échapper du gril. Si l’air chaud ne peut pas s’échapper, les brûleurs peuvent devenir privés d’oxygène et causer un retour de
flamme. Si cela se produit de façon répétitive, la céramique risque de fissurer. Ne recouvrez pas plus que 75 % de la surface de
cuisson avec des composants métalliques solides (p. ex. : plaque de cuisson ou large plateau).
i) Ne jamais jeter d’eau dans le gril pour contrôler les poussées de flamme.
ii) Ne faites pas fonctionner les brûleurs infrarouges sous la pluie.
iii) Si vous découvrez de l’eau dans votre gril (provenant de la pluie, d’arrosoirs, etc.), vérifiez si elle est entrée en
GUIDE DE DÉP ANNAGE
Problème Causes Probables Solution
Chaleur faible / Flamme
petite lorsque le bouton de
contrôle est sur “high”.
Flambée excessive /
Chaleur inégale.
Pour le propane - procédure
d’allumage incorrect.
Pour le gaz naturel - tuyau
d’arrivée du gaz trop petit.
Pour les deux sortes de gaz mauvais préchauffage
Plaques de brûleur mal
installées.
Mauvais préchauffage Préchauffez le gril à l’aide des deux brûleurs principaux
Amas excessif de graisse et de
cendres sur les plaques de
brûleur et dans le tiroir
d’égouttement.
Assurez-vous que la procédure d’allumage est suivie à la
lettre. Tous les boutons de contrôle du gril doivent être fermés
lorsque vous ouvrez la soupape d’arrivée de gaz à la
bonbonne ce qui devrait être fait lentement pour assurer
l’équilibre de la pression. Voir les instructions d’allumage.
Grosseur du tuyau doit être selon le code d’installation.
Préchauffez le gril à l’aide des brûleurs principaux en les
plaçant à “high” pendant 10 à 15 minutes.
Assurez-vous que les plaques de brûleur sont installées de
façon adéquate. Consultez les instructions d’assemblage.
pendant 10 à 15 minutes.
Nettoyez les plaques de brûleur et le tiroir d’égouttement
régulièrement. Ne tapissez pas le tiroir d’égouttement avec
du papier d’aluminium. Consultez les instructions de
nettoyage.
Les flammes produites par
les brûleurs sont jaunes et
vous détectez une odeur de
gaz.
Possibilité de toiles d’araignée,
d’autres débris ou d’un mauvais
ajustement des volets d’air.
Enlevez le brûleur et nettoyez-le complètement. Consultez
les instructions d’entretien. Ouvrez les volets d’air un peu
tout en suivant les règles.
(ceci doit être effectué par un installateur de gaz qualifié)
21
Page 22

Problème Causes Probables Solution
Les flammes se détachent
du brûleur, accompagnées
d’une odeur de gaz et
possiblement une difficulté
d’allumage.
Le brûleur ne s’allume pas
avec l’allumeur mais
s’allume avec une
allumette.
Le régulateur murmure.
Les brûleurs ne s’allument
pas les uns aux autres.
Mauvais ajustement des volets
d’air.
La pile est déchargée ou installée
incorrectement.
Fil de l’électrode lâche.
Mauvais allumeur de rechange. Le système à 1 étincelle ne fonctionnera qu’avec un allumeur
Mauvais écart du bout de
l’électrode.
Les flammes se séparent du
brûleur.
Problème normal en temps
chaud.
Les orifices sont bouchées à
l’arrière du brûleur.
Fermez légèrement les volets d’air selon les instructions
d’ajustement des volets d’air.
(ceci doit être effectué par un installateur de gaz qualifié)
Remplacez avec des piles AAA à grande capacité. Installez la
pile avec la borne positive (+) vers le haut.
Assurez-vous que le fil de l’électrode soit poussé bien au
fond sur le terminal derrière l’allumeur.
de ce type.
Assurez-vous que la boîte de connection est bien fixée et que
la distance entre l’électrode et celle-ci est entre 1/8" et 3/16".
La distance peut être ajustée en poussant la boîte vers
l’extérieur.
Fermez le volet d’air légèrement - voir le problème précédent.
Ceci n’est pas un défaut. Il est causé par une vibration à
l’intérieur du régulateur et n’affecte en rien la performance et
la sécurité du gril à gaz.
Nettoyez les orifices du brûleur. Consultez les instructions
d’entretien.
La peinture semble peler à
l’intérieur du couvercle.
Les contrôles sont réglés à
“high” mais la chaleur
générée par les brûleurs
est trop basse.
Le brûleur infrarouge
produit des retours de
flamme (pendant qu’il
fonctionne, le brûleur fait
subitement un bruit qui
s’apparente à un “whoosh”,
suivi d’un bruit continuel
semblable à une lampe à
souder et qui diminue en
intensité.
22
Accumulation de graisse sur les
surfaces internes.
Manque de gaz. Vérifiez le niveau de propane dans la bonbonne.
Le tuyau d’alimentation en gaz
est pincé.
L’injecteur du brûleur est sale ou
obstrué.
Présence de toiles d’araignée
ou autres débris dans le tube du
venturi.
Une tuile de céramique est
fissurée.
Le régulateur de propane est en
situation de “faible débit”.
Les tuiles de céramique sont
surchargées de graisse de
cuisson et d’accumulations, les
orifices sont obstrués.
Le brûleur a surchauffé dû à une
ventilation inadéquate (trop grande
surface de cuisson recouverte par
des plaques de cuisson ou des
plateaux).
Des tuiles de céramique sont
fissurées.
Le joint d’étanchéité autour de la
céramique n’est plus étanche,
ou une soudure dans le boîtier
du brûleur est cassée.
Ceci n’est pas un défaut. Le pelage est causé par la graisse
qui durci et sèche comme des éclats de peinture qui pèlent.
Un nettoyage régulier préviendra ce problème. Consultez les
instructions de nettoyage.
Replacez le tuyau d’alimentation convenablement.
Nettoyez l’injecteur du brûleur.
Nettoyez le tube du venturi.
Commandez un brûleur de rechange auprès de votre
détaillant autorisé Napoléon.
Assurez-vous que la procédure d’allumage est suivie à la
lettre. Tous les boutons de contrôle du gril doivent être
fermés lorsque vous ouvrez la soupape de la bonbonne.
Tournez la soupape de la bonbonne lentement pour
assurer l’équilibre de la pression. Voir les instructions
d’allumage.
Fermez le brûleur et laissez-le refroidir pendant au moins
deux minutes. Réallumez le brûleur et réglez-le à “high”
pendant au moins cinq minutes ou jusqu’à ce que les
tuiles deviennent uniformément incandescentes.
Ne recouvrez pas plus que 75 % de la surface de cuisson
avec des objets ou des accessoires. Fermez le brûleur et
laissez-le refroidir pendant au moins deux minutes puis
réallumez-le.
Laissez le brûleur refroidir puis vérifiez de près pour des
fissures. Si vous détectez des fissures, commandez un
brûleur de rechange auprès de votre détaillant autorisé
Napoléon.
Contactez votre détaillant autorisé Napoléon pour obtenir
des instructions sur l’achat d’un brûleur de rechange.
Page 23

COMMANDE DES PIÈCES DE RECHANGE / RETOURS
Avant de contacter le bureau de service du clientele, veuillez prendre note, que notre guide de dépanage est maintenent disponible sur le net
a www.napoleongrills.com. Ici, vous trouver beaucoup d'information comme les instructions de d'opération et de nettoyage et comment
remplacer les pièces. Contactez le manufacturier directement pour obtenir des pièces de rechanges et faire des réclamations sur garantie.
Le département de service est à votre disposition entre 9 AM et 5 PM (heure normale de l’est) au 1-888-820-8686 ou fax au 1-705-727-4282.
Pour qu’une réclamation soit traitée, l’information suivante est nécessaire :
1. Modèle et numéro de série de l’appareil.
2. Numéro de la pièce et description.
3. Une description concise du problème («cassé» n’est pas suffisant).
4. Preuve d’achat (copie de la facture).
Dans quelques cas, le département du service peut demander de leur retourner la pièce pour des fins d’inspection avant de fournir une pièce
de rechange. Les pièces doivent être expédiées port payé à l’attention du département de service avec l’information suivante :
1. Modèle et numéro de série de l’appareil.
2. Une description concise du problème («cassé» n’est pas suffisant.
3. Preuve d’achat (copie de la facture).
4. Un numéro de « SPC » - fourni par le représentant du département de service.
Avant de contacter le département de service, veuillez prendre note que les items suivants ne sont par couverts par la garantie :
-coûts de transport, bris et frais d’exportation
-main-d’oeuvre pour l’enlèvement et l’installation de la pièce
-coûts des appels de service pour diagnostiquer le problème
-décoloration des pièces en acier inoxydable
-bris des pièces suite à un manque d’entretien ou de maintenance, ou utilisation de nettoyeurs non appropriés (nettoyeur à fourneau)
23
Page 24

3/8"
4 X
N570-0026 (#14 x 1/2")
3/8"
PROPANE ONLY
PROPANE SEULEMENT
24
Page 25

4 X
N570-0026 (#14 x 1/2")
3/8"
2 X
N570-0026 (#14 x 1/2")
IF NECESSARY, THE REAR
PANEL CAN BE TAPPED DOWN
WITH A RUBBER MALLET.
SI NÉCESSAIRE, LE PANNEAU
ARRIÉRE PEUT ÊTRE ENFONCÉ
AVEC UN MAILLET EN CA-
OUTCHOUC.
3/8"
25
Page 26

1 X
N485-0009
IF NECESSARY, THE MAGNET
BRACKET CAN BE TAPPED
DOWN WITH A RUBBER MAL-
LET.
SI NÉCESSAIRE, LE SUPPORT À
AIMENT PEUT ÊTRE ENFONCÉ
AVEC UN MAILLET EN CA-
OUTCHOUC.
3/8"
+
-
4 X
N570-0026 (#14 x 1/2")
TWO PEOPLE ARE REQUIRED FOR
THIS STEP.
DEUX PERSONNNES SON
NÉCESSAIRES POUR CETTE
ÉTAPPE.
26
Page 27

2 X
N570-0026 (#14 x 1/2")
PROPANE ONLY
PROPANE SEULEMENT
3/8"
27
Page 28

5 X
N570-0076 (#8 X 1/2”)
3/8"
28
2 X
N570-0026 (#14 x 1/2")
OPTIONAL LOCKING SCREW
VIS DE VERROUILLAGE OPTIONNELLE
2 X
N570-0029 (1/4-20 x 3/8")
2 X
N450-0006 (1/4-20)
Page 29

SIDE BURNER UNITS ONLY
Appareils avec brûleur latéral SEULEMENT
2 X
N570-0026 (#14 x 1/2")
3/8"
2 X
N450-0005 (10-24)
SIDE BURNERS MUST BE LOCKED IN PLACE
LES BRÛLEURS LATÉRAUX DOIVENT
ÊTRE BLOQUÉS EN PLACE.
3/8"
29
Page 30

2 X N305-0065
2 X N305-0041(UD405)
1 X N305-0041(US405)
N160-0010
N185-0001
N520-0012K
N520-0011K
30
Page 31

PROPANE ONLY - PROPER HOSE CONNECTION
PROPANE SEULEMENT - BRANCHEMENT ADÉQUAT DU BOYAU
•Ensure the hose does not contact any high temperature surfaces, or it may melt and leak causing a fire.
•Assurez-vous que le boyau ne touche à aucune surface à haute température sinon il risque de
fondre, de provoquer une fuite et causer un feu.
NATURAL GAS ONLY
2 x
3/4"
GAZ NATUREL SEULEMENT
TO GAS SUPPLY
À L'ARRIVÉE DE GAZ
•The installation must be performed by a licensed gas fitter, and all connections must be leak tested
before operating the grill.
•L’installation doit être effectuée par un installateur certifié pour le gaz et tous les raccordements
doivent être testés pour des fuites avant de faire fonctionner le gril.
KNOCKOUT
DISQUE
POINÇONNÉ
31
Page 32

NATURAL GAS ONLY - IMPROPER HOSE CONNECTION
GAZ NATUREL SEULEMENT - BRANCHEMENT INADÉQUAT DU BOYAU
“WARNING - FIRE HAZARD”
“ATTENTION - RISQUE D’INCENDIE”
• Do not route hose underneath drip pan.
• Ne pas passer le tuyau d’alimentation sous le tiroir
d’égouttement afin de garder.
• Do not route hose over top of rear panel.
• N’acheminez pas le boyau par-dessus le
panneau arrière.
• Hose must be routed through right side panel only. Do
not route hose through left side panel and underneath
drip pan.
• Le boyau doit être acheminé à travers le panneau
droit seulement. N’acheminez pas le boyau à travers le
panneau gauche et en dessous du tiroir d’égouttement.
• Ensure the hose does not contact any high temperature surfaces, or it may melt and leak causing a
fire.
• Assurez-vous que le boyau ne touche à aucune surface à haute température sinon il risque de
32
fondre, de provoquer une fuite et causer un feu.
Page 33

LEAK TESTING
TEST DE DÉTECTION DE FUITES
DANGER
Do not use an open flame to check for gas leaks. Be sure there are no sparks
or open flames in the area while you check for leaks. Sparks or open flames
will result in a fire or explosion, damage to property, serious bodily injury or
death.
N’utilisez pas une flamme nue pour vérifier pour des fuites de gaz.
Assurez-vous qu’il n’y ait aucune étincelle ni flamme nue à proximité de
l’endroit à vérifier. Les étincelles ou les flammes nues provoqueront un
feu ou une explosion, causant des dommages matériels, des blessures
graves ou des pertes de vie.
LEAK TESTING: This must be done before initial use, annually and whenever
any gas components are replaced or serviced. Do not smoke while performing
this test, and remove all sources of ignition. See Leak Testing Diagram for areas
to check.
1. Turn all burner controls to off. Turn supply valve on.
2. Brush a half and half solution of liquid soap and water onto all joints and
connections of the regulator, hose, manifolds and valves.
3. Bubbles will indicate a gas leak. Either tighten the loose joint or have the part
replaced with one recommended by the customer care department.
4. If the leak cannot be stopped, shut off the gas supply, disconnect it and
have the barbecue inspected by your gas supplier or dealer. Do not use the
appliance until the leak has been corrected.
5. Turn off gas supply.
TEST DE FUITES: Il doit être fait avant la première utilisation, annuellement et à
chaque fois qu’une pièce du système de gaz est remplacée ou réparée. Ne fumez
pas et enlevez toutes sources d’allumage lorsque vous faites ce test. Consultez le
schéma de test de fuites pour voir les endroits à tester.
1 - Fermez tous les boutons des brûleurs. Ouvrez la soupape de la bonbonne.
2 - Appliquez une solution de deux parts égales de savon liquide et d’eau sur
tous les joints du régulateur, le tuyau et ses raccords.
3 - Des bulles indiqueront une fuite de gaz. Resserrez le joint ou remplacez la
pièce avec une autre recommandée par le détaillant.
4 - Si la fuite ne peut être réparée, fermez l’alimentation de gaz à la bonbonne,
enlevez-la et faites inspecter votre gril par votre fournisseur de gaz ou détaillant.
N’utilisez pas l’appareil jusqu’à ce que la fuite soit réparée.
5 - Fermez la soupape de la bonbonne.
33
Page 34

PARTS LIST / LISTE DE PIÈCES
ITEM PART # DESCRIPTION US405RSBI UD405RSB
1 n135-0026p lid casting / moulage du couvercle x x
2 n335-0031 lid insert / couvercle xx
3 n685-0003 temperature gauge / jauge de température x x
4 n325-0051 lid handle / poignèe du couvercle x x
5 n570-0056 lid pivot screw / vis du pivot xx
6 n520-0012k w arming basket / grille - réchaud x x
7 n520-0011k w arming rack / gr ille - réchaud x x
8 n200-0056 rear burner cover (infra red) / boîter du brûleur arrière (infra-rouge) x x
9 n100-0027 rear burner / brûleur arrière xx
10 n200-0055p rear cover / boîter arrière xx
11 n305-0065 cooking grill / gr ille de cuisson x x
12 n305-0041 sear plate left and right / plaque de brûleur gauche et droite x x
13 n100-0038 main burner / brûleur principal x
n100-0021 main burner left and right / brûleur principal gauche et droite x
n100-0022 main burner centre / brûleur principal centrale x
14 n010-0535 main burner infrared / brûleur principal infrarouge x
n350-0054 collector box - main burner / boîte du collecteur du brûleur principal x x
n240-0016 main burner electrode / électrode du brûleur principal x x
n240-0025 infrared burner electrode / électrode du brûleur infrarouge x
n750-0016 infrared burner electrode w ire / électrode fil du brûleur infrarouge x
n200-0070 infrared burner electrode cover / boîter électrode du brûleur infrarouge x
15 n200-0083 burner grease shield / plaque de brûleur x
15 n200-0054 burner grease shield / plaque de brûleur x
16 n135-0029p base casting / cuve xx
17 n080-0111p base mounting brackets / supports de la cuve x x
18 n585-0018p heatshield / pare chaleur xx
19 n590-0159 stainless steel side shelf, left / tablette latérale en acier inoxydable, gauche x x
20 n120-0004 luxidio side shelf end cap, left / embout en luxidio de le tablette latéral, gauche x x
21 n590-0160 side burner shelf / tablette du brûleur latérale x x
22 n120-0005 luxidio side shelf end cap, right / embout en luxidio de le tablette latéral, droite x x
n570-0076 #8 x 1/2" screw / #8 x 1/2" vis x x
24 n335-0043 sideburner lid / couvercle du brûleur latérale x x
n385-0002 sideburner label / étiquette brûleur latérale x x
25 n357-0013 electronic ignition / allumeur électronique x x
26 n305-0059 side burner grate / grille de cuisson brûleur latérale x x
27 n500-0035k side burner plate assembly / ensemble du plateau du brûleur latérale x x
28 n100-0039 side burner - burner / brûleur - brûleur latérale x x
29a n725-0030 side burner valve / soupape du brûleur latérale p p
29b n725-0031 side burner valve / soupape du brûleur latéral n n
w 255-0004 90 degree elbow (3/8F to 1/8MP) / coude 90 degrés (3/8F to 1/8MP) p p
n255-0017 T-fitting (3/8F to 1/8MP) / raccord en T (3/8F to 1/8MP) n n
30 n380-0006 side burner control knob / bouton de contrôle de brûleur latérale x x
31 n570-0008 #8 x 1/2 screw / #8 x 1/2 vis x x
32 n475-0203 control panel / panneau de contrôle x
n475-0202 control panel / panneau de contrôle x
33 n570-0028 shoulder screw #14 x 1/2" / vis #14 x 1/2" x
34 n357-0014 electronic ignition / allumeur électronique x
n357-0013 electronic ignition / allumeur électronique x
35 n380-0012 control knob / bouton de contrôle x x
n380-0012r control knob inf ra red burner / bouton de contrôle infrarouge brûleur x
36a n010-0335c manifold assembly / ensemble du collecteur p p
36b n010-0336c manifold assembly / ensemble du collecteur n n
n720-0035 rear burner supply tube / tuyau d'alimenation brûleur arrière x x
34
Page 35

ITEM PA RT # DESCRIPT ION US405RSBI UD405RSB
38 n160-0010 grease tray holder / support du récipient à graisse x x
39 62007 5 replacement grease trays / ensemble de 5 récipient à graisse ac ac
40 n475-0206p rear cart enclosure panel / panneau arriére pour chariot x x
41 n475-0207p left/right cart enclosure panel / panneau pour chariot gauche/droite x x
42 n570-0026 #14 x 1/2 screw / #14 x 1/2 vis xx
43 n555-0026 door pivot rod / tige-pivot de porte xx
45 n010-0539 cart door - stainless s teel / porte pour chariot - en acier inoxydable x x
46 n325-0016 snap-in door handle / poignée de porte à pression x x
47 n430-0002 magnetic catch / loquet magnètique xx
48 n130-0005 caster assembly - each / ensemble de roulettes (unité) x x
49 n585-0026p tank heatshield / écran de chaleur pp
50a n010-0539p bottom shelf / tablettes infèrieur pp
50b n010-0538p bottom shelf / tablettes infèrieur nn
51 n105-0002 snap bushing / bague à pression xx
52 n475-0091 rotisserie mount / support de la rôtissoire x x
53 n450-0006 1/4-20 locknut / écrou 1/4-20 xx
54 n530-0008 1-outlet regulator w /quick disconnect / tuyau de régulateur à 1 sortie avec débranchement rapide p p
n345-0010 24" side burner hose / tuyau brûleur latérale de 24" p p
n345-0001 10ft n/g hose w /quick disconnect / tuyau de 10 pieds avec débranchement rapide n n
n345-0011 32" side burner hose / tuyau brûleur latérale de 20" n n
55 n080-0131p magnet bracket / support à aiment xx
56 n010-0360p tank support / support du bonbonne pp
n555-0006 rotisserie spit / tige de rôtissoire xx
n370-0442 rotisserie kit / ensemble de la rôtissoire x
n370-0092 rotisserie kit / ensemble de la rôtissoire x
63161 vinyl cover / housse en vinyle ac ac
x - standard p - propane units only p - appareils propane seulement
x - compris n - natural gas units only n- appareils gaz naturel seulement
ac - accessory ac - accessoires
35
Page 36

36
Page 37

FAX TO: 705 727 4282
ACCESSORIES & PARTS ORDER FORM
PLEASE PRINT CLEARLY
CONTACT NAME:______________________________________________________________________
SHIP TO :_____________________________________________________________________________
_________________________________________________________________________________________
_________________________________________________________________________________________
_________________________________________________________________________________________
TEL :_________________________________ FAX :______________________________
EMAIL: __________________________________________________________________
VISA OR MASTERCARD # :_______________________________________ EXPIRY DATE: _____________
SIGNATURE:_____________________________________________________________________________
QUANTITY
TAXES MAY APPLY
SHIPPING EXTRA
IF CONFIRMATION IS REQUIRED PLEASE INCLUDE A FAX NUMBER OR EMAIL ADDRESS
PART NUMBER DESCRIPTION
37
Page 38

NOTES
38
Page 39

NOTES
39
Page 40

40
 Loading...