

Page 1

OPERATING
FOR YOU R
RP1054D KEYPAD
© Napco 1992 DESIG N P ATS. PENDING
GUI DE
Page 2

INTRODUCTION
CONGRATULATIONS!
...on your purchase of a NAPCO Magnum
Alert security system. Your new installation is
a sophist icated war ning system w ith many
available features. Your alarm specialist will
explain your system and show you how it
works. Contact him should questions concerning operation arise.
These instructions conta in important information about the operation of your system
TABLE OF CONTENTS
Section Page
CENTRAL-STATION MONITORING........................................................................................ 3
GLOSS ARY.............................................................................................................................. 4
KEYPAD CONTROLS AND INDICATORS...............................................................................6
HOLD-DOWN FUNCTIONS.....................................................................................................7
SELECTING AND PROGRAMMING YOUR CODES...............................................................8
SETTING THE ALARM (AR MING) WHEN LEAVING............................................................... 9
TURNING OFF THE ALARM (DISARMING) WHEN RETURNING.........................................10
PR OTECTI NG YOURSELF WHILE ON THE PREMISES......................................................11
FIRE PROTECTION............................................................................................................... 12
with the RP1054D Keypad. Read them carefully and keep them handy for future r eference. Check the Glossary for an explanation
of terms that may be unfamiliar to y o u .
You’ll probably find items mentioned here
that do not apply to your sys tem. Napco control panels have such a wide variety of features that few, if any, security systems will
ever need them all. Your alarm professional
has chosen appropriate features for your situ-
ation.
Your system has been carefully designed
and engineered to the highest industry standards . To ass u re optimum safety and se c u rity,
familiarize yourself with th is equipment. Periodically check its condition and state of readiness by testing it at least once a week in both
the a c/battery and batter y-only modes (ask
your installer how to make the se tests).
REMEMBER: TO SHUT OFF AN ALARM
WHILE ARMED, ENTER YOUR CODE!
FIRE SIGNAL*:
BURGLARY SIGNAL*:
EXIT DELAY:
ENTRY DELAY:
FOR SERVICE:
CENTRAL STATION:
*FIRE HAS PRIORITY OVER BURGLARY
_______________________
_________________
_________________________
______________________
_______________________
__________________
2
Page 3
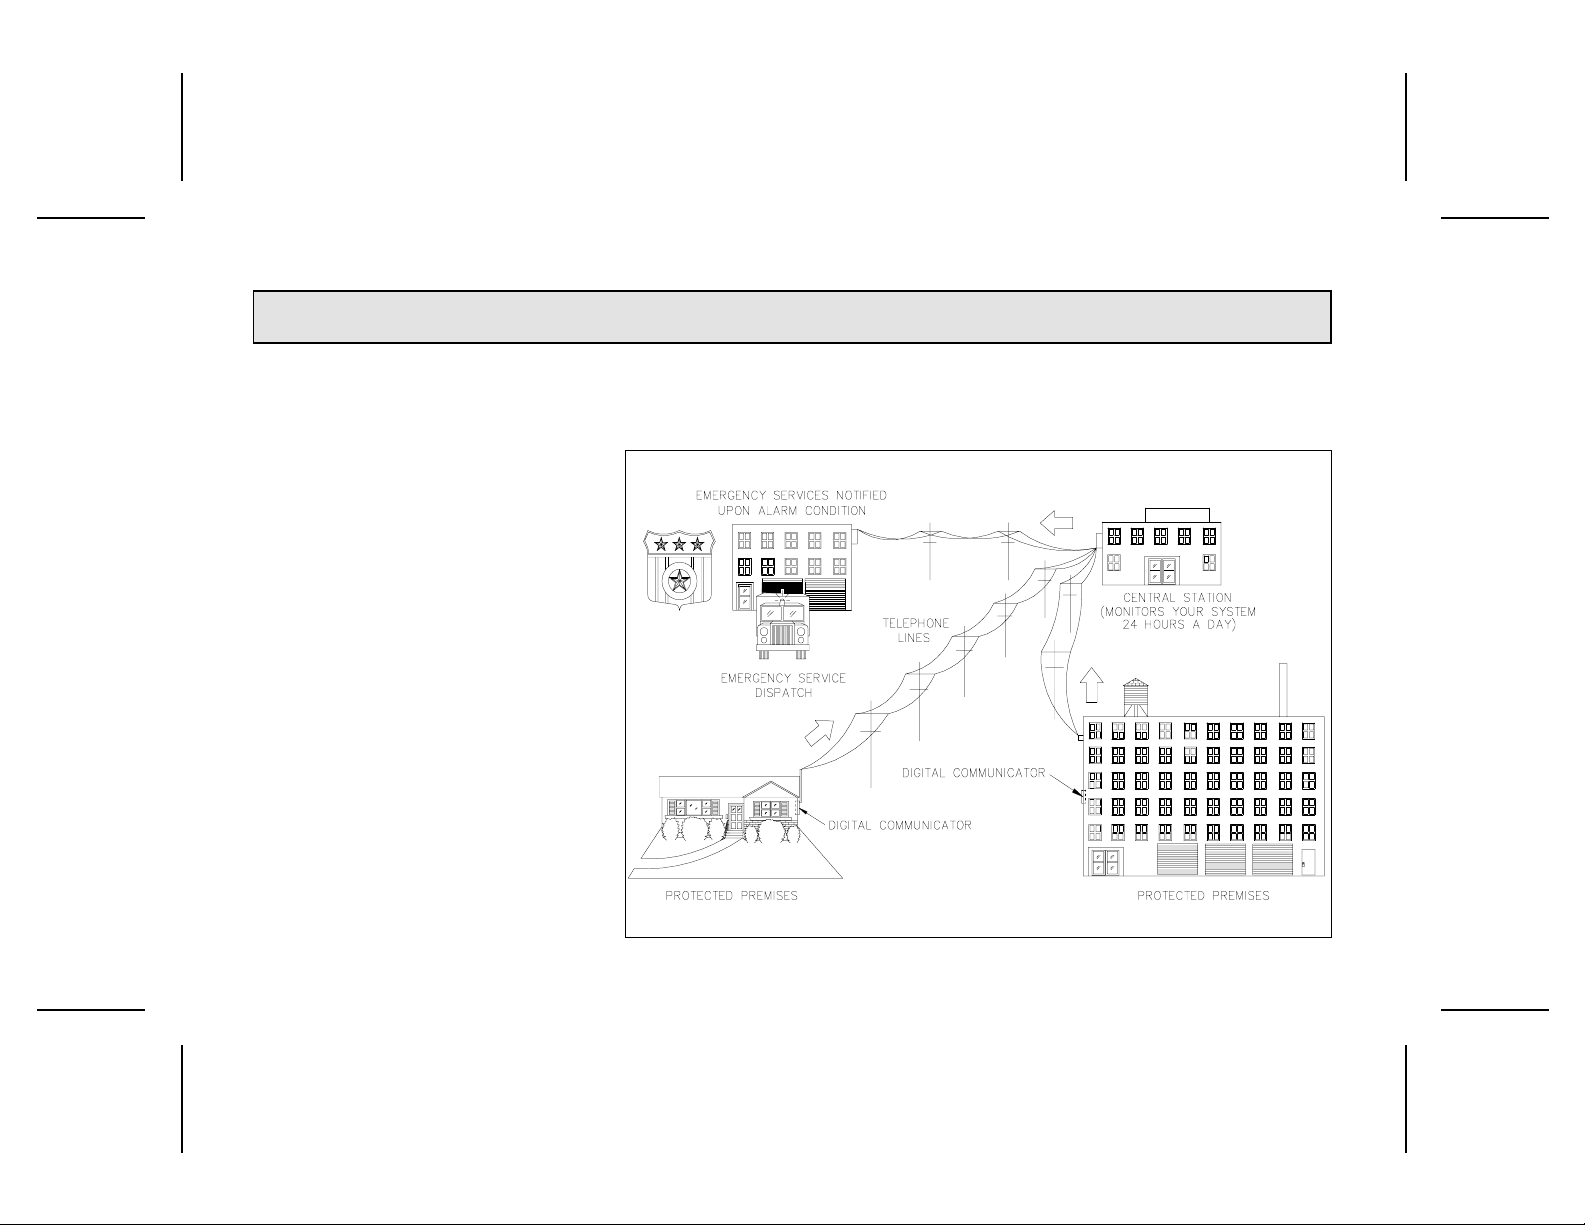
CENTRAL-STATION MONITORING
Your alarm specialist may have programmed your system to be moni tored by a
central s tation. The built-in digital communicator can transmit emergency signals and status
reports to the centr al station 24 hour s a day.
COMMUNICATOR FEATURES
Abort Delay. Note which of your zones have
abort delay, a delay that allows y o u time to rese t th e system, thus aborting a report to the
central s tation.
• Regular Burglary (Non-24-Hour) Zone re-
ports are aborted by disarming within the
del ay period.
• 24 -Hour Zones and zones programmed to
report restores must be repaired first, then
the panel armed and disarmed, all within
the delay period.
Opening and Closing Reporting. Notifies
the central station every time the system is disarmed and armed. Each user opening or closing c an be identif ied by his code .
Telephone-Line Test (Programmed Option). To check your telephone connection
with the central station hold down Key [6]. After the beep sounds, a puls e tone will be
heard from the keypad sounder. If the phone
line is good the sound will silence in a few seconds. If not, a continuous tone will sound. The
keypad sounder can be s ile nced by pressing
Key [9].
Your alarm specialist may have also programmed your system to automatically sen d
a test signal to the central station every 24
hours.
Central-Station Ringback (Programmed
Option). The cen tral sta tion will acknowledge
arming of the system by ringing back with a
short beep from the keypad sounder.
3
Page 4

GLOSSA RY
Note: Not all features are applicable to all
systems.
Abort Delay. A delay period that allo ws the
control panel to be reset, thereby aborting a
report to a central station.
Ambush Code. A 2-digit code enter ed when
forced to disarm. Sends a silent alarm to the
central s tation.
Arm. To turn the system on by entering a
User Code at the keypad.
Arm/Disarm Code. A personalized code for
arming and disarming the system. It may contain up to four digits .
Battery. Backup power source in the controlpanel enclosur e to provide protection for at
leas t four hour s in the event of a power failure .
Bypass Button (Key [S] on keypad). A llows
you to manually remove one or more protective zones from the system.
Central Station. Monitors incoming reports
an d emergen cy messages f rom a digital co mmunicator and notifies the proper authorities
(optional).
Chime. A keypad beep while disarmed alert-
ing that the programmed zone (Entry Zone, in
the MA854) has been opened. Chime Zones
may have been programmed t o display when
activated (option in MA1008 and MA1010).
Also see Never-Arm Zone.
Closing. A report sent to the central station
when the premises is closed (system armed)
(optional).
Communicator. R eports intrusions a nd
emergencies directly to the central station
over telephone lines.
Control Panel. The brain of the system, it
controls all system functions.
Disarm. To turn the system off by entering
a User Code at the keypad.
Exit/Entry Delay. A programmed time that
lets you exit a nd ente r your premises without
setting off an alarm after the system is armed.
Instant Protection. Arming without entry delay while on the premises using Key [4].
Keypad. Puts control-panel functions at
your fingertips. It can be mounted anywhe r e
in your pre mises.
Opening. A report sent to the central station
when the premises is opened (system disarmed) (optional).
Panic Buttons (optional). Keys [*] and [#]
on the keypad, pressed at the same time to
alert the central station of an emergency.
Report. A transmission to a central station
specifying a change in the status of the system (alarm, trouble, low battery, etc.) (optional).
Ringback. A beep after arming verifying
central-station receipt of report.
Service Code. (MA1008 and MA1010 only):
A res tricted Arm/Disarm Code intended for
temporary use.
Sounder. A local war ning device at the keypad to alert that (a) entry delay has started;
(b) an attempt was made to arm with a zone
in trouble; (c) Chime Zone or Day Zone activated; (d) a fire alarm or fire trouble condition
exists; or (e) the central station has acknowle dged arming (optiona l).
4
Page 5

GLOSSA RY
Trouble. An open door, window, or other
problem on a zone that may prevent arming.
User Program Code. A code (up to 6 di gits)
required to enter th e Pr o gram Mode in order
to program or change Arm/Disarm Codes.
Watch Mode (MA1008 and MA1010 only).
Turns all Day Zones on and off simultaneously
by pressing Ke y [S] twice. (Optional.)
Zones. Indepen dent circuits that protect
specific areas of the premises:
• Auto-Bypass Zone: A zone th at will auto-
matical ly be bypassed from the system if
in trouble (faulty) when the system is
armed. (Not available in U L installations.)
• Burglary Zone: Detects intrusion.
• Day Zone: A zone programmed to cause
visual and audible indication at the keypad
when it is in trouble w hile disar med. This
feature is generally used to detect a problem, such as a break in a window foil, during the day. If a Day Zone is open, the
green STATUS light will flash, the sounder
will pulse, and the numeric al display will indicate the zone. Hold down Key [9] to si-
lence the sounder and clear the display.
Arm and dis arm the panel to re-enable t he
Day Zone. (In the MA1008 or MA1010, this
feature may have been programmed so
that Key [9] will turn off only the sounder;
the displa y will continue to in dicate the
open zone until the zone is corrected, at
which time the display will be cleared a n d
the Da y Zone re-enabled.)
• Exit/Entry Zone: Provides exit and entry
del ays to permit arming a nd dis arming
without causing an ala rm.
• Exit/Entry Follower Zone: For interior
zones. Ignores detection during exit delay;
ignores detection during entry delay only if
re- entry takes place through the normal
exit/entry door.
• Fire Zone: A zone that provides audible
and visual indication at the keypad in the
event of a fire alar m or trouble condition.
The Fire Zone is active 24 hours a day.
• Group-Bypass Zones: Circuits within the
premises, usually including space-protection devices, inte rior doors, etc. (but not ex-
terior doors or w indows ) that can all be bypassed simultaneously by pressing Key [S]
twice. (No t available in UL installations.)
• Never-Arm Zone: (MA1008 and MA1010
only): A zone that will remain disarmed,
even when the rest of the system is armed.
If Chime is programmed, the keypad will
sound while ar med or disarmed. This feature may be used as a driveway monitor,
pool alert, etc.
• Priority Zone: A zone that prevents arming
if in trouble.
• Priority Zone with Bypass: A Priority Zone
that can be bypassed by pressing Reset
Key [9] then entering your Arm/Disarm
Code.
• Selective-Bypass Zone: A zone that can
be i ndividually bypassed by pressing Key
[S] followed by the zone number.
• 24-Hour Zone: A zone that is armed and
ready at all times to respond to an emergency situation.
5
Page 6

Digital Display
Flashes Number – indicates which non-2 4Hour Zone s are in an alarm condition, and
which Da y Zones ar e in a trouble condition.
Flashes “P” – indicates a priority condition
(armed with a Priority Zone in trouble or
armed without resetting a Day Zone).
Displays one or more horizontal segments
— STOP! Call for service.
ARMED/ALARM Light
On – system is armed.
Flashing – alarm on a non-24-Hour Zone.
Flashing (rapidly) – instant protection; entry
delay cancelled.
STATUS (Gr een) Light
On – system disarmed, all non-24-Hour
Zones okay.
Flashing once ever y second – trouble on
any non-24-Hour Zone.
Flashing (rapidly) – trouble on Day Zone.
BYPASS Light
On (with red or green light on or flashing) –
one or more zones manually bypassed.
On (with no other lights but with or without
a di git displayed) – STOP! Call for serv ice .
First Three Lights
F lashing (slow ly, with digit displayed (e xcept with MA854 and early MA1008 & MA1010
panels)) – System trouble: see SETTING THE
6
KEYPAD CONTROLS AND INDICATORS
ALARM WHEN LEAVING.
Flashing (rapidly, with pulsing sounder) –
User Program Mode; press [S] twice to exit.
FIRE/TROUBLE Light
On – Fire Zone in alar m condition.
Flashing – Fir e Zone in trouble condition.
Keypad Sounder
Steady Tone (with “P” displayed) – a priority
condition exists.
Steady Tone (when entering) – entry delay
in progress.
Beep (of pr ogrammed duration) – Chime
Zo ne trippe d.
Beep (2 seconds) – system armed with a
zone in trouble.
trouble or in alarm.
down Key [9] for 2 seconds.)
BY PASS BUTTON (Key [S])
ton, then the digit repr ese n tin g the zone number. Refer to SETTING THE ALARM WHEN
LEAVING: Arming With A Zone In Trouble.
PANIC BUTTONS (KEYS [*] & [#], Optional)
vate a Panic Alarm. See PROTECTING YOURSELF WHILE ON THE PREMISES.
Pulsing – Day Zone trouble; Fire Zone in
(To stop sounder “Trouble” warnings, hold
T o manu ally bypass a zone, press this but-
Press in g these keys s imultaneously will acti-
Page 7

HOLD-DOWN FUNCTIONS
T o perform designat ed “Hol d-Down” Fu nctions, selected key must be held down for
about 2 se conds, until sounder beeps. Note:
Those functions identified by an asterisk (* )
hav e sec o ndary utility functions for installer’s
use only. Do not attempt to access these functions wi th in 10 s econds a fter disa rming.
Key [1]: TEST
Momentarily sounds the burglar alarm. If no
alarm is heard, or if it is weak, the battery may
need replacing. Make this test weekly. (To perform this function, hold down Key [1] until
alarm sounds.)
Key [2]: DISPLAY BY PASS
Numerically displays all zone s that have
been bypassed using Key [S]. To perform this
function, hold down Key [2] until the sounder
beeps, a nd continue to hold it down until all
zones have been displayed.
Key [3]: DISPLAY STATUS
Numerically displays all zone s that are in
“trouble”. To perform this function, hold down
Key [3] until the sounder beeps, and continue
to hold it down until all zones have been displayed.
Key [4]: INSTANT PROTECTION
Cancels entry delay period when arming.
The delay is restored after you disarm the system. To perform this function, hold down Key
*
[4] until the sounder beeps.
Key [5]: C HIME* (Chime Zone(s):
This will enable a feature that sounds a
“chime” (beep) at the keypad each time a programmed zone (Entry Zone, in the MA854) is
opened. The Chime Mode functions when the
alarm system is disarmed (off), but it will always operate on a Never-Arm Zone (see
GLOSSARY). To disable the chime feature,
hold down Key [5] again (until sounder
beeps).
Key [6]: TEL CO TEST
(Optional; Enabled?
Pressing the key tests your phone lines ( the
sounder will start to pulse). If the line is good,
the pulsing will stop: if not, a steady tone will
sound. (To perform this function, hold down
Key [6] until sounder beeps.) Reset the
sounder using K ey [9]. Call for se rvice, if necessary.
Key [7]: FAULT FIND
For installer’s us e only; holding down Reset
Key [9] or arming the panel will cancel the
Fault-Find Mode.
Key [8]: PROGRAM
(Alarm functions are dis abled while in the
Progra m Mode.) Allows you to enter the Program Mode, where you can program up to 5
personal User Codes (up to 4 in the MA854),
*
YES NO)
_________
including a Service Code (MA1008 and
MA1010 only, optional). Refer to SELECTING
)
AND PROGRAMMING YOUR CODES for
more information. (To perform this function,
hold down Key [8] until sounder beeps.)
Key [9]: RESET
Resets any sounder indication, sys temtrouble indication, Day-Zone indication (in
MA1008 and MA1010, may be programmed to
reset Day-Zone condition), and Fault-Find
Mode. After an alarm occurs and the system
is disa rmed, the numerical display will still indicate which non-24-Hour Zone(s) caused the
alarm. Key [9] will clear the display. (T o perform this function, hold down Key [9] until
sounder beeps.)
Key [S]: ALARM HISTORY
This will flash the red ARMED/ALARM light
to indicate the last alarm condition. The numerical display will indicate th e zone s violated. History is not lost when the system is
rearmed; the previous alarm history w ill remain in alarm memory until automatically reset by a ne w alarm condition. To perform this
function, hold down Key [S] until the sounder
beeps, then continue to hold it down until all
information has been displayed.
7
Page 8

SELECTING AND PROGRAMMING YOUR CODES
Note: While programming, fire/burglar
alarm functions are disabled.
User (A rm/Disarm ) Codes
You can choose up to 5 different four-digit
codes (4 in the MA854) that will allow you to
arm and disarm your system. Any of these
codes can easi ly be cha nged or removed
should it become necessary in the future to
deny a user access to the premises. Your security syste m cannot be disarmed by unauthorized persons. It will respond only when
a code of your choosing is entered through
the keypad.
Servi ce Code (MA1008 and MA1010 only )
Your alarm specialist may have programmed User 5’s code as a Service Code, a
temporary code intended for occasional use
only, thus allowing guests, babysitters, service
employees, etc. limited access to the control
panel. When no longer needed, the code is
disabled.
The Service Code is controlled by User 1.
Whenever User 1’s Code is entered, the Serv-
ice Code is disabl ed, and it remain s disa bled
until the panel is once again armed using the
Service Code. (The Serv ice Code can always
be used to arm and, in fact, can be programmed as an arm-only code by your in stalle r . )
Selecting Your Codes
A fter your alarm specialist ins talls your system, he w ill give you a “User Program Code”
and show you how to program your User
Codes. For optimum security, do not select
obvious combinations, such as consecutive
numbers (1,2,3,4), repetitive numbers
(2,2,2,2), your stre et or telephone number,
birth date, etc., for any user code. A code of at
least three digits is re quir ed in UL installatio n s.
1. Hold down Ke y [8] until the sounder
beeps. This puts the system into the User Program Mode.
2. Enter your Program Code into the keypad; the first three lights will flash and
sounder will puls e. Pr ogram your User Codes
as fo llo ws:
a. Press Key [S].
b. Enter the user number “1” through “5”
(“1” through “4” in the MA854). (MA1008,
MA1010: Enter “5” for the Service Code, if
available.)
c. Enter a code of up to four-digits (digits 19 only).
Examples:
Press
• [S] + [1] + up to four digits = Use r 1’s
Code
• [S] + [2] + up to four digits = User 2’s
Code
• [S] + [5] + up to four digits = User 5’s
Code (or Service Code)
You do not have to assign all codes . Use as
many as you need and change them as necessary.
To erase any code(s), repeat steps 1, 2a,
and 2b. For example, to erase User 3, enter
[S] + [3] ( do not enter the four-digit code).
3. To en d the programming mode, pre ss
Key [S] twice.
8
Page 9

SETTING THE ALARM (ARMING) WHEN LEAVING
Arming Before You Leave
Check the green STATUS light on the keypad. If it is on, enter your code. The red
A RMED /ALA RM light will come on and the
green light w ill go off. If your syste m was programmed for an automatic audible test on
arming, the alarm will sound briefly shortly after arming. Note: It is possible to arm your
syste m with a bad or disconnected battery.
Leave immediately through the exit/entry
door before your exit delay time runs out. If
you wait too long, the keypad sounder will
warn that your exit delay time has elapsed
and entry delay has started. To avoid causing
an alarm, quickly return to the keypad and enter yo u r code to reset the control pa n el. Y o u
may then arm the system again.
Arming With A Zone In Trouble
A flashing green STATUS light indicates that
at least one zone is “in trouble”, that is, the
zone is not secured. If a Day Zone is in
trouble, th e zone will also display numerica lly
and the sounder will be pulsing. Any zone in
trouble may be dis play ed by holding down
Key [3] until the sounder beeps. T r y to fix the
zone by closing windows or doors that may
be open. If a Day Zone is in trouble, reset the
Day-Zone indication by arming and disarming
or, if so programmed, by holding down Key
[9] until the sounder beeps. ( Reset the Day
Zone by corre cting the condition, then arming
and disarming.) If no zones are in trouble, the
green light w ill c o me on , indicating that the
system is ready to be armed.
If a zone cannot be fixed immediately, you
may still be able to arm without the protection
of that zone. C heck your A larm Plan (see control-panel instructions ) . If Auto-Bypass was
programmed for the zone in trouble ( not for
UL installations), simply arm your system. A
short beep will sound at the keypad, indicating that a zone has been auto-bypassed, that
is, it has been removed from the system and
cannot cause an alarm.
If the zone is programmed for Selectiv e Bypass, pressi ng Key [S] and then the number
of the z o n e will manually bypass tha t zone.
(Caution: Temporary users should never be
shown how to bypass a zone.) Group-Bypass
Zones are a group of zones that can all be
Check your keypad before you attempt to arm. A number flashing together with the ARMED/ALARM, STATUS, and BYPASS
lights will alert you of a problem in the system, as indicated below. If you must arm in this condition, hold down Key [9] until
the function beep sounds to temporarily reset the keypad, then test the system by holding down Key [1]. If the alarm sounds,
arm t he s y stem, however be sure to have the probl e m correc t e d a s soon as pos s i bl e . If the ala rm does not sound or is weak c a l l
your alarm specialist. TEST YOUR SYSTEM WEEKLY!
“1” (Power Failure). Check for an area p ower outage. Also
•
check that the panel’s power transformer is plugged in.
“2” (Low Battery). Hold down Key [9] to clear the display,
•
then hold down Key [1] to intiate a Bell/Battery Test. If the
low-battery disp lay retu rn s, the b attery m ay n eed rep lac e-
ment. Call for service. Note: If arming with a lo w-battery
indication (not in all models), backup power may not be
SYSTEM TROUBLES
manually bypas sed simultane o u sly by simply
pressi ng Ke y [S] tw ice See PROTECTING
YOURSEL F W HILE ON THE PREMISES: Bypassing Interior Zones.
You will not be able to arm your system if
(a) a Priority Zone is in trouble; (b) a Day-Zone
numerical display is s till flashing; or ( c ) the
first three keypad lights are flashing due to a
system trouble. If you attempt to arm, the
sounder will c ome on and a “P” will be displayed. Enter your code again, and reset the
keypad indication by holding down Key [9] (remember to test your system!). The “P” must
be cleared by fixing or bypassing the zone in
trouble. Prior ity Z ones must be corrected before the system can be armed. Zones selected
for Priority with Bypass may be bypas sed by
holding down Reset K ey [9] before arming.
Be sure to have all zones in trouble fixed
quickly.
present in the event of a power failure.
“3” (Failure to Communicate). (Displayed with steady
•
sounder . ) H old down Key [9] to r es e t the k e ypa d, the n hol d
down Key [6] to test the phone lines. If the indication
return s, ca ll fo r service. (A su cc essfu l co m m un ic ati on will
clear the system trouble display.
ANY OTHER NUMBER — Call your alarm professional.
•
9
Page 10

TURNING OFF THE ALARM (DISARMING) WH EN RETURNING
Disarming When You Return
Whe n you enter through the exit/entry door,
the sounder will come on for the entire entry
period. (If, upon entering, the red
ARMED/ALARM light is flashing, leave the
premises and call authorities from a neighbor’s telephone.) Disarm the panel quickly using y our Arm/Disarm Code . Note: I f you enter
the wrong code, you must wait at least 2 seconds before trying again.
If there has bee n an alarm on a non- 24-H our
Zone , the AR MED/ALARM light will be flashing
and the zone number will be displayed, e ven
after you disa rm. To reset th e display, h o ld
down Key [9].
When the system is disarmed, the red
A RMED /ALARM light w ill go off and the green
light will come on (or flash if a zone is in
trouble).
If an alarm occurred on a 24-Hour Zone,
there will be no indica tio n at the keypad, however an alarm condition will be r ecorded by
Alarm History (see Key [S]: Bypass/Alarm
History).
Ambush Code
If an intruder forces you to disarm your sys tem, enter your programmed one- or two-digit
Ambush Code before your Arm/Disarm Code .
This activates the Ambush feature, which will
send a silent alarm to a central station. (Ambush is an optional fea tur e.)
10
Page 11

PROTECTING YOURSELF WHILE ON T HE PREMISES
Arming With Zones Bypassed
Your alarm specialist may have programmed one or more zones for Selective Bypass, that is, they may be remova ble from the
syste m. Since a bypassed zone cannot caus e
an alarm, you may wish to use this feature to
turn off the interior areas while armed and
keep your perimeter z ones (windows, doors,
etc.) active.
Pr ess th e bypass button (Key [S]), the n th e
number of the zone you wish to bypass.
Check the green STATUS light to be sure that
no zone is in trouble, then enter your arming
code to arm.
To verify which zones have been bypassed,
hold down Key [2] until all zones have bee n
displayed.
Bypassing Interior Zones
Your in staller may have also selected all interior zones to be Group Bypass Zones (not
for UL installations). Bypass these zones all at
the same time by simply pressing Key [S]
twice. The yellow BYPASS light will come on
whenever you bypass one or more zones. Enter your code to arm remaining zones ; the
green light w ill go off and the re d
A RMED/ALA RM light will come on. The yellow
light will go off the next time you disarm, indicating that the bypassed zones are no longer
bypassed. (The BYPASS light does not come
on when zones are auto-bypassed (unless programmed otherwise by your alarm specialist.)
To review which zones have been bypassed,
hol d down Key [2] until all bypassed zo nes
ha ve been displayed.
Arming With Instant Protection
Holding down Key [4] (until beep sounds)
will can c el the e n try delay on th e exit/entry
zones when arming. The red ARMED/ALARM
light will flash rapidly to indicate this condition. If someone enters through an Exit/Entry
Zone, an alarm will s ound immediately.
Panic Alarm
(Keypad Panic Di sable d?
YES
NO)
To activate a Panic Alarm, press Keys [*]
and [# ] at the same time. This feature may
have been programmed to send a silent alarm
to a central station, activate an audible alarm,
or both.
11
Page 12

FIRE PROTECTION
The following information is applicable only
where local ordinance permits use of your
alarm control panel for fire detection. Refer to
the instructions fu rnishe d with th e control
panel for important information on how to prepare an evacuation plan.
Controlling Your Fire Circuit
If your s ystem includes smoke detectors or
heat-sensing thermostats, you have 24-hour
fire protection. The pane l will constantly monitor this zone for any alarm or trouble condition.
Fire-Zone Alarm
A n alarm on the Fire Zone will caus e the red
FIRE/TROU BLE light to come on and the
sounder to pulse. The fire alarm will sound,
overr iding any other alarm.
Fire-Zone Trouble
If there is trouble on the fire circuit, the red
FIRE/TROUBLE light will flash and the
sounder will pulse after a 10-second delay . To
silence the sounder, hold down Key [9]. The
light will continue to flash to indicate the
trouble. After the trouble is repaired, h o ld
down Key [9] again until the beep sounds; the
keypad will reset after a brief delay and the
light will go off.
Resetting After An A larm
The fire alarm may be reset by holding
Napco Security Systems, Inc.
333 Bayview Avenue
Amityville, New York 11701
down Key [9] for 2 seconds, then arming and
dis arming or (if so programmed) by waiting
for it to automatically shut off. The sounder
and the FIRE/TRO UBLE light will stay on. H o ld
down Key [9] to silence the sounder. The red
FIRE/TROUBLE light should go off in about 30
seconds. If smoke has not cle ared from a
smoke detector, or a thermostat has not
cooled, the red FIRE/TROUBLE light will remain on. Hold down Key [9] every 30 seconds
or so until the condition has cleared and the
light goes off.
OI142B 7/93
 Loading...